application notes for bold technologies manitou with avaya
TRANSCRIPT

TLT; Reviewed:
SPOC 5/1/2013
Solution & Interoperability Test Lab Application Notes
©2013 Avaya Inc. All Rights Reserved.
1 of 30
Bold-Dial-AES
Avaya Solution & Interoperability Test Lab
Application Notes for Bold Technologies Manitou with
Avaya Aura® Communication Manager and Avaya Aura®
Application Enablement Services – Issue 1.0
Abstract
These Application Notes describe the configuration steps required for Bold Technologies
Manitou to interoperate with Avaya Aura® Communication Manager and Avaya Aura®
Application Enablement Services. Bold Technologies Manitou is an alarm automation
solution for central stations.
In the compliance testing, Bold Technologies Manitou used the Device, Media, and Call
Control interface from Avaya Aura® Application Enablement Services to support the Auto
Dialer feature for central station operators.
Information in these Application Notes has been obtained through DevConnect compliance
testing and additional technical discussions. Testing was conducted via the DevConnect
Program at the Avaya Solution and Interoperability Test Lab.

TLT; Reviewed:
SPOC 5/1/2013
Solution & Interoperability Test Lab Application Notes
©2013 Avaya Inc. All Rights Reserved.
2 of 30
Bold-Dial-AES
1. Introduction These Application Notes describe the configuration steps required for Bold Technologies
Manitou to interoperate with Avaya Aura® Communication Manager and Avaya Aura®
Application Enablement Services. Bold Technologies Manitou is an alarm automation solution
for central stations.
In the compliance testing, Bold Technologies Manitou used the Device, Media, and Call Control
(DMCC) interface from Avaya Aura® Application Enablement Services to provide the Auto
Dialer feature for central station operators.
The central station operators have desktop computers running the Bold Technologies ManitouCS
Operator Workstation to handle alarms. The Auto Dialer feature allows an operator to select a
customer contact phone number, and have the system place the outbound call on behalf of the
operator. Bold Technologies Manitou accomplishes this by using the DMCC interface and the
Multiple Registration feature from Avaya Aura® Application Enablement Services to register a
virtual IP softphone for the operator, and initiate the outbound call from the virtual IP softphone.
The Bold Technologies ManitouCS Operator Workstation can also be used to hang up the
outbound call.
2. General Test Approach and Test Results The feature test cases were performed manually. Initiation and termination of outbound calls
were performed using the ManitouCS Operator Workstation. Additional call controls such as
hold, resume, transfer, and conference were performed from the operator telephone.
The serviceability test cases were performed manually by disconnecting and reconnecting the
Ethernet connection to Manitou and to the ManitouCS Operator Workstation.
DevConnect Compliance Testing is conducted jointly by Avaya and DevConnect members. The
jointly-defined test plan focuses on exercising APIs and/or standards-based interfaces pertinent
to the interoperability of the tested products and their functionalities. DevConnect Compliance
Testing is not intended to substitute full product performance or feature testing performed by
DevConnect members, nor is it to be construed as an endorsement by Avaya of the suitability or
completeness of a DevConnect member’s solution.

TLT; Reviewed:
SPOC 5/1/2013
Solution & Interoperability Test Lab Application Notes
©2013 Avaya Inc. All Rights Reserved.
3 of 30
Bold-Dial-AES
2.1. Interoperability Compliance Testing
The interoperability compliance test included feature and serviceability testing.
The feature testing focused on verifying the following on Manitou:
Use of DMCC registration and monitoring services to register and monitor the virtual IP
softphones.
Use of DMCC call control services to initiate and drop outbound calls via the virtual IP
softphones.
Proper passing of replacement calling party number in the User-to-User Information
parameter.
Proper handling of outbound call for scenarios involving invalid number, internal
destination, external destination, drop, hold, resume, transfer, conference, multiple
operators, and multiple calls.
The serviceability testing focused on verifying the ability of Manitou to recover from adverse
conditions, such as disconnecting and reconnecting the Ethernet connection to Manitou and to
the ManitouCS Operator Workstation.
2.2. Test Results
All test cases were executed and verified. The following were observations on Manitou from the
compliance testing.
When the operator uses ManitouCS Operator Workstation to drop from an active
conference, by design the conference call is cleared and therefore all remaining parties are
dropped.
The ManitouCS Operator Workstation displays the generic “Unknown error in connecting”
for any failures from the outbound call, including a busy destination.
The ManitouCS Operator Workstation may generate multiple instances upon server and/or
client Ethernet disruptions. The multiple instances do not have downside impact as any can
continue to be used, and the operator can manually close the extra instances as desired.
2.3. Support
Technical support on Manitou can be obtained through the following:
Phone: (719) 593-2829
Email: [email protected]

TLT; Reviewed:
SPOC 5/1/2013
Solution & Interoperability Test Lab Application Notes
©2013 Avaya Inc. All Rights Reserved.
4 of 30
Bold-Dial-AES
3. Reference Configuration Manitou can be configured on a single server or with components distributed across multiple
servers. The compliance test configuration used a single server configuration, which also hosted
the ManitouCS Supervisor Workstation application, as shown in Figure 1.
The detailed administration of basic connectivity between Communication Manager and
Application Enablement Services, and of telephony devices are not the focus of these
Application Notes and will not be described.
Figure 1: Compliance Testing Configuration

TLT; Reviewed:
SPOC 5/1/2013
Solution & Interoperability Test Lab Application Notes
©2013 Avaya Inc. All Rights Reserved.
5 of 30
Bold-Dial-AES
4. Equipment and Software Validated The following equipment and software were used for the sample configuration provided:
Equipment/Software Release/Version
Avaya Aura® Communication Manager on
Avaya S8300D Server with
Avaya G450 Media Gateway
6.2 SP5
(R016x.02.0.823.0-20396)
Avaya Aura® Application Enablement Services 6.2 (r6-2-0-18-0 Patch 1)
Avaya 1608 IP Deskphone (H.323) 1.302S
Avaya 9611G IP Deskphone (H.323) 6.2209
Avaya 9650 IP Deskphone (H.323) 3.105S
Bold Technologies Manitou on
Microsoft Windows 2008 R2 Standard
PBXServer
ManitouCS Supervisor Workstation
Avaya DMCC .NET (ServiceProvider.dll)
1.61.0.885
SP1
1.61.4827.650
1.61.0.682
6.2.0.29
Bold Technologies ManitouCS Operator Workstation on
Microsoft Windows XP Professional
BoldPBX.tsp
1.61.0.885
2002 SP3
1.61.4827.381

TLT; Reviewed:
SPOC 5/1/2013
Solution & Interoperability Test Lab Application Notes
©2013 Avaya Inc. All Rights Reserved.
6 of 30
Bold-Dial-AES
5. Configure Avaya Aura® Communication Manager This section provides the procedures for configuring Communication Manager. The procedures
include the following areas:
Verify license
Administer CTI link
Administer special applications
Administer operator stations
5.1. Verify License
Log into the System Access Terminal (SAT) to verify that the Communication Manager license
has proper permissions for features illustrated in these Application Notes. Use the “display
system-parameters customer-options” command to verify that the Computer Telephony
Adjunct Links customer option is set to “y” on Page 3. If this option is not set to “y”, then
contact the Avaya sales team or business partner for a proper license file.
display system-parameters customer-options Page 3 of 11
OPTIONAL FEATURES
Abbreviated Dialing Enhanced List? y Audible Message Waiting? y
Access Security Gateway (ASG)? y Authorization Codes? y
Analog Trunk Incoming Call ID? y CAS Branch? n
A/D Grp/Sys List Dialing Start at 01? y CAS Main? n
Answer Supervision by Call Classifier? y Change COR by FAC? n
ARS? y Computer Telephony Adjunct Links? y
ARS/AAR Partitioning? y Cvg Of Calls Redirected Off-net? y
ARS/AAR Dialing without FAC? y DCS (Basic)? y
ASAI Link Core Capabilities? y DCS Call Coverage? y
ASAI Link Plus Capabilities? y DCS with Rerouting? y
Async. Transfer Mode (ATM) PNC? n
5.2. Administer CTI Link
Add a CTI link using the “add cti-link n” command, where “n” is an available CTI link number.
Enter an available extension number in the Extension field. Note that the CTI link number and
extension number may vary. Enter “ADJ-IP” in the Type field, and a descriptive name in the
Name field. Default values may be used in the remaining fields.
add cti-link 1 Page 1 of 3
CTI LINK
CTI Link: 1
Extension: 40001
Type: ADJ-IP
COR: 1
Name: TSAPI Link

TLT; Reviewed:
SPOC 5/1/2013
Solution & Interoperability Test Lab Application Notes
©2013 Avaya Inc. All Rights Reserved.
7 of 30
Bold-Dial-AES
5.3. Administer Special Applications
Use the “change system-parameters special-applications” command, and navigate to Page 4.
Enable the (SA8481) – Replace Calling Party Number with ASAI ANI special application, as
shown below.
This feature allows Manitou to supply calling party number information as part of the third party
make call request for outgoing ISDN calls.
change system-parameters special-applications Page 4 of 10
SPECIAL APPLICATIONS
(SA8481) - Replace Calling Party Number with ASAI ANI? y
(SA8500) - Expanded UUI Display Information? n
(SA8506) - Altura Interoperability (FIPN)? n
(SA8507) - H245 Support With Other Vendors? n
(SA8508) - Multiple Emergency Access Codes? n
(SA8510) - NTT Mapping of ISDN Called-Party Subaddress IE? n
(SA8517) - Authorization Code By COR? n
(SA8520) - Hoteling Application for IP Terminals? n
(SA8558) - Increase Automatic MWI & VuStats (S8700 only)? n
(SA8567) - PHS X-Station Mobility over IP? n
(SA8569) - No Service Observing Tone Heard by Agent? n
(SA8573) - Call xfer via ASAI on CAS Main? n
(SA8582) - PSA Location and Display Enhancements? n
(SA8587) - Networked PSA via QSIG Diversion? n
(SA8589) - Background BSR Polling? n
(SA8608) - Increase Crisis Alert Buttons? n
(SA8621) - SCH Feature Enhancements? n

TLT; Reviewed:
SPOC 5/1/2013
Solution & Interoperability Test Lab Application Notes
©2013 Avaya Inc. All Rights Reserved.
8 of 30
Bold-Dial-AES
5.4. Administer Operator Stations
Use the “change station n” command, where “n” is the first operator station extension, in this
case “45001”.
Enable IP SoftPhone, to allow for a virtual IP softphone to be registered against the station.
Note the value of Security Code, which will be used later to configure Manitou.
change station 45001 Page 1 of 4
STATION
Extension: 45001 Lock Messages? n BCC: 0
Type: 1608 Security Code: 12345 TN: 1
Port: S00000 Coverage Path 1: 1 COR: 1
Name: Bold Operator #1 Coverage Path 2: COS: 1
Hunt-to Station:
STATION OPTIONS
Time of Day Lock Table:
Loss Group: 19 Personalized Ringing Pattern: 1
Message Lamp Ext: 45001
Speakerphone: 2-way Mute Button Enabled? y
Display Language: english
Survivable GK Node Name:
Survivable COR: internal Media Complex Ext:
Survivable Trunk Dest? y IP SoftPhone? y
IP Video Softphone? n
Short/Prefixed Registration Allowed: default
Repeat this section to administer all operator stations. In the compliance testing, two stations
were administered as shown below.
list station 45001 count 2
STATIONS
Ext/ Port/ Name/ Room/ Cv1/ COR/ Cable/
Hunt-to Type Surv GK NN Move Data Ext Cv2 COS TN Jack
45001 S00000 Bold Operator #1 1 1
1608 no 1 1
45002 S00045 Bold Operator #2 1 1
9611 no 1 1

TLT; Reviewed:
SPOC 5/1/2013
Solution & Interoperability Test Lab Application Notes
©2013 Avaya Inc. All Rights Reserved.
9 of 30
Bold-Dial-AES
6. Configure Avaya Aura® Application Enablement Services This section provides the procedures for configuring Application Enablement Services. The
procedures include the following areas:
Launch OAM interface
Verify license
Administer TSAPI link
Administer H.323 gatekeeper
Disable security database
Restart services
Obtain Tlink name
Administer Bold user
Enable ports
6.1. Launch OAM Interface
Access the OAM web-based interface by using the URL “https://ip-address” in an Internet
browser window, where “ip-address” is the IP address of the Application Enablement Services
server.
The Please login here screen is displayed. Log in using the appropriate credentials.

TLT; Reviewed:
SPOC 5/1/2013
Solution & Interoperability Test Lab Application Notes
©2013 Avaya Inc. All Rights Reserved.
10 of 30
Bold-Dial-AES
The Welcome to OAM screen is displayed next.
6.2. Verify License
Select Licensing WebLM Server Access in the left pane, to display the Web License
Manager pop-up screen (not shown), and log in with the appropriate credentials.
TLT; Reviewed:
SPOC 5/1/2013
Solution & Interoperability Test Lab Application Notes
©2013 Avaya Inc. All Rights Reserved.
11 of 30
Bold-Dial-AES
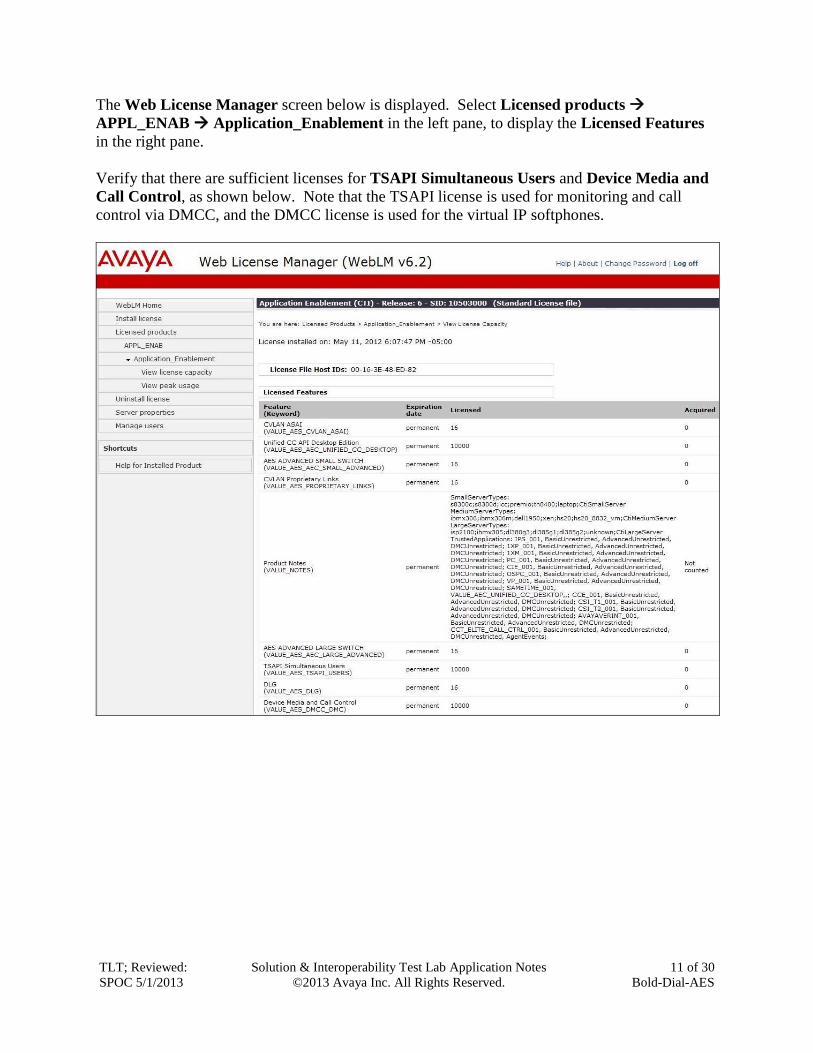
The Web License Manager screen below is displayed. Select Licensed products
APPL_ENAB Application_Enablement in the left pane, to display the Licensed Features
in the right pane.
Verify that there are sufficient licenses for TSAPI Simultaneous Users and Device Media and
Call Control, as shown below. Note that the TSAPI license is used for monitoring and call
control via DMCC, and the DMCC license is used for the virtual IP softphones.

TLT; Reviewed:
SPOC 5/1/2013
Solution & Interoperability Test Lab Application Notes
©2013 Avaya Inc. All Rights Reserved.
12 of 30
Bold-Dial-AES
6.3. Administer TSAPI Link
To administer a TSAPI link, select AE Services TSAPI TSAPI Links from the left pane
of the Management Console. The TSAPI Links screen is displayed, as shown below. Click
Add Link.
The Add TSAPI Links screen is displayed next.
The Link field is only local to the Application Enablement Services server, and may be set to
any available number. For Switch Connection, select the relevant switch connection from the
drop-down list. In this case, the existing switch connection “S8300D” is selected. For Switch
CTI Link Number, select the CTI link number from Section 5.2. Retain the default values in
the remaining fields.

TLT; Reviewed:
SPOC 5/1/2013
Solution & Interoperability Test Lab Application Notes
©2013 Avaya Inc. All Rights Reserved.
13 of 30
Bold-Dial-AES
6.4. Administer H.323 Gatekeeper
Select Communication Manager Interface Switch Connections from the left pane. The
Switch Connections screen shows a listing of the existing switch connections.
Locate the connection name associated with the relevant Communication Manager, in this case
“S8300D”, and select the corresponding radio button. Click Edit H.323 Gatekeeper.
The Edit H.323 Gatekeeper screen is displayed. Enter the IP address of a C-LAN circuit pack
or the Processor C-LAN on Communication Manager to be used as the H.323 gatekeeper, in this
case “10.32.39.83” as shown below. Click Add Name or IP.

TLT; Reviewed:
SPOC 5/1/2013
Solution & Interoperability Test Lab Application Notes
©2013 Avaya Inc. All Rights Reserved.
14 of 30
Bold-Dial-AES
6.5. Disable Security Database
Select Security Security Database Control from the left pane, to display the SDB
Control for DMCC, TSAPI, JTAPI and Telephony Web Services screen in the right pane.
Uncheck both fields below.
6.6. Restart Services
Select Maintenance Service Controller from the left pane, to display the Service Controller
screen in the right pane. Check DMCC Service and TSAPI Service, and click Restart Service.

TLT; Reviewed:
SPOC 5/1/2013
Solution & Interoperability Test Lab Application Notes
©2013 Avaya Inc. All Rights Reserved.
15 of 30
Bold-Dial-AES
6.7. Obtain Tlink Name
Select Security Security Database Tlinks from the left pane. The Tlinks screen shows a
listing of the Tlink names. A new Tlink name is automatically generated for the TSAPI service.
Locate the Tlink name associated with the relevant switch connection, which would use the
name of the switch connection as part of the Tlink name. Make a note of the associated Tlink
name, to be used later for configuring Manitou.
In this case, the associated Tlink name is “AVAYA#S8300D#CSTA#AES2-S8800”. Note the
use of the switch connection “S8300D” from Section 6.3 as part of the Tlink name.
TLT; Reviewed:
SPOC 5/1/2013
Solution & Interoperability Test Lab Application Notes
©2013 Avaya Inc. All Rights Reserved.
16 of 30
Bold-Dial-AES
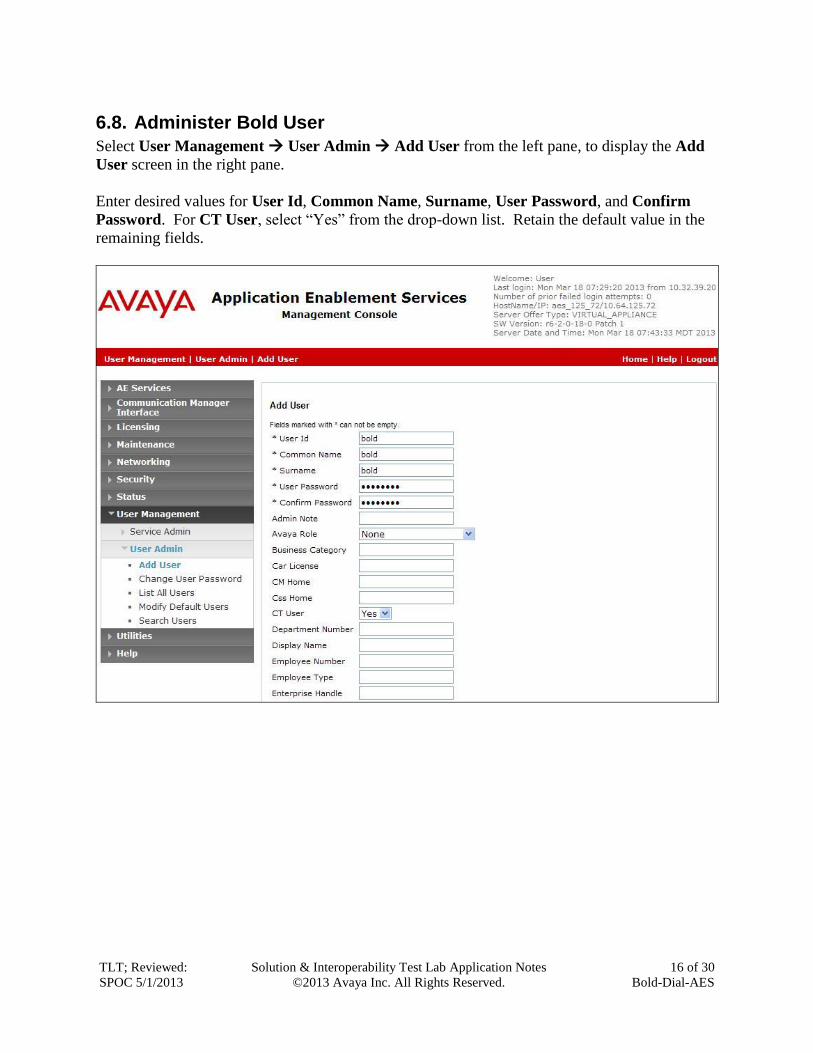
6.8. Administer Bold User
Select User Management User Admin Add User from the left pane, to display the Add
User screen in the right pane.
Enter desired values for User Id, Common Name, Surname, User Password, and Confirm
Password. For CT User, select “Yes” from the drop-down list. Retain the default value in the
remaining fields.

TLT; Reviewed:
SPOC 5/1/2013
Solution & Interoperability Test Lab Application Notes
©2013 Avaya Inc. All Rights Reserved.
17 of 30
Bold-Dial-AES
6.9. Enable Ports
Select Networking Ports from the left pane, to display the Ports screen in the right pane.
In the DMCC Server Ports section, select the radio button for Unencrypted Port under the
Enabled column, as shown below. Retain the default values in the remaining fields.

TLT; Reviewed:
SPOC 5/1/2013
Solution & Interoperability Test Lab Application Notes
©2013 Avaya Inc. All Rights Reserved.
18 of 30
Bold-Dial-AES
7. Configure Bold Technologies Manitou This section provides the procedures for configuring Manitou. The procedures include the
following areas:
Administer PBX server
Administer Avaya switch
Administer extensions
The configuration of Manitou is performed by Bold Technologies technicians. The procedural
steps are presented in these Application Notes for informational purposes.
7.1. Administer PBX Server
From the Manitou server running the PBXServer component, navigate to the C:\ProgramData\
Bold Technologies\PBX Server directory to locate the PBXServer.config file shown below.
TLT; Reviewed:
SPOC 5/1/2013
Solution & Interoperability Test Lab Application Notes
©2013 Avaya Inc. All Rights Reserved.
19 of 30
Bold-Dial-AES
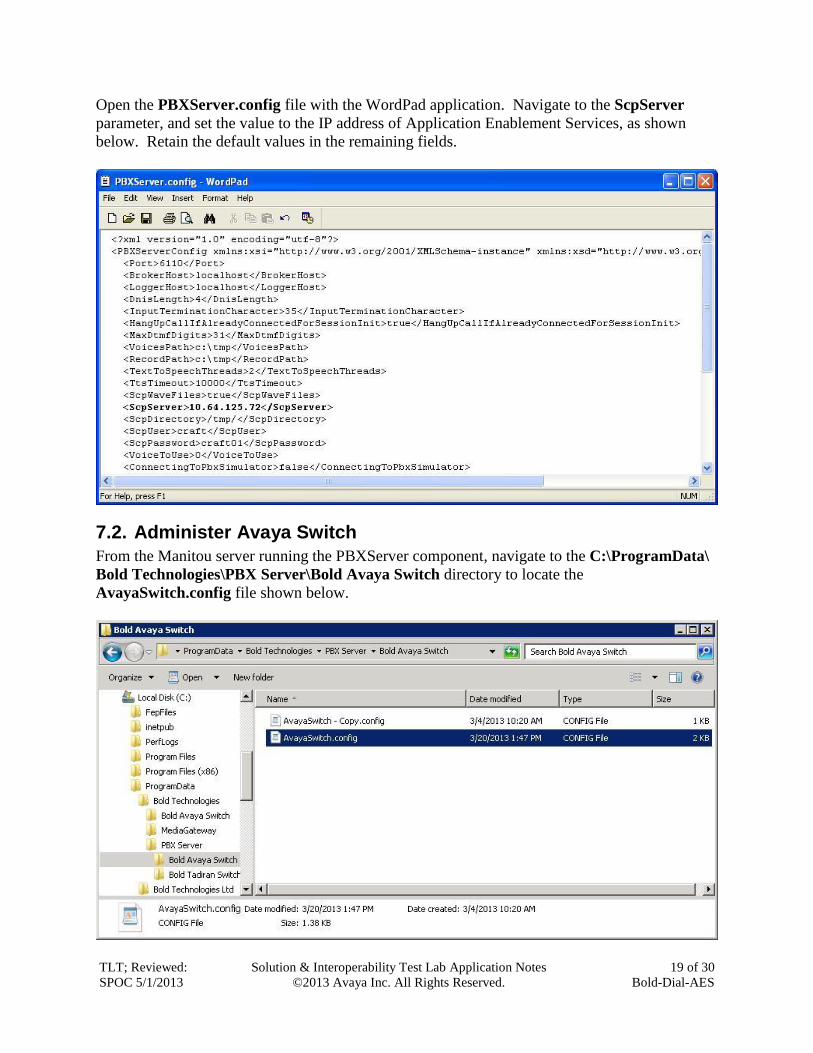
Open the PBXServer.config file with the WordPad application. Navigate to the ScpServer
parameter, and set the value to the IP address of Application Enablement Services, as shown
below. Retain the default values in the remaining fields.
7.2. Administer Avaya Switch
From the Manitou server running the PBXServer component, navigate to the C:\ProgramData\
Bold Technologies\PBX Server\Bold Avaya Switch directory to locate the
AvayaSwitch.config file shown below.

TLT; Reviewed:
SPOC 5/1/2013
Solution & Interoperability Test Lab Application Notes
©2013 Avaya Inc. All Rights Reserved.
20 of 30
Bold-Dial-AES
Open the AvayaSwitch.config file with the WordPad application. Enter the following values for
the specified fields, and retain the default values for the remaining fields.
IPAddressToAESServer: IP address of Application Enablement Services.
IPAddressToCMServer: IP address of H.323 gatekeeper from Section 6.4.
LoginName: The Bold user credential from Section 6.8.
LoginPassword: The Bold user credential from Section 6.8.
SwitchName: Switch connection name from Section 6.3.
SwitchSupportsAliInjection: “true”
For each operator station from Section 5.4, create a virtual IP softphone device in the
DeviceConfig subsection as shown below. For Extension and ExtensionPassword, use the
operator station extension and security code from Section 5.4. Use “Independent” for
Dependency, and enter a desired description for ExtensionDescription.

TLT; Reviewed:
SPOC 5/1/2013
Solution & Interoperability Test Lab Application Notes
©2013 Avaya Inc. All Rights Reserved.
21 of 30
Bold-Dial-AES
7.3. Administer Extensions
From the Manitou server running the ManitouCS Supervisor Application, select Start All
Programs Bold Technologies Supervisor Workstation to launch the application, and log
in using the appropriate credentials.
The Supervisor Workstation – Manitou screen is displayed. Select Maintenance
Workstations from the top menu, to display the updated screen below.
Select a workstation entry that corresponds to an operator, in this case PC2. Click Edit toward
the top of the screen.
In the workstation entry, click on the Extension field and enter the corresponding operator
station extension from Section 5.4, in this case “45002”. Repeat this section for all operator
workstations.

TLT; Reviewed:
SPOC 5/1/2013
Solution & Interoperability Test Lab Application Notes
©2013 Avaya Inc. All Rights Reserved.
22 of 30
Bold-Dial-AES
8. Verification Steps This section provides the tests that can be performed to verify proper configuration of Manitou,
Communication Manager, and Application Enablement Services.
8.1. Verify Bold Technologies Manitou
From the operator PC running the ManitouCS Operator Workstation application, select Start
All Programs Bold Technologies Manitou Workstation to launch the application, and
log in using the appropriate credentials.
The Operator Workstation - Manitou screen is displayed. Select the Alarm Queue icon from
the top menu to display a list of outstanding alarms, as shown below. Double click on an alarm
entry.

TLT; Reviewed:
SPOC 5/1/2013
Solution & Interoperability Test Lab Application Notes
©2013 Avaya Inc. All Rights Reserved.
23 of 30
Bold-Dial-AES
The screen is updated with the details of the alarm and associated customer information. Select
View All Contacts, and expand the Contact listing. Right click on a contact entry and select
Do, as shown below.

TLT; Reviewed:
SPOC 5/1/2013
Solution & Interoperability Test Lab Application Notes
©2013 Avaya Inc. All Rights Reserved.
24 of 30
Bold-Dial-AES
Verify that the Auto-Dialer screen is displayed, and that the Status is “Dialing”, as shown
below. Also verify that the call is ringing at the PSTN destination.
Answer the call at the PSTN. Verify that the Auto-Dialer screen is updated with Status of
“Connected”, and that the operator station is connected to the PSTN user with two-way talk
paths.

TLT; Reviewed:
SPOC 5/1/2013
Solution & Interoperability Test Lab Application Notes
©2013 Avaya Inc. All Rights Reserved.
25 of 30
Bold-Dial-AES
From the Operator Workstation – Manitou screen, select the Monitoring Company
Maintenance icon from the top menu, to display the details of the monitoring company.
Verify that the display of the connected PSTN telephone shows the calling number shown below
in the ALI Injection field.

TLT; Reviewed:
SPOC 5/1/2013
Solution & Interoperability Test Lab Application Notes
©2013 Avaya Inc. All Rights Reserved.
26 of 30
Bold-Dial-AES
8.2. Verify Avaya Aura® Communication Manager
On Communication Manager, verify the status of the administered CTI link by using the “status
aesvcs cti-link” command. Verify that the Service State is “established” for the CTI link
administered in Section 5.2, as shown below.
status aesvcs cti-link
AE SERVICES CTI LINK STATUS
CTI Version Mnt AE Services Service Msgs Msgs
Link Busy Server State Sent Rcvd
1 4 no aes_125_72 established 23 21
Verify the registration status of the virtual IP softphones by using the “list registered-ip-stations”
command. Verify that there is a virtual IP softphone entry for each operator station that is active
on an outbound call, as shown below.
list registered-ip-stations Page 1
REGISTERED IP STATIONS
Station Ext Set Type/ Prod ID/ TCP Station IP Address/
or Orig Port Net Rgn Release Skt Gatekeeper IP Address
------------- --------- ---------- --- ---------------------------------------
45000 9650 IP_Phone y 10.32.39.104
1 3.105S 10.32.39.83
45001 1608 IP_Phone y 10.32.39.105
1 1.302S 10.32.39.83
45001 1608 IP_API_A y 10.64.125.72
1 3.2040 10.32.39.83
45002 9611 IP_Phone y 10.32.39.106
1 6.2209 10.32.39.83

TLT; Reviewed:
SPOC 5/1/2013
Solution & Interoperability Test Lab Application Notes
©2013 Avaya Inc. All Rights Reserved.
27 of 30
Bold-Dial-AES
8.3. Verify Avaya Aura® Application Enablement Services
On Application Enablement Services, verify the status of the TSAPI link by selecting Status
Status and Control TSAPI Service Summary from the left pane. The TSAPI Link Details
screen is displayed.
Verify that the Status is “Talking” for the TSAPI link administered in Section 6.3, as shown
below. Also verify that the corresponding Associations column reflects the number of active
virtual IP softphones from Section 8.2.

TLT; Reviewed:
SPOC 5/1/2013
Solution & Interoperability Test Lab Application Notes
©2013 Avaya Inc. All Rights Reserved.
28 of 30
Bold-Dial-AES
Verify the status of the DMCC link by selecting Status Status and Control DMCC
Service Summary from the left pane. The DMCC Service Summary – Session Summary
screen is displayed.
In the lower portion of the screen, verify that the User column shows an active session with the
Bold user name from Section 6.8, and that the # of Associated Devices column reflects the
number of active virtual IP softphones from Section 8.2.

TLT; Reviewed:
SPOC 5/1/2013
Solution & Interoperability Test Lab Application Notes
©2013 Avaya Inc. All Rights Reserved.
29 of 30
Bold-Dial-AES
9. Conclusion These Application Notes describe the configuration steps required for Bold Technologies
Manitou to successfully interoperate with Avaya Aura® Communication Manager and Avaya
Aura® Application Enablement Services. All feature and serviceability test cases were
completed with observations noted in Section 2.2.
10. Additional References This section references the product documentation relevant to these Application Notes.
1. Administering Avaya Aura® Communication Manager, Document 03-300509, Issue 7.0,
Release 6.2, July 2012, available at http://support.avaya.com.
2. Avaya Aura® Application Enablement Services Administration and Maintenance Guide,
Release 6.2, Issue 1, July 2012, available at http://support.avaya.com.
3. Bold Technologies Manitou CS Operator Workstation, Manitou CS 1.6.0, February 2013,
available at http://support.boldgroup.com.

TLT; Reviewed:
SPOC 5/1/2013
Solution & Interoperability Test Lab Application Notes
©2013 Avaya Inc. All Rights Reserved.
30 of 30
Bold-Dial-AES
©2013 Avaya Inc. All Rights Reserved.
Avaya and the Avaya Logo are trademarks of Avaya Inc. All trademarks identified by ® and ™
are registered trademarks or trademarks, respectively, of Avaya Inc. All other trademarks are the
property of their respective owners. The information provided in these Application Notes is
subject to change without notice. The configurations, technical data, and recommendations
provided in these Application Notes are believed to be accurate and dependable, but are
presented without express or implied warranty. Users are responsible for their application of any
products specified in these Application Notes.
Please e-mail any questions or comments pertaining to these Application Notes along with the
full title name and filename, located in the lower right corner, directly to the Avaya DevConnect
Program at [email protected].