application notes for telstrat engage record with avaya
TRANSCRIPT

MJH; Reviewed:
SPOC 4/21/2009
Solution & Interoperability Test Lab Application Notes
©2009 Avaya Inc. All Rights Reserved.
1 of 43
TelStrat_AES_CM
Avaya Solution & Interoperability Test Lab
Application Notes for TelStrat Engage Record with Avaya
Communication Manager and Avaya Application
Enablement Services - Issue 1.0
Abstract
These Application Notes describe the steps required to configure TelStrat Engage Record to
interoperate with Avaya Communication Manager and Avaya Application Enablement
Services.
TelStrat Engage Record is a call recording solution that interfaces with Avaya Communication
Manager and Avaya Application Enablement Services (AES). Engage Record can be
configured to automatically record all calls, record on-demand, or rules can be set up for
recording based on incidents, schedules, customers, agents, or even at random. Engage Record
uses the Telephony Service API (TSAPI) to receive call related events. It also uses the
Device, Media & Call Control (DMCC) API to register a number of softphones that can be
single step conference into calls to obtain the audio for recording purposes.
Information in these Application Notes has been obtained through DevConnect compliance
testing and additional technical discussions. Testing was conducted via the DevConnect
Program at the Avaya Solution and Interoperability Test Lab.

MJH; Reviewed:
SPOC 4/21/2009
Solution & Interoperability Test Lab Application Notes
©2009 Avaya Inc. All Rights Reserved.
2 of 43
TelStrat_AES_CM
1. Introduction These Application Notes describe a compliance tested configuration that comprised of an Avaya
Communication Manager, an Avaya Application Enablement Services server, and a TelStrat
Engage Record server and client.
TelStrat Engage Record is a call recording solution that interfaces with Avaya Communication
Manager and Avaya Application Enablement Services. Engage Record uses a TSAPI CTI link
to an Application Enablement Services server to monitor stations, agents, and hunt groups to
obtain recording triggers and call information. Engage Record also uses the DMCC interface of
Application Enablement Services to register DMCC softphones with Avaya Communication
Manager. Engage Record uses the DMCC softphones as recording devices. When recording of
a call is desired, Engage Record uses the Single Step Conference feature to conference a DMCC
softphone into the call to obtain the audio.
1.1. Interoperability Compliance Testing
The interoperability compliance testing focused on feature functionality, serviceability, and
performance tests. The feature functionality testing evaluated the ability of TelStrat Engage
Record to monitor and record calls placed to and from stations on Avaya Communication
Manager. The serviceability testing introduced failure conditions to see if Engage Record could
properly resume recording calls after each failure recovery. The performance testing stressed
TelStrat Engage Record by continuously placing calls over extended periods of time.
The compliance testing validated the monitoring and recording performed by Engage Record of
calls placed to and from analog phones, digital phones, IP phones, softphones, agents, Vector
Directory Numbers (VDNs), and hunt groups on an Avaya Media Server running Avaya
Communication Manager.
1.2. Support
Technical support for TelStrat Engage Record can be obtained by contacting TelStrat at:
Phone: 1-972-633-4548
E-mail: [email protected]
Web: http://www.telstrat.com/content/view/302/349/

MJH; Reviewed:
SPOC 4/21/2009
Solution & Interoperability Test Lab Application Notes
©2009 Avaya Inc. All Rights Reserved.
3 of 43
TelStrat_AES_CM
2. Reference Configuration The figure below shows the configuration used during compliance testing. Site A is comprised
of an Avaya S8500 Media Server with an Avaya G650 Media Gateway. Site B is comprised of
an Avaya S8300 Media Server with an Avaya G450 Media Gateway. The two Avaya
Communication Manager systems are connected to each other via an IP (H.323) trunk and an
ISDN-PRI trunk. The various telephones shown are used to generate intra-switch calls (calls
between telephones on the same system), outbound/inbound calls to/from the PSTN, and inter-
switch calls (calls between the two Avaya Communication Manager systems via the two trunks).
The TelStrat Engage Record server is set up to record calls at Site A. The TelStrat Engage
Record client is used for administration, such as setting up call recording criterion, in addition to
retrieving and playing back the call recordings.
Figure 1: TelStrat Engage Record with Avaya Communication Manager and Avaya AES

MJH; Reviewed:
SPOC 4/21/2009
Solution & Interoperability Test Lab Application Notes
©2009 Avaya Inc. All Rights Reserved.
4 of 43
TelStrat_AES_CM
3. Equipment and Software Validated The following equipment and software were used for the test configuration provided:
Equipment Software
Avaya™ S8500 Server (w/ G650) Avaya Communication
Manager 5.1.2
(R015x.01.2.416.4)
Avaya™ S8300 Server (w/ G450) Avaya Communication
Manager 5.1.2
(R015x.01.2.416.4)
Avaya™ G650 Media Gateway:
TN799DP (C-LAN)
TN2602AP (MEDPRO)
TN2312BP (IPSI)
HW01, FW026
HW02, FW007
HW15, FW030
Avaya™ G450 Media Gateway :
MM710BP (DS1)
MM712AP (DCP)
HW11, FW044
HW07, FW009
Avaya™ Application Enablement Services (AES) Server 4.2
Avaya™ C364T-PWR Converged Stackable Switch
4.5.14
Avaya™ 1600 Series IP Phones :
1608SW (H.323)
1616SW (H.323)
1.0.3
1.0.3
Avaya™ 4600 Series IP Phones:
4610SW (H.323)
4620SW (H.323)
4621SW (H.323)
2.9
2.9
2.9
Avaya™ 9600 Series IP Phones:
9620 (H.323)
2.0.0
Avaya™ 6400 Series Digital Phones -
TelStrat Engage Record Server 3.0.0
TelStrat Engage Record Client 3.0.0
4. Configure Avaya Communication Manager All the configuration changes in this section for Avaya Communication Manager are performed
through the System Access Terminal (SAT) interface. For more information on configuring
Avaya Communication Manager, refer to the Avaya product documentation, Reference [1].
The information shown on the screens throughout this section indicate the values that were used
during compliance testing.

MJH; Reviewed:
SPOC 4/21/2009
Solution & Interoperability Test Lab Application Notes
©2009 Avaya Inc. All Rights Reserved.
5 of 43
TelStrat_AES_CM
4.1. Configure IP Codec Sets & IP-Network Regions
This section provides the steps required for configuring ip-codec-set and ip-network regions.
1. Enter the change ip-codec-set <codec set number> command, where <codec set number>
is the codec set number to be used with TelStrat recording solution.
In the Audio Codec field, type G.711MU.
change ip-codec-set 1 Page 1 of 2
IP Codec Set
Codec Set: 1
Audio Silence Frames Packet
Codec Suppression Per Pkt Size(ms)
1: G.711MU n 2 20
2:
3:
4:
5:
6:
7:
Media Encryption
1: none
2:
3:

MJH; Reviewed:
SPOC 4/21/2009
Solution & Interoperability Test Lab Application Notes
©2009 Avaya Inc. All Rights Reserved.
6 of 43
TelStrat_AES_CM
2. Enter the change ip-network-region <region number>, where <region number> is the ip
network region number to be used with TelStrat recording solution.
In the Code Set field, type <codec set number>, where <codec set number> is the
number of the codec set administered in Step 1. The Codec Set field reflects the codec
set that must be used for connections between phones within this region or between
phones and media processor boards within this region.
change ip-network-region 1 Page 1 of 19
IP NETWORK REGION
Region: 1
Location: 1 Authoritative Domain: dev8.com
Name: interop
MEDIA PARAMETERS Intra-region IP-IP Direct Audio: yes
Codec Set: 1 Inter-region IP-IP Direct Audio: yes
UDP Port Min: 2048 IP Audio Hairpinning? y
UDP Port Max: 65535
DIFFSERV/TOS PARAMETERS RTCP Reporting Enabled? y
Call Control PHB Value: 48 RTCP MONITOR SERVER PARAMETERS
Audio PHB Value: 48 Use Default Server Parameters? y
Video PHB Value: 26
802.1P/Q PARAMETERS
Call Control 802.1p Priority: 6
Audio 802.1p Priority: 6
Video 802.1p Priority: 5 AUDIO RESOURCE RESERVATION PARAMETERS
H.323 IP ENDPOINTS RSVP Enabled? n
H.323 Link Bounce Recovery? y
Idle Traffic Interval (sec): 20
Keep-Alive Interval (sec): 5
Keep-Alive Count: 5
During compliance testing, two IP Network regions were used. It is best practice for all CLANs
dedicated to Avaya AE Services to be in a separate network region from those CLANs servicing
endpoints (i.e. phones). For compliance testing, a single CLAN in network region 1 was used to
service endpoints, while 3 CLANs in network region 2 were dedicated to Avaya Application
Enablement Services. Both IP network regions were configured to use IP codec set 1.
4.2. Configure Connectivity to AES and Endpoints
This section provides the steps required for configuring connectivity from Avaya
Communication Manager to Avaya Application Enablement Services and endpoints.
The Avaya Application Enablement Services server communicates with Avaya Communication
Manager by using one or more CLANs to create a switch connection. The following steps show
only the configuration required in Avaya Communication Manager to set up a switch connection.
See Section 5.1 for the configuration steps required in Avaya Application Enablement Services
to complete the administration of the switch connection.

MJH; Reviewed:
SPOC 4/21/2009
Solution & Interoperability Test Lab Application Notes
©2009 Avaya Inc. All Rights Reserved.
7 of 43
TelStrat_AES_CM
1. Enter the change node-names ip command.
In the Name field, type a descriptive name to assign to a CLAN to be administered.
In the IP Address field, type the IP address that will be assigned to the CLAN.
change node-names ip Page 1 of 2
IP NODE NAMES
Name IP Address
8300 192.45.89.20
CLAN 192.45.88.10
CLAN2 192.45.88.13
CLAN3 192.45.88.14
CLAN4 192.45.88.15
LSP-8300 192.45.88.30
Member-CDR 192.168.199.69
RDTT-CDR 192.45.88.45
SES 192.45.88.50
cf-medpro 192.45.88.11
default 0.0.0.0
ipoffice 192.45.88.40
procr 192.45.88.20
Repeat this step for each CLAN. In the compliance tested configuration, the CLAN node was
used for registering endpoints and the CLAN2, CLAN3, and CLAN4 nodes were used for
connectivity to Avaya Application Enablement Services.

MJH; Reviewed:
SPOC 4/21/2009
Solution & Interoperability Test Lab Application Notes
©2009 Avaya Inc. All Rights Reserved.
8 of 43
TelStrat_AES_CM
2. Enter the add ip-interface <board location> command, where <board location> is the
board location for the CLAN, for example: 01A02.
In the Node Name field, type <CLAN name>, where <CLAN name> is the Name from
Step 1.
In the IP Address field, type the IP address from Step 1.
In the Subnet Mask field, type the subnet mask for the network configuration.
In the Gateway Address field, type the gateway address for the network configuration.
In the Enable Ethernet Port field, type y.
In the Network Region field, type the network region number administered in Section
4.1.
add ip-interface 01a02 Page 1 of 2
IP INTERFACES
Type: C-LAN
Slot: 01A02
Code/Suffix: TN799 D
Node Name: CLAN
IP Address: 192.45 .88 .10
Subnet Mask: 255.255.255.0 Link: 1
Gateway Address: 192.45 .88 .1
Enable Ethernet Port? y Allow H.323 Endpoints? y
Network Region: 1 Allow H.248 Gateways? y
VLAN: n Gatekeeper Priority: 5
Target socket load and Warning level: 400
Receive Buffer TCP Window Size: 8320
ETHERNET OPTIONS
Auto? n
Speed: 100Mbps
Duplex: Full
Repeat this step for each CLAN.
In the compliance tested configuration, the CLAN node was assigned to network region 1 and
the CLAN2, CLAN3, and CLAN4 nodes were assigned to network region 2.

MJH; Reviewed:
SPOC 4/21/2009
Solution & Interoperability Test Lab Application Notes
©2009 Avaya Inc. All Rights Reserved.
9 of 43
TelStrat_AES_CM
3. Enter the add data-module next command.
In the Type field, type ethernet.
In the Port field, type the board location and port 17, for example 01A0217.
In the Name field type, type a descriptive name for the data module.
In the Link field, enter an available link number.
In the Network uses 1’s for Broadcast Addresses field, type y.
add data-module next Page 1 of 1
DATA MODULE
Data Extension: 30000 Name: CLANDATA
Type: ethernet
Port: 01A0217
Link: 1
Network uses 1's for Broadcast Addresses? y
4. Enter the change ip-services command.
In the Service Type field, type AESVCS.
In the Enabled field, type y.
In the Local Node field type <nodename>, where <nodename> is the name of the
CLAN board used for connectivity to Avaya Application Enablement Services.
In the Local Port field, accept the default port (8765).
change ip-services Page 1 of 4
IP SERVICES
Service Enabled Local Local Remote Remote
Type Node Port Node Port
AESVCS y CLAN2 8765
AESVCS y CLAN3 8765
AESVCS y CLAN4 8765
Repeat this step for each CLAN used for connectivity to Avaya Application Enablement
Services.

MJH; Reviewed:
SPOC 4/21/2009
Solution & Interoperability Test Lab Application Notes
©2009 Avaya Inc. All Rights Reserved.
10 of 43
TelStrat_AES_CM
On Page 4,
In the AE Services Server field, type the <name> of the Avaya Application Enablement
Services server. On the Avaya Application Enablement Services server, the name can be
obtained by typing “uname –n” at the command prompt. The name entered on Avaya
Communication Manager must match the Avaya Application Enablement Services server
name exactly.
In the Password field, enter an alphanumeric password. The passwords must exactly
match on both Avaya Communication Manager and the Avaya Application Enablement
Services (administered in Section 5.1).
In the Enabled field, type y.
change ip-services Page 4 of 4
AE Services Administration
Server ID AE Services Password Enabled Status
Server
1: aeserver25 xxxxxxxxxxxxx y in use
2:
3:
4.3. Configure CTI Link
This section provides the steps required for configuring a CTI link on Avaya Communication
Manager. See Section 5.3 for the configuration steps required on Avaya Application
Enablement Services to complete the administration.
1. Enter the display system-parameters customer-options command.
On Page 3, verify that the Computer Telephony Adjunct Links field is set to y. If not,
contact an authorized Avaya account representative to obtain the license. display system-parameters customer-options Page 3 of 11
OPTIONAL FEATURES
Abbreviated Dialing Enhanced List? y Audible Message Waiting? y
Access Security Gateway (ASG)? n Authorization Codes? y
Analog Trunk Incoming Call ID? y CAS Branch? n
A/D Grp/Sys List Dialing Start at 01? n CAS Main? n
Answer Supervision by Call Classifier? y Change COR by FAC? n
ARS? y Computer Telephony Adjunct Links? y
ARS/AAR Partitioning? y Cvg Of Calls Redirected Off-net? n
ARS/AAR Dialing without FAC? y DCS (Basic)? y
ASAI Link Core Capabilities? y DCS Call Coverage? y
ASAI Link Plus Capabilities? y DCS with Rerouting? y
Async. Transfer Mode (ATM) PNC? n
Async. Transfer Mode (ATM) Trunking? n Digital Loss Plan Modification? y
ATM WAN Spare Processor? n DS1 MSP? y
ATMS? y DS1 Echo Cancellation? y
Attendant Vectoring? y

MJH; Reviewed:
SPOC 4/21/2009
Solution & Interoperability Test Lab Application Notes
©2009 Avaya Inc. All Rights Reserved.
11 of 43
TelStrat_AES_CM
2. Enter add cti-link <link number> command, where <link number> is an available CTI link
number.
In the Extension field, type <station extension>, where <station extension> is a valid
station extension.
In the Type field, type ADJ-IP.
In the Name field, type a descriptive name.
add cti-link 10 Page 1 of 3
CTI LINK
CTI Link: 10
Extension: 39010
Type: ADJ-IP
COR: 1
Name: TSAPI Link 1 - aeserver25
4.4. Configure Stations (DMCC Recording Devices)
This section provides the steps required for configuring stations on Avaya Communication
Manager that will function as recording devices for TelStrat Engage Record.
For the purpose of this document, devices that have been registered using the DMCC service will
be called “DMCC devices”. When a client application registers itself as a DMCC device at an
extension, it can act like an IP softphone to control and monitor physical aspects of the extension
(button pushes, lamps, the display, etc.) or access and control the media streams at the extension.
For a client application to be able to control the media at an extension, and record calls at that
extension, it must register itself as a DMCC device with the media mode set to “Client”. Client
media mode indicates that the client application will handle the media streams from the DMCC
device. DMCC devices that have been registered in Client media mode will be called “DMCC
recording devices”.
The DMCC recording devices used by TelStrat Engage Record are administered as IP softphones
on Avaya Communication Manager. Each DMCC recording device requires either an
“IP_API_A” license on Avaya Communication Manager or a “VALUE_DMCC_DMC” license
on Avaya Application Enablement Services.
Note that these licenses are separate and independent from the Avaya IP Softphone licenses
required on Avaya Communication Manager for Avaya IP Softphones, but not for DMCC
recording devices.

MJH; Reviewed:
SPOC 4/21/2009
Solution & Interoperability Test Lab Application Notes
©2009 Avaya Inc. All Rights Reserved.
12 of 43
TelStrat_AES_CM
1. Enter the display system-parameters customer-options command to verify that there are
sufficient IP_API_A licenses for the DMCC recording devices. If not, contact an authorized
Avaya account representative to obtain these licenses.
display system-parameters customer-options Page 10 of 11
MAXIMUM IP REGISTRATIONS BY PRODUCT ID
Product ID Rel. Limit Used
IP_API_A : 1000 0
IP_API_B : 1000 0
IP_API_C : 1000 0
IP_Agent : 1000 0
IP_IR_A : 0 0
IP_Phone : 2400 3
IP_ROMax : 2400 0
IP_Soft : 2 0
IP_eCons : 0 0
oneX_Comm : 2400 0
: 0 0
2. Enter the add station <extension> command, where <extension> is a valid station
extension.
In the Type field, type an IP telephone set type with configurable buttons; for example,
4620.
In the Security Code, type the value entered for <extension> (the station extension and
security code must match).
In the Name field, type a descriptive name.
In the IP SoftPhone, type y.
add station 31126 Page 1 of 5
STATION
Extension: 31126 Lock Messages? n BCC: 0
Type: 4620 Security Code: 31126 TN: 1
Port: IP Coverage Path 1: COR: 1
Name: DMCC Softphone Coverage Path 2: COS: 1
Hunt-to Station:
STATION OPTIONS
Time of Day Lock Table:
Loss Group: 19 Personalized Ringing Pattern: 1
Message Lamp Ext: 31126
Speakerphone: 2-way Mute Button Enabled? y
Display Language: english Expansion Module? n
Survivable GK Node Name:
Survivable COR: internal Media Complex Ext:
Survivable Trunk Dest? y IP SoftPhone? y
IP Video? n
Customizable Labels? Y
This completes the Avaya Communication Manager configuration.

MJH; Reviewed:
SPOC 4/21/2009
Solution & Interoperability Test Lab Application Notes
©2009 Avaya Inc. All Rights Reserved.
13 of 43
TelStrat_AES_CM
5. Configure Avaya Application Enablement Services The Avaya Application Enablement Services (AES) server enables Computer Telephony
Interface (CTI) applications to monitor and control telephony resources on Avaya
Communication Manager. The Avaya Application Enablement Services server receives requests
from CTI applications, and forwards them to Avaya Communication Manager. Conversely, the
Avaya Application Enablement Services server receives responses and events from Avaya
Communication Manager and forwards them to the appropriate CTI applications.
This section assumes that the installation and basic administration of the Avaya Application
Enablement Services server has already been performed. For more information on administering
Avaya Application Enablement Services, refer to the Avaya product documentation, Reference
[2].
1. Launch a web browser and enter https://<IP address of AES Server> in the address field.
Click AE Server Administration.

MJH; Reviewed:
SPOC 4/21/2009
Solution & Interoperability Test Lab Application Notes
©2009 Avaya Inc. All Rights Reserved.
14 of 43
TelStrat_AES_CM
2. Log in with the appropriate credentials for accessing the Avaya Application Enablement
Services CTI OAM web pages.
3. Click CTI OAM Administration in the left pane menu.

MJH; Reviewed:
SPOC 4/21/2009
Solution & Interoperability Test Lab Application Notes
©2009 Avaya Inc. All Rights Reserved.
15 of 43
TelStrat_AES_CM
4. Verify that Avaya Application Enablement Services is licensed for the DMCC Service and
TSAPI Service. If these services are not licensed, contact an authorized Avaya account
representative to obtain these licenses.
5. Each DMCC recording device used by TelStrat Engage Record requires either an
“IP_API_A” license on Avaya Communication Manager or a “VALUE_DMCC_DMC”
license on Avaya Application Enablement Services. If “VALUE_DMCC_DMC” licenses
are being used, log in to the Avaya Web License Manager (WebLM) and verify that there are
sufficient licenses for the DMCC recording devices. Additionally, verify there are sufficient
TSAPI licenses to monitor and control Avaya Communication Manager resources for call
events and Single Step Conferencing. If not, contact an authorized Avaya account
representative to obtain these licenses.

MJH; Reviewed:
SPOC 4/21/2009
Solution & Interoperability Test Lab Application Notes
©2009 Avaya Inc. All Rights Reserved.
16 of 43
TelStrat_AES_CM
5.1. Configure a Switch Connection
This section provides the steps required for configure a Switch Connection. A Switch
Connection defines a connection between the Avaya Application Enablement Services server
and Avaya Communication Manager.
1. Select Administration Switch Connections from the left pane menu. In the Add
Connection field, type a descriptive name and click Add Connection.
2. In the Switch Password field, type the password that was entered during Step 4 of Section
4.2. Re-type the password in the Confirm Switch Password field. Leave SSL checked if
using a secure connection to Avaya Communication Manager. Click Apply.
OAM adds the switch connection and returns to the “Switch Connections” page.

MJH; Reviewed:
SPOC 4/21/2009
Solution & Interoperability Test Lab Application Notes
©2009 Avaya Inc. All Rights Reserved.
17 of 43
TelStrat_AES_CM
3. From the “Switch Connections” page, select the newly added switch connection, and click
Edit CLAN IPs.
4. In the Add Name or IP field, type the <Host Name> or the <IP Address> of the CLAN,
and click Add Name or IP (use the Host Name or IP address of the CLAN that was
administered for Avaya Application Enablement Services connectivity in Section 4.2).
Repeat this step for each CLAN. The screen below shows the CLANs that were used during
compliance testing.

MJH; Reviewed:
SPOC 4/21/2009
Solution & Interoperability Test Lab Application Notes
©2009 Avaya Inc. All Rights Reserved.
18 of 43
TelStrat_AES_CM
5. Navigate back to Administration Switch Connections. Select the switch connection,
and click Edit H.323 Gatekeeper.
6. In the Add Name or IP field, type the <Host Name> or <IP address> of the CLAN to be
used. Click Add Name or IP.
Repeat this step as necessary to add multiple H.323 Gatekeepers. The screen below shows the
CLANs that were used during compliance testing.

MJH; Reviewed:
SPOC 4/21/2009
Solution & Interoperability Test Lab Application Notes
©2009 Avaya Inc. All Rights Reserved.
19 of 43
TelStrat_AES_CM
5.2. Configure DMCC Server Ports
This section provides the steps required for configuring DMCC server ports.
1. Navigate to the CTI OAM Home Administration Ports page. During compliance
testing, the default port values shown are the screen below were utilized. Since the
unencrypted port was utilized during the compliance test, set the Unencrypted Port field to
Enabled. Click the Apply Changes button (not shown) at the bottom of the screen to
complete the process.

MJH; Reviewed:
SPOC 4/21/2009
Solution & Interoperability Test Lab Application Notes
©2009 Avaya Inc. All Rights Reserved.
20 of 43
TelStrat_AES_CM
5.3. Configure TSAPI Link
This section provides the steps required for configuring a TSAPI Link.
1. From the CTI OAM main menu select Administration CTI Link Admin TSAPI
Links. Click Add Link.
2. Complete the “Add / Edit TSAPI Links” page as follows:
In the Link field, select an available link number.
In the Switch Connection field, select the switch connection configured in Section 5.1.
In the Switch CTI Link Number field, select the CTI link number that was administered
on Avaya Communication Manager in Step 2 of Section 4.3.
In the ASAI Link Version field, select the default value, 4.
In the Security field, select the appropriate encryption option for connectivity to the
TelStrat Engage Record server.
MJH; Reviewed:
SPOC 4/21/2009
Solution & Interoperability Test Lab Application Notes
©2009 Avaya Inc. All Rights Reserved.
21 of 43
TelStrat_AES_CM
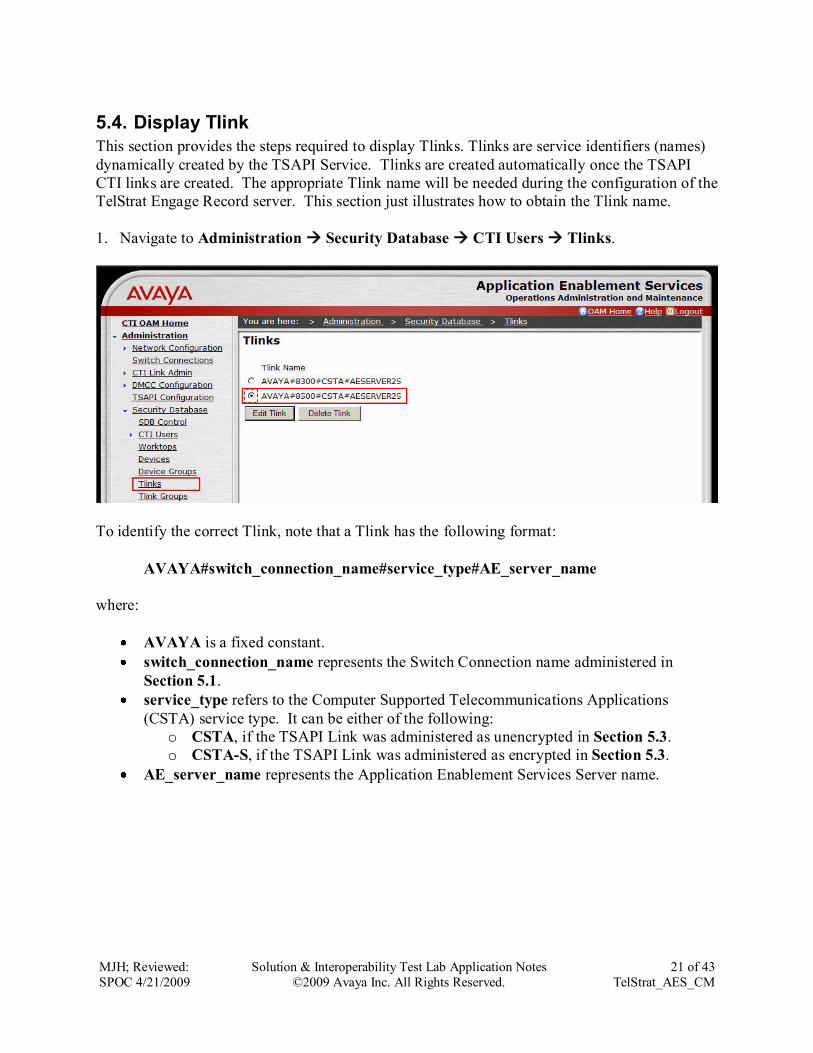
5.4. Display Tlink
This section provides the steps required to display Tlinks. Tlinks are service identifiers (names)
dynamically created by the TSAPI Service. Tlinks are created automatically once the TSAPI
CTI links are created. The appropriate Tlink name will be needed during the configuration of the
TelStrat Engage Record server. This section just illustrates how to obtain the Tlink name.
1. Navigate to Administration Security Database CTI Users Tlinks.
To identify the correct Tlink, note that a Tlink has the following format:
AVAYA#switch_connection_name#service_type#AE_server_name
where:
AVAYA is a fixed constant.
switch_connection_name represents the Switch Connection name administered in
Section 5.1.
service_type refers to the Computer Supported Telecommunications Applications
(CSTA) service type. It can be either of the following:
o CSTA, if the TSAPI Link was administered as unencrypted in Section 5.3.
o CSTA-S, if the TSAPI Link was administered as encrypted in Section 5.3.
AE_server_name represents the Application Enablement Services Server name.

MJH; Reviewed:
SPOC 4/21/2009
Solution & Interoperability Test Lab Application Notes
©2009 Avaya Inc. All Rights Reserved.
22 of 43
TelStrat_AES_CM
5.5. Configure CTI Users
This section provides the steps required to configure a CTI user. If necessary, log in to the
Avaya Application Enablement Services server again with the appropriate credentials for
accessing the “User Management” pages.
1. Navigate to the “OAM Home” page. Select User Management from the left pane menu.

MJH; Reviewed:
SPOC 4/21/2009
Solution & Interoperability Test Lab Application Notes
©2009 Avaya Inc. All Rights Reserved.
23 of 43
TelStrat_AES_CM
2. Navigate to the User Management Add User. On the “Add User” page, provide the
following information:
In the User Id field, type the user ID being assigned to the user.
In the Common Name field, enter the name the user prefers to use.
In the Surname field, type the surname.
In the User Password field, type the password being assigned to the user.
In the Confirm Password field, re-type the assigned password.
In the CT User field, select Yes to add the user as a member of the Security Database
(SDB).
Click the Apply button (not shown) at the bottom of the screen.
Note: The User Id and User Password must match with the information configured on the
TelStrat Engage Record server in Section 6.2.

MJH; Reviewed:
SPOC 4/21/2009
Solution & Interoperability Test Lab Application Notes
©2009 Avaya Inc. All Rights Reserved.
24 of 43
TelStrat_AES_CM
3. Select OAM Home in upper right and navigate to the CTI OAM Administration
Security Database CTI Users List All Users page. Select the User ID created in
Step 2, and click the Edit button to set the permissions of the user.
4. Provide the user with unrestricted access privileges by clicking the Enable button on the
Unrestricted Access field. A Warning screen will be displayed (not shown). Click Apply.

MJH; Reviewed:
SPOC 4/21/2009
Solution & Interoperability Test Lab Application Notes
©2009 Avaya Inc. All Rights Reserved.
25 of 43
TelStrat_AES_CM
6. Configure TelStrat Engage Record Server This section describes the configuration required for the TelStrat Engage Record server to
interface with Avaya Application Enablement Services and Avaya Communication Manager.
6.1. VOIP Server Installation
This section provides the steps required to install the VOIP Recording feature during installation.
For further information on the installation of TelStrat Engage Record, refer to the TelStrat
product documentation, Reference [3].
1. During installation of the TelStrat Engage Record server, install VOIP Recording by
selecting the Servers Voice Recording Server VOIP Recording feature.
MJH; Reviewed:
SPOC 4/21/2009
Solution & Interoperability Test Lab Application Notes
©2009 Avaya Inc. All Rights Reserved.
26 of 43
TelStrat_AES_CM
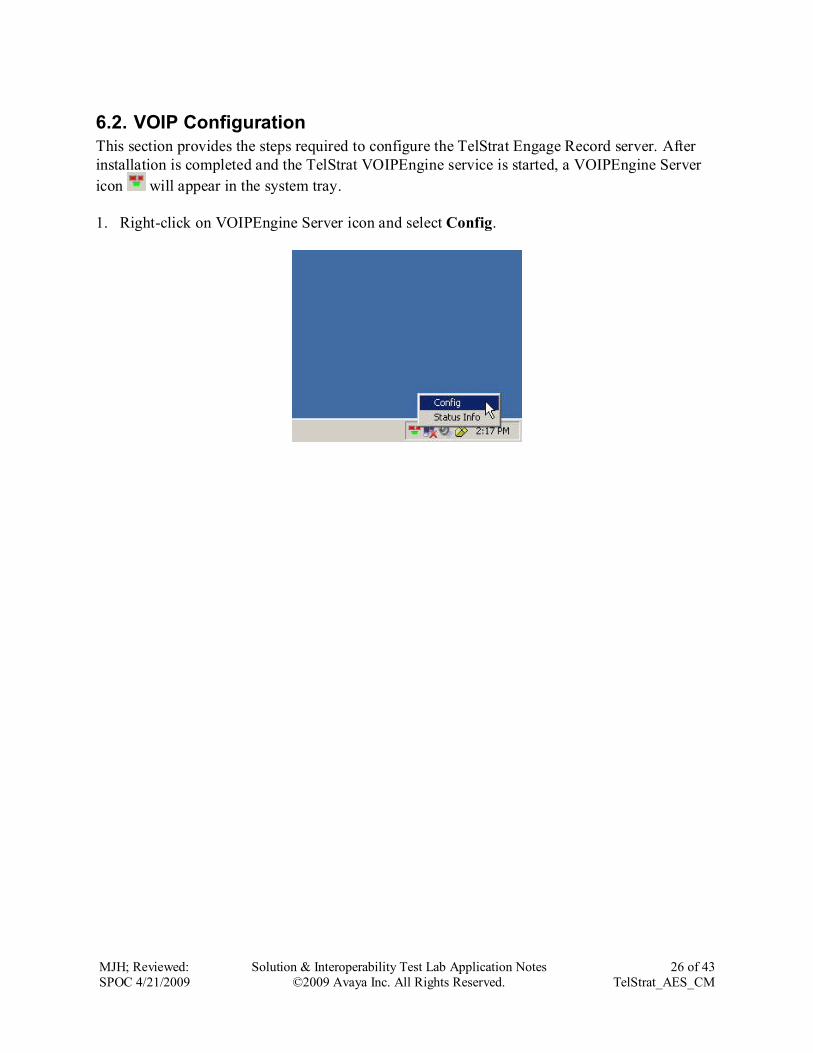
6.2. VOIP Configuration
This section provides the steps required to configure the TelStrat Engage Record server. After
installation is completed and the TelStrat VOIPEngine service is started, a VOIPEngine Server
icon will appear in the system tray.
1. Right-click on VOIPEngine Server icon and select Config.

MJH; Reviewed:
SPOC 4/21/2009
Solution & Interoperability Test Lab Application Notes
©2009 Avaya Inc. All Rights Reserved.
27 of 43
TelStrat_AES_CM
2. Provide the following information on the “VOIP Configuration” screen:
In the CTI Option field, select Avaya TSAPI/DMCC.
In the AES Server field, type the IP Address of the Avaya Application Enablement
Services server.
In the DMCC Port field, type the DMCC server port as configured on Avaya
Application Enablement Services in Section 5.2.
In the TSAPI APP ID field, type the TLink obtained in Section 5.4.
In the User ID, type the User ID from Section 5.5.
In the Password field, type the password from Section 5.5.
In the Calls To Record field, select the appropriate option.

MJH; Reviewed:
SPOC 4/21/2009
Solution & Interoperability Test Lab Application Notes
©2009 Avaya Inc. All Rights Reserved.
28 of 43
TelStrat_AES_CM
6.2.1. Configure Devices / Ports Mapping
This section provides the steps required to configure the TelStrat Engage Record system to
record calls at Avaya stations.
1. Right-click in the Port Mapping area and select ADD.

MJH; Reviewed:
SPOC 4/21/2009
Solution & Interoperability Test Lab Application Notes
©2009 Avaya Inc. All Rights Reserved.
29 of 43
TelStrat_AES_CM
2. In the Device ID and DN fields, type the Avaya Communication Manager station extension.
In the CommSrv Port Number field, type an available port number. Click Add.
Repeat this step as necessary to add additional station extensions, and then close the window
when finished (or click Cancel).

MJH; Reviewed:
SPOC 4/21/2009
Solution & Interoperability Test Lab Application Notes
©2009 Avaya Inc. All Rights Reserved.
30 of 43
TelStrat_AES_CM
The screen below shows some of the stations (Device IDs) used during compliance testing.

MJH; Reviewed:
SPOC 4/21/2009
Solution & Interoperability Test Lab Application Notes
©2009 Avaya Inc. All Rights Reserved.
31 of 43
TelStrat_AES_CM
6.2.2. Configure SoftPhones (DMCC Recording Devices)
This section provides the steps required to configure the range of SoftPhones (DMCC recording
devices) used by the TelStrat Engage Record system. DMCC recording devices are Single Step
Conference into calls in order to obtain the audio for recording purposes.
1. From the “VoIP Configuration” page, click the SoftPhone button.

MJH; Reviewed:
SPOC 4/21/2009
Solution & Interoperability Test Lab Application Notes
©2009 Avaya Inc. All Rights Reserved.
32 of 43
TelStrat_AES_CM
2. Provide the following information and then click OK:
In the CM Server field, type the IP address of the CLAN used for servicing endpoints
(see Section 4.2).
In the From field, type the first extension in the range of softphone station extensions.
In the To field, type the last extension in the range of consecutive softphone station
extensions.
In the SoftPhone Station IP field, type the IP address of the TelStrat Engage Record
server.

MJH; Reviewed:
SPOC 4/21/2009
Solution & Interoperability Test Lab Application Notes
©2009 Avaya Inc. All Rights Reserved.
33 of 43
TelStrat_AES_CM
6.2.3. Configure ACD Groups
This section provides the steps required to configure ACD Groups. The administered ACD
Groups are monitored for Logon and Logoff events.
1. Click the ACD Groups button.

MJH; Reviewed:
SPOC 4/21/2009
Solution & Interoperability Test Lab Application Notes
©2009 Avaya Inc. All Rights Reserved.
34 of 43
TelStrat_AES_CM
2. Right-click in the ACD Group Number area and select Add.
3. Enter an ACD Group Number and click Add.
Repeat this step as necessary to add additional ACD Groups and then close the screen (or click
Cancel).

MJH; Reviewed:
SPOC 4/21/2009
Solution & Interoperability Test Lab Application Notes
©2009 Avaya Inc. All Rights Reserved.
35 of 43
TelStrat_AES_CM
7. Configure TelStrat Engage Record Client The TelStrat Engage Record client can be configured to record calls in numerous ways to meet
business needs, including:
To automatically record all calls (full-time recording)
To record on-demand
To have rules set up for recording based on
o incidents
o schedules
o customers
o agents
o at random
No Avaya specific administration is required on the TelStrat Engage Record client. During
compliance testing, various full-time and on-demanding records were configured.
For more information on the administration of the TelStrat Engage Record client, refer to the
TelStrat product documentation, Reference [4].
8. General Test Approach and Test Results The general test approach was to place calls and use basic telephony operations to verify that
TelStrat Engage Record could properly record the calls, associate the calls with the correct
stations and agents, and to confirm that quality recordings could be retrieved and played back.
The test cases were broken down into three categories: feature testing, serviceability testing, and
performance testing.
For feature testing, several types of calls were placed, including: internal calls, inbound trunk
calls, outbound trunk calls, transfer calls, and conference calls. The calls were placed to and
from various endpoints, including: stations, agents, VDNs, and hunt groups.
For serviceability testing, failure conditions were introduced into the test configuration, such as
network cable pulls, CTI link busyouts, and server resets to verify that TelStrat Engage Record
could properly resume operation after failure recovery.
For performance testing, a sustained volume of calls were generated for an extended period of
time to verify that TelStrat Engage Record could record all the calls during that time period.
All test cases were executed and passed.

MJH; Reviewed:
SPOC 4/21/2009
Solution & Interoperability Test Lab Application Notes
©2009 Avaya Inc. All Rights Reserved.
36 of 43
TelStrat_AES_CM
9. Verification Steps This section provides the steps that can be performed to verify proper configuration of Avaya
Communication Manager, Avaya Application Enablement Services, and TelStrat Engage
Record.
9.1. Verify Avaya Communication Manager
This section provides the steps required to verify the status of the link(s) to Avaya Application
Enablement Services and the CTI link.
1. Enter the status aesvcs link command. Verify the Remote IP is the IP address of the Avaya
Application Enablement Services server, the Local Node displays each CLAN used for
connectivity to Avaya Application Enablement Services, and that there is appropriate
message traffic over the links (Msgs Sent and Msgs Rcvd).
status aesvcs link
AE SERVICES LINK STATUS
Srvr/ AE Services Remote IP Remote Local Node Msgs Msgs
Link Server Port Sent Rcvd
01/01 aeserver25 192. 45. 88. 25 56300 CLAN2 207 192
01/02 aeserver25 192. 45. 88. 25 56302 CLAN4 180 180
01/03 aeserver25 192. 45. 88. 25 56304 CLAN3 180 180
2. Enter the status aesvcs cti-link command. Verify the Service State is established for the
CTI link number administered in Section 4.3.
status aesvcs cti-link
AE SERVICES CTI LINK STATUS
CTI Version Mnt AE Services Service Msgs Msgs
Link Busy Server State Sent Rcvd
1 no down 0 0
2 no down 0 0
3 no down 0 0
4 no down 0 0
5 no down 0 0
6 no down 0 0
7 no down 0 0
8 no down 0 0
9 no down 0 0
10 4 no aeserver25 established 15 15

MJH; Reviewed:
SPOC 4/21/2009
Solution & Interoperability Test Lab Application Notes
©2009 Avaya Inc. All Rights Reserved.
37 of 43
TelStrat_AES_CM
9.2. Verify Application Enablement Services
This section provides the steps required to verify the status of the TSAPI and DMCC services.
1. From the Application Enablement Services “CTI OAM Admin” web pages, navigate to
Status and Control Services Summary in the left pane menu. Verify that the State of
the TSAPI Service and the DMCC Service is ONLINE and the Cause is NORMAL.
2. Select the radio button for TSAPI Service, and click Details.
3. Verify that the Conn Status is Talking for the TSAPI link administered in Section 5.3.

MJH; Reviewed:
SPOC 4/21/2009
Solution & Interoperability Test Lab Application Notes
©2009 Avaya Inc. All Rights Reserved.
38 of 43
TelStrat_AES_CM
9.3. Verify Calls Recorded
This section provides the steps required to verify TelStrat Engage Record is recording calls and
the calls can be played back. Set up Engage Record to record calls at a few stations before
proceeding.
1. Open the TelStrat Engage Record client application by navigating from the Windows Start
menu to Start All Programs TelStrat Engage Engage Client. Log in with the
appropriate credentials:

MJH; Reviewed:
SPOC 4/21/2009
Solution & Interoperability Test Lab Application Notes
©2009 Avaya Inc. All Rights Reserved.
39 of 43
TelStrat_AES_CM
The main application window, shown below, appears after logging in.

MJH; Reviewed:
SPOC 4/21/2009
Solution & Interoperability Test Lab Application Notes
©2009 Avaya Inc. All Rights Reserved.
40 of 43
TelStrat_AES_CM
2. Navigate to Engage Status Active Calls. Place a few calls to and/or from the stations
that are being recorded. Verify the calls show up in the Active Calls list and the correct
values (e.g. DNIS, DN, Start Time, etc.) are shown for each call. Hang up the calls.

MJH; Reviewed:
SPOC 4/21/2009
Solution & Interoperability Test Lab Application Notes
©2009 Avaya Inc. All Rights Reserved.
41 of 43
TelStrat_AES_CM
3. Navigate to Engage Log Playback. Verify the calls placed in the previous step appear
in the Playback Log list and the correct values (e.g. DNIS, DN, Start Time, etc.) are shown
for each call. Double-click on one of those calls and verify the proper recording of the entire
call.
10. Conclusion These Application Notes describe the configuration steps required for TelStrat Engage Record 3.0.0
to interoperate with Avaya Communication Manager 5.1.2 and Avaya Application Enablement
Services 4.2. All feature, serviceability, and performance test cases were completed and passed.

MJH; Reviewed:
SPOC 4/21/2009
Solution & Interoperability Test Lab Application Notes
©2009 Avaya Inc. All Rights Reserved.
42 of 43
TelStrat_AES_CM
11. Additional References This section references the Avaya and TelStrat product documentation that are relevant to these
Application Notes.
The following Avaya product documentation can be found at http://support.avaya.com:
[1] Administrator Guide for Avaya Communication Manager, Issue 4, January 2008,
Document Number 03-300509
[2] Application Enablement Services Administration and Maintenance Guide, Release
4.1, Issue 9, February 2008, Document Number 02-300357
The following TelStrat product documentation was used during installation and configuration.
Customers are provided a copy of these guides with the software:
[3] TelStrat Engage Contact Center Suite Installation Guide, Product Release 3.0,
Standard 3.0, March 2009, Document Number 662-00011-01R03
[4] TelStrat Engage Contact Center Suite System Administration Guide, Standard 3.0,
Product Release 3.0, March 2009, Document Number 662-00012-01R03

MJH; Reviewed:
SPOC 4/21/2009
Solution & Interoperability Test Lab Application Notes
©2009 Avaya Inc. All Rights Reserved.
43 of 43
TelStrat_AES_CM
©2009 Avaya Inc. All Rights Reserved.
Avaya and the Avaya Logo are trademarks of Avaya Inc. All trademarks identified by ® and
™ are registered trademarks or trademarks, respectively, of Avaya Inc. All other trademarks
are the property of their respective owners. The information provided in these Application
Notes is subject to change without notice. The configurations, technical data, and
recommendations provided in these Application Notes are believed to be accurate and
dependable, but are presented without express or implied warranty. Users are responsible for
their application of any products specified in these Application Notes.
Please e-mail any questions or comments pertaining to these Application Notes along with the
full title name and filename, located in the lower right corner, directly to the Avaya
DevConnect Program at [email protected].