applications see application list inside chrysler … disassembly 95-6511 chrysler town and country...
TRANSCRIPT

APPLICATIONS
INSTALLATION INSTRUCTIONS FOR PART 95-6511
• Panel removal tool • Phillips screwdriver • Small flat blade screwdriver • Socket set
TOOLS REQUIRED
Chrysler multi-kit 2007-up95-6511
A
• A) Double DIN brackets/trim plate
KIT FEATURES
KIT COMPONENTS
• Double DIN head unit provision• Stacked ISO head unit provision
WIRING & ANTENNA CONNECTIONS (sold separately) Wiring Harness: • XSVI-6522-NAV Chrysler CAN RAP harness 2007-up• CHTO-03 Chrysler CAN AMP harness 2007-up Antenna Adapter: • 40-EU10 European antenna adapter 2002-up
See application list inside

95-6511
ApplicationsChrysler200 2011-up300/300C 2008-2010 Aspen 2008-2009Sebring 2007-2010Town and Country 2008-up
Dodge Avenger 2007-upCaliber 2009-upChallenger 2008-upCharger 2008-2010
Dodge (continued)Dakota 2008-2011Durango 2008-2010Grand Caravan 2008-upJourney** 2009-2010Magnum 2008Nitro 2007-2011Ram 1500 2009-upRam 2500/3500 2010-up
Jeep Compass 2009-up
Jeep (continued)Commander 2008-2010Grand Cherokee 2008-2010Patriot 2009-upLiberty 2008-upWrangler** 2007-2010
MitsubishiRaider 2008-2009
VWRoutan 2009-up
**(Modifications to radio cavity required)

Dash Disassembly 95-6511
Chrysler Aspen 2008-2009 Dodge Durango 2008-2010
1. Unsnap and remove storage cup holder assembly. (Figure A)
2. Remove (2) screws from bottom edge of center dash trim panel. Unsnap and remove the panel. (Figure B)
3. Remove (4) screws securing the radio. Unplug and remove radio. (Figure C)
Continue to kit assembly
POWEROUTLET
123
69
POWEROUTLET
1 2 3 4 5 6
123
1 2 3 4 5 6
69
(Figure A)
(Figure B)
(Figure C)

Dash Disassembly 95-6511
Chrysler Sebring2007-2010
1. Unclip entire panel surrounding radio including A/C vents and clock. Unplug and remove panel. (Figure A)
2. Remove (4) 7 mm screws securing radio. Unplug and remove radio. (Figure B)
Continue to kit assembly
(Figure A)
(Figure B)

Dash Disassembly 95-6511
Chrysler Town and Country 2008-2010 Dodge Grand Caravan 2008-2010
1. Remove (2) screw covers facing up above radio then remove the (2) Phillips screws exposed. (Figure A)
2. Lift up on panel above radio then remove (2) Phillips screws exposed at front edge of radio trim panel. (Figure B)
3. Remove (3) plastic push pins per side of bottom trim panel then slide panel toward rear of van to access (2) screws on bottom of radio trim panel. (Figure C)
Continued on next page
(Figure A)
(Figure B)
(Figure C)

Dash Disassembly 95-6511
Chrysler Town and Country 2008-2010 Dodge Grand Caravan 2008-2010
4. Remove (2) Phillips screws exposed at bottom edge radio trim panel. (Figure D)
5. Unclip and remove entire panel surrounding radio including climate controls, vents and clock. (Figure E)
6. Remove (4) Phillips screws securing radio. (Figure F)
Continue to kit assembly
1 2 3 4 5 6 AUX
AUX
SET
VOLUME
PUSH ON PUSH AUDIO/SELECTAM
FM
DISC
LIST
MUSIC TYPE
SEL;ECT
TUNE/SCROLL
SEEKSEEK SCAN TIME INFO RW FFU
(Figure E)
(Figure F)
(Figure D)
Dash Disassembly 95-6511
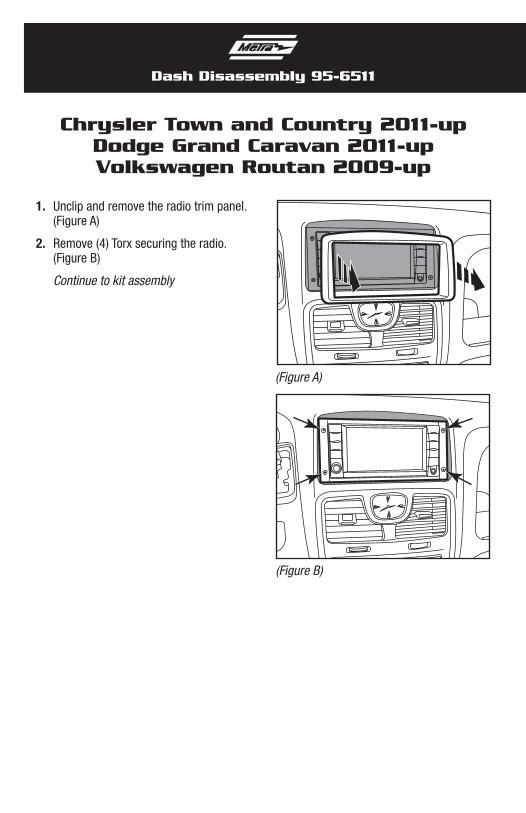
Chrysler Town and Country 2011-up Dodge Grand Caravan 2011-upVolkswagen Routan 2009-up
1. Unclip and remove the radio trim panel. (Figure A)
2. Remove (4) Torx securing the radio. (Figure B)
Continue to kit assembly
(Figure A)
(Figure B)

Dash Disassembly 95-6511
1. Unclip and remove the radio trim panel. (Figure A)
2. Remove (4) Torx securing the radio. (Figure B)
Continue to kit assembly
Chrysler 200 2011-up
(Figure A)
(Figure B)

Dash Disassembly 95-6511
1. Unsnap and remove center dash trim panel. (Figure A)
2. Remove (4) screws securing the radio. Disconnect and remove the radio. (Figure B)
Continue to kit assembly
Chrysler 300/300C 2008-2010 Dodge Magnum 2008
Dodge Charger 2008-2010
1 2 3 4 5 6
1 2 3 4 5 6
(Figure A)
(Figure B)

Dash Disassembly 95-6511
Dodge Avenger 2007-up
1 2 3 4 5 6 AUX
AUX
SET
VOLUME
PUSH ON PUSH AUDIO/SELECTAM
FM
DISC
LIST
MUSIC TYPE
SEL;ECT
TUNE/SCROLL
SEEKSEEK SCAN TIME INFO RW FFU
(Figure C)
(Figure D)
(Figure B)
(Figure A)
1. Unclip and remove the center console trim panel. (Figure A)
2. Unclip the center dash trim panel. (Figure B)
3. Remove (4) screws securing the radio. Disconnect and remove the radio. (Figure C)
4. Remove (3) screws securing the radio rear support bracket and remove the bracket. (Figure D)
Continue to kit assembly

Dash Disassembly 95-6511
1. Unclip and remove the trim panel surrounding the radio. (Figure A)
2. Remove (4) Phillips screws securing the radio. (Figure B)
Continue to kit assembly
Dodge Dakota 2008-2011
1 2 3 4 5 6 AUX
AUX
SET
VOLUME
PUSH ON PUSH AUDIO/SELECTAM
FM
DISC
LIST
MUSIC TYPE
SEL;ECT
TUNE/SCROLL
SEEKSEEK SCAN TIME INFO RW FFU
(Figure A)
(Figure B)
Dash Disassembly 95-6511
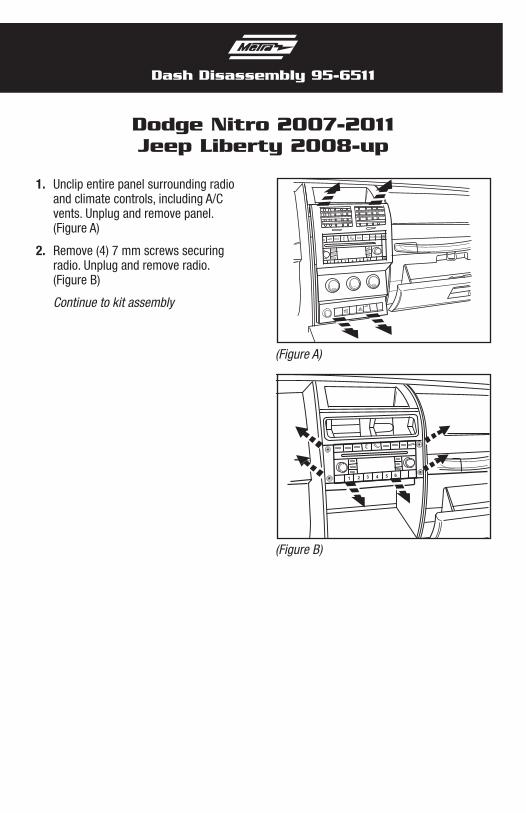
Dodge Nitro 2007-2011 Jeep Liberty 2008-up
61 2 3 4 5
2 3 4 5 61
(Figure B)
(Figure A)
1. Unclip entire panel surrounding radio and climate controls, including A/C vents. Unplug and remove panel. (Figure A)
2. Remove (4) 7 mm screws securing radio. Unplug and remove radio. (Figure B)
Continue to kit assembly

Dash Disassembly 95-6511
1. Unclip and remove the entire factory radio trim panel including the A/C controls. (Figure A)
TIP: Open the compartment door at the top of the radio trim panel.
2. Remove (4) 7 mm screws securing radio to dash to remove. (Figure B)
NOTE: The top of the metal bracket in the sub dash will need to be cut to allow for the clearance of the Double DIN radio’s chassis. (Figure C)
Continue to kit assembly
Dodge Journey 2009-2010(Modifications to radio cavity required)
1 2 3 4 5 6 AUX
AUX
SET
VOLUME
PUSH ON PUSH AUDIO/SELECTAM
FM
DISC
LIST
MUSIC TYPE
SEL;ECT
TUNE/SCROLL
PUSH PUSH
OFF
PUSH
OUTLET
POWEROUTLET
1 2 3 4 5 6 AUX
AUX
SET
VOLUME
PUSH ON PUSH AUDIO/SELECTAM
FM
DISC
LIST
MUSIC TYPE
SEL;ECT
TUNE/SCROLL
SEEKSEEK SCAN TIME INFO RW FFU
POWEROUTLET
(Figure A)
(Figure B)
(Figure C)

Dash Disassembly 95-6511
Dodge Caliber 2009-up Dodge Challenger 2009-up
Jeep Compass 2009-up Jeep Patriot 2009-up
(Figure A)
1. Unsnap and move shifter trim to the side. (Figure A)
2. Unsnap center dash trim panel (do not remove until climate controls are removed). (Figure A)
3. Remove (4) Phillips screws holding climate control panel to backside of the center dash panel.
4. Remove (4) 7 mm screws securing radio. Unplug and remove radio.
5. The metal bracket in the sub-dash will need to be removed for the aftermarket Double DIN radio’s depth.
Continue to kit assembly
Dash Disassembly 95-6511
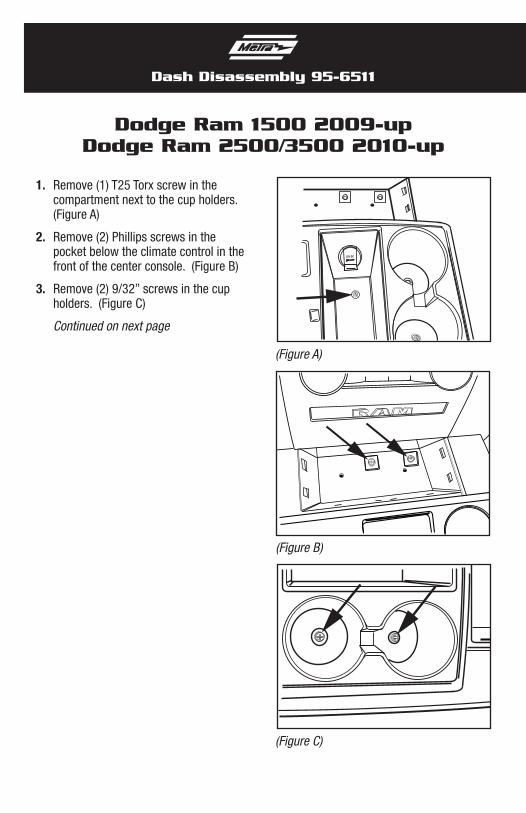
1. Remove (1) T25 Torx screw in the compartment next to the cup holders. (Figure A)
2. Remove (2) Phillips screws in the pocket below the climate control in the front of the center console. (Figure B)
3. Remove (2) 9/32” screws in the cup holders. (Figure C)
Continued on next page
Dodge Ram 1500 2009-up Dodge Ram 2500/3500 2010-up
12V DC
(Figure A)
(Figure B)
(Figure C)

Dash Disassembly 95-6511
Dodge Ram 1500 2009-up Dodge Ram 2500/3500 2010-up
115V AC 150W
P R N D
115V AC 150W
(Figure E)
(Figure D)
(Figure F)
4. Push down on the collar below the shifter then pull the shifter straight up to remove. (Figure D)
5. Unclip and remove the top of the center console including the cup holders. (Figure E)
6. Unclip and remove the trim panel from the accessory socket on the radio trim panel, then remove (1) T25 Torx screw. (Figure F)
Continued on next page

Dash Disassembly 95-6511
7. Remove (2) T25 Torx screws from the top of the radio trim panel. (Figure G)
8. Unclip and remove the entire radio trim panel including the climate controls. (Figure H)
9. Remove (4) 9/32” screws securing the radio. (Figure I)
Continue to kit assembly
Dodge Ram 1500 2009-up Dodge Ram 2500/3500 2010-up
115V AC 150W
(Figure G)
(Figure H)
(Figure I)

Dash Disassembly 95-6511
Jeep Commander/Grand Cherokee 2008-2010
POWEROUTLET
1 2 3 4 5 6 AUX
AUX
SET
VOLUME
PUSH ON PUSH AUDIO/SELECTAM
FM
DISC
LIST
MUSIC TYPE
SEL;ECT
TUNE/SCROLL
SEEKSEEK SCAN TIME INFO RW FFU
(Figure C)
(Figure D)(Figure A)
(Figure B)
1. Unsnap and remove the small trim around the console shifter. (Figure A)
2. Unsnap and remove the larger trim around the console shifter. (Figure B)
3. Remove (1) Phillips screw from inside the small storage pocket in the lower dash, between the power outlets. (Figure C)
4. Unsnap and remove the dash panel from around the radio (including climate controls). (Figure D)
5. Remove (4) Phillips screws securing the radio. Unplug and remove radio.
Continue to kit assembly

Dash Disassembly 95-6511
1. Unclip and remove the lower center trim below A/C controls. (Figure A)
2. Remove (2) Phillips screws exposed behind lower center panel. (Figure A)
3. Unclip and remove the upper center trim starting towards the rear of the panel. (Figure A)
4. Remove (2) Phillips screws exposed behind upper center panel. (Figure A)
5. Unclip and remove entire panel surrounding radio and climate controls, including A/C vents.
6. Remove (4) 7 mm screws securing radio. Unplug and remove radio. (Figure B)
NOTE: The top of the metal bracket in the sub dash will need to be cut to allow for the clearance of the Double DIN radio’s chassis.
Continue to kit assembly
Jeep Wrangler 2007-2010(Modifications to radio cavity required)
1 2 3 4 5 6
(Figure A)
(Figure B)
Dash Disassembly 95-6511
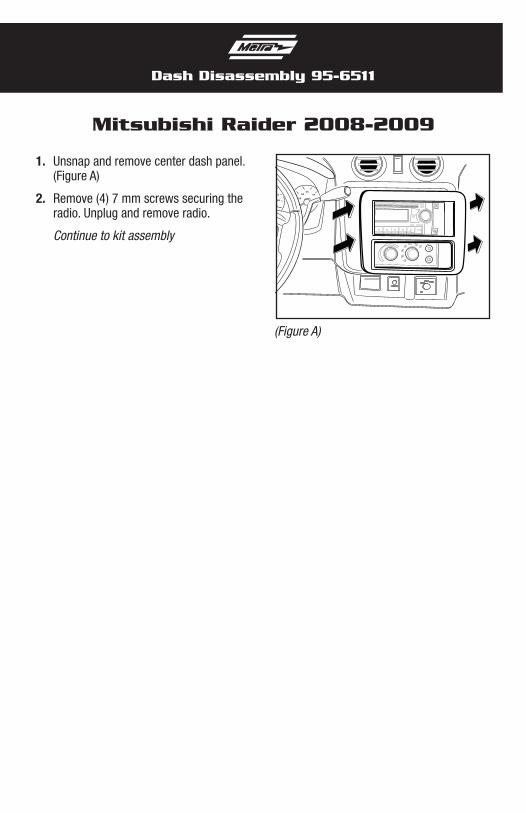
Mitsubishi Raider 2008-2009
(Figure A)
1. Unsnap and remove center dash panel. (Figure A)
2. Remove (4) 7 mm screws securing the radio. Unplug and remove radio.
Continue to kit assembly

Kit Assembly 95-6511
Double DIN head unit provision
Stacked ISO head unit provision
(Figure A)
(Figure A)
1. Locate the factory wiring harness in the dash. Metra recommends using the proper mating adapter from Metra or AXXESS. Re-connect the negative battery terminal and test the unit for proper operation.
2. Attach the Double DIN brackets/trim plates to the Double DIN radio using the screws supplied with the radio. (Figure A)
3. Reassemble dash in reverse order of disassembly.
1. Locate the factory wiring harness in the dash. Metra recommends using the proper mating adapter from Metra or AXXESS. Re-connect the negative battery terminal and test the unit for proper operation.
2. Attach the Double DIN brackets/trim plates to the stacked ISO units using the screws supplied with the units. (Figure A)
3. Reassemble dash in reverse order of disassembly.

APLICACIONES
INSTRUCCIONES DE INSTALACIÓN PARA LA PIEZA 95-6511
• Herramienta de remoción de panel • Destornillador Phillips• Destornillador de hoja plana pequeño • Conjunto de receptáculo
HERRAMIENTAS REQUERIDAS
Chrysler multi-kit 2007 y mas95-6511
A
• A) Soportes doble DIN/placa de moldura
CARACTERÍSTICAS DEL KIT
COMPONENTES DEL KIT
• Provisión de unidad central doble DIN• Provisión de unidad central ISO vertical
Lista de aplicaciones dentro
CABLEADO Y CONEXIONES DE ANTENA (se venden por separado)Arnés de cableado:• XSVI-6522-NAV - Arnés Chrysler CAN RAP 2007 y mas• CHTO-03 - Arnés Chrysler CAN con amplificador 2007 y masAdaptador de antena: • 40-EU10 - Adaptador de antena europeo 2002 y mas
Desmontaje del tablero 95-6511
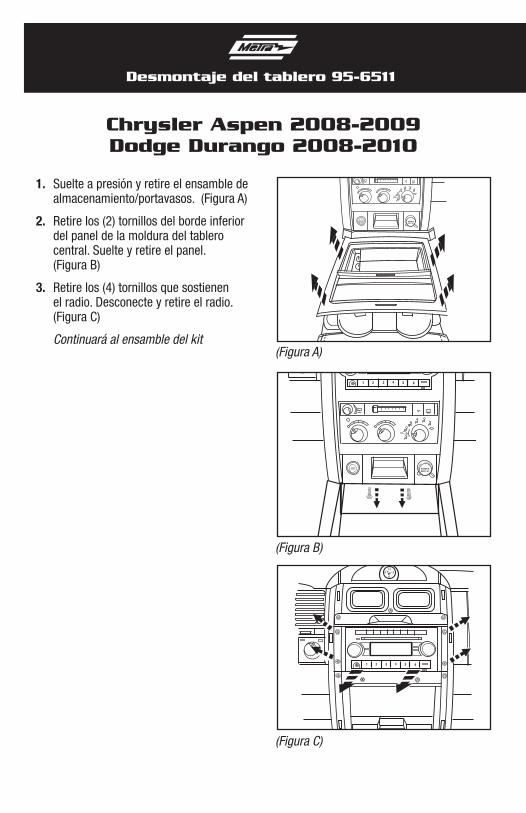
Chrysler Aspen 2008-2009 Dodge Durango 2008-2010
1. Suelte a presión y retire el ensamble de almacenamiento/portavasos. (Figura A)
2. Retire los (2) tornillos del borde inferior del panel de la moldura del tablero central. Suelte y retire el panel. (Figura B)
3. Retire los (4) tornillos que sostienen el radio. Desconecte y retire el radio. (Figura C)
Continuará al ensamble del kit
POWEROUTLET
123
69
POWEROUTLET
1 2 3 4 5 6
123
1 2 3 4 5 6
69
(Figura A)
(Figura B)
(Figura C)

Desmontaje del tablero 95-6511
Chrysler Sebring2007-2010
1. Desenganche todo el panel que rodea el radio, incluyendo las rejillas del aire acondicionado y el reloj. Desconecte y retire el panel. (Figura A)
2. Retire los (4) tornillos de 7 mm que sostienen el radio. Desconecte y retire el radio. (Figura B)
Continuará al ensamble del kit
(Figura A)
(Figura B)
Desmontaje del tablero 95-6511
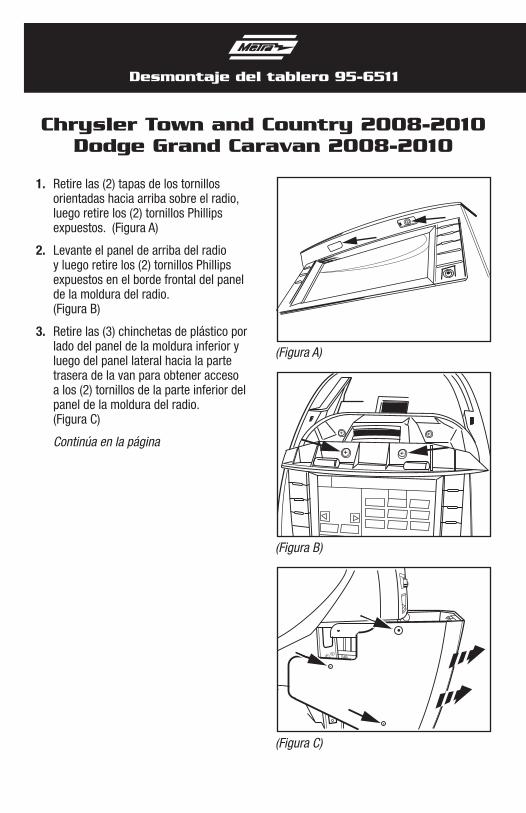
Chrysler Town and Country 2008-2010 Dodge Grand Caravan 2008-2010
1. Retire las (2) tapas de los tornillos orientadas hacia arriba sobre el radio, luego retire los (2) tornillos Phillips expuestos. (Figura A)
2. Levante el panel de arriba del radio y luego retire los (2) tornillos Phillips expuestos en el borde frontal del panel de la moldura del radio. (Figura B)
3. Retire las (3) chinchetas de plástico por lado del panel de la moldura inferior y luego del panel lateral hacia la parte trasera de la van para obtener acceso a los (2) tornillos de la parte inferior del panel de la moldura del radio. (Figura C)
Continúa en la página
(Figura A)
(Figura B)
(Figura C)
Desmontaje del tablero 95-6511
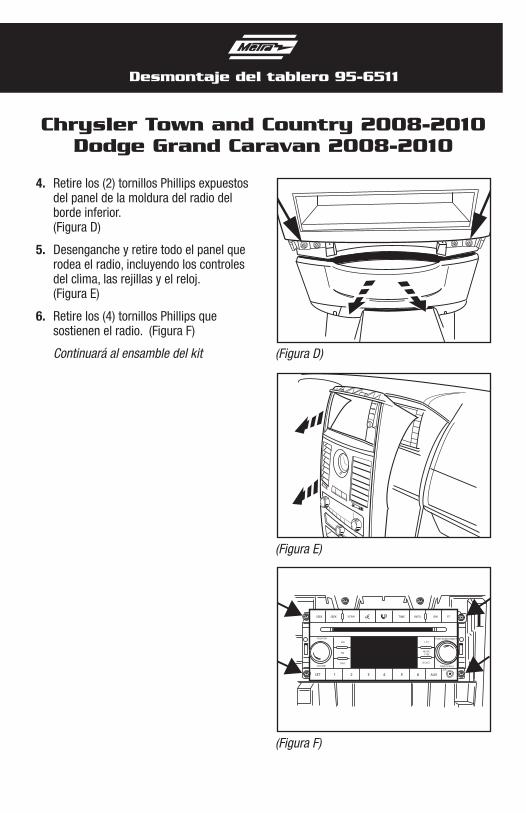
Chrysler Town and Country 2008-2010 Dodge Grand Caravan 2008-2010
4. Retire los (2) tornillos Phillips expuestos del panel de la moldura del radio del borde inferior. (Figura D)
5. Desenganche y retire todo el panel que rodea el radio, incluyendo los controles del clima, las rejillas y el reloj. (Figura E)
6. Retire los (4) tornillos Phillips que sostienen el radio. (Figura F)
Continuará al ensamble del kit
1 2 3 4 5 6 AUX
AUX
SET
VOLUME
PUSH ON PUSH AUDIO/SELECTAM
FM
DISC
LIST
MUSIC TYPE
SEL;ECT
TUNE/SCROLL
SEEKSEEK SCAN TIME INFO RW FFU
(Figura E)
(Figura F)
(Figura D)
Desmontaje del tablero 95-6511
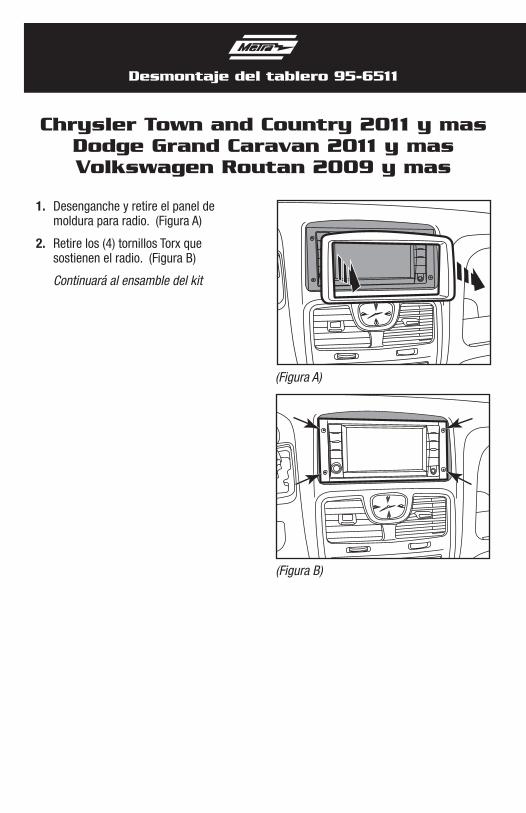
Chrysler Town and Country 2011 y mas Dodge Grand Caravan 2011 y masVolkswagen Routan 2009 y mas
1. Desenganche y retire el panel de moldura para radio. (Figura A)
2. Retire los (4) tornillos Torx que sostienen el radio. (Figura B)
Continuará al ensamble del kit
(Figura A)
(Figura B)

Desmontaje del tablero 95-6511
1. Desenganche y retire el panel de moldura para radio. (Figura A)
2. Retire los (4) tornillos Torx que sostienen el radio. (Figura B)
Continuará al ensamble del kit
Chrysler 200 2011 y mas
(Figura A)
(Figura B)

Desmontaje del tablero 95-6511
1. Suelte a presión y retire el panel de la moldura del tablero central. (Figura A)
2. Retire los (4) tornillos que sostienen el radio. Desconecte y retire el radio. (Figura B)
Continuará al ensamble del kit
Chrysler 300/300C 2008-2010 Dodge Magnum 2008
Dodge Charger 2008-2010
1 2 3 4 5 6
1 2 3 4 5 6
(Figura A)
(Figura B)

Desmontaje del tablero 95-6511
Dodge Avenger 2007 y mas
1 2 3 4 5 6 AUX
AUX
SET
VOLUME
PUSH ON PUSH AUDIO/SELECTAM
FM
DISC
LIST
MUSIC TYPE
SEL;ECT
TUNE/SCROLL
SEEKSEEK SCAN TIME INFO RW FFU
(Figura C)
(Figura D)
(Figura B)
(Figura A)
1. Desenganche y retire el panel de la moldura de la consola central. (Figura A)
2. Desenganche el panel de la moldura del tablero central. (Figura B)
3. Retire los (4) tornillos que sostienen el radio. Desconecte y retire el radio. (Figura C)
4. Retire los (3) tornillos que sujetan el soporte de apoyo trasero del radio y retire el soporte. (Figura D)
Continuará al ensamble del kit

Desmontaje del tablero 95-6511
1. Desenganche y retire el panel de moldura que rodea el radio. (Figura A)
2. Retire los (4) tornillos Phillips que sostienen el radio. (Figura B)
Continuará al ensamble del kit
Dodge Dakota 2008-2011
1 2 3 4 5 6 AUX
AUX
SET
VOLUME
PUSH ON PUSH AUDIO/SELECTAM
FM
DISC
LIST
MUSIC TYPE
SEL;ECT
TUNE/SCROLL
SEEKSEEK SCAN TIME INFO RW FFU
(Figura A)
(Figura B)

Desmontaje del tablero 95-6511
Dodge Nitro 2007-2011 Jeep Liberty 2008 y mas
61 2 3 4 5
2 3 4 5 61
(Figura B)
(Figura A)
1. Desenganche todo el panel que rodea el radio y los controles del clima, incluyendo las rejillas del aire acondicionado. Desconecte y retire el panel. (Figura A)
2. Retire los (4) tornillos de 7 mm que sostienen el radio. Desconecte y retire el radio. (Figura B)
Continuará al ensamble del kit
Desmontaje del tablero 95-6511
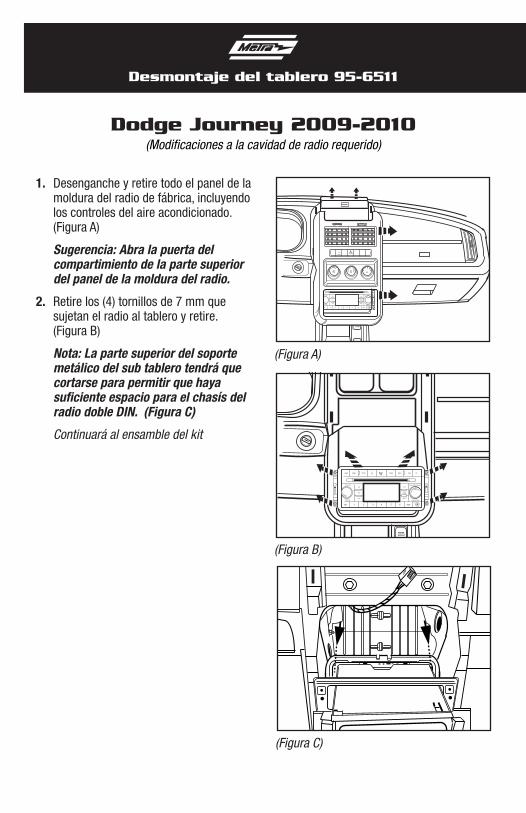
1. Desenganche y retire todo el panel de la moldura del radio de fábrica, incluyendo los controles del aire acondicionado. (Figura A)
Sugerencia: Abra la puerta del compartimiento de la parte superior del panel de la moldura del radio.
2. Retire los (4) tornillos de 7 mm que sujetan el radio al tablero y retire. (Figura B)
Nota: La parte superior del soporte metálico del sub tablero tendrá que cortarse para permitir que haya suficiente espacio para el chasís del radio doble DIN. (Figura C)
Continuará al ensamble del kit
Dodge Journey 2009-2010(Modificaciones a la cavidad de radio requerido)
1 2 3 4 5 6 AUX
AUX
SET
VOLUME
PUSH ON PUSH AUDIO/SELECTAM
FM
DISC
LIST
MUSIC TYPE
SEL;ECT
TUNE/SCROLL
PUSH PUSH
OFF
PUSH
OUTLET
POWEROUTLET
1 2 3 4 5 6 AUX
AUX
SET
VOLUME
PUSH ON PUSH AUDIO/SELECTAM
FM
DISC
LIST
MUSIC TYPE
SEL;ECT
TUNE/SCROLL
SEEKSEEK SCAN TIME INFO RW FFU
POWEROUTLET
(Figura A)
(Figura B)
(Figura C)

Desmontaje del tablero 95-6511
Dodge Caliber 2009 y mas Dodge Challenger 2009 y mas
Jeep Compass 2009 y mas Jeep Patriot 2009 y mas
(Figura A)
1. Suelte y mueva la moldura de la palanca de velocidades a un lado. (Figura A)
2. Suelte el panel de la moldura del tablero central (no lo retire hasta que se hayan retirado los controles de clima). (Figura A)
3. Retire los (4) tornillos Phillips que sostienen el panel de control de clima a la parte posterior del panel del tablero central.
4. Retire los (4) tornillos de 7 mm que sostienen el radio. Desconecte y retire el radio.
5. El soporte metálico del sub tablero tendrá que retirarse por la profundidad del radio doble DIN de mercado secundario.
Continuará al ensamble del kit

Desmontaje del tablero 95-6511
1. Retire (1) tornillo Torx T25 del compartimiento junto a los portavasos. (Figura A)
2. Retire los (2) tornillos Phillips de la cavidad debajo del control de clima al frente de la consola central. (Figura B)
3. Retire los (2) tornillos de 9/32” de los portavasos. (Figura C)
Continúa en la página
Dodge Ram 1500 2009 y mas Dodge Ram 2500/3500 2010 y mas
12V DC
(Figura A)
(Figura B)
(Figura C)

Desmontaje del tablero 95-6511
Dodge Ram 1500 2009 y mas Dodge Ram 2500/3500 2010 y mas
115V AC 150W
P R N D
115V AC 150W
(Figura E)
(Figura D)
(Figura F)
4. Empuje hacia abajo el collar debajo de la palanca de velocidades, luego jale la palanca en línea recta hacia arriba para retirarla. (Figura D)
5. Desenganche y retire la parte superior de la consola central, incluyendo los portavasos. (Figura E)
6. Desenganche y retire el panel de la moldura del receptáculo de accesorios en el panel de la moldura del radio, luego retire (1) tornillo Torx T25. (Figura F)
Continúa en la página

Desmontaje del tablero 95-6511
7. Retire los (2) tornillos Torx T25 de la parte superior del panel de la moldura del tablero. (Figura G)
8. Desenganche y retire todo el panel de la moldura del radio, incluyendo los controles del clima. (Figura H)
9. Retire los (4) tornillos de 9/32” que sostienen el radio. (Figura I)
Continuará al ensamble del kit
Dodge Ram 1500 2009 y mas Dodge Ram 2500/3500 2010 y mas
115V AC 150W
(Figura G)
(Figura H)
(Figura I)

Desmontaje del tablero 95-6511
Jeep Commander/Grand Cherokee 2008-2010
POWEROUTLET
1 2 3 4 5 6 AUX
AUX
SET
VOLUME
PUSH ON PUSH AUDIO/SELECTAM
FM
DISC
LIST
MUSIC TYPE
SEL;ECT
TUNE/SCROLL
SEEKSEEK SCAN TIME INFO RW FFU
(Figura C)
(Figura D)(Figura A)
(Figura B)
1. Suelte a presión y retire la moldura pequeña de alrededor de la palanca de velocidades de la consola. (Figura A)
2. Suelte a presión y retire la moldura más grande alrededor de la palanca de velocidades de la consola. (Figura B)
3. Retire (1) tornillo Phillips del interior de la pequeña cavidad de almacenamiento del tablero inferior, entre los tomacorrientes. (Figura C)
4. Suelte a presión y retire el panel del tablero de alrededor del radio (incluyendo los controles del clima). (Figura D)
5. Retire los (4) tornillos Phillips que sostienen el radio. Desconecte y retire el radio.
Continuará al ensamble del kit

Desmontaje del tablero 95-6511
1. Desenganche y retire la moldura central inferior debajo de los controles del aire acondicionado. (Figura A)
2. Retire los (2) tornillos Phillips expuestos detrás del panel central inferior. (Figura A)
3. Desenganche y retire la moldura central superior, empezando hacia la parte trasera del panel. (Figura A)
4. Retire los (2) tornillos Phillips expuestos detrás del panel central superior. (Figura A)
5. Desenganche y retire todo el panel que rodea el radio y los controles del clima, incluyendo las rejillas del aire acondicionado.
6. Retire los (4) tornillos de 7 mm que sostienen el radio. Desconecte y retire el radio. (Figura B)
Nota: La parte superior del soporte metálico del sub tablero tendrá que cortarse para permitir que haya suficiente espacio para el chasís del radio doble DIN.
Continuará al ensamble del kit
Jeep Wrangler 2007-2010(Modificaciones a la cavidad de radio requerido)
1 2 3 4 5 6
(Figura A)
(Figura B)
Desmontaje del tablero 95-6511
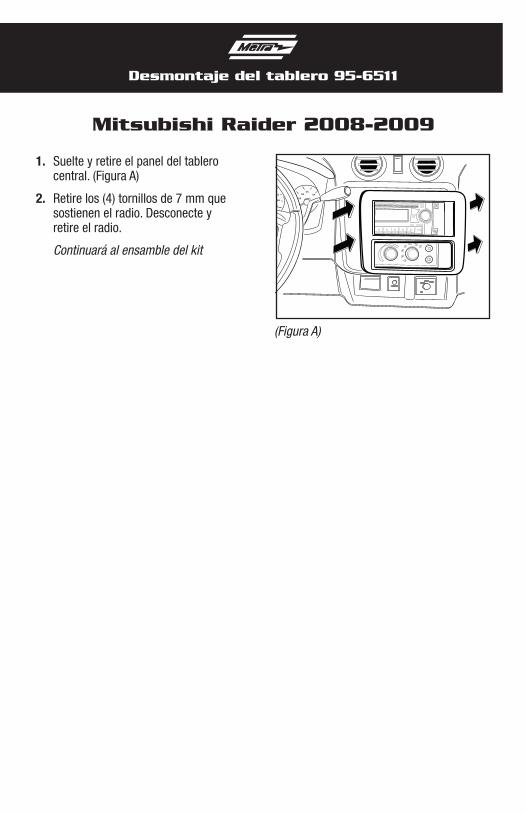
Mitsubishi Raider 2008-2009
(Figura A)
1. Suelte y retire el panel del tablero central. (Figura A)
2. Retire los (4) tornillos de 7 mm que sostienen el radio. Desconecte y retire el radio.
Continuará al ensamble del kit

Ensamble del kit 95-6511
Provisión de unidad central doble DIN
Provisión de unidad central ISO vertical
(Figura A)
(Figura A)
1. Ubique el arnés del cableado de fábrica en el tablero. Metra recomienda usar el adaptador de acoplamiento adecuado de Metra o AXXESS. Vuelva a conectar el terminal negativo de la batería y pruebe la unidad para verificar que funcione correctamente.
2. Una los soportes doble DIN/las placas de moldura al radio doble DIN con los tornillos suministrados con el radio. (Figura A)
3. Vuelva a montar el tablero en forma inversa al desmontaje.
1. Ubique el arnés del cableado de fábrica en el tablero. Metra recomienda usar el adaptador de acoplamiento adecuado de Metra o AXXESS. Vuelva a conectar el terminal negativo de la batería y pruebe la unidad para verificar que funcione correctamente.
2. Una los soportes doble DIN/las placas de moldura a las unidades ISO verticales con los tornillos suministrados con las unidades. (Figura A)
3. Vuelva a montar el tablero en forma inversa al desmontaje.
METRA ACCESSORIES STEREO DASH KITS