arcgis 10.x installation instructions - gis courses · version 10.x - arcgis for desktop student...
TRANSCRIPT

ArcGIS 10.X Installation Instructions To install ArcGIS on a WINDOWS Operating System (on a PC or Mac): Please follow the instructions below to activate your authorization code, download and install the software. The version you install is up to you. The lab instructions and videos are using 10.2 & 10.3. We have 10.4 installed on the Lab computers. The functions that we are using in class are the same on 10.2, 10.3 & 10.4. The newest release has new features but we are not using them in this “introductory” class. My suggestion is use 10.4.1 as it is the newest and might have early bugs fixed. Below is the “official instructions from ESRI” to authorize, download and install the software. Following the brief ESRI notes I have included step by step screen shots of the entire installation process for your reference. Thanks Andy Jenks [email protected]
Version 10.x - ArcGIS for Desktop Student Trial software Instructions
A. Before you install ArcGIS for Desktop
1. Check our system requirements to make sure your computer has the hardware and software required for the trial.
B. Activate your authorization code
2. Visit www.esri.com/educationedition to begin the process of activating and downloading your ArcGIS for Desktop Student Trial software.
3. Log in using your Existing Esri account, or sign-up for a new Esri account, if necessary.
4. Enter the authorization code and click Activate ArcGIS.
a. If you need to download ArcGIS for Desktop, proceed to step 5.
b. If you received the ArcGIS for Desktop software from your instructor or license administrator, or will be installing from a network server, proceed to step 10.
5. Click the button for the ArcGIS for Desktop software version being activated.

C. Download and install ArcGIS for Desktop Student Trial
6. If necessary, download the ArcGIS Uninstall Utility and uninstall previous versions of ArcGIS Desktop or Server. The software cannot be installed on a computer that has a previous version of ArcGIS for Desktop or ArcGIS for Server installed. It's OK if the computer has ArcGIS Explorer installed.
7. If necessary, install the Microsoft .NET Framework (version 3.5 Service Pack 1 or higher).
a. If you are unsure if you have the .NetFramework installed, you can download a .net Version detector from the following site - http://www.asoft.be/prod_netver.html.
8. Determine the location for the ArcGIS for Desktop software you wish to install and click the Download button. You can also download the Tutorial Data, if desired.
9. Double-click ArcGIS_Desktop_10XXXXXXX.exe (Depending on the version you selected, the file extensions may be different) to extract the installation files.
10. Locate and run Setup.exe to install ArcGIS for Desktop. The “Complete” installation is recommended.
11. After the files are installed, the Authorization Wizard will open and prompt you to choose a product to authorize; select “ArcGIS Desktop Advanced (Single Use)” and click continue.
12. The Authorization Wizard will prompt you for an authorization code; enter your activated code. Follow the prompts and the software will authorize and be ready for use. Note: leave the default option for the software extensions selected; they will be authorized automatically.
Support for the ArcGIS Desktop Student Trial is available at esri.com/trialhelp.

SCREEN SHOTS FROM THE SET UP/INSTALL PROCESS
Here is the link to check your system system requirements
Here is the link: www.esri.com/StudentEdition
Or version 10.3 or 10.4; you choose the version; the functions we are using are same on these versions. My recommendation is get the newest (10.4.1) but realize the basic functions are similar on all the 10.x releases

It then sends and Email to your account:

You get an Email with this message. Select Activate Your Account
Fill in your information; create a user name and password. See my example below; list the UMN address but your phone number.

Then sign in with you ESRI username and password

Enter the code sent by the instructor
Select the newest version (but any version will do)
Note: These instructions were created with ArcGIS 10.2 and the class lab instructions were written with 10.1, 10.2 & 10.3 versions. My suggestion is use 10.4.1 as it is the newest. It is always best to use the newest version but remember for our instructional purpose the versions are pretty much the same.

The software will down load to your computer. Run it after down load


This step took 20 minutes on my computer

If the ArcGIS Administrator Wizard does not start, go to the Start Menu and find ArcGIS and run ArcGIS Administrator and select Desktop and Advanced (Arcinfo) Single user then click Authorize Now…

Fill in as below with your name and email/phone but UMN address
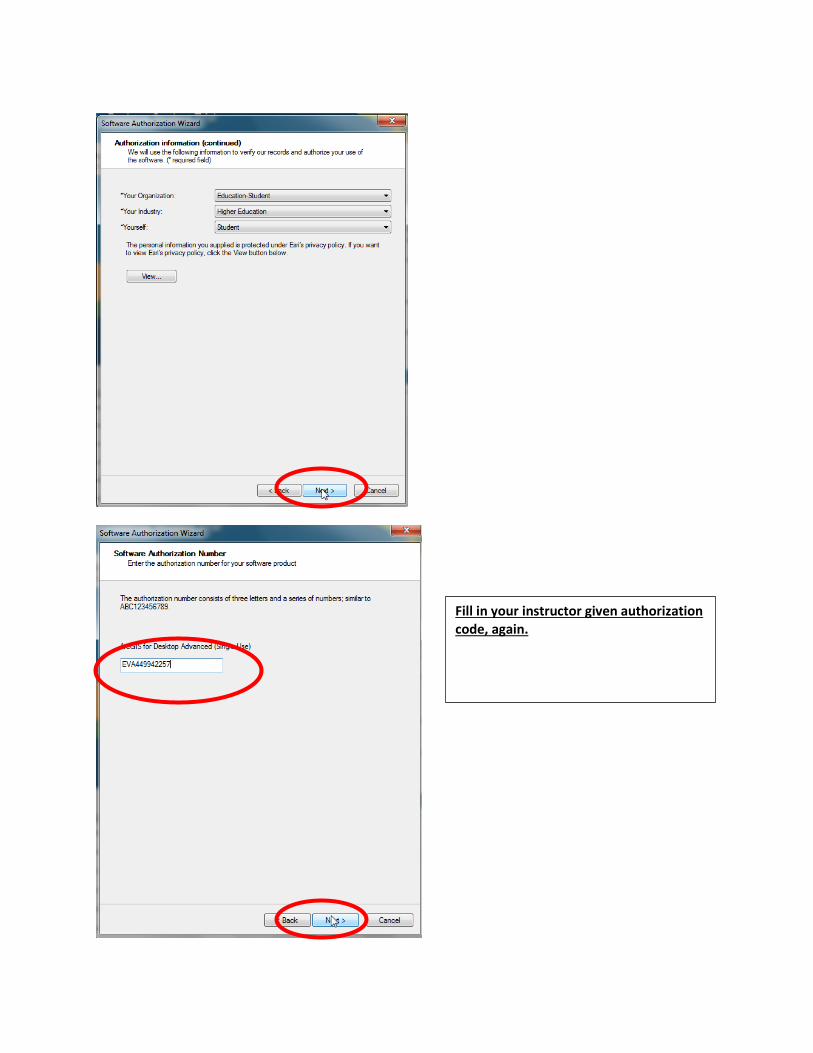
Fill in your instructor given authorization code, again.

Fill in your instructor given authorization code, again here too


Start ArcMAP and set up the Extensions and Toolbars


Add these Toolbars and after adding move this around as below. Toolbars can be anywhere you want but this approach basically follows the class instructions sheets.
