arduino networking - · pdf file27.05.2003 · table of contents arduino networking...
TRANSCRIPT


ArduinoNetworking

TableofContents
ArduinoNetworking
Credits
AbouttheAuthor
AbouttheReviewers
www.PacktPub.com
Supportfiles,eBooks,discountoffers,andmore
Whysubscribe?
FreeaccessforPacktaccountholders
Preface
Whatthisbookcovers
Whatyouneedforthisbook
Whothisbookisfor
Conventions
Readerfeedback
Customersupport
Downloadingtheexamplecode
Errata
Piracy
Questions
1.DiscovertheArduinoEthernetShield
Hardwareandsoftwarerequirements
Hardwareconfiguration
Testingyourconnection
Summary
2.SendingDatatoaWebServer
Hardwareandsoftwarerequirements
Hardwareconfiguration
Sendingdatatoaserver
Logincomingdatainadatabase

Displayingtheresults
Summary
3.DataLoggingStation
Hardwareandsoftwarerequirements
Hardwareconfiguration
LoggingdataonanSDcard
CreatingawebserveronArduino
Plottingthedatalocally
Summary
4.ControllingObjectsfromAnywhere
Hardwareandsoftwarerequirements
Hardwareconfiguration
Testingtherelay
Controllingtherelayremotely
Controllingtherelayfromanywhere
Summary
5.InternetofThingswithXively
Hardwareandsoftwarerequirements
Hardwareconfiguration
CreatingyourXivelyaccount
SendingdatatoXively
Visualizingtherecordeddata
Summary
6.LoggingDatainGoogleDocs
Hardwareandsoftwarerequirements
Hardwareconfiguration
SettingupyourGoogleAccount
CreatingyourTembooaccount
Loggingdatainaspreadsheet
Sendingautomatede-mails
Summary

Index


ArduinoNetworking


ArduinoNetworkingCopyright©2014PacktPublishing
Allrightsreserved.Nopartofthisbookmaybereproduced,storedinaretrievalsystem,ortransmittedinanyformorbyanymeans,withoutthepriorwrittenpermissionofthepublisher,exceptinthecaseofbriefquotationsembeddedincriticalarticlesorreviews.
Everyefforthasbeenmadeinthepreparationofthisbooktoensuretheaccuracyoftheinformationpresented.However,theinformationcontainedinthisbookissoldwithoutwarranty,eitherexpressorimplied.Neithertheauthor,norPacktPublishing,anditsdealersanddistributorswillbeheldliableforanydamagescausedorallegedtobecauseddirectlyorindirectlybythisbook.
PacktPublishinghasendeavoredtoprovidetrademarkinformationaboutallofthecompaniesandproductsmentionedinthisbookbytheappropriateuseofcapitals.However,PacktPublishingcannotguaranteetheaccuracyofthisinformation.
Firstpublished:August2014
Productionreference:1140814
PublishedbyPacktPublishingLtd.
LiveryPlace
35LiveryStreet
BirminghamB32PB,UK.
ISBN978-1-78398-686-6
www.packtpub.com
CoverimagebyPratyushMohanta(<[email protected]>)


CreditsAuthor
MarcoSchwartz
Reviewers
C.M.Banas
RyanDunn
PhillipMayhew
TomO’Connor
KrisjanisRijnieks
CommissioningEditor
PramilaBalan
AcquisitionEditor
HarshaBharwani
ContentDevelopmentEditor
SumeetSawant
TechnicalEditors
KunalAnilGaikwad
SiddhiRane
CopyEditors
MradulaHegde
AdithiShetty
ProjectCoordinator
DanutaJones
Proofreader
AmeeshaGreen
Indexer
RekhaNair
ProductionCoordinator
MelwynD’sa
CoverWork
MelwynD’sa


AbouttheAuthorMarcoSchwartzisanelectricalengineer,entrepreneur,andblogger.HehasaMaster’sdegreeinElectricalEngineeringandComputerSciencefromSUPELECinFrance,andaMaster’sdegreeinMicroengineeringfromEPFLinSwitzerland.
Hehasmorethan5yearsofexperienceworkinginthedomainofelectricalengineering.Hisinterestsgravitatearoundelectronics,homeautomation,theArduinoandtheRaspberryPiplatforms,opensourcehardwareprojects,and3Dprinting.
HerunsseveralwebsitesaroundArduino,includingtheOpenHomeAutomationwebsite(http://www.openhomeautomation.net/),whichisdedicatedtobuildinghomeautomationsystemsusingopensourcehardware.
Hehaswrittenanotherbook,HomeAutomationwithArduino,AmazonDigitalServices,Inc.,whichisaself-publishedKindlebook.HehasalsowrittenabookonhowtobuildInternetofThingsprojectswithArduinocalledInternetofThingswiththeArduinoYun,PacktPublishing.


AbouttheReviewersRyanDunnisasolutionsarchitect,whospecializesinwebtechnologiesandenterprise-leveldeployments.HecurrentlylivesinSouthernKansasCity,KS.
HeholdsaBachelor’sdegreeinComputerSciencefromKansasStateUniversityandaMaster’sdegreeinBusinessAdministrationfromtheUniversityofKansas.Hehasworkedforavarietyoforganizations,withhiscareerspanninganumberofindustries,includinge-commerce,digitalmarketing,SEO,education,security,andmobile.
Hehasbeenworkingwithwebtechnologiesforover10years,andduringthistime,hehasalwaysretainedanagnosticapproachtothetechnology,whichhasresultedinawiderangeofexperience.Asasolutionsarchitect,hemanageseveryaspectofsolutiondeployments,includinganalysis,networkarchitecture,systemarchitecture,creativedesign,anddevelopment.
Ihaveawife,Crystal,andtwochildren.Asaresultoftheirsupport,Ihavebeenabletopursuemypassionfortechnologyandamforevergratefulforalltheirlove.
PhillipMayhewhasaBachelorofSciencedegreeinComputerSciencefromNorthCarolinaStateUniversity.HeisthefounderandmanagingprincipalofRextencyTechnologiesLLC,whichisbasedinStatesville,NorthCarolina.Hisprimaryexpertiseliesinsoftwareapplicationperformancetestingandmonitoring.
TomO’ConnorisanexperiencedsystemsarchitectandDevOpsengineer.HelivesintheWestMidlandsintheUnitedKingdom.Overthelast8years,hehasworkedforawidevarietyofcompanies,frome-commercetovideoeffects,andnowistheownerofthecompanyhefounded,whichprovidessystemsconsultancyforwirelessnetworkdesignandinstallations.
Hewritesatechnicalblogonhiswebsitethatprovidesbothtutorialarticlesandupdatesonwhathe’sbeenworkingon.Hehaswide-reachingskillsandexperiencegatheredoverthelast10yearsofworkingonWindows,Linux,andUnixsystemsformostofthattime,coupledwithrecentexperienceindesigningandbuildinghigh-performancecomputersystems.
HeisalsoanactivememberoftheUKDevOpscommunityaswellasacommunitymoderatoronwww.serverfault.com,wherehedemonstrateshisexpertiseandskillstoawideaudience.
KrisjanisRijnieksisadigitalinteractivemediaprofessionalworkingwithprojectsthatinvolvegraphicdesign,animation,userinterfacedesign,projectionmapping,programming,andelectronics.Theoutcomeofhisprojectsusuallyarewebsites,games,andhardwareprototypesorinteractiveinstallations.Healsorunsworkshopsinthefieldofcreativecodingandprojectionmapping.Oneofhismostinterestingcurrentprojectsisthedevelopmentofanopenframeworksadd-onforprojectionmappingontheRaspberryPi—ofxPiMapper.
HeisalsoanMAstudentattheMediaLabHelsinki(AaltoUniversitySchoolofArts,

DesignandArchitecture),andheiscurrentlyworkingonhismasterthesis,whichisrelatedtotheofxPiMapperprojectionmappingsoftwareproject.
KrisjanisrunsasmalldigitalmediacompanyCodeBark(www.codebark.com)withhiscolleague,IrinaSpicaka.Together,theyalsodevelopedaplatformcalledCreativeCodingforLiveAudioandVisuals(www.cc4av.info),whichactsasaplaceholderfordifferenteventsandworkshopsrelatedtoelectronicaudiovisualculture.
HeisalsocollaboratingwiththeFabLab,Berlin,andthisiswherehespendsmostofhistimewheninBerlin.
Cinder–BeginCreativeCoding,PacktPublishing,isthefirstbookthathehasworkedon.It’sanintroductiontoCinder,theC++creativecodingframework,(similartoopenFrameworks)andcontainstutorialstogetyoustartedwithCinderasfastandpainlessaspossible.


www.PacktPub.com

Supportfiles,eBooks,discountoffers,andmoreYoumightwanttovisitwww.PacktPub.comforsupportfilesanddownloadsrelatedtoyourbook.
DidyouknowthatPacktofferseBookversionsofeverybookpublished,withPDFandePubfilesavailable?YoucanupgradetotheeBookversionatwww.PacktPub.comandasaprintbookcustomer,youareentitledtoadiscountontheeBookcopy.Getintouchwithusat<[email protected]>formoredetails.
Atwww.PacktPub.com,youcanalsoreadacollectionoffreetechnicalarticles,signupforarangeoffreenewslettersandreceiveexclusivediscountsandoffersonPacktbooksandeBooks.
http://PacktLib.PacktPub.com
DoyouneedinstantsolutionstoyourITquestions?PacktLibisPackt’sonlinedigitalbooklibrary.Here,youcanaccess,read,andsearchacrossPackt’sentirelibraryofbooks.

Whysubscribe?FullysearchableacrosseverybookpublishedbyPacktCopyandpaste,print,andbookmarkcontentOndemandandaccessibleviawebbrowser

FreeaccessforPacktaccountholdersIfyouhaveanaccountwithPacktatwww.PacktPub.com,youcanusethistoaccessPacktLibtodayandviewnineentirelyfreebooks.Simplyuseyourlogincredentialsforimmediateaccess.


PrefaceArduinoisanamazingplatformtoquicklycreateexcitingelectronicsprojects.UsingtheArduinoplatform,evennon-expertscanconnectsensors,actuators,anddisplaystogetherandbuildcomplexprojectsthatprovideimmediateapplicationsforeverydaylife.
However,theseprojectsareevenbetterwhentheyareconnected,meaningtheyhavesomewaytocommunicatewithotherdevices,andnotnecessarilywithotherArduinoboards.TherearemanywaystoconnectArduinoprojectstogetherandtootherdevicessuchascomputers:WiFi,XBee,Bluetooth,andEthernet.ThisbookwillfocusentirelyonhowtocreateamazingprojectsusingthislatesttechnologytoconnectArduinoprojects.
UsingEthernethasseveraladvantagesoverwirelesssolutions:itisfast,cheap,andyouwillfindplentyofhelponthesubjectontheInternet.Forme,themostimportantthingisthattheEthernetlibraryforArduinoisverywelldocumented,andcomesbuilt-inwiththeArduinosoftware.It’shardwarecounterpart,theArduinoEthernetshield,isalsoverywellbuiltandwellsupportedbytheArduinocommunity.
Inthisbook,wearegoingtoseehowtousetheEthernetshieldandtheEthernetlibraryviasixexcitingprojects.WearegoingtostartwiththeverybasicsandseehowtoconnecttheEthernetshieldtoyourlocalnetworkandtheWeb.Then,wewillsenddatafromtheEthernetshieldtoaserverlocatedonyourlocalnetwork.Finally,wewillintegratetheEthernetshieldinan“InternetofThings”framework,bybuildingseveralprojectsconnecteddirectlytotheWeb.

WhatthisbookcoversChapter1,DiscovertheArduinoEthernetShield,introducestheArduinoEthernetshieldbyshowingyouhowtosetupeverythingsoyoucaneasilybuildmoreexcitingapplicationsinthenextchapters.WearegoingtoconnecttheEthernetshieldtoyourrouter,andmakesurethatitcanaccesstheWeb.
Chapter2,SendingDatatoaWebServer,explainshowtoconnectatemperatureandhumiditysensortoyourArduinoboardandusetheEthernetshieldtosendthisdatacontinuouslytoawebserverrunningonyourcomputer.Wewillalsoplotthisdatainrealtimeonthewebserversothatyoucanvisualizeitinyourbrowser.
Chapter3,DataLoggingStation,usesthesamehardwareasinthepreviouschapter,butwewillmaketheArduinoEthernetmoreindependent.WewilllogthedatameasuredbytheboardlocallyonanSDcard,andalsocreateawebserverontheEthernetshieldsothatitcanbeaccessedfromanydeviceinyourlocalnetwork.
Chapter4,ControllingObjectsfromAnywhere,covershowtoconnectarelaymoduletoourArduinoandEthernetshieldhardwaresothatitcanbecontrolledviathenetwork.Wearefirstgoingtocontrolthisrelaymodulefromwithinyourlocalnetwork,andthenuseadedicatedservicetobeabletocontrolthisrelayfromanywhere.Asanexample,wearealsogoingtoconnectalamptothisrelaymodule.
Chapter5,InternetofThingswithXively,continueswithcloud-connectedprojectsbyinterfacingtheEthernetshieldwithacloudservicecalledXively.Usingthisservice,wewillbeabletosendthedatameasuredbyourprojecttotheWebandmonitoritinrealtimefromtheXivelywebsite,fromanywhereintheworld.
Chapter6,LoggingDatainGoogleDocs,usesthewebserviceTembootointerfacetheEthernetshieldwithevenmorewebservicessuchasGoogleDocsorGmail.Forexample,wearegoingtomakemeasurementsusingourArduinoboardandautomaticallylogtheseresultsinaGoogleDocsspreadsheet,whichcanbeaccessedfromanywhereintheworld.

WhatyouneedforthisbookYouwillneedseveralhardwareandsoftwarecomponentstomakealltheprojectsfoundinthisbook.Ofcourse,youcanjustreadthedescriptionoftheprojectsandlearnthisway.However,IreallyrecommendactuallydoingtheprojectsyourselftoreallylearnabouthowtousetheArduinoEthernetshieldtobuildexcitingnetworkingapplications.
Thehardwarecomponentsrequiredaredetailedatthebeginningofeachchapter.However,whatyouwillreallyneedforalltheprojectsisanArduinoboard.
AlltheprojectsofthebookarebasedontheArduinoUnoboard:
http://arduino.cc/en/Main/arduinoBoardUno
Foralltheprojectsofthisbook,youwillalsoneedtheArduinoEthernetshield:
http://arduino.cc/en/Main/ArduinoBoardEthernet
Onthesoftwareside,thereissomesoftwarethatwewilluseinallthechaptersofthebook.ThefirstsoftwarethatwewilluseinallthechaptersistheArduinoIDEthatyouneedtoinstall.Youcandownloaditfrom:
http://arduino.cc/en/main/software
TheEthernetlibraryitselfiscontainedwithintheArduinoIDE,soyouwon’tneedtoinstallityourself.Therearealsoseveralexternallibrariesyouwillneed,butthesearedetailedineachchapterwheretheyarenecessary.
Youwillalsoneedawebserverrunningonyourcomputerforsomeoftheprojects.Irecommendusingsoftwarethatintegratesawebserverandadatabase,andthathandlesallthedetailsforyou.
IfyouareworkingonWindows,IrecommendusingEasyPHP:
http://www.easyphp.org/
UnderOSX,IrecommendusingMAMP:
http://www.mamp.info/
ForLinux,youcanfollowtheinstructionsprovidedatthefollowinglinktoinstallawebserver:
http://doc.ubuntu-fr.org/lamp
Makesurethattheserverisrunningatthispoint;wearegoingtouseitinseveralprojectsinthisbook.


WhothisbookisforThisbookisforallthosewhoarewillingtobuildexcitingconnectedArduinoprojectsusingtheEthernetshield.Youactuallydon’tneedtoknowtheArduinoplatformbeforehandasalltheprojectswillbeexplainedstepbystepwithclearinstructions.Youalsodon’tneedanypriorknowledgeintheEthernettechnology.Theonlythingyouneedtounderstandistheprojectsfoundinthisbookarejustbasicknowledgeinelectronicsandprogramming.
ThisbookisalsoforelectronichobbyistswhowanttolearnmoreabouttheArduinoplatform.Byexecutingtheprojectsfoundinthisbook,youwilllearnaboutmanypossiblewaystousetheArduinoEthernetshield.YouwillalsolearnhowtoconnectsensorsandactuatorstoArduinoandcontrolthemwithinyourlocalnetwork.
Finally,thisbookisalsoforthosewhoarewillingtolearnmoreabouttheInternetofThingsframeworkusingtheArduinoEthernetshield.Thelastchaptersofthebookarededicatedtobuildingprojectsthatareconnectedtocloudservicesandcanbeaccessedfromanywhereintheworld,simplybyconnectingyourArduinoprojectstoyourInternetrouterviaEthernet.


ConventionsInthisbook,youwillfindanumberofstylesoftextthatdistinguishbetweendifferentkindsofinformation.Herearesomeexamplesofthesestylesandanexplanationoftheirmeaning.
Codewordsintext,databasetablenames,foldernames,filenames,fileextensions,pathnames,dummyURLs,userinput,andTwitterhandlesareshownasfollows:“Inthesetup()functionofthesketch,wewilltrytogetanIPaddressusingDHCP.”
Ablockofcodeissetasfollows:
Stringlog_time=String(day())+"/"+
String(month())+"/"+String(year())+""+
String(hour())+":"+String(minute())+":"+
String(second());
Anycommand-lineinputoroutputiswrittenasfollows:
#192.168.1.103/digital/7/1
Newtermsandimportantwordsareshowninbold.Wordsthatyouseeonthescreen,inmenusordialogboxesforexample,appearinthetextlikethis:“IfyouareusingWindows,youwillfindtheinformationyouneedunderNetworkSettingsinyourControlPanel.”
NoteWarningsorimportantnotesorsomeadditionalinformationappearinaboxlikethis.
TipTipsandtricksappearlikethis.


ReaderfeedbackFeedbackfromourreadersisalwayswelcome.Letusknowwhatyouthinkaboutthisbook—whatyoulikedormayhavedisliked.Readerfeedbackisimportantforustodeveloptitlesthatyoureallygetthemostoutof.
Tosendusgeneralfeedback,simplysendane-mailto<[email protected]>,andmentionthebooktitlethroughthesubjectofyourmessage.
Ifthereisatopicthatyouhaveexpertiseinandyouareinterestedineitherwritingorcontributingtoabook,seeourauthorguideonwww.packtpub.com/authors.


CustomersupportNowthatyouaretheproudownerofaPacktbook,wehaveanumberofthingstohelpyoutogetthemostfromyourpurchase.

DownloadingtheexamplecodeYoucandownloadtheexamplecodefilesforallPacktbooksyouhavepurchasedfromyouraccountathttp://www.packtpub.com.Ifyoupurchasedthisbookelsewhere,youcanvisithttp://www.packtpub.com/supportandregistertohavethefilese-maileddirectlytoyou.
Alltheup-to-datecodefortheprojectsofthisbookcanalsobefoundatthefollowingaddress:
https://github.com/openhomeautomation/arduino-networking/

ErrataAlthoughwehavetakeneverycaretoensuretheaccuracyofourcontent,mistakesdohappen.Ifyoufindamistakeinoneofourbooks—maybeamistakeinthetextorthecode—wewouldbegratefulifyouwouldreportthistous.Bydoingso,youcansaveotherreadersfromfrustrationandhelpusimprovesubsequentversionsofthisbook.Ifyoufindanyerrata,pleasereportthembyvisitinghttp://www.packtpub.com/support,selectingyourbook,clickingontheerratasubmissionformlink,andenteringthedetailsofyourerrata.Onceyourerrataareverified,yoursubmissionwillbeacceptedandtheerratawillbeuploadedtoourwebsite,oraddedtoanylistofexistingerrata,undertheErratasectionofthattitle.

PiracyPiracyofcopyrightmaterialontheInternetisanongoingproblemacrossallmedia.AtPackt,wetaketheprotectionofourcopyrightandlicensesveryseriously.Ifyoucomeacrossanyillegalcopiesofourworks,inanyform,ontheInternet,pleaseprovideuswiththelocationaddressorwebsitenameimmediatelysothatwecanpursuearemedy.
Pleasecontactusat<[email protected]>withalinktothesuspectedpiratedmaterial.
Weappreciateyourhelpinprotectingourauthors,andourabilitytobringyouvaluablecontent.

QuestionsYoucancontactusat<[email protected]>ifyouarehavingaproblemwithanyaspectofthebook,andwewilldoourbesttoaddressit.


Chapter1.DiscovertheArduinoEthernetShieldInthisfirstchapterofthebook,wewillonlyfocusonthebasicsandgetstartedwiththeArduinoEthernetshield.Inordertobuildmorecomplexprojectsinthenextchaptersofthebook,wefirstneedtobeabsolutelysurethatourshieldisfunctioningcorrectly,anditcanconnecttoourlocalnetworkandtheWeb.
Toensurethis,we’llfirstassemblethehardware,andthenbuildasimpleArduinosketchthatwillconnecttotheWeb,grabatestwebpage,anddisplayitbackinsidetheArduinoSerialMonitor.
Thesewillbethemajortakeawaysofthischapter:
First,we’llmakesurethatyouhavealltherequiredhardwareandsoftwarecomponents.WearealsogoingtoassembletheshieldandtheArduinoUnoboard,andconnecteverythingtoourlocalnetworkviaarouter.Then,wewillwritethesketchthatwillconnectyourshieldtoyourlocalnetworkaswellastheWeb,andthissketchwillgrabatestpagetomakesureyourconnectionisworkingcorrectly.Finally,wearegoingtotestthissketchandmonitorthestatusoftheEthernetshieldontheArduinoSerialMonitor.Fromthisfirsttestoftheshield,we’llbeabletotellwhethertheshieldiscorrectlyconnectedtotheInternetornot.

HardwareandsoftwarerequirementsYoudon’tneedalotofhardwareforthisfirstproject.YouonlyneedanArduinoUnoboard,andofcourse,theArduinoEthernetshield.OtherboardssuchastheArduinoMegawillworkaswellfortheprojectsinthefirstchapterofthebook,butyoumightfacedifficultiesfortheprojectsinthefollowingchaptersinthebook.Therefore,IrecommendthatyouuseanArduinoUnoboardforalltheprojectsofthisbook.
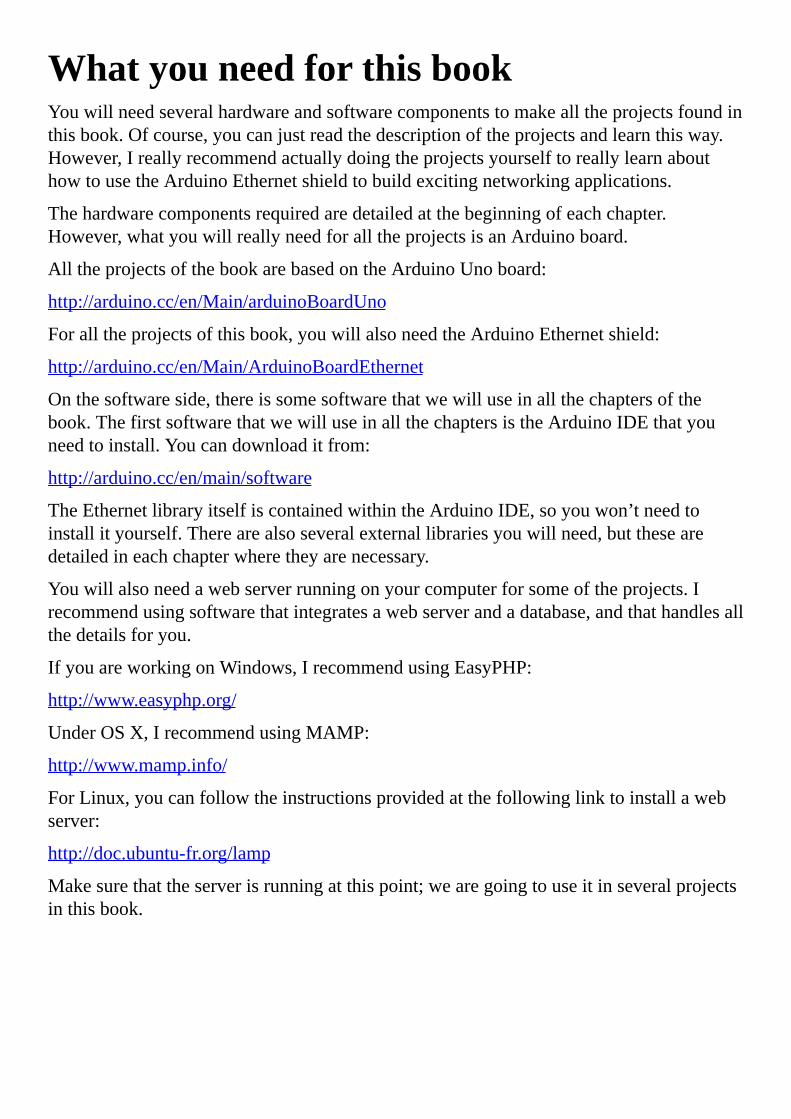
Beforeactuallyassemblingtheshieldwiththeboard,makesuretowritedowntheMACaddressoftheshield,whichiswrittenonthebackoftheshield.Wewillneeditlaterintheprojectwhenwewritethefirstsketch.
ThisisanimageoftheassembledboardandtheEthernetshield:
YouwillalsoneedaUSBBtoUSBAcabletoconnecttheArduinoboardtoyourcomputer,andanEthernetcabletoconnecttheshieldtoarouter.
Onthesoftwareside,allyouneedistheArduinoIDE,whichcanbefoundatthefollowingaddress:
http://arduino.cc/en/main/software
TheEthernetlibraryisincludedbydefaultintheArduinosoftware,soyoudon’tneedtoinstallanyadditionalcomponents.

HardwareconfigurationThehardwareconfigurationinthischapterisreallysimple.Atthispoint,youshouldalreadyhavetheArduinoEthernetshieldconnectedtoyourArduinoUnoboard.Ifthat’snotthecase,pleasedosonow.
Youthenhaveonlytwocablestoplugin:aUSBcablebetweenyourcomputerandtheArduinoUnoboardandtheEthernetcable.SimplyconnecttheUSBcabletooneportofyourcomputer.
FortheEthernetcable,youhaveseveraloptions.Theeasiestthingyoucando,whichiswhatIrecommend,istoconnecttheEthernetcabledirectlyfromtheshieldtothemainrouterofyourhome.Usually,youwillhaveaWi-Firouterinyourhome,whichyouusetoenableWi-Ficonnectivityforyourcomputerandotherdevices.ThisroutershouldalsohavesomeEthernetports,whereyoucanconnectyourEthernetshield.TheadvantageofthissolutionisthatyourshieldwillautomaticallygetanIPaddressandwillhaveaccesstotheInternetautomatically.ThisassumesthatyourrouterisconfiguredforDHCP;gotoyourroutersettingstoenableDHCP.Asthisprocedurevariesdependingonthebrandofyourrouter,refertoyourrouterdocumentationtofindouthowtodothisonyourspecificrouter.
Ifyoudon’thavearouter,youcandirectlyconnecttheEthernetcabletoyourcomputer.Idon’trecommendthisalternative,asconfiguringyourcomputertoconnecttotheshieldandsharingtheInternetconnectionwiththeshieldisreallycomplex,anditalsodependsonyouroperatingsystem.
Ifyoureallydon’thaveaccesstoarouterbutyouhaveaccesstoaWi-Finetwork,IrecommendbuyingoneofthesesmallWi-FiroutersthathaveanEthernetport.ItcanconnecttoanyWi-FinetworkinrangeandsharetheconnectionautomaticallywithotherdevicesviaEthernet.
Forexample,asshowninthefollowingimage,IrecommendtheTP-LinkMR3020router:
Thisisanimageoftheassembledhardwareforthetasksinthischapter,withtheUSB
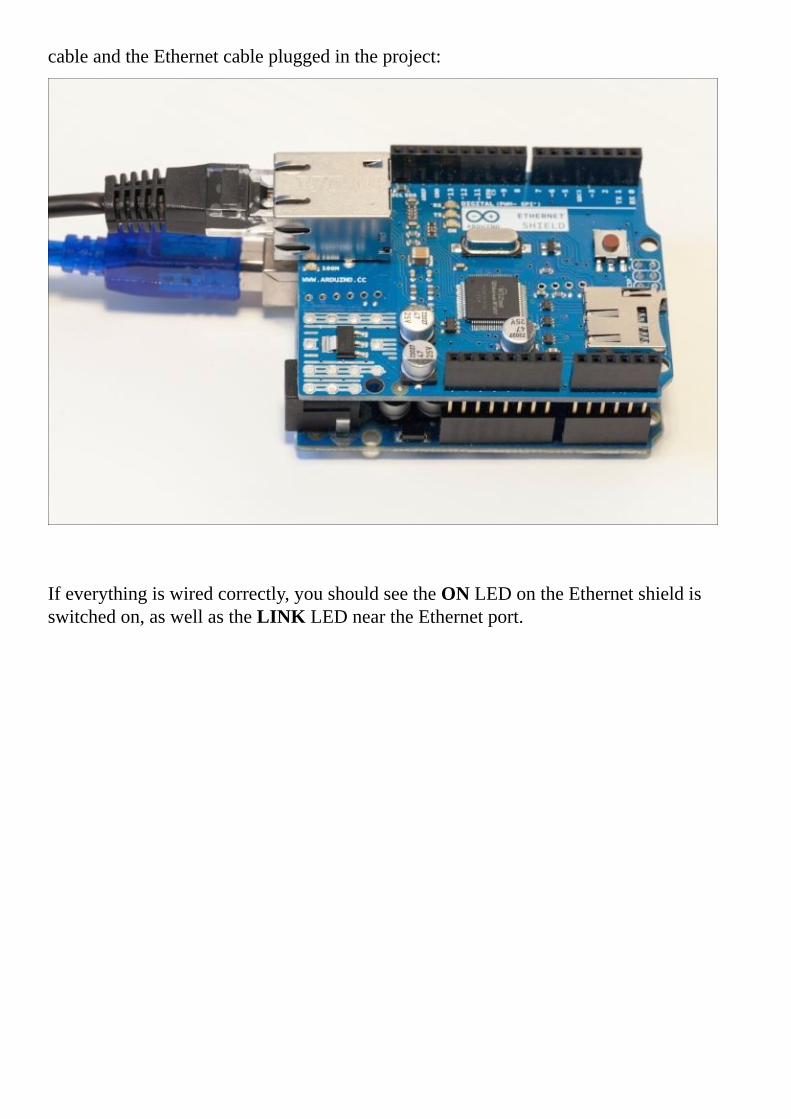
cableandtheEthernetcablepluggedintheproject:
Ifeverythingiswiredcorrectly,youshouldseetheONLEDontheEthernetshieldisswitchedon,aswellastheLINKLEDneartheEthernetport.


TestingyourconnectionNowthatthehardwareisready,wecanwriteourfirstsketchtotesttheEthernetshieldandtheconnectiontotheWeb.Notethatthepiecesofcodeshowninthissectionareonlythemostimportantpartsofthecode,andyoucanfindthecompletecodeinsidetheGitHubrepositoryofthebook.
StarttheArduinosketchbyincludingthefollowingrequiredlibrariestousetheshield:
#include<SPI.h>
#include<Ethernet.h>
TipDownloadingtheexamplecode
YoucandownloadtheexamplecodefilesforallPacktbooksyouhavepurchasedfromyouraccountathttp://www.packtpub.com.Ifyoupurchasedthisbookelsewhere,youcanvisithttp://www.packtpub.com/supportandregistertohavethefilese-maileddirectlytoyou.
Then,wehavetodefinetheMACaddressoftheEthernetshield.Thisaddressislocatedjustbehindtheshield,andyoushouldhavenoteditdownalready.Youhavetoenteritinthefollowingformat:
bytemac[]={0x90,0xA2,0xDA,0x0E,0xFE,0x40};
Wealsoneedtodefinewherewearegoingtoconnecttotesttheconnection.Youcanuseanywebpageyouwant,orevenperformasearchonGoogle,butforthisfirsttest,Iwanttouseasimplepage.
Ifoundthiswebsitewithasimpletestpagethatwe’lltrytograbwhilemakingarequestlaterinthesketch.Youcanalsosetupyourownpageifyouhaveawebserveronline,forexample,ifyouhaveabloghostedsomewhere.
Thewebsiteaddressisstoredinacharvariable:
charserver[]="www.brainjar.com";
Notethatyoucanalsouseotherpageshere,forexamplehttp://www.example.com/hello.
TheEthernetshieldwillthenautomaticallygettheIPaddressofthiswebsite.
TogetanIPaddressfortheEthernetshielditself,we’lluseDHCPtoautomaticallygetonefromtherouterweareconnectedto.However,ifDHCPfails,weneedtoassignadefaultaddresstotheshield.
ThisisstoredinanIPAddressvariable.Notethatyoucanputanythingyouwantinsidethisvariable.Asforthisfirstproject,wereallyneedDHCPtoworktogetconnectedtotheWeb.However,itisagoodpracticetospecifyanIPaddressinthesamesubnetasyourrouter,sotheshieldcanatleastconnecttoyourlocalnetwork.Forexample,theIPaddress

ofmycomputerwas192.168.1.100,soIspecifiedasimilarIPaddressfortheshield:
IPAddressip(192,168,1,50);
WecannowcreatetheinstancefortheEthernetclientwiththefollowingcode:
EthernetClientclient;
Now,inthesetup()functionofthesketch,wewilltrytogetanIPaddressusingDHCP.Ifyou’reconnectedtoarouter,thereisnoreasonitwouldfail.However,ifitdoesindeedfail,wewillautomaticallysetthedefaultIPaddressfortheshield:
if(Ethernet.begin(mac)==0){
Serial.println("FailedtoconfigureEthernetusingDHCP");
Ethernet.begin(mac,ip);
}
Then,wewillprintouttheIPaddressontheSerialportfordebuggingreasons:
Serial.begin(115200);
Serial.print("IPaddress:");
Serial.println(Ethernet.localIP());
Now,intheloop()functionofthesketch,wewillactuallyconnecttotheserver.Itstartsbycallingtheconnectfunctionandcheckswhetherweareindeedconnected.Ifthat’sthecase,weprintitoutontheSerialmonitorfordebuggingpurposes:
if(client.connect(server,80)){
if(client.connected()){
Serial.println("connected");
Nowthatweareconnected,wecansettheGETrequestforthetestpagewewanttoaccess:
client.println("GET/java/host/test.htmlHTTP/1.1");
client.println("Host:www.brainjar.com");
client.println("Connection:close");
client.println();
Aftertherequestissent,wewillreadthedatathatiscomingbackfromtheserver,tocheckwhethereverythingwentfine.WewillalsoprintoutthisdataontheSerialmonitor:
while(client.connected()){
while(client.available()){
charc=client.read();
Serial.print(c);
}
}
Finally,whenwearesurethattheclientisnotconnectedanymore,wewillprinttheinformationontheSerialmonitorandcalltheclose()functionontheEthernetclient:
if(!client.connected()){
Serial.println();
Serial.println("disconnecting.");

client.stop();
}
Finally,wedon’twanttocontinuouslydothisaction,butonlyrepeatiteveryfiveseconds.Thisisdonewithadelay()function:
delay(5000);
It’snowtimetotestthesketch.
NoteThecompletecodeforthisfirstchaptercanbefoundtheGitHubrepositoryofthebook:
https://github.com/openhomeautomation/arduino-networking/tree/master/chapter1
MakesurethattheEthernetcableispluggedinyourshieldandyourrouter,anduploadthesketchtotheArduinoboard.YoucannowalsoopentheSerialMonitor,andselectthecorrectSerialspeed(115200fortheArduinosketchofthischapter);that’sthefirstthingyoushouldsee,whichistheIPaddressofyourboard:
IPaddress:192.168.1.103
Then,theArduinoboardshouldconnecttotheserver:
Connecting…
Ifthisissuccessful,theoutputwillshowthatitisindeedconnected:
connected
Now,theArduinoboardwillsendtheGETrequesttotheserverinordertograbthecontentofthetestpage.TheserverwillanswerwithanHTTP200OKstatusiftherequestwassuccessful,alongwiththecontentsofthepage:
HTTP/1.1200OK
Content-Length:308
Content-Type:text/html
Last-Modified:Tue,27May200315:17:04GMT
Accept-Ranges:bytes
ETag:"6291ea76324c31:5897"
Server:Microsoft-IIS/6.0
X-Powered-By:ASP.NET
Date:Thu,15May201417:35:40GMT
Connection:close
Insidethislonganswer,youshouldseemanyHTMLtags,suchas<html>and<head>tags.Insidetheanswer,youshouldalsogetthecontentofthepageinsidea<p>tagasfollows:
<p>ThisisaverysimpleHTMLfile.</p>
Ifyoucanseethis,congratulations!YourEthernetshieldisworkingcorrectly!Finally,theArduinoboardwillalsodisplaythattheEthernetshieldhasbeendisconnectedfromtheremoteserver:
disconnecting

Ifeverythingworkedcorrectly,itmeansthatyourEthernetshieldisworkingcorrectly,anditcanconnectwithoutanyproblemstoyourlocalnetworkandtotheWeb.
Ifsomethingdidn’tworkasexpected,thereareseveralthingsyoucancheck.First,makesurethatallconnectionsarecorrectlymade,andthattheEthernetcableiscorrectlypluggedbetweentheshieldandyourrouter.
IftheDHCPfailsatthebeginningofthesketchandyourshieldcan’tgetanIPaddress,pleasecheckwhetherDHCPisactivatedwithoutlimitationsontheMACaddressesintheconfigurationpanelofyourrouter.
Finally,iftheArduinoboardcan’tconnecttotheremoteserver,firstcheckwhethertheserveritselfisworkingbyenteringtheURLofthetestpagemanuallyinyourbrowser.


SummaryInthisfirstchapterofthebook,webuiltourfirstprojectwiththeArduinoEthernetshield,onlytocheckwhethertheshieldwasworkingcorrectlyandwhetheritcouldconnecttoyourlocalnetworkandtotheInternet.WeonlymadesurethattheEthernetshieldcouldindeedbeconnectedtotheInternet,butthisalreadygaveyouanoverviewofeverythingthatyoucandowiththeEthernetshield.YousawhoweasyitistosendrequestswiththeEthernetshield,whichissomethingwewilluselaterinthebooktosenddatafromtheEthernetshieldtoaremoteserver.
Thesewerethemajortakeawaysfromthisfirstchapter:
First,wemadesurethatallthehardwarewascorrectlysetandthattheshieldwasconnectedtoyourrouterviaanEthernetcable.Then,webuiltthefirstsketchofthisbooksimplytotestthattheEthernetshieldcouldindeedconnecttothelocalnetworkandtheWeb.Totestthis,webuiltasketchthatconnectstotheWebandgrabsatestpagefromaremoteserver.Finally,weuploadedthiscodetotheboardandcheckedthateverythingwasworkingcorrectlybymonitoringthestatusoftheconnectionintheArduinoSerialMonitor.Wealsodefinedsomestrategiesonwhattodoifthesketchdidn’tworkandtheshieldcouldnotconnecttotheWeb.
Inthenextchapterofthebook,wearegoingtobuildourfirstapplicationusingtheEthernetshield.WearealsogoingtouseanEthernetclient,butthistimetoconnecttoaserverrunningonourowncomputerandtosendmeasurementsthatcomefromatemperatureandhumiditysensor.


Chapter2.SendingDatatoaWebServerInthepreviouschapter,wemadesurethatyourArduinoEthernetshieldcouldactuallyconnecttoyourlocalnetworkandtotheWeb.Inthischapter,wearegoingtobuildonthat,andbuildourfirstapplicationusingtheEthernetshield.
WearegoingtoseeinmoredetailhowtheEthernetclientworksbymeasuringdatafromadigitalsensorandsendingthisdatatoawebserver.Inthischapter,thiswebserverwillbeaserverrunningonyourowncomputer.
Thesewillbethemajortakeawaysfromthischapter:
First,wearegoingtochoosethetemperatureandhumiditysensorthatwewillalsouselaterinthebook.Wearealsogoingtoinstallthedifferentsoftwarecomponentsthatarerequiredforthischapter,especiallythelibrarytoplotdataonyourcomputer.Then,wearegoingtobuildtheArduinocodethatwillperformmeasurementsandsendthesemeasurementstothewebserverrunningonyourcomputer.Afterthat,we’llstartbuildingtheserver-sidecode.Inthefirstpart,wearegoingtobuildthecoderesponsibleforsimplyloggingthereceiveddataintoalocaldatabase.Finally,wewillinterfacethedatabasewithaliveplottinglibrarysothemeasurementscanbeseenastheycomefromtheEthernetshieldandareloggedinthedatabase.

HardwareandsoftwarerequirementsOnthehardwareside,youwillofcourseneedtheArduinoUnoboardandArduinoEthernetshield.
Youwillalsoneedasensortomeasuresomedata.AsthisbookisabouthowtousetheEthernetshieldandnothowtomeasuredatafromsensors,youcanactuallytakeanysensorofyourchoice.
IusedaDHT11sensor,whichisadigitaltemperatureandhumiditysensor.IchosethissensorforthischapterandformanychaptersofthebooksinceitisaverycheapsensorandeasytointerfacewithArduino.AlongwiththeDHT11sensor,youwillalsoneeda4.7kOhmresistor.
Youcanalsouseotherkindofsensors.Youcanuseanalogsensors,whichreturnasignaldependingonthemeasureddata.Forexample,theTMP36sensorisananalogtemperaturesensorthatreturnsavoltageproportionaltotheambienttemperature.
OtherkindofsensorsyoucanuseherearesensorsbasedontheSPIorI2Cprotocols,whicharedigitalcommunicationprotocolsthatareeasytousewithArduino.Forexample,youcanusetheBMP085orBMP180sensors,whichhaveanI2Cinterface,andyoucanalsomeasurethebarometricpressureandambienthumidity.
YouwillalsoneedabreadboardandsomejumperwirestomaketheconnectionsbetweenthesensorandtheEthernetshield.
Thisisalistofallthecomponentsthatwereusedforthischapter:
ArduinoUno(https://www.adafruit.com/products/50)ArduinoEthernetShield(https://www.adafruit.com/products/201)DHT11sensor(https://www.adafruit.com/products/386)Breadboard(https://www.adafruit.com/product/64)Jumperwires(https://www.adafruit.com/product/758)
Onthesoftwareside,thefirstthingyouwillneedisthelibrarytointerfacewiththesensoryouchosebefore.AsIchoseaDHT11sensorforthisproject,youwillneedtodownloadandinstalltheDHTlibrary:
https://github.com/adafruit/DHT-sensor-library
ToinstallanArduinolibrary,simplyunzipthecontentofthedownloadedfileintothe/librariesfolderofyourmainArduinofolder(orcreatethisfolderifitdoesn’texistalready).
Youwillalsoneedalibrarytoplotthedatastoredinthedatabase.Iusedtheflotlibrary,whichisveryconvenienttouseandallowsreal-timevisualizationofincomingdata.Thislibraryisincludedinthecodeofthischapter,butifyouwantmoreinformationonthelibraryyoucangotohttp://www.flotcharts.org/.
Aboutthedatabaseitself,thisprojectusesSQLite,whichisaliteandeasy-to-usedatabase.Itisperfectforsuchprojects,asitdoesn’trequireadatabaseserverrunningon

yourcomputer.
ItcomespreinstalledonmanyoperatingsystemssuchasOSXorLinux,butifthat’snotthecase,goovertotheirwebsitetodownloadandinstallit:
http://www.sqlite.org/
IfyouareusingLinux,thebestoptionistoinstallSQLitewithyourLinuxdistributionpackagemanager.
NotethatitisalsopossibletouserelationaldatabasesotherthanSQLite,suchasMySQL.ManywebserverscomewiththeMySQLserveraswell,andyouwillonlyneedtomakesmallchangesinthecodeofthischaptertouseaMySQLdatabase.YoucanalsousenonrelationaldatabasessuchasMongoDB(http://www.mongodb.org/),butthiswillrequiremorechangesinthecode.
Finally,youwillalsoneedtohaveawebserverupandrunningtomakethisprojectwork.Youcanfindmoreinformationabouthowtosetupawebserverintheprefaceofthisbook.Ifyoudon’thaveawebserverinstalledyet,youcanvisitthefollowinglinkstogetone:
Windows:EasyPHP(http://www.easyphp.org/)orWAMP(http://www.wampserver.com/en/)OSX:MAMP(http://www.mamp.info/)Linux:LAMP(https://help.ubuntu.com/community/ApacheMySQLPHP)

HardwareconfigurationIt’snowtimetosetupthehardwareforthisproject.Atthispoint,ifyoufollowedthefirstchapter,youshouldalreadyhaveyourArduinoEthernetshieldpluggedintotheArduinoboard,andoneEthernetcableconnectingtheEthernetshieldandyourInternetrouter.Ifthat’snotthecasealready,pleasedoso.
TheonlythingyouwillhavetoconnectinthisprojectistheDHT11sensorandtheresistor.Youcanhaveanoverviewofthedifferentconnectionsyouhavetomakebylookingatthefollowingschematics:
First,plugtheDHT11sensortothebreadboard.Then,connectpinnumber1and2ofthesensorusingthe4.7kOhmresistor.
Now,forthepowersupply.Connectpinnumber1ofthesensortoArduino5V,andpinnumber4totheArduinoGND.Finally,connectpinnumber2oftheDHTsensortoArduinopinnumber7.
Thisiswhatitshouldlooklikeattheend:

Ifyourprojectlooksthesame,congratulations,youcanmovetothenextpartwherewearegoingtobuildtheArduinosketchforthisproject.


SendingdatatoaserverItisnowtimetobuildthesketchforourfirstapplicationusingtheArduinoEthernetshield.Butfirst,weneedonemorepieceofdata:thelocalIPaddressofyourcomputer.InsidetheArduinosketch,wearegoingtospecifywheretheArduinoEthernetshieldhastosendthedata.
FindingyourIPaddressiseasy,butitdependsonyouroperatingsystem.IfyouareusingOSX,youcanfindyourIPaddressinsideNetworkPreferences.
IfyouareusingWindows,youwillfindtheinformationyouneedundertheNetworkSettingsinyourControlPanel:
AnotherwayunderWindowsistogotoStart,thenRun,andtypecmd.Then,insidetheconsole,typeipconfigandhitEnter.Yourcomputer’sIPaddresswillbedisplayed.
IfyouareusingLinuxorOSX,youcansimplygotoaterminalandtype:
ifconfig
ThiscommandshouldprintyourIPaddressinsidetheterminalwindow.Itwillingeneralbesomethinglikeeth0oren0.ThisiswhatIhadonmymachine:
en0:flags=8863<UP,BROADCAST,SMART,RUNNING,SIMPLEX,MULTICAST>mtu1500
etherb8:f6:b1:12:c4:d7
inet6fe80::baf6:b1ff:fe12:c4d7%en0prefixlen64scopeid0x4
inet192.168.1.100netmask0xffffff00broadcast192.168.1.255
nd6options=1<PERFORMNUD>
media:autoselect
status:active
SomeLinuxdistributionsmadethemovetoanothertoolcalledip.Touseit,simplygotoaterminalandtype:

ipaddr
Thiswillalsodisplayyourcomputer’sIPaddress.
WearenowreadytobuildtheArduinosketch.First,weneedtoincludetherequiredlibraries:
#include<SPI.h>
#include<Ethernet.h>
#include"DHT.h"
InserttheMACaddressofyourEthernetshield,whichyoucanfindonthebackoftheshield:
bytemac[]={0x90,0xA2,0xDA,0x0E,0xFE,0x40};
YouwillalsoneedtodefinethepinonwhichtheDHTsensorwasconnected,aswellasthetypeofsensoryouareusing:
#defineDHTPIN7
#defineDHTTYPEDHT11
NotethatyoudonotneedasensorconnectedtoyourArduinoboardtotestthisproject.Youcansimplysendthecontentofanyvariableasatest,orusetherandom()functionofArduinotogeneraterandomdatameasurements.
First,wewilldefineadefaultIPaddressfortheEthernetshield.Thesketchshouldnotusethisaddresssincewe’llattempttoconnectusingDHCP,butifDHCPfails,weneedthisdefaultIPaddress.IrecommendusinganaddressthatisinthesameIPdomainasyourcomputerIPaddress:
IPAddressip(192,168,1,50);
Then,wecandefinetheIPaddressoftheserver,whichinthiscaseisyourcomputer.ThisiswhereyouneedtoentertheIPaddressyougotbefore:
IPAddressserver(192,168,1,100);
WecanthencreateaninstanceoftheEthernetclient:
EthernetClientclient;
WecanalsocreateaninstanceoftheDHTlibrary:
DHTdht(DHTPIN,DHTTYPE);
Nowinthesetup()functionofthesketch,wefirsttrytouseDHCPtoautomaticallygetanIPaddressfortheEthernetshield.Thisisdoneusingthefollowingpieceofcode:
Serial.begin(115200);
if(Ethernet.begin(mac)==0){
Serial.println("FailedtoconfigureEthernetusingDHCP");
Ethernet.begin(mac,ip);
}
Afterthisstep,weprinttheIPaddressontheSerialport:

Serial.print("IPaddress:");
Serial.println(Ethernet.localIP());
Intheloop()functionofthesketch,thefirststepistotakemeasurementsfromtheDHT11sensor:
floath=dht.readHumidity();
floatt=dht.readTemperature();
Convertthesemeasurementsintostrings:
Stringtemp=String((int)t);
Stringhum=String((int)h);
Fordebuggingpurposes,wealsoprintthesevaluesontheSerialport.We’llchecklaterwhetherthesevaluesarecorrectwhentestingthesketch:
Serial.println("Temperature:"+temp);
Serial.println("Humidity:"+hum);
Now,weareactuallygoingtosendthedatatotheserver.Don’tworryaboutunderstandingwhattheserver-sidecodedoesfornow,aswe’lldealwiththatlater.First,wehavetoconnecttotheserverrunningonyourcomputer:
if(client.connect(server,80)){
if(client.connected()){
Serial.println("connected");
Ifthisissuccessful,wecanmaketherequest.AsinChapter1,DiscovertheArduinoEthernetShield,wearegoingtouseastandardGETrequest,andtopassthetemperatureandhumiditymeasurementsasarguments.Atthispoint,youwillalsoneedtoentertheIPaddressofyourcomputer.Thisisalldoneusingthefollowingpieceofcode:
client.println("GET/datalogger/datalogger.php?temp="+temp+"&hum="+
hum+"HTTP/1.1");
client.println("Host:192.168.1.100");
client.println("Connection:close");
client.println();
Youcanseethatthecodecallsafilenamedatalogger.php,whichwearegoingtoexamineinthenextsection.
Then,aftertherequestismade,wecanreadtheanswerfromtheserver:
while(client.connected()){
while(client.available()){
charc=client.read();
Serial.print(c);
}
}
Next,wecanclosetheconnectioniftheclientisnotconnectedtotheserveranymore:
if(!client.connected()){
Serial.println();
Serial.println("disconnecting.");
client.stop();

}
Wearealsogoingtorepeatthewholeloopeverysecond:
delay(1000);
NoteYoucanfindallthecodeforthissectionintheGitHubrepositoryofthischapter:
https://github.com/openhomeautomation/arduino-networking/tree/master/chapter2
Now,ifwejustuploadedthecodetotheArduinoboard,notmuchwouldhavehappened,sincewedidn’tdoanythingontheserverside.TheArduinoboardwouldmaketherequest,butastherequestfiledoesn’texistontheserver,theserverwouldreturnanerrorcode.
Sofirst,weneedtobuildafileontheserverthatwillhandletherequestfromtheboardandlogthedatasomewhere.That’sexactlywhatwearegoingtodonext.


LogincomingdatainadatabaseInthissection,wearegoingtousePHPtobuildtheserver-sidepartoftheproject.IfyouareacompletenoviceinPHP,Irecommendthefollowingresourcetolearnthebasicsofthelanguage:
http://php.net/manual/en/tutorial.php
First,wearegoingtoseethecontentofthedatalogger.phpfile.ThisfilewillhandletherequestscomingfromtheArduinoboard,logthedatainadatabase,andanswerwithasimplemessage.Notethatthisfilehastobeinafoldernameddataloggeronyourwebserver.Wewillseetheimportantpartsofthecode.Togetthecompletecodeforthissection,pleaserefertotheGitHubrepositoryofthechapter.NotethatallthePHPcodeshouldbebetweenthe<php…?>tags.
ThefilestartsbyreceivingthedatafromtheGETrequestsentbytheArduinoEthernetshield:
$temperature=intval($_GET["temp"]);
$humidity=intval($_GET["hum"]);
WealsoinstantiatetheconnectionwiththeSQLitedatabase:
$db=newSQLite3('database.db');
Then,weneedtogivesomestructuretothedatabaseifthedatabasefileisbrandnew.IfyouarenotfamiliarwiththeSQLcommands,Iinviteyoutovisitthefollowinglink:
http://www.cs.utexas.edu/~mitra/csFall2013/cs329/lectures/sql.html
Wearegoingtocreatefourdifferentcolumnsinsidethedatabase:auniqueIDthatwillbeautomaticallyincrementedbySQLite,atimestamptoknowwhenthemeasurementwasmade,andthetemperatureandhumiditydata.Thisisdoneusingthefollowingpieceofcode:
$db->exec('CREATETABLEIFNOTEXISTSmeasurements(idINTEGERPRIMARYKEY,
timestampTIMESTAMPDEFAULTCURRENT_TIMESTAMPNOTNULL,temperature
INTEGER,humidityINTEGER);');
Notethatifyouareusingmoresensors(forexample,ifyouarealsomeasuringtheambientlightlevel),youcanaddmorefieldshere.Simplyaddanewfieldtothelist,forexample:pressureINTEGER.
Now,wecanactuallyinsertthedataasanewrowinthedatabase.SinceSQLiteautomaticallyaddstheIDandtimestampfields,wejustneedtoinsertthedataconcerningthetemperatureandhumidity:
$db->exec("INSERTINTOmeasurements(temperature,humidity)VALUES
('$temperature','$humidity');");
Ifyouneedtoinsertmoredataintothedatabase,forexample,ifyouhaveanothermeasurementtolog,youcansimplyextendthiscommandtoinsertmoredataintotheSQLitedatabase.

TipThissimplecodeillustrateshoweasyitistoinsertdataintotheSQLitedatabase.However,itleavesourserverexposedtoasecurityissueknownastheSQLinjection.Sinceourprojectismadeforyourownlocalnetworkonly,thisisnotreallyanissuehere.However,ifyouplantodeploytheprojectonline,Irecommendmodifyingthecodetosolvethissecurityproblem.Thefollowinglinkwillgiveyoumoreinformationaboutthisissuehttp://www.tutorialspoint.com/sqlite/sqlite_injection.htm.
Finally,wereplytotheArduinoboardwithasimplemessage:
echo"Datareceived";
Now,wehaven’tactuallytalkedaboutthedatabaseitselfyet.Thereisadatabase.dbfileincludedasanexampleinthecodeforthischapter,butIrecommendyousimplydeleteitandtrytomakeyourowndatabase.Youcansimplygotothedirectoryinaterminalwhereallfilesoftheprojectarelocatedandtype:
sqlite3database.db
TipIfyouareusingWindows,IrecommendusingConsoleasaterminal.Youcangetitatthefollowinglinkhttp://sourceforge.net/projects/console/.
Thiscommandwillcreateyourdatabasefile.Youcannowagainexitthedatabasefilebytypingthefollowingcommand:
.exit
NotethatifyouareunderLinux,youmighthavetochangethepermissionsonthedatabaseandthefolderthatcontainstheproject.Todoso,gotheproject’sfolderviaaterminalandtype:
chmod777database.db
Now,itistimetomakeafirsttestoftheproject.Makesurethatallthefilesoftheserverarelocatedinafoldercalleddataloggeronyourwebserver.YoucannowuploadtheArduinosketchtoyourboardandopentheSerialmonitor.YoushouldfirstseethatthesketchisconnectingtoyournetworkandreceivinganIPaddressasfollows:
IPaddress:192.168.1.103
Then,itshouldenterthefirstiterationoftheloop()function,andprintoutthetemperatureandhumiditymeasurements:
Temperature:21
Humidity:37
Afterthisstep,youshouldseethatthesketchisconnectedtoyourserver,andthattheserverisansweringwithastandard200OKanswer:
connected
HTTP/1.1200OK

Date:Mon,19May201408:09:57GMT
Server:Apache/2.2.23(Unix)mod_ssl/2.2.23OpenSSL/0.9.8yDAV/2PHP/5.4.10
X-Powered-By:PHP/5.4.10
Content-Length:13
Connection:close
Content-Type:text/html
Also,attheendofthisanswer,youshouldseetheconfirmationmessagethatwedefinedinthePHPfile:
Datareceived
disconnecting.
Ifyouareseeingthesemessages,congratulations!ItmeansthatyourArduinoEthernetshieldissuccessfullycommunicatingwiththewebserverrunningonyourcomputer,andisactuallyloggingsomedata.
Ifthisisnotthecase,firstcheckyourhardwareconnections.MakesuretheDHT11sensoriscorrectlywiredwiththeArduinoboard,andthattheEthernetcableispluggedintotheshieldandyourInternetrouter.Don’thesitatetoredoChapter1,DiscovertheArduinoEthernetShield,tomakesurethatyourEthernetshieldisworkingproperly.
Also,makesurethatthewebserverisactiveonyourcomputer,andthatallthefilesoftheproject(especiallythedatalogger.phpfile)arelocatedinafoldernameddataloggerinsideyourwebserverfolder.YoucantestthisindependentlyfromtheArduinoEthernetshield.Simplygotoyourfavoritewebbrowser,andtype:
localhost/folder_of_the_project/datalogger.php?temp=20&hum=40
Thiswilllogsomefakedatainsidethedatabase,soyoucanbesurethatthewebserverisrunningcorrectly.
Wearenowgoingtocheckontheserversidewhetherthedatawasrecordedcorrectly.Andweareactuallygoingtokilltwobirdswithonestone,sincethiscodewillalsobeusedinthenextsectiontoplotthedata.
Tocheckthatthedatawasrecordedcorrectly,youcansimplycreateafilenamedreadout.php,whichwillreaddatafromthedatabase,formatit,andprinttheformatteddatasoyouthatcanseeit.First,weneedtoaccesstheSQLitedatabase:
$db=newSQLite3('database.db');
Wethenneedtomakeaquerytothedatabasesoitreturnsthedatawewant.Inthisrequest,wearesimplygoingtotakeallthefieldsfromthetablecalledmeasurements.Thisisdoneusingthefollowingpieceofcode:
$results=$db->query('SELECTid,timestamp,temperature,humidityFROM
measurements');
Now,weneedtousePHPtoparsethisvariablethatcontainsalltheresultsfromthequery.Wesimplyuseawhilestatementforthat:
while($row=$results->fetchArray())
{

$dataset[]=array(strtotime($row['timestamp'])*
1000,$row['temperature']);
}
Notethatintheprocessofparsingtheresults,weformatthedatainanothervariable,sothatthescriptwewillusetoplotthedatacanuseit.Wealsoconvertthetimestampcolumnsothattheplottingscriptcanuseit.Inthisexample,wearejustgoingtodisplayandlaterplotthetemperature,whichiswhyweonlytakethesetwovariablesoutfromthedatabase.Youcan,ofcourse,dothesameforthehumidity.
Finally,weprintouttheformatteddataintheJSONformat:
echojson_encode($dataset);
Now,wecantestthisreadoutfile.Simplygoovertoaterminal,gotothefolderwherethefileislocated,andtype:
phpreadout.php
Thisshouldplotalltherecordingsthathavebeenmadesofar:
[[1400486855000,20],[1400486868000,20],[1400486879000,21],
[1400486890000,21],[1400486901000,21],[1400486912000,21],
[1400486922000,22],[1400486933000,23],[1400486944000,23]]
Whatareyouareseeingintheterminalwindowistherawdatathatwasrecordedforthetemperature.Itconsistsofseveralsmallarraysoftwoelements,whicharethetimestampandrecordedtemperature.IfyouwanttolearnmoreabouttheJSONformatthatthisPHPscriptisreturning,youcanvisithttp://json.org/.
Ifyoucanseethisrawdatabeingdisplayed,itmeansthatthedatacomingfromtheArduinoboardwascorrectlyloggedinyourcomputer.


DisplayingtheresultsWearenowgoingtousethedatathatwasloggedinthedatabaseanddisplayitonagraphformoreconvenience.Forthistask,wearegoingtouseaJavaScriptlibrarycalledflot,whichisalreadyincludedinthecodeforthischapter.Thislibraryprovidesnicefunctionstoplotdataonawebpage,andalsoallowsyoutoplotdatainrealtime,soyouwillseethegraphbeingautomaticallyupdatedasmoredatacomesin.
EverythingwillhappeninsideanHTMLfilecalledplot.html.Wewillonlyseethemostimportantpartsofthecodehere.PleaserefertotheGitHubrepositoryofthechaptertogetthecompletefiles.Insidethisfile,youfirsthavetoincludethefilesrequiredfortheflotlibrary:
<scriptsrc="flot/jquery.js"></script>
<scriptsrc="flot/jquery.flot.js"></script>
<scriptsrc="flot/jquery.flot.time.js"></script>
YoualsoneedanelementintheHTMLpagethatwillhostthegraph.Thisisdoneusingthefollowingpieceofcode:
<divid="placeholder"style="width:800px;height:450px;"></div>
Let’salsodefinesomeoptionsfortheplot.SincethisisnowJavaScript,wehavetowritethiscodeinsidethe<script>…</script>tags.IfyouwanttolearnmoreaboutJavaScriptfirst,Irecommendthisexcellentinteractivetutorial:
http://www.codecademy.com/en/tracks/javascript
Becausewehavetimestampsasthex-axis,weneedtospecifythatthedataforthisaxisisaspecifictime,andthatwewanttodisplaythehours,minutes,andseconds:
varoptions={
xaxis:{
mode:"time",
timeformat:"%H:%M:%S"
}
};
Wealsoneedtoreceivethedataeverytimewecallthescripttoplotthedata.ThisisdonebyanAJAXcalltothePHPfilewecreatedbefore:
$.ajax({
url:"readout.php",
type:"GET",
dataType:"json",
success:onDataReceived
});
Notethatthiscodehastogoinsidetheupdate()functionintheJavaScriptcode.Youcandefinethisfunctionwith:
functionupdate(){
YoucanseethatthisAJAXcall,ifsuccessful,callsanotherJavaScriptfunction.This

functionwillactuallytakethedataasanargumentandplotitwiththeoptionswedefinedbefore:
functiononDataReceived(series){
vardata=[];
data.push(series);
$.plot("#placeholder",data,options);
}
Allthiscodeiscontainedintheupdate()function,andthisfunctioniscalledcontinuously(every10milliseconds)sothattheplotisalwaysupdatedwhenanewdatapointcomesin:
setTimeout(update,10);
Finally,attheendofthescript,wecallthisfunctiononcetogetthegraphstarted:
update();
Itisnowtimetotestthepagewejustcreated.PlaceallthefilesinthedataloggerfolderonyourwebserverandmakesurethatthesketchisstillloadedontheArduinoboard.
Forillustrationpurposes,Iresetthemeasurementdatabaseatthispoint,butyoucanofcoursejustkeepthemeasurementsthatthesensoralreadyperformed.
Opentheplot.htmlfile.ThisistheresultIgotafterthefirsttwomeasurementpoints:
Toillustratethebehaviorofthesensorontheplot,Ipincheditwithmyfingersandreleaseditabitlater.Asexpected,thetemperaturewentupbeforegoingdownagainafterawhile.Thefollowingscreenshotistheresultonthewebpage:

Ifitdoesn’tworkatthispoint,therearemanythingsyoucancheck.First,makesureagainthatthecodefortheprevioussectionsisworkingandthattheArduinoEthernetshieldiscorrectlysendingdatatotheserver.Also,checkthatallthecodefilesarelocatedinsidethesamefolderonthewebserver.Andmakesurethatyouareaccessingplot.htmlviathelocalhostURLinyourbrowser.
Then,opentheJavaScriptconsoletocheckthateverythingisfine.Youwillusuallyfindtheconsoleinthedevelopertoolsofyourwebbrowser.Forexample,inChrome,youwillfindtheconsoleintheView|Developermenu:

Insidethisconsole,youwillbeabletoseewhetherthereareanyerrorsintheJavaScriptcodeonthepage,andthiswillusuallygiveyouagoodideaofwhatisgoingoninthepageandwhatyouhavetofix.


SummaryInthissecondchapterofthebook,webuiltourfirstapplicationbasedontheArduinoEthernetshieldandEthernetclientclass.WedidsomebasicmeasurementsontheArduinoboard,sentthesemeasurementsonalocalwebserver,andfinallydisplayedthisdatainrealtimeonagraph.
Toproceedfurtherwiththischapter,IinviteyoutocarefullyrepeatallthestepsofthischaptertoreallyunderstandwellhowtheArduinoEthernetshieldcommunicateswiththePHPcoderunningonyourcomputer.Youcanalsoaddmoresensorstotheprojectsandlogthisdatainsidethedatabase.Also,youcantrytoplotseveralvariablesatonceondifferentgraphs.
Thesewerethemajortakeawaysfromthischapter:
First,weinterfacedadigitaltemperatureandhumiditysensortotheArduinoboardsothatwecansendthemeasurementstoalocalwebserverusingtheEthernetshield.Wealsoinstalledsomeusefulsoftwarecomponentssuchasalibrarytoplotdatainawebpage.Then,webuiltanArduinosketchtosenddatadirectlytoawebserverrunningonyourcomputer.Afterthat,westartedbuildingtheserver-sidecodebycodingthefileresponsibleforloggingdataintoalocaldatabase.WealsotestedthiscodewiththeArduinoEthernetshield,andmadesurethatthedatawascorrectlytransmittedtotheserverandloggedinthedatabase.Finally,webuiltawebpagetoautomaticallyplotthedataasitisreceivedonthewebserver,usingaJavaScriptlibrarycalledflot.
Inthenextchapter,wearegoingtodosimilarthings,butusingacompletelydifferentapproach:insteadofrunningaclientontheArduinoboardandtransmittingthedataonalocalwebserver,wearegoingtoruntheserverrightontheArduinoboard.TheArduinoprojectwillconstantlydisplaythemeasurementsonawebpageandlogthedatalocallyonaSDcard.


Chapter3.DataLoggingStationInthischapter,wearegoingtocreatesomethingreallysimilartowhatwedidinChapter2,SendingDatatoaWebServer,thatismeasuringdatafromasensor,storingthedata,andsendingitbacktoawebserversothatitcanbeplotted.
However,thingsaregoingtobesimilaronlyontheappearancefront.InsteadofhavinganEthernetclientthatrunsontheArduinoboardandsendsdatatoaserver,wearegoingtomaketheArduinoboardmoreindependent.Inthefirstpartofthechapter,wearegoingtologthedatalocallyusingtheintegratedMicroSDcardreaderoftheEthernetshield.
Then,wearegoingtocreateaserverrightontheArduinoboard.Theboardwillmeasuredataasusual,buttheserverwillservethedatatotheincomingclients.Finally,wewilluseamodifiedversionofthecodeweusedintheChapter2,SendingDatatoaWebServer,toplotthemeasureddataonyourcomputer.
Thefollowingwillbethemajortakeawaysofthischapter:
First,wearegoingtobuildthehardwareforthisproject,includingthetemperatureandhumiditysensor,andtheSDcardtologthemeasureddata.Then,wewillcreatethefirstpartoftheproject,andlogdataautomaticallyontheSDcard,whichisinsertedinsidetheEthernetshield.Atthispoint,wearegoingtousetheInternetconnectionoftheEthernetshieldtoautomaticallyobtainthecurrenttimefromaNetworkTimeProtocol(NTP)timeserver.Finally,wearegoingtobuildawebserverandrunitontheArduinoboard.Youwillthenbeabletoaccessthedatameasuredbytheboardjustbyenteringintheaddressoftheboardinawebbrowser.WearealsogoingtomodifythecodefromthelastchaptertoobtainthemeasurementsfromtheArduinoboardandplotthemliveinyourbrowser.

HardwareandsoftwarerequirementsOnthehardwarefront,youwillofcourse,needtheArduinoEthernetshieldandanArduinoboardsuchastheArduinoUno.
Youwillalsoneedasensortomeasuresomedata.AsthisbookisabouthowtousetheEthernetshieldandnothowtomeasurefromsensors,youcouldactuallytakeanysensorofyourchoice.
IusedaDHT11sensor,whichisadigitaltemperatureandhumiditysensor.IchosethissensorforthischapterandformanychaptersofthebookasitisaverycheapsensorandeasytointerfacewithArduino.AlongwiththeDHT11sensor,youwillalsoneeda4.7kohmresistor.
Tologthedata,youwillneedtohaveaMicroSDcardthatyoucanplugintotheEthernetshield.Idon’thaveaspecificbrandtorecommend,butIusedaSanDiskMicroSDcardwithanormalSDadapter(whichworkedwellforme),soyoucanalsoplugitintoyourcomputertocheckwhetherthedatawascorrectlylogged.Also,makesurethattheSDcardisformattedusingtheFAT32format.
YouwillalsoneedabreadboardandsomejumperwirestocreatetheconnectionbetweenthesensorandtheEthernetshield.
Thefollowingisalistofallcomponentsthatwereusedforthischapter:
TheArduinoUno(https://www.adafruit.com/products/50)TheArduinoEthernetshield(https://www.adafruit.com/products/201)TheDHT11sensor(https://www.adafruit.com/products/386)AMicroSDcard(http://www.amazon.com/SanDisk-Micro-SDHC-Memory-Adapter/dp/B0052MHQM6)Abreadboard(https://www.adafruit.com/product/64)Jumperwires(https://www.adafruit.com/product/758)
Onthesoftwarefront,thefirstthingyouwillneedisthelibrarytointerfacewiththesensoryouchosebefore.IchoseaDHT11sensorforthisproject.YouwillneedtodownloadandinstalltheDHTlibraryfromhttps://github.com/adafruit/DHT-sensor-library.
ToinstallanArduinolibrary,simplyunzipthecontentofthedownloadedfiletoyourlibrariesfolderofyourmainArduinofolder(orcreatethisfolderifyouhaven’tdonesoalready).

HardwareconfigurationIt’snowtimetosetupthehardwareforthisproject.Atthispoint,ifyoufollowedanyofthepreviouschaptersofthisbook,youshouldalreadyhaveyourArduinoEthernetshieldpluggedintotheArduinoboard,andoneEthernetcableconnectingtheEthernetshieldandyourInternetrouter.Ifthat’snotthecasealready,pleasedoso.
TheonlythingyouwillhavetoconnectinthisprojectistheDHT11sensorandtheresistor.Youcanseeanoverviewofthedifferentconnectionsyouhavetomakebylookingatthefollowingschematicdiagram:
First,plugtheDHT11sensorintothebreadboard.Then,connectthepinnumber1and2ofthesensorusingthe4.7kohmresistor.
Nowcomesthepowersupply.Connectthepinnumber1ofthesensortotheArduino5V,andthepinnumber4totheArduinoGND.Finally,connectthepinnumber2oftheDHTsensortotheArduinopinnumber7.
Attheend,itshouldlooklikethefollowingimage:

Finally,simplyinserttheSDcardintotheSDcardslotontheEthernetshield.


LoggingdataonanSDcardLet’sstartwiththefirsttopicofthischapter—loggingdataonaSDcardusingtheintegratedSDcardslotoftheEthernetshield.WhatwearegoingtodoisperformsomemeasurementsontheArduinoboardandlogeachofthesemeasurementstotheSDcardinasimpletextfile.
However,comparedtotheprojectoftheChapter2,SendingDatatoaWebServer,wedon’tactuallyknowthedatewhenthemeasurementwastaken.Inthepreviouschapter,wesimplyusedthedateofthecomputer,butwedon’thavethisinformationhere.TogetthetimeontheArduinoboard,wearegoingtouseanotherstrategy.WearegoingtousetheEthernetshieldtoconnecttoanNTPtimeserver,grabthetimeoncewhentheArduinosketchstarts,andthenusetheTimelibrarytotrackthetimefromthere.
TolearnmoreabouttheTimelibrary,youcanvisitthefollowingpageontheArduinowebsite:
http://playground.arduino.cc/Code/Time
TheprocessofloggingdataonaSDcardstartsbyincludingthecorrectlibrariesasfollows:
#include"DHT.h"
#include<SD.h>
#include<Time.h>
#include<Ethernet.h>
#include<EthernetUdp.h>
#include<SPI.h>
Wealsoneedtodefinethesensortypeandthepintowhichthesensorisconnected.Thisisdonewiththefollowinglinesofcode:
#defineDHTPIN7
#defineDHTTYPEDHT11
TodefinetheMACaddressoftheEthernetshield,usethefollowinglineofcode:
bytemac[]={0x90,0xA2,0xDA,0x0E,0xFE,0x40};
TousetheSDcard,youwillalsoneedtodefinethechipSelectpin,whichisthepinnumber4ontheEthernetshield.Thisisdoneusingthefollowingline:
constintchipSelect=4;
Now,wearegoingtodealwiththeNTPserver.ThereareactuallyseveralNTPserversyoucanuse(youcanseetheIPaddressesofmanyoftheseserversinsidetheTimeNTPexamplethatcomewiththeTimelibrary).Youcanalsosetyourtimezonehere.TogetmoreinformationaboutwhichNTPserveryoucanuseandwhichtimezonetoset,youcanhavealookattheexampleTimeNTPsketch.ThissketchisgivenasanexampleinsidetheTimelibrary.Forthisproject,Iusedthefirstserveravailablewithtimezonenumber1,asshowninthefollowingcode:

IPAddresstimeServer(132,163,4,101);
constinttimeZone=1;
Toconnecttothisserver,wealsoneedtodefineanEthernetclient.Thistime,wearegoingtouseaprotocoldifferentfromtheearlierone,whichiscalledUDP.UDPisdifferentfromTCP—it’smuchsimplerandlighter.However,itdoesn’tguaranteethatthedatawascorrectlydelivered,whichTCPdoes.Youdon’tactuallyneedtocareaboutthedetailsofthisprotocol,astheTimelibraryhandleseverything.YoucanjustleavethedefaultUDPport,asshowninthefollowingcode:
EthernetUDPUdp;
unsignedintlocalPort=8888;
YoualsoneedtocreateaninstanceoftheDHTsensorasfollows:
DHTdht(DHTPIN,DHTTYPE);
Now,inthesetup()functionofthesketch,youneedtodefinethefollowingcoderesponsibleforgettinganIPaddressfortheEthernetshield:
Serial.begin(9600);
if(Ethernet.begin(mac)==0){
//nopointincarryingon,sodonothingforevermore:
while(1){
Serial.println("FailedtoconfigureEthernetusingDHCP");
delay(10000);
}
}
Afterthat,wewilltrytoinitializetheSDcard,asshowninthefollowingcode:
Serial.print("InitializingSDcard…");
pinMode(10,OUTPUT);
Ifthisissuccessful,wewillprintoutamessageontheSerialport,asshowninthefollowingcode:
if(!SD.begin(chipSelect)){
Serial.println("Cardfailed,ornotpresent");
//don'tdoanythingmore:
return;
}
Serial.println("cardinitialized.");
WewillalsostarttheDHTsensorasfollows:
dht.begin();
Finally,stillinthesetup()function,wewillprintouttheIPaddressoftheEthernetshieldandcreatetheconnectiontotheNTPserver.NotethatherewearecallingafunctioncalledgetNtpTime,whichisdefinedlaterinthesketch.AsthisisafunctionprovidedbytheTimelibrary,wearenotgoingtolookintothedetailsofthisfunction.Thefollowingisthecodeforthispart:
Serial.print("IPnumberassignedbyDHCPis");
Serial.println(Ethernet.localIP());

Udp.begin(localPort);
Serial.println("waitingforsync");
setSyncProvider(getNtpTime);
Now,intheloop()functionofthesketch,wewillfirstmeasurethetemperatureandhumidityfromthesensorusingthefollowingcode:
floath=dht.readHumidity();
floatt=dht.readTemperature();
Secondly,wewillconvertthesemeasurementstostringsasfollows:
Stringtemp=String((int)t);
Stringhum=String((int)h);
WearenowgoingtobuildastringthatcontainsthedateandtimeofthemeasurementusingtheTimelibrary.Thislibrarycontainsfunctionstogetthecurrenttime,day,ormonth,forexample,whicharecalculatedfromtheinitialcalltotheNTPserver.Forexample,callingtheday()functionwillreturnthecurrentday.Thefollowingpieceofcodereturnsastringwiththedateandtime:
Stringlog_time=String(day())+"/"+
String(month())+"/"+String(year())+""+
String(hour())+":"+String(minute())+":"+
String(second());
Wethenassemblethisstringwiththetemperatureandhumiditymeasurementsusingcommasasseparatorsbetweenthedifferentstrings,asshowninthefollowinglineofcode:
StringdataString=log_time+","+temp+","+hum;
WearenowgoingtowritethisdataontheSDcard.Wefirstneedtoopenthecardtowritedatausingthefollowingline:
FiledataFile=SD.open("datalog.txt",FILE_WRITE);
Ifthat’ssuccessful,wewillputthecontentsofthedataStringvariabletothisfilenameddatalog.txt,asshowninthefollowingcode:
if(dataFile){
dataFile.println(dataString);
dataFile.close();
Serial.println(dataString);
}
else{
Serial.println("erroropeningdatalog.txt");
}
Finally,wewillrepeattheoperationevery10seconds,butyoucan,ofcourse,modifythisdelaywiththefollowingline:
delay(10000);
Note

AllthecodeforthissectioncanbefoundinsidetheGitHubrepositoryofthischapterathttps://github.com/openhomeautomation/arduino-networking/tree/master/chapter3.
It’snowtimetotestthissketch.MakesurethattheEthernetcableispluggedintotheshieldandyourInternetrouter,andtheSDcardispluggedintotheEthernetshieldSDcardslot.YoucannowuploadthesketchtotheboardandopentheSerialMonitor.Thefollowinglineiswhatyoushouldseefirst:
InitializingSDcard…cardinitialized.
Then,youshouldseethatyourEthernetshieldhasanIPaddress,asshowninthefollowingline:
IPnumberassignedbyDHCPis192.168.1.103
YoushouldseethatthisshieldiscurrentlysynchronizingthetimewiththeNTPserver,asshowninthefollowingoutput:
waitingforsync
TransmitNTPRequest
ReceiveNTPResponse
Afterthat,youshouldseethatthefirstmeasurementismadeasfollows:
21/5/20149:32:13,22,38
Afterthedelayyoufixedinthesketch,youwillseethatasecondmeasurementismadewiththecorrespondingdateandtime.TobesurethatthesketchiscorrectlywritingdataontheSDcard,youcanletitrunforawhileandthendisconnecttheEthernetshieldfromthepowersupply.Afterthis,removetheSDcard,andreaditonyourcomputerviaanadapter.Youshouldseethefollowingscreenshot:

Asyoucansee,allthemeasurementswerecorrectlyloggedontheSDcard,andwecanclearlyseethattheintervalbetweentwomeasurementswas10seconds.


CreatingawebserveronArduinoFortherestofthischapter,wearegoingtotakeanotherapproach.WearestillgoingtomaketheArduinowiththeEthernetShieldworkasanindependentsystem,butthistimeweareevengoingtocreateawebserverontheArduinoboard.ThisisactuallysimilartotheprojectwesawintheChapter2,SendingDatatoaWebServer,butthistimeitistheArduinoboarditselfthatwilldisplaythedataasitismeasured.
Thesketchforthispartstartsbyincludingtherightlibraries,asshowninthefollowingcode:
#include"DHT.h"
#include<Ethernet.h>
#include<SPI.h>
Definethepinandthetypeofthesensorinthefollowingmanner:
#defineDHTPIN7
#defineDHTTYPEDHT11
Also,youhavetodefinetheMACaddressofyourEthernetshieldasusual,asshowninthefollowinglineofcode:
bytemac[]={0x90,0xA2,0xDA,0x0E,0xFE,0x40};
WewillalsodefineadefaultIPaddressincasetheDHCPfails,asshowninthefollowingline:
IPAddressip(192,168,1,50);
Thisiswherethenewfeaturecomesin.Sofar,weonlyusedtheEthernetClientclasstodefineaclientthatwillconnecttoaremoteserver.Here,however,becausewewanttocreateaserverrightontheArduinoboard,wearegoingtousetheEthernetServerclass,asshowninthefollowinglineofcode:
EthernetServerserver(80);
Youcanusetheport80foryourserver,asitwillbemucheasiertoaccesstheserverfromyourwebbrowser.
WealsoshouldnotforgettocreateaninstanceoftheDHTsensor.Thisisdoneusingthefollowingline:
DHTdht(DHTPIN,DHTTYPE);
Now,inthesetup()functionofthesketch,wewilltrytouseDHCPtogetanIPaddressfortheEthernetshieldusingthefollowingcode:
if(Ethernet.begin(mac)==0){
Serial.println("FailedtoconfigureEthernetusingDHCP");
Ethernet.begin(mac,ip);
}
Stillinthesetup()function,wealsohavetostartourEthernetserver,andprintouttheIP

addressoftheserverusingthefollowingcode:
server.begin();
Serial.print("Serverisat");
Serial.println(Ethernet.localIP());
Finally,wewillstarttheDHTsensorasfollows:
dht.begin();
Now,intheloop()partofthesketch,wewillperformthetemperatureandhumiditymeasurements,asshowninthefollowingcode:
floath=dht.readHumidity();
floatt=dht.readTemperature();
Convertthemeasurementstostringsusingthefollowingcode:
Stringtemp=String((int)t);
Stringhum=String((int)h);
Then,weneedtohandletheconnectionsthatcometotheArduinoboard,forexample,fromawebbrowser.Todoso,weareactuallygoingtocreateaninstanceoftheEthernetClientclasseverytimetheserverbecomesavailable.Asthisisaclasswealreadysawinpreviouschaptersofthebook,thisissomethingwealreadyknowhowtoworkwith.
Ifaconnectionisdetected,wecreatethisclient,andprintitoutontheSerialportfordebuggingpurposes,asshowninthefollowingcode:
EthernetClientclient=server.available();
if(client){
Serial.println("Newclient");
Thenextpartisabittechnical.Weneedtoreadouttherequestthatcomesfromtheclient,butalsodetectthemomentwhentherequestisoversothatwecanclosetheconnection.Thisishandledbyalwayscheckingwhetherthecurrentlineisblankornot.Thefirststepisthentoreadouttherequestthatcomesfromtheclient,characterpercharacter,usingthefollowingpieceofcode:
booleancurrentLineIsBlank=true;
while(client.connected()){
//Readdata
if(client.available()){
charc=client.read();
Serial.write(c);
NotethattheincomingrequestisalsoprintedoutontheSerialportfordebuggingpurposes.Now,ifwedetectthatwehaveanendoflinecharacterandthatthecurrentlineisblank,it’sasignthattherequestisover,asshowninthefollowingline:
if(c=='\n'&¤tLineIsBlank){
Therefore,wecananswertheclient.WewillfirstsendastandardHTTPheaderthatstateseverythingwentOK,andthatwewanttorefreshthepageautomaticallyevery5seconds,asshowninthefollowingcode:
client.println("HTTP/1.1200OK");
client.println("Content-Type:text/html");
client.println("Connection:close");
client.println("Refresh:5");//Refreshthepageautomaticallyevery5
sec
client.println();
client.println("<!DOCTYPEHTML>");
client.println("<html>");
Then,wewillprintoutthedatafromthemeasurementonthepageusingthefollowingcode:
client.print("Temperature:");
client.print(temp);
client.print("<br/>");
client.print("Humidity:");
client.print(hum);
client.println("<br/>");
client.println("</html>");
Therestofthefollowingcodeistheretodetectwhetherwereachedtheendoftherequestornot:
if(c=='\n'){
//Startinganewline
currentLineIsBlank=true;
}
elseif(c!='\r'){
//you'vegottenacharacteronthecurrentline
currentLineIsBlank=false;
}
Finally,wewillgivethebrowserasmalldelaytoreceivetheanswer,andwewillclosetheconnection,asshowninthefollowingcode:
//Givethewebbrowsertimetoreceivethedata
delay(1);
//Closetheconnection:
client.stop();
Serial.println("Clientdisconnected");
NoteAllthecodeforthissectioncanbefoundintheGitHubrepositoryofthischapterathttps://github.com/openhomeautomation/arduino-networking/tree/master/chapter3.
It’snowtimetotestthecodethatwewroteinthissection.Again,makesurethattheEthernetcableispluggedtotheEthernetshieldandtoyourrouter.Then,youcanuploadthecodetotheboard,andopentheSerialMonitor.YoushouldfirstseetheIPaddressofthewebserverrunningontheArduinoboardasfollows:

Serverisat192.168.1.103
Afterthat,thesketchwilljustdonothingwhilewaitingforanyincomingconnection.Tomakeaconnectionhappen,justgoovertoyourwebbrowserandtypeintheIPaddressoftheboard.YoushouldimmediatelyseetheGETrequestfromthebrowserbeingprintedoutintheArduinoSerialMonitor,asshowninthefollowingoutput:
Newclient
GET/HTTP/1.1
Host:192.168.1.103
Connection:keep-alive
Cache-Control:max-age=0
Accept:
text/html,application/xhtml+xml,application/xml;q=0.9,image/webp,*/*;q=0.8
User-Agent:Mozilla/5.0(Macintosh;IntelMacOSX10_9_3)
AppleWebKit/537.36(KHTML,likeGecko)Chrome/34.0.1847.137Safari/537.36
Referer:http://192.168.1.103/
Accept-Encoding:gzip,deflate,sdch
Accept-Language:fr-FR,fr;q=0.8,en-US;q=0.6,en;q=0.4,de;q=0.2
Aswecansee,thereisalotoftextandthisdependsonyourbrowser.However,theimportantthingisactuallythefirstlineoftherequest,whichmeansit’saGETrequesttoourArduinoboard.
Finally,aftertheArduinoanswerstheserver,theconnectionisclosedandthefollowingmessageisdisplayed:
Clientdisconnected
Inyourbrowser,youshouldalsodirectlyseethatthedataisbeingprintedoutonthepagecreatedbytheArduinoboard,asshowninthefollowingscreenshot:
Ifyoucanseethis,congratulations,youjustcreatedyourownwebserverthatrunsonanArduinoboard.Ifyoucan’tseeapage,firstmakesurethatArduinohasanIPaddressanditcanbeconnectedtoyourlocalnetwork.Todoso,repeattheinstructionsinChapter1,DiscovertheArduinoEthernetShield,again.
AlsomakesurethatyoucorrectlyenteredtheIPaddressoftheboardinyourbrowser.YoucanalsocheckontheSerialMonitorthatyouarenotreceivinganyerrormessagesfromtheDHTsensor,whichwillcompromisethebehaviorofthewebserver.


PlottingthedatalocallyToendthechapter,wearegoingtoseehowtoplotdatameasuredbytheArduinoboard.Todoso,wewillmodifytheArduinosketchalittlebit,andthenusepartofthecodefromthepreviouschaptertoplotthedatarightinyourwebbrowser.
First,wearegoingtomodifytheArduinosketchsothatitreturnsdatainamoreusefulformat;inthepresentcase,theJSONformat.Inplaceofthecoderesponsibletoprintoutthemeasurements,wearegoingtosimplyprintthedataintheJSONformat.Thisisdoneusingthefollowingpieceofcode:
client.println("HTTP/1.1200OK");
client.println("Content-Type:application/json");
client.println("Connection:close");
client.println();
client.print("{\"temperature\":");
client.print(temp);
client.print(",\"humidity\":");
client.print(hum);
client.println("}");
Wecannowquicklytestthisproject.UploadthecodetotheArduinoboardagain,openyourwebbrowser,andgotothesameIPaddressyouusedbefore.Youshouldseethefollowinglineprintedonthepage:
{"temperature":24,"humidity":36}
Now,wealsohavetobuildtheserver-sidecodetoplotthedata.Thecodeisverysimilartothecodeofthepreviouschapter,soIwillonlydetailthedifferencesbetweenthetwoprojects.Inthepreviouschapter,itwastheboardthatwastryingtoreachouttheserverrunningonyourcomputer,andthedatalogger.phpfilewashandlingtherequests.Inthischapter,wearegoingtodothereverseandcalltheboardfromthewebserverrunningonyourcomputer.Todoso,wearegoingtouseamodulefromPHPcalledcURLtomakeGETrequeststoagivenURL;inthiscase,theURLoftheArduinoboard.
Thefirstthingwehavetodoismakechangestothedatalogger.phpfileandaddtheURLoftheArduinoboard,asshowninthefollowinglineofcode:
$url='http://192.168.1.103';
StartthecURLcall,asshowninthefollowinglineofcode:
$curl=curl_init();
WealsohavetosettheoptionsofthecURLcall.WewantthecalltoreturnthedatafromourArduinowebserver,andwealsowanttheURLtobetheonewedefinedbefore.Thisisdoneusingthefollowingcode:
curl_setopt_array($curl,array(
CURLOPT_RETURNTRANSFER=>1,
CURLOPT_URL=>$url,
));

Wecannowexecutethecommand,asshowninthefollowinglineofcode::
$resp=curl_exec($curl);
ClosethecURLcall,asfollows:
curl_close($curl);
Wegettheanswerinavariablethatcontainsthedatainastring.InordertoopenitwithPHP,weneedtoconvertittotheJSONformatfirst,andthenextractthetemperatureandhumidityfields.Thisisdoneusingthefollowingpieceofcode:
$json=json_decode($resp,true);
$temperature=intval($json["temperature"]);
$humidity=intval($json["humidity"]);
Therestofthefileisstrictlyidenticaltothecodewedevelopedinthepreviouschapter.
Now,wealsoneedtomakeasmallmodificationintheplot.htmlfile.Inthepreviouschapter,thedatawasautomaticallyloggedinsidethedatabaseastheArduinoboardwasconstantlysendingdatatotheserver.Here,weneedtomakethecallontheserverside.Thisisdonebyaddingthefollowingsmallpieceofcodejustbeforethecodethatreadsoutthedatafromthedatabase:
$.ajax({
url:"datalogger.php",
type:"GET",
});
Thismeansthatjustbeforethedataisreadfromthedatabasetobeplotted,wearecallingtheArduinoboardtogetthetemperatureandhumiditymeasurements.
NoteAllthecodeforthissectioncanbefoundinsidetheGitHubrepositoryofthischapterathttps://github.com/openhomeautomation/arduino-networking/tree/master/chapter3.
Wecannowtestthispartofthechapter.NotethatthecodefromtheGitHubrepositoryincludesanexampledatabasesoyoucantesttheprojectrightaway,butIrecommenddeletingthefilejustbeforetestingtheproject,soyouwillplotyourownmeasureddatawhiletestingthecode.
Youcanjustputallthecodefortheplottingpartinsideafolderattherootofyourwebserver.Then,opentheplot.htmlfileviathelocalhostURLinyourwebserver.Youshouldimmediatelyseethatdataisbeingplottedinsideyourwebbrowser.Afterawhile,youshouldgetagraphsimilartothefollowinggraph:

Ifyoucanseethisplotinyourbrowser,congratulations!ThismeansyoucanperformremotemeasurementsfromthewebserverrunningonyourArduinoboard.
Ifthisisnotthecase,thereareseveralthingsyoucancheck.ThisfirstthingyoucancheckismakingsurethattheArduinoboardcorrectlydisplaysthedatainaJSONformat.Todoso,youcansimplyentertheaddressofyourboardinabrowser.Then,checkwhetheryourwebserverisrunningonyourcomputerandthatyouhaveplacedallthefilesfromtheprojectinsidearepositoryinyourwebserver’smainfolder.Finally,makesurethatyouareaccessingtheHTMLfilefromthelocalhostURLinyourbrowserandnotbyclickingonitinsideyourfileexplorer.


SummaryLet’ssummarizewhatwedidinthischapter.WecreatedanindependentmeasurementstationwithArduinothatautomaticallymeasuresandservesthedatainsomeway.First,weloggedthedatalocallyonaSDcardandthenweservedthisdatausingawebserverrunningontheArduinoboard.
Thefollowingarethemajortakeawaysofthischapter:
1. First,webuilttherequiredhardwareforthischapter,andinsertedtheSDcardintotheEthernetshield.
2. Then,inthefirstpartoftheproject,weloggedthemeasureddataontheSDcardandusedaremotetimeservertoautomaticallygetthemeasurementtimes.
3. Finally,webuiltanewArduinosketchtohaveawebserverrunningontheArduinoboard.WethenmodifiedtheplottingcodefromthepreviouschaptersoitcancalltheserverontheArduinoboardtogetandplotthemeasureddata.
Thereare,ofcourse,manywaystoimprovethisproject.YoucanaddmoresensorstotheprojectandeitherlogthisadditionaldataonaSDcardorserveitonawebpageusingtheArduinowebserver.YoucanalsohavemanyoftheseboardsinyourhomeorevenoutsideandmakeyourcomputerpollalltheseArduinoserversataregularintervaltogettheirmeasurements.
Inthenextchapter,wearegoingtoworkagainwiththisideaofcreatinganindependentsystemwiththeArduinoEthernetshield.WearegoingtoconnectarelaytotheArduinoboard,soyoucanswitchalamponandoffremotely.Thisprojectwillcomeintwoflavors.First,wewillmakeasketchtocontroltherelayremotelyviayourwebbrowser.Inthesecondpartofthechapter,wewilluseaspeciallibrarysotherelaycanbecontrolledfromanywhereintheworld.


Chapter4.ControllingObjectsfromAnywhereInthischapter,wearegoingtodosomethingdifferenttowhatwedidintheotherchapters.WhatwedidsofarwasmeasuresomedataontheArduinoboardandtransmitthisdatabacktothenetworkusingtheEthernetshield.Inthischapter,wearegoingtocontroladeviceinsteadofmeasuringdata.
Todoso,wewillusearelayconnectedtotheArduinoboardwiththeEthernetshieldandcontrolthisrelayremotely.Wearealsogoingtoconnectasetofpowercablestothisrelaysoyoucandirectlyplugalampintoitsothatitcanbecontrolledremotely.
Inthefirstpartofthechapter,wearegoingtocontrolthisrelayremotelywithinyourlocalnetwork.Inthesecondpartofthechapter,wewilluseadedicatedwebservicetocontrolthisrelayfromanywhereintheworld.
Thefollowingwillbethemajortakeawaysfromthischapter:
First,wearegoingtoseehowtochoosethedifferentcomponentsforthisproject,includingtherelayandcablestoconnectadevicetotherelaysuchasalamp.Then,wewillassemblethedifferenthardwarecomponents,connecttherelaytotheArduinoboard,andthepowercablestotherelay.Afterthat,wewillwriteanArduinosketchtotestwhethertherelayisworkingcorrectlyandhasbeencorrectlyconnectedtothecircuit.Whenwearesurethattherelayisworking,wewillwriteanapplicationusingtheEthernetshieldalongwiththerelay.WearegoingtowriteasketchtocontroltherelayviaEthernetandthenbuildaninterfacetocontroltherelayfromyourwebserver.Finally,inthelastsectionofthechapter,wearegoingtouseadedicatedwebservicetocontroltherelayfromanywhereintheworld.Wearealsogoingtoadapttheinterfacewejustcreatedtocontroltherelayfromanywhere.

HardwareandsoftwarerequirementsLet’sfirstseewhatweneedforthisproject.Aswithalltheotherchapters,youwillneedanArduinoboardandtheArduinoEthernetshield.
Youwillalsoneedarelaymodule.Ireallyrecommendusingarelaythatisintegratedonaboard,withalltherequiredcomponentsontheboardaswell.Itwillavoidyouhavingtobuildyourownrelaymoduleonabreadboard,anditisalsomuchsafer.Indeed,thereisnoriskinwiringtherelayandothercomponentsinanincorrectfashion.Simplymakesurethattherelayyouchooseiscompatiblewith5Vinputvoltagelevels.Also,youhavetomakesurethattherelaymodulecanhandlethepowerofthedeviceyouaregoingtouseforthisproject.Forexample,thelampIusedwasa30Wlamp,andtherelaycouldhandlemorethan1000W,justtobeonthesafeside.Ichosea5VrelaymodulefromPolulu,asshown:
Youcansimplyusetherelayasitisandcontrolitwiththecodewearegoingtodevelopinthisproject,butthegoalofhavingarelayistoconnectadevicetoit.Forthisproject,Ichosetoconnectalamptotherelay,butbyfollowingtheinstructionsinthischapter,youwillbeabletoconnectanydevicethatusesastandardpowerplug.
Todoso,Iusedasetofpowercables,onewithamalesocketandonewithafemalesocket,asshowninthefollowingimage:

Themaleplugwillbeusedtoconnecttherelaytothemainpowerpluginthewallandthefemalesocketwillbeusedtoconnectthedevicetocontroltherelay.
NoteAlwaysbeverycarefulwhenconnectingwirestothemainelectricity.Makesurethatyoudon’ttouchanyoftheexposedpartsoftherelay,andmakesurethatthecablesthemselvesdon’thaveanyexposedcopper.Also,connecttheplugtotheelectricitylatestwhenassemblingtheproject.
Let’snowseethesoftwarerequirementsforthisproject.Asusual,youwillneedtohavetheArduinoIDEinstalled,alongwithawebserverrunningonyourcomputer.
Inthesecondpartofthechapter,wearegoingtouseaservicecalledTeleduinotocontroltheEthernetshieldfromanywhere.Tousethisservice,youwillneedtogetanAPIkey,whichyouwillhavetoinsertinsidetheArduinosketch.
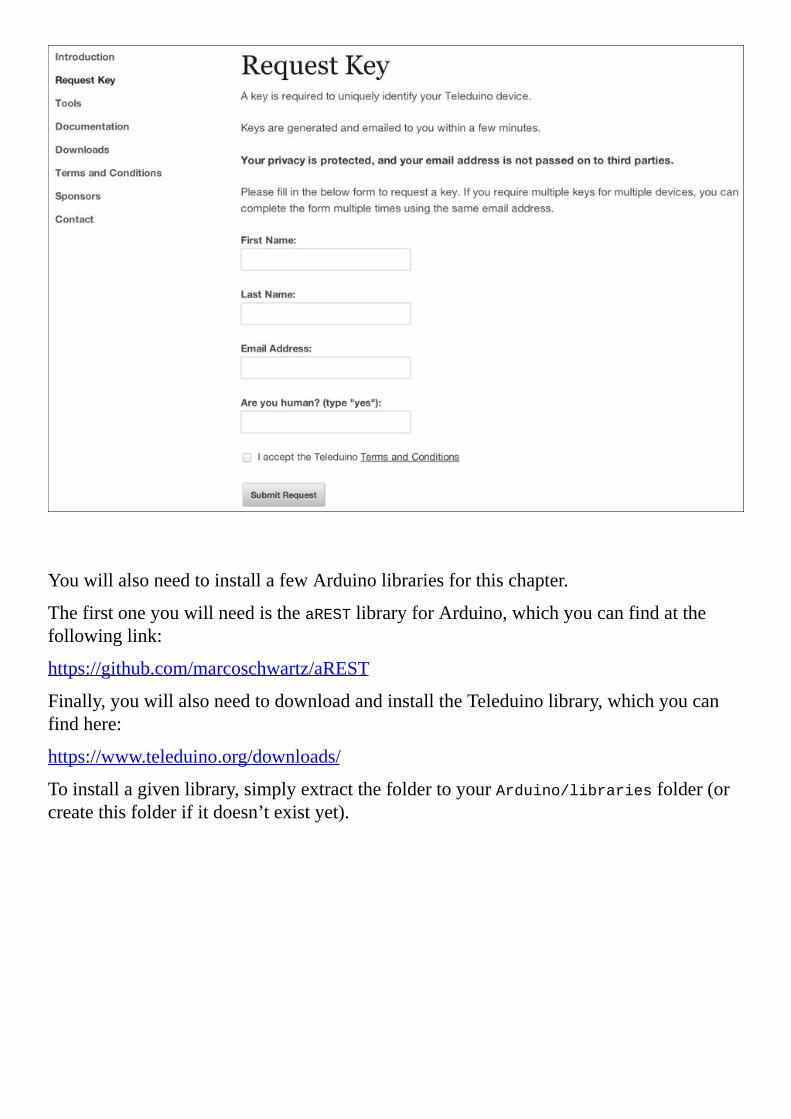
Youcangetakeybyvisitingthefollowingaddress:
https://www.teleduino.org/tools/request-key
Youwillbetakentothefollowingpagewhereyoucangetyourkey:
YouwillalsoneedtoinstallafewArduinolibrariesforthischapter.
ThefirstoneyouwillneedistheaRESTlibraryforArduino,whichyoucanfindatthefollowinglink:
https://github.com/marcoschwartz/aREST
Finally,youwillalsoneedtodownloadandinstalltheTeleduinolibrary,whichyoucanfindhere:
https://www.teleduino.org/downloads/
Toinstallagivenlibrary,simplyextractthefoldertoyourArduino/librariesfolder(orcreatethisfolderifitdoesn’texistyet).

HardwareconfigurationNowlet’sseehowtoconnectthedifferentcomponentsoftheproject.Aswiththeotherchaptersofthebook,youwillneedtohavetheEthernetshieldpluggedintotheArduinoboard.YouwillalsoneedtoconnectanEthernetcablebetweentheEthernetshieldandyourrouter.
Then,youneedtoconnecttherelaymodule.Therelaymodulehasthreeinputpins:VCC,GND,andasignalpinusuallycalledSIG.YouneedtoconnecttheVCCpintoArduino5V,GNDtoArduinoGND,andfinallythesignalpintoArduinopinnumber7,whichisadigitalpin.Thefollowingimageshowsthesystematthispoint:
Then,youneedtoconnectthepowercablestotherelaymodule.Arelaymodulebasicallyhasthreeoutputpins:COM(forthecommonpin),NC(forthenormallyclosedpin),andNO(forthenormallyopenpin).
WhatwewantistohavetheCOMpinoftherelayconnectedtoonewireofthepowerplug,NCnotconnected,andNOconnectedtooneotherwireofthepowerplug.Thefollowingimagesummarizestheconnectionsatthisstage:

First,connectonepinofthefemalepowerplugtotheCOMpin.Then,connectonepinofthemalepowerplugtotheNOpin.Finally,connectthetworemainingcablestogether,forexample,usingatypicalelectricalscrewterminal.
Oncethisisdone,youcanconnectthedeviceyouwanttocontroltherelay.Connectthelampinsidethefemalepowersocket,andthenconnectthemalepowerplugtothepowerpluginthewall.Thefollowingimagerepresentsthesystematthispoint,withoutthedevicetocontrolbeingconnected:
Ifyouhavesomethingsimilar,congratulations!Youaredonewiththehardwareconnectionsforthischapter.


TestingtherelayWearenowgoingtobuildaverysimplesketchtotestthehardwareconnectionswejustmade.Thesketchwillsimplyswitchtherelayonandoffeverysecond.
Thesketchstartsbydeclaringtherightpinfortherelay:
constintrelay_pin=7;
Then,wesetthispinasanoutput:
pinMode(relay_pin,OUTPUT);
Then,intheloop()functionofthesketch,wesettherelaytoaHIGHstate:
digitalWrite(relay_pin,HIGH);
Wewaitfor5seconds:
delay(5000)
Then,weswitchtherelaypintoaLOWstateagain:
digitalWrite(relay_pin,LOW);
Wethenwaitagainfor5seconds:
delay(5000);
NoteThecodeforthissectioncanbefoundintheGitHubrepositoryforthischapterathttps://github.com/openhomeautomation/arduino-networking/tree/master/chapter4.
YoucannowuploadthecodetotheArduinoboard.Youshouldheartherelayswitchingonandoffeverysecond.Ifyouconnectalamptotheproject,forexample,youshouldalsoseeitswitchingonandoffeverysecond.


ControllingtherelayremotelyNow,wearegoingtobuildourfirstinterestingapplicationusingthesystemwejustassembled.WearegoingtobuildanArduinosketchtocontroltherelayfromanywherewithinyourlocalnetwork.Forexample,ifyourcomputerisconnectedviaWi-FitoyourrouterandtheEthernetshieldisconnectedtothesamerouter,youwillbeabletocontroltherelayviayourcomputer.TheadvantageofthisapproachinthissectionisthatevenifyourInternetconnectionisdown,youwillstillbeabletocontroltherelay.
Theapplicationstartsbyincludingthecorrectlibraries:
#include<SPI.h>
#include<Ethernet.h>
#include<aREST.h>
WesetuptheMACaddressoftheboard:
bytemac[]={0x90,0xA2,0xDA,0x0E,0xFE,0x40};
WealsodefineadefaultIPaddressfortheboardthatwillbeusedifDHCPfails:
IPAddressip(192,168,1,150);
WethencreateaninstanceoftheaRESTlibrary,whichwillhandletherequestthatcomestotheboard:
aRESTrest=aREST();
YoualsoneedtocreateaninstanceoftheEthernetserver:
EthernetServerserver(80);
Inthesetup()functionofthesketch,wegetanIPaddressusingDHCP,asshowninthefollowingcodesnippet:
if(Ethernet.begin(mac)==0){
Serial.println("FailedtoconfigureEthernetusingDHCP");
Ethernet.begin(mac,ip);
}
PrinttheIPaddressontheSerialMonitor,usingthefollowingcode:
server.begin();
Serial.print("Serverisat");
Serial.println(Ethernet.localIP());
Finally,intheloop()functionofthesketch,wecheckwhetherthereareincomingclientsandhandletheseclientswiththeaRESTinstance:
EthernetClientclient=server.available();
rest.handle(client);
NoteThecodeforthissectioncanbefoundintheGitHubrepositoryforthischapterat

https://github.com/openhomeautomation/arduino-networking/tree/master/chapter4.
YoucannowuploadthecodetotheArduinoboardandopentheSerialMonitor.YoushouldseetheIPaddressoftheboardbeingprintedout:
Serverisat192.168.1.103
Youcannowgotoyourwebbrowserandstarttypingincommands.TheaRESTlibraryallowsyoutodirectlycommandallthepinsoftheArduinoboardviaEthernet.Youcanfindthecompletedocumentationofthelibraryathttps://github.com/marcoschwartz/aREST.Forexample,wefirstneedtosetpinnumber7asanoutput.Thisisdoneusingthefollowingcommand:
http://192.168.1.103/mode/7/o
Youwillbegreetedwiththefollowingmessageinthebrowser:
PinD7settooutput
Now,tosetthepintoaHIGHstate,youcansimplytype:
http://192.168.1.103/digital/7/1
Youwillgettheconfirmationinyourbrowser:
PinD7setto1
Youshouldalsoheartherelayswitchingfromonestatetotheotherwhenyouenterthecommand.
Nowwearegoingtobuildtheserver-sideinterfacetocontroltherelayfromyourcomputerwithouthavingtoentercommandsmanuallyinyourbrowser.
TheinterfaceisbasedonHTML,JavaScript,andPHP.IntheHTMLfile,therearebasicallytwobuttons:onetoturntherelayonandonetoturntherelayoff.Thefollowingisthecodeforoneofthebuttons:
<buttonclass="btnbtn-blockbtn-lgbtn-primary"type="button"id="1"
onClick="buttonClick(this.id)">On</button>
Youcanseethatthebuttoncallsafunction,whichisdefinedinaJavaScriptfile.Nowlet’shavealookatthisfile.Thefirstthingwehavetodowhenthepageloadsissettherelaypintobeanoutput,justaswedidwhenwetypedcommandsdirectlyinthebrowser.Thisisdoneusingthefollowingpieceofcode:
window.onload=function(){
$.get("command.php",{command:"/mode/7/o"});
}
Youcanseethatwearecallingafilenamedcommand.php.Wewillseethedetailsofthisfilelater.Now,wesawearlierthateverytimeabuttonisclicked,itcallsafunctioncalledbuttonClick.ThefollowingfunctionisalsodefinedintheJavaScriptfile:
functionbuttonClick(clicked_id){
Dependingonwhichbuttonwasclicked,wesendthecorrespondingcommandtothe

Arduinoboard.Forexample,fortheOnbutton,weputaHIGHstateontherelaypin,asshowninthefollowingcode:
if(clicked_id=="1"){
$.get("command.php",{command:"/digital/7/1"});
}
Finally,wehavetolookatthePHPfilethatwillactuallysendthecommandtotheboard.WefirstneedtogetthecommandthatwassentbytheJavaScriptfileandstoreitinavariable:
$command=$_GET['command'];
Then,weneedtosettheURLtowhichwewillsendthecommand.Tosendthecommandtotheboard,wewilluseaPHPmodulecalledcURL,whichwilldoexactlythesameaswhatwejustdidfromthewebbrowser.
Atthispoint,youwillhavetomodifytheIPaddressdefinedinthePHPfileandreplaceitwiththeIPaddressofyourboard.Thefollowingpieceofcodedoesjustthat:
$service_url='http://192.168.1.103'.$command;
$curl=curl_init($service_url);
Then,wecanactuallyperformthecURLcallusingthefollowingpieceofcode:
curl_setopt($curl,CURLOPT_IPRESOLVE,CURL_IPRESOLVE_V4);
curl_setopt($curl,CURLOPT_CONNECTTIMEOUT,0.5);
$curl_response=curl_exec($curl);
curl_close($curl);
NoteThecodeforthissectioncanbefoundintheGitHubrepositoryforthischapterathttps://github.com/openhomeautomation/arduino-networking/tree/master/chapter4.
Wecannowtesttheinterface.Makesurethatallthefilesofthisinterfacearestoredinsideafolderattherootofyourwebserverfolder,andalsomakesurethatthewebserverisrunning.Then,gotothisfolderviathelocalhostpathinyourbrowserandopentheHTMLfile.Youshouldseethefollowingscreenshot:
Trytoclickononeofthebuttons:youshouldhearthattherelayinstantlyswitches

accordingtothebuttonyouclicked.
NoteWhenyouloadedtheinterfaceinyourbrowser,therelaypinwasalsoautomaticallysettobeanoutput.


ControllingtherelayfromanywhereInthelastsectionofthischapter,wearegoingtotakeanotherapproach.Sofar,wehaveaserverrunningonourArduinoboard,whichcanreceivecommandsfromanydeviceonyourlocalnetwork.However,thisisnotconvenientifyouwanttocontroladevicefromanywhereintheworld.Forexample,youwanttoactivatealampinyourhomeatgivenintervalswhenyouareawayfromyourhome.
Todoso,wearegoingtousetheTeleduinoservice,whichallowsyoutodoexactlythat.TheArduinoEthernetshieldwillbeconstantlyconnectedtothisservice,soyoucantransmitcommandstotheboardfromanywhereintheworldifyouhaveanInternetconnection.WearegoingtobuildanewsketchfortheArduinoboardandthenadapttheinterfaceaccordingly,soyoucancontroltherelayfromanywhereintheworldrightfromyourwebbrowser.
Youfirstneedtoincludetherequiredlibraries:
#include<EEPROM.h>
#include<Servo.h>
#include<Wire.h>
#include<Teleduino328.h>
#include<SPI.h>
#include<Ethernet.h>
ThenyouneedtodefinetheMACaddressofyourEthernetshield:
bytemac[]={0x90,0xA2,0xDA,0x0E,0xFE,0x40};
Then,definealotofparametersfortheTeleduinoservice.AswewilluseDHCPtogetanIPaddress,youdon’tneedtochangeanythinginthefollowingcode:
IPAddressdeviceIp(192,168,1,100);//OnlyifuseDhcpisfalse
IPAddressgatewayIp(192,168,1,1);//OnlyifuseDhcpisfalse
IPAddressdnsIp(192,168,1,1);//OnlyifuseDhcpisfalse
IPAddresssubnet(255,255,255,0);//OnlyifuseDhcpisfalse
IPAddressserverIp(173,230,152,173);//OnlyifuseDnsisfalse
charserverName[]="us01.proxy.teleduino.org";//OnlyifuseDnsistrue
unsignedintserverPort=5353;//Canbesettoeither53or5353
bytestatusLedPin=8;
Wealsoneedtoenterthekeythatyougotatthebeginningofthechapter.However,youwillneedtoconvertthiskeytothecorrectformatsothatyoucaninsertitinsidetheArduinosketch.
YoucandosobyvisitingthefollowingURL:
https://www.teleduino.org/tools/arduino-sketch-key
Youwillbepromptedtoinsertthekeyinsidethenewwindow,asshowninthefollowingscreenshot:

YoucanthencopyandpastetheresultinsidetheArduinosketch:
bytekey[]={0x64,0x26,0xFF,0xC9,
0x20,0x4D,0xF1,0xCF,
0xAE,0x42,0xD4,0x1A,
0xED,0x6C,0xB0,0xB7};
YoualsoneedtodefinethefollowingvariablessothattheTeleduinoservicecanwork:
bytedata[257];
bytedataLength;
bytehexStage;
unsignedlonglastInstruction=0;
unsignedlonglastRefresh=0;
bytestage=0;
Finally,defineanEthernetclient:
EthernetClientClient;
TherestofthesketchcomesfromtheTeleduinoexampleandwon’tbedetailedhere.
NoteThecodeforthissectioncanbefoundintheGitHubrepositoryforthischapterathttps://github.com/openhomeautomation/arduino-networking/tree/master/chapter4.
It’snowtimetomakeafirsttestofthissketch.UploadthesketchtoyourArduinoboard,andthengotoyourwebbrowser.Youcannowdirectlysendcommandstoyourboard.First,wearegoingtosettherelaypinasanoutputasseenearlier.Thisisdoneusingthefollowingcommand(whereyouhavetoinsertyourownkeyatthekparameter):
http://us01.proxy.teleduino.org/api/1.0/328.php?k=yourKey
&r=definePinMode&pin=7&mode=1
Youwillbegreetedbyaconfirmationmessageinsideyourwebbrowser.YoucannowswitchtherelaypintoaHIGHstateusingthefollowingcommand:
http://us01.proxy.teleduino.org/api/1.0/328.php?
k=yourKey&r=setDigitalOutput&pin=7&output=1

Bydoingso,youshouldheartheclickoftherelay,meaningthecommandwascorrectlysent.Youwillalsobegreetedbyaconfirmationmessageinsideyourbrowser.
Now,wearegoingtomodifytheinterfacesoyoucancommandtherelayfromanywhereusingyourwebbrowser.InsidetheJavaScriptfile,youwillthenneedtodefineyourTeleduinoAPIkey:
varkey="yourAPIkey";
Then,wehavetochangethecommandparameterstofittheTeleduinoAPIandmentionthekeyaswell,asshowninthefollowingcode:
window.onload=function(){
$.get("command.php",{
key:key,command:"definePinMode&pin=7&mode=1"});
}
Also,wehavetochangethecommandparametersandmentionthekeyforthefunctionthatiscalledwhenabuttonisclicked:
if(clicked_id=="1"){
$.get("command.php",{
key:key,command:"setDigitalOutput&pin=7&output=1"});
}
InsidethePHPfile,wenowhavetogettwoparameters,thecommandandAPIkeyfromTeleduino:
$key=$_GET['key'];
$command=$_GET['command'];
WealsoneedtomodifytheserviceURL,asshowninthefollowingcode:
$service_url='http://us01.proxy.teleduino.org/api/1.0/328.php?k='.
$key.'&r='.$command;
$curl=curl_init($service_url);
Therestofthefilesarestrictlyidentical,asseenintheprevioussection.
NoteThecodeforthissectioncanbefoundintheGitHubrepositoryforthischapterathttps://github.com/openhomeautomation/arduino-networking/tree/master/chapter4.
Youcannowputallthefilesforthismodifiedinterfaceinsideafolderattherootofyourwebserver.Also,makesurethatthewebserverisstillrunning.YoucanopentheHTMLfileandyoushouldseeexactlythesameinterfaceasbefore.
Youcannowtrytoclickonabuttonandyoushouldinstantlyheartherelayswitch.Theadvantageovertheprevioussectionofthechapteristhatthisinterfacecannowworkfromanywhere.YoucanbeinonepartoftheworldandhaveyourEthernetshieldinanotherpartoftheworldanditwouldstillwork.


SummaryInthischapter,weinterfacedarelaytotheArduinoboardandtheEthernetshieldsothatitcanbecontrolledremotely.Todoso,weusedtwodifferentapproaches,eachwiththeirownadvantagesanddisadvantages.First,wekeptthingslocalandcontrolledtherelayfromwithinyourlocalnetwork.ThissolutionhastheadvantagethatevenifyourInternetconnectionisdown,theprojectstillworks.
Then,weusedadedicatedwebservicetocontroltherelayfromanywhere.Thisisclearlyanadvantageofthelatterapproach;however,itwillnotworkifyourEthernetshieldisnotconnectedtotheweb.
Thefollowingwerethemajortakeawaysfromthischapter:
First,wechosethedifferentcomponentsfortheproject,andassembledthemsothatwecancontroladevicefromtheArduinoboardsuchasadesklamp.Then,wewrotethefirstsketchtotesttheprojectbysimplyswitchingtherelayonandoff.Afterthat,webuiltthefirstapplicationbasedonthehardwarewejustassembled.WeusedadedicatedlibrarysothattheArduinoboardcouldreceivecommandsfromthenetworkusingtheEthernetshield.Wealsobuiltasimpleweb-basedinterfacesothatyoucancontroltherelayfromagraphicalinterfacerunningonyourcomputer.Finally,weusedawebservicecalledTeleduinotocontroltherelayfromanywhereintheworld.Wealsomodifiedthegraphicalinterfacesothatwecancontroltherelayfromanywhere.
Inthenextchapter,wearegoingtotakeyetanotherapproachandusetheEthernetshieldtoconnectourArduinoprojectstotheInternetofThings.WearegoingtoperformsomemeasurementsontheArduinoboardandsendthisdatarighttoacloudservice.Usingthisservice,wewillbeabletomonitorthemeasurementsthatcomefromtheboardinrealtimeandfromanywhereintheworld.


Chapter5.InternetofThingswithXivelyInthepreviouschaptersofthebook,wemainlykeptthingslocalwhenperformingmeasurementsontheArduinoboardwiththeEthernetshield.Forexample,wesentsomemeasureddatabacktoadatabaseonyourcomputeranddisplayedthemeasurementsthere.
Inthischapter,wearegoingtotakeadifferentapproach.WearegoingtointegratetheEthernetshieldintoanInternetofThingsperspective.Thismeansthatinsteadofloggingmeasurementslocallywithinyourlocalnetwork,wearegoingtoautomaticallysendthemeasureddatatoacloudservicecalledXively.ThepurposeoftheXivelywebsiteistostoredatathatcomesfromyourdevicesanddisplaythisdataontheirwebsite.Thisway,yourdatawillbeavailableatanytimeandcanbeaccessedfromanywhere.
Thefollowingwillbethemajortakeawaysfromthischapter:
First,wearegoingtobuildthehardwareforthisprojectaroundtheEthernetshieldandtheDHT11temperatureandhumiditysensor.Then,wewillcreateanaccountontheXivelywebsite.WewillalsoconfigurethisaccountsothatwecansendthemeasureddatatoitusingtheArduinoEthernetshield.Whentheaccountiscorrectlyset,wewillusetheaccountinformationsuchastheXivelyAPIkeytobuildtheArduinosketchforthisproject.Finally,wewilluploadthesketchtotheArduinoboardandtestit.WewillcheckthatthedataiscorrectlysenttotheArduinoboardandvisualizetherecordeddatainrealtimeinyourbrowser.
HardwareandsoftwarerequirementsOnthehardwareside,youwillofcourseneedtheArduinoEthernetshieldandanArduinoboardsuchastheArduinoUno.
Youwillalsoneedasensortomeasuresomedata.AsthisbookisabouthowtousetheEthernetshieldandnothowtomeasurefromsensors,youcanactuallyuseasensorofyourchoice.
IpickedaDHT11sensor,whichisadigitaltemperatureandhumiditysensor.IchosethissensorasitisaverycheapsensorandeasytointerfacewithArduino.AlongwiththeDHT11sensor,youwillalsoneeda4.7kohmresistor.
YouwillalsoneedabreadboardandsomejumperwirestomaketheconnectionsbetweenthesensorandtheEthernetshield.
Onthesoftwareside,thefirstthingyouwillneedisthelibrarytointerfacewiththesensoryouchosebefore.AsIchoseaDHT11sensorforthisproject,youwillneedtodownloadandinstalltheDHTlibraryfromhttps://github.com/adafruit/DHT-sensor-library.
ToinstallanArduinolibrary,simplyunzipthecontentsofthedownloadedfileintoyourlibrariesfolderofyourmainArduinofolder(orcreatethisfolderifitdoesn’texistalready).
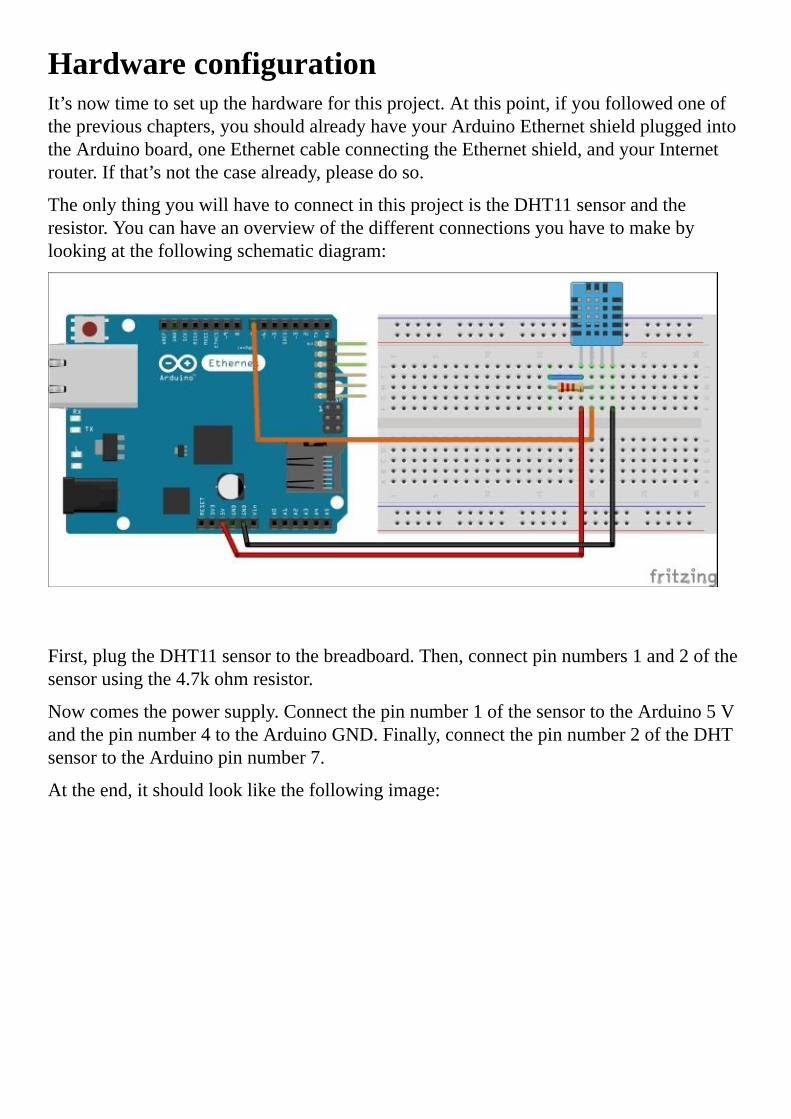
HardwareconfigurationIt’snowtimetosetupthehardwareforthisproject.Atthispoint,ifyoufollowedoneofthepreviouschapters,youshouldalreadyhaveyourArduinoEthernetshieldpluggedintotheArduinoboard,oneEthernetcableconnectingtheEthernetshield,andyourInternetrouter.Ifthat’snotthecasealready,pleasedoso.
TheonlythingyouwillhavetoconnectinthisprojectistheDHT11sensorandtheresistor.Youcanhaveanoverviewofthedifferentconnectionsyouhavetomakebylookingatthefollowingschematicdiagram:
First,plugtheDHT11sensortothebreadboard.Then,connectpinnumbers1and2ofthesensorusingthe4.7kohmresistor.
Nowcomesthepowersupply.Connectthepinnumber1ofthesensortotheArduino5Vandthepinnumber4totheArduinoGND.Finally,connectthepinnumber2oftheDHTsensortotheArduinopinnumber7.
Attheend,itshouldlooklikethefollowingimage:

Youarenowdonewiththehardwareconfigurationofthisprojectandcanmovetothenextstep,whichiscreatinganaccountonXively.


CreatingyourXivelyaccountThefirstthingwehavetodotousetheXivelyserviceiscreateandconfigureaXivelyaccount.YouneedtocreateanaccountonXivelysothatwecansenddatatotheirservice.XivelyisbasicallyanonlineplatformforconnectedobjectssuchasourEthernetshield.Theservicewillautomaticallystorethedatathatwesend.Itwillalsodisplaythemeasureddataintheformofgraphsthatareupdatedinrealtimeasthedatacomesin.
TheveryfirststepistogoovertotheXivelysignuppageontheirwebsiteathttps://xively.com/signup/.Youwillarriveatapagewhereyoucanenteryourpersonaldetails:
Then,youwillneedtocreateadevice,whichisavirtualentityontheXivelywebsite.Thisdevicewillreceivethemeasureddata.Whenyoucreateanewdevice,youwillneedtoenteranameforyourdevice:

Then,youcanaddchannelstoyourdevice.AchannelonXivelyislikeavariableorarowinadatabase;itistheentitythatwillreceiveaspecificmeasurementfromtheArduinoboard.Youcancreateanewchannelonthepageofyourdevicebyclickingonthebuttonshowninthefollowingscreenshot:

Youwillneedtoentersomenameforyourchannels.Youwillhavetocreatetwoofthemforthisproject:onecalledTemperatureandonecalledHumidity.
Then,youwillneedtogetsomeinformationaboutyouraccount,whicharealllocatedonthedevicepage.
ThefirstoneisthefeedID,whichidentifiesthisspecificdevice.Youcanfinditinthefollowingsectionofthepage:
Then,youwillhavetogetyourAPIkey,whichisspecifictoyouraccount.Youcanalsofinditonthedevicepage,asshowninthefollowingscreenshot:

YouwillneedtoenterthesetwokeysinsidetheArduinosketchthatwewillbuildinthischapter,sokeepthemathand.

SendingdatatoXivelyWearenowgoingtobuildtheArduinosketchforthisproject.ThegoalistomeasuredataontheArduinoboard,connectwiththeXivelyserver,andsendthedata.
Thefirststepistoincludethefollowingrequiredlibraries:
#include<SPI.h>
#include<Ethernet.h>
#include"DHT.h"
EntertheMACaddressofyourboard:
bytemac[]={0x90,0xA2,0xDA,0x0E,0xFE,0x40};
WecanthendefinethepinandthetypeoftheDHTsensorasfollows:
#defineDHTPIN7
#defineDHTTYPEDHT11
Createaninstanceonthesensor,asshowninthefollowingline:
DHTdht(DHTPIN,DHTTYPE);
CreateaninstanceoftheEthernetclient:
EthernetClientclient;
WealsodefineadefaultIPaddressfortheboard:
IPAddressip(192,168,1,50);
Inthesketch,wealsosettheaddressofthesecuredXivelyserverthatwewillconnecttousingtheEthernetshield:
IPAddressserver(216,52,233,120);
Now,wehavetomodifythesketchalittlebittoenteryourowninformationaboutyourXivelyaccount.ThisiswhereyouhavetoenteryourAPIkeyandfeedIDthatyougotintheprevioussection.Usingthefollowingcode,youcandefineyourAPIkeyandfeedID:
#defineWEBSITE"api.xively.com"
#defineAPI_key"yourAPIKey"
#definefeedID"yourFeedID"
Inthesetup()functionofthesketch,wecannowuseDHCPtogetanIPaddressforthesketch,asshowninthefollowingcode:
//StarttheEthernetconnection
if(Ethernet.begin(mac)==0){
Serial.println("FailedtoconfigureEthernetusingDHCP");
Ethernet.begin(mac,ip);
}
Fordebugpurposes,weprintthisIPaddressontheSerialMonitor:
Serial.print("IPaddress:");

Serial.println(Ethernet.localIP());
Now,intheloop()functionofthesketch,wewillmakethemeasurementswiththeDHTsensor,formatthedataforXively,andsendthisdatatotheXivelyserver.
Thefirststepistomakethemeasurements.Thisisdonewiththefollowinglinesofcode:
floathumidity=dht.readHumidity();
floattemperature=dht.readTemperature();
WethenneedtoformatthismeasureddatasotheXivelyservercanunderstandit.Indeed,Xivelydefinesaspecificformattoreceivedata.Alltheformatsaredefinedathttps://xively.com/dev/docs/api/communicating/data_formats/.
Inourcase,wewillneedtoputthedatainaJSONstringaccordingtotheXivelyspecifications.Thisisdoneusingthefollowingpieceofcode:
intlength=0;
Stringdata="";
data=data+"\n"+"{\"version\":\"1.0.0\",\"datastreams\":[{\"id\":
\"Temperature\",\"current_value\":\""+String((int)temperature)+"\"},"
+"{\"id\":\"Humidity\",\"current_value\":\""+String((int)humidity)+
"\"}]}";
Serial.println(data);
length=data.length();
YouwillnotethatwealsogetthelengthofthestringthatwewillalsoneedinordertosendthedatatotheXivelyserver.Also,weareusingbackslashesbeforequotationsmarkstoindicatethatwewanttotransmitquotationmarksandnottheendofthestring.
Then,wewillactuallyconnecttotheXivelyserverandsendthedata.ThisisdonebyusingaPUTrequestandsendingaJSONfiletotheXivelyserver.Intheheaderoftherequest,wedefinethefeedIDoftheXivelydeviceandwealsotransmityourXivelyAPIkey.
Wealsoneedtosendthedatawedefinedbeforeinthebodyoftherequest.Thisisdoneusingthefollowingpieceofcode:
if(client.connect(server,80)){
if(client.connected()){
Serial.println("connected");
client.println("PUT/v2/feeds/"+String(feedID)+".jsonHTTP/1.1");
client.println("Host:api.xively.com");
client.println("X-ApiKey:"+String(API_key));
client.println("Content-Length:"+String(length));
client.print("Connection:close");
client.println();
client.print(data);
client.println();
}else{
Serial.println(F("Connectionfailed"));
return;
}
Then,afterthedataissent,wereadbackthedatacomingfromtheserverandprintthe

answerontheSerialMonitorfordebuggingpurposes,usingthefollowingpieceofcode:
while(client.connected()){
while(client.available()){
charc=client.read();
Serial.print(c);
}
}
Finally,whenitisover,westoptheconnection.Thisisdonewiththefollowingcode:
if(!client.connected()){
Serial.println();
Serial.println("disconnecting.");
client.stop();
}
Werepeattheentireprocessevery10secondswiththefollowingline:
delay(10000);
NoteAllthecodeforthischaptercanbefoundontheGitHubrepositoryofthischapterathttps://github.com/openhomeautomation/arduino-networking/tree/master/chapter5.
ItisnowtimetotestthesketchanduploaddatatoXively.YoucanuploadthesketchtoXivelyatthispoint,andopentheSerialMonitorintheArduinoIDE.YoushouldseethattheIPaddressoftheboardisbeingprintedout,andthatthesketchisconnectedtotheXivelyserver:
IPaddress:192.168.1.104
Connecting…
YoushouldalsoseehowthedatawasformattedforXively:
{"version":"1.0.0","datastreams":[{"id":"Temperature","current_value"
:"24"},{"id":"Humidity","current_value":"37"}]}
Afteramoment,youshouldseetheanswercomingbackfromXively.IfthedatawassentcorrectlytotheXivelyserver,youshouldseea200OKcodebeingprintedouttotheSerialMonitor:
HTTP/1.1200OK
Date:Wed,21May201415:02:49GMT
Content-Type:application/json;charset=utf-8
Content-Length:0
Connection:close
X-Request-Id:e44becaa5231354568262013fa713d9f099ffc83
Cache-Control:max-age=0
Vary:Accept-Encoding
ThismeansthatthedatawascorrectlyreceivedbytheXivelyserver,andinanunderstandableformat.
Ifthatisnotthecase,thereareseveralthingsyoucancheck.First,makesurethatthe

InternetconnectionofyourEthernetshieldisworking,andthattheshieldisindeedreceivinganIPaddress.Then,makesurethatyoucorrectlyenteredyourXivelyinformation,meaningtheAPIkeyandthefeedID.Also,checkthatyoucorrectlyformattedyourdataintheJSONformat,whichweintroducedwhilewritingthesketch.Finally,makesurethattheDHTsensoriscorrectlywiredandmeasuringdataproperly,asitcouldinterferewiththenormalbehavioroftherestofthesketch.


VisualizingtherecordeddataWearenowgoingtovisualizethedatawerecordedwithXively.YoucangooveragaintothedevicepageontheXivelywebsite.Youshouldseethatsomedatahasbeenrecordedindifferentchannels,asshowninthefollowingscreenshot:
Byclickingononeofthesechannels,youcanalsodisplaythedatagraphically.Forexample,thefollowingscreenshotshowsthetemperaturechannelafterafewmeasurements:

Afterawhile,youwillhavemorepointsforthetemperaturemeasurements,asshowninthefollowingscreenshot:
Youcanalsodothesameforthehumiditymeasurements;thefollowingscreenshotshowsthehumiditymeasurements:

Notethatbyclickingonthetimeicon,youcanchangethetimeaxisanddisplayalongerorshortertimerange.
Ifyoudon’tseeanydatabeingdisplayed,youneedtogobacktotheArduinoIDEandmakesurethattheanswercomingfromtheXivelyserverisa200OKmessage,likewesawintheprevioussection.


SummaryLet’ssummarizewhatwedidinthischapter.WeusedtheEthernetshieldtobuildanInternetofThingsproject,asweconnectedtheEthernetshielddirectlytoacloudservice.WemeasureddataontheArduinoboardandsentthisdatatothecloudserviceXivelysothatitcanbeaccessedanddisplayedfromanywhere.
TheadvantageofthissolutionisthatthedatarecordedonXivelyisaccessiblefromanywhere,andnotonlyfromyourlocalnetwork.YoucanalsousethedataandXivelytocreateautomatedtriggersbasedonthedata.Youcan,forexample,sendarequesttoanotherwebsitebasedontherecordeddata.Youcanalsosharethedatathatisrecordedbyyourdevicewithcolleaguesorfriendssothattheycanalsomonitorwhatyourprojectisrecordinginrealtime.
Ofcourse,oneofthedrawbacksfromthissolutionisthatifyourInternetconnectionisdown,thewholeprojectwon’tworkatall.
Thefollowingwerethemajortakeawaysfromthischapter:
Wefirstbuiltthehardwareofthisproject,includingtheEthernetshieldandtheDHT11sensortomeasuretemperatureandhumidity.Then,wewentovertotheXivelywebsiteandcreatedanaccountthere.WealsosetupadeviceontheXivelyinterface,andcreatedchannelssothatdatacanberecordedontheXivelywebsite.Finally,wealsogotafeedIDandAPIkeysothattheArduinosketchknowswheretosendthedata.WethendesignedtheArduinosketchforthisproject.TheArduinosketchwasresponsibleformeasuringdata,formattingitaccordingtotheXivelyguidelines,andsendingittoXively.WetestedthissketchandmadesurethatXivelyacceptedthedata.Finally,wewentagaintotheXivelywebsitetovisualizethedata.Welearnedhowtovisualizethisdatagraphically,andsawthedataarriveinrealtime.
Inthenextchapter,wearegoingtocontinuebuildingInternetofThingsapplications.WearegoingtouseanotherwebservicecalledTemboo,whichisaplatformthatcanbeinterfacedwithotherservicessuchasGmailorGoogleDocs.WearegoingtousethisservicetorecorddatadirectlyonaGoogleDocsspreadsheetandsendautomatede-mailsbasedontherecordeddata.


Chapter6.LoggingDatainGoogleDocsInthischapter,wearegoingtocontinuebuildingInternetofThingsapplicationsusingtheArduinoEthernetshield.Thistime,wearegoingtousethewebserviceTemboo,tobuildsomeusefulandinterestingapplications.TembooisdifferentfromXively,whichweusedinthepreviouschapter.Itisnotacloudplatforminitself,butitcanbeusedtointerfaceourArduinoprojectswithseveralotherapplicationsandservices.YoucanseeTembooasabridgebetweenyourEthernetshieldandawiderangeofwebservices,suchase-mailservices,textmessagingservices,orstorageservices.
Forexample,inthischapter,wearegoingseehowtointerfaceyourArduinoprojecttoyourGoogleAccountviaTemboo.WewillusethisfunctionalitytoautomaticallylogmeasurementsinsideaGoogleDocsspreadsheet.
TheadvantageofthissolutionisthatyoucanaccessyourGoogleDocsspreadsheetfromanywhere,thusmonitoringyourdatafromanywhereintheworldwhileyourEthernetshieldissendingdatafromhome.Wearealsogoingtosendautomatede-mailalertsusingGmailbasedonthemeasureddata.
Thefollowingwillbethemajortakeawaysofthischapter:
First,wearegoingtoconfigurethehardwarepartofthisprojectusingtheEthernetshieldandtheDHT11sensor.Wearealsogoingtodownloadandinstalltherequiredlibrariesfortheproject,includingtheTembooArduinolibrary.Then,wewillsetupthedifferentaccountsthatweneedforthischapter.First,wewillsetupyourGoogleAccountandcreateaspreadsheetwherethedatawillbelogged.WearealsogoingtosetupaTembooaccountandconfigureittousetheArduinoEthernetshield.Oncealltheaccountsareset,wearegoingtobuildthefirstapplicationofthisproject—automaticlogmeasureddatainaGoogleDocsspreadsheet.Youwillbeabletoseethemeasureddatarecordedliveinthespreadsheetandthedatabeingplottedautomaticallyinrealtime.Finally,wearegoingtosetupourArduinosystemtoautomaticallysende-mailswhenagivenmeasurementexceedsathreshold.

HardwareandsoftwarerequirementsOnthehardwareside,youwillofcourseneedtheArduinoEthernetshieldandanArduinoboardsuchastheArduinoUno.
Youwillalsoneedasensortomeasuresomedata.AsthisbookisabouthowtousetheEthernetshieldandnothowtomeasurefromsensors,youcouldactuallytakeanysensorofyourchoice.
IusedaDHT11sensor,whichisadigitaltemperatureandhumiditysensor.IchosethissensorforthischapterandformanychaptersofthebookasitisaverycheapsensoranditiseasytointerfacewithArduino.AlongwiththeDHT11sensor,youwillalsoneeda4.7kohmresistor.
YouwillalsoneedabreadboardandsomejumperwirestocreatetheconnectionsbetweenthesensorandtheEthernetshield.
Onthesoftwareside,thefirstthingyouwillneedisthelibrarytointerfacewiththesensoryouchosebefore.AsIchoseaDHT11sensorforthisproject,youwillneedtodownloadandinstalltheDHTlibraryfromhttps://github.com/adafruit/DHT-sensor-libraryinordertousethis.
YouwillalsoneedtodownloadandinstalltheArduinoTemboolibraryfromhttps://www.temboo.com/arduino/others/library-installation.
ToinstallanArduinolibrary,simplyunzipthecontentsofthedownloadedfiletoyourlibrariesfolderofyourmainArduinofolder(orcreatethisfolderifitdoesn’texistalready).

HardwareconfigurationIt’snowtimetosetupthehardwareforthisproject.Atthispoint,ifyoufollowedoneofthepreviouschapters,youshouldalreadyhaveyourArduinoEthernetshieldpluggedtotheArduinoboard,oneEthernetcableconnectingtheEthernetshield,andyourInternetrouter.Ifthat’snotthecasealready,pleasedoso.
TheonlythingyouwillhavetoconnectinthisprojectistheDHT11sensorandtheresistor.Youcanhaveanoverviewofthedifferentconnectionsyouhavetomakebylookingatthefollowingschematicdiagram:
First,plugtheDHT11sensortothebreadboard.Then,connectpinnumber1and2ofthesensorusingthe4.7kohmresistor.
Now,wearegoingtoconnectthepowersupply.Connectpinnumber1ofthesensortotheArduino5V,andpinnumber4totheArduinoGND.Finally,connectpinnumber2oftheDHTsensortotheArduinopinnumber7.
Attheend,theconnectionsshouldlooklikethefollowingscreenshot:

Youarenowdonewiththehardwareconfigurationofthisprojectandyoucanmovetothenextstep,thatis,settingupyourGoogleAccountforthisproject.

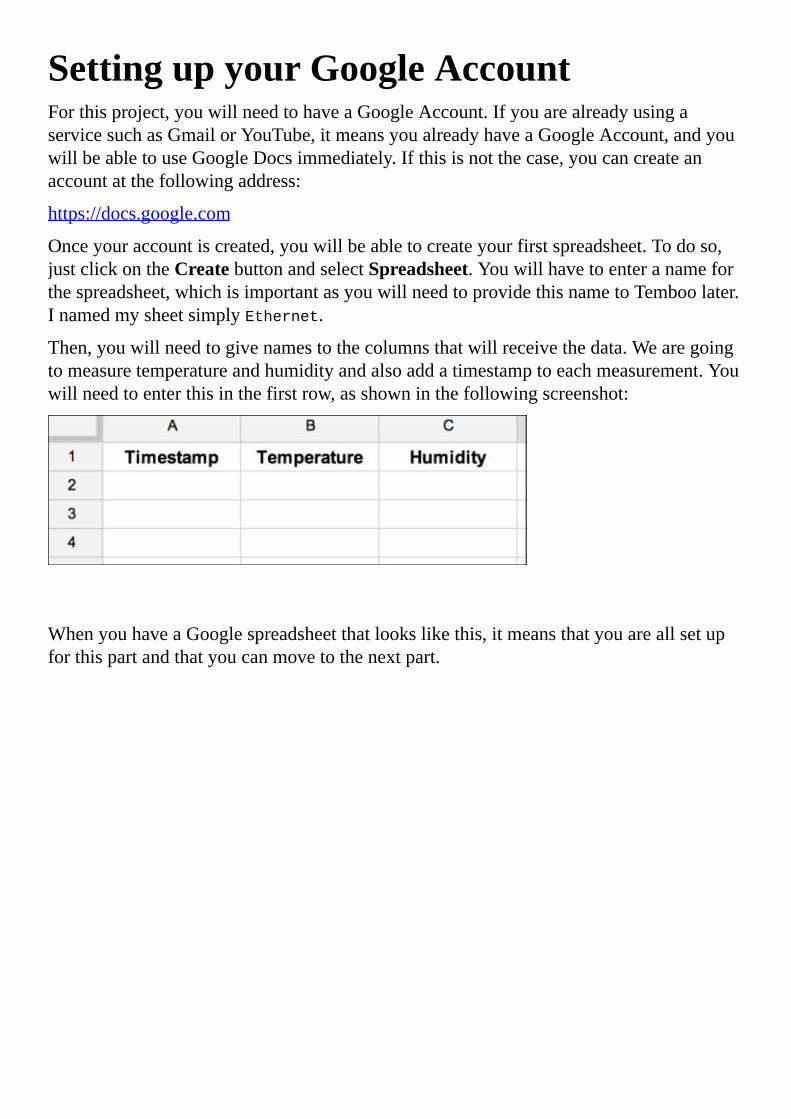
SettingupyourGoogleAccountForthisproject,youwillneedtohaveaGoogleAccount.IfyouarealreadyusingaservicesuchasGmailorYouTube,itmeansyoualreadyhaveaGoogleAccount,andyouwillbeabletouseGoogleDocsimmediately.Ifthisisnotthecase,youcancreateanaccountatthefollowingaddress:
https://docs.google.com
Onceyouraccountiscreated,youwillbeabletocreateyourfirstspreadsheet.Todoso,justclickontheCreatebuttonandselectSpreadsheet.Youwillhavetoenteranameforthespreadsheet,whichisimportantasyouwillneedtoprovidethisnametoTemboolater.InamedmysheetsimplyEthernet.
Then,youwillneedtogivenamestothecolumnsthatwillreceivethedata.Wearegoingtomeasuretemperatureandhumidityandalsoaddatimestamptoeachmeasurement.Youwillneedtoenterthisinthefirstrow,asshowninthefollowingscreenshot:
WhenyouhaveaGooglespreadsheetthatlookslikethis,itmeansthatyouareallsetupforthispartandthatyoucanmovetothenextpart.


CreatingyourTembooaccountThenextstepistocreateanaccountonTemboo.Todothis,simplygotothefollowingaddress:
https://www.temboo.com/
Youwillbegreetedwithapagethatasksyoutoenteryoure-mailaddress.
Onceyouraccountiscreated,youwillbetakentotheTemboomainpage.Youwillhavemanychoicesatthisstage,buttheonewearelookingforisDevices,whichisdisplayedinthefollowingscreenshot:
Insidethedevicespage,TembooproposesatoolcalledDeviceCoder.ThistoolisintendedtogeneratemostofthecodeforuswhenweuseaplatformsuchastheArduinoYun,orinourcase,theArduinoEthernetshield.
Simplyclickontherightchoice,whichcorrespondstootherArduinodevicessuchastheEthernetshield,asshowninthefollowingscreenshot:

Then,youwillbeaskedwhichkindofsensoryouwanttouse.Ofcourse,Temboocannotlisteverypossiblesensorwecoulduseforthiskindofproject.Therefore,theDHT11sensorisnotinthelistofpossibledevices.However,wewillfixthisbyrewritingpartofthegeneratedcode.Fornow,simplychooseGenericsensor.Theninthenextmenu,selectSpreadsheet.
Youwillthenbetakentoanewmenuwhereyoucanconfigureyourdevice.Asthisisyourfirsttimeconfiguringthedevice,youwillbeaskedtocreatenewTemboocredentialsforyourEthernetshield.ATemboocredentialisasetofparametersthatarestoredontheTembooserverssothatyoudon’thavetoenterthemlaterwhiledevelopingyourapplications.
EnterthedetailsaboutyourArduinoboardandEthernetshieldinthecredentialsbox,asshowninthefollowingscreenshot:

Then,justasyouselectedtoworkwithaspreadsheet,youwillalsoneedtoenteryourGoogleAccountcredentials.WewilluseittoaccessGoogleDocsandalsointhefinalpartofthechaptertointerfacewithGmail.
EnterallyourGoogleAccountinformationinthebox,whichisshowninthefollowingscreenshot:

ForthenameofmyGoogleAccountcredential,IusedEthernetGmail.
NotethatifyouhavetheGoogle2-Stepauthenticationmethodactivated,youwillneedtoprovideanapplication-specificpasswordhere.Thisisdoneforsecurityreasons,soyourGoogleAccountdoesn’tgetcompromisedifTemboogetscompromised.Youcanfindmoreinformationaboutapplication-specificpasswordsathttps://support.google.com/accounts/answer/185833?hl=en.
YoucanalsochoosenottoenteryourGoogleinformationatthispoint.However,inthatcase,youwillneedtoenteritinsidetheArduinosketchandmodifythissketchslightly.Tofindmoreinformationaboutthis,youcanvisithttps://www.temboo.com/arduino/yun/update-google-spreadsheet.
Youwillalsobeaskedtogiveanameofaspreadsheetyoupreparedbefore.Simplyenterthisnameinthecorrectbox,asshowninthefollowingscreenshot:
Forexample,InamedmyspreadsheetEthernet:

Afterthat,youwillhavetoselectthedeviceyouwillbeworkingwithtologdatatothespreadsheet.Thisiswhereyouselectthecredentialsthatwecreatedbefore,asshowninthefollowingscreenshot:
YouwillalsoneedtogiveanametotheprojectyoujustcreatedsoyourArduinosketchwilllateronknowwheretosendthedata.InamedminearduinoTemperatureSpreadsheet.Ifyoudecidetouseanothername,youwillhavetomakeasmallmodificationinthecodelater.
Whenthisisdone,youwillbepromptedtodownloadacompressedfilethatcontainstwoArduinocodefiles.Downloadit,unzipit,andhavealookatit.Itwillappearlikethefollowingscreenshot:
ThereshouldbeanArduinofileandanotherfilecalledTembooAccount.h.Thislastfileisthemostimportantasitcontainsyourcredentialsfortheproject.YouwillneedtousethisfilefortherestoftheprojectinplaceofthefilethatisincludedintheGitHubrepositoryoftheproject.


LoggingdatainaspreadsheetAfterfinishingtheconfigurationofourdeviceontheTemboowebsite,wedownloadedabunchoffilesfromTemboo.However,theArduinofilethatwasdownloadedisforagenericsensor.Inthissection,wearegoingtoadaptthisfileforourownneedsandseethedetailsofhowthecodeworks.
NoteYouwillneedtoinsertyourownTembooAccount.hfileinthesamefolderastheArduinofilesothatthecodecanwork.
ThemainArduinosketchforthissectionstartsbyincludingallthelibrariesthatarerequiredfortheprojecttoworkwithTemboo.NotethatwewillalsoinserttheDHTlibrary.Addthefollowinglibrariesinthecode:
#include<SPI.h>
#include<Dhcp.h>
#include<Dns.h>
#include<Ethernet.h>
#include<EthernetClient.h>
#include<Temboo.h>
#include"TembooAccount.h"
#include"DHT.h"
WealsodefinethepinonwhichtheDHTsensorisconnectedandthetypeofthesensor:
#defineDHTPIN7
#defineDHTTYPEDHT11
Then,wewillcreateaninstanceofthesensor:
DHTdht(DHTPIN,DHTTYPE);
WealsoassigntheMACaddressoftheEthernetshield.Notethathereitisnotexplicitlyassigned,buttheinformationisdirectlytakenfromyourTembooaccountfile.TheMACaddressisassignedwiththefollowingline:
byteethernetMACAddress[]=ETHERNET_SHIELD_MAC;
WewillalsocreateaninstanceofanEthernetclientasfollows:
EthernetClientclient;
Now,inthesetup()functionofthesketch,wewillgetanIPaddressfortheEthernetshieldviaDHCP,asshowninthefollowingcode:
Serial.print("DHCP:");
if(Ethernet.begin(ethernetMACAddress)==0){
Serial.println("FAIL");
while(true);
}
Serial.println("OK");
delay(5000);

StarttheDHTsensorwiththefollowingline:
dht.begin();
Then,intheloop()function,wewillmeasurethetemperatureandhumidityfromtheDHTsensorandconvertthemeasurementstostringswiththefollowingpieceofcode:
floath=dht.readHumidity();
floatt=dht.readTemperature();
inttemperature=(int)t;
inthumidity=(int)h;
Serial.println("Temperature:"+String(temperature));
Serial.println("Humidity:"+String(humidity));
Afterthemeasurementsaredone,wewillcallthefollowingfunctionthatwillactuallyconnecttothewebandlogthedatatoourGoogleDocsspreadsheet.WearegoingtoseethedetailsofthisfunctionthatwasautogeneratedbyTembooinamoment:
runAppendRow(temperature,humidity);
Finally,wewillalsoinsertsomedelaybetweeneachmeasurement.Irecommendusingalargedelay(Ichosetologdataeveryminutefordemonstrationpurposes)becausethenumberofcallsyoucanmaketoTembooislimited.Thedelayisinsertedwiththefollowingline:
delay(60000);
Youcanseethedifferentplansandpricingatthefollowinglink:
https://www.temboo.com/about/plans
Forexample,onthefreeplan,youarelimitedto1,000callspermonth,whichmeansthatyoucanlogmeasurementsapproximatelyevery44minutes.Onthefirstpaidplan,youcanlogonedatapointapproximatelyevery5minutes.Keeptheselimitationsinmindwhiledevelopingyourapplications.
Let’snowseethedetailsoftherunAppendRow()function.ItstartsbydeclaringthetypeofChoreowewanttouse.AChoreoistheequivalentofalibraryontheTembooservice.Forexample,wewilldeclarethatwewanttousethespecificlibrarytoinsertdatainarowintheGoogleDocsspreadsheet:
TembooChoreoAppendRowChoreo(client);
Wewillsetthedifferentinformationaboutyouraccount,suchasthenameoftheaccountandyourappkey.AllthesearealreadydefinedinyourTembooaccountfilethatyoudownloadedbefore,soyoudon’tneedtodefineanythingmore:
AppendRowChoreo.setAccountName(TEMBOO_ACCOUNT);
AppendRowChoreo.setAppKeyName(TEMBOO_APP_KEY_NAME);
AppendRowChoreo.setAppKey(TEMBOO_APP_KEY);
Then,youneedtosomehowspecifywherethedatashouldbelogged.Oncemore,alltheworkisdonebyTemboo:alltheinformationissavedontheTemboosideintheGoogle

Accountcredentialsyouhavesetbefore.IfyouusedthesamenameasIdidforthisexample,youdon’thavetomodifyanythinginthefollowingline:
AppendRowChoreo.setSavedInputs("arduinoTemperatureSpreadsheet");
NotethatthenewwaytoovercometheTemboocalllimitationisalsototransmitseveraldatapointsateachcalloftheTembooAPI,forexample,byappendingseveralrowsateachcall.Youcanmodifythecodeaccordinglyasanexercise.
Now,weneedtoformatthedatasoitcanberecordedcorrectlyinGoogleDocs.Whatyouwanttoinsertinagivenrowisatimestamp,thetemperature,andthehumidity.Forthetimestamp,wearesimplygoingtousethetimethathaspassedsincethedevicewaspoweredonwiththemillis()function.
Thedataitselfwillbecontainedinsideastringvariable,wherethevalueofeachcolumnwillbeseparatedwithacomma,asshowninthefollowingcode:
StringRowDataValue=String(millis())+","+String(temperature)+","+
String(humidity);
AppendRowChoreo.addInput("RowData",RowDataValue);
WealsoneedtosetwhichChoreowewanttousewiththefollowingline:
AppendRowChoreo.setChoreo("/Library/Google/Spreadsheets/AppendRow");
Then,wecanfinallyexecuteChoreoandstoretheresultinavariablecalledreturnCodeusingthefollowingline:
unsignedintreturnCode=AppendRowChoreo.run();
Ifthiscodeisequalto0afterChoreohasbeenexecuted,itmeansthateverythingwentfine,andwewillprintthecorrespondingmessageontheSerialMonitorfordebuggingpurposesusingthefollowingpieceofcode:
if(returnCode==0){
Serial.println("Done!\n");
}else{
//Anon-zeroreturncodemeanstherewasanerror
//Readandprinttheerrormessage
while(AppendRowChoreo.available()){
charc=AppendRowChoreo.read();
Serial.print(c);
}
Serial.println();
}
Ifthat’snotthecase,wewillprintthecorrespondingerrormessageontheSerialMonitor.Finally,wecloseChoreowiththefollowingline:
AppendRowChoreo.close();
NoteYoucanfindallthecodeforthissectionontheGitHubrepositoryofthischapterathttps://github.com/openhomeautomation/arduino-networking/tree/master/chapter6.

EvenifyoudecidetogetthecodedirectlyfromtheGitHubrepository,notethatyouwillneedtotakeyourownTembooaccountfileorenterthecorrectinformationintheTembooaccountfileprovidedonGitHub.
Wecannowtesttheproject.UploadthecodetotheArduinoboard,gotoGoogleDocs,andopenthespreadsheetoftheproject.Afteramoment,youshouldseethefirstmeasurementsbeingloggedinsidethespreadsheet,asshowninthefollowingscreenshot:
YoucanalsousetheintegratedplottingfunctionalitiesofGoogleDocstodisplaythemeasurementsonagraph.Youcansimplyselectthecolumnscorrespondingtothedata(A,B,andCintheexampledevelopedinthischapter),andclickontheInsertChartbuttoninsidethetoolbar.Youwillbepromptedtochoosethetypeofgraphyouwanttoplot.Isimplychosealinecharttoplotallthedataonasinglegraph.Thegraphwilllooksimilartothefollowingscreenshot:
Aseverythingisdynamic,youshouldseethatthegraphisupdatedinrealtimeasnewmeasurementscomein.NotethatasthisisaspreadsheetonGoogleDocs,itisaccessible

fromanywhereyouareintheworld,youjustneedtologintoyourGoogleAccount.


Sendingautomatede-mailsInthislastpartofthechapter,wearegoingtobuildonwhatwealreadydid,butchangetheapplicationslightly.Thistime,wearegoingtousetheEthernetshieldandTembootoautomaticallysende-mailswhenaconditionisreached.Asanexample,wewillsetaconditiononthemeasuredtemperature.Wheneverthetemperaturereachesagivenvalue,wewillsendane-mailtotheaddressofyourchoice,forexample,yourprofessionale-mailtokeepyouupdatedwhenyouareatwork.
ItstartsbygoingagaintotheDeviceCoderontheTemboowebsiteathttps://www.temboo.com/library/Library/Devices/Arduino/Others/.
ClickonGenericsensorandthenonEmail.Thistimeyouwon’thavetoenterthatmuchinformation.YourGmailaccountshouldalreadybesetfromtheprevioussectionandtheDeviceCodershouldautomaticallyselectyourEthernetshield.
Yousimplyneedtoenterthedestinatione-mail(forexample,yourprofessionale-mailaddressorthee-mailaddressfromafamilymember)andtheSubjectfieldofthee-mail.Donotworrynowaboutthevalueofthebodyofthee-mail;wewillchangeitlater:
Whenitisfinished,clickonGenerate.Asfortheprevioussection,youwillbepromptedtoenteranameforthisprojectsothatTembooknowswheretosende-mails.InamedminearduinoTemperatureEmail,butifyoudecidetouseanothername,youwillsimplyhavetochangeonelineinthecodelater.
Youcannowdownloadthegeneratedcode,whichwewillmodifyabit.Asfortheprevioussection,wearegoingtomodifytheArduinocode,butitisimportantthatyougetyourownTembooAcccount.hfilethatcontainstheinformationrelativetoyourownaccountonTemboo.
TheArduinosketchissimilartotheoneintheprevioussection,soIwillonlydiscussthemainchanges.
Intheloop()functionofthesketch,youneedtosetthelimitatwhichthee-mailwillbesentbyTemboo.Fordemonstrationpurposes,Iwillsetthelimitto23,asshowninthefollowingcode:

if(temperature>23){
Serial.println("\nTriggered!Calling/Library/Google/Gmail/SendEmail…");
//Sendemail
runSendEmail(temperature);
}
Youcanseethateverytimethetemperaturegoesabovethatlimit,analertwillbesentbyTembooviae-mail.Wewillseethedetailsofthisfunctioninamoment.Ialsoinserteda1-minutedelaybetweeneachmeasurement,sowedon’tcontinuouslysende-mailsifthethresholdiscrossed:
delay(60000);
Nowlet’slookatthedetailsoftherunSendEmail()function.ThisfunctionisresponsibleforcreatingthecorrectChoreotosendane-mail,setthebodyofthee-mail,andsenditviaTemboo.
ItstartsbycreatingthecorrectChoreotosendane-mailwiththefollowingline:
TembooChoreoSendEmailChoreo(client);
WealsodefinethedifferentinformationrelativetoyouraccountthatisdefinedintheTembooaccountfileyoujustdownloadedfromTemboo:
SendEmailChoreo.setAccountName(TEMBOO_ACCOUNT);
SendEmailChoreo.setAppKeyName(TEMBOO_APP_KEY_NAME);
SendEmailChoreo.setAppKey(TEMBOO_APP_KEY);
Then,thisiswhereyouneedtoenterthenameofthee-mailprojectthatyoujustcreatedonTemboo.IfyouusethesamenameasIdid,thereisnoneedtomodifyanythinginthefollowingline:
SendEmailChoreo.setSavedInputs("arduinoTemperatureEmail");
Wewillnowbuildthebodyofthee-mail,whichwillbestoredinastringvariable.Wesimplyuseagenericmessagewhereweattachthevalueofthemeasuredtemperatureandstoreeverythinginastring.Finally,wewilladdthefollowinglinesasaninputtotheChoreousedtosende-mails:
StringMessageBodyValue=String("Alert!Thecurrentsensorvalueis:")+
String(sensorValue);
SendEmailChoreo.addInput("MessageBody",MessageBodyValue);
JustbeforeexecutingChoreo,wedefinethatwewanttouseSendEmailChoreofromGmailusingthefollowingline:
SendEmailChoreo.setChoreo("/Library/Google/Gmail/SendEmail");
WecanfinallyexecuteChoreoandstoretheresultinavariable:
unsignedintreturnCode=SendEmailChoreo.run();
Asintheprevioussection,iftheresultis0,itmeanseverythingwentfine.Ifthisisnotthecase,wewillprinttheerrormessageontheSerialportfordebuggingusingthefollowing

pieceofcode:
if(returnCode==0){
Serial.println("Done!\n");
}else{
//Anon-zeroreturncodemeanstherewasanerror
//Readandprinttheerrormessage
while(SendEmailChoreo.available()){
charc=SendEmailChoreo.read();
Serial.print(c);
}
Serial.println();
}
Finally,wewillcloseChoreowiththefollowingline:
SendEmailChoreo.close();
NoteYoucanfindallthecodeforthissectionontheGitHubrepositoryofthischapterathttps://github.com/openhomeautomation/arduino-networking/tree/MASTER/chapter6.
Youcannowtestthesketch.ThefirstthingtodoistomakesurethatyouhaveyourownTembooaccountfileinthesamefolderastheArduinosketch.Then,uploadthesketchtotheArduinoboardandopentheSerialMonitor.Thefirstthingyoushouldseeistheconfirmationmessagethateverythingwentok:
DHCP:OK
Setupcomplete
Then,youshouldseethefirstmeasurementsontheSerialMonitor:
Temperature:21
Humidity:39
Dependingonthetemperaturevalue,youmightneedtopinchyoursensortotriggerthee-mailalert.Remember,intheexampleofthischapter,wesetavalueof23degreesforthetemperature.Afterawhile,ifthetemperaturereachesthethreshold,youshouldseethefollowingmessage:
Triggered!Calling/Library/Google/Gmail/SendEmail…
Afterawhile,thefollowingconfirmationmessageshouldappear:
Done!
YoucannowclosetheSerialMonitorandgocheckthee-mailaccountthatyousetonTemboo.YoushouldhavereceivedamessagewiththetitleyousetonTemboo,andyouwillalsoreceivethebodythatindicatesthegenericmessageyousetinthesketchalongwiththemeasuredtemperature.

SummaryInthischapter,wecreatedanotherInternetofThingsprojectusingthewebserviceTemboo.BasedonTemboo,webuilttwoexcitingapplications.ThefirstonewastoautomaticallylogmeasurementsinsideaGoogleDocsspreadsheet.Comparedtotheapproachwetookinthepreviouschapter,theadvantagehereisclearlythatGoogleDocsisthewidelyusedstandardtocreateandsharespreadsheets.Youcanaccessyourdatafromanywherejustbyusingawebbrowser,andyoucanalsoplotthedataandshareiteasilywithyourfriendsandfamily.
WealsobuiltanexcitingapplicationwhereweinterfacedourprojectwithGmailviaTemboo.Webuiltanautomatede-mailalertsystembasedonthemeasureddata.
Let’sseewhatthemajortakeawaysofthischapterwere.First,webuiltthehardwareoftheproject,withtheDHT11temperatureandhumiditysensorontopoftheArduinoEthernetshield.
Then,wesetupthedifferentaccountsthatwereneededfortheproject.WefirstcreatedaspreadsheetonGoogleDocsandconfigureditcorrectlysoitcanworkwithTemboo.Then,wealsocreatedaTembooaccountandconfigureditsothatyourEthernetshieldcansenddatatoTembooandlogmeasurementstoGoogleDocs.
Afterthesettingupphase,webuiltthefirstapplicationofthisproject,whichconsistedofloggingdatadirectlytoaGoogleDocsspreadsheet.WealsodisplayedthisdatausingtheGoogleDocsplottingcapabilities.
Finally,weusedTembooagaintocreateanautomatede-mailalertsystembysendingane-mailautomaticallytotheaddressofyourchoicewhenameasurementreachedagiventhreshold.
Asthisistheendofthisbook,let’sseewhatwelearnedabouttheArduinoEthernetshieldandwhatexcitingapplicationswecancreatewithit.
ThefirstpartofthebookwasallaboutrunningawebclientontheEthernetshield.WemadeafirsttestbyjusttryingouttheshieldandseeingwhetheritcouldconnecttotheInternetandgrabthecontentsofapage.Then,webuiltourfirstmeasurementsystem,wheretheEthernetshieldwasconnectingtoaserverrunningtoyourcomputertologsomedata.
Inthesecondpartofthebook,wegavemoreautonomytotheArduinoEthernetshieldbyrunningawebserverrightontheArduinoboard.Wemadethemeasurementprojectagain,butthistimebyhavingawebserverrunontheboardandloggingdatatoaSDcardinsertedintheshield.WealsoconnectedarelaytotheArduinoboardandwecontrolleditviaEthernet.
Finally,webuilttwoInternetofThingsprojectusingtheplatformsXivelyandTemboo.Inboththeseprojects,wesentdatatotheWebusingtheEthernetshieldsothatthisdatacanbeaccessedanddisplayedgraphicallyfromanywhereintheworld.
Toconcludethisbook,Ihopethatalltheinformationyoufoundinthedifferentchapters

willgiveyouthewilltobuildevenmoreexcitingapplications.TheArduinoEthernetshieldisoneofthebestwaystobuildamazingconnectedapplicationswithArduino,andthereisnolimittowhatyoucandowiththeconceptsyoulearnedinthisbook.

IndexA
account,Googlesettingup/SettingupyourGoogleAccount
account,Temboocreating/CreatingyourTembooaccount
application,buildingwithArduinoboardhardwarerequisites/Hardwareandsoftwarerequirementssoftwarerequisites/Hardwareandsoftwarerequirementshardwareconfiguration/Hardwareconfiguration
application,buildingwithArduinoEthernetshieldhardwarerequisites/Hardwareandsoftwarerequirementssoftwarerequisites/Hardwareandsoftwarerequirementshardwareconfiguration/Hardwareconfiguration
Arduinoboardwebserver,creatingon/CreatingawebserveronArduino
ArduinoEthernetShieldURL/Hardwareandsoftwarerequirements,Hardwareandsoftwarerequirements
ArduinoIDEURL/Hardwareandsoftwarerequirements
Arduinolibraryinstalling/Hardwareandsoftwarerequirements
ArduinoTemboolibraryURL/Hardwareandsoftwarerequirementsinstalling/Hardwareandsoftwarerequirements
ArduinoUnoURL/Hardwareandsoftwarerequirements,Hardwareandsoftwarerequirements
automatede-mailssending/Sendingautomatede-mails

BBreadboard
URL/Hardwareandsoftwarerequirements,Hardwareandsoftwarerequirements

CCOMpin,relay/Hardwareconfigurationconnection,ArduinoEthernetShield
testing/Testingyourconnection

Ddata
sending,toserver/Sendingdatatoaserverlogging,onSDcard/LoggingdataonanSDcardplotting/Plottingthedatalocallysending,toXively/SendingdatatoXivelylogging,inGoogleDocsspreadsheet/Loggingdatainaspreadsheet
databaseincomingdata,logginginto/Logincomingdatainadatabase
delay()function/TestingyourconnectionDeviceCoder,Temboo/CreatingyourTembooaccount
URL/Sendingautomatede-mailsDHT11sensorArduinoEthernetShield
URL/Hardwareandsoftwarerequirements,Hardwareandsoftwarerequirements
DHTlibraryURL/Hardwareandsoftwarerequirements,Hardwareandsoftwarerequirements,Hardwareandsoftwarerequirements

Ee-mails
sending/Sendingautomatede-mailsEasyPHP
URL/Hardwareandsoftwarerequirements

Fflotlibrary
URL/Hardwareandsoftwarerequirements

GGNDpin,relay/HardwareconfigurationGoogleAccount
settingup/SettingupyourGoogleAccountGoogleDocs
URL/SettingupyourGoogleAccountGoogleDocsspreadsheet
data,logging/Loggingdatainaspreadsheet

Hhardwareconfiguration
fordata,logginginGoogleDocs/Hardwareconfigurationhardwareconfiguration,ArduinoEthernetShield/Hardwareconfigurationhardwareconfiguration,InternetofThingsproject/Hardwareconfigurationhardwarerequirements,ArduinoEthernetshield/Hardwareandsoftwarerequirementshardwarerequisites
application,buildingwithArduinoEthernetshield/Hardwareandsoftwarerequirementsforbuilding,applicationwithArduinoboard/Hardwareandsoftwarerequirementsforcontrollingobjectsremotely/HardwareandsoftwarerequirementsforInternetofThingsproject/Hardwareandsoftwarerequirementsfordata,logginginGoogleDocs/Hardwareandsoftwarerequirements

Iinputpins,relay
VCCpin/HardwareconfigurationGNDpin/HardwareconfigurationSIGpin/Hardwareconfiguration
InternetofThingsprojecthardwarerequisites/Hardwareandsoftwarerequirementssoftwarerequisites/Hardwareandsoftwarerequirements

JJSONformat
URL/LogincomingdatainadatabaseJumperwires
URL/Hardwareandsoftwarerequirements,Hardwareandsoftwarerequirements

LLAMP
URL/HardwareandsoftwarerequirementsLINKLED/Hardwareconfiguration

MMAMP
URL/HardwareandsoftwarerequirementsMicroSDcard
URL/HardwareandsoftwarerequirementsMongoDB
URL/Hardwareandsoftwarerequirements

NNCpin,relay/HardwareconfigurationNOpin,relay/Hardwareconfiguration

Ooutputpins,relay
COMpin/HardwareconfigurationNCpin/HardwareconfigurationNOpin/Hardwareconfiguration

PPHP
used,forbuildingserver-sideapplication/Logincomingdatainadatabase

Rrecordeddata
visualizing/Visualizingtherecordeddatarelay
testing/Testingtherelaycontrolling,remotely/Controllingtherelayremotelycontrolling,fromdistantlocation/Controllingtherelayfromanywhere
remoteobjects,controllinghardwarerequisites/Hardwareandsoftwarerequirementssoftwarerequisites/Hardwareandsoftwarerequirementshardwareconfiguration/Hardwareconfiguration
resultsdisplaying/Displayingtheresults
runAppendRow()function/Loggingdatainaspreadsheet

SSDcard
data,loggingon/LoggingdataonanSDcardserver
data,sendingto/SendingdatatoaserverSIGpin,relay/Hardwareconfigurationsketch
writing,fortestingArduinoEthernetShieldconnection/Testingyourconnection
softwarerequirements,ArduinoEthernetshield/Hardwareandsoftwarerequirementssoftwarerequisites
forbuildingapplication,withArduinoEthernetshield/Hardwareandsoftwarerequirementsforbuilding,applicationwithArduinoboard/Hardwareandsoftwarerequirementsforcontrollingobjectsremotely/HardwareandsoftwarerequirementsforInternetofThingsproject/Hardwareandsoftwarerequirementsfordata,logginginGoogleDocs/Hardwareandsoftwarerequirements
SQLiteURL/Hardwareandsoftwarerequirements

TTeleduinolibrary
URL/HardwareandsoftwarerequirementsTeleduinoservice
URL/ControllingtherelayfromanywhereTemboo
account,creating/CreatingyourTembooaccountTembooaccount
creating/CreatingyourTembooaccountURL/CreatingyourTembooaccount
TembooAccount.hfile/CreatingyourTembooaccountTimelibrary
URL/LoggingdataonanSDcard

Uupdate()function/Displayingtheresults

VVCCpin,relay/Hardwareconfiguration

WWAMP
URL/Hardwareandsoftwarerequirementswebserver
creating,onArduinoboard/CreatingawebserveronArduino

XXively
data,sendingto/SendingdatatoXivelyXivelyaccount
creating/CreatingyourXivelyaccountURL,forsignup/CreatingyourXivelyaccount