atn gis support arcgis: arcmap layout view
TRANSCRIPT

ATN GIS Supporthttp://help.unc.edu/gis
ArcGIS: ArcMap Layout View

ATN GIS Supporthttp://help.unc.edu/gis
Agenda
• The Layout Interface• Using Templates• Page properties• Data Frame Properties• Toolbars• Layout elements• Fine-tuning• Finishing the layout

ATN GIS Supporthttp://help.unc.edu/gis
The Layout Interface - Empty

ATN GIS Supporthttp://help.unc.edu/gis
The Layout Interface – In use

ATN GIS Supporthttp://help.unc.edu/gis
Using Templates• Opening a Layout View window
– Select Layout View from the View menu, OR– Click on the Layout View button
• Creating a Layout from a Template– Open the Template file (*.mxt)
*Also available during startup
– Add Data to the Map template– Save work as a Map Document
• Creating a Template– Create the desired layout structure (you can decide
whether or not to include data in the template)– Select “Save As…” from the file menu.– Choose “ArcMap Templates(*.mxt)” as the
Save As Type

ATN GIS Supporthttp://help.unc.edu/gis
Using Templates (cont.)• Special Templates – There is a template
folder in the bin directory. This contains the templates available at startup. Some of these are standard templates, but some are full base maps for basic mapping needs. Be sure to explore these time-savers
• Switching Templates – There is a “Change Layout” button on the far right of the Layout toolbar. Click this and you will get a dialog for converting to a different layout template.
ATN GIS Supporthttp://help.unc.edu/gis
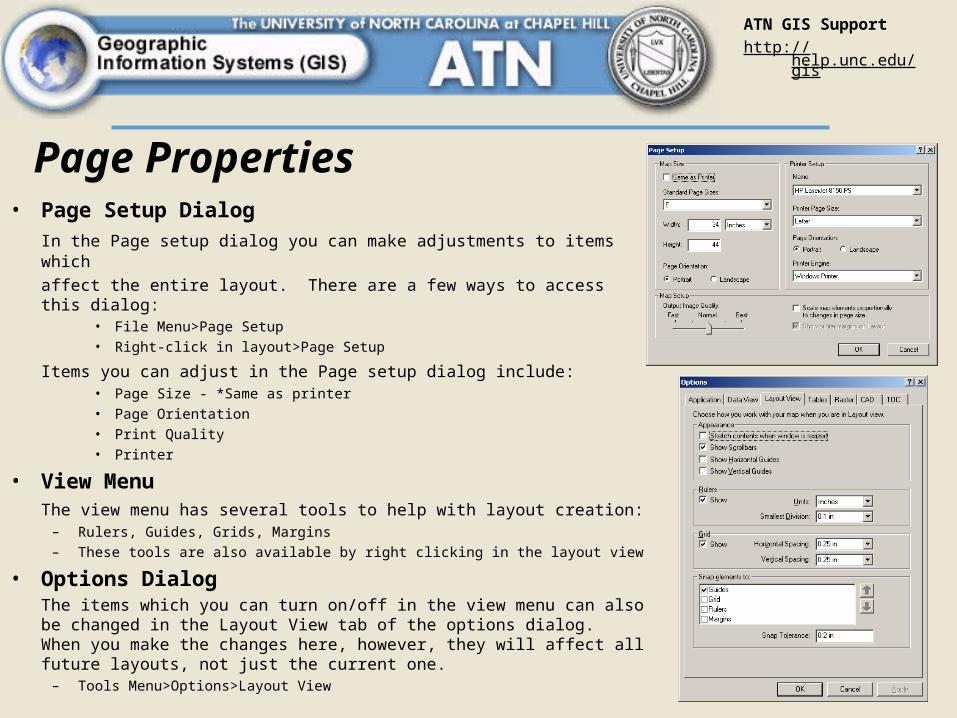
Page Properties• Page Setup Dialog
In the Page setup dialog you can make adjustments to items which
affect the entire layout. There are a few ways to access this dialog:• File Menu>Page Setup
• Right-click in layout>Page Setup
Items you can adjust in the Page setup dialog include:• Page Size - *Same as printer
• Page Orientation
• Print Quality
• Printer
• View MenuThe view menu has several tools to help with layout creation:
– Rulers, Guides, Grids, Margins
– These tools are also available by right clicking in the layout view
• Options DialogThe items which you can turn on/off in the view menu can also be changed in the Layout View tab of the options dialog. When you make the changes here, however, they will affect all future layouts, not just the current one.
– Tools Menu>Options>Layout View

ATN GIS Supporthttp://help.unc.edu/gis
Data Frame Properties• Right-Click on Data frame in Table of Contents>Properties
There are several items which can be set for the data frame in the Data Frame properties dialog. The items of concern when working in layouts are available in the Frame and Grid Tabs
• Frame Tab
– Border – Add a border in the color and style of your liking to the data frame
– Background – Select a background color for the data frame
– Drop Shadow – gives a subtle 3d effect to the layout
• Grids Tab
– Add Graticule – Add a grid based on the coordinate system
– Add Measured Grid – Add a grid with custom dimensions
– Add Reference Grid – Add a grid with Row column ID info

ATN GIS Supporthttp://help.unc.edu/gis
Toolbars• Tools Toolbar – Same Toolbar that was available in
the data view. You can actually zoom in and out of data frames directly on the layout!
• Layout Toolbar – Similar to the Tools Toolbar. Used to navigate around the layout page.
• Data Frame Toolbar – Has tools for rotating your data frame. You can choose a set interval, or you can “eyeball” it

ATN GIS Supporthttp://help.unc.edu/gis
Layout Elements• Main Elements - Data Frame, North Arrow, Scale Bar/Text, Legend• Other Elements – Titles, Graphics, Neat-line, Picture, Object• Adding and deleting elements – All elements are available in the Insert menu.
Just select the item from the insert menu. Some elements open a wizard because they need input before being added to the layout. To delete any element, first click on it to select it, then hit the delete key. You may also choose delete from the edit menu if you prefer.
• Moving and Resizing Elements – Click on an element to select it. When you mouse-over the element, you will notice the pointer with 4 arrows pointing out from it. When you see this cursor, you can click and drag to relocate the element. To resize an element, mouse over one of the corners of the selected element. When you get the two diagonal arrows click and drag to resize the item
• Element Properties – You can access element properties by double clicking on the element. You can also select the element, right-click on it, then choose properties. Properties vary by element.
ATN GIS Supporthttp://help.unc.edu/gis
Fine-Tuning
• Detailed Element Arrangement – Available from the Draw toolbar. Also available if you select the element(s) and right click.– Align – Line up elements with one another or with page– Distribute – Spread items evenly across the page– Nudge – Useful when you need to make very small changes– Rotate or Flip – Self-explanatory *Graphics only
• Grouping/Ungrouping – Grouping elements can make it easier to work with several items at once. Ungrouping can allow you to edit specific parts of complex items.
• Order – Change the drawing order of elements on a Layout

ATN GIS Supporthttp://help.unc.edu/gis
Finishing the Layout
• Exporting – Select Export Map from the file menu. Choose a format to export your map to (.tiff, .jpg, .emf, etc.) and click on “Options” to change the quality of the output image. Note: Select your format before setting options as the options vary based on the format used.
• Printing – Most of the ArcGIS printing options are available in the Page Setup menu. Once you are ready to print, select Print from the file menu. You will get a standard Windows printing dialog.