auditcon 2 series software reference manual - kaba-mas.com · 4 introducing the auditcon ® 2...
TRANSCRIPT

Auditcon® 2 Series Software
REFERENCE MANUAL

© 2005-2010 Kaba Mas
All rights reserved
Document Number 3054.025Rev. E - 08/10
Trademarks
The following items are trademarks or registered trademarks of Kaba Mas in the UnitedStates and/or other countries.
• Auditcon
• PowerStar Technology
• Smart Key
Windows, Windows XP, Windows Vista, and Windows 7 are registered trademarks ofMicrosoft Corporation.
Intel and Pentium are registered trademarks of Intel Corporation.
Adobe, Acrobat, and Reader are registered trademarks of Adobe Systems Incorporated.
Notice: The information in this manual is subject to change without notice anddoes not represent a commitment on the part of the Kaba Mas. KabaMas shall not be liable for technical or editorial errors or omissions con-tained herein; nor for incidental or consequential damages resulting fromthe furnishing, performance or use of this material.

Table of Contents
CHAPTER 1INTRODUCING THE AUDITCON® 2 SERIES SOFTWARE .....................1
Kaba Mas Welcome.....................................................................................................1The Auditcon® 2 Series Software Program Package ..................................................1System Overview ........................................................................................................1System Components ...................................................................................................2
PC Based Computer System ................................................................................2High Security Locks ..............................................................................................2Smart Keys ............................................................................................................3
Key Types ........................................................................................................3Lock Modes ........................... .......................................................................................3Personnel Classifications ............................................................................................4
Master User ...........................................................................................................4Access User..........................................................................................................4Supervisor .............................................................................................................4Subordinate User ...................................................................................................4Time Delay Override User .....................................................................................4User ID ..................................................................................................................5Combination ...........................................................................................................5Activity Chart .........................................................................................................5
System Processes ......................................................................................................6Program Lock ........................................................................................................6Add/Delete Users to/from Lock .............................................................................6Upload TIme Windows to Lock ..............................................................................7Retrieve & Report on Audit Download from Lock ..................................................7Retrieve & Report on User Table Download from Lock .........................................7
CHAPTER 2AUDITCON® 2 SERIES SOFTWARE ..............................................9
Software Conventions .................................................................................................9Start the Auditcon 2 Series Software Program............................................................9Main Menu ...................................................................................................................9
Menu Bar ................................................................................................................... 10Toolbar .......................................................................................................................11Status Bar .................................................................................................................. 11
File Menu ...................................................................................................................12Print Setup .................................................................................................................12Exit .............................................................................................................................12
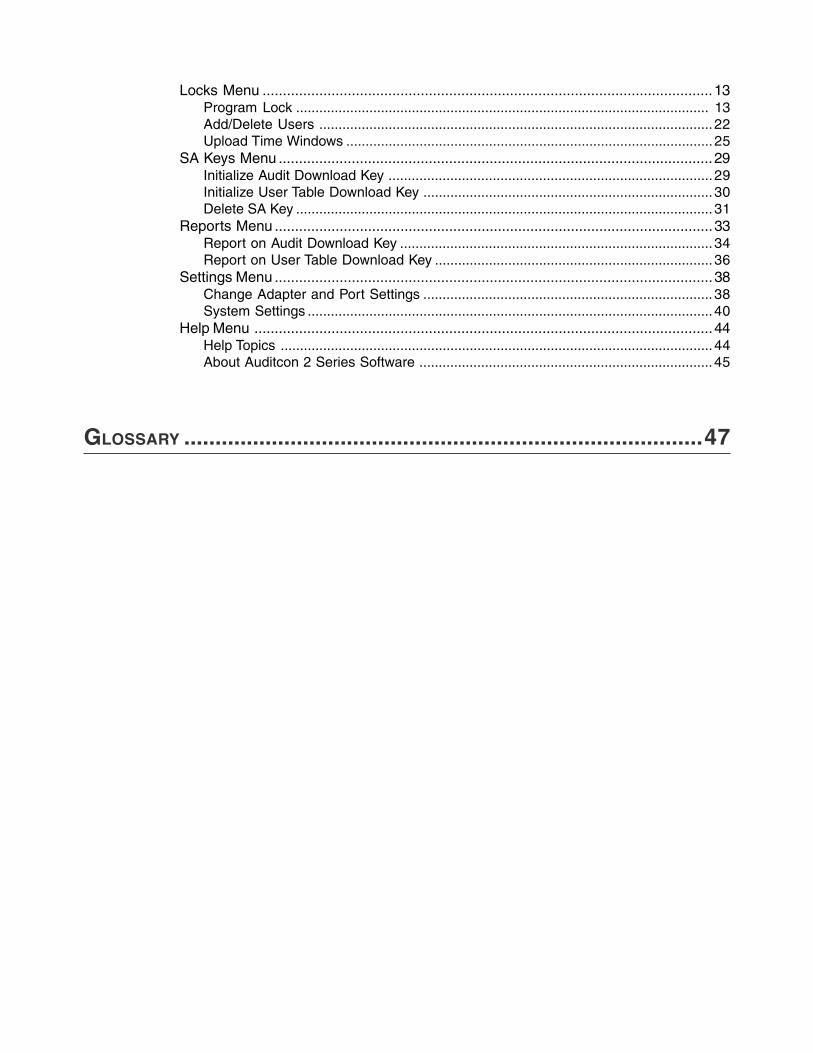
Locks Menu ...............................................................................................................13Program Lock ........................................................................................................... 13Add/Delete Users ...................................................................................................... 22Upload Time Windows ...............................................................................................25
SA Keys Menu ...........................................................................................................29Initialize Audit Download Key .................................................................................... 29Initialize User Table Download Key ........................................................................... 30Delete SA Key ............................................................................................................ 31
Reports Menu ............................................................................................................33Report on Audit Download Key ................................................................................. 34Report on User Table Download Key ........................................................................ 36
Settings Menu ............................................................................................................38Change Adapter and Port Settings ........................................................................... 38System Settings ......................................................................................................... 40
Help Menu .................................................................................................................44Help Topics ................................................................................................................ 44About Auditcon 2 Series Software ............................................................................ 45
GLOSSARY ...................................................................................47

Introducing the Auditcon® 2 Series Software 1Document Number 3054.025 Rev. E - 08/10
CHAPTER 1
INTRODUCING THE AUDITCON® 2 SERIES SOFTWARE SYSTEM
Kaba Mas Welcome
Kaba Mas, part of the world-wide Kaba group, is the world’s leading manufacturer andsupplier of high security, electronic safe locks. Our complete line of self powered, battery,and mechanical locks meets virtually every safe lock requirement. Kaba Mas is dedicatedto satisfying end-user needs for security, safety, and convenience. We welcome you tothe world of Kaba Mas security and the Auditcon® 2 Series Software system.
The Auditcon® 2 Series Software Program Package
The Auditcon 2 Series Software implementation package includes:
• The Auditcon 2 Series Software Install CD, Version 1.2.0
• USB Adapter
• Serial Key Reader
• 1 Supervisor Audit Key (Red SA Key)
• Auditcon 2 Series Software Getting Started Guide
• Auditcon 2 Series Software Reference Manual (Included on Install CD inelectronic format)
Note: If you purchased the Software Only package, you will only receive theInstall CD (with Reference Manual included) and the Getting StartedGuide.
If you are missing any of the above items, contact Kaba Mas Customer Service at 1(800)950-4744.
Note: If you will be working with Model 552 locks and wish to update the lockdate and time using the software, the teal colored B key (P/N 202023) isrequired. This item is ordered separately.
Introducing the Auditcon® 2 Series Software Document Number 3054.025 Rev. E - 08/102
System Overview
The Auditcon 2 Series Software allows PC based programming of lock data instead ofmanual entry at the lock. Additionally, it allows the retrieval and reporting of data stored inthe lock.
Upload Data to Lock
As an alternative to defining setup data and user data manually at the lock, certaintypes of data can be defined at the PC using the Auditcon 2 Series Software and theinformation can then be uploaded (transferred) to the lock via a Smart Key.
Download Data from Lock
There are two types of data that can be “downloaded” (retrieved) from the Auditcon 2Series locks using the Auditcon 2 Series Software. Lock audit data and user tabledata can be retrieved from the lock using a Smart Key and can then be reported on atthe PC.
It is important that you understand how the entire system operates, even though many ofthe operations will be carried out by other personnel. Before you start using the program,be sure to read the next few pages. They tell you what this package includes, the equip-ment you need to use the software, and identify the components of the system and thepeople who will be working with them.
The Auditcon 2 Series Software system consists of three basic components:
1) PC Based Computer Program
The PC Based Computer System is actually comprised of hardware and software compo-nents, including a Smart Key Reader, consisting of two Smart Key ports. The softwarecomponent is the PC based Auditcon 2 Series Software.
2) High Security Locks
The Auditcon locks are highly secured, advanced design locks. The original design wasfirst developed for use on United States Government safes containing classified material.There are currently 4 different models of the Auditcon lock family that will operate inconjunction with the Auditcon 2 Series Software. They are as follows:
• Auditcon 2 Series Model 252
• Auditcon 2 Series Model 552
• Auditcon Series Model 500
• Auditcon 2100
Some functions of the software will be limited depending on which type of lock you areworking with at the time.
Introducing the Auditcon® 2 Series Software 3Document Number 3054.025 Rev. E - 08/10
3) Smart Keys
Smart Keys are used by everyone who works with the Cencon System 2000, whether itbe at the PC using the software program or at the lock. A Smart Key is actually a DallasSemiconductor electronic device imbedded in a plastic or metal fob. The keys are de-signed to be carried on a key ring like a traditional key. The keys are placed in the keyreader attached to the PC and are initialized with unique data. These sophisticated elec-tronic keys can hold large amounts of both temporary and permanent information.
Key Types
There are two types of Smart Keys that are used with the Auditcon 2 Series Software.They are designated and used as follows:
• Supervisor Audit (SA) Key - The red Supervisor Audit key is initialized at the PCkey reader with the information needed to take it into the field and program a lock.This key can also be used to retrieve audit records or user tables from a lock.
• Date & Time (B) Key - The teal Date & Time key is only required if you are settingthe date and time in a Model 552 lock. It is initialized at the PC key reader with theinformation needed to take it into the field and program a lock.
The memory in the key is used to transfer data from the computer to the lock and fromthe lock to the computer. The data read from the key by the lock is used to define locksetup values, users, and time windows. Data can also stored in the key by the lock, suchas the data from an audit download. The key can then be read by the computer to providea record of lock activity.
Lock Modes
A lock is shipped from the factory with default lock “setup” values and a pre-set PIN forunlocking the lock. This is referred to as Factory Mode.
The lock has two modes of operation: Independent Mode and Supervisory/Subordi-nate Mode. Within each operation mode, two access modes are available: Single Useraccess and Dual User access. In Single User access, only one combination is requiredto open the lock. In Dual User access, two combinations must be correctly and consecu-tively entered to open the lock.
• Independent Mode - To operate in Independent Mode, the Master User must firstadd Access Users. One (Single User access) or two (Dual User access) combinationsare required to open the lock.
• Supervisory/Subordinate Mode (Super/Sub Mode) - To operate in Super/Sub Mode,the Master User must first add a Supervisor. Subordinate Users must then be addedby and assigned to a Supervisor. A Supervisor must enable lock access for Sub-ordinate User(s).
Introducing the Auditcon® 2 Series Software Document Number 3054.025 Rev. E - 08/104
In Single User access, an enabled Subordinate User combination is required to openthe lock.
In Dual User access, two enabled Subordinate User combinations are required toopen the lock.
Once a Supervisor combination and the Supervisor ID are re-entered to disable lockaccess for the Subordinate User(s) assigned to that Supervisor ID, the SubordinateUser combinations for that will no longer open the lock.
To remove a lock from an operational mode, one can “shelve” the lock which places it inShelved Mode. Most lock values are returned to the factory default.
Personnel Classifications
There are five different classifications of lock personnel:
• Master User - The Master User performs the initial lock setup activities and can alsoshelve the lock. There is a maximum of one Master User per lock. The Master Usercombination will not open the lock.
• Access User - In Independent mode, a user added by the Master User. An AccessUser can open the lock.
• Supervisor - In Super/Sub mode, a user added by the Master User who has theability to add/delete Subordinate Users. The maximum number of Supervisors perlock varies according to lock model. A Supervisor cannot open the lock.
• Subordinate User - In Super/Sub mode, a user who is added by and assigned to aSupervisor. Subordinates can open the lock when enabled by a Supervisor.
• Time Delay Override User - When Time Delay is set in a lock, designated Users(Access or Subordinate) become Time Delay Override Users.
User ID
A User ID is a two-digit number that represents a user. In all models, User ID 00 isreserved for the Master User. For a Model 252 lock, the User IDs available for assign-ment are 01 through 20. For a Model 552, User IDs 01 through 99 are available forassignment. All operations performed by users require the entry of the User’s ID as thefirst two digits of the combination. User IDs are assigned by the Master User or by aSupervisor.
In Super/Sub mode certain User IDs are reserved for Supervisors. For a Model 252 inSuper/Sub mode, User IDs 01 through 03 are reserved for a Supervisor. For a Model552 User IDs 01 through 05 are reserved for Supervisors.
Introducing the Auditcon® 2 Series Software 5Document Number 3054.025 Rev. E - 08/10
Mas
ter
Use
rA
cces
s U
ser
Supe
rvis
orSu
bord
inat
eU
ser
Key
pad
Com
man
d
Tim
e D
elay
Ove
rrid
e U
ser
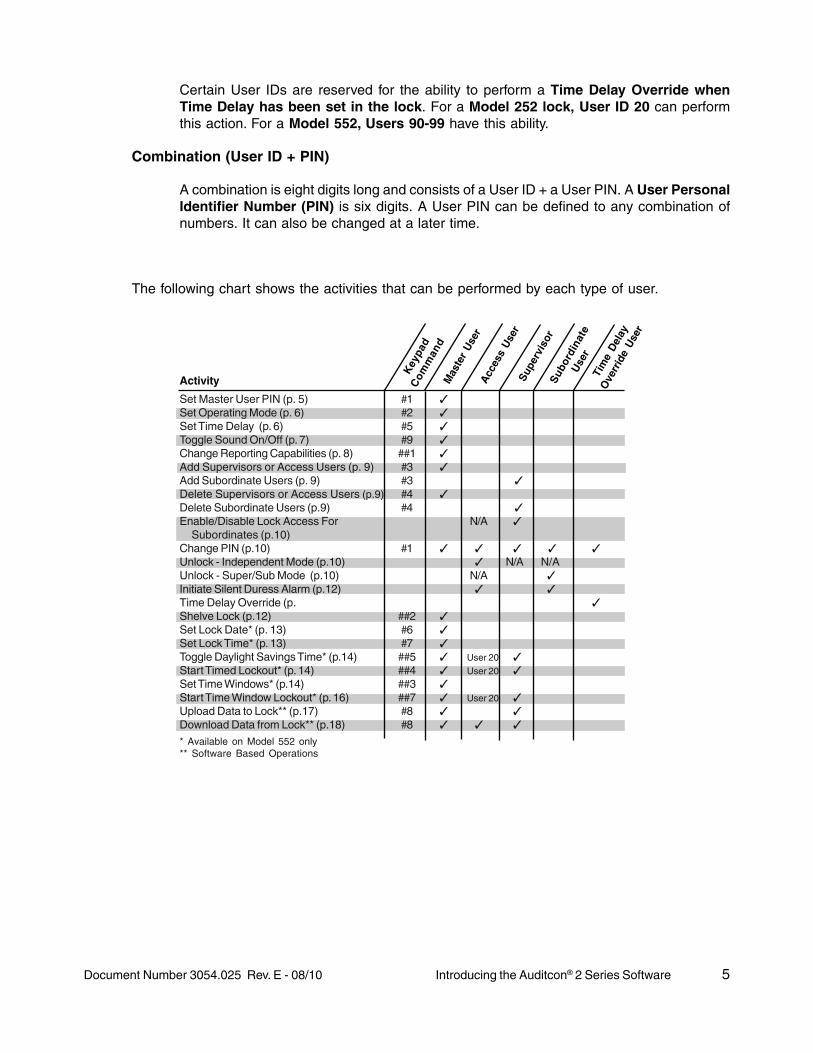
Certain User IDs are reserved for the ability to perform a Time Delay Override whenTime Delay has been set in the lock. For a Model 252 lock, User ID 20 can performthis action. For a Model 552, Users 90-99 have this ability.
Combination (User ID + PIN)
A combination is eight digits long and consists of a User ID + a User PIN. A User PersonalIdentifier Number (PIN) is six digits. A User PIN can be defined to any combination ofnumbers. It can also be changed at a later time.
The following chart shows the activities that can be performed by each type of user.
Activity
Set Master User PIN (p. 5) #1 ✓Set Operating Mode (p. 6) #2 ✓Set Time Delay (p. 6) #5 ✓Toggle Sound On/Off (p. 7) #9 ✓Change Reporting Capabilities (p. 8) ##1 ✓Add Supervisors or Access Users (p. 9) #3 ✓Add Subordinate Users (p. 9) #3 ✓Delete Supervisors or Access Users (p.9) #4 ✓Delete Subordinate Users (p.9) #4 ✓Enable/Disable Lock Access For N/A ✓ Subordinates (p.10)Change PIN (p.10) #1 ✓ ✓ ✓ ✓ ✓Unlock - Independent Mode (p.10) ✓ N/A N/AUnlock - Super/Sub Mode (p.10) N/A ✓Initiate Silent Duress Alarm (p.12) ✓ ✓Time Delay Override (p. ✓Shelve Lock (p.12) ##2 ✓Set Lock Date* (p. 13) #6 ✓Set Lock Time* (p. 13) #7 ✓Toggle Daylight Savings Time* (p.14) ##5 ✓ User 20 ✓Start Timed Lockout* (p. 14) ##4 ✓ User 20 ✓Set Time Windows* (p.14) ##3 ✓Start Time Window Lockout* (p. 16) ##7 ✓ User 20 ✓Upload Data to Lock** (p.17) #8 ✓ ✓Download Data from Lock** (p.18) #8 ✓ ✓ ✓
* Available on Model 552 only** Software Based Operations
Introducing the Auditcon® 2 Series Software Document Number 3054.025 Rev. E - 08/106
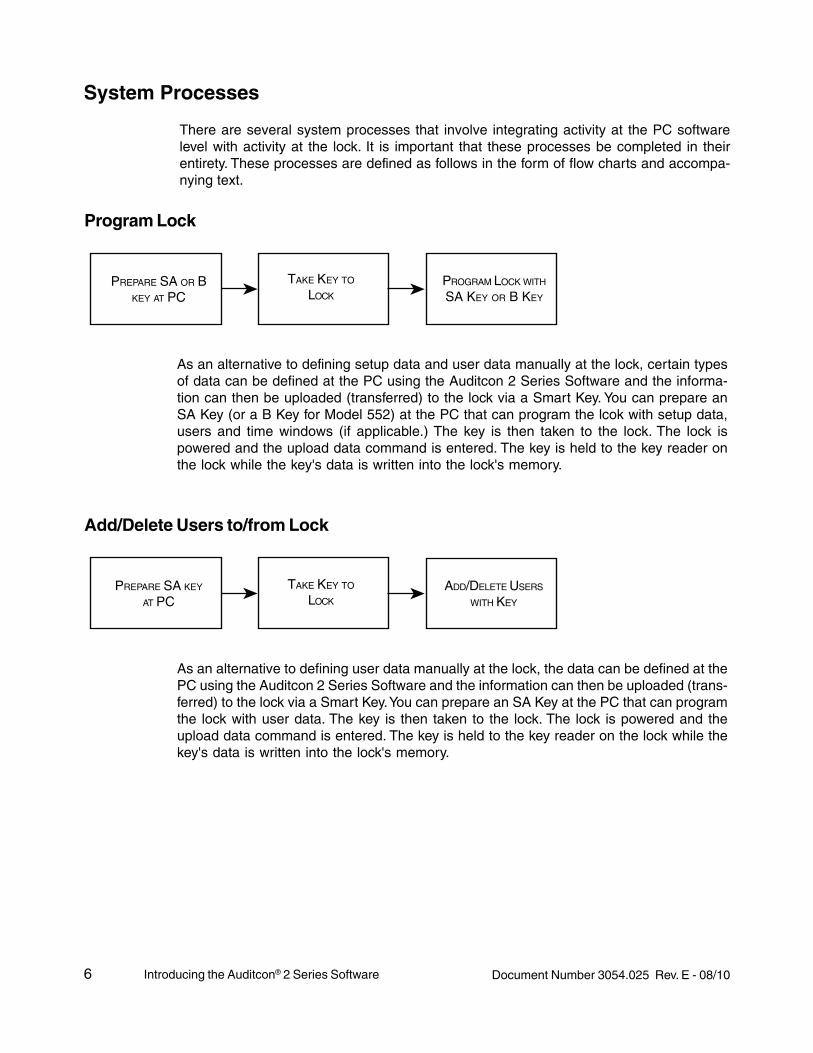
System Processes
There are several system processes that involve integrating activity at the PC softwarelevel with activity at the lock. It is important that these processes be completed in theirentirety. These processes are defined as follows in the form of flow charts and accompa-nying text.
As an alternative to defining setup data and user data manually at the lock, certain typesof data can be defined at the PC using the Auditcon 2 Series Software and the informa-tion can then be uploaded (transferred) to the lock via a Smart Key. You can prepare anSA Key (or a B Key for Model 552) at the PC that can program the lcok with setup data,users and time windows (if applicable.) The key is then taken to the lock. The lock ispowered and the upload data command is entered. The key is held to the key reader onthe lock while the key's data is written into the lock's memory.
PREPARE SA OR BKEY AT PC
TAKE KEY TO
LOCK
PROGRAM LOCK WITH
SA KEY OR B KEY
Program Lock
As an alternative to defining user data manually at the lock, the data can be defined at thePC using the Auditcon 2 Series Software and the information can then be uploaded (trans-ferred) to the lock via a Smart Key. You can prepare an SA Key at the PC that can programthe lock with user data. The key is then taken to the lock. The lock is powered and theupload data command is entered. The key is held to the key reader on the lock while thekey's data is written into the lock's memory.
PREPARE SA KEY
AT PCTAKE KEY TO
LOCK
ADD/DELETE USERS
WITH KEY
Add/Delete Users to/from Lock
Introducing the Auditcon® 2 Series Software 7Document Number 3054.025 Rev. E - 08/10
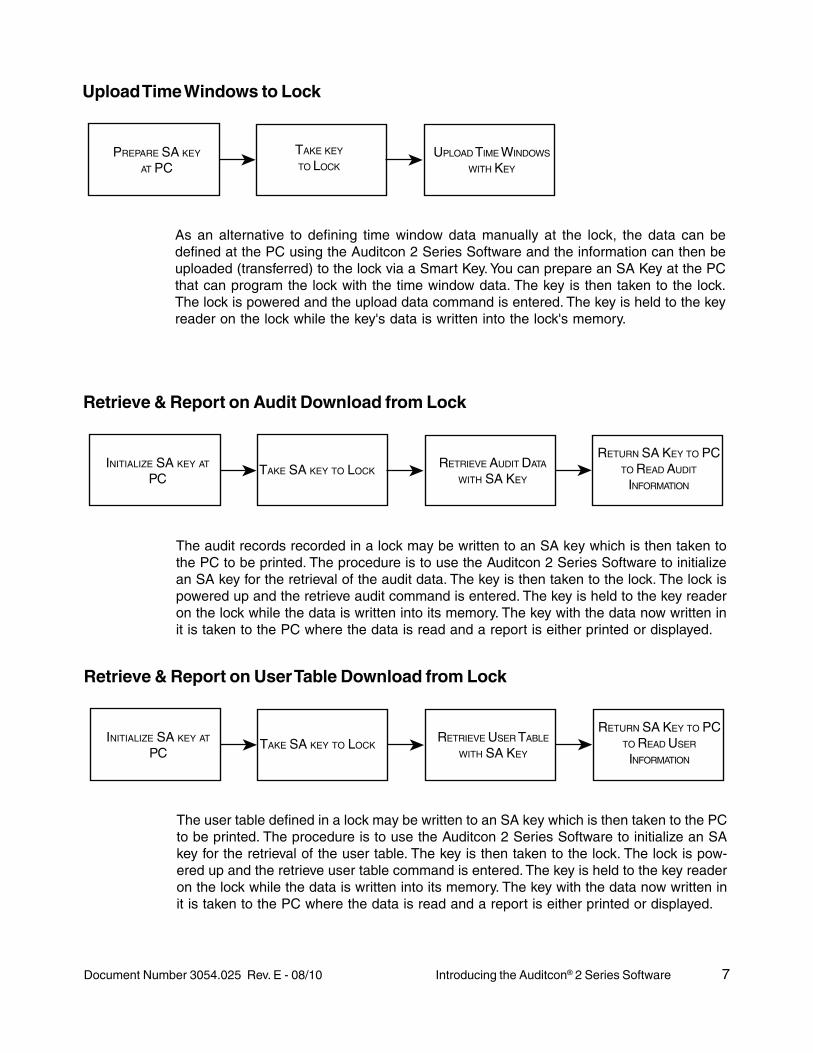
The audit records recorded in a lock may be written to an SA key which is then taken tothe PC to be printed. The procedure is to use the Auditcon 2 Series Software to initializean SA key for the retrieval of the audit data. The key is then taken to the lock. The lock ispowered up and the retrieve audit command is entered. The key is held to the key readeron the lock while the data is written into its memory. The key with the data now written init is taken to the PC where the data is read and a report is either printed or displayed.
INITIALIZE SA KEY AT
PCTAKE SA KEY TO LOCK
RETRIEVE AUDIT DATA
WITH SA KEY
RETURN SA KEY TO PCTO READ AUDIT
INFORMATION
Retrieve & Report on Audit Download from Lock
The user table defined in a lock may be written to an SA key which is then taken to the PCto be printed. The procedure is to use the Auditcon 2 Series Software to initialize an SAkey for the retrieval of the user table. The key is then taken to the lock. The lock is pow-ered up and the retrieve user table command is entered. The key is held to the key readeron the lock while the data is written into its memory. The key with the data now written init is taken to the PC where the data is read and a report is either printed or displayed.
INITIALIZE SA KEY AT
PCTAKE SA KEY TO LOCK
RETRIEVE USER TABLE
WITH SA KEY
RETURN SA KEY TO PCTO READ USER
INFORMATION
Retrieve & Report on User Table Download from Lock
As an alternative to defining time window data manually at the lock, the data can bedefined at the PC using the Auditcon 2 Series Software and the information can then beuploaded (transferred) to the lock via a Smart Key. You can prepare an SA Key at the PCthat can program the lock with the time window data. The key is then taken to the lock.The lock is powered and the upload data command is entered. The key is held to the keyreader on the lock while the key's data is written into the lock's memory.
PREPARE SA KEY
AT PCTAKE KEY
TO LOCK
UPLOAD TIME WINDOWS
WITH KEY
Upload Time Windows to Lock

Introducing the Auditcon® 2 Series Software Document Number 3054.025 Rev. E - 08/108

9Auditcon 2 Series SoftwareDocument Number 3054.025 Rev. E - 08/10
CHAPTER 2
AUDITCON® 2 SERIES SOFTWARE
Software Conventions
The Auditcon® 2 Series Software program is operated through several windows. It con-forms to Windows conventions so Windows users should have no trouble using it. Enoughdetail is included in this manual to enable a non-experienced user to follow the requiredprocedures.
Note: The screens shown in the Auditcon 2 Series Software manuals werecaptured on a Windows XP system. If your PC is running under a differ-ent operating system, your screens may look slightly different.
Start the Auditcon® 2 Series Program
To start the Auditcon 2 Series Software program, you can select the Auditcon 2 SeriesSoftware icon from the desktop.
If you prefer, you can complete the following steps to start the Auditcon® 2 Series Soft-ware Program from the Programs Menu:
1. Select the Start icon from the Windows task bar.
2. Select the Programs menu item.
3. Select the Auditcon 2 Series Software menu item.
4. Select the Auditcon 2 Series Software icon.
Main MenuThe Auditcon 2 Series Software Main Menu will be displayed.

10 Auditcon 2 Series Software Document Number 3054.025 Rev. E - 08/10
Menu Bar
The Menu Bar displays the available menu options.Some of these options are also avail-able from the toolbar. The menus available from the Auditcon 2 Series Software menu barare listed below and the corresponding toolbar icon (if applicable) is located to the left ofeach menu description:
File - Exit the Cencon for Windows Software.
Locks - Program Lock, Add/Delete Users or Upload Time Windows
SA Keys - Initialize or Delete SA Keys
Reports - View or Print Reports
Settings - Define or Maintain System Settings & Data
Help - 1) Display the Auditcon 2 Series Software basic program information,version number and copyright or 2) access the online system help information.
Menu Bar
Toolbar
Status Bar

11Auditcon 2 Series SoftwareDocument Number 3054.025 Rev. E - 08/10
You can select an option on the menu bar by 1) positioning the mouse pointer on theoption name and clicking the left mouse button one time 2) using the shortcut keysunderlined on the option’s label. For example, for the option label Locks, you can selectthe option by pressing the Alt and L keys at the same time (Alt + L).
Toolbar
The Toolbar is located directly below the menu bar and displays the icons for the menubar options. You can select an icon on the toolbar by positioning the mouse pointer on theicon and clicking the left mouse button one time. The available toolbar icons are picturedand described in the previous Menu Bar section.
Status Bar
The Status Bar is located at the bottom of the Auditcon 2 Series Software window. Thisbar displays system information (e.g., a brief description of the Toolbar button on whichthe mouse pointer is positioned).
12 Auditcon 2 Series Software Document Number 3054.025 Rev. E - 08/10
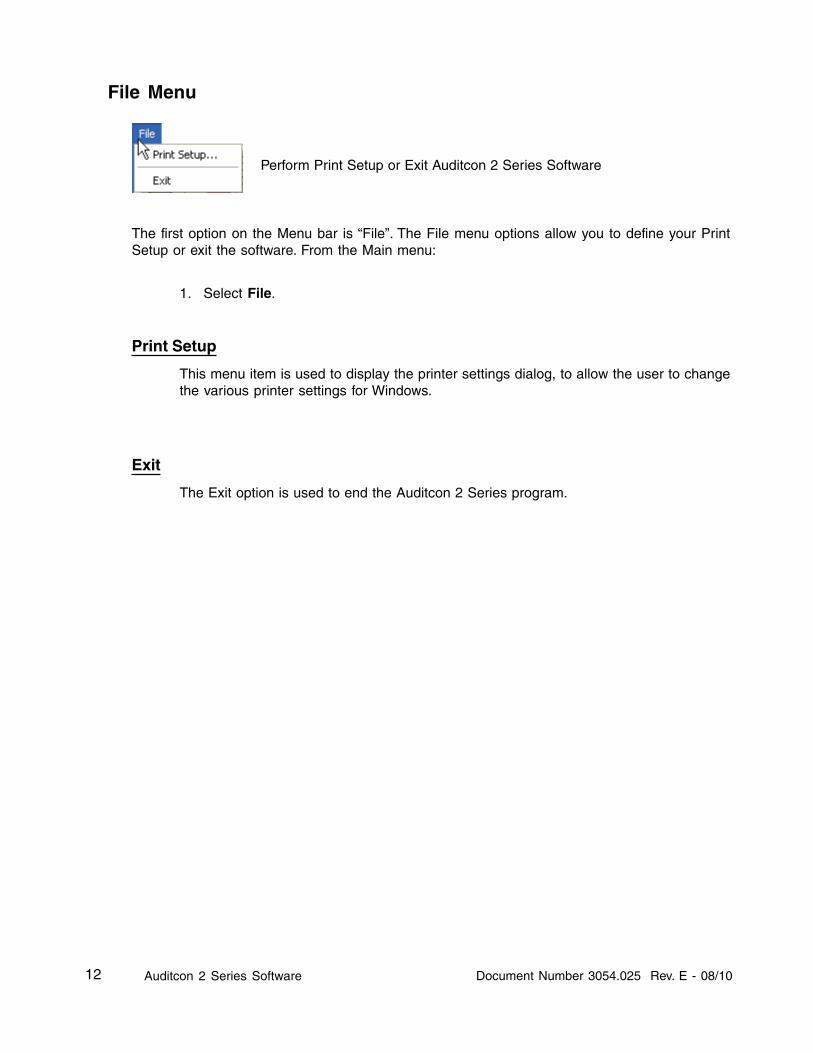
File Menu
Perform Print Setup or Exit Auditcon 2 Series Software
The first option on the Menu bar is “File”. The File menu options allow you to define your PrintSetup or exit the software. From the Main menu:
1. Select File.
Print Setup
This menu item is used to display the printer settings dialog, to allow the user to changethe various printer settings for Windows.
Exit
The Exit option is used to end the Auditcon 2 Series program.

13Auditcon 2 Series SoftwareDocument Number 3054.025 Rev. E - 08/10
Locks Menu
Program Lock, Add/Delete Users or Upload Time Windows
The second menu option on the Main Menu is “Locks.” The Locks Menu options allowyou to program the lock, add/delete users, or define time windows for the lock. The Locksmenu options can also be accessed by selecting the Locks icon from the Tool Bar.
From the Main menu:
1. Select the Locks Menu or the tool bar icon.

14 Auditcon 2 Series Software Document Number 3054.025 Rev. E - 08/10
Program Lock
The first option on the Locks menu is “Program Lock”. This menu item is used to initiatethe program locks wizard and is only applicable for Model 252 or 552 locks. It should beselected to define the original lock setup data, users, and time windows for a lock.
If you choose the “Program the Lock” menu option from the Auditcon 2 Series PC soft-ware, you can define the following data in a lock:
• Lock ID
• Access Mode
• Lock Mode
• Sound ON/OFF
• Reporting Capabilities
• Delay Time and Delayed Opening Window
• Users
Note: The Program Lock operation requires a red SA key that has been prop-erly prepared at the PC using the Auditcon 2 Series Software.
If you are programming a Model 552 lock, you can also set the Date & Time in the lockand define Time Windows.
Note: If you choose to set the time in the lock using the software, the opera-tion requires a teal colored B key (P/N 202023), prepared at the PCusing the Auditcon 2 Series Software, rather than a red SA key.
1. Select Program Lock.
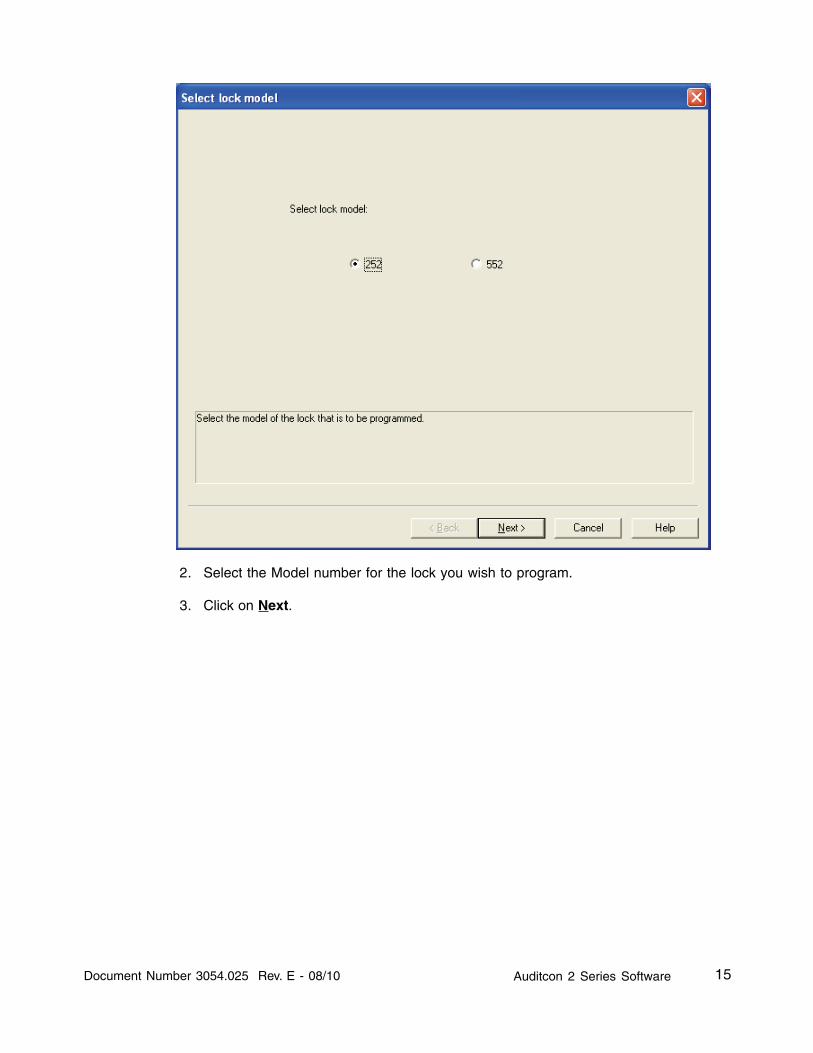
The “Select lock model” screen is displayed.
15Auditcon 2 Series SoftwareDocument Number 3054.025 Rev. E - 08/10
2. Select the Model number for the lock you wish to program.
3. Click on Next.
16 Auditcon 2 Series Software Document Number 3054.025 Rev. E - 08/10
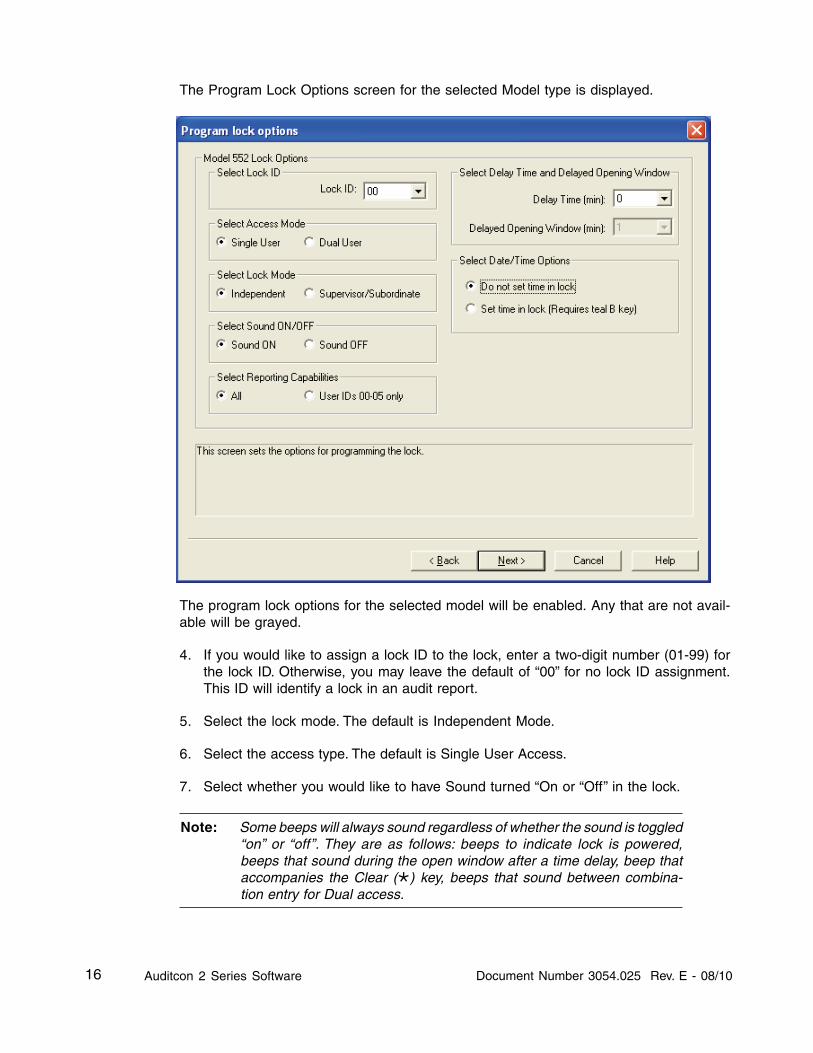
The Program Lock Options screen for the selected Model type is displayed.
The program lock options for the selected model will be enabled. Any that are not avail-able will be grayed.
4. If you would like to assign a lock ID to the lock, enter a two-digit number (01-99) forthe lock ID. Otherwise, you may leave the default of “00” for no lock ID assignment.This ID will identify a lock in an audit report.
5. Select the lock mode. The default is Independent Mode.
6. Select the access type. The default is Single User Access.
7. Select whether you would like to have Sound turned “On or “Off” in the lock.
Note: Some beeps will always sound regardless of whether the sound is toggled“on” or “off”. They are as follows: beeps to indicate lock is powered,beeps that sound during the open window after a time delay, beep thataccompanies the Clear () key, beeps that sound between combina-tion entry for Dual access.
17Auditcon 2 Series SoftwareDocument Number 3054.025 Rev. E - 08/10
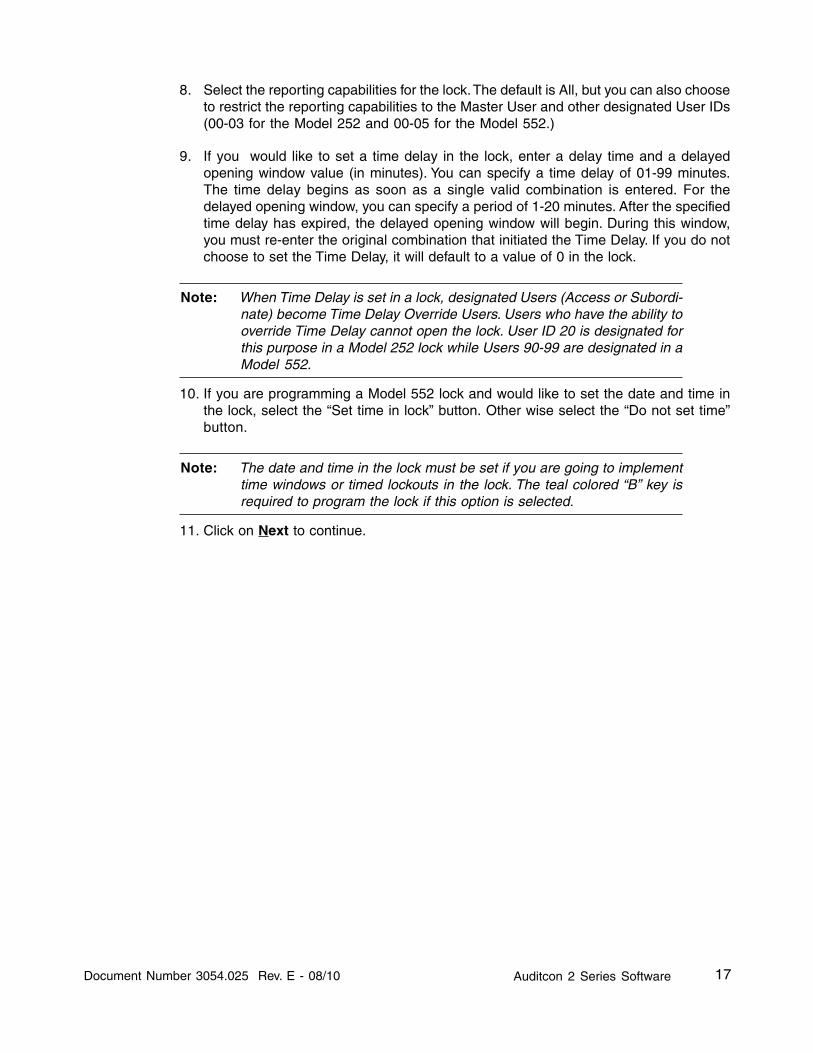
8. Select the reporting capabilities for the lock. The default is All, but you can also chooseto restrict the reporting capabilities to the Master User and other designated User IDs(00-03 for the Model 252 and 00-05 for the Model 552.)
9. If you would like to set a time delay in the lock, enter a delay time and a delayedopening window value (in minutes). You can specify a time delay of 01-99 minutes.The time delay begins as soon as a single valid combination is entered. For thedelayed opening window, you can specify a period of 1-20 minutes. After the specifiedtime delay has expired, the delayed opening window will begin. During this window,you must re-enter the original combination that initiated the Time Delay. If you do notchoose to set the Time Delay, it will default to a value of 0 in the lock.
Note: When Time Delay is set in a lock, designated Users (Access or Subordi-nate) become Time Delay Override Users. Users who have the ability tooverride Time Delay cannot open the lock. User ID 20 is designated forthis purpose in a Model 252 lock while Users 90-99 are designated in aModel 552.
10. If you are programming a Model 552 lock and would like to set the date and time inthe lock, select the “Set time in lock” button. Other wise select the “Do not set time”button.
Note: The date and time in the lock must be set if you are going to implementtime windows or timed lockouts in the lock. The teal colored “B” key isrequired to program the lock if this option is selected.
11. Click on Next to continue.
18 Auditcon 2 Series Software Document Number 3054.025 Rev. E - 08/10
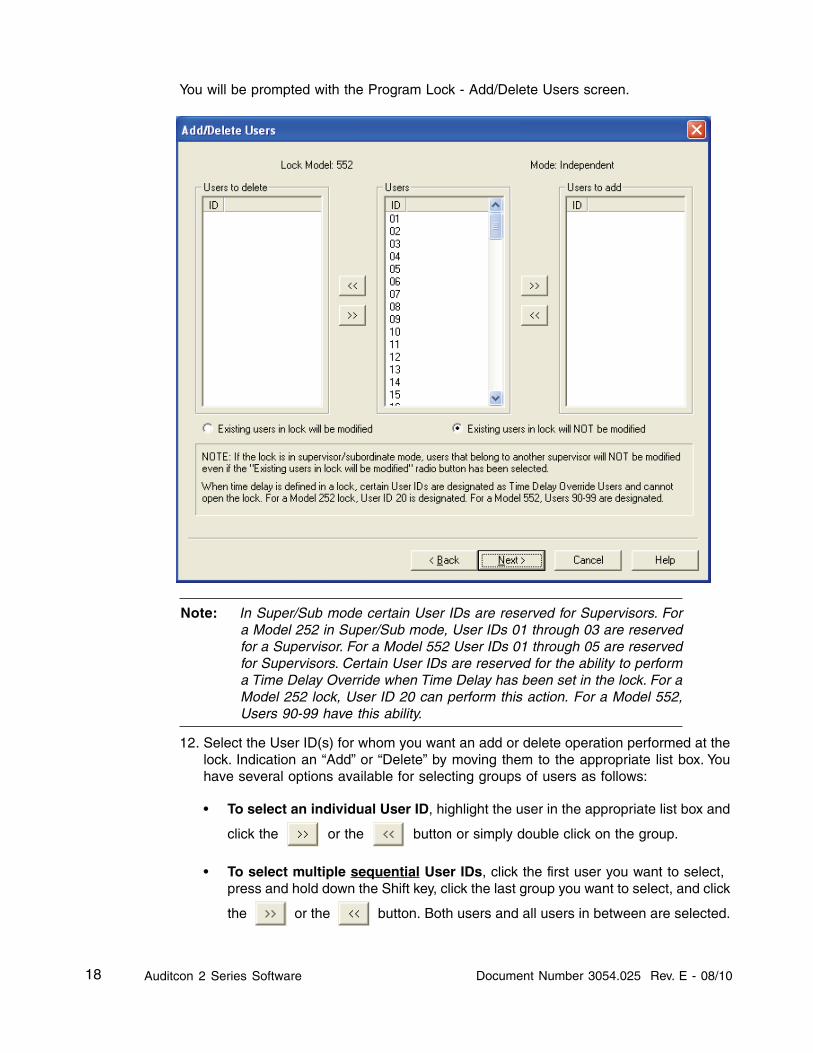
You will be prompted with the Program Lock - Add/Delete Users screen.
Note: In Super/Sub mode certain User IDs are reserved for Supervisors. Fora Model 252 in Super/Sub mode, User IDs 01 through 03 are reservedfor a Supervisor. For a Model 552 User IDs 01 through 05 are reservedfor Supervisors. Certain User IDs are reserved for the ability to performa Time Delay Override when Time Delay has been set in the lock. For aModel 252 lock, User ID 20 can perform this action. For a Model 552,Users 90-99 have this ability.
12. Select the User ID(s) for whom you want an add or delete operation performed at thelock. Indication an “Add” or “Delete” by moving them to the appropriate list box. Youhave several options available for selecting groups of users as follows:
• To select an individual User ID, highlight the user in the appropriate list box and
click the or the button or simply double click on the group.
• To select multiple sequential User IDs, click the first user you want to select,press and hold down the Shift key, click the last group you want to select, and click
the or the button. Both users and all users in between are selected.
19Auditcon 2 Series SoftwareDocument Number 3054.025 Rev. E - 08/10
• To select multiple non-sequential User IDs, press and hold down the Ctrl key,
click each user you want to select, and click the or the button.
Note: If you are programming the lock to operate in Independent Mode, youhave the option to add all of the valid Users (other than the MasterUser) for a lock model at this time. If, however, you are programmingthe lock for Supervisor/Subordinate Mode, you will only have the optionto add the valid Supervisor User IDs for the lock model. Once the Su-pervisor IDs have been defined in the lock and the Supervisor PINshave been manually changed at the lock, then the Add/Delete Usersoption can be selected from the software to add Subordinate Users forindividual Supervisors.
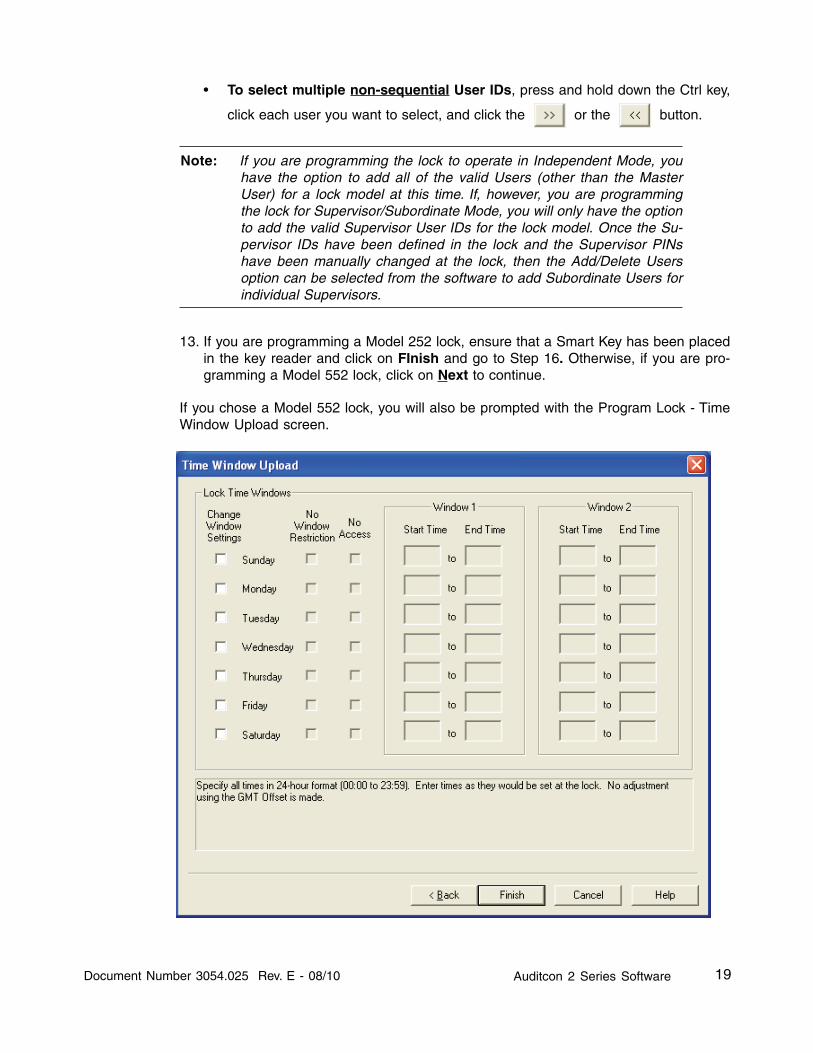
13. If you are programming a Model 252 lock, ensure that a Smart Key has been placedin the key reader and click on FInish and go to Step 16. Otherwise, if you are pro-gramming a Model 552 lock, click on Next to continue.
If you chose a Model 552 lock, you will also be prompted with the Program Lock - TimeWindow Upload screen.
20 Auditcon 2 Series Software Document Number 3054.025 Rev. E - 08/10
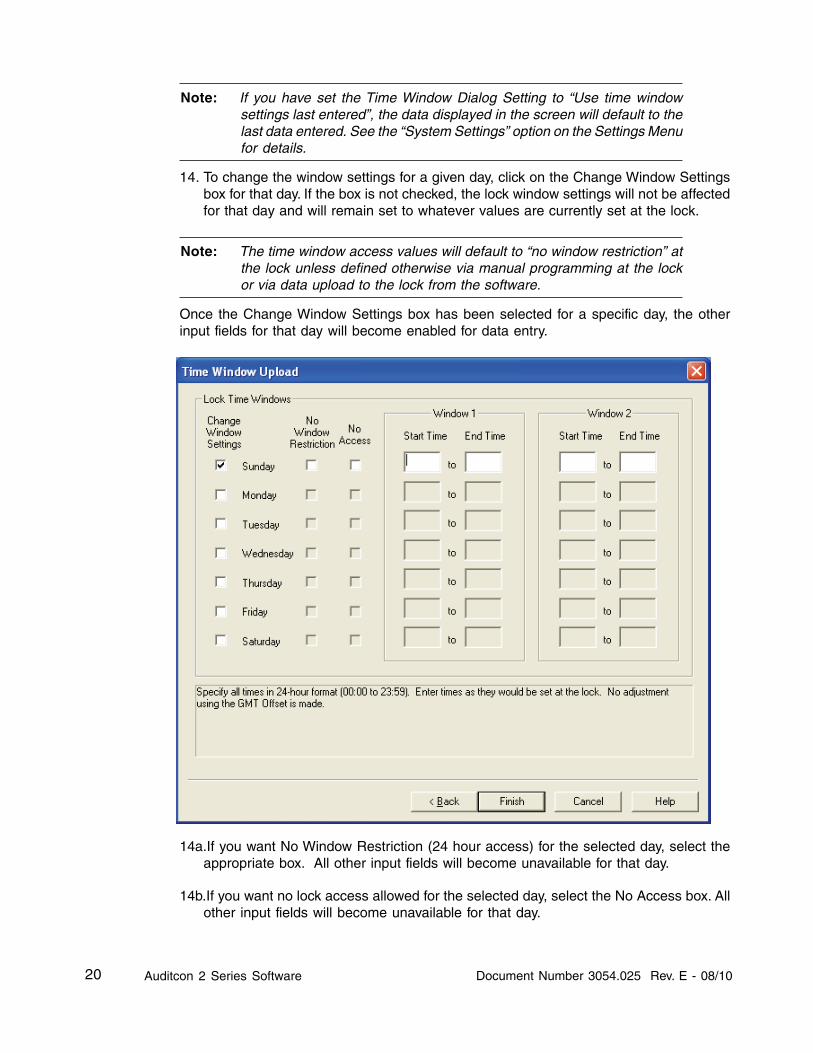
Note: If you have set the Time Window Dialog Setting to “Use time windowsettings last entered”, the data displayed in the screen will default to thelast data entered. See the “System Settings” option on the Settings Menufor details.
14. To change the window settings for a given day, click on the Change Window Settingsbox for that day. If the box is not checked, the lock window settings will not be affectedfor that day and will remain set to whatever values are currently set at the lock.
Note: The time window access values will default to “no window restriction” atthe lock unless defined otherwise via manual programming at the lockor via data upload to the lock from the software.
Once the Change Window Settings box has been selected for a specific day, the otherinput fields for that day will become enabled for data entry.
14a.If you want No Window Restriction (24 hour access) for the selected day, select theappropriate box. All other input fields will become unavailable for that day.
14b.If you want no lock access allowed for the selected day, select the No Access box. Allother input fields will become unavailable for that day.
21Auditcon 2 Series SoftwareDocument Number 3054.025 Rev. E - 08/10
14c.If you want to limit access to a certain time period of the selected day, define anaccess time window by entering a Start Time and End Time under the Window 1section of the screen. Specify all times in HH:MM format. Enter times as they would beset at the lock. If the time in the locks is set to GMT, use the same GMT time here. Ifset to local time at the lock, use the standard 24-hour format (00:00 to 23:59).
Caution: If a GMT offset is set, it is NOT used to adjust the values entered inStart Time and End Time. The time values entered should reflect locktimes. There can be some drifting in the lock clocks in the Model 500and 552 locks, up to 15 minutes per year. Because of this possible vari-ance, there should be minor allowances made in both the starting timeand the ending time when setting time windows.
Note: When data is entered for Window 1, the same Start and End Time willautomatically be filled in for Window 2.
If you want to define a second access time window for the selected day, update the StartTime and End Time under the Window 2 section of the screen to the values for thesecond window.
15. Tab to the Start Time in Window 2. If you want to define a second access timewindow for the selected day, update the Start Time and End Time under the Window 2section of the screen to the values for the second window.
Note: If you do not choose to define a second window, the second window willdefault to the same time period as the first window.
Repeat steps 14 and 15 for each day that you would like to define lock access.
16. Once you are finished with the Time Windows screen, ensure that a Smart Key hasbeen placed in the key reader and click on FInish.
17. The key should now be taken to the lock to program the lock data.
Note: Previous to uploading the Program Lock data to a lock, the Master UserPIN must be “set” in the lock. The default PIN assigned to a new User orSupervisor ID is “502550”. A user must change this default PIN beforeany lock operations can be performed.

22 Auditcon 2 Series Software Document Number 3054.025 Rev. E - 08/10
Add/Delete Users
This option is used to add and/or delete users to or from a lock using an SA Key. Theoption should be selected only to add or delete users to a lock that has already beenprogrammed.
Note: If the lock is operating in Supervisor/Subordinate Mode, Supervisorscannot be added or deleted using this option. Time Delay Overide Us-ers can be added using this option even if the Time Delay value hasalready been programmed at the lock.
1. Select Add/Delete Users.
The “Add/Delete Users” screen is displayed.
23Auditcon 2 Series SoftwareDocument Number 3054.025 Rev. E - 08/10
Note: In Super/Sub mode certain User IDs are reserved for Supervisors. Fora Model 252 in Super/Sub mode, User IDs 01 through 03 are reservedfor a Supervisor. For a Model 552 User IDs 01 through 05 are reservedfor Supervisors. Certain User IDs are reserved for the ability to performa Time Delay Override when Time Delay has been set in the lock. For aModel 252 lock, User ID 20 can perform this action. For a Model 552,Users 90-99 have this ability.
2. Select the model of the lock to which you want to add/delete users.
3. Select the lock mode that was previously defined in the lock.
4. If the lock is operating in Supervisor/Subordinate mode, you must also enter theSupervisor ID of the Supervisor to whom the Subordinate Users will be assigned orare currently assigned (if deleting.)
Note: If adding or deleting Subordinate Users, the Supervisor’s combinationmust be used to perform the download of the data to the lock.
5. Select the User ID(s) for whom you want an add or delete operation performed at thelock. Indication an “Add” or “Delete” by moving them to the appropriate list box. Youhave several options available for selecting groups of users as follows:
• To select an individual User ID, highlight the user in the appropriate list box and
click the or the button or simply double click on the group.
• To select multiple sequential User IDs, click the first user you want to select,press and hold down the Shift key, click the last group you want to select, and click
the or the button. Both users and all users in between are selected.
• To select multiple non-sequential User IDs, press and hold down the Ctrl key,
click each user you want to select, and click the or the button.

24 Auditcon 2 Series Software Document Number 3054.025 Rev. E - 08/10
6. If you have existing users in the lock and do not want to change any of the existinguser data, select the button for “Existing users in lock will not be modified”. Otherwise,the button for “Existing users in the lock will be modified”.
Note: If the lock is in Supervisor/Subordinate mode, users that are assignedto another Supervisor will NOT be modified even in “Existing users willbe modified” has been selected.
7. When all settings are complete and all desired users have been moved to the appro-priate lists, ensure that a Smart Key has been placed in the key reader and click onthe OK button.
A window will be displayed indicdating that the SA key was written successfully.

25Auditcon 2 Series SoftwareDocument Number 3054.025 Rev. E - 08/10
8. Click on OK to return to the Main Menu.
9. The key should now be taken to the lock to add/delete users to/from the lock.
Note: Previous to uploading the user data to a lock, the Master User PIN mustbe “set” in the lock. The default PIN assigned to a new User or Supervi-sor ID is “502550”. A user must change this default PIN before any lockoperations can be performed.
Upload Time Windows
By default, the lock is set to have No Window Restriction for all seven days. This meansthat users can open the lock at any time during any day. This option allows time windowaccess to be programmed at the PC and then uploaded to the lock.
From the Locks menu:
1. Select Upload Time Windows.
The “Time Window Upload” screen is displayed.
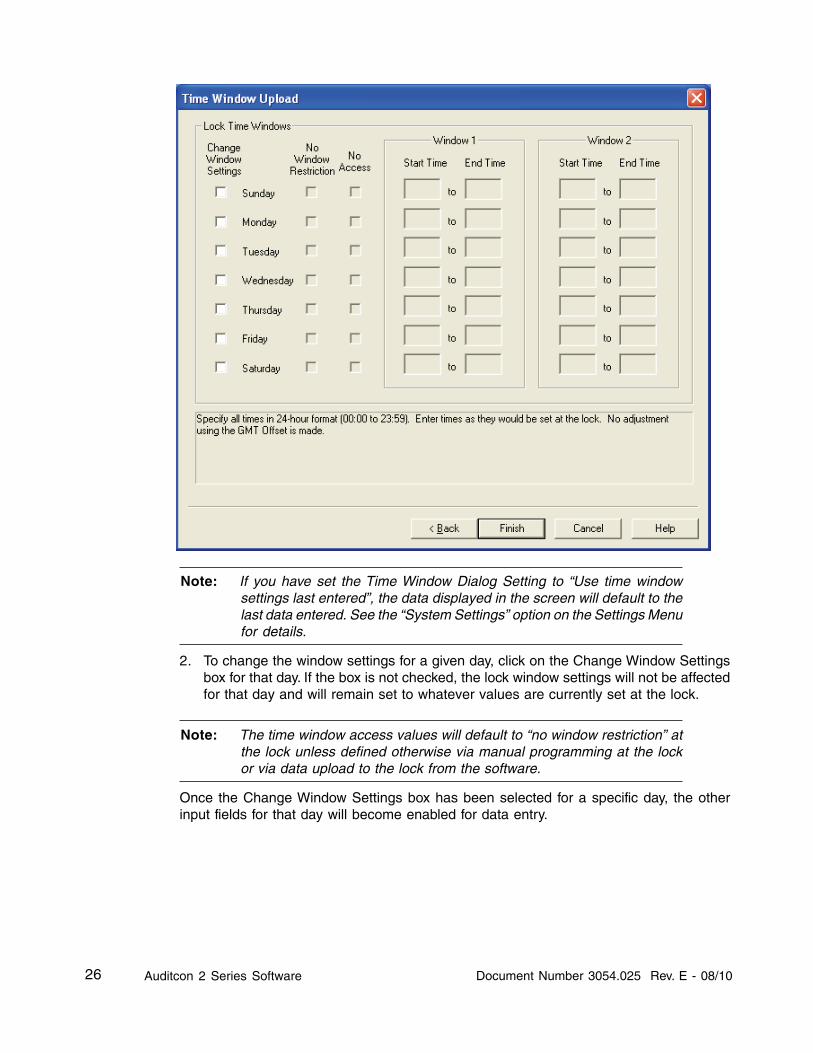
26 Auditcon 2 Series Software Document Number 3054.025 Rev. E - 08/10
Note: If you have set the Time Window Dialog Setting to “Use time windowsettings last entered”, the data displayed in the screen will default to thelast data entered. See the “System Settings” option on the Settings Menufor details.
2. To change the window settings for a given day, click on the Change Window Settingsbox for that day. If the box is not checked, the lock window settings will not be affectedfor that day and will remain set to whatever values are currently set at the lock.
Note: The time window access values will default to “no window restriction” atthe lock unless defined otherwise via manual programming at the lockor via data upload to the lock from the software.
Once the Change Window Settings box has been selected for a specific day, the otherinput fields for that day will become enabled for data entry.
27Auditcon 2 Series SoftwareDocument Number 3054.025 Rev. E - 08/10
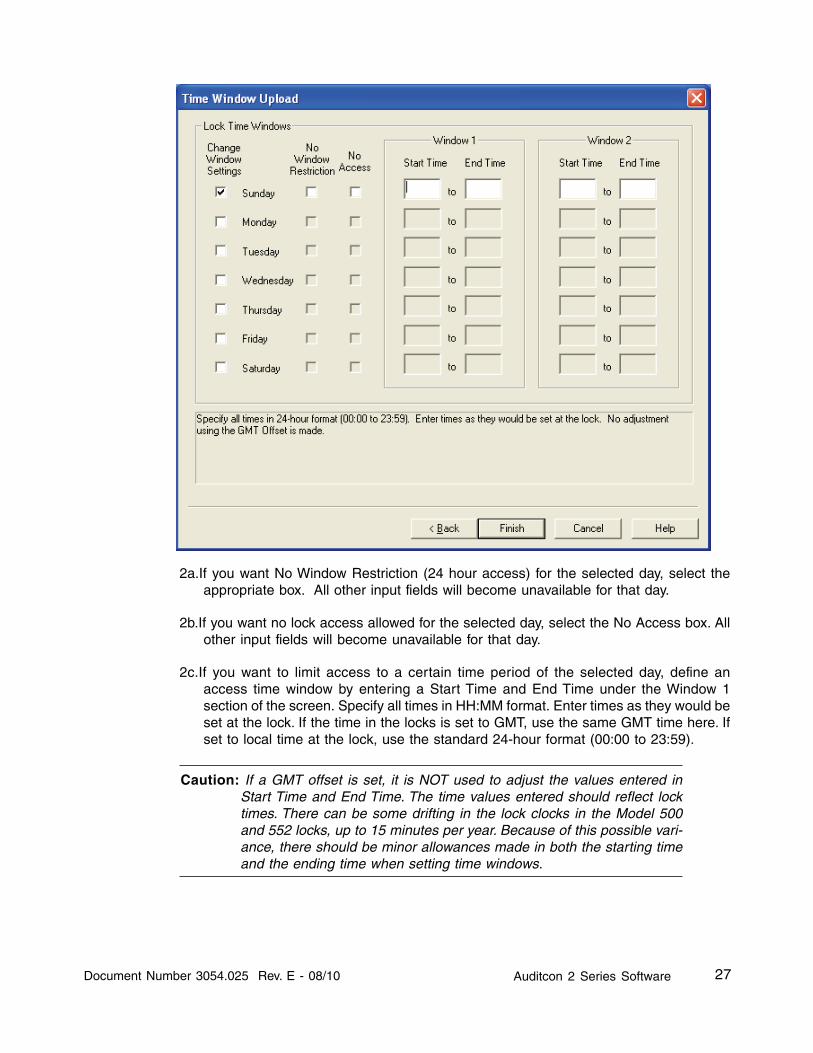
2a.If you want No Window Restriction (24 hour access) for the selected day, select theappropriate box. All other input fields will become unavailable for that day.
2b.If you want no lock access allowed for the selected day, select the No Access box. Allother input fields will become unavailable for that day.
2c.If you want to limit access to a certain time period of the selected day, define anaccess time window by entering a Start Time and End Time under the Window 1section of the screen. Specify all times in HH:MM format. Enter times as they would beset at the lock. If the time in the locks is set to GMT, use the same GMT time here. Ifset to local time at the lock, use the standard 24-hour format (00:00 to 23:59).
Caution: If a GMT offset is set, it is NOT used to adjust the values entered inStart Time and End Time. The time values entered should reflect locktimes. There can be some drifting in the lock clocks in the Model 500and 552 locks, up to 15 minutes per year. Because of this possible vari-ance, there should be minor allowances made in both the starting timeand the ending time when setting time windows.
28 Auditcon 2 Series Software Document Number 3054.025 Rev. E - 08/10
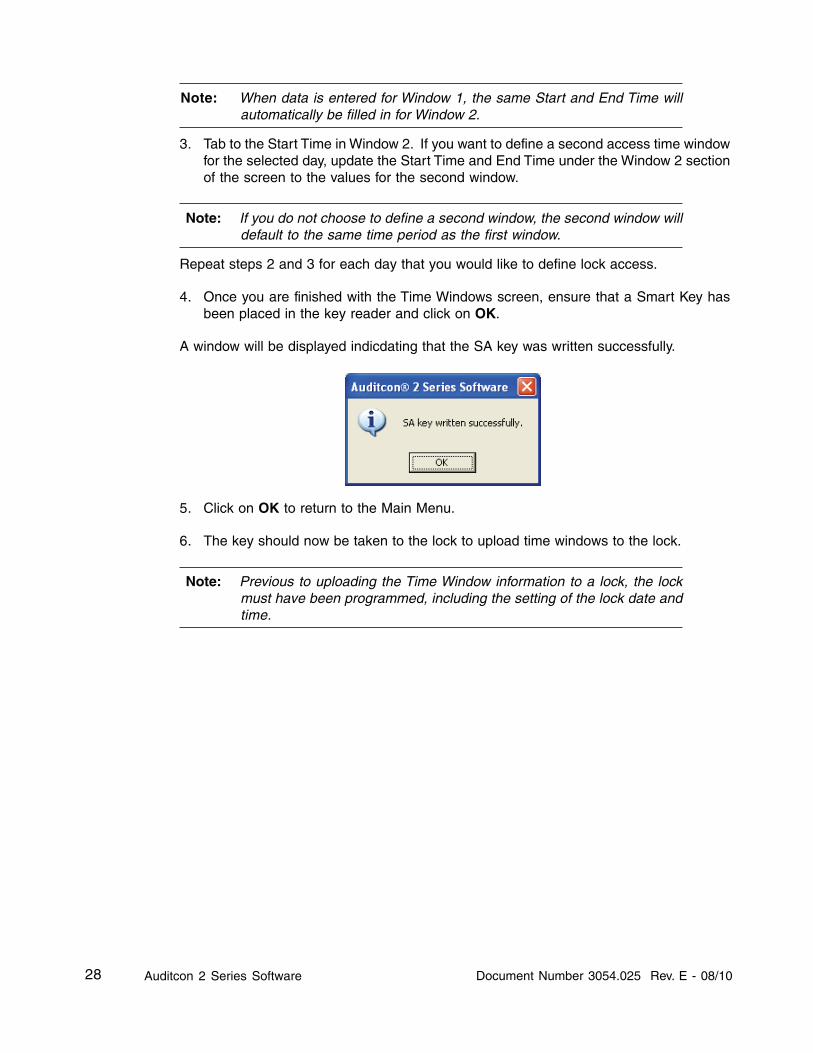
Note: When data is entered for Window 1, the same Start and End Time willautomatically be filled in for Window 2.
3. Tab to the Start Time in Window 2. If you want to define a second access time windowfor the selected day, update the Start Time and End Time under the Window 2 sectionof the screen to the values for the second window.
Note: If you do not choose to define a second window, the second window willdefault to the same time period as the first window.
Repeat steps 2 and 3 for each day that you would like to define lock access.
4. Once you are finished with the Time Windows screen, ensure that a Smart Key hasbeen placed in the key reader and click on OK.
A window will be displayed indicdating that the SA key was written successfully.
5. Click on OK to return to the Main Menu.
6. The key should now be taken to the lock to upload time windows to the lock.
Note: Previous to uploading the Time Window information to a lock, the lockmust have been programmed, including the setting of the lock date andtime.

29Auditcon 2 Series SoftwareDocument Number 3054.025 Rev. E - 08/10
SA Keys
Initialize or Delete SA Keys
The third menu option on the Main Menu is “SA Keys.” The SA key is used to transfer databetween the Auditcon 2 Series Software program and the locks. The SA key is programmedby the Auditcon 2 Series program for a specific function and can only be used for thatfunction until reprogrammed. The SA Keys menu options can also be accessed by select-ing the SA Keys icon from the Tool Bar.
From the Main menu:
1. Select the SA Keys Menu or the tool bar icon.

30 Auditcon 2 Series Software Document Number 3054.025 Rev. E - 08/10
Initialize Audit Download Key
The first option on the SA Keys menu is “Initialize Audit Download Key.” This function isused to initialize a Supervisor Audit key so that it can be taken to a lock to obtain an auditdownload from a lock’s memory. The key is then returned to this system so that the datacan be retrieved from the key. From the SA Keys menu:
1. Select Initialize Audit Download Key.
The SA Key reminder message is displayed.
2. Ensure that there is an SA key in the key reader and click on the OK button to pro-ceed.
The SA key will be initialized for the lock audit download and the following confirmationmessage will be displayed.
3. Click on the OK button to close the window.
4. Take the SA key to the lock to retrieve the audit data. Return the SA key to report theaudit data.
Initialize User Table Download Key
This option is used to initialize an SA key so that it can be used to download the user tablefrom a lock. From the SA Keys menu:
1. Select Initialize User Table Download Key.
The SA Key reminder message is displayed.

31Auditcon 2 Series SoftwareDocument Number 3054.025 Rev. E - 08/10
2. Ensure that there is an SA key in the key reader and click on the OK button to pro-ceed.
The SA key will be initialized for the user table download and the following confirmationmessage will be displayed.
3. Click on the OK button to close the window.
Delete SA Key
The next option on the SA Keys menu is “Delete SA Key”. This option is used to delete thecontents of a Supervisor Audit key after data has been retrieved from a lock. Once datahas been retrieved from a lock and the data has been viewed, printed or saved through aReport option, you may want to delete the data from the key for security purposes. Fromthe SA Keys menu:
1. Select Delete SA Key.
The SA Key reminder message is displayed.
2. Ensure that there is an SA key in the key reader and click on the OK button to pro-ceed.
The contents of the SA key will be deleted and the following confirmation message will bedisplayed.
32 Auditcon 2 Series Software Document Number 3054.025 Rev. E - 08/10
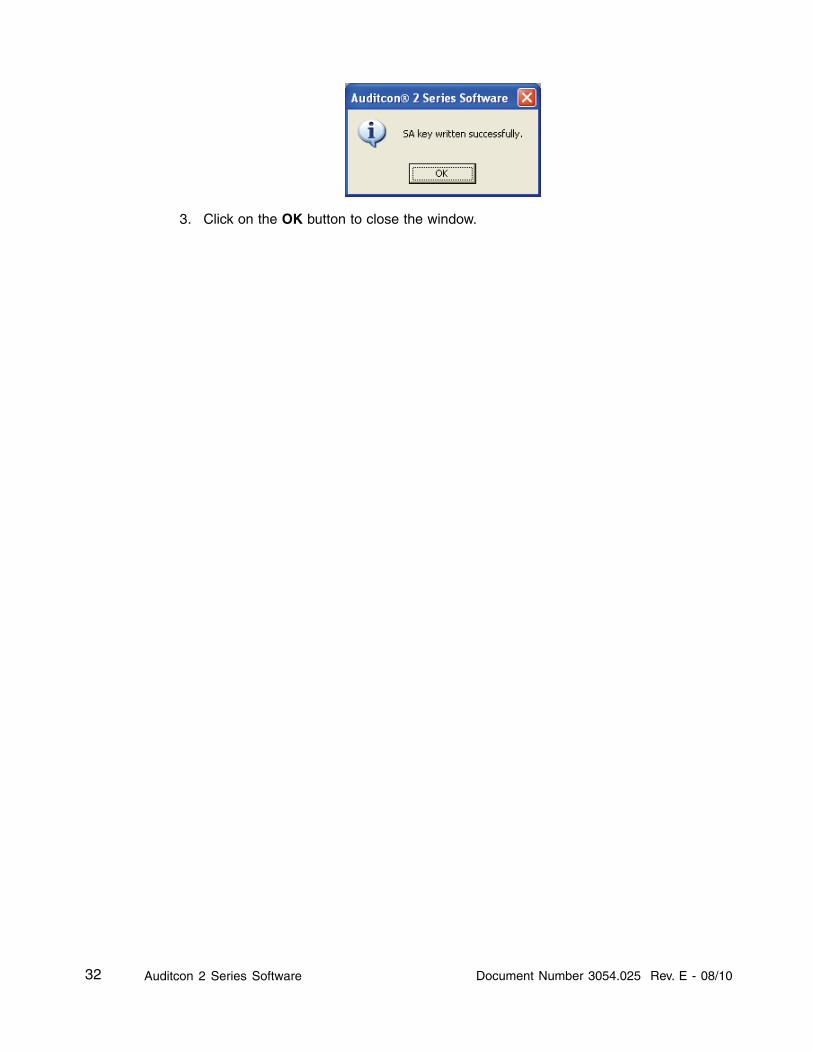
3. Click on the OK button to close the window.
33Auditcon 2 Series SoftwareDocument Number 3054.025 Rev. E - 08/10
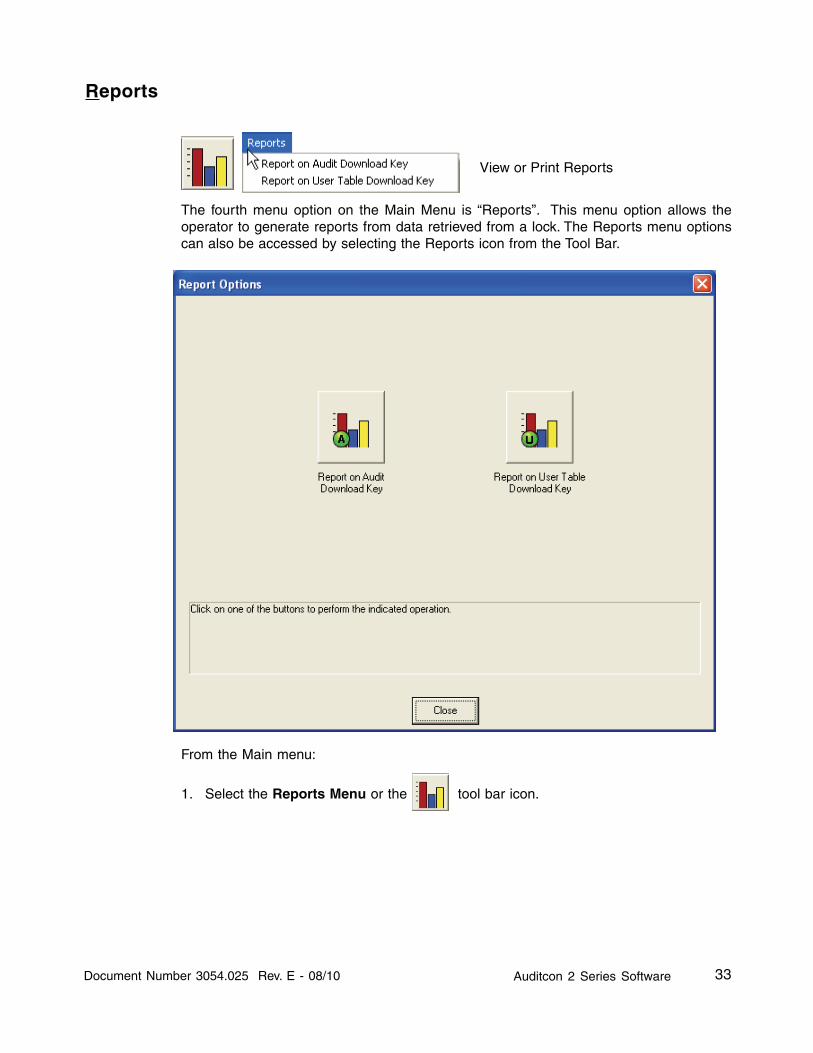
Reports
View or Print Reports
The fourth menu option on the Main Menu is “Reports”. This menu option allows theoperator to generate reports from data retrieved from a lock. The Reports menu optionscan also be accessed by selecting the Reports icon from the Tool Bar.
From the Main menu:
1. Select the Reports Menu or the tool bar icon.
34 Auditcon 2 Series Software Document Number 3054.025 Rev. E - 08/10
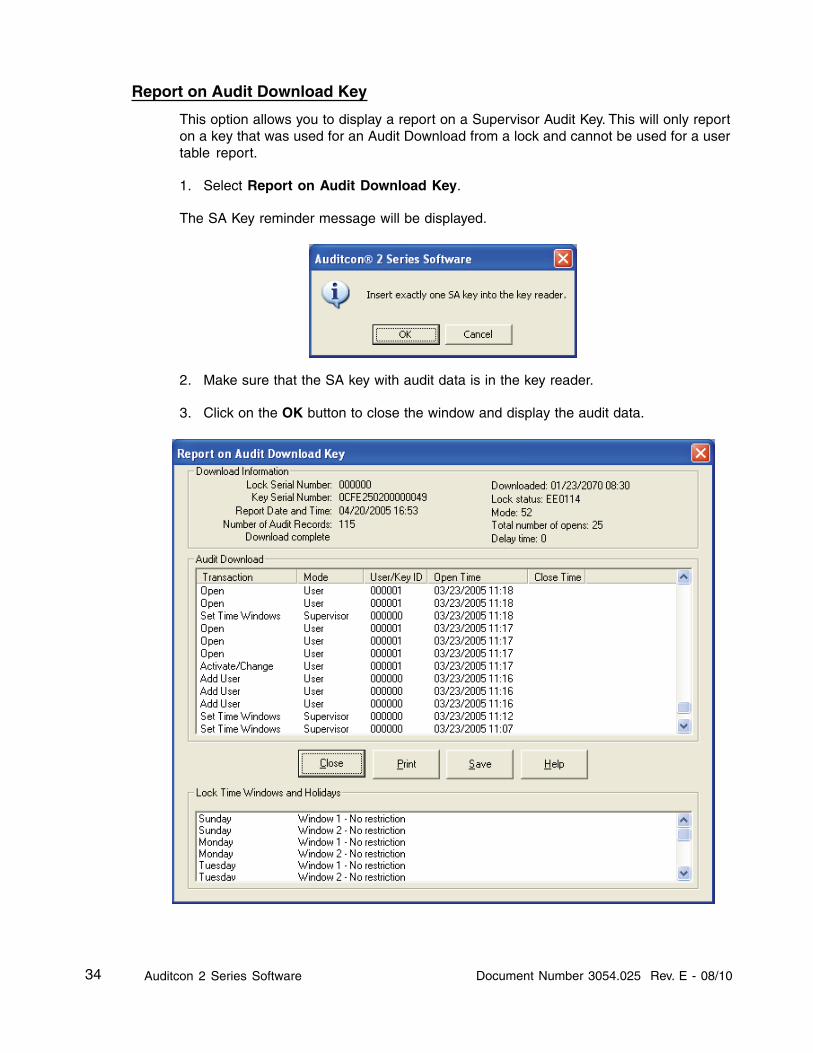
Report on Audit Download Key
This option allows you to display a report on a Supervisor Audit Key. This will only reporton a key that was used for an Audit Download from a lock and cannot be used for a usertable report.
1. Select Report on Audit Download Key.
The SA Key reminder message will be displayed.
2. Make sure that the SA key with audit data is in the key reader.
3. Click on the OK button to close the window and display the audit data.
35Auditcon 2 Series SoftwareDocument Number 3054.025 Rev. E - 08/10
Note: Audits from a Model 500, 552, or a System 2100 lock will display dateand time stamps. Only an audit from a System 2100 lock will display theclose date and time. The System 2100 lock is also the only lock modelthat has the capability for Holidays in addition to Time Windows.
The Lock Status field is represented in Hexadecimal format, but can be decoded asfollows.
• The first two characters of the lock status refer to the Product Code:5A-9F designates Model 252AA-FF designates Model 552
• The second two characters refer to the hardware level, and is always a 00 or 01,where 01 distinguishes a Model 552.
• The last two digits refer to the software level and ranges from 00 to FF.
The Lock Mode field when represented in binary coded decimal can be decoded fortroubleshooting purposes as follows, where bit positions 0 through 7 have the followingmeanings:
• if bit 0 is set - indicates daylight savings time is in effect• if bit 1 is set - indicates super/subordinate mode is in effect• if bit 2 is set - indicates audit buffer has wrapped• if bit 3 is set - indicates factory mode is active• if bit 4 is set - indicates single user mode is active• if bit 5 is set - indicates dual user mode is active• if bit 6 is set - indicates the sound (beeper) is on• if bit 7 is set - indicates that audit downloades are restructed to allowed id’s
The User/Key ID field on each audit record indicates the User ID of the person whoperformed tha action.
Note: If the audit data being reviewed is from a Model 500 or 552, lock TimeWindows will also be displayed.
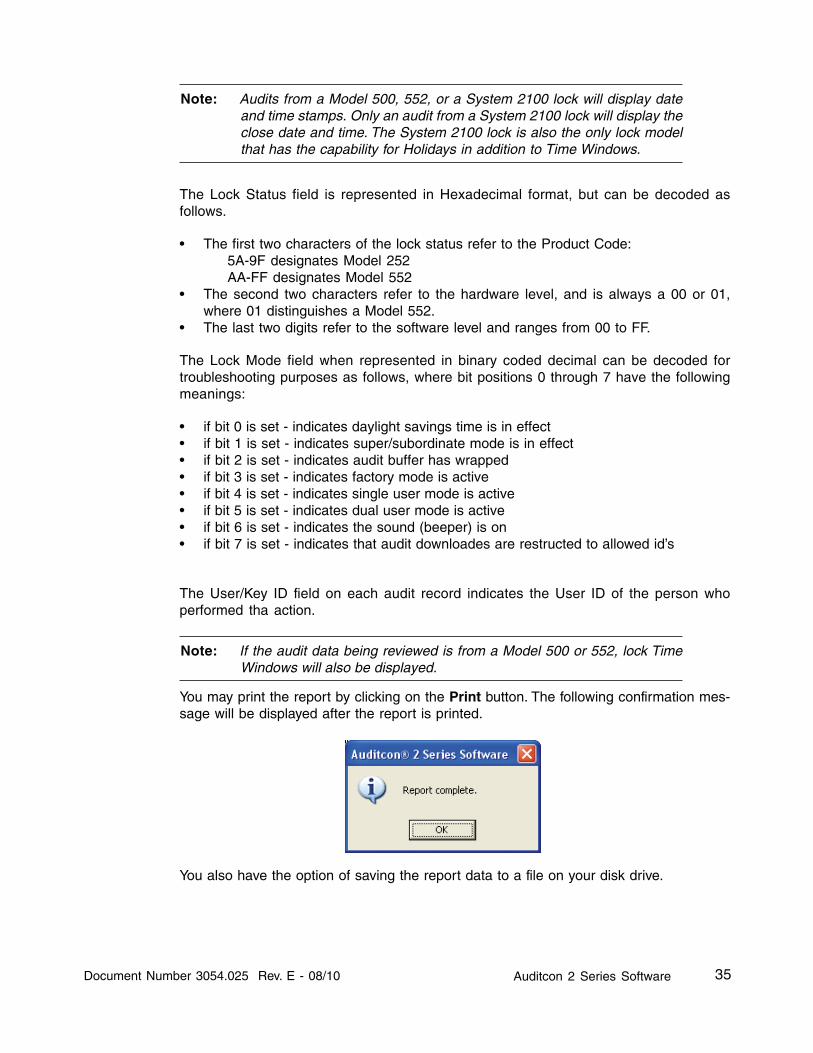
You may print the report by clicking on the Print button. The following confirmation mes-sage will be displayed after the report is printed.
You also have the option of saving the report data to a file on your disk drive.
36 Auditcon 2 Series Software Document Number 3054.025 Rev. E - 08/10
4. To save the report data in a file, click on the File button. The Open window will bedisplayed.
Enter the name of the file where you want the data filed and click on the OK button tosave. The report data will be saved and the following confirmation screen will be dis-played.
5. Click on the OK button to close the window and return to the main window.
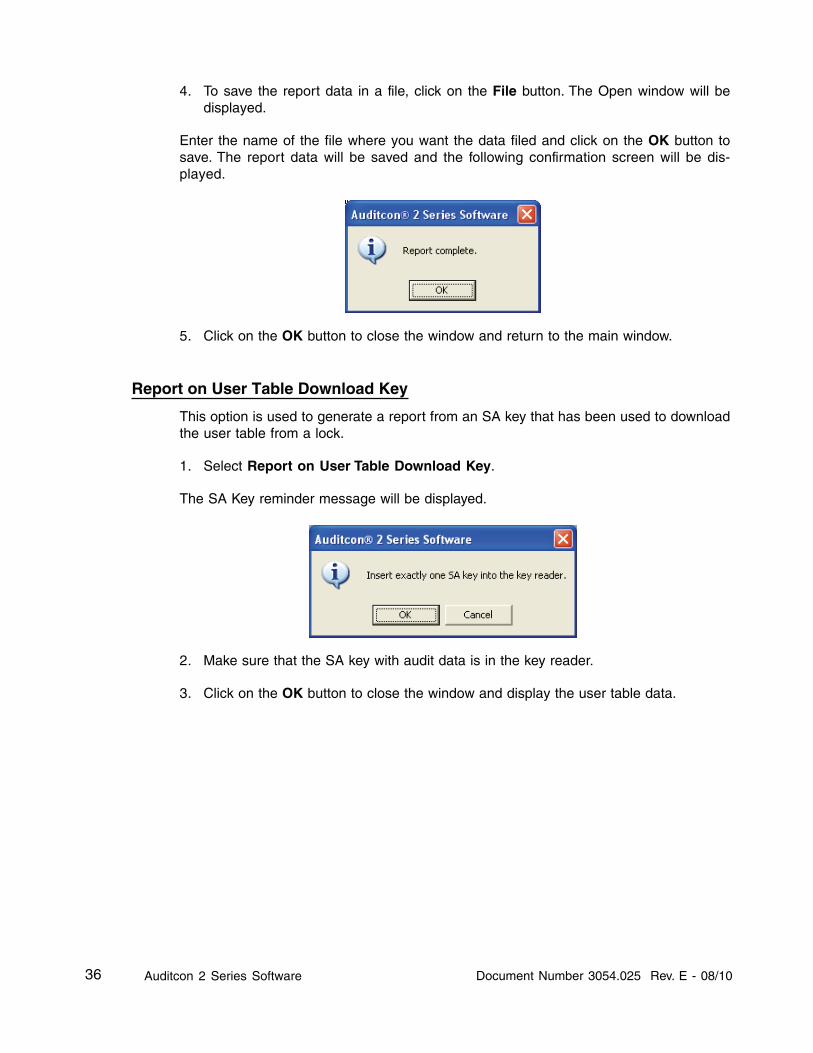
Report on User Table Download Key
This option is used to generate a report from an SA key that has been used to downloadthe user table from a lock.
1. Select Report on User Table Download Key.
The SA Key reminder message will be displayed.
2. Make sure that the SA key with audit data is in the key reader.
3. Click on the OK button to close the window and display the user table data.
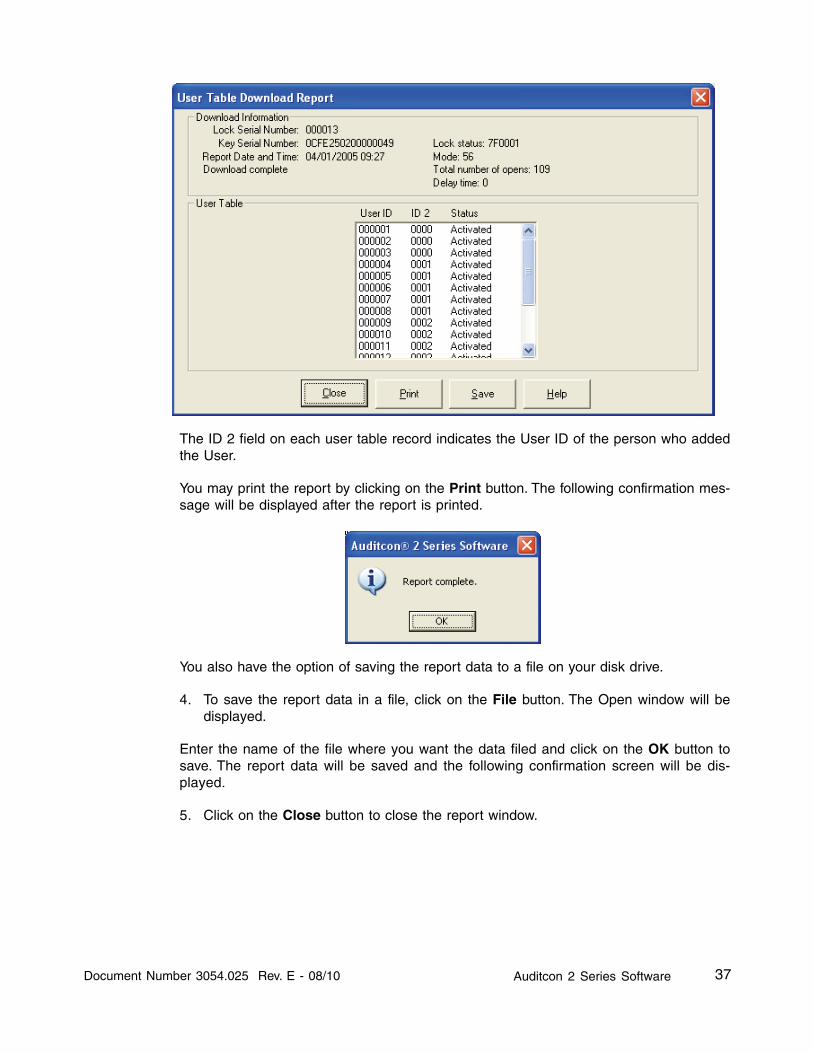
37Auditcon 2 Series SoftwareDocument Number 3054.025 Rev. E - 08/10
The ID 2 field on each user table record indicates the User ID of the person who addedthe User.
You may print the report by clicking on the Print button. The following confirmation mes-sage will be displayed after the report is printed.
You also have the option of saving the report data to a file on your disk drive.
4. To save the report data in a file, click on the File button. The Open window will bedisplayed.
Enter the name of the file where you want the data filed and click on the OK button tosave. The report data will be saved and the following confirmation screen will be dis-played.
5. Click on the Close button to close the report window.
38 Auditcon 2 Series Software Document Number 3054.025 Rev. E - 08/10
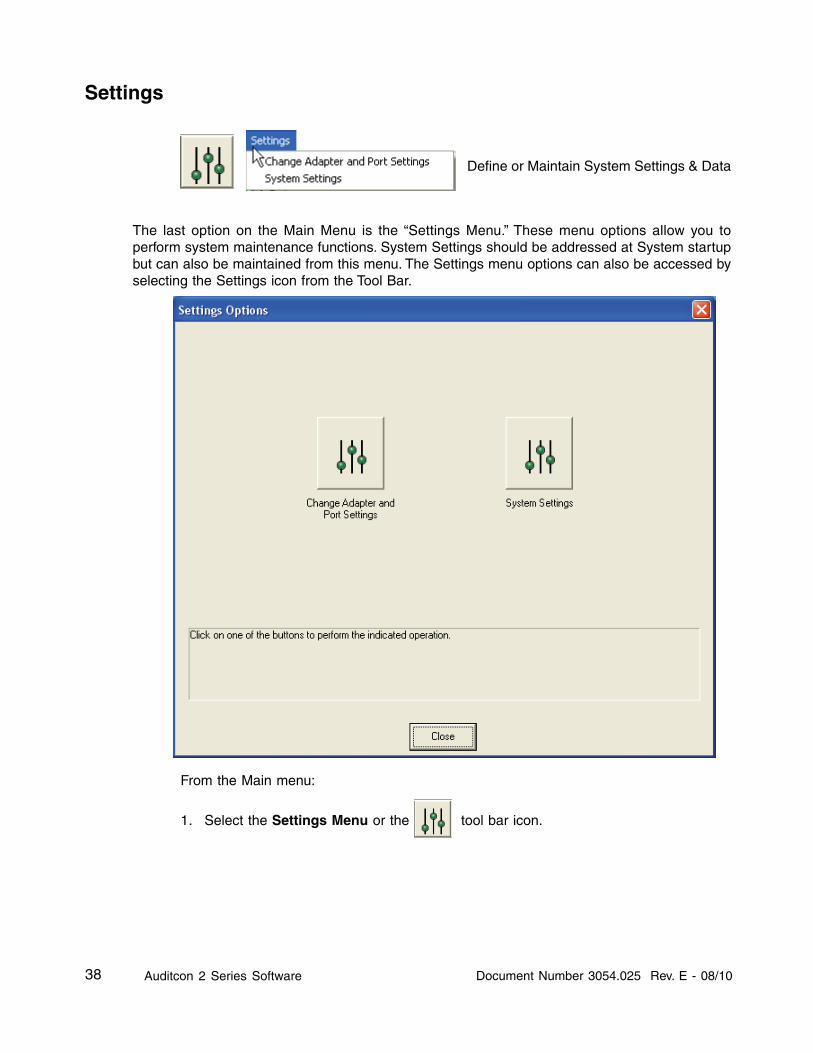
Settings
Define or Maintain System Settings & Data
The last option on the Main Menu is the “Settings Menu.” These menu options allow you toperform system maintenance functions. System Settings should be addressed at System startupbut can also be maintained from this menu. The Settings menu options can also be accessed byselecting the Settings icon from the Tool Bar.
From the Main menu:
1. Select the Settings Menu or the tool bar icon.

39Auditcon 2 Series SoftwareDocument Number 3054.025 Rev. E - 08/10
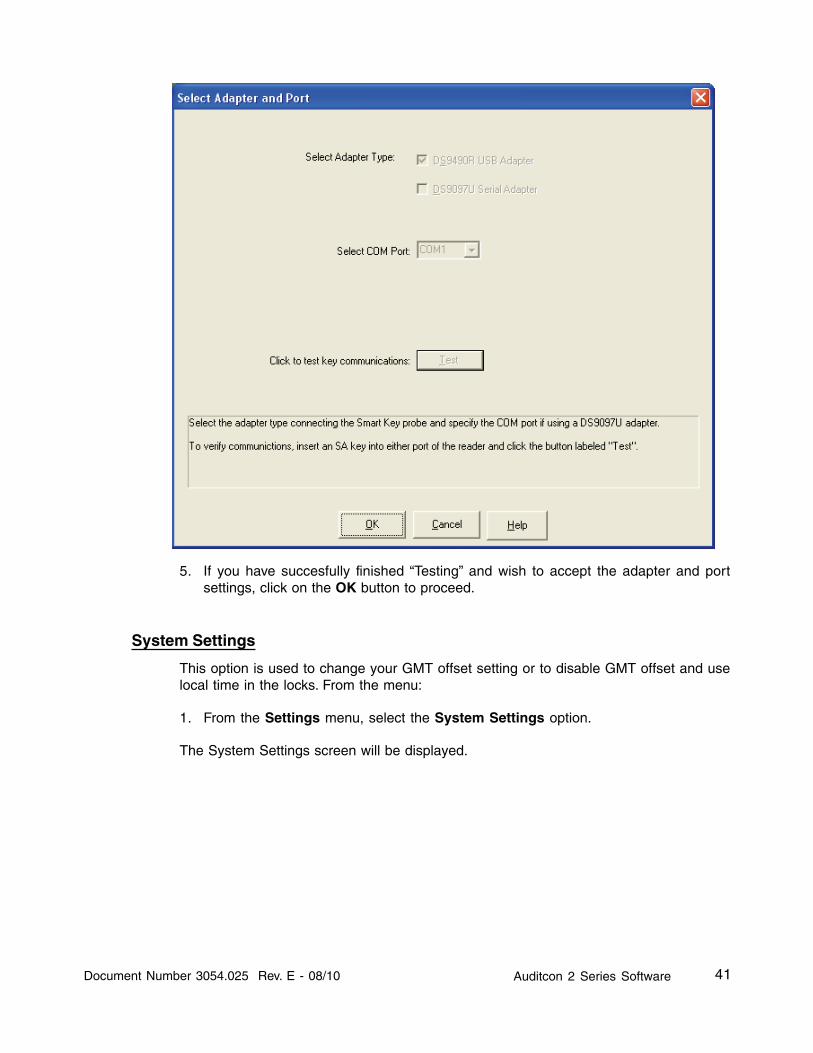
Change Adapter and Port Settings
This option is used to change the adapter and port settings in case the adaptert type ischanged or the adapter has to be moved to a different port. From the Settings menu:
1. Select Change Adapter and Port Settings.
The Select Adapter and Port screen is displayed. This window prompts you to specifywhat type of key reader you have and where it is installed.
2. Select the Adapter Type that you have installed with your system. The default valuefor the Adapter Type is the DS9490R USB Adapter. If the Adapter Type is differentfrom the default, change it at this time.
3. To ensure that your selection(s) are correct, we recommend that you “Test” yourselection(s) to verify communications. Insert an SA Key into either port of the readerand click on the Test button.

40 Auditcon 2 Series Software Document Number 3054.025 Rev. E - 08/10
If the Test is successful, a message window is displayed indicating the key was found andcommunication was successful.
If the key reader was not installed or the proper adapter type/port is not selected, thefollowing error message will be displayed and you will not be able to proceed until theproblem is corrected.
If the SA key is not in the reader, the following error message will be displayed and youwill not be able to proceed until the problem is corrected.
4. Click on OK. If the test was not successful, attempt to correct the problem and “test”again. If the test was successful, all selection boxes will be grayed out.
41Auditcon 2 Series SoftwareDocument Number 3054.025 Rev. E - 08/10
5. If you have succesfully finished “Testing” and wish to accept the adapter and portsettings, click on the OK button to proceed.
System Settings
This option is used to change your GMT offset setting or to disable GMT offset and uselocal time in the locks. From the menu:
1. From the Settings menu, select the System Settings option.
The System Settings screen will be displayed.
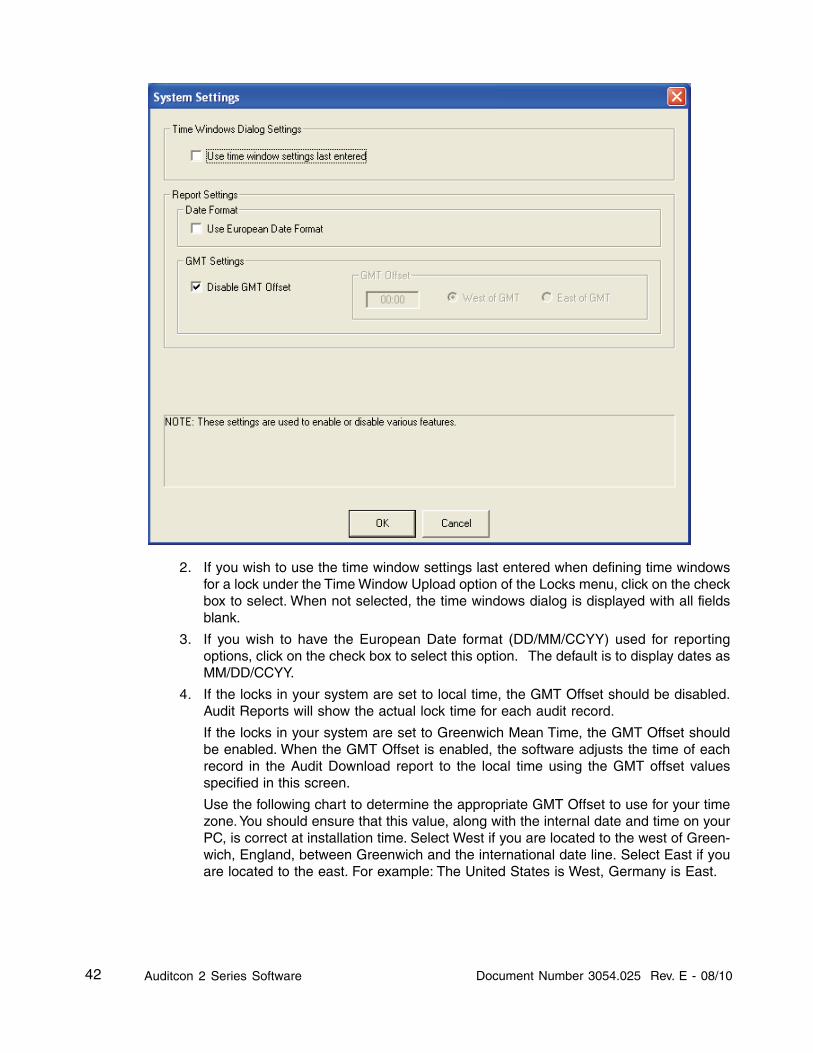
42 Auditcon 2 Series Software Document Number 3054.025 Rev. E - 08/10
2. If you wish to use the time window settings last entered when defining time windowsfor a lock under the Time Window Upload option of the Locks menu, click on the checkbox to select. When not selected, the time windows dialog is displayed with all fieldsblank.
3. If you wish to have the European Date format (DD/MM/CCYY) used for reportingoptions, click on the check box to select this option. The default is to display dates asMM/DD/CCYY.
4. If the locks in your system are set to local time, the GMT Offset should be disabled.Audit Reports will show the actual lock time for each audit record.
If the locks in your system are set to Greenwich Mean Time, the GMT Offset shouldbe enabled. When the GMT Offset is enabled, the software adjusts the time of eachrecord in the Audit Download report to the local time using the GMT offset valuesspecified in this screen.
Use the following chart to determine the appropriate GMT Offset to use for your timezone. You should ensure that this value, along with the internal date and time on yourPC, is correct at installation time. Select West if you are located to the west of Green-wich, England, between Greenwich and the international date line. Select East if youare located to the east. For example: The United States is West, Germany is East.
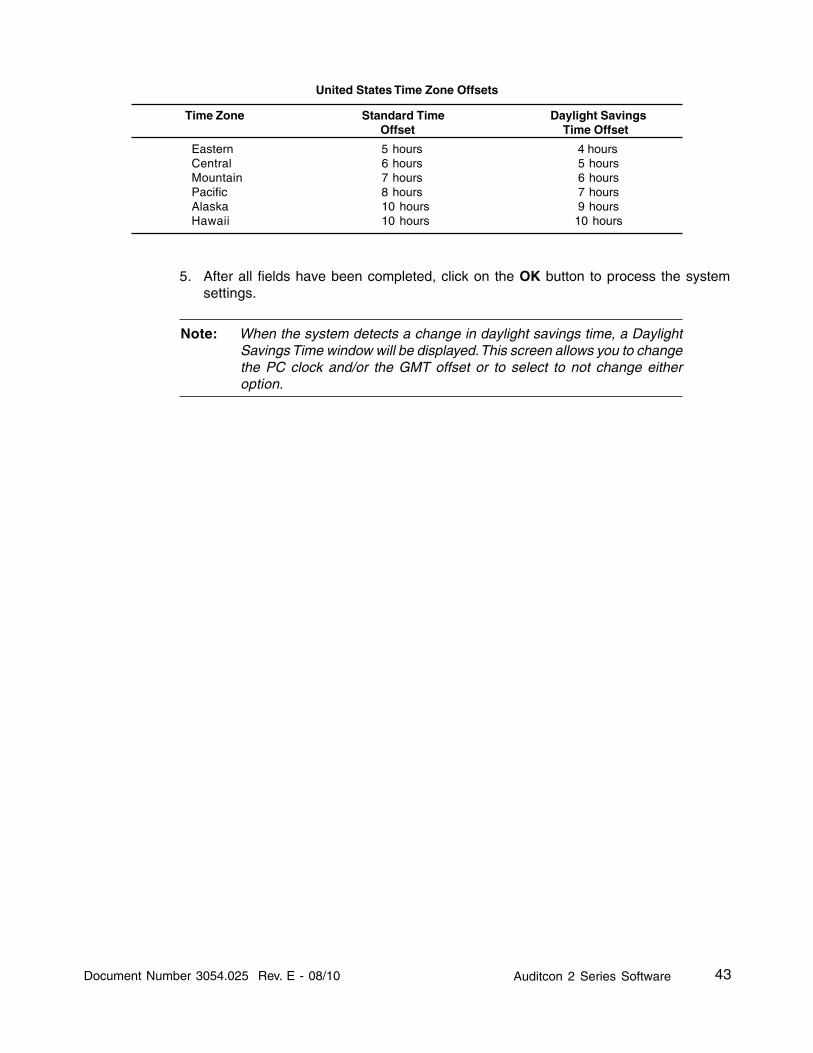
43Auditcon 2 Series SoftwareDocument Number 3054.025 Rev. E - 08/10
United States Time Zone Offsets
Time Zone Standard Time Daylight Savings Offset Time Offset
Eastern 5 hours 4 hoursCentral 6 hours 5 hoursMountain 7 hours 6 hoursPacific 8 hours 7 hoursAlaska 10 hours 9 hoursHawaii 10 hours 10 hours
5. After all fields have been completed, click on the OK button to process the systemsettings.
Note: When the system detects a change in daylight savings time, a DaylightSavings Time window will be displayed. This screen allows you to changethe PC clock and/or the GMT offset or to select to not change eitheroption.

44 Auditcon 2 Series Software Document Number 3054.025 Rev. E - 08/10
Help
System Help
From this menu, you can: 1) Access the online system help information, or 2) Display the Auditcon2 Series Software version number and copyright information.
From the Main Menu:
1. Select Help.
Help Topics
The Auditcon 2 Series Software has extensive Help screens available which cover allportions of the operation of the Auditcon 2 Series Software. The Help Topics option dis-plays the main Help window. From this window, you may obtain help on the Auditcon 2Series Softwrae software functions by clicking on the name of the function. The detailedhelp screen for the selected function is displayed. If the Help data is longer than onescreen, use the scroll bars to move through the data. The taskbar commands at the top ofthe screen may be used to move through the help screen for the different functions.Select the Windows File/Exit command to close the Help functions.

45Auditcon 2 Series SoftwareDocument Number 3054.025 Rev. E - 08/10
About Auditcon 2 Series Software
The About Auditcon 2 Series Software option displays data about the Auditcon 2 SeriesSoftware program. From the Main menu:
1. Select About Auditcon 2 Series Software.
The About Auditcon 2 Series window is displayed.

46 Auditcon 2 Series Software Document Number 3054.025 Rev. E - 08/10
2. Click on the OK button to close the window.
47GlossaryDocument Number 3054.025 Rev. E - 08/10
GLOSSARY
CCW - Counterclockwise rotation to the left. This is used in referring to the direction thatthe lock dial should be turned at certain times when performing lock operations.
CW - Clockwise rotation to the right. This is used in referring to the direction that the lockdial should be turned at certain times when performing lock operations.
B Key - The teal Date & Time Key that is used to transfer data to the lock. This type of keyis required if setting the date and time in a Model 552 lock.
Dual User Access Mode - A setting in the lock activation process that causes the lockto require two users to open the lock.
Fob - A plastic or metal molding into which an electronic chip can be imbedded to forma Smart Key.
GMT - The acronym for Greenwich Mean Time. This is the zero line for all time zones.Each time zone is offset from the zero line by a specific number of hours. The numberof hours to be used for offset correlates to the number of time zones that you areaway from the zero line. With the induction of daylight savings time, this offset de-creases by one hour.
iButton - The trademarked Dallas Semiconductor name for the electronic Smart Keysused with the Auditcon 2 Series system.
PowerStarTM technology - The technology that allows the System 2000 lock to operateusing internally generated power. No batteries or external power are required.
SA Key - A red Smart Key that is initialized at the PC with information needed to transferdata to and from a lock.
Single User Access - A setting in the lock activation process that causes the lock torequire only one user to open the lock.
Smart Key - This is a Dallas Semiconductor electronic chip imbedded in a fob.
Smart Key Reader - This is the key reader that is attached to the PC as a peripheralitem. It is used to write and read data to and from, respectively, the Smart Keys.
Two Person Integrity ( TPI ) - When two keys are required to perform certain functions.This provides a higher level of security and is called Two Person Integrity (TPI). Twoperson integrity applies if a lock is set up for Dual Mode.

48 Glossary Document Number 3054.025 Rev. E - 08/10


Document Number 3054.025Rev. E - 08/10
Kaba Mas LLC749 W. Short Street, Lexington, KY 40508 USAPhone: (859) 253-4744 FAX: (859) 255-2655
Customer Service: (800) 950-4744www.kaba-mas.com