autodesk 3ds max certified user skills - rawledu.com certification/3ds max... · the autodesk ®...
TRANSCRIPT

Aut
odes
k 3d
s M
ax C
erti
fied
Use
r Ski
lls
Aut
odes
k 3d
s M
ax C
erti
fied
Use
r Ski
lls
Image courtesy of Amorpheus C.A.

2
Aut
odes
k 3d
s M
ax C
erti
fied
Use
r Ski
lls Introduction
Welcome to the Autodesk® 3ds Max® Certified User Digital Skills. This document was designed to help educators and educational institutions teach Autodesk® 3ds Max®software skills. Created using valuable input from respected educators and designers, it sets forth important skill standards for developing a high-quality user certification exam and curriculum resources.
The Autodesk® 3ds Max® Certified User Skills serves to standardize the core competencies for fundamental-level instruction with Autodesk® 3ds Max® for a two-semester class and provides a content framework and reference guide for the Autodesk Digital STEAM Workshop.
TIP: Although this document is designed to facilitate teacher-led courses and lessons, it may also be referenced for self-paced learning through the use of the Autodesk® Digital STEAM Workshop and the Autodesk® 3ds Max® Certified User Digital Study Packet.
Using This Document
This easy-to-read document lists industry-specific topics pertaining to a function or feature set of Autodesk 3ds Max software. Topics are organized into three substructures logically sequenced for classroom presentation:
• Topic: A standard functional subject area and/or feature set available in Autodesk 3ds Max software. Example: Sketching and Modeling.
• Subtopic: A subtopic provides more detail on the topics and what the topics support. Example: 2D Sketching with Transforming Objects.
• Content: The content provides more detail about the subtopic and what should be taught and learned. Example: Select, Move, Rotate, Scale.
• Learning Objective: The learning objective exemplifies what the student is expected to understand. Example: Demonstration these specific functions and their hot keys.
LEARNING OBJECTIVE
TOPIC SUBTOPIC CONTENT

3
Aut
odes
k 3d
s M
ax C
erti
fied
Use
r Ski
lls Introduction
Autodesk 3ds Max Certified User Digital Study Packet
The Autodesk 3ds Max Certified User Digital Study Packet is a digital learning resource that provides students with a library of short videos based on the Autodesk 3ds Max Certified User Skills . The study packet covers the basic techniques required to become familiar with the software and get hands-on quickly.
TIP: Teachers can leverage the study packets in conjunction with the Autodesk Digital STEAM Workshop or their own curriculum to help their students build their software skill.
Autodesk Digital STEAM Workshop
The Autodesk Digital STEAM Workshop provides teachers and students with a highly visual story-based curriculum created to promote design innovation and creative problem-solving through science, technology, engineering, arts, and math (STEAM). The curriculum is structured as a framework for learning software through project-based content based on engaging real-world industry projects that build gradually in difficulty, offering students a chance to achieve small successes as they build their technical skills.
TIP: Using the 3ds Max Certified User Skills as benchmarks, teachers can measure a student’s progress as they work through the skills-building projects offered in the Autodesk Digital STEAM Workshop.
Feedback
We welcome your feedback on the 3ds Max Certified User Skills. Please email us at [email protected].

Aut
odes
k 3d
s M
ax C
erti
fied
Use
r Ski
lls
Aut
odes
k 3d
s M
ax C
erti
fied
Use
r Ski
lls
Image courtesy of Autodesk Gallery

5
Aut
odes
k 3d
s M
ax C
erti
fied
Use
r Ski
lls
5
Industry Specific Topic
Sub-Topic Content Teacher Recommendation Examples of Learning Objective
UI/Scene ManagementDefinitions
Labeling UI Elements i.e. Menu bar, Command panels, etc
Give students a snapshot image of the Default UI with everything named
Coordinate system Discuss the different systems, highlighting their unique features
Orthographic/Perspective Discuss the differences between both views
Viewport Navigation ControlAlt + MMB - Rotate Demonstrate the ability to Rotate
viewports with Alt+MMB
Viewport Display
Smooth + Highlights Discuss the different Displays and their uses. Introduce F3 hotkey
Create a simple 3ds Max scene with different display modes and have students identify these modes within the scene mainly the wireframe, smooth + highlight, edge faces, flat, lit wireframes, facets, bounding box, lighting and shadows etc..
Wireframe Discuss the different Displays and their uses. Introduce F3 hotkey
Hidden Line Discuss the different Displays and their uses
Edged Faces Discuss the different Displays and their use. Introduce F4 hotkey
Viewport Display Preferences
Undo Demonstrate the ability to increase/decrease the amount of Undos and it’s impact on performance
AutoBack Discuss the AutoBack feature and how to change it’s settings

6
Aut
odes
k 3d
s M
ax C
erti
fied
Use
r Ski
lls
6
Industry Specific Topic
Sub-Topic Content Teacher Recommendation Examples of Learning Objective
UI/Scene Management
Selection of ObjectsClick and drag- window/crossing
Discuss and demonstrate the differences between the two selection types
Lock Selection Demonstrate the benifits of Locking a Selection
Selection of ObjectsSelection Filters Demonstrate the ability to filter the
type of Object you wish to select
Named Selection Explore the Select by Name Tool
TransformsAxis Constraints Demonstrate the benifits of
constraining Transforms to a certain Axis
Create a simple scene of a bookshelf and show it in 4 views, 3 othrographic and 1 camera view. Have some of the books/objects outside the shelf and simply ask students to put them back in place while using 4 views. The idea is to understand 3d space as the books/objects may look outside the shelf in the top view but not in the side or front view or even the camera view depending on the viewing angle.
Rgb=xyz=uvw Discuss how rgb=xyz=uvw corrspond to each other
Transform type- in fields Demonstrate the ability to produce accurate Transforms by typing them in
Align Tool Demonstrate the Align Tool and its benefits
Pivot point Demonstrate and discuss the Pivot Point’s ability to change how Transforms effect the object
Right-click spinner zero Highlight this funtionality as a time saving funtion
7
Aut
odes
k 3d
s M
ax C
erti
fied
Use
r Ski
lls
7
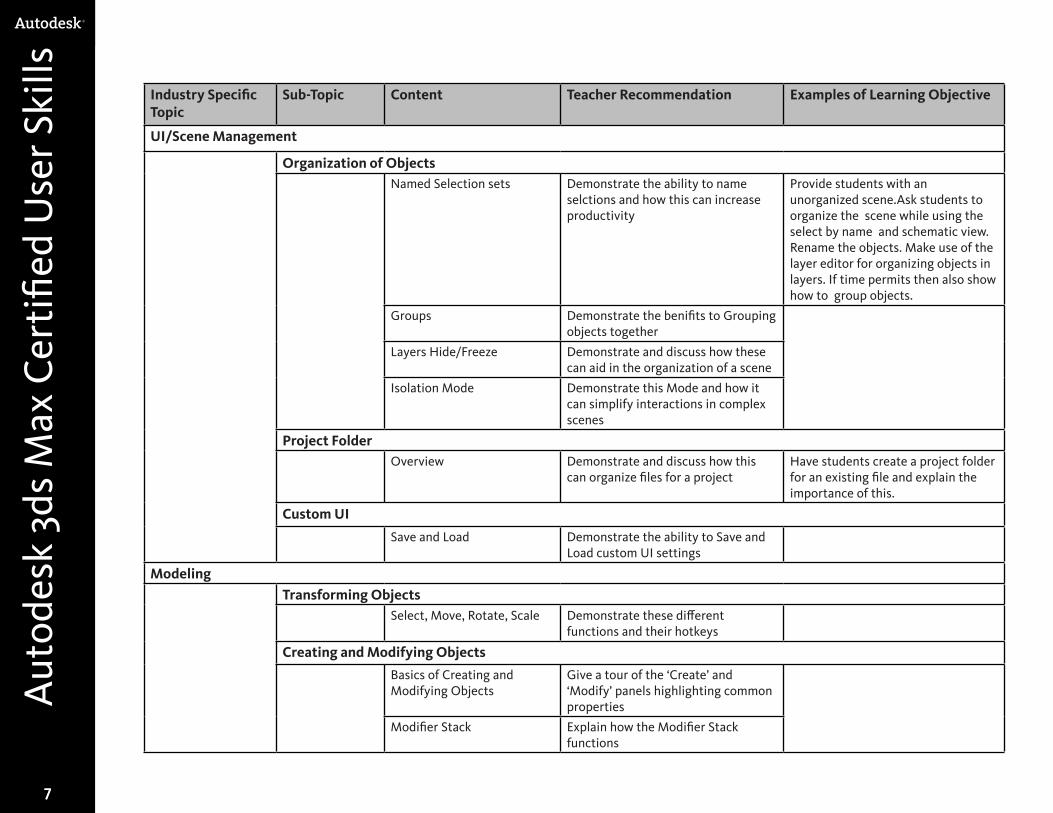
Industry Specific Topic
Sub-Topic Content Teacher Recommendation Examples of Learning Objective
UI/Scene Management
Organization of ObjectsNamed Selection sets Demonstrate the ability to name
selctions and how this can increase productivity
Provide students with an unorganized scene.Ask students to organize the scene while using the select by name and schematic view. Rename the objects. Make use of the layer editor for organizing objects in layers. If time permits then also show how to group objects.
Groups Demonstrate the benifits to Grouping objects together
Layers Hide/Freeze Demonstrate and discuss how these can aid in the organization of a scene
Isolation Mode Demonstrate this Mode and how it can simplify interactions in complex scenes
Project FolderOverview Demonstrate and discuss how this
can organize files for a projectHave students create a project folder for an existing file and explain the importance of this.
Custom UI
Save and Load Demonstrate the ability to Save and Load custom UI settings
Modeling Transforming Objects
Select, Move, Rotate, Scale Demonstrate these different functions and their hotkeys
Creating and Modifying Objects
Basics of Creating and Modifying Objects
Give a tour of the ‘Create’ and ‘Modify’ panels highlighting common properties
Modifier Stack Explain how the Modifier Stack functions

8
Aut
odes
k 3d
s M
ax C
erti
fied
Use
r Ski
lls
8
Industry Specific Topic
Sub-Topic Content Teacher Recommendation Examples of Learning Objective
Modeling
GeometryStandard Primitives Create each Primitive and change
common propertiesExtended Primitives Build a robot while using only
primitive objects. The only thing students are allowed is to transform the objects. No polygonal modeling or sub-object editing. Also make sure students are using all four views, organizing the scene while naming the objects and using layers.
SplinesStandard Splines Create each Spline and change
common propertiesExtended Splines
Surface Modeling
Sub-Object Selection Explain the basics of working in Sub-Object mode
Editable Mesh Surface Demonstrate how to create this Surface and its Sub-Object tools
Editable Poly Surface
Editable Spline Demonstrate how to create this spline and its Sub-Object toolsand its Sub-Object tools
Nurbs Surfaces Demonstrate how to create this Surface and its Sub-Object tools

9
Aut
odes
k 3d
s M
ax C
erti
fied
Use
r Ski
lls
9
Industry Specific Topic
Sub-Topic Content Teacher Recommendation Examples of Learning Objective
ModelingObject Cloning
Copy Explain the unique features of each different method of Cloning
Instance
Reference
Make Unique
Object CloningArray Create an Array and examine key
parametersProvide students with a simple warehouse scene. Make a simple array of boxes to be stacked into the storage.Mirror Create and Mirror a simple Object
Create Shape, turn off Start New Shape, Create 2nd ShapeNesting shapes for compound shape
Show how multiple shapes can be nested inside one another for modeling purposes
Interpolation/Rendering
Demonstrate the interpolation and rendering features for splines
Create some simple objects for e.g. pipes, hoses etc.. while using splines and while using the interpolation and rendering features of splines.

10
Aut
odes
k 3d
s M
ax C
erti
fied
Use
r Ski
lls
10
Industry Specific Topic
Sub-Topic Content Teacher Recommendation Examples of Learning Objective
Modeling2D Sub- Object Editing Vertex tangency types Demonstrate the different tangent
types in the vertex sub--object mode
Segment tangency type Demonstrate the different tangent types in the segment sub--object mode
Create line tool Explain the impotance of the Create Line Tool in splines
Refine Demonstrtaehow refine can be used for spline editing
Make First/Reverse Demonstrate how the make first/reverse can be useful in different scenarios
Shift key for straight line creation
Demonstrate the use of shift while making splines
2D Procedural Modifiers
Extrude Demonstrate the extrude modifier Create a simple logo such as the “3ds Max” logo while using splines. Use background images as modeling aids. Use the extrude modifier to create the logo. Discuss the Extrude parameters in detail.
Bevel Demonstrate the bevel modifier Create a simple logo such as the “3ds Max” logo while using splines. Use background images as modeling aids. Use the bevel modifier to create the logo. Discuss the Bevel parameters in detail.Discuss the difference between Extrude and Bevel.

11
Aut
odes
k 3d
s M
ax C
erti
fied
Use
r Ski
lls
11
Industry Specific Topic
Sub-Topic Content Teacher Recommendation Examples of Learning Objective
Modeling
2D Procedural Modifiers
Bevel Profile Demonstrate the bevel profile modifier
Create a simple logo such as the “3ds Max” logo while using splines. Use background images as modeling aids. Use the bevel profile modifier to create the logo. Discuss the Bevel Profile parameters in detail. Discuss the difference between Extrude, Bevel and Bevel profile.
Lathe (flip normals) Demonstrate the lathe modifier Create a simple wine glass model while using lathe. Explain the difference between the line, point curve and cv curve tools. Explain the importance of pivot points.Show how to snap pivot points. Also make use of background images. Explain the Lathe modifier parameters in detail and show how you can get different output geometry while using the tool.
Lofting
Definition shape+path=3D Object
Explain the concept of shpe + path for lofting
Create a simple toothpaste tube while using loft. Use circles, ellipses and any other shapes. Explain the Loft tool parameters in detail and show deformations in the loft.
Compound object Examine the basic parameters and demonstrate common operations
Pivot point location Demonstate the concept of the importance of pivot points
Multiple shapes on path Demonstrate how multiple shapes can be lofted ona path

12
Aut
odes
k 3d
s M
ax C
erti
fied
Use
r Ski
lls
12
Industry Specific Topic
Sub-Topic Content Teacher Recommendation Examples of Learning Objective
Modeling
Compound ObjectsProBoolean Examine the basic parameters and
demonstrate common operationsWhile using primitive objects have students create interesting shapes such as the inside of a dome, a sink etc… while using ProBooleans
3D Procedural Modeling
Bend Examine the basic parameters and demonstrate common operations
Either use a simple primitive object or use some existing models and demonstrate all the modifiers like bend, taper,twist, ffd, lattice etc…For e.g. create some text like ‘AUTODESK’, use bevel or bevel profile and then apply the bend modifier. Use a simple model of a hose and use the twist, taper and the bend individually and together. Use the ripple and wave modifier to make simple surfaces like a flag or a water surface.Explain how the modifier stack functions.
Taper
Twist

13
Aut
odes
k 3d
s M
ax C
erti
fied
Use
r Ski
lls
13
Industry Specific Topic
Sub-Topic Content Teacher Recommendation Examples of Learning Objective
Modeling
Sub-Object Tools
Attach Demonstrate each operation and any important properties
Build a fire hydrant or a simple hammer or a household object while using, extrude, bevel,bridge, chamfer and some of the edge loop tools. Show Meshsmooth, Turbosmooth and NURMS Subdivision result. Don’t forget to make use of the ‘;’ hotkey.
Bevel
Chamfer
Cut
Detach
Extrude
Provide students with a simple polygonal model with some edges and vertice broken. Use weld and target weld to fix the geometry. Also talk about Show Statistics before and after the welding.
CameraCamera Types
Target Camera Demonstrate each operation and any important properties
Free Camera Demonstrate how to setup background images to assist as reference in modeling objects
Prepare a scene for modeling while showing image planes on actual planes instead of being shown in the viewport. Show the advantage of using alpha channels in the image planes.Also show how making use of layers can help organize the planes better

14
Aut
odes
k 3d
s M
ax C
erti
fied
Use
r Ski
lls
14
Industry Specific Topic
Sub-Topic Content Teacher Recommendation Examples of Learning Objective
CameraCamera Types
Dolly Camera, Target, or Both
Perspective Demonstrate the difference between the 2 types of Cameras
Create an establishing shot for an existing scene to understand camera composition
Roll Camera Create a close up shot for an existing scene to understand camera composition
Camera Viewport ControlsTruck Camera Demonstrate the difference between
the 3 types of DollyCreate a bird’s eye view shot for an existing scene to understand camera composition.
Orbit/Pan Camera Demonstrate the ability to change the Perspective
Make a camera from the perspective view while using ctrl+c and also make multiple cameras and show you can switch between multiple cameras.
Filed-of-view Demonstrate how Align Camera Works
Camera ParametersSafe Frames Demonstrate difference between
Prespective and Orthographic
Demonstrate the effect of changing the FOV
Lighting
Standard Light TypesOmni Light Demonstrate how the Near/Far Clip
Planes control what is rendered in Camera
Target Spotlight Demonstrate why safe frames are an important part of camerasand the final output
Create a simple scene with some text as a logo animating into the camera and demonstrate the safe title and safe action for TV production
Free Spotlight

15
Aut
odes
k 3d
s M
ax C
erti
fied
Use
r Ski
lls
15
Industry Specific Topic
Sub-Topic Content Teacher Recommendation Examples of Learning Objective
Lighting
Standard Light Types
Target Directional Light Explore each type of Light, taking note of each Light’s unique features
Provide students with an interior scene and demonstrate the omni light and relate it to real world scenarios. Discuss all the parameters.
Free Directional Light Provide students with an interior scene or a performance stage and demonstrate the target spotlight and relate it to real world scenarios. Discuss all the parameters.
Light Include/Exclude Tool Outline the similarities and differences of lighting in 3DS Max and the real world
Light Lister Explain the differences between Natural (Outdoor) and Artificial (Indoor) lighting
Managing Lights
Shadow Parameters Show how to exclude objects from recieving light from lights
Provide a detailed scene like an Interior of a room and use different lights to illuminate the scene. Discuss how include/exclude can come in handy in computer graphics to avoid unnecessary washing out of objects.
ToolsShadow Types and Shadow Controls
Demonstrate how the Light Lister is an effective light managment tool
Show a detailed scene with a lot of lights and open the light lister and explain how it’s a great tool for managing lights.
Demonstrate the use of place highlight for positioning the highlight or reflection of the light

16
Aut
odes
k 3d
s M
ax C
erti
fied
Use
r Ski
lls
16
Industry Specific Topic
Sub-Topic Content Teacher Recommendation Examples of Learning Objective
Materials
Material EditorMaterial Editor/Slate Material Editor
Discuss a simple scene for e.g. wine glass/bottle on a table or a fruit bowl casting shadows. Discuss all different shadow types and all the parameters and show the difference between different shadow types.
ShadersBlinn Shader Define material with a real world
exampleShow a simple scene like a cofee table with cups,dishes etc.. and explain the difference between materials and textures
Metal Shader Define map with a real world example Open a scene with a complex material network and demonstrate the node based heirarchy in 3ds Max Slate Material Editor
Explain the basics of Shaders
Shader Basic Parameters Discuss each Shader and their unique properties and appearance
Explain in detail all the shader types with a simple example like a cofee set, fruit bowl etc…
Shader Parameters
Standard MaterialsStandard Material Explain all the features under this
rollout
Double Sided Explain each Material and their unique properties and appearance
Create a simple scene to explain the standard material
Top/Bottom Create a scene which will make use of the raytrace material
Blend Explain the matte shadow material by having a 3d object cast shadows on a background plate while using Matte/Shadow on the bottom plane.
17
Aut
odes
k 3d
s M
ax C
erti
fied
Use
r Ski
lls
17
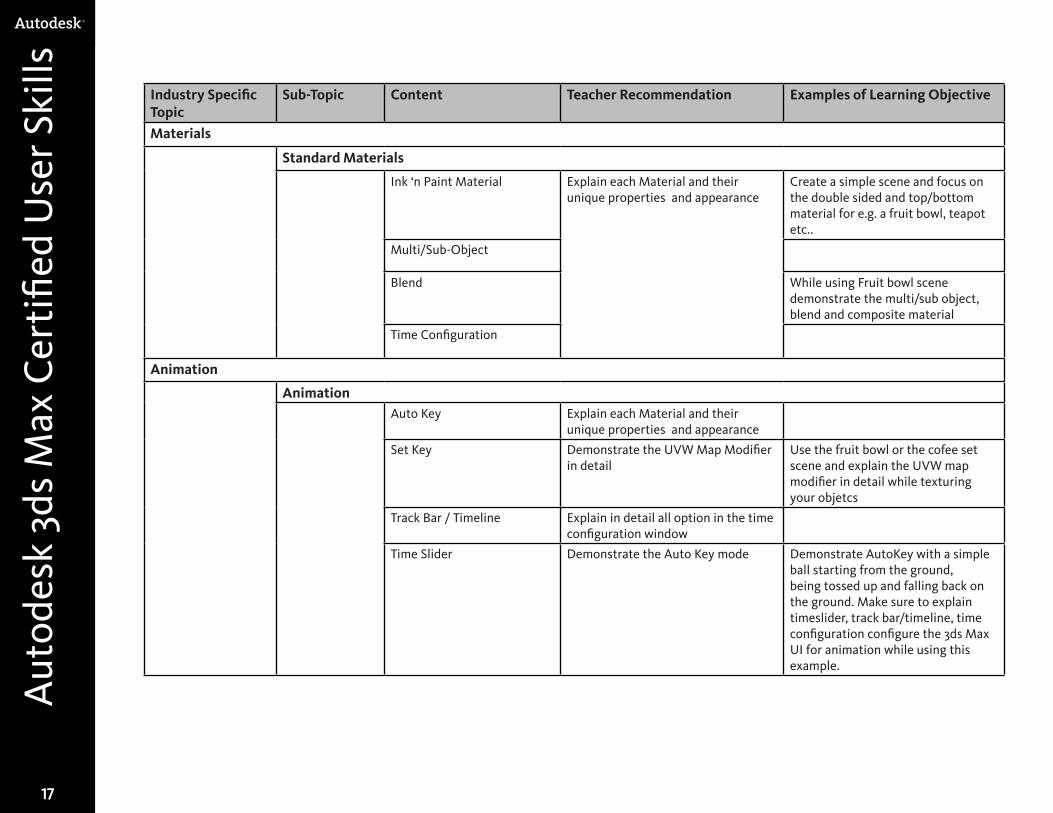
Industry Specific Topic
Sub-Topic Content Teacher Recommendation Examples of Learning Objective
Materials
Standard Materials
Ink ‘n Paint Material Explain each Material and their unique properties and appearance
Create a simple scene and focus on the double sided and top/bottom material for e.g. a fruit bowl, teapot etc..
Multi/Sub-Object
Blend While using Fruit bowl scene demonstrate the multi/sub object, blend and composite material
Time Configuration
Animation
AnimationAuto Key Explain each Material and their
unique properties and appearance
Set Key Demonstrate the UVW Map Modifier in detail
Use the fruit bowl or the cofee set scene and explain the UVW map modifier in detail while texturing your objetcs
Track Bar / Timeline Explain in detail all option in the time configuration window
Time Slider Demonstrate the Auto Key mode Demonstrate AutoKey with a simple ball starting from the ground, being tossed up and falling back on the ground. Make sure to explain timeslider, track bar/timeline, time configuration configure the 3ds Max UI for animation while using this example.

18
Aut
odes
k 3d
s M
ax C
erti
fied
Use
r Ski
lls
18
Industry Specific Topic
Sub-Topic Content Teacher Recommendation Examples of Learning Objective
AnimationEditing Animation
Trajectories Demonstrate the operation and any important properties
Curve Editor
Dope Sheet Animate a simple ball starting from the ground, being tossed up and ahead while roatating and falling back on the ground. Use the trajectories to modify the motion and add new keys.
Motion Panel>Trajectories Explain the importance of the curve editor with an example
Preview/Render Animation
Make Preview Exaplin the importance of the dope sheet with an example
Animate an objects visibility while using the Dope Sheet.
Motion Panel Show the ram player for a sequence of images
Controllers & ConstraintsNoise Controller Apply parameter animation for a
basic Object-Space Modifier (i.e. Bend Modifier)
Show a simple object and apply a bend modifier and animate the bend modifer. You can also try to animate a simple plane with the ripple and wave modifier while showing the effect of a pebble being tossed on a water surface.
Look At Constraint Demonstrate the controller and all it’s important properties
Path Constraint
Time Output Introduce the Hotkey-Home
Output Size Introduce the Hotke- End

19
Aut
odes
k 3d
s M
ax C
erti
fied
Use
r Ski
lls
19
Industry Specific Topic
Sub-Topic Content Teacher Recommendation Examples of Learning Objective
RenderingCommon Render Setup Dialogs
Assign Renderer Highlight these important settings
Renderer - AntiAliasing Highlight these important settings
Render Highlight these important settings
Render Setup Highlight these important settings
Quick RenderDemonstrate how Active Shade can speed up production
Introduce the Hotkey-F9
Introduce the Hotkey-F10

20
Aut
odes
k 3d
s M
ax C
erti
fied
Use
r Ski
lls
20
Acknowledgements
Production design/layout:Diane Erlich
Editorial services:Jessica Bendy
Additional editorial services:Diane Erlich
Primary authors:Sandeep Kulkarni
Producer:Linda Sellheim
© 2011 Autodesk®. All rights reserved.
No part of this publication may be edited or reproduced in any form or by any means, electronic or mechanical, without permission in writing from the publisher.
Notices Knowledge and best practice in this field are constantly changing. As new research and experience broaden our understanding, changes in research methods, professional practices, or medical treatment may become necessary.
Practitioners and researchers must always rely on their own experience and knowledge in evaluating and using any information, methods, compounds, or experiments described herein. In using such information or methods they should be mindful of their own safety and the safety of others, including parties for whom they have a professional responsibility.
To the fullest extent of the law, neither the Publisher nor the authors, contributors, or editors, assume any liability for any injury and/or damage to persons or property as a matter of products liability, negligence or otherwise, or from any use or operation of any methods, products, instructions, or ideas contained in the material herein.

Aut
odes
k 3d
s M
ax C
erti
fied
Use
r Ski
lls
Aut
odes
k 3d
s M
ax C
erti
fied
Use
r Ski
lls
Image courtesy of Neoscape, Inc.