automating data collection in qw 5 -...
TRANSCRIPT
by Busitech
Automating Data Collection in Quality Window 5
A guide to selecting the right solution and configuring the QWSchedule Utility
Revised March 2012

by Busitech
A u t o m a t i n g D a t a C o l l e c t i o n i n Q u a l i t y W i n d o w 5 P a g e 2
Selecting the right solution: Quality Window helps you to unlock the power of your data. Imagine how much more powerful
your data would be if you could collect more information, more often and more accurately.
To maximize the use of automation data it is important to understand and pick the right
solution to meet your needs. The Quality Window Product line provides two solutions and
picking the right one is important. Let’s step through an outline of those two solutions to help
you make the right decision. Understand that you can contact us at any time to help you in this
process.
First, the two alternatives for collecting Automation data (DDE/OPC) are:
Option 1: Using QWSchedule communicating directly through an I/O Server to an
Automation System
o Included in the QW 5 product
Option 2: Using QWDataHub – a managed gateway to all your automation data
o This is a separate product from QW 5 at an additional cost
Both solutions do make use of the QWSchedule utility available in the QW 5 product. The
difference in the two solutions is the interaction and efficiency of dealing with different
Automation Systems.
Note: Both solutions require IO Servers to communicate with an Automation System. These I/O
Servers are not included with QW 5 or QWDataHub but can be purchased from the Automation
System provider or from third party sources.
Special Note:
If you are using the RSLinx product as a Provider it is recommended that you use the
QWDataHub solution. Providers, like RSLinx, typically expect connections to be opened
and kept open for long periods of time. If RSLinx is flooded with single requests
(opening and closing communications) at a rapid rate the communication link stalls and
the I/O Server, which communicates with RXLinx would have to be restarted and may
cause the loss of data.
Option 1: QWSchedule direct link to Automation Systems
Ideal to meet small data collection requirements
o 10 or less data points (tags) at a time
Downtime Tracking
Supplementing manual data collection through Add data screen
Drawbacks:
o 1 I/O Server required per work station requesting data
o May require NetDDE and or DCOM connections depending on configuration
Option 2: QWDataHub – a managed gateway to all automation data.
o Ideal High volume (number of tags) and rapid requests for data
o Supports multiple QW Applications at a time – plant wide
o Single source of all Automation data
o Decreases need for multiple IO Servers
o Secure managed access to automation data
by Busitech
A u t o m a t i n g D a t a C o l l e c t i o n i n Q u a l i t y W i n d o w 5 P a g e 3
The remainder of this document will deal with the setup and configuration of the QWSchedule
Utility, QWSchedule may be used in either option you select the only differences would be in
the source of the actual data. Using the QWDataHub option you would be using the tags
defined in the QWDataHub application. If you are using Option 1 then the addresses will be the
Automation (PLC) addresses accessible directly through the I/O Server.
Overview of the QWSchedule Utility in Quality Window 5
A Fast and Simple Way to Collect Data Automatically
In the past, solutions used to automate data collection were complex, expensive, time
consuming and inflexible…often requiring specialized IT resources to create and manage
the system on an ongoing basis. Even small applications would require the use of
expensive, dedicated servers to collect data for their client applications.
Busitech has made a breakthrough in providing simple yet flexible tools to integrate and
automate data collection. These tools are designed to provide the "rapid change
capability" that you have come to expect using Quality Window. Users can create very
flexible solutions in a timely fashion, without the need for specialized and expensive
resources. In small applications, data collection can even be done directly within the
workstation…avoiding the cost and maintenance of dedicated servers.
Perhaps the best news is the fact that these tools are included with the latest version of
Quality Window… at no additional cost!
Introducing QWSchedule
QWSchedule is a stand-alone utility that has been introduced in the most recent
maintenance release of Quality Window (QW 5 - Build 530). QWSchedule allows you to
define and schedule tasks that include asking Quality Window to automatically collect
data from a number of different sources.
The "data" can be any Microsoft DDE/OLE compliant information available anywhere on
the network or directly wired to your computer. This can include data within other
commercial databases, PLCs, Test Instruments, etc.
QWSchedule can run tasks that collect data on either a regular timed interval and/or event
basis. An example of regular timed interval would be to collect data once an hour, or
once a day, whereas an example of event based collection would be when a trigger value
is detected, such as in the case of when a machine stops (downtime). QWSchedule works
in the background, independent of regular QW 5 users.
When QWSchedule is started the first time it automatically places itself in the System
Tray in the lower right. Just click on the icon and it will appear on your screen. Simply

by Busitech
A u t o m a t i n g D a t a C o l l e c t i o n i n Q u a l i t y W i n d o w 5 P a g e 4
select the Task option in the top left and you are ready to create a Scheduled Task.
Creating Different Tasks
QWSchedule allows you to create and save several different tasks and gives you
considerable flexibility in defining the options for each particular task.
There are two distinct types of tasks that can be created and used in QWSchedule:
a Scheduled Task, which is used to make something happen on a regular timed
basis, for example once a minute, once an hour or once a day;
an Event-Based Task, which is based on a trigger value that indicates that
something has happened and it is time to perform a specified action.
The variations on these two groups of tasks are endless, and therefore the opportunities
to use QWSchedule are limited only to your imagination. Typical examples include:
Capturing process data with each manual quality check
End of shift snapshot of downtime/scrap/reliability/production
Automating labs
Capturing upstream information (such as making, materials, etc) with downstream
information
Capturing process data with each downtime event,
Background data collection of process data
Collection of environmental data such as temperature, humidity, etc, etc.
QWSchedule allows you to automatically run any process that is currently available in
Quality Window. This includes adding data to an existing QW Application using the
QWAdd feature. Data can be added on a regular timed interval and/or event basis.

by Busitech
A u t o m a t i n g D a t a C o l l e c t i o n i n Q u a l i t y W i n d o w 5 P a g e 5
You can also use QWSchedule to archive data (copy and delete) from an active QW
application file to a historical file using QWUtil. Another example would be to set-up an
automatic data backup procedure to run at a specific time each morning (e.g. 1:00 AM).
In the following pages, we will explore the following topics:
Creating a Scheduled Task
Creating an Event-Based Task
Creating a Downtime Task
Defining Input Sources in a QW Application
Creating a Scheduled Task to Automatically Collect Data
Perhaps the most powerful use of QWSchedule is to collect data directly from devices
like Programmable Logic Controllers (PLC’s) and update a QW application data file
without operator intervention. Instead of having a person standing at the computer and
pressing the Add key every 30 minutes to obtain the data we can have QWSchedule do it
automatically for us.
The basis of automating data collection with the QWSchedule program is the use of the
QWAdd feature in Quality Window. A key component of the process is the use of
Input/Output (I/O) File definitions for variables within a QW 5 application. Defining
Input/Output (I/O) Files is explored later in this article, and for now we will concentrate
on simply creating a task to Automatically Collect Data.
The following is an example of how you would create a new Scheduled Task to collect
data and set it to execute once every minute.
Click on the QWSchedule Icon in the System Tray to launch QWSchedule.

by Busitech
A u t o m a t i n g D a t a C o l l e c t i o n i n Q u a l i t y W i n d o w 5 P a g e 6
Select the Task option in the top left and then choose Add a Scheduled Task.
Define the Task
Now we just need to supply the necessary information. We use the Edit Task Detail
screen to give the task a meaningful name.
We must also establish what program is to be run. In this example we want to run the
QWAdd program in Quality Window.
Every time the QWAdd program is run, it will scan the appropriate QW Application
template for Input File Sources.
This action is equivalent to pressing the Add key in QW50, then Save, then Exit
Records are ReOrganized (ReOrged and ReCalced) after every QWAdd

by Busitech
A u t o m a t i n g D a t a C o l l e c t i o n i n Q u a l i t y W i n d o w 5 P a g e 7
Input File Sources, explained in greater detail at the end of this paper, are where the data
will be sourced that QWadd will write to the QW Application template.
Finally, you need to establish the Parameters for the Task, and in this example that means
identifying which QW Application the new data will be added to.
Selecting the Browse option for either Run or Parameters will allow you to navigate to
the appropriate directories to make selections.
Establish a Schedule
We now need to tell QWSchedule when and how often to run this particular Task.
This is done by selecting the Run Schedule tab.
For our Task we are only interested in an Interval of 1 minute and that we want it to run
Monday through Sunday. As you can see you can get very precise in the running of a
Task. For example, we could set a Task to run between 7 am and 11 pm Monday through
Friday and by using the Date Range option at the bottom just run it for September
through December this year.
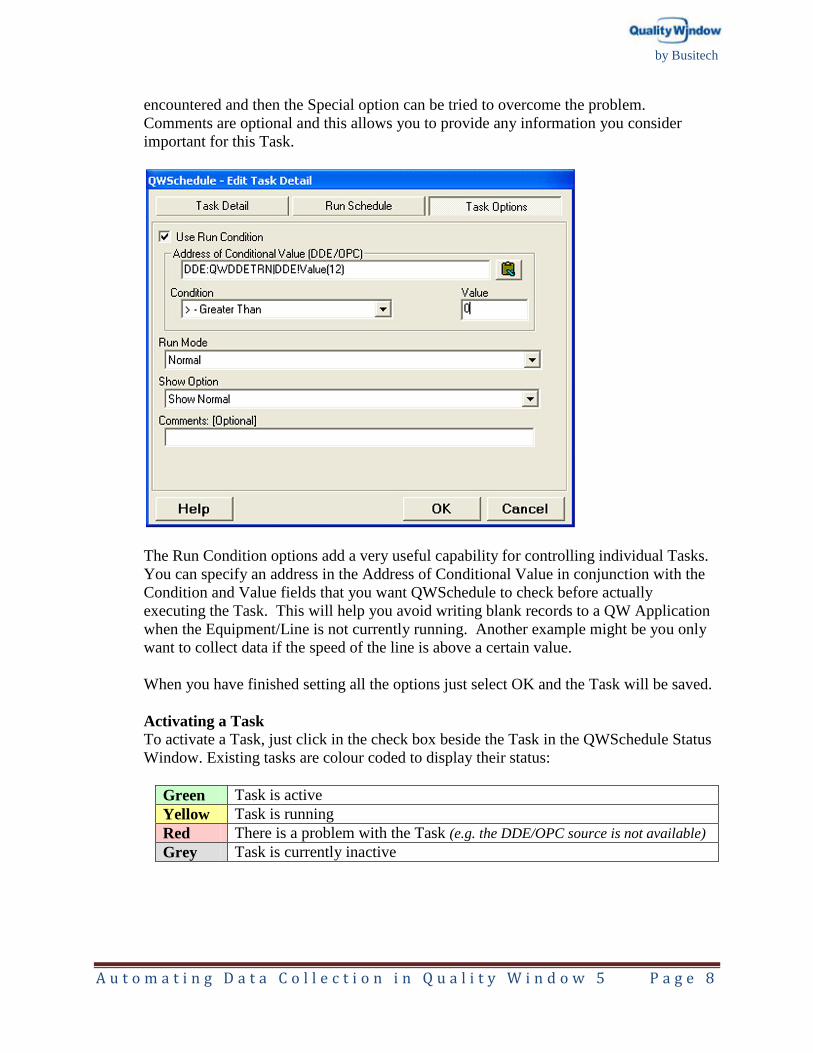
Fine Tune the Options
Our last job is to view the Task Option screen. This screen lets you specify any special
options when running this Task. For instance the Show Option lets you control what is
displayed on the screen when the program in the Task Detail-Run option is executed.
The pull down menu lets you select from Normal, Maximized, Minimized or Hidden
views. The Run Mode defaults to Normal unless a problem in running the Task is
by Busitech
A u t o m a t i n g D a t a C o l l e c t i o n i n Q u a l i t y W i n d o w 5 P a g e 8
encountered and then the Special option can be tried to overcome the problem.
Comments are optional and this allows you to provide any information you consider
important for this Task.
The Run Condition options add a very useful capability for controlling individual Tasks.
You can specify an address in the Address of Conditional Value in conjunction with the
Condition and Value fields that you want QWSchedule to check before actually
executing the Task. This will help you avoid writing blank records to a QW Application
when the Equipment/Line is not currently running. Another example might be you only
want to collect data if the speed of the line is above a certain value.
When you have finished setting all the options just select OK and the Task will be saved.
Activating a Task
To activate a Task, just click in the check box beside the Task in the QWSchedule Status
Window. Existing tasks are colour coded to display their status:
Green Task is active
Yellow Task is running
Red There is a problem with the Task (e.g. the DDE/OPC source is not available)
Grey Task is currently inactive

by Busitech
A u t o m a t i n g D a t a C o l l e c t i o n i n Q u a l i t y W i n d o w 5 P a g e 9
Creating an Event-Based Task
There are two variations of Event Tasks available in QWSchedule. The first is based on
a trigger value and when that value changes it is time to perform a specified action. This
could be a value in a PLC that indicates the end of a shift has occurred and it is time to
run the end of shift report.
In the following example, we want to run an End of Shift Report when the shift changes.
Click on the QWSchedule Icon in the System Tray to launch QWSchedule.
Select the Task option in the top left and then choose Add an Event Task.
Define the Task
We use the Edit Task Detail screen to give the task a name that clearly indicates what the
task is for. In this case, we will name the task “End of Shift Report”.

by Busitech
A u t o m a t i n g D a t a C o l l e c t i o n i n Q u a l i t y W i n d o w 5 P a g e 1 0
In the next field you define the Trigger Address. This can be a DDE or OPC address in a
PLC or as in this case a QW Input/Output file called Shift.IO.
In this example, you have designed your QW application with a field to note which shift
is working. When a new shift begins, the first task of the shift leader is to add a record in
the QW application noting the change. QW stores that value in an Input/Output file called
Shift.IO. The IO Files continues to store this value until the next shift starts, when a new
value would be recorded.
QWSchedule will continue to monitor this file and when the file changes the Task will be
triggered. You must provide the complete location information for the file to ensure the
correct file is being monitored.
C:\Busitech\QW50\Samples\Shift.io
Once the Task is triggered you need to define what action you want QWSchedule to take.
In the Run field you specify the program or activity you want performed. In this case we
want to run the program QWREPORT.EXE, which is located in the Busitech/QW50
directory on the C: drive. The Browse option to the right of the field can make this
selection easier.
C:\Busitech\QW50|QWReport.exe
Along with specifying the program there options that can be specified to clearly define
the task you want to perform. These options are sometimes called command line options
and in this case we want QWREPORT.EXE to run a report for the Monitoring
application and specifically we want the “Previous Shift Detail” Report to be printed on
the default printer.
PRINTER C:\Busitech\QW50\Samples\MONITOR.QWT[Previous Shift Detail]
Each program you place in the Run option may have a variety of command line options.
You should investigate these options to select the best method of accomplishing your
objective.

by Busitech
A u t o m a t i n g D a t a C o l l e c t i o n i n Q u a l i t y W i n d o w 5 P a g e 1 1
Establish a Schedule
We now need to tell QWSchedule when and how often to run this particular Task.
This is done by selecting the Scan Schedule tab.
This screen allows you to clearly define when this task should be available to be executed.
For instance in this example we know we only run a 5 day a week operation so we only
want the task to be available Monday through Friday.

by Busitech
A u t o m a t i n g D a t a C o l l e c t i o n i n Q u a l i t y W i n d o w 5 P a g e 1 2
Fine Tune the Options
The last option screen for you to consider is the Task Option screen.
Here you can set the Task to only run if a certain condition is met (Use Run Condition).
This is useful if it is important that this task only run if the Line is currently running. In
other words, you do not want the Task to run if the Line is currently on a Maintenance
shut-down.
You can also set how the task is to be displayed on the screen when it is executing. You
may not want anything to show on the screen.
by Busitech
A u t o m a t i n g D a t a C o l l e c t i o n i n Q u a l i t y W i n d o w 5 P a g e 1 3
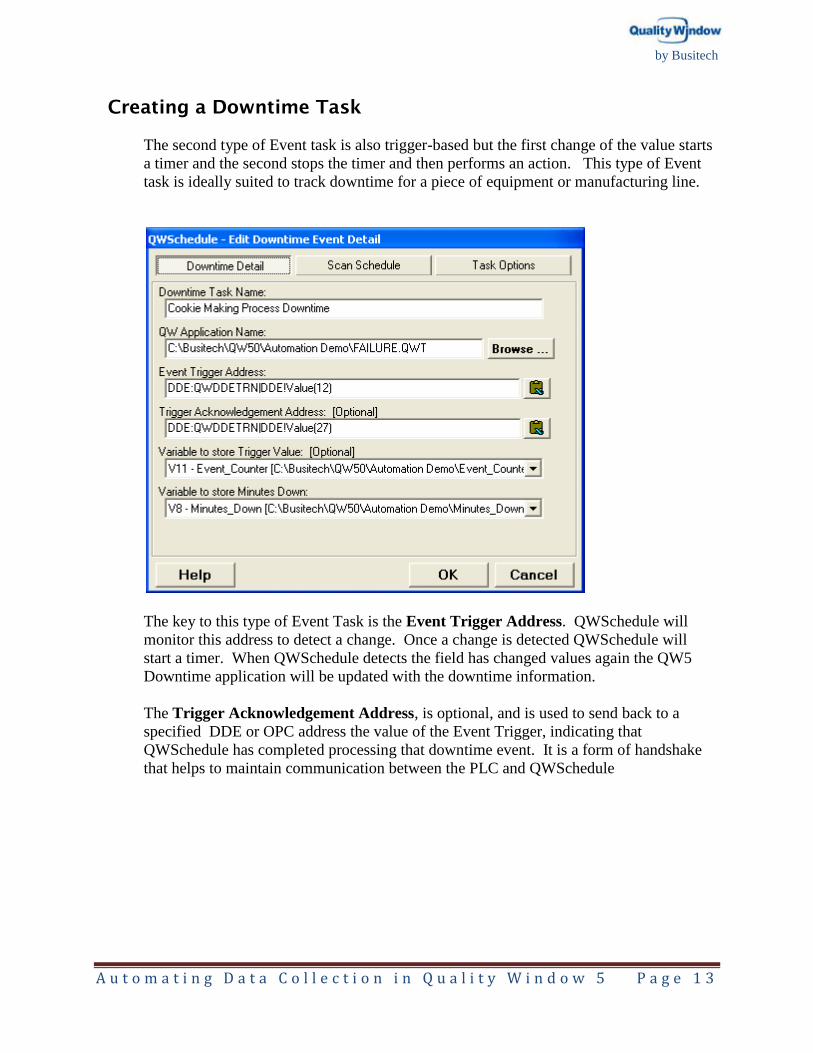
Creating a Downtime Task
The second type of Event task is also trigger-based but the first change of the value starts
a timer and the second stops the timer and then performs an action. This type of Event
task is ideally suited to track downtime for a piece of equipment or manufacturing line.
The key to this type of Event Task is the Event Trigger Address. QWSchedule will
monitor this address to detect a change. Once a change is detected QWSchedule will
start a timer. When QWSchedule detects the field has changed values again the QW5
Downtime application will be updated with the downtime information.
The Trigger Acknowledgement Address, is optional, and is used to send back to a
specified DDE or OPC address the value of the Event Trigger, indicating that
QWSchedule has completed processing that downtime event. It is a form of handshake
that helps to maintain communication between the PLC and QWSchedule

by Busitech
A u t o m a t i n g D a t a C o l l e c t i o n i n Q u a l i t y W i n d o w 5 P a g e 1 4

by Busitech
A u t o m a t i n g D a t a C o l l e c t i o n i n Q u a l i t y W i n d o w 5 P a g e 1 5
Defining Input Sources in a QW Application
As noted above, QWSchedule calls on the QWAdd feature in Quality Window to
automatically collect data. For QWAdd to successfully collect data, one or more variables
within the specified QW Application template must have an Input File specified for it.
The Input File tells the QWAdd process what value to establish for that variable in the
record that is about to be written. Every variable within a QW template can have an Input
File specified for it.
The following notes explain how you can define Input Sources in a QW application.
Getting Started
Input Files can be specified for each variable using the QWSetup program.
Choose which existing QW Application you wish to modify, and then use QWSetup to
modify each necessary variable.
Input Files can be specified with 3 different sources: a simple Input/Output (I/O) file, a
Dynamic Data Exchange (DDE) address, or an Open Process Control (OPC) address.
I/O Files
Quality Window allows you to set up a simple data file to collect input/output data. These
files are called I/O Files. You can specify an I/O file as the input source, such as:
C:\busitech\qw50\samples\team.io
where a single value may be stored within this file
I/O input files are typically used to receive data from RS232 devices like a weight scale.
Dynamic Data Exchange (DDE) address
You can specify a DDE application source file as the input file, such as:
DDE:EXCEL|c:\MyWorksheet.xls!R1C3
where Excel is the DDE application
where c:\MyWorksheet.xls is the spreadsheet file
where R1C3 is Excel's way of pointing to Cell C1 (Col 3, Row 1)
To gain access to PLC sources a bridge is required (called an IO Server). These servers
are typically software gateways supplied by Control System suppliers like Allen-Bradley,
Siemens or Honeywell. These IO Servers receive the data request from QW 5 and then
talks to the Control System to supply the data.

by Busitech
A u t o m a t i n g D a t a C o l l e c t i o n i n Q u a l i t y W i n d o w 5 P a g e 1 6
Open Process Control (OPC) address
You can specify an OPC application source file as the input file, such as:
OPC://Server1/ICONICS/BatchViscosity
where Server1 is the name of the server (computer)
where ICONICS is the name of the OPC Server Application
where BatchViscosity is the item or tagname
When QWAdd requests data for a particular variable through an Input File source, the
current data value from the file, DDE or OPC location is retrieved and used as the
variable value for the new record being added.
More Information
More information on Quality Window and its associated features can be found on the
Busitech website at www.Busitech.com, where you can also download a full working
version.
Alternatively, you can contact the Busitech support team at (613) 938-0900.
www.Busitech.com