avtp model tripod
TRANSCRIPT
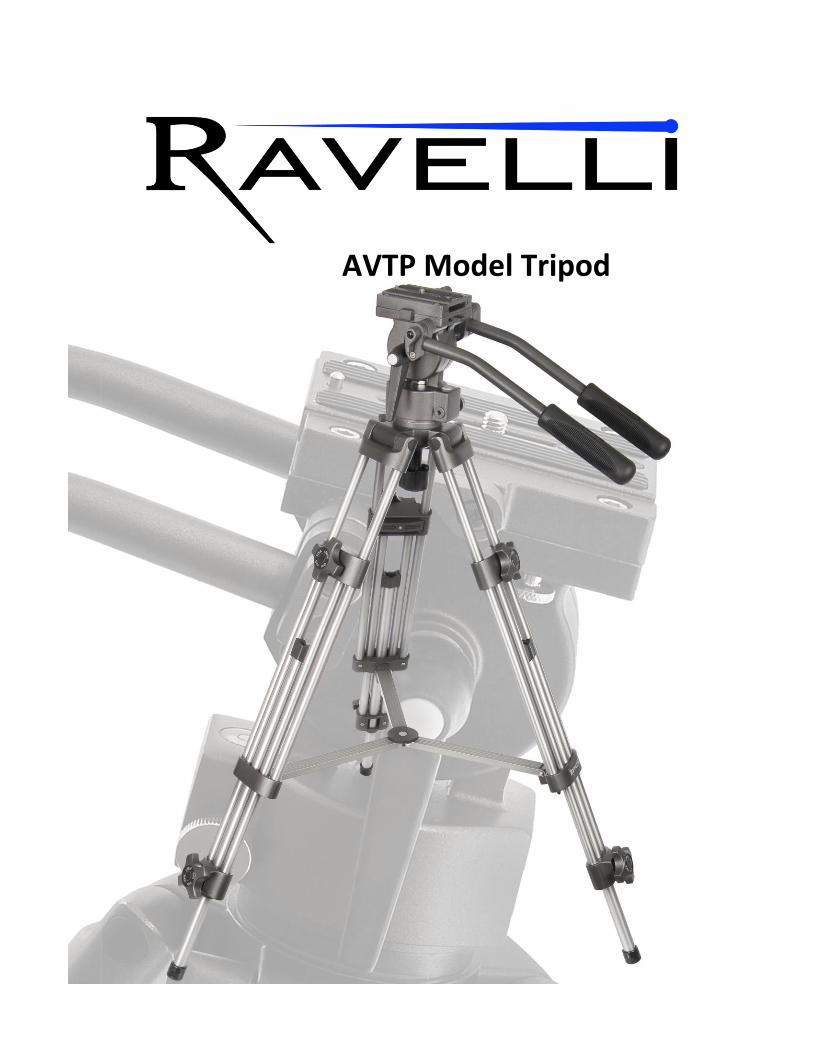
AVTP Model Tripod

Product Overview:
The Ravelli AVTP professional tripod is a high performance, fluid drag tripod that provides
smooth continuous drag control and operates on both pan and tilt axis with independent
pan and tilt locks. The Ravelli AVTP tripod head features finely machined aluminum parts for
precise positioning with smooth, definite action. The fluid head is comprised of titanium-line
components for years of durability and utilizes full two-way action allowing you to isolate
the plane of motion and make precise adjustments to your compositions. The head features
dual continuous drag fluid movement for both 360 degree pan and 180 degree tilt as well as
dual handles for more precise control.
Key Features:
● Supports Cameras Up To 27LBS
● Professional 3-Segment Interlocking Crutch Type Legs
● Channel Quick Release Locking Leg Sections
● Quick Release Plate With Locking Button.
● Pro Dual Pan Handles
● Integrated Bubble Level

Parts List:
Part Description Quantity
1 Quick Release Mounting Plate 1
2 Video/Camera Mounting Screws 2
3 Pan and Tilt Handle, Screws 2
4 Fluid Drag Head/ Adjustment knob 1
5 Ravelli AVTP Tripod 1
6 Carrying Bag 1

Specifications:
Model: AVTP Model Tripod
Unit Heights: Collapsed: 28.5"
Min Operating: 27"
Max Operating: 54.5"
Unit Weight Tripod 10.8 LBS
Shipping Weight: 14 LBS
Unit Materials: Tripod: 100% High Grade Aluminum
Carrying Case: Nylon
Total Footprint: Min: Radius-10.5", Foot To Foot-18.5"
Max: Radius- 23.5" , Foot To Foot-40.5"
Height Leg Locks: 2 Height Adjustment Leg Locks
Max Weight: Supports Up To 27 LBS
Quick Release Plate 3.5" x 2.25"
Tilt: 180°, 90° Upward or 90° Downward

Figure 1

Set Up Instructions:
1. Setting Up The Tripod: First, remove the contents from the box, then open up the tripod by holding
the legs in each hand and spreading them apart.
2. Mounting The Fluid Drag Head: To install the fluid drag
head, position the head over the 75mm mounting bowl
located on the top of the tripod as shown in figure 1. Screw
the head adjustment knob onto the threads and tighten to
secure the head. This knob can be used to gain more tilt or
precisely adjust the angle of the panning motion.
4. Attaching The Pan Handles: To attach the right and left
pan/tilt handles, position the handles with the handle screws
as shown in figure 1. Adjust the handle angle level and tighten
down.
5. Attaching The Quick Release Plate: To first remove the quick
release plate from the head, loosen the quick release plate
adjuster then press the safety lock button in and slide the plate
off. Next, position the plate on the bottom of your camera
aligning the screw threads with the camera mounting hole, then
rotate the screw clockwise to tighten. Align and slide the quick
release plate back on the head until it is centered and you hear
the safety button click. Finally, tighten the quick release plate
adjuster to secure to plate to the head.
6. Height Adjustment: Adjusting the height of the Ravelli AVT Tripod can be done by simply loosening
the leg height adjuster knobs in a counter-clockwise rotation, then pulling the legs downward until the
desired height is obtained. Tighten the leg height adjusters back down to lock the legs into place.
7.Adjusting The Tilt: To adjust the tilt angle of the tripod, turn the tilt adjuster handle counter-
clockwise until it reaches the quick plate adjuster, then place your thumb on the white circle and pull
the handle outward. Turn the handle clockwise and release the handle back in. Repeat this process if
necessary to loosen the tension further and achieve the tilt angle desired. To tighten the tilt adjuster
handle reverse this process
Notes On Panning: For smooth consistent panning, the pan adjuster knob can be fined tuned by either
tightening or loosening the knob until the right amount of resistance is obtained. Turning the knob
clockwise will tighten it and make panning slow and firmer. Turning the knob counter-clockwise to
loosen it and will make panning fast and easy. Finding the right amount of panning resistance will give
you smooth and optimal speed for great captures. We also recommend the use of sand bags to provide
greater stability when panning.

Notes On The Bubble Level: The included bubble level is a guide. The exact level position of the tripod
depends on the extension of the legs, the angle of the legs, whether or not the surface the tripod is
sitting on is level or not etc. Also, the bubble level is mid-level on the tripod head and slightly off of
dead center. Thus, it may read perfectly level with the tripod head pointing in one directly and then
read something other than perfectly level during a pan. Also, it is possible for the tripod to be level at
the base of the head where the level is but off slightly above or below the level If it is crucial to the user
to have perfect true level, we recommend using a professional separate level at least 6 inches in length
or more.
Optional ATD Tripod Dolly*: To easily maneuver your tripod or stands, we recommend our universal
heavy duty Ravelli ATD Tripod Dolly. The ATD dolly is an excellent choice for use with your professional
background stands, light stands, and also video and camera tripods. These dollies offer smooth
movement with 3" rubber wheels and metal ball bearings. The Ravelli ATD also includes a one-step lock
on each wheel to securely hold your tripod in place. The dolly is easily folded and has a carrying handle
built in and includes a protective bag
WARNING: There is a tipping risk for the fully extended tripods. This can be due to moving the tripods
while fully extended, things such as uneven surfaces or wind. To reduce the risk of tipping over, we
recommend placing one tripod leg facing the same direction as the camera or the heavy part of
mounted equipment to balance the weight. We also recommend purchasing sand bags or weights to set
on the tripod legs to hold the tripod in place. Ravelli™ guarantees the tripod only and is not liable for
damage caused to backdrops, cameras, lighting, or any other items.
© Ravelli™ Revision: 1.1.3 Revision Date: 03/4/13