azi-pay azizi bank mobile wallet
TRANSCRIPT

September 16, 2020
Page 1
Prepared By: Obaidullah Masood Project Management Office
AZI-PAY AZIZI BANK MOBILE WALLET
AZI-PAY: Payment Innovation by AZIZI BANK Prepared by: Obaidullah Masood
Project Management Office
Head Office, Azizi Bank
September 16, 2020
Page 2
Prepared By: Obaidullah Masood Project Management Office
Contents Introduction ................................................................................................................................................. 3
Features: .................................................................................................................................................... 3
Download and Installation: .................................................................................................................... 4
Initial Configuration and User Registration for New Users/Users: .......................................................... 4
Initial Configuration and User Registration for Existing Users/Users:..................................................... 7
Login to Application: .................................................................................................................................... 9
Adding Card to Wallet Application: ........................................................................................................... 10
Add Money to Wallet Application: ............................................................................................................. 11
Fund Transfer using Mobile Wallet Application: ....................................................................................... 12
Adding Wallet Beneficiary: ........................................................................................................................ 13
Wallet to Wallet Funds Transfer: ................................................................................................................ 14
Wallet To Account Funds Transfer:............................................................................................................ 15
Account to Wallet Funds Transfer: ............................................................................................................. 16
Account to Account Funds Transfer: .......................................................................................................... 17
Deleting an Already Added Card: ............................................................................................................... 18
ATM CASH OUT: ...................................................................................................................................... 19
SEND MONEY: ......................................................................................................................................... 20
Bank Account Balance Enquiry: ................................................................................................................. 21
Bank Account Mini Statement: ................................................................................................................... 22
Request Money: .......................................................................................................................................... 23
Scan and Pay: .............................................................................................................................................. 24
Request for Opening Bank Account: .......................................................................................................... 25
Bill Payment: .............................................................................................................................................. 26
Mobile Recharge: ........................................................................................................................................ 27
Update User Profile: ................................................................................................................................... 28
Wallet Mini Statement: ............................................................................................................................... 29
Generate QR CODE: ................................................................................................................................... 30
Settings of the App: .................................................................................................................................... 30
1: Change MPIN: .................................................................................................................................... 30
1.1: Forgot MPIN: ................................................................................................................................... 31
2: Enable or Disable Biometric Login: ................................................................................................... 32
September 16, 2020
Page 3
Prepared By: Obaidullah Masood Project Management Office
Introduction There was a time when general public had no choice but to carry loads of cash in their wallets when
they went out shopping. Be it a scarf which was worth AFN 300 or headphones which cost AFN
3000, carrying around thick, heavy notes of hard cash was the only available mode of payment.
However, with the advancement of technology and digitization of methods, general public now have
a lot of payment options available, which can help eliminate the use of hard cash. Debit cards, credit
cards and any other cards make the payment process much easier.
If a person has forgotten his/her wallet at home while out shopping though, how will he/she be able
to pay for the shopping he/she has done? How will he/she be able to withdraw from their account
through ATM?
Now, with the further advancement of technology, Banks are now taking a step further to the
introduction of Mobile Payments. These processes allow general public to make payments directly
from their mobile phones without the use of cards or any other solid material at hand. This means that
payments could be even easier, faster and a person would be able to pay them out anywhere and
anytime.
Mobile Wallet is a simple mobile-based virtual wallet, which a person can load money in using their
ATM Cards. A person can use this money later with any of the online or offline merchants for things
like buying coffee, buying a dress from a shop or even buying grocery.
“AZI-PAY Azizi Bank Mobile Wallet Application”, the mobile wallet from AZIZI BANK, allows
a person to use his/her smartphone as an electronic wallet to make and receive payments. It is
launched in January 2018; and the upgraded version is launched on 20th September 2020; the
Application offers users with an efficient alternative to cash transactions. The AZI-PAY Wallet
Application provides people across the country an adoptable and convenient way of paying Utility
Bills and Perform Mobile Top-Up of Different Telecom Companies, Do ATM Withdraawals without
using ATM CARD and many new transactions through various Mobile platforms such as Android,
iOS.
Features:
Some of the key features of AZI-PAY Azizi Bank Mobile Wallet Application are as follows:
1. The application is now available in 3 Languages i.e Pashto, Dari, and English.
2. Users can now do withdrawal transaction from ATM without using ATM CARD
through the ATM CASH OUT option of AziPay.
3. Users are now able to send money to their loved ones, and their loved ones can directly
withdraw the amount from ATM Machines across the country.
4. Wallet KYC is now possible through the Mobile Wallet Application itself.
5. Users can now view their Bank Account Mini Statement and Bank Account Balance,
directly through mobile wallet application.
6. Now users can add card directly to Wallet Application for each transaction involving
ATM CARD, user will be asked to enter CARD PIN only.
7. Users can load money into Wallet using their INSTA-CARD, Master Debit Card and once
transactions over APS (Afghanistan Payment System) goes live, users will be able to load
money into Wallet using all APS member banks’ cards.
8. Users can pay Breshna Electric Supply Company electricity bills easily with no extra
September 16, 2020
Page 4
Prepared By: Obaidullah Masood Project Management Office
charges through their mobile phones.
9. Users can do Mobile Top Up of any MNOs.
10. Users can pay merchant payment at all the stores where AZI-PAY is accepted with no extra
charges.
Download and Installation: Azi-Pay Azizi Bank Mobile Wallet Application can be downloaded from Google Playstore
for Android devices or Appstore for IOS devices. Once the download is completed the device will
automatically start the installation process, and once the installation is done, the application can be
opened.
Initial Configuration and User Registration for New Users/Users:
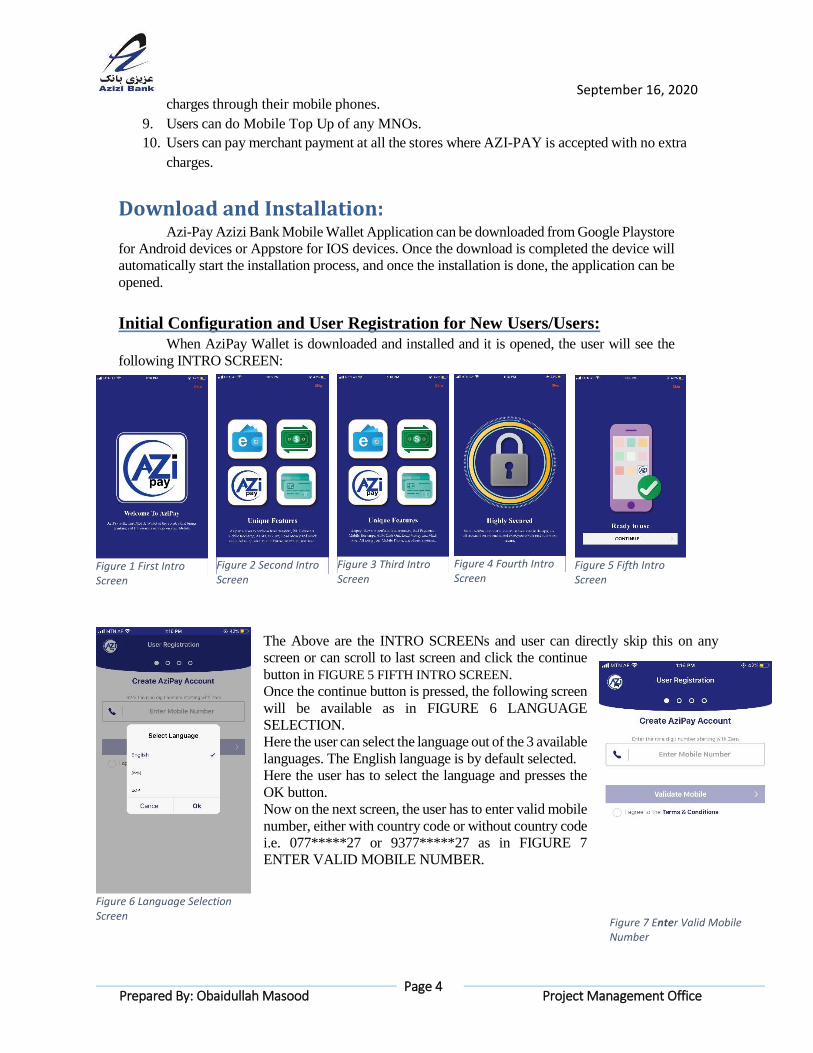
When AziPay Wallet is downloaded and installed and it is opened, the user will see the
following INTRO SCREEN:
The Above are the INTRO SCREENs and user can directly skip this on any
screen or can scroll to last screen and click the continue
button in FIGURE 5 FIFTH INTRO SCREEN.
Once the continue button is pressed, the following screen
will be available as in FIGURE 6 LANGUAGE
SELECTION.
Here the user can select the language out of the 3 available
languages. The English language is by default selected.
Here the user has to select the language and presses the
OK button.
Now on the next screen, the user has to enter valid mobile
number, either with country code or without country code
i.e. 077*****27 or 9377*****27 as in FIGURE 7
ENTER VALID MOBILE NUMBER.
Figure 1 First Intro Screen
Figure 2 Second Intro Screen
Figure 3 Third Intro Screen
Figure 4 Fourth Intro Screen
Figure 5 Fifth Intro Screen
Figure 6 Language Selection Screen
Figure 7 Enter Valid Mobile Number
September 16, 2020
Page 5
Prepared By: Obaidullah Masood Project Management Office
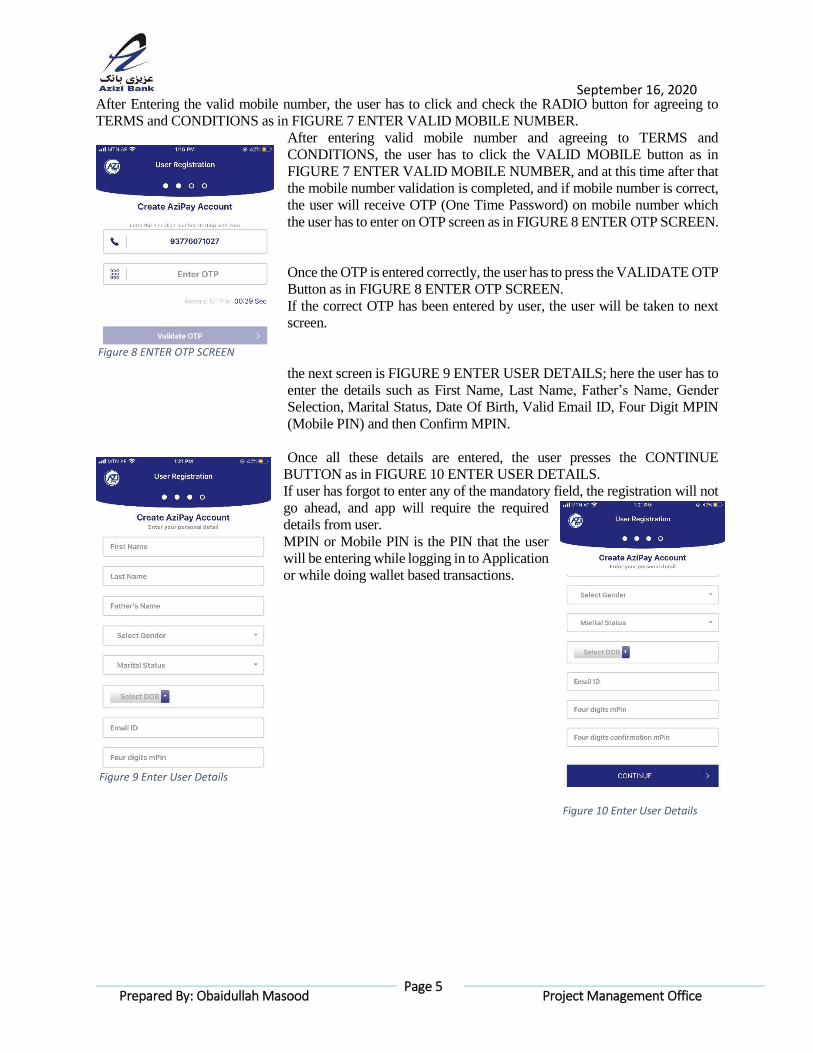
After Entering the valid mobile number, the user has to click and check the RADIO button for agreeing to
TERMS and CONDITIONS as in FIGURE 7 ENTER VALID MOBILE NUMBER.
After entering valid mobile number and agreeing to TERMS and
CONDITIONS, the user has to click the VALID MOBILE button as in
FIGURE 7 ENTER VALID MOBILE NUMBER, and at this time after that
the mobile number validation is completed, and if mobile number is correct,
the user will receive OTP (One Time Password) on mobile number which
the user has to enter on OTP screen as in FIGURE 8 ENTER OTP SCREEN.
Once the OTP is entered correctly, the user has to press the VALIDATE OTP
Button as in FIGURE 8 ENTER OTP SCREEN.
If the correct OTP has been entered by user, the user will be taken to next
screen.
the next screen is FIGURE 9 ENTER USER DETAILS; here the user has to
enter the details such as First Name, Last Name, Father’s Name, Gender
Selection, Marital Status, Date Of Birth, Valid Email ID, Four Digit MPIN
(Mobile PIN) and then Confirm MPIN.
Once all these details are entered, the user presses the CONTINUE
BUTTON as in FIGURE 10 ENTER USER DETAILS.
If user has forgot to enter any of the mandatory field, the registration will not
go ahead, and app will require the required
details from user.
MPIN or Mobile PIN is the PIN that the user
will be entering while logging in to Application
or while doing wallet based transactions.
Figure 8 ENTER OTP SCREEN
Figure 9 Enter User Details
Figure 10 Enter User Details
September 16, 2020
Page 6
Prepared By: Obaidullah Masood Project Management Office
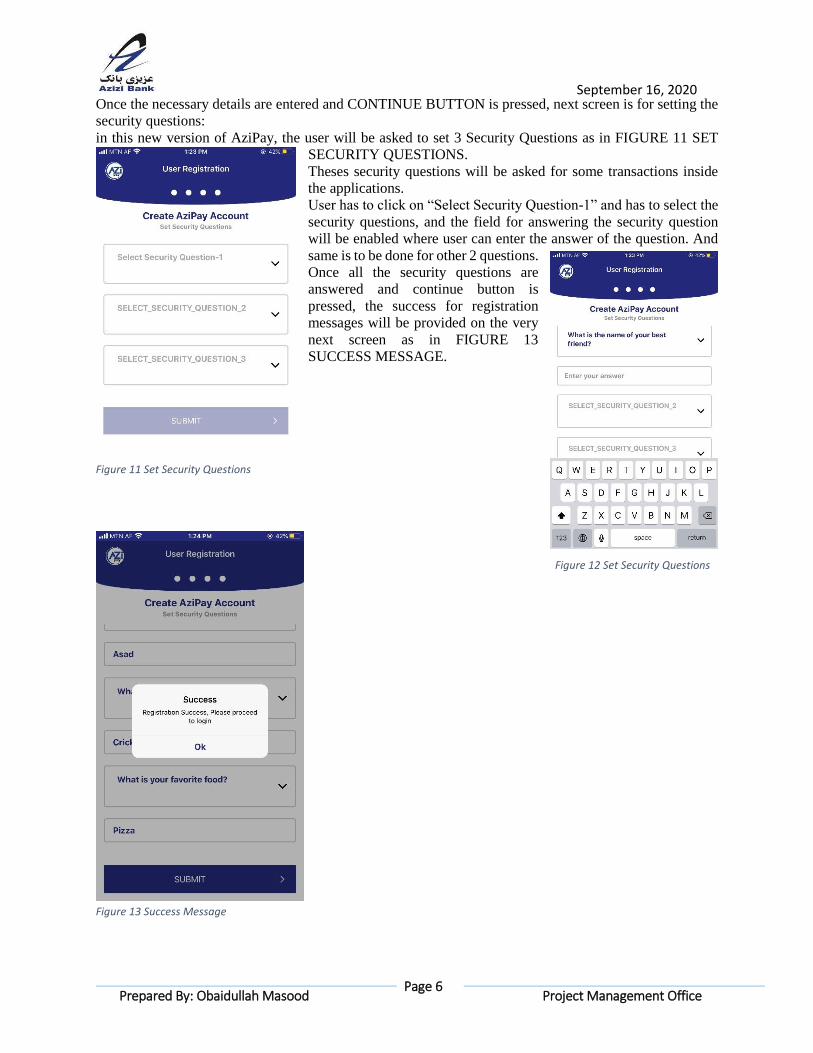
Once the necessary details are entered and CONTINUE BUTTON is pressed, next screen is for setting the
security questions:
in this new version of AziPay, the user will be asked to set 3 Security Questions as in FIGURE 11 SET
SECURITY QUESTIONS.
Theses security questions will be asked for some transactions inside
the applications.
User has to click on “Select Security Question-1” and has to select the
security questions, and the field for answering the security question
will be enabled where user can enter the answer of the question. And
same is to be done for other 2 questions.
Once all the security questions are
answered and continue button is
pressed, the success for registration
messages will be provided on the very
next screen as in FIGURE 13
SUCCESS MESSAGE.
Figure 11 Set Security Questions
Figure 12 Set Security Questions
Figure 13 Success Message
September 16, 2020
Page 7
Prepared By: Obaidullah Masood Project Management Office
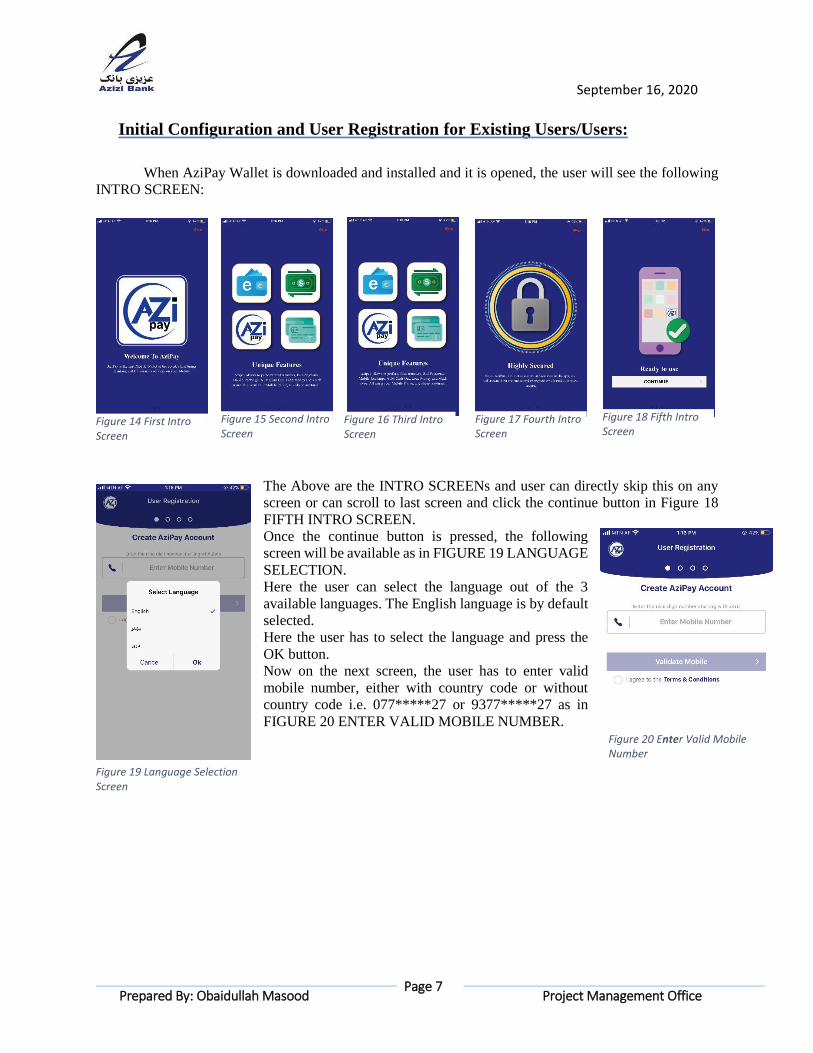
Initial Configuration and User Registration for Existing Users/Users:
When AziPay Wallet is downloaded and installed and it is opened, the user will see the following
INTRO SCREEN:
The Above are the INTRO SCREENs and user can directly skip this on any
screen or can scroll to last screen and click the continue button in Figure 18
FIFTH INTRO SCREEN.
Once the continue button is pressed, the following
screen will be available as in FIGURE 19 LANGUAGE
SELECTION.
Here the user can select the language out of the 3
available languages. The English language is by default
selected.
Here the user has to select the language and press the
OK button.
Now on the next screen, the user has to enter valid
mobile number, either with country code or without
country code i.e. 077*****27 or 9377*****27 as in
FIGURE 20 ENTER VALID MOBILE NUMBER.
Figure 14 First Intro Screen
Figure 15 Second Intro Screen
Figure 16 Third Intro Screen
Figure 17 Fourth Intro Screen
Figure 18 Fifth Intro Screen
Figure 19 Language Selection Screen
Figure 20 Enter Valid Mobile Number

September 16, 2020
Page 8
Prepared By: Obaidullah Masood Project Management Office
After Entering the valid mobile number, the user has to click and check
the RADIO button for agreeing to TERMS and CONDITIONS as in
FIGURE 20 ENTER VALID MOBILE NUMBER.
After entering valid mobile number and agreeing to TERMS and
CONDITIONS, the user has to click the VALID MOBILE button as in
FIGURE 20 ENTER VALID MOBILE NUMBER, and at this time after
that the mobile number validation is completed and if mobile number is
correct, the user will receive OTP (One Time Password) on mobile number
which the user has to enter on OTP screen as in FIGURE 21 ENTER OTP
SCREEN.
Once the OTP is entered correctly, the user has to press the VALIDATE
OTP Button as in FIGURE 21 ENTER OTP SCREEN.
If the correct OTP has been entered by user, the user will be taken to next
screen.
if the user was already available in OLD AZIPAY and his wallet was
active in OLD AziPay and had recent activity, so that user will be
migrated to new AziPay Application.
So for the migrated user, the screen that will be made available is the
screen in FIGURE 22 SET PIN AND SECURITY QUESTIONS.
In this screen, the user has to set only the NEW PIN and NEW SECURITY
QUESTIONS.
The user has to enter the four digits new MPIN, and then confirms the four
digits new MPIN.
After that the user has to set 3 security
questions, and has to click on the SUBMIT
button as in FIGURE 22 SET PIN AND
SECURITY QUESTIONS.
if everything is fine, the registration will be
success and success message will be
provided and shown to user as in FIGURE
23 SUCCESS MESSAGE
Figure 21 ENTER OTP SCREEN
Figure 22 Set PIN and Security Questions
Figure 23 SUCCESS MESSAGE
September 16, 2020
Page 9
Prepared By: Obaidullah Masood Project Management Office
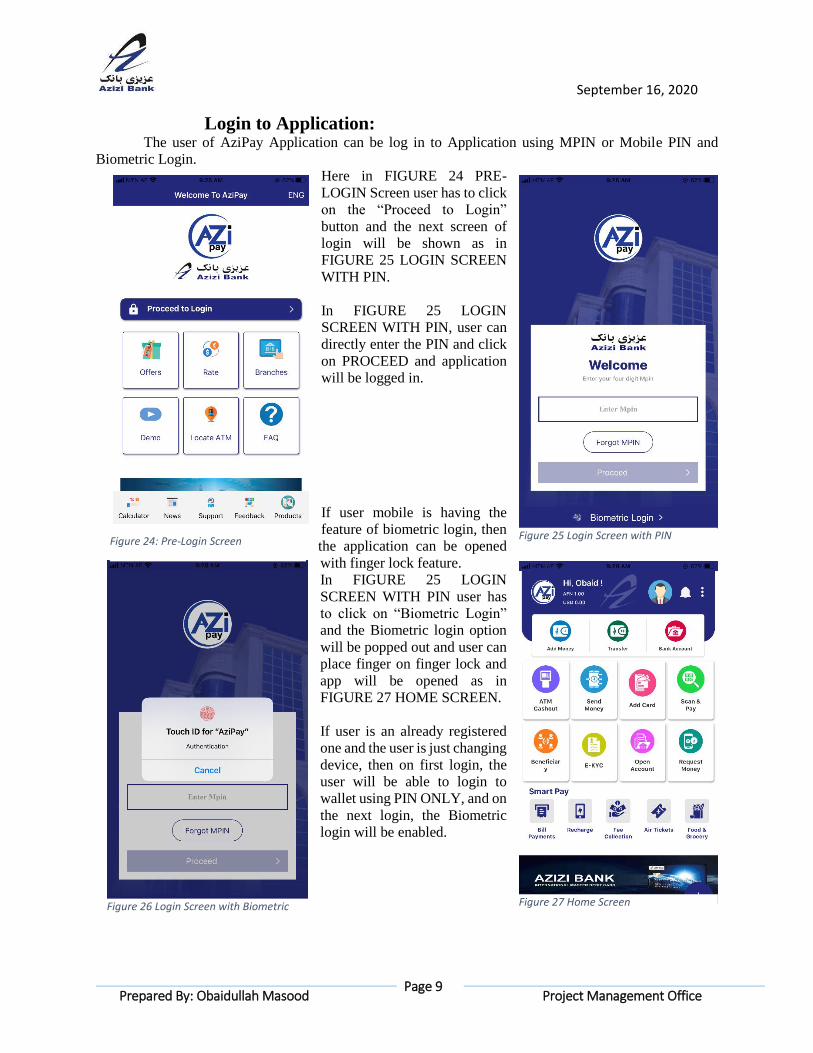
Login to Application: The user of AziPay Application can be log in to Application using MPIN or Mobile PIN and
Biometric Login.
Here in FIGURE 24 PRE-
LOGIN Screen user has to click
on the “Proceed to Login”
button and the next screen of
login will be shown as in
FIGURE 25 LOGIN SCREEN
WITH PIN.
In FIGURE 25 LOGIN
SCREEN WITH PIN, user can
directly enter the PIN and click
on PROCEED and application
will be logged in.
If user mobile is having the
feature of biometric login, then
the application can be opened
with finger lock feature.
In FIGURE 25 LOGIN
SCREEN WITH PIN user has
to click on “Biometric Login”
and the Biometric login option
will be popped out and user can
place finger on finger lock and
app will be opened as in
FIGURE 27 HOME SCREEN.
If user is an already registered
one and the user is just changing
device, then on first login, the
user will be able to login to
wallet using PIN ONLY, and on
the next login, the Biometric
login will be enabled.
Figure 24: Pre-Login Screen Figure 25 Login Screen with PIN
Figure 26 Login Screen with Biometric Figure 27 Home Screen
September 16, 2020
Page 10
Prepared By: Obaidullah Masood Project Management Office
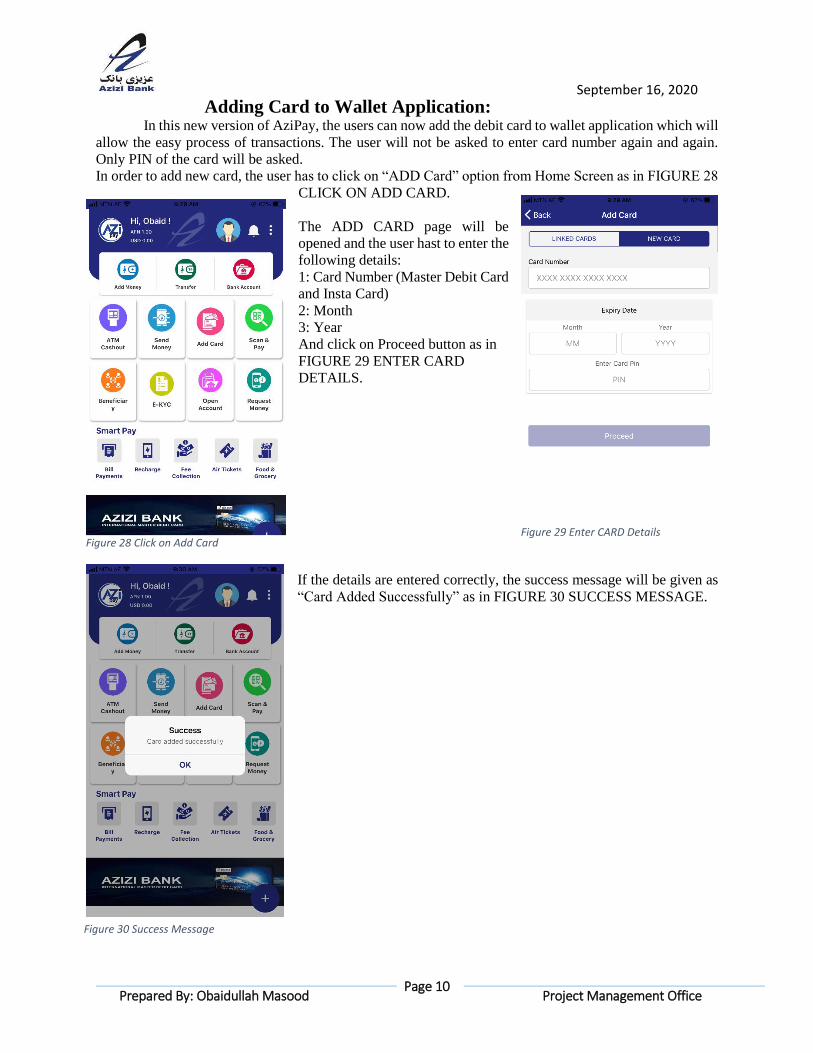
Adding Card to Wallet Application: In this new version of AziPay, the users can now add the debit card to wallet application which will
allow the easy process of transactions. The user will not be asked to enter card number again and again.
Only PIN of the card will be asked.
In order to add new card, the user has to click on “ADD Card” option from Home Screen as in FIGURE 28
CLICK ON ADD CARD.
The ADD CARD page will be
opened and the user hast to enter the
following details:
1: Card Number (Master Debit Card
and Insta Card)
2: Month
3: Year
And click on Proceed button as in
FIGURE 29 ENTER CARD
DETAILS.
If the details are entered correctly, the success message will be given as
“Card Added Successfully” as in FIGURE 30 SUCCESS MESSAGE.
Figure 28 Click on Add Card Figure 29 Enter CARD Details
Figure 30 Success Message

September 16, 2020
Page 11
Prepared By: Obaidullah Masood Project Management Office
Add Money to Wallet Application: Now that the card is added, user can now add money to the wallet. The new AziPay Application
comes with two currency wallets:
1. AFN
2. USD
User can add money in any of these two wallet and enjoy and get benefited from both the wallet account
in a single wallet account.
The user has to selected the “Add
Money” option from Home Screen as in
FIGURE 31 CLICK ON ADD
MONEY, the Add Money page will be
opened. The user has to fill in the details
such as:
1: Select Card,
2: Select Account from which user
wants to add money,
3: Select Wallet Currency, to which the
user wants to add money,
4: Enter the amount to add into wallet,
5: Provide Remarks and then click the
proceed button and again click the
proceed button on ALERT message.
Now the application will be asking for
Debit Card PIN which user uses on
ATM. If PIN is correct, the money will
be added to wallet.
Figure 31 Click on Add Money Figure 32 Fill In Details Figure 33 Click on Proceed Button
Figure 34 Enter Card PIN Figure 35 Success Message
September 16, 2020
Page 12
Prepared By: Obaidullah Masood Project Management Office
Fund Transfer using Mobile Wallet Application: In the upgraded version of AziPay, we are having the following types of fund transfers:
1. Wallet to Wallet (Transfer funds from one wallet to another wallet).
2. Wallet to Account (Transfer funds from wallet to Bank Account).
3. Account to Wallet (Transfer funds from your account to your friend and family wallet
accounts).
4. Account to Account (Transfer Funds from your Bank Account to other Accounts in the
Bank).
Wallet to Wallet: the process of Wallet to Wallet Funds Transfer requires the creation of Beneficiary.
Users can create two types of Beneficiaries:
1: Bank Account Beneficiary
2: Wallet Account Beneficiary
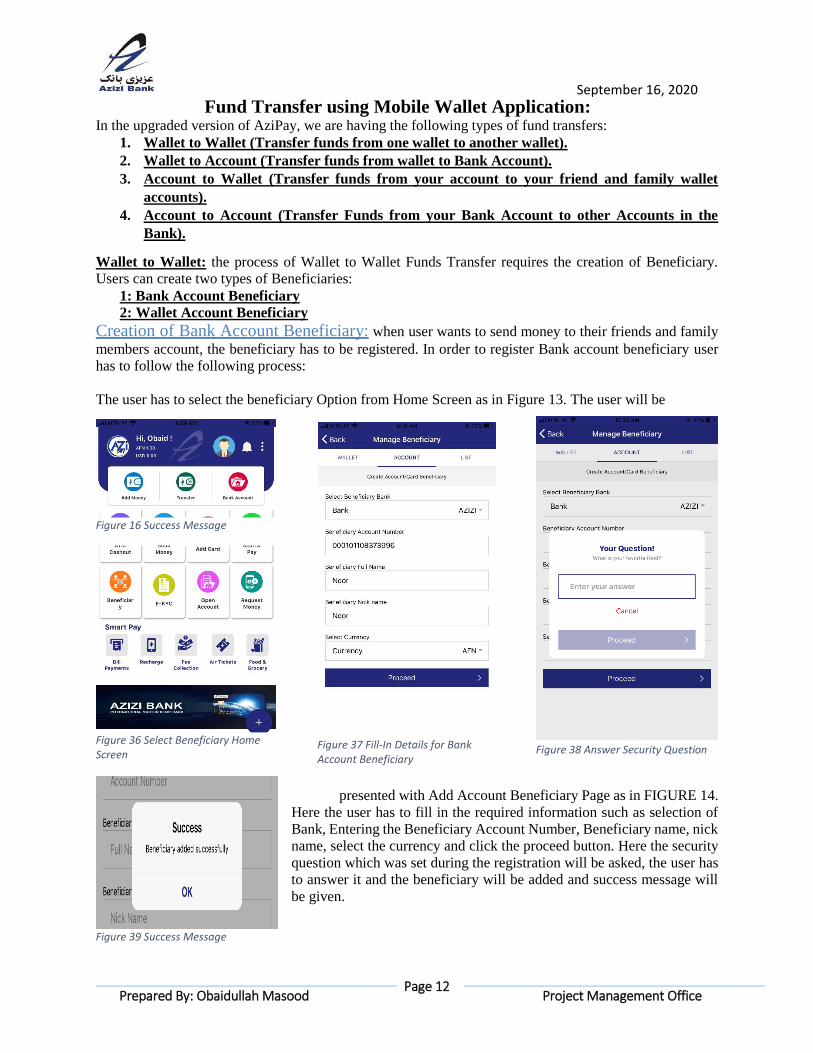
Creation of Bank Account Beneficiary: when user wants to send money to their friends and family
members account, the beneficiary has to be registered. In order to register Bank account beneficiary user
has to follow the following process:
The user has to select the beneficiary Option from Home Screen as in Figure 13. The user will be
presented with Add Account Beneficiary Page as in FIGURE 14.
Here the user has to fill in the required information such as selection of
Bank, Entering the Beneficiary Account Number, Beneficiary name, nick
name, select the currency and click the proceed button. Here the security
question which was set during the registration will be asked, the user has
to answer it and the beneficiary will be added and success message will
be given.
Figure 36 Select Beneficiary Home Screen
Figure 37 Fill-In Details for Bank Account Beneficiary
Figure 38 Answer Security Question
Figure 16 Success Message
Figure 39 Success Message
September 16, 2020
Page 13
Prepared By: Obaidullah Masood Project Management Office
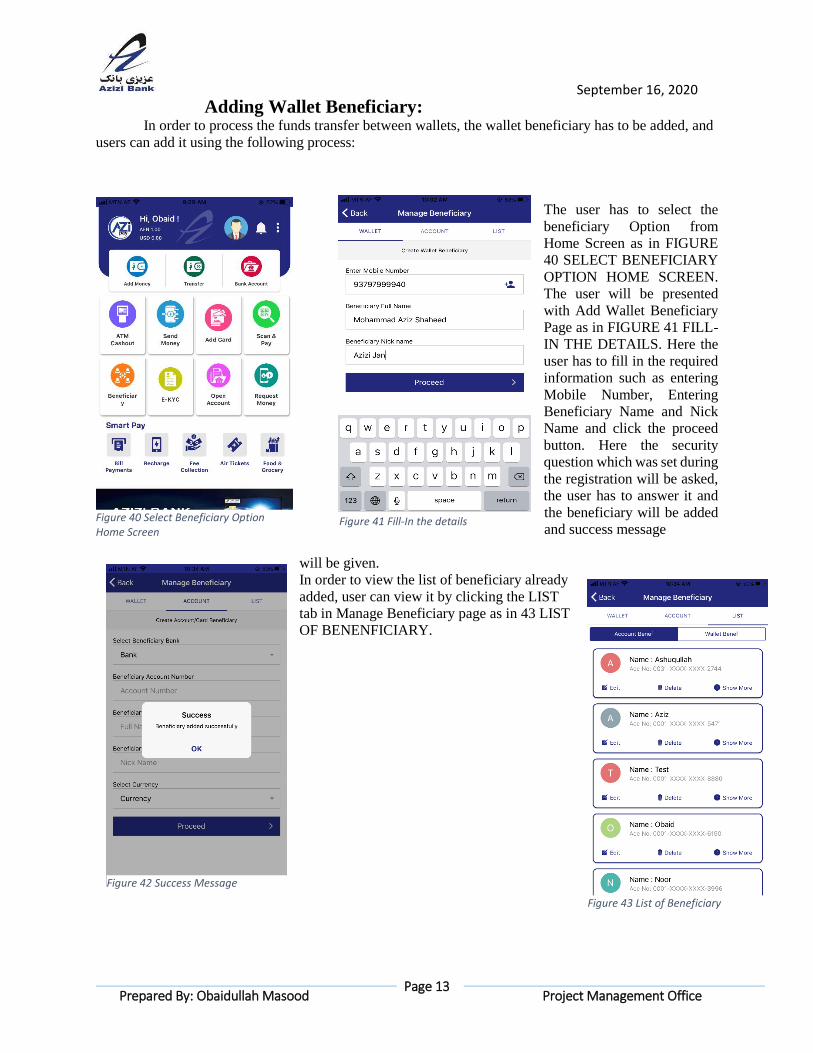
Adding Wallet Beneficiary: In order to process the funds transfer between wallets, the wallet beneficiary has to be added, and
users can add it using the following process:
The user has to select the
beneficiary Option from
Home Screen as in FIGURE
40 SELECT BENEFICIARY
OPTION HOME SCREEN.
The user will be presented
with Add Wallet Beneficiary
Page as in FIGURE 41 FILL-
IN THE DETAILS. Here the
user has to fill in the required
information such as entering
Mobile Number, Entering
Beneficiary Name and Nick
Name and click the proceed
button. Here the security
question which was set during
the registration will be asked,
the user has to answer it and
the beneficiary will be added
and success message
will be given.
In order to view the list of beneficiary already
added, user can view it by clicking the LIST
tab in Manage Beneficiary page as in 43 LIST
OF BENENFICIARY.
Figure 40 Select Beneficiary Option Home Screen
Figure 41 Fill-In the details
Figure 42 Success Message
Figure 43 List of Beneficiary
September 16, 2020
Page 14
Prepared By: Obaidullah Masood Project Management Office
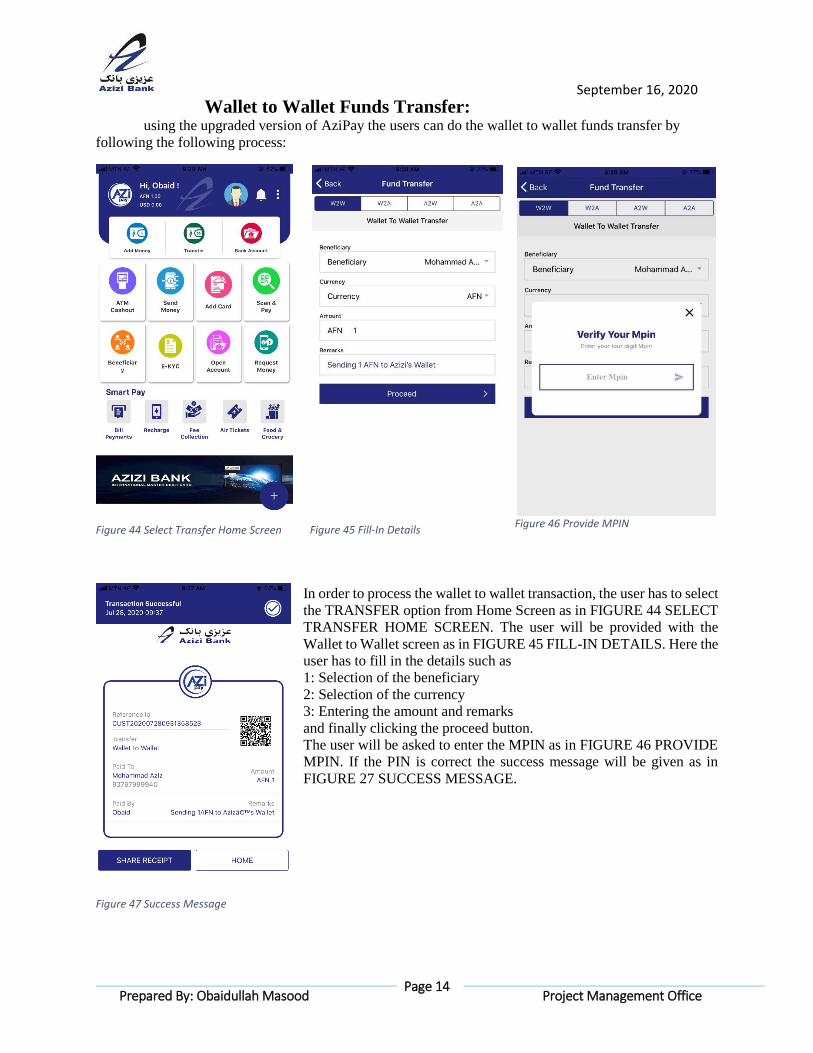
Wallet to Wallet Funds Transfer: using the upgraded version of AziPay the users can do the wallet to wallet funds transfer by
following the following process:
In order to process the wallet to wallet transaction, the user has to select
the TRANSFER option from Home Screen as in FIGURE 44 SELECT
TRANSFER HOME SCREEN. The user will be provided with the
Wallet to Wallet screen as in FIGURE 45 FILL-IN DETAILS. Here the
user has to fill in the details such as
1: Selection of the beneficiary
2: Selection of the currency
3: Entering the amount and remarks
and finally clicking the proceed button.
The user will be asked to enter the MPIN as in FIGURE 46 PROVIDE
MPIN. If the PIN is correct the success message will be given as in
FIGURE 27 SUCCESS MESSAGE.
Figure 44 Select Transfer Home Screen Figure 45 Fill-In Details Figure 46 Provide MPIN
Figure 47 Success Message
September 16, 2020
Page 15
Prepared By: Obaidullah Masood Project Management Office
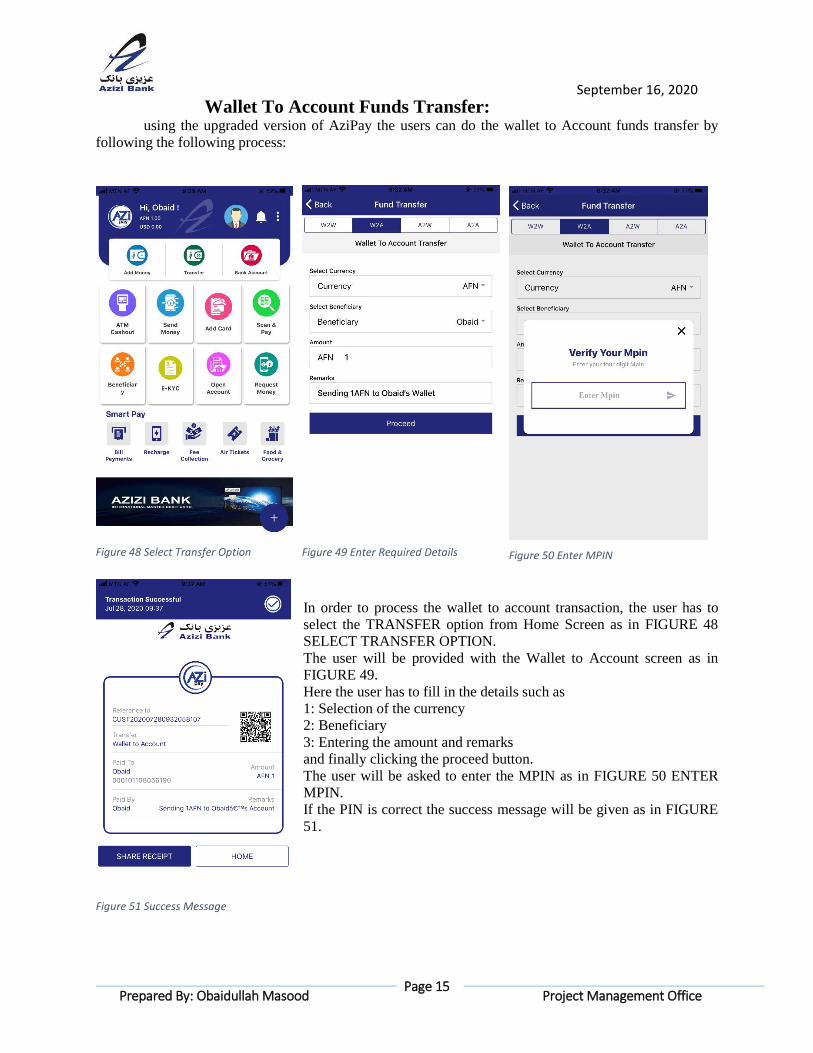
Wallet To Account Funds Transfer: using the upgraded version of AziPay the users can do the wallet to Account funds transfer by
following the following process:
In order to process the wallet to account transaction, the user has to
select the TRANSFER option from Home Screen as in FIGURE 48
SELECT TRANSFER OPTION.
The user will be provided with the Wallet to Account screen as in
FIGURE 49.
Here the user has to fill in the details such as
1: Selection of the currency
2: Beneficiary
3: Entering the amount and remarks
and finally clicking the proceed button.
The user will be asked to enter the MPIN as in FIGURE 50 ENTER
MPIN.
If the PIN is correct the success message will be given as in FIGURE
51.
Figure 48 Select Transfer Option Figure 49 Enter Required Details Figure 50 Enter MPIN
Figure 51 Success Message
September 16, 2020
Page 16
Prepared By: Obaidullah Masood Project Management Office
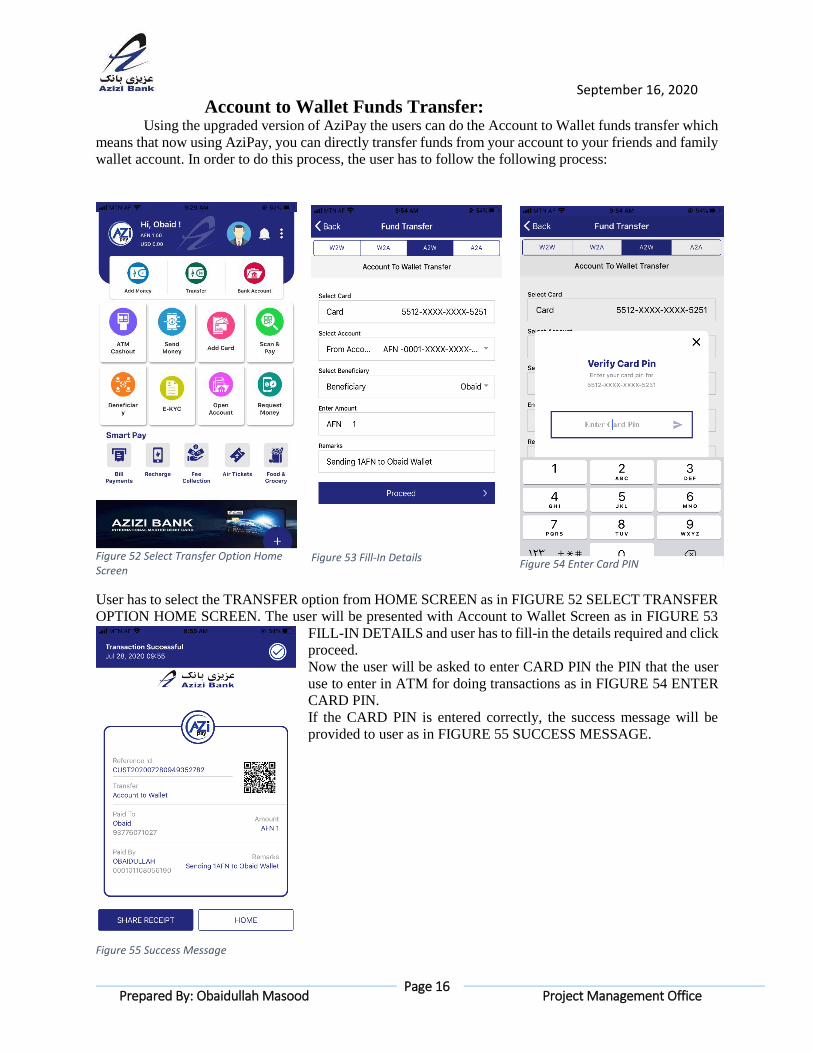
Account to Wallet Funds Transfer: Using the upgraded version of AziPay the users can do the Account to Wallet funds transfer which
means that now using AziPay, you can directly transfer funds from your account to your friends and family
wallet account. In order to do this process, the user has to follow the following process:
User has to select the TRANSFER option from HOME SCREEN as in FIGURE 52 SELECT TRANSFER
OPTION HOME SCREEN. The user will be presented with Account to Wallet Screen as in FIGURE 53
FILL-IN DETAILS and user has to fill-in the details required and click
proceed.
Now the user will be asked to enter CARD PIN the PIN that the user
use to enter in ATM for doing transactions as in FIGURE 54 ENTER
CARD PIN.
If the CARD PIN is entered correctly, the success message will be
provided to user as in FIGURE 55 SUCCESS MESSAGE.
Figure 52 Select Transfer Option Home Screen
Figure 54 Enter Card PIN Figure 53 Fill-In Details
Figure 55 Success Message
September 16, 2020
Page 17
Prepared By: Obaidullah Masood Project Management Office
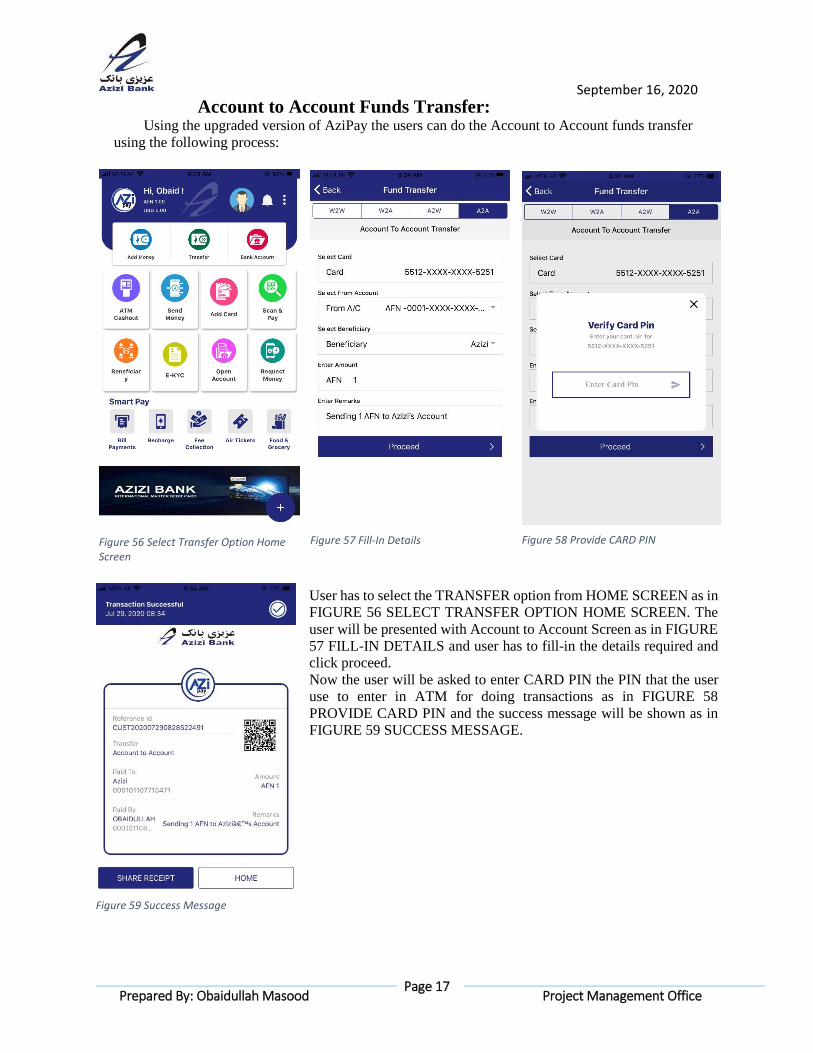
Account to Account Funds Transfer: Using the upgraded version of AziPay the users can do the Account to Account funds transfer
using the following process:
User has to select the TRANSFER option from HOME SCREEN as in
FIGURE 56 SELECT TRANSFER OPTION HOME SCREEN. The
user will be presented with Account to Account Screen as in FIGURE
57 FILL-IN DETAILS and user has to fill-in the details required and
click proceed.
Now the user will be asked to enter CARD PIN the PIN that the user
use to enter in ATM for doing transactions as in FIGURE 58
PROVIDE CARD PIN and the success message will be shown as in
FIGURE 59 SUCCESS MESSAGE.
Figure 56 Select Transfer Option Home Screen
Figure 57 Fill-In Details Figure 58 Provide CARD PIN
Figure 59 Success Message
September 16, 2020
Page 18
Prepared By: Obaidullah Masood Project Management Office
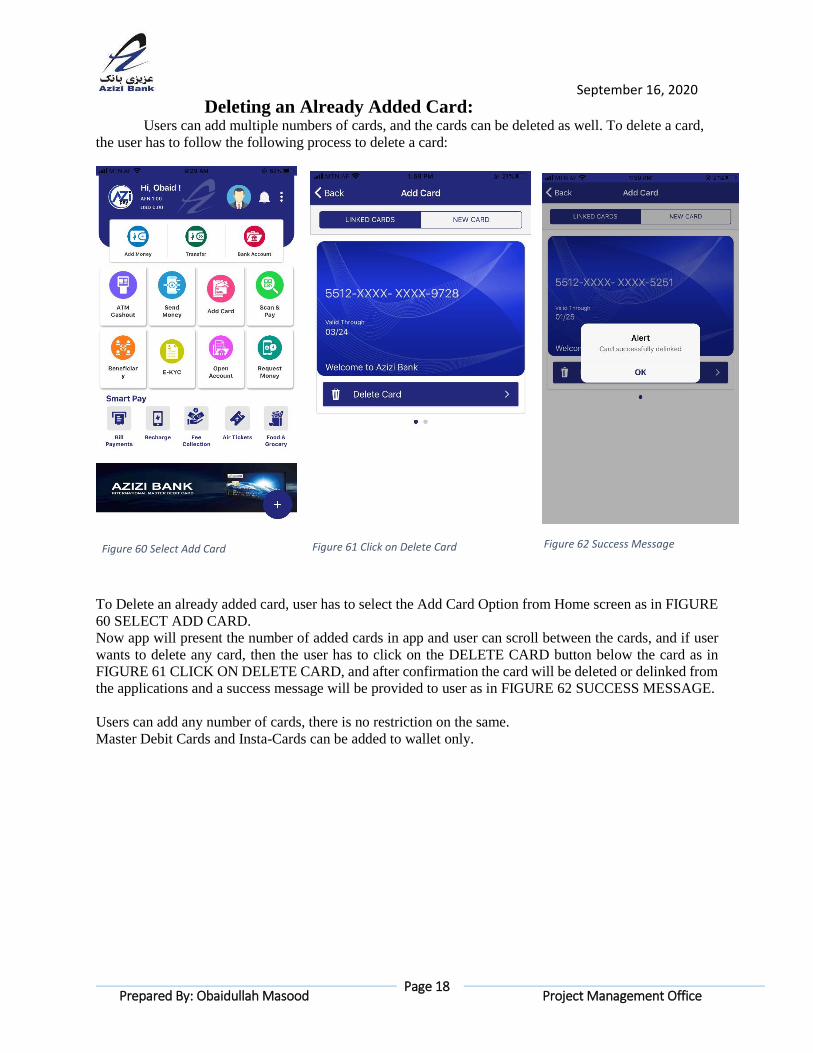
Deleting an Already Added Card: Users can add multiple numbers of cards, and the cards can be deleted as well. To delete a card,
the user has to follow the following process to delete a card:
To Delete an already added card, user has to select the Add Card Option from Home screen as in FIGURE
60 SELECT ADD CARD.
Now app will present the number of added cards in app and user can scroll between the cards, and if user
wants to delete any card, then the user has to click on the DELETE CARD button below the card as in
FIGURE 61 CLICK ON DELETE CARD, and after confirmation the card will be deleted or delinked from
the applications and a success message will be provided to user as in FIGURE 62 SUCCESS MESSAGE.
Users can add any number of cards, there is no restriction on the same.
Master Debit Cards and Insta-Cards can be added to wallet only.
Figure 60 Select Add Card Figure 61 Click on Delete Card Figure 62 Success Message

September 16, 2020
Page 19
Prepared By: Obaidullah Masood Project Management Office
ATM CASH OUT: This is the very new feature of AziPay where users can withdraw amount from their wallet or their
account from Azizi Bank’s ATMs.
To perform ATM CASH OUT, do follow the following process:
User has to select the ATM CASH OUT option from Home Screen
as in FIGURE 63 SELECT ATM CASH OUT OPTION. The ATM Cash out screen will be presented, and here the user has
to fill-in details such as in FIGURE 64 FILL-IN THE TREQUIRED
DETAILS, and the details are:
Pay from: Here if the user wants to cash out Wallet amount, then selects WALLET, if the user wants to cash out from Bank Account, then selects the Account. User has to enters the rest of the details accordingly and presses PROCEED button as in FIGURE 64 FILL-IN THE REQUIRED DETAILS. The user will be asked for CARD PIN, and user enters the same as in FIGURE 65 ENTER YOU CARD PIN and success message will be
given as in FIGURE 66 SUCCESS MESSAGE. Here the user will be provided with REF NUMBER as in FIGURE 66 SUCCESS MESSAGE and the user will receive PASS CODE on SMS. To withdraw the amount from ATM, the user has to have both the REF NUMBER and PASS CODE. The receiver has to go ATM and PRESS the 3rd Button from top on the right side of ATM on ATM IDLE SCREEN. User has to select the Language, and then provides the amount received, and then has to enter the mobile number on which the SMS was received. Now the user has to enter the Reference number next, and if mobile number and ref number are correct, then the machine will ask for Pass Code which is received in SMS. If the details are correct the ATM will dispense the amount.
Figure 63 Select ATM Cash Out Option
Figure 64 Fill In the Required Details Figure 65 Enter Your Card PIN
Figure 66 Success Message
September 16, 2020
Page 20
Prepared By: Obaidullah Masood Project Management Office
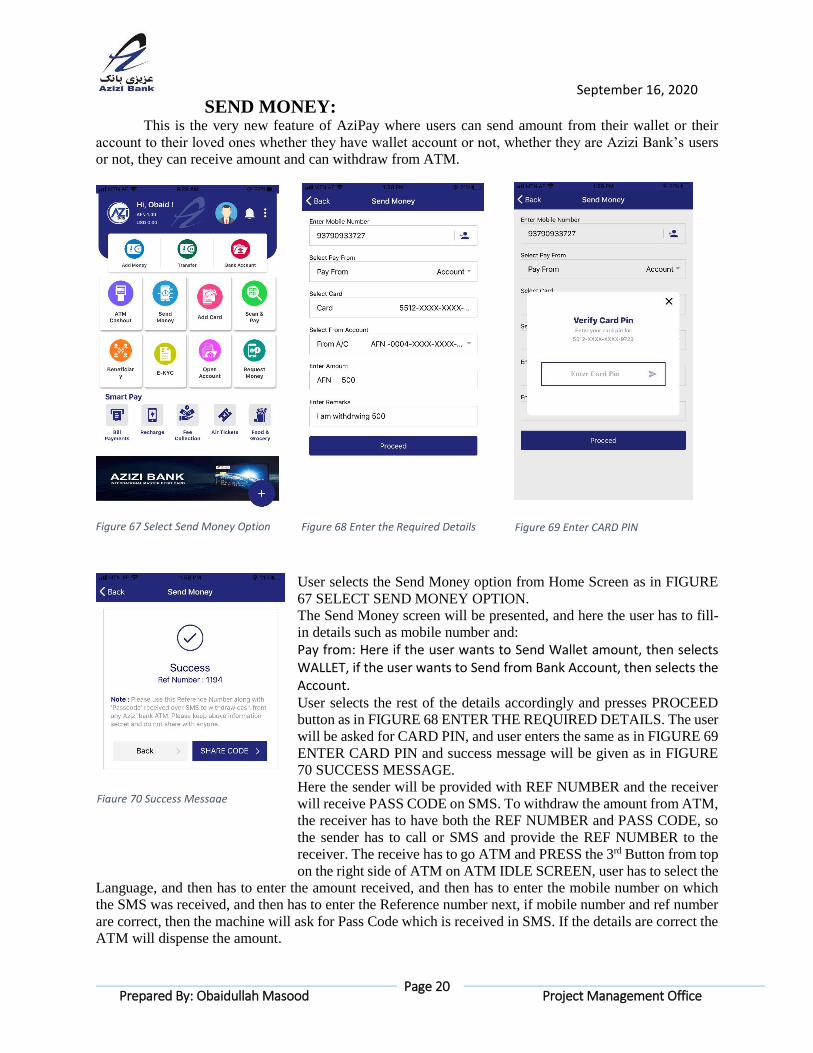
SEND MONEY: This is the very new feature of AziPay where users can send amount from their wallet or their
account to their loved ones whether they have wallet account or not, whether they are Azizi Bank’s users
or not, they can receive amount and can withdraw from ATM.
User selects the Send Money option from Home Screen as in FIGURE
67 SELECT SEND MONEY OPTION.
The Send Money screen will be presented, and here the user has to fill-
in details such as mobile number and:
Pay from: Here if the user wants to Send Wallet amount, then selects WALLET, if the user wants to Send from Bank Account, then selects the Account. User selects the rest of the details accordingly and presses PROCEED
button as in FIGURE 68 ENTER THE REQUIRED DETAILS. The user
will be asked for CARD PIN, and user enters the same as in FIGURE 69
ENTER CARD PIN and success message will be given as in FIGURE
70 SUCCESS MESSAGE.
Here the sender will be provided with REF NUMBER and the receiver
will receive PASS CODE on SMS. To withdraw the amount from ATM,
the receiver has to have both the REF NUMBER and PASS CODE, so
the sender has to call or SMS and provide the REF NUMBER to the
receiver. The receive has to go ATM and PRESS the 3rd Button from top
on the right side of ATM on ATM IDLE SCREEN, user has to select the
Language, and then has to enter the amount received, and then has to enter the mobile number on which
the SMS was received, and then has to enter the Reference number next, if mobile number and ref number
are correct, then the machine will ask for Pass Code which is received in SMS. If the details are correct the
ATM will dispense the amount.
Figure 67 Select Send Money Option Figure 68 Enter the Required Details Figure 69 Enter CARD PIN
Figure 70 Success Message
September 16, 2020
Page 21
Prepared By: Obaidullah Masood Project Management Office
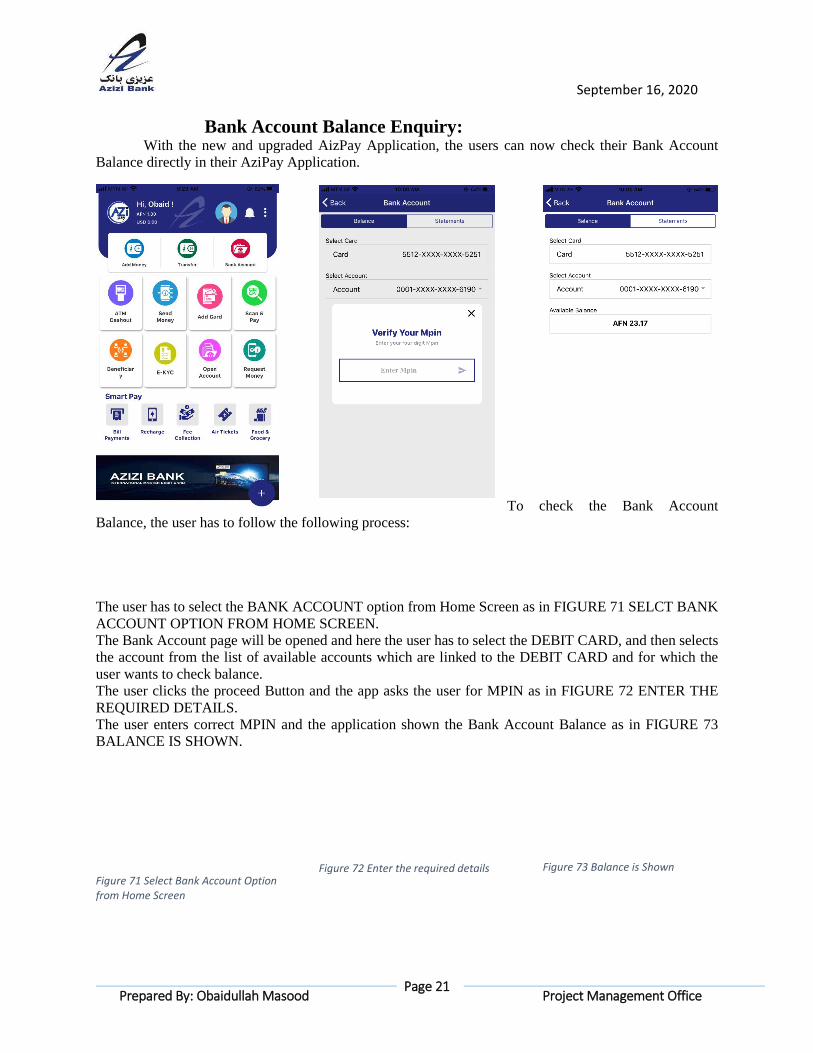
Bank Account Balance Enquiry: With the new and upgraded AizPay Application, the users can now check their Bank Account
Balance directly in their AziPay Application.
To check the Bank Account
Balance, the user has to follow the following process:
The user has to select the BANK ACCOUNT option from Home Screen as in FIGURE 71 SELCT BANK
ACCOUNT OPTION FROM HOME SCREEN.
The Bank Account page will be opened and here the user has to select the DEBIT CARD, and then selects
the account from the list of available accounts which are linked to the DEBIT CARD and for which the
user wants to check balance.
The user clicks the proceed Button and the app asks the user for MPIN as in FIGURE 72 ENTER THE
REQUIRED DETAILS.
The user enters correct MPIN and the application shown the Bank Account Balance as in FIGURE 73
BALANCE IS SHOWN.
Figure 71 Select Bank Account Option from Home Screen
Figure 72 Enter the required details Figure 73 Balance is Shown
September 16, 2020
Page 22
Prepared By: Obaidullah Masood Project Management Office
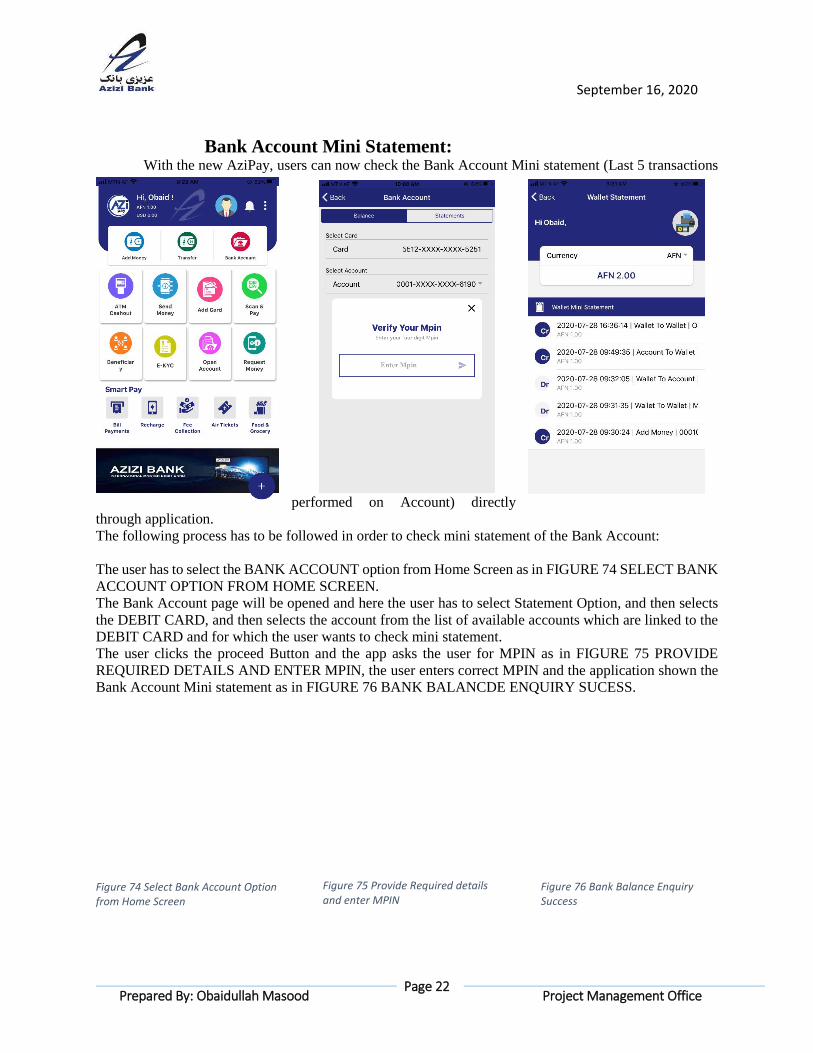
Bank Account Mini Statement: With the new AziPay, users can now check the Bank Account Mini statement (Last 5 transactions
performed on Account) directly
through application.
The following process has to be followed in order to check mini statement of the Bank Account:
The user has to select the BANK ACCOUNT option from Home Screen as in FIGURE 74 SELECT BANK
ACCOUNT OPTION FROM HOME SCREEN.
The Bank Account page will be opened and here the user has to select Statement Option, and then selects
the DEBIT CARD, and then selects the account from the list of available accounts which are linked to the
DEBIT CARD and for which the user wants to check mini statement.
The user clicks the proceed Button and the app asks the user for MPIN as in FIGURE 75 PROVIDE
REQUIRED DETAILS AND ENTER MPIN, the user enters correct MPIN and the application shown the
Bank Account Mini statement as in FIGURE 76 BANK BALANCDE ENQUIRY SUCESS.
Figure 74 Select Bank Account Option from Home Screen
Figure 75 Provide Required details and enter MPIN
Figure 76 Bank Balance Enquiry Success
September 16, 2020
Page 23
Prepared By: Obaidullah Masood Project Management Office
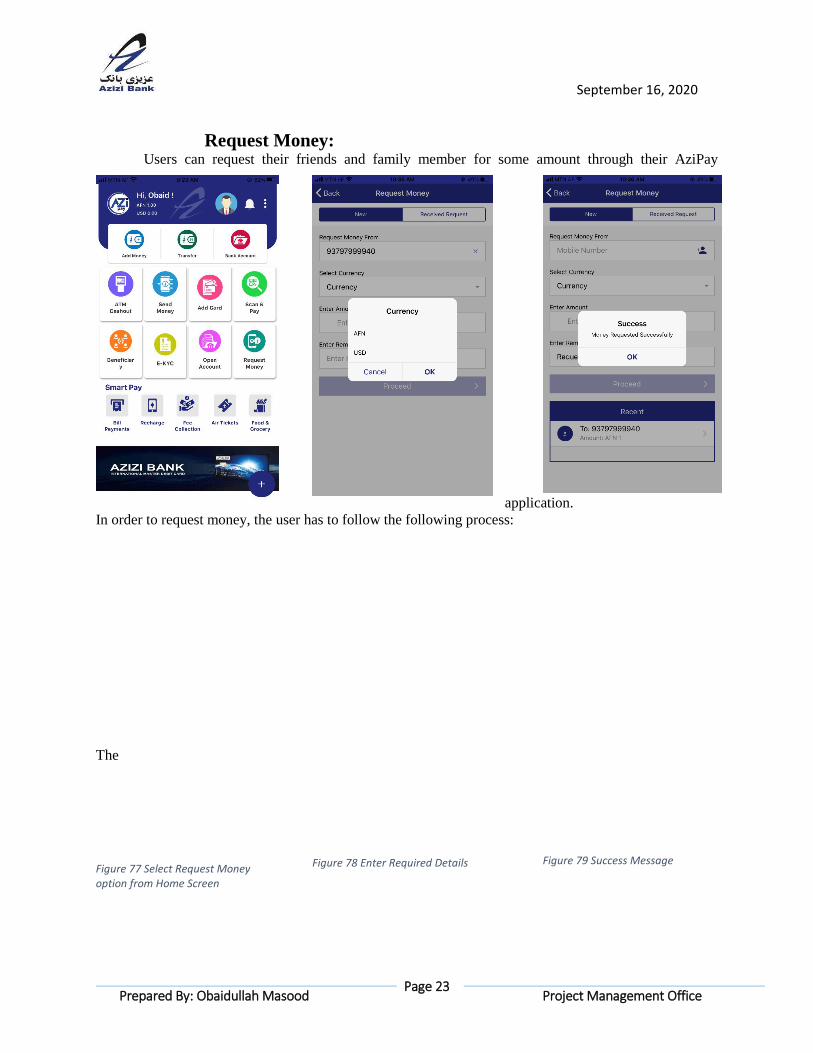
Request Money: Users can request their friends and family member for some amount through their AziPay
application.
In order to request money, the user has to follow the following process:
The
Figure 77 Select Request Money option from Home Screen
Figure 78 Enter Required Details Figure 79 Success Message

September 16, 2020
Page 24
Prepared By: Obaidullah Masood Project Management Office
User selects the Request Money option from Home Screen as in FIGURE 77 SELEC REQUEST MONEY OPTION FROM HOME SCREEN. The Request Money page is opened, and user enters the required details such as REQUESST MONEY FROM, CURRENCY, AMOUNT, REMARKS and presses the Proceed button as in FIGURE 78 ENTERY
REQUIRED DETAILS. If everything is well, the request will be sent to the wallet of the person from whom the user has request
money.
In order to view all the requests received, the user can click the RECEIVE REQUEST tab from the same
page as in FIGURE 80 LIST OF REQUESTS RECEIVED, and a list of
all the requests will be shown.
Scan and Pay: With the new AziPay wallet application, the users can scan and
pay the payment for the goods purchased at AziPay Merchant site.
To pay using Scan and Pay Option of AziPay, the user has to follow the
following process:
Figure 80 List of Requests Received
Figure 81 Select Scan and Pay Option from Home Screen

September 16, 2020
Page 25
Prepared By: Obaidullah Masood Project Management Office
User Selects the Scan and Pay Option from Home Screen as in
FIGURE 81 SELECT SCAN AND PAY OPTION FROM HOME SCREEN, and the QR Payment page
opens.
Here the user has to scan the QR Code the user Has as in FIGURE 82 PLACE QR UNDER MOBILE
CAMERA.
If the QR Code is scanned so the details will be shown in APP as in FIGURE 83 QR CODE SCANNED.
Here the user clicks the proceed button and the app asks for MPIN. The user enters MPIN and the payment
is made on the QR Code and success message is shown as in FIGURE 85 SUCCESS MESSAGE.
Request
for
Opening
Bank
Account: The AziPay mobile
Wallet users can ask for Opening
an Account with Azizi Bank by
requesting through AziPay.
Once the Request is received in
AziPay, the report for Opening
Account will be share with
Marketing Team.
The Marketing Team then
contacts the user and opens the
account as per user’s request.
In order to request for Account
Opening the user has to follow
the following process:
Figure 82 Place QR Under Mobile Camera
Figure 83 QR Code is Scanned
Figure 84 Enter MPIN Figure 85 Success Message

September 16, 2020
Page 26
Prepared By: Obaidullah Masood Project Management Office
User Selects the Open Account option from Home Screen as in FIGURE 86 SELECT OPEN ACCOUNT
OPTION FROM HOME SCREEN.
The Open Account Page is presented to user, where user has to select and enter the required details and
press SUBMIT button as in FIGURE 87 ENTER THE REQUIERD
DETAILS.
The request will be received in AziPay
Admin.
The ADMIN generates the report on daily basis and provides the same to CALL CENTER.
The CALL CENTER contacts the user and opens the account as per Operations and Marketing Policy.
Bill Payment: With the new AziPay Mobile Wallet Application, the user can pay various bill payments.
Currently AziPay is having only Breshna Bill Payment, and soon many other service provider bill
payments will be provided through AziPay.
In order to pay Breshna Bill Payment through AziPay, the user has to follow the following process:
Figure 86 Select Open Account Option from Home Screen
Figure 87 Enter the required details Figure 88 Success Message
Figure 91 Enter Bill/Account Number

September 16, 2020
Page 27
Prepared By: Obaidullah Masood Project Management Office
The user selects the Bill Payment Option from Home Screen as in FIGURE 89 SELECT BILL PAYMENT
FROM HOME SCREEN.
The bill payment screen is opened
to user, here the user selects the
Electricity as in FIGURE 90
SELECT ELECTRICITY.
The Electricity Bill Payment Page is opened as in FIGURE 91 ENER BILL/ACCOUNT NUMBER, and
here the user enters the Account Number from the Breshna Bill that is received from Breshna.
The application shows the details of the bill, and if the user understands that details is correct, the user
clicks the PROCEED button and applications asks for MPIN.
The user enters correct MPIN and the Breshna Bill is paid.
Mobile Recharge: With the new AziPay the Mobile Recharge can be performed by following the following process:
Figure 89 Select Bill Payment from Home Screen
Figure 90 Select Electricity
Figure 92 Select Recharge Option from Home Page Figure 93 Enter the Required Details Figure 94 Enter MPIN Figure 95 Failed or Success Message

September 16, 2020
Page 28
Prepared By: Obaidullah Masood Project Management Office
User Selects the RECHARGE option from Home Screen as in FIGURE 95 FAILED OR SUCCESS
MESSAGE.
The Mobile Recharge screen is presented to user, the user enters the required information, and presses the
RECHARGE Button as in FIGURE 93 ENTER THE REQUIRED DETAILS.
The application askes for MPIN as in FIGURE 94 ENTER MPIN, the user enters the MPIN and if balance
is available the success messages will be provided and if balance is not available then the failed messages
will be provided as in FIGURE 95
FAILED OR SUCCESS
MESSAGE.
Update User
Profile: With new AziPay version, user can now update their profile:
The users can update the following details:
1. Profile Picture
2. Marital status
3. Email Address
To update the same, the user has to follow the following process:
Figure 97 Click on Option to Update Figure 98 Example
September 16, 2020
Page 29
Prepared By: Obaidullah Masood Project Management Office
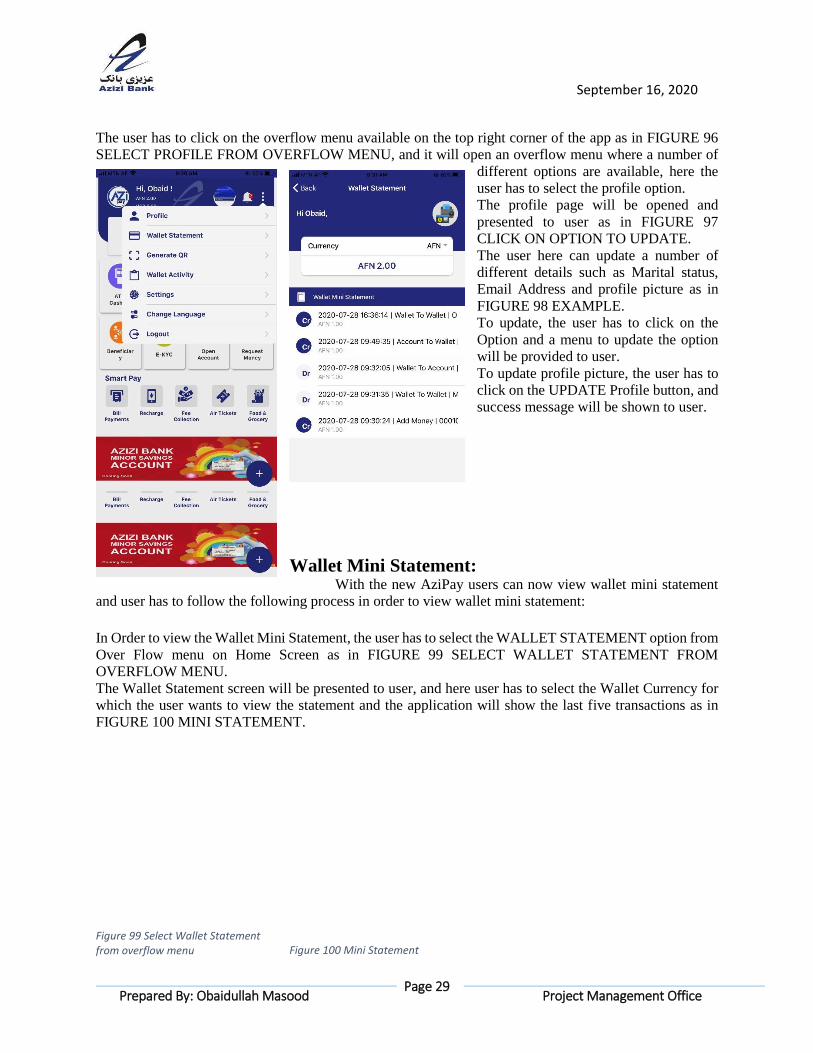
The user has to click on the overflow menu available on the top right corner of the app as in FIGURE 96
SELECT PROFILE FROM OVERFLOW MENU, and it will open an overflow menu where a number of
different options are available, here the
user has to select the profile option.
The profile page will be opened and
presented to user as in FIGURE 97
CLICK ON OPTION TO UPDATE.
The user here can update a number of
different details such as Marital status,
Email Address and profile picture as in
FIGURE 98 EXAMPLE.
To update, the user has to click on the
Option and a menu to update the option
will be provided to user.
To update profile picture, the user has to
click on the UPDATE Profile button, and
success message will be shown to user.
Wallet Mini Statement: With the new AziPay users can now view wallet mini statement
and user has to follow the following process in order to view wallet mini statement:
In Order to view the Wallet Mini Statement, the user has to select the WALLET STATEMENT option from
Over Flow menu on Home Screen as in FIGURE 99 SELECT WALLET STATEMENT FROM
OVERFLOW MENU.
The Wallet Statement screen will be presented to user, and here user has to select the Wallet Currency for
which the user wants to view the statement and the application will show the last five transactions as in
FIGURE 100 MINI STATEMENT.
Figure 96 Select Profile from Overflow Menu
Figure 99 Select Wallet Statement from overflow menu Figure 100 Mini Statement
September 16, 2020
Page 30
Prepared By: Obaidullah Masood Project Management Office
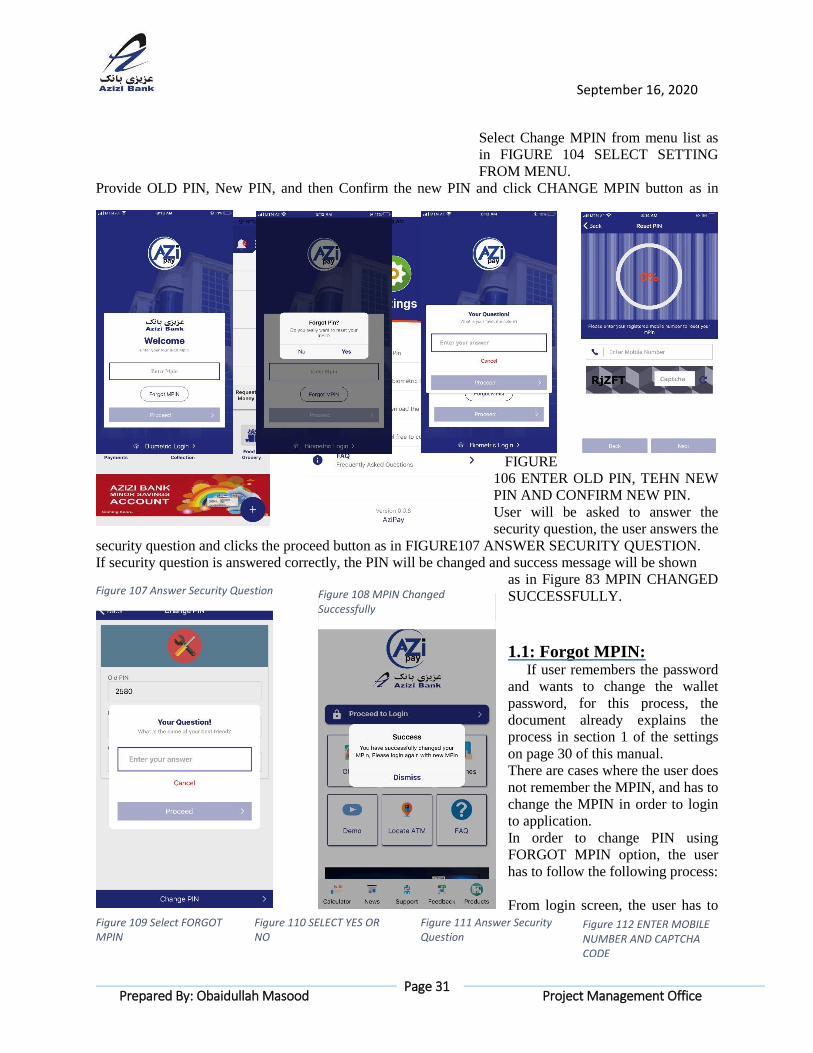
Generate QR CODE: With the new AziPay wallet users can generate QR Code and send it to friends
and family who can scan it and pay the amount. To generate QR Code, Follow the process:
Select the GENERATE QR Code Option from overflow menu, enter the details and QR Code is generated.
Settings of the App: There are a number of setting that the user can set from the settings option of
the app. So let’s work on each option separately.
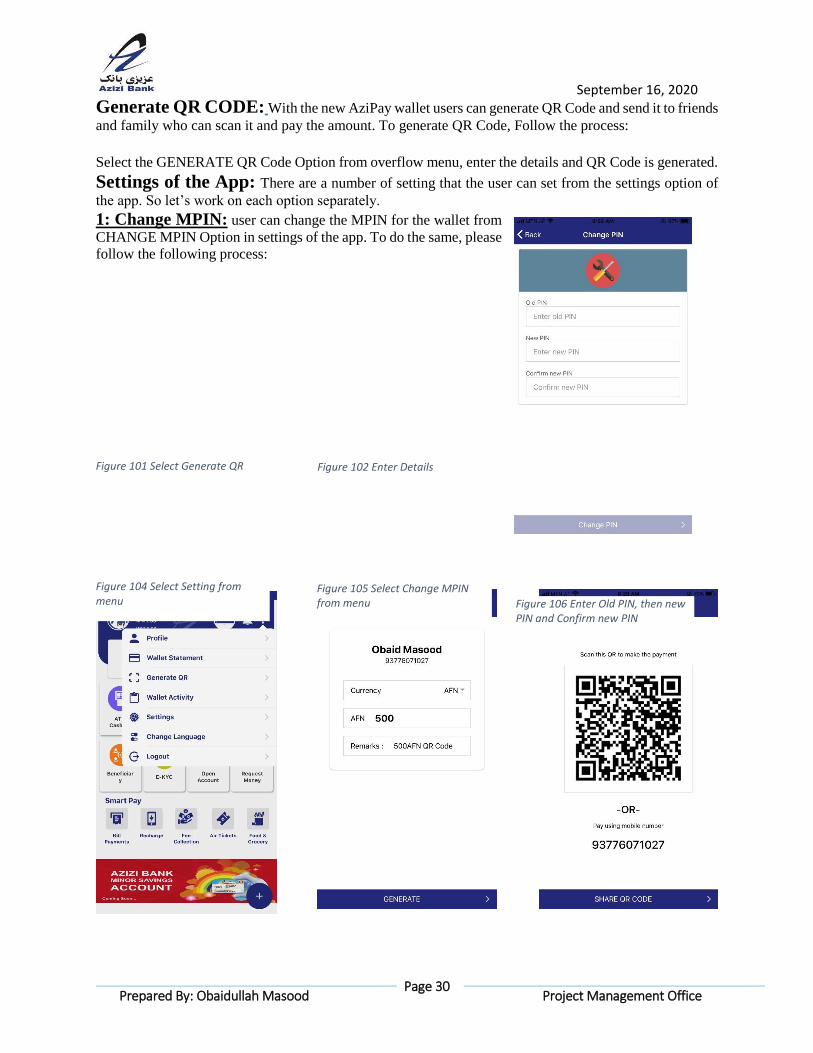
1: Change MPIN: user can change the MPIN for the wallet from
CHANGE MPIN Option in settings of the app. To do the same, please
follow the following process:
Figure 101 Select Generate QR CODE
Figure 102 Enter Details Figure 103 QR CODE is
GENERATED
Figure 104 Select Setting from menu
Figure 105 Select Change MPIN from menu Figure 106 Enter Old PIN, then new
PIN and Confirm new PIN
September 16, 2020
Page 31
Prepared By: Obaidullah Masood Project Management Office
Select Change MPIN from menu list as
in FIGURE 104 SELECT SETTING
FROM MENU.
Provide OLD PIN, New PIN, and then Confirm the new PIN and click CHANGE MPIN button as in
FIGURE
106 ENTER OLD PIN, TEHN NEW
PIN AND CONFIRM NEW PIN.
User will be asked to answer the
security question, the user answers the
security question and clicks the proceed button as in FIGURE107 ANSWER SECURITY QUESTION.
If security question is answered correctly, the PIN will be changed and success message will be shown
as in Figure 83 MPIN CHANGED
SUCCESSFULLY.
1.1: Forgot MPIN: If user remembers the password
and wants to change the wallet
password, for this process, the
document already explains the
process in section 1 of the settings
on page 30 of this manual.
There are cases where the user does
not remember the MPIN, and has to
change the MPIN in order to login
to application.
In order to change PIN using
FORGOT MPIN option, the user
has to follow the following process:
From login screen, the user has to
Figure 107 Answer Security Question Figure 108 MPIN Changed Successfully
Figure 109 Select FORGOT MPIN
Figure 110 SELECT YES OR NO
Figure 111 Answer Security Question
Figure 112 ENTER MOBILE NUMBER AND CAPTCHA CODE
September 16, 2020
Page 32
Prepared By: Obaidullah Masood Project Management Office
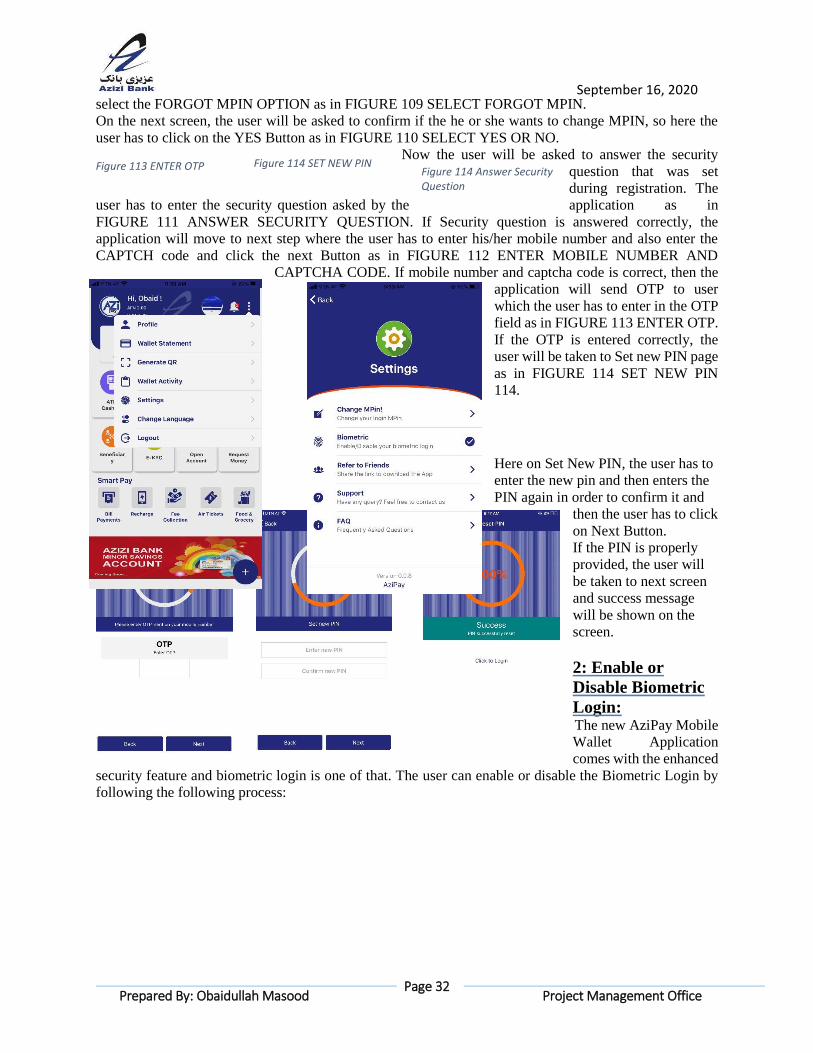
select the FORGOT MPIN OPTION as in FIGURE 109 SELECT FORGOT MPIN.
On the next screen, the user will be asked to confirm if the he or she wants to change MPIN, so here the
user has to click on the YES Button as in FIGURE 110 SELECT YES OR NO.
Now the user will be asked to answer the security
question that was set
during registration. The
user has to enter the security question asked by the application as in
FIGURE 111 ANSWER SECURITY QUESTION. If Security question is answered correctly, the
application will move to next step where the user has to enter his/her mobile number and also enter the
CAPTCH code and click the next Button as in FIGURE 112 ENTER MOBILE NUMBER AND
CAPTCHA CODE. If mobile number and captcha code is correct, then the
application will send OTP to user
which the user has to enter in the OTP
field as in FIGURE 113 ENTER OTP.
If the OTP is entered correctly, the
user will be taken to Set new PIN page
as in FIGURE 114 SET NEW PIN
114.
Here on Set New PIN, the user has to
enter the new pin and then enters the
PIN again in order to confirm it and
then the user has to click
on Next Button.
If the PIN is properly
provided, the user will
be taken to next screen
and success message
will be shown on the
screen.
2: Enable or
Disable Biometric
Login: The new AziPay Mobile
Wallet Application
comes with the enhanced
security feature and biometric login is one of that. The user can enable or disable the Biometric Login by
following the following process:
Figure 113 ENTER OTP Figure 114 SET NEW PIN Figure 114 Answer Security Question
September 16, 2020
Page 33
Prepared By: Obaidullah Masood Project Management Office
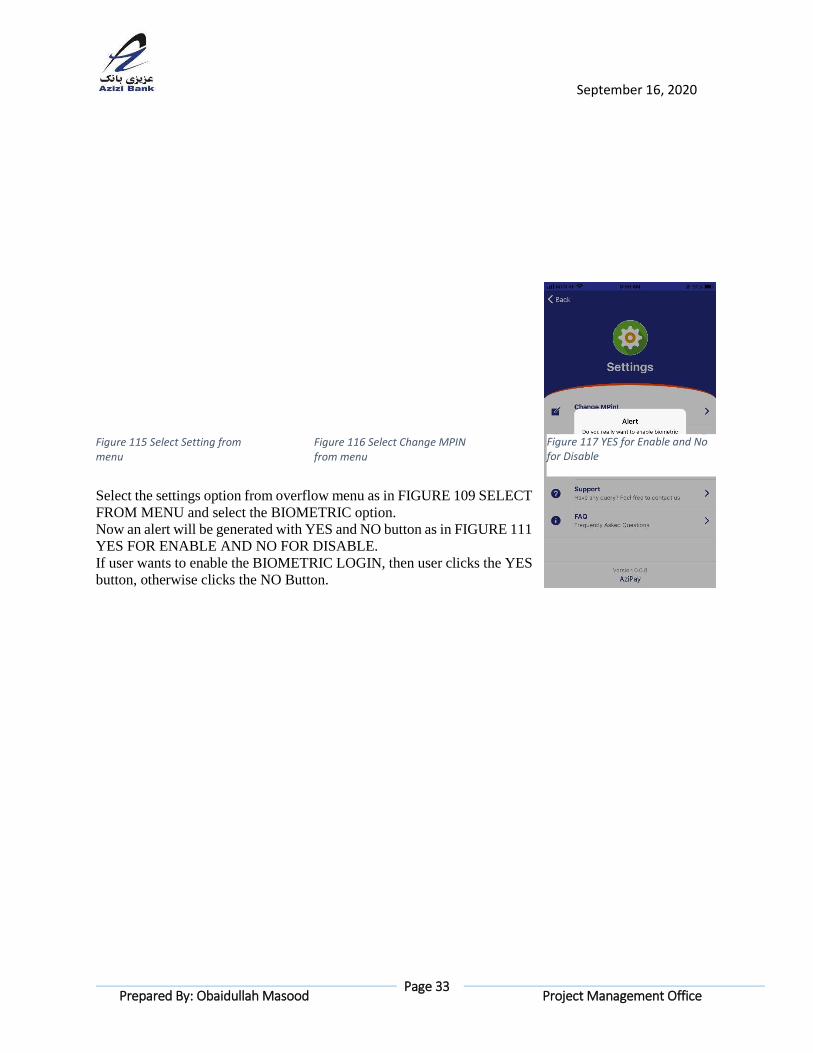
Select the settings option from overflow menu as in FIGURE 109 SELECT
FROM MENU and select the BIOMETRIC option.
Now an alert will be generated with YES and NO button as in FIGURE 111
YES FOR ENABLE AND NO FOR DISABLE.
If user wants to enable the BIOMETRIC LOGIN, then user clicks the YES
button, otherwise clicks the NO Button.
Figure 115 Select Setting from menu
Figure 116 Select Change MPIN from menu
Figure 117 YES for Enable and No for Disable