back to the roots: homemade basic foods - amazon …megadroughtusa.com.s3.amazonaws.com/download/h20...
TRANSCRIPT


Back to the Roots: Homemade Basic Foods
Page 1 of 43
© Back to the Roots: Homemade Basic Foods
Back to the Roots:
Homemade Basic Foods

Back to the Roots: Homemade Basic Foods
Page 2 of 43
© Back to the Roots: Homemade Basic Foods
TABLE OF CONTENTS
DISCLAIMER .................................................................................................................. 4
Homemade Flour and Bread ........................................................................................ 5
Grinding Grains at Home ............................................................................................. 5
What Kinds of Grains Work Best? ............................................................................ 6
Grinding Your Grains ................................................................................................ 7
Difference between Meal and Flour .......................................................................... 9
6 Bread Recipes For A Healthy Life ........................................................................... 10
1. Basic White Bread .............................................................................................. 11
2. Low Glycemic Index Banana Bread .................................................................... 12
3. Light Fluffy Cheddar Bacon Biscuits ................................................................... 13
4. Cinnamon Flax Muffin ......................................................................................... 13
5. Rosemary Herb French Bread ............................................................................ 14
6. Wonderful Wheat-Free Wheat Bread .................................................................. 15
Making and Canning Homemade Butter ................................................................... 17
The Science of Butter ................................................................................................ 18
Start with Good Cream ........................................................................................... 18
Ripening ................................................................................................................. 19
Shearing ................................................................................................................. 19
Straining and Cleaning the Butter ........................................................................... 20

Back to the Roots: Homemade Basic Foods
Page 3 of 43
© Back to the Roots: Homemade Basic Foods
Canning Your Butter .................................................................................................. 20
How to Make Sugar at Home ...................................................................................... 22
How to Make Beet Sugar ........................................................................................... 23
How to Make Maple Sugar at Home .......................................................................... 24
How to Make Vinegar at Home ................................................................................... 26
Rules for Making Vinegar ........................................................................................... 27
What You’ll Need to Make Vinegar ............................................................................ 27
3 Recipes for Making Vinegar .................................................................................... 28
1. Making Hard Cider from Apple Scraps ............................................................... 28
2. Making Hard Cider from Apple Juice .................................................................. 29
3. Making Apple Cider Vinegar from Cider ............................................................. 30
Storage ...................................................................................................................... 30
How to Make Beer at Home ........................................................................................ 32
What You Need for Making Beer ............................................................................... 33
Equipment .............................................................................................................. 33
Ingredients .............................................................................................................. 34
Brew It Up .................................................................................................................. 34
Fermenting ................................................................................................................. 35
Bottling or Casking ..................................................................................................... 36
How to Make Alcohol at Home ................................................................................... 38
Mash .......................................................................................................................... 40
Fermentation .............................................................................................................. 41
Distillation................................................................................................................... 41

Back to the Roots: Homemade Basic Foods
Page 4 of 43
© Back to the Roots: Homemade Basic Foods
DISCLAIMER
THE INFORMATION CONTAINED IN “Back to the Roots: Homemade Basic Foods” IS MEANT
TO SERVE AS A COMPREHENSIVE COLLECTION OF TIPS THAT THE AUTHORS OF THIS
COURSE LEARN OVER THE YEARS RELATED TO SURVIVAL/PREPAREDNESS. SUMMARIES,
STRATEGIES, TIPS AND TRICKS INCLUDED IN THIS E-BOOK ARE ONLY
RECOMMENDATIONS BY THE AUTHORS, AND READING THIS E-BOOK DOES NOT
GUARANTEE THAT ONE’S RESULTS WILL EXACTLY MIRROR OUR OWN RESULTS.
THE AUTHOR OF “Back to the Roots: Homemade Basic Foods” HAS MADE ALL
REASONABLE EFFORTS TO PROVIDE CURRENT AND ACCURATE INFORMATION FOR THE
READERS OF THIS COURSE. THE AUTHOR WILL NOT BE HELD LIABLE FOR ANY
UNINTENTIONAL ERRORS OR OMISSIONS THAT MAY BE FOUND.
THE MATERIAL IN “Back to the Roots: Homemade Basic Foods” MAY INCLUDE
INFORMATION, PRODUCTS, OR SERVICES BY THIRD PARTIES. THIRD PARTY MATERIALS
COMPRISE OF THE PRODUCTS AND OPINIONS EXPRESSED BY THEIR OWNERS. AS SUCH,
THE AUTHORS OF THIS GUIDE DO NOT ASSUME RESPONSIBILITY OR LIABILITY FOR ANY
THIRD PARTY MATERIAL OR OPINIONS. THE PUBLICATION OF SUCH THIRD PARTY
MATERIALS DOES NOT CONSTITUTE THE AUTHORS’ GUARANTEE OF ANY INFORMATION,
INSTRUCTION, OPINION, PRODUCTS OR SERVICE CONTAINED WITHIN THE THIRD PARTY
MATERIAL.
WHETHER BECAUSE OF THE GENERAL EVOLUTION OF THE INTERNET, OR THE
UNFORESEEN CHANGES IN COMPANY POLICY AND EDITORIAL SUBMISSION GUIDELINES,
WHAT IS STATED AS FACT AT THE TIME OF THIS WRITING, MAY BECOME OUTDATED OR
SIMPLY INAPPLICABLE AT A LATER DATE. THIS MAY APPLY TO THE “Back to the Roots:
Homemade Basic Foods” AS WELL AS THE VARIOUS SIMILAR COMPANIES THAT WE HAVE
REFERENCED IN THIS EBOOK.
GREAT EFFORT HAS BEEN EXERTED TO SAFEGUARD THE ACCURACY OF THIS WRITING.
OPINIONS REGARDING SIMILAR WEBSITE PLATFORMS HAVE BEEN FORMULATED AS A
RESULT OF BOTH PERSONAL EXPERIENCE, AS WELL AS THE WELL DOCUMENTED
EXPERIENCES OF OTHERS.
NO PART OF THIS PUBLICATION SHALL BE REPRODUCED, TRANSMITTED OR RESOLD IN
WHOLE OR IN PART IN ANY FORM, WITHOUT THE PRIOR WRITTEN CONSENT OF THE
AUTHORS. ALL TRADEMARKS AND REGISTERED TRADEMARKS APPEARING IN “Back to the
Roots: Homemade Basic Foods” ARE THE PROPERTY OF THEIR RESPECTIVE OWNER. ANY
AND ALL REQUESTS FOR SUCH PERMISSION SHOULD BE SENT BY TO
COPYRIGHT 2015 SurvivopediaTM, Back to the Roots: Homemade Basic Foods

Back to the Roots: Homemade Basic Foods
Page 5 of 43
© Back to the Roots: Homemade Basic Foods
Homemade Flour and Bread
Grinding Grains at Home
There are many reasons why you may want to grind your own grains at home. Making
your own flour is a rewarding experience, and your product will still have all of the
nutrients and flavor that commercial milling takes away.
In a survival situation, you may only have access to grains, nuts and seeds and will
need to know how to make your own flour from what you have.
Milling at home is also a great way to blend unique flours so that you can make baked
goods with distinctive flavor, nutritional, and texture profiles. It’s also amazingly simple
and requires very little time.

Back to the Roots: Homemade Basic Foods
Page 6 of 43
© Back to the Roots: Homemade Basic Foods
What Kinds of Grains Work Best?
Traditional flours are made
predominantly from wheat, barley, and
rye. Corn is also up there on the list,
especially for people who enjoy
cornbread or corn tortillas.
You don’t have to limit yourself to
making flour from just grains. You can
make it from nuts, seeds, beans, rice,
and roots as well. These lend beautiful flavors and distinctive textures to your finished
flour and may also be a viable alternative to those who don’t want the gluten that’s in
wheat, rye, and barley.
You do need to know that if you’re not using wheat, barley, or rye in your flours, they will
behave differently because they lack gluten, the protein that gives those types of flours
elasticity and also helps them bind and rise. You can always add xanthan gum or guar
gum to other flours to mimic that if you need to but the textures won’t be quite the same.
Here is a list of just a few of the products that you can use to make flour at home:
Wheat
Barley (though it’s bitter – you don’t want to use it alone)
Rye
Spelt
Corn
Oats
Buckwheat
Millet
Quinoa
Nuts such as almonds, hazelnuts, cashews, pecans, macadamias, and walnuts

Back to the Roots: Homemade Basic Foods
Page 7 of 43
© Back to the Roots: Homemade Basic Foods
Seeds such as sunflowers, hemp, pumpkin, amaranth and flax
Potatoes (yes, potatoes)
Arrowroot
Tapioca
Coconut
Soybean
This is by no means an inclusive list but it’s a starting point. How you grind them
depends upon how hard they are. With the exception of some beans, the products
above all grind well in a coffee grinder or food processor.
Grinding Your Grains
Many grains are easily ground just
by using a food processor or even
a good blender. Others require
heavier equipment such as a flour
mill.
Other tools that can be used
include the old school mortar and
pestle, spice mills, manual or
electric coffee grinders and small
electric grinders made specifically
for home milling.
Using a mortar and pestle may very well be your only option if SHTF (Shit Hits The Fan)
but we recommend being well-prepared for making your own flour if that’s what you plan
to do.
You can pick up a manual coffee grinder at yard sales, flea markets and even the store
for very little money. Make sure to grab an heir and a spare, too. If one breaks, you’re
going to need a backup.

Back to the Roots: Homemade Basic Foods
Page 8 of 43
© Back to the Roots: Homemade Basic Foods
Depending upon where you live, you may
have access to some sort of nut, seed, or
grain even if you don’t stockpile any.
If you live near soybean fields or have a
walnut or pecan tree, you’re golden. You can,
of course, always grow corn, sunflowers, and
pumpkins, too.
Until then, you may wish to use your food
processor or mill since you have electric
because it’s much easier.
If you’ve purchased grains, corn or seeds for
grinding, you can mill them just as they are. If
you’d like, you can always toast the seeds and
nuts to add a bit more flavor. Now, let’s get started.
1. Make sure that your product is clean and dry. Often there are bugs, rocks, or
other debris in there and you don’t want to grind those up into your flour. As a
matter of fact, though the bugs may add more protein (kidding!), the rocks will be
pretty hard on your grinder, so pick through carefully.
2. Fill your grinder or food processor up no more than 2/3 of the way. Half is better
so that the product can reach the blades and be ground equally.
3. Grind until you have smooth, fluffy flour.
4. Open your grinder and pick out the larger chunks. You can grind a bit more or
just pick them out and grind them alone, which is probably the better option. Toss
them in with the next turn, if you’re doing more, or just do them alone. No need to
waste them.
5. Repeat the process until you’ve made all of the flour that you need.
6. Sift the flour (you don’t have to but we like to for some recipes and for some
products because it gets out the rest of any little chunks. A chunk of nut is ok, but
we’re not big fans of having half of a garbanzo bean in our brownies!

Back to the Roots: Homemade Basic Foods
Page 9 of 43
© Back to the Roots: Homemade Basic Foods
7. Store your flour in an airtight container in a cool, dry place, preferably the freezer
or fridge. Because it’s fresh and isn’t packed full of bleach and preservatives,
your “live” flour won’t last as long as the “dead” store-bought ones.
Helpful Tips:
If your grinder sounds like it’s bogging down, check for nuts, seeds, or grains that
are stuck under the blades. If it’s clear and still sounds like that, you may have
too much in there. Pour some out and grind two batches.
Always be sure that your equipment is clean because these flours will go rancid
quickly. If there is still flour stuck in there from the last time, you’re adding gross
flour and other nasties into your fresh batch.
Don’t over-grind your nuts. Otherwise, you’ll have nut butter instead of flour.
Pulse them until they’re flour but be careful. Though almond butter is delicious,
it’s not nearly as good for dredging pork chops in as almond flour is!
Difference between Meal and Flour
You have undoubtedly heard of cornmeal and possibly even almond meal, but what’s
the difference between a meal and flour?
Meals are ground more coarsely. They’re
great for several different uses because they
add a heartier flavor and more texture to
your goods.
They’re bad, though, if you’re shooting for
something nice and light to make a cake
with.
To make meal, just don’t grind your product
as long. When it starts to get a crumbly
texture, you’re done. Compare it mentally to
cornmeal. You want to keep that grainy feel.

Back to the Roots: Homemade Basic Foods
Page 10 of 43
© Back to the Roots: Homemade Basic Foods
This is really good when you’re making a hearty loaf of country bread but if you’re
shooting for hot rolls, grind longer.
Grinding your own grains is a wonderful idea for surviving a SHTF scenario because
you’re getting a ton of nutrition from your flour. Commercial white flour has practically no
nutrients other than carbohydrates, and there’s not really any fiber in there to help slow
down the digestion.
Though white bread is better than starving to death, freshly ground flours offer nutrition
and fiber that will help you be hearty and full regardless of your circumstances. And they
taste great, too!
6 Bread Recipes for a Healthy Life
Bread is a staple in most diets and can be a real lifesaver, literally, when it comes to
surviving.
Unfortunately modern store-bought bread has very little nutrition. However, you can
make many different kinds of bread at home that are nutritious and good for you even if
you have such conditions as diabetes, gluten intolerance, allergies or other issues that
may otherwise be affected by bread consumption.
If you have diabetes, you obviously need to watch your carbohydrate consumption in
order to keep your blood sugar under control. Fortunately, there are many bread recipes
that use nut flours or whole grains that contain the fiber you need to counteract the
carbohydrates. These recipes will help you enjoy bread without spiking your blood
sugar.
If you have a gluten intolerance or celiac disease, you can’t have wheat, rye, barley or
triticale because of the protein, gluten, found in the bread.

Back to the Roots: Homemade Basic Foods
Page 11 of 43
© Back to the Roots: Homemade Basic Foods
Up til recently, the only gluten-free bread options were either gross or prohibitively
expensive. Most of these recipes are gluten-free and guaranteed to taste better than
store-bought bread.
Nut allergies are also a concern for many people. Unlike some other allergies, a nut
allergy is often extremely dangerous; people die from exposure. We included nut-free
recipes in here, too!
1. Basic White Bread
This recipe is good for diabetics and is nut-free.
4 t bread machine yeast
1/2 t sugar
1 1/4 cups water (90-100 F)
3 T olive oil
3/4 t baking powder
1 t salt
1 T sugar substitute
1 cup vital wheat gluten flour
1/4 cup oat flour
3/4 cup almond flour
1/4 cup flax seed
1/4 cup wheat bran
Directions:
1. Put the water, oil and sugar in your bread maker.
2. In a separate bowl, mix all the dry ingredients with the exception of the yeast and
baking powder.
3. Mix well.
4. Take out approximately 1/4 cup.
5. Pour the rest of dry ingredients into the pan.

Back to the Roots: Homemade Basic Foods
Page 12 of 43
© Back to the Roots: Homemade Basic Foods
6. Mix the reserved 1/4 cup of dry ingredients with the yeast and baking powder.
7. Pour into the bread machine pan.
8. Use the three hour bake cycle.
9. After 55 minutes, gently lift the dough out and remove the paddle and place the
dough back into the machine so that you don’t have a huge hole in your finished
loaf.
2. Low Glycemic Index Banana Bread
This recipe is courtesy of the Weight Watcher website and is good for diabetics and
people with nut allergies.
3 very ripe bananas
1 cup sugar substitute
1/2 cup natural applesauce
3/4 cup all-purpose flour
1/2 cup whole wheat flour
1/2 t salt
1 1/2 t baking soda
Directions:
1. Preheat oven to 350 degrees.
2. In a mixer, mash bananas, add sugar
substitute and mix.
3. Mix in rest of ingredients.
4. Pour ingredients into a greased bread pan.
5. Bake for 50 to 60 minutes or until a toothpick comes out clean.
6. Remove from pan and cool on a wire rack.
*If using a dark coated pan, bake at 325 degrees and bake a little longer.

Back to the Roots: Homemade Basic Foods
Page 13 of 43
© Back to the Roots: Homemade Basic Foods
3. Light Fluffy Cheddar Bacon Biscuits
These biscuits are easy to make and are diabetic-friendly, gluten-free and nut-free. Oh
yeah, and delicious!
1/4 cup butter, melted and slightly cooled.
1/3 cup sifted coconut flour
4 eggs
1/4 teaspoon salt
1/4 teaspoon garlic powder
1/4 teaspoon baking powder
1 cup sharp cheddar cheese, shredded
1/2 cup diced bacon, optional
Directions:
1. Preheat oven to 400 degrees.
2. Grease a cookie sheet.
3. Mix eggs, butter, salt, and garlic powder.
4. Add flour and baking powder and mix until there are no lumps.
5. Fold in cheese and bacon.
6. Drop batter by the heaping tablespoon onto greased cookie sheet.
7. Bake for 15 minutes, or until lightly browned.
8. Let cool for 5-10 minutes before removing and serving. Cool completely before
storing.
4. Cinnamon Flax Muffin
This recipe is a bit unique and well-suited to survival because it’s only for a single
muffin. You can make it in the microwave or in the oven, or even in a cup over a fire if
you use a lid.
It’s diabetic-friendly, gluten-free and nut-free.

Back to the Roots: Homemade Basic Foods
Page 14 of 43
© Back to the Roots: Homemade Basic Foods
1 large egg
1 T honey
1 1/2 t cinnamon
2 t plain fat-free yogurt
1/2 t baking powder
3 T ground flax seeds
Directions:
1. Spray a microwave safe coffee cup or
bowl with cooking spray.
2. Mix the egg and honey until well combined, add the yogurt and blend well.
3. Mix in the ground flaxseed, cinnamon and baking powder until well combined.
4. Pour in coffee cup so that it’s no more than half full and microwave on high for 1
1/2 minutes.
5. Serve hot.
5. Rosemary Herb French Bread
This recipe is good for diabetics and is gluten-free,
nut-free, soy-free and dairy-free.
3/4 cup sorghum flour
1/4 cup millet flour
1/2 cup tapioca flour
1/2 T xanthan gum
3/4 t salt
1 t egg replacer, dry. Skip this if you’re using
real eggs.
1 T sugar
3/4 cup lukewarm water
1 T rapid-rise yeast

Back to the Roots: Homemade Basic Foods
Page 15 of 43
© Back to the Roots: Homemade Basic Foods
1 T olive oil
2 t egg replacer whisked with 6 tbsp. warm water or 3 eggs, if eggs aren’t an
issue
1/2 t vinegar
1 T olive oil
1/2 T crushed rosemary
1/2 T kosher salt
Directions:
1. Preheat oven to 375F.
2. Grease sides of French bread pan or regular loaf pan and sprinkle with cornmeal.
3. Combine dry ingredients in a medium mixing bowl of a standing mixer and
combine.
4. Put sugar and lukewarm water in a small bowl and add yeast and allow it to
activate.
5. Add the yeast water to the medium mixing bowl.
6. Add first amount of olive oil, egg replacer “Eggs” or regular eggs and vinegar and
mix on medium for 3 minutes.
7. Carefully scoop out your dough and make a bread-shaped loaf. Baste with
remaining oil or melted butter and make a few decorative slices in the top if you
want. Sprinkle with rosemary and salt.
8. Let rise for 20-30 minutes or until about doubled in size.
9. Bake for 25-30 minutes or until bread is browned and sounds slightly hollow
when you tap it.
10. Allow to cool for several minutes then remove from pan.
6. Wonderful Wheat-Free Wheat Bread
This bread has a pleasant, nutty flavor and works well as a sandwich bread. It’s also
great with just butter. It’s diabetic friendly, gluten-free, dairy-free and nut-free.

Back to the Roots: Homemade Basic Foods
Page 16 of 43
© Back to the Roots: Homemade Basic Foods
2 cups almond flour
2 T coconut flour
1/4 cup flax meal
1/4 t sea salt
1/2 t baking soda
5 eggs
1 T coconut oil
1 T honey
1 T apple cider vinegar
Directions:
1. Place almond flour, coconut flour, flax, salt and baking soda in a food processor
and pulse to combine.
2. Pulse in eggs, oil, honey and vinegar until well-combined.
3. Transfer batter to a greased 7 1/2″ x 3 1/2” loaf pan. Don’t worry if the texture is
looser than “regular” dough. That’s the way that it’s supposed to be.
4. Bake at 350° for 30 minutes.
5. Allow to cool in the pan for 2 hours.
6. Serve and enjoy!
We hope that these breads make you happy as well as healthy!
Back to the Roots: Homemade Basic Foods
Page 17 of 43
© Back to the Roots: Homemade Basic Foods
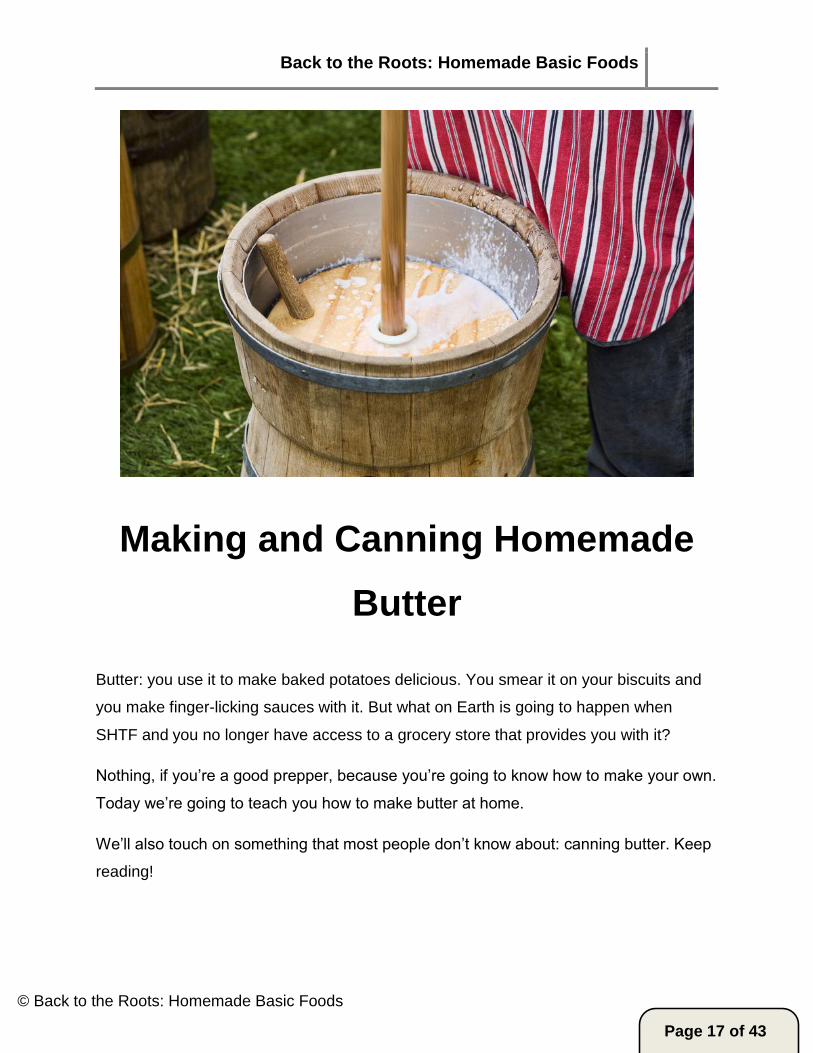
Making and Canning Homemade
Butter
Butter: you use it to make baked potatoes delicious. You smear it on your biscuits and
you make finger-licking sauces with it. But what on Earth is going to happen when
SHTF and you no longer have access to a grocery store that provides you with it?
Nothing, if you’re a good prepper, because you’re going to know how to make your own.
Today we’re going to teach you how to make butter at home.
We’ll also touch on something that most people don’t know about: canning butter. Keep
reading!

Back to the Roots: Homemade Basic Foods
Page 18 of 43
© Back to the Roots: Homemade Basic Foods
The Science of Butter
It’s always good to know how things work. Butter is formed from the milk fats in the milk.
You use cream to make butter, and cream is made up of fat particles suspended in
water. When you agitate it by shaking it, it turns to an emulsion of water particles
suspended in fat.
Before you make butter, you have to let the cream ripen. You do that by letting it set at
room temperature for several hours until it begins to sour. At that point, the fat
crystallizes and a membrane forms around the fat molecules and further separates it
from the water.
When you agitate it by shaking it or beating it with a churn (called shearing), the fat
globules merge and form balls of butter.
As you continue to shake it, the fat continues to separate from the water and proteins
left in the liquid and forms bigger blobs of butter, and eventually all the butter is one big
clump and the liquid left is buttermilk, which is great to cook with or even drink, though
it’s definitely an acquired taste!
Start with Good Cream
The best milk to use for making butter comes from cows that yield milk with a high
cream content. These are commonly referred to as milk cows (versus beef cattle). Milk
breeds include the Guernsey, Jersey, Holstein and Brown Swiss. Of course, all cows
make milk but beef cattle breeds offer a lower yield with much less cream.
A good milk cow will yield several gallons per day and the cream separates easily and
naturally without any special equipment. Though goats are popular animals for
prepping, their milk isn’t ideal for making butter because the cream doesn’t separate
easily without the use of an expensive separator.

Back to the Roots: Homemade Basic Foods
Page 19 of 43
© Back to the Roots: Homemade Basic Foods
It also has a different flavor than butter made from cow’s milk. After you milk the cow,
make sure to strain your milk to remove any impurities that may have fallen into the milk
bucket, then put it in a large jar in the fridge. The cream will separate out within just a
few hours.
Use a spoon or a measuring cup to skim the cream off the top of the milk. If you skim
off all the cream, you’ll be lift with skim milk. If you leave a bit, you’ll have the equivalent
of 1% or 2% milk, just FYI.
Ripening
To start the process of making butter at home, leave the cream out at room temperature
for about 12 hours until it just starts to smell sour. Don’t let it set out too long or else it
will ripen too much and your butter will taste sour.
However, if you don’t let it ripen enough, it will be hard to separate the fat from the milk.
Shearing
Once the cream has ripened, fill a jar 1/3 full of cream and put the lid on tightly. You can
use a churn if you have one or if you want to make a large amount of butter, but the jar
method is just as good, if not better. Don’t overfill the jar because it won’t be able to hit
the sides of the jar hard enough to make butter.
Begin shaking the jar vigorously so that the cream is banged, or concussed, against the
sides and top of the jar. This is what separates the fat molecules from the water and
makes them stick together. It’s hard to put a time frame on this process because it
depends upon how vigorously you shake, the temperature of the cream, and how well it
ripened.
Generally speaking though, it takes anywhere from 15-30 minutes. First you’ll notice
that the cream is getting thicker, then you’ll see little blobs of butter forming. Keep
shaking until you have one big blob of butter. Once you have this blob, you can stop
shaking unless you want a really firm butter.

Back to the Roots: Homemade Basic Foods
Page 20 of 43
© Back to the Roots: Homemade Basic Foods
Straining and Cleaning the Butter
The next step in the process of making butter is to strain it. Using a colander or other
straining device, separate the butter from the buttermilk. Leave the butter in the
colander and rinse it with cold water for a few seconds. You don’t want to use warm or
hot water because it will melt your butter.
As the cold water chills and cleans the butter, it’ll turn into little crumbles instead of one
big glob. Now it’s time to get the water out of your butter. Place it in a bowl with enough
room to squish it against the sides. Tilt the bowl a bit so that the water can run out as
you work the butter against the sides to “wring” it out.
Once it’s fairly firm and there’s no more water coming out, it’s time to salt your butter. A
good rule of thumb is 1 teaspoon of salt per pound of butter. You don’t have to salt it but
it does add to the flavor. This is really a matter of personal taste so go with what you
like.
Pour the salt in and just start working it into the butter with your fingers or a spoon.
Don’t over mix it but make sure that the butter is combined.
You’ve now officially made butter at home for the very first time. Easy, right? And butter
will make an excellent bartering item in a post-SHTF world. To keep your butter from
going rancid, refrigerate it.
Canning Your Butter
Canning butter is a great way to prep for a future without access to your cow in a
survivalist situation.
Here’s the process in a nutshell:
1. Place clean pint jars in roaster and heat in a 250 degree oven. Just FYI, it takes
a little less than a pound of butter to make a pint.

Back to the Roots: Homemade Basic Foods
Page 21 of 43
© Back to the Roots: Homemade Basic Foods
2. While your jars are heating, put your butter in a saucepan or pot and bring it to a
simmer. Simmer for about 5 minutes, stirring constantly to keep it from burning.
Use this time to heat your lids, too.
3. Using a ladle, scoop the butter from the top to the bottom to fill your jars. Do it
this way because your butter may have separated a bit and scooping top to
bottom helps. Leave 3/4 inch headspace in your jar.
4. Carefully and thoroughly clean the tops of your jars. Remove the lids from the
boiling water and place on your jars. Screw on the rings.
5. Once some of the jars start to ping, indicating that they’re sealing, shake the
butter to recombine it because it will separate as it cools into a foamy top and
whitish fat on the bottom. Shake while it’s still warm and liquid and repeat a
couple of times as it cools until it remains combined.
6. When the butter is nearly cool, put it in the fridge and shake a bit one final time
right before it solidifies.
Your butter should keep for at least 3 years as long as it stays sealed!
Now you know how to make butter at home, as well as how to can butter. This is
another great skill that preppers and homesteaders need to know because the more
survival skills you have, the better off you’ll be.

Back to the Roots: Homemade Basic Foods
Page 22 of 43
© Back to the Roots: Homemade Basic Foods
How to Make Sugar at Home
One of the best bartering products when SHTF is undoubtedly going to be sugar. It will
also be a great product to have in order to make treats that boost morale and lend a
sense of normalcy to life, which will be crucial to survival.
The problem is that storing large quantities of sugar is a challenge. It’s bulky, takes up a
ton of space, and is a bug magnet.
Even if you stockpile the sweetness, you will still eventually run out, but what if you
knew how to make your own? It’s really not that difficult and there are a couple of ways
that you can do it. For that matter, as part of your homesteading way of life, you could
make your own just so that you know where it’s coming from.
Today we’re going to tell you how to make sugar at home. As a matter of fact, we’re
going to teach you about two types.

Back to the Roots: Homemade Basic Foods
Page 23 of 43
© Back to the Roots: Homemade Basic Foods
Unless you’re fortunate enough to live in a tropical climate and have a ton of expensive
equipment, you won’t be able to grow sugar cane, the crop that yields about 70% of
table sugar in the US. You can, however, grow sugar beets, which is used to produce
the other 30% of the sugar that you buy. You can also make maple sugar from maple
syrup.
How to Make Beet Sugar
Not surprisingly, beet sugar is made from sugar
beets. These aren’t the same as the red or white
bulbous beets that you’ve eaten as a dinner side or
with pickled eggs; sugar beets actually look more like
a parsnip or daikon than they do their sister beets.
They’re elongated and have a similar coloring to
white potatoes and sugar beets grow well in a variety
of climates just like all beets do.
Sugar beets were originally grown to feed livestock
but aren’t really fit for human consumption.
Here’s one of our favorite things about sugar beets –
after you make the sugar, you can still use the
leftover meat of the beet as a hot or cold mash for your livestock. No waste!
Beet sugar is super-easy to make, too. No special equipment is required and it doesn’t
take a long time to do it.
1. Scrub your beets to get all dirt and debris off of them.
2. Thinly slice, dice or shred the beets and place them in a pot.
3. Add just enough water to cover the beets.
4. Heat to a boil then simmer long enough for the beets to become tender and soft.
5. Remove from heat and strain the beet pulp out of the juice using cheesecloth.

Back to the Roots: Homemade Basic Foods
Page 24 of 43
© Back to the Roots: Homemade Basic Foods
6. Return the syrup to the pot.
7. Hold the cheesecloth full of pulp over the pot and squeeze as much water as
possible out.
8. Simmer until it becomes thick, honey-like syrup, stirring frequently, then remove
from heat.
9. Place in a storage container and allow to cool.
10. As it cools, the sugar will crystalize. Remove crystals and smash into a powder
with your fingers so that it looks like table sugar.
11. Store and use just like you would regular sugar.
See how easy it is to make beet sugar at home?
Just FYI, you can expect to get about 17% of your original beet weight in sugar. To do
the math for you, you’ll need about 10 pounds of beets to yield 1.7 pounds of sugar.
How to Make Maple Sugar at Home
Maple sugar is deliciously reminiscent of the syrup that it’s made from; it has that
beautiful, sort of smoky maple flavor. Chances are that you’ve had maple sugar at least
once in your life. It’s frequently sold as candy in the shape of maple leaves.
Maple sugar is great for baking, eating, or just adding to your tea. Once you try it, you’ll
be hooked. You don’t need anything too specialized but you will need a candy
thermometer and a heavy-bottomed pan.
1. Start with about 3 gallons of pure, organic maple syrup.
2. Heat on medium high until the syrup reaches 290-300 degrees, which is between
soft crack and hard crack stages. If the syrup starts to overflow, just reduce heat
a bit then turn it back up after the foam settles.
3. Remove from heat and stir vigorously for about 5 minutes.
4. Pour into a heat-resistant container; it’s going to be extremely hot!
5. Allow to cool completely.

Back to the Roots: Homemade Basic Foods
Page 25 of 43
© Back to the Roots: Homemade Basic Foods
6. Break into chunks and grate into a powder.
7. Store as you would standard sugar.
One quart of syrup will yield about 2 pounds of granulated sugar. If you live in an area
with maple trees, you can draw the sap directly from the trees and make your own
syrup. Making maple sugar is a great skill to have for survival because it’s easy and
requires very little specialized equipment other than a tap for the tree.
Just FYI, darker maple syrups tend to yield a moister sugar than lighter-colored syrups
do. Since maple trees are tapped in the spring when the sap is running, you need a
tremendous amount of sap, about 40 gallons, just to make 1 gallon of good syrup. Just
to give you an idea, an average tree yields about 3-4 gallons per day and a little over 13
gallons per season, total.
It’s easy to make both beet sugar and
maple sugar at home and they both
have their uses.
Maple sugar does taste differently so
you may wish to use it when you’re
looking specifically for that flavor
profile.
Beet sugar tastes just like plain white
sugar so you can use it just as you
would cane sugar.
When SHTF, sugar is going to be a primo product because of the luxury of the crop.
Those who have it or, even better, know how to make it, will certainly benefit from both
the time and effort.
Plus, you won’t have to worry about drinking your tea unsweetened no matter how bad
things get. In post-disaster times, a little bit of comfort or luxury may very well go a long
way.

Back to the Roots: Homemade Basic Foods
Page 26 of 43
© Back to the Roots: Homemade Basic Foods
How to Make Vinegar at Home
Vinegar: the delicious, magical, germ-killing cleaning agent and wondrous elixir that
cures what ails you.
Since you’re a smart prepper, you may have plenty stockpiled, but wouldn’t it be much
easier, and prepper-friendly, if you could just make vinegar at home from ingredients
that you already have on hand? Well, you can. As a matter of fact, it pretty much makes
itself if you just combine a few basic ingredients and leave it alone.
You can make vinegar from just about anything that has sugar or starch in it. As a
matter of fact, you can make it straight from sugar, but it’s a bit more difficult.
Let’s see the details of making apple cider vinegar from start to finish. The process
transfers pretty easily to all other fruits that you may want to use.

Back to the Roots: Homemade Basic Foods
Page 27 of 43
© Back to the Roots: Homemade Basic Foods
Rules for Making Vinegar
There are only four important guidelines to successfully making vinegar and as long as
you follow the simple directions and abide by these rules, you’ll be using your own
vinegar in no time.
1. Make sure that your equipment is clean. You don’t want wayward bacteria
affecting the process.
2. Don’t use metal or plastic containers. They affect the process and the flavor and
can derail the whole project.
3. If you’re comfortable with the temperature, your vinegar probably is, too. If it’s too
hot, the good bacteria will die. If it’s too cold, the bacteria will go dormant. Either
way, you’re not going to get vinegar. 70-80 degrees Fahrenheit is about perfect
and you can go as low as 60.
4. Store your future vinegar out of direct light to avoid killing necessary bacteria.
You can do this by storing in a dark place or by using a dark jar or crock to
ferment it in.
What You’ll Need to Make Vinegar
Just like with most homesteading projects, you don’t need any super-fancy equipment
to make vinegar at home.
For the sake of thoroughness and preparedness, we’re going to talk about the entire
vinegar-making process from apple to vinegar, though there are a couple of shortcuts
that you can take if you have hard cider, starter, or vinegar on hand. Since you may
have none if SHTF, we’ll start from scratch so this list is inclusive.
1. Fresh juice from unblemished apples that have been thoroughly cleaned before
pressing. Use sweet apples because it’s the sugar that causes the fermentation.
Fall apples such as Red Delicious, Golden Delicious, Gala, Jonagold and Fuji
apples are all good ones. Taste them. If they’re fairly sweet, they’ll work. You can

Back to the Roots: Homemade Basic Foods
Page 28 of 43
© Back to the Roots: Homemade Basic Foods
also use store-bought juice as long as it has no additives and isn’t pasteurized.
You can also use apple scraps – cores and peels – as long as the apples are
organic.
2. An airlock cap. You can buy these at any winery or make them from a piece of
wine cork or corn cob. Drill a hole in the cork or cob and insert a snug-fitting
piece of tubing long enough to go from the juice out through the hole and into a
jar of water. A couple of feet should do. You don’t need an airlock cap if you’re
starting with hard cider or wine already because the second fermentation stage
NEEDS plenty of air. For that matter, you don’t need it for the first phase but it
speeds the process up considerably because carbon dioxide can escape without
letting in any air that will slow down this stage of the fermentation process.
3. Glass or enameled earthenware jug(s)/bottle(s).
4. Cheesecloth or an old T-shirt (for us preppers who like to repurpose things).
5. Rubber band or string to secure cheesecloth or T-shirt on top of jug during the
second fermentation.
6. Jars or bottles with lids for storing the finished vinegar.
3 Recipes for Making Vinegar
1. Making Hard Cider from Apple Scraps
Let your scraps turn brown then fill your jars up with them and cover with water, filling to
the top. Put your airlock cap on. If you’re using the homemade version, run the hose to
a jar of water. Place in a dark place and allow to ferment for about 4-6 weeks.
A gray foam will form on the top of the cider; this is normal. It’s harmless. You’ll know
the juice has turned to cider when there’s no more air (bubbles) coming through the
tube. This means that all of the sugar has turned to alcohol. There will be a thick layer of
silt, called lees, in the bottom and the juice will smell like alcohol.

Back to the Roots: Homemade Basic Foods
Page 29 of 43
© Back to the Roots: Homemade Basic Foods
Strain the cider through cheesecloth, an old t-shirt or a coffee filter. Now you’re ready to
make vinegar.
Note: If you don’t use an airlock device, you may want to use a wider-mouthed jar
or crock so that the vinegar fermentation will go faster. Alternatively, you can
watch for bubbles to stop during the cider fermentation, then strain the cider from
the fruit and fill the jugs back up half way to finish the cider-to-vinegar
fermentation so that you have more surface area exposed to air.
2. Making Hard Cider from Apple Juice
The process is basically the same except that you use juice instead of peels and water.
Just fill your bottle or jug with juice and follow the same procedure as above.
Note: If you’re worried that your juice isn’t sweet enough, you can fix that by
dissolving a couple of teaspoons of sugar per gallon of juice/water into the mix.
Speeding things up: Many people use a starter such as yeast or vinegar but this isn’t
really necessary because there are enough of the good bacteria in the air to cause
fermentation without the additions.
You can use them, though, if you want to speed things up a bit. If you’re using wine-
making yeast, use 1 cake per 5 gallons of juice. If you’re using vinegar, use a 1:4
vinegar to juice ratio.
Note: You don’t have to use an airlock lid for this process but if you don’t, it will
take up to 6 months or so for the juice to turn to vinegar if you don’t have a
starter.
Still, if you don’t have access and you want vinegar in a SHTF situation, you can always
wait for your first batch to be finished, then use the mother or some of your vinegar to
make speedier batches after that.

Back to the Roots: Homemade Basic Foods
Page 30 of 43
© Back to the Roots: Homemade Basic Foods
2. Making Apple Cider Vinegar from Cider
Now that you have your cider, you’re ready to start the vinegar making process. This is
the easy part: just put your cider in jugs, cover the top with cheesecloth or a piece of old
t-shirt, and place it in a dark, warm place. It’ll do its own thing and turn to vinegar on its
own.
Since air is required for this process, you should only fill your jars to the widest part of
the vessel, allowing as much surface area to be exposed as possible. You can also stir
it daily, or regularly, to speed things up a bit.
You’ll notice that the thick, gray or white gelatinous foam will form on top again during
this process. This is called the “mother” and can either be discarded or used to speed
up the process of making vinegar at home the next time.
The speed of this process depends upon temperature, whether or not you’re using a
starter, and how much air the bacteria has access to, but expect this fermentation
phase to take 3 weeks to 6 months. Just keep smelling it and once it smells vinegary,
taste it and let it ferment till it tastes strong enough to you.
There’s a special kit called a titration kit that you can use to measure and adjust the
acidity of the vinegar. It’s important though that your vinegar be at least 5% acetic acid if
you’re going to use it for preserving foods.
Note: In place of apples, you can use grapes, berries, or any other high-sugar
food to make vinegar. The process is basically the same. Ferment it to an alcohol
state then ferment the wine or cider to vinegar.
Storage
If you want to keep your vinegar for more than a few months, you need to pasteurize it
and store it in clean, sealed containers. Do this by bringing it to 170 degrees for 10

Back to the Roots: Homemade Basic Foods
Page 31 of 43
© Back to the Roots: Homemade Basic Foods
minutes. This will also burn off any residual alcohol left in the vinegar. Store in sealed
bottles or canning jars and it’ll stay good practically indefinitely.

Back to the Roots: Homemade Basic Foods
Page 32 of 43
© Back to the Roots: Homemade Basic Foods
How to Make Beer at Home
Have you ever been sipping a cold one and wondered to yourself, “Self, what would
happen if there suddenly was no more beer manufacturers? Can I make this myself?”
As a prepper and a do-it-yourselfer, you most likely have, and the answer is yes, but
we’re going to have to qualify it. Yes, you can make your own beer at home as long as
you’ve stockpiled the equipment and the ingredients.
Making beer isn’t like making wine; you can’t just toss some grape juice, yeast and
sugar in a bottle and wait it out. You really do need 3 specialized ingredients (hops,
beer yeast, and fermented sugar) a couple of common ingredients and some fairly
specialized yet simple equipment.

Back to the Roots: Homemade Basic Foods
Page 33 of 43
© Back to the Roots: Homemade Basic Foods
You can also opt to start with a beer kit, which will provide you with everything that you
need to get started, but will only have enough supplies for your first batch or two. After
that, you’ll need to order ingredients but you’ll have your equipment.
Since bottles may be rare in a post-SHTF world, we’re going to tell you how to store
your beer in casks instead of bottling it after we go through the process of making it, too.
You know, just in case you want to open the first saloon when society starts to
restructure, or if you just want really good beer.
For simplicity, because you probably won’t be growing your own wheat and making your
own malt, we’re going to use an extract. You can, of course, make it straight from wheat
but that would require, well, wheat.
What You Need for Making Beer
Equipment
2 food-grade 5-gallon buckets with lids, or 1 bucket and 1 “carboy”, a 5-gallon
glass bottle
Large pot or kettle that will hold at least 3 gallons of liquid with extra room to
spare
6 feet of plastic, food-grade tubing
1 airlock, aka fermentation lock, to keep bacteria out of your beer while letting
Co2 out.
1 long spoon – you’ll use this for stirring so make sure it’s long enough to stir
your pot.
At least 55 bottles
At least 55 bottle caps (not twist-offs)
2 bottle cappers
Bottling wand
1 large funnel

Back to the Roots: Homemade Basic Foods
Page 34 of 43
© Back to the Roots: Homemade Basic Foods
Food thermometer
A cool place to ferment – cooler, fridge, cold basement, cellar
Ingredients
These are the ingredients you’ll need to make basic are:
5 gallons of filtered, purified water
6 pounds of DME (dry malt extract)
1 oz. hop pellets, your choice (this will play a huge part in the taste of the beer)
14g (2 7oz packs) ale yeast
1 C warm water to activate the yeast in
3/4 C liquid corn syrup
Before you start the process of actually making beer at home, you need to carefully
sanitize all of your equipment. Any bacteria will cause spoilage of your beer, or at the
very least will affect the flavor.
As a good prepper, you should have plenty of bleach stored back so make yourself a
bleach solution with 1T of bleach per gallon of water to sanitize stuff so that you kill all
the nasties.
Brew It Up
Now to the good part – making your beer at home!
1. Gather all of your ingredients and equipment.
2. Place your hops pellets in cheesecloth or some type of clean cloth so that it just
steeps in the beer.
3. Pour 1.5 gallons of water into your kettle and bring it to a boil.
4. Remove from heat and add the malt, stirring so that it’s all dissolved. If it sinks to
the bottom, it’ll burn, and burned malt tastes like crap.

Back to the Roots: Homemade Basic Foods
Page 35 of 43
© Back to the Roots: Homemade Basic Foods
5. Bring it back to a boil for about 50 minutes. It’s going to bubble so be sure to
watch it carefully. If you need to beat back the foam to keep it from overflowing,
spray it with a bit of water in a spray bottle.
6. Add your hops. Now the mix will get REALLY foamy so watch it carefully and
spray if necessary; you can’t walk away at this point.
7. Boil for another 10-20 minutes, depending upon how “hoppy” you want your beer.
8. While your wort (that’s what the mix is called) is boiling, dissolve your yeast in the
water. If it doesn’t activate (get bubbly), your yeast is no good. Try again with
fresh yeast or your beer won’t ferment correctly.
9. Next, you can either remove from heat and let it cool naturally or place the pot in
an ice bath to cool it quickly. If you use an ice bath, it will take about 20 minutes
to cool. Stir it a bit so that it cools faster.
Fermenting
1. Pour the remaining 3.5 gallons of water into your fermenting bucket or carboy
and use the funnel to add the wort.
2. Sprinkle in the yeast and then stir it or add the lid and shake it so that the yeast
dissolves.
3. Add the airlock and store in a cool place (60-75 degrees F) such as a dark room
or your basement or cellar, where no light will get to it. Some foam will likely
escape through the airlock so make sure that it’s not going to ruin anything that
the carboy or bucket is sitting on.
4. The fermentation process should take about 2 weeks. If the temperature of the
room raises and the airlock stops bubbling, you need to move it to a cooler place
right then.
5. If all is well, the airlock will have a slow trickle of bubbles that will increase for a
few days, then decrease over the next few days.
6. It’s possible that the fermentation process will pop your airlock out. If that
happens, just sanitize it and put it back in.

Back to the Roots: Homemade Basic Foods
Page 36 of 43
© Back to the Roots: Homemade Basic Foods
Bottling or Casking
Now it’s time to store your beer. Regardless of whether you’re using bottles or a
cask/keg, sanitize them well and let them air dry. Your bottles caps will come with
sanitizing instructions.
In a sanitized pot, bring the corn syrup and 1 cup of water to a boil and boil it for
10 minutes. Don’t use too much syrup because the beer will over-carbonate and
cause the bottles to explode.
Cool for 10 minutes and pour the sugar mixture into your bottling bucket. (or your
cask if you’re casking)
Set your full fermentation bucket on the counter and place the bottling bucket in
the floor beneath it.
Using your sanitized siphoning hose, begin to siphon the beer from the
fermentation bucket into the bottling bucket (or cask). Control how fast it flows by
pinching the siphon. You don’t want it to splash but rather to flow gently in.
After all the beer has siphoned into the bottling bucket, cover and allow it to set
for 30 minutes so that the sediment sinks.
Now move the bottling bucket gently to the counter and siphon the beer into your
bottles, leaving 3/4-inch headspace.
Cap each bottle securely.
Let the bottles age for at least 2 weeks, but up to 2 months, then enjoy!
If you’ve placed your beer in a cask, store it somewhere cool, 55-65 degrees,
with the airlock still in place.
Sample after a few days and drink it when it’s ready, or bottle it if you were
casking for flavor. If you do use a cask, make sure that your siphon hose is a
couple of inches or so off the bottom so that you’re not siphoning the dead yeast
and sediment off the bottom.
Casked beers go bad more quickly than bottled beers, so keep that in mind. There’s a
whole art to choosing your casks, too, but that’s an article for another day!

Back to the Roots: Homemade Basic Foods
Page 37 of 43
© Back to the Roots: Homemade Basic Foods
After you get the hang of this basic recipe for making beer at home, you can experiment
with different hops and yeasts to alter the flavors. You can even add fruits or spices to
make your very own craft beers. Once you get the basics and understand the science,
the world is your brew-toy. Enjoy!

Back to the Roots: Homemade Basic Foods
Page 38 of 43
© Back to the Roots: Homemade Basic Foods
How to Make Alcohol at Home
Humans have been making, using, and consuming alcohol since the dawn of
civilization. It first began with the cereal grains used to make beer by the cultures of
Mesopotamia and Egypt. Later, the cultures of the Mediterranean–the city-states of
Greece and the Roman Empire–adopted wine as an integral part of social, political, and
religious life.
The Age of Exploration starting in the 15th century gave birth to a new range of spirits
thanks to the improvement and growth of the distillation process. Drinks like rum,
whiskey, and brandy were used as currency to buy slaves in the colonies of the New
World. Eventually, these same spirits played a major role in the formation of the United
States.

Back to the Roots: Homemade Basic Foods
Page 39 of 43
© Back to the Roots: Homemade Basic Foods
In today’s times, alcohol is more than just a thirst quencher, religious symbol, or
bartering agent. We now use alcohol as a disinfecting antiseptic, chemical solvent, in
products like antifreeze, and as fuel. With such versatility, alcohol is one product whose
demand will increase exponentially in the event of a disaster.
Thus, learning how to make your own alcohol can be an incredibly gratifying and
potentially life-saving way to spend your time prepping. Doing so could yield an
unlimited supply to be used for personal consumption, medical use, sterilization, fuel,
and trade. If using a homemade still you can also create distilled water, another
multipurpose survival substance.
The components for making alcohol are actually quite simple. Alcohol is made when
yeast is added to a sugar-containing substance, which releases CO2 and starts the
fermentation process. In wine, yeast is added to a grape mixture to ferment the natural
sugars over time.
The process is slightly more complicated in beer, as
grains don’t contain as much natural sugar. Thus, the
grain-growing process is halted midway to harness the
sugar enzymes and “malt” the grain before yeast is
added.
Hard liquor requires the additional step of distillation,
which serves to concentrate the liquid AFTER the
fermentation process of a “mash” of corn or fruit.
Though the process is labor intensive, making your own
beer and wine is perfectly legal. In fact, homebrewing has taken off as a hobby around
the world in recent years.
You can purchase a kit with everything you need to get started or do it from scratch with
your own materials.

Back to the Roots: Homemade Basic Foods
Page 40 of 43
© Back to the Roots: Homemade Basic Foods
Unfortunately, distilling alcohol remains illegal for personal use and distribution (in the
United States) for reasons of safety, taxation, and regulation. However, distilled
ethanol, or grain alcohol, is the most versatile and useful form of alcohol for survival
purposes.
Ethanol is a clean burning fuel that can power your vehicle and be used as fuel for
cooking or lighting. In fact, it was once mixed with turpentine as an alternative to whale
oil for 19th century street lamps. Accordingly, ethanol mixes well with kerosene to allow
for an extended supply.
If dehydrated properly, ethanol can also be added to unleaded gasoline to extend its
life. If you face a scenario where the supply of gasoline is exhausted, ethanol could
also be used to make your own E85.
The supplies and purification process are complicated, but this homemade fuel could be
created for less than what you’d expect to pay at the pump.
Another benefit of ethanol is its extended shelf life. If stored in an airtight container,
ethanol can retain its potency for years. If stored in your garden-variety lawnmower gas
can or other open-topped container, ethanol will become less stable as a source of fuel.
Additionally, alcohol makes great fuel for cooking. Homemade tin can alcohol stoves
are something every prepper should know how to make and carry in their bug out bags
as a backup fuel source.
The basic process for making homemade ethanol alcohol is as follows:
Mash
Distilled ethanol alcohol starts with a mash. Corn is commonly used, as it is
inexpensive and readily available. However, pretty much any compost material could
be used granted it contains the right enzymes to react with yeast to break down the
sugars. These could be potatoes, carrots, sugar cane, or any other starchy produce.

Back to the Roots: Homemade Basic Foods
Page 41 of 43
© Back to the Roots: Homemade Basic Foods
You typically start with equal parts mash starch and sugar in a five-gallon bucket with
filtered water added until full. A few packets (recipes and amounts vary) of yeast is
added and stirred until (roughly) dissolved.
Fermentation
The mixture in the bucket is then covered and left to sit for 2-3 days (or longer). The lid
should not be opened at any point during this time.
If you would like a one-way vent, you can drill a small hole in the bucket of the lid. Then
tape a surgical glove (or balloon) around the hole and poke a small pinhole in the tip of
one of the fingers. As the mash ferments you will see the fingers of the glove (or
balloon) partially inflate.
After 3 days, agitate the mixture by shaking the bucket without removing the lid. The
mash should be ready after 4-5 days when the sediment rests at the bottom of the
bucket and is no longer partially suspended. This is a sign the yeast has completed
fermenting the sugars into alcohol.
Distillation
The distillation process requires boiling your mash, condensation of the liquid, and
cooling and collecting the vapor. Ideally, this will be done in some kind of still.
Popular homemade versions are Reflux and Fractionating stills, typically used to make
neutral, or tasteless, ethanol alcohol that can be used straight up or flavored for
consumption later.
The alcohol will begin to boil off at about 170 degrees Fahrenheit. The outlet of your
still should cool the vapors down to about 70 or 80 degrees and turn the ethanol back
into liquid.

Back to the Roots: Homemade Basic Foods
Page 42 of 43
© Back to the Roots: Homemade Basic Foods
As the alcohol levels of the mash are boiled off and reduced, the temperature of the pot
will begin to rise.
Once your mixture reaches about 220 degrees it is finished producing ethanol and a
new batch of mash will need to be added.
While anyone can learn how to make homemade beer or wine, distillation is a bit more
difficult. Yet with so many uses both in times of peace and crisis, knowing how to make
homemade alcohol is a lifesaving skill no prepper should be without.