bacterial assembly and epigenetic analysis
TRANSCRIPT

Bacterial Assembly and Epigenetic Analysis
100‐338‐900‐01
6. Bacterial Assembly and Epigenetic Analysis
6.1 Bacterial Assembly and Epigenetic Analysis
Notes:
Welcome to the Pacific Biosciences® Bacterial Assembly and Epigenetic Analysis Overview.
In this presentation, we will demonstrate the use of the HGAP Assembly protocol and workflow to assemble the genome of an E. coli bacterium and perform an analysis of its epigenetic DNA modifications.

6.2 Bacterial Assembly and Epigenetic Analysis
Notes:
We will use the HGAP assembly procedure, and Base Modification
pipelines in SMRT® Portal 2.0.1.
If you are not familiar with basic SMRT® Portal navigation please take some time to familiarize yourself with the interface.
In this module ‐ we will setup and run:
the HGAP Assembly Protocol,
Base Modification Protocol,
And finally, take a high level view of the outputs

1. Setting Up HGAP Protocol
1.1 HGAP Assembly Protocol Setup
Notes:
In this section, we will take you through the process of HGAP Assembly Protocol Setup.

1.2 HGAP Assembly Protocol Setup
Notes:
First, in SMRT® Portal, we need to create a new job.

1.3 HGAP Assembly Protocol Setup
Notes:
Enter the name of your job.

1.4 HGAP Assembly Protocol Setup
Notes:
Add some comments, if desired.

1.5 HGAP Assembly Protocol Setup
Notes:
Select the RS_HGAP_Assembly protocol.

1.6 HGAP Assembly Protocol Setup
Notes:
Take a look at the Protocol parameters.

1.7 HGAP Assembly Protocol Setup
Notes:
Filtering, Consensus, and Mapping parameters are no different than a standard resequencing pipeline.

1.8 HGAP Assembly Protocol Setup
Notes:
Under the assembly parameters we can leave most of the settings as defaults, but do have to change the estimated genome size.
You may want to change some of the parameters to get the best assemblies, please see additional documentation:
<https://github.com/PacificBiosciences/Bioinformatics-Training/wiki/HGAP-2.0>
github bioinformatics training wiki

1.9 HGAP Assembly Protocol Setup
Notes:
Enter a best estimate of the genome size. Here we know E.coli K12 is around 4.6 Mbp

1.10 HGAP Assembly Protocol Setup
Notes:
Apply the parameters to this protocol.

1.11 HGAP Assembly Protocol Setup
Notes:
Click the OK button.

1.12 HGAP Assembly Protocol Setup
Notes:
Select the SMRT® Cells that are to be used in the analysis.
This data is from a 20 kb Sage Science™ BluePippin™ DNA-size selection system: size-selected E.coli K12 library.
Data quality and number of bases is dependent on library quality, this data is from a highly optimized library, and is available to download from the link below.
https://github.com/PacificBiosciences/DevNet/wiki/E.-coli-20kb-Size-Selected-Library-with-P4-C2

1.13 HGAP Assembly Protocol Setup
Notes:
Add SMRT® Cells to the job by clicking on the Add button here.
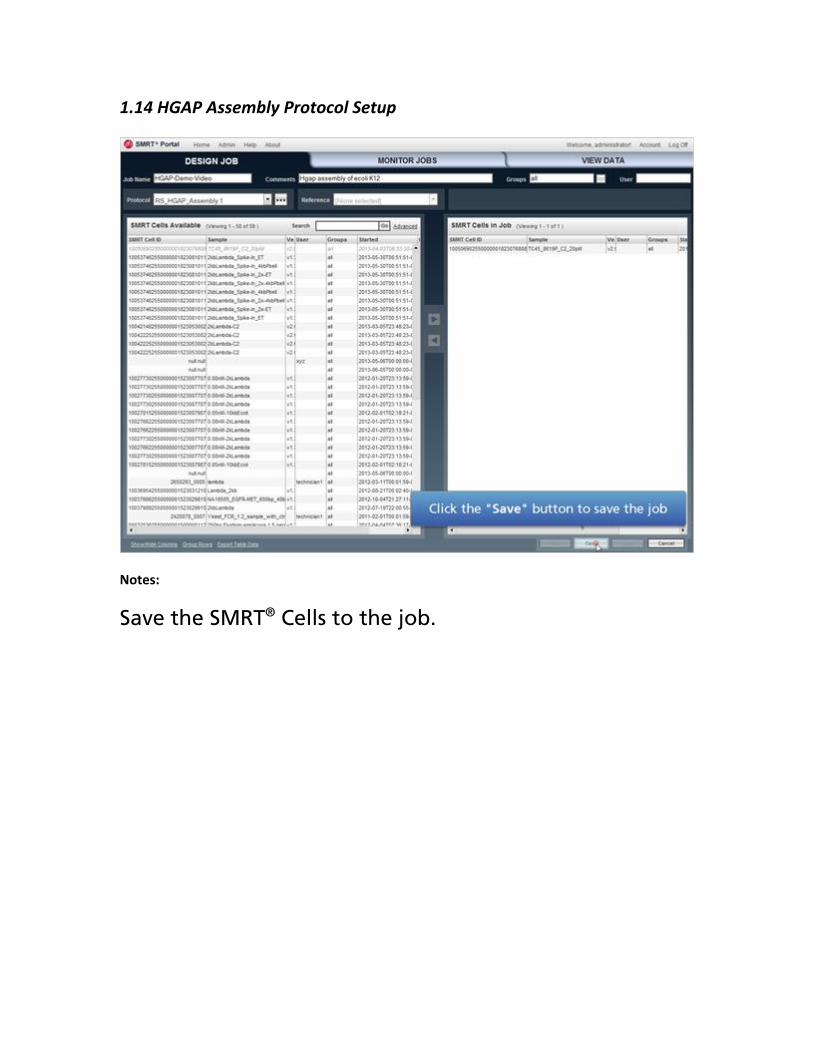
1.14 HGAP Assembly Protocol Setup
Notes:
Save the SMRT® Cells to the job.

1.15 HGAP Assembly Protocol Setup
Notes:
Start the job. Processing time may take several hours. You will be emailed upon completion.

2. HGAP Results
2.1 HGAP Results
Notes:
Next, we will look at some of the HGAP results.

2.2 HGAP Results
Notes:
The assembly has completed.
From the SMRT® Portal View Data tab, the - jobs metric page shows much of the same information as a standard resequencing job.

2.3 HGAP Results
Notes:
Taking a look at the PreAssembly report, we can see the number of bases that went into the PreAssembly step, the automatic length cutoff that was used, the number of seed bases, i.e., the number of bases in reads above the seed length cutoff, the number of PreAssembled reads and the number of bases in these reads.
The Yield is the number of PreAssembled bases over the number of seed bases.
If this value is low you may be limited by your raw read coverage.
You can also see the Pre-Assembled mean readlength and N50.

2.4 HGAP Results
Notes:
Here we can see the results of the final polished assembly.
We can see that we have one contig, and it is around 4.6 Mbp

2.5 HGAP Results
Notes:
Looking at the coverage can give you an indication of any obvious problems in the assembly.
Shown here, - we can see a nice, even, raw - read coverage.

2.6 HGAP Results
Notes:
Under the DATA section we have access to all the file generated during the assembly.
It is always worth checking the degenerate and singletons FASTA files.
The Celera® Assembler degenerate and singletons files may contain useful sequence. In particular, high copy number plasmids will likely reside in the degenerate file.
We are going to need the results of the polished assembly to use as a reference in the Base Modification analysis.
It can be downloaded from here.

3. Importing Reference
3.1 Importing Reference
Notes:
Importing Reference
3.2 Importing Reference
Notes:
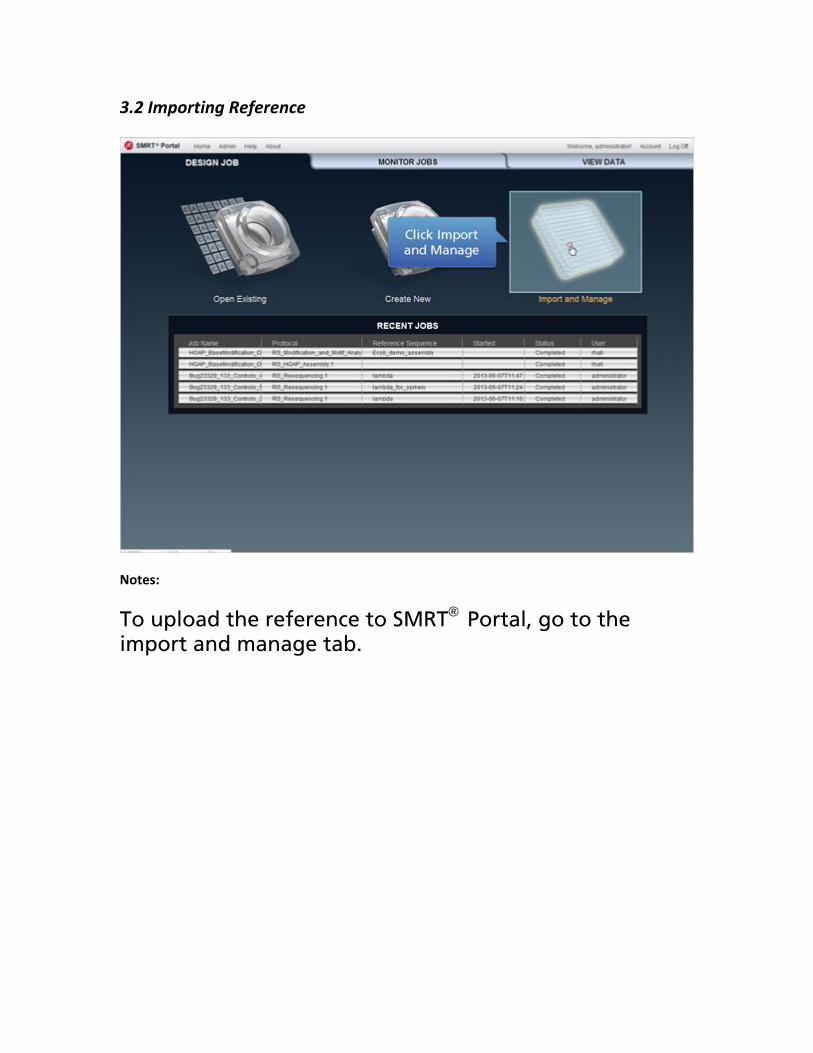
To upload the reference to SMRT® Portal, go to the import and manage tab.

3.3 Importing Reference
Notes:
Click on the Reference Sequences Link

3.4 Importing Reference
Notes:
We need to add a new sequence

3.5 Importing Reference
Notes:
Enter an appropriate name for your assembly.

3.6 Importing Reference
Notes:
Enter the name of the organism.

3.7 Importing Reference
Notes:
Now we have to find the reference file previously downloaded to the local computer.
Click the Browse button to select the appropriate FASTA file.

3.8 Importing Reference
Notes:
Navigate to the file and click on your reference assembly file.

3.9 Importing Reference
Notes:
Open the file.
In this example: polished.assembly.fasta

3.10 Importing Reference
Notes:
Upload the file to SMRT® Portal.

3.11 Importing Reference
Notes:
Reference validation should only take a few minutes. You will be emailed when it is available to use.
4. Base Mod Protocol Set up
4.1 Base Modification Protocol Setup
Notes:
Base Modification Protocol Setup

4.2 Base Modification Protocol Setup
Notes:
Now we can run the Base Modification analysis on the assembly that we just generated.

4.3 Base Modification Protocol Setup
Notes:
Give the job a name.

4.4 Base Modification Protocol Setup
Notes:
Enter some comments, if desired.

4.5 Base Modification Protocol Setup
Notes:
Select the RS Modification and Motif Analysis protocol.

4.6 Base Modification Protocol Setup
Notes:
Specify a reference.
Select the previously uploaded reference from the drop-down list.

4.7 Base Modification Protocol Setup
Notes:
We are going to use the same SMRT® Cell that was used for the HGAP assembly.

4.8 Base Modification Protocol Setup
Notes:
Add the SMRT® Cell to the job.

4.9 Base Modification Protocol Setup
Notes:
Open the Protocol Parameters.

4.10 Base Modification Protocol Setup
Notes:
Take a look at the protocol parameters; the filtering, mapping and consensus parameters are the same as for a standard resequencing protocol.

4.11 Base Modification Protocol Setup
Notes:
Base Modification analysis happens as a post-processing step.
We do not have a whole genome amplified (WGA) sample to use as a control for this sample, so we leave the Control Job ID field blank.
We want to identify the modifications that are found using the internal model, so we leave this checked. All the other parameters can be left as defaults.
Click OK

4.12 Base Modification Protocol Setup
Notes:
We can then save and start the job.

4.13 Base Modification Protocol Setup
Notes:
Similar to the assembly, the processing time may take a few hours. An email will be sent upon completion.

5. Base Modification Results
5.1 Base Modification Results
Notes:
Base Modification Results

5.2 Base Modification Results
Notes:
Now take a look at the results from the Base Modification analysis.
The first thing we want to check is the consistency of our polished assembly with the raw reads.
The assembly has been corrected once using Quiver in the assembly step, but during the resequencing Quiver is run again.
Looking at the variants report will give us an indication of whether the assembly can be polished further with Quiver.
In this example, we can see that we call very few variants, only two insertions, indicating that the assembly polishing was successful.

5.3 Base Modification Results
Notes:
Now we can look at the Modifications report

5.4 Base Modification Results
Notes:
The plots here show per strand coverage vs the modification QV.
From this plot it is clear that we have modified adenine.
This is also evident from the second plot, which shows a count of bases by modification QV.
Next we can look at the result from the motif finder.

5.5 Base Modification Results
Notes:
We can see that the algorithm found five motifs modified: three at high % detection, and two at very low %.
The GATC motif is part of a Type II restriction modification system; the two longer motifs are part of a Type I system.
The motifs at low % detection share a common CCTGG signature. We know from other studies of this E.coli strain that this is due to a CCWGG motif that is 5-mC modified.
To reliably detect 5-mC, we recommend treating the sample with Tet1 enzyme prior to sequencing.

See literature for further information.
The plot shows the modification QVs within the found motifs in comparison to all other modifications not found to be in a motif.
The raw base-modification data can be downloaded from the data section to be used in further analysis. It is also possible to launch SMRT® View via the link for a more detailed look at the base modification data.
5.6 Additional Information
Notes:
Additional Information

5.7 Additional Information
Notes:
Here are some useful links to find additional information.

7. End
7.1 Thank You
Notes:
Thank you for your participation.
For more information, please contact your local PacBio Field Applications Scientist (FAS) or PacBio account representative.
www.pacificbiosciences.com