bandit user manual - patuxent wildlife research center · pdf filebandit user manual by kevin...
TRANSCRIPT

Bandit User Manual
Kevin LaurentMargarita Malorodova
Jorawar SinghJerry McFaul

Bandit User Manualby Kevin Laurent, Margarita Malorodova, Jorawar Singh, and Jerry McFaul
Version 3.0, 2011-01-21

iii
Table of Contents1. Introduction to Bandit ...................................................................................................... 1
1.1. Welcome ............................................................................................................ 11.1.1. Features of Bandit ...................................................................................... 11.1.2. Using Bandit—An Overview ....................................................................... 1
2. Installing Bandit ............................................................................................................. 32.1. System Requirements ............................................................................................ 3
2.1.1. Windows .................................................................................................. 32.1.2. Macintosh ................................................................................................. 3
2.2. Obtaining Bandit Software ..................................................................................... 32.3. Installation .......................................................................................................... 4
2.3.1. Installing on Windows ................................................................................ 42.3.2. Installing on Macintosh OS X ...................................................................... 52.3.3. Upgrading from an Earlier Version of Bandit .................................................. 5
2.4. Running Bandit .................................................................................................... 62.4.1. Bandit Opening Screen ............................................................................... 62.4.2. Getting Around .......................................................................................... 8
3. Bandit Settings ............................................................................................................. 103.1. Bander Info ....................................................................................................... 113.2. Data Entry Preferences ........................................................................................ 123.3. Optional Validations ............................................................................................ 133.4. Wing & Weight .................................................................................................. 133.5. User Fields ........................................................................................................ 143.6. Other Settings .................................................................................................... 14
4. Band Inventory ............................................................................................................. 155. Locations ..................................................................................................................... 19
5.1. Location Screen—Table View ............................................................................... 195.1.1. Resizing and Repositioning Columns ........................................................... 205.1.2. Sorting Location Records by Columns ......................................................... 225.1.3. Entering Location Data in Table View ......................................................... 22
5.2. Location Screen—Details View ............................................................................. 235.3. Entering locations by different precision options. ...................................................... 24
5.3.1. Entering Locations with 10-Minute Block Precision ........................................ 245.3.2. Entering Locations with 1-Minute Block Precision .......................................... 255.3.3. Entering Locations with Exact Precision ....................................................... 26
6. Entering Banding Data ................................................................................................... 286.1. Bands Screen—Table View .................................................................................. 29
6.1.1. Resizing and Repositioning Columns ........................................................... 296.1.2. Sorting Banding Data by Columns ............................................................... 296.1.3. Entering Banding Data in Table View .......................................................... 29
6.2. Bands Screen—Details View ................................................................................ 306.2.1. Using the Navigation Panel ........................................................................ 316.2.2. Entering Auxiliary Marker Data .................................................................. 316.2.3. Entering Data for Double Banded Birds ........................................................ 326.2.4. Entering Replaced Bands ........................................................................... 336.2.5. Reporting Recaptures ................................................................................ 33
6.3. Error Checking ................................................................................................... 336.4. Using the Remarks Field ...................................................................................... 346.5. User Fields ........................................................................................................ 346.6. Other Features of the Bands Screens ...................................................................... 35
6.6.1. Filtering Banding Data .............................................................................. 356.6.2. Fill-down Feature ..................................................................................... 36

Bandit User Manual
iv
6.6.3. Duplicating Banding Records ..................................................................... 366.6.4. Clearing Banding Data .............................................................................. 376.6.5. Submitting Banding Data ........................................................................... 376.6.6. Importing Banding Data ............................................................................ 386.6.7. Exporting Banding Data ............................................................................ 386.6.8. Reports ................................................................................................... 38
7. Entering recapture and other re-encounter data ................................................................... 397.1. Recaptures Screen—Table View ............................................................................ 39
7.1.1. Sorting Recapture Data by Columns ............................................................ 407.1.2. Entering Recapture Data in Table View ........................................................ 40
7.2. Recaptures Screen—Details View .......................................................................... 417.2.1. Using the Navigation Panel ........................................................................ 417.2.2. Entering Auxiliary Marker Data .................................................................. 427.2.3. Entering Data for Double Banded Birds ........................................................ 437.2.4. Recording Recaptures from the Banding Details View ..................................... 43
7.3. Error Checking ................................................................................................... 447.4. Using the Remarks Field ...................................................................................... 447.5. User Fields ........................................................................................................ 447.6. Other Features of the Recaptures Screens ................................................................ 45
7.6.1. Filtering Recapture Data ............................................................................ 457.6.2. Duplicating Recapture Records ................................................................... 467.6.3. Recaptures Records Menu .......................................................................... 467.6.4. Submitting Recapture Data ......................................................................... 487.6.5. Importing Recapture Data .......................................................................... 487.6.6. Exporting Recapture Data .......................................................................... 507.6.7. Recapture data fields received and processed by the BBL/BBO ......................... 50
8. Data Submission ........................................................................................................... 518.1. Banding Data Submission Process ......................................................................... 518.2. Recapture Data Submission Process ....................................................................... 56
9. Find Mode ................................................................................................................... 5710. Reports ...................................................................................................................... 5911. Reference Tables ......................................................................................................... 6112. Importing and Exporting ............................................................................................... 63
12.1. Importing from Band Manager ............................................................................ 6312.1.1. Importing Band Inventory from Band Manager ............................................ 6312.1.2. Importing Locations from Band Manager .................................................... 6412.1.3. Importing Bander Information from Band Manager ....................................... 6412.1.4. Importing Banding and Recapture Records from Band Manager ....................... 64
12.2. Importing from Other Sources ............................................................................. 6512.3. Exporting from Bandit ....................................................................................... 67
12.3.1. Exporting Bands, Band Inventory, Banders, Locations and Recapture Records....................................................................................................................... 6712.3.2. Exporting Reference Tables ...................................................................... 67
13. Bandit Backup File ...................................................................................................... 6813.1. Creating a Backup File ...................................................................................... 6813.2. Restoring from a Backup File .............................................................................. 68
A. Tips and Shortcuts ........................................................................................................ 69B. Bandit Band Record ...................................................................................................... 70C. Data Editing Error Messages .......................................................................................... 73D. Alert Messages ............................................................................................................ 80E. Frequently Asked Questions about Bandit ......................................................................... 83F. Release Notes ............................................................................................................... 87
F.1. Version 3.0 (released 01/20/2011) ......................................................................... 87

v
List of Figures2.1. Patch Log ................................................................................................................... 62.2. Bandit Opening Screen .................................................................................................. 72.3. Bandit Screen Layout .................................................................................................... 83.1. Bandit Bander Info Screen ........................................................................................... 103.2. Settings Screen—Data Entry Tab ................................................................................... 133.3. Bandit User Fields Settings Screen ................................................................................ 144.1. Bandit Band Inventory Screen ....................................................................................... 154.2. Add to Inventory Screen .............................................................................................. 165.1. Locations Table View Screen ....................................................................................... 205.2. Modify Table View ..................................................................................................... 215.3. Column Header popup menu ........................................................................................ 225.4. Locations Detail View Screen ....................................................................................... 236.1. Bandit Bands Table View Screen .................................................................................. 286.2. Bandit Band Details View Screen .................................................................................. 316.3. Aux Marker tab for a coded marker ............................................................................... 326.4. Aux Marker for a Sequence of Uncoded Colored Bands ..................................................... 326.5. User Fields tab on the Bands Screen—Details View .......................................................... 356.6. Bands Screen Records Menu ........................................................................................ 377.1. Recapture Table View ................................................................................................. 407.2. Recaptures Details View Screen .................................................................................... 417.3. Aux Marker tab on the Recaptures Screen—Details View .................................................. 427.4. Aux Marker for a Sequence of Uncoded Colored Bands ..................................................... 437.5. User Fields tab on the Recaptures Screen—Details View ................................................... 457.6. Recaptures Screen Records Menu .................................................................................. 487.7. Recapture Import Field Mapping ................................................................................... 498.1. Banding Data to be Submitted Report ............................................................................ 528.2. Bandit Data Submission Dialog Box .............................................................................. 538.3. Bandit Data Submission Email ...................................................................................... 548.4. Note For Submission File Report ................................................................................... 559.1. Bandit Mode Icon Bar ................................................................................................. 579.2. Find Mode Symbols Drop-down Menu ........................................................................... 5810.1. Bands Screen with Reports Drop-down ......................................................................... 5911.1. Bandit Reference Tables Screen ................................................................................... 6112.1. Import Data from File ................................................................................................ 6512.2. Import Field Mapping Screen ...................................................................................... 66

1
Chapter 1. Introduction to Bandit1.1. Welcome
Bandit is the latest in a series of programs aimed at helping bird banders manage and submit their datafor banded birds. We have tried to make the process of maintaining a series of banding records as simpleas possible. Bandit was created by the Bird Banding Laboratory (BBL) at the U. S. Geological SurveyPatuxent Wildlife Research Center, Laurel, Maryland.
1.1.1. Features of BanditThe principal use of Bandit is to store data obtained during banding operations and facilitate the transferof banding data to the BBL and the Canadian Bird Banding Office (BBO). Bandit allows the bander toenter or import data and edit data associated with bands obtained from the BBL/BBO as well as data forrecaptured or resighted birds, including those banded by other banders.
Other major features of Bandit are itemized below:
• Data entry and editing can be performed via a spreadsheet-like table interface or a record-by-recordform-based interface. The user can switch back and forth between the two interfaces just by clickinga button.
• Ability to enter data in an extensive list of fields, including the traditional fields (Species, Age, Sex,Banding Date, Banding Location, Bander ID, etc.) and a wide variety of other fields (how aged/sexed,extensive measurements, auxiliary markings, tests performed, molt/parasites observed, etc.) A list ofthe most important fields in the banding record can be found in Appendix B, Bandit Band Record.
• Pervasive error avoidance, error checking and feedback. Most of the fields in Bandit have an auto-complete feature which checks against a list of predefined values. Where appropriate, you can also addyour own values to these lists. Range checking, cross field validation, and location-based checking areincluded.
• Extensive export capabilities. All of the data contained in Bandit, including all of the lookup tables, canbe exported to a variety of other formats, including Excel, tab-delimited text, comma-delimited text,DBF, HTML, and XML.
• Banding location coordinates may be entered precisely, including degrees, minutes, and seconds, andcountry, state/province, and county names.
• Data submission to the BBL/BBO can be done via an email link built into the program, providedthe computer running Bandit is connected to the internet and a default email client is configured andopened. Separate data submissions can contain new bandings or modifications made to banding recordspreviously submitted.
1.1.2. Using Bandit—An Overview1. Installing— You can double click the installer program that you received and follow the instructions in
the installer. More detailed instructions on the installation process can be found in Chapter 2, InstallingBandit.
2. Running the program. On a PC, select the program from the Start menu, in the program group namedBandit or you can click on the Bandit Icon (yellow bird icon) on your desktop, if it is present. On a

Introduction to Bandit
2
Mac, select the program from the Applications folder. You may want to drag the icon to your dockso it is available there.
On the opening screen:
Link 1 will take you to a screen where you can enter information about your permit and banders, andsome other preferences on how you want to use the program. More details on the Settings part of theprogram may be found in Chapter 3, Bandit Settings.
Link 2 will allow you to build an inventory of the bands you received from the BBL/BBO. Details onaccessing and updating the Banding Inventory maintained by Bandit, including how to add bands intothe Inventory, may be found in Chapter 4, Band Inventory.
Link 3 is for entering your location information. You can switch back and forth between Table andDetails data entry modes by clicking either Table or Details. More details on the Locations part of theprogram may be found in Chapter 5, Locations.
Link 4 is for entering your banding information. You can switch back and forth between Table andDetails data entry modes by clicking either Table or Details. Chapter 6, Entering Banding Data containsmore information on the details of using Bandit to store banding data.
Link 5 is for entering your recapture and other re-encounter information. You can switch back and forthbetween Table and Details data entry modes by clicking either Table or Details. Chapter 7, Enteringrecapture and other re-encounter data contains more information on the details of using Bandit to storethe data associated with recaptures.
Link 6 contains a series of references that is helpful to understand the various codes and how to usethem. Chapter 11, Reference Tables has more information on this feature.
To get back to the opening screen, click the word Bandit at the top of the green portion of the screen.You also may navigate to any Bandit screen by using the buttons at the top of the green portion ofeach screen.
3. Bandit, by default is a complete file of all your data, not a program in which you save and open differentfiles. But if you need to see or work with any subset (a year, a species, etc.) of your data, you can dothis with the Find option. Chapter 9, Find Mode has more information on how to use this feature.
4. Submit your data to the BBL/BBO by clicking either on the words "Submit New Data" or "Submit
Modified Data" on the Bands screen. A file will be created of any bands without errors (or with errorsbypassed) you have added or modified since the last time you submitted data and placed in your “MyDocuments” (“Documents” in Mac) folder. Additionally, if you have an email client installed, an emailwith this file attached will automatically be generated and will appear in your computer's email program.More information on the data submission process is available in Chapter 8, Data Submission.
5. Reports are available from the Bands Table and Details screens. Select the report you want from thedrop-down menu and click the Show/Print Report button. Reports can be sent directly to the printer (tobe printed or saved as PDF) or saved in Excel format. See Chapter 10, Reports, for more information.
6. Methods for importing data into Bandit and exporting data from Bandit are in Chapter 12, Importingand Exporting.

3
Chapter 2. Installing Bandit
2.1. System RequirementsBandit requires a computer equipped with either a Windows or Macintosh operating system.
2.1.1. Windows
• Operating System: Windows XP, Windows Vista, Windows 7.
• Memory: Minimum 256MB RAM (Minimum 1GB RAM for Windows Vista and Windows 7).
• Disk Space: Minimum 500MB free.
Note
To be able to send automatic email from Bandit you must have:
1. an internet connection.
2. a [mail] section in the Win.ini file.
3. Microsoft Exchange, Microsoft Outlook, Microsoft Outlook Express or Eudora installed,configured properly, and opened.
2.1.2. Macintosh
• Operating System: Macintosh OS X 10.5.7, or later.
• Memory: Minimum 512MB RAM (Minimum 1GB RAM for Mac OS X v10.6)
• Disk Space: Minimum 500MB free.
Note
To be able to send automatic email out of Bandit application, you must have:
1. an internet connection.
2. Mac OS X Mail or Microsoft Entourage installed to send email with FileMaker Pro.
3. Internet system preferences configured for use with one of the supported mail applications.If you use Eudora 5, start the Eudora application before using Bandit.
2.2. Obtaining Bandit SoftwareYou may download Bandit from the Bird Banding Lab website, http://www.pwrc.usgs.gov/BBL/resources/bandit/Software/index.html. Version 3 of Bandit will not work on Windows systems previousto XP. If you are using an older version of Windows or Mac, you must download the appropriate versionof Bandit v. 2.01. If you cannot download from the web, you can request a copy of the CD ROM from

Installing Bandit
4
the Bird Banding Lab (specify your operating system in the request). If you received the software on aCD ROM from the Bird Banding Lab, insert the CD ROM into your CD drive and follow the installationinstructions on the CD ROM.
Tip
For dial up connections it might take a fairly long time to download the software.
2.3. InstallationBandit comes with an installer program that will guide you through the installation of the program.
Tip
If you need administrative access to install programs on your computer, you should requestthat the installation be performed by your system administrator.
2.3.1. Installing on Windows
Double-click the installer to begin the process. The installer will ask where you want to install the program.The default is under C drive for new installation, and previously installed directory for upgrade installation.You can install the program somewhere else if you have limited space on your default hard drive. ClickNext to go to the next screen.
Tip
For Windows Vista, it is recommended not to install Bandit under Program Files, use C drive(For example C:\Bandit ).
Tip
If you manage data for more than one banding permit, you will need an installation of Banditfor each permit. You may want to make each Bandit folder easily identifiable by adding anappropriate permit number, e.g. Bandit55555.
The installer will put the program into a folder available under your Start menu. The default name for thisfolder is Bandit. You can give it a different name here. Click Next to go to the next screen.
You can have the installer create icons on the Desktop or in the Quick Launch bar at the bottom of thescreen so you can get to the program without having to go back to the Start menu. If you want these icons,check the appropriate boxes. Then click Next to go to the next screen.
The program will show you a summary of the installation to make sure you want to proceed. Click theInstall button to continue with the installation.
Note
You will also be given the opportunity of installing a utility program called PDFCreator.PDFCreator is used by Bandit to enable saving reports in Adobe Portable Document Format(PDF). This is useful for saving your reports for later viewing or printing or for emailingthe report to someone else. If you do not install PDFCreator, Bandit will not be able to

Installing Bandit
5
save reports in PDF format. You may see error messages generated by PDFCreator duringinstallation; they may be disregarded.
The installer will extract all of the files and store them on your computer. Finally, you will see a screenindicating the installation was successful and asking you if you want to run Bandit. Click Finish to launchthe program.
2.3.2. Installing on Macintosh OS X
You may need to know the name and password of a user that has administrative privileges on yourcomputer. If this is your own machine, it is just your regular login name and password. If you don't knowthe name and password of a user with administrative privileges on your computer, you should request thatthe installation be performed by your system administrator. Alternatively, you can avoid this requirementby installing the software in a location other than the Applications folder.
If you downloaded the software directly from the BBL, first change the file extension on the Bandit installerfile from .bin to .dmg. Click directly on the name under the icon and type .dmg instead of .bin. The iconwill change to allow you to open the file. Double-click the icon and the system will check the disk image,then open a new window showing the contents of the disk image. Double-click the installer icon to beginthe process. The installer will bring up a welcome screen. Click Continue to go to the next screen.
The installer will ask you to select the destination volume where Bandit will be installed. Typically youwill only have one hard disk and it will have a green arrow on it, indicating this is the selected drive. Ifyou have more than one drive and you want to store the software on one of the other drives, click on thedrive and the green arrow will move to this selected drive. Click Continue to go to the next screen, thenclick Install.
Next the installer will ask where you want to install the program. By default, the program installs thesoftware into a folder called Bandit in your Applications folder. You can install the program somewhereelse if you have limited space on your main drive.
The installer installs the software and you will see a screen indicating the installation was successful. Clickthe Close button to exit the installer.
Warning
Users need to have full access to the directory where Bandit is installed.
2.3.3. Upgrading from an Earlier Version of Bandit
If you are updating from an earlier version of Bandit already installed on your computer, the programwill ask if you want to automatically save a backup of your existing data file and reload the data from thebackup once the new version of the software has started to run. You will see a pop-up box informing youthat the program is going to reload the data from the previous version. If, for some reason, you do not wishto reload the data from the previous version, you can click Cancel here. Usually, though, you will wantto click OK to reload the data from the previous version. After you click OK the reload will proceed andyou will see a box showing the summary of the reload process. Next, you may see a box showing that theprogram is updating the values in the Wing and Weight tables. This patching process will only changevalues if they are the same as they were when the original Wing and Weight table was installed. (If youmodified values in the Wing and Weight table, those values will not be changed.) See Figure 2.1, “PatchLog”. Finally, a box will appear asking if you want to delete the backup file which was created during theinstallation process. Click Yes to delete or No to skip.

Installing Bandit
6
Figure 2.1. Patch Log
Warning
As mentioned above, the upgrade process automatically saves a backup of your existingdata file prior to installation. We recommend, however, that you create your own backupusing the regular backup facility within Bandit (see Chapter 13, Bandit Backup File) priorto performing the upgrade process. Store this backup in a safe place, such as a removabledrive, or a CD.
Warning
For Windows Vista save backup prior to upgrade, and use Restore From Backup in Filemenu to load data from this backup after upgrade.
2.4. Running BanditOnce you have successfully installed Bandit onto your computer you can run the software by a variety ofmethods. In Windows, select the program from the Bandit group in your Start menu, double-click the iconfor Bandit on your desktop (if you requested one during installation) or single-click the small bird icon inyour Quick Launch bar (if you requested one during installation). In Mac, open the Applications folder,find and open the Bandit folder, and drag the bird picture icon for Bandit down to your dock. Then it willalways be available for easy execution with a single click of the mouse.
2.4.1. Bandit Opening Screen
When you first launch Bandit, you will see the Bandit opening screen, and a small dialog box will appearasking if you want to save a backup of your current Bandit data file. It is a good idea to save a backupwhenever you are going to be making changes to the file, in case you need to return to an earlier versionof the database.

Installing Bandit
7
Figure 2.2. Bandit Opening Screen
After you have dispatched the Backup dialog box, you will be presented with an opening screen showingsix ways of entering the program on the left and a summary of the banding data contained in the Banditdata file on the right. The six ways of entering the program are presented as a numbered list:
Tip
You can place your cursor over any link on this page to see a pop-up box, called a “tool tip”with description of the link.
1. Settings. Goes directly to the Settings screen. If this is the first time you are using Bandit, it is veryimportant that you go here first to set your basic settings for using the program. Refer to Chapter 3,Bandit Settings for more details.
2. Inventory. Goes directly to the Band Inventory screen. If you just received some new bands from theBBL or the BBO, you need to go here to add the bands to your inventory via the Add to Inventoryprocess. If you are importing data from Band Manager, refer to Chapter 12, Importing and Exportingto successfully complete this process. Also if you are importing data from another file, Chapter 12 willexplain how to do that. Chapter 4, Band Inventory has details on the use of the inventory and how toadd bands into your inventory.
3. Locations. Goes directly to the Locations screen. Refer to Chapter 5, Locations for more information.

Installing Bandit
8
4. Bands. Goes directly to the Bands screen. Refer to Chapter 6, Entering Banding Data for moreinformation. Appendix A, Tips and Shortcuts contains useful keyboard shortcuts that can make the taskof entering your banding data even faster.
5. Recaptures. Goes directly to the Recaptures screen. Refer to Chapter 7, Entering recapture and otherre-encounter data for more information. Appendix A, Tips and Shortcuts contains useful keyboardshortcuts that can make the task of entering your recapture data even faster. Refer to Chapter 12,Importing and Exporting, if you are importing data from another file.
6. Reference. Goes directly to the References screen. Chapter 11, Reference Tables has more informationon this feature.
Tip
Unlike most other computer applications you have encountered, Bandit saves the informationyou enter automatically whenever you go to another record or screen. Therefore, you neverneed to click save or append.
Tip
Navigation between all the screens is possible from any screen without going back to openingscreen.
2.4.2. Getting Around
Once past the opening screen, all of the screens in Bandit share a similar layout. For example, Figure 2.3,“Bandit Screen Layout” shows the Bands Table View screen, with numbers added to identify the variousareas of the screen.
Figure 2.3. Bandit Screen Layout

Installing Bandit
9
Take a minute or two to look through the menus and familiarize yourself with the layout of the Banditprogram. It will pay dividends in the future through increased efficiency and understanding all the featuresBandit has to offer.
1. A menu bar appears at the top of the Bandit window (along the top of the screen on Macintosh OS X) andhas the usual features of a typical Windows program, including the ability to Exit or Quit the program,found in the File menu, and the Cut, Copy, and Paste functions in the Edit menu. The ability to importand export data can be found in the File menu, and the Records menu has functions for working withthe records in the database. There is no Save function in the File menu, because Bandit automaticallysaves each record as you enter it.
2. A gray navigation panel appears at the top of the Inventory, Locations, Bands, and Recaptureswindows. It allows you to leaf through your data (while in Detail view) as easily as flipping throughthe pages of a book, and see at a glance how many records are in your file. You may switch to Findmode by clicking on the magnifying glass icon, for searching and filtering the contents of your data.You will also see how many records are in a current found set.
3. The six buttons near the top of the green part of the screen of all screens allow you to switch easily to oneof the six sections of the program: Inventory, Locations, Bands, Reference, Recaptures, and Settings.
4. The functions available below these section buttons change depending on which section you are in.
5. If you want to get back to the opening screen, click on the line containing the word Bandit in the greenarea of any screen. The opening screen summarizes the number of bands in your file and their status.
6. At the bottom left corner of each screen there are 4 boxes. The left one, here containing the value 150,shows the current zoom level (default value is 100). Click on the second box containing the smallermountain range to zoom out for a big picture view. Click on the third box containing the bigger mountainrange to zoom in for a detailed view. Click on the fourth button with the panel icon to toggle hidingor showing the gray navigation panel. The fifth button allows you to switch between Browse, Find andPreview modes.

10
Chapter 3. Bandit SettingsNote
if this is the first time you are using Bandit, it is imperative that you fill in the fields underthe Bander Info tab in the Settings section. All of the submission functions rely upon havingthe information completed correctly.
You can navigate to the Settings section of Bandit by clicking on the button labeled 1 on the opening screenor by clicking on the Settings section button at the top of the green area of any of the other screens.
Figure 3.1. Bandit Bander Info Screen
Once you are inside the Settings section, you will see five tabs: Bander Info, Data Entry Preferences, Optional
Validations, Wing & Weight, and User Fields. Each of these tabs has fields to be filled in. The most importanttabs are Bander Info, which allows you to enter information about the master bander and the sub-banders,and Data Entry Preferences, which allows you to choose between alpha and numeric formats for Species,Age and Sex.
To leave the Settings section, click on any other section button near the top of the screen. If you allow yourmouse to pause over each of these buttons you will see the purpose of each section. You can also click onthe word Bandit at the top of the green part of the screen to return to the opening screen.

Bandit Settings
11
3.1. Bander InfoNote
It is imperative that you fill in the bander information since it will be needed for datasubmission to correctly identify your data when it is received by BBL or BBO.
Click the Bander Info tab to bring up the page where information about the banders can be stored. First, putin the name of the Master Bander (or the station name followed by the name of the responsible individualif you have a station permit) in the Master Bander field. Next, in the Permit Number field, enter the permitnumber that was assigned to you or your team by the Bird Banding Lab or the Canadian Bird BandingOffice. Choose the country where data are to be submitted by clicking the appropriate radio button.
Warning
If you hold a U.S. permit, click in the U.S. radio button and if you hold a Canadian permit,click in the Canada radio button.
Under Choose Email Option, click appropriate radio button to specify your email client settings. Ifyou choose Email Client Established, at the time of submission Bandit will try to open the client andautomatically attach the submission file and send the email. The client must be open for this to work.If you are using webmail and do not have an email client established, you should choose the No EmailClient Established radio button. It will be necessary to manually send an email with the submission file(s)attached. The program will give you a warning telling you which file, where to send the email and whatthe subject line should be.
Warning
If you have problems during data submission (Bandit crash), your selection should probablybe No Email Client Established.
Next, begin filling in the table below these entries by first clicking on the Add button. Be sure to enterthe Master Permit holder’s name as well as any other banders as this table will be used during the dataentry step to fill in the initials of the bander who actually banded each particular bird. Begin by typingin the Master Bander's initials, the name of the Master Bander and entering the email address and phonenumber in the appropriate fields (if desired). Only the initials (or other unique identifier) is required. Inthe Sub ID field you may put in a sub-bander's Alpha ID (as assigned by the BBL or BBO), but leave thisfield blank for the master bander, or any other banders who are not officially listed as subs. None of theinformation in this table is transmitted to the BBL or BBO. It is for your own convenience to maintaininformation about the banders.
Warning
Inadvertently clicking the Add button after you have added the final bander will create ablank line. When you try to leave the screen, you will get an error message. Delete the blankline in the table by clicking on the Delete button on the right.
If you wish to delete a bander, click with your cursor anywhere on the row containing the bander you wishto delete and then click the Delete button on the right. This will delete the information contained in theentire row of the table.
If you have more entries in the banders table than are visible in the space provided you can scroll throughthe table using the scroll bar on the right.

Bandit Settings
12
Tip
If you have more banders than can be seen on the screen and you want to print out a list ofall of them, click on the Export button to the right of the table. An Export Records File dialogbox will appear. Choose where you wish to save the file and type the name of the file inthe appropriate box and choose the type of file you would like to save in the Save as Typebox. (Choose .tab for a tab-delimited table, for example.) Next, in the Specify Field Order for
Export dialog box, choose which fields you wish to export and in what order. Then, click theExport button and a file will be created that you can print or email.
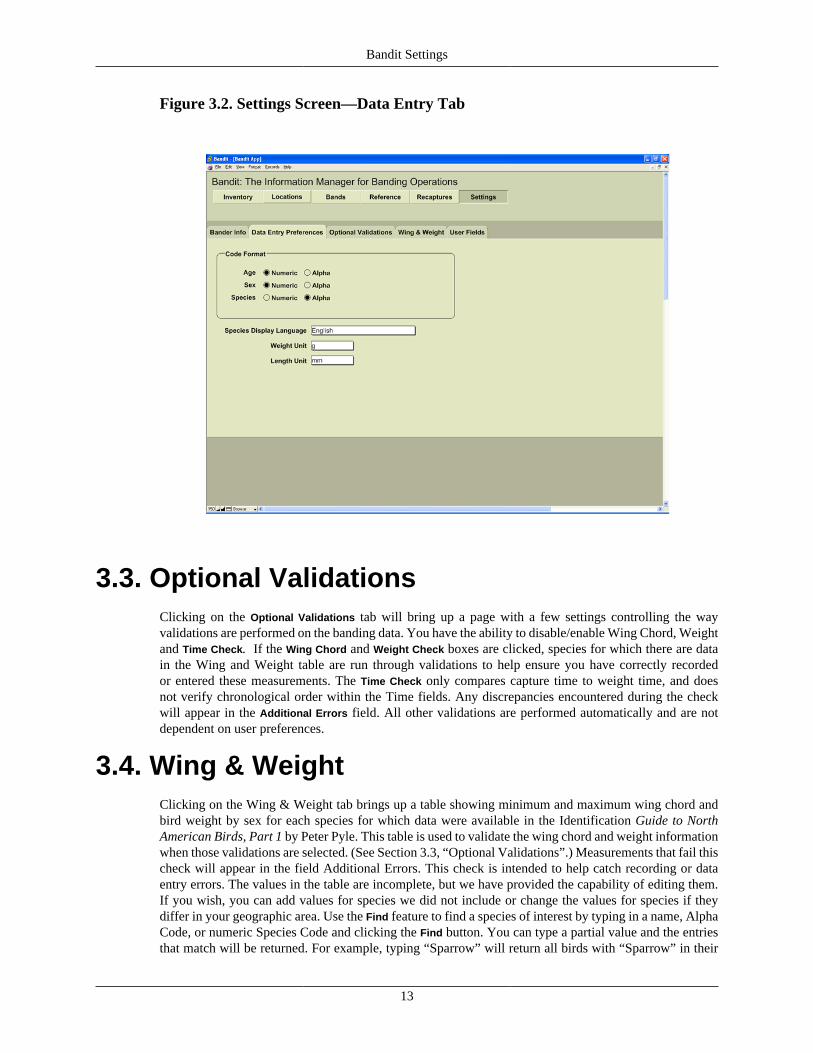
3.2. Data Entry PreferencesClicking on the Data Entry Preferences tab will bring up a page with information about code formats,language, and measuring units used by Bandit.
In this section you have the option to select the code format for entering Species, Bird Age, and BirdSex codes. The code formats available are alpha and numeric. Upon first installation, the defaults will beNumeric, Numeric, Alpha in that order. To select a code format click the appropriate radio button. Whena format is changed, the program will rebuild the related lookup table to correspond to the selection youhave chosen and then go through the Band and Recapture tables, changing the codes in all of the records tomatch. Measurement units for Weight and Length are grams and mm, respectively, and cannot be changed.
Warning
If you are importing banding data, the code formats in the import file must match the codeformats set in Bandit. Band Manager export files always use numeric coding, even if youused the alpha option in the program.
Warning
It is best to settle on your preferences when you start and never change them. If you do changethem later, all records will be marked as “Modified”, and this will confuse things later if youintend to actually submit modified data.
Bandit Settings
13
Figure 3.2. Settings Screen—Data Entry Tab
3.3. Optional ValidationsClicking on the Optional Validations tab will bring up a page with a few settings controlling the wayvalidations are performed on the banding data. You have the ability to disable/enable Wing Chord, Weightand Time Check. If the Wing Chord and Weight Check boxes are clicked, species for which there are datain the Wing and Weight table are run through validations to help ensure you have correctly recordedor entered these measurements. The Time Check only compares capture time to weight time, and doesnot verify chronological order within the Time fields. Any discrepancies encountered during the checkwill appear in the Additional Errors field. All other validations are performed automatically and are notdependent on user preferences.
3.4. Wing & WeightClicking on the Wing & Weight tab brings up a table showing minimum and maximum wing chord andbird weight by sex for each species for which data were available in the Identification Guide to NorthAmerican Birds, Part 1 by Peter Pyle. This table is used to validate the wing chord and weight informationwhen those validations are selected. (See Section 3.3, “Optional Validations”.) Measurements that fail thischeck will appear in the field Additional Errors. This check is intended to help catch recording or dataentry errors. The values in the table are incomplete, but we have provided the capability of editing them.If you wish, you can add values for species we did not include or change the values for species if theydiffer in your geographic area. Use the Find feature to find a species of interest by typing in a name, AlphaCode, or numeric Species Code and clicking the Find button. You can type a partial value and the entriesthat match will be returned. For example, typing “Sparrow” will return all birds with “Sparrow” in their

Bandit Settings
14
name. Click the Show All button to return to the original entire list. Finally, you can click the Export buttonto export the wing and weight values. See Chapter 12, Importing and Exporting for detailed instructionson the use of this feature and the file formats supported.
3.5. User FieldsClick on the User Fields tab to enter the labels for up to 5 additional fields you want to associate withyour banding/recapture records. These fields are to be used for information that is meaningful to you,but not likely to affect any of the codes that are stored in the main BBL database, or be of use to futuredata-users. For example, you might wish to note birds that escaped before all measurements were taken,orenter certain field notes associated with bandings. Each of the 5 fields can contain an arbitrary amount ofinformation. Chapter 6, Entering Banding Data contains additional details on the use of this feature.
Figure 3.3. Bandit User Fields Settings Screen
3.6. Other SettingsThere is one additional setting to turn the automatic spell checker on or off in Bandit (default is off). Findthis option by selecting File Options from the File menu. The spell checker is most useful in finding spellingerrors in the Remarks field. You can choose for errors to show up with a special colored underline familiarto users of Microsoft Word. Visual and audio cues are also available. For Bandit, though, users may findthe spell checker unnecessary and intrusive.

15
Chapter 4. Band InventoryNote
You must enter band spans in the inventory before you can enter any banding data.
The Band Inventory in Bandit contains information about the strings of bands you have received from theBBL or BBO. These bands are issued in strings having contiguous numbers spanning a range. One stringor contiguous strings of bands is commonly referred to as a band span.
You can navigate to the Band Inventory section of Bandit in one of two ways: Click on the button labeled2 on the opening screen, or click the Inventory button at the top of any of the other screens.
Figure 4.1. Bandit Band Inventory Screen
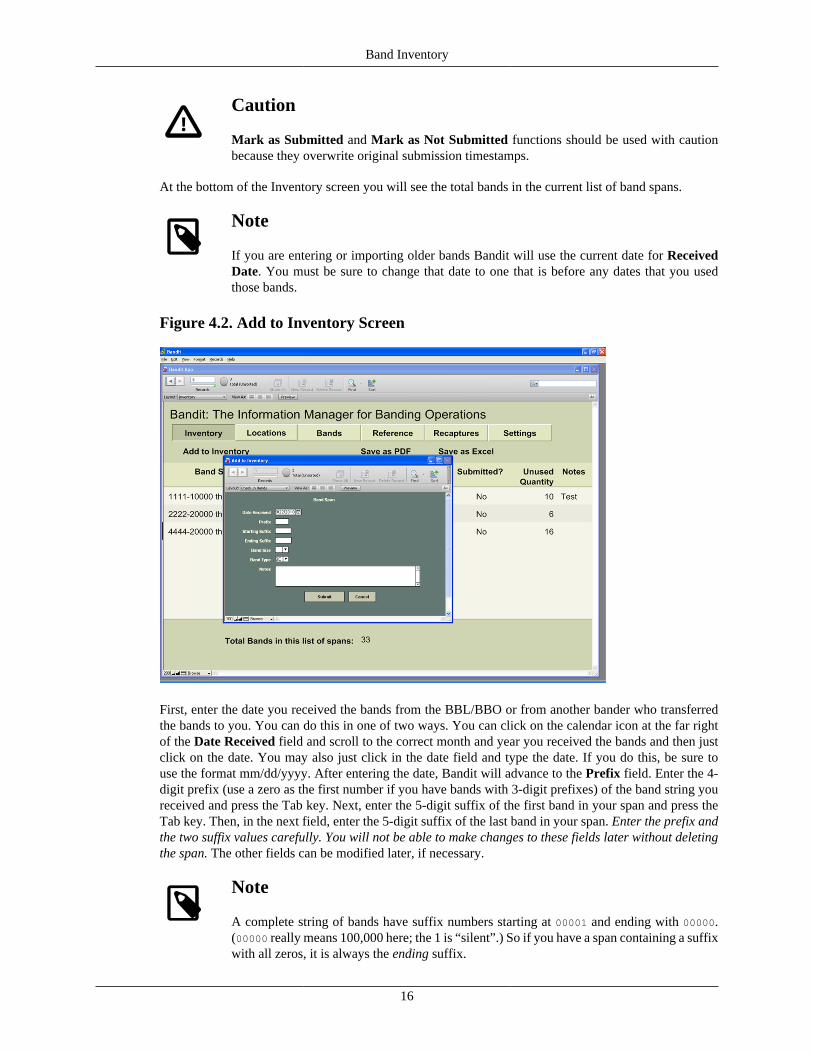
The Band Inventory screen allows you to add bands to your inventory and edit the information about theband spans in your inventory. To add band spans to your inventory, go to the Inventory page and click onthe words Add to Inventory above the table. This will bring up a new window with fields for entering theband number prefix, the starting and ending numbers of the suffix, the band size and type, the date youreceived the bands, and a place for remarks.
You can also remove spans from the inventory, but understand that all banding records for those bandswill be removed also. The function for removing band spans in under Records in the top menu bar. Alsounder Records is a function for removing unused bands from the inventory.
Bands can also be imported into the inventory, but only as complete lists of bands, not as spans. This optionis under File in the top menu bar. For more details on importing, see Chapter 12, Importing and Exporting.
There are two more functions Mark as Submitted and Mark as Not Submitted under the Records menu.These functions can be used to reset submission timestamps for all banding records in the current span.
Band Inventory
16
Caution
Mark as Submitted and Mark as Not Submitted functions should be used with cautionbecause they overwrite original submission timestamps.
At the bottom of the Inventory screen you will see the total bands in the current list of band spans.
Note
If you are entering or importing older bands Bandit will use the current date for ReceivedDate. You must be sure to change that date to one that is before any dates that you usedthose bands.
Figure 4.2. Add to Inventory Screen
First, enter the date you received the bands from the BBL/BBO or from another bander who transferredthe bands to you. You can do this in one of two ways. You can click on the calendar icon at the far rightof the Date Received field and scroll to the correct month and year you received the bands and then justclick on the date. You may also just click in the date field and type the date. If you do this, be sure touse the format mm/dd/yyyy. After entering the date, Bandit will advance to the Prefix field. Enter the 4-digit prefix (use a zero as the first number if you have bands with 3-digit prefixes) of the band string youreceived and press the Tab key. Next, enter the 5-digit suffix of the first band in your span and press theTab key. Then, in the next field, enter the 5-digit suffix of the last band in your span. Enter the prefix andthe two suffix values carefully. You will not be able to make changes to these fields later without deletingthe span. The other fields can be modified later, if necessary.
Note
A complete string of bands have suffix numbers starting at 00001 and ending with 00000.(00000 really means 100,000 here; the 1 is “silent”.) So if you have a span containing a suffixwith all zeros, it is always the ending suffix.

Band Inventory
17
Press the Tab key to enter the Band Size, and enter the band size. You can do this by selecting it from thedrop down menu or by typing it. If the number entered in this box does not correspond to the last digit inthe prefix, a pop up box will appear to warn you. Bandit will move you forward to the Band Type field,from which you may select the appropriate band type from a drop down menu. You can press the Tabkey and enter a remark in the Notes field for that particular band span, if necessary. Finally, click the Add
button at the bottom of the window to add the span. Bandit will create a blank banding record for each ofthe bands within the span and automatically link them to the band span in inventory.
Note
Depending on how many bands are in the band span, the process of adding the bands to yourinventory can take a while to finish.
If you entered a band span erroneously, are transferring bands to another bander, or returning bands to yourcoordinator at the end of a banding season, you may want to remove those bands from your inventory.To remove bands from inventory you have two options: remove the whole span or remove unused bandsfrom the span. To remove a whole span, select the span you want to remove by clicking with your cursorinside the line of the desired span on the Inventory page. Then click on the Records menu at the top of thepage and select Delete Inventory Record from the menu. A message will appear to confirm you really wantto remove the whole span, pointing out how many of the bands in the span are used, and warning that thebanding data will be removed as well. You may cancel at this point, or proceed, in which case all relatedbanding data will be removed from the band table and saved in a .xls file in your My Documents folder(Documents folder on the Mac). For example, if you removed the bands 1234-00001 through 1234-00024on January 12, 2007, the name of the saved file is Bandit_Bands_123400001_123400024_20070112.xls.(In case if you were using “Remove Unused Bands from Inventory Record” function the file name wouldbe Unused_Bands_123400001_123400024_20070112.xls ).
To remove unused bands from a span, select the span you want to modify by clicking with your cursorinside the line of the desired span. Then click on the Records menu at the top of the page and select Remove
Unused Bands from Inventory Record from the menu. A message will appear stating how many unusedbands will be removed. You may cancel or proceed. If you proceed, the band span inventory record willbe split, to leave only the used bands. The Unused Bands Removed Report will appear on your screen.You may print the report (using the tool Print icon) and then click the blue Continue in the upper rightportion of the screen to resume using the program.
To leave the Band Inventory section, click on one of the other Section buttons near the top of the screen.If you allow your mouse to pause over each of these buttons you will see the purpose of each section.You can also click on the name Bandit at the top of the screen to return to the opening screen. Typically,after entering spans into the band inventory you are ready to enter banding information. If so, just clickthe Bands button near the top of the screen to go to the data entry screen.
Note
If you imported bands from Band Manager or any other file, the date received will be thedate you performed the inventory process, not the date received in Band Manager or theother file. If there are data associated with these bands that will also be imported, you mustchange the date received to be a date earlier than the first bird banded using these bands. Todo this, go to the Inventory page, click on the date in the line containing the imported bandsand simply retype a date that is earlier than any banding date for birds associated with thesebands. Everything else can remain the same. Repeat this in each span, or use “Replace FieldContents” under Records to fill all inventory records.

Band Inventory
18
Tip
You can sort the records in your inventory by using Sort Records... in the Records menu orSort icon at the top. You can also use Find mode to select the spans you want to work with.For more information about Find mode, see Chapter 9, Find Mode.

19
Chapter 5. LocationsAn important characteristic of the banding and recapture data submitted to the BBL/BBO is the quality ofthe banding location data attached to the record. In the past, due to limited computer memory and storage,the BBL/BBO stored locations only with 10-minute block precision in latitude and longitude. Because ofadvances in computer technologies, the precision of banding locations can be significantly enhanced. InBandit, we have taken the opportunity to permit the storage and submission of banding locations to thenearest second, but if you prefer, you can use 10-minute block precision or 1-minute block precision.
In version 3.0 of Bandit the ability to see each location record in Table or Detail view was added. Now theLocations screen is actually a pair of screens showing two views (or modes) of the same information. TheTable view shows a spreadsheet-like table of the information in the location records. You can use this viewto see a number of locations at a glance and rapidly enter a large amount of data, but only a limited numberof fields are visible without using the scroll bar at the bottom of the window. This is also the preferredview for sorting locations or performing Finds. The Details view allows you to see all of the fields in aparticular location record at once, but only for one record at a time. This view can be easily navigated byusing the light gray navigation panel which appears at the top of the screen. Using this panel you can flipforwards and backwards through the location records or jump directly to a particular location record. It ispossible to search and sort locations records by any field.
All of the banding locations are stored in a table that can be easily accessed at any time by clicking onthe Locations button at the top of the green part of the screen. The table has fields for a short identifierLocation ID (which must be unique), Country, State (Province in Canada), County, Nearest Place/Town(this can be a town or a notable place like a mountain peak, within the country/state/county selected), Milesand Direction from that place, Location Description (street address preferred, or any description that helpsyou keep locations straight), fields for Coordinate Precision, Latitude and Longitude coordinates (indegrees, minutes, seconds, and hemisphere). The fields Valid? and Bands Count, are used by the systemto provide feedback on the locations in the table. Valid? will have the value Yes if the location record haspassed all validations and the coordinates provided match the bounding box outline for the Country andState provided. If the value in Valid? is No, you can place your cursor over the box containing the No to seewhat validations this location did not pass. The errors will appear in a pop-up box, called a “tool tip” in theTable view, or in the Errors field in a Details view. Band Count shows how many birds have been bandedat a particular location. Recapture Count shows how many recaptures are associated with this location.
Tip
If you are banding outside the U.S., State and County are placeholder names for the 1stand 2nd administrative divisions of the country.
Tip
For any location that has errors, all associated banding records will show errors, until thoseerrors are fixed.
5.1. Location Screen—Table ViewThe Table View presents the location data in much the same way as it would appear in a spreadsheet. Likea spreadsheet you can rapidly enter information and use other keyboard commands to skip to the next andprevious fields, duplicate information in successive records, jump to the first field in the table, etc.

Locations
20
Figure 5.1. Locations Table View Screen
5.1.1. Resizing and Repositioning Columns
In the Table view, Bandit allows you to set the relative position and width of each column. Once you setthe widths and positions, the columns will remain the way you set them through each successive use of theprogram, until you change them again (or upgrade to new version). To set the width of a column, positionthe cursor between two column headings. A double-headed arrow cursor will appear. Click and drag thecursor to the left to make the column smaller and right to make the column larger. To reposition a column,click and drag the column heading to a new location to the right or left. A dark line will appear to showyou the position you are dragging to as you drag the column. When you get the column where you wantit, let go of the mouse button. The column will move in place.
The other way to rearrange columns is to use the Modify button in the upper right part of the screen. Thisbutton allows you to modify Table view by showing or hiding columns and changing the order of thecolumns. If a checkbox is checked – the column is shown in the view. To hide a column simply uncheckit. To change the order of the columns, you can drag and drop any column up or down in this pop-upwindow (point to double arrow symbol , when cursor changes, left mouse click and while holding thekey, start dragging, release the mouse key to drop the column in the appropriate place). See Figure 5.2,“Modify Table View”

Locations
21
Figure 5.2. Modify Table View
Another way to get to modify Table view is to Right mouse click on any column header, choose ModifyTable View from pop-up menu as shown in Figure 5.3, “Column Header popup menu”

Locations
22
Figure 5.3. Column Header popup menu
5.1.2. Sorting Location Records by Columns
Most of the time when you are entering data you will want to see the locations records sorted in someorder. You can sort location records on any field by clicking on the column header. Click once to sortin ascending order. Click again to sort in descending order. Click on another column header to sort therecords based on the value in that field. You can also sort records by using Sort Records in the Records
menu at the top of the screen. It can sort by multiple columns.
5.1.3. Entering Location Data in Table View
To enter location data, click in one of the cells to start. You can see what is supposed to be entered intoa particular column by pausing with your cursor over any cell in a column. The Tab key takes you to thenext field. Shift-Tab takes you to the previous field.
Caution
If you click on any cell in the blank line at the bottom of the list (the one with a + on theleft) Bandit thinks you are trying to add a location and will not let you leave that page untilyou either enter data or choose delete.

Locations
23
Tip
Using the Find function before entering location data helps to focus on those locations youwill be using during a session, see Chapter 9, Find Mode for information about the way toselect records you want to operate on.
5.2. Location Screen—Details ViewThe Details view of the Locations screen presents the location data as a collection of fields shown as aform, making it easier to see all the fields for the location record at once. Although the screen presents dataon only one location at a time, a navigation panel is provided to scroll through the location records (see leftportion of the grey area at the top). The Details view also provides a Map feature not available in Tableview. This feature links to Google Maps and will only function with a high-speed internet connection. Itis intended to help you determine the coordinates of your banding location. Once you have located it onthe map, you can click the map to show a balloon with the coordinates in it.
By default, Bandit enters the Locations screen in Table view. To switch to Details view, click the Details
button. To switch back to Table view, click the Table button.
Caution
Depending upon the focus on the screen, the mouse wheel works differently. When you firstopen this screen, the default is that the mouse wheel scrolls through the different locationrecords on the left of the map. If you use the map, you will find that the mouse wheel becomesa way to zoom in and out on the map.
Figure 5.4. Locations Detail View Screen

Locations
24
Note
Looking for the Save item in the File menu? Bandit automatically saves data whenever youleave a record or go to another screen so you never have to worry about doing the saveyourself.
Four buttons are placed at the top of the table to facilitate maintaining the locations table: Add, Delete,Print, and Export.
Add To add a new location into the locations table, click the Add button. This will create a new emptyrecord. You must populate it with correct data, including a unique identifier for Location ID.
Delete If a location has been entered in error or is not being used it can be deleted. Click anywhereon the row containing the location to be deleted and then click the Delete button. The systemchecks to make sure that there are no banding data with that location in the database. If thereare none, the location will be deleted. If there are banding or recapture data at that location,you will not be able to delete it.
Print Use the Print button to print out the locations.
Export If you are interested in using the location information in another program you can use the Export
button. The exported locations can be put into a file in a variety of formats. See Chapter 12,Importing and Exporting for more details on the formats provided.
To begin entering locations in the Locations Table view, click on Add at the top of the table. This willcreate a new empty record. For Location ID enter up to 8 characters to create a unique location identifier.It may contain alphabetic and numeric characters. Use the Tab key to navigate through the fields. For Loc
Precision field there are three options available: the traditional 10-minute block, a more precise 1-minuteblock, and the capability to enter an exact (to the nearest second) location. Each option will have differenteffects on the Degrees, Minutes, and Seconds entries under Latitude and Longitude.
Tip
Choose 10-minute block precision if you have multiple banding sites in the same 10-minuteblock and do not wish to catalog all of the locations separately or you wish to mask the exactlocation or be less specific about the location of a sensitive species.
Using 1-minute block precision is recommended for an operation like a MAPS station ormigration monitoring station, where several mist nets are in a small area. We prefer that youNOT identify each mist net site as an exact location.
Choose Exact Precision if you are only banding at one location or several well-separatedlocations. Banders at MAPS or migration monitoring stations may also choose to use acentroid for the net locations and use this option, instead of the 1-minute block option.
5.3. Entering locations by different precisionoptions.
5.3.1. Entering Locations with 10-Minute Block PrecisionIf you choose 10-minute block, a 10 will be entered in the Loc Precision column and 00 will automaticallybe entered into the Sec column for both latitude and longitude. Next, enter a location description. The

Locations
25
description must be identifiable on most common maps and should include miles and direction from anidentifiable landmark such as a town, lake, mountain peak etc.
Note
It is important to describe the location in such a way that it can be relocated by others,because this information will be used for the Certificate of Appreciation provided to a personwho may report this bird in the future. A good location description could help them locate(approximately) where the bird was banded using a common map. More importantly, at theBBL, we use the description you provide to confirm the coordinates. Do not put country,state, province, or county into the location description field. There are separate fields for thisinformation.
After entering the description, enter the degrees and minutes of latitude that correspond to the bandinglocation using the closest 10-minute line of latitude to the south. The number entered can only be 0 through5. You may then press the Tab key and a 5 will automatically be inserted as the second digit. If you entera second digit in the Minute field, the program will automatically change it to a 5. This is because youselected 10-minute block as the location precision and Bandit is expecting the value entered to be thecenter of the 10-minute block. After the latitude, enter the number of degrees and minutes of Longitudeto the closest 10-minute line of longitude to the east. The number entered again can only be 0 through5 and after pressing the Tab key, the second digit will automatically default to 5 for the same reason asdescribed in the latitude entry.
Tip
South of the equator, the closest 10-minute line of latitude to the north of the banding locationshould be chosen. Likewise, when banding east of Greenwich, choose the closest 10-minuteline of longitude to the west of the banding location.
If you selected U.S. for where you want your data to be submitted during the Bander Info settings set up,United States will be the default in the Country field. If you are entering data for a non-U.S. location,you may change this by selecting the correct country from the drop down list. Typing the first few lettersof the country will shorten the list closer to the correct country. Press the Tab key again to go to the State/
Prov field and select the appropriate state or province. If your country is United States, the drop down listwill be populated with the U.S. states and again, the list can be shortened by typing the first few letters ofthe state. If you selected data submission to Canada during the Bander Info settings set up, Canada will bethe default country and the drop down list for State/Prov will be populated with the Canadian Provinces.
For U.S. locations, a county for the banding location will be required. After selecting United States andthe appropriate state, the county list for that state will appear in the drop down list. Select the appropriatecounty from the list provided and again, typing the first few letters of the county will shorten the list.
If all of the information is correct, a Yes will appear under the Valid? column. If a No appears, place yourcursor over the No to see why the location is invalid. It may be for one of several reasons: the latitude andlongitude are not in the state or country entered, the second digit of the minutes field is not a 5, or the twodigits of the seconds field are not zeros. If it is a U.S. location, the county must be entered. Since v 3.0 ofBandit the Nearest Place/Town field is required. Check these fields and ensure they are correct.
5.3.2. Entering Locations with 1-Minute Block PrecisionIf you choose 1-minute block, a 1 will be entered in the Loc Precision column and 30 will automaticallybe entered into the Sec column for both latitude and longitude. Next, enter a location description. Thedescription must be identifiable on most common maps and should include miles and direction from anidentifiable landmark such as a town, lake, mountain peak etc.

Locations
26
Note
It is important to describe the location in such a way that it can be relocated by others,because this information will be used for the Certificate of Appreciation provided to a personwho may report this bird in the future. A good location description could help them locate(approximately) where the bird was banded using a common map. More importantly, at theBBL, we use the description you provide to confirm the coordinates. Do not put country,state, province, or county into the location description field. There are separate fields for thisinformation.
After entering the description, enter the degrees and minutes of latitude that correspond to the bandinglocation using the closest 1-minute line of latitude to the south. The number of minutes entered should be00 through 59. As mentioned above, the seconds will be 30. This is because Bandit is expecting the point tobe the center of a 1-minute block. You may then press the Tab key 3 times to tab to the Longitude degreesfield. Next, repeat the process for the longitude degrees. Enter the degrees of longitude and press the Tabkey to get to the Minute field. Then enter the closest 1-minute line of longitude to the east. The number ofminutes entered again should be 00 through 59. Then press the Tab key 4 times to enter the State/Prov field.
Tip
South of the equator, the closest 1-minute line of latitude to the north of the banding locationshould be chosen. Likewise, when banding east of Greenwich, choose the closest 1-minuteline of longitude to the west of the banding location.
If you selected U.S. for where you want your data to be submitted during the Bander Info settings set up,United States will be the default in the Country field. If you are entering data for a non-U.S. location,you may change this by selecting the correct country from the drop down list. Typing the first few lettersof the country will shorten the list closer to the correct country. Press the Tab key again to go to the State/
Prov field and select the appropriate state or province. If your country is United States, the drop down listwill be populated with the U.S. states and again, the list can be shortened by typing the first few letters ofthe state. If you selected data submission to Canada during the Bander Info settings set up, Canada will bethe default country and the drop down list for State/Prov will be populated with the Canadian Provinces.
For U.S. locations, a county for the banding location will be required. After selecting United States andthe appropriate state, the county list for that state will appear in the drop down list. Select the appropriatecounty from the list provided and again, typing the first few letters of the county will shorten the list.
If all of the information is correct, a Yes will appear under the Valid? column. If a No appears, place yourcursor over the No to see why the location is invalid. It may be for one of several reasons: the latitude andlongitude are not in the state or country entered, the minutes field is not in the range 00 through 59, orthe two digits of the seconds field are not 30. If it is a U.S. location, the county must be entered. Checkthese fields and ensure they are correct.
5.3.3. Entering Locations with Exact PrecisionIf you choose Exact from the Loc Precision drop down menu, a 0 will be entered in the Loc Precisioncolumn and you will be required to fill in the exact degrees, minutes, and seconds in both the latitudeand longitude columns. Next, enter a location description. The description must be identifiable on mostcommon maps and should include miles and direction from an identifiable landmark such as a town, lake,mountain peak etc.
Note
It is important to describe the location in such a way that it can be relocated by others,because this information will be used for the Certificate of Appreciation provided to a person

Locations
27
who may report this bird in the future. A good location description could help them locate(approximately) where the bird was banded using a common map. More importantly, at theBBL, we use the description you provide to confirm the coordinates. Do not put country,state, province, or county into the location description field. There are separate fields for thisinformation.
After entering the description, enter the degrees, minutes, and seconds of latitude that correspond to thebanding location. The degrees entered should be in the range (longitude: 0-180, latitude 0-90). Minutesshould be in the range 0-59, Seconds should be in the range 0-59.

28
Chapter 6. Entering Banding DataClicking on Link 4 on the opening screen or clicking on the Bands button on one of the other screenswill bring up the screen for entering banding data. This is actually a pair of screens showing two views(or modes) of the same information. The Table view shows a spreadsheet-like table of the information inthe banding records. You can use this view to see a number of banding records at a glance and rapidlyenter a large amount of data, but only a limited number of fields are visible without using the scroll barat the bottom of the window. The Details view allows you to see most of the fields in a particular bandingrecord at once, but only for one record at a time. This view can be easily navigated by using the lightgray navigation panel that appears on the top of the screen. Using this panel you can flip forwards andbackwards through the banding records or jump directly to a particular banding record.
Figure 6.1. Bandit Bands Table View Screen
By default, Bandit always enters the Bands screen in Table view. To switch to Details view, click theDetails button. To switch back to Table view, click the Table button.
Note
Looking for the Save item in the File menu? Bandit automatically saves data whenever youleave a record or go to another screen so you never have to worry about doing the saveyourself.

Entering Banding Data
29
6.1. Bands Screen—Table ViewThe Table view presents the banding data in much the same way as it would appear in a spreadsheet. Likea spreadsheet you can rapidly enter information and use other keyboard commands to skip to the next andprevious fields, duplicate information in successive records, jump to the first field in the table, etc.
6.1.1. Resizing and Repositioning ColumnsIn the Table view, Bandit allows you to set the relative position and width of each column. Once youset the widths and positions, the columns will remain the way you set them through each successive useof the program, until you change them again. To set the width of a column, position the cursor betweentwo column headings. A double-headed arrow cursor will appear. Click and drag the cursor to the left tomake the column smaller and right to make the column larger. To reposition a column, click and drag thecolumn heading to a new location to the right or left. A dark line will appear to show you the position youare dragging to as you drag the column to the left or right. When you get the column where you want it,let go of the mouse button. The column will move in place.
Tip
There are 12 fields that are transmitted to the BBL/BBO when you submit data. These fieldsare Band Number, Disposition, Species, Age, How Aged, Sex, How Sexed, Banding Date, Bird
Status, Location, Aux Marker Combined, and Remarks. All of the data in these fields must beerror free in order for the data to be submitted. It is therefore recommended that you locatethe Error Text column, click on the heading, and drag that column so it is immediately to theright of these columns. Any errors in the mandatory data will then be readily visible and canbe corrected immediately.
6.1.2. Sorting Banding Data by ColumnsMost of the time when you are entering data you will want to see the banding records sorted in bandnumber order. This is the default in Bandit, however, you can sort on any field by clicking on the columnheader. Click once to sort in ascending order. Click again to sort in descending order. Click on anothercolumn header to sort the records based on the value in that field. You can also sort records by using Sort
Records in the Records menu at the top of the screen. It can sort by multiple columns.
6.1.3. Entering Banding Data in Table ViewTo enter banding data, click in one of the cells to start. You can see what is supposed to be entered into aparticular column by pausing with your cursor over any cell in a column. You cannot enter anything intothe band number field as that field is pre-populated from the inventory. Pausing over the band numberfield will give you a summary of information about the band.
Many of the fields have a list of possible values associated with them. When you click in a cell a smalltriangle will appear. You can click the triangle to bring up the list or type in the value yourself. For codedfields, you may wish to refer to the associated reference table. You may do so at any time by clicking onthe Reference section button near the top of the green part of the screen. When you return to the Bandssection, you will still be in the same place you were when you left the screen.
The Species, Age, and Sex fields can be coded using either alpha or numeric codes. Refer to the Data Entrysection in Chapter 3, Bandit Settings, for details on how to tell Bandit which coding format you wish touse (and be sure the Settings section is completed prior to entering banding information.)

Entering Banding Data
30
Many of the fields feature type-ahead completion. As you type, the program looks through the list ofpossible values and finds the first one that matches what you have typed so far, completing the value. If thisis the value you want you can just Tab to the next field. If this is not the value you want, continue typinguntil the value is matched. The Tab key takes you to the next field. Shift-Tab takes you to the previous field.
Most of the fields are self-explanatory, but Banding Date needs extra attention to prevent errors. Thebanding date must be after the Received Date in your inventory. If you imported data from Band Manageror any other file, the received date will be automatically defaulted to the date you imported. If that date isn'tchanged as described in Chapter 4, Band Inventory, you will get Banding Date VS Received Date error.
Tip
Using the Filter function before entering banding data helps to focus on those bands you willbe using during a session. Select the prefix and the starting and ending suffixes and click theFilter button. Only those records will appear in the table. You can return to showing all bandsin the table by clicking the Show All button. See Section 6.6.1, “Filtering Banding Data” formore information about filtering banding data, and see Chapter 9, Find Mode for informationabout an alternative way to select banding records you want to work with.
6.2. Bands Screen—Details ViewThe Details view of the Bands screen presents the banding data as a collection of fields shown as a form,making it easier to group related information (such as auxiliary marking). Although the screen presentsdata on only one band at a time, a navigation panel is provided to scroll through the banding records. TheDetails view also provides additional features not available in Table view for double banding, auxiliarymarking, error reporting and bypassing certain errors, reporting recaptures, and more.

Entering Banding Data
31
Figure 6.2. Bandit Band Details View Screen
Entering banding data in Details view has all of the features from Table view, described in the previoussection, including help when you pause over a field, value lists, type-ahead completion, and the use of theTab key (and Shift-Tab) to jump from one field to the next.
6.2.1. Using the Navigation Panel
The Details view provides a gray navigation panel at the top of the screen. The navigation panel includesa small book icon to flip forward (right-hand page) or backward (left-hand page) through pages. Use theslider below the book to rapidly scroll ahead or back in the book of records.
6.2.2. Entering Auxiliary Marker Data
The Details view has a tab named Aux Marker which is for entering auxiliary marker data associated witha bird. First choose a marker type from the drop-down list in the Aux Marker Type field. If the auxiliarymarker contains a code, click on the circle with Y under Is Aux Marker Coded? and fill out the left-handside of the screen, indicating the actual code, the color of the band, and the color of the code. If the birdis marked by a sequence of uncoded colored bands on one or both legs, click on the circle with N under IsAux Marker Coded? and fill out the right-hand side of the screen, choosing the colors for the sequence ofbands as appropriate. The Remarks field is repeated here, making it easy to add explanatory remarks.

Entering Banding Data
32
Figure 6.3. Aux Marker tab for a coded marker
Figure 6.4. Aux Marker for a Sequence of Uncoded Colored Bands
The Aux Marker Combined field is automatically generated from the rest of the information on the screen.It summarizes the information into a single field. This is the field that is submitted to BBL/BBO.
Note
The Aux Marker page in Bandit is a work in progress, and currently only accommodatesrelatively simple auxiliary marking conditions. If the bird has more than one type of marker,one of which is coded, describe only the coded one and mention the other(s) in remarks. Inthis case, you would set the Aux Marker Type field to match the type of the coded marker. Inany combination of markers, the default one to be reported here is the one most likely to beseen and reported by the public.
6.2.3. Entering Data for Double Banded BirdsIf your banding permit authorization allows it, the Details view makes it easy to add data for double bandingbirds. First, make sure the Disposition code associated with the band is D. Fill in the remaining data fields

Entering Banding Data
33
and then, in the field Second Band Number, type the band number for the other band. Then click the buttonnext to the field labeled Fill Second Record. Bandit will copy the data from the current banding record intothe record for the second band number, changing the Disposition code to S and setting the Second Band
Number field to the starting band number.
Note
Double-banding of birds can only be done with permission from the appropriate BandingOffice. It is preferred that this be done with two separate strings, rather than adding adjacentband numbers to the same bird. Be consistent: If you use two strings of bands, one stringshould all have Disposition code set to D and other to S. If one string is used, odd numbersmay be set to D and even to S.
6.2.4. Entering Replaced BandsFrom time to time, it is necessary or desirable to replace a band on a bird. Often this is because theband is too worn to be read or is close to being that worn. If you do replace a band, use the Replacedor Second Band # field to enter the REPLACED band. If the number can’t be read completely, fillthe missing numbers with question marks. The unreadable band must be sent to the BBL or BBO foretching. It is extremely important that each band that is sent has the replacement number associated with it.Recommended is a piece of masking tape on the back of the flattened band with the replacement numberon it.
Occasionally a bird is captured with an auxiliary marker but no Federal leg band. In this case, if youknow the band number that was originally on the bird, use it and explain in Remarks. If you do not knowthe original band number, you can put the auxiliary marker code in the REPLACED field and explain inRemarks. It may be possible to determine the original band at the BBL or BBO.
6.2.5. Reporting RecapturesIf you want to record the recapture of a bird you banded previously, click the button next to the bandnumber labeled Report Recapture. A new recapture record will be created and you will automatically beswitched to the Recapture function. See Chapter 7, Entering recapture and other re-encounter data forcomplete details on recording recaptures.
6.3. Error CheckingBandit automatically and transparently checks the banding data using a variety of validation checks toensure the data are coded correctly and the fields are internally consistent. Any fields that fail thesechecks are considered errors. You can see the errors Bandit has identified by looking at the Error fieldin the Details view or the Error Text column in the Table view. Where possible, fields with erroneous orinconsistent data are highlighted in yellow. Also, the field containing the error text will be highlighted inyellow if there are non-bypassable errors in the record. Refer to Appendix C, Data Editing Error Messagesfor a complete description of the errors that may occur and how to correct them. Some less-critical errorsmay be bypassed, allowing the banding record to be submitted during the data submission process. Othererrors may be bypassed after appropriate remarks are entered. For example, the Bad Size error can bebypassed if an explanatory remark is added to the Remarks field indicating why a different size band wasused. When you click Y in the Bypass Error field, the error message will still be visible, but the record willbe submitted during the data submission process. If you try to bypass errors and Bandit does not allow it,this is because, in addition to the bypassable error, one or more errors in the record cannot be bypassed.Records with errors that cannot be bypassed and records that have errors that can be bypassed but Bypass
Error was not set to Y will not be sent during the data submission process.

Entering Banding Data
34
Errors that show up in the Error field (Details view) or Error Text field (Table view) must either be correctedor bypassed for the data to be submitted. Errors that show up in the Additional Errors field of the Table orDetails view are informational only and are associated with fields that are not submitted. Errors in wingchord, weight, and time appear here. These Additional Errors do not need to be bypassed in order for therecord to be submitted.
6.4. Using the Remarks FieldAssociated with each banding record is a Remarks field which is useful in several situations. Add anexplanatory remark whenever you bypass an error, indicating why the error does not apply to this record.Add a remark as necessary for special auxiliary marking situations not covered by the capabilities of theauxiliary marker fields. You can add any other information you want the banding office to be aware of.Keep in mind that only the first 250 characters of the Remarks field are submitted to the BBL/BBO. If youwish to keep other detailed information associated with a particular banding that is not sent to the BBL/BBO, use one of the user-defined fields.
Note
The Band Manager program had a remarks field that applied to all 100 records in a band span.In Bandit, each banding record has its own remarks. If the remark should apply to severalbands, use the ditto feature (see Appendix A, Tips and Shortcuts) to duplicate the remarkfrom the previous record. You can also use Replace Field Contents to repeat remarks for alarge number of records.
6.5. User FieldsUp to 5 additional fields can be associated with each banding record. You can create labels for these fieldson the Settings screen. Enter and edit information for these fields using the User Fields tab on the Details
view of the Bands screen or by referring to the User Field 1, …User Field 5 columns on the Table view. Anarbitrary amount of information can be stored in each of these fields. Use the scroll bar to scroll throughthe information.

Entering Banding Data
35
Figure 6.5. User Fields tab on the Bands Screen—Details View
6.6. Other Features of the Bands ScreensThe Bands screens have several other important features. The most important is the ability to submitbanding data to the BBL or the BBO. Other features facilitate data entry and editing such as the abilityto filter the bands visible on the screen, propagate field values throughout a collection of bands, duplicatethe contents of a banding record, and clear out (reset) a banding record. Also, see Appendix A, Tips andShortcuts for additional enhancements to data entry and editing.
6.6.1. Filtering Banding DataYou may select which bands are visible in the Table view by filtering by prefix, suffix range, used andsubmitted bands. If you fill in just the prefix, only those bands with that prefix will be on your screen. Ifyou fill in only the first suffix, all the bands in the span starting with that suffix will be in view. If you fillin both suffix blocks, only those bands in that range will be in view. The Used and Submitted checkboxescan be checked to narrow the list even further. The Used and Submitted boxes can be checked and usedwithout entering anything in either the prefix or suffix boxes as well. After you have entered your criteriaclick the Filter button. To go back and see all of your bands click the Show All button.
Tip
If you open Bandit and all of your data are not visible as you may expect, you may haveperformed a filter operation the last time you used the program. In this case, be sure to clickon the Show All button to bring all of your bands back into view.

Entering Banding Data
36
Tip
See Chapter 9, Find Mode for an alternative way to select banding records. Find mode willpermit you to do more complex searches and base your selection on any of the fields in eitherthe Table or Details view.
6.6.2. Fill-down Feature
The fill-down feature lets you quickly enter large amounts of banding data, in much the same way as theBatch function in Band Manager. When using the fill-down feature all of the records in the set selectedwill be updated with the criteria you selected to be filled down. It is important that you perform a filteror find first so only the records you want will be updated.
Begin by filling in the prefix and suffix range for bands that have identical information for the fields youwish to fill, and click Filter. Verify that these bands are the only ones now visible on your screen. Next, fillin all of the blocks on the first line of the table. Go to the bottom of the screen and check each box to theright of Fill Down By, selecting which information you want to have filled in the remaining records on yourscreen. Then click Fill Down. A Verify Fill Down Operation box will appear, giving you the opportunityto confirm this is actually what you want to do. Click OK if it is correct or Cancel if you see somethingyou do not intend to do. After clicking OK, all of the information in the selected columns will be repeatedin the remaining records.
Caution
It is imperative that you have the band numbers correctly selected/filtered before the fill-down feature is used. This feature can modify large numbers of records at one time and theoperation cannot be undone.
After completing the Fill Down function, either select the next range of bands you wish to perform thisoperation on or click Show All to return to the Table view showing all of your records.
6.6.3. Duplicating Banding Records
You can duplicate one banding record at a time using the Duplicate Band function located under the Records
menu found at the top of the screen. First, click with your cursor in any field in a row of completed data.
In the menu bar at the top of the screen select Records → Duplicate Band and all fields of the current rowwill be copied to the next row. CTRL-d is the shortcut for this function. To use the shortcut, click yourcursor in the row containing the data to be duplicated and press the CTRL-d key combination. The nextrow will be populated with the same data. This feature cannot be undone.
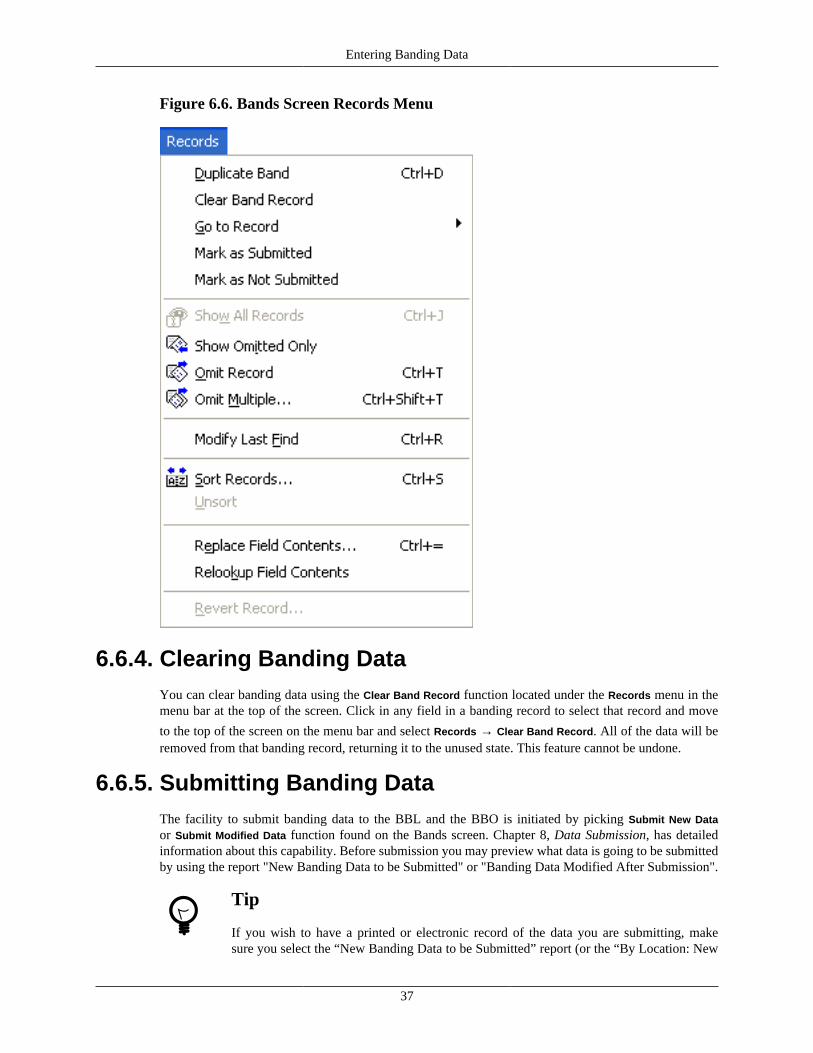
Entering Banding Data
37
Figure 6.6. Bands Screen Records Menu
6.6.4. Clearing Banding DataYou can clear banding data using the Clear Band Record function located under the Records menu in themenu bar at the top of the screen. Click in any field in a banding record to select that record and move
to the top of the screen on the menu bar and select Records → Clear Band Record. All of the data will beremoved from that banding record, returning it to the unused state. This feature cannot be undone.
6.6.5. Submitting Banding DataThe facility to submit banding data to the BBL and the BBO is initiated by picking Submit New Data
or Submit Modified Data function found on the Bands screen. Chapter 8, Data Submission, has detailedinformation about this capability. Before submission you may preview what data is going to be submittedby using the report "New Banding Data to be Submitted" or "Banding Data Modified After Submission".
Tip
If you wish to have a printed or electronic record of the data you are submitting, makesure you select the “New Banding Data to be Submitted” report (or the “By Location: New

Entering Banding Data
38
Banding Data to be Submitted” report) prior to submitting the data. This is the only meansyou have to create a schedule similar to the one you had using Band Manager. Look near thetop of the green part of the screen and locate Report Name. Select the name of the report in thedrop down list and click Show/Print Report. You will get a Print Options box where you maychoose to print or export the report. If you choose Print, you will have the choice of savingas PDF. This will be your only chance to print a schedule. After the data are submitted theywill no longer show in this report.
6.6.6. Importing Banding Data
Banding data can be imported by selecting the File → Import Data From File → Bands/Recaptures item fromthe File menu. See Chapter 12, Importing and Exporting, for more details on this capability.
Tip
Data quality checking constraints inside Bandit require the use of an ordered importsequence. Bands must be added into your inventory before banding data can be imported.Likewise, banding location data must be imported or created before banding data is importedto avoid location errors. Finally, bander information must be available before banding data isimported to avoid bander identification errors. Importing in this order: inventory, locations,bander information, and importing bands last will ensure consistency.
6.6.7. Exporting Banding DataIf you want to export banding data for use in another program or to share it with other people you can useone of several methods for data export found on the banding screen:
• Export Bands. Extract the banding information and create an external file in a variety of formats. Youcan choose which fields you want to export and the order in which you want them to appear.
• Save as PDF. Saves a version of the banding record (or records) as it (they) appear on the screen as anAdobe Portable Document Format (PDF) file suitable for printing or e-mailing.
• Save as Excel. This function outputs directly to the Microsoft Excel worksheet format. You cannotchoose which fields you want to see or the order in which you want them to appear. The entire Tableview will be exported into an Excel spreadsheet. If you want more versatility in the selection of fieldsor order of the fields you are exporting, see Chapter 12, Importing and Exporting.
6.6.8. ReportsThe Banding screen provides easy access to a variety of reports. Select the report you want to see fromthe drop-down list and click the Show/Print Report button. The report will be created in another window.You can flip through the pages by using the book icon in the navigation panel along the left side of thewindow and then choose to send the output to the printer, save the results in Microsoft Excel format, orcreate an Adobe Portable Document Format (PDF) file. See Chapter 10, Reports, for more details on thereports provided and detailed instructions for using the report facilities.

39
Chapter 7. Entering recapture andother re-encounter data
When a previously banded bird is recaptured, resighted, or encountered via another means, this isconsidered an encounter record. A recapture is the capture of a previously banded bird. A resighting isthe observation of a bird previously marked with a unique identifier such as a neck collar, wing tag, orradio transmitter. Recaptures and resightings are usually made by the original bander, but, like most othertypes of encounters, may be made by other banders, collaborators or the public. Recaptures and resightingsconstitute the majority of post-release data obtained from banded non-game birds, and for most analyticalpurposes the two can be considered equivalent. Individual banders often make extensive use of their ownrecapture and resighting data. In Bandit, for the sake of simplicity, we are referring to all re-encountersas “recaptures”.
A powerful suite of analytical models and software is available for analyzing recapture data to estimateparameters such as survival, population size, rate of population change, movement probabilities, and age-specific breeding probabilities. Many banders deliberately collect and analyze recapture data for theirproject-specific needs. Others cumulatively collect millions of recapture data records suitable for use inmark-recapture models but do not use them. The potential use of these data in population research andmanagement is great.
The functions available in the Recaptures section are similar to those in the Banding section. You havethe ability to add recaptures, delete recaptures, duplicate recapture records, and submit recapture data. Thetwo viewing modes, Table and Detail, are also available.
Clicking on Link 5 on the opening screen or clicking on the Recaptures button on one of the other screenswill bring up the screen for entering recapture data. This is actually a pair of screens showing two views(or modes) of the same information. The Table view shows a spreadsheet-like table of the information inthe recapture records. You can use this view to see a number of recapture records at a glance and rapidlyenter a large amount of data, but only a limited number of fields are visible without using the scroll bar atthe bottom of the window. The Details view allows you to see most of the fields in a particular recapturesrecord at once, but only for one record at a time. This view can be easily navigated by using the lightgray navigation panel that appears on the top of the screen. Using this panel you can flip forwards andbackwards through the records or jump directly to a particular recapture record.
By default, Bandit enters the Recaptures screen in Table view. To switch to Details view, click the Details
button. To switch back to Table view, click the Table button.
Note
Looking for the Save item in the File menu? Bandit automatically saves data whenever youleave a record or go to another screen so you never have to worry about doing the saveyourself.
7.1. Recaptures Screen—Table ViewThe table mode presents the recapture data in much the same way as it would appear in a spreadsheet. Likea spreadsheet you can rapidly enter information and use other keyboard commands to skip to the next andprevious fields, duplicate information in successive records, jump to the first field in the table, etc.

Entering recapture andother re-encounter data
40
Figure 7.1. Recapture Table View
7.1.1. Sorting Recapture Data by ColumnsMost of the time when you are entering data you will want to see the recapture records sorted in a preferredorder. You can sort on any field by clicking on the column header. Click once to sort in ascending order.Click again to sort in descending order. Click on another column header to sort the records based on thevalue in that field. You can also sort records by using Sort Records in the Records menu at the top of thescreen. It can sort by multiple columns.
7.1.2. Entering Recapture Data in Table ViewTo enter recapture data, click in one of the cells to start. You can see what is supposed to be entered intoa particular column by pausing with your cursor over any cell in a column. The prefix and suffix of eachband number must be entered into separate columns.
If this is a recapture of one of your bands currently being maintained in the banding inventory in Bandit,choose R (for Recapture) from the Disposition drop-down list. If you have recaptured a bird that was bandedby someone else, choose F (for Foreign Recapture) from the Disposition drop-down list.
Many of the fields have a list of possible values associated with them. You can click the little triangle tobring up the list or type in the value yourself. For coded fields, you may wish to refer to the associatedreference table. You may do so at any time by clicking on the Reference section button near the top ofthe screen.
The Species, Age, and Sex fields can be coded using either alpha or numeric codes. Refer to the Data Entrysection in Chapter 3, Bandit Settings, for details on how to tell Bandit which coding format you wish touse (and be sure the Settings section is completed prior to entering recapture information.)
Many of the fields feature type-ahead completion. As you type, the program looks through the list ofpossible values and finds the first one that matches what you have typed so far, completing the value. If thisis the value you want you can just Tab to the next field. If this is not the value you want, continue typinguntil the value is matched. The Tab key takes you to the next field. Shift-Tab takes you to the previous field.

Entering recapture andother re-encounter data
41
7.2. Recaptures Screen—Details ViewThe Details view of the Recaptures screen presents the recapture data as a collection of fields shown as aform, making it easier to see related information (such as auxiliary marking). Although the screen presentsdata on only one recapture at a time, a navigation panel is provided to scroll through the recapture records.The Details view also provides additional features not available in Table view for auxiliary marking, errorreporting and bypassing certain errors and more.
In the details view on the right-most portion of the view, there is also the ability to see the banding data ifit is in the Bands module or to add the banding data for foreign recaptures/re-encounters. Typically youwill only know this information after hearing back from the BBL after you report the band. Fields thatcan be added for foreign recaptures are banding date, banding age and sex, and banding location. Thesefields are here for your information and are not viewable in the Table view, nor do they interact with anyof the recapture fields for editing purposes.
Figure 7.2. Recaptures Details View Screen
Entering Recapture data in Details view has all of the features from Table view, described in the previoussection, including help when you pause over a field, value lists, type-ahead completion, and the use of theTab key (and Shift-Tab) to jump from one field to the next.
Tip
Enter key (Return Key on MAC) works the same way as Tab Key.
7.2.1. Using the Navigation PanelThe Details view provides a gray navigation panel at the top of the screen. The navigation panel includesa small book icon to flip forward (right-hand page) or backward (left-hand page) through pages. Use theslider below the book to rapidly scroll ahead or back in the book.

Entering recapture andother re-encounter data
42
7.2.2. Entering Auxiliary Marker Data
The Details view has a tab named Aux Marker which is for entering auxiliary marker data associated witha bird. First choose a marker type from the drop-down list in the Aux Marker Type field. If the auxiliarymarker contains a code, click on the circle with Y under the Is Aux Marker Coded? and fill out the left-hand side of the screen, indicating the actual code, the color of the band, and the color of the code. Ifthe bird is marked by a sequence of uncoded colored bands on one or both legs, click on the circle withN under the Is Aux Marker Coded? field and fill out the right-hand side of the screen, choosing thecolors for the sequence of bands as appropriate. The Remarks field is repeated here, making it easy toadd explanatory remarks if necessary.
Caution
The Aux Marker fields are in place to describe auxiliary markers on the bird at time ofrecapture. If a marker is added or replaced prior to the bird's release, the new markerdescription, including any codes on the marker, should go into the Remarks field, not theAux Marker fields. If a bird's status is changed as the result of adding or removing markers,the How Obtained for the recapture record must be “53: Captured for Scientific Purposes(not collected). Status changed.” Remember that changing the status of any already-bandedbird requires permission from the BBL or BBO.
Figure 7.3. Aux Marker tab on the Recaptures Screen—Details View

Entering recapture andother re-encounter data
43
Figure 7.4. Aux Marker for a Sequence of Uncoded Colored Bands
The Aux Marker Combined field is automatically generated from the rest of the information on thescreen. It summarizes the information into a single field. This is the field that is submitted to BBL/BBO.
Note
The Aux Marker page in Bandit is a work in progress, and currently only accommodatesrelatively simple auxiliary marking conditions. If you feel you cannot properly describe themarker(s) by using the available auxiliary marker fields, first complete the available fieldsand describe the remaining details in Remarks. If the bird has more than one type of marker,one of which is coded, describe only the coded one and mention the others in remarks. Inthis case, you would set the Aux Marker Type field to match the type of the coded marker. Inany combination of markers, the default one to be reported here is the one most likely to beseen and reported by the public.
7.2.3. Entering Data for Double Banded Birds
If you recapture a bird that is double banded with an additional Federal band, enter the second band numberin the Second Band # field in the recapture record.
If a bird is recaptured and the original band is replaced or an additional Federal band is placed on an alreadybanded bird, this is considered a banding event and should be recorded in the Bands table. See Chapter 6,Entering Banding Data for more information.
7.2.4. Recording Recaptures from the Banding DetailsView
If you want to record the recapture of a bird you banded previously, in the Banding Details View clickthe button next to the band number labeled Report Recapture. A new recapture record will be created

Entering recapture andother re-encounter data
44
and you will automatically be switched to the Recapture module. Band Number, Disposition, Species,and How Obtained will be pre-populated by the Bandit.
7.3. Error CheckingBandit automatically and transparently checks the recapture data using a variety of checks to ensure the dataare coded correctly and the fields are internally consistent. Any fields that fail these checks are considered“errors”. You can see the errors Bandit has identified for an individual record by looking at the Error fieldin the Details view or the Error Text column in the Table view. The field containing the error text will behighlighted in yellow if there are non-bypassable errors in the record. Once the non-bypassable errors areresolved, the error text will no longer be highlighted. Refer to Appendix C, Data Editing Error Messagesfor a complete description of the errors that may occur and how to correct them. Some less-critical errorsmay be bypassed, allowing the recapture record to be submitted during the data submission process. Whenyou click Y in the Bypass Error field, the error message will still be visible if left unresolved, but the recordwill be submitted during the data submission process. If you try to bypass errors and Bandit does not allowit, one or more errors in the record cannot be bypassed. Records with errors that were not bypassed or arenon-bypassable will not be sent during the data submission process.
7.4. Using the Remarks FieldAssociated with each recapture record is a Remarks field which is useful in several situations. Add anexplanatory remark whenever you bypass an error, indicating why the error does not apply to this record.Add a remark as necessary for special auxiliary marking situations not covered by the capabilities of theauxiliary marker fields. You can add any other information you want the banding office to be aware of.Keep in mind that only the first 250 characters of the Remarks field are submitted to the BBL/BBO. Ifyou wish to keep other detailed information associated with a particular recapture that is not sent to theBBL/BBO, use one of the user-defined fields.
7.5. User FieldsUp to 5 additional fields can be associated with each recapture record. You can create labels for thesefields on the Settings screen. Enter and edit information for these fields using the User Fields tab on theDetails view of the Recaptures screen or by referring to the User Field 1, …User Field 5 columns on theTable view. An arbitrary amount of information can be stored in each of these fields. Use the scroll barto scroll through the information.

Entering recapture andother re-encounter data
45
Figure 7.5. User Fields tab on the Recaptures Screen—Details View
7.6. Other Features of the Recaptures ScreensThe Recapture screens have several other important features. The most important is the ability to submitrecapture data to the BBL or the BBO. Other features facilitate data entry and editing such as the abilityto filter the recapture records visible on the screen, propagate field values throughout a collection ofrecaptures, duplicate the contents of a recapture record, and delete a recapture record or series of recapturerecords. Also, see Appendix A, Tips and Shortcuts for additional enhancements to data entry and editing.
7.6.1. Filtering Recapture Data
You may select which recaptures are visible in the Table view by filtering by prefix, suffix range, andsubmitted recaptures (see footer area of the screen). If you fill in just the prefix, only those bands with thatprefix will be on your screen. If you fill in only the first suffix, all the bands with that suffix and higher willbe in view. If you fill in both suffix blocks, only those bands in that range will be in view. The Submittedcheckbox can be checked to narrow the list even further. The Submitted box can be checked and usedwithout entering anything in either the prefix or suffix boxes as well. After you have entered your criteriaclick the Filter button. To go back and see all of your bands click the Show All button.
Tip
If you open Bandit and all of your records are not visible as you may expect, you may haveperformed a filter operation the last time you used the program. In this case, be sure to clickon the Show All button to bring all of your bands back into view.

Entering recapture andother re-encounter data
46
Tip
See Chapter 9, Find Mode for an alternative way to select recapture records you want tooperate on. Find mode will permit you to do more complex searches and base your selectionon any of the fields in either the Table or Detail view.
7.6.2. Duplicating Recapture RecordsYou can duplicate one recapture record at a time using the Duplicate Recapture function located under theRecords menu found at the top of the screen. First, click with your cursor in any field in a row of completeddata. Select Duplicate Recapture from the Records menu and all fields of the current row will be copied tothe next row except for the band number. CTRL-d is the shortcut for this function. To use the shortcut,click your cursor in the row containing the data to be duplicated and press the CTRL-d key combination.The next row will be populated with the same data.
Note
For those accustomed to using CTRL-d in Excel, note that this is the opposite of how thisshortcut works in Excel.
7.6.3. Recaptures Records MenuIn addition to the previously described functions in the Records menu, there are others which may behelpful.
Delete Recapture – This will delete the recapture record that is selected. You will be prompted to answer ifyou want to permanently delete the entire recapture record. Select Cancel or Delete. This function cannotbe undone. This function is also available as an icon immediately below the file menu.
Delete All Found Recaptures – This will delete all recaptures in the found set. You will be prompted toanswer whether or not to permanently delete the records in the found set. Select Cancel or Delete All.This function can be used to delete all recaptures if Show All has been selected prior to this function. Thisfunction cannot be undone.
Add Recapture – This will allow a new recapture record to be added. This function is also available as anicon immediately below the file menu.
Mark as Submitted – This will mark all records in the found set as submitted. A prompt will provide thenumber of recapture records that will be marked as submitted. The submission timestamp will be set tothe current day for all records in found set. These records will not be submitted the next time SubmitRecap Data is selected.
Mark as Not Submitted – This will mark all records in the found set as not submitted. A prompt will providethe number of recapture records that will be marked as not submitted. The submission timestamp will beset to null for all records in found set. These records will be submitted the next time Submit Recap Datais selected.
Go to Record – This function is most useful when working in the Details view. Select ‘next’ or ‘previous’as needed. The record number for a recapture in the found set can be entered under the ‘Go To’ selection.
Show All Records – This function is the same as ‘Show All’ at the bottom of the screen when in Tableview. When selected, all recaptures will be shown in the Table view. If records were previously filteredor the Find function used, Show All Records can be used to return to a view of all recapture records.

Entering recapture andother re-encounter data
47
Show Omitted Only -Selecting this will show all records that were omitted from the previous found set.Clicking on the green pie immediately below the file menu will also revert to showing all omitted records.Clicking on it again will reverse the action.
Omit Record – This function will omit the selected record from the found set.
Omit Multiple... – This function will omit the number of records entered, beginning with the selected record,from the found set.
Modify Last Find - This will bring up the find criteria from your previous search and you can change oradd any fields you wish for a new search.
Sort – This will allow records to be sorted based on selected criteria. If the recapture records need to besorted at multiple levels (for example, first by prefix, then suffix, then recapture date), the desired ordercan be assigned based on the selected criteria in the Sort Order box. Records can be sorted in ascending,descending, or a customized order.
Tip
You can also sort records on any field by clicking on the column header. Click once to sortin ascending order. Click again to sort in descending order. Click on another column headerto sort the records based on the value in that field.
Revert Record – Returns the current record or request to the way it was before you began adding or changingdata in the record.

Entering recapture andother re-encounter data
48
Figure 7.6. Recaptures Screen Records Menu
7.6.4. Submitting Recapture Data
The facility to submit recapture data to the BBL and the BBO is initiated by picking the Submit Recap
Data function found on the Recaptures screen. Chapter 8, Data Submission has detailed information aboutthis capability.
7.6.5. Importing Recapture Data
Recapture data can be imported by selecting the Import Data From File# Bands/Recaptures item from theFile menu.
Caution
Make sure Recapture Date source field is mapped to target field Banding Recapture Date.

Entering recapture andother re-encounter data
49
If there is a column for a second band number in the source file it should be mapped to thetarget field Replaced Band Number.
How Captured and How Obtained are two different fields for different purposes. HowCaptured is the technique used to capture the bird (e.g. mist net, rocket netting) whereasHow Obtained is how recapture was encountered (see How Obtained table in the Referencesection of Bandit).
Figure 7.7. Recapture Import Field Mapping
See Chapter 12, Importing and Exporting for more details on this capability.
Tip
Data quality checking constraints inside Bandit suggest the use of an ordered importsequence. Bands must be added into your inventory before banding data can be imported.Likewise, banding location data must be imported or created before banding data is importedto avoid location "errors". Finally, bander information must be available before bandingdata is imported to avoid bander identification "errors". Importing in this order: inventory,locations, bander information, and importing bands last will ensure consistency.

Entering recapture andother re-encounter data
50
7.6.6. Exporting Recapture DataIf you want to export your recapture data for use in another program or to share it with other people youcan use one of several methods for data export found on the recapture screen:
• Export Recaps. Extract the recapture information and create an external file in a variety of formats. Youcan choose which fields you want to export and the order in which you want them to appear.
• Save as PDF. Saves a version of the recapture record (or records) as it (they) appear on the screen as anAdobe Portable Document Format (PDF) file suitable for printing or e-mailing.
• Save as Excel. This function outputs directly to the Microsoft Excel worksheet format. You cannotchoose which fields you want to see or the order in which you want them to appear. The entire Tableview will be exported into an Excel spreadsheet. If you want more versatility in the selection of fieldsor order of the fields you are exporting, see Chapter 12, Importing and Exporting.
7.6.7. Recapture data fields received and processed bythe BBL/BBO
There are 14 fields that are transmitted to the BBL/BBO when you submit data. These fields arePermit Number, Band Number, Disposition, Species, Age, How Aged, Sex, How Sexed, Recapture Date,Location, Aux Marker Combined, How Obtained, Present Condition, and Remarks. All of the data in thesefields must be "error" free in order for the data to be submitted. It is therefore recommended that you locatethe Error Text column, click on the heading, and drag that column so it is immediately to the right of thesecolumns. Any errors in the mandatory data will then be readily visible and can be corrected immediately.
After recapture data are submitted to the BBL/BBO, currently (at the time of release of Bandit v 3.0) onlyforeign recaptures and certain local recaptures are processed into the encounter database. Only one recordper band number per day (first received) is loaded into the BBL/BBO encounter database. Also, while thefields Age, How Aged, Sex, How Sexed, and Bird Status are submitted to the BBL, these fields are notcurrently loaded into the BBL/BBO encounter database.
Note
When recaptures are fully processed into the BBL/BBO encounter database, at the end ofthat week you will be sent a report, similar to the Report to Bander, titled Banding Reportfor Recaptures. It will contain the banding data for any fully processed foreign recapturessubmitted via Bandit v 3.0 and foreign replaced or added-to bandings submitted via anyversion of Bandit.

51
Chapter 8. Data SubmissionIn previous programs used to manage banding information, banding data were arranged to match a specialpaper coding form called a Banding Schedule. Typically banders, after inputting the data would print theschedule, which was then submitted to the BBL/BBO. Many banders found this confusing, as they wereunsure whether they had to wait until the schedule was completely filled out before they could send inthe banding data.
Bandit takes a different approach. Because there are no paper schedules to submit, new data or previously-submitted records that have been modified can be submitted at any time. Hopefully this will makesubmission of banding data less cumbersome and more timely.
Note
It is imperative that your data be nearly error free prior to using the data submission process.As described in the data editing section, some errors may be bypassed and some may not.Errors that cannot be bypassed must be corrected. Bypassed errors must be set to Y to skipthese errors. The program will tell you which errors can be bypassed when you attemptto bypass them. Records that contain errors that cannot be bypassed, or errors that can bebypassed and have not been, will not be transmitted using the data submission process.
Eight fields are required to be submitted. These include Band Number, Disposition, Species,Age, Sex, Banding Date, Bird Status, and Location. If you have placed an auxiliary marker onthe bird and used a status code reflecting that, aux marker data fields are also required. If youdo not have these fields filled in or bypassed correctly, the aux marker data fields will notbe included in the submission record when you submit data. The How Aged and How Sexed
fields are not required, but if the fields contain data, they must be valid and consistent withthe rest of the data in the record. The Remarks field may also be required, depending on thevalue of Bird Status, auxiliary marker, and whether errors have been bypassed.
8.1. Banding Data Submission ProcessWhen you initiate the data submission process by clicking on the Submit New Data function on the Bandingscreen the system automatically goes through the data looking for bands that have been used but the datahave not been sent previously. These bands are added to a file.
When you initiate the data submission process by clicking on the Submit Modified Data function, the systemlooks to see if any banding record has been modified since the last time that record was submitted. If so,these bands are marked for inclusion in the data submission. As with New Data, only records without"errors", or records where the "errors" were bypassed (true only for bypassable errors) will be submitted.
Tip
If you wish to have a printed copy of the data for your records you are submitting in a formatsimilar to the "schedule" produced by Band Manager, you must select the New Banding Datato be Submitted report from the Report Name drop-down menu, then click Show/Print Report
and choose any options you want from the pop up box, prior to submitting data. This reportcan only be created prior to submitting records.
You may also use the New Banding Data to be Submitted report to see all of the records readyto be sent. Any records containing errors will be highlighted so you can easily tell at a glancewhich records need to be corrected. Go to the bands Details screen, where you can see all

Data Submission
52
the errors, and bypass them in appropriate cases or fix the errors. See Figure 8.1, “BandingData to be Submitted Report” for an example.
Figure 8.1. Banding Data to be Submitted Report
Bandit prepares the file and displays a dialog box showing the number of records being submitted.(See Figure 8.2, “Bandit Data Submission Dialog Box”.) After the dialog box is dismissed, Bandit willautomatically launch your system-wide email program to send the message containing the file directly tothe BBL or the BBO, provided the system is configured to do so.

Data Submission
53
Figure 8.2. Bandit Data Submission Dialog Box

Data Submission
54
Figure 8.3. Bandit Data Submission Email
If your email program isn't automatically launched, the file containing the data submissionis saved to your My Documents folder (Documents folder on the Mac) with the nameBandit_Submission_PPPPP_YYYYMMDDHHMM.tab, where PPPPP is the permit number, YYYY is the currentyear, MM is the current month, DD is the current day of the month, HHMM is the time the file was created.So Bandit_Submission_55555_200607241020.tab contains a data submission that was created July 24,2006 at 10:20am by the bander with permit number 55555. Open your email client as if you were sendingany normal email and type [email protected] (or [email protected] for Canadian Banding Officesubmissions) in the address field and Bandit Banding Data Submission from PPPPP (Your Name) intothe subject field. Attach the file located in your My Documents folder as described above and then sendas any normal email.
The user has the option to create a Note for File, which will include a summary of all band spans andlocations submitted. You may print this note or save it as a file. The last Note for File will be available inthe Report Name drop-down menu, but only if you create the Note for File.

Data Submission
55
Figure 8.4. Note For Submission File Report
Once a banding record has been submitted, a submission timestamp will be created by the program andplaced in the Submission Timestamp field in the Table view or the Submission Date field in the Detailsview. A modification date is also maintained by the system, and changes whenever changes are madeto the banding record. If the banding record has been modified after its original submission, the recordwill automatically be included in the next submission file, when you choose to submit modified data. TheNumber of Submissions field on the Details view indicates how many times a particular banding recordhas been submitted.
Tip
If you are importing data from Band Manager or some other source file and you are certainthat data have been previously submitted, you can use the Mark as Submitted feature (in theRecords menu) to create a submission timestamp. First, use the Filter feature or the Find modeto select the subset of your records that have already been submitted. Next, choose the Mark
as Submitted item from the Records menu. The submission timestamp is created for all of therecords in the current found set and the records will not be included in future submissionsunless you modify a record. This can be handy if you wish to have all of your previous datain Bandit to check for recaptures, etc., but you should be sure to complete all of the importprocesses prior to entering new data. Remember to choose Show All Records from the Records
menu to see all of your records.
Once the data submission email is received by the BBL/BBO, an email response is returned, oftenimmediately, but usually by the end of the next business day. If you do not receive a response, it is likelythat the data file was not received. Check within your email program to see if the email is still pending. Ifnot, you may have to go to My Documents (Documents in Mac) and find the file and email it.

Data Submission
56
8.2. Recapture Data Submission ProcessWhen you initiate the data submission process by clicking on the Submit Recap Data link on the Recapturescreen the system automatically goes through the data looking for records without errors or with errorsbypassed. These recaptures are added to a file for inclusion. Only records not submitted previously willbe added to BBL database.
To submit recapture data, If your email program isn't automatically launched, the file containing thedata submission is saved to your My Documents folder (Documents folder on the Mac) with the nameBandit_Recaps_PPPPP_YYYYMMDDHHMM.tab. Open your email client as if you were sending anynormal email and type [email protected] (or [email protected] for Canadian Banding Officesubmissions) in the address field and Bandit Recaptures Submission from PPPPP (Your Name) into thesubject field. Attach the file located in your My Documents folder as described above and then send asany normal email.

57
Chapter 9. Find ModeFind mode may be used to search for particular records that match a set of criteria. You can then workwith this subset of your records, called the found set. Find can be used in either the Table or Details view.To make a find request:
1. Go to the screen that has fields in which you want to enter criteria: Bands, Recaptures, Locations orBand Inventory.
2. Choose Find Mode from the View menu at the top of the screen or use CTRL-f (CMD-f on the Mac).You may also click the magnifying glass icon in the grey portion of at the top of your screen, or chooseFind from Bandit Mode pop-up list in the bottom left corner of the screen, see Figure 9.1, “BanditMode Icon Bar”
Figure 9.1. Bandit Mode Icon Bar
3. Enter your criteria into any fields to be used for finding records. The more fields you fill in, the more younarrow down your found set. For example, you may just fill in a value for species. This will return allrecords for that species. If you fill in both species and age, it will return all records for just that speciesand that age. You can use operators such as greater than, less than etc. in your searches. Availableoperators can be seen and selected by right-clicking in the field and selecting Operators from the drop-down menu or using the Operators drop-down located in the status area at the top of your screen.
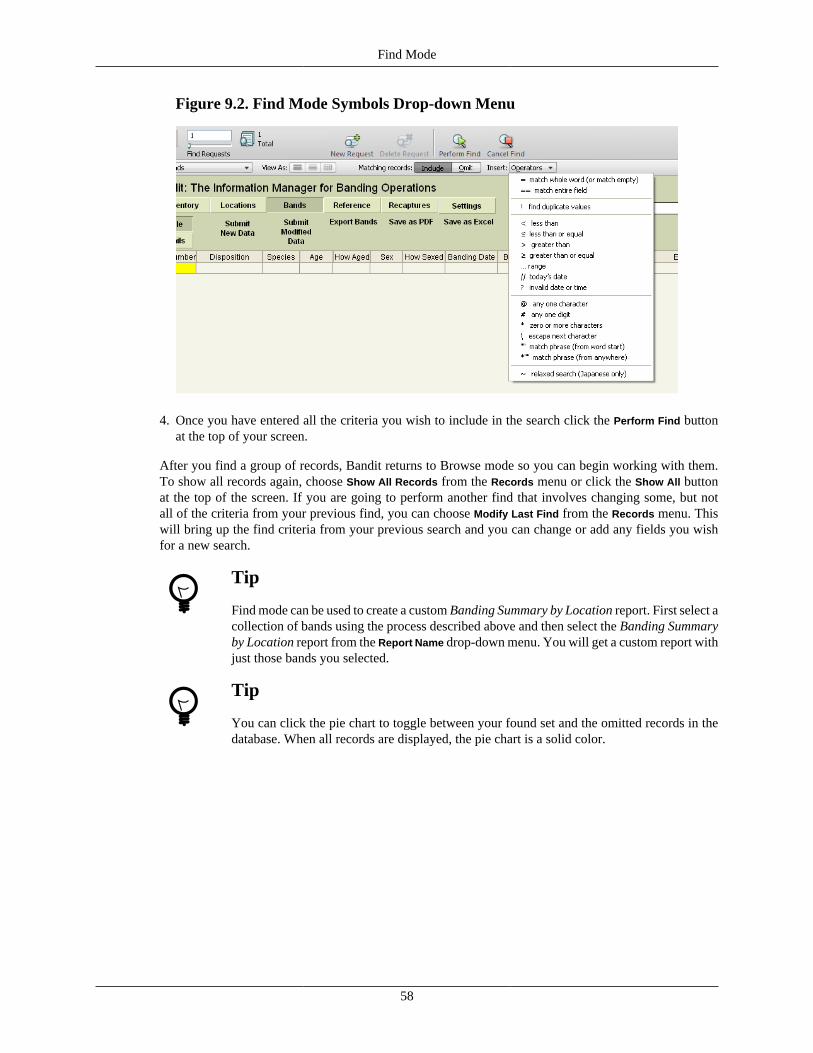
Find Mode
58
Figure 9.2. Find Mode Symbols Drop-down Menu
4. Once you have entered all the criteria you wish to include in the search click the Perform Find buttonat the top of your screen.
After you find a group of records, Bandit returns to Browse mode so you can begin working with them.To show all records again, choose Show All Records from the Records menu or click the Show All buttonat the top of the screen. If you are going to perform another find that involves changing some, but notall of the criteria from your previous find, you can choose Modify Last Find from the Records menu. Thiswill bring up the find criteria from your previous search and you can change or add any fields you wishfor a new search.
Tip
Find mode can be used to create a custom Banding Summary by Location report. First select acollection of bands using the process described above and then select the Banding Summaryby Location report from the Report Name drop-down menu. You will get a custom report withjust those bands you selected.
Tip
You can click the pie chart to toggle between your found set and the omitted records in thedatabase. When all records are displayed, the pie chart is a solid color.

59
Chapter 10. ReportsAll of the reports in Bandit are available from the Bands section. Pick the report you want from the Report
Name drop-down menu and click the Show/Print Report button. A new window will appear where you canpreview the report. Use the book icon on the navigation and status panel at the top of the window to lookthrough the pages of the report. A small dialog box will also appear with 2 checkbox options: Export to
Excel and Print. You can select any or all of these options. Then click OK to complete the process or clickCancel to cancel the process.
Figure 10.1. Bands Screen with Reports Drop-down
The following reports are available in Bandit.
Report Name Use
New Banding Data to be Submitted Similar to the "Schedule" produced from Band Manager. Thisreport must be produced before the submission process. Itcontains all the records not submitted to BBL previously(Number of submission = 0).
Banding Data Modified after submission Similar to New Banding Data to be Submitted report exceptit contains only previously submitted data that was modifiedsince last submission (Number of submission >0).
Banding Summary by Location Summary report grouped by location showing the number ofbirds of each species, age, and sex combination banded atthat location. Use the filter function or the find mode beforerequesting the report to select a subset of all the records to beused for this report.
By Bander: Count Birds Handled perYear
Summary report showing how many birds have been handledby each bander.
By Location: New Banding Data to beSubmitted
Similar to the "Schedule" produced from Band Manager, withthe information divided by banding location. This report must

Reports
60
Report Name Use
be produced before the submission process. It contains allthe records not submitted to BBL previously (Number ofsubmission = 0).
By Location: Banding Data Modifiedafter submission
Similar to By Location: New Banding Data to be Submittedreport except it contains only data submitted before andmodified since last submission (Number of submission >0).
By Species: Count Bandings by recordtype
Summary report divided by species showing how many birdswere banded, recaptured, etc.
By Species: Count Bandings Per Day Summary report divided by species showing how many birdswere banded each day over a range of dates.
By Species: Count Bandings Per Month Summary report divided by species showing how many birdswere banded each month over a range of dates.
By Species: Count Bandings Per Year Summary report divided by species showing how many birdswere banded each year over a range of dates.
By Species: Count Birds by Age and Sex Summary report divided by species showing how many birdsof each age and sex combination are being maintained in theinventory.
Summary of Bandings per Location byDate
Summary report showing the banding activity for each locationover a range of dates.
Last Note For File (Bands) The last Note for File submission report created during thesubmission process is available under this selection, providedyou asked to create the Note for File at the time of submission.
Unused Bands Removed A report showing the list of bands removed via the RemoveUnused Bands from Inventory function.

61
Chapter 11. Reference TablesBandit uses a variety of reference tables to facilitate data entry and aid in the error checking process.
Figure 11.1. Bandit Reference Tables Screen
To see what is contained in any of the reference tables, click on the Reference tab at the top of the screen.Here is a list of the reference tables and their use.
Age Bird age codes and meanings. Both alpha and numeric codes are given.Used in the drop-down lists for age data entry and error checking.
Color List of color codes and their meanings, for use with auxiliary markings.
Condition Present condition of the bird/band used in recapture module.
Disposition List of banding and recapture record disposition codes and theirmeanings.
Error Messages Error messages, Causes, and Resolutions for all the possible banding,recapture and location errors.
Other way to lookup Error Messages is by using Error MessagesLookup under Help menu (where you can do find and sort as well).
How Aged List of how aged codes and their meanings.
How Obtained Explanation for the How Obtained codes used in recapture module.
How Sexed List of the how sexed codes and their meanings.
Present Condition List of the codes and their meanings for the condition of a recapturedbird when it was released.
Region Region codes and their equivalent meanings for geographic regions.The region codes are being phased out in favor of using the Federal

Reference Tables
62
Information Processing Standard (FIPS) codes for country, state/province/territory, and county/parish/district.
Sex Bird sex codes and meanings. Both alpha and numeric codes are given.Used in the drop-down lists for sex data entry and error checking.
Size List of band sizes. Refer to the Species tab to see which band sizes areallowable on which species of bird. Used in the drop-down list for bandsizes.
Species Bird species alpha codes, numeric species ids, names, and allowableband sizes. Used in the drop-down list for species and for error checking.Because this list is lengthy, it includes a search facility.
Species-Age-Sex-Month Months or fractions of months a particular species, age of bird, and sexof bird combination is likely to be encountered.
Species-State-Month Months or fractions of months a particular species is likely to beencountered within a particular state/province/territory or country.
Status Combination of the bird "status" and "additional information" fields.Lists status code and a longer description. Because this list is lengthy,it includes a search facility
Type List of the types of bands that may be used. Used in the drop-down listfor band types.

63
Chapter 12. Importing and ExportingThe ability to transfer data between Bandit and other programs such as Excel and SAS is an importantpart of successfully integrating Bandit into your work processes. These capabilities have been enhancedin the current version of Bandit.
Tip
Data quality checking constraints inside Bandit suggest the use of an ordered importsequence. Bands must be added into your inventory before banding data can be imported.Likewise, banding location data must be imported or created before banding data is importedto avoid location errors. Finally, bander information must be available before banding data isimported to avoid bander identification errors. Importing in this order: inventory, locations,bander information, and importing bands last will ensure consistency.
12.1. Importing from Band ManagerYou can import four kinds of records from Band Manager: Band Inventory, Banding Locations, Banders,and Bands. The first step is to use the export facilities of Band Manager to export the data in each ofthese four areas. Export the files to a location on your hard drive or removable storage device that youwill be able to easily locate later, and be sure to give the files meaningful names so you know what eachof the files contains. Most often, it will be easiest to export them into the Band Manager Export folder.When exporting files from Band Manager for future importing into Bandit, it is best to select dbf as thefile type for export in Band Manager. However, if you have user-defined fields, Excel is the preferred filetype for the export.
Imports for all four kinds of records from Band Manager can be done by selecting the appropriate Import
item located in the File menu. For each kind of record, the process is the same: find the file containing therecords you exported from Band Manager, verify that the fields from the import file match the fields inthe Bandit record, and click the Import button. Bandit will automatically verify the data from the importfile and incorporate it into the Bandit data file. In addition to Import from Band Manager, Bandit providesthe capability to import bandings, locations, and bander information from a variety of other types of files.For more information, see Section 12.2, “Importing from Other Sources”, below.
12.1.1. Importing Band Inventory from Band ManagerBegin the process by exporting your inventory in Band Manager as a dbf (dBase IV) file into the BandManager Export folder and be sure to name it as something you will remember. Also check the box inBand Manager at the bottom of the Export screen for the No. of Bands and note that number. Switch to
Bandit and click on the File menu and then select Import from Band Manager → Band Inventory from thesubmenu. A dialog box will appear asking you to locate the file containing the data you exported fromBand Manager. Navigate to the Band Manager Export folder and click on the inventory file you exportedfrom Band Manager and wish to import into Bandit. A results box will appear telling you how many bandswere successfully imported as well as the number of spans added to your inventory. Ensure that the totalnumber of bands that were imported matches the number of bands shown on the inventory Export screenas mentioned above. This will ensure that you successfully exported all of your bands from Band Managerand imported them into Bandit.
Warning
Import Inventory from Band Manager may take a long time if you have a large number ofbands. The process is fairly quick (minutes) for less than 10,000 bands but may take some

Importing and Exporting
64
time (hours) if your inventory in Band Manager is extensive, particularly in the 100,000 bandrange. Do not interrupt this process. After the import has started, clicking anywhere else inthe program will interrupt it. Interrupting the import process will result in erroneous recordsbeing entered into the band number field and the only way to correct this is to reload theprogram.
12.1.2. Importing Locations from Band ManagerBegin the process by opening Band Manager and navigating to the export function for locations by clickingthis sequence of buttons: Utilities, Program Lookups, Locations, Export. Your locations table will open.Select dBase IV as the format and export the locations table to the Export folder by clicking on Export.
Switch to Bandit and click on the File menu and then select Import from Band Manager → Locations. Adialog box will appear asking you to locate the file containing the data you exported from Band Manager.Navigate to the Band Manager Export folder and click on the locations file you exported from BandManager and wish to import into Bandit. An Import Field Mapping box will appear. About 2/3 of the waydown the window on the right side, just at the top of the gray area, there will be an Arrange By drop-downlist. Select Matching Names from the drop-down list if it is not already there and then click the Import
button at the bottom right of the window. An Import Summary box will appear showing you how manylocations were successfully imported. Make sure this is the same number of locations you had in BandManager. Click OK. An Import Locations Result box will appear showing you how many locations wereadded to the Bandit locations table. Click OK. The locations will now be in your table, added to the bottomif you already had locations entered into the table. You must now add the counties to the table to get theValid? column to say Yes. County is required in Bandit for U.S. locations. Click on the Location tab tonavigate to the location table.
12.1.3. Importing Bander Information from BandManager
Begin the process by opening Band Manager and navigating to the export function by clicking thissequence of buttons: Utilities, Program Lookups, Banders, and Export. Once again, select dBase IV as theappropriate format and click Export. Name the file and save it in the Band Manager Export folder. Switch
to Bandit and click on the File menu and then select Import from Band Manager → Banders. A dialog boxwill appear asking you to locate the file containing the data you exported from Band Manager. Navigate tothe Band Manager Export folder and click on the banders file you exported from Band Manager and wishto import into Bandit. An Import Field Mapping box will appear. About 2/3 of the way down the window onthe right side, just at the top of the gray area, there will be an Arrange By drop-down list. Select MatchingNames from the drop-down list if it is not already there and then click the Import button at the bottom rightof the window. An Import Summary box will appear showing you how many banders were successfullyimported. Make sure this is the same number of banders you had in Band Manager. Click OK. An Import
Banders Result box will appear showing you how many banders were actually added to the Bandit banderinformation table. Click OK. The banders will now be in your table, added to the bottom if you already hadbanders entered into the table. You can now add the email addresses and phone numbers for sub bandersby clicking in the appropriate fields on the banders information table. The banders information table islocated by clicking the Settings section button and then the Bander Info tab.
12.1.4. Importing Banding and Recapture Records fromBand Manager
Begin the process by opening Band Manager and selecting the file containing the banding records youwish to import into Bandit. Open that file and then click Export and go through the Band Manager export

Importing and Exporting
65
fields process. Select the dBase IV format and click Export. Name the file and save it in the Band Manager
Export folder. Switch to Bandit and click on the File menu and then select Import from Band Manager →Bands/Recaptures. A dialog box will appear asking you to locate the file containing the data you exportedfrom Band Manager. Navigate to the Band Manager Export folder and click on the banding records fileyou exported from Band Manager and wish to import into Bandit. An Import Field Mapping box willappear. About 2/3 of the way down the window on the right side, just at the top of the gray area, there willbe an Arrange By drop-down list. Select Matching Names from the drop-down list if it is not already thereand then click the Import button at the bottom right of the window. An Import Summary box will appearshowing you how many bands were successfully imported. Make sure this is the same number of bandsyou had in Band Manager. Click OK. An Import Banders Result box will appear showing you how manyband records were actually assimilated into the Bandit banding records table. Click OK.
12.2. Importing from Other SourcesBanders who have never used Band Manager, but maintain files in other formats, such as Excel, Access,SQL Server, dBase, etc. can also import data into Bandit if they wish to do so. In the File menu, chooseImport Data From File. It is recommended that, when the data are exported from the other program, they bein tab-delimited (.tab), comma-delimited (.csv), Excel spreadsheet (.xls), or dBase (.dbf) format.
Figure 12.1. Import Data from File
After the Import Data From File choice is made, choose the file and note that a Field Mapping screen appears.In the Arrange By box, the recommended choice is matching names, but this option will not work unlessyou have already named your fields to match those in Bandit. For fields that do not match, click and dragthe target fields up or down, using the double-sided arrow icon, to match the data you see from the sourcefields on the left. You must also make sure that any field you want to import has a thick arrow, not a thinline connecting from the source side to the target side. If the data you are importing has headings in thefirst row, you should click the option Don’t import first record at the bottom of the screen.

Importing and Exporting
66
Figure 12.2. Import Field Mapping Screen
When using this import option, it is important to note that the band number can be separated into two fields:prefix and suffix or together in one field. Also, the date can be expressed as one field or three separatefields. The Field Mapping screen allows for either option. If Band Number is in one field it can includea dash between prefix and suffix or not.
Tip
In Excel, numbers with dashes have the advantage that the leading zeros are maintained on3-digit prefixes. If you have your data in separate fields or don’t want to use dashes, put anapostrophe (single quote) in front of the band number to tell Excel to treat the value as textrather than as a number.
Tip
Dates can be imported as either 3 separate fields: month, day, and year, or as one combinedfield. If you are using one combined field, put the fields in the order month, then day, thenyear, and separate the parts with either slashes '/', dashes '-', dots '.', or semicolons ';' (but youmust use the same separator character in both places). Either two- or four-digit years can beinput, but note the following: two-digit year dates are converted into four-digit year datesbased on the year in which the date is entered into Bandit, with the assumption that the four-digit year date should be in either the next 30 years, or the preceding 70 years.

Importing and Exporting
67
12.3. Exporting from BanditBandit has several ways of exporting data. You can export data to Adobe Portable Document Format(PDF), Microsoft Excel Worksheet format, or a variety of other formats, including tab-delimited text,comma-delimited text, SYLK, DBF, HTML Table, and XML.
Note
Microsoft Excel 2003 has a limit of 65,536 rows. If you choose the Microsoft ExcelWorksheet (.xls) format for export, only the first 65,536 records will be exported.
12.3.1. Exporting Bands, Band Inventory, Banders,Locations and Recapture Records
To export bands from Bandit go to the File menu. Then go to the Export Into File sub menu and select Bands.A dialog box will appear asking you to name the file you want to export the records to, where you want toput the file, and the type of file you want to create. When you click Save (or just press Enter) a new dialogbox will appear allowing you to select the fields you want to export and the order in which you want themto appear in the exported file. A number of fields have already been selected and will appear in the boxlabelled Field export order. You can select additional fields from the list on the left and click Move to addit to the Field export order box, click a field in the Field export order box and click Clear to remove the fieldfrom the export list, or click and drag up and down with your cursor on the little double-pointed arrow iconto move the fields up or down in the Field export order box. Finally, click Export to complete the operation.
Use a similar procedure to export band inventory, banders, locations, and recaptures. Each of these itemsappears under the Export Into File sub menu under the Files menu. To export band inventory go to the File
menu. Then go to the Export Into File sub menu and select Band Inventory. To export banders go to the File
menu. Then go to the Export Into File sub menu and select Banders. To export locations go to the File menu.Then go to the Export Into File sub menu and select Locations. To export recaptures go to the File menu.Then go to the Export Into File sub menu and select Recaptures.
Tip
Bander information, banding locations, and wing and weight data can also be exporteddirectly from the tabbed screens associated with each of these collections in the Settingssection. See Chapter 3, Bandit Settings.
12.3.2. Exporting Reference TablesTo export reference tables go to the tab page with the reference table you want to export. Then click theExport button in the upper left hand corner of the screen. Enter in the file name and select the file type. Tab-separated Text Files (*.tab), comma-separated Text Files and Excel Files (*.xls) are the most common.
68
Chapter 13. Bandit Backup File13.1. Creating a Backup File
Each time you open Bandit you will see a pop-up box that asks you if you wish to create a backup file. Itis recommended that you always choose OK. By selecting OK, a backup file is created and saved beforeyou start making changes to the data. The backup file is normally saved into your My Documents folder(Documents folder on the Macintosh) but you have the option of choosing an alternate location. Then,if something happens while you are in the program, you can use the backup file to restore the Banditdata up to the date of the backup. By selecting OK at the beginning of each session, there is no need toworry about being unable to recover from unanticipated problems. To identify the backup files, Banditgives them a special name which includes the date and time the backup was created. (Bandit Data bak200803141549.fp7 is the backup created March 14, 2008 at 3:49pm.) You may delete these files anytimeyou wish, but you may want to keep at least the latest two or three files in case you need to use them. Youmay also create a separate folder and move them there after they are created. You can also rename or addto the name of the files to help you keep them straight.
In addition there is ability to create backup file at any time by using Backup Data function under the File
menu.
Tip
For additional protection against unforeseen circumstances such as disk crashes, operatingsystem corruption, etc., it is a good idea to store your backup files on a separate disk from theone containing your primary data file. You can store the files on a removable disk such as aCD, a USB-based drive, or a different hard drive in your system, if you have more than one.
13.2. Restoring from a Backup FileIf you inadvertently delete your data file or you feel you have corrupted your data file to the point youmust step back to a previous version, restoring from a backup file may be necessary. Keep in mind that ifyou choose to restore from a backup file,addition or corrections made since that file will be lost.
Restoring data from a backup file created in Bandit 1.02 or later is quite simple. From the File menu at thetop of the screen, click Restore From Backup. Navigate to your My Documents folder (Documents folder onthe Macintosh) and select the backup file that you wish to use to restore your data. Choose “OK” on thepop-up dialog box. Another pop-up box will appear showing you the results of the restore process.
Restoring data from a backup file created in Bandit 1.0 is a little more complicated. After you select thebackup file you wish to use to restore your data, a series of dialog boxes will appear asking you to put inyour Name and Password. In the name field, enter user for the name and leave the password field blank. Itmay be necessary to repeat this many times. At the end of this process, the pop-up box will appear showingyou the results of the restore process.

69
Appendix A. Tips and ShortcutsOn the Bands and Recaptures screens (both Details and Table data entry modes) you can duplicate thecontents of the current record into the next record by selecting Duplicate from the Records menu or usingthe keyboard shortcut (Windows: CTRL-d; Macintosh: CMD-d).
To duplicate (ditto) the contents of a field from the same field in the previous record, type Windows:CTRL-'(single quote mark); Macintosh: CMD-' (single quote mark). Add the shift key (Windows: SHIFT-CTRL-' (single quote mark); Macintosh: SHIFT-CMD-' (single quote mark)) to do the duplicate (ditto)and automatically tab to the next field.
To enter today’s date, type Windows: CTRL-(dash); Macintosh: CMD-(dash). ???
To enter the current time, type Windows: CTRL-(semicolon); Macintosh: CMD-(semicolon).
To go to the next record, type CTRL-(down arrow). To go to the previous record, type Windows: CTRL-(up arrow).
To go to the first field in the record, type Windows: CTRL-(left arrow); Macintosh: CMD-(left arrow).
To go to the next field, type Tab. To go to the previous field, type Shift-Tab.
To enter Find mode, type Windows: CTRL-f; Macintosh: CMD-f. To enter Browse mode, type Windows:CTRL-b; Macintosh: CMD-b.
To copy all of the records to the clipboard, hold down ALT-SHIFT (OPT-SHIFT on the Macintosh) andselect Copy from the Edit menu. Then go to another application, like Word or Excel, set an insertion pointand select Paste.

70
Appendix B. Bandit Band RecordWithin Bandit, the Band Record is the primary place where data is stored about a banding. Although manyof the fields contain primary information about banding, some of the fields are used for error checking. Inthis Appendix, only the fields of general interest to banders will be described.
Additional Errors Additional error text associated with the banding record.
Age User-visible age code in either alpha or numeric form, dependingon the setting in the preference section.
Age Code1 Numeric age code equivalent of the Age field.
AOU1 Numeric species id based on the 4-digit numbering schemeoriginally developed by the American Ornithologists’ Union.
Aux Marker Band Color The code referencing the color of the auxiliary marker band.
Aux Marker Code The alphanumeric string imprinted on the band.
Aux Marker Code Color The code referencing the color of the alphanumeric string imprintedon the band.
Aux Marker Combined1 A calculated field combining all of the given auxiliary marker-related fields.
Aux Marker Type The type of auxiliary marker used on the bird.
Band Number Calculated version of the band number containing the prefix, a dash,and the suffix.
Band Size Coded size of the band.
Bander ID Identifier for the bander who handled this bird. If this was an officialsub-bander, this should be the sub-bander ID.
Banding Date1 Date the bird was banded.
Bill Height Height in millimeters of the bill.
Bill Length Length in millimeters of the bill.
Bill Width Width in millimeters of the bill.
Bird Status1 The 3-digit code indicating the status of the bird after the bandingoperation was completed.
Bird Weight The weight in grams (mass) of the bird at the time it was captured.
Body Molt Whether or not body molt was observed.
Brood Patch Presence and size of the brood patch.
Capture Time Time of day the bird was captured.
1Data field submitted as part of the banding record. These fields must be error free or have the errors bypassed if able with remarks.

Bandit Band Record
71
Cloacal Protuberance Presence and size of the cloacal protuberance.
Culmen Length Length in millimeters of the culmen.
Date Received Date the band was received.
Disposition1 Code indicating what happened to the band.
Errors Error text associated with the banding record.
Ectoparasites Whether or not ectoparasites were present on the bird.
Eye Color Color of the eyes of the bird.
Fat Score Amount of migratory fat found on the bird, using a scale of 1-6.
How Aged1 Code indicating how the age of the bird was determined.
How Captured Code indicating how the bird was captured.
How Sexed1 Code indicating the method used to determine the sex of the bird.
Left Leg Color 1 Color of the 1st auxiliary marker on the left leg for non-codedmarkers.
Left Leg Color 2 Color of the 2nd auxiliary marker on the left leg for non-codedmarkers.
Left Leg Color 3 Color of the 3rd auxiliary marker on the left leg for non-codedmarkers.
Net Nest Cavity Designator How (or from where) the bird was captured. Could be Mist Net,Nest, Box, etc.
Net Nest Cavity Number Specific location where bird was captured from.
Prefix1 The 4-digit prefix of the band number. The value has leading zerosif necessary.
Present Condition The condition of the bird.
Right Leg Color 1 Color of the 1st auxiliary marker on the right leg for non-codedmarkers.
Right Leg Color 2 Color of the 2nd auxiliary marker on the right leg for non-codedmarkers.
Right Leg Color 3 Color of the 3rd auxiliary marker on the right leg for non-codedmarkers.
Remarks1 Free-form text for remarks relating to this bird. May indicateadditional information about aux markers, methods used, etc. Onlythe first 100 characters of the remarks are included in the datasubmission.
Replaced Band Number1 If the band is a replacement band or an additional band put on abird, this field contains the band number of the original band.

Bandit Band Record
72
Reward Band Number1 5- or 6-digit reward band number.
Scribe Initials or reference to the person writing down information at thebanding site.
Sex The sex of the bird in coded form. Can be either alpha or numericcode, depending on what the user requested in preferences.
Sex Code1 Numeric version of the sex of the bird.
Skull Degree of skull pneumatization.
Species1 The 4-letter or 4-digit code representing the species of the bird ineither alpha or numeric format, depending on the preference set bythe user.
Species Name The name of the species of the bird.
Submission Date The date the banding record was (last) submitted.
Suffix1 The 5-digit suffix of the band number. This number has leadingzeros, if necessary. The 5 digits of the band number stored here areactually the last 5 digits of what is really a 6-digit suffix.
Tail Length Length in millimeters of the tail of the bird.
Tarsus Length Length in millimeters of the tarsus of the bird.
Tests Performed The tests that were performed on the bird.
Weight Time The time of day the bird was weighted, including hours andminutes, using the 24-hour clock.
Wing Chord The length in millimeters of the wing chord of the bird.

73
Appendix C. Data Editing ErrorMessages
The table below lists all of the errors flagged by Bandit as it edits the data, along with an explanation of thecause of the error and the suggested way to fix it. Many of the edits apply to banding and recapture records,so these errors are grouped together. Errors associated with banding locations are grouped separately.
Error Message Cause Resolution Bypassable? Module
Banding and Recapture Data
Age/Sex unlikelyon this date
Species-Age-Sex-Monthcombination invalid.
See Species-Age-Sex-Month table for validcombinations. **May bebypassed with remarks.
Yes** Bndg, Recap
Aux. MarkerType VS othermarker-relatedinfo
Aux Marker Type fieldis blank but some othermarker-related field ispopulated
Verify if an Aux Markerwas used and choosecorrect marker type if not,empty other marker-relatedfields.
Bndg, Recap
Bad RecaptureAge VS BandedAge
Recapture Age does notagree to Banding Age(based on banding andrecapture dates).
Verify Age and Dates onboth sides (banding andrecapture).
Recap
Bad RecaptureSex VS BandedSex
Sex should correspondon banding and recapturerecords.
Verify sex of recapturedbird.
Recap
Bad RecaptureSpecies VSBanded Species
Species are not the samefor same band number.
Verify recapture bandnumber; Verify species.
Recap
Bad Size Species is not supposed towear this size of band.
Go to species referencetable to see the lisBndg,Recapt of appropriatesizes. May be bypassedwith an explanatoryremark.
Yes Bndg
Band Found inBands Inventory.Incorrectdisposition codeused
Disposition code is set to Fwhile the banding record isin inventory.
Set disposition code to Ror verify band number.
Recap
Band NotFound in BandsInventory. Makesure this is not aforeign recapture
Disposition code is set to Rand the banding record isnot in inventory.
Verify disposition code.May be bypassed.
Yes Recap
Banding DateGreater ThanCurrent Date
Banding Date greater thanCurrent Date
Verify banding date. Verifyif system date is current.
Bndg

Data Editing Error Messages
74
Error Message Cause Resolution Bypassable? Module
Banding Date VSReceived Date
Banding Date less thanDate Received
Make sure Received Datein band inventory is set toproper value
Bndg
Duplicated bandnumber
This band number alreadyexists.
Fix band number. Bndg
How ObtainedVS BandingStatus
The banding record showsthat this bird has anauxiliary marker but thehow obtained code showsthat the federal band, notthe auxiliary marker, wasread from a distance.
If the federal band wasdetermined via the auxiliarymarker, modify the howobtained to 29. If the federalband was read, bypass theerror.
Yes Recap
Invalid Age Age is not in the list. Choose an Age from thedrop-down list.
Bndg, Recap
Invalid BandNumber
Not numeric band numberor Band Number Length isnot equal to 9.
Fix band number (prefixand suffix).
Bndg, Recap
Invalid BandingDate
Banding Date greaterthan Current Date orBanding Date less thanDate Received.
Make sure Received Datein band inventory is setto proper value. Verifybanding date.
Bndg
Invalid BirdStatus VS TestsPerformed
If Bird Status indicatesblood sample was taken,Test Performed needsto reflect this (and viceversa.)
Make sure bird statusreflects test performedinformation.
Bndg
Invalid Color(s) Color of markers or Colorof Code are not correctlycoded.
Choose appropriate colorsfrom associated drop-downlists.
Bndg, Recap
Invalid HowAged code
How Aged value is not inthe list of values.
Make sure the How Agedfield is either empty orcontains a value from thedrop-down list.
Bndg, Recap
Invalid HowObtained
How obtained is empty ornot in the list of acceptablevalues
Verify How Obtained Recap
Invalid HowObtained VSPresent Condition
Present condition of thebird is not corresponding tohow obtained code.
Verify how obtained andpresent condition (*somecases may be by-passed)
* Recap
Invalid HowSexed code
How Sexed value is not inthe list of values.
Make sure the How Sexedfield is either empty orcontains a value from thedrop-down list.
Bndg, Recap
Invalid Location Location is empty or notverified.
Make sure Location fieldis not empty. Go toSettings screen, Locationstab. Verify location
Recap

Data Editing Error Messages
75
Error Message Cause Resolution Bypassable? Module
information. Valid columnhas to be Yes. (Hint: Putyour cursor over any Novalue to see what the errorsare.)
Invalid MarkerType
Marker Type is notcorrectly coded.
Choose Marker Type fromdrop-down.(*on recapturesite is bypassable)
* Bndg, Recap
Invalid PresentCondition
Present Condition of thebird/band is empty or not inthe list of acceptable values
Verify Present Condition Recap
Invalid RecaptureDate
Recapture Date greaterthan Current Date or isempty.
Verify recapture date. Recap
Invalid RecaptureDate VS DateReceived
Recapture Date less thanDate Received.
Verify recapture date. Recap
Invalid ReplacedBand Number
If Disposition code is 5,6, S, or D, Replaced orSecond Band Number hasto be reported, and thelength of this number mustbe 9. Otherwise this fieldhas to be empty.
Verify disposition andreplaced band numberfields.
Yes Bndg, Recap
Invalid RewardBand Number
If Status indicates this is areward band, the length ofReward Band has to be 5or 6.
Verify status and rewardband fields.
Bndg
Invalid Sex Sex is not in the list. Choose a Sex from the dropdown list.
Bndg, Recap
Invalid Species Species is not entered or isnot in the species list.
Verify species. Bndg, Recap
Invalid Status VSDisposition Code
If this bird has been doublebanded (Disposition codeD or S,) Status needs toreflect this.
Verify disposition and birdstatus.
Bndg
Invalid Status VSHow Sexed
How Sexed is L(laparotomy orlaparoscopy) but Statusdoes not reflect this.
Status code must endwith 11, 12, or 85 iflaparotomy or laparoscopywas doneBndg, Recap.
Bndg
Invalid StatusVS Marker TypeCode
Bird status needs tocorrespond to Aux MarkerType.
Verify Status and AuxMarker Type fields.
Bndg
Location used isnot valid
Location is empty or notverified.
Make sure Locationfield is not empty. Go toSettings screen, Locationstab. Verify locationinformation. Valid column
Bndg, Recap

Data Editing Error Messages
76
Error Message Cause Resolution Bypassable? Module
has to be Yes. (Hint: Putyour cursor over any Novalue to see what the errorsare.)
Marker Code istoo long
Aux. marker code is longerthan 5 char.
Verify Aux Marker Codefield.
Yes Bndg, Recap
Recapture datebefore banded
Banding date is greaterthan recapture date.
Verify dates. Recap
Recapture datebefore or onbanding date
Banding date is greater thanor equal to recapture date.
Verify dates. *By-passableif dates are the same.
* Recap
Remarks arerequired forselected howobtained code
How obtained shows thatstatus of the bird waschanged, but remarks areempty.
Explain in the remarks howstatus of the bird waschanged.
Recap
Replaced band? The selected presentcondition suggests thatthe band may have beenreplaced on this bird.
If the band was not replacedand bird released withouta band, bypass the error.If the band was replaced,the replacement should bereported in the bandingrecord for the new band andthis recapture deleted.
Yes Recap
Same-dayrecapture record
This bird was alreadyentered into the system asrecaptured on this date.
If appropriate, delete oneof the recapture records.By-passable.
Yes Recap
Sex in BandingRecord mustbe set tocorrect sexedupon recapturevalue
Sex at banding is unknown,but is known at recapturetime.
Sex in banding record needsto set to 6 or 7 depending onSex in the recapture record.
Recap
Species unlikelyin state
Species-Regioncombination questionable.
See Species-State-Monthreference table for validcombinations. **May bebypassed with remarks.
Yes** Bndg, Recap
Species unlikelyon date
Species-Monthcombination questionable.
See Species-State-Monthreference table for validcombinations. **May bebypassed with remarks.
Yes** Bndg, Recap
Status coderequires remarks
Remarks field is emptybut the status code enteredrequires an explanation inthe remarks field.
Add appropriateinformation to the remarksfield. See the BBL web sitehttp://www.pwrc.usgs.gov/BBL/manual/status.htmfor details. (Status codesending with 25 and 29require a marker type to
Bndg

Data Editing Error Messages
77
Error Message Cause Resolution Bypassable? Module
be entered in the remarksfield. Status codes endingwith 06 or 85, or codesstarting with 5, 7, or 8require an explanation tobe entered in the remarksfield. Status codes startingwith 2 require capturelocation and date to beentered in the remarksfield.)
Undefined Age Age is empty. Choose an age from drop-down list.
Bndg, Recap
Undefined BirdStatus
Bird Status is empty. Set Bird Status field fromthe choices in the drop-down list.
Bndg
UndefinedRecord Type
Disposition code is emptyor invalid.
Choose a Disposition codefrom the drop-down list.
Bndg, Recap
Undefined Sex Sex is empty. Choose a Sex code fromthe drop-down list. *By-passable for recaptures.
* Bndg, Recap
Location Data
Direction fromtown notspecified
Miles from nearest town/place is not empty, butdirection is not provided.
Provide direction fromtown or empty miles fromtown field.
Loc
Invalidcoordinates VSRegion
Coordinates provided donot correspond to Country/State combination
Verify Latitude/Longitudeand Country/State.
Loc
Invalid Country Country is empty orinvalid.
Choose a Country from thedrop-down list.
Loc
Invalid County US locations must have acounty entered.
Choose a County from thedrop-down list.
Loc
InvalidDescription
Location Description isempty.
Enter a short description forthis location.
Loc
Invalid Direction Hemisphere values areincorrect.
Verify the hemispherefields for both Latitude andLongitude.
Loc
Invalid Directionfrom town
Direction from town is notempty and is not in the list.
Choose correct directionfrom drop down list, orempty the field.
Loc
Invalid Lat Latitude degrees must bein the range 0-90. Minutesand seconds must be in therange 0-59.
Verify Latitude (Deg, Min,Sec).
Loc
Invalid Lat Hem Latitude hemisphere mustbe N (North) or S (South).
Choose LatitudeHemisphere from the drop-down list.
Loc

Data Editing Error Messages
78
Error Message Cause Resolution Bypassable? Module
Invalid LocationID
Location ID is empty, notunique, or length is greaterthan 8 characters.
Set Location ID to correctvalue.
Loc
Invalid LocationPrecision
Location Precision isempty or invalid.
Choose Location Precisionfrom the drop-down list.
Loc
Invalid Long Longitude degrees must bein the range from 0 to 180.Minutes and seconds mustbe in the range 0-59.
Verify Longitude (Deg,Min, Sec).
Loc
Invalid LongHem
Longitude hemispheremust be E (East) or W(West).
Choose LongitudeHemisphere from the drop-down list.
Loc
Invalid Minutes Latitude and longitudeminutes must be in therange 0 to 59.
Verify Minutes. Loc
Invalid Region Bandit is unable to findthe region code based onCountry/State provided.
Verify the Country andState fields.
Loc
Invalid Seconds Latitude and longitudeseconds must be in therange 0 to 59.
Verify seconds. Loc
Invalid State US and Canada locationsmust have State entered.
Choose State from thedrop-down list.
Loc
Miles from townnot specified
Direction from nearesttown/place is not empty,but miles are not provided.
Provide miles or emptydirection from town field.
Loc
Miles must bepositive, numeric,preferably inrange from 0 to 10
Miles are not numeric, notin range 0-999, or the lengthof the field is longer than 5characters.
Verify Miles from town.Round miles to 1(maximum 2) digits afterpoint if needed. Youmay choose different town-miles-direction descriptionif available.
Loc
Minutes/Seconds do notcorrespond tothe center of 1degree block
If Location Precision is 60,minutes must be 30 andseconds must be 00.
Verify Minutes andSeconds or changeLocation Precision.
Loc
Minutes/Seconds do notcorrespond tothe center of 10minute block
If Location Precision is10, minutes must be 05,15, 25, 35, 45, or 55 andseconds must be 00.
Verify Minutes andSeconds or changeLocation Precision.
Loc
Nearest Town isunknown
Nearest town/Place namefield is empty.
Provide Nearest Town/Place.
Loc
Negative Lat Deg Negative value in locationlatitude degrees field.
Fix Latitude Dec field.(Hint: Set the hemisphere
Loc

Data Editing Error Messages
79
Error Message Cause Resolution Bypassable? Module
to E (East) or W (West)in the field followingseconds.)
Negative Lat Min Negative value in locationlatitude minutes field.
Fix Latitude Min field. Loc
Negative Lat Sec Negative value in locationlatitude seconds field.
Fix Latitude Sec field. Loc
Negative LongDeg
Negative value in locationlongitude degrees field.
Fix Longitude Dec field.(Hint: Set the hemisphereto E (East) or W (West)in the field followingseconds.)
Loc
Negative LongMin
Negative value in locationlongitude minutes field.
Fix Longitude Min field. Loc
Negative LongSec
Negative value in locationlongitude seconds field.
Fix Longitude Sec field. Loc
Not Numeric LatDeg
Invalid character inlatitude degrees field.
Latitude Deg field must benumeric.
Loc
Not Numeric LatMin
Invalid character inlatitude minutes field.
Latitude Min field must benumeric.
Loc
Not Numeric LatSec
Invalid character inlatitude seconds field.
Latitude Sec field must benumeric.
Loc
Not NumericLong Deg
Invalid character inlongitude degrees field.
Longitude Deg field mustbe numeric.
Loc
Not NumericLong Min
Invalid character inlongitude minutes field.
Longitude Min field mustbe numeric.
Loc
Not NumericLong Sec
Invalid character inlongitude seconds field.
Longitude Sec field mustbe numeric.
Loc
Seconds do notcorrespond tothe center of 1minute block
If Location Precision is 1,seconds must be 30.
Verify Seconds or changeLocation Precision.
Loc

80
Appendix D. Alert MessagesThe table below lists all of the pop-up alert messages displayed by Bandit along with the circumstancein which the message appears.
Error Message Cause
Band Inventory
Not all required fields are entered. Please enter allthe fields.
When entering band spans into inventory, you mustenter band number prefix, starting suffix, endingsuffix, and band size.
One or more bands are already in the file for therange you specified. Please recheck your values.
When entering band spans into inventory, the bandnumber range cannot include bands that are alreadyin the file.
There are no unused bands in this span. Nothing toremove.
If you try to use the Records menu function Remove
Unused Bands from Inventory Record on a span inthe inventory that does not have unused bands youwill see this message. Make sure your cursor is onthe correct span before selecting this function. (Thecolumn Unused Quantity shows how many bands inthe span are unused.)
Locations
An error occurred while trying to add this location.Location IDs must be unique.
Every location must have a unique identifierassociated with it. The identifier can be up to8 characters long. The identifier is used on thebanding record to refer back to the location.
The location x can not be deleted because there arex bands with this location.
In the Locations screen, check the value in thecolumn Bands Count. If there is a non-zero valuehere, you cannot delete the location because thereare banding records which reference this location.Make sure your cursor is on the correct locationbefore trying to delete a location.
Bands
There are no band records which match the filterrequest.
The filtering criteria you specified did not select anyrecords. Look at all the possibilities in the filteringcriteria and change it to match the records you wantto see.
No band record to duplicate to. The Duplicate Record function takes the values fromthe current record and copies them into the nextrecord. If there is no next record, you will see thismessage.
Second Band x has been filled previously. Do youwant to overwrite existing record?
For double-banded 1st band and double-banded 2ndband, if the record associated with the second bandis already filled in, you will get this message. This isjust a warning so you do not inadvertently overwritepreviously entered data.
Second Band x not found. Please, provide correctsecond band number, or if it is correct, go to band
For a double-banded bird (disposition code D or S,)both the 1st band number and the 2nd band numbermust be in your inventory. If you meant to add an

Alert Messages
81
Error Message Cause
inventory and add the corresponding span in to thesystem.
additional band, use disposition code 6. If this is areplacement band, use disposition code 5.
Invalid Second Band Number. The value in the Second Band Number field is not avalid band number.
Current Band x and Second Band x are the same.Please correct second band number.
The value in the Second Band Number field is not avalid band number.
Band x has status x. Recapture may not be reportedfor this band.
The status of the band (as indicated in the Disposition
field) is undefined or indicates that the band (orrecord of the band) was lost or destroyed. Youcannot report a recapture by clicking the Report
Recapture button. (You may, however, add therecapture through the Add Recapture button on theRecaptures screen.)
Data Submission
Permit number is not defined. Please go to Settings:Bander Info, and define permit number
Your permit number must be entered on the Settings
screen before data submission can occur.
The country where submission has to be sent is notdefined.
The country of submission (Canada or US) mustbe selected on the Settings screen before datasubmission can occur.
No valid data was found to be submitted. The submission process only submits bandingrecords which are either new or have changed sincethe last submission. Further, the records have tobe error free before they can be submitted. Someerrors can be bypassed, but you must select theBypass Errors option on the banding record. Prior tosubmitting data, it is a good idea to use the BandingData to be Submitted report (or the By Location:Banding Data to be Submitted report) to see whatdata will be submitted.
Recaptures
There are no recapture records which match thefilter request.
The filtering criteria you specified did not select anyrecords. Look at all the possibilities in the filteringcriteria and change it to match the records you wantto see.
Reports
No records found for this report. The report cannot be produced because there is nodata available for this report.
Importing
This process may take a long time, please let it finish(you may want to run it during night). Alert - noedits will be performed on inventory records. Noduplicated records will be loaded. If you are notsure if data is valid, you better use Add to Inventoryfunction instead.
This warning message appears when the File →Import from Band Manager → Band Inventory menuitem is selected.
Import Band Inventory Error: Band x already existsin inventory. Cannot import this band.
Duplicate records are not allowed in the bandinventory.

Alert Messages
82
Error Message Cause
Miscellaneous
Function is under construction. May appear when a capability has been partiallyimplemented.
Program Expiration: This version of Bandit 0.x hasexpired. Contact the USGS Bird Banding Lab for anew version.
Your version of Bandit is an old version. The newversions do not expire.

83
Appendix E. Frequently AskedQuestions about Bandit
Q: How do I import banding data with bands that have a 3-digit prefix?
A: Make sure the file you are importing has lead zeros. In Excel, you must put an apostrophe in frontof the number for the lead zero to stay.
Q: If I am importing a file from another program, must I have a dash in the band numbers?
A: No. Bandit with take the band number with or without dashes.
Q: When I download the Mac version, my computer says it doesn’t recognize the file Bandit_1.02.bin.How do I proceed?
A: You need to either change the extension to .dmg or open it with Disk Utility.
Q: I am trying to install the program and I get a message saying “Error opening registry key, accessdenied”. How do I proceed?
A: You need administrative access to install the program. Contact your I.T. support staff.
Q: My email program is not sending submission data automatically. What email address should I useto submit my banding data?
A: <[email protected]> or <[email protected]> for Canadian Banding Officesubmissions.
Q: I’m having trouble getting the program to work. Where do I go to get help?
A: Send an email request for help to the Bandit Help Desk, <[email protected]>, availablealso from the Help menu or the opening screen. You can also call the Help desk at 301-497-5566.
Q: If I import data from Band Manager, will Bandit recognize if those data have already been submitted?
A: Bandit does not recognize that schedules have already been submitted via Band Manager. To avoidre-submitting the data, they must be marked as submitted in Bandit. In version 2.0 and above, usethe "Mark As Submitted" function. In older versions you must click the "submit" button, but stopthe email. This will mark the data as "submitted". You can then add (or import) new data and onlyit will be sent. If you have a mix of previously-submitted AND new data, mark only the previously-submitted.
Q: Can I create user-defined fields in Bandit?
A: In versions of Bandit prior to version 2.01 you cannot. Starting from Bandit version 2.01 this featureis available. See documentation chapter 5.5. (User-defined Fields) for details.
Q: How can I filter on fields other than band number?
A: See Chapter 9, Find Mode.
Q: Is there a way to copy identical data from one record to the next?
A: Yes,to duplicate an entire line of data, make sure you have clicked any box in the line to be repeated.Hold the control key down while hitting the letter "D". This will copy all of the data (all fields) fromthis line to the next line. If you only want to copy data from one field to the next line, click in that

Frequently AskedQuestions about Bandit
84
field on the line below the data you want to copy and hold the control key down while hitting theapostrophe(') key. This will copy the data from the line above for that field only.
Q: How do I restore from a BANDIT backup file?
A: Use Restore From Backup function under File menu. See Chapter 13, Bandit Backup File
Q: I chose ALPHA for entering data but used Numeric Codes. I am now getting an error message. CanI correct this by re-choosing NUMERIC?
A: Yes.
Q: How do I export my data from Band Manager so I can import it in to Bandit?
A: NOTE: You cannot copy your Band Manager files via Windows Explorer, you must follow thesteps below.
Band Inventory
Open Band Manager
Click Inventory
Click Export
Select Export to .dbf (preferred) or .xls format
Click Export
Name the file and click Save
The file will be saved in the Export Directory of Band Manager. If you saved it as Excel, it shouldbe opened in Excel and saved as a newer version (Bandit will not accept the older version). You canthen import the file into Bandit. (or save the file onto disc, etc.)
Subs
Open Band Manager
Click Utilities
Click Program Lookups
Click Banders
Click Export
Select Export to .dbf (preferred) or .xls. Format
Click Export
Name the file and click Save
The file will be saved in the Export Directory of Band Manager. If you saved it as Excel, it shouldbe opened in Excel and saved as a newer version (Bandit will not accept the older version). You canthen import the file into Bandit. (or save the file onto disc, etc.)
Locations

Frequently AskedQuestions about Bandit
85
Open Band Manager
Click Utilities
Click Program Lookups
Click Locations
Click Export
Select Export to .dbf (preferred) or .xls. Format
Click Export
Name the file and click Save
The file will be saved in the Export Directory of Band Manager. If you saved it as Excel, it shouldbe opened in Excel and saved as a newer version (Bandit will not accept the older version). You canthen import the file into Bandit. (or save the file onto disc, etc.)
Bands (banding datafile)
Open Band Manager
Click Data
Select and open appropriate .dbf file
Click Export
Follow instructions regarding “Export Setup”
Click Export
Select Export to .dbf (preferred) or .xls. Format
Click Export
Name the file and click Save
The file will be saved in the Export Directory of Band Manager. If you saved it as Excel, it shouldbe opened in Excel and saved as a newer version (Bandit will not accept the older version). You canthen import the file into Bandit. (or save the file onto disc, etc.).
Q: I have gotten a message that a file is corrupted. How do I recover it?
A: To recover a damaged file:
On Windows machines, press Ctrl+Shift while double-clicking the Bandit icon on your desktop.Hold the keys down until you see the "Open Damaged File" dialog box.
On Mac OS X machines, press Option + command while double-clicking the Bandit icon on yourdesktop. Hold the keys down until you see the "Open Damaged File" dialog box.
In "Open Damaged File" dialog box, browse to Bandit installation directory, choose BanditApp.BND file and click select. Wait until recovery process for this file is finished, click ok, and

Frequently AskedQuestions about Bandit
86
when you see "Open Damaged File" dialog box, select Bandit Data.BND file. When both files arerecovered, cancel "Open Damaged File" dialog box.
During the recovery process, Bandit:
1. Creates a new file.
2. Renames any damaged files by adding "Old" to the end of the filenames (for example, "BanditData.BND" is renamed to "Bandit Data Old.BND").
3. Gives the (new) repaired file the original name(Bandit Data.BND).
If you experience unusual behavior in the recovered files, you should revert to a backup copy(explained here) that was made before the file became corrupt, or contact Help for technicalassistance. After you verify your data is correct, you can delete old files from bandit installationdirectory (Bandit Data Old.BND, Bandit App Old.BND).
87
Appendix F. Release NotesF.1. Version 3.0 (released 01/20/2011)
Version 3.0 contains several new major features along with a significant number of fixes, refinements andenhancements. A summary of the changes is given below, along with references to the relevant sectionscontaining more information, as appropriate.
1. Added records into the table for editing Region VS Coordinates (St. Helena - region 001-Africa)
2. Import Bands from File bug is fixed (only records in found set were imported, not all records)
3. Status X85 may allow color marker (bug fixed)
4. Falkland Islands (FK) flyway fixed (0 changed to 8)
5. Marker field added to the "Banding Data to be Submitted Report"
6. Status X85 may allow blood sample taken (bug fixed)
7. Two species added 3651, 6113
8. LO_HI_LAT_LON_REGION table reloaded
9. How Obtained table loaded. Fields How Obtained Code and Description added to Recapture module.Default =89
10.Locations Layout created to make it easier deal with locations (sort, search, view as table or detail et.)Locations tab from Settings screen is removed.
11.Nearest Town, Miles From Town, Direction From Town fields were added to the location record.
12.Banding Submission is separated. There are 2 functions: Submit New Data and Submit Modified Data.
13.Map interface added to the Location (see layout Locations With Map) Map zoom level field added tolocation record (not to be sent to BBL yet)
14.Country-State-County table reloaded.
15.Same Day Recapture error is by-passable now, but only one recapture per day(the first received) isgoing to be accepted by BBL. Currently only “foreign” recaptures are loaded into BBL Database.
16.Undo/Redo command are available in some simple modifications (typing, pasting)
17.Status bar moved to the top of the screen from the left part of it (FileMaker 10 related change)
18.Link to www.reportband.gov added to the help menu.
19.Function “Show Local Map” added to the location detail screen. The map functionality may be availableonly if there is Internet connection.
20.Remarks field length extended to 250 char.
21.Email to the Bandit Help Desk will be prepopulated with some system info.

Release Notes
88
22.Acceptable band sizes for Northern Pygmy Owl (3790) changed from 2,3,4 to 3,3A,4
23.Total Bands count is available on inventory screen (this is the count of individual bands for the currentlyshown list of spans).
24."Aux Marker Combined" field will not be calculated unless an Aux Marker Type has been chosen."space" is not going to be kept in Aux Marker Code field.
25.Band Size, Lat Float, Long Float, Location Coordinates fields are available on Banding screen. (notmodifiable).
26.Size 1D added as acceptable size for multiple species.
27.Error messages lookup is available in “Help” menu and in “Reference” screen.
28.Explanation what needs to be in Remarks is shown on Band Detail screen near remarks (based on birdstatus code).
29.Bird Status 640 and 685 are not acceptable.
30.Backup Data function added to the “File” menu.
31.“Add to inventory” bug fixed (more checks performed before adding bands).
32.Species Name for species 0985 changed from Dark-rumped Petrel to Hawaiian Petrel, and the four-letter alpha code from DRPE to HAPE.
33.Import Bands/Recaptures bug fixed (the “banding date” label is now “Banding Recapture Date”, but itneeds to be matched manually as well as Second Band field.
34.New colors added to the color lookup table (to be used in color markers).
35.Upper limit of weight for species 6580 changed from 10 to 12 for both sexes.
36.Size 4A added as valid band size for Cooper's Hawks
37.Validation to compare empty Aux Marker Type to non-empty other marker related fields added.
38.“Band Edits” tab under settings renamed into “Optional Validations”.
39.Banding Info added to the recapture detail screen.
40.Recapture Age VS Banding Ade validation added.
41.“Save As PDF” option has been removed. In order to save as pdf, choose “Print” and use print to fileoption with Adobe PDF, or PDF Creator as a printer instead.
42.”Find Related Bandings” and ”Find Related Recaptures” buttons are available now on Location (detail)screen.
43.”Delete All Found Recaptures” function is available under records menu on Recapture screens.
44.Recapture validations added: “Invalid How Obtained VS Present Condition”, “Remarks are requiredfor selected how obtained code”, “Replaced band?”, “How Obtained VS Banding Status”.
45.Option to choose do not send email automatically added. See it on the Settings screen.
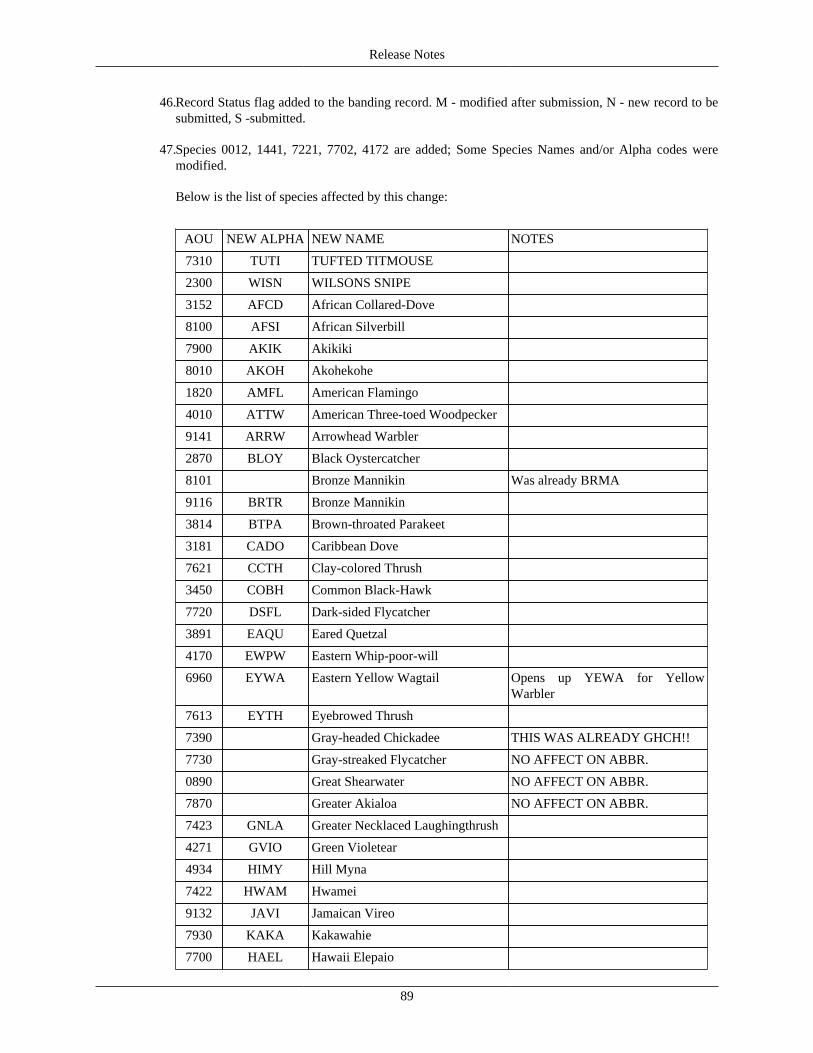
Release Notes
89
46.Record Status flag added to the banding record. M - modified after submission, N - new record to besubmitted, S -submitted.
47.Species 0012, 1441, 7221, 7702, 4172 are added; Some Species Names and/or Alpha codes weremodified.
Below is the list of species affected by this change:
AOU NEW ALPHA NEW NAME NOTES
7310 TUTI TUFTED TITMOUSE
2300 WISN WILSONS SNIPE
3152 AFCD African Collared-Dove
8100 AFSI African Silverbill
7900 AKIK Akikiki
8010 AKOH Akohekohe
1820 AMFL American Flamingo
4010 ATTW American Three-toed Woodpecker
9141 ARRW Arrowhead Warbler
2870 BLOY Black Oystercatcher
8101 Bronze Mannikin Was already BRMA
9116 BRTR Bronze Mannikin
3814 BTPA Brown-throated Parakeet
3181 CADO Caribbean Dove
7621 CCTH Clay-colored Thrush
3450 COBH Common Black-Hawk
7720 DSFL Dark-sided Flycatcher
3891 EAQU Eared Quetzal
4170 EWPW Eastern Whip-poor-will
6960 EYWA Eastern Yellow Wagtail Opens up YEWA for YellowWarbler
7613 EYTH Eyebrowed Thrush
7390 Gray-headed Chickadee THIS WAS ALREADY GHCH!!
7730 Gray-streaked Flycatcher NO AFFECT ON ABBR.
0890 Great Shearwater NO AFFECT ON ABBR.
7870 Greater Akialoa NO AFFECT ON ABBR.
7423 GNLA Greater Necklaced Laughingthrush
4271 GVIO Green Violetear
4934 HIMY Hill Myna
7422 HWAM Hwamei
9132 JAVI Jamaican Vireo
7930 KAKA Kakawahie
7700 HAEL Hawaii Elepaio

Release Notes
90
4551 LSFL La Sagra's Flycatcher
4190 LEPA Least Pauraque
2790 LRSP Lesser Sand-Plover Opens up MOPL for MountainPlover
8800 MASW Mariana Swiftlet
7920 MAAL Maui Alauahio
5491 NESP Nelson's Sparrow
7940 OAAL Oahu Alauahio
5490 SALS Saltmarsh Sparrow
1711 TABG Taiga Bean-Goose
7710 TAFL Taiga Flycatcher
8120 TRMU Tricolored Munia
9166 VETR Venezuelan Troupial
6101 WESP Western Spindalis
8042 YCBI Yellow-crowned Bishop
48.Wing-Weght table was updated.
Version 2.01 (04/16/2008)
1. Import bands bug is fixed.
2. County 014 (Broomfield) added to the list of counties in Colorado(US).
3. Import Inventory bug related to missing leading zeros is fixed.
4. Submission Bands confirmation message was modified to clarify what was done and what to do ifconfirmation was not received.
5. Import Inventory bug related to empty records and duplicated records is fixed.
6. Lat Min and Long Min - 0 will automatically precede numbers less than 10.