bar systems w/ usb sd fm radio& wireless remote · front panel functions-----7 back panel...
TRANSCRIPT

PSBV200BT
OWNER’S MANUAL
PLEASE READ BEFORE OPERATING THIS EQUIPMENT
300 Watts Bluetooth Sound Bar
Systems W/ USB SD FM Radio&
Wireless remote
WWW.PYLEAUDIO.COM
STANDBY INPUT
USBSD
PSBV200BT

1
TABLE OF CONTENTS
TABLE OF CONTENTS---------------------------------------------------------------1
PACKAGE CONTENTS----------------------------------------------------------------1
IMPORTANT SAFETY INSTRUCTIONS---------------------------------------2-3
FEATURES---------------------------------------------------------------------------------3
SPECIFICATIONS------------------------------------------------------------------------4
PLACING THE UNIT-------------------------------------------------------------------4
SYSTEM CONNECTIONS-------------------------------------------------------------5
1. CONNECT POWER SUPPLY------------------------------------------------5
2. CONNECT WITH PC & Mp3-----------------------------------------------5
3. CONNECT WITH TV/DVD----------------------------------------------------6
FRONT PANEL FUNCTIONS--------------------------------------------------------7
BACK PANEL FUNCTIONS----------------------------------------------------------7
REMOTE CONTROL FUNCTIONS-------------------------------------------------8
HOW TO USE THE REMOTE CONTROL-------------------------------------9
OPERATIONS----------------------------------------------------------------------------10
1. GENERAL OPERATION------------------------------------------------------10
2. LISTEN TO FM RADIO------------------------------------------------------11
3. SD/USB SLOT OPERATION------------------------------------------------12
4. HOW TO OPERATE BLUETOOTH FUNCTION----------------------12
1PC Owner’s Manual
PACKAGE CONTENTS
1PC Remote Control
2PCS AAA Batteries
1PC 3.5mm/3.5mm
plug connection cable

2
IMPORTANT SAFETY INSTRUCTIONS
Warning:
The lighting flash with arrowhead symbol, within an equilateral triangle, is intended to alert user to the presence of uninsulated "dangerous voltage" within the product's enclosure, that may be of sufficient magnitude to constitute a risk of electric shock.
The exclamation point within an equilateral triangle is ialert the user to the presence of important operating and servicinginstruction in the literature accompanying the appliance.
ntended to
1. Read these instructions All the safety and operating instructions should be read before the product is operated.2. Keep these instructions The safety and operating instructions should be retained for future reference.3. Follow all instructions All operating and use instructions should be followed.4. Do not use this apparatus near water Do not use this product near water and moisture, for example: near a bathtub, washbowl, kitchen sink, or laundry tub; in a wet basement; or near a swimming pool.5. Clean only with dry cloth Unplug this product from the wall outlet before cleaning. Do not use liquid cleansers or aerosol cleansers. Use a dry cloth for cleaning.6. Do not block any ventilation openings. Slots and openings in the cabinet and in the back or bottom are provided for ventilation, to ensure reliable operation of the product and to protect it from overheating. These openings must NOT be blocked or covered. The openings should never be blocked by placing the product on a bed, sofa, rug or other similar surface.7. Do not install near any heat sources such as radiators, heat registers, stoves, or other apparatus(including amplifiers) that produce heat.8. Protect the power cord from being walked on or pinched particularly at plugs, convenience receptacles and the point where they exit from the apparatus.
To reduce the risk of fire or electric shock, do not expose this appliance to rain or moisture.Dangerous high voltages are present inside the enclosure. Do not open the cabinet, refer to qualified personnel only.

3
10. Unplug this apparatus during lightning storms or when unused for long period of time.11. Power Source The product should be operated only from the type of power source indicated on the rear of the unit.12. Overloading Do not overload wall outlets and extension cords as this can result in a risk of fire or electric shock.13. Object and liquid entry Never push objects of any kind into this product through as they may touch dangerous voltage points or short out parts that could result in fire or electric shock. Never spill or spray any type of liquid on the product.14. Service Do not attempt to service this product yourself as opening or removing covers may expose you to dangerous voltage or other hazards. Refer all servicing to qualified service personnel.
Entire wooden case, piano style painted front panel with blue backlight
LCD display.
3D technology for true surround sound.
FM stereo radio with automatic search and can store 30 stations.
USB 2.0 host and SD/MMC connector for external moving HD, flash
drive, SD/MMC card, can play MP3, WMA format music.
INPUT, STANDBY,( )PLAY/PAUSE/PHONE, ( )VOL + and ( )
VOL - buttons.
AUX1, AUX2, PC/MP3/FM ANT inputs.
Bluetooth & handsfree functions.
1x 5.25" woofer, 2x3" full range speaker and 2x1" tweeter.
With remote control
FEATURES

4
Take advantage of 3D stereo technology, you can listen to surround sound without extra speakers. Placing your system as follows, and turn on BASS +/- or TRE +/- effect by pressing these Buttons on the remote control, you will get the surround sound effects.
PLACING THE UNIT
Power Supply----------Peak RMS Output--------------------------------------------------------------------300WInput Sensitivity---------------------------------------------------------- 400mV±50mVS/N(A Weight)---------------------------------------------------------------------- 80dBChannel Separated Rate(1KHz)----------------------------------------------- 40dBWoofer Impedance----------------------------------------- -----------------------8 OhmTweeter and full range speaker Impedance----------------------------------4 OhmTHD(1KHz, 1W, 8Ohm)---------------------------------------------------------- 0.5%Frequency Response------------------------------------------------------ 20Hz-20KHzDimensions(WxDxH)------------------------------------------------- 605x250x120MM Weight---------------------------------------------------------------------------------5.3KGS
-----------------------------------------
---
--
--
-
AC:100~120V, 50/60Hz
NOTE: Specifications are subject to change for improvement without prior notice.
SPECIFICATIONS

5
Insert the power plug into a wall socket. Make sure the voltage marked at the rear panel is same as your AC power. Do not operate with wet hands to avoid electric shock.
Socket
Power plug
SYSTEM CONNECTIONS
1. CONNECT POWER SUPPLY
2. CONNECT WITH PC/MP3
To listen to the sound source from PC (Computer) or MP3 Players,
connect the unit with the external device as below:
MP3PC
3.5mm mini plug
connection cable
AUDIO IN
DC:18V/2.5A
STANDBY INPUT
USBSD
PSBV200BT

6
3. CONNECT WITH TV/DVD
DVD Audio Out
To listen to the sound source from Television and/or CD/VCR/DVD/DVR
players, connect the unit with the external device as below:
Audio In
DVD Video Out
TV Video InTV
CD/VCR/DVD/DVR Players
L R
TV Audio Out
L
R
AUX 1 AUX 2
INPUTSELECTP C/MP3
Audio In
7
1
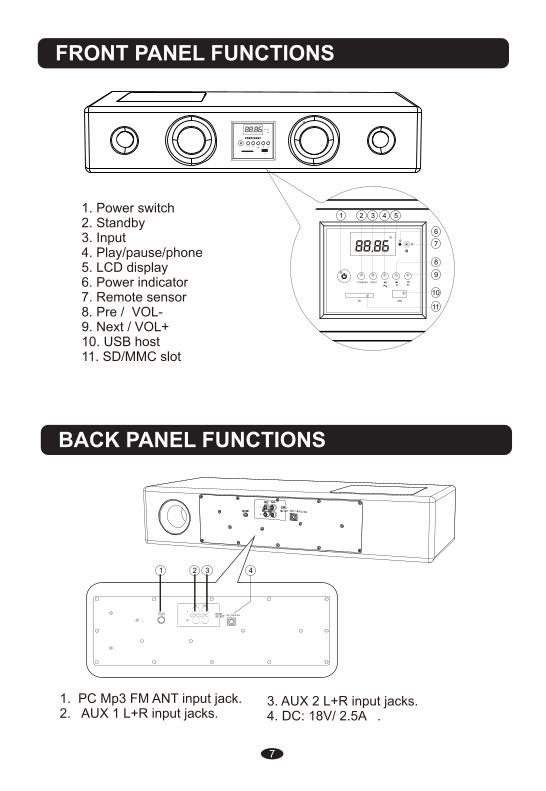
1. PC Mp3 2. AUX 1 L+R input jacks.
FM ANT input jack.
BACK PANEL FUNCTIONS
FRONT PANEL FUNCTIONS
L
R
AUX 1 AUX 2
FM ANTPC/MP3
3. AUX 2 L+R input jacks.4. DC: 18V/ 2.5A .
1. Power switch2. Standby3. Input4. Play/pause/phone5. LCD display6. Power indicator7. Remote sensor8. Pre / VOL-9. Next / VOL+10. USB host11. SD/MMC slot
1 2 3 4 5
9
10
11
7
8
6
2 3 4
STANDBY INPUT
USBSD
PSBV200BT
STANDBY INPUT
DC:18V/2.5A
INPUTSELECTINPUTSELECT
DC:18V/2.5A
8
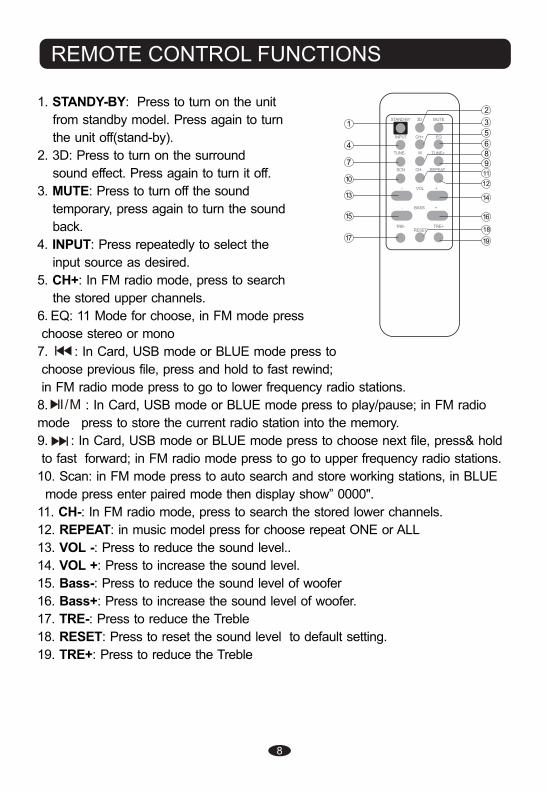
1. STANDY-BY: Press to turn on the unit
from standby model. Press again to turn
the unit off(stand-by).
2. 3D:
MUTE:
CH+: In FM radio mode, press to search
the stored upper channels.
6.EQ: 11 Mode for choose, in FM mode press
choose stereo or mono
Card, USB mode or BLUE mode press to
choose previous file, press and hold to fast rewind;
in FM radio mode press to go to lower
Card, USB mode or BLUE mode press to play/pause; in FM radio
mode press to store
Card, USB mode or BLUE mode press to choose next file, press& hold
to fast forward; in FM radio mode press to go to upper
11. CH-:
Press to turn on the surround
sound effect. Press again to turn it off.
3. Press to turn off the sound
temporary, press again to turn the sound
back.
4. INPUT: Press repeatedly to select the
input source as desired.
5.
7. : In
frequency radio stations.
8. : In
the current radio station into the memory.
9. : In
frequency radio stations.
10. Scan: in FM mode press to auto search and store working stations, in BLUE
mode press enter paired mode then display show” 0000".
In FM radio mode, press to search the stored lower channels.
12. REPEAT: in music model press for choose repeat ONE or ALL
13. VOL -: Press to reduce the sound level..
14. VOL +: Press to increase the sound level.
15. Bass-: Press to reduce the sound level of woofer
16. Bass+: Press to increase the sound level of woofer.
17. TRE-: Press to reduce the Treble
18. RESET: Press to reset the sound level to default setting.
19. TRE+: Press to reduce the Treble
REMOTE CONTROL FUNCTIONS
STAND-BY 3D MUTE
EQCH+INPUT
TUNE- M TUNE+
REPEATSCN CH-
- VOL +
- BASS +
RESETTRE- TRE+
1
2
3
4 6
5
789
1011
12
13 14
15 16
17 19
18

9
HOW TO USE THE REMOTE CONTROL
1. Battery Installation:
a. Slide and lift up the battery door.
b. Install two "AAA' size batteries (included) into the battery compartment
according to the polarity markings inside battery compartment.
c. Replace the battery door.
Follow these precautions when using batteries in this device:1. Use only the size and type of batteries specified.2. Be sure to follow the correct polarity when installing the
batteries as indicated next to the battery compartment. Reversed batteries may cause damage to the device.
3. Do not mix different types of batteries together(e.g. Alkaline, Rechargeable and Carbon-zinc) or old batteries with fresh ones.
4. If the device is not to be used for a long period of time, remove the batteries to prevent damage or injury from possible battery leakage.
5. Do not try to recharge batteries which are not designed to be recharged. They can overheat and rupture.
6. Do not dispose of batteries in fire. Batteries may explode or leak.
BATTERY PRECAUTIONS
2. Effective scope of the remote control
The remote control has an operating range which is less than 16 feet
and at 30 degree angle left or right away from the system.
NOTES:
When there is an obstacle between the unit
and the transmitter, the transmitter may not
operate.
When direct sunlight, an incandescent lamp,
fluorescent lamp or any other strong light
shines on the remote sensor of the unit, the
remote operation may be unstable.
3030
Approx 16 feet
STANDBY INPUT
USBSD
PSBV200BT

1) Press the POWER button on the front panel of the unit to turn the
unit to Standby mode.
2) Press the STANDBY button on the unit or remote control to power
on the unit.
3) Press the INPUT button on the unit or remote control repeatedly to
select the input sources to USB, CARD, FM radio, Blue, AUX1,
AUX2, PC as desired.
4) Hold Press the ( or )VOL +/- buttons on the unit or press it
on remote control to adjust volume as desired. Short press ( or
) for choose PRE or NEXT song.
5) Press the Bass +/- buttons on the remote control to adjust the
sound level of woofer.
6) Press the 3D button on the remote control to turn the Surround
Sound Effect ON, press again to turn it OFF.
7) During listening, press the MUTE button on remote control to turn
off the sound temporary (MUTE will appear on the display), press
again to turn the sound back on.
8) During listening, press the RESET button on the remote control to
reset the sound level to default settings.
9) When finished listening, press the STANDBY button on the unit or
remote control to turn off the unit(Standby mode).
NOTE: If you will not use the unit for long period of time, press the
POWER button on the front panel of the unit to cut off the AC
supply.
OPERATIONS
1. GENERAL OPERATION
10
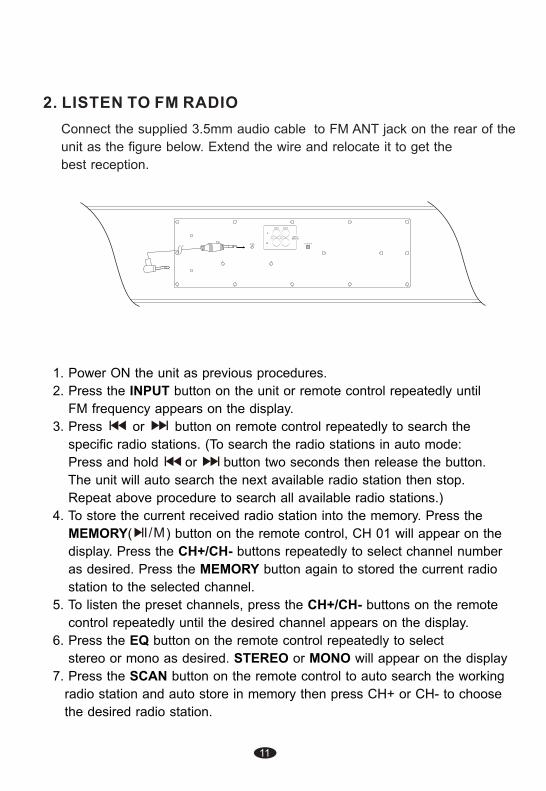
1. Power ON the unit as previous procedures.
2. Press the INPUT button on the unit or remote control repeatedly until
FM frequency appears on the display.
3. Press or button on remote control repeatedly to search the
specific radio stations. (To search the radio stations in auto mode:
Press and hold or button two seconds then release the button.
The unit will auto search the next available radio station then stop.
Repeat above procedure to search all available radio stations.)
4. To store the current received radio station into the memory. Press the
MEMORY( ) button on the remote control, CH 01 will appear on the
display. Press the CH+/CH- buttons repeatedly to select channel number
as desired. Press the MEMORY button again to stored the current radio
station to the selected channel.
5. To listen the preset channels, press the CH+/CH- buttons on the remote
control repeatedly until the desired channel appears on the display.
6. Press the EQ button on the remote control repeatedly to select
stereo or mono as desired. STEREO or MONO will appear on the display
7. Press the SCAN button on the remote control to auto search the working
radio station and auto store in memory then press CH+ or CH- to choose
the desired radio station.
11
2. LISTEN TO FM RADIO
Connect the supplied 3.5mm audio cable to FM ANT jack on the rear of the
unit as the figure below. Extend the wire and relocate it to get the
best reception.
L
R
AUX 1 AUX 2
INPUTSELECT
PC/MP3 DC:18V/2.5A

3. SD/USB SLOT OPERATION
Before connecting USB flash drive or SD cards please make sure they
are in right direction. Refer following figure.
1.
2. Insert SD cards to SD slot and/or USB memory stick to USB slot.
3.
play the MP3/MWA songs automatically.
5. Press or button on the remote control to choose previous
or next songs. Press and hold the buttons to fast rewind/fast forwar.
6. When you turn off the unit and turn it on again, the unit will
automatically play the last song which you played before turnoff.
Power ON the unit as previous procedures.
Press INPUT button on the unit or remote control repeatedly until
CARD or USB is displayed. To play files in USB, choose USB.
To play files in SD card, choose CARD.
4. The unit will
12
4. HOW TO OPERATE BLUETOOTH FUNCTIONS
1. Press “INPUT” to enter “BLUE” mode then unit will auto show "0000" on
display when connecting with your mobile phone in first times. (The unit
will auto enter “BLUE” mode when there aren’t any USB sticker or SD cards
in unit)
2. Use mobile phone bluetooth search and choose” BT-speaker” enter” 0000"
for paired with unit. The unit will control your mobile phone music by press
“( )” or ( )VOL + and ( ), these keys had same function with “USB/
CARD” mode. ”

3. When mobile phone had a call the unit will show “CALL” press” ” to listening
phone and the meanwhile you will enter handsfee mode, the effect distance will be
1 meter. Hang up by repeat press “ ” the unit will resume to play music.
4.The bluetooth of Unit will auto search and connecting with the last mobile phone
after power off.
5. Our products had pass BLUETOOTH BOB certificates
Note: FCC ID
This device comply with parts 15 of the FCC rules.
Equipments Regulations
Operations is subject to the following tow conditions
(1) The device may not cause harmfull interference and
(2) The device must accept any interference received, including
interference that may cause undesired operation.
MAD IN CHINA