basic gps navigation - pronto!home.wavecable.com/~captsteiny04/mikesspot/basicg… · ·...
TRANSCRIPT
Basic GPS Navigation A practical guide to GPS navigation.
by
John Bell

Copyright Unauthorized copying or distribution is prohibited. Copyright 2005 John Bell All rights reserved Last revision 08/11/2005 Acknowledgement In my research to find what kind of material was already available on the web, I came across a GPS for kayaking course taught in Boston by Adam Bolonsky. I sent an e-mail to Adam to ask his opinion. Adam has been kind enough to give me extensive feedback on this book. Note that this is an expression of thanks for his help rather than Adam’s endorsement for the content. For that, I remain solely responsible. Adam teaches kayaking skills as well as being an outdoor writer. His e-mail is [email protected] . I used G7toWin, by Ron Henderson, extensively for screen captures. It is available at http://www.gpsinformation.org/ronh/. Thanks to Fred Simon and his many e-mails on tacking.


Preface and Disclaimer Although I say essentially the same thing in the introduction, I believe that it bears being said separately for emphasis. Both the e-book and print on demand versions of this book are not professionally edited or published. Professional editing adds a layer of confidence in that the text is checked for both writing errors as well as factual errors. Although I consider myself to be knowledgeable and I have tried to make this information accurate to the best of my knowledge, this book has not been edited. Although I have hopefully provided accurate information that will increase your level of safety and effectiveness in navigating with GPS, I take no liability for any of the material. If this book proves to be sufficiently popular, I may have it edited and published in a more formal manner. By doing so I will have to freeze the content and updates will be harder to make and fewer. The grammatical and general stylistic errors will be the easiest to fix by hiring somebody with more writing skill. Although I am open to such corrections, these are not my primary concern. I would very much like to hear about substantive errors. These are cases where I was outright wrong or explained something in a manner that while being logical to me, was actually confusing. I would also like to hear if this book helped you and if there are things that you wish that I had included but did not. Not that I will necessarily include them, there has to be some winnowing of subject matter, but I do appreciate any ideas. Sincerely, John Bell [email protected]

Contents Chapter 1 Introduction .......................................................................................... 1
What I hope to accomplish in this book............................................................. 1 Which GPS receivers I address. ....................................................................... 1 My experiences and qualifications .................................................................... 1 A brief history of this book................................................................................. 2 Nomenclature.................................................................................................... 2 Synopsis ........................................................................................................... 3
Chapter 2 How GPS Works.................................................................................. 5 Basic GPS......................................................................................................... 5 Selective Availability, SA................................................................................... 7 Differential GPS ................................................................................................ 7
Basic GPS..................................................................................................... 7 WAAS............................................................................................................ 8
What your GPS does when it starts up ............................................................. 9 Chapter 3 Issues ................................................................................................ 11
Proficiency ...................................................................................................... 11 How to become proficient................................................................................ 11 GPS fixation .................................................................................................... 12 GPS dependence............................................................................................ 12 Operator Error................................................................................................. 13 Accuracy ......................................................................................................... 14 Hazards not depicted ...................................................................................... 17 Signal Availability ............................................................................................ 17
Detecting Signal Loss.................................................................................. 18 Channel marker collisions............................................................................... 19 Traffic in Low Visibility..................................................................................... 20
Using GPS to avoid collisions...................................................................... 20 GPS and Terror............................................................................................... 20
Chapter 4 Choosing a GPS receiver .................................................................. 23 Total Cost........................................................................................................ 23 Mapping GPS.................................................................................................. 24
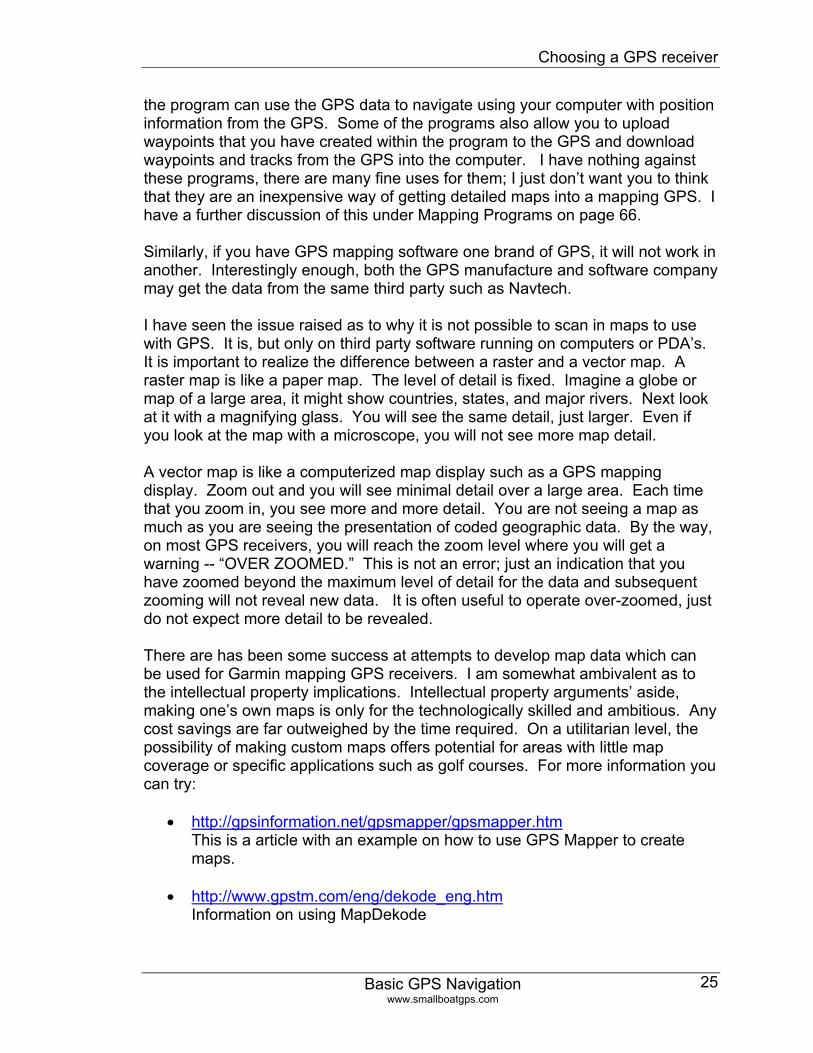
Mapping data............................................................................................... 24 Which map product? ................................................................................... 26 Unlock areas on CD-rom............................................................................. 27 U.S. GPS outside of the basemap area ...................................................... 28 Memory requirements for maps................................................................... 30 Memory availability ...................................................................................... 33
Processor Speed ............................................................................................ 33 Display Screen................................................................................................ 33 Available data fields ........................................................................................ 33 Marine vs. Generic.......................................................................................... 35 Aviation GPS Receivers.................................................................................. 35 Built in Altimeter and Compass ....................................................................... 35 Number of Channels ....................................................................................... 36
Less than 12 channels ................................................................................ 36 More than 12 channels................................................................................ 37
WAAS or non-WAAS ...................................................................................... 37 Antenna Location and Type............................................................................ 37 Mounting......................................................................................................... 39 Automotive use............................................................................................... 39 Auto routing and pedestrian use..................................................................... 42 Dead Reckoning ............................................................................................. 43 Multiple Uses .................................................................................................. 43 Where to get more information ....................................................................... 44 Laptops and PDA’s ......................................................................................... 44 Specific Garmin Models.................................................................................. 45
Garmin eMap .............................................................................................. 45 eTrex (basic) and Geko............................................................................... 45 Garmin GPS 72........................................................................................... 46 Garmin GPS III Plus.................................................................................... 46 Garmin eTrex Vista, Legend, and Venture.................................................. 46 Garmin GPS 76........................................................................................... 47 GPS V ......................................................................................................... 47 Garmin GPS Map 176................................................................................. 48 Garmin 196 and 295 ................................................................................... 48
Magellan ......................................................................................................... 48 Lowrance ........................................................................................................ 50 Other Manufactures ........................................................................................ 51
Chapter 5 Waypoints.......................................................................................... 53 Appropriateness of data.................................................................................. 53 Mark Present Position..................................................................................... 55 Marking on the map screen ............................................................................ 56 Projecting a point ............................................................................................ 57 Understanding some mapping basics............................................................. 57 Datums ........................................................................................................... 57
Datum Example........................................................................................... 58 A little extra background on datums............................................................ 58
Location Format.............................................................................................. 60 Latitude and Longitude................................................................................ 61 UTM, Universal Transverse Mercator ......................................................... 62 Various other Grids ..................................................................................... 63
Specialized Charts and Maps ......................................................................... 64 From the Internet ............................................................................................ 64 Mapping Programs ......................................................................................... 66
Delorme Map Print Pack (U.S. Only) www.delorme.com ............................ 67 Microsoft Streets and Trips ......................................................................... 68 GPS Manufactures’ Mapping and Data Software........................................ 69 National Geocgraphic http://maps.nationalgeographic/top.......................... 69 Ozi Explorer www.oziexplorer.com ............................................................. 69 Other software............................................................................................. 69
Ordinary Road Maps....................................................................................... 70 Chapter 6 Navigation Terminology ..................................................................... 71
What is North? ................................................................................................ 71 Magnetic North ............................................................................................ 71 Grid North.................................................................................................... 73
TRACK—synonym TRK or COG (Course over Ground) or HEADING ........... 74 BEARING........................................................................................................ 74 TURN.............................................................................................................. 74 COURSE-- synonym DTK(desired track) ........................................................ 75 TKE, Track error ............................................................................................. 75 TO COURSE, COURSE TO STEER .............................................................. 75 OFF COURSE, XTK (cross track error) .......................................................... 75 Terminology Example ..................................................................................... 76
Chapter 7 Navigation Displays ........................................................................... 77 Map Display .................................................................................................... 77 Bearing Pointer, Compass, or RMI ................................................................. 77 HSI or Course Pointer ..................................................................................... 78 Highway Screen.............................................................................................. 79 Other navigation screens ................................................................................ 79 Which screen should you use? ....................................................................... 80 Setting up the map display for navigation ....................................................... 81
Lines............................................................................................................ 81 Detail ........................................................................................................... 81 Data Fields .................................................................................................. 82 The variations:............................................................................................. 83
Chapter 8 Two Dimensional Vehicle Navigation................................................. 85 When this chapter does not apply:.................................................................. 86 Technique ....................................................................................................... 86
Navigating to a point using BEARING and TRACK information .................. 87 Steering ....................................................................................................... 87 Homing verses tracking............................................................................... 88 Sighting ....................................................................................................... 89 TURN Sensitivity ......................................................................................... 90 Navigating along a line using bearing information ....................................... 91 Navigating along a line using COURSE information.................................... 92
Navigating to a point using course information ............................................... 94 Great Circle..................................................................................................... 94
Chapter 9 Two Dimensional Navigation on foot.................................................. 97 Warning .......................................................................................................... 97 Which activities does this chapter apply to?.................................................... 97 Track vs. Heading ........................................................................................... 98
Track ........................................................................................................... 98 Heading....................................................................................................... 99
What data and displays are still useful without TRACK? ................................ 99 Basic BEARING and a compass technique .................................................. 100 Which Screen to navigate with...................................................................... 101

Magnetic North ............................................................................................. 102 Other navigation clues .................................................................................. 103 More Tricks................................................................................................... 104
Using True North....................................................................................... 104 Aligning the GPS screen ........................................................................... 105 Triangulation ............................................................................................. 106
Foot navigation for the urban tourist ............................................................. 106 Equipment................................................................................................. 107 Finding Points of Interest .......................................................................... 107 Routes....................................................................................................... 109 Navigating ................................................................................................. 110
More information on using a Map and Compass .......................................... 110 Chapter 10 Routes ........................................................................................... 111
Warning: ....................................................................................................... 111 What is a route?............................................................................................ 111 First leg uses the second waypoint............................................................... 111 Evaluating routes.......................................................................................... 113 Waypoint and leg sequencing....................................................................... 113 Creating a route using the map display ........................................................ 113
Garmin ...................................................................................................... 114 Magellan ................................................................................................... 115
Enroute GOTO ............................................................................................. 115 Is the receiver capable of an enroute GOTO? .......................................... 116 Executing an enroute GOTO..................................................................... 116
Example: Setup of Manchester Channel ..................................................... 118 Example: Route between a chain of lakes................................................... 119
Chapter 11 Path navigation.............................................................................. 122 Using the computer to create the route......................................................... 124 Magellan adaptive technique ........................................................................ 125 Another example........................................................................................... 125
Chapter 12 Using Maps with an unknown or no grid ........................................ 127 A little math of conversion review ................................................................. 129 Bearing reciprocal calculation technique ...................................................... 130 Creating Waypoints from known Waypoints ................................................. 131
Bearing and Distance method................................................................... 131 UTM method ............................................................................................. 134
Example using a reference point .................................................................. 135 END relative to reference points ............................................................... 136 Some Bearing and Distances.................................................................... 136 How well did the methods work?............................................................... 139
Chapter 13 Advance techniques for generic maps........................................... 141 Bearing from two points method ................................................................... 141 User Grid Overview ...................................................................................... 142
Map Requirements.................................................................................... 142 User Grid Preview......................................................................................... 144 User Grid Technique..................................................................................... 145
1. Renumber the grid if necessary ......................................................... 145 2. Enter the reference point into the GPS............................................... 145 3. Measure the point on the map in grid terms ....................................... 145 4. Calculate meters per grid: .................................................................. 145 5. Calculate GPS scale: ......................................................................... 147 7. Get Northing of the reference point. ................................................... 148 8. Set User Grid False Northing to: ........................................................ 149 9. You are finished setting up the GPS. ................................................. 149
User Grid Summary and worksheet .............................................................. 151 Chapter 14 Connecting your GPS to the computer .......................................... 153
Connecting the GPS to your Computer......................................................... 153 Software........................................................................................................ 154
G7toWin .................................................................................................... 154 http://www.gpsinformation.org/ronh/.......................................................... 154 EasyGPS................................................................................................... 154 www.easygps.com .................................................................................... 154
Chapter 15 Rowing, Kayaking, and Sailing ...................................................... 155 Rowing.......................................................................................................... 155
Rowing promotion ..................................................................................... 155 GPS techniques ........................................................................................ 155
Sailing ........................................................................................................... 156 VMG, Velocity Made Good ........................................................................ 156 Hazards ..................................................................................................... 158
Chapter 16 Odds and Ends .............................................................................. 163 Man Overboard – MOB................................................................................. 163 Measuring with a map display....................................................................... 163 Tracks ........................................................................................................... 164
Chapter 17 Links and Further Reading............................................................. 167 Marine GPS use............................................................................................ 167 Aviation use .................................................................................................. 167 GPS information............................................................................................ 167 Map and Compass Information ..................................................................... 168 Cartographic information............................................................................... 169 Rowing.......................................................................................................... 169 Kayaking ....................................................................................................... 170 Geocaching and other different uses ............................................................ 170

Introduction
Basic GPS Navigation www.smallboatgps.com
1
Chapter 1 Introduction What I hope to accomplish in this book. It is possible to go into a chain store and purchase a GPS receiver which will give more navigation capability than was available at any price just a couple of years ago. However, many people have no idea what they can do with one. Many of the people that have GPS receivers are using their GPS receivers to a fraction of their potential. My intent is to try to show you how to use a GPS for many recreational activities.
Which GPS receivers I address. I use screen shots from several different GPS receivers. I occasionally mention a feature or trick that is applicable to a specific receiver. However, this book in no way is meant to be model specific. Much of navigation is relating parameters such as bearing, cross track error, track, routes, etc. Whether you are using a very economical handheld GPS receiver, an expensive marine chart plotter, or an integrated flight management system on an airliner, many of the principles of navigation are similar. Different receivers have different keystrokes and menu selections to accomplish certain tasks. This is certainly true from manufacture to manufacture, but this is even true between different receivers made by the same manufacture. Although I may occasionally give advice relevant to a specific receiver, for the most part I do not tell you the button and menu sequences to accomplish a specific task. This is the realm of the owner’s manual and simply playing with the GPS to get familiar with it. Generally, there is a logic to the menus and button presses. Even if the logic is not what you might try on the first guess, a little trial and error will usually get you to the required menu or function.
My experiences and qualifications The perspective of an author always influences a book. It is fair that you know my expertise and experience relative to using GPS. By profession, I am an airline pilot for a major airline in the U.S. I also have a degree in Aerospace Engineering. One thing that I am not is a writer. Even though my professional expertise is flying, I have used GPS for a variety of activities. I have used GPS for aircraft navigation, kayaking, rowing, bicycling, personal watercraft riding, and I commonly use GPS to find my way around unfamiliar cities. Some of the uses of GPS that would get strange looks from my neighbors if they didn’t know me as well as they do are when I have put a GPS into my hat to measure the linear distance mowing my lawn. I commonly inline

Introduction
Basic GPS Navigation www.smallboatgps.com
2
skate around the neighborhood with a GPS strapped to the top of my helmet to tell me how far and fast I have skated. In only one of these activities that I have used GPS, flying, would I claim to be an expert or at least professional. I am confident in my knowledge of how to use GPS for navigation, but my advice does not extend beyond the GPS aspect of the activity. Thus, there are many subjects that I do not cover in much detail, such as reading nautical charts or topographic maps because they are beyond the scope of the book and my expertise. The good news is that there is much good material addressing these issues.
A brief history of this book My little sister married a Norwegian. She was kind enough to release me from the standard bridal registry of useless things such as fine china. Instead she let me know that they could really use some camping gear. Living in the Houston, Texas at the time, I would occasionally read about someone being caught in a blizzard and being lost. Certainly Norway qualified as having blizzard potential, so I also purchased a GPS for my little sister so that she and her new husband would be able to navigate their way through any surprise blizzard. Unfortunately, I played with the GPS before I gave it to her. I had to have one also. I was amazed that for a couple of hundred dollars, this handheld device would provide much of the navigation information that the boxes costing hundreds of thousands of dollars in the airliners that I was flying. I became fascinated with GPS, and I think that my sister’s GPS resides in a drawer in Norway. When I first started using GPS in airplanes, I realized that many pilots did not know how to use GPS to its fullest potential. What started as an e-mail became a website which eventually became a downloadable book, Cockpit GPS (www.cockpitgps.com). GPS became somewhat of a hobby and I would often talk to boaters about using GPS. I would also talk to salesman at local boating stores, occasionally go to seminars for boaters, and read several books. Unfortunately, I found a shortage of knowledge and skill in using GPS. I also felt that many of the books on using GPS left out some crucial skills in using the GPS. Thus, I wrote Small Boat GPS which was published on the Internet. Much of what was in Small Boat GPS is generic to navigation using GPS and is applicable across a wide variety of activities. Thus, this book is a re-editing and expansion of the scope of Small Boat GPS.
Nomenclature
Introduction
Basic GPS Navigation www.smallboatgps.com
3
GPS stands for Global Positioning System. It is a system that includes satellites that are monitored and controlled by ground stations as well as receivers. The thing commonly referred to as a GPS is actually a receiver integrated with a navigation computer, sometimes called a GPS navigator. Referring to a GPS navigator while being technically incorrect is the common usage. I feel that nothing is lost in this somewhat incorrect terminology and I often use the term “GPS” in reference to the receiver. It is usually contextually obvious when the receiver is being referenced and when the whole system is being referenced.
Synopsis I have tried to lay out this book in a logical manner. However, this is not a novel; pick and choose what you find interesting and useful. There is information that some people will find irrelevant that others will find useful. For example, if you already have a GPS, you will not need advice on which GPS to buy. If you have a mapping GPS, you will not need to figure out how to get waypoints.
• How it works Every book has a description of how GPS works. There is also much good information available on the web. I have a brief oversimplified explanation that will hopefully give you the conceptual knowledge of how GPS works.
• Issues GPS is a wonderful technology, but there are some caveats and limitations that you should understand.
• Which GPS Before you can use a GPS, you must have one to use. GPS receivers are like any other piece of electronics in that new models are constantly replacing old models. Thus, a model-by-model buyer’s guide quickly becomes obsolete. Although I list my opinions on some specific models, my primary goal is to let you know what issues to consider in choosing a GPS.
• Where to get Waypoints Another issue is where to get waypoints. Before you can navigate with a GPS. It is necessary to describe where you want to go to the GPS receiver. There are a variety of methods for getting these coordinates. Some are as easy as pointing and clicking on a mapping GPS. There are also ways to get coordinates using a computer including Internet sites. Maps and charts are also useful for finding coordinates. Using a road
Introduction
Basic GPS Navigation www.smallboatgps.com
4
map for flying would obviously be improper. However, a road map might be ideal for using with a basic GPS for a canoe trip. A proper topographic map may be better in such a case. However, the time and expense of acquiring such a map may be overkill when a road map or free map from the ranger station might be adequate.
• Navigation terminology Although it is possible to navigate with GPS in a rudimentary fashion without knowing basic GPS terminology, there are some terms that you should know.
• Navigation Displays This chapter explains how the GPS displays the navigation information.
• How to Navigate I divide GPS navigation into two-dimensional vehicle navigation, foot navigation, and path navigation. Two dimensional vehicle navigation applies to steering a vehicle such as an airplane or a boat where the GPS is used for a steering reference. Path navigation is where the GPS is used to orient and provide progress along a route such as boating along a river or traveling along a road or trail. However, in path navigation the GPS is not actually used for steering guidance. The sides of the road or banks of the river provide guidance. Furthermore, there is a slight variation in using GPS for foot navigation. One of the biggest advantages of GPS is that it provides information on the direction that you are traveling. This is unique in that most systems in the past have only provided information on the direction that a vessel is pointing. Due to currents and winds, there is often a significant difference. However, often during foot navigation the GPS is unable to provide direction of travel. Thus, there is a difference in navigation technique.
How GPS Works
Basic GPS Navigation www.smallboatgps.com
5
Chapter 2 How GPS Works There is no shortage of information on how GPS works. My explanation is meant as a brief summary. If you would like more information, I have many sources in the links and reference section. Essentially GPS takes the range (distance) from a constellation of satellites to calculate your position. If the GPS knows where you are and you tell it where you want to go it is then able to calculate bearings, distances, off course distances, and your track. If you want to have a slightly more detailed explanation, I have a slightly longer but still purposefully over simplified explanation in the next several pages. If you want a more detailed explanation than I offer, here are some sources:
• GPS Explained, Paul Bertorelli of IFR magazine http://www.avweb.com/articles/gpsexpln.html One of the best explanations that I have seen on how GPS works.
• GPS Guide for Beginners, http://www.garmin.com/aboutGPS/manual.html This is a Garmin pamphlet that is good at explaining the basics of how GPS works. There are also basic introductory explanations of elementary navigation terms.
• Trimble GPS tutorial, http://www.trimble.com/gps/index.htm This is a Flash explanation of how GPS works.
• Navtech GPS Seminars and Supply, http://www.navtechgps.com If you want a post graduate engineering text on GPS, Navtech would be a source.
Basic GPS The GPS system consists of 24 satellites. The number may vary slightly as new ones are launched and old ones are retired. Each satellite is in an 11,000 mile orbit and transmits a very weak signal. The system is monitored and maintained by the U.S. Military. The satellites only broadcast to the user and the user only receives. There is no charge for use. To start with, assume that all of the satellites and the receiver have a perfect internal clock. This is not the case, but it makes a good starting point. Each satellite transmits a coded signal. Consider this signal to be like the peaks and ridges along the edge of a super long key. This code is generated as a function of time. The receiver is also able to generate the same code. The receiver
How GPS Works
Basic GPS Navigation www.smallboatgps.com
6
matches the incoming code to the internally generated code except that there is a delay caused by the signal’s travel time between the satellite and the receiver. The receiver measures how much it has had to shift the timing of its code to match the incoming code. Since the receiver knows how much time it took the signal to reach the receiver and the speed of travel of the signal, it can then calculate the distance from the satellite. If you know how far you are from one satellite then you know that you are somewhere along an imaginary sphere around that satellite. If you know how far you are from two satellites, then you are somewhere along the intersection of where these two spheres, which is a circle. If you add another satellite, then you are somewhere where this third sphere intercepts the circle created by the intersection of the other two spheres. The sphere will most likely intercept the previous circle at two points. One of these points is where you are, and the other is not a reasonable solution – somewhere in outer space. Thus by knowing where you are relative to these three satellites the receiver with a perfect clock can know where it is. Although no clock is perfect, the satellites have atomic clocks—pretty close. The clock in the GPS receiver is closer in technology to an inexpensive digital watch. Light travels at 186,000 miles per second. If the receiver time was off by 1/100 of a second the calculated distance would be off by 1,860 miles. For each receiver to have its own cesium clock would make GPS technology prohibitively expensive and non-portable. What the GPS receiver does is to use a cheap clock similar to a digital watch and add one more satellite to the calculation to correct the time in the receiver. The receiver shifts the time calculation back and forth so that all of the imaginary spheres around the satellites intercept at one point. For three-dimensional navigation you need to receive four satellites. Think of it as one satellite for each dimension and one for the time. For two-dimensional navigation you can scrape by with only receiving three satellites. If you know your altitude, the GPS can treat the center of the earth as a satellite reducing the number of required satellites by one. Your distance from the center of the earth is the radius of the earth plus your altitude. This is why aviation GPS models have barometric altimeter input and you may occasionally see a handheld GPS ask for your altitude during poor reception conditions. Newer GPS receivers use the extra signals above the minimum that is required to further refine the position for increased accuracy. This is known as an over determined solution.
How GPS Works
Basic GPS Navigation www.smallboatgps.com
7
Selective Availability, SA SA is an intentional error introduced into the GPS signal to make it less accurate. Although I suppose that the military could turn it on again, SA no longer exists. I mention it because you may see it in mentioned in literature on GPS. Not only is GPS good for flying airplanes, but it is good for guiding bombs and missiles. To prevent somebody else from doing this well, the military added a little random time shift to the satellite signal available for civilian use. This added some inaccuracy to the calculated position. Error correction technologies such as differential GPS, WAAS, and LAAS take out much of the SA induced error. Thus a sophisticated enemy could negate the effects. Thus, selective availability was turned off.
Differential GPS If you have an inaccurate piece of equipment, but know exactly how inaccurate the output is, then you know the correct value. For example, if your watch was exactly 5 minutes fast, you could look at your watch and subtract five minutes to know exactly what time it was. In fact, I have found most people who use this watch setting technique to prevent chronic tardiness also subconsciously perform this calculation every time they look at their watch. Differential GPS technologies use a similar idea. The signal from each satellite must pass through the atmosphere. The atmosphere, and especially the ionosphere, causes errors due to refraction. The GPS receiver has some internal models to calculate these effects, but an even better way is to directly measure the errors. The idea of differential GPS is to install a GPS receiver at a known point. Since the location is known, this GPS compares the distance to each satellite and to what it should be and then rebroadcasts the error in digital format. GPS receivers so equipped can then use this known error in its position calculations.
Basic GPS
Basic GPS uses local receivers and local transmitters. In order to use differential GPS, you need a special differential receiver which then sends the signal to the the GPS. Differential GPS is mainly a marine application and it is not widely used for recreational applications. For more information on differential GPS:
How GPS Works
Basic GPS Navigation www.smallboatgps.com
8
http://www.navcen.uscg.gov/dgps/default.htm
One of the biggest advantages of differential GPS is that it helped to eliminate the purposeful errors caused by Selective Availability. Now that Selective Availability has been turned off, the level of accuracy increase from using differential GPS is significantly less. Additionally, WAAS, Wide Area Augmentation Service is common in most new GPS receivers. WAAS is a differential type of technology.
WAAS
Another differential technique is known as WAAS, Wide Area Augmentation Service. WAAS has 25 receivers scattered around the United States. A mathematical model of the satellite errors is created based on the measurements and the error correction values are then sent to a geo synchronous satellite to be rebroadcast. The advantage of WAAS over conventional differential GPS is that it is available in small handheld receivers without needing a separate receiver. In fact, almost every new GPS receiver is WAAS capable. Europe is developing a system similar to WAAS called EGNOS, European Geostationary Overlay Service. Japans is developing MSAS, Multi-Function Satellite Augmentation System. Hopefully, any WAAS receiver should work with EGNOS or MSAS. WAAS was designed for aviation use. GPS is more accurate in laterally than for altitude. One of the goals of WAAS was to provide sufficient accuracy to allow GPS to be used to provide vertical guidance during an instrument approach. Most larger airports have something called an ILS (Instrument Landing System) which provides a “radio beam” down to the runway. However, many smaller airports do not have this expensive navigational infrastructure. There are many issues involved, but WAAS enabled GPS approaches with vertical guidance offer big safety improvements to runways without ILS equipment. The other goal of WAAS is not so much accuracy as it is integrity. If a satellite is sending a bad signal, it takes a few minutes to detect and stop broadcasting the signal. Currently aviation receivers use satellite signals beyond the minimum required to cross check the accuracy of the signal. For example, if you need 4 satellites to determine a position and you are receiving 5 satellites, you can use the extra signal as a cross check. This is called RAIM, Receiver Autonomous Integrity Monitoring. Part of WAAS provides integrity checking which is faster than what is offered through the basic GPS system. Most newer inexpensive handheld GPS receivers, use the extra signals above the minimum that is required to further refine the accuracy of the position solution. The technical difference between RAIM and the possibly proprietary
How GPS Works
Basic GPS Navigation www.smallboatgps.com
9
algorithms that consumer handhelds use is well beyond the scope of this discussion or my knowledge. However, I think that it is fair to say that an aviation receiver is optimized to give as quick of a warning as possible to bad or insufficient satellite data, whereas a consumer GPS and the aviation handheld receivers that they are based on them are not designed with this in mind. In fact, consumer handheld receivers are probably more designed to not give nuisance warnings than they are to give timely warnings of bad navigational data. This is not necessarily bad design as much as it is a reflection of differing design parameters for different uses. For the most part, this is not a big issue, but it is a very good reason why you cannot use a handheld receiver as if it were a certified aviation receiver.
What your GPS does when it starts up You may have noticed that the amount of time it takes for your GPS to calculate a position varies. It will take an especially long time to get an initial fix when you first start it and it will get a fix very quickly when you start it again after just shutting it down. The GPS has two types of data on the location of the satellites and their orbits. The first is a rough idea of where each satellite is located and is called the almanac. This almanac data is good for a couple of months. If the GPS does not have a current almanac it will take about 15 minutes to download. The second type of data is the fine data more technically referred to as the ephemeris data. Each satellite broadcasts the almanac which is applicable to all of the satellites, but only broadcasts its own ephemeris data. The ephemeris data takes 18 seconds to download and is good for a couple of hours. It is this ephemeris data that the GPS actually uses for deriving a position. The almanac is used for deciding which satellites to “look for.” For most 12 channel parallel receivers, the GPS will start looking for the satellites that it expects that it can receive based on it’s current position and time using the almanac data. The GPS assumes that it is where it was last shut down and the clock is correct. However, you can change the position and time, this is called initialization. No accuracy is required in this initial position. I have shut down my GPS in Florida and turned it on in Europe and was able to get a position. The GPS did not attempt to look for satellites that would be in view to the east because they would be invisible from Florida where the GPS was assuming that it was. Likewise, the GPS was attempting to download data from satellites that would be well over the western horizon from Europe that would be visible from Florida. However, there are usually enough satellites that would be visible from both Europe and Florida and eventually the GPS will get a position and sort things out.
How GPS Works
Basic GPS Navigation www.smallboatgps.com
10
I have been keep the GPS from getting a lock in the wide open outdoors by initializing it to the other side of the world. Thus none of the satellites that it was attempting to receive would be in view. The point of this is that when you give the initial position during the initialization, accuracy is not important – anywhere within a couple of thousand miles is probably good enough. Obviously, part of this calculation is the almanac data. If the Almanac data is grossly out of date, the GPS will not have the correct data to calculate which satellites to look for. The almanac data takes 12.5 minutes to download. Thus, you should leave the receiver on for at least 15 minutes to a half hour every couple of months to get a fresh almanac. Most receivers have a mode where they can just start searching cycling through the list of satellites searching in a trial and error manner. The advantage of this mode is that it does not depend on a initialization position, time, or current almanac. Most receivers will display a list of choices if it has trouble getting an initialization asking you if you want to use the automatic mode, enter a new position, continue trying with the same initialization, or just give up because you are indoors. Having more than 12-channels will make most of this discussion a non-issue. Cobra makes a handheld GPS with 18 channels at the time of this writing. I would be surprised if other manufactures don’t eventually follow. Quite honestly, getting an initial first fix usually is not a problem. When it is a problem, it is simply dealt with by giving the GPS a new position or using the automatic mode. Once the GPS starts to receive data from a satellite, it will show a hollow bar on the satellite page. On some receivers you might see bars go solid with others following. On other receivers you might not see any go solid until at least three go solid simultaneously. In the first case, the bars go solid as soon as the ephemeris data can be used to give a pseudorange to calculate a position. In the second case, the solid bar indicates that the satellite is being used for a position fix. In this second case, If at least three satellites are not being received with current ephemeris data, there is no position fix and therefore an individual satellite is not being used for a position fix because there is none. A “D” for differential superimposed on the bar means that WAAS corrections are being applied.
Issues
Basic GPS Navigation www.smallboatgps.com
11
Chapter 3 Issues Proficiency I find that the biggest shortcoming with GPS is that users do not know how to use it. A GPS is a powerful tool. It is up to the user as to whether it is used like a hammer in the hands of a two year old or in the hands of a craftsman. Human Factors Ph.D. theses have been written about the application and pitfalls of automation and advanced tools such as GPS, especially in the aviation field. GPS can be a distraction, it can create complacency, it can carry you down the road to the wrong destination. However, when wisely and proficiently applied, GPS navigation can significantly improve your situational awareness and be an overall safety enhancement.
GPS is often easy to use on one level, but it is also very sophisticated if you want to master it. In this respect, GPS is similar to many other fields. Take the example of an engineer. Calculators are available at a modest price that would amaze an engineer working on the space program in the 1960’s. However, this does not mean that you can go into a local chain store and buy a programmable scientific calculator, sit down, read the owner’s manual, and be able to design a rocket to the moon. Keeping with the same analogy, you can go to the chain store, buy the calculator, and immediately be able to add, subtract, and multiply. You do not need to know every function to get utility out of the calculator.
How to become proficient One of the biggest factors in becoming proficient is simply to use the GPS. Obviously, the best thing is to just get out and use the GPS. However, some activities such as some forms of boating, flying, or learning to use your new GPS when you live in cold climates and you just got a new GPS for Christmas are more suitable to using the simulator mode. The specifics on how to use the simulator vary from model to model. Most of the simulator modes allow you to set a speed and track as well as to allow the GPS to automatically track the navigation information. A known exception to this is the Garmin eTrex series, including the Legend series, which allow you to only follow the navigation information at a set speed. For most Garmin GPS receivers, go to the satellite page, press menu and select the simulator function. You can also use the menu on the satellite page to select “New Location” to locate the GPS wherever you want. Press the page button until you get to the compass page. On some GPS receivers this is called the pointer, compass, HSI, RMI, etc. I get into the details
Issues
Basic GPS Navigation www.smallboatgps.com
12
of these displays later, but just get to the page with a compass card display. From this page you can use the rocker pad to control the speed and track. Up and down controls speed and left and right steers. If you execute a route or a GOTO, the GPS will usually follow it; however, you can manually override the track with left and right on the rocker pad. You can also set in values in the setup menu, but the rocker pad is usually easier. A couple of extra details: On some GPS receivers, such as the Garmin 196 the zoom keys can be used to set the altitude. The simulator function is a great way to “play” with the GPS and learn the functions. Most of the screen shots in this book have been made using the simulator mode.
GPS fixation Precise navigation using GPS is of no benefit as you run over something or somebody or get run over yourself. GPS can be an eyeball magnet, especially when you first start using it. It is still vitally important that you do not let it distract you from your other duties such as looking for hazards and traffic. As you become proficient, you should be able to get the information that you need from the GPS by just including it in your scan. I think that ease of using GPS actually frees up brain computing power to be used else ware. The catch is that this depends on your proficiency at using GPS.
GPS dependence Name the activity -- flying, kayaking, boating, etc. Many “old hands” think that there people too dependent on GPS. If you take away the GPS, then several people will be clueless. I think that this view has its merits. However, if you learn to navigate with GPS as opposed to using GPS to avoid learning basic navigation, then I do not think this will be a great problem. If there is a rule of thumb, I would say don’t get yourself into a situation where losing the GPS would leave you unable to find your way. Ask yourself, “If the GPS fails, how will I find my way?” GPS is not unique in this regard. When I fly over the ocean, the flight plan still has dead reckoning headings and times to fly should we loose all navigation data. This is in addition to triple inertial navigation systems which are able to navigate with no external input. Also, it is often possible to visually follow another aircraft at a different altitude on the same track. In other words, there are several options.
Issues
Basic GPS Navigation www.smallboatgps.com
13
However, when I go on a well-marked trail in the local state park, do I carry a topographic map and a compass? No. If the GPS dies, I can follow the signs or just ask somebody. Obviously, the GPS is not even necessary. My point is that there are too many situations for me to give you some specific admonishment. Just use common sense and think of various contingencies. There is the possibility of the whole GPS system going down. For the most part I consider this to be fairly unlikely – not that it is impossible and that you should not have a contingency. In fact, this fear and is one of the reasons that Europe is implementing its own GPS system, Galileo. For areas of systems unavailability you can check the U.S. Coast Guard website at http://www.navcen.uscg.gov/gpsnotices/. The most likely failure is from the failure of your receiver. For a handheld receiver, the most likely failure mode is power failure -- carry spare batteries. You might also consider having a spare receiver. A relatively inexpensive battery powered handheld makes a great emergency backup whether the primary navigation is another handheld GPS or an expensive onboard navigation system that uses ship’s power.
Operator Error The biggest weakness of GPS is operator error. Not that this is unique to GPS technology. If you ignore the conspiracy theorists; a 747, KAL 007, was shot down because the pilots input the wrong co-ordinates into the inertial navigation system. Part of the vulnerability of GPS is that it is too easy to blindly follow it. Accurately navigating to the wrong place is of no benefit. In spite of this, with the proper precautions, GPS is one of the most dependable systems available. I see two independent courses of action to reduce operator error: identify the most likely sources of error and cross check the solution. The cross check will most likely be a method of navigation that you could rely on if appropriate. In all cases, the first and best cross check is your own reasonability filter. Is the distance and direction that the GPS is indicating reasonable? Mapping GPS receivers also add the cross check of looking at the route on the map display The two biggest potential sources of error are in measuring the coordinates and then in entering coordinates into the GPS. A good way to eliminate both of these errors is to have a mapping GPS and to enter the route or waypoint using the map display. A second way is to create the waypoints and route on the map display of a computer and transfer them into the GPS directly. If you merely measure the waypoints using an Internet site or a mapping program, you have at least eliminated the measurement error. If you are measuring directly from a
Issues
Basic GPS Navigation www.smallboatgps.com
14
chart and then entering the coordinates into the GPS, you are doubly vulnerable. The only protection is being careful and double-checking.
Accuracy Standard GPS is generally advertised to be accurate within about 15 meters (50 feet). In actual practice you will probably find basic GPS to be more accurate. Differential GPS is accurate to within 3 to 5 meters (10 to 15 feet). How accurate is accurate enough is a matter of perspective. A typical recreational receiver is phenomenally accurate in the perspective of price and intended use. If you start talking about landing an aircraft traveling 150 miles per hour on a runway that is 150 feet wide, un-augmented GPS is insufficient. Usually, the GPS would get the airplane very close to the centerline of the runway, but every once in a while the airplane would be off in the grass. For this reason, the pilot has to see the runway by a specified height before he continues. For those of you who are pilots, I apologize for the oversimplification. For those of you who have read about airplanes making blind landings, most airliners and some business jets can, but this is not based on GPS. My point is that I think that the accuracy of GPS is very impressive. However, I would not depend absolutely on it. An example where I can see this becoming a problem is for a boater trying to use GPS to navigate a narrow passage around a hazard or through a narrow channel. In such a case, GPS is a great tool, and would be sufficient 99% of the time. However, due to the small number of times that the GPS accuracy is insufficient, it would be dangerous to depend solely on un-augmented GPS without sighting the hazard or locating it on radar. Ask yourself, “what if I am really not where the GPS says that I am?” Even if your GPS shows an accuracy circle, this is just a calculation based on probable error. Just because you are probably within the circle this does not mean that you are absolutely in the circle. In addition to the actual accuracy of the GPS there is the issue of the accuracy of the surveys used to draw maps. It is very possible that the GPS is more accurate than the map. Thus, a disagreement between the position indicated by the GPS and your location on the map, the map may actually be in error. Although I have read of stories of islands being way off, generally I don’t think you will find these errors to be large. However, when you wonder why a landmark is a couple hundred feet from where it should be and the GPS is giving a position error significantly smaller, the problem may be the map more than the GPS. The GPS will give an estimated position error, EPE. This is usually on the satellite page. Understand that this is not a guarantee. For an actual
Issues
Basic GPS Navigation www.smallboatgps.com
15
measurement of this error, the GPS would have to know exactly where it was and compare it to where it thought that it was. If it knew exactly where it was, then there would be no use of measuring the error since it would know exactly. The EPE is an estimate of how accurate the position is based on a number of factors. It is undocumented, but I have read estimates that the EPE means that there is a 50% estimated chance that you are within the given value of the position. A 50% chance that you are within the EPE radius would also imply that there is a 50% chance that you are more than the EPE measurement from your position. Many of the Garmin handheld GPS receivers will also draw a circle around the present position indicating the EPE. Another accuracy measurement that you might see is Dilution of Precision, DOP. This is a measurement of satellite geometry. A lower DOP is better than a higher DOP. For most recreational use, it isn’t necessary to get wrapped up in the details of DOP and EPE. Another point is that comparing two receivers by comparing EPE readings is not that useful. The percentage that the EPE is based on is not published and appears to vary from one model to another. So one receiver that shows an EPE of 10 feet may not be more accurate than a GPS that shows an EPE of 20 feet, but might just be reflective of a different percentage used for the probability calculation. If I have totally confused you, here is the main point. EPE and DOP are both useful to see how well the GPS is receiving satellites and will give a rough idea of the accuracy of the receiver. However, there is not much you can do about and while it is interesting, it not something to worked up about.
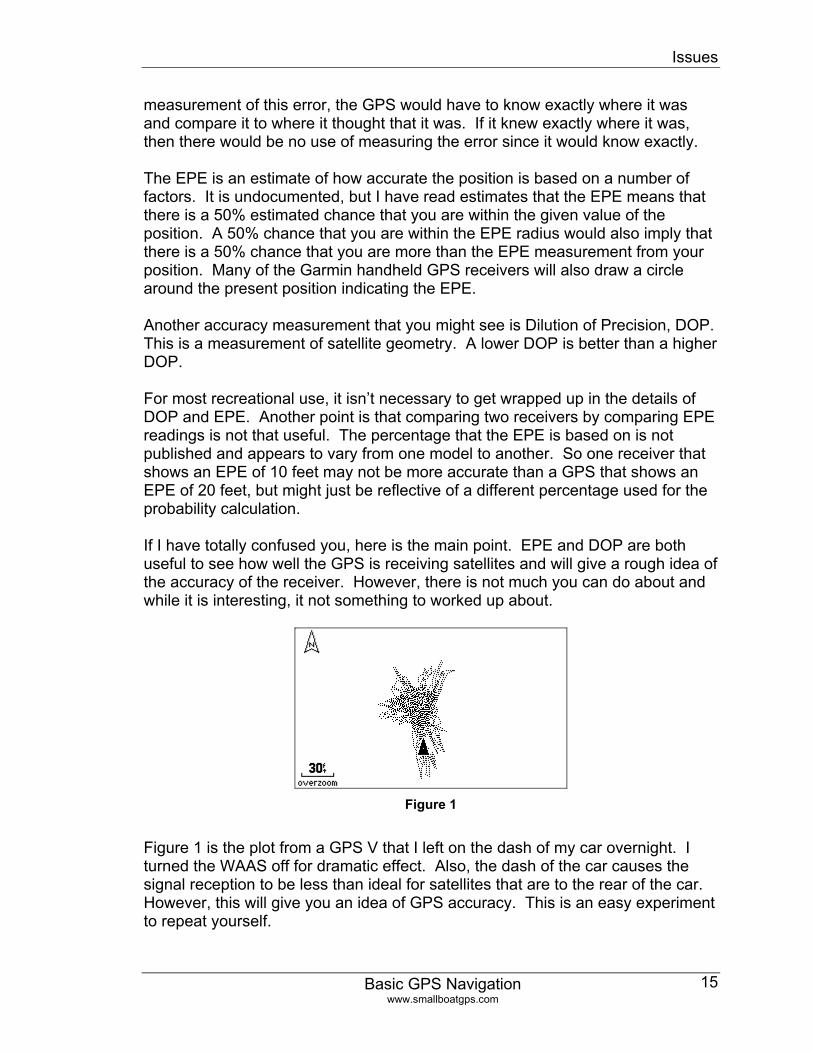
Figure 1
Figure 1 is the plot from a GPS V that I left on the dash of my car overnight. I turned the WAAS off for dramatic effect. Also, the dash of the car causes the signal reception to be less than ideal for satellites that are to the rear of the car. However, this will give you an idea of GPS accuracy. This is an easy experiment to repeat yourself.
Issues
Basic GPS Navigation www.smallboatgps.com
16
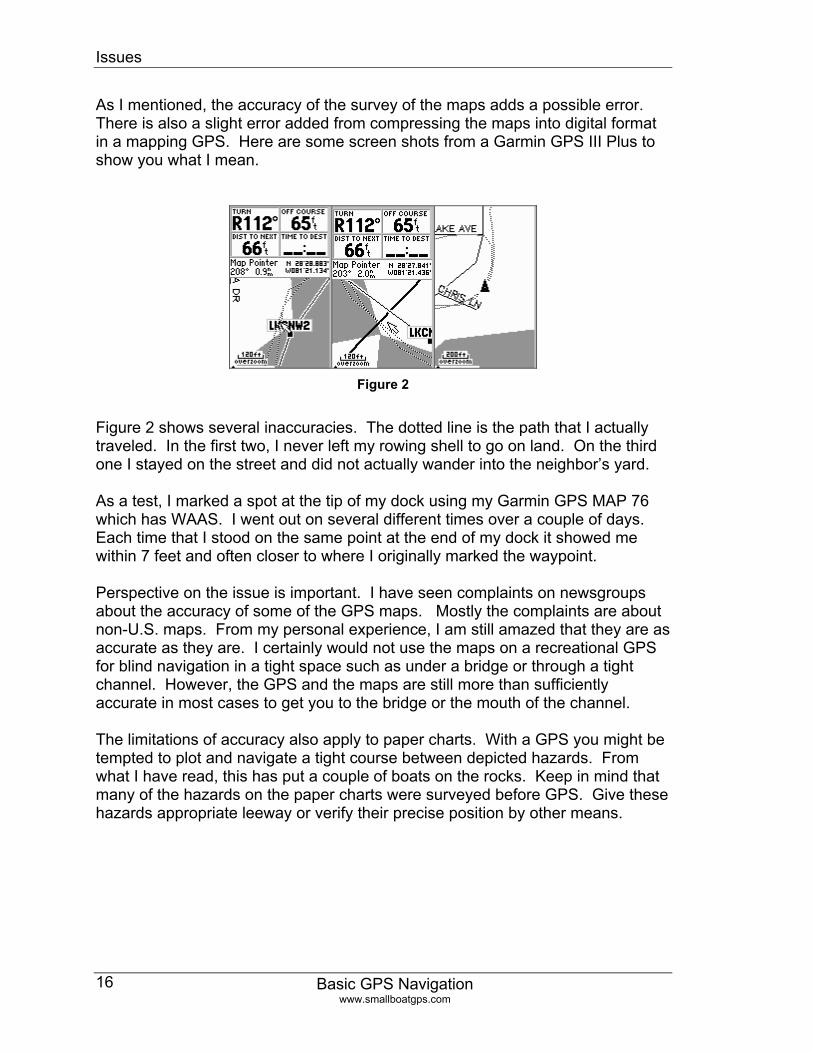
As I mentioned, the accuracy of the survey of the maps adds a possible error. There is also a slight error added from compressing the maps into digital format in a mapping GPS. Here are some screen shots from a Garmin GPS III Plus to show you what I mean.
Figure 2
Figure 2 shows several inaccuracies. The dotted line is the path that I actually traveled. In the first two, I never left my rowing shell to go on land. On the third one I stayed on the street and did not actually wander into the neighbor’s yard. As a test, I marked a spot at the tip of my dock using my Garmin GPS MAP 76 which has WAAS. I went out on several different times over a couple of days. Each time that I stood on the same point at the end of my dock it showed me within 7 feet and often closer to where I originally marked the waypoint. Perspective on the issue is important. I have seen complaints on newsgroups about the accuracy of some of the GPS maps. Mostly the complaints are about non-U.S. maps. From my personal experience, I am still amazed that they are as accurate as they are. I certainly would not use the maps on a recreational GPS for blind navigation in a tight space such as under a bridge or through a tight channel. However, the GPS and the maps are still more than sufficiently accurate in most cases to get you to the bridge or the mouth of the channel. The limitations of accuracy also apply to paper charts. With a GPS you might be tempted to plot and navigate a tight course between depicted hazards. From what I have read, this has put a couple of boats on the rocks. Keep in mind that many of the hazards on the paper charts were surveyed before GPS. Give these hazards appropriate leeway or verify their precise position by other means.
Issues
Basic GPS Navigation www.smallboatgps.com
17
Hazards not depicted
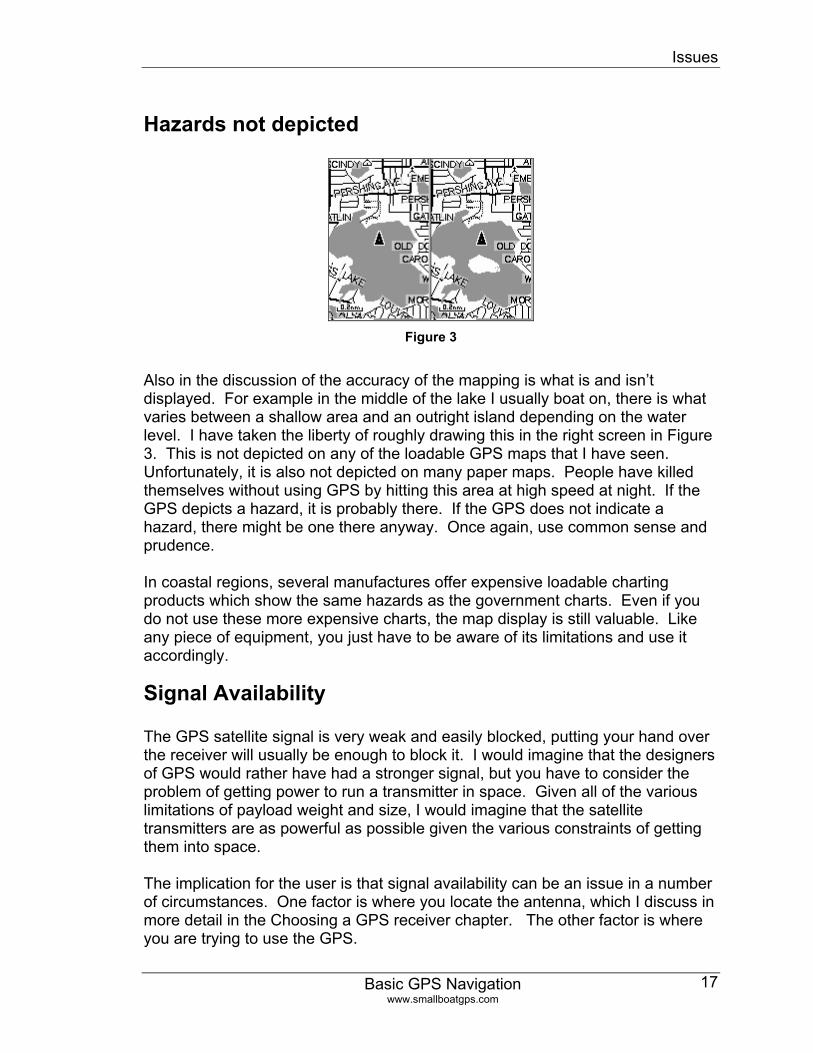
Figure 3
Also in the discussion of the accuracy of the mapping is what is and isn’t displayed. For example in the middle of the lake I usually boat on, there is what varies between a shallow area and an outright island depending on the water level. I have taken the liberty of roughly drawing this in the right screen in Figure 3. This is not depicted on any of the loadable GPS maps that I have seen. Unfortunately, it is also not depicted on many paper maps. People have killed themselves without using GPS by hitting this area at high speed at night. If the GPS depicts a hazard, it is probably there. If the GPS does not indicate a hazard, there might be one there anyway. Once again, use common sense and prudence. In coastal regions, several manufactures offer expensive loadable charting products which show the same hazards as the government charts. Even if you do not use these more expensive charts, the map display is still valuable. Like any piece of equipment, you just have to be aware of its limitations and use it accordingly.
Signal Availability The GPS satellite signal is very weak and easily blocked, putting your hand over the receiver will usually be enough to block it. I would imagine that the designers of GPS would rather have had a stronger signal, but you have to consider the problem of getting power to run a transmitter in space. Given all of the various limitations of payload weight and size, I would imagine that the satellite transmitters are as powerful as possible given the various constraints of getting them into space. The implication for the user is that signal availability can be an issue in a number of circumstances. One factor is where you locate the antenna, which I discuss in more detail in the Choosing a GPS receiver chapter. The other factor is where you are trying to use the GPS.
Issues
Basic GPS Navigation www.smallboatgps.com
18
If you are boating and flying, signal reception is seldom a factor because you are generally out in the open. Where this becomes a factor is using the GPS in a city, hiking in heavy tree cover, etc. Added to the blocking of the signal is something called Multi Path error, where the signal bounces off of buildings or rocks before reaching the receiver. The GPS works on the principle of calculating the distance the signal has traveled from the satellite. If the signal zig-zags around a little by bouncing off of things, this increases the distance and introduces and error. I use GPS for finding my way around cites on layovers. I expect the signal to be spotty. Needless to say, it is possible to find your location in a city without a GPS. However, the GPS can be a useful tool. I will find that walking down the street I often lose the satellite lock. When I am at a street corner, I find that I am usually able to get a good position because the receivers view of the sky has been improved. I was riding in a bicycle ride in New York, www.bikenewyork.org. I found that when I was stopped, the GPS position would float all over Manhattan and often into the East or Hudson rivers. When I would start moving the GPS would give a good position. It appeared that moving would allow a signal from one satellite to come into view as another one was blocked. I have also found this to be true when using the GPS in my car. Some more expensive automotive systems use a system that detects heading and vehicle speed such as a from speedometer input to estimate the position based on the last known position when satellites are blocked such as driving in a city.
Detecting Signal Loss
The Garmin handhelds go into a dead reckoning mode when they lose the signal. The purpose of this feature is to avoid constant nuisance warnings during weak signal reception. The GPS will just assume that you are still traveling in the same direction and speed as when it lost the signal. This happens for well under a minute before a message is displayed indicating that the GPS has lost satellite reception. A good way of demonstrating this is in an automobile. Just before coming to an intersection cover the antenna with your hand. Turn at the intersection. The GPS will show that you have gone straight through the intersection before it displays a warning that it has lost the signal. For most recreational purposes, the dead reckoning feature is not a problem. However, if you were to be pressing the limits of common sense such as navigating a tight channel with no backup and a poor antenna location, this might be a problem.
Issues
Basic GPS Navigation www.smallboatgps.com
19
The Magellan units that I am familiar with give no warning of signal loss unless you override the default setting and activate the loss of signal alarm. The default setting for this alarm is off. Without this alarm set, they will just display the last navigation information such as bearings and position before it lost the signal. They more or less just freeze. I recommend that you activate the loss of signal alarm.
Channel marker collisions
Figure 4
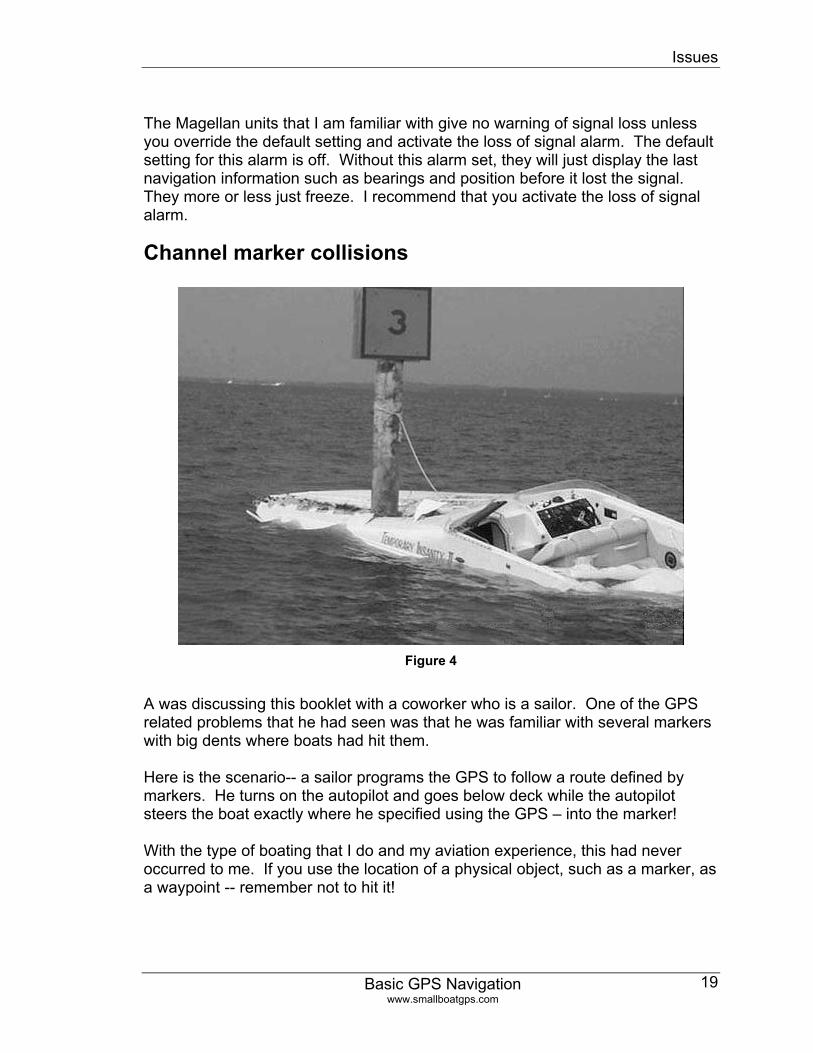
A was discussing this booklet with a coworker who is a sailor. One of the GPS related problems that he had seen was that he was familiar with several markers with big dents where boats had hit them. Here is the scenario-- a sailor programs the GPS to follow a route defined by markers. He turns on the autopilot and goes below deck while the autopilot steers the boat exactly where he specified using the GPS – into the marker! With the type of boating that I do and my aviation experience, this had never occurred to me. If you use the location of a physical object, such as a marker, as a waypoint -- remember not to hit it!
Issues
Basic GPS Navigation www.smallboatgps.com
20
Traffic in Low Visibility GPS will allow you to navigate in zero visibility conditions. I have already mentioned that accuracy and dependably issues make this a bad idea. Additionally, the GPS does nothing to deal with collision prevention. This ability to navigate in such conditions might lead to false security ending in a collision. The techniques for dealing with this are outside the scope of this book and beyond my personal experience.
Using GPS to avoid collisions
Interestingly enough and as an aside, there is an experimental technology being developed for aviation called ADS-B, Automatic Dependent Surveillance Broadcast. The basic idea is that each aircraft constantly broadcasts its GPS based position and track and any aircraft in the area can then receive this position and track, which can then be displayed. Garmin produces radios (Rhino) that broadcast their GPS position which can then be displayed on another corresponding unit. These radios are short range and do not constantly broadcast. The purpose is more for hunters, hikers, and maybe kayakers to find each other. However, the principle is somewhat analogous to ADS-B in a relatively inexpensive consumer variant. There are many problems with ADS-B for marine use such as the fact that all vessels would have to have a transmitter for it to be useful and airplanes do not have to deal with airplanes floating around un-powered or otherwise anchored in the sky. Even as a marine layman, I can see many reasons why an ADS-B type of system for marine applications may never be practical, especially in comparison to more traditional tools such as radar. However, since I am on the topic of GPS and collisions, I though that it made an interesting aside.
GPS and Terror Could GPS be used in a terror attack? Sure. However, so could many ordinary devices that we use daily. I don’t think that GPS significantly increases our risk from terror attacks.
Issues
Basic GPS Navigation www.smallboatgps.com
21
I bring up the subject up as somewhat of a retort to what I have already seen in the press. The New York Times published an article discussing the fact that the September 11th hijackers had purchased Garmin GPS III Pilot GPS’s. The heated windshield of the 767 blocks the GPS signal making the operation of a handheld GPS receiver very difficult. I can say beyond a reasonable doubt that the final targeting on September 11 was flown visually. If you have suicidal terrorists who are able to guide a weapon visually to the target, GPS is a moot point. The availability of economical portable GPS has nothing to do with the hijackers ability to execute their diabolical plan on September 11th. While I am here, let me also say that very little if any flying skill was demonstrated on September 11th. Landing the airplane safely, even in good whether requires skill. Anybody who credits the September 11th hijackers with a demonstration of skill is misinformed. Now, back to using GPS.

Choosing a GPS receiver
Basic GPS Navigation www.smallboatgps.com
23
Chapter 4 Choosing a GPS receiver This booklet is meant to be a guide to give you some techniques for using GPS. It is definitely not meant to be a buyer’s guide. Specific advice on any piece of electronic gear quickly becomes obsolete. Although, I have some specific references to some specific receivers, my ultimate goal is to explain the factors that you should consider in choosing a GPS. I include these, because I think that it is worthwhile knowledge to pass along even if it is not my primary focus. Primarily, most GPS receivers give you certain fundamental navigation parameters and an electronically generated map on the mapping units. There will certainly be increases in capability. I think that you will continue seeing better screens, more data storage capacity, and maybe a couple of new bells and whistles; however, much of the basic functioning of the GPS will remain. There is always the issue of should you buy a GPS or wait for the next model which will offer more capability for the money. In this respect, GPS is similar to many of the electronic products available. However, if you continue to wait you will miss out on the utility available from the given product. Without a doubt, I have my prejudices and preferences. Hopefully, these are based on experience and with good reason. However, it is fair to say that these preferences are based on uses and parameters that may differ considerably from yours.
Total Cost This is probably one of the bigger factors for most people. There are receivers that I consider hard to use and primitive and would otherwise not recommend, such as the Magellan 310. However, when I find one available for $50, I have to just be amazed at the price to performance ratio. If you are comfortable with basic navigation, this little receiver will give you location and navigation information anywhere in the world. Not only must you include the cost of the GPS receiver itself, but include the cost of extra downloadable maps, a computer interface cable, memory cartridges, power cable and mount. Some of these items are included with one brand or package and not included in others and some are not necessary. Of course, the value and cost of such components must be looked at in the context of the intended use. For example, a package that includes a cigarette lighter power adapter is not much of a benefit to a kayaker. Conversely, if you buy a GPS for your car and must buy a mount and you will probably want to run it from the car’s power instead of on battery. These additional costs must be factored in.
Choosing a GPS receiver
Basic GPS Navigation www.smallboatgps.com
24
Something to consider when debating as to whether or not to purchase a mapping GPS is that even though the total cost may include the extra expense of the extra downloadable maps, they may be purchased later. A non-mapping GPS can never be upgraded to be a mapping GPS. However, you can use a mapping GPS with just the base map and purchase the improved maps for a mapping GPS later. Also some GPS packages include the extra maps, but most do not.
Mapping GPS The implementation of mapping displays is an order of magnitude improvement to GPS. A non-mapping receiver will still offer quite a bit of utility. However, if you can afford a mapping GPS, I believe that you will be glad that you spent the money. Although inexpensive non-mapping GPS receivers can be very useful, you will have to be much more proficient with maps and ways of getting coordinates to fully utilize a less expensive non-mapping GPS.
Mapping data
When choosing a mapping GPS, one consideration is the availability of downloadable maps for your region and purpose. Mapping receivers come with a built in base map that usually includes major roads and waterways within the given region and a world wide map consisting of the borders of countries around the rest of the world. Additionally you can download extra detailed maps for a much smaller region. The utility offered by mapping GPS varies on the quality of the maps. There are some parts of the world, where there is little coverage. Generally, you are restricted to maps in the manufacture’s proprietary format. There are some minor exceptions in that some manufactures offer mapping products created by third party developers in the manufacture’s proprietary format and some manufactures’ GPS receivers are compatible with mapping products that are in the proprietary format of third party companies. Thus, the availability of mapping products for a given GPS is also a consideration. I think that the issue and what will develop as far as data standards is an interesting business economics and intellectual property problem. However, the important thing to realize for the scope of my discussion is that you cannot buy a computerized mapping program such as Microsoft Streets and Trips or Delorme Street Atlas and hope to load the maps into a mapping GPS. I have seen many such programs offer GPS capability. This is not false advertising, it generally means that you can link you GPS to a computer so that
Choosing a GPS receiver
Basic GPS Navigation www.smallboatgps.com
25
the program can use the GPS data to navigate using your computer with position information from the GPS. Some of the programs also allow you to upload waypoints that you have created within the program to the GPS and download waypoints and tracks from the GPS into the computer. I have nothing against these programs, there are many fine uses for them; I just don’t want you to think that they are an inexpensive way of getting detailed maps into a mapping GPS. I have a further discussion of this under Mapping Programs on page 66. Similarly, if you have GPS mapping software one brand of GPS, it will not work in another. Interestingly enough, both the GPS manufacture and software company may get the data from the same third party such as Navtech. I have seen the issue raised as to why it is not possible to scan in maps to use with GPS. It is, but only on third party software running on computers or PDA’s. It is important to realize the difference between a raster and a vector map. A raster map is like a paper map. The level of detail is fixed. Imagine a globe or map of a large area, it might show countries, states, and major rivers. Next look at it with a magnifying glass. You will see the same detail, just larger. Even if you look at the map with a microscope, you will not see more map detail. A vector map is like a computerized map display such as a GPS mapping display. Zoom out and you will see minimal detail over a large area. Each time that you zoom in, you see more and more detail. You are not seeing a map as much as you are seeing the presentation of coded geographic data. By the way, on most GPS receivers, you will reach the zoom level where you will get a warning -- “OVER ZOOMED.” This is not an error; just an indication that you have zoomed beyond the maximum level of detail for the data and subsequent zooming will not reveal new data. It is often useful to operate over-zoomed, just do not expect more detail to be revealed. There are has been some success at attempts to develop map data which can be used for Garmin mapping GPS receivers. I am somewhat ambivalent as to the intellectual property implications. Intellectual property arguments’ aside, making one’s own maps is only for the technologically skilled and ambitious. Any cost savings are far outweighed by the time required. On a utilitarian level, the possibility of making custom maps offers potential for areas with little map coverage or specific applications such as golf courses. For more information you can try:
• http://gpsinformation.net/gpsmapper/gpsmapper.htm This is a article with an example on how to use GPS Mapper to create maps.
• http://www.gpstm.com/eng/dekode_eng.htm Information on using MapDekode
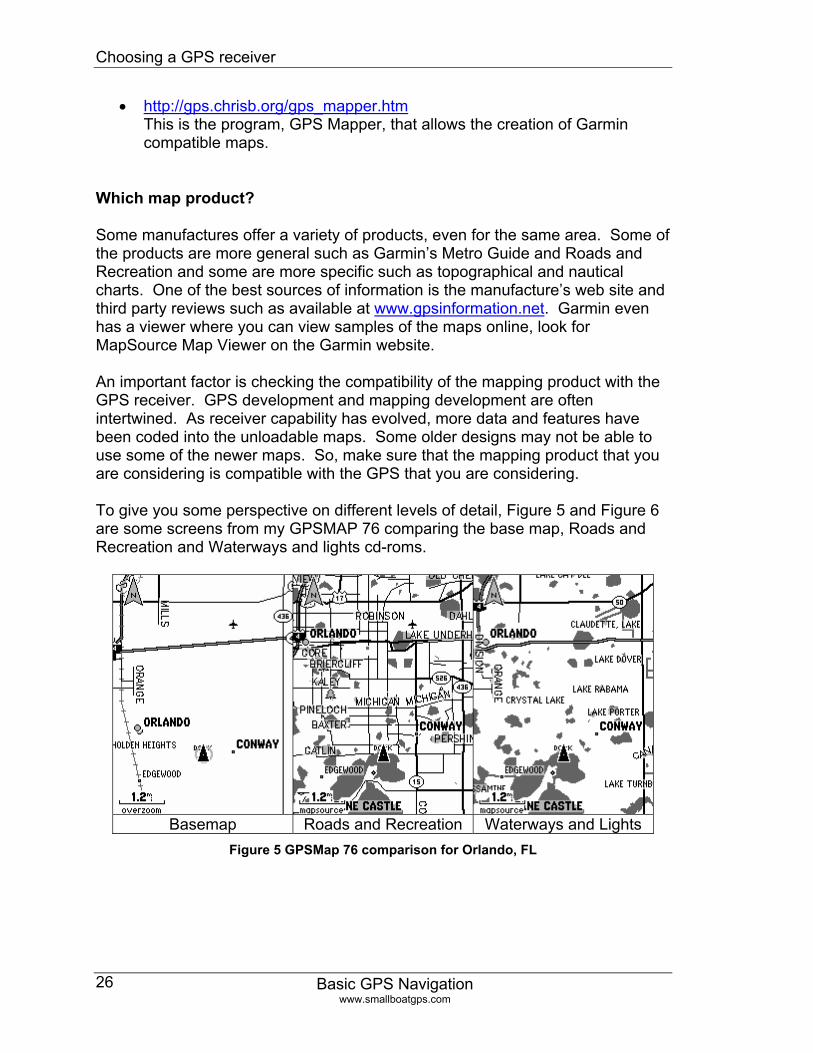
Choosing a GPS receiver
Basic GPS Navigation www.smallboatgps.com
26
• http://gps.chrisb.org/gps_mapper.htm This is the program, GPS Mapper, that allows the creation of Garmin compatible maps.
Which map product?
Some manufactures offer a variety of products, even for the same area. Some of the products are more general such as Garmin’s Metro Guide and Roads and Recreation and some are more specific such as topographical and nautical charts. One of the best sources of information is the manufacture’s web site and third party reviews such as available at www.gpsinformation.net. Garmin even has a viewer where you can view samples of the maps online, look for MapSource Map Viewer on the Garmin website. An important factor is checking the compatibility of the mapping product with the GPS receiver. GPS development and mapping development are often intertwined. As receiver capability has evolved, more data and features have been coded into the unloadable maps. Some older designs may not be able to use some of the newer maps. So, make sure that the mapping product that you are considering is compatible with the GPS that you are considering. To give you some perspective on different levels of detail, Figure 5 and Figure 6 are some screens from my GPSMAP 76 comparing the base map, Roads and Recreation and Waterways and lights cd-roms.
Basemap Roads and Recreation Waterways and Lights
Figure 5 GPSMap 76 comparison for Orlando, FL
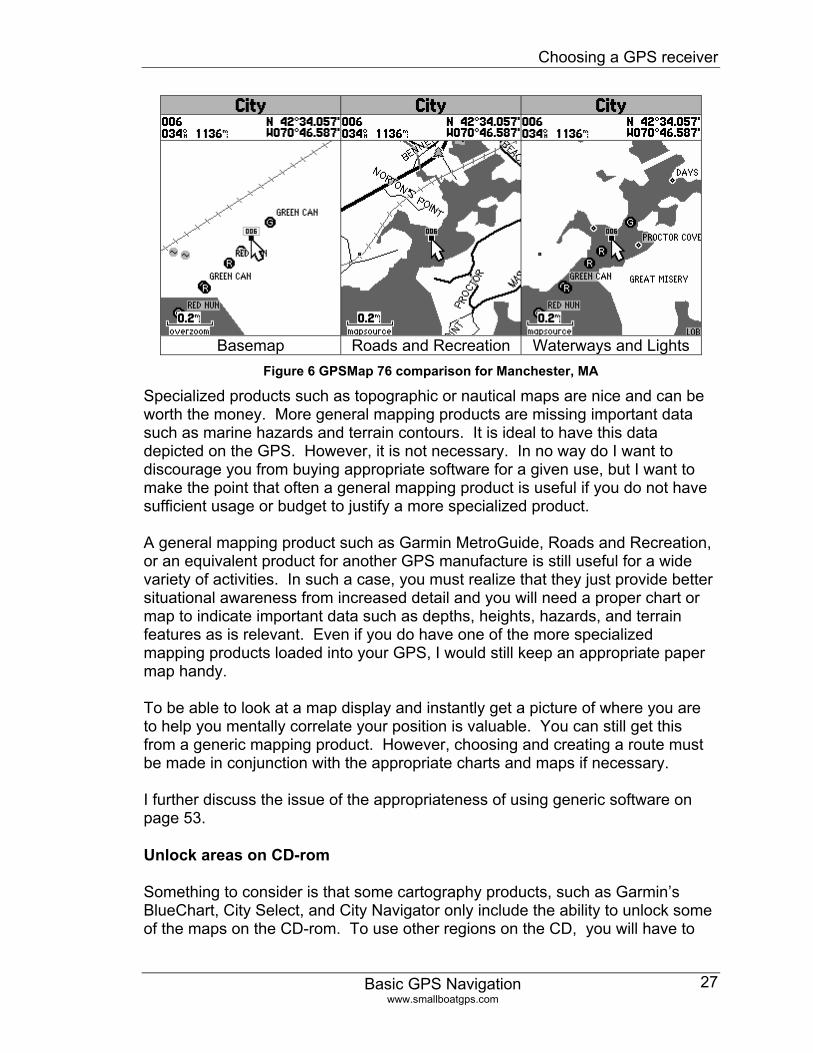
Choosing a GPS receiver
Basic GPS Navigation www.smallboatgps.com
27
Basemap Roads and Recreation Waterways and Lights Figure 6 GPSMap 76 comparison for Manchester, MA
Specialized products such as topographic or nautical maps are nice and can be worth the money. More general mapping products are missing important data such as marine hazards and terrain contours. It is ideal to have this data depicted on the GPS. However, it is not necessary. In no way do I want to discourage you from buying appropriate software for a given use, but I want to make the point that often a general mapping product is useful if you do not have sufficient usage or budget to justify a more specialized product. A general mapping product such as Garmin MetroGuide, Roads and Recreation, or an equivalent product for another GPS manufacture is still useful for a wide variety of activities. In such a case, you must realize that they just provide better situational awareness from increased detail and you will need a proper chart or map to indicate important data such as depths, heights, hazards, and terrain features as is relevant. Even if you do have one of the more specialized mapping products loaded into your GPS, I would still keep an appropriate paper map handy. To be able to look at a map display and instantly get a picture of where you are to help you mentally correlate your position is valuable. You can still get this from a generic mapping product. However, choosing and creating a route must be made in conjunction with the appropriate charts and maps if necessary. I further discuss the issue of the appropriateness of using generic software on page 53.
Unlock areas on CD-rom
Something to consider is that some cartography products, such as Garmin’s BlueChart, City Select, and City Navigator only include the ability to unlock some of the maps on the CD-rom. To use other regions on the CD, you will have to
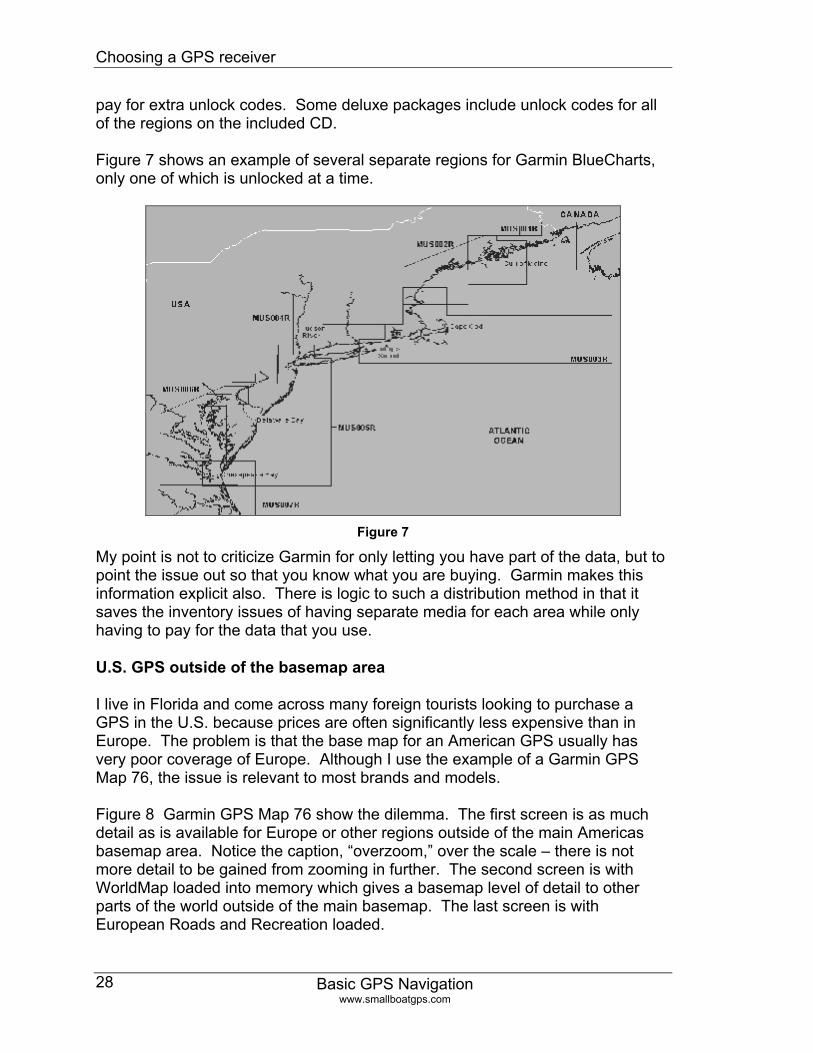
Choosing a GPS receiver
Basic GPS Navigation www.smallboatgps.com
28
pay for extra unlock codes. Some deluxe packages include unlock codes for all of the regions on the included CD. Figure 7 shows an example of several separate regions for Garmin BlueCharts, only one of which is unlocked at a time.
Figure 7
My point is not to criticize Garmin for only letting you have part of the data, but to point the issue out so that you know what you are buying. Garmin makes this information explicit also. There is logic to such a distribution method in that it saves the inventory issues of having separate media for each area while only having to pay for the data that you use.
U.S. GPS outside of the basemap area
I live in Florida and come across many foreign tourists looking to purchase a GPS in the U.S. because prices are often significantly less expensive than in Europe. The problem is that the base map for an American GPS usually has very poor coverage of Europe. Although I use the example of a Garmin GPS Map 76, the issue is relevant to most brands and models. Figure 8 Garmin GPS Map 76 show the dilemma. The first screen is as much detail as is available for Europe or other regions outside of the main Americas basemap area. Notice the caption, “overzoom,” over the scale – there is not more detail to be gained from zooming in further. The second screen is with WorldMap loaded into memory which gives a basemap level of detail to other parts of the world outside of the main basemap. The last screen is with European Roads and Recreation loaded.
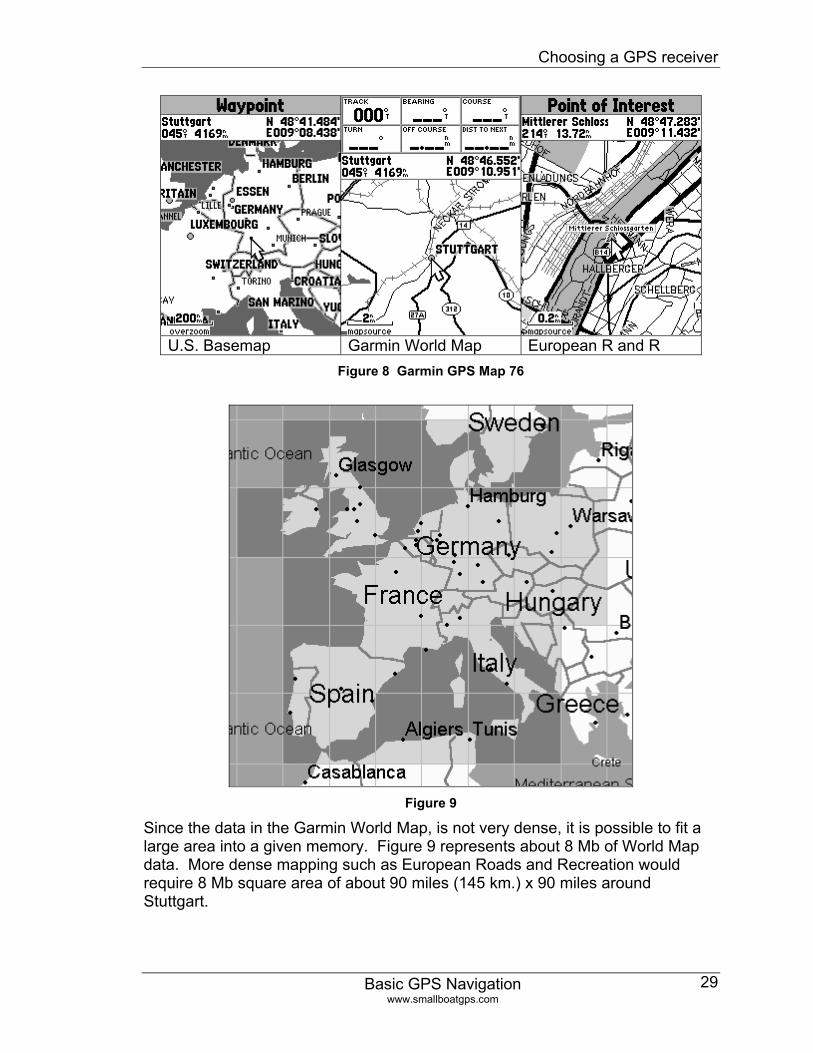
Choosing a GPS receiver
Basic GPS Navigation www.smallboatgps.com
29
U.S. Basemap Garmin World Map European R and R Figure 8 Garmin GPS Map 76
Figure 9
Since the data in the Garmin World Map, is not very dense, it is possible to fit a large area into a given memory. Figure 9 represents about 8 Mb of World Map data. More dense mapping such as European Roads and Recreation would require 8 Mb square area of about 90 miles (145 km.) x 90 miles around Stuttgart.
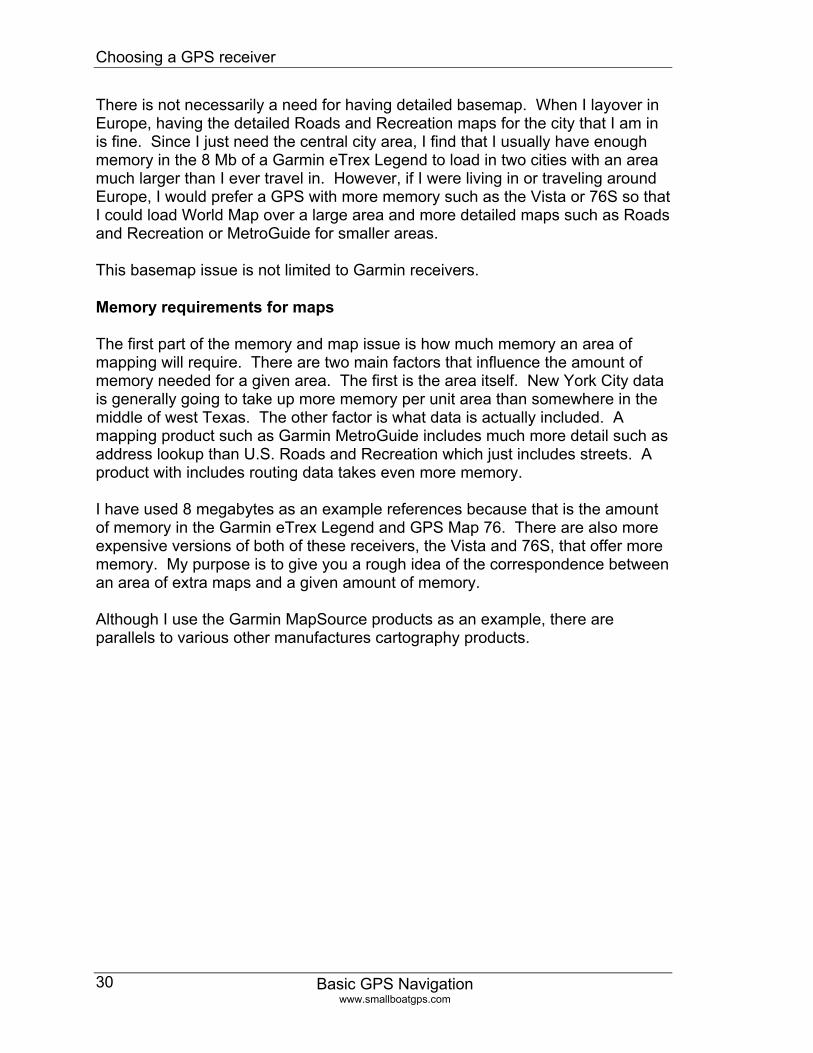
Choosing a GPS receiver
Basic GPS Navigation www.smallboatgps.com
30
There is not necessarily a need for having detailed basemap. When I layover in Europe, having the detailed Roads and Recreation maps for the city that I am in is fine. Since I just need the central city area, I find that I usually have enough memory in the 8 Mb of a Garmin eTrex Legend to load in two cities with an area much larger than I ever travel in. However, if I were living in or traveling around Europe, I would prefer a GPS with more memory such as the Vista or 76S so that I could load World Map over a large area and more detailed maps such as Roads and Recreation or MetroGuide for smaller areas. This basemap issue is not limited to Garmin receivers.
Memory requirements for maps
The first part of the memory and map issue is how much memory an area of mapping will require. There are two main factors that influence the amount of memory needed for a given area. The first is the area itself. New York City data is generally going to take up more memory per unit area than somewhere in the middle of west Texas. The other factor is what data is actually included. A mapping product such as Garmin MetroGuide includes much more detail such as address lookup than U.S. Roads and Recreation which just includes streets. A product with includes routing data takes even more memory. I have used 8 megabytes as an example references because that is the amount of memory in the Garmin eTrex Legend and GPS Map 76. There are also more expensive versions of both of these receivers, the Vista and 76S, that offer more memory. My purpose is to give you a rough idea of the correspondence between an area of extra maps and a given amount of memory. Although I use the Garmin MapSource products as an example, there are parallels to various other manufactures cartography products.
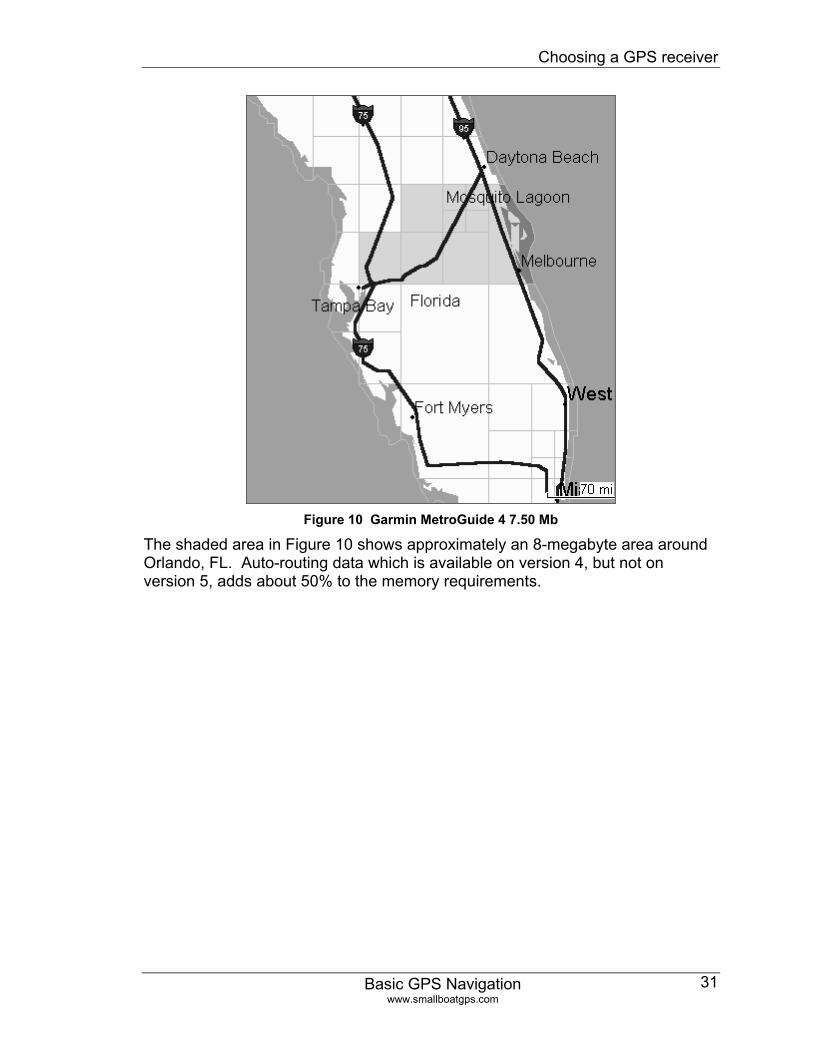
Choosing a GPS receiver
Basic GPS Navigation www.smallboatgps.com
31
Figure 10 Garmin MetroGuide 4 7.50 Mb
The shaded area in Figure 10 shows approximately an 8-megabyte area around Orlando, FL. Auto-routing data which is available on version 4, but not on version 5, adds about 50% to the memory requirements.
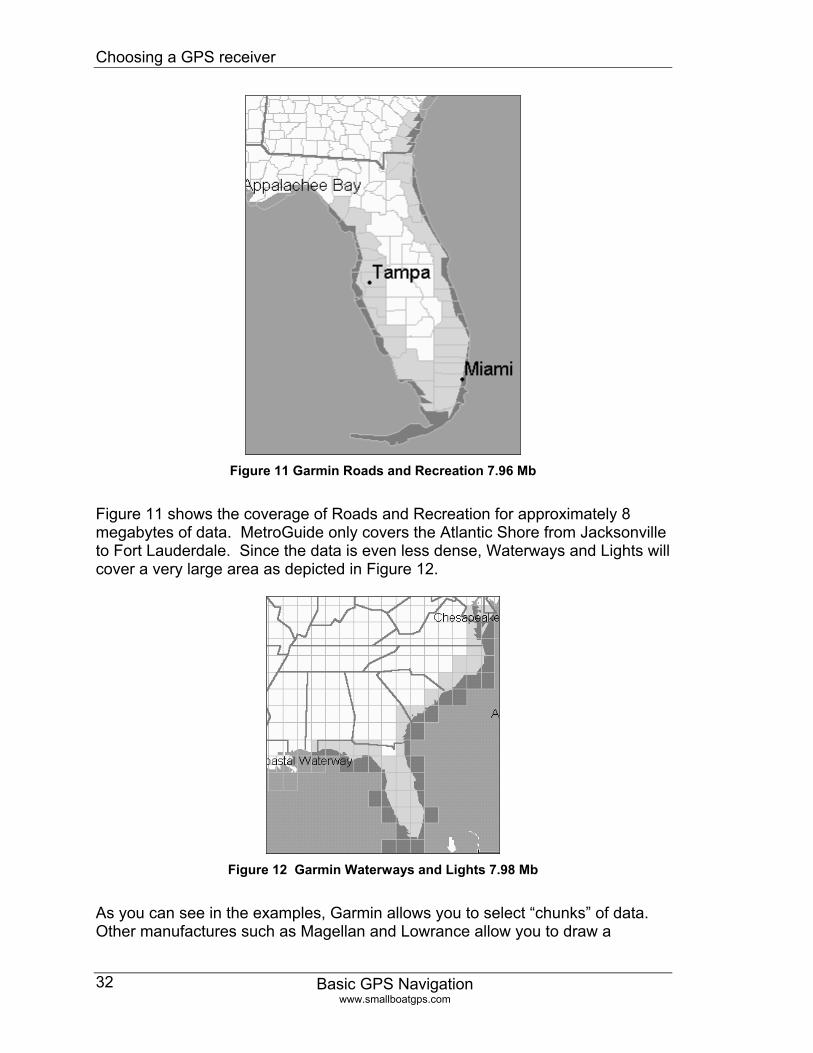
Choosing a GPS receiver
Basic GPS Navigation www.smallboatgps.com
32
Figure 11 Garmin Roads and Recreation 7.96 Mb
Figure 11 shows the coverage of Roads and Recreation for approximately 8 megabytes of data. MetroGuide only covers the Atlantic Shore from Jacksonville to Fort Lauderdale. Since the data is even less dense, Waterways and Lights will cover a very large area as depicted in Figure 12.
Figure 12 Garmin Waterways and Lights 7.98 Mb
As you can see in the examples, Garmin allows you to select “chunks” of data. Other manufactures such as Magellan and Lowrance allow you to draw a
Choosing a GPS receiver
Basic GPS Navigation www.smallboatgps.com
33
rectangular section. The “chunk” method prevents overlap, but the drawing rectangular section method allows you to select the are that you want to closer tolerances.
Memory availability
Many of the handheld GPS receivers use internal memory and are therefore restricted to the amount of memory available. At the time of this writing, all of the Garmin handheld receivers, except the eMap, use internal memory. The Magellan Meridian series and the Lowrance iFinder offer the ability to store maps onto SD memory cards. SD memory is a common format used in many devices such as PDA’s and digital cameras. They are widely available at a variety of electronics and chain stores. A variety of Garmin receivers, such as the eMap, 196, 295, and various marine units, use proprietary memory modules. Perhaps Garmin is moving away from proprietary memory. The new Garmin Street Pilot 2610 uses compact flash and the iQue uses SD memory. The models that use memory cards give a virtually unlimited capacity for carrying extra detailed maps without needing to a computer to load them. I like the idea of having the ability to use non-proprietary memory cards such as SD memory. However, I should add that many of my favorite receivers are made by Garmin and do not offer this ability.
Processor Speed The processor speed makes a big difference in how fast you can do things like zoom and pan the map screen. Unfortunately, this is not published and it is one of those “how does it feel” type of items. I am sure that there are other factors beyond processor speed, so publishing a specification would probably be useless. You will have to play with the receiver and see if it is sluggish.
Display Screen Not only is size a factor, but so is resolution. Bigger is not always better. The eTrex Legend, Venture, and Vista have small screens, but they are sharp.
Available data fields Which data will the GPS display? Where and how will it display it? When I explain navigation, I see the problem as three separate cases, 2-D vessel navigation, path navigation, and foot navigation. 2-D navigation is where you are free to travel in any direction such as a boat or airplane. Path navigation is when you are traveling along a road or river and are constrained to traveling along a
Choosing a GPS receiver
Basic GPS Navigation www.smallboatgps.com
34
path. Foot navigation is unique in that often you are stopped and have to get a bearing from a compass because the GPS can only tell you which way that you need to go. The GPS only knows your direction of movement and if there is no movement, this changes the way in which you navigate. Each form of navigation creates different data requirements, the case of 2-D vessel navigation being the most restrictive. The data display capacity of handheld receivers vary from something like a Garmin original yellow eTrex that will give you the distance to a waypoint, a pointer, and one user selectable data field to a Garmin 76 which will display nine data fields. I have a personal prejudice that is no doubt caused by my aviation background in that I like to be as precise as possible. When I am navigating a vessel of any type, I prefer that the GPS give me a digital display so that I can best exploit the accuracy that the GPS has to offer. When navigating a vessel, I want to know the direction that I am going, TRACK; the directions that I need to go, BEARING or COURSE; how far off course I am, CROSS TRACK ERROR; and how far it is to the waypoint. Generally this requires a minimum of four data fields, unless the GPS offers a data field called TURN which is the difference between TRACK and BEARING, then I find the minimum to be three data fields. For foot navigation, I really only care about bearing and distance. As I will discuss further in the Two Dimensional Navigation on foot on page 97, the arrow is pointer is useless unless you are moving. If the GPS will give BEARING and DISTANCE, this is all I need for foot navigation. For path navigation, I am usually most concerned about the distance to the end of the route, not the intermediate points. For example, if I am canoeing along a river and create a route with several waypoints to define the shape of the river, I usually don’t care about how far it is to the next waypoint, but how far it is to the end of my journey. The Magellan mapping receivers do not have a data field for this. Map displays give excellent situational awareness. However, map displays can be somewhat slow to update and are very poor at precisely showing how far off course you are when zoomed out. A digital presentation is very precise, but it requires quite a bit of interpretation to translate into a mental picture of your location. When a map display is combined with digital data fields, it provides a very powerful combination. Thus, for navigating a vessel in two dimensions, I like to have the previous minimum three or four data fields displayed on the map. For foot navigation, I find two data fields adequate. For path navigation, generally distance to the destination is all that I need, but I like more information such as ETA and speed.
Choosing a GPS receiver
Basic GPS Navigation www.smallboatgps.com
35
Marine vs. Generic For the most part there is not much difference between a generic GPS and a marine unit as far as navigation. The two most common features that make a marine GPS a marine model are tide charts and preloaded waypoints such as lights and buoys. In fact some GPS receivers not primarily marketed for marine use such as the eTrex Legend, Venture, and Vista come with these waypoints preloaded. Note: It does not appear that the eTrex Legend, Venture, and Vista still come with the preloaded marine waypoints. However, they did at one time and you can still go to the Garmin website under Updates and Downloads to load the files. My bet is that Garmin got tired of the technical support issue of dealing with users that had their marine points overridden by other Map Source maps and just stopped preloading the points. I demonstrate this override in Figure 6 on page 27.
Aviation GPS Receivers Handheld aviation GPS receivers sell at a premium to the generic models that they are based on. I would like to see the differential smaller, but in many ways I consider an aviation receiver to be a bargain if you can justify the expense. However, it is possible to use a generic GPS for aircraft navigation. I cover this in much more detail in my book, Cockpit GPS available at www.cockpitgps.com.
Built in Altimeter and Compass Several of the top of the line Garmin and Magellan GPS receivers have built in altimeters and compasses. Without an internal compass sensor, the GPS only knows the direction that you are traveling, TRACK. It has no idea of which way that you are pointing, HEADING. If you are not moving, then there is no direction of travel and no TRACK. Some handheld GPS receivers have a built in electronic compass that will orient the GPS when you are moving to slowly to get a useful value for TRACK . There is a user settable threshold speed that below the speed the GPS will orient with the compass and above that speed it will use the GPS track data. Where this is useful is while trolling or standing and reading a map while hiking. If you do not have this feature, you can simply use an economical compass, something that you should carry anyway when you are in the woods. I have more detail on using a GPS while hiking in Two Dimensional Navigation on foot on page 97. One thing to consider is that at least in the Garmin line, the models with the compass often have more memory.
Choosing a GPS receiver
Basic GPS Navigation www.smallboatgps.com
36
The GPS calculates a three dimensional position. Of all the parameters, altitude is the least accurate. Some GPS receivers have a built in barometric altimeter also. An altimeter is nothing more than a barometer or atmospheric pressure gauge calculated to read altitude. Let’s say that you had a giant tower with the height marked along it like a measuring tape. Starting on the ground, you would first have to set the altimeter to read the altitude of the base of the tower to compensate for atmospheric pressure conditions. If you went up the tower on a cold day, you would notice that the altimeter would indicate higher than the height on the tower because the cold air is more dense and the same amount of air is shorter if it is colder. If it were a hot day, the altimeter would read lower than the tower because the hot air is less dense. The point is that an barometric altimeter also has its share of errors. The GPS uses the input from the barometric sensor and from the GPS to calculate the altitude. Overtime the difference between the GPS altitude and the barometric altitude can be used to calibrate the readings from the barometric altitude to get a more accurate short-term reading of altitude. I cannot think of any aviation GPS that has a barometric sensor, nor would I suggest using a GPS with an altimeter for aviation type of use in general. There are some activities such as hiking in the mountains or for recording soaring flight paths where I could see some benefit. Also, as I mentioned earlier, many of the Garmin units that have the compass and altimeter have more memory.
Number of Channels If you are looking at a new receiver, you do not even need to bother reading this section. All of the receivers that I know of on the market are at least 12 channel parallel receivers. There are some brands that offer 14 or 18 channel receivers. More channels than 12 is better, but not significantly so. However, there are still many used GPS units that are not 12-channel available used such as on eBay. Among the more common ones are the Garmin II and the Garmin 38. The Garmin II Plus is a 12-channel.
Less than 12 channels
The big advantage of a modern 12-channel receiver over an older 8 channel is not in the number of satellites it can monitor, but the manner in which it monitors the satellites. A 12 channel parallel receiver essentially has 12 receivers on chip and is able to dedicate a receiver to each satellite. An older receiver such as a Garmin 38 will monitor up to 8 satellites at a time, but it does this by rapidly switching between satellites with one receiver. The biggest advantage to a 12-channel receiver is the ease in which the receiver obtains and keeps a lock on the satellites. If you plan on using the GPS for anything other than on open
Choosing a GPS receiver
Basic GPS Navigation www.smallboatgps.com
37
water where the signal is not blocked, I would not even consider anything other than a 12-channel parallel receiver. Overall, a GPS that was not a 12-channel parallel would have to be almost free for me to consider recommending the purchase. Even then, it would not be an enthusiastic recommendation.
More than 12 channels
The idea of 12 channels is that if there are 24 satellites are in the GPS constellation, then the most you can expect to see at any given time would be 12. I have heard it argued that this is not entirely correct. However, in a case where you may be able to receive more than 12 satellites, many of them will be too low on the horizon to be useful. Thus, there may be some cases where having 12 channels adds to the accuracy, but the additional accuracy is unlikely to be much and it is unlikely to be beneficial very often. On page 9, What your GPS does when it starts up, I discuss how the GPS searches for satellites. Having more channels would mean that having the correct initialization time and position as well as almanac data would be less important and that initial fixes would often be easier to obtain. However, this usually isn’t much of a problem. More channels is better, but not so much that I would give it much if any weigh when choosing between two receivers.
WAAS or non-WAAS Whether or not to buy a WAAS GPS is quickly becoming a moot point. Most of the newer receivers, including the moderate priced ones, have WAAS. WAAS is only really effective in the U.S. but eventually Europe and Japan will have their versions operational. The lack of WAAS does not necessarily make a receiver obsolete. For basic navigation, it probably does not make that much of a difference. If you want to find a spot again that is readily identifiable visually once you get reasonably close, WAAS is probably not that important. If you are trying to locate something underwater such as a dive site, WAAS might be important. What I have noticed kayaking is that both of my WAAS capable receivers react much quicker to course changes. Since I notice this even with WAAS selected off on the receiver, I suspect that this is as much the design of the internal software and the speed of the processor as much as it is WAAS.
Antenna Location and Type The GPS signal is a very weak signal that is being broadcast from a minimum of 11,000 miles. Essentially, the receiver has to have a clear view of the sky. If you
Choosing a GPS receiver
Basic GPS Navigation www.smallboatgps.com
38
are in an open boat, this is not a problem. If you have some type of top, it may or may not be a factor. I use a GPS on the dashboard of my car and it is able to maintain a good lock. The metal of the body blocks the signal, but the windshield does not. As an aside, some coatings on some windshields do block the signal. A couple of examples come to mind where the top could be a problem, a long metal canopy on a pontoon boat, a bimini top on a sailboat, or a high wing metal airplane. In many cases, materials such as fiberglass and fabric will have little or no effect on the signal. However, metal coverings will block the signal. Also, materials that have not effect when dry may impede the signal when wet. In some cases cases, location within a wheelhouse or cockpit might make a difference. For example, a GPS without an external antenna may work on the glare shield of a high wing metal aircraft, but not on the control yoke. If you plan on using a GPS where this might be a factor, buy a GPS that has a provision for an external antenna. If the receiver works without the need for an external antenna, which it probably will, great. If you need to add one they are relatively inexpensive. In addition to the manufacture’s models, I have found generic antennas on eBay and from Gilsson Technologies, www.gilsson.com. Antennas on several of the Garmin receivers; such as the Garmin II, III, V, and 176, 196 and Street Pilot series; can be removed from the unit and mounted remotely with some inexpensive cable and fittings from Radio Shack. Another antenna factor is orientation. There are two types of antennas, helix and patch. The patch antennas are usually the ones that are internal such as on the Garmin 12 and the eTrex series. The helix antennas are generally the ones that stick out such as on the Magellan 3xx series and the Garmin II, III, V, and 176. However, there are internal helix antennas such as on the Garmin 76 and the Magellan Meridian. The helix antennas should ideally be orientated vertically like a flagpole. The patch antennas should be used horizontally. I have found that most receivers do surprisingly well when they are orientated the wrong way, but you can often see a significant effect of the angle on signal strength. As a practical matter try to use a patch antenna with at least a little tilt towards horizontal—the more the better. Try to use a helix antenna with at least a little tilt towards vertical, the more the better. I routinely use a GPS Map 76 with about a 30-degree tilt from horizontal and the performance is fine. I need this 30 degrees for viewing the screen anyway. As a practical matter, the antenna orientation will usually not be enough to effect the GPS functioning. However, if you add this to another factor such as a cover of dense wet foliage, the two factors added together might be enough to cause the GPS to lose the satellite lock.
Choosing a GPS receiver
Basic GPS Navigation www.smallboatgps.com
39
Mounting Simply enough – where are you going to put the GPS on your boat, airplane, or other vehicle? Most manufactures make a variety of mounts for different models. In addition to the manufacture’s mounts, another source of mounts is Ram Mounts, www.ram-mount.com or Gilsson Technologies, www.gilsson.com. One of my favorite mounts for the Garmin GPS V and III is the beanbag mount which works well on the dash of a car or the glare shield of an airplane. Certainly, I would not use this in an open cockpit or a boat. For temporary mounting, I have found Silly Putty or its generic equivalent to be useful. It will not keep objects from tipping, but it will keep them from slipping. For example, I put a small bead of silly putty around the circular base of the Garmin dash mount in my car. It is easily removable, withstands the Florida sun, and is sufficient to hold a Garmin 196. In addition to keeping the GPS from sliding around, the bead around the edge has a suction cup effect, even on the textured surface. However, Silly Putty is not easily removed from all surfaces including carpet, fabrics, and the rubber like material on the Garmin Legend. Test any material first. Many of the GPS units are advertised as waterproof. Garmin’s specifications are IPX7 which is 30 minutes of submersion at 1 meter. However, I just feel more comfortable carrying my GPS in a dry bag when I kayak. Whether or not you want to use your GPS in a dry bag depends on what kind of boating you do and your comfort with the manufacture’s water resistance claims. Most outdoor and camping shops sell these dry bags. Certainly kayak shops do. I have used both the Voyegeur and the AquaPac dry bags and have been happy with them. I looked at the Seal Line bag. Although it looked like was a high quality product, I liked the Voyegeur or AquaPac because the plastic is softer and clearer making the GPS easier to operate and see.
Automotive use Most GPS receivers will only draw straight lines between waypoints. There are several that will follow roads and even choose the roads along the way. Some of the older receivers such as the original Garmin Street Map, will allow you to use the cursor to drag the map over roads and the route would “rubber band” to the roads as opposed to a straight line between waypoints. Newer GPS receivers with this feature allow you to put in a destination such as an address and the GPS will calculate a route along the roads.

Choosing a GPS receiver
Basic GPS Navigation www.smallboatgps.com
40
Figure 13
Figure 13 shows the difference between an auto route and a direct route. Both cases are using a Garmin GPS V. In the first screen I had the GPS calculate the fastest time to an address. While actually traveling along the route, messages pop up to alert you to the next turn. In the second screen, I had the GPS create an off road routing to the same address. Notice the difference between the highlighted road in the first screen and the direct line in the second. This second screen is the way in which a wide variety of non-auto routing GPS receivers can be used in the car. There are many GPS receivers that are built just for automotive navigation, including built in units offered as an option on new cars. However, this is becoming a more common feature offered on more general receivers. I have used the feature on the Garmin GPS V which is somewhat of a generic receiver and the Garmin GPS 196 which is an aviation GPS. I thought that auto routing was interesting, but personally not that useful. Most of the streets in Orlando, FL, where I live, are laid out on a north-south and east-west orientation. It is relatively easy to find your way in a car. The couple of times that I have actually used auto routing for finding my way around Washington, D.C. and Boston as opposed to checking out the feature in familiar territory, it was incredibly useful. The GPS V processor is a little over taxed and takes a while to find a route, but it does work. The Garmin 196 has a very fast processor and the auto routing works very well. One of the slicker features is the automatic recalculation feature. If you skip a turn, whether purposefully or accidentally, the GPS will recalculate a route from your present position to the destination. On the Garmin GPS V the processor is a little over taxed in that by the time the new route is calculated, you may have already missed it. This causes an endless loop of recalculation until your route corresponds with the calculated routes. Even so, this is still a nice feature. If you are really lost, you can pull into a parking lot for a short time and wait for the GPS to recalculate. On a GPS with a faster processor, this works very well.
Choosing a GPS receiver
Basic GPS Navigation www.smallboatgps.com
41
In the setup menu there are settings to avoid toll roads, U-turns, etc. There is also a setting to choose the type of vehicle that you are driving. Among the choices is pedestrian, which I will address in the next section. It is important to realize that not only must the GPS receiver be capable of calculating an autoroute, but the mapping data loaded in the GPS must also support auto-routing. For example, you could purchase a Garmin GPS 60C, which supports auto routing, and load in MetroGuide 5 maps and then find that the 60C will not calculate a route. This is because MetroGuide 5 will not support auto routing in the GPS. Auto routing is slick technology. However, just because a GPS does not have auto routing, that does not mean that it is useless in the car. Often just being able to know your position in relationship to the final destination is 90% of the utility. If you are truly unfamiliar with an area, you can create a route from the origin of the trip to the destination. You can then use the map editing features to drag the route to intersections where you have to turn along the way. This is the same technique that I later describe for creating a route along a river in the Routes and Path navigation chapters. In creating a route, you will be reminded of not only where you are in relationship to the destination, but also where you are in relationship to the next turn. I have used a Garmin eTrex Legend very effectively in this way. It is also possible in some cases to create a route on the computer and load it onto the GPS. For example, MetroGuide 5 will calculate a route on the computer. You can then load this route into a non-autorouting GPS such as a Garmin GPS Map76 or an eTrex Legend as a route made up of a series of waypoints. The waypoints will correspond with turns and intersections and the route legs will be straight lines between the corresponding waypoints. For that matter, you can load the route into a non-mapping GPS such as a standard eTrex. There are also some third party applications such as Delorme Street Atlas that also offer this feature. For GPS receivers without the ability to load extra street level maps, or with no mapping ability at all, you still might occasionally find it useful to find the coordinates of an address and using the GPS to help find the address. While using a non-mapping GPS to find an address is not nearly as nice as using a mapping GPS, even a bearing and distance can be useful. A couple of sources of coordinates are:
• Computer mapping programs such as Delorme Street Atlas and Microsoft Trips and Streets. Many PC programs also allow you to use the GPS linked to a laptop computer for added function.
Choosing a GPS receiver
Basic GPS Navigation www.smallboatgps.com
42
• On the web, most mapping sites do not give latitude and longitude, but some such as www.mapsonus.com do give them. Note that this site gives latitude and longitude in NAD-27 datum. If you enter the waypoints in this format the error should not be more than a couple of hundred feet, but if you change the GPS to NAD-27 before entering a point, the location will be more accurate. Just make sure that you change the datum back to WGS-84 after you enter the point.
Auto routing and pedestrian use I use an eTrex Legend and Roads and Recreation Europe to find my way around European cities on layovers. Although not perfect, I find that this makes a good compromise considering factors such as total cost and size. I also usually grab one of the free tourist maps to help me find my way around. Although I personally do not use a GPS with auto routing capabilities for pedestrian navigation, I like the idea. One of the settings on most auto routing GPS receivers is the type of vehicle that the GPS will calculate a route for. Among the settings is “pedestrian”. In the past, this has always seemed a little silly to me. Most auto routing GPS receivers have been a little large to carry around while walking. Even the Garmin GPS V is not really something that easily fits in a pocket. However, with some of the newer small receivers such as the Garmin 60C, 76C, and iQue offer auto routing. I routinely use a GPS while finding my way around European cities on foot. For example, I load Roads and Recreation Europe maps into my eTrex Legend. I create a route from my hotel to my destination. It I am ambitious, I will drag the route to some of the turns that I will have to make. If I were to use an auto routing GPS, it would calculate turn by turn directions to get to my destination. I find that I am often only able to pick up a good satellite lock only at street corners where the GPS has two unblocked directions to receive satellite signals from. The nature of the problem is such that I am often doing this while stopped. Thus, the GPS has no way to orient its direction. I find a cheap compass on my watch band is sufficient considering it is needed only to choose which street corresponds with the desired direction of travel rather than for a precise heading. However, a built in compass with a GPS that offered auto routing would be a slick combination. Remember that it is necessary to have the maps which support auto routing and that these maps are more expensive. For example, with the Garmin 60CS, you would need to use the City Select maps instead of the much less expensive Metro Guide or Roads and Recreation maps.
Choosing a GPS receiver
Basic GPS Navigation www.smallboatgps.com
43
As I mentioned, I use the eTrex Legend with Roads and Recreation Europe. MetroGuide would offer better information, a unit such as a Vista with more memory and a compass sensor would be better, and a unit such as a Garmin 60CS with auto routing and the appropriate City Select maps would be ideal. However, on the opposite end of the spectrum, you can still get a lot of use from a simple non-mapping GPS using a street map and creating waypoints using a bearing and distance from a known point such as your hotel if you know the techniques to do so.
Dead Reckoning As I have mentioned, one of the problems with GPS is that the signal is easily blocked, especially in a city with narrow streets or tall buildings. Dead reckoning is the calculation of your position based on the speed and track from your last known position. On most handhelds, this involves just calculating the position based on the last know speed and track. However, some automotive GPS units use other techniques to navigate. Garmin offers some versions of the Street Pilot series that use input from the car’s speedometer. A special Garmin authorized dealer must install these versions. Tom Tom is introducing a unit that uses accelerometers and rate sensors to dead reckon. You can measure acceleration as the amount of force exerted on a mass. Think of this as the amount that you are pushed back against your seat or forward against your seatbelt, or the amount that you are pulled from side to side. Acceleration is just the change in speed. Thus, by measuring acceleration you can indirectly calculate speed and therefore position. In fact airliners use an order of magnitude more accurate and more expensive version of this technology called inertial navigation.
Multiple Uses I have multiple GPS receivers for various uses. However, I also find GPS interesting enough to write this booklet. For most people, you will want to use a GPS for multiple uses. You may or may not have to make some compromises for one use or the other. For example, a Garmin GPS 176 might be great for your boat; but even though it is portable, it is too big to be a good GPS for hiking. If your other intended use is as an automotive GPS rather than hiking, it would be great for both. A Garmin eTrex Legend is great for hiking, but the screen size might be a little small for the boat. In this case, a good compromise might be a GPS MAP 76. Something to consider is that a marine GPS is perfectly usable in other applications. Take the Garmin 176. You can buy extra memory and load Metro Guide maps into the unit and it will be a pretty good automotive GPS. It will not have auto routing, like the GPS V or the Street Pilot III, but it will still work well in the car. The things that make the 176 a marine GPS will not detract from the

Choosing a GPS receiver
Basic GPS Navigation www.smallboatgps.com
44
secondary use. In fact, the tide table might be useful if you are driving on Daytona Beach (you are still allowed to drive on the beach).
Where to get more information One of the best ways to get information is to go to the manufacture’s web site. Even better than the information page about each receiver, most of the manufactures publish the owner’s manual. The owner’s manual is a good way to get details on the operation and specific capabilities of each receiver. I would also suggest www.gpsinformation.net for reviews.
• Garmin, www.garmin.com The Garmin site has a feature where you can compare different units side by side in a chart. Click on the Product Comparison link from any individual receiver’s page
• Lowrance, www.lowrance.com
• Magellan, now owned by Thales Navigation, www.magellangps.com
• Raymarine, formerly Raytheon Marine, www.raymarine.com
• Furuno, www.furuno.com
• Standard Horizon, http://www.standardhorizon.com/
• C-Map, www.c-map.com • Tom Tom, www.tomtom.com
• Cobra, www.cobra.com
Laptops and PDA’s You might be wondering why you could not use a laptop or a PDA as a GPS interface. In fact, this is a very popular option. It is not an option that I have used except just to see how that it works while riding as an automobile passenger. My prejudice is towards a dedicated GPS receiver. This is based on my personal use. Even though a PDA with a GPS receiver could be entered into used in a dry bag on my kayak, a mapping GPS receiver is considerably more robust and cheaper. However, there are certainly many uses and arguments for using a GPS with a PDA or laptop.

Choosing a GPS receiver
Basic GPS Navigation www.smallboatgps.com
45
Among the possibilities is to purchase a relatively inexpensive GPS and hook it into the laptop or PDA. You can use the GPS/computer combination or just the GPS separately for situations where the computer or PDA would not be appropriate. A couple of sources of information on using the GPS with a computer or PDA:
• http://www.palmflying.com/
• http://www.gpsinformation.org/dale/
• http://www.gpsinformation.net
Specific Garmin Models Just to reemphasize, this is not meant to be a full GPS review. However, I have had some experience with several units and thought that I would pass them along. All of the units are Garmin receivers. I have comments later about my Garmin prejudice. These are my personal opinions. I have had at one time or another had a Garmin 38, II Plus, III Plus, III Pilot, eTrex, eTrex Legend, and GPS Map 76, Magellan 315, and Magellan 330. Garmin has recently announced the 60, 76 color, and 296 series. I do not have specific comments on them other than they appear to be big improvements on products that I am already a fan of. The biggest changes are colored screens, automatic road routing, and increased memory. I started to list all of the GPS units that I know something about, but instead I’ll list some of my recommendations and opinions.
Garmin eMap
The eMap is clean design. It is usable for foot and path navigation. I would not recommend it for vessel navigation such as boating. It lacks the ability to show OFF COURSE data or TURN. Certainly, you could zoom on the map and see how far off course you are and t does provide an arrow, but it lacks the precision of data fields for this data.
eTrex (basic) and Geko
I have mixed feelings about these models. On one hand, they are very inexpensive and can certainly be useful tools. However, I think that you would be better served to spend a little more and look at the eTrex Venture, GPS 72, or even a Lowrance iFinder.
Choosing a GPS receiver
Basic GPS Navigation www.smallboatgps.com
46
My complaints are that these two models are just too basic. The eTrex and Geko 101 do not offer a field for OFF COURSE. The Geko 101 does not even offer multiple point routes. The Geko 201 offers TURN and OFF COURSE, but they can only be displayed on the trip computer page.
Garmin GPS 72
This is the economy version of the non-mapping GPS 76. It has a lower resolution screen, lacks the ability to use and external antenna, and does not include the data cable. Since this is a non-mapping receiver, the lower resolution is not a big problem. Generally the lack of external antenna support should not be a problem. The extra expense of the cable is a factor, however you can connect the GPS 72 to a computer for a couple of dollars in parts from the local electronic store. I describe this in more detail on page 153. For the price, the GPS 72 has a lot to offer.
Garmin GPS III Plus
This is a good solid mapping GPS. Although, it is still a solid handheld receiver, there are newer models such as that offer more memory and better screens. The limitations are that it is non-WAAS and it is only able to hold 1.4 Megs of maps. The non-plus version is an earlier version without the capability to load Map Source maps.
Garmin eTrex Vista, Legend, and Venture
These are the second generation eTrex receivers. All of these are WAAS enabled. The Venture is non-mapping; the Legend is mapping with 8 megs; and the Vista is mapping with 24 megs, an electronic compass, and an altimeter. The original yellow eTrex is cute and inexpensive, but the interface on the Venture is so much better, it comes with a computer interface cable, and it has WAAS that I would at least jump this extra step in price. The Legend is one of my favorite GPS receivers for recreational use such as kayaking. I have at times seen the Legend sell for a similar price to the Venture when rebates are included. Often this is just a little more expensive than the basic eTrex. Not only is the Legend a mapping GPS, but it includes the computer interface cable. Even if you do not decide to spend the money on additional maps, the Legend’s base map is still useful, it will perform at least as well as a non-mapping GPS, and you will have the option of purchasing a MapSource CD later. The Vista is even nicer, but is usually much more expensive. The screen is small. However, it has good resolution. One potential problem is the click stick. If you want to use it for kayaking, it is virtually impossible to
Choosing a GPS receiver
Basic GPS Navigation www.smallboatgps.com
47
operate the click stick inside a dry bag. Even though the Legend is waterproof to 1 meter for 30 minutes, I feel much more comfortable with the GPS in a dry bag. The Legend series is not totally useless for kayaking though. I found some parts bags similar to a Zip Loc sandwich bag, but they are thicker and the main compartment is smaller at 4 inches x 6 inches. You might find these at a jewelry store. There is a hole above the seal where a piece of shoelace or string can be used as a lanyard. Worst case, you could probably get by with a sandwich bag. The eTrex doesn’t float normally, but these bags trap enough air so that they float in the bag. The click stick is more necessary for setting up a route than it is for operating in the boat. Most of the things that need to be done in the boat such as changing screens and zooming can be accomplished with the side buttons instead of the click stick. If you do need a click stick function, the click stick can be operated through the plastic even if a little awkwardly. One little trick that I have not seen documented is that there is a quick way to get to the active route. Hold the bottom left button on the side for a couple of seconds until the active route appears. If you are not navigating on a route, but are going directly to a waypoint the active waypoint will appear.
Garmin GPS 76
The GPS 76 also comes in non-mapping, mapping with 8 megs, and a 24 meg altimeter and compass version. The 76 is WAAS enabled. Among my favorite features is the ability to display up to 9 data fields on the map display. For a pocket sized GPS, this is a lot. The GPS 76 is at the limit of being pocket sized. The buttons are on the front making it easily operable in a dry bag or a mount. There is also a provision for an external antenna. This is also built to IPX 7 standards and will supposedly float although I have not tried it. I have both a Legend and a Map 76. I like the Legend for it’s pocket size and price. I like the Map 76 for its bigger screen, ability to show more data fields, and touchpad on the front. Overall, I think that the GPS 76 is more versatile and is better for marine use, but it is also more expensive and a little bigger.
GPS V
The GPS V has the capability of calculating road routings. For off road routing the interface is very similar to the eTrex Legend. My biggest objection was the thick line for off road routes. It is more like a gray highlighter than a nice clean line. This has been fixed in the 2.11b software which is available for download on the Garmin website. My only objection is that as of 2.11b there is no true enroute GOTO capability. If you execute a GOTO on a route, it will cancel the

Choosing a GPS receiver
Basic GPS Navigation www.smallboatgps.com
48
rest of the route. This is a disappointment for a receiver that is advertised as versatile and hopefully Garmin will fix this. However, overall the GPS V is certainly feasible for generic and marine use. For auto-routing, the GPSV often is slow to calculate a route, or re-calculate a route. Slow is a relative term to expectations. The GPS V will recalculate the route when it finds that you have not followed the original suggested route. However, often I will find that by the time it recalculates the route that I am often not on that route and it will start recalculating again. The auto-routing feature seems to be at the limits of the processor capability. Believe it or not, I like the GPS V. Considering, the compact size, price, battery life, I still think that there is much to recommend it.
Garmin GPS Map 176
I have not actually used a 176 outside of the store. The only real downside to the 176 is that it is no longer truly pocket sized, which may or may not be relevant to any secondary use. What it offers is a relatively large and very sharp screen with the option of color. The 176 does not have any memory built in, but it allows memory cartridges. Unfortunately, Garmin memory cartridges are proprietary and expensive per unit of storage. However, this allows you to load the 176 with up to 128 MB of data. Battery life may be an issue with the color version.
Garmin 196 and 295
There is no reason that you can’t use an aviation GPS for boating. Usually my argument is that a marine or generic GPS can be used for aviation. There is definitely a price premium for an aviation GPS receiver. You definitely would not purchase an aviation GPS instead of a marine to save money. However, if you are a pilot, an aviation GPS might be able to serve dual duty. The 196 is advertised as a receiver for marine, auto, and aviation GPS. I do not use my 196 for boating because there is no way that I want to risk it on my kayak. However, the 196 is very impressive. The brief review is that the Garmin 196 earns its hype. I hope that Garmin brings out a non-aviation version of the 196 or a version of the 176 with the faster processor and auto-routing.
Magellan Considering that cost is usually a factor, I am not recommending that you not consider the Magellan products. I have occasionally seen packages including a Magellan GPS and MapSend CD for prices that I would definitely recommend a Magellan receiver for consideration for someone who needs a basic GPS. There are many people who are satisfied with their Magellan GPS receivers, but I find them disappointing for all but the most basic navigation functions. Although they
Choosing a GPS receiver
Basic GPS Navigation www.smallboatgps.com
49
are usable, I find them less than ideal for more complicated tasks such as 2-D navigation along a route or even path navigation. All of my complaints could be fixed with a software upgrade if Magellan were so inclined. I must add the disclaimer that I have not extensively used one of the new Magellan Meridians and that my experience is based on using the 315 and 330 in actual use and experimenting with the Meridian and SporTrak series in stores. The operating system on the SporTrac and Meridian series appears to be very similar to the 330. Before I start complaining, I must give credit that I like the Meridian’s ability to use non-proprietary SD memory cards in the Meridian is a very nice feature. Here are my specific complaints with regard to the Magellan mapping receivers as well as some perspective and adaptive techniques if you already own one..
1. All of the Magellan mapping receivers can only display two data fields on the map. This is adequate for foot navigation. Where this is most lacking is for 2-D navigation. The two data fields will allow you to display TURN and DISTANCE. If you are following a route, XTE is also important. You could set up the GPS to display TURN and XTE on the map page. DISTANCE is not required to actually follow a route, but it is an extremely useful data field. I would suggest using TURN and DISTANCE while occasionally checking another page that has been so customized to get a value of XTE. It is true that the map display itself will show a course deviation as indicated by the difference between the route line and the position icon. However, when the map display is zoomed far out, the deviation has to be large to be detectable from the map display itself. My point is not that it is impossible to navigate with the two data fields, but that it is less than optimum and less than most other brands offer.
2. The Magellan GPS receivers do not offer a data field for distance to destination as opposed to distance to the next waypoint. There is no easy way to get this information, including on the route page. About the only way to get this information is to add the distance to the current waypoint to the subsequent leg distances on the route page. I have been informed that some models may now offer DISTANCE TO DESTINATION through a software update. Unfortunately, the 330 is not among them and the models that I have seen in stores do not have the update. This is significant for what I label as path navigation. An example situation
Choosing a GPS receiver
Basic GPS Navigation www.smallboatgps.com
50
is on page 122 where the GPS is used to canoe around a hook in the river. The direct line distance is about 3 miles, but the path along the river is over 10 miles. In this case, a route is created to follow the river. The GPS can then be used to let you know how much further you have to travel. The key to this is having a data field for DISTANCE TO DESTINATION. The distance to the intermediate waypoints is of no significant use. A work around is to use the distance to the destination in the name of the waypoints. If you know that you are 1.2 miles from WPT 3.2, then you have 4.4 miles to go. I have an explanation of this on page 125.
3. The Magellans hold 500 user waypoints. Selecting these waypoints is annoying slow on the Meridian and 330. The entire list must be scrolled through line by line. The 315 at least allows you to scroll one page at a time with the left and right movement of the rocker pad. If you do not use all of the user waypoints, this may not be a factor. There are some useful features that allow you to find waypoints near the present position, cursor, or other map object such as a city. This find near feature is not unique to Magellan.
4. Being able to edit the route graphically from a map display is a powerful feature that the Garmin and Lowrance units have. It is possible to drag the route to where you want on the map. On the Magellans, it is possible to move the cursor to points, create waypoints and then add them to a route. However, it lacks the elegance of being able to edit on the map. On the Magellan mapping receivers you can move the cursor to the position that you want, create a waypoint by holding the “Mark/ GOTO” button and then adding it to a pre-existing route. The trick is to first create a dummy route with any two waypoints. You then add waypoints to this pre-existing route as you create them. When you are finished, you delete the two dummy waypoints. There is also a way of creating a horizontal route using the menu selections of Vertical Profile and Path Check. Thus, the Magellans can be made to create a route graphically, but the features are much less sophisticated than the Garmin and Lowrance receivers.
One of the most frustrating things about several of these faults is that they could be fixed with software updates. Now that Thales owns Magellan, I am hoping that Magellan produces a more polished product in the future. Thales, formerly named Thomson-CSF Sextant, is a major European avionics company.
Lowrance
Choosing a GPS receiver
Basic GPS Navigation www.smallboatgps.com
51
I have not had the experience with Lowrance that I have with Garmin or Magellan. However, I have had the chance to experiment with an iFinder. Lowrance offers a variety of GPS receivers, mostly marine, but the iFinder series is the consumer handheld model. In addition to information on the iFinder, Lowrance offers a downloadable emulator on their website. This allows you to try all of the various features of the GPS. There is an advance mode that offers all of the features and an easy mode that only offers the more popular features. Needless to say, I had no use for the easy mode. I see what the engineers were attempting with the easy mode, but I am not sure it works. All of my comments refer to the advance mode. Overall, I thought that it had a well designed interface. The navigation screen was well thought out. It combines and course pointer and a bearing pointer. If you are familiar with aircraft instrumentation, it is much like an HSI and RMI combined into one. However, I think that the map on a mapping display should be used as the primary reference. The map display allows up to seven selectable data fields to be displayed. Something that I like about the Garmin mapping receivers is the ability to fully exploit the map display for creating routes. The iFinder offers a form of this capability. The iFinder uses SD/MMC memory cards to store maps and data. At least for waypoints, the memory card acts like a computer hard drive in that the waypoints are stored on the MMC device and then imported into the GPS. I was able to create sets of waypoints in Microsoft Excel, save them as comma separated files on a memory card and then import them as needed until the 1,000 user waypoints were filled. The format is decimal latitude, decimal longitude, wayponit name with a space after the comma. These waypoints were imported into Lowrance’s free GPS data management program and then saved in the Lowrance format. The iFinder is not in the least bit waterproof, but it comes with a dry bag. For something like kayaking, I use the GPS in a dry bag anyway. However, I do like the idea of the GPS inside being advertised as water resistant as one more layer of protection.
Other Manufactures In no way do I want to imply that Garmin, Magellan, and Lowrance are the only options. However, they represent the more popular choices in the handheld GPS market, which is my area of familiarity. As I mentioned in the beginning of the chapter, my goal is to explain many of the factors in choosing a specific model rather than to create a review of all of the models available.

Choosing a GPS receiver
Basic GPS Navigation www.smallboatgps.com
52
Waypoints
Basic GPS Navigation www.smallboatgps.com
53
Chapter 5 Waypoints WARNING: Do not interpret this chapter as a recommendation to throw away your nautical charts and topographic charts and replace them with a road map from the convenience store or some waypoints downloaded from an auto-mapping program off of the Internet. Before you can navigate with GPS, you have to tell the GPS where you want to go. This can be as simple as moving the cursor to a point on a mapping GPS. If you have a non-mapping GPS, finding the latitude and longitude of a place can be somewhat of a data scavenger hunt. For experienced users of non-mapping GPS receivers who are used to specialized maps such as topographic maps and nautical charts, getting coordinates is no problem. However, for many recreational activities there are a variety of places to get coordinates without needing to resort to specialized, which often implies expensive and hard to locate, maps and charts.
Appropriateness of data Before I get to the subject of how to tell the GPS to navigate to where you want, I think that it is important to discuss the issue of using the proper charts and data. Specialized charts such as nautical charts and topographic maps give much more information than just the location of points. They give information on depths, hazards, visual navigation aids, shore characteristics, currents, heights of terrain, etc. A generic road map, mapping program, or internet site will not replace a topographic map or a marine chart. However, there are many cases that using such a generic mapping data is still very useful. In some cases, the more specific mapping is not necessary, and in other cases, the generic mapping data is useful when used in conjunction with more specific mapping data. There are simply too many variations and possibilities for me to give hard and fast rules. Mostly it comes down to common sense and prudence. As I have previously disclaimed, I am a professional pilot, but an amateur at many of the possible activities in which GPS navigation can be used. I use specialized aeronautical charts when I fly and would not dream of replacing them with road maps. There is a slow flowing river near my house in a state park that rents canoes. I use a mapping GPS such as Garmin GPS Map 76 with a MetroGuide maps loaded in. MetroGuide is a generic mapping product made more for automobile navigation than anything else. Considering that most people do not even use a
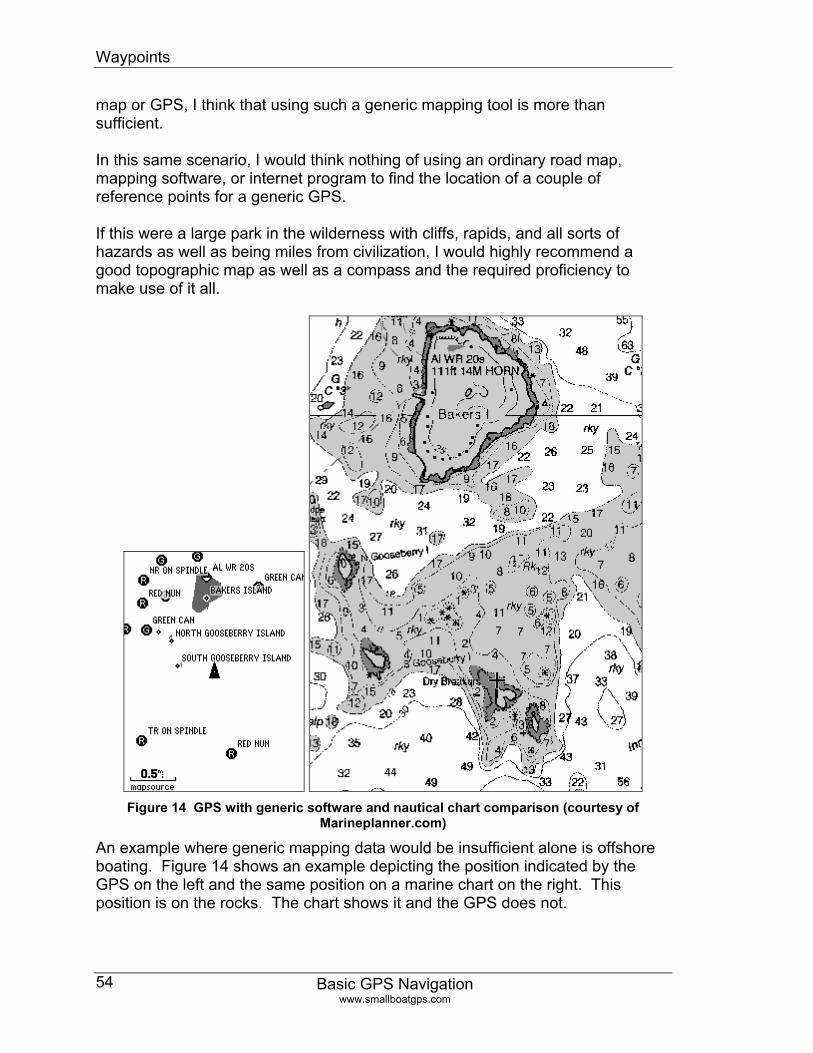
Waypoints
Basic GPS Navigation www.smallboatgps.com
54
map or GPS, I think that using such a generic mapping tool is more than sufficient. In this same scenario, I would think nothing of using an ordinary road map, mapping software, or internet program to find the location of a couple of reference points for a generic GPS. If this were a large park in the wilderness with cliffs, rapids, and all sorts of hazards as well as being miles from civilization, I would highly recommend a good topographic map as well as a compass and the required proficiency to make use of it all.
Figure 14 GPS with generic software and nautical chart comparison (courtesy of
Marineplanner.com)
An example where generic mapping data would be insufficient alone is offshore boating. Figure 14 shows an example depicting the position indicated by the GPS on the left and the same position on a marine chart on the right. This position is on the rocks. The chart shows it and the GPS does not.
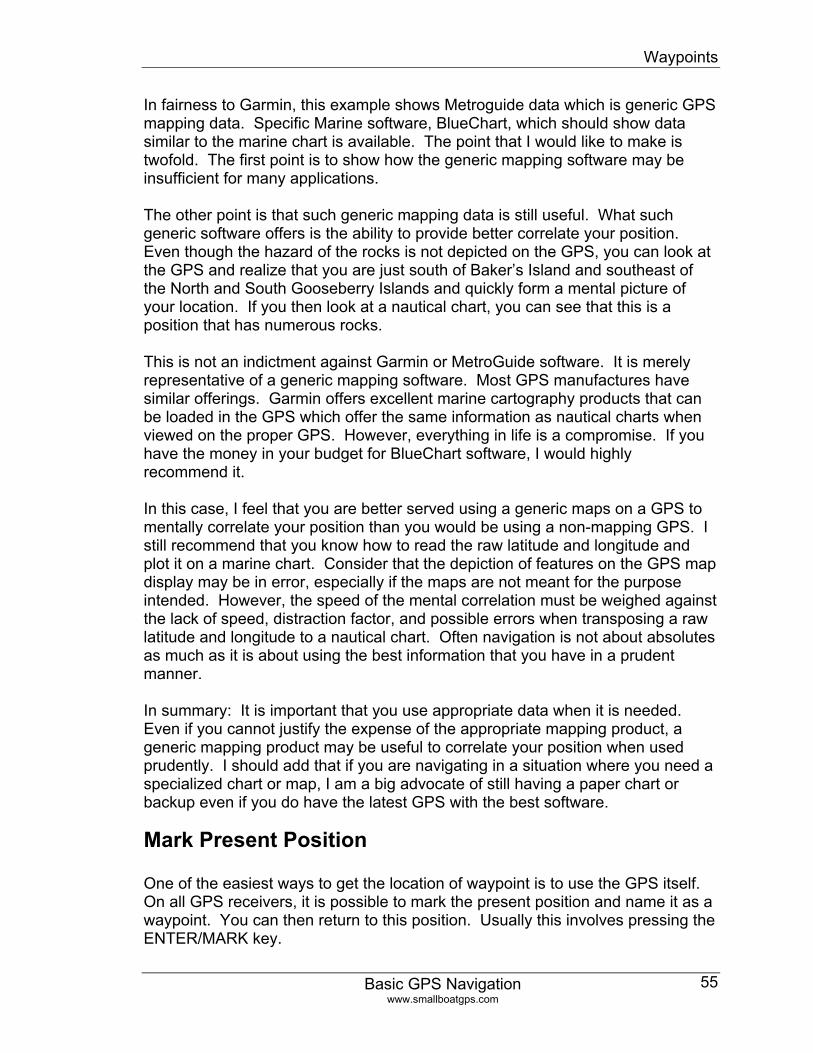
Waypoints
Basic GPS Navigation www.smallboatgps.com
55
In fairness to Garmin, this example shows Metroguide data which is generic GPS mapping data. Specific Marine software, BlueChart, which should show data similar to the marine chart is available. The point that I would like to make is twofold. The first point is to show how the generic mapping software may be insufficient for many applications. The other point is that such generic mapping data is still useful. What such generic software offers is the ability to provide better correlate your position. Even though the hazard of the rocks is not depicted on the GPS, you can look at the GPS and realize that you are just south of Baker’s Island and southeast of the North and South Gooseberry Islands and quickly form a mental picture of your location. If you then look at a nautical chart, you can see that this is a position that has numerous rocks. This is not an indictment against Garmin or MetroGuide software. It is merely representative of a generic mapping software. Most GPS manufactures have similar offerings. Garmin offers excellent marine cartography products that can be loaded in the GPS which offer the same information as nautical charts when viewed on the proper GPS. However, everything in life is a compromise. If you have the money in your budget for BlueChart software, I would highly recommend it. In this case, I feel that you are better served using a generic maps on a GPS to mentally correlate your position than you would be using a non-mapping GPS. I still recommend that you know how to read the raw latitude and longitude and plot it on a marine chart. Consider that the depiction of features on the GPS map display may be in error, especially if the maps are not meant for the purpose intended. However, the speed of the mental correlation must be weighed against the lack of speed, distraction factor, and possible errors when transposing a raw latitude and longitude to a nautical chart. Often navigation is not about absolutes as much as it is about using the best information that you have in a prudent manner. In summary: It is important that you use appropriate data when it is needed. Even if you cannot justify the expense of the appropriate mapping product, a generic mapping product may be useful to correlate your position when used prudently. I should add that if you are navigating in a situation where you need a specialized chart or map, I am a big advocate of still having a paper chart or backup even if you do have the latest GPS with the best software.
Mark Present Position One of the easiest ways to get the location of waypoint is to use the GPS itself. On all GPS receivers, it is possible to mark the present position and name it as a waypoint. You can then return to this position. Usually this involves pressing the ENTER/MARK key.
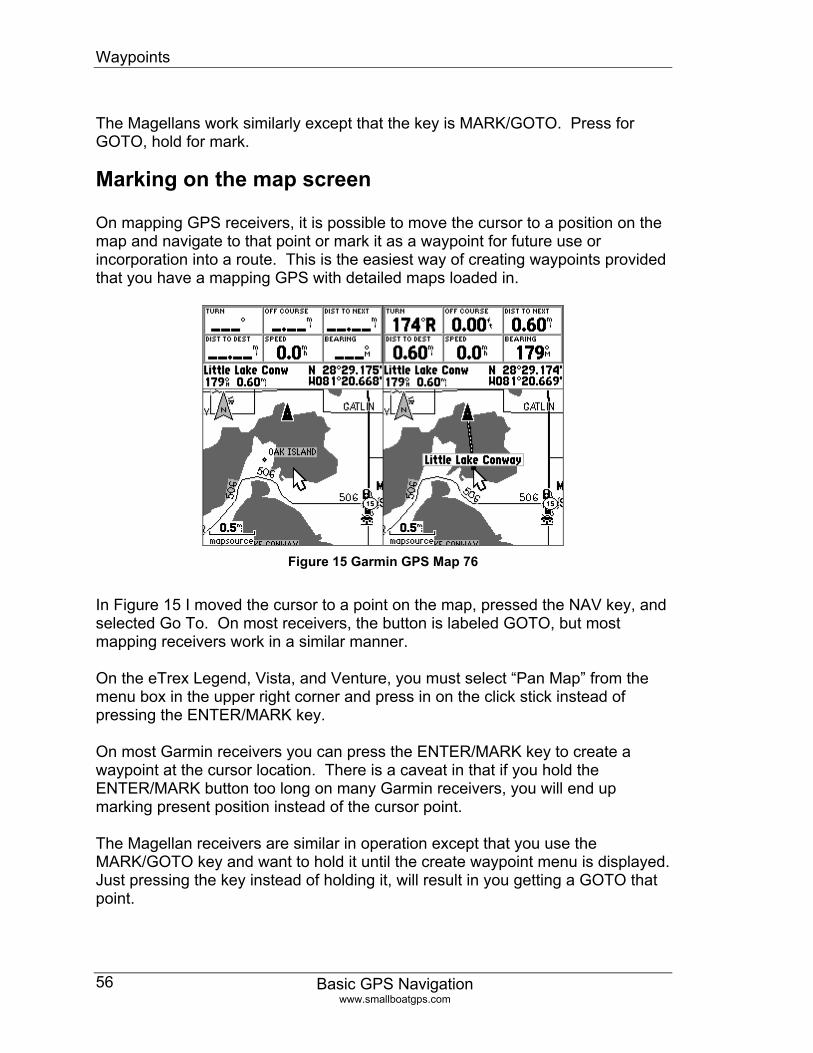
Waypoints
Basic GPS Navigation www.smallboatgps.com
56
The Magellans work similarly except that the key is MARK/GOTO. Press for GOTO, hold for mark.
Marking on the map screen On mapping GPS receivers, it is possible to move the cursor to a position on the map and navigate to that point or mark it as a waypoint for future use or incorporation into a route. This is the easiest way of creating waypoints provided that you have a mapping GPS with detailed maps loaded in.
Figure 15 Garmin GPS Map 76
In Figure 15 I moved the cursor to a point on the map, pressed the NAV key, and selected Go To. On most receivers, the button is labeled GOTO, but most mapping receivers work in a similar manner. On the eTrex Legend, Vista, and Venture, you must select “Pan Map” from the menu box in the upper right corner and press in on the click stick instead of pressing the ENTER/MARK key. On most Garmin receivers you can press the ENTER/MARK key to create a waypoint at the cursor location. There is a caveat in that if you hold the ENTER/MARK button too long on many Garmin receivers, you will end up marking present position instead of the cursor point. The Magellan receivers are similar in operation except that you use the MARK/GOTO key and want to hold it until the create waypoint menu is displayed. Just pressing the key instead of holding it, will result in you getting a GOTO that point.
Waypoints
Basic GPS Navigation www.smallboatgps.com
57
I should add that the Garmin receivers also allow you to go to a point on the map. When you get the waypoint creation menu, many of the Garmin receivers will have a GOTO menu button. Even easier, on the Garmin receivers with a NAV or GOTO button, place the cursor on the map and press GOTO or NAV. On many of the Garmin mapping receivers, the name of the geographic feature will come up when you press ENTER at the point that you want to create a waypoint. For example, if you are trying to create a waypoint at the cursor location in Figure 15, “Little Lake Conway” will be displayed. In such a case, you can usually press MENU and select SAVE AS WAYPOINT. There are variations on exactly how this is implemented on each model. You can either play with it and probably figure it out or refer to the manual for more specific information. The advantage of using the GPS in this way is that it avoids a variety of errors including, incorrect datums, mis-measured coordinates, and mis-entered coordinates.
Projecting a point Most GPS receivers allow you to create a new point based on a bearing and distance from a previous point. This is a significant help in working with generic maps with no grid. I discuss this in more detail in the Using Maps with an unknown or no grid on page 127.
Understanding some mapping basics Before you get coordinates from an external source such as a map or even an electronic source, it is important that the GPS and the map are referencing the same thing.
Datums Just to add a little confusion, it is often not enough to know the coordinates such a latitude and longitude that define a waypoint. It is also necessary to know the datum. I found that I could not improve on Peter Dana’s definition of the term datum:
• Geodetic datums define the size and shape of the earth and the origin and orientation of the coordinate systems used to map the earth. Hundreds of different datums have been used to frame position descriptions since the first estimates of the earth's size were made by Aristotle. Datums have evolved from those describing a spherical earth to ellipsoidal models derived from years of satellite measurements.
Waypoints
Basic GPS Navigation www.smallboatgps.com
58
• Modern geodetic datums range from flat-earth models used for plane surveying to complex models used for international applications which completely describe the size, shape, orientation, gravity field, and angular velocity of the earth. (http://www.colorado.edu/geography/gcraft/notes/datum/datum.html):
The default datum for GPS is World Geodetic System 1984, WGS 84. Unless you know that data uses WGS 84, you should look in the legend or documentation. There are still many charts, maps, and geographic information that are not based on WGS 84. If you can’t find the datum, you should treat the accuracy of any points derived from the source as possibly inaccurate until you have had the chance to see how the waypoints correlate with actual locations. If you find the coordinates for a waypoint in another datum, it is usually possible to change the setup menu of the GPS to accept the coordinates in this datum. Most GPS receivers offer a large number of datum options. These coordinates are converted and stored in the GPS as WGS 84. If you enter a point in a non WGS 84 datum, the GPS will indicate the coordinates that you entered. If you then change the GPS to WGS 84, the numbers displayed for the coordinates will change, but it will still define the same point.
Datum Example
In Florida, entering a waypoint with NAD 27 instead of WGS 84 will result in an error of around 100 feet. Depending on what you are doing this may or may not be even noticeable. As an example, I input a waypoint and named it W84, at N 30.00000 W080.00000 with the GPS set to WGS 84. I then changed the setting to NAD27 CONUS. This GPS now converts the W84 waypoint to NAD 27 CONUS for display. The point is now displayed as N 27.99977 W080.00021 even though the same point on the earth is represented. I next created a waypoint and named it N27, at N 30.00000 W080.0000 while the GPS was still set to NAD 27 CONUS. I then switched back to WGS 84. The second waypoint, N27, was actually stored as N 30.00023 W079.99979, which is what the GPS displays now that it is set to WGS 84. I set up a route from W84 to N27 to measure the distance, which was 108 ft.
A little extra background on datums
Because the earth rotates, the measuring of longitude across oceans has historically depended on comparing the positions of stars and planets with relationship to the time in Greenwich, England. As the ability to coordinate the time in Greenwich improved with such inventions as transatlantic cables and shortwave radio so did the accuracy of latitude measurements. Eventually such tools as bouncing laser beams from the moon and satellite radar images were

Waypoints
Basic GPS Navigation www.smallboatgps.com
59
used to more accurately locate reference points and to measure the shape of the earth. Currently, a more accurate version of GPS than is available in the average consumer GPS is used for surveying. The technology for accurately measuring distances within a landmass relative to some fixed reference point has historically been a step ahead of the ability to measure coordinates, especially longitude, in an absolute sense. Thus maps have been surveyed relative to a “known” point within the landmass. In this case, “known” is a relative term. As technology has increased, so also has the ability to more precisely locate these known reference points. An additional factor is that the earth is not round. The earth is not perfectly spherical. It is more like a piece of spherical fruit like an orange -- fairly round, a little fatter around the middle (by approximately 1/298) but with some irregularities. The abstraction of the shape of the earth that is an ellipse rotated around the earth’s axis is known as the ellipsoid. As our level of technology has changed, our ability to accurately measure and model the shape of the earth has improved. Until global navigation systems such as GPS or perhaps Loran, the fact that one chart may be mapped relative to a datum which is slightly inaccurate in the context of a world system was not important. What was important was that everything on a given map was accurately surveyed relative to other things on that map. The fact that a property line in the United States might be off several feet relative to Greenwich, England is not important. The accuracy of this property line being mapped with regard to other property lines, roads, etc. is critical. For navigation use, long-range navigation was insufficiently accurate for it to make any difference and short-range navigation has been done relative to the navigational aids located at a physical location on the earth rather than by reference to a worldwide system. Thus, different regions being surveyed relative to different datums has not been a problem. Let’s say that an aircraft was flying from Europe to the New York. There are still many airplanes that navigate across the ocean with only inertial navigation. Inertial navigation measures the effects of acceleration over time to get velocity. It measures the effect of velocity over time to calculate a position. If you are familiar with calculus, inertial navigation double integrates acceleration, which can be measured with an accelerometer, to get position. Over time, the inertial position drifts. When over land, the aircraft navigation system corrects this drift with radio navigation input. After being out of radio contact for a couple of hours, the system can drift up to several miles with no correction. As the aircraft approaches the shore, it is once again able to use radio navigation aids to update the inertial position. This aircraft will eventually follow a radio beam called an Instrument Landing System, ILS, to the runway.
Waypoints
Basic GPS Navigation www.smallboatgps.com
60
To use the ILS it does not matter that the ILS is charted correctly relative to some worldwide reference. It matters that the transmitter is physically placed beside the runway. A similar situation exists with a boat navigating using the radar returns from the land. It is important that the features on the chart be correct relative to each other, especially the radar return generating features, rather than correct relative to a worldwide grid. This is a gross oversimplification to make a point. Yes, newer aircraft use GPS to update the inertial systems. There are 60 miles between the tracks across the Atlantic, so a couple of miles of inaccuracy is not a safety hazard. However, the point is that until GPS and perhaps Loran, the inaccuracies of long range navigation systems was greater than errors caused by different datums. The accuracy of GPS has made the errors from using different datums noticeable. The accuracy of GPS also allows it to be used for things that previous long-range navigation systems would never be used for. Being able to correlate the position indicated by the GPS with the position of points on the earth make it important that the data or map and the GPS use the same datum. Here are a couple of references for more information on Datums:
• http://gpsinformation.net/main/maps.txt Jack Yeazel’s explanation of datums.
• http://www.nima.mil/GandG/geolay/toc.htm This is Geodesy for Laymen by NIMA, the National Imagery and Mapping Agency
• http://www.colorado.edu/geography/gcraft/notes/datum/datum.html Peter Dana’s Geodetic Datum Overview
• Longitude Longitude is the story of John Harrison’s development of the sea going chronometer. I have seen the A and E movie version which is based on the book by Dava Sobel. Although I have read that there is some literary license, it is still an excellent story.
Location Format There is a multitude of ways of defining a location. All GPS receivers allow you to input a latitude and longitude. However, this is just one of many ways of defining a location. To locate a point on a surface, you need two coordinates. Latitude and longitude is just one potential format. My Garmin GPSMap 76 lists 28 possible ways of

Waypoints
Basic GPS Navigation www.smallboatgps.com
61
entering a position. Most of these represent various official grid systems for maps. Even beyond latitude and longitude and any number of grid systems there are other ways of defining a point. Think about an address -- this is usually a street and a number along the street. Another example is an intersection of two streets. Although these are not coordinates in the traditional numerical sense, they are coordinates in the sense of being two complimentary specifications to locate a point. Many mapping GPS receivers, assuming the proper map data is loaded, allow you to specify an address or intersection to specify a point. It is also possible to define a location with respect to other known waypoints. Many GPS receiver allow you to specify a new waypoint as being a bearing and distance from a previously known waypoint. Although it takes a little trickery for most GPS receivers, it is also possible to define a point as separate bearings from two separate points. I have only seen panel mounted aviation receivers that explicitly support this feature.
Latitude and Longitude
The GPS has three ways of being setup to enter latitude and longitude. The difference is when you stop dividing into units of 60 and just use the decimal portion. Minutes and seconds work just like in time with each degree being divided into 60 minutes and each minute being divided into 60 seconds. The format is a ‘ behind the number to designate minutes and “ to designate seconds. Here is the same coordinate all three formats.
Hddd° mm.mmmm’ N38° 51.418 W094° 47.941 Hddd.ddddd° N38.85697° W094.79902° Hddd° mm’ ss.s” N38° 51’ 25.1” W094° 47’ 56.5”
If you want to convert the decimal portion of a degrees to minutes, just multiply the decimal portion by 60. From the above example, to convert the .85697 in N 38.85697, multiply it by 60 to get 51.418’. Conversely, to convert minutes to a decimal portion of a degree, just divide by 60. From the same example, 51.418’ / 60 = .85967. Some inexpensive scientific calculators have a special button to do this conversion more automatically. Some more information on latitude while I am on the subject: Latitude is commonly thought of as the angle formed between two lines, one from the point to the center of the earth and the other being from the equator to the center of the earth. This is close and would be true if the earth was a sphere. However, the longitude is actually based on the line perpendicular to the ellipsoid
Waypoints
Basic GPS Navigation www.smallboatgps.com
62
at the point in question and the surface of the equatorial plane. This line does not quite intercept the earth at the center. While I am on the subject of latitude and longitude, a nautical mile is approximately 1 minute of latitude. My memory trick is that the normal highway speed (I learned to drive when the national speed limit was 55 miles per hour) used to be approximately 60 miles per hour, which is on mile per minute. A nautical mile is one nautical mile per minute. The approximation of a nautical mile being equal to 1 minute of latitude is now just an approximation. It used to be the definition, but such a definition meant that the value of the nautical mile kept changing as the shape of the earth was further refined. The nautical mile is now defined as 1852 meters, which converts to approximately 1.15078 statute miles or 6076.1 feet. Lastly, if you need a way to remember which direction is latitude and which is longitude I like to remember the Jimmy Buffet song, “Changes in Latitude – Changes in Attitude.” My son’s teacher taught him to think that latitude sounds like ladder and that the latitudes are like rungs.
UTM, Universal Transverse Mercator
This is a very light coverage of UTM because there are several very good sources of information on the Web. Four good sources of information on UTM on the web are:
• http://www.nps.gov/prwi/readutm.htm • www.dbartlett.com • www.maptools.com/UsingUTM
On this site, follow the “Datums” link for some good information on the measurement difference between NAD 27 and WGS 84 maps.
• Using a Garmin GPS with Paper Land Maps Go to the Garmin web site, www.garmin.com. Select Support ->User Manuals. There will be three pull down menus to select the category and type of receiver that you want the manual. Select, other and other, then select the title.
Some maps do not use latitude and longitude. If you are using a topographical map for, there is a good chance that you might run into the Universal Transverse Mercator, UTM, coordinate system. It is interesting, but initially confusing to read the full details about what each UTM coordinate means. However, using UTM in practice is simple.
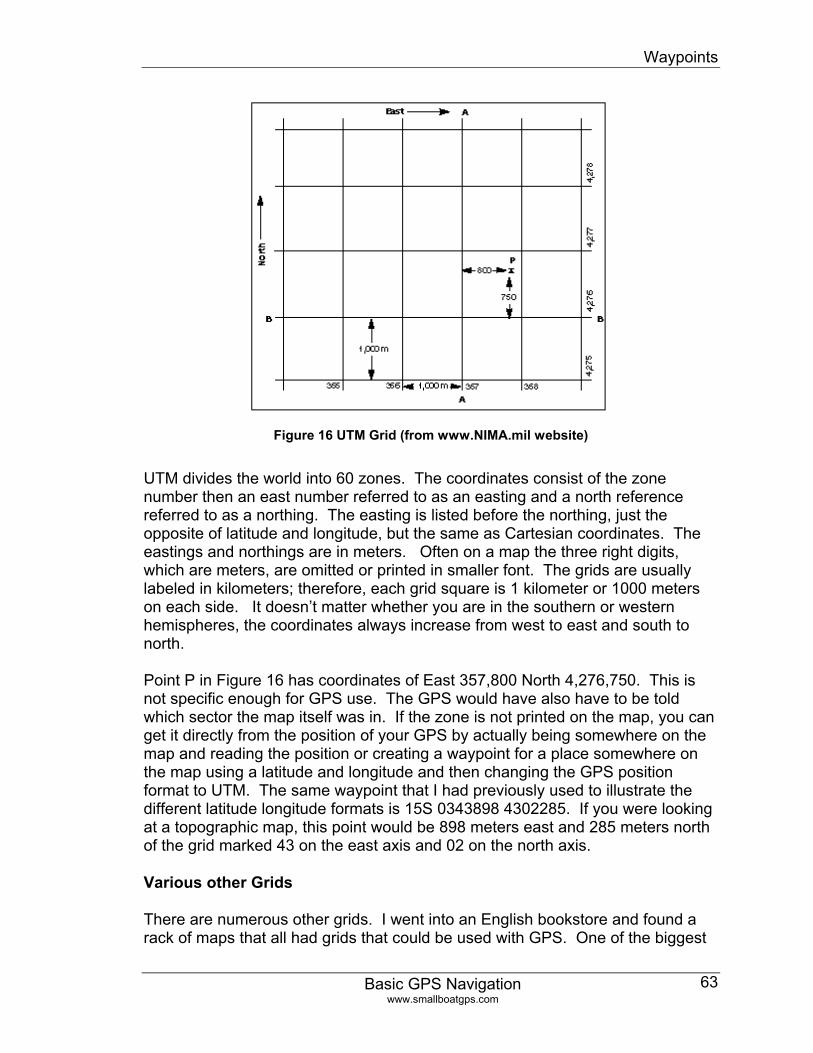
Waypoints
Basic GPS Navigation www.smallboatgps.com
63
Figure 16 UTM Grid (from www.NIMA.mil website)
UTM divides the world into 60 zones. The coordinates consist of the zone number then an east number referred to as an easting and a north reference referred to as a northing. The easting is listed before the northing, just the opposite of latitude and longitude, but the same as Cartesian coordinates. The eastings and northings are in meters. Often on a map the three right digits, which are meters, are omitted or printed in smaller font. The grids are usually labeled in kilometers; therefore, each grid square is 1 kilometer or 1000 meters on each side. It doesn’t matter whether you are in the southern or western hemispheres, the coordinates always increase from west to east and south to north. Point P in Figure 16 has coordinates of East 357,800 North 4,276,750. This is not specific enough for GPS use. The GPS would have also have to be told which sector the map itself was in. If the zone is not printed on the map, you can get it directly from the position of your GPS by actually being somewhere on the map and reading the position or creating a waypoint for a place somewhere on the map using a latitude and longitude and then changing the GPS position format to UTM. The same waypoint that I had previously used to illustrate the different latitude longitude formats is 15S 0343898 4302285. If you were looking at a topographic map, this point would be 898 meters east and 285 meters north of the grid marked 43 on the east axis and 02 on the north axis.
Various other Grids
There are numerous other grids. I went into an English bookstore and found a rack of maps that all had grids that could be used with GPS. One of the biggest
Waypoints
Basic GPS Navigation www.smallboatgps.com
64
caveats is that it is not enough to specify the grid, but you must also specify the datum. For example, if I select British Grid as the position format using my Garmin Legend C, the Map Datum automatically changes to Ord Srvy GB. On the basic eTrex, I have to make sure that I select the map datum manually. Another example is the Swiss grid works with the CH-1903 datum. For more information on the Ordinance Survey maps and grid, the website is: http://www.ordnancesurvey.co.uk.
Specialized Charts and Maps Needless to say specialized maps such as marine charts and topographic maps are an excellent source of getting data. I have even seen specialized maps for local chains of lakes in my local Wal-Mart which include latitude and longitude marks for using with GPS. By the way, even if you have a mapping GPS with specialized marine or topographic data, it is still wise to carry a physical map or chart. Chart and map reading is a separate subject altogether. There are many books that cover this subject well.
From the Internet There are a couple of sites on the internet that allow you to find coordinates. Unfortunately, finding the latitude and longitude takes some hunting around. Additionally, website designs change and the methods or even the possibility of getting longitude and lattidue from any of the sites that I mention may change. For example, www.mapquest.com and www.mapblast.com both used to be able to give latitude and longitude information but have been redesigned so that they are not longer useful for getting coordinates.
• Google Earth, http://earth.google.com. Warning: Google Earth may be addictive. Google earth is a downloadable program that connects to the internet to get data. The basic program is free, but for $20 a year it is possible to upgrade to a version that allows you to download GPS waypoints and tracks and display them. Unfortunately, it is not possible to mark a point and load it to the GPS. It is possible to display a latitude and longitude grid by selecting View -> Lat/Lon grid or CTRL-L. Also, the latitude and longitude of the cursor is displayed at the bottom of the image.
• Marine Planner, www.marineplanner.com, good site with marine charts.
Waypoints
Basic GPS Navigation www.smallboatgps.com
65
• Maps On Us, www.mapsonus.com. In addition for obvious non-marine use, this is a handy site for finding coordinates on inland bodies of water. A couple of notes:
o This is U.S. only. o To get to the map you have to input address information. However,
the minimum specification is just inputting a state. o To get a latitude/longitude label, select “Shoe Lat/Long” from the
“Map Clicking will:” menu at the bottom of the map. o The datum for the latitudes and longitudes appears to be NAD27.
Simply set your GPS to NAD27 before inputting a latitude and longitude.
• MapCard, www.mapcard.com (U.S. Only) MapCard is not free, but it is relatively inexpensive. It has tools to mark coordinates at points.
• Maporama, www.maporama.com, The latitude and longitude is the bottom and to the left of the map under “Information.” To measure a latitude and longitude, select “re-center” or “re-center and zoom in” from the options of “Click on the map to.” The datum appears to be WGS84.
• Topozone, www.topozone.com, has topographic maps of the United States. Note that many of the maps are Nad 27 datum.
• MultiMap, www.multimap.com. The latitude and longitude is at the bottom of the map. The help page indicates that this is WGS-84 data.
• Streetmap.co.uk , http://www.streetmap.co.uk/ , streetmaps of the U.K.
• TerraServer.com http://www.terraserver.com/ TerraServer allows you to view aerial or satellite images and find the latitude and longitude of a point on the image or find an image of a latitude and longitude. There are various subscription and download options, but when you select and download a map, the position of the cursor is indicated to the left of the map.
• TerraServer USA, http://www.terraserver-usa.com The initial TerraServer project was by Microsoft and Compaq and was meant to demonstrate Microsoft’s data management software. I am not well versed in the details of the split, but this is also a source of finding the latitude and longitude of a place or finding and aerial or satellite image of a point. As the name implies, the data is limited to the USA. Click on the “Info”
Waypoints
Basic GPS Navigation www.smallboatgps.com
66
icon at the top of the page for the latitude and longitude. You can click on the map to re-center and zoom as well as use the controls to the right of the map. However, you will need to click on the “Info” icon again to get the latitude and longitude.
• Tela Atlas Geocode, www.geocode.com This site allows you to put in an address and get a latitude and longitude of an address in the USA. Select “Test Drive Geocode” on the left side of the page. You are allowed to find up to 25 addresses. I have no idea how it detects whether you have exceeded the 25.
• National Geospatial Intelligence Agency, www.nga.mil ( formerly National Imagery and Mapping Agency, NIMA) There is quite a bit of publicly available data for those willing to explore.
Mapping Programs The PC or a PDA can be useful for finding waypoints. Many programs offer GPS compatibility. This can mean one of two things: 1. The ability to use the computer such as a laptop to display your position on the map using GPS. 2. The ability to upload points on the map into the GPS so that you can use the GPS independently of the computer. Most of the programs that advertise GPS compatibility are advertising this first type. I am sure that there are many people who find the first type of compatibility quite advantageous. For example, a salesman who is driving to new unfamiliar places would likely find this very useful. I have hooked up my laptop with a mapping program and it was pretty impressive. However, for recreation use, this type of GPS compatibility usually is not of much use. I can’t see taking my laptop kayaking or inline skating. If you intend on using the GPS with the computer as an interface in this manner, you might want to check www.rammount.com to mount the laptop. The second type of GPS compatibility is obviously useful for many recreational activities in that it eliminates incorrect measurement and entry of data. Even though many programs do not offer this second type of GPS compatibility or any GPS compatibility at all, they can still be very useful. Many programs can give you a latitude and longitude of a point of the cursor. You can then manually enter these into the GPS. Often you can print a map and mark points along with the latitude and longitude that you measured at waypoints. Examples of this are Figure 17 and Figure 18. This is a simple and inexpensive solution.

Waypoints
Basic GPS Navigation www.smallboatgps.com
67
The factors for the feasibility of using a PDA with GPS are the same as using a computer with GPS except that the magnitudes have changed. Using a GPS with a PDA is similar to using a GPS with a computer. The tradeoffs are similar, but at a different point on the continuum. For example, the display is not as big as a laptop, but a PDA is not nearly as bulky. For more information on using a PDA I would recommend Dale DePriest’s information at: http://www.gpsinformation.org/dale/. The more recent the program and the data, the more likely it is to be based on the WGS-84 datum. However, this is not necessarily the case. Be weary or the program unless it states the datum or until you have had the chance to use a couple of measurements and see how well they work. Most likely the latter will be the case. Although I list a couple of programs in the next few pages, there are many more. Also some of these programs are only applicable to United States use. My purpose is to find some of the more readily available concrete examples. I have even used some of the inexpensive atlas programs in the discount software rack.
Delorme Map Print Pack (U.S. Only) www.delorme.com
Delorme does not sell marine charts, but they do have topographic maps. For many lakes and inland waterways these are what you need. Some of the more expensive products have the ability to create routes and waypoints and then upload them into the GPS. I was impressed with Map Print Pack USA for the money. Map Print Pack retails for $20 and is the least expensive DeLorme product line. It is somewhat stripped down from the other DeLorme products, but for the price it is great for recreational use. If you want to spend the money, you can pay an extra $40 and download an optional GPS interface for the program. This will give you both types of GPS compatibility. An interesting feature of Delorme Map Print Pack and several of the other Delorme products is that they let you print a large map by separating the map into separate sheets. Each sheet is printed separately and becomes part of a mosaic covering a large area. Maps can be printed as single sheet, 2 x 2, or 3 x 3. Map Print Pack comes with a vinyl 3 x 3 holder to slip the maps into. You also have the option of overlaying the maps with a latitude/longitude or a UTM grid. The downside of Map Print Pack is that it has limited use as a road map. Roads will be shown, but street names are only displayed at the closest range. Even then, the naming coverage is not complete. This program also lacks address lookup. These are not failures of the program, but will be disappointments if you are looking for this program to be something that it is not. For the price, I think that this is an excellent program.
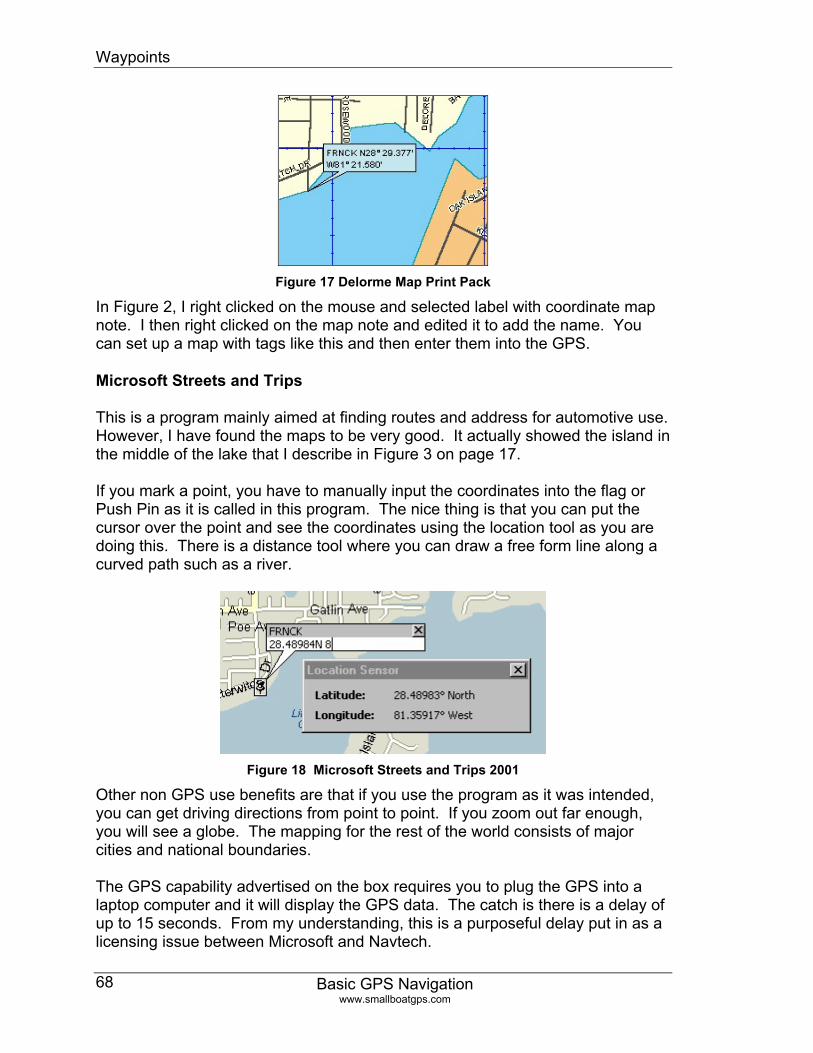
Waypoints
Basic GPS Navigation www.smallboatgps.com
68
Figure 17 Delorme Map Print Pack
In Figure 2, I right clicked on the mouse and selected label with coordinate map note. I then right clicked on the map note and edited it to add the name. You can set up a map with tags like this and then enter them into the GPS.
Microsoft Streets and Trips
This is a program mainly aimed at finding routes and address for automotive use. However, I have found the maps to be very good. It actually showed the island in the middle of the lake that I describe in Figure 3 on page 17. If you mark a point, you have to manually input the coordinates into the flag or Push Pin as it is called in this program. The nice thing is that you can put the cursor over the point and see the coordinates using the location tool as you are doing this. There is a distance tool where you can draw a free form line along a curved path such as a river.
Figure 18 Microsoft Streets and Trips 2001
Other non GPS use benefits are that if you use the program as it was intended, you can get driving directions from point to point. If you zoom out far enough, you will see a globe. The mapping for the rest of the world consists of major cities and national boundaries. The GPS capability advertised on the box requires you to plug the GPS into a laptop computer and it will display the GPS data. The catch is there is a delay of up to 15 seconds. From my understanding, this is a purposeful delay put in as a licensing issue between Microsoft and Navtech.
Waypoints
Basic GPS Navigation www.smallboatgps.com
69
Things I did not like were that there is no way to print a grid on the map. Thus, there is no way to measure new points on the printed map without using the computer. It is not possible to print large area maps using DeLorme’s mosaic method.
GPS Manufactures’ Mapping and Data Software
Even if you do not have a mapping GPS, you might consider purchasing the extra mapping or cartographic software from the same manufacture. You will have to check the compatibility of the software and your GPS. For example, if you had a non-mapping Garmin GPS you could buy the Waterways and Lights or Roads and Recreation CD and still be able to upload routes and waypoints that you had created on the PC. What you would not be able to do is upload the maps themselves. Unfortunately, you would be paying for this unusable capability. However, you would have the software should you later buy a mapping GPS receiver. I have a more detailed discussion of the various mapping software on page 24 under my discussion of whether to by a mapping of non-mapping GPS.
National Geocgraphic http://maps.nationalgeographic/top
I have not had the chance to try this software. These are topographic maps available by state. They also offer a PDA (both Palm and Pocket PC) version. Both the PC and PDA versions advertise the ability to upload route and waypoint information to the GPS.
Ozi Explorer www.oziexplorer.com
I have not used Ozi Explorer, but it is a very popular program that among other capabilities allows you to import and calibrate scanned maps.
Other software
There are many other programs on the market that I have not mentioned. There are even programs where you can scan in maps with your computer, calibrate points on the map with known coordinates of the points, and then measure other points on the map and print it out with a grid overlay. Instead of trying to list them, let me send you to some sources where you can find this software.
• GPS for Dummies Joel McNamara Wiley Publishing, ISBN 0-7645-6933-3 GPS for Dummies has good coverage of the various software available to
Waypoints
Basic GPS Navigation www.smallboatgps.com
70
interface a computer with the GPS.
• For PC shareware, try www.gpsinformation.net I have referred to this multiple times, but this is a great place to look for links to several other shareware programs. Look under the section for Third Party Software.
• For PDA software http://www.gpsinformation.org/dale/ www.palmgear.com (palm) www.handango.com (Palm, Pocket PC / Windows CE) www.tucows.com (Palm, Pocket PC / Windows CE) Search on keywords “map” or “GPS”
Ordinary Road Maps Most ordinary road maps have grids that are of little use with GPS, but if you hunt around, you can find some maps that can be used easily with a GPS. Even those that lack any kind of useful marking may still be of use using some of hte techniques in the Using Maps with an unknown or no grid chapter on page 127. In the U.S., Delorme has been good about putting latitude and longitude on their map products. This includes their state Atlas and Gazetteer series. Recently, Rand McNally has started updating their maps with latitude and longitude grids. Ordinance Survey maps of Great Britain have grids that can be used. More information on the grid can be found at www.ordnancesurvey.co.uk. In addition to selecting the grid, also make sure that you change the datum to Ordinance Survey Great Britain if your GPS does not automatically do so when you select the grid. I have also seen some Michelin road maps with latitude and longitude.
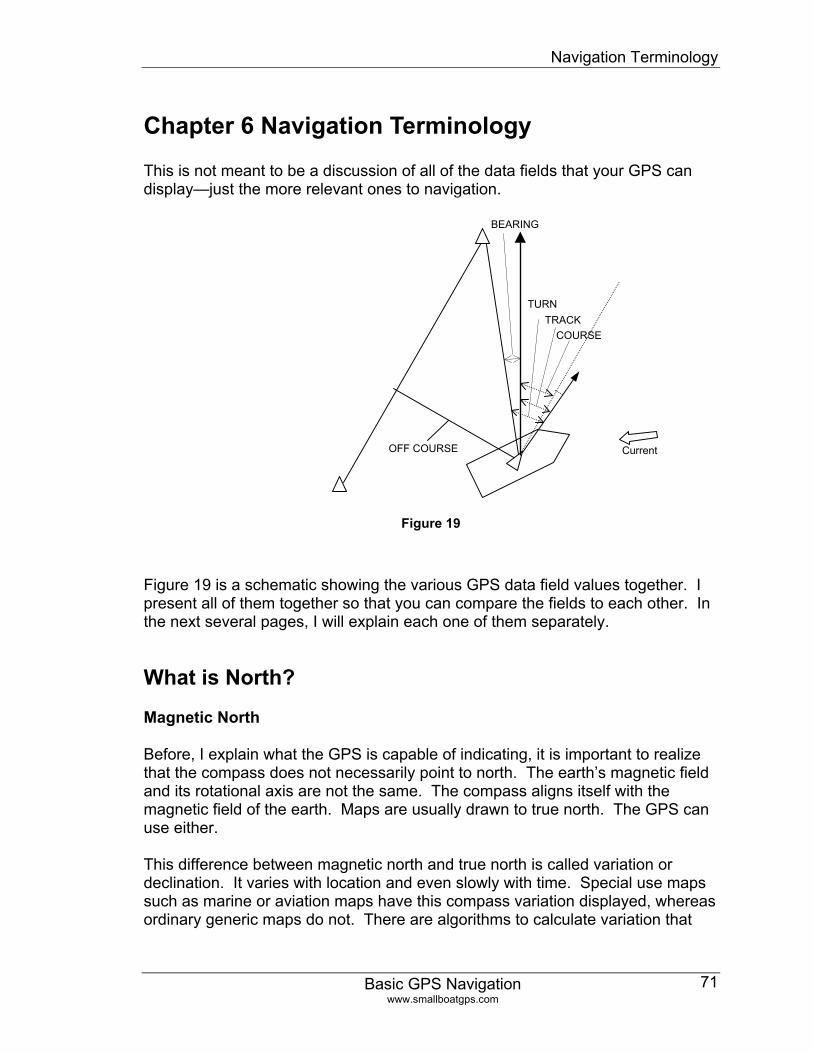
Navigation Terminology
Chapter 6 Navigation Terminology
Basic GPS Navigation www.smallboatgps.com
71
This is not meant to be a discussion of all of the data fields that your GPS can display—just the more relevant ones to navigation.
Figure 19
OFF COURSE Current
TRACK TURN
COURSE
BEARING
Figure 19 is a schematic showing the various GPS data field values together. I present all of them together so that you can compare the fields to each other. In the next several pages, I will explain each one of them separately.
What is North?
Magnetic North
Before, I explain what the GPS is capable of indicating, it is important to realize that the compass does not necessarily point to north. The earth’s magnetic field and its rotational axis are not the same. The compass aligns itself with the magnetic field of the earth. Maps are usually drawn to true north. The GPS can use either. This difference between magnetic north and true north is called variation or declination. It varies with location and even slowly with time. Special use maps such as marine or aviation maps have this compass variation displayed, whereas ordinary generic maps do not. There are algorithms to calculate variation that
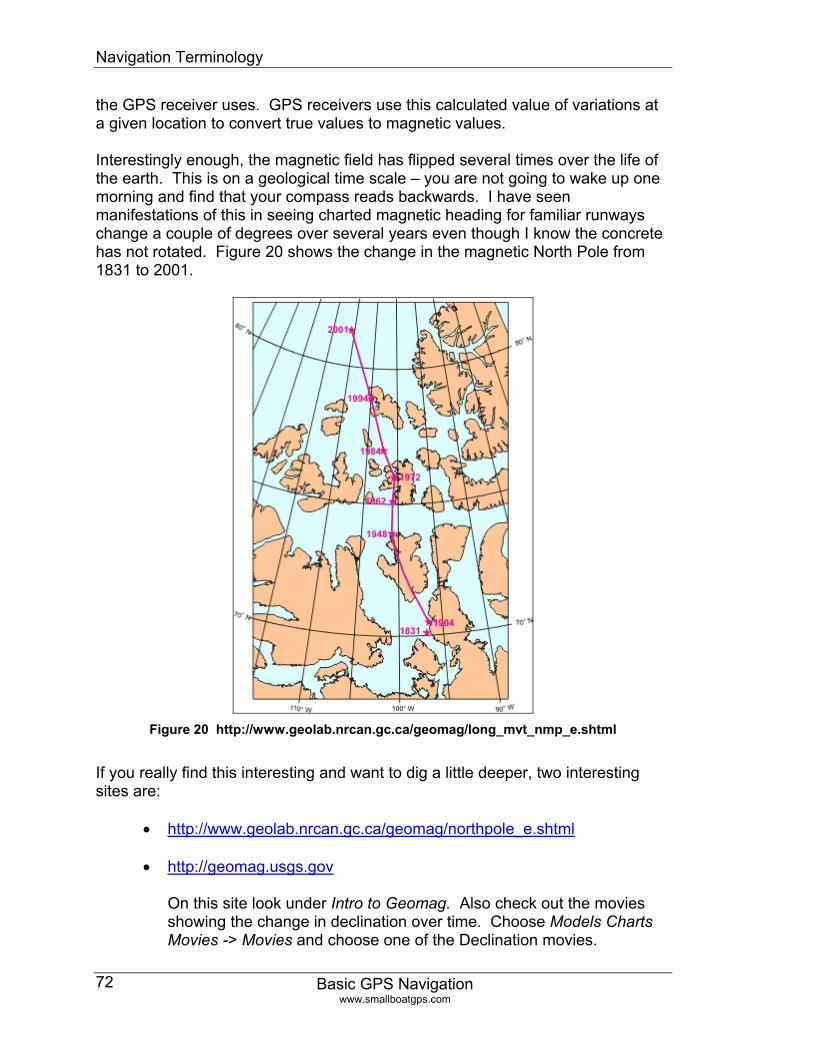
Navigation Terminology
Basic GPS Navigation www.smallboatgps.com
72
the GPS receiver uses. GPS receivers use this calculated value of variations at a given location to convert true values to magnetic values. Interestingly enough, the magnetic field has flipped several times over the life of the earth. This is on a geological time scale – you are not going to wake up one morning and find that your compass reads backwards. I have seen manifestations of this in seeing charted magnetic heading for familiar runways change a couple of degrees over several years even though I know the concrete has not rotated. Figure 20 shows the change in the magnetic North Pole from 1831 to 2001.
Figure 20 http://www.geolab.nrcan.gc.ca/geomag/long_mvt_nmp_e.shtml
If you really find this interesting and want to dig a little deeper, two interesting sites are:
• http://www.geolab.nrcan.gc.ca/geomag/northpole_e.shtml
• http://geomag.usgs.gov On this site look under Intro to Geomag. Also check out the movies showing the change in declination over time. Choose Models Charts Movies -> Movies and choose one of the Declination movies.
Navigation Terminology
Basic GPS Navigation www.smallboatgps.com
73
Other things such as metal structures and electronics can also affect the compass. This is something that is impossible to map or for the GPS to calculate. This is referred to as deviation. This is an entirely different issue and involves adjusting your compass or displaying a correction card. Back to variation… In Boston, MA the variation is 16°W. To steer a heading of 090° on the map, you would actually need to steer a compass heading of 106°. Similarly, if you thought that you were heading east because your compass indicated 090°, you would actually be headed 074° with respect to true north. To convert a true heading to a magnetic heading, a memory aid is “east is least and west is best.” This means to add the west variation and subtract an east variation. Just remember, that the opposite is true if you need to convert a magnetic value to a true value. If you setup your GPS to use magnetic values, the GPS data will correspond to your compass with no conversion. If you set up the GPS to use true values, then the GPS data will correspond to your map without conversion. There are advantages and disadvantages to either one. For navigating a vessel with GPS, it is best to compare the GPS generated TRACK with the GPS calculated value for BEARING or COURSE. In such a case, you are more concerned with the difference between the values whether they are both magnetic or both true. For example, if the GPS indicates a TRACK of 085° and a BEARING of 090°, you are tracking 5° left of going directly to the waypoint. It doesn’t matter if both values are magnetic or true, any magnetic variation cancels out. It is important that you understand the difference between magnetic and true values, but where the issue of magnetic verses true headings becomes especially important is when the GPS does not indicate a useful value for TRACK such as when hiking. I address this in more detail in the Two Dimensional Navigation on foot chapter on page 97.
Grid North
Every map projection warps something when trying to represent a three-dimensional curved surface on a flat piece of paper. In trying to represent square areas on the map, UTM causes the grid to not be exactly north south except at the central meridian. Usually, the effect is only one or two degrees. Grid north is measured relative to the grid lines rather than true north.
Navigation Terminology
Basic GPS Navigation www.smallboatgps.com
74
TRACK—synonym TRK or COG (Course over Ground) or HEADING This is the answer to the question “which way am I going.” This is the direction the boat is actually moving relative to the earth. With a couple of exceptions, the GPS has no idea which way you are pointed or your speed through the water. Put down the book or the computer, stand up, and start walking sideways like a crab. The direction that you are pointing is your HEADING. The direction that you are traveling is your TRACK. They are very different. It is not uncommon for an airliner to have a TRACK that is 20 degrees different from the heading. Imagine paddling a kayak at 3 knots across a current that is 4 knots. HEADING and TRACK are sometimes very different. The exception is that some more expensive GPS receivers have an electronic compass built in which will actually tell you which way that you are pointed. This electronic compass works like a regular compass in that it gets its alignment from the information from the earth’s magnetic field. This feature is designed to give a heading reference when you are not moving or practically still. When you are still, there is no track. It is important that if you have one of these GPS receivers, that you set the speed at which the GPS switches from referencing this internal compass to referencing the GPS satellite system to an appropriate value. The ability of the GPS to use the actual track of the boats is one of the significant benefits of the system. I have not used one of these receivers, but I would suggest that if you are kayaking or rowing that you might even consider setting this threshold as low as 1 or 2 knots, mph, or kilometers per hour.
Several GPS receivers throw the term heading around loosely. For example, the Garmin eTrex series uses the term HEADING, but it is really TRACK with the exception of units that have electronic compass functions when they are below the transition speed discussed in the previous paragraph.
BEARING This is the answer to the question “Which way do you need to go in order to go directly to the waypoint?” BEARING is the direction to the next waypoint relative to North. For actually guiding the boat, BEARING should be compared to TRACK rather than the heading. For sighting, BEARING is useful relative to heading.
TURN
Most handhelds have a TURN field which tells you how far you need to turn the boat to go directly to the active waypoint. Turn is the difference between the TRACK and the BEARING already calculated by the GPS. It is both easier to
Navigation Terminology
Basic GPS Navigation www.smallboatgps.com
75
read and takes up one less data field than using BEARING and TRACK separately.
COURSE-- synonym DTK(desired track)
The term COURSE is somewhat confusing in that many of us are used to using course for the thing that is TRACK in GPS nomenclature. COURSE is really just short for desired course. COURSE in the context of GPS data fields means the TRACK necessary to parallel a route leg. It is important to distinguish that BEARING is relative to the active waypoint from the present position and COURSE is relative to the line between two waypoints. The waypoint being navigated to makes one end of the line. The other end is the waypoint being navigated from. If a GOTO has been executed, the position at which it was executed becomes the waypoint being navigated from.
Desired track is a bit of a nomenclature problem in that the Desired Track may not be the TRACK that you desire. If you want to go directly to a point, then the TRACK that you should desire is BEARING not DTK.
TKE, Track error This is analogous to the TURN field except that it is the difference between TRACK and DTK rather than the difference in between TRACK and BEARING. You are only likely to see this data field on panel mounted aviation GPS receivers. It is useful, but is used slightly differently from TURN.
TO COURSE, COURSE TO STEER
Quite simply, I do not like and do not use TO COURSE for navigation. Theoretically, you could steer so that your TRACK match TO COURSE. What I find is that TO COURSE is too sensitive for manual steering. The TRACK correction for a given OFF COURSE value is usually what I consider to be more than necessary.
OFF COURSE, XTK (cross track error)
This is just how far you are off the line defined in the definition of COURSE. The direction indicated is the direction of the error. L 1.2 nm. means that you are 1.2 nm to the left of course not that you need to go 1.2 nm. to the left. The sensing of the OFF COURSE fields is one of my pet peeves. Most navigation devices tell you which direction to go to get to the course. If an aircraft’s navigation needle is to the left, you need to go to the left to get on course. Even the TURN field functions this way. A TURN of L005 would mean that you have to turn 5 degrees to the left to go direct to the waypoint, not that you are drifting 5 degrees to the left.
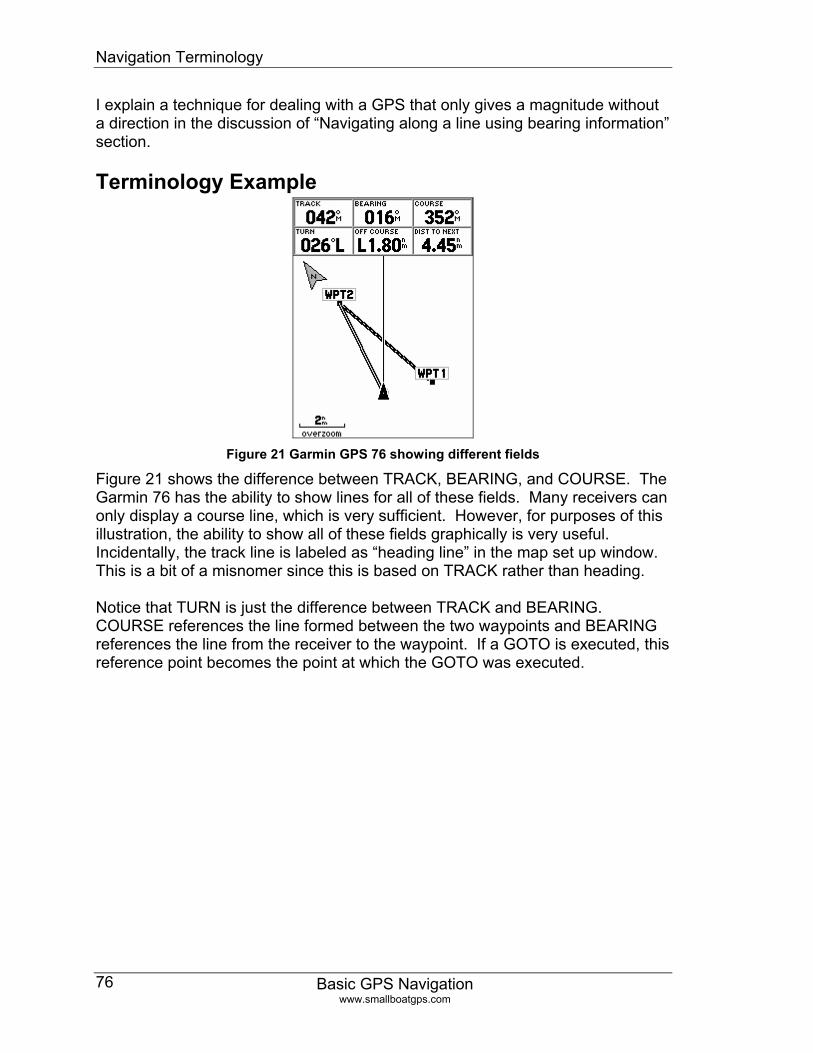
Navigation Terminology
Basic GPS Navigation www.smallboatgps.com
76
I explain a technique for dealing with a GPS that only gives a magnitude without a direction in the discussion of “Navigating along a line using bearing information” section.
Terminology Example
Figure 21 Garmin GPS 76 showing different fields
Figure 21 shows the difference between TRACK, BEARING, and COURSE. The Garmin 76 has the ability to show lines for all of these fields. Many receivers can only display a course line, which is very sufficient. However, for purposes of this illustration, the ability to show all of these fields graphically is very useful. Incidentally, the track line is labeled as “heading line” in the map set up window. This is a bit of a misnomer since this is based on TRACK rather than heading. Notice that TURN is just the difference between TRACK and BEARING. COURSE references the line formed between the two waypoints and BEARING references the line from the receiver to the waypoint. If a GOTO is executed, this reference point becomes the point at which the GOTO was executed.
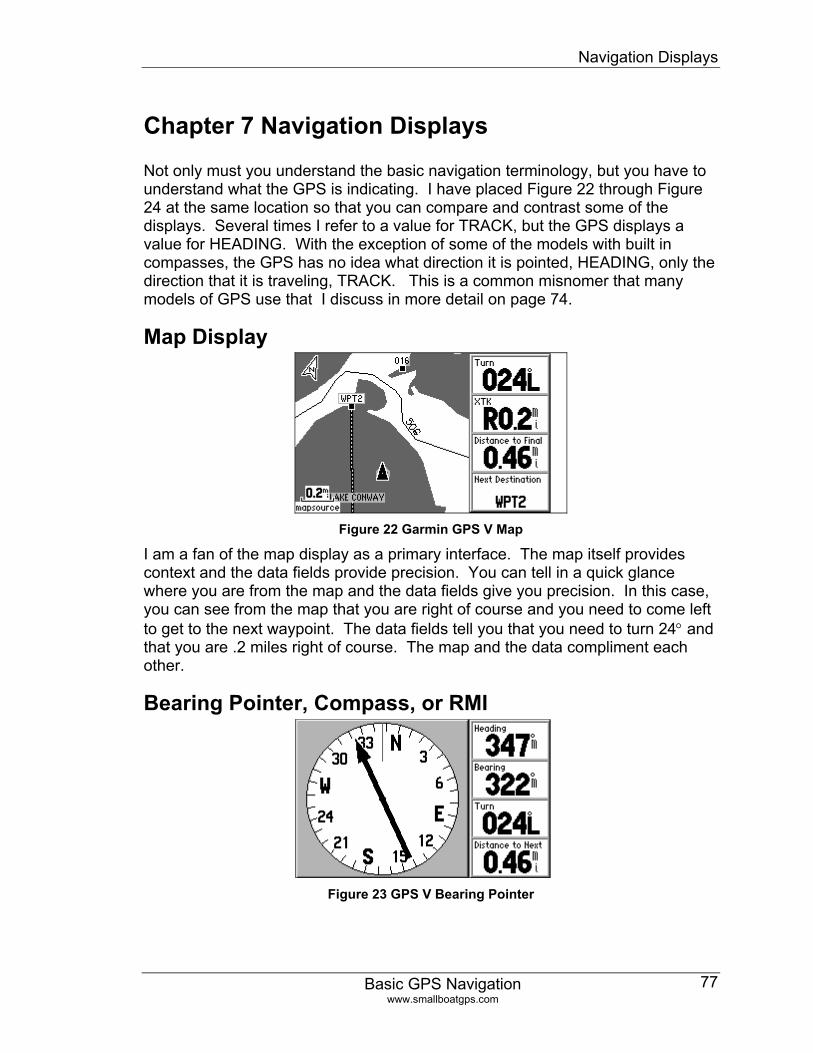
Navigation Displays
Chapter 7 Navigation Displays
Basic GPS Navigation www.smallboatgps.com
77
Not only must you understand the basic navigation terminology, but you have to understand what the GPS is indicating. I have placed Figure 22 through Figure 24 at the same location so that you can compare and contrast some of the displays. Several times I refer to a value for TRACK, but the GPS displays a value for HEADING. With the exception of some of the models with built in compasses, the GPS has no idea what direction it is pointed, HEADING, only the direction that it is traveling, TRACK. This is a common misnomer that many models of GPS use that I discuss in more detail on page 74.
Map Display
Figure 22 Garmin GPS V Map
I am a fan of the map display as a primary interface. The map itself provides context and the data fields provide precision. You can tell in a quick glance where you are from the map and the data fields give you precision. In this case, you can see from the map that you are right of course and you need to come left to get to the next waypoint. The data fields tell you that you need to turn 24° and that you are .2 miles right of course. The map and the data compliment each other.
Bearing Pointer, Compass, or RMI
Figure 23 GPS V Bearing Pointer
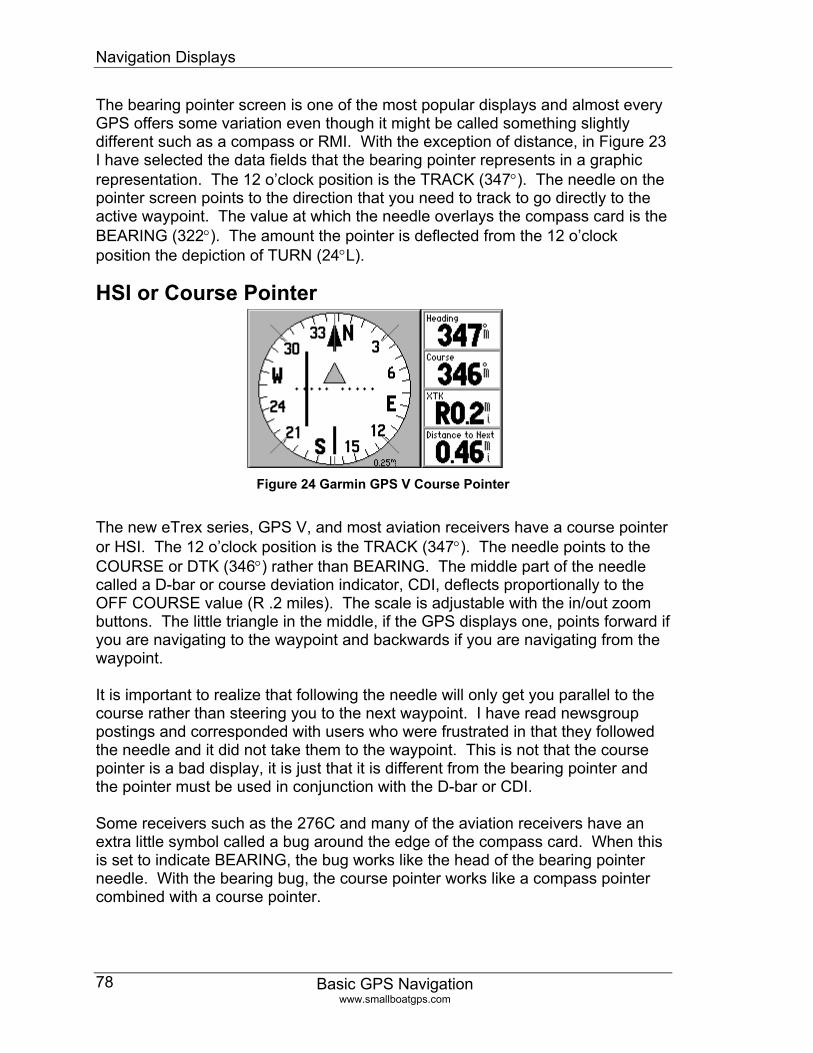
Navigation Displays
Basic GPS Navigation www.smallboatgps.com
78
The bearing pointer screen is one of the most popular displays and almost every GPS offers some variation even though it might be called something slightly different such as a compass or RMI. With the exception of distance, in Figure 23 I have selected the data fields that the bearing pointer represents in a graphic representation. The 12 o’clock position is the TRACK (347°). The needle on the pointer screen points to the direction that you need to track to go directly to the active waypoint. The value at which the needle overlays the compass card is the BEARING (322°). The amount the pointer is deflected from the 12 o’clock position the depiction of TURN (24°L).
HSI or Course Pointer
Figure 24 Garmin GPS V Course Pointer
The new eTrex series, GPS V, and most aviation receivers have a course pointer or HSI. The 12 o’clock position is the TRACK (347°). The needle points to the COURSE or DTK (346°) rather than BEARING. The middle part of the needle called a D-bar or course deviation indicator, CDI, deflects proportionally to the OFF COURSE value (R .2 miles). The scale is adjustable with the in/out zoom buttons. The little triangle in the middle, if the GPS displays one, points forward if you are navigating to the waypoint and backwards if you are navigating from the waypoint. It is important to realize that following the needle will only get you parallel to the course rather than steering you to the next waypoint. I have read newsgroup postings and corresponded with users who were frustrated in that they followed the needle and it did not take them to the waypoint. This is not that the course pointer is a bad display, it is just that it is different from the bearing pointer and the pointer must be used in conjunction with the D-bar or CDI. Some receivers such as the 276C and many of the aviation receivers have an extra little symbol called a bug around the edge of the compass card. When this is set to indicate BEARING, the bug works like the head of the bearing pointer needle. With the bearing bug, the course pointer works like a compass pointer combined with a course pointer.
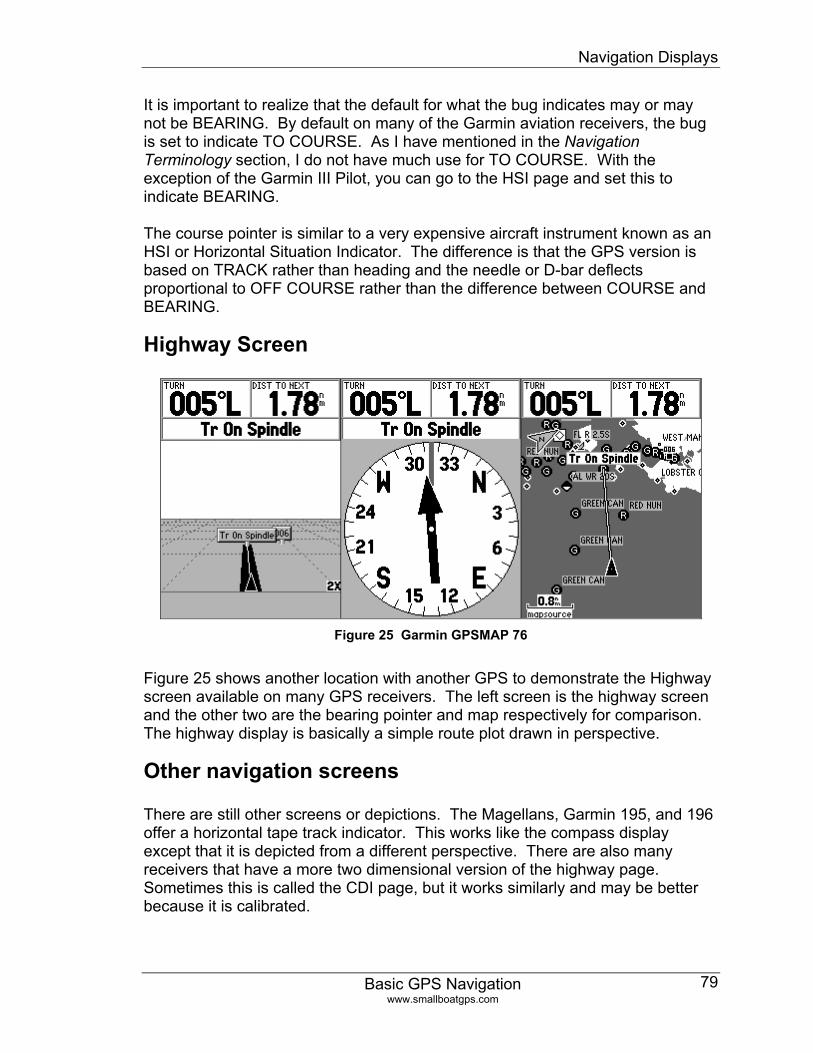
Navigation Displays
Basic GPS Navigation www.smallboatgps.com
79
It is important to realize that the default for what the bug indicates may or may not be BEARING. By default on many of the Garmin aviation receivers, the bug is set to indicate TO COURSE. As I have mentioned in the Navigation Terminology section, I do not have much use for TO COURSE. With the exception of the Garmin III Pilot, you can go to the HSI page and set this to indicate BEARING. The course pointer is similar to a very expensive aircraft instrument known as an HSI or Horizontal Situation Indicator. The difference is that the GPS version is based on TRACK rather than heading and the needle or D-bar deflects proportional to OFF COURSE rather than the difference between COURSE and BEARING.
Highway Screen
Figure 25 Garmin GPSMAP 76
Figure 25 shows another location with another GPS to demonstrate the Highway screen available on many GPS receivers. The left screen is the highway screen and the other two are the bearing pointer and map respectively for comparison. The highway display is basically a simple route plot drawn in perspective.
Other navigation screens There are still other screens or depictions. The Magellans, Garmin 195, and 196 offer a horizontal tape track indicator. This works like the compass display except that it is depicted from a different perspective. There are also many receivers that have a more two dimensional version of the highway page. Sometimes this is called the CDI page, but it works similarly and may be better because it is calibrated.
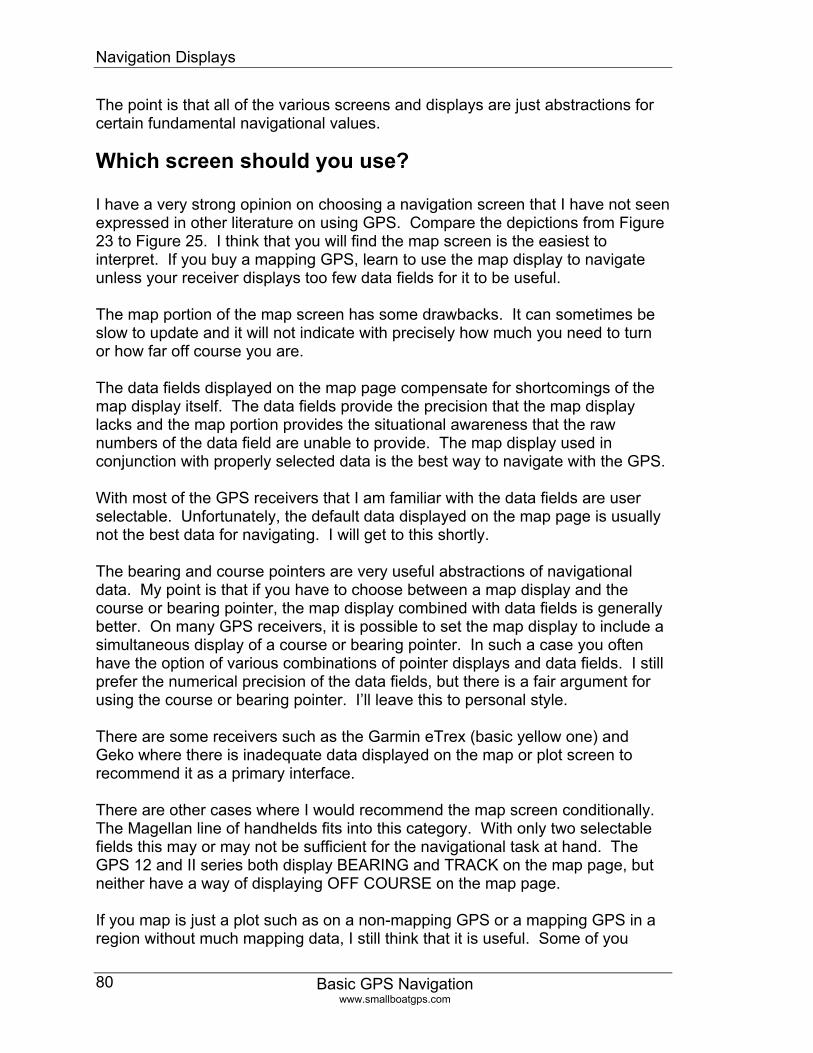
Navigation Displays
Basic GPS Navigation www.smallboatgps.com
80
The point is that all of the various screens and displays are just abstractions for certain fundamental navigational values.
Which screen should you use? I have a very strong opinion on choosing a navigation screen that I have not seen expressed in other literature on using GPS. Compare the depictions from Figure 23 to Figure 25. I think that you will find the map screen is the easiest to interpret. If you buy a mapping GPS, learn to use the map display to navigate unless your receiver displays too few data fields for it to be useful. The map portion of the map screen has some drawbacks. It can sometimes be slow to update and it will not indicate with precisely how much you need to turn or how far off course you are. The data fields displayed on the map page compensate for shortcomings of the map display itself. The data fields provide the precision that the map display lacks and the map portion provides the situational awareness that the raw numbers of the data field are unable to provide. The map display used in conjunction with properly selected data is the best way to navigate with the GPS. With most of the GPS receivers that I am familiar with the data fields are user selectable. Unfortunately, the default data displayed on the map page is usually not the best data for navigating. I will get to this shortly. The bearing and course pointers are very useful abstractions of navigational data. My point is that if you have to choose between a map display and the course or bearing pointer, the map display combined with data fields is generally better. On many GPS receivers, it is possible to set the map display to include a simultaneous display of a course or bearing pointer. In such a case you often have the option of various combinations of pointer displays and data fields. I still prefer the numerical precision of the data fields, but there is a fair argument for using the course or bearing pointer. I’ll leave this to personal style. There are some receivers such as the Garmin eTrex (basic yellow one) and Geko where there is inadequate data displayed on the map or plot screen to recommend it as a primary interface. There are other cases where I would recommend the map screen conditionally. The Magellan line of handhelds fits into this category. With only two selectable fields this may or may not be sufficient for the navigational task at hand. The GPS 12 and II series both display BEARING and TRACK on the map page, but neither have a way of displaying OFF COURSE on the map page. If you map is just a plot such as on a non-mapping GPS or a mapping GPS in a region without much mapping data, I still think that it is useful. Some of you

Navigation Displays
Basic GPS Navigation www.smallboatgps.com
81
might be surprised to know that the mapping display on a modern airliner is much closer to the mapping display on a non-mapping GPS such as an eTrex Venture or GPS Map 76. Just the route and waypoints are normally displayed along with the compass arc at the top of the screen. Some more data such as airports and navaids can also be displayed, but these are just symbols—similar to other waypoints being displayed on the GPS screen. There is no map display similar to the detail of the average consumer mapping GPS. If you have a mapping GPS and do not have the appropriate maps loaded for the activity, the map is still of enormous use. For example, if are boating and using Metro Guide or Roads and Recreation data instead of BlueChart maps, this is not foolhardy. The depiction of shoreline and various features are still enormously helpful for situational awareness. It would however, be inappropriate in many cases not to use the appropriate marine chart for more information on hazards. Similar logic applies for many other activities. Non-aviation GPS receivers do not show pertinent aeronautical information and aviation GPS receivers show this for reference only. If flying along you see that the GPS shows you next to a big lake and the chart shows that your course runs beside a big lake, then you know where you are. Of course, you would use the proper aeronautical chart for information such as obstructions, airspace restrictions, etc.
Setting up the map display for navigation
Lines
Depending on the GPS there are several different options for setting up the map display. In Figure 21 on page 76 I depict an example of the various lines that can be displayed – course, heading, and bearing. My intent at that point was to illustrate the corresponding navigational terms. However, it also demonstrates the possible map setup options. Not all GPS receivers are capable of displaying each type of line. Generally, the default is the course line. If this is all that your GPS is capable of displaying, you can be reassured that this is generally quite adequate. In fact, displaying every line option can be more cluttered than beneficial. This is something that you will have to experiment and decide what you like.
Detail
Some receivers allow you to select a level general level of detail. Some receivers allow you to select whether or at what zooms to display certain mapping features. More detail is not always better. There is a tradeoff between a screen being detailed and cluttered. It depends on the use and user. In fact most aviation receivers have a “declutter” button that can be used to reduce the level of detail. Your preferences will develop with experience.
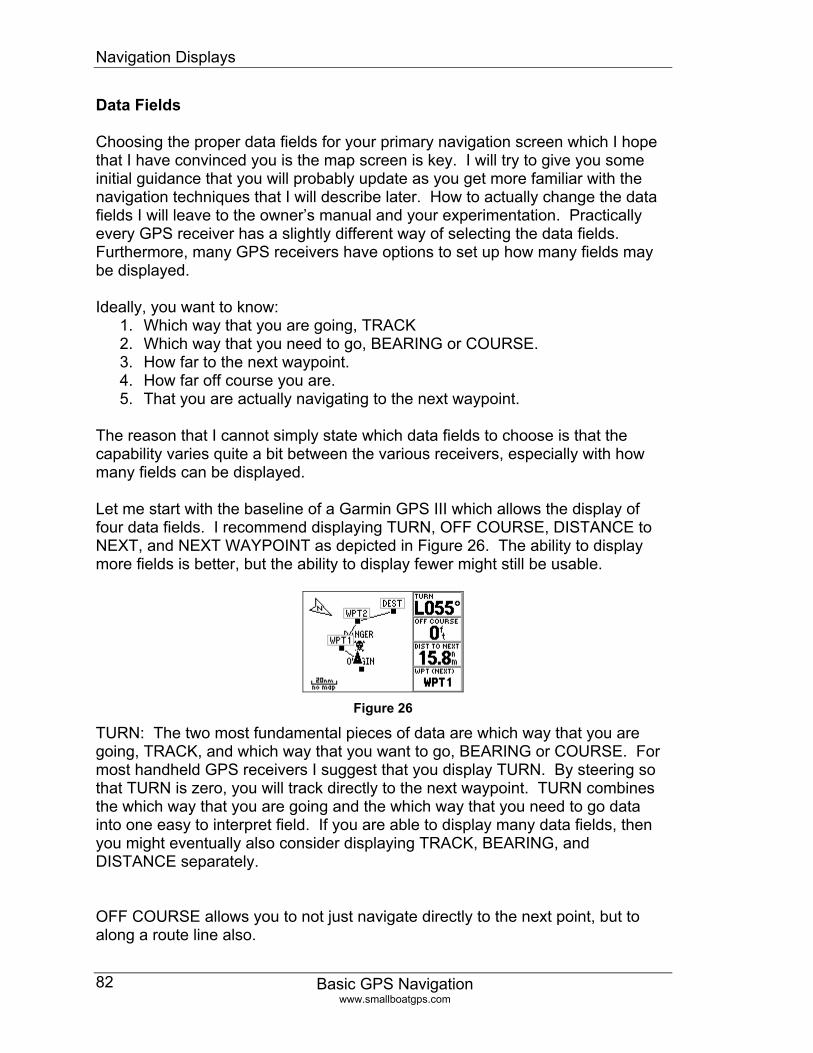
Navigation Displays
Basic GPS Navigation www.smallboatgps.com
82
Data Fields
Choosing the proper data fields for your primary navigation screen which I hope that I have convinced you is the map screen is key. I will try to give you some initial guidance that you will probably update as you get more familiar with the navigation techniques that I will describe later. How to actually change the data fields I will leave to the owner’s manual and your experimentation. Practically every GPS receiver has a slightly different way of selecting the data fields. Furthermore, many GPS receivers have options to set up how many fields may be displayed. Ideally, you want to know:
1. Which way that you are going, TRACK 2. Which way that you need to go, BEARING or COURSE. 3. How far to the next waypoint. 4. How far off course you are. 5. That you are actually navigating to the next waypoint.
The reason that I cannot simply state which data fields to choose is that the capability varies quite a bit between the various receivers, especially with how many fields can be displayed. Let me start with the baseline of a Garmin GPS III which allows the display of four data fields. I recommend displaying TURN, OFF COURSE, DISTANCE to NEXT, and NEXT WAYPOINT as depicted in Figure 26. The ability to display more fields is better, but the ability to display fewer might still be usable.
Figure 26
TURN: The two most fundamental pieces of data are which way that you are going, TRACK, and which way that you want to go, BEARING or COURSE. For most handheld GPS receivers I suggest that you display TURN. By steering so that TURN is zero, you will track directly to the next waypoint. TURN combines the which way that you are going and the which way that you need to go data into one easy to interpret field. If you are able to display many data fields, then you might eventually also consider displaying TRACK, BEARING, and DISTANCE separately. OFF COURSE allows you to not just navigate directly to the next point, but to along a route line also.
Navigation Displays
Basic GPS Navigation www.smallboatgps.com
83
DISTANCE to NEXT: Obviously your distance to the next point is a useful bit of data. NEXT WAYPOINT: Accurately navigating to the wrong waypoint is considered a navigational faux pas. You must verify that you are indeed navigating to the point you intend.
The variations:
As I said, this is a baseline configuration. If you have sufficient data fields, you may decide to display TRACK, BEARING, and COURSE separately in lieu of or in addition to TURN. Some aviation receivers do not have a TURN field, but offer TKE. Given four data fields such as on the Garmin GPS 400 series, I would just substitute TKE for TURN. There are some slight technique differences in that the TKE only directs you to parallel the course rather than going directly to the next point. If you have a GPS that only allows you to display two data fields, such as the Magellan handheld receivers, then you might choose to only display TURN and DIST depending on your needs. Steering so that TURN is equal to zero should keep you on course. It is critical that you have a way of verifying that you are navigating to the correct waypoint. Some GPS receivers such as the Garmin 76 series do not allow you to select a data field to display the name of the active waypoint. If you are using a Magellan, then you will not want to spend 50% of your data fields on this information. Just make sure that you have the map zoomed out far enough to see the waypoint that you are navigating to. Some of the Garmin aviation GPS receivers such as the 295 and 196 allow you to choose between more data fields or an HSI or RMI. Personally, I am used to the data fields and like the precision. However, HSI or RMI when used in conjunction with the map display instead of in lieu of is still a very powerful navigational interface. Just change the bug to use BEARING rather than TO COURSE! The eTrex Legend, Venture, and Vista only display two user selectable navigation screens. However, by displaying NAV Status you get the name of the next waypoint along with the distance and time along the top of the screen. When you display Data Fields, then you also get two user selectable fields that can be set to TURN and OFF COURSE. In effect, you have five data fields on the map display, two of which are user selectable.
Navigation Displays
Basic GPS Navigation www.smallboatgps.com
84
There are many other useful things that the GPS can tell you in addition to the primary data fields that I have suggested. This is data that you will want often, such as SPEED, ETA at NEXT, ETA at DEST, etc. However, these fields are of secondary importance and to not need to be on your primary navigation screen. Set up one of the other screens to display your favorite secondary data so that you can switch to and back from this screen quickly rather than having to change data fields on your primary screen. A point to consider with a GPS that can display many fields is that too much data may be confusing and the font size suffers. For example, the Garmin 76 can display nine data fields in small font. However, it can also be set to display a maximum of two data fields in very large font. Perhaps a good tradeoff between leftover map size not taken by data fields and readability would be four fields of medium text. Another consideration is that you should try to order the data fields in some layout that seems logical. Since I consider TURN to be most important, I like this high as possible and left is possible as appropriate. It is the first field that I come to when reading the data fields. Next, I like OFF COURSE. This is my preference, but my point is that it helps having a logic to the arrangement.
Two Dimensional Vehicle Navigation
Basic GPS Navigation www.smallboatgps.com
85
Chapter 8 Two Dimensional Vehicle Navigation The best way of navigating with GPS depends on what you are trying to do with it. I have chosen to divide GPS navigation into three different classes: Two dimensional vehicle navigation, two dimensional foot navigation, and path navigation. I have devoted a chapter to each. Path navigation is where you use the GPS to navigate along a predetermined path. Examples of this are navigating along a river, road, or trail. In this case the GPS is not used for steering, but for orientation. Two-dimensional navigation is where there is freedom to steer and the GPS is used for guidance. I further divide this into vehicle and foot navigation. Although I could think of some overlaps, let me explain the difference. What makes GPS unique is that it will give a value for the direction you are traveling, TRACK, as opposed to the direction you are pointing, HEADING. While GPS is not the first navigation equipment to give TRACK, it is the first technology to do so at a price that makes it readily available for a wide variety of users. Boats and airplanes are the primary examples of vehicle navigation in two dimensions as opposed to being confined to a path. In both cases, the direction that the vehicle is pointed may be very different from the direction of travel. Winds and currents cause the vehicle to travel a different direction from the direction that it is pointed. Most navigation techniques have been designed to work around the fact that it has been difficult to directly measure TRACK. While it is possible to use many of these techniques with your GPS, using TRACK is fundamental to fully exploiting GPS to its full potential. For review and emphasis: TRACK is the direction you are moving and HEADING is the direction that you are pointing. Due to winds or water currents, these can be very different. In general, the GPS has no idea what your HEADING is. It is only able to detect your movement, which is TRACK. There is a slight issue in that if you are not moving the GPS has no directional reference. Some GPS receivers compensate for this by including an electronic compass, which is an internal magnetic sensor. Thus, below a certain speed the GPS gives HEADING from the magnetic sensor and above the threshold speed it gives TRACK from the GPS. I don’t dislike built in electronic compasses, it can be a very useful feature. However, if you have one of these GPS receivers, it is very important that you
Two Dimensional Vehicle Navigation
Basic GPS Navigation www.smallboatgps.com
86
know whether you GPS is giving you TRACK or HEADING. The way this usually works is that if the GPS is below a threshold speed for a given amount of time, the GPS starts using the heading from the internal magnetic sensor instead of TRACK from the GPS receiver as the directional reference. This speed threshold can be set in the setup menu. At the time of this writing, 10 miles per hour seems to be a common default setting. I find that TRACK information is useful at much slower speeds such as kayaking speeds. At slower speeds such as kayaking speeds, the effects of current and wind are increased and exploiting TRACK for navigation is even more useful. In such a case I recommend that you lower this threshold speed. There is also a nomenclature issue. TRACK is labeled different things on different receivers. On some receivers it is referred to as COG for Course over Ground. On many receivers, such as the Garmin eTrex series, the data field is labeled HEADING even though the information is actually TRACK. On models with the internal compass feature, the label for the data does not change when the reference switches between HEADING and TRACK although some receivers display a small icon to indicate that the directional information is from the compass sensor rather than the GPS.
When this chapter does not apply: Even if the issue of cross currents and winds is not an issue, there are activities that I would imagine that using GPS navigational techniques base on TRACK are still useful. Although I have never done either, driving across an open desert or snowmobiling across a featureless terrain come to mind. However, there are many times where it is not possible to get a useful value of TRACK. One of the biggest examples that I can think of is hiking. Although it is often possible to use the TRACK as you walk along at a reasonable speed in an area of good satellite reception, it is often the case that TRACK is not useful while hiking. Often the navigating is done while standing still for obvious reasons or hiking is often done in environments where the GPS coverage is intermittent due to blockage by terrain, forests, or buildings. Thus, I have a separate discussion of using GPS for hiking in the Two Dimensional Navigation on foot chapter on page 97.
Technique All of the examples in this chapter use a mapping GPS. The mapping GPS screenshots provide a much better illustration of what is behind the in this book as well as in real life. However, these techniques are certainly not limited to mapping GPS receivers.
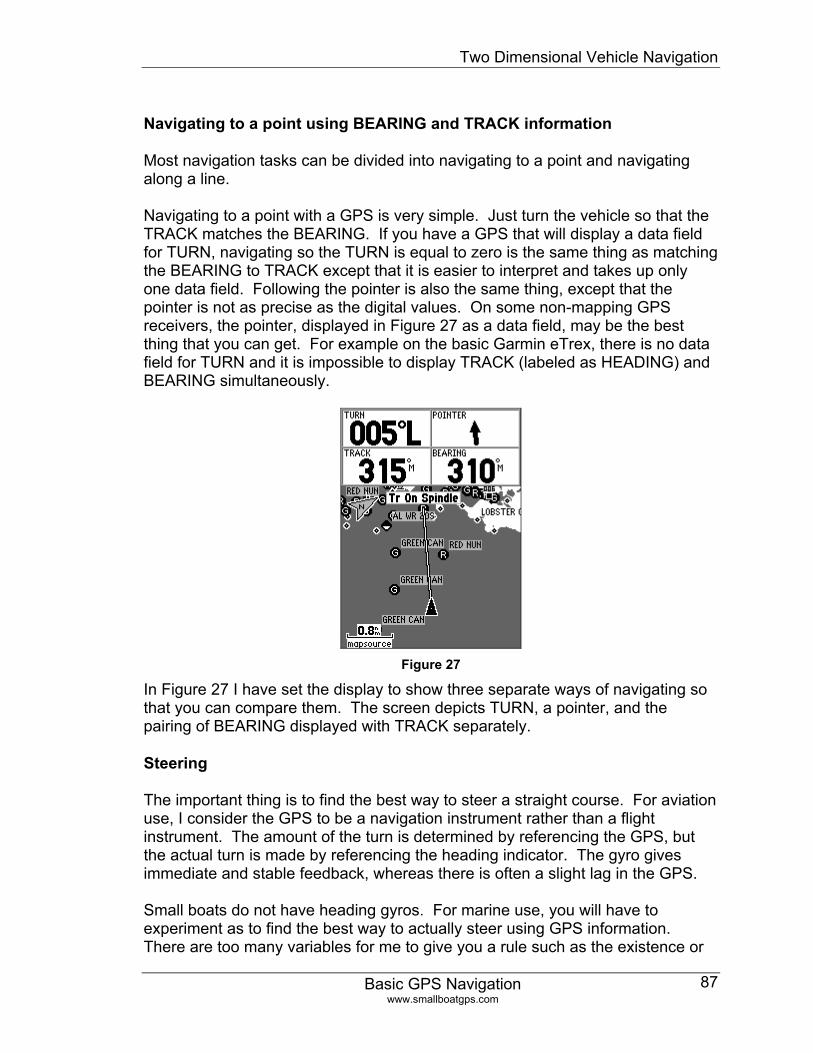
Two Dimensional Vehicle Navigation
Basic GPS Navigation www.smallboatgps.com
87
Navigating to a point using BEARING and TRACK information
Most navigation tasks can be divided into navigating to a point and navigating along a line. Navigating to a point with a GPS is very simple. Just turn the vehicle so that the TRACK matches the BEARING. If you have a GPS that will display a data field for TURN, navigating so the TURN is equal to zero is the same thing as matching the BEARING to TRACK except that it is easier to interpret and takes up only one data field. Following the pointer is also the same thing, except that the pointer is not as precise as the digital values. On some non-mapping GPS receivers, the pointer, displayed in Figure 27 as a data field, may be the best thing that you can get. For example on the basic Garmin eTrex, there is no data field for TURN and it is impossible to display TRACK (labeled as HEADING) and BEARING simultaneously.
Figure 27
In Figure 27 I have set the display to show three separate ways of navigating so that you can compare them. The screen depicts TURN, a pointer, and the pairing of BEARING displayed with TRACK separately.
Steering
The important thing is to find the best way to steer a straight course. For aviation use, I consider the GPS to be a navigation instrument rather than a flight instrument. The amount of the turn is determined by referencing the GPS, but the actual turn is made by referencing the heading indicator. The gyro gives immediate and stable feedback, whereas there is often a slight lag in the GPS. Small boats do not have heading gyros. For marine use, you will have to experiment as to find the best way to actually steer using GPS information. There are too many variables for me to give you a rule such as the existence or
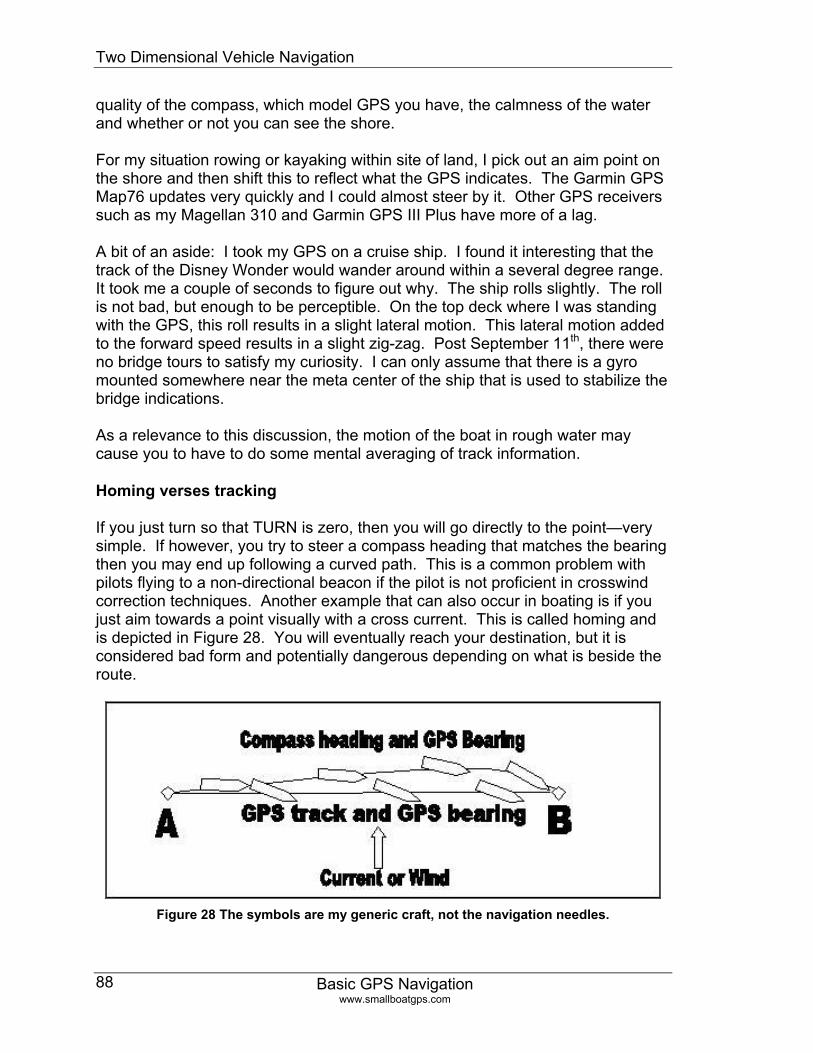
Two Dimensional Vehicle Navigation
Basic GPS Navigation www.smallboatgps.com
88
quality of the compass, which model GPS you have, the calmness of the water and whether or not you can see the shore. For my situation rowing or kayaking within site of land, I pick out an aim point on the shore and then shift this to reflect what the GPS indicates. The Garmin GPS Map76 updates very quickly and I could almost steer by it. Other GPS receivers such as my Magellan 310 and Garmin GPS III Plus have more of a lag. A bit of an aside: I took my GPS on a cruise ship. I found it interesting that the track of the Disney Wonder would wander around within a several degree range. It took me a couple of seconds to figure out why. The ship rolls slightly. The roll is not bad, but enough to be perceptible. On the top deck where I was standing with the GPS, this roll results in a slight lateral motion. This lateral motion added to the forward speed results in a slight zig-zag. Post September 11th, there were no bridge tours to satisfy my curiosity. I can only assume that there is a gyro mounted somewhere near the meta center of the ship that is used to stabilize the bridge indications. As a relevance to this discussion, the motion of the boat in rough water may cause you to have to do some mental averaging of track information.
Homing verses tracking
If you just turn so that TURN is zero, then you will go directly to the point—very simple. If however, you try to steer a compass heading that matches the bearing then you may end up following a curved path. This is a common problem with pilots flying to a non-directional beacon if the pilot is not proficient in crosswind correction techniques. Another example that can also occur in boating is if you just aim towards a point visually with a cross current. This is called homing and is depicted in Figure 28. You will eventually reach your destination, but it is considered bad form and potentially dangerous depending on what is beside the route.
Figure 28 The symbols are my generic craft, not the navigation needles.
Two Dimensional Vehicle Navigation
Basic GPS Navigation www.smallboatgps.com
89
In kayaking, steering with a correction for the cross current as depicted in the GPS path is referred to as “ferry gliding.” One of the implications of the fact that GPS does not suffer from homing when using the technique of matching TRACK to BEARING is that if you get off course either accidentally or purposefully, the shortest distance to the next waypoint is to go directly to the waypoint rather than to re-intercept the original route leg. This is one of the reasons that I do not recommend using the TO COURSE field. If there is no hazard between you and the waypoint – just go direct. If there is a hazard, you will want to choose your own intercept path rather than blindly following the TO COURSE field. There is a caveat to this technique. I was talking to a sailor friend who was saying that many people sailing from Florida to the Bahamas for the first time get caught making very little progress crossing the Gulf Stream. I will defer detailed explanations of how to deal with this problem to appropriate books on boating technique. However, let me at least give you a description of the problem. Let’s take the problem to its limits for illustration. Let’s say that you are trying to cross a 5 knot current in a boat that is only capable of 5 knots due to wind or muscle power. If attempt to track straight across the current, you will only end up pointing into the current and remaining still – you will never get to the other side. If you head (as opposed to track) straight across, you will drift down stream, but you will make it across. This is the same problem as a swimmer in a rip-tide. The trick is to not fight the rip tide, but to swim out of the influence laterally. My initial instinct, open to further analysis and argument, is that for all but the strongest cross currents in the slowest boats, that tracking directly to the waypoint is the most efficient path.
Sighting
The fact that the GPS uses and displays track rather than heading will cause objects not to be where you might think they should be if you do not consider this difference and just looked at the GPS. Figure 29 is a depiction of the same scenario as Figure 28 from the perspective of what you would see looking straight towards the bow of the boat. The GPS map display shows waypoint B straight ahead. However, waypoint B (the lighthouse) appears 20 degrees to the left of the bow. The boat is tracking on a straight line towards B, but the heading is 20 degrees to the right to counteract the current and/or wind.
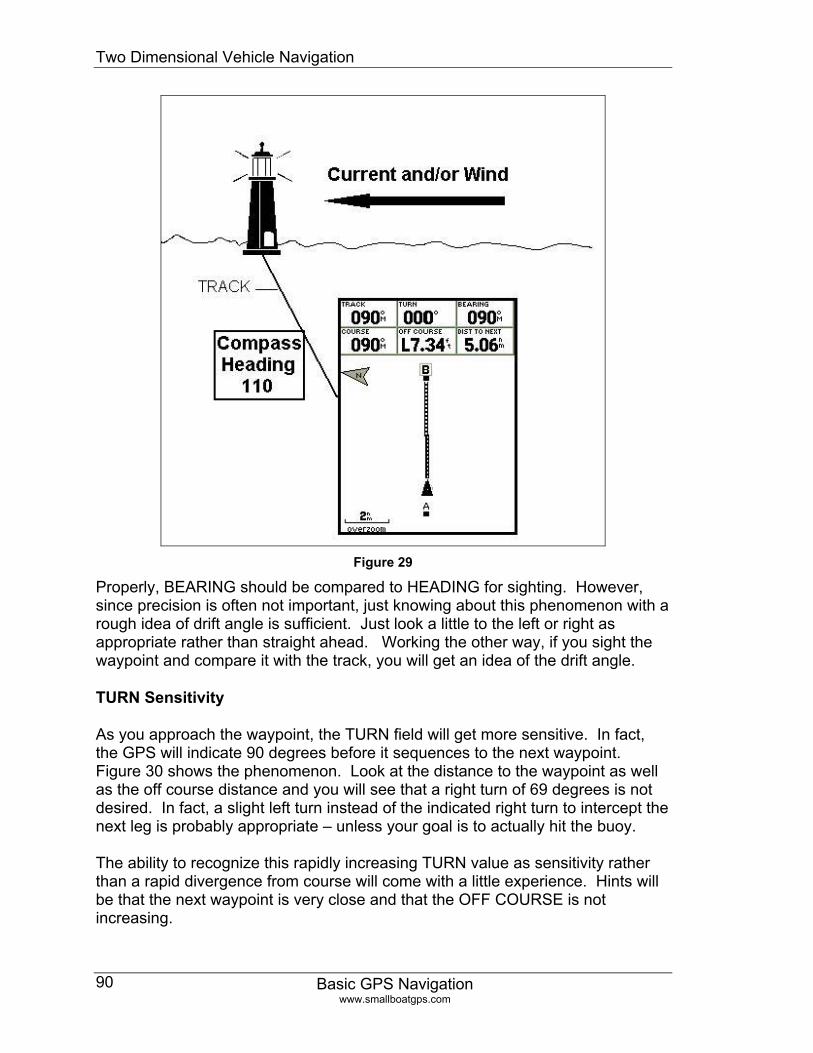
Two Dimensional Vehicle Navigation
Basic GPS Navigation www.smallboatgps.com
90
Figure 29
Properly, BEARING should be compared to HEADING for sighting. However, since precision is often not important, just knowing about this phenomenon with a rough idea of drift angle is sufficient. Just look a little to the left or right as appropriate rather than straight ahead. Working the other way, if you sight the waypoint and compare it with the track, you will get an idea of the drift angle.
TURN Sensitivity
As you approach the waypoint, the TURN field will get more sensitive. In fact, the GPS will indicate 90 degrees before it sequences to the next waypoint. Figure 30 shows the phenomenon. Look at the distance to the waypoint as well as the off course distance and you will see that a right turn of 69 degrees is not desired. In fact, a slight left turn instead of the indicated right turn to intercept the next leg is probably appropriate – unless your goal is to actually hit the buoy. The ability to recognize this rapidly increasing TURN value as sensitivity rather than a rapid divergence from course will come with a little experience. Hints will be that the next waypoint is very close and that the OFF COURSE is not increasing.
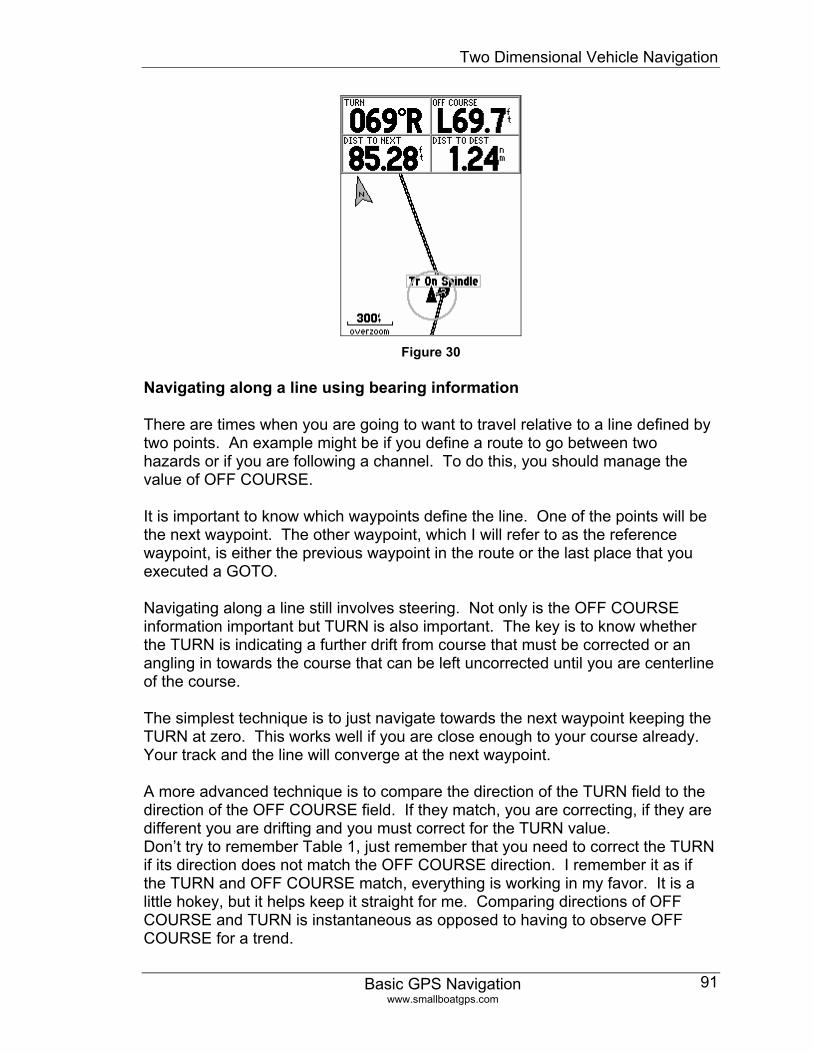
Two Dimensional Vehicle Navigation
Basic GPS Navigation www.smallboatgps.com
91
Figure 30
Navigating along a line using bearing information
There are times when you are going to want to travel relative to a line defined by two points. An example might be if you define a route to go between two hazards or if you are following a channel. To do this, you should manage the value of OFF COURSE. It is important to know which waypoints define the line. One of the points will be the next waypoint. The other waypoint, which I will refer to as the reference waypoint, is either the previous waypoint in the route or the last place that you executed a GOTO. Navigating along a line still involves steering. Not only is the OFF COURSE information important but TURN is also important. The key is to know whether the TURN is indicating a further drift from course that must be corrected or an angling in towards the course that can be left uncorrected until you are centerline of the course. The simplest technique is to just navigate towards the next waypoint keeping the TURN at zero. This works well if you are close enough to your course already. Your track and the line will converge at the next waypoint. A more advanced technique is to compare the direction of the TURN field to the direction of the OFF COURSE field. If they match, you are correcting, if they are different you are drifting and you must correct for the TURN value. Don’t try to remember Table 1, just remember that you need to correct the TURN if its direction does not match the OFF COURSE direction. I remember it as if the TURN and OFF COURSE match, everything is working in my favor. It is a little hokey, but it helps keep it straight for me. Comparing directions of OFF COURSE and TURN is instantaneous as opposed to having to observe OFF COURSE for a trend.
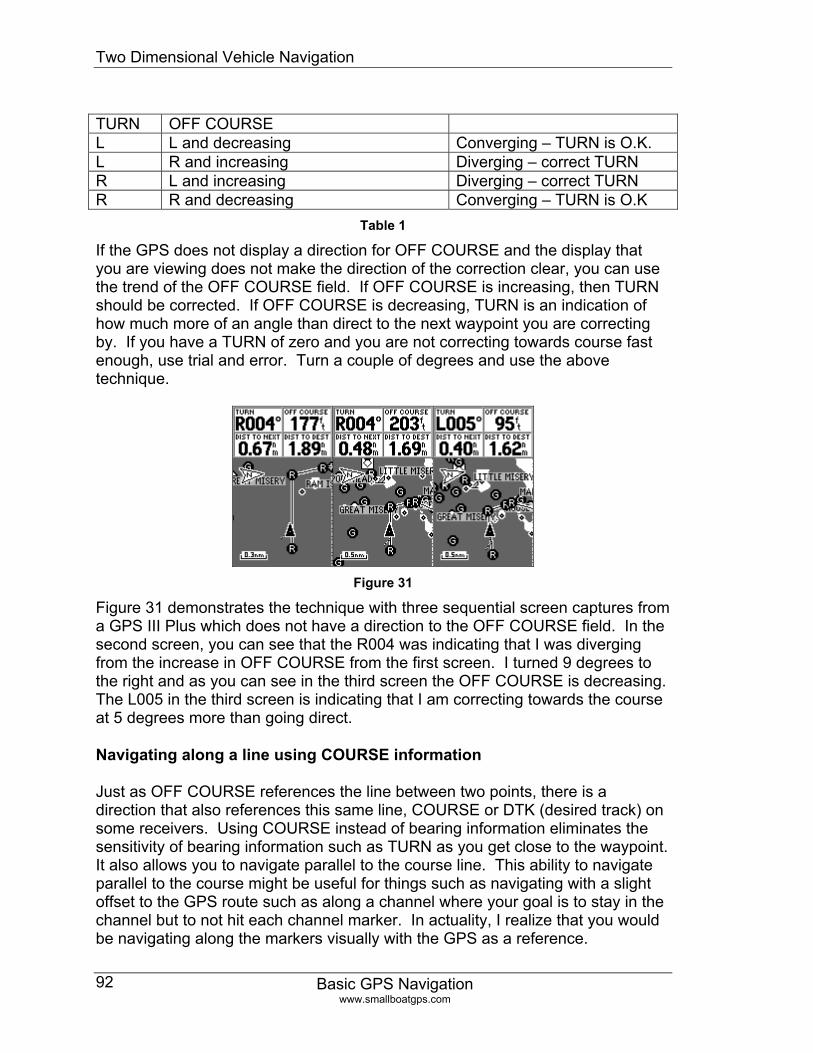
Two Dimensional Vehicle Navigation
Basic GPS Navigation www.smallboatgps.com
92
TURN OFF COURSE L L and decreasing Converging – TURN is O.K. L R and increasing Diverging – correct TURN R L and increasing Diverging – correct TURN R R and decreasing Converging – TURN is O.K
Table 1
If the GPS does not display a direction for OFF COURSE and the display that you are viewing does not make the direction of the correction clear, you can use the trend of the OFF COURSE field. If OFF COURSE is increasing, then TURN should be corrected. If OFF COURSE is decreasing, TURN is an indication of how much more of an angle than direct to the next waypoint you are correcting by. If you have a TURN of zero and you are not correcting towards course fast enough, use trial and error. Turn a couple of degrees and use the above technique.
Figure 31
Figure 31 demonstrates the technique with three sequential screen captures from a GPS III Plus which does not have a direction to the OFF COURSE field. In the second screen, you can see that the R004 was indicating that I was diverging from the increase in OFF COURSE from the first screen. I turned 9 degrees to the right and as you can see in the third screen the OFF COURSE is decreasing. The L005 in the third screen is indicating that I am correcting towards the course at 5 degrees more than going direct.
Navigating along a line using COURSE information
Just as OFF COURSE references the line between two points, there is a direction that also references this same line, COURSE or DTK (desired track) on some receivers. Using COURSE instead of bearing information eliminates the sensitivity of bearing information such as TURN as you get close to the waypoint. It also allows you to navigate parallel to the course line. This ability to navigate parallel to the course might be useful for things such as navigating with a slight offset to the GPS route such as along a channel where your goal is to stay in the channel but to not hit each channel marker. In actuality, I realize that you would be navigating along the markers visually with the GPS as a reference.
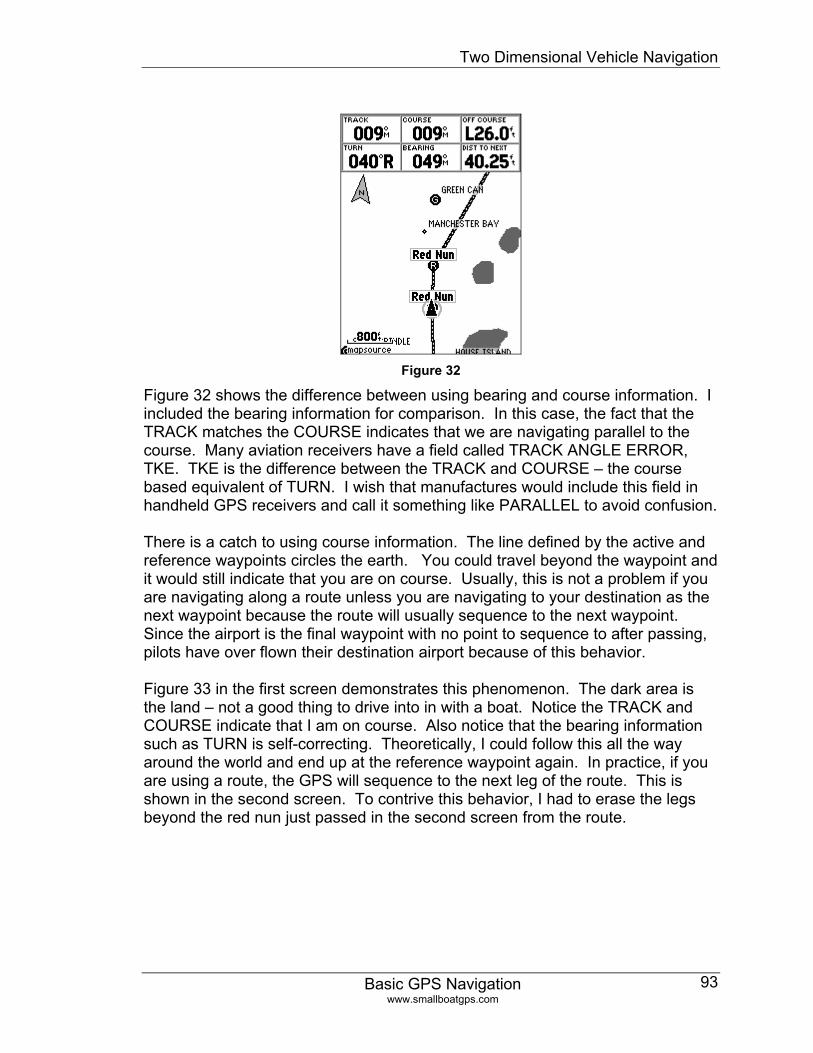
Two Dimensional Vehicle Navigation
Basic GPS Navigation www.smallboatgps.com
93
Figure 32
Figure 32 shows the difference between using bearing and course information. I included the bearing information for comparison. In this case, the fact that the TRACK matches the COURSE indicates that we are navigating parallel to the course. Many aviation receivers have a field called TRACK ANGLE ERROR, TKE. TKE is the difference between the TRACK and COURSE – the course based equivalent of TURN. I wish that manufactures would include this field in handheld GPS receivers and call it something like PARALLEL to avoid confusion. There is a catch to using course information. The line defined by the active and reference waypoints circles the earth. You could travel beyond the waypoint and it would still indicate that you are on course. Usually, this is not a problem if you are navigating along a route unless you are navigating to your destination as the next waypoint because the route will usually sequence to the next waypoint. Since the airport is the final waypoint with no point to sequence to after passing, pilots have over flown their destination airport because of this behavior. Figure 33 in the first screen demonstrates this phenomenon. The dark area is the land – not a good thing to drive into in with a boat. Notice the TRACK and COURSE indicate that I am on course. Also notice that the bearing information such as TURN is self-correcting. Theoretically, I could follow this all the way around the world and end up at the reference waypoint again. In practice, if you are using a route, the GPS will sequence to the next leg of the route. This is shown in the second screen. To contrive this behavior, I had to erase the legs beyond the red nun just passed in the second screen from the route.
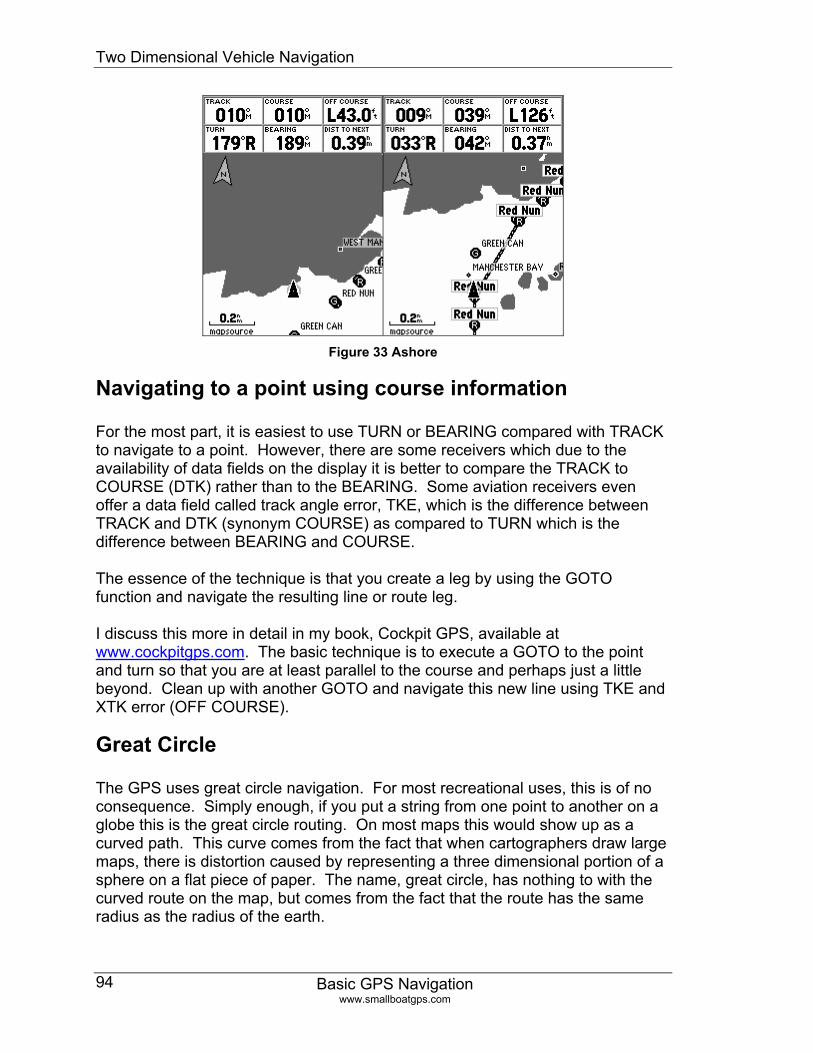
Two Dimensional Vehicle Navigation
Basic GPS Navigation www.smallboatgps.com
94
Figure 33 Ashore
Navigating to a point using course information For the most part, it is easiest to use TURN or BEARING compared with TRACK to navigate to a point. However, there are some receivers which due to the availability of data fields on the display it is better to compare the TRACK to COURSE (DTK) rather than to the BEARING. Some aviation receivers even offer a data field called track angle error, TKE, which is the difference between TRACK and DTK (synonym COURSE) as compared to TURN which is the difference between BEARING and COURSE. The essence of the technique is that you create a leg by using the GOTO function and navigate the resulting line or route leg. I discuss this more in detail in my book, Cockpit GPS, available at www.cockpitgps.com. The basic technique is to execute a GOTO to the point and turn so that you are at least parallel to the course and perhaps just a little beyond. Clean up with another GOTO and navigate this new line using TKE and XTK error (OFF COURSE).
Great Circle The GPS uses great circle navigation. For most recreational uses, this is of no consequence. Simply enough, if you put a string from one point to another on a globe this is the great circle routing. On most maps this would show up as a curved path. This curve comes from the fact that when cartographers draw large maps, there is distortion caused by representing a three dimensional portion of a sphere on a flat piece of paper. The name, great circle, has nothing to with the curved route on the map, but comes from the fact that the route has the same radius as the radius of the earth.
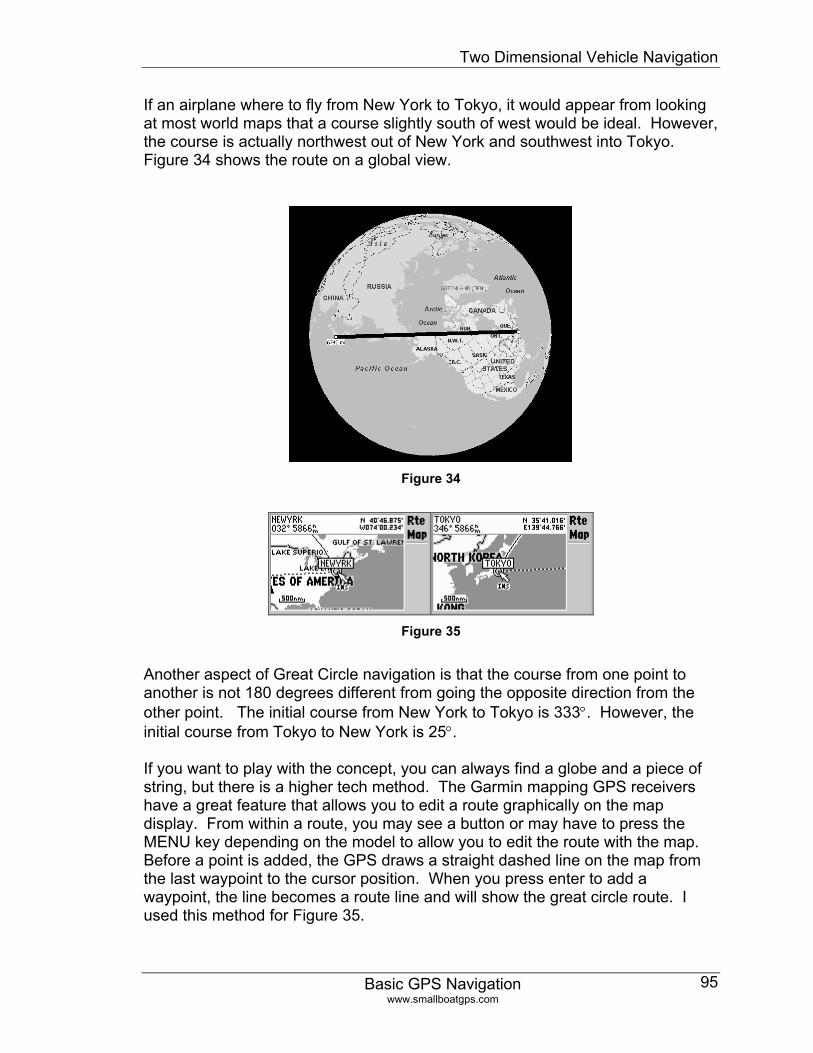
Two Dimensional Vehicle Navigation
Basic GPS Navigation www.smallboatgps.com
95
If an airplane where to fly from New York to Tokyo, it would appear from looking at most world maps that a course slightly south of west would be ideal. However, the course is actually northwest out of New York and southwest into Tokyo. Figure 34 shows the route on a global view.
Figure 34
Figure 35
Another aspect of Great Circle navigation is that the course from one point to another is not 180 degrees different from going the opposite direction from the other point. The initial course from New York to Tokyo is 333°. However, the initial course from Tokyo to New York is 25°. If you want to play with the concept, you can always find a globe and a piece of string, but there is a higher tech method. The Garmin mapping GPS receivers have a great feature that allows you to edit a route graphically on the map display. From within a route, you may see a button or may have to press the MENU key depending on the model to allow you to edit the route with the map. Before a point is added, the GPS draws a straight dashed line on the map from the last waypoint to the cursor position. When you press enter to add a waypoint, the line becomes a route line and will show the great circle route. I used this method for Figure 35.
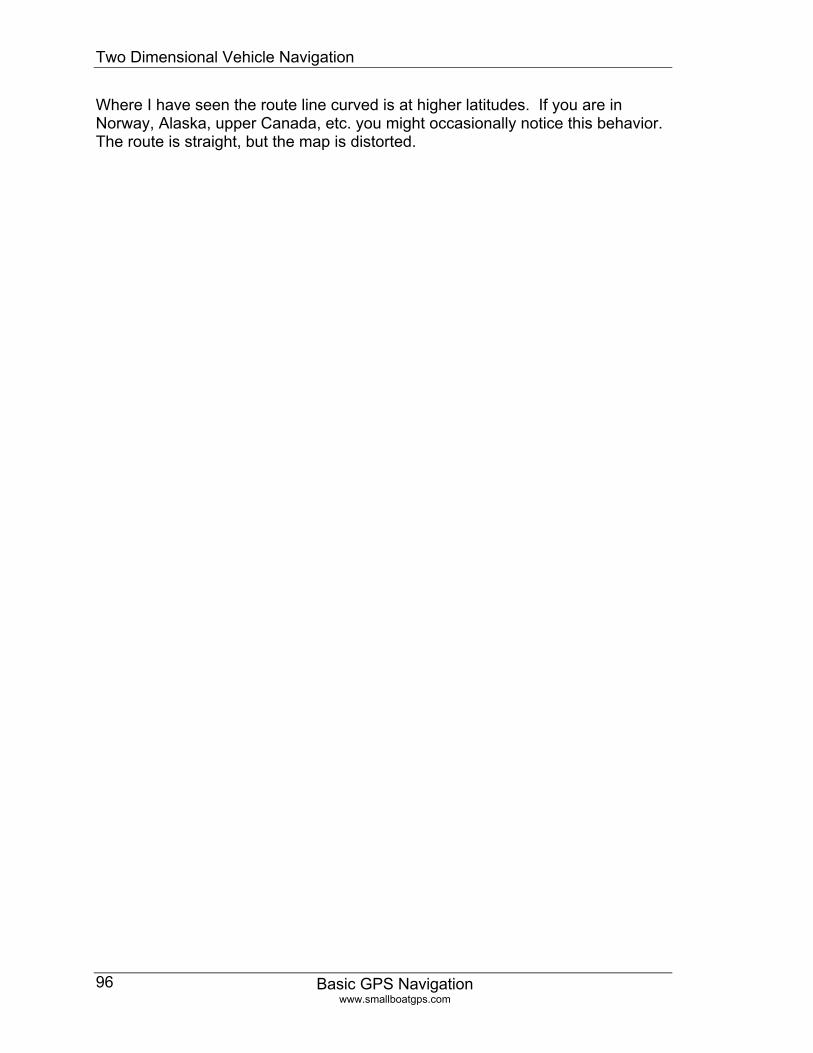
Two Dimensional Vehicle Navigation
Basic GPS Navigation www.smallboatgps.com
96
Where I have seen the route line curved is at higher latitudes. If you are in Norway, Alaska, upper Canada, etc. you might occasionally notice this behavior. The route is straight, but the map is distorted.
Two Dimensional Navigation on foot
Basic GPS Navigation www.smallboatgps.com
97
Chapter 9 Two Dimensional Navigation on foot Warning In no way do I want to give you the impression that a GPS is a replacement for map and compass skills. As with any other activities where you use GPS for navigation, you need to be able to find your way without the GPS.
Which activities does this chapter apply to? A basic GPS orients itself using TRACK. TRACK is just the relatively instantaneous direction of movement. As long as the speed is consistent and above a certain threshold, the techniques that exploit TRACK in the previous chapter are recommended. With the elimination of the errors created by selective availability (page 7) and with a modern 12-channel receiver the speed at which TRACK becomes useful is very low. I find that even at kayaking speeds, the GPS information based on TRACK is useful. Therefore, the techniques in the previous chapter are much more useful. Considering that currents and winds have even a greater effect on a kayak than a faster moving boat, the use of TRACK is a tremendous benefit. The problem with foot navigation is that one is often not moving at a sufficient speed or consistency to use TRACK. Without TRACK, the basic GPS has no directional orientation. Exacerbating the situation is the fact that often foot navigation takes place in places where GPS signal coverage is marginal such as in heavily wooded areas or cities. Even when walking in good GPS coverage, TRACK is determined by the path of the receiver rather than the hiker. A modern GPS is even sensitive enough pick up the motions of arm swing. It is possible to hold the GPS steady while walking in an area of good satellite reception and follow the guidance directly. However, if you are going to use the GPS for hiking in general, especially in wooded areas, it is good to know how to use the GPS without regard to TRACK. This means using a compass or having a GPS with a built in electronic compass. There are borderline activities such as canoeing along a wooded creek or river. In areas of heavy tree cover, the satellite signal may be blocked. Generally, this is not a problem in terms of navigating, but instead it is an irritant in that the ability of the GPS to provide orientation is not constant. In such a case, the need to determine the direction to steer is moot. The actual determination of which way to steer is determined by the banks of the river. About the only boating example that I could think of where track might be useless is poling in a skiff through a heavily wooded swamp – an activity that I have not tried.
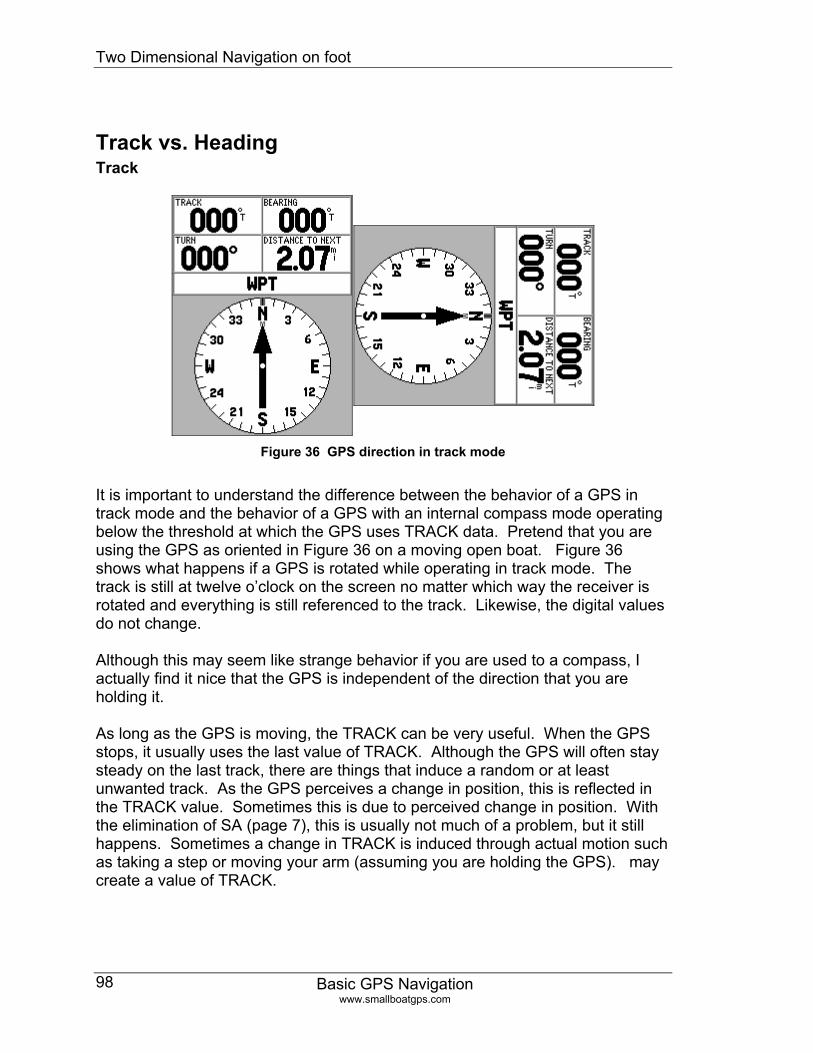
Two Dimensional Navigation on foot
Basic GPS Navigation www.smallboatgps.com
98
Track vs. Heading Track
Figure 36 GPS direction in track mode
It is important to understand the difference between the behavior of a GPS in track mode and the behavior of a GPS with an internal compass mode operating below the threshold at which the GPS uses TRACK data. Pretend that you are using the GPS as oriented in Figure 36 on a moving open boat. Figure 36 shows what happens if a GPS is rotated while operating in track mode. The track is still at twelve o’clock on the screen no matter which way the receiver is rotated and everything is still referenced to the track. Likewise, the digital values do not change. Although this may seem like strange behavior if you are used to a compass, I actually find it nice that the GPS is independent of the direction that you are holding it. As long as the GPS is moving, the TRACK can be very useful. When the GPS stops, it usually uses the last value of TRACK. Although the GPS will often stay steady on the last track, there are things that induce a random or at least unwanted track. As the GPS perceives a change in position, this is reflected in the TRACK value. Sometimes this is due to perceived change in position. With the elimination of SA (page 7), this is usually not much of a problem, but it still happens. Sometimes a change in TRACK is induced through actual motion such as taking a step or moving your arm (assuming you are holding the GPS). may create a value of TRACK.
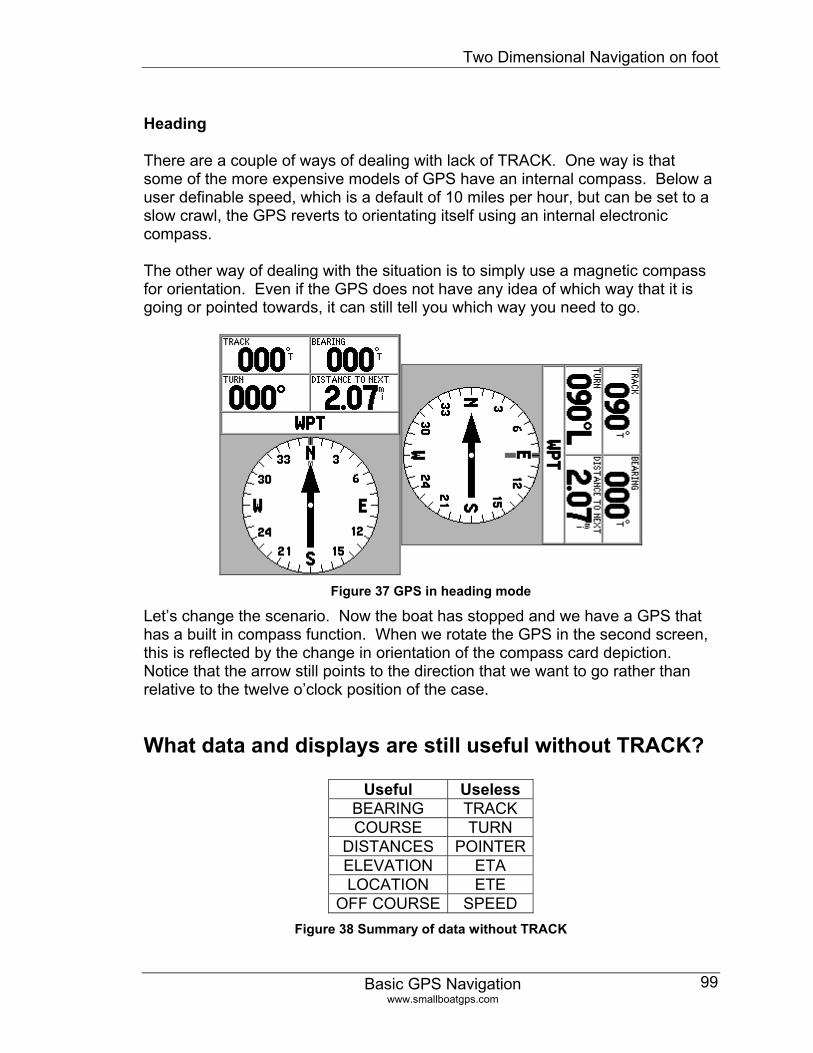
Two Dimensional Navigation on foot
Basic GPS Navigation www.smallboatgps.com
99
Heading
There are a couple of ways of dealing with lack of TRACK. One way is that some of the more expensive models of GPS have an internal compass. Below a user definable speed, which is a default of 10 miles per hour, but can be set to a slow crawl, the GPS reverts to orientating itself using an internal electronic compass. The other way of dealing with the situation is to simply use a magnetic compass for orientation. Even if the GPS does not have any idea of which way that it is going or pointed towards, it can still tell you which way you need to go.
Figure 37 GPS in heading mode
Let’s change the scenario. Now the boat has stopped and we have a GPS that has a built in compass function. When we rotate the GPS in the second screen, this is reflected by the change in orientation of the compass card depiction. Notice that the arrow still points to the direction that we want to go rather than relative to the twelve o’clock position of the case.
What data and displays are still useful without TRACK?
Useful Useless BEARING TRACK COURSE TURN
DISTANCES POINTERELEVATION ETA LOCATION ETE
OFF COURSE SPEED Figure 38 Summary of data without TRACK
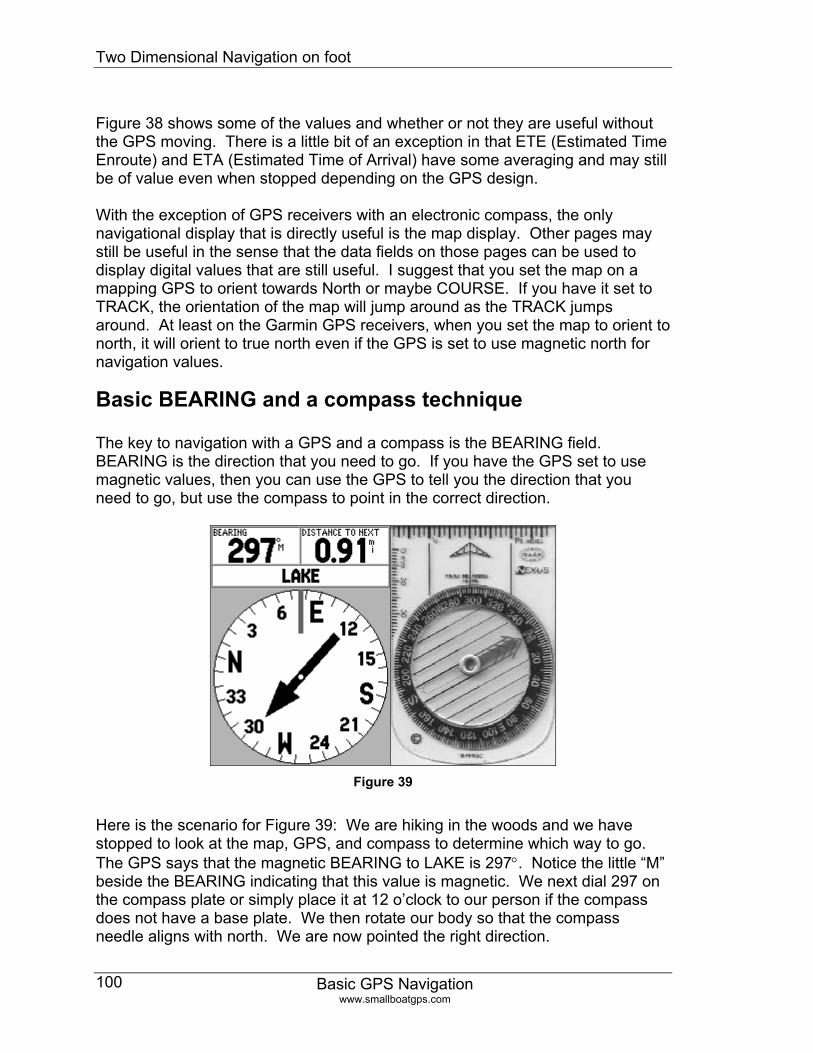
Two Dimensional Navigation on foot
Basic GPS Navigation www.smallboatgps.com
100
Figure 38 shows some of the values and whether or not they are useful without the GPS moving. There is a little bit of an exception in that ETE (Estimated Time Enroute) and ETA (Estimated Time of Arrival) have some averaging and may still be of value even when stopped depending on the GPS design. With the exception of GPS receivers with an electronic compass, the only navigational display that is directly useful is the map display. Other pages may still be useful in the sense that the data fields on those pages can be used to display digital values that are still useful. I suggest that you set the map on a mapping GPS to orient towards North or maybe COURSE. If you have it set to TRACK, the orientation of the map will jump around as the TRACK jumps around. At least on the Garmin GPS receivers, when you set the map to orient to north, it will orient to true north even if the GPS is set to use magnetic north for navigation values.
Basic BEARING and a compass technique The key to navigation with a GPS and a compass is the BEARING field. BEARING is the direction that you need to go. If you have the GPS set to use magnetic values, then you can use the GPS to tell you the direction that you need to go, but use the compass to point in the correct direction.
Figure 39
Here is the scenario for Figure 39: We are hiking in the woods and we have stopped to look at the map, GPS, and compass to determine which way to go. The GPS says that the magnetic BEARING to LAKE is 297°. Notice the little “M” beside the BEARING indicating that this value is magnetic. We next dial 297 on the compass plate or simply place it at 12 o’clock to our person if the compass does not have a base plate. We then rotate our body so that the compass needle aligns with north. We are now pointed the right direction.
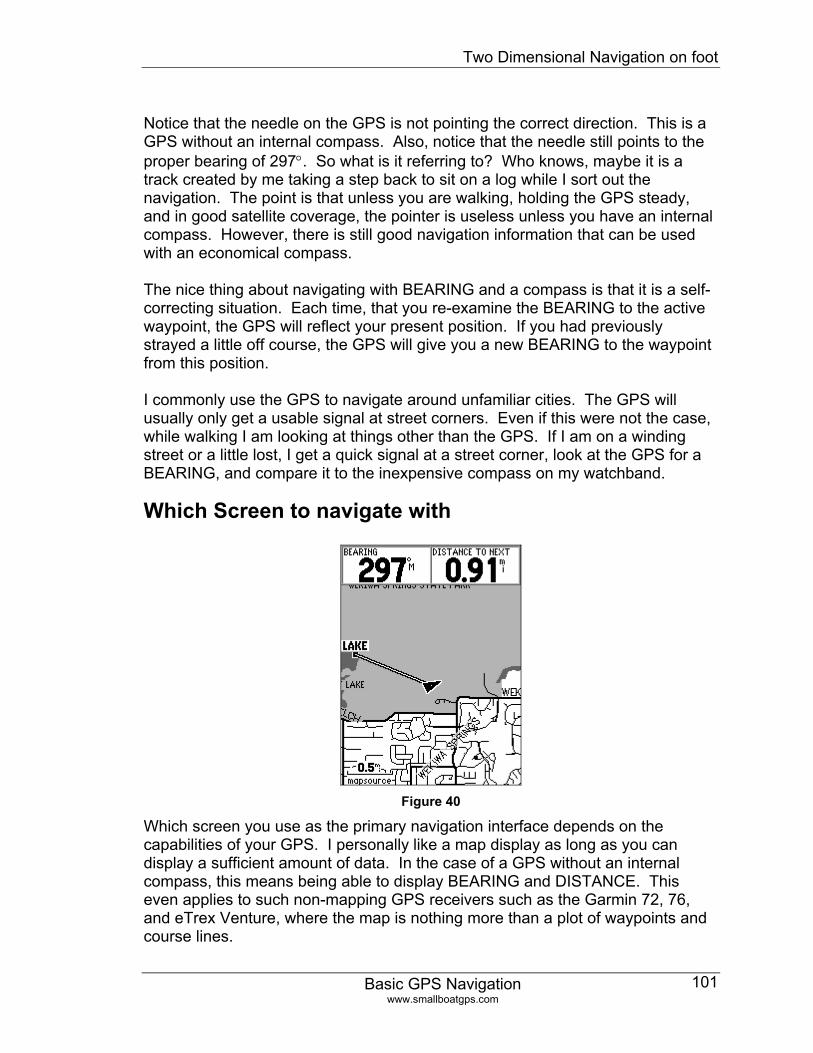
Two Dimensional Navigation on foot
Basic GPS Navigation www.smallboatgps.com
101
Notice that the needle on the GPS is not pointing the correct direction. This is a GPS without an internal compass. Also, notice that the needle still points to the proper bearing of 297°. So what is it referring to? Who knows, maybe it is a track created by me taking a step back to sit on a log while I sort out the navigation. The point is that unless you are walking, holding the GPS steady, and in good satellite coverage, the pointer is useless unless you have an internal compass. However, there is still good navigation information that can be used with an economical compass. The nice thing about navigating with BEARING and a compass is that it is a self-correcting situation. Each time, that you re-examine the BEARING to the active waypoint, the GPS will reflect your present position. If you had previously strayed a little off course, the GPS will give you a new BEARING to the waypoint from this position. I commonly use the GPS to navigate around unfamiliar cities. The GPS will usually only get a usable signal at street corners. Even if this were not the case, while walking I am looking at things other than the GPS. If I am on a winding street or a little lost, I get a quick signal at a street corner, look at the GPS for a BEARING, and compare it to the inexpensive compass on my watchband.
Which Screen to navigate with
Figure 40
Which screen you use as the primary navigation interface depends on the capabilities of your GPS. I personally like a map display as long as you can display a sufficient amount of data. In the case of a GPS without an internal compass, this means being able to display BEARING and DISTANCE. This even applies to such non-mapping GPS receivers such as the Garmin 72, 76, and eTrex Venture, where the map is nothing more than a plot of waypoints and course lines.
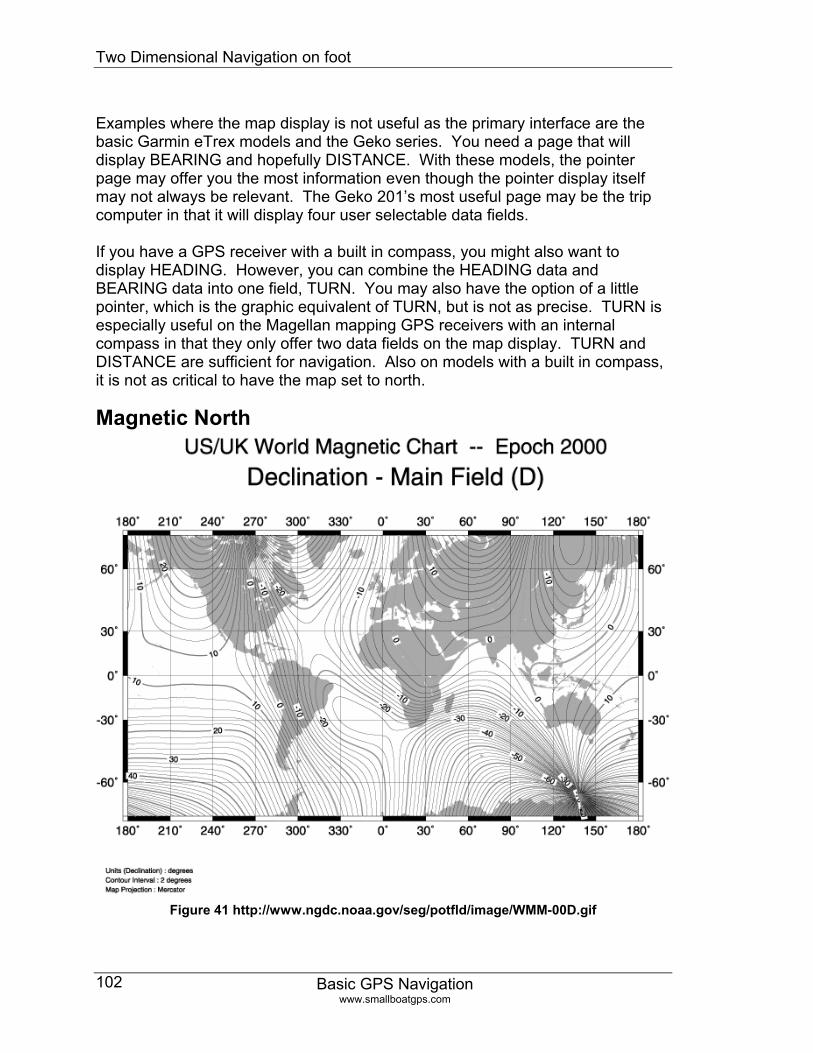
Two Dimensional Navigation on foot
Basic GPS Navigation www.smallboatgps.com
102
Examples where the map display is not useful as the primary interface are the basic Garmin eTrex models and the Geko series. You need a page that will display BEARING and hopefully DISTANCE. With these models, the pointer page may offer you the most information even though the pointer display itself may not always be relevant. The Geko 201’s most useful page may be the trip computer in that it will display four user selectable data fields. If you have a GPS receiver with a built in compass, you might also want to display HEADING. However, you can combine the HEADING data and BEARING data into one field, TURN. You may also have the option of a little pointer, which is the graphic equivalent of TURN, but is not as precise. TURN is especially useful on the Magellan mapping GPS receivers with an internal compass in that they only offer two data fields on the map display. TURN and DISTANCE are sufficient for navigation. Also on models with a built in compass, it is not as critical to have the map set to north.
Magnetic North
Figure 41 http://www.ngdc.noaa.gov/seg/potfld/image/WMM-00D.gif
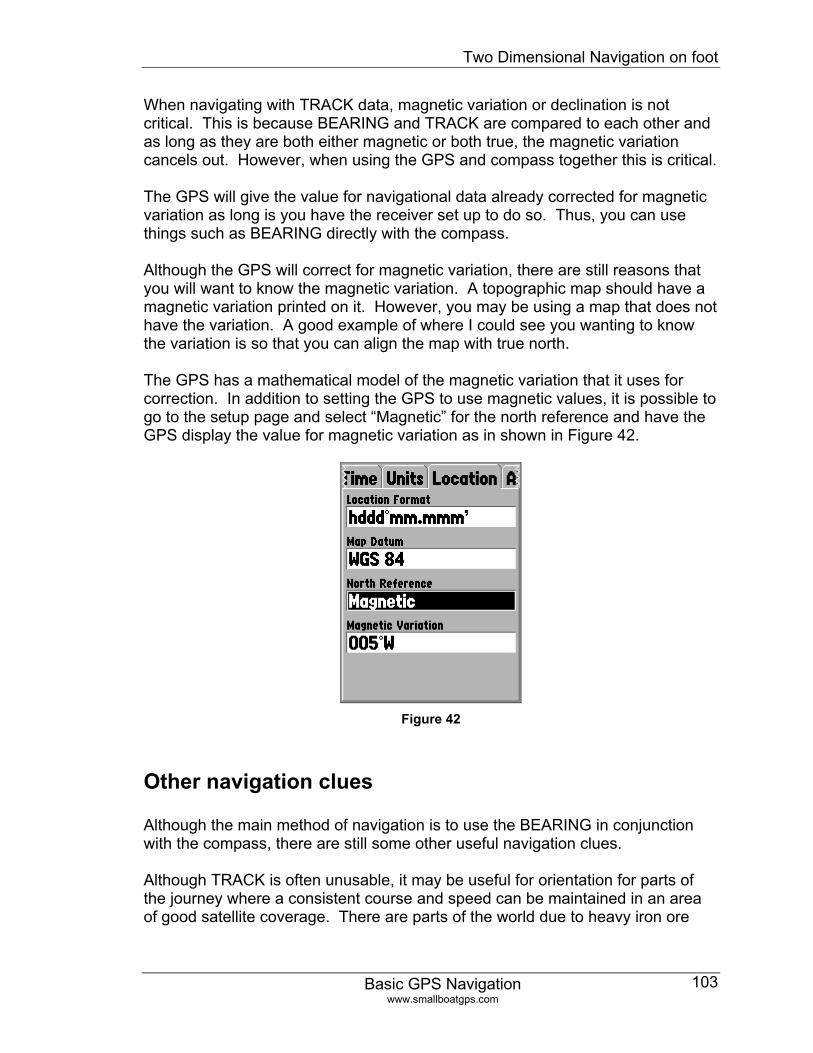
Two Dimensional Navigation on foot
Basic GPS Navigation www.smallboatgps.com
103
When navigating with TRACK data, magnetic variation or declination is not critical. This is because BEARING and TRACK are compared to each other and as long as they are both either magnetic or both true, the magnetic variation cancels out. However, when using the GPS and compass together this is critical. The GPS will give the value for navigational data already corrected for magnetic variation as long is you have the receiver set up to do so. Thus, you can use things such as BEARING directly with the compass. Although the GPS will correct for magnetic variation, there are still reasons that you will want to know the magnetic variation. A topographic map should have a magnetic variation printed on it. However, you may be using a map that does not have the variation. A good example of where I could see you wanting to know the variation is so that you can align the map with true north. The GPS has a mathematical model of the magnetic variation that it uses for correction. In addition to setting the GPS to use magnetic values, it is possible to go to the setup page and select “Magnetic” for the north reference and have the GPS display the value for magnetic variation as in shown in Figure 42.
Figure 42
Other navigation clues Although the main method of navigation is to use the BEARING in conjunction with the compass, there are still some other useful navigation clues. Although TRACK is often unusable, it may be useful for orientation for parts of the journey where a consistent course and speed can be maintained in an area of good satellite coverage. There are parts of the world due to heavy iron ore
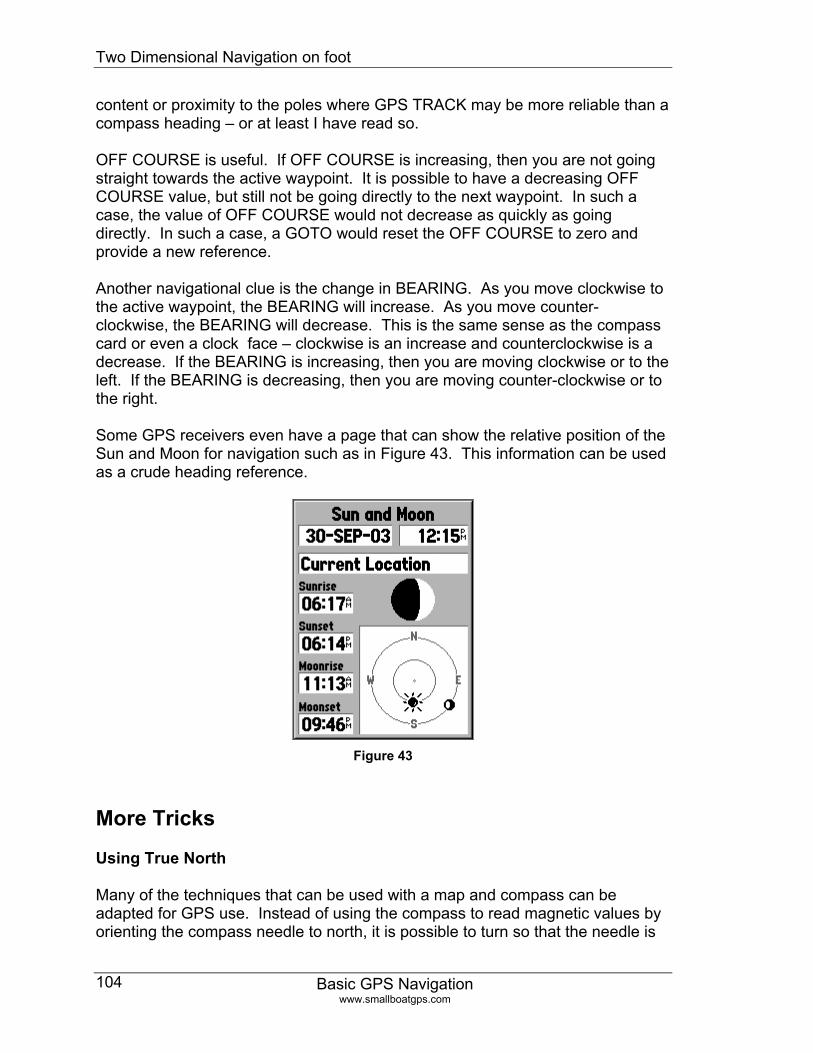
Two Dimensional Navigation on foot
Basic GPS Navigation www.smallboatgps.com
104
content or proximity to the poles where GPS TRACK may be more reliable than a compass heading – or at least I have read so. OFF COURSE is useful. If OFF COURSE is increasing, then you are not going straight towards the active waypoint. It is possible to have a decreasing OFF COURSE value, but still not be going directly to the next waypoint. In such a case, the value of OFF COURSE would not decrease as quickly as going directly. In such a case, a GOTO would reset the OFF COURSE to zero and provide a new reference. Another navigational clue is the change in BEARING. As you move clockwise to the active waypoint, the BEARING will increase. As you move counter-clockwise, the BEARING will decrease. This is the same sense as the compass card or even a clock face – clockwise is an increase and counterclockwise is a decrease. If the BEARING is increasing, then you are moving clockwise or to the left. If the BEARING is decreasing, then you are moving counter-clockwise or to the right. Some GPS receivers even have a page that can show the relative position of the Sun and Moon for navigation such as in Figure 43. This information can be used as a crude heading reference.
Figure 43
More Tricks
Using True North
Many of the techniques that can be used with a map and compass can be adapted for GPS use. Instead of using the compass to read magnetic values by orienting the compass needle to north, it is possible to turn so that the needle is
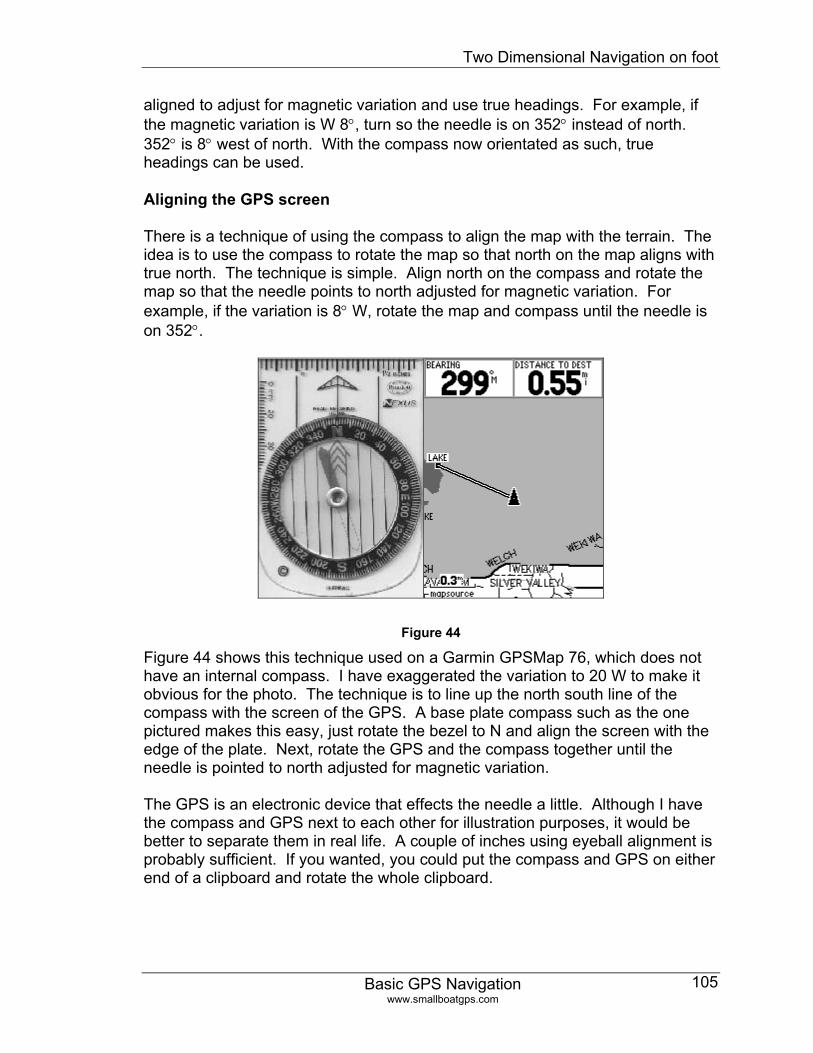
Two Dimensional Navigation on foot
Basic GPS Navigation www.smallboatgps.com
105
aligned to adjust for magnetic variation and use true headings. For example, if the magnetic variation is W 8°, turn so the needle is on 352° instead of north. 352° is 8° west of north. With the compass now orientated as such, true headings can be used.
Aligning the GPS screen
There is a technique of using the compass to align the map with the terrain. The idea is to use the compass to rotate the map so that north on the map aligns with true north. The technique is simple. Align north on the compass and rotate the map so that the needle points to north adjusted for magnetic variation. For example, if the variation is 8° W, rotate the map and compass until the needle is on 352°.
Figure 44
Figure 44 shows this technique used on a Garmin GPSMap 76, which does not have an internal compass. I have exaggerated the variation to 20 W to make it obvious for the photo. The technique is to line up the north south line of the compass with the screen of the GPS. A base plate compass such as the one pictured makes this easy, just rotate the bezel to N and align the screen with the edge of the plate. Next, rotate the GPS and the compass together until the needle is pointed to north adjusted for magnetic variation. The GPS is an electronic device that effects the needle a little. Although I have the compass and GPS next to each other for illustration purposes, it would be better to separate them in real life. A couple of inches using eyeball alignment is probably sufficient. If you wanted, you could put the compass and GPS on either end of a clipboard and rotate the whole clipboard.
Two Dimensional Navigation on foot
Basic GPS Navigation www.smallboatgps.com
106
Triangulation
A common application of the compass is in triangulating a position. The GPS will give positions in a variety of coordinate systems. This is useful only as long as you have a map with a grid. The GPS can also be used for triangulation so that you can locate yourself on maps with no grid. Unlike the compass, the GPS is not limited to objects you can see. I cover this in more detail in the Using Maps with an unknown or no grid chapter on page 127.
Foot navigation for the urban tourist I make no claims of being a great outdoorsman. However, I often use the techniques in this chapter for navigating around European cities on layovers. Overall, I find that the key to finding the GPS useful for navigation around a city is low expectations. The problem with GPS is that the signal is easily blocked by buildings. You will probably be able to get a satellite fix as you walk down a wide boulevard. However, forget about picking up a satellite fix while walking down those quaint side streets of Europe. For that matter, satellite reception is also a problem in a place like New York City where the streets may be wide, but the buildings are tall. Thus, the angle of sky view is still small. The compass and map are still the most valuable navigation tools for finding your way around a city. However, in spite of its limitations, I still find the GPS to be tremendously useful while I tour an unfamiliar city on foot. I leave the GPS on and when I come to a reasonable large street corner I am usually able to get a satellite position. Since I use a GPS that does not have a built in compass, I refer to a compass to orient my direction. I use a very inexpensive watchband compass. The streets are usually labeled and I do not need to find a precise heading, but to make the proper choice between opposite directions. Thus, a compass heading within 90 degrees is theoretically sufficient. I still use a map. The maps that I usually use are either the inexpensive ones from tourist offices or the free ones from the hotel. It is usually much easier to initially plan a route on the map than to use the small screen of the GPS. This is often true even if you program a more detailed route into your GPS beyond a simple GOTO the destination. To most people, the GPS looks like a cell phone. I still have to stop and look at a map occasionally, but for the most part I can walk along without looking like as much of a tourist as I might otherwise appear.
Two Dimensional Navigation on foot
Basic GPS Navigation www.smallboatgps.com
107
Equipment
I use the Garmin eTrex Legend with European Roads and Recreation maps. Every choice of a GPS model is a compromise. The 8MB of the Legend is plenty to load two cities worth of Roads and Recreation maps into. If I get the Legend stolen such as through pick pocketing, I will be able to replace it for $150 and can upload the Roads and Recreation maps into the new GPS because unlike City Select, their is no unlock code keyed to the specific GPS. This is the best match of my parameters to my budget. However, there are many other solutions. I think that the Garmin 76 CS or 60 CS with the European City Select would probably be the ideal GPS solution for foot navigation in the European cities that I lay over. This is considering memory capacity, compass sensor, color screen, size, ruggedness, and battery life. At the time of this writing, this combination is about $700. Not that it is not worth it, but I find that the Legend and European Roads and recreation is sufficient in the context of my personal needs and budget. Also a novel solution is the idea of city guides loaded into a PDA with GPS support. One of the interesting solutions that I have come across are the Lonely Planet travel guides from www.gate5.de. It is also possible to go to the lower end of the spectrum and use a non-mapping GPS. The problem with this it is more difficult to get the location of the desired destination. However, using some of the sources I discuss in the Waypoints chapter or the Using Maps with an unknown or no grid chapter it is possible to use an inexpensive non-mapping GPS.
Finding Points of Interest
I will use the Garmin GPS Map 76 with European Roads and Recreation software. However the discussion in various degrees applies to other models and manufactures. addendum: Since I initially wrote this, I purchased a Garmin Vista C. Many of the newer Garmin GPS receivers allow you to search for points of interest containing a term in addition to searching by name. If you are using one of these newer receivers, this is a very nice fix to the next issue. Laying over in Rome, I wanted see Saint Peter’s Basilica (where I was denied entrance for wearing shorts). It is not as simple to look up on the GPS as you might think. The name is not found by looking up “Saint Peter”, but is under “B” for “Basilica Di San Pietro”. Sacre Coeur in Paris is Basilique Du Sacre-Coeur, Trevi fountain is Fountana Di Trevi, etc.
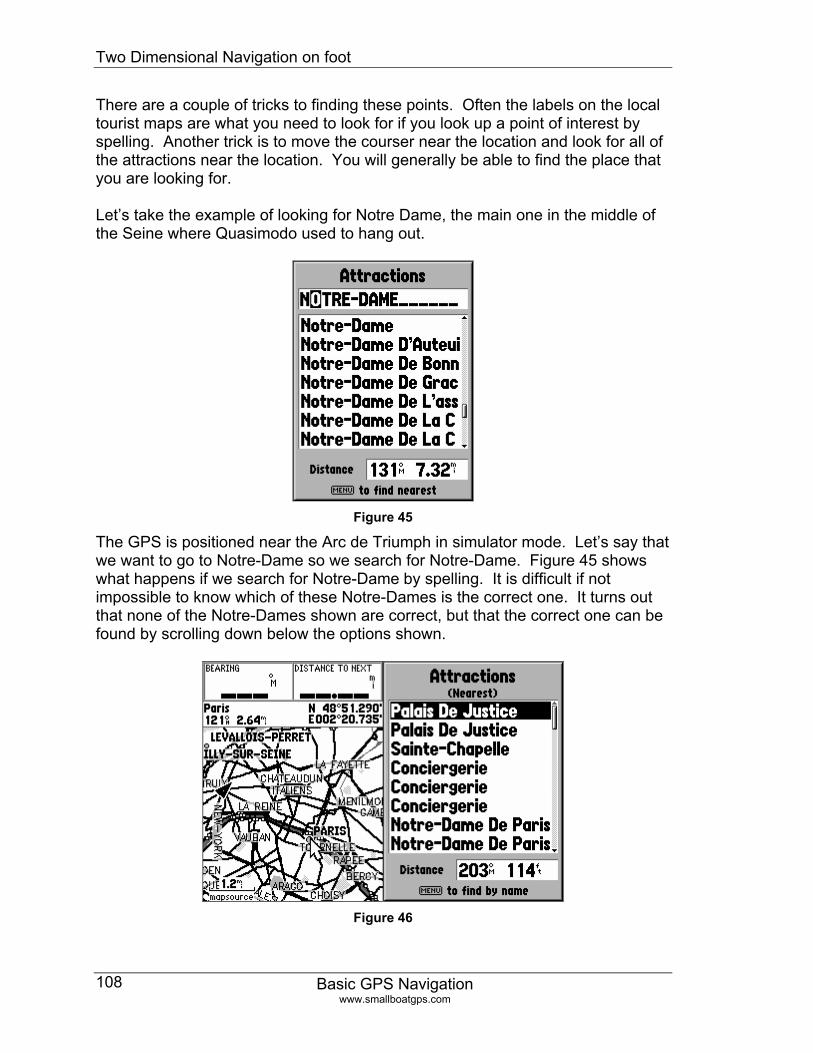
Two Dimensional Navigation on foot
Basic GPS Navigation www.smallboatgps.com
108
There are a couple of tricks to finding these points. Often the labels on the local tourist maps are what you need to look for if you look up a point of interest by spelling. Another trick is to move the courser near the location and look for all of the attractions near the location. You will generally be able to find the place that you are looking for. Let’s take the example of looking for Notre Dame, the main one in the middle of the Seine where Quasimodo used to hang out.
Figure 45
The GPS is positioned near the Arc de Triumph in simulator mode. Let’s say that we want to go to Notre-Dame so we search for Notre-Dame. Figure 45 shows what happens if we search for Notre-Dame by spelling. It is difficult if not impossible to know which of these Notre-Dames is the correct one. It turns out that none of the Notre-Dames shown are correct, but that the correct one can be found by scrolling down below the options shown.
Figure 46
Two Dimensional Navigation on foot
Basic GPS Navigation www.smallboatgps.com
109
One of the best tricks that I have found is to move the cursor to the approximate area where the landmark is supposed to be and search for landmarks near the cursor. Figure 46 shows the search for Notre-Dame using this technique. Using a tourist map or some general knowledge it is possible to move the cursor to the general location of Notre Dame. It is pretty easy to locate being on an island in the middle of the Seine. To find a location near the cursor with the Garmin GPS Map 76:
First move the cursor to the desired location with the touch pad to the desired location -> NAV button -> Go To Point -> Points of Interest -> Attractions -> All Types -> if necessary: (MENU button -> Find Nearest).
To find the location near the cursor with the Garmin eTrex Legend or Vista:
Use the Click Stick to move to and select the second box from the upper right corner of the screen. Select Pan Map -> move the cursor to the approximate location -> Press the FIND button (bottom button on the left of the case -> Points of Interest -> Near Map Pointer -> Attractions -> All Types. There is a nice feature of the Legend series in that if you select the local menu (second from upper right box) you can add this point to your favorites. You can then access your favorites by pressing the FIND key and selecting Favorites instead of Points of Interest.
Routes
Usually a simple GOTO is sufficient. When I have a satellite lock, I can use the bearing and distance along with a simple compass to know that I am still going the right direction and that I have not passed the destination. Certainly, I can still refer to a paper map and even ask directions. The GPS is one more tool. A GPS loaded with the appropriate maps that supports auto routing would be ideal. However, on the Garmin mapping receivers it is possible to drag and drop the route to intersections along the way. The easiest method that I have found is to create a route consisting of two points which can be looked up such as the name of a hotel and the name of the destination. I then select “edit on map” and drag the route to significant intersections along the way. Move the cursor to the route until it becomes a dash line, press ENTER or click on the Click Stick, now drag the route to an intermediate point and press ENTER or click on the Click Stick again. The route will consist of straight lines between the intersections rather than conforming to the road, but this may still be useful. This is one of those features that is more complicated to explain than it is to use after playing with it for a few minutes.
Two Dimensional Navigation on foot
Basic GPS Navigation www.smallboatgps.com
110
With other brands of GPS, it is usually possible to use the map display to mark waypoints and incorporate them into a route.
Navigating
So now that I have found and selected a GOTO the proper Point of Interest, I can set out. I put on my sunglasses, my best disinterested look, and stuff the minimum I.D., ATM card, and some cash into my travel wallet which I keep in an undisclosed location. If I am walking along a wide street, I can look at the GPS to see my progress. The position indicator should line up roughly with the street, which should match the BEARING line. Since there are many times that I will not be able to keep a satellite lock, I keep the map display oriented to North and display the BEARING data field. If I get disoriented, I can usually get a good position fix at an intersection. I look at my watchband compass and can usually decide whether to turn or go straight or in some cases, which of the intersecting streets to take. This is where I think that an auto-routing GPS with the compass sensor would be ideal. The GPS can orient itself as well as calculating which street to take – taking into account all of the turns along subsequent streets to get to the destination. Most of the auto-routing Garmin receivers that I am familiar with have an option for choosing the type of automatic route calculations, pedestrian being one of the options. Usually, this process takes a couple of moments. However, it is more discreet than pulling out a big map. Although sometimes pulling out the map is best. I will even admit that I have even asked directions, but this is rare.
More information on using a Map and Compass The map and compass have been around for a long time and a good-sized body of literature has been created on navigating with a map and compass. There are several books available and I have several internet links in the Links and Further Reading chapter under Map and Compass Information on page 168.
Routes
Basic GPS Navigation www.smallboatgps.com
111
Chapter 10 Routes
Warning: Since routes consist of waypoints, I have already discussed at length the issue of the appropriateness of different data sources including the GPS itself in the Waypoints chapter on page 53. Essentially, I feel that the GPS itself or mapping software is a good way of reducing measurement and input errors and provides excellent situational awareness even if it is not application specific such as being a marine cartography product. However, in many such cases the amount of information available is insufficient and you should use the proper nautical chart for trip planning. The nautical charts will offer the data on depths, hazards, currents, and etc. that the mapping GPS or mapping software lacks.
What is a route? Routes are just a sequence of waypoints. Once you are past one waypoint, the next waypoint will be navigated to. Whether you navigate each leg as a line or navigate directly to the next waypoint is a matter of circumstance. For example, if you are navigating a channel, the OFF COURSE value will be important. If you are navigating from a point on one lake to a point a couple of lakes away in a chain you will want to navigate directly from point to point. You can mark a point at the mouth of each canal or creek connecting the lakes. After getting into the next lake, you only care about navigating as directly as possible to the entry to the next lake rather than how far you are laterally from the route. If you are navigating a river, bearing and track information might not even be important because the navigating will essentially be one-dimensional. I address this as Path Navigation on page122. Routes are reasonably straightforward conceptually. However, there are several tricks and caveats.
First leg uses the second waypoint Another important thing to note is that when you activate a route, the first waypoint being navigated to will actually be the second waypoint in the route. This is logical after you understand what the GPS is doing. Let’s say that you are navigating on a route from A to B to C to D. When you first activate the route, the GPS will assume that the first leg is A to B. B is the waypoint being navigated to and A is the anchor point that defines the first leg of the route. There are two simple ways around this. Either include the origin or some other reference point in the route or execute a GOTO to the first waypoint. On some
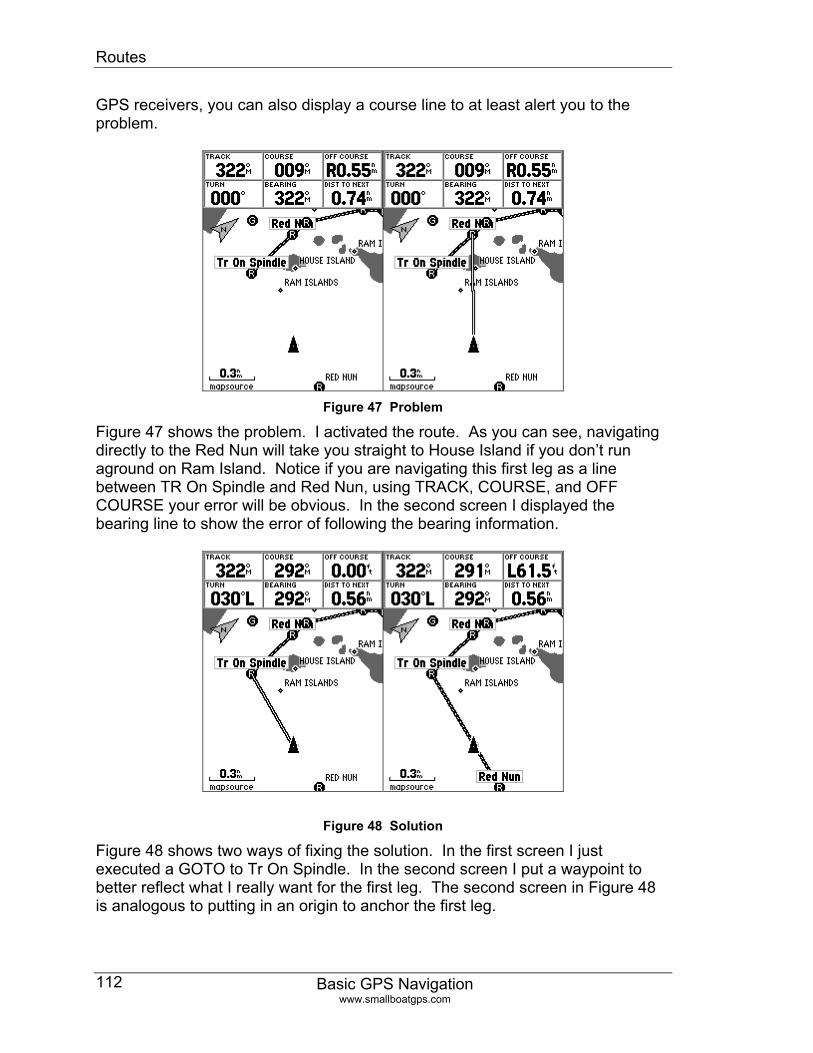
Routes
Basic GPS Navigation www.smallboatgps.com
112
GPS receivers, you can also display a course line to at least alert you to the problem.
Figure 47 Problem
Figure 47 shows the problem. I activated the route. As you can see, navigating directly to the Red Nun will take you straight to House Island if you don’t run aground on Ram Island. Notice if you are navigating this first leg as a line between TR On Spindle and Red Nun, using TRACK, COURSE, and OFF COURSE your error will be obvious. In the second screen I displayed the bearing line to show the error of following the bearing information.
Figure 48 Solution
Figure 48 shows two ways of fixing the solution. In the first screen I just executed a GOTO to Tr On Spindle. In the second screen I put a waypoint to better reflect what I really want for the first leg. The second screen in Figure 48 is analogous to putting in an origin to anchor the first leg.
Routes
Basic GPS Navigation www.smallboatgps.com
113
Evaluating routes When you evaluate the route for things like distances and courses along each waypoint, make sure that the route is not activated. If the route is activated, distances will be based on the present position of the GPS rather than from the first point of the route.
Waypoint and leg sequencing Usually the GPS will sequence to the next waypoint and leg with no problem. However, I have seen it occasionally not do so. This usually seems to happen when a route is intercepted at a point beyond the first leg. However, even then I find that it usually works. As you pass each waypoint, the GPS should sequence to the next waypoint and leg. I really do not know how the GPS sequences to the next leg. I have read that some older GPS receivers require you to pass within a certain distance of the active waypoint in order for it to sequence. Most of the Garmin units seem to calculate which leg is closer. If the GPS does not sequence properly, the easiest thing is to do is to reactivate the route. This varies from receiver to receiver. On most receivers you will have to go through the route list and reactivate it. On some receivers, you might have to de-activate the route before you can reactivate it. Here are some examples of how this is done.
• Garmin GPS III: Press the MENU button from within the active route and select “Re-evaluate.”
• Garmin GPS 76: Press the NAV button and then select NAVIGATE ROUTE and re-choose the route.
• Garmin Legend, Vista, and Venture: Hold the bottom left key until you get to the active route. This is an unpublished shortcut that is much easier than drilling down through the menus. You will notice the STOP button is highlighted – click on the click stick. Now the button will say NAVIGATE—click again.
Creating a route using the map display On any GPS, you can create waypoints and then create a route by listing the waypoints textually in order. Many mapping GPS receivers offer the capability to create a route using the map display. I have found this feature to be poorly documented, but it is easy to learn with just a little playing around.
Routes
Basic GPS Navigation www.smallboatgps.com
114
Garmin
First of all get to a route, not the list of routes, but a single route. It can be a new route or you can modify an existing route. From within the route on some GPS receivers, press the MENU key and there should be an option such as EDIT ON MAP. The Garmin Legend, Vista, Venture, and GPS V have a MAP button on the route. When you select edit on map, you will see that the cursor has “INS” in small text for insert. Using the cursor you can point and click and edit the route. Move the cursor to a point that you want to add to the route and press ENTER or click on the click stick as appropriate. If there is no point at the point that you press, such as out in the middle of a body of water, you will get a menu to create a new waypoint at this point. After you have created this new waypoint, you may have to go back over the point and then add it to the route – a two step process on some receivers. Note for Garmin Legend C, Vista C, 60C and 76C: When you get to the menu to create a new waypoint while creating a route on the map, use the QUIT (upper right button on Legend and Vista) key to jump back to the route rather than selecting the DELETE, MAP, or GOTO buttons at the bottom of the screen. If you want to modify a route, you can do the same thing with an existing route. Move the cursor over the route line until it is a dashed line. Press ENTER (or click), now you can drag the route to an interim point as I described above. You can also click on the first or last point of the route and you should get a menu asking you if you want to add turns or review the waypoint. If you choose, “add turns”, you can now add to the route at the beginning or end. There are slight variations from receiver to receiver, but I find that it is reasonably intuitive. Also note that many receivers such as the eTrex Venture, GPS 76, and GPS 72 that are the non-mapping versions of mapping receivers also offer this capability. In this case, there is no map to reference, but you can do the same thing for existing waypoints or tracks. To exit this mode on the Legend, Vista, and Venture press the side upper right button. On most other Garmins, press the QUIT button -- this will still leave you on the map page so that you can do more editing. Press QUIT one more time to get back to the textual route. On some receivers, you may be able to press MENU and select SHOW TEXT to get out of the map editing mode. If the cursor position is already defined, such as a road intersection or city name, the GPS will save it as such and will not offer the create waypoint screen. Usually this is not a problem, but if for some reason you want to save the point as a waypoint, it is possible. Go to the route, select the point, and press ENTER. Press MENU and select SAVE AS WAYPOINT. You can name this waypoint
Routes
Basic GPS Navigation www.smallboatgps.com
115
and change the symbol. You will then have to change the route to go over this waypoint that is located at the same point as the previous point. You can also do this ahead of time by pointing and clicking on a point in the map display, pressing MENU and saving this point as a waypoint. This will allow you to create a waypoint at this point. The Legend, Vista, and Venture function similarly except the menu is selected at the top of the screen with the click stick. This ability to edit on the screen is also useful to review and check a route. By going to the map screen, you can then pan the map to make sure that the route really is what you want. On some receivers, if you cursor over the first point and press ENTER you will see a menu option, NEXT. This allows you to jump to the next point. By successively doing this, you can graphically review the route.
Magellan
The Magellan receivers do not offer nearly the same capability to edit the route with the map display. I have a Magellan 330 and often check on specific functions at the local boating store. The Magellan software appears to be very similar from model to model when compared to the Garmin receivers. However, I am not nearly as familiar with Magellans. With this disclaimer in mind, I can still offer some techniques.
Technique 1
On the map screen, you can create a point by pressing MARK at the cursor location. Hold the MARK/GOTO button until you get the new waypoint page. You should see a ROUTE button on the page. By selecting this, you can add the new waypoint to a route. The caveat is that you must have a route to add it to. This can be solved by first creating a route with two dummy waypoints. When you are done creating the route with the map display, erase the two dummy waypoints that you had used to first establish the route.The waypoints do not matter, just
Technique 2
Press the menu key and select “Vert. Profile.” From the next menu, select “Path Check.” Using the cursor, press the MARK button at each point that you want to add to the route. When you are done press Save to Rte to create the route. I would be happy to explain the logic of creating a horizontal route from a vertical profile if I understood it, but I don’t.
Enroute GOTO Often you will want to skip a waypoint along a route, yet continue to operate along the rest of the route. This is a very common scenario in aviation where a
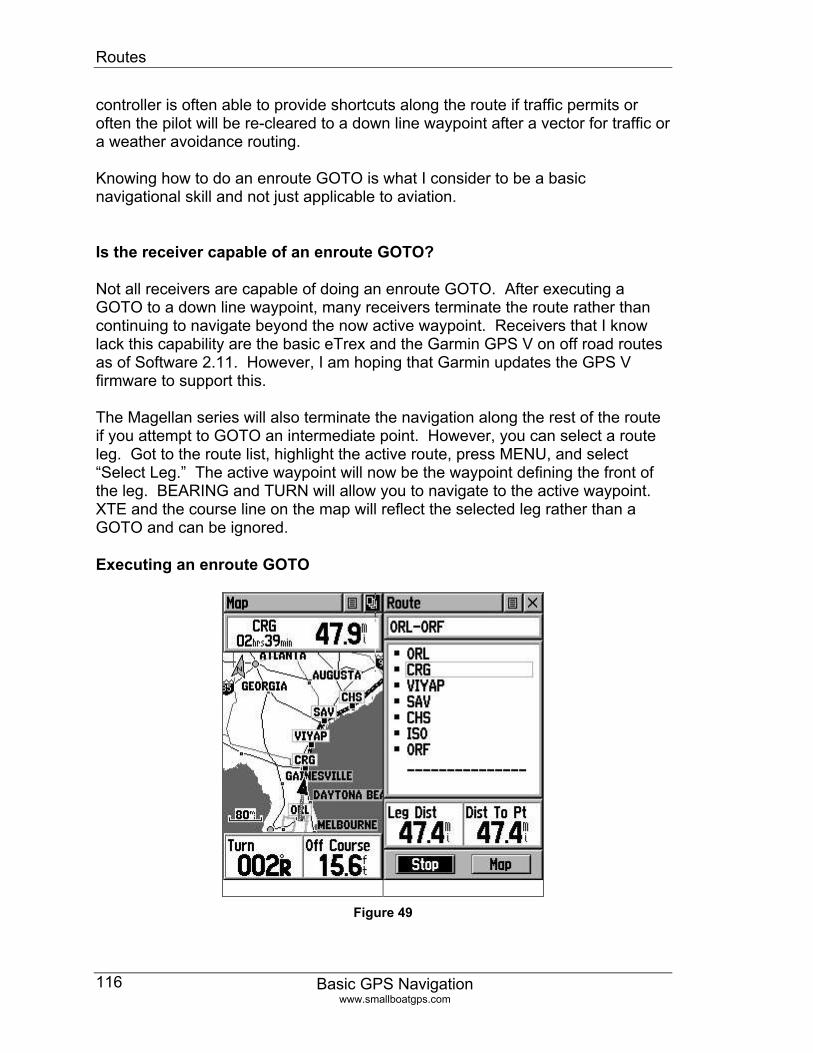
Routes
Basic GPS Navigation www.smallboatgps.com
116
controller is often able to provide shortcuts along the route if traffic permits or often the pilot will be re-cleared to a down line waypoint after a vector for traffic or a weather avoidance routing. Knowing how to do an enroute GOTO is what I consider to be a basic navigational skill and not just applicable to aviation.
Is the receiver capable of an enroute GOTO?
Not all receivers are capable of doing an enroute GOTO. After executing a GOTO to a down line waypoint, many receivers terminate the route rather than continuing to navigate beyond the now active waypoint. Receivers that I know lack this capability are the basic eTrex and the Garmin GPS V on off road routes as of Software 2.11. However, I am hoping that Garmin updates the GPS V firmware to support this. The Magellan series will also terminate the navigation along the rest of the route if you attempt to GOTO an intermediate point. However, you can select a route leg. Got to the route list, highlight the active route, press MENU, and select “Select Leg.” The active waypoint will now be the waypoint defining the front of the leg. BEARING and TURN will allow you to navigate to the active waypoint. XTE and the course line on the map will reflect the selected leg rather than a GOTO and can be ignored.
Executing an enroute GOTO
Figure 49
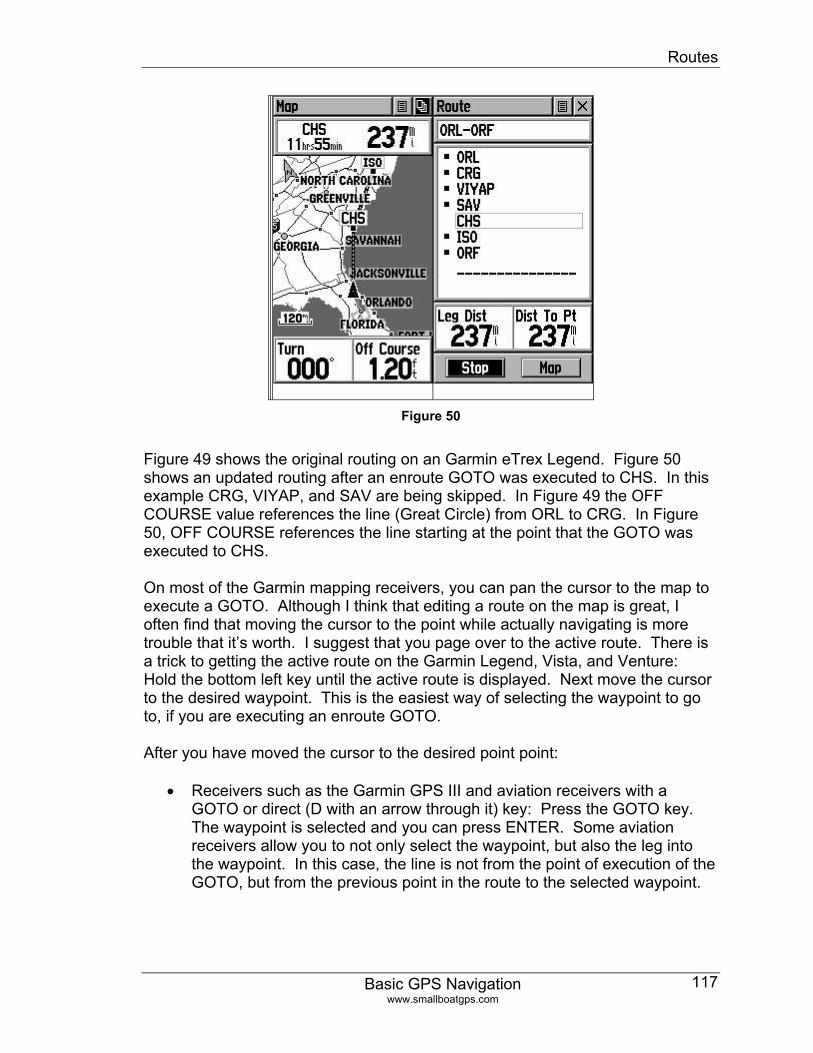
Routes
Basic GPS Navigation www.smallboatgps.com
117
Figure 50
Figure 49 shows the original routing on an Garmin eTrex Legend. Figure 50 shows an updated routing after an enroute GOTO was executed to CHS. In this example CRG, VIYAP, and SAV are being skipped. In Figure 49 the OFF COURSE value references the line (Great Circle) from ORL to CRG. In Figure 50, OFF COURSE references the line starting at the point that the GOTO was executed to CHS. On most of the Garmin mapping receivers, you can pan the cursor to the map to execute a GOTO. Although I think that editing a route on the map is great, I often find that moving the cursor to the point while actually navigating is more trouble that it’s worth. I suggest that you page over to the active route. There is a trick to getting the active route on the Garmin Legend, Vista, and Venture: Hold the bottom left key until the active route is displayed. Next move the cursor to the desired waypoint. This is the easiest way of selecting the waypoint to go to, if you are executing an enroute GOTO. After you have moved the cursor to the desired point point:
• Receivers such as the Garmin GPS III and aviation receivers with a GOTO or direct (D with an arrow through it) key: Press the GOTO key. The waypoint is selected and you can press ENTER. Some aviation receivers allow you to not only select the waypoint, but also the leg into the waypoint. In this case, the line is not from the point of execution of the GOTO, but from the previous point in the route to the selected waypoint.
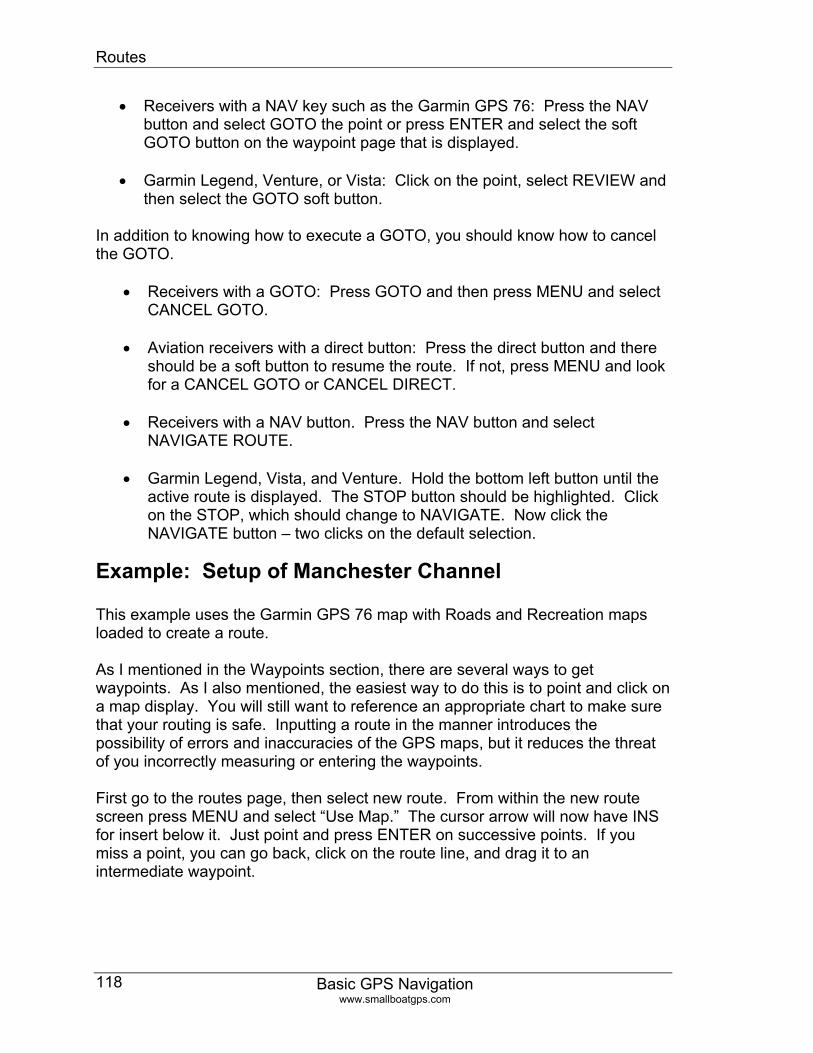
Routes
Basic GPS Navigation www.smallboatgps.com
118
• Receivers with a NAV key such as the Garmin GPS 76: Press the NAV button and select GOTO the point or press ENTER and select the soft GOTO button on the waypoint page that is displayed.
• Garmin Legend, Venture, or Vista: Click on the point, select REVIEW and then select the GOTO soft button.
In addition to knowing how to execute a GOTO, you should know how to cancel the GOTO.
• Receivers with a GOTO: Press GOTO and then press MENU and select CANCEL GOTO.
• Aviation receivers with a direct button: Press the direct button and there should be a soft button to resume the route. If not, press MENU and look for a CANCEL GOTO or CANCEL DIRECT.
• Receivers with a NAV button. Press the NAV button and select NAVIGATE ROUTE.
• Garmin Legend, Vista, and Venture. Hold the bottom left button until the active route is displayed. The STOP button should be highlighted. Click on the STOP, which should change to NAVIGATE. Now click the NAVIGATE button – two clicks on the default selection.
Example: Setup of Manchester Channel This example uses the Garmin GPS 76 map with Roads and Recreation maps loaded to create a route. As I mentioned in the Waypoints section, there are several ways to get waypoints. As I also mentioned, the easiest way to do this is to point and click on a map display. You will still want to reference an appropriate chart to make sure that your routing is safe. Inputting a route in the manner introduces the possibility of errors and inaccuracies of the GPS maps, but it reduces the threat of you incorrectly measuring or entering the waypoints. First go to the routes page, then select new route. From within the new route screen press MENU and select “Use Map.” The cursor arrow will now have INS for insert below it. Just point and press ENTER on successive points. If you miss a point, you can go back, click on the route line, and drag it to an intermediate waypoint.
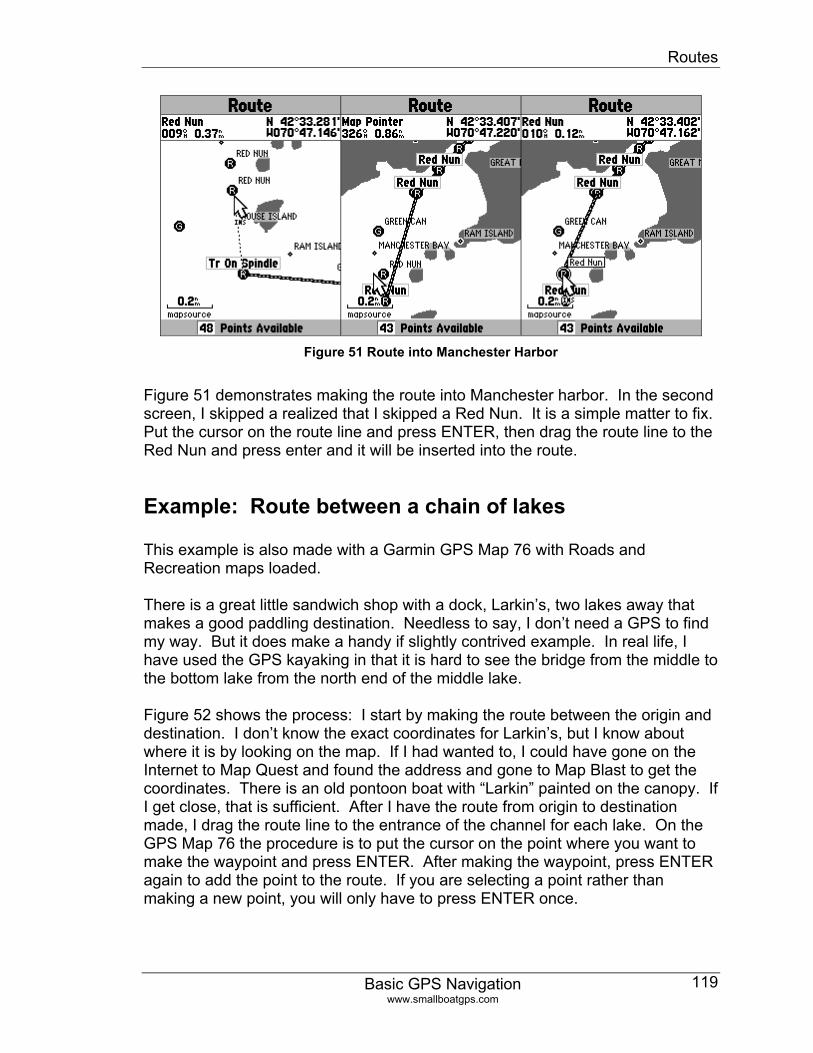
Routes
Basic GPS Navigation www.smallboatgps.com
119
Figure 51 Route into Manchester Harbor
Figure 51 demonstrates making the route into Manchester harbor. In the second screen, I skipped a realized that I skipped a Red Nun. It is a simple matter to fix. Put the cursor on the route line and press ENTER, then drag the route line to the Red Nun and press enter and it will be inserted into the route.
Example: Route between a chain of lakes This example is also made with a Garmin GPS Map 76 with Roads and Recreation maps loaded. There is a great little sandwich shop with a dock, Larkin’s, two lakes away that makes a good paddling destination. Needless to say, I don’t need a GPS to find my way. But it does make a handy if slightly contrived example. In real life, I have used the GPS kayaking in that it is hard to see the bridge from the middle to the bottom lake from the north end of the middle lake. Figure 52 shows the process: I start by making the route between the origin and destination. I don’t know the exact coordinates for Larkin’s, but I know about where it is by looking on the map. If I had wanted to, I could have gone on the Internet to Map Quest and found the address and gone to Map Blast to get the coordinates. There is an old pontoon boat with “Larkin” painted on the canopy. If I get close, that is sufficient. After I have the route from origin to destination made, I drag the route line to the entrance of the channel for each lake. On the GPS Map 76 the procedure is to put the cursor on the point where you want to make the waypoint and press ENTER. After making the waypoint, press ENTER again to add the point to the route. If you are selecting a point rather than making a new point, you will only have to press ENTER once.

Routes
Basic GPS Navigation www.smallboatgps.com
120
Figure 52
Figure 53
As shown in the first screen of Figure 53, the routing takes me right across land. This is not a problem. I would just follow the shore around from waypoint 1 to 2. Having waypoint 2 marked would make sure that I got the correct cove for the entrance to the channel. I would go through the channel and then when I got to the next lake, I would navigate directly to point 3 as shown in Figure 52. Essentially from waypoint 1 to the north end of the next lake would be one dimensional navigation along the shore and through the channel. If I wanted to engage in a little overkill, I could add more points as shown in the second screen of Figure 53. What might be useful is to add a waypoint for the exit of each lake. These would become the entrances going home. I can go to the text display of the route and then press MENU and select Plan Route. The route plan accepts values of speed, fuel flow, departure time, and departure date. After putting in my speed of 3 knots, I can get an idea of how far the route is and how long it will take as depicted in Figure 54.
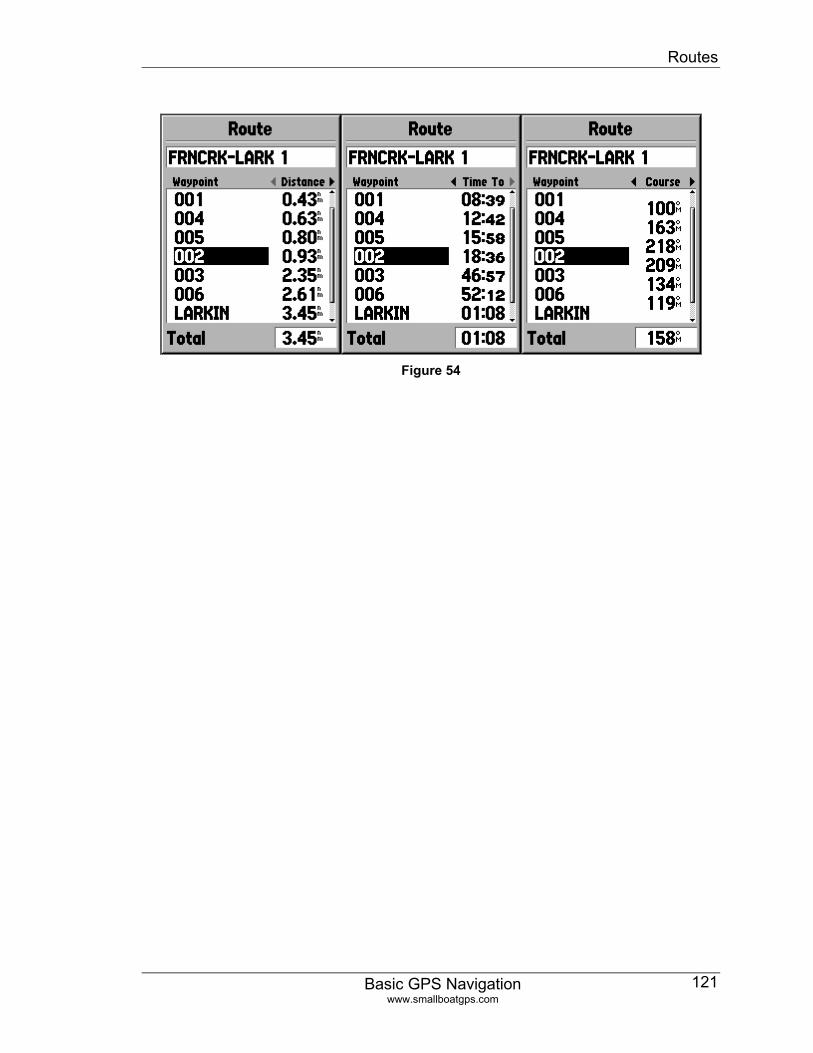
Routes
Basic GPS Navigation www.smallboatgps.com
121
Figure 54
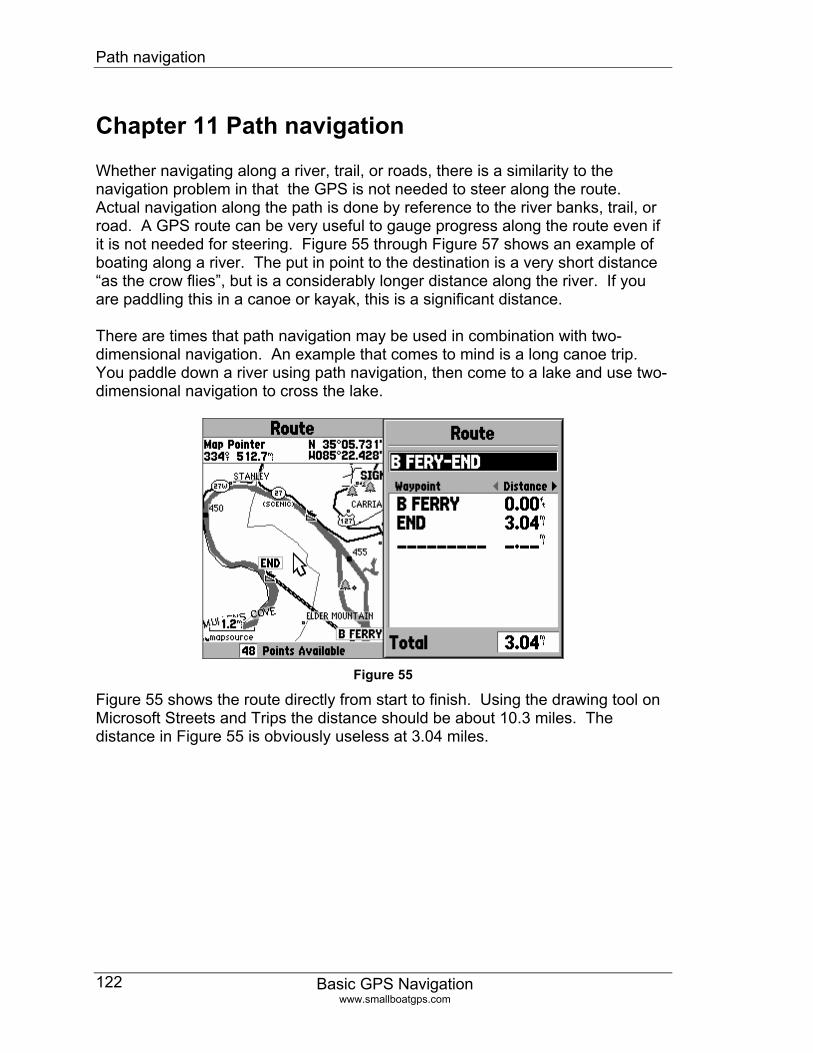
Path navigation
Chapter 11 Path navigation
Basic GPS Navigation www.smallboatgps.com
122
Whether navigating along a river, trail, or roads, there is a similarity to the navigation problem in that the GPS is not needed to steer along the route. Actual navigation along the path is done by reference to the river banks, trail, or road. A GPS route can be very useful to gauge progress along the route even if it is not needed for steering. Figure 55 through Figure 57 shows an example of boating along a river. The put in point to the destination is a very short distance “as the crow flies”, but is a considerably longer distance along the river. If you are paddling this in a canoe or kayak, this is a significant distance. There are times that path navigation may be used in combination with two-dimensional navigation. An example that comes to mind is a long canoe trip. You paddle down a river using path navigation, then come to a lake and use two-dimensional navigation to cross the lake.
Figure 55
Figure 55 shows the route directly from start to finish. Using the drawing tool on Microsoft Streets and Trips the distance should be about 10.3 miles. The distance in Figure 55 is obviously useless at 3.04 miles.

Path navigation
Basic GPS Navigation www.smallboatgps.com
123
Figure 56
Figure 56 shows the resulting distance after putting in seven intermediate waypoints. Putting these waypoints in was very fast using the graphic route editing features of the Garmin GPS Map 76 and therefore totally practical. If you have a Garmin mapping GPS, I highly recommend that you learn to edit the route using the map page. I have more information on page 113. Using the map display to edit the route made the task much easier. However, this could be done without too much difficulty with a non-mapping GPS using one of the many techniques in the Waypoints chapter.
Figure 57
Figure 57 shows what the display would look at two different zooms while navigating. There is really no need for a course or a bearing line, so I shut them off. As you can see, I set up the data fields to display different data from the two dimensional navigation. The data that is useful are things such as ETA’s, and distances.
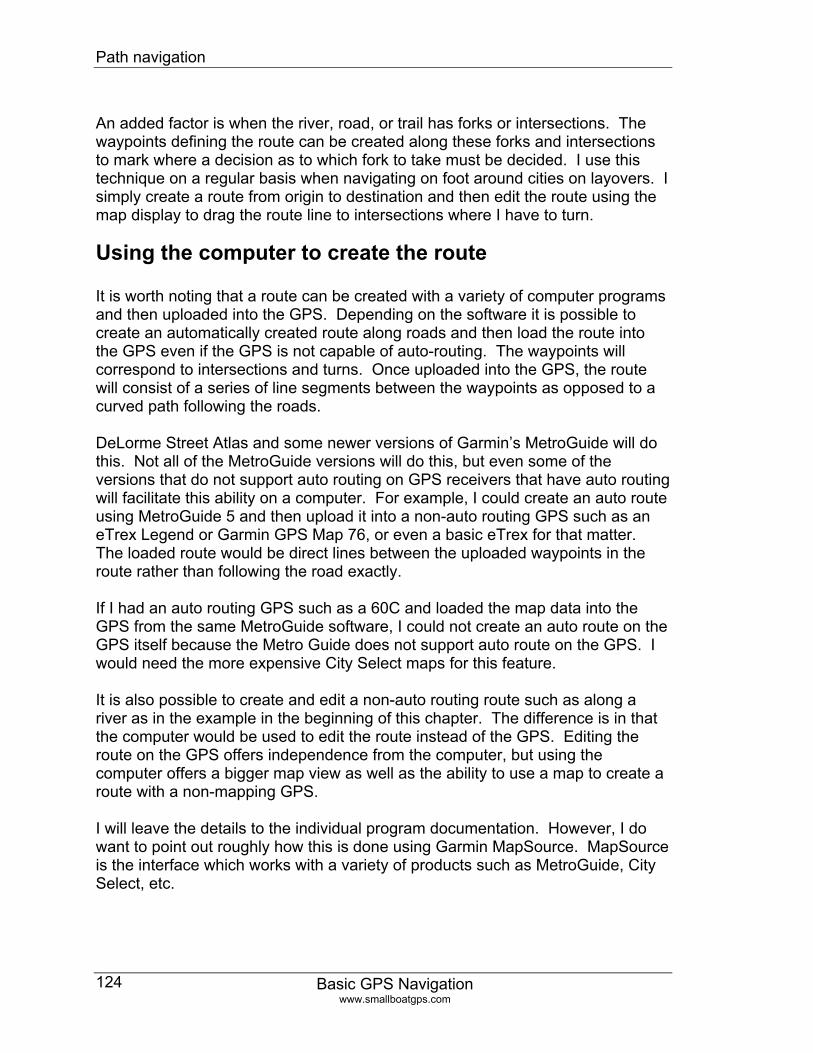
Path navigation
Basic GPS Navigation www.smallboatgps.com
124
An added factor is when the river, road, or trail has forks or intersections. The waypoints defining the route can be created along these forks and intersections to mark where a decision as to which fork to take must be decided. I use this technique on a regular basis when navigating on foot around cities on layovers. I simply create a route from origin to destination and then edit the route using the map display to drag the route line to intersections where I have to turn.
Using the computer to create the route It is worth noting that a route can be created with a variety of computer programs and then uploaded into the GPS. Depending on the software it is possible to create an automatically created route along roads and then load the route into the GPS even if the GPS is not capable of auto-routing. The waypoints will correspond to intersections and turns. Once uploaded into the GPS, the route will consist of a series of line segments between the waypoints as opposed to a curved path following the roads. DeLorme Street Atlas and some newer versions of Garmin’s MetroGuide will do this. Not all of the MetroGuide versions will do this, but even some of the versions that do not support auto routing on GPS receivers that have auto routing will facilitate this ability on a computer. For example, I could create an auto route using MetroGuide 5 and then upload it into a non-auto routing GPS such as an eTrex Legend or Garmin GPS Map 76, or even a basic eTrex for that matter. The loaded route would be direct lines between the uploaded waypoints in the route rather than following the road exactly. If I had an auto routing GPS such as a 60C and loaded the map data into the GPS from the same MetroGuide software, I could not create an auto route on the GPS itself because the Metro Guide does not support auto route on the GPS. I would need the more expensive City Select maps for this feature. It is also possible to create and edit a non-auto routing route such as along a river as in the example in the beginning of this chapter. The difference is in that the computer would be used to edit the route instead of the GPS. Editing the route on the GPS offers independence from the computer, but using the computer offers a bigger map view as well as the ability to use a map to create a route with a non-mapping GPS. I will leave the details to the individual program documentation. However, I do want to point out roughly how this is done using Garmin MapSource. MapSource is the interface which works with a variety of products such as MetroGuide, City Select, etc.

Path navigation
Basic GPS Navigation www.smallboatgps.com
125
• From the main menu, go to Edit -> Preferences -> Routing tab and choose “Use Direct Routes.”
• Go to View and select “GPS map detail.”
• Select the route creation icon from the tool bar. It is the icon with the black squares connected by magenta lines.
• Now go to the map and click where you want to the route to go. You can use the find function (binocular icon) to find something first. You can click successive waypoints or you can just create a route from origin to destination and modify it.
• If you want to create a route from origin to destination and then drag the route to follow a contour such as in the river example, you can use the route tool and press the escape key when you have created a route from origin to destination. Now move the cursor over the route and right click and select “insert route section.” Successive clicking on the route with the route creation icon selected will allow you to drag the route to intermediate points.
Magellan adaptive technique One of the keys to this technique being useful is to be able to display a distance to destination as opposed to the next waypoint. Many Magellan receivers do not offer this data. My first recommendation is that you go to the Magellan website, www.magellangps.com and check for an software update in hopes that this feature has been added. My second recommendation is that you use the name of the waypoints as an indirect indicator of distance to go. By going to the route page, it is possible to get leg distances. Rename the waypoints to reflect the distance from the end of the route. For example, the waypoints in Figure 56 could be renamed something like END, R11, R20, R31, R38, R50, etc. If you were .8 miles from R20, then you would have 2.8 miles left to paddle.
Another example I borrowed my brother in law’s personal watercraft in Saint Simon’s Island, Georgia. I thought that it might be interesting to follow the water to Fort Frederica. The intercoastal waterway and Frederica River are set in a large grassy moss. The GPS was immensely helpful in providing orientation and making sure that I traveled up the correct fork among the many little creeks in the marsh.
Path navigation
Basic GPS Navigation www.smallboatgps.com
126
Figure 58 depicts the route from the boat ramp, RAMP, to Fort Frederica, FORT. All that I found necessary was to include a point at the fork, FORK, to make sure that I made the turn. This was a short distance sitting on a personal watercraft – a low effort trip. If I were kayaking, I probably would have added some interim waypoints so that I had a more accurate distance to the destination as I paddled. However, the line from FORK to FORT was plenty to orient me considering that I also had a map display and that I was steering between the river banks rather than steering from the GPS guidance.
Figure 58
Using Maps with an unknown or no grid
Basic GPS Navigation www.smallboatgps.com
127
Chapter 12 Using Maps with an unknown or no grid This chapter describes some techniques of using a GPS with ordinary maps. Certainly, the ideal situation is to have a mapping GPS with extra detailed maps loaded in. The next best thing is to have a detailed paper map with a grid that is usable for inputting coordinates into a GPS. However, there are a wide variety of maps that can be used with reasonable common sense with even the most basic GPS. Where do you get these maps? I have seen maps in the back of phonebooks, guidebooks, rental car counters, on the internet, entrances to parks, tourist information services, and printed out from mapping programs. Additionally, within this category are satellite and aerial photos. The catch to the wide availability of maps is that most often these maps do not have latitudes or longitudes or other grids such as UTM that can directly be used with GPS. Even though GPS is becoming more popular and more map publishers are printing maps with such information, there are still a large number of otherwise good maps that do not include this information. However, with some simple techniques, these maps can be used with an inexpensive GPS. The requirement for a map is that it is proportional and accurate. You have to be able to measure bearings or distances accurately. Every map is distorted because the earth is spherical and paper is flat. For the size of areas that I see these applications being applicable, the distortion should be minimal. I can’t see using these techniques for areas much larger than a city. Another factor is precision. For each degree of error in a bearing a point would be off by one unit for each 60 units of distance from the point. For example, if you tried to create a point that was 120 miles away, if you mis-measured the point by 1 degree, the new point would be off by 2 miles. Thus, precision in measurement is more of a limitation than map projection. Common sense is important. Specialized and expensive maps such as marine charts and topographic maps have a lot of important information in addition to where things are. Nobody would have much sympathy for you if you drug the keel of an expensive sailboat across some submerged rocks because you were navigating with a road map from a convenience store. However, these techniques might be of great use if you use a simple inexpensive non-mapping GPS to keep track of your journey on a couple of hour canoe trip in a state park where most people do not even use a map. The techniques for working with generic maps are often similar to more traditional navigation and position fixing techniques. If you are familiar with such
Using Maps with an unknown or no grid
Basic GPS Navigation www.smallboatgps.com
128
techniques as getting a fix from such things as non-directional beacons or compass sightings, then many of these techniques are conceptually similar. Although the GPS is similar to compass triangulation, there are some important advantages that the GPS offers. The GPS will give a distance to a waypoint, you do not have to actually have the landmark in sight if you have it saved as a waypoint, and you can use bearings relative to true north rather than having to convert magnetic values to true values. There is a multitude of ways that you can use these maps. My intent is to not so much explain every possible way to use every possible map, but to give you an idea of how you might use a generic map. Essentially, you correlate the position on a map with the coordinates or location of a known point. Additionally, some of these techniques might be of some use when using a map with a grid. There are some clever and popular computer programs that allow you to scan in maps and calibrate them for GPS. Certainly, they are worth checking out if this subject interests you. My only objection to them is that they require a computer, scanner, and printer. Not only will these computer programs work with scanned maps, but they will work with aerial photographs. For an excellent list of computer software that will calibrate maps, I would refer you to the Third Party Software section of www.gpsinformation.net, the book GPS for Dummies, or Mapping Programs section on page 66. The computer offers more accuracy, but the methods that I give only require a GPS, calculator, ruler, and perhaps a protractor or base plate compass. Between using a mapping GPS with extra maps loaded in, using a computer program or Internet source to get waypoint coordinates, using scanned maps with a calibration program, the techniques in this chapter are potentially the least accurate and most hassle. However, being able to use the least expensive GPS with cheap or free maps offers much flexibility and capability. The accuracy of GPS is addictive. However, sometimes precision just isn’t that important. For example taking the paddle along the river in a rented canoe, often a simple, “I’m about here” on the map is more than sufficient. Although, I use an example with angle drawn with a protractor, often a simple mental bearing is all that is required. Also, consider that the GPS does not have to be used in isolation, but can be used with several other techniques to help locate yourself. For example, you might use the GPS bearing from the start point and the fact that you are on a portion of the river that goes a certain direction as indicated you either the GPS or the compass to get an approximate position. Perhaps you see a landmark that you think that you might recognize. A rough bearing from a GPS landmark
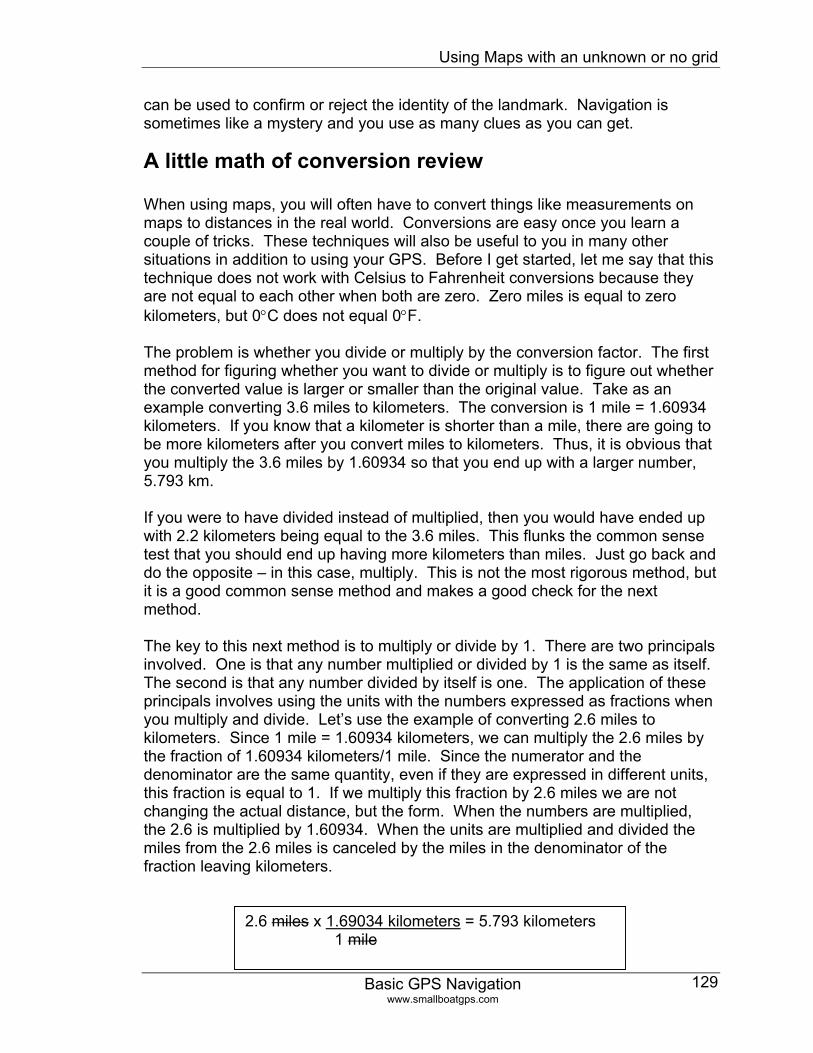
Using Maps with an unknown or no grid
Basic GPS Navigation www.smallboatgps.com
129
can be used to confirm or reject the identity of the landmark. Navigation is sometimes like a mystery and you use as many clues as you can get.
A little math of conversion review When using maps, you will often have to convert things like measurements on maps to distances in the real world. Conversions are easy once you learn a couple of tricks. These techniques will also be useful to you in many other situations in addition to using your GPS. Before I get started, let me say that this technique does not work with Celsius to Fahrenheit conversions because they are not equal to each other when both are zero. Zero miles is equal to zero kilometers, but 0°C does not equal 0°F. The problem is whether you divide or multiply by the conversion factor. The first method for figuring whether you want to divide or multiply is to figure out whether the converted value is larger or smaller than the original value. Take as an example converting 3.6 miles to kilometers. The conversion is 1 mile = 1.60934 kilometers. If you know that a kilometer is shorter than a mile, there are going to be more kilometers after you convert miles to kilometers. Thus, it is obvious that you multiply the 3.6 miles by 1.60934 so that you end up with a larger number, 5.793 km. If you were to have divided instead of multiplied, then you would have ended up with 2.2 kilometers being equal to the 3.6 miles. This flunks the common sense test that you should end up having more kilometers than miles. Just go back and do the opposite – in this case, multiply. This is not the most rigorous method, but it is a good common sense method and makes a good check for the next method. The key to this next method is to multiply or divide by 1. There are two principals involved. One is that any number multiplied or divided by 1 is the same as itself. The second is that any number divided by itself is one. The application of these principals involves using the units with the numbers expressed as fractions when you multiply and divide. Let’s use the example of converting 2.6 miles to kilometers. Since 1 mile = 1.60934 kilometers, we can multiply the 2.6 miles by the fraction of 1.60934 kilometers/1 mile. Since the numerator and the denominator are the same quantity, even if they are expressed in different units, this fraction is equal to 1. If we multiply this fraction by 2.6 miles we are not changing the actual distance, but the form. When the numbers are multiplied, the 2.6 is multiplied by 1.60934. When the units are multiplied and divided the miles from the 2.6 miles is canceled by the miles in the denominator of the fraction leaving kilometers.
2.6 miles x 1.69034 kilometers = 5.793 kilometers 1 mile
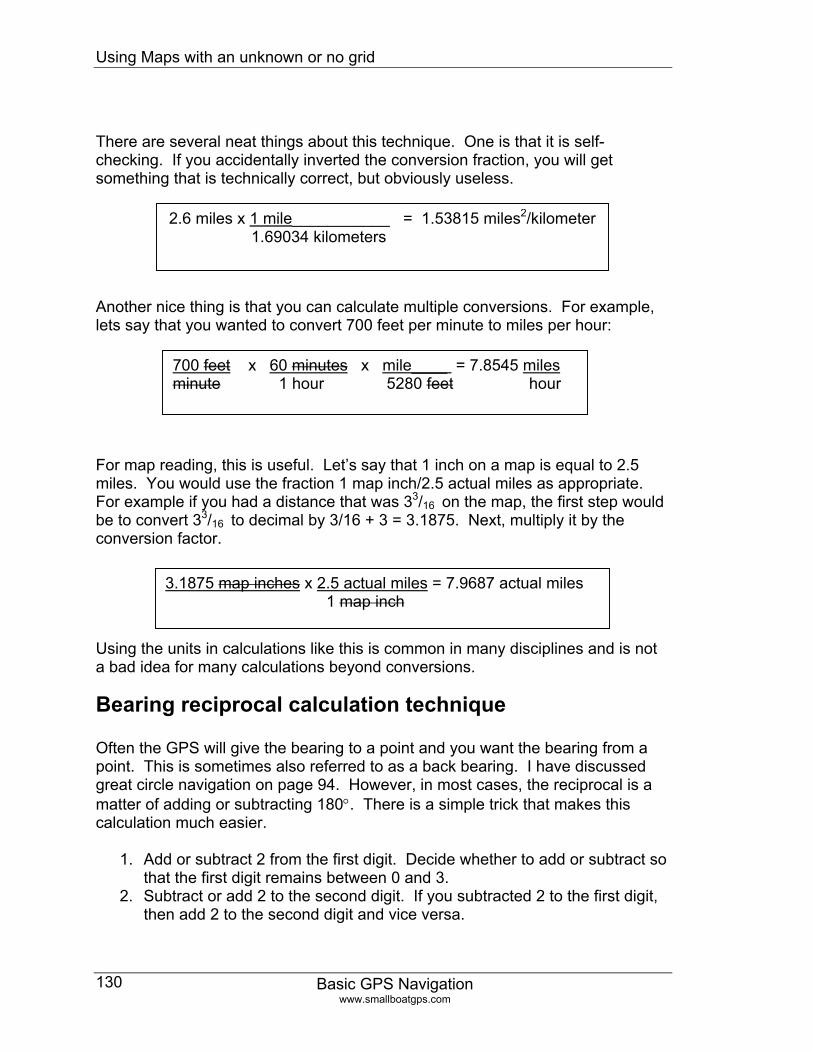
Using Maps with an unknown or no grid
Basic GPS Navigation www.smallboatgps.com
130
There are several neat things about this technique. One is that it is self-checking. If you accidentally inverted the conversion fraction, you will get something that is technically correct, but obviously useless.
2.6 miles x 1 mile___________ = 1.53815 miles2/kilometer 1.69034 kilometers
Another nice thing is that you can calculate multiple conversions. For example, lets say that you wanted to convert 700 feet per minute to miles per hour:
700 feet x 60 minutes x mile____ = 7.8545 miles minute 1 hour 5280 feet hour
For map reading, this is useful. Let’s say that 1 inch on a map is equal to 2.5 miles. You would use the fraction 1 map inch/2.5 actual miles as appropriate. For example if you had a distance that was 33/16 on the map, the first step would be to convert 33/16 to decimal by 3/16 + 3 = 3.1875. Next, multiply it by the conversion factor. 3.1875 map inches x 2.5 actual miles = 7.9687 actual miles
1 map inch Using the units in calculations like this is common in many disciplines and is not a bad idea for many calculations beyond conversions.
Bearing reciprocal calculation technique Often the GPS will give the bearing to a point and you want the bearing from a point. This is sometimes also referred to as a back bearing. I have discussed great circle navigation on page 94. However, in most cases, the reciprocal is a matter of adding or subtracting 180°. There is a simple trick that makes this calculation much easier.
1. Add or subtract 2 from the first digit. Decide whether to add or subtract so that the first digit remains between 0 and 3.
2. Subtract or add 2 to the second digit. If you subtracted 2 to the first digit, then add 2 to the second digit and vice versa.
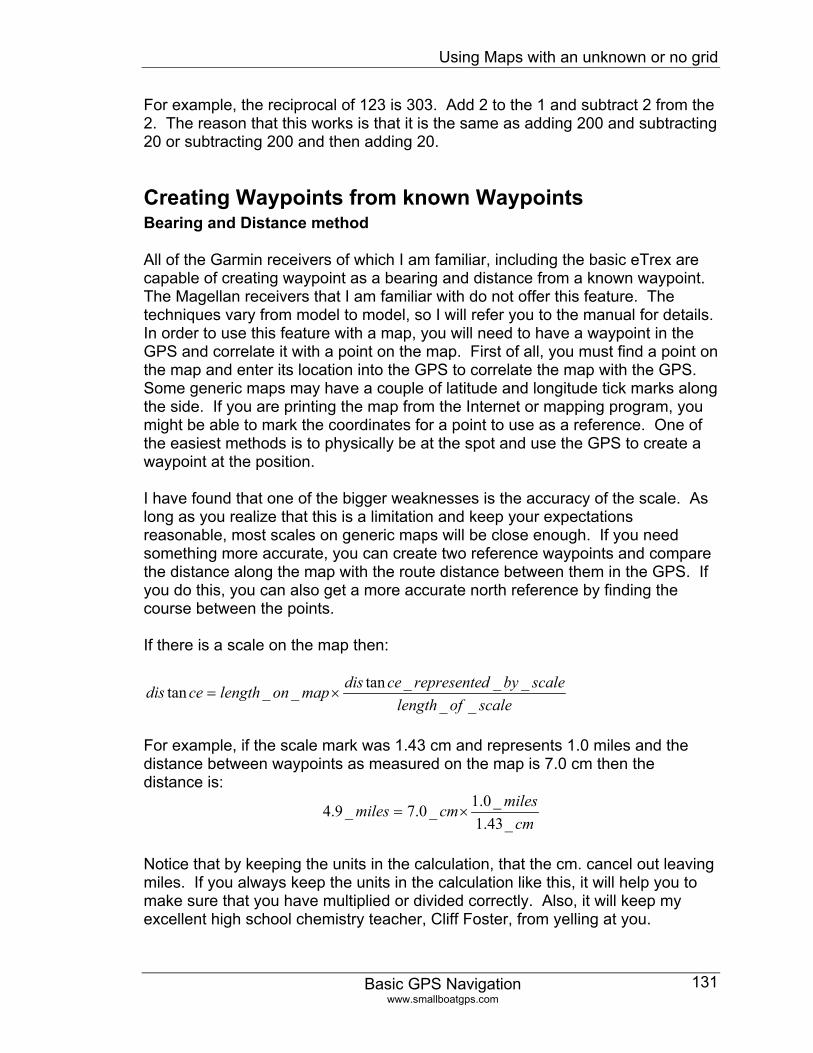
Using Maps with an unknown or no grid
Basic GPS Navigation www.smallboatgps.com
131
For example, the reciprocal of 123 is 303. Add 2 to the 1 and subtract 2 from the 2. The reason that this works is that it is the same as adding 200 and subtracting 20 or subtracting 200 and then adding 20.
Creating Waypoints from known Waypoints Bearing and Distance method
All of the Garmin receivers of which I am familiar, including the basic eTrex are capable of creating waypoint as a bearing and distance from a known waypoint. The Magellan receivers that I am familiar with do not offer this feature. The techniques vary from model to model, so I will refer you to the manual for details. In order to use this feature with a map, you will need to have a waypoint in the GPS and correlate it with a point on the map. First of all, you must find a point on the map and enter its location into the GPS to correlate the map with the GPS. Some generic maps may have a couple of latitude and longitude tick marks along the side. If you are printing the map from the Internet or mapping program, you might be able to mark the coordinates for a point to use as a reference. One of the easiest methods is to physically be at the spot and use the GPS to create a waypoint at the position. I have found that one of the bigger weaknesses is the accuracy of the scale. As long as you realize that this is a limitation and keep your expectations reasonable, most scales on generic maps will be close enough. If you need something more accurate, you can create two reference waypoints and compare the distance along the map with the route distance between them in the GPS. If you do this, you can also get a more accurate north reference by finding the course between the points. If there is a scale on the map then:
scaleoflengthscalebydrepresentecedismaponlengthcedis
_____tan__tan ×=
For example, if the scale mark was 1.43 cm and represents 1.0 miles and the distance between waypoints as measured on the map is 7.0 cm then the distance is:
cmmilescmmiles_43.1
_0.1_0.7_9.4 ×=
Notice that by keeping the units in the calculation, that the cm. cancel out leaving miles. If you always keep the units in the calculation like this, it will help you to make sure that you have multiplied or divided correctly. Also, it will keep my excellent high school chemistry teacher, Cliff Foster, from yelling at you.

Using Maps with an unknown or no grid
Basic GPS Navigation www.smallboatgps.com
132
In this example, you can also store the 1.0 miles divided by 1.43 cm which is .6993 miles/cm in the memory of your calculator and write it on the map by the scale. Sometimes you may be given a scale such as 1:50,000 instead of scale as a mark and represented distance. This means that each unit of measurement on the map represents 50,000 of the same unit over the ground. You could measure the map with and convert inches to miles and then multiply by the scale, but I don’t recommend it. Measure the distance in metric distances and multiply and set your GPS to metric. You can change the GPS back to whatever system you had before after you had have entered the distance and bearing. Take as an example that the distance on the map is 6.8 cm and you are using a 1:50000 map. The distance is:
kmmetersmetermapmetersactualmetersmap 4.33400
_1_000,50_068. ==×
Here is a some typical examples of how to create a new waypoint using the bearing and distance from an old waypoint:
• Garmin GPS 76: Press and hold the ENTER MARK button. From the edit waypoint page press MENU and select “Project Waypoint.” This menu will then give you the chance to base the waypoint being edited on the bearing and distance from the map cursor, present position, or another waypoint.
• Garmin eTrex: Select the reference waypoint from the waypoint menu. When you select the waypoint, you will be given an option of Delete, Map, GOTO, or Project. Select Project and a new waypoint menu will be created that will allow you to reference the previous waypoint. The eTrex is limited in that the distance is only 1/10th of a unit. For example, if you are using statute units, you can only specify the distance within .1 miles which is 528 ft.
• Garmin eTrex Legend: Pick a reference waypoint by pressing the bottom left side button and then going through the menu to view it. There are two navigation boxes in the top right corner. Using the click stick, click on the right box and then select “Project Waypoint.” A new waypoint will be created based on the waypoint that you had originally selected. The BEARING and DISTANCE fields are editable and are based on the previous point. Also, the name is editable.
• Garmin GPS III and 196. When creating a waypoint, there is a bearing, distance, and point selection field on the waypoint creation menu itself.
Using Maps with an unknown or no grid
Basic GPS Navigation www.smallboatgps.com
133
I have not listed every Garmin GPS, but most likely it works something like one of these. If yours is not listed, play with it and/or read the owner’s manual. Here are some tricks and caveats:
• Go to the setup page and change the north reference to true rather than magnetic north so that the map and the GPS are referencing the same thing. If you are using the GPS with a compass make sure that you go back and return the setting to magnetic when you are finished.
• To help with measuring the angle on the map with the protractor, you can crease or draw a line on the map to make a north – south and an east-west line through the reference point.
• If you want to use this reference point for orientating yourself on the map as opposed to creating and navigating to a new point, you can GOTO the waypoint and use the BEARING and DISTANCE to the point. Optionally on some GPS units you can place the cursor on the reference point and get a bearing and distance to the point from your present position using the plotting or map page.
• Many GPS receivers only allow distances to be defined to the first decimal point. For example, if you are using miles, you can only define a distance to the reference point within .1 miles or 528 feet. In many cases, this is close enough to still have practical value.
• If you need the conversion: There are 5280 feet in a stature mile, 6078 feet in a nautical mile.
If your GPS does not support creating a waypoint by referencing a third point or if you want more accuracy, you are not without options:
• NavCalc for Palm OS is a $10 utility that allows you to get coordinates by using radial and distance from a known point, or bearings from two separate points. Go to www.palmgear.com and search for NavCalc. While you are at PalmGear.com, search for “Converter.” It is a free application for unit conversion. It is fantastic. Before, I leave this aside, I use APCalc, also available at PalmGear, for my calculator and am very pleased with it.
• Ed Williams’s Aviation page, at http://williams.best.vwh.net/, offers an online javascript calculator as well as formulas if you want to write your own program.

Using Maps with an unknown or no grid
Basic GPS Navigation www.smallboatgps.com
134
• There are probably several other places to get this information. You might look around www.gpsinformation.net for other sources.
UTM method
If you recall, UTM coordinates are based on meters east and north. If you the reference waypoint in your GPS, you can change the GPS setup to UTM. You can then measure how many meters east and north the new point is from the reference point. When adding distances, north and east are positive and south and west are negative. For example, your reference point is 17R 450771 3182409 and the point that you want to go to is 5.7 km east and 6 km south as measured on the map. The zone of 17R remains the same. The new easing is 450771 + 5700 = 456,471. The new northing is 3,182,409 – 6,000 = 3,176,409. Thus, the new point is 17R 456471 3176409. There is the caveat that if you are at the edge of a zone and the new waypoint is in the next zone over this technique will not work. It is worth noting that although the UTM grid is based on the metric system, it is not required that you use or set up your GPS to use metric values. You can still put in a UTM coordinate and have the GPS indicate distances and speeds in miles or nautical miles and miles per hour or knots.
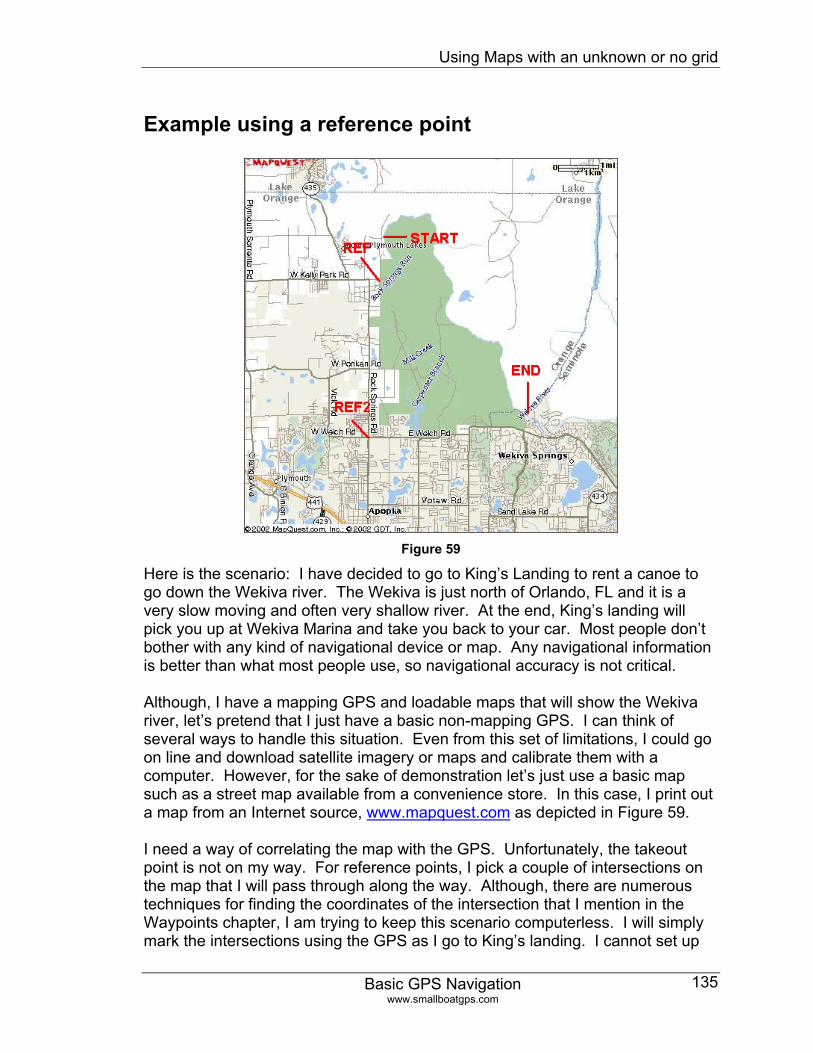
Using Maps with an unknown or no grid
Basic GPS Navigation www.smallboatgps.com
135
Example using a reference point
Figure 59
Here is the scenario: I have decided to go to King’s Landing to rent a canoe to go down the Wekiva river. The Wekiva is just north of Orlando, FL and it is a very slow moving and often very shallow river. At the end, King’s landing will pick you up at Wekiva Marina and take you back to your car. Most people don’t bother with any kind of navigational device or map. Any navigational information is better than what most people use, so navigational accuracy is not critical. Although, I have a mapping GPS and loadable maps that will show the Wekiva river, let’s pretend that I just have a basic non-mapping GPS. I can think of several ways to handle this situation. Even from this set of limitations, I could go on line and download satellite imagery or maps and calibrate them with a computer. However, for the sake of demonstration let’s just use a basic map such as a street map available from a convenience store. In this case, I print out a map from an Internet source, www.mapquest.com as depicted in Figure 59. I need a way of correlating the map with the GPS. Unfortunately, the takeout point is not on my way. For reference points, I pick a couple of intersections on the map that I will pass through along the way. Although, there are numerous techniques for finding the coordinates of the intersection that I mention in the Waypoints chapter, I am trying to keep this scenario computerless. I will simply mark the intersections using the GPS as I go to King’s landing. I cannot set up
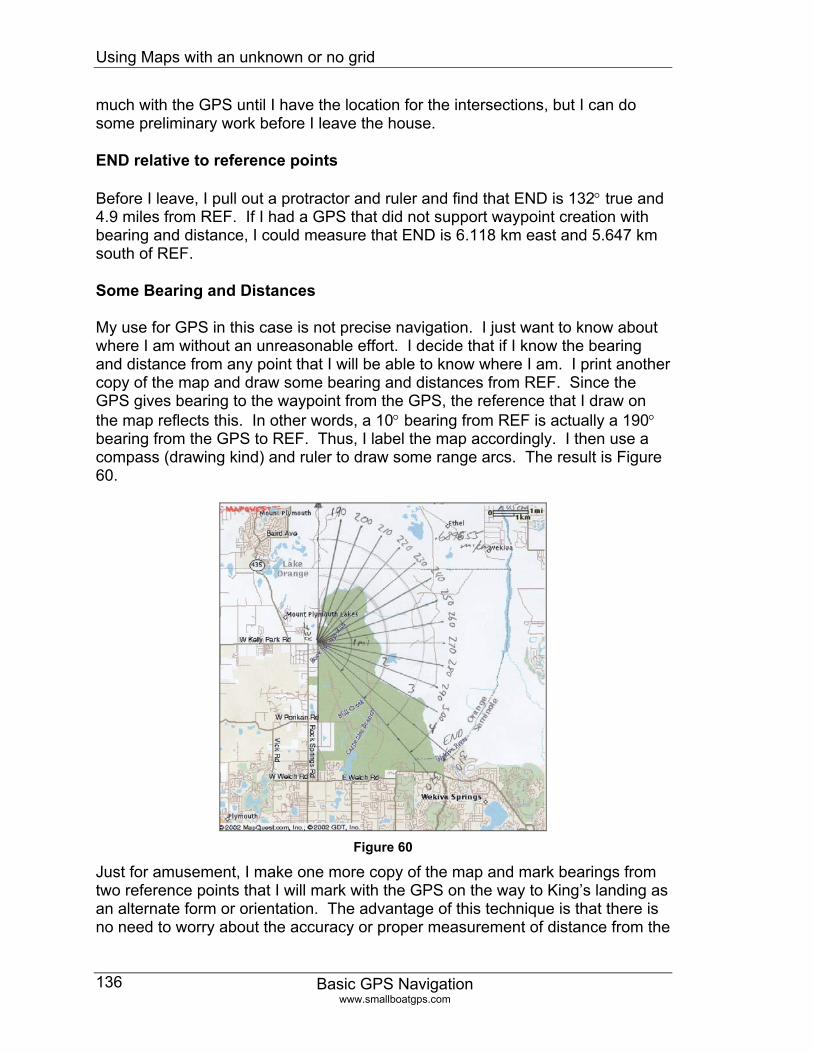
Using Maps with an unknown or no grid
Basic GPS Navigation www.smallboatgps.com
136
much with the GPS until I have the location for the intersections, but I can do some preliminary work before I leave the house.
END relative to reference points
Before I leave, I pull out a protractor and ruler and find that END is 132° true and 4.9 miles from REF. If I had a GPS that did not support waypoint creation with bearing and distance, I could measure that END is 6.118 km east and 5.647 km south of REF.
Some Bearing and Distances
My use for GPS in this case is not precise navigation. I just want to know about where I am without an unreasonable effort. I decide that if I know the bearing and distance from any point that I will be able to know where I am. I print another copy of the map and draw some bearing and distances from REF. Since the GPS gives bearing to the waypoint from the GPS, the reference that I draw on the map reflects this. In other words, a 10° bearing from REF is actually a 190° bearing from the GPS to REF. Thus, I label the map accordingly. I then use a compass (drawing kind) and ruler to draw some range arcs. The result is Figure 60.
Figure 60
Just for amusement, I make one more copy of the map and mark bearings from two reference points that I will mark with the GPS on the way to King’s landing as an alternate form or orientation. The advantage of this technique is that there is no need to worry about the accuracy or proper measurement of distance from the
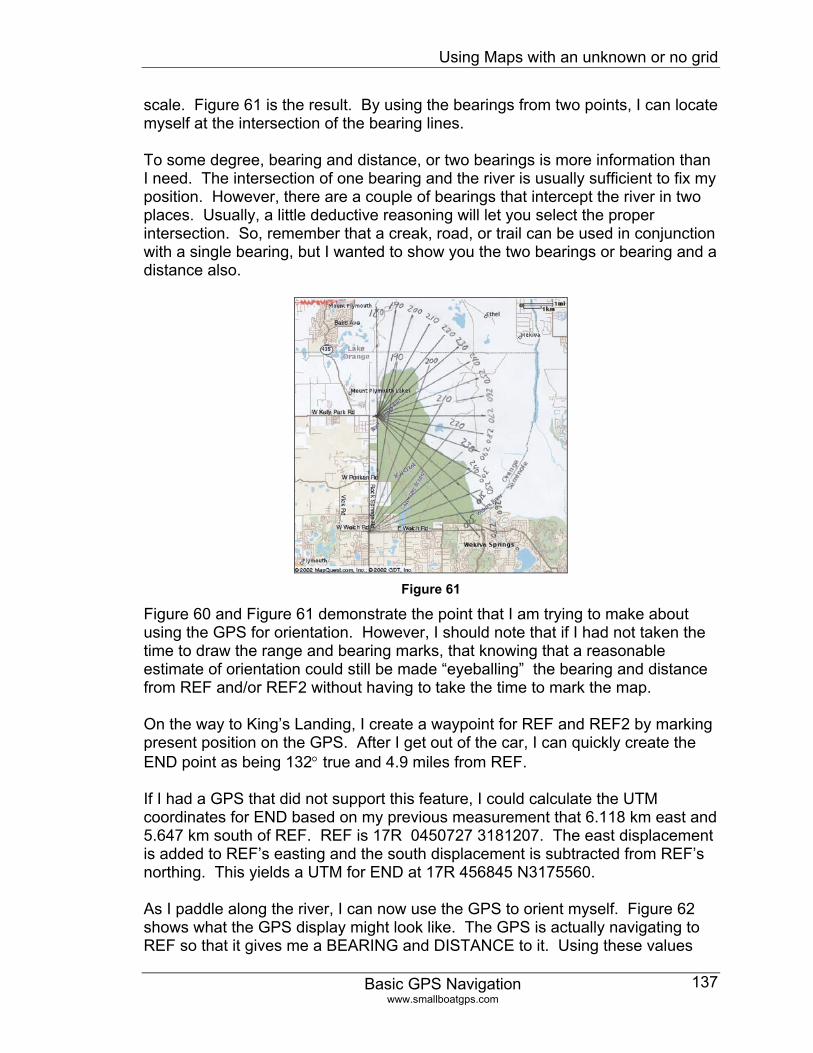
Using Maps with an unknown or no grid
Basic GPS Navigation www.smallboatgps.com
137
scale. Figure 61 is the result. By using the bearings from two points, I can locate myself at the intersection of the bearing lines. To some degree, bearing and distance, or two bearings is more information than I need. The intersection of one bearing and the river is usually sufficient to fix my position. However, there are a couple of bearings that intercept the river in two places. Usually, a little deductive reasoning will let you select the proper intersection. So, remember that a creak, road, or trail can be used in conjunction with a single bearing, but I wanted to show you the two bearings or bearing and a distance also.
Figure 61
Figure 60 and Figure 61 demonstrate the point that I am trying to make about using the GPS for orientation. However, I should note that if I had not taken the time to draw the range and bearing marks, that knowing that a reasonable estimate of orientation could still be made “eyeballing” the bearing and distance from REF and/or REF2 without having to take the time to mark the map. On the way to King’s Landing, I create a waypoint for REF and REF2 by marking present position on the GPS. After I get out of the car, I can quickly create the END point as being 132° true and 4.9 miles from REF. If I had a GPS that did not support this feature, I could calculate the UTM coordinates for END based on my previous measurement that 6.118 km east and 5.647 km south of REF. REF is 17R 0450727 3181207. The east displacement is added to REF’s easting and the south displacement is subtracted from REF’s northing. This yields a UTM for END at 17R 456845 N3175560. As I paddle along the river, I can now use the GPS to orient myself. Figure 62 shows what the GPS display might look like. The GPS is actually navigating to REF so that it gives me a BEARING and DISTANCE to it. Using these values
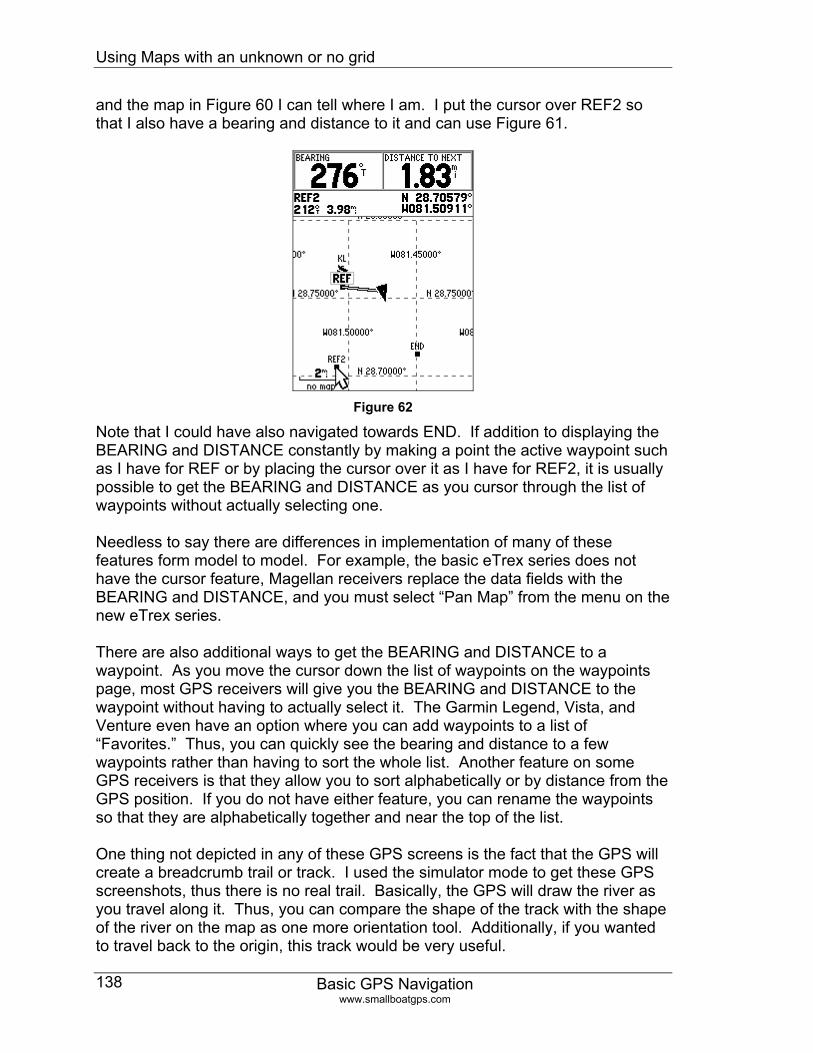
Using Maps with an unknown or no grid
Basic GPS Navigation www.smallboatgps.com
138
and the map in Figure 60 I can tell where I am. I put the cursor over REF2 so that I also have a bearing and distance to it and can use Figure 61.
Figure 62
Note that I could have also navigated towards END. If addition to displaying the BEARING and DISTANCE constantly by making a point the active waypoint such as I have for REF or by placing the cursor over it as I have for REF2, it is usually possible to get the BEARING and DISTANCE as you cursor through the list of waypoints without actually selecting one. Needless to say there are differences in implementation of many of these features form model to model. For example, the basic eTrex series does not have the cursor feature, Magellan receivers replace the data fields with the BEARING and DISTANCE, and you must select “Pan Map” from the menu on the new eTrex series. There are also additional ways to get the BEARING and DISTANCE to a waypoint. As you move the cursor down the list of waypoints on the waypoints page, most GPS receivers will give you the BEARING and DISTANCE to the waypoint without having to actually select it. The Garmin Legend, Vista, and Venture even have an option where you can add waypoints to a list of “Favorites.” Thus, you can quickly see the bearing and distance to a few waypoints rather than having to sort the whole list. Another feature on some GPS receivers is that they allow you to sort alphabetically or by distance from the GPS position. If you do not have either feature, you can rename the waypoints so that they are alphabetically together and near the top of the list. One thing not depicted in any of these GPS screens is the fact that the GPS will create a breadcrumb trail or track. I used the simulator mode to get these GPS screenshots, thus there is no real trail. Basically, the GPS will draw the river as you travel along it. Thus, you can compare the shape of the track with the shape of the river on the map as one more orientation tool. Additionally, if you wanted to travel back to the origin, this track would be very useful.
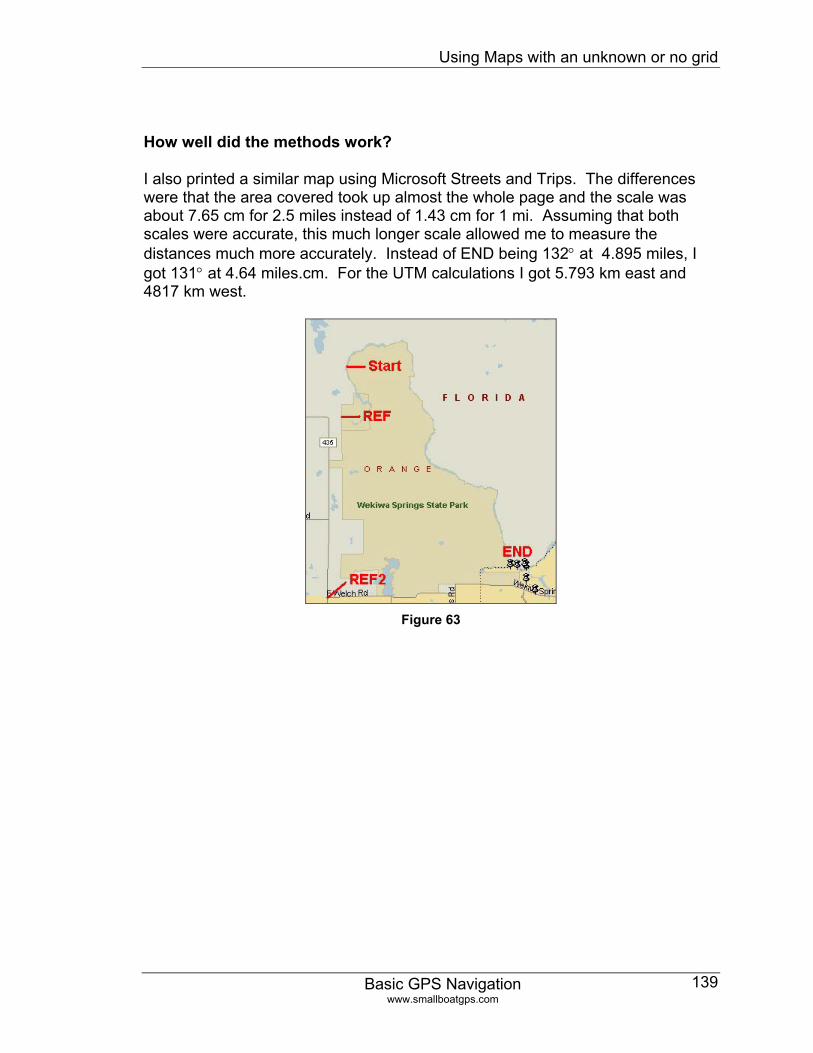
Using Maps with an unknown or no grid
Basic GPS Navigation www.smallboatgps.com
139
How well did the methods work?
I also printed a similar map using Microsoft Streets and Trips. The differences were that the area covered took up almost the whole page and the scale was about 7.65 cm for 2.5 miles instead of 1.43 cm for 1 mi. Assuming that both scales were accurate, this much longer scale allowed me to measure the distances much more accurately. Instead of END being 132° at 4.895 miles, I got 131° at 4.64 miles.cm. For the UTM calculations I got 5.793 km east and 4817 km west.
Figure 63
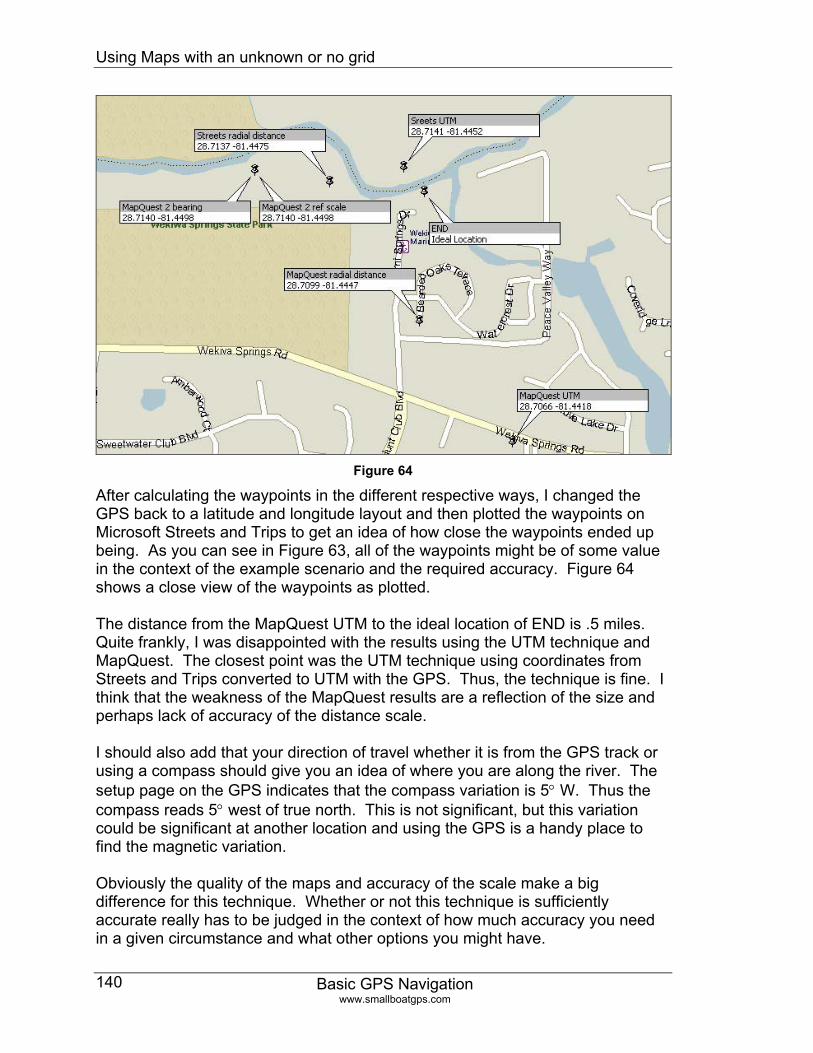
Using Maps with an unknown or no grid
Basic GPS Navigation www.smallboatgps.com
140
Figure 64
After calculating the waypoints in the different respective ways, I changed the GPS back to a latitude and longitude layout and then plotted the waypoints on Microsoft Streets and Trips to get an idea of how close the waypoints ended up being. As you can see in Figure 63, all of the waypoints might be of some value in the context of the example scenario and the required accuracy. Figure 64 shows a close view of the waypoints as plotted. The distance from the MapQuest UTM to the ideal location of END is .5 miles. Quite frankly, I was disappointed with the results using the UTM technique and MapQuest. The closest point was the UTM technique using coordinates from Streets and Trips converted to UTM with the GPS. Thus, the technique is fine. I think that the weakness of the MapQuest results are a reflection of the size and perhaps lack of accuracy of the distance scale. I should also add that your direction of travel whether it is from the GPS track or using a compass should give you an idea of where you are along the river. The setup page on the GPS indicates that the compass variation is 5° W. Thus the compass reads 5° west of true north. This is not significant, but this variation could be significant at another location and using the GPS is a handy place to find the magnetic variation. Obviously the quality of the maps and accuracy of the scale make a big difference for this technique. Whether or not this technique is sufficiently accurate really has to be judged in the context of how much accuracy you need in a given circumstance and what other options you might have.
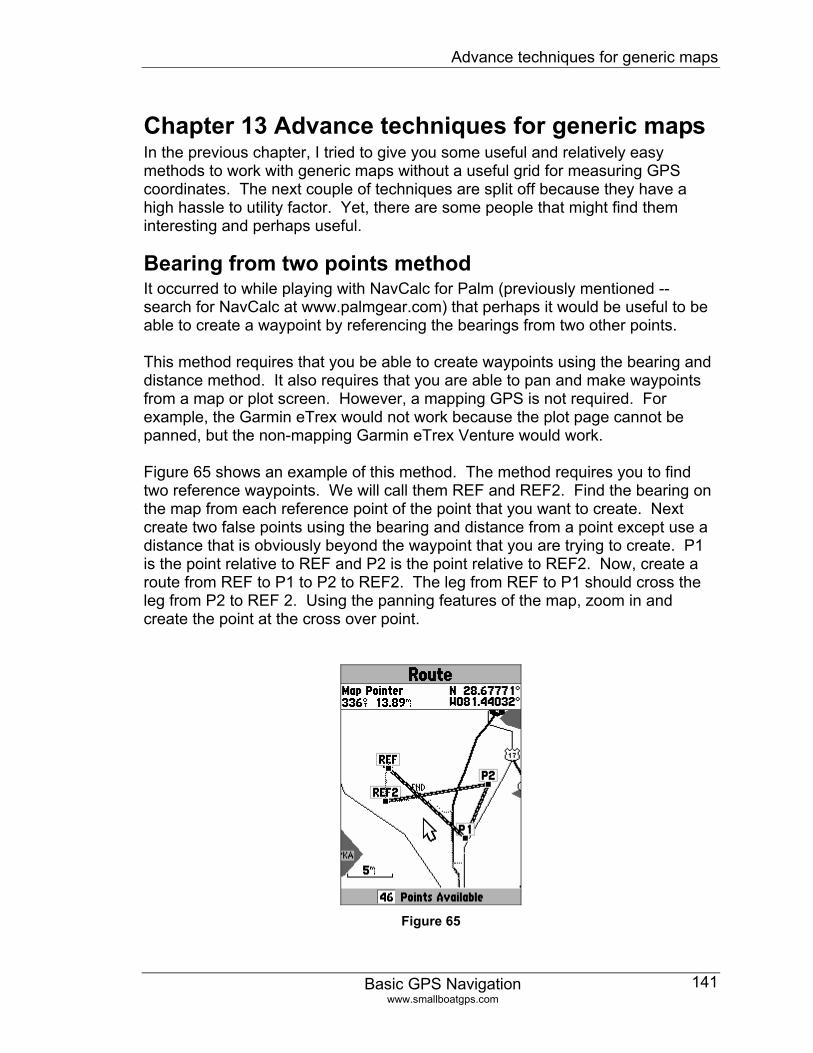
Advance techniques for generic maps
Chapter 13 Advance techniques for generic maps
Basic GPS Navigation www.smallboatgps.com
141
In the previous chapter, I tried to give you some useful and relatively easy methods to work with generic maps without a useful grid for measuring GPS coordinates. The next couple of techniques are split off because they have a high hassle to utility factor. Yet, there are some people that might find them interesting and perhaps useful.
Bearing from two points method It occurred to while playing with NavCalc for Palm (previously mentioned -- search for NavCalc at www.palmgear.com) that perhaps it would be useful to be able to create a waypoint by referencing the bearings from two other points. This method requires that you be able to create waypoints using the bearing and distance method. It also requires that you are able to pan and make waypoints from a map or plot screen. However, a mapping GPS is not required. For example, the Garmin eTrex would not work because the plot page cannot be panned, but the non-mapping Garmin eTrex Venture would work. Figure 65 shows an example of this method. The method requires you to find two reference waypoints. We will call them REF and REF2. Find the bearing on the map from each reference point of the point that you want to create. Next create two false points using the bearing and distance from a point except use a distance that is obviously beyond the waypoint that you are trying to create. P1 is the point relative to REF and P2 is the point relative to REF2. Now, create a route from REF to P1 to P2 to REF2. The leg from REF to P1 should cross the leg from P2 to REF 2. Using the panning features of the map, zoom in and create the point at the cross over point.
Figure 65
Advance techniques for generic maps
Basic GPS Navigation www.smallboatgps.com
142
This is a little bit of a kludge, but it eliminates the problem of measuring distances accurately on the map and converting them into actual distance. Also note that by comparing the route distance directly from REF to REF2 and comparing it to the distance on the map you can potentially have a more accurate scale for the map as well as a way of checking the north/south orientation.
User Grid Overview If you want a couple of waypoints, making a new waypoint by using relative position to a previous waypoint is relatively simple. If you are cartographically adventurous, obsessed, or desperate, it is possible to create a user grid to use with any map. If the map has a north-south grid, you can make the GPS use this grid, even if it doesn’t have a correlation with any recognizable grid. If there is no pre-drawn grid, you can also create a grid or use measurements from the lower left corner of the map. As part of my experimentation with this technique, I have even folded maps to create grids. The grids have to be square, so initially I folded the top edge to each side edge to mark the square and then successively folded the paper in half from the square reference. There is a limited number of times that you can fold the paper, but I found if I folded the paper in half in alternate directions I was able to fold an 8.5 by 11 sheet into squares approximately 1 inch square. You can also use this technique to use measurements from the bottom left corner of the map. This just becomes an invisible grid. I find that centimeters work better than inches because centimeters are divided into tenths on most rulers. Inches are divided into sixteenths, which is cumbersome. This is considerably more work than just using the bearing and distance from a reference point, but it is also more powerful. Although the calculations are straight forward, I have posted a spreadsheet to help make the calculations in the download section of www.smallboatgps.com. I use a version of this spreadsheet on my Palm, which makes it very portable. Magellan 310 notice: Sorry, you cannot use this technique. The 310 does not have a user grid.
Map Requirements
For this technique to work you need the following:
• A reasonably small area map where projection differences between the different corners are small. A city, regional, or perhaps even state road map is an example of a suitable type of map. One of the discoveries that I made when playing with this technique was that it works with maps printed from Internet sites such as www.mapblast.com, www.mapquest.com, or a
Advance techniques for generic maps
Basic GPS Navigation www.smallboatgps.com
143
variety of mapping programs. This permits you to use a relatively detailed map of a small area. For example, I had good results by printing out a 4 mile by 5 mile map which covers a chain of lakes in the local area.
• The map must have square grids oriented to the north. This technique will not work with a rectangular grid or one that is not north oriented. If the map doesn’t have grids there are several work-arounds:
o Draw your own grid on the map. o Fold the map and use the creases instead of drawing grids. If you
do this, start by alternately folding and unfolding the top edge over to touch each side to mark the square are of the paper. Then successively fold the map in half. I tried this with a map printed from a free Internet mapping site and it worked reasonably well. I ended up with a grid that was about 2.7 centimeters square. Remember to make the creases sharp.
o Use measurements from the bottom left corner of the map. You can define points as x units (inches, cm, whatever) east and y units north. In effect, you have set up an imaginary grid.
• You have to be able to save a known point on the map as a waypoint in the GPS. You can use one of the many methods in the previous chapter to find the location of a point on the map, including and especially physically standing at that point and using the GPS to measure it. However, you might also find ticks marking latitude and longitude on a road map. If you are using an Internet or mapping program you can mark a point somewhere. This point would then be entered into the GPS as a reference waypoint.
• You must be able to correlate the scale of the map with a known distance. Usually there is a printed scale. However, you can use two reference points. Find the actual distance between the two reference points using the GPS as well as the measured distance on the map to create a scale.
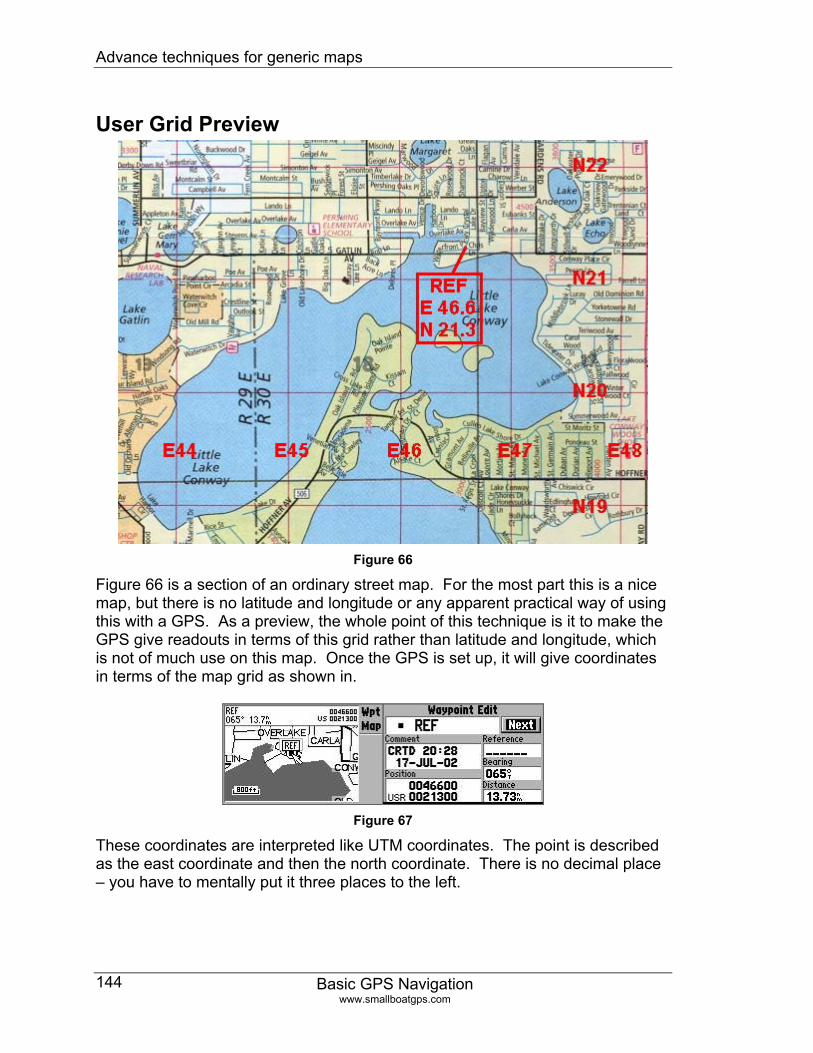
Advance techniques for generic maps
Basic GPS Navigation www.smallboatgps.com
144
User Grid Preview
Figure 66
Figure 66 is a section of an ordinary street map. For the most part this is a nice map, but there is no latitude and longitude or any apparent practical way of using this with a GPS. As a preview, the whole point of this technique is it to make the GPS give readouts in terms of this grid rather than latitude and longitude, which is not of much use on this map. Once the GPS is set up, it will give coordinates in terms of the map grid as shown in.
Figure 67
These coordinates are interpreted like UTM coordinates. The point is described as the east coordinate and then the north coordinate. There is no decimal place – you have to mentally put it three places to the left.
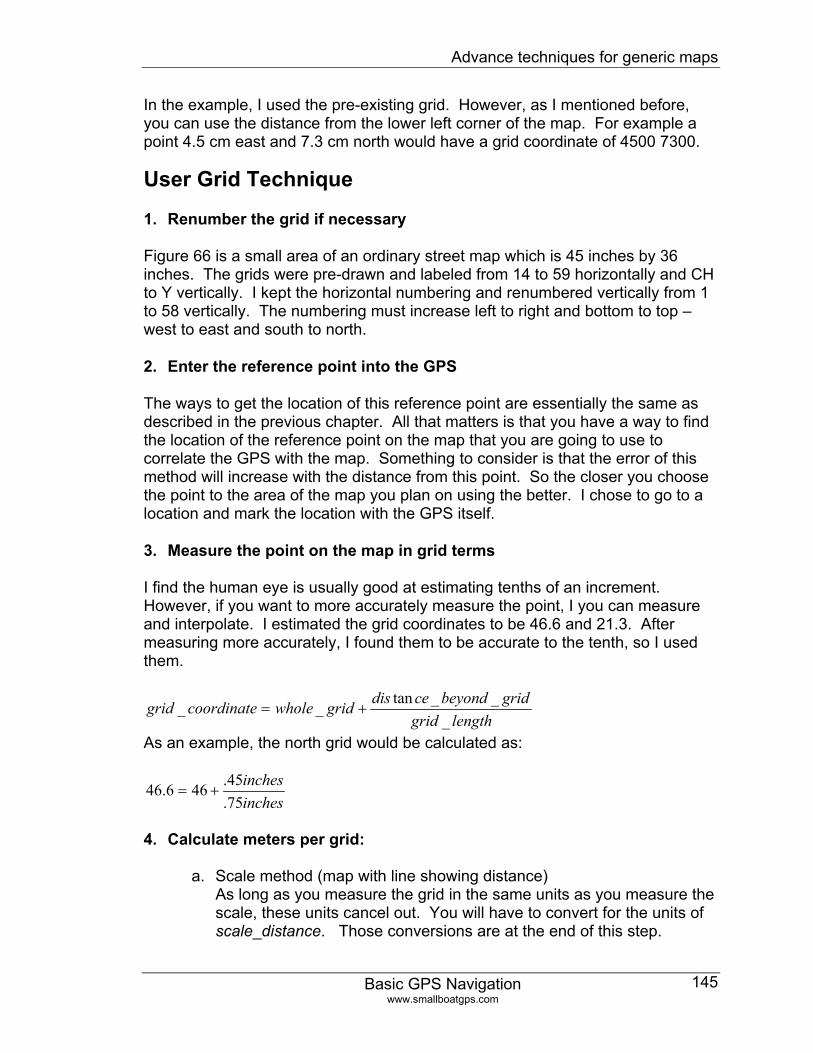
Advance techniques for generic maps
Basic GPS Navigation www.smallboatgps.com
145
In the example, I used the pre-existing grid. However, as I mentioned before, you can use the distance from the lower left corner of the map. For example a point 4.5 cm east and 7.3 cm north would have a grid coordinate of 4500 7300.
User Grid Technique
1. Renumber the grid if necessary
Figure 66 is a small area of an ordinary street map which is 45 inches by 36 inches. The grids were pre-drawn and labeled from 14 to 59 horizontally and CH to Y vertically. I kept the horizontal numbering and renumbered vertically from 1 to 58 vertically. The numbering must increase left to right and bottom to top – west to east and south to north.
2. Enter the reference point into the GPS
The ways to get the location of this reference point are essentially the same as described in the previous chapter. All that matters is that you have a way to find the location of the reference point on the map that you are going to use to correlate the GPS with the map. Something to consider is that the error of this method will increase with the distance from this point. So the closer you choose the point to the area of the map you plan on using the better. I chose to go to a location and mark the location with the GPS itself.
3. Measure the point on the map in grid terms
I find the human eye is usually good at estimating tenths of an increment. However, if you want to more accurately measure the point, I you can measure and interpolate. I estimated the grid coordinates to be 46.6 and 21.3. After measuring more accurately, I found them to be accurate to the tenth, so I used them.
lengthgridgridbeyondcedisgridwholecoordinategrid
___tan__ +=
As an example, the north grid would be calculated as:
inchesinches
75.45.466.46 +=
4. Calculate meters per grid:
a. Scale method (map with line showing distance) As long as you measure the grid in the same units as you measure the scale, these units cancel out. You will have to convert for the units of scale_distance. Those conversions are at the end of this step.
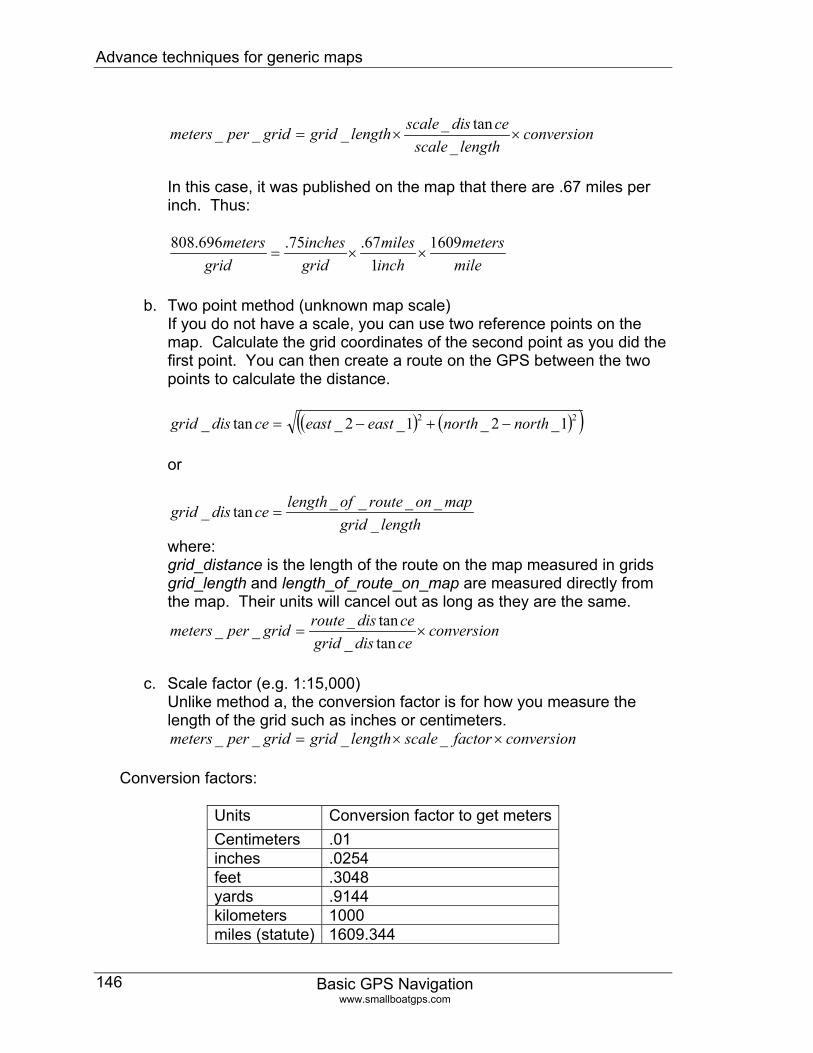
Advance techniques for generic maps
Basic GPS Navigation www.smallboatgps.com
146
conversionlengthscale
cedisscalelengthgridgridpermeters ××=_
tan____
In this case, it was published on the map that there are .67 miles per inch. Thus:
milemeters
inchmiles
gridinches
gridmeters 1609
167.75.696.808
××=
b. Two point method (unknown map scale)
If you do not have a scale, you can use two reference points on the map. Calculate the grid coordinates of the second point as you did the first point. You can then create a route on the GPS between the two points to calculate the distance.
( ) (( ))22 1_2_1_2_tan_ northnortheasteastcedisgrid −+−= or
lengthgridmaponrouteoflengthcedisgrid
_____tan_ =
where: grid_distance is the length of the route on the map measured in grids grid_length and length_of_route_on_map are measured directly from the map. Their units will cancel out as long as they are the same.
conversioncedisgridcedisroutegridpermeters ×=
tan_tan___
c. Scale factor (e.g. 1:15,000)
Unlike method a, the conversion factor is for how you measure the length of the grid such as inches or centimeters.
conversionfactorscalelengthgridgridpermeters ××= ____ Conversion factors:
Units Conversion factor to get metersCentimeters .01 inches .0254 feet .3048 yards .9144 kilometers 1000 miles (statute) 1609.344
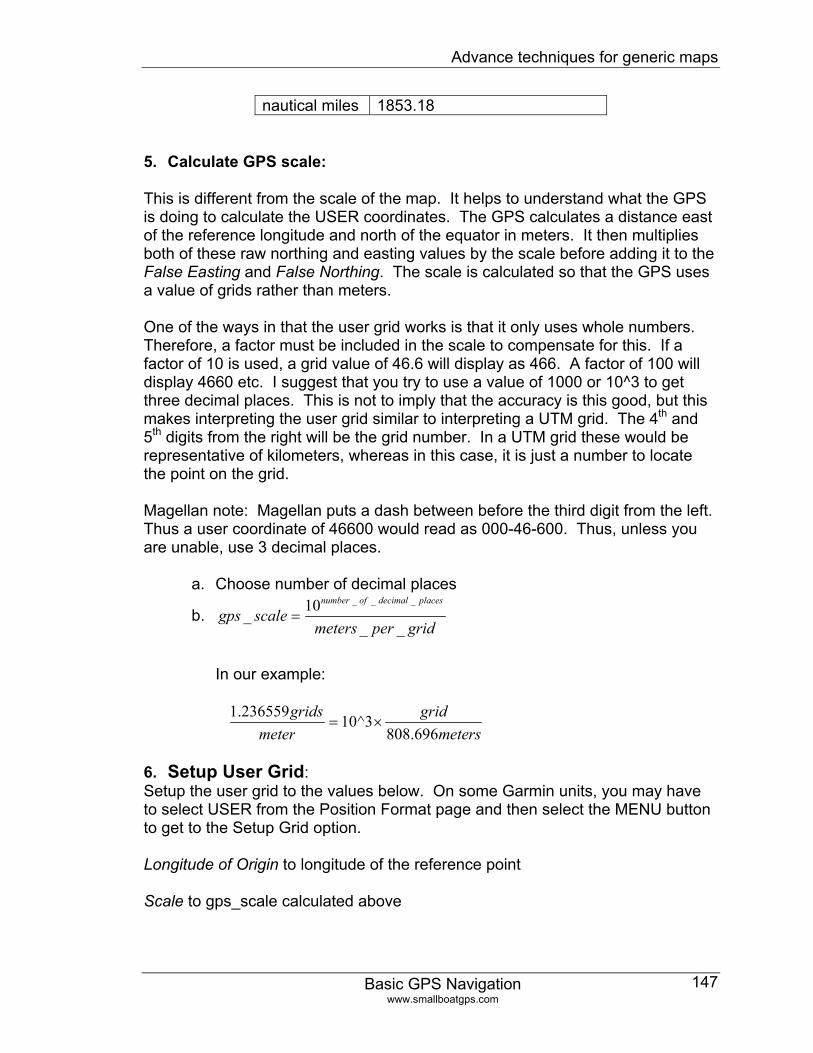
Advance techniques for generic maps
Basic GPS Navigation www.smallboatgps.com
147
nautical miles 1853.18
5. Calculate GPS scale:
This is different from the scale of the map. It helps to understand what the GPS is doing to calculate the USER coordinates. The GPS calculates a distance east of the reference longitude and north of the equator in meters. It then multiplies both of these raw northing and easting values by the scale before adding it to the False Easting and False Northing. The scale is calculated so that the GPS uses a value of grids rather than meters. One of the ways in that the user grid works is that it only uses whole numbers. Therefore, a factor must be included in the scale to compensate for this. If a factor of 10 is used, a grid value of 46.6 will display as 466. A factor of 100 will display 4660 etc. I suggest that you try to use a value of 1000 or 10^3 to get three decimal places. This is not to imply that the accuracy is this good, but this makes interpreting the user grid similar to interpreting a UTM grid. The 4th and 5th digits from the right will be the grid number. In a UTM grid these would be representative of kilometers, whereas in this case, it is just a number to locate the point on the grid. Magellan note: Magellan puts a dash between before the third digit from the left. Thus a user coordinate of 46600 would read as 000-46-600. Thus, unless you are unable, use 3 decimal places.
a. Choose number of decimal places
b. gridpermeters
scalegpsplacesdecimalofnumber
__10_
___
=
In our example:
metersgrid
metergrids
696.8083^10236559.1
×=
6. Setup User Grid: Setup the user grid to the values below. On some Garmin units, you may have to select USER from the Position Format page and then select the MENU button to get to the Setup Grid option. Longitude of Origin to longitude of the reference point Scale to gps_scale calculated above
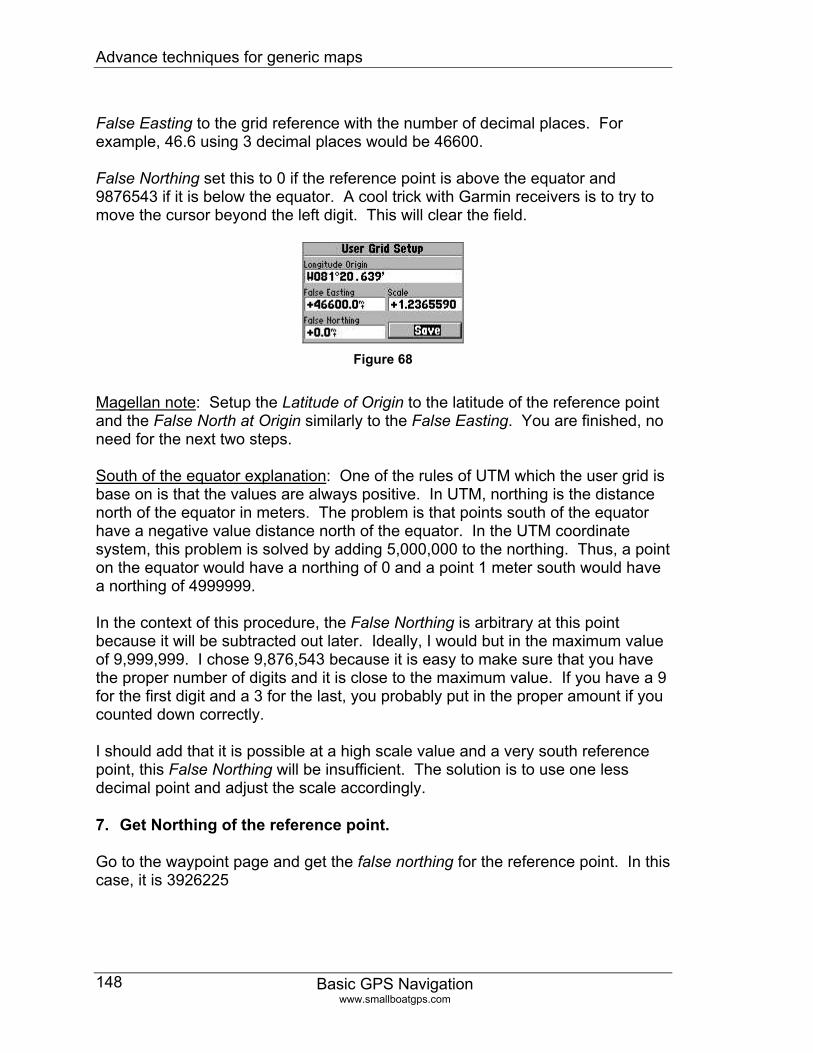
Advance techniques for generic maps
Basic GPS Navigation www.smallboatgps.com
148
False Easting to the grid reference with the number of decimal places. For example, 46.6 using 3 decimal places would be 46600. False Northing set this to 0 if the reference point is above the equator and 9876543 if it is below the equator. A cool trick with Garmin receivers is to try to move the cursor beyond the left digit. This will clear the field.
Figure 68
Magellan note: Setup the Latitude of Origin to the latitude of the reference point and the False North at Origin similarly to the False Easting. You are finished, no need for the next two steps. South of the equator explanation: One of the rules of UTM which the user grid is base on is that the values are always positive. In UTM, northing is the distance north of the equator in meters. The problem is that points south of the equator have a negative value distance north of the equator. In the UTM coordinate system, this problem is solved by adding 5,000,000 to the northing. Thus, a point on the equator would have a northing of 0 and a point 1 meter south would have a northing of 4999999. In the context of this procedure, the False Northing is arbitrary at this point because it will be subtracted out later. Ideally, I would but in the maximum value of 9,999,999. I chose 9,876,543 because it is easy to make sure that you have the proper number of digits and it is close to the maximum value. If you have a 9 for the first digit and a 3 for the last, you probably put in the proper amount if you counted down correctly. I should add that it is possible at a high scale value and a very south reference point, this False Northing will be insufficient. The solution is to use one less decimal point and adjust the scale accordingly.
7. Get Northing of the reference point.
Go to the waypoint page and get the false northing for the reference point. In this case, it is 3926225
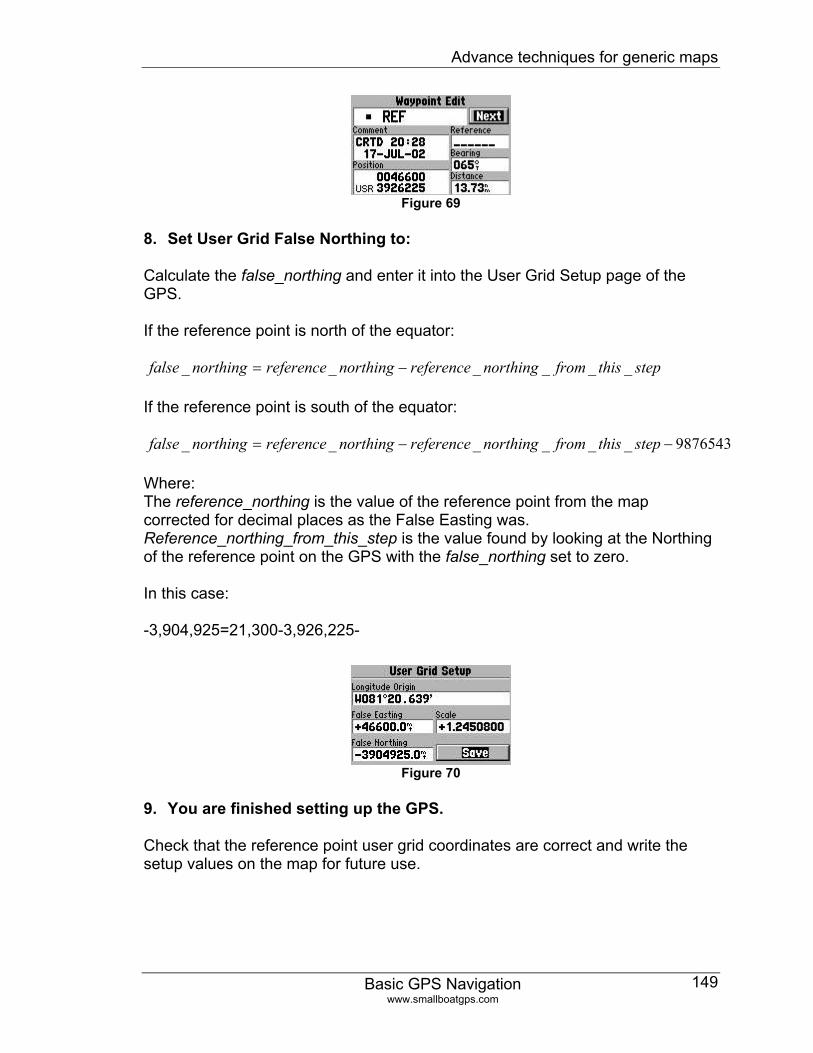
Advance techniques for generic maps
Basic GPS Navigation www.smallboatgps.com
149
Figure 69
8. Set User Grid False Northing to:
Calculate the false_northing and enter it into the User Grid Setup page of the GPS. If the reference point is north of the equator:
stepthisfromnorthingreferencenorthingreferencenorthingfalse ______ −= If the reference point is south of the equator:
9876543______ −−= stepthisfromnorthingreferencenorthingreferencenorthingfalse Where: The reference_northing is the value of the reference point from the map corrected for decimal places as the False Easting was. Reference_northing_from_this_step is the value found by looking at the Northing of the reference point on the GPS with the false_northing set to zero. In this case: -3,904,925=21,300-3,926,225-
Figure 70
9. You are finished setting up the GPS.
Check that the reference point user grid coordinates are correct and write the setup values on the map for future use.

Advance techniques for generic maps
Basic GPS Navigation www.smallboatgps.com
150
Figure 71
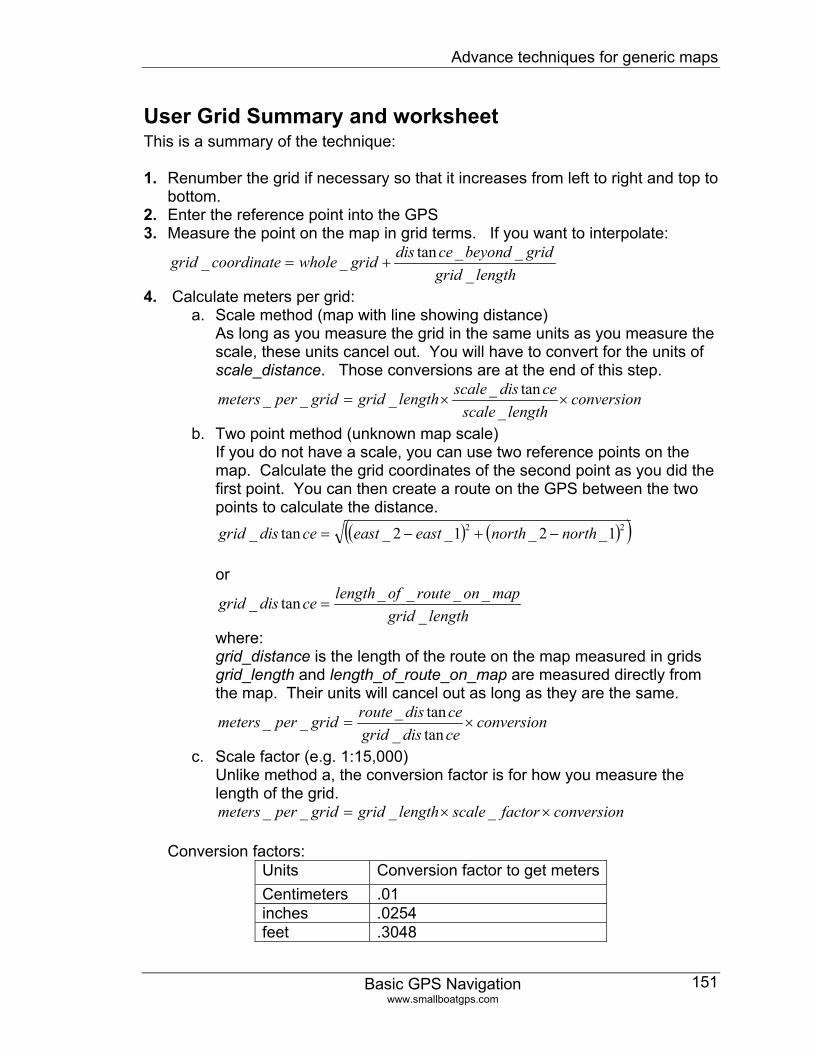
Advance techniques for generic maps
Basic GPS Navigation www.smallboatgps.com
151
User Grid Summary and worksheet This is a summary of the technique: 1. Renumber the grid if necessary so that it increases from left to right and top to
bottom. 2. Enter the reference point into the GPS 3. Measure the point on the map in grid terms. If you want to interpolate:
lengthgridgridbeyondcedisgridwholecoordinategrid
___tan__ +=
4. Calculate meters per grid: a. Scale method (map with line showing distance)
As long as you measure the grid in the same units as you measure the scale, these units cancel out. You will have to convert for the units of scale_distance. Those conversions are at the end of this step.
conversionlengthscale
cedisscalelengthgridgridpermeters ××=_
tan____
b. Two point method (unknown map scale) If you do not have a scale, you can use two reference points on the map. Calculate the grid coordinates of the second point as you did the first point. You can then create a route on the GPS between the two points to calculate the distance.
( ) ( )( )22 1_2_1_2_tan_ northnortheasteastcedisgrid −+−= or
lengthgridmaponrouteoflengthcedisgrid
_____tan_ =
where: grid_distance is the length of the route on the map measured in grids grid_length and length_of_route_on_map are measured directly from the map. Their units will cancel out as long as they are the same.
conversioncedisgridcedisroutegridpermeters ×=
tan_tan___
c. Scale factor (e.g. 1:15,000) Unlike method a, the conversion factor is for how you measure the length of the grid.
conversionfactorscalelengthgridgridpermeters ××= ____ Conversion factors:
Units Conversion factor to get meters Centimeters .01 inches .0254 feet .3048
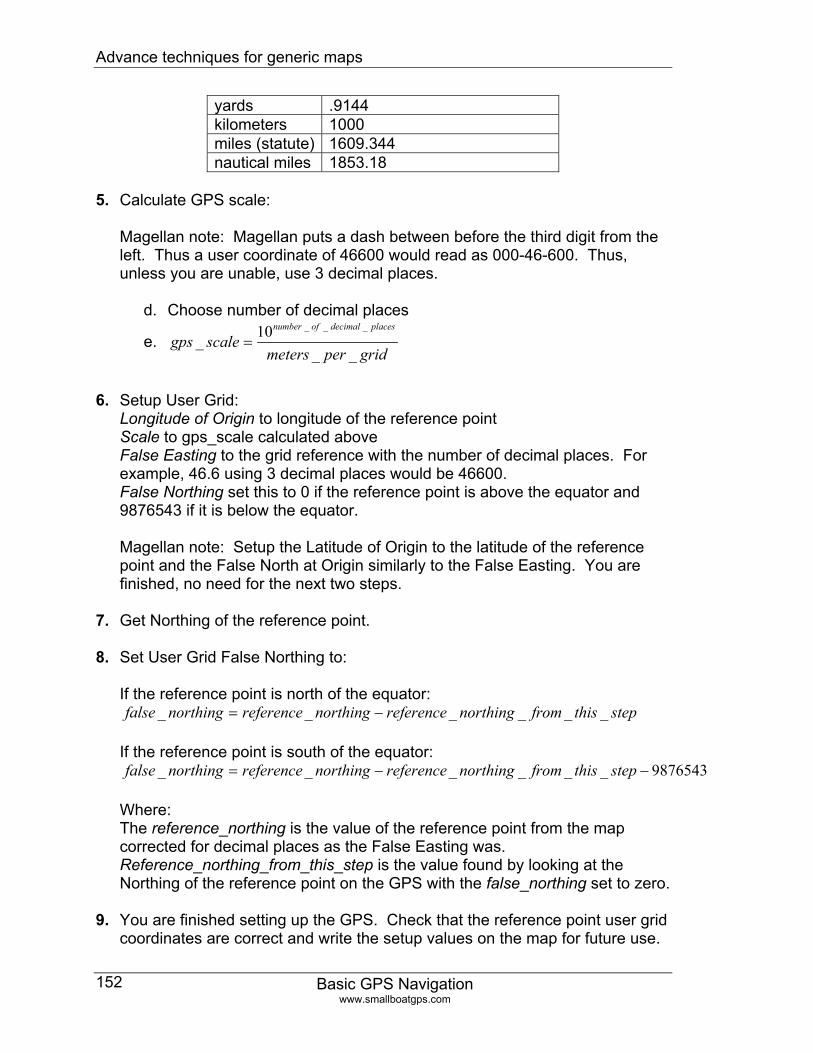
Advance techniques for generic maps
Basic GPS Navigation www.smallboatgps.com
152
yards .9144 kilometers 1000 miles (statute) 1609.344 nautical miles 1853.18
5. Calculate GPS scale:
Magellan note: Magellan puts a dash between before the third digit from the left. Thus a user coordinate of 46600 would read as 000-46-600. Thus, unless you are unable, use 3 decimal places.
d. Choose number of decimal places
e. gridpermeters
scalegpsplacesdecimalofnumber
__10_
___
=
6. Setup User Grid: Longitude of Origin to longitude of the reference point Scale to gps_scale calculated above False Easting to the grid reference with the number of decimal places. For example, 46.6 using 3 decimal places would be 46600. False Northing set this to 0 if the reference point is above the equator and 9876543 if it is below the equator. Magellan note: Setup the Latitude of Origin to the latitude of the reference point and the False North at Origin similarly to the False Easting. You are finished, no need for the next two steps.
7. Get Northing of the reference point.
8. Set User Grid False Northing to: If the reference point is north of the equator:
stepthisfromnorthingreferencenorthingreferencenorthingfalse ______ −=
______
If the reference point is south of the equator:
9876543−−= stepthisfromnorthingreferencenorthingreferencenorthingfalse Where: The reference_northing is the value of the reference point from the map corrected for decimal places as the False Easting was. Reference_northing_from_this_step is the value found by looking at the Northing of the reference point on the GPS with the false_northing set to zero.
9. You are finished setting up the GPS. Check that the reference point user grid coordinates are correct and write the setup values on the map for future use.
Connecting your GPS to the computer
Basic GPS Navigation www.smallboatgps.com
153
Chapter 14 Connecting your GPS to the computer There are several programs for saving your waypoints onto your computer. If you have a program to load maps such as Garmin Map Source, you can use this program to save your waypoints. If you do not have a mapping GPS or do not have the extra loadable maps, here are a couple of free programs to interface with your computer.
Connecting the GPS to your Computer
Many GPS receivers include a data cable, but some of them do not. The official Garmin cable is about $38. There are cheaper options available such as www.pfranc.com. If you need a robust connection that you will use often, buy a cable. If you just need to occasionally save some waypoints or update the firmware of the GPS, this will work.
For the Garmin receivers such as the 12, II, III, 72, with the round plug it is fairly easy to connect the GPS to a serial port for $2 worth of parts at an electronics store such as Radio Shack. The part from Radio Shack is 276-1428, 9-Position Female D-Sub Connector. You can enter this part number at www.radioshack.com to see better what it is. You will need 3 wires about 1 foot long. Strip about 3/8 inches off of each end and crimp the metal fittings onto each end of each wire. The holes of the connector are numbered, you will need to stuff the metal ends into the housing on the end that will attach to the computer. The other ends will clip onto the pins on the GPS with the fittings. The wires should connect to the GPS as follows: pin 2 – receive (T on the GPS), pin 3 – transmit (R on the GPS), and pin 5 ground (- on the GPS). You will want to somehow mark the wires for future references. The source for this information is: http://www.garmin.com/support/faqs/faq.jsp?faq=68).
Using the Garmin source in the previous paragraph it is also possible to connect a Garmin eTrex. However, it is much harder to maintain the connection between the ends of the wire and the contacts on the GPS. I have tried bending the wire over the end of a small piece of note card which slid into the slot on the back of the GPS. I had to hold the wires against the contacts with my finger to keep the connection. Certainly not elegant and it might be too frustrating, but I did get it to work. With a little work and some scrounging, you might be able to find some springs and a small piece of plastic to do some minor recreational engineering.
Although there is the possibility that you could do some damage, the risk is relatively low. I initially connected the transmit and receive wires backwards. It didn’t work until I switched the wires, but it didn’t harm the GPS or the computer.
Connecting your GPS to the computer
Basic GPS Navigation www.smallboatgps.com
154
Software Many of the programs that I listed in the Mapping Programs section on page 66 also have the ability to transfer waypoints, tracks, and routes between the GPS and your computer. However, these are much simpler programs whose function is more for saving and loading routes, waypoints, and tracks.
G7toWin
http://www.gpsinformation.org/ronh/
This is one of the more powerful freeware programs. I highly recommend this program.
EasyGPS
www.easygps.com
Perhaps the simplest program of my suggestions. It works with several different brands of GPS. EasyGPS is simple and free. Although, I have not had time to explore the programs in any depth, TopoGrafix also sells some other programs including ExpertGPS, which allows you to view waypoints overlaid on satellite photos.
Rowing, Kayaking, and Sailing
Basic GPS Navigation www.smallboatgps.com
155
Chapter 15 Rowing, Kayaking, and Sailing Rowing Rowing promotion
Most people think of rowing as being done as a team sport in schools, especially the Ivy League. Usually, this is done in long, thin, and expensive boats on calm rivers. Rowing is incorrectly perceived as being only slightly more accessible than Polo. There are also people that row in open water, such as in San Francisco bay and near Cape Cod. Rowing is great exercise in that especially with a sliding seat, it involves the whole body. With a sliding seat, much of the initial push is done by the legs with the continuation of the stroke being done with the upper body. I have some more information Links and Further Reading section. Just as in bicycling, there is a whole spectrum from hard-core road racers to mountain biking – there is a spectrum from the exclusive and expensive carbon fiber equipped competitive rowing to the open water rowing in San Francisco Bay. Somewhere in this spectrum are people who just enjoy going out at an enjoyable but vigorous pace to enjoy the water and get some fitness. I am in this last category.
GPS techniques
Following a GPS while rowing is simple. The pointer or turn field tells you which direction to turn the stern. The biggest point about using GPS is that the indications given by the TURN field or by pointer type of screens work correctly even while sitting backwards. If the GPS indicates a turn of L005, this means that the bow needs to come left 5 degrees. If the bow turns left by 5 degrees, the stern will turn left by 5 degrees when looking backward. Thus, the GPS works fine while sitting backwards in a boat. The direction of OFF COURSE does reverse sensing while when rowing. As I mention in the Navigation Terminology section, I think that the sensing direction of OFF COURSE is backwards anyway. While rowing, the direction indicated by OFF COURSE is to the course line rather than from the course line. What has not changed is how to correct towards the course described in the “Navigating along a line using bearing information” section on page 91. Still try to get the OFF COURSE direction and the TURN direction to agree.
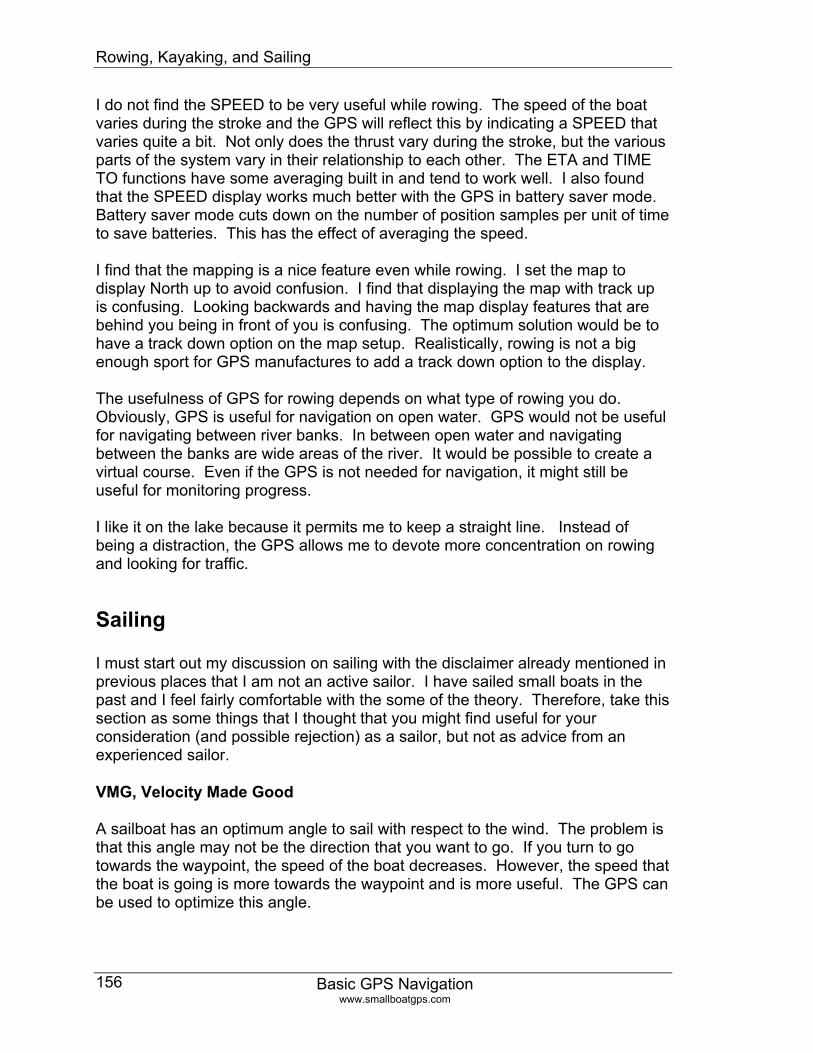
Rowing, Kayaking, and Sailing
Basic GPS Navigation www.smallboatgps.com
156
I do not find the SPEED to be very useful while rowing. The speed of the boat varies during the stroke and the GPS will reflect this by indicating a SPEED that varies quite a bit. Not only does the thrust vary during the stroke, but the various parts of the system vary in their relationship to each other. The ETA and TIME TO functions have some averaging built in and tend to work well. I also found that the SPEED display works much better with the GPS in battery saver mode. Battery saver mode cuts down on the number of position samples per unit of time to save batteries. This has the effect of averaging the speed. I find that the mapping is a nice feature even while rowing. I set the map to display North up to avoid confusion. I find that displaying the map with track up is confusing. Looking backwards and having the map display features that are behind you being in front of you is confusing. The optimum solution would be to have a track down option on the map setup. Realistically, rowing is not a big enough sport for GPS manufactures to add a track down option to the display. The usefulness of GPS for rowing depends on what type of rowing you do. Obviously, GPS is useful for navigation on open water. GPS would not be useful for navigating between river banks. In between open water and navigating between the banks are wide areas of the river. It would be possible to create a virtual course. Even if the GPS is not needed for navigation, it might still be useful for monitoring progress. I like it on the lake because it permits me to keep a straight line. Instead of being a distraction, the GPS allows me to devote more concentration on rowing and looking for traffic.
Sailing I must start out my discussion on sailing with the disclaimer already mentioned in previous places that I am not an active sailor. I have sailed small boats in the past and I feel fairly comfortable with the some of the theory. Therefore, take this section as some things that I thought that you might find useful for your consideration (and possible rejection) as a sailor, but not as advice from an experienced sailor.
VMG, Velocity Made Good
A sailboat has an optimum angle to sail with respect to the wind. The problem is that this angle may not be the direction that you want to go. If you turn to go towards the waypoint, the speed of the boat decreases. However, the speed that the boat is going is more towards the waypoint and is more useful. The GPS can be used to optimize this angle.
Rowing, Kayaking, and Sailing
Basic GPS Navigation www.smallboatgps.com
157
Most handheld GPS receivers have a data field for Velocity Made Good, VMG. VMG is the speed projected along the bearing line, which is the line between the boat and the active waypoint. Another way of saying this is VMG is the speed at which you are going towards the waypoint. The formula for this is VMG= SPEED * COS (TURN), where TURN= TRACK-BEARING. This is not the speed along the course line. Figure 72 shows this speed at several points along a tack. Look at the data fields for detail.
Point 1 Point 2 Point 3 Figure 72 (Garmin GPS MAP 76)
Figure 72 shows a tack that is a constant speed and track. All that changes is the relationship of the boat to points A and B. In the second screen, the VMG has been reduced to zero and in the third screen, the VMG is negative. This is because if you maintain the same track beyond boat’s location in the second screen, you are actually getting further from waypoint B. If you were to draw a circle around waypoint B, point 2 would be the tangent point. In all three cases if you were to project the speed of the boat along the course line it would be the same, 5 knots. The calculation is ( SPEED * cos ( COURSE – TRACK), 10 knots * cos (60)). There is no data field for the projection of the speed along the course. Even though the speed towards waypoint B is actually negative at point 3, the boat is still progressing along the course from A to B. The location of point A and the course is irrelevant to VMG. The only factors for VMG are TRACK, BEARING, SPEED and TRACK. I have exaggerated my example for illustration. In many cases, VMG will be reasonably close to the speed projected along the course. The third screen of Figure 72 is useful for understanding the concept of VMG. If you get to this region of negative VMG, you have probably traveled too far on the tack.
Rowing, Kayaking, and Sailing
Basic GPS Navigation www.smallboatgps.com
158
My purpose was to explain what the VMG is actually telling you. If you agree to take the disclaimer of my previously mentioned lack of sailing experience I will continue with further discussion of possible uses for VMG for your consideration and possible rejection. One thing that VMG will not tell you is how far to travel on a tack. What it can be used for is to optimize the heading while on a tack. If you track directly to a waypoint, VMG will stay steady and be equal to SPEED. However, unless you are tracking directly to the waypoint, the VMG will decrease as you get closer to the waypoint. This is usually a longer term and more constant effect than the changes in VMG because of changes in heading. Not only will changing the heading change TRACK, but it will also change SPEED. The change in SPEED is a result of the change in relationship of the boat with the wind. Use trial and error to find the heading that gives you the best VMG at any point. Generally, the short term effects of the heading change will be easy to pick up relative to the longer term effects of the natural decay of VMG due to the geometry of the solution. An interesting point is that VMG can be used in situations where a tack is not necessary to go directly to the waypoint. Take going directly downwind as an example. Any sailboat will sail downwind directly to a point. However, the speed polar is such that tacking at a slight angle will often result in a faster time to the point. In other words, the increase in speed more than compensates for the increase in distance by not going direct. The VMG field can be used to find this angle. In case you were wondering how TIME TO NEXT is calculated, I have to admit my ignorance. If you are tracking towards your active waypoint, it works well. There appears to be some short term averaging in the solution. If you are not tracking towards your waypoint, it is suspect. Obviously, there is more involved than VMG as indicated by there being a value for TIME TO NEXT when the VMG is zero or negative.
Hazards
With power boating it is possible to plot a route and follow it. Sailing is more complicated in that it is often necessary to tack back and forth along the route. There are ways of using a GPS to accomplish this task. Again, keep in mind my disclaimer at the beginning of this section. Simply enough, even though I understand the techniques that I explain, I am not an active sailor. All of the techniques require that you are familiar with and use a chart to plot zones of safety. These techniques can be used with a very simple non-mapping
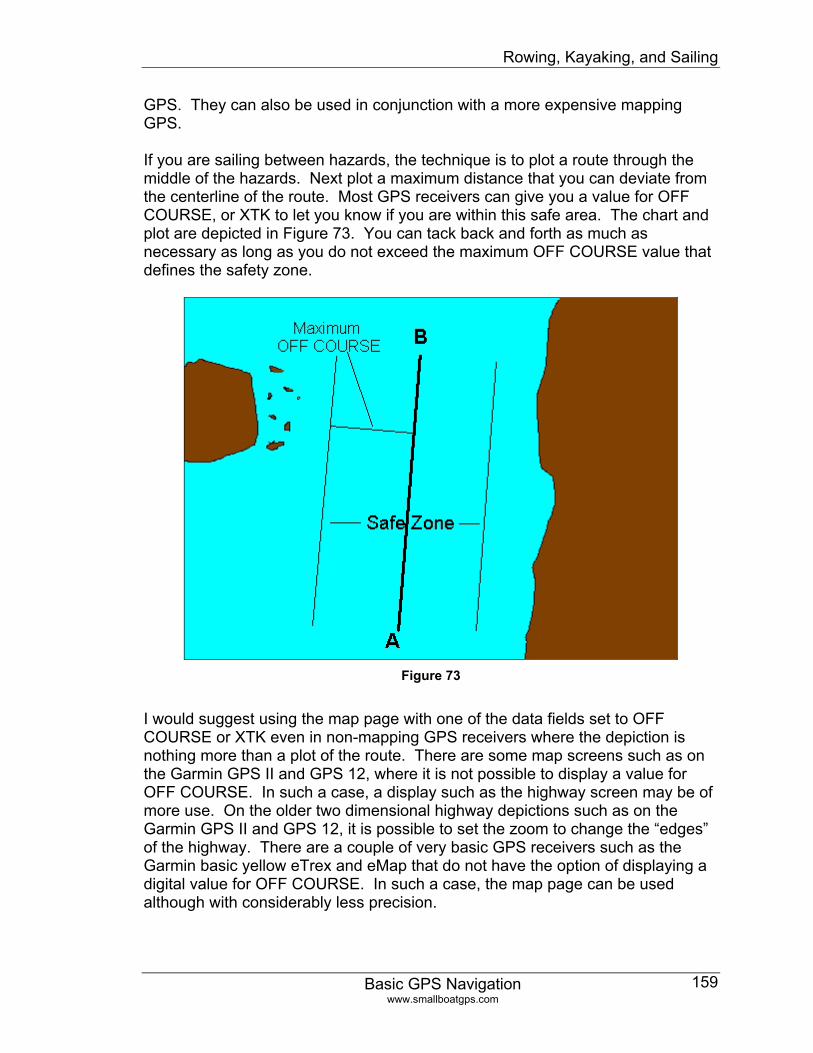
Rowing, Kayaking, and Sailing
Basic GPS Navigation www.smallboatgps.com
159
GPS. They can also be used in conjunction with a more expensive mapping GPS. If you are sailing between hazards, the technique is to plot a route through the middle of the hazards. Next plot a maximum distance that you can deviate from the centerline of the route. Most GPS receivers can give you a value for OFF COURSE, or XTK to let you know if you are within this safe area. The chart and plot are depicted in Figure 73. You can tack back and forth as much as necessary as long as you do not exceed the maximum OFF COURSE value that defines the safety zone.
Figure 73
I would suggest using the map page with one of the data fields set to OFF COURSE or XTK even in non-mapping GPS receivers where the depiction is nothing more than a plot of the route. There are some map screens such as on the Garmin GPS II and GPS 12, where it is not possible to display a value for OFF COURSE. In such a case, a display such as the highway screen may be of more use. On the older two dimensional highway depictions such as on the Garmin GPS II and GPS 12, it is possible to set the zoom to change the “edges” of the highway. There are a couple of very basic GPS receivers such as the Garmin basic yellow eTrex and eMap that do not have the option of displaying a digital value for OFF COURSE. In such a case, the map page can be used although with considerably less precision.
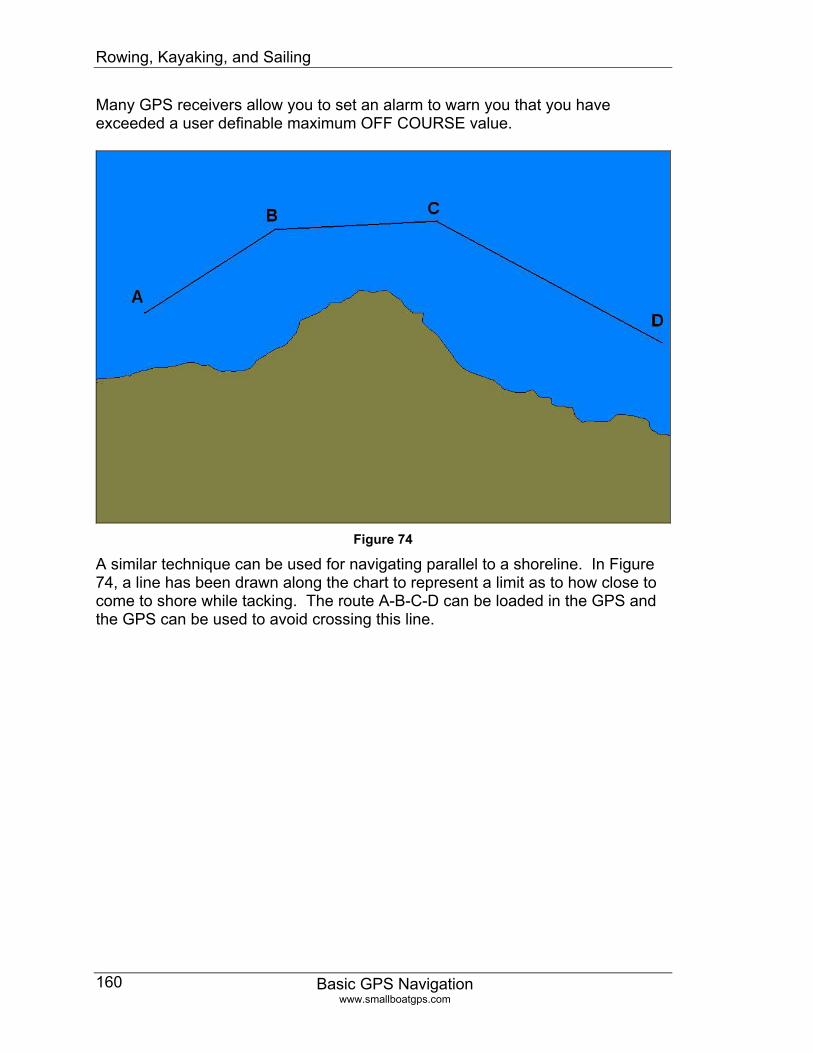
Rowing, Kayaking, and Sailing
Basic GPS Navigation www.smallboatgps.com
160
Many GPS receivers allow you to set an alarm to warn you that you have exceeded a user definable maximum OFF COURSE value.
Figure 74
A similar technique can be used for navigating parallel to a shoreline. In Figure 74, a line has been drawn along the chart to represent a limit as to how close to come to shore while tacking. The route A-B-C-D can be loaded in the GPS and the GPS can be used to avoid crossing this line.
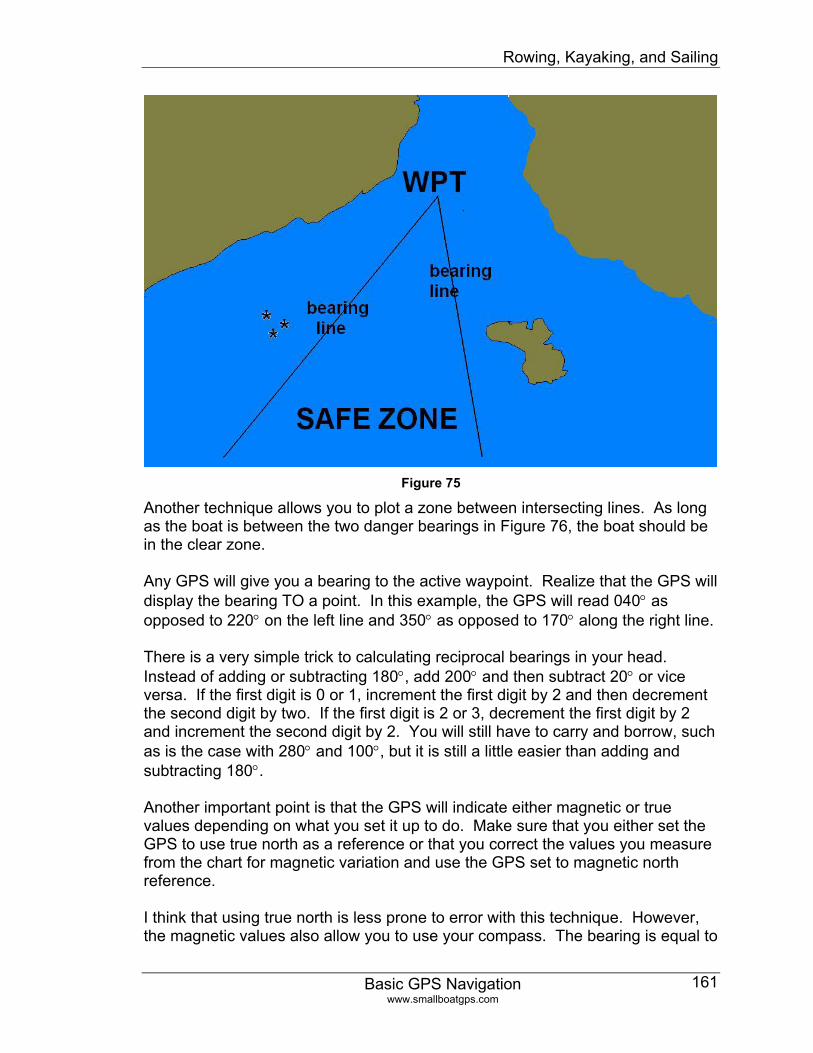
Rowing, Kayaking, and Sailing
Basic GPS Navigation www.smallboatgps.com
161
Figure 75
Another technique allows you to plot a zone between intersecting lines. As long as the boat is between the two danger bearings in Figure 76, the boat should be in the clear zone. Any GPS will give you a bearing to the active waypoint. Realize that the GPS will display the bearing TO a point. In this example, the GPS will read 040° as opposed to 220° on the left line and 350° as opposed to 170° along the right line. There is a very simple trick to calculating reciprocal bearings in your head. Instead of adding or subtracting 180°, add 200° and then subtract 20° or vice versa. If the first digit is 0 or 1, increment the first digit by 2 and then decrement the second digit by two. If the first digit is 2 or 3, decrement the first digit by 2 and increment the second digit by 2. You will still have to carry and borrow, such as is the case with 280° and 100°, but it is still a little easier than adding and subtracting 180°. Another important point is that the GPS will indicate either magnetic or true values depending on what you set it up to do. Make sure that you either set the GPS to use true north as a reference or that you correct the values you measure from the chart for magnetic variation and use the GPS set to magnetic north reference. I think that using true north is less prone to error with this technique. However, the magnetic values also allow you to use your compass. The bearing is equal to
Rowing, Kayaking, and Sailing
Basic GPS Navigation www.smallboatgps.com
162
the heading added to the relative bearing. For example, if WPT is an object that you can sight, you can visually get a relative bearing. If you are heading 040° and the object is 30° to the left of the bow, then the BEARING to the object is 010°. Back to the example, as long as the position of the boat is between 040° and 350° true, the boat is in the safe area. Some other tricks: If you have an isolated hazard, many GPS receivers allow you to create a proximity alarm around a waypoint. This feature allows you to draw a circle of a distance that you specify around a waypoint and it gives you a warning of when your position is within the circle. In such a case, create a waypoint at the center of the location of the hazard and set the proximity radius to an appropriately conservative value. In the case of a GPS without proximity waypoints, you can still create waypoints to represent hazards. Depending on your GPS, you can put the cursor over the created waypoint to get a bearing and distance to the waypoint in addition to the point that you are navigating to, or you might consider creating a waypoint that is biased toward your route rather than in the center of the hazard area.
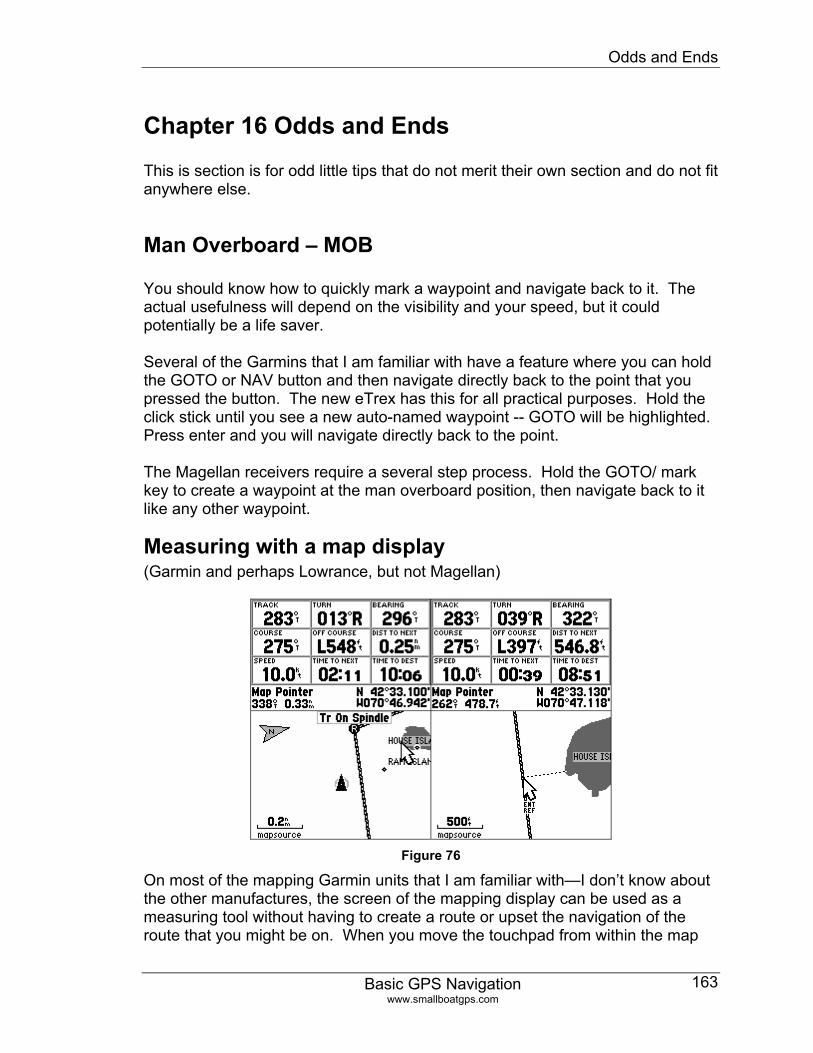
Odds and Ends
Chapter 16 Odds and Ends
Basic GPS Navigation www.smallboatgps.com
163
This is section is for odd little tips that do not merit their own section and do not fit anywhere else.
Man Overboard – MOB You should know how to quickly mark a waypoint and navigate back to it. The actual usefulness will depend on the visibility and your speed, but it could potentially be a life saver. Several of the Garmins that I am familiar with have a feature where you can hold the GOTO or NAV button and then navigate directly back to the point that you pressed the button. The new eTrex has this for all practical purposes. Hold the click stick until you see a new auto-named waypoint -- GOTO will be highlighted. Press enter and you will navigate directly back to the point. The Magellan receivers require a several step process. Hold the GOTO/ mark key to create a waypoint at the man overboard position, then navigate back to it like any other waypoint.
Measuring with a map display (Garmin and perhaps Lowrance, but not Magellan)
Figure 76
On most of the mapping Garmin units that I am familiar with—I don’t know about the other manufactures, the screen of the mapping display can be used as a measuring tool without having to create a route or upset the navigation of the route that you might be on. When you move the touchpad from within the map

Odds and Ends
Basic GPS Navigation www.smallboatgps.com
164
display, you get a cursor. The bearing and distance as well as the coordinates are displayed to the cursor point. This is dynamic and will update as you travel. If you press MENU and choose measure distance you will get an ENT REF under the cursor. When you press ENTER, this will set that point as a reference point. Now the cursor will give the bearing and distance relative to the point where you pressed enter. In Figure 76, I pressed ENTER on the shore of House Island. I then moved the curser to the route line to see that the route along the buoys is 478 ft. from the shore. If I were to press ENTER again, I would start measuring from this point. Notice that in the measuring mode the map switched to North orientation. The first screen has a North pointer in the upper left. The second screen does not show the pointer because the whole screen is oriented to North.
Tracks Most of this book has been concerned with navigation – how to find your way to your destination. However, it is sometimes interesting to use the GPS to find out where you have been. In addition to viewing the track on the GPS itself, it is possible to download the track and superimpose it on a variety of maps including aerial photographs. Figure 77 is a track that I downloaded from a basic Garmin eTrex. I saved the track as a .gpx file using G7toWin, http://www.gpsinformation.org/ronh/, and then uploaded it to www.gpsvisualizer.com. This was a very simple process, but there are many various programs with various capabilities that are beyond my interest and expertise. I have also used USA Photo Maps, http://jdmcox.com, with good results. I have just played around with this capability. There are a plethora of programs that allow you to download and view tracks. I would suggest the following sources for further research:
• GPS for Dummies Joel McNamara Wiley Publishing, ISBN 0-7645-6933-3 GPS for Dummies has good coverage of the various software available to interface a computer with the GPS.
• For PC shareware, try www.gpsinformation.net I have referred to this multiple times, but this is a great place to look for links to several other shareware programs. Look under the section for Third Party Software.
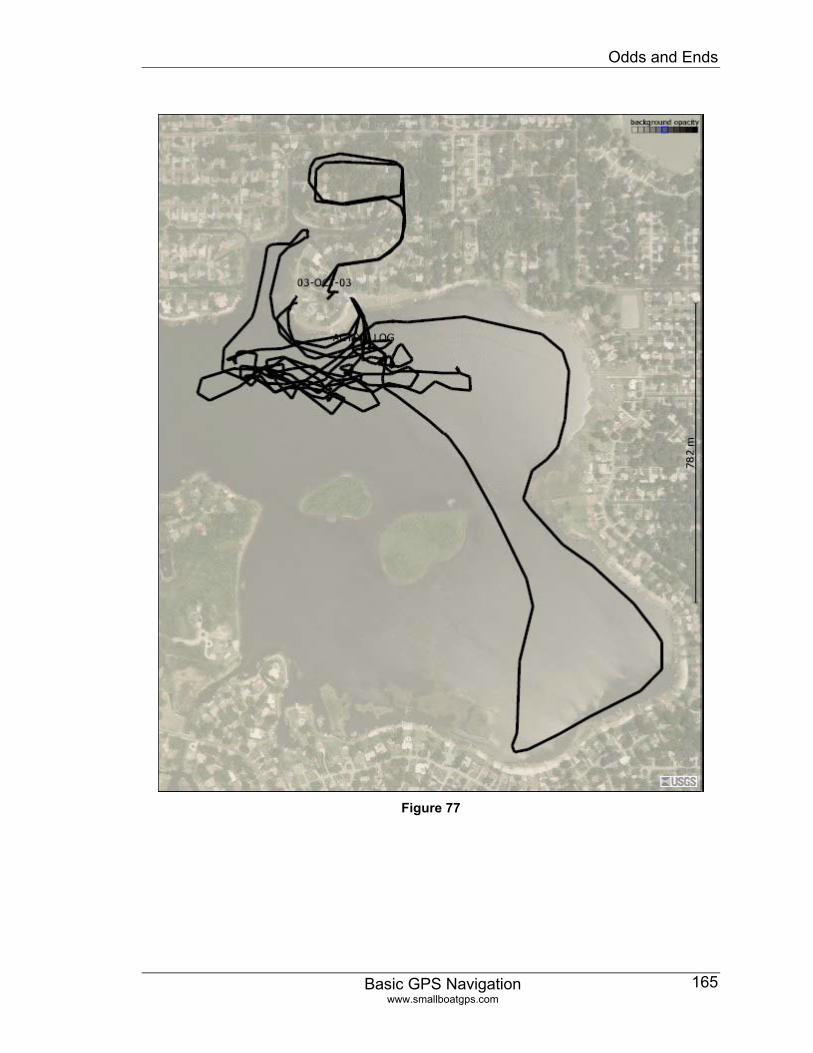
Odds and Ends
Basic GPS Navigation www.smallboatgps.com
165
Figure 77

Links and Further Reading
Basic GPS Navigation www.smallboatgps.com
167
Chapter 17 Links and Further Reading Most of the links are imbedded in the various sections of this text. However there are a couple of sources that just do not fit any particular place that I wanted to list.
Marine GPS use
• GPS Instant Navigation, 2nd edition Kevin Monahan & Don Douglass Fine Edge, 2000; ISBN 0-938665-76-6 www.FineEdge.com Excellent text on using GPS for marine navigation. Few examples using smaller handheld receivers, but there is still much good information from two experienced skipper.
Aviation use
• Cockpit GPS www.cockpitgps.com At the present time this is unpublished. This is my book on using GPS for aviation use.
GPS information
• A GPS User Manual, Working with Garmin Receivers Dale DePriest 1st Books, ISBN 1-4033-9823-2 (e-book), ISBN 1-4033-9824-0 (Paperback) http://users.cwnet.com/dalede/ This book has a lot of good information on the specifics operational tricks of many of the Gamin handheld receivers.
• Joe Mehaffey and Jack Yeazel's GPS Information Website www.gpsinformation.net consider this to be a GPS portal. This is a good place to start your search if you are looking for GPS information.
• GPS tracking of plate tectonics http://sideshow.jpl.nasa.gov/mbh/series.html This is a site run by the Jet Propulsion Laboratory showing plate tectonic
Links and Further Reading
Basic GPS Navigation www.smallboatgps.com
168
movement using GPS tracking. Obviously this is not being done with consumer grade GPS receivers. This is a unique application of GPS technology.
• GPS Guide for Beginners, www.garmin.com This is a good overview of GPS. Go to the Garmin website, follow the Support link, then select User Manuals; then choose Other, Other, and GPS Guide for Beginners.
• Hunting and Fishing times, www.solunar.com Many GPS receivers calculate best hunting and fishing times. I am neither a hunter nor a fisherman, but I had been intrigued as to what the GPS would base such a calculation on. This site will explain the theory.
• GPS for Dummies Joel McNamara Wiley Publishing, ISBN 0-7645-6933-3 This is a good source of information on PDA programs and third party GPS programs for calibrating maps.
• GPS and Mathmatics, http://www.math.uncc.edu/~droyster David Royster This is a paper explaining GPS with some mathematics such as simultaneous equations.
Map and Compass Information • Finding Your Way with Map and Compass, U.S. Geological Survey
http://mac.usgs.gov/mac/isb/pubs/factsheets/fs03501.html#toc
• How to Use a Map and Compass, Kjetil Kjernsmo’ http://www.learn-orienteering.org
• OA Guide to Map and Compass, Rick Curtis http://www.princeton.edu/~oa/manual/mapcompass.shtml
• Traditional Mountaineering http://www.traditionalmountaineering.org On this site you will find a link to Robert Speik’s class handout on using GPS and compass for navigation.
• Maps 101, Natural Recourses Canada http://maps.nrcan.gc.ca/maps101/index.html This is a very extensive site on reading maps as well as some information on using a compass
Links and Further Reading
Basic GPS Navigation www.smallboatgps.com
169
Cartographic information
• Odden’s Bookmarks, http://oddens.geog.uu.nl/index.html Over 16,000 cartographic links.
• Using a Garmin GPS with Paper Land Maps, www.garmin.com This is a good overview of basic cartography. Go to the Garmin website, follow the Support link, then select User Manuals; then choose Other, Other, and Using a Garmin GPS with Paper Land Maps.
Rowing
• Search for “recreational rowing” in Internet search engines
• What is Open Water Rowing? http://www.openwater.com/Stories/What_is_STORY.htm
• Alden Rowing Shells, www.rowalden.com Maker of recreational rowing shells. I row the Alden 18 with one Oarmaster. The Horizon, which is a polyethylene shell for less than $1000 (without oars), looks intriguing.
• Life in the Slow Lane Arthur Martin Peter Randall, 1990; ISBN 0914339303 This is the autobiography of the naval architect, Arthur Martin, who created the Alden Ocean Shell.
• MAAS Shells, www.maasboats.com These are well regarded recreational and open water shells.
• Recreation Rowing http://www.adirondackrowing.com/ This is a dealer’s website, Peter Gallo. If you are interested in recreational rowing this is one possible place to start. I have talked to Peter a couple of times when I was contemplating getting a boat and feel comfortable recommending him based on this experience.
Links and Further Reading
Basic GPS Navigation www.smallboatgps.com
170
Kayaking
• Folding Kayaks, http://www.foldingkayaks.org/ Rowing and kayaking are two very different sports. I enjoy them both, but for different reasons. My kayaks fold and can be checked as luggage on board an aircraft. These kayaks can portage at 500 m.p.h. Michael Edelman has put together an excellent site on foldable kayaks with good information including where to find more information.
• Fundamentals of Kayak Navigation, 3rd edition David Burch Globe Pequot Press, 1999; ISBN 0-7627-0473-X The title sums it up, this is a book dedicated to kayak navigation. Issues such as tides, currents, rules of the road, chart reading, and non-GPS navigation are covered.
Geocaching and other different uses
• http://www.geocaching.com/ Geocaching is something like a GPS aided scavenger hunt.
• http://www.confluence.org/ The Degree Confluence project is an effort to take pictures at whole degree latitude and longitude points.

Basic GPS Navigation This book is a practical guide to using GPS, especially consumer handheld models for a variety of navigational activities. Topics covered:
• How GPS works This is a purposefully oversimplified version. I have links to more in depth explanations.
• Issues A discussion of where I see the vulnerabilities of using GPS
• Choosing a GPS receiver What you should look for in a receiver I do have a couple of my favorite recommendations, but this is not intended as a comprehensive review of the models on the market.
• Waypoints In order to navigate to someplace, you need to have the coordinates of that place. I have some sources of how to get those coordinates. As well as some links to free computer software to save your favorite coordinates from you GPS to your computer.
• Navigation How to get to where you are going using the GPS
• Routes How to setup routes
This is am Internet based home publishing project by an airline pilot, novice rower, kayaker, and sailor who has a degree in engineering, but almost majored in freshman English. No claims are made to the quality of the writing, but I think that you will find the information useful.
Visit my website at www.smallboatgps.com for the latest updates.