bcm administration element managerxtremetelecom.com/images/xtreme/training guides/norstarbcm...
TRANSCRIPT
BCM ADMINISTRATION Element Manager
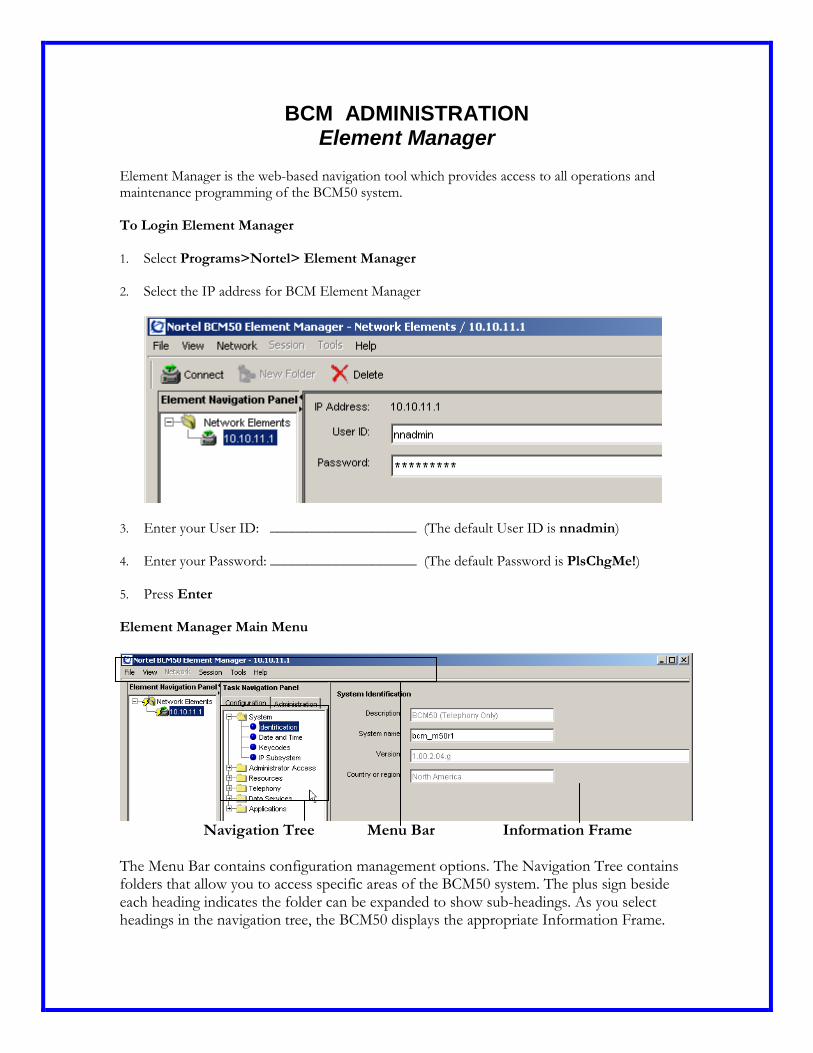
Element Manager is the web-based navigation tool which provides access to all operations and maintenance programming of the BCM50 system. To Login Element Manager
1. Select Programs>Nortel> Element Manager 2. Select the IP address for BCM Element Manager
3. Enter your User ID: ____________________ (The default User ID is nnadmin) 4. Enter your Password: ____________________ (The default Password is PlsChgMe!) 5. Press Enter Element Manager Main Menu
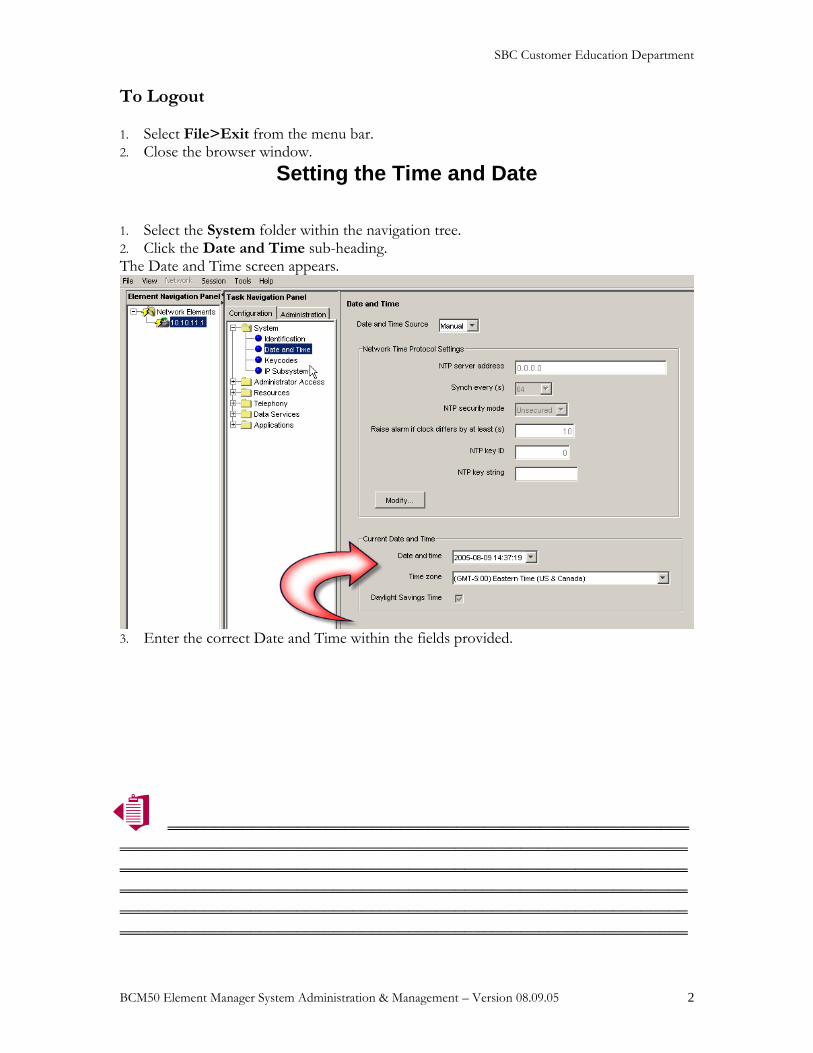
Navigation Tree Menu Bar Information Frame
The Menu Bar contains configuration management options. The Navigation Tree contains folders that allow you to access specific areas of the BCM50 system. The plus sign beside each heading indicates the folder can be expanded to show sub-headings. As you select headings in the navigation tree, the BCM50 displays the appropriate Information Frame.
SBC Customer Education Department
BCM50 Element Manager System Administration & Management – Version 08.09.05 2
To Logout 1. Select File>Exit from the menu bar. 2. Close the browser window.
Setting the Time and Date 1. Select the System folder within the navigation tree. 2. Click the Date and Time sub-heading. The Date and Time screen appears.
3. Enter the correct Date and Time within the fields provided.
_________________________________________________________________________________________________________________________________________________________________________________________________________________________________________________________________________________________________________________________________________________________________________
SBC Customer Education Department
BCM50 Element Manager System Administration & Management – Version 08.09.05 3
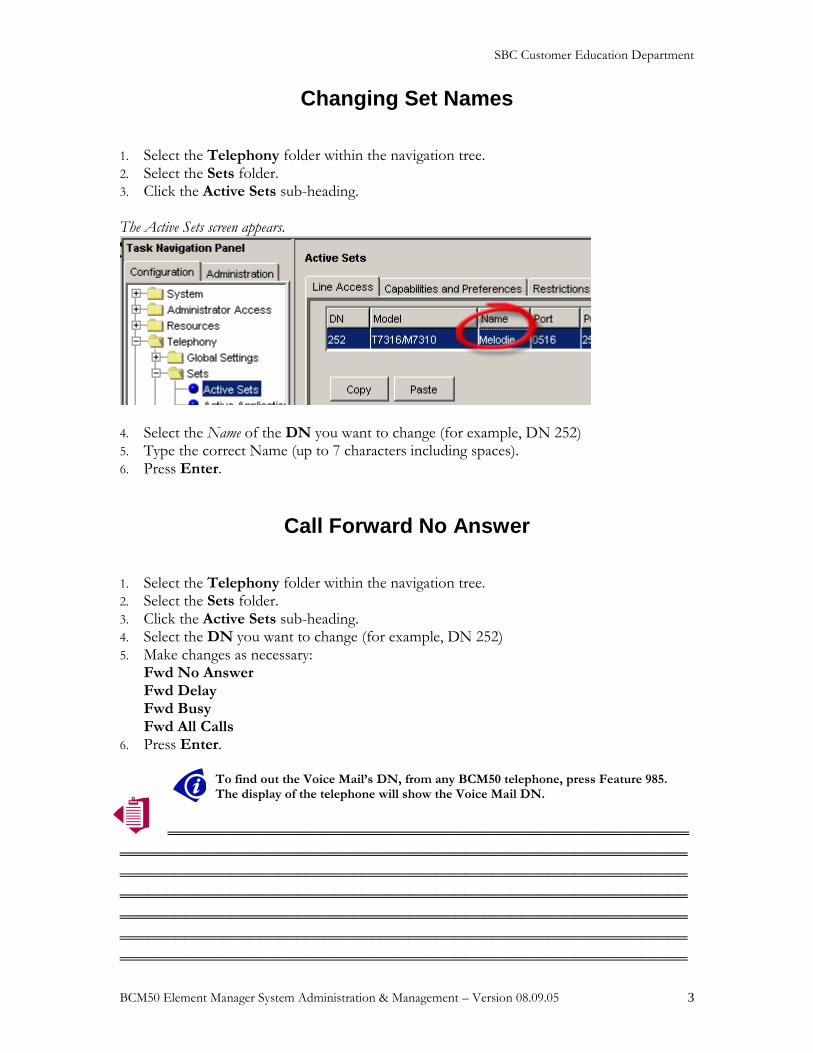
Changing Set Names 1. Select the Telephony folder within the navigation tree. 2. Select the Sets folder. 3. Click the Active Sets sub-heading. The Active Sets screen appears.
4. Select the Name of the DN you want to change (for example, DN 252) 5. Type the correct Name (up to 7 characters including spaces). 6. Press Enter.
Call Forward No Answer 1. Select the Telephony folder within the navigation tree. 2. Select the Sets folder. 3. Click the Active Sets sub-heading. 4. Select the DN you want to change (for example, DN 252) 5. Make changes as necessary:
Fwd No Answer Fwd Delay Fwd Busy Fwd All Calls
6. Press Enter.
To find out the Voice Mail’s DN, from any BCM50 telephone, press Feature 985. The display of the telephone will show the Voice Mail DN.
______________________________________________________________________________________________________________________________________________________________________________________________________________________________________________________________________________________________________________________________________________________________________________________________________________________________________
SBC Customer Education Department
BCM50 Element Manager System Administration & Management – Version 08.09.05 4
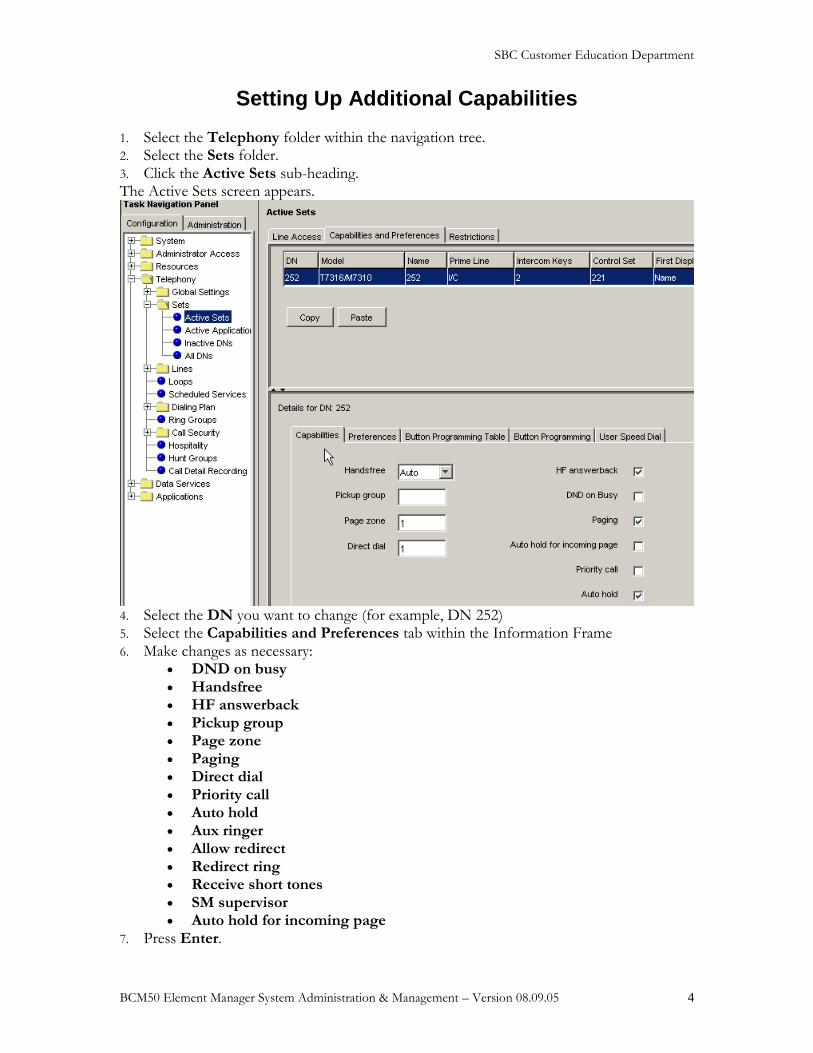
Setting Up Additional Capabilities 1. Select the Telephony folder within the navigation tree. 2. Select the Sets folder. 3. Click the Active Sets sub-heading. The Active Sets screen appears.
4. Select the DN you want to change (for example, DN 252) 5. Select the Capabilities and Preferences tab within the Information Frame 6. Make changes as necessary:
DND on busy Handsfree HF answerback Pickup group Page zone Paging Direct dial Priority call Auto hold Aux ringer Allow redirect Redirect ring Receive short tones SM supervisor Auto hold for incoming page
7. Press Enter.

SBC Customer Education Department
BCM50 Element Manager System Administration & Management – Version 08.09.05 5
Line Appearances 1. Select the Telephony folder within the navigation tree. 2. Select the Sets folder. 3. Click the Active Sets sub-heading. The Active Sets screen appears.
1. Select the DN you want to change (for example, DN 252) 2. Select the Line Assignment tab within the Information Frame 3. Make changes as necessary:
Appearance type Appearances Caller ID set Vmsg set
4. Press Enter.
_________________________________________________________________________________________________________________________________________________________________________________________________________________________________________________________________________________________________________________________________________________________________________
SBC Customer Education Department
BCM50 Element Manager System Administration & Management – Version 08.09.05 6
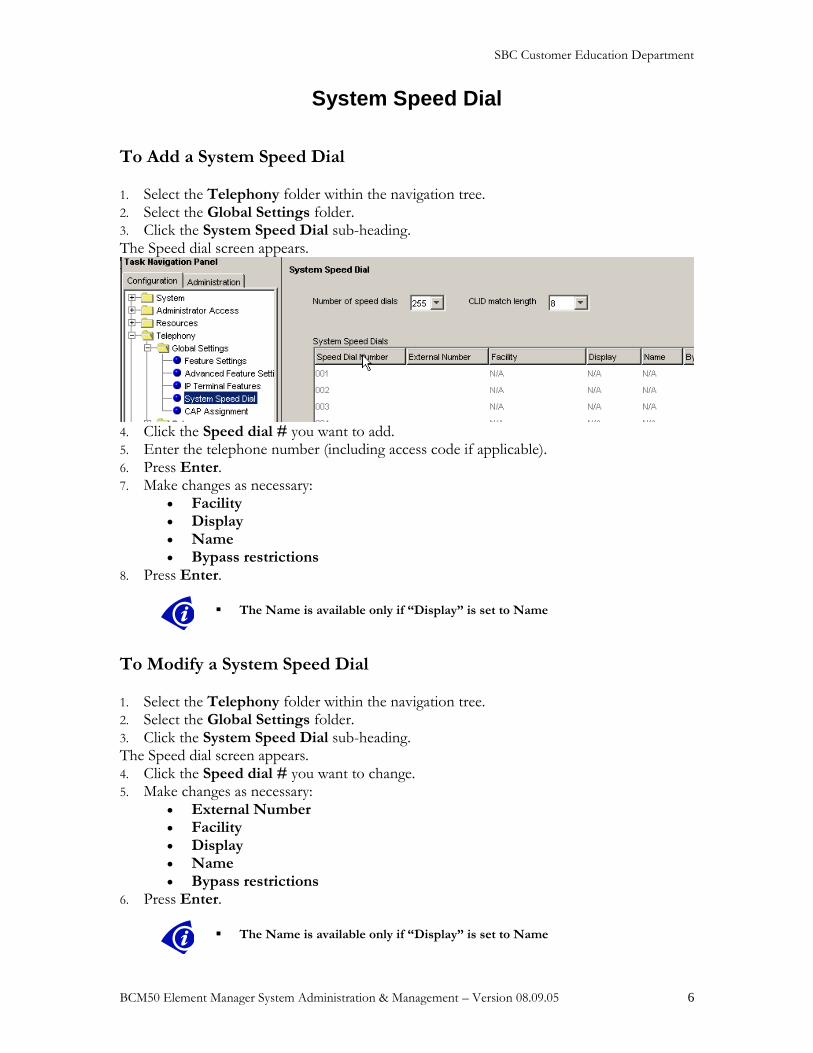
System Speed Dial
To Add a System Speed Dial 1. Select the Telephony folder within the navigation tree. 2. Select the Global Settings folder. 3. Click the System Speed Dial sub-heading. The Speed dial screen appears.
4. Click the Speed dial # you want to add. 5. Enter the telephone number (including access code if applicable). 6. Press Enter. 7. Make changes as necessary:
Facility Display Name Bypass restrictions
8. Press Enter.
The Name is available only if “Display” is set to Name
To Modify a System Speed Dial 1. Select the Telephony folder within the navigation tree. 2. Select the Global Settings folder. 3. Click the System Speed Dial sub-heading. The Speed dial screen appears. 4. Click the Speed dial # you want to change. 5. Make changes as necessary:
External Number Facility Display Name Bypass restrictions
6. Press Enter.
The Name is available only if “Display” is set to Name
SBC Customer Education Department
BCM50 Element Manager System Administration & Management – Version 08.09.05 7
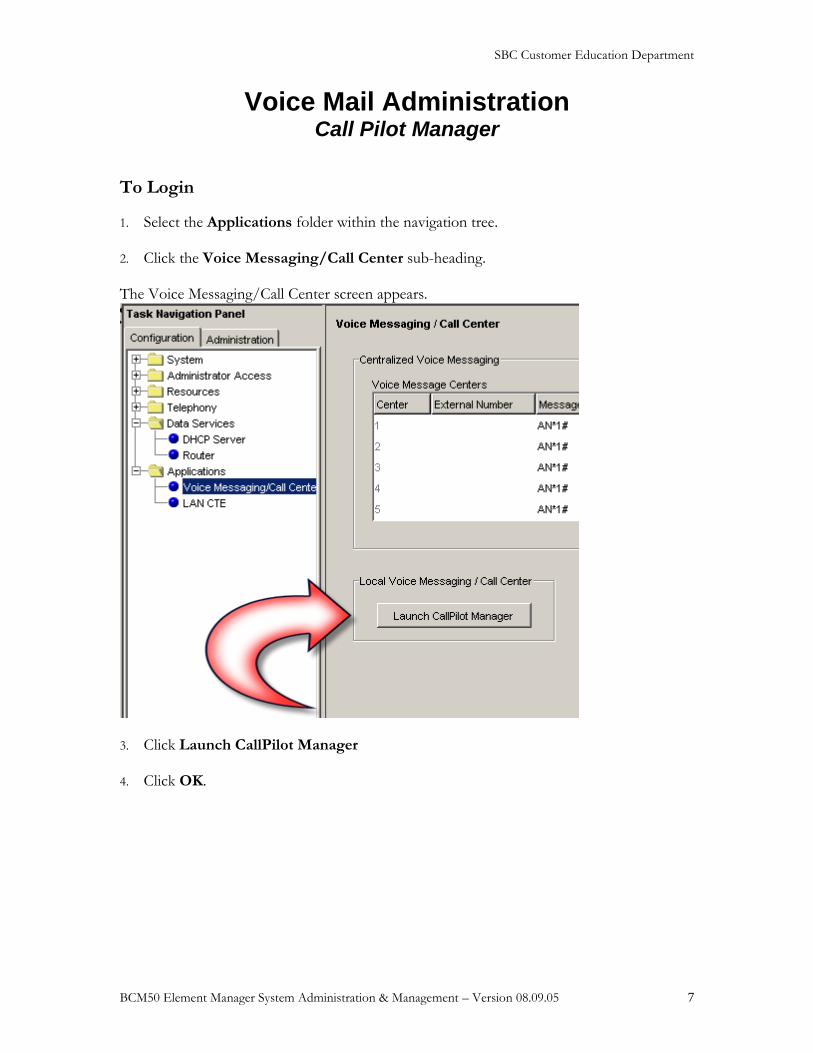
Voice Mail Administration Call Pilot Manager
To Login
1. Select the Applications folder within the navigation tree. 2. Click the Voice Messaging/Call Center sub-heading. The Voice Messaging/Call Center screen appears.
3. Click Launch CallPilot Manager 4. Click OK.
SBC Customer Education Department
BCM50 Element Manager System Administration & Management – Version 08.09.05 8
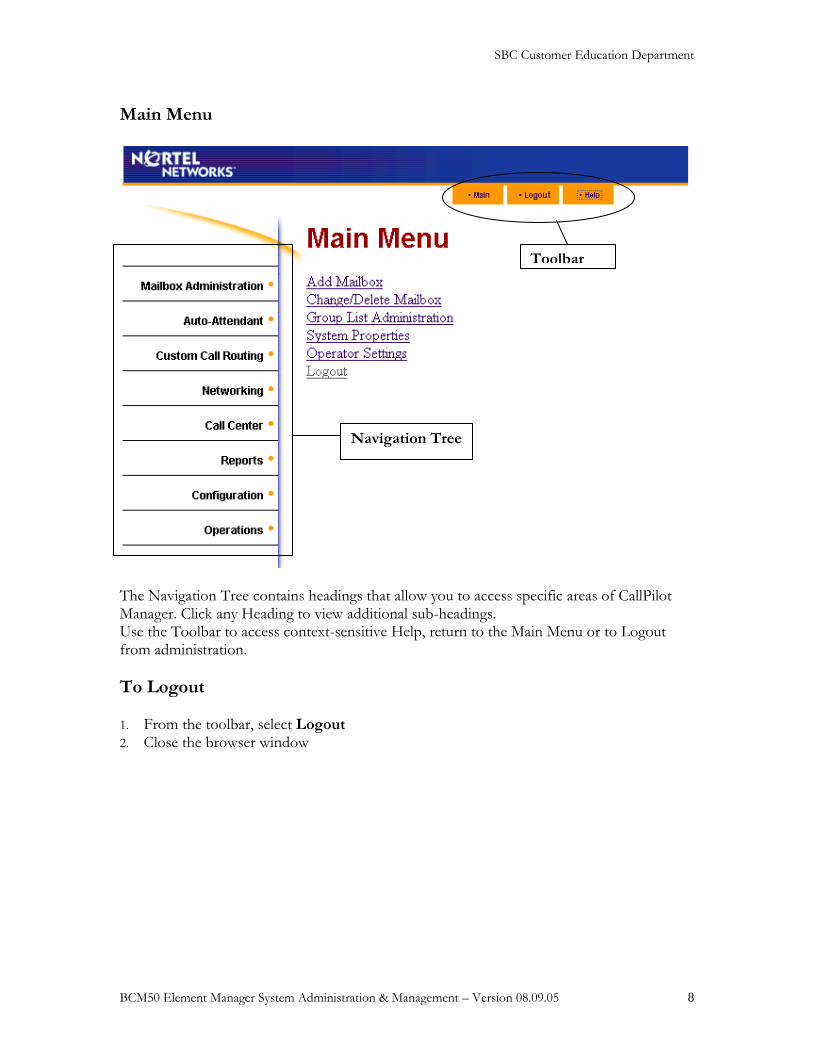
Main Menu
The Navigation Tree contains headings that allow you to access specific areas of CallPilot Manager. Click any Heading to view additional sub-headings. Use the Toolbar to access context-sensitive Help, return to the Main Menu or to Logout from administration.
To Logout
1. From the toolbar, select Logout 2. Close the browser window
Toolbar
Navigation Tree
SBC Customer Education Department
BCM50 Element Manager System Administration & Management – Version 08.09.05 9
Mailbox Maintenance Adding a Subscriber Mailbox 1. Click the Mailbox Administration heading. 2. Click the Add Mailbox link.
The Add Mailbox page appears. 3. In the Mailbox box, type the mailbox number. 4. From the Mailbox Type list box, select Subscriber. 5. Click the Submit button.
The Subscriber Mailbox page appears for the mailbox. 6. In the Extension box, type the extension. 7. In the Last Name and the First Name boxes, type the mailbox owner’s last and first
names. Do not create a name that starts with the number 1, for example “1Smith”. 8. From the Class Of Service list box, select a Class of Service. 9. Clear the Display in Directory check box if you do not want the mailbox owner’s name
to appear in the Company Directory. 10. Clear the Enable Message Waiting check box if you do not want message notification
to appear on the mailbox owner’s telephone display. 11. From the Outdial Type list box:
__ select Line and type the specific outgoing line you want to assign for outdialing __ select Pool and type the Line Pool number you want to assign for outdialing __ select Route to assign a route code for outdialing __ click None if you do not want to assign outdialing capabilities.
12. Select the Enable Auto-Login box if you want to assign Auto-Login to the subscriber. 13. In the Alternate Ext 1 box, type the Alternate extension. If you do not require an
alternate extension leave this box empty. 14. In the Alternate Ext 2 box, type the second Alternate extension. If you do not require a
second alternate extension leave this box empty. 15. Select the Enable Call Screening check box to assign screened transfers to the mailbox
owner or clear the Call Screening check box to assign blind transfers to the mailbox owner.
16. If you want to assign an Express Messaging Line to the mailbox, in the Express Messaging Line box type the line number.
17. Click the Submit button.
_______________________________________________________________________________________________________________________________________________________________________________________________________________________________________________
SBC Customer Education Department
BCM50 Element Manager System Administration & Management – Version 08.09.05 10
Resetting a Mailbox Password
1. Click on Mailbox Administration heading
2. From the mailbox list, click on RESET PASSWORD link for the appropriate
mailbox
3. Click OK
NOTE: This process will reset the mailbox password to the default password of 0-0-0-0
Other Subscriber Mailbox Changes 1. Click the Mailbox Administration heading. 2. From the Mailbox List, click the Change link next to the appropriate mailbox 3. Make changes as necessary:
In the Extension box, type the extension. In the Last Name and the First Name boxes, type the mailbox owner’s last and
first names. Do not create a name that starts with the number 1, for example “1Smith”.
From the Class Of Service list box, select a Class of Service. Clear the Display in Directory check box if you do not want the mailbox
owner’s name to appear in the Company Directory. Clear the Enable Message Waiting check box if you do not want message
notification to appear on the mailbox owner’s telephone display. From the Outdial Type list box: select Line and type the specific outgoing line you want to assign for outdialing select Pool and type the Line Pool number you want to assign for outdialing select Route to assign a route code for outdialing click None if you do not want to assign outdialing capabilities. Select the Enable Auto-Login box if you want to assign Auto-Login to the
subscriber. In the Alternate Ext 1 box, type the Alternate extension. If you do not require
an alternate extension leave this box empty. In the Alternate Ext 2 box, type the second Alternate extension. If you do not
require a second alternate extension leave this box empty. Select the Enable Call Screening check box to assign screened transfers to the
mailbox owner or clear the Call Screening check box to assign blind transfers to the mailbox owner.
If you want to assign an Express Messaging Line to the mailbox, in the Express Messaging Line box type the line number.
4. Click the Submit button.
Deleting a Subscriber Mailbox
1. Click the Mailbox Administration heading. 2. From the Mailbox List, click the Delete link next to the appropriate mailbox 3. Click the OK button
Before deleting a mailbox, you should retrieve any remaining messages.
SBC Customer Education Department
BCM50 Element Manager System Administration & Management – Version 08.09.05 11
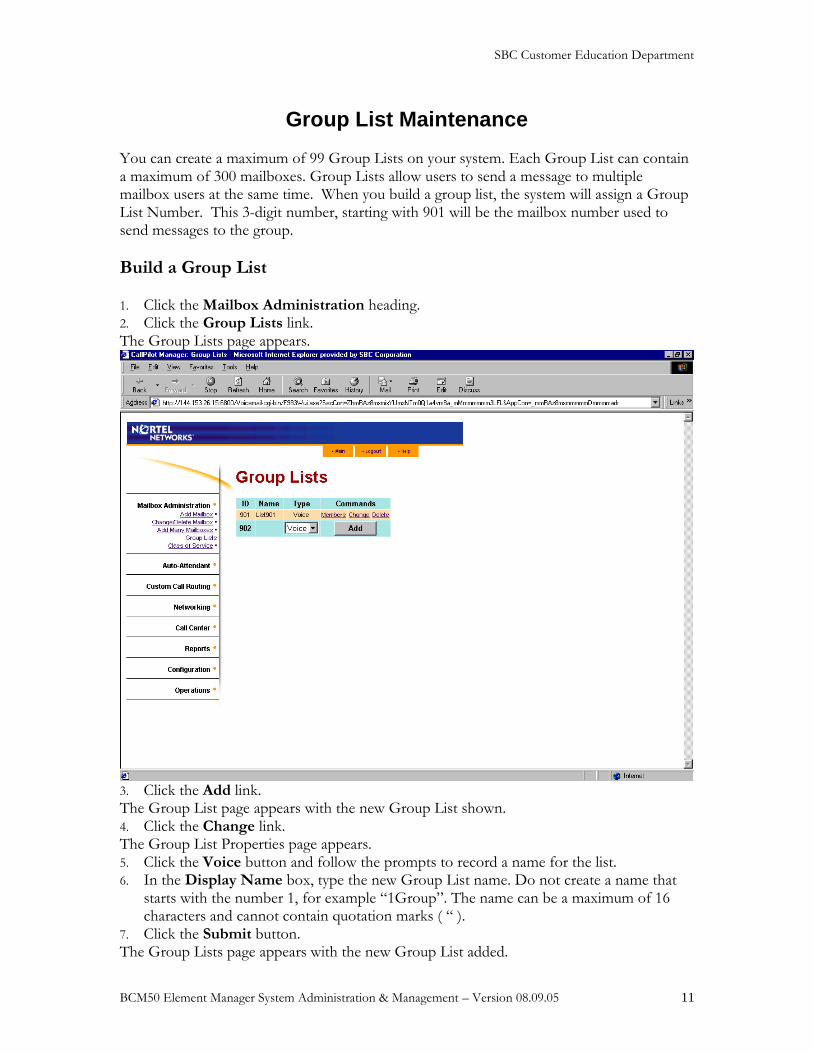
Group List Maintenance You can create a maximum of 99 Group Lists on your system. Each Group List can contain a maximum of 300 mailboxes. Group Lists allow users to send a message to multiple mailbox users at the same time. When you build a group list, the system will assign a Group List Number. This 3-digit number, starting with 901 will be the mailbox number used to send messages to the group.
Build a Group List 1. Click the Mailbox Administration heading. 2. Click the Group Lists link. The Group Lists page appears.
3. Click the Add link. The Group List page appears with the new Group List shown. 4. Click the Change link. The Group List Properties page appears. 5. Click the Voice button and follow the prompts to record a name for the list. 6. In the Display Name box, type the new Group List name. Do not create a name that
starts with the number 1, for example “1Group”. The name can be a maximum of 16 characters and cannot contain quotation marks ( “ ).
7. Click the Submit button. The Group Lists page appears with the new Group List added.
SBC Customer Education Department
BCM50 Element Manager System Administration & Management – Version 08.09.05 12
Adding Members to a Group List 1. Click the Mailbox Administration heading. 2. Click the Group Lists link. 3. Click the Members link. The Members List page appears. 4. Click the Add button. The Add Members page appears. 5. Select each mailbox that you want to add to the Group List. 6. Click the Submit button. The Members List page appears, showing the mailboxes you selected. 7. Click the Close button.
Record a Message Using Group Lists 1. Press 9 8 0 2. Enter the Group List number 3. Press # 4. At the tone, record your message. 5. Press # to end the recording. 6. Press # to send the message.
Delete a Group List 1. Click the Mailbox Administration heading. 2. Click the Group Lists link. 3. Click the Delete link. 4. Click the OK button.
________________________________________________________
_________________________________________________________________________________________________________________________________________________________________________________________________________________________________________________________________________________________________________________
SBC Customer Education Department
BCM50 Element Manager System Administration & Management – Version 08.09.05 13
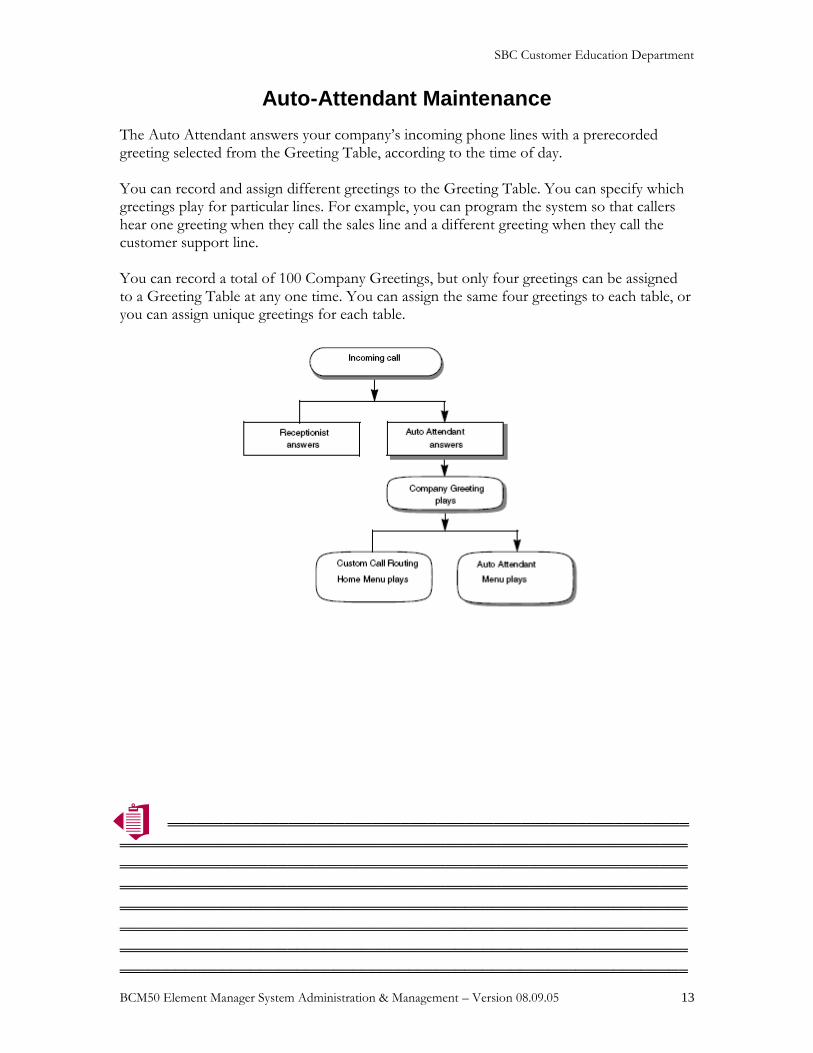
Auto-Attendant Maintenance
The Auto Attendant answers your company’s incoming phone lines with a prerecorded greeting selected from the Greeting Table, according to the time of day. You can record and assign different greetings to the Greeting Table. You can specify which greetings play for particular lines. For example, you can program the system so that callers hear one greeting when they call the sales line and a different greeting when they call the customer support line. You can record a total of 100 Company Greetings, but only four greetings can be assigned to a Greeting Table at any one time. You can assign the same four greetings to each table, or you can assign unique greetings for each table.
________________________________________________________
___________________________________________________________________________________________________________________________________________________________________________________________________________________________________________________________________________________________________________________________________________________________________________________________________________________________________________
SBC Customer Education Department
BCM50 Element Manager System Administration & Management – Version 08.09.05 14
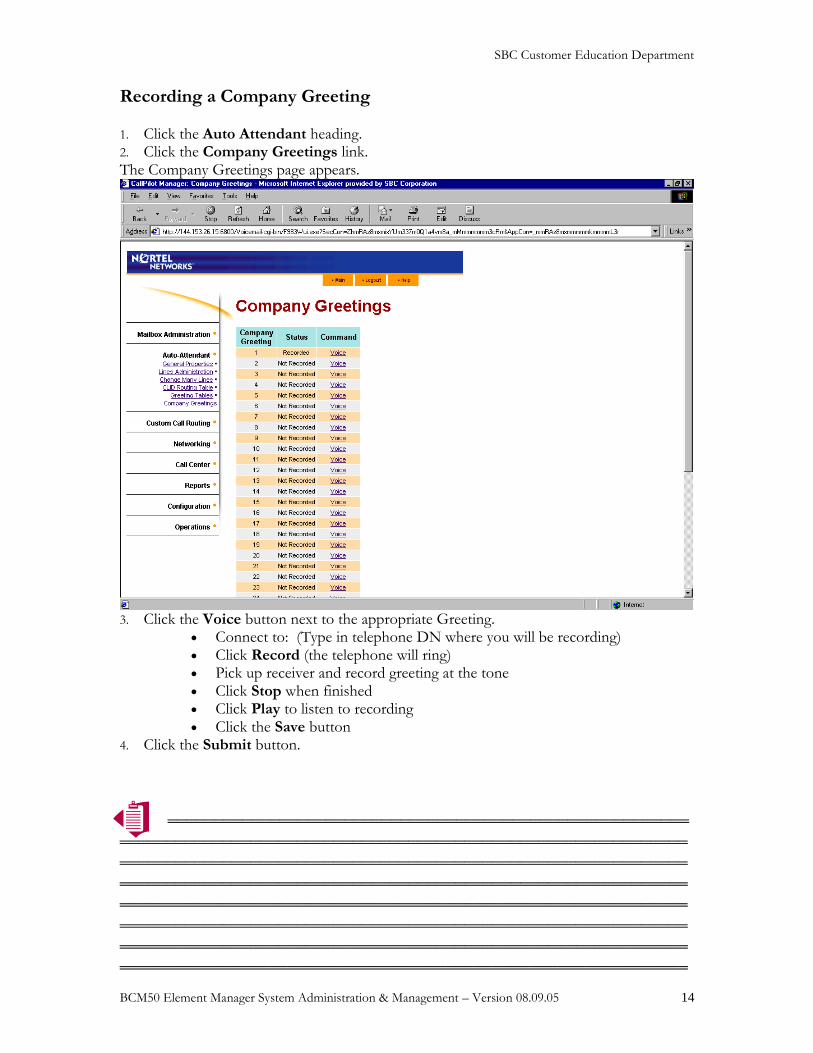
Recording a Company Greeting 1. Click the Auto Attendant heading. 2. Click the Company Greetings link. The Company Greetings page appears.
3. Click the Voice button next to the appropriate Greeting.
Connect to: (Type in telephone DN where you will be recording) Click Record (the telephone will ring) Pick up receiver and record greeting at the tone Click Stop when finished Click Play to listen to recording Click the Save button
4. Click the Submit button.
________________________________________________________
___________________________________________________________________________________________________________________________________________________________________________________________________________________________________________________________________________________________________________________________________________________________________________________________________________________________________________
SBC Customer Education Department
BCM50 Element Manager System Administration & Management – Version 08.09.05 15
Recording a Company Greeting Remotely 1. Dial the main company number 2. When the system answers, press * * on your touch tone dial pad 3. Enter the System Administrator Mailbox number and password.
Your System Administrator Mailbox and Password combination ______________ 4. Press # 5. Press 99 to access Remote Administration 6. Press 2 to access Company Greetings 7. Enter the greeting number you want to record (1 – 100) 8. Press 1 9. At the tone, record your greeting. 10. Press # to end the recording. 11. Press # to accept the greeting.
________________________________________________________
___________________________________________________________________________________________________________________________________________________________________________________________________________________________________________________________________________________________________________________________________________________________________________________________________________________________________________
SBC Customer Education Department
BCM50 Element Manager System Administration & Management – Version 08.09.05 16
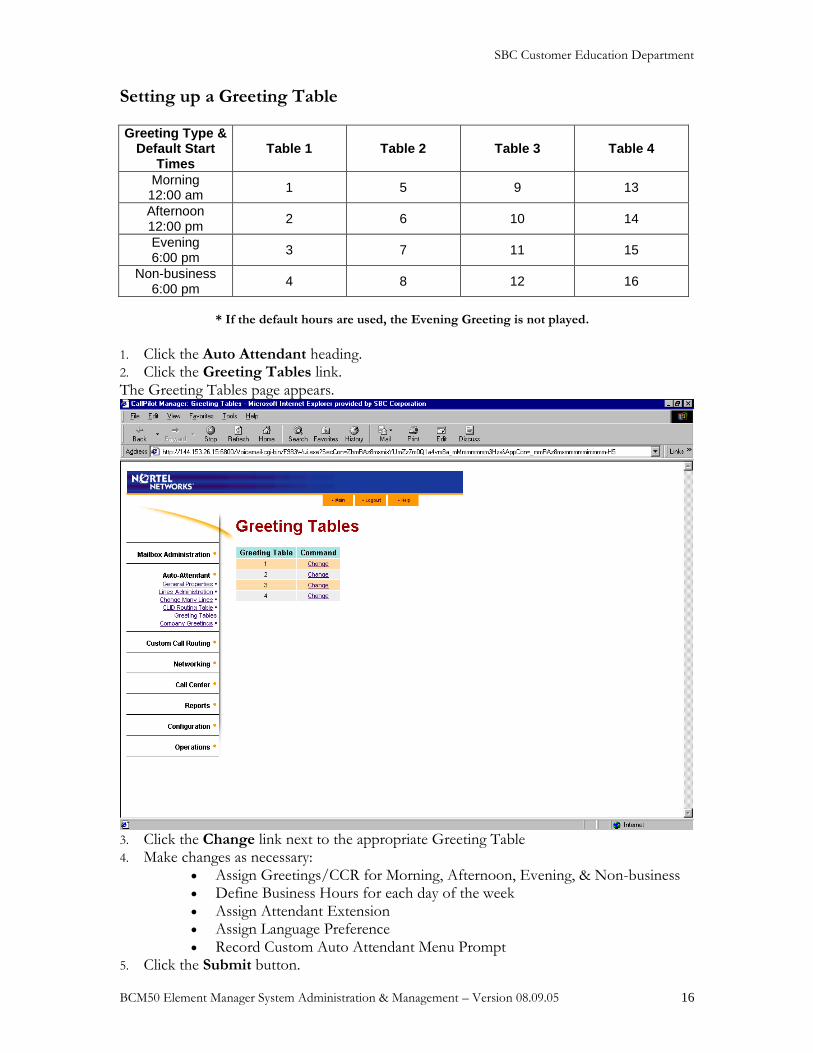
Setting up a Greeting Table Greeting Type &
Default Start Times
Table 1 Table 2 Table 3 Table 4
Morning 12:00 am
1 5 9 13
Afternoon 12:00 pm
2 6 10 14
Evening 6:00 pm
3 7 11 15
Non-business 6:00 pm
4 8 12 16
* If the default hours are used, the Evening Greeting is not played.
1. Click the Auto Attendant heading. 2. Click the Greeting Tables link. The Greeting Tables page appears.
3. Click the Change link next to the appropriate Greeting Table 4. Make changes as necessary:
Assign Greetings/CCR for Morning, Afternoon, Evening, & Non-business Define Business Hours for each day of the week Assign Attendant Extension Assign Language Preference Record Custom Auto Attendant Menu Prompt
5. Click the Submit button.
SBC Customer Education Department
BCM50 Element Manager System Administration & Management – Version 08.09.05 17
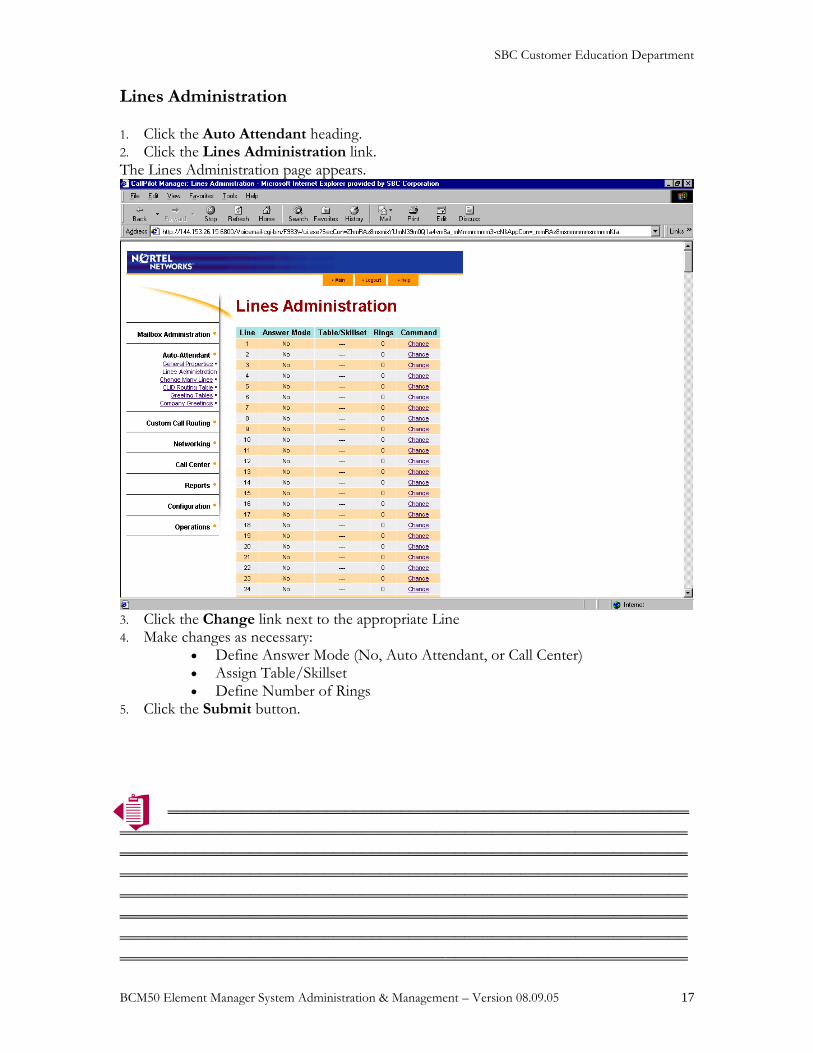
Lines Administration
1. Click the Auto Attendant heading. 2. Click the Lines Administration link. The Lines Administration page appears.
3. Click the Change link next to the appropriate Line 4. Make changes as necessary:
Define Answer Mode (No, Auto Attendant, or Call Center) Assign Table/Skillset Define Number of Rings
5. Click the Submit button.
________________________________________________________
___________________________________________________________________________________________________________________________________________________________________________________________________________________________________________________________________________________________________________________________________________________________________________________________________________________________________________
SBC Customer Education Department
BCM50 Element Manager System Administration & Management – Version 08.09.05 18
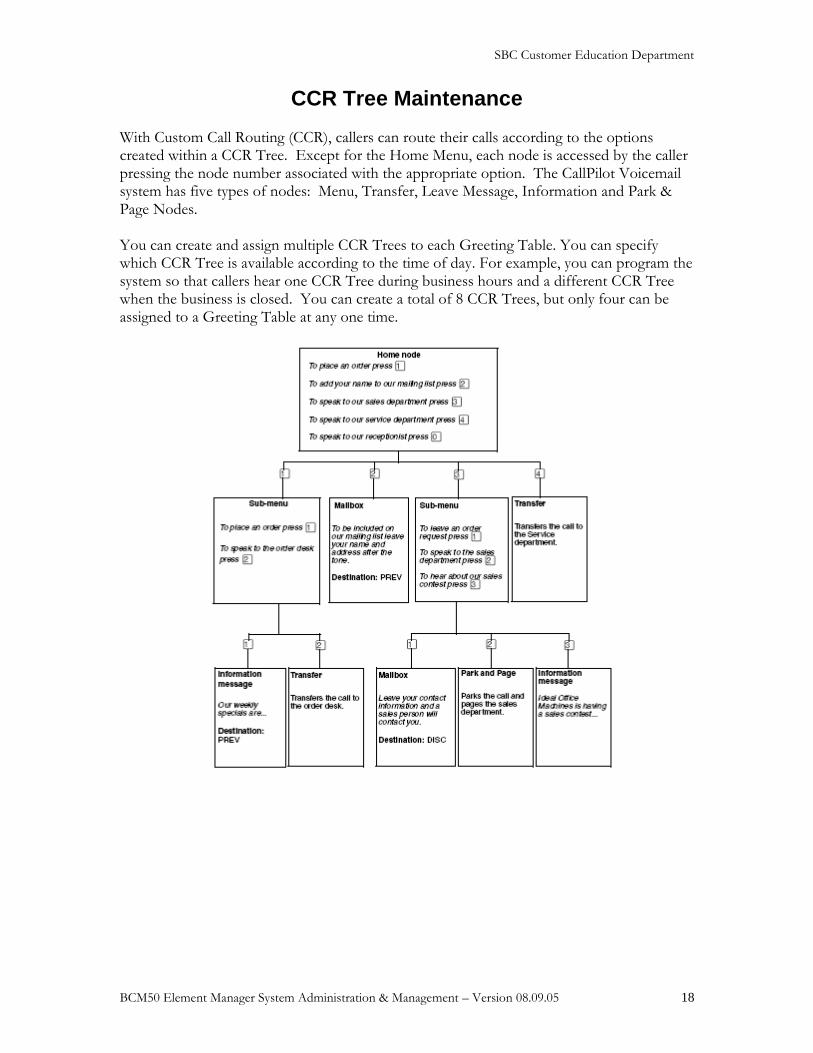
CCR Tree Maintenance With Custom Call Routing (CCR), callers can route their calls according to the options created within a CCR Tree. Except for the Home Menu, each node is accessed by the caller pressing the node number associated with the appropriate option. The CallPilot Voicemail system has five types of nodes: Menu, Transfer, Leave Message, Information and Park & Page Nodes. You can create and assign multiple CCR Trees to each Greeting Table. You can specify which CCR Tree is available according to the time of day. For example, you can program the system so that callers hear one CCR Tree during business hours and a different CCR Tree when the business is closed. You can create a total of 8 CCR Trees, but only four can be assigned to a Greeting Table at any one time.
SBC Customer Education Department
BCM50 Element Manager System Administration & Management – Version 08.09.05 19
Types of Nodes The CallPilot Voicemail system has five types of nodes: Menu, Transfer, Leave Message, Information and Park & Page Nodes. Except for the Home Menu, each node is accessed by the caller pressing the node number associated with the appropriate option. Menu Nodes – Menu Nodes provide callers with a recorded menu of one-touch options (nodes) to route his/her call. The Home Menu (Node 0) is the first menu that a caller hears once the CCR Tree is enabled. You can also have sub menus, which are one-touch choices off of another menu to give the caller more options. Each menu can offer a maximum of 8 options. Transfer Nodes –Transfer Nodes are one-touch options that transfer the caller either to an internal extension or an outside telephone number. Leave Message Nodes –Leave Message Nodes are one-touch options that transfer the caller directly into either a subscriber mailbox or an information mailbox. Information Nodes –Information Nodes are one-touch options that transfer the caller to a specific information recording (i.e. directions to your building). Park & Page Nodes –Park & Page Nodes are one-touch options that parks a call and announces it to a paging zone and/or overhead paging system.
It is important that once you begin making changes to a CCR Tree that you do not stop. After a period of time of no activity, the administration will log you off automatically.
________________________________________________________
_________________________________________________________________________________________________________________________________________________________________________________________________________________________________________________________________________________________________________________
SBC Customer Education Department
BCM50 Element Manager System Administration & Management – Version 08.09.05 20
Disabling the CCR Tree Before you make any changes to the CCR Tree, you must disable it. The tree will be deactivated until you are finished and re-enable the tree. 1. Click the Auto-Attendant heading. 2. Click the Greeting Tables link. 3. Click the Change link for the Greeting Table that uses the CCR Tree that you want to
disable. The Greeting Table Setup page appears. 4. For each time of day, remove the CCR Tree you want to disable 5. Click the Submit button.
_________________________________________________________________________________________________________________________________________________________________________________________________________________________________________________________________________________________________________________________________________________________________________
SBC Customer Education Department
BCM50 Element Manager System Administration & Management – Version 08.09.05 21
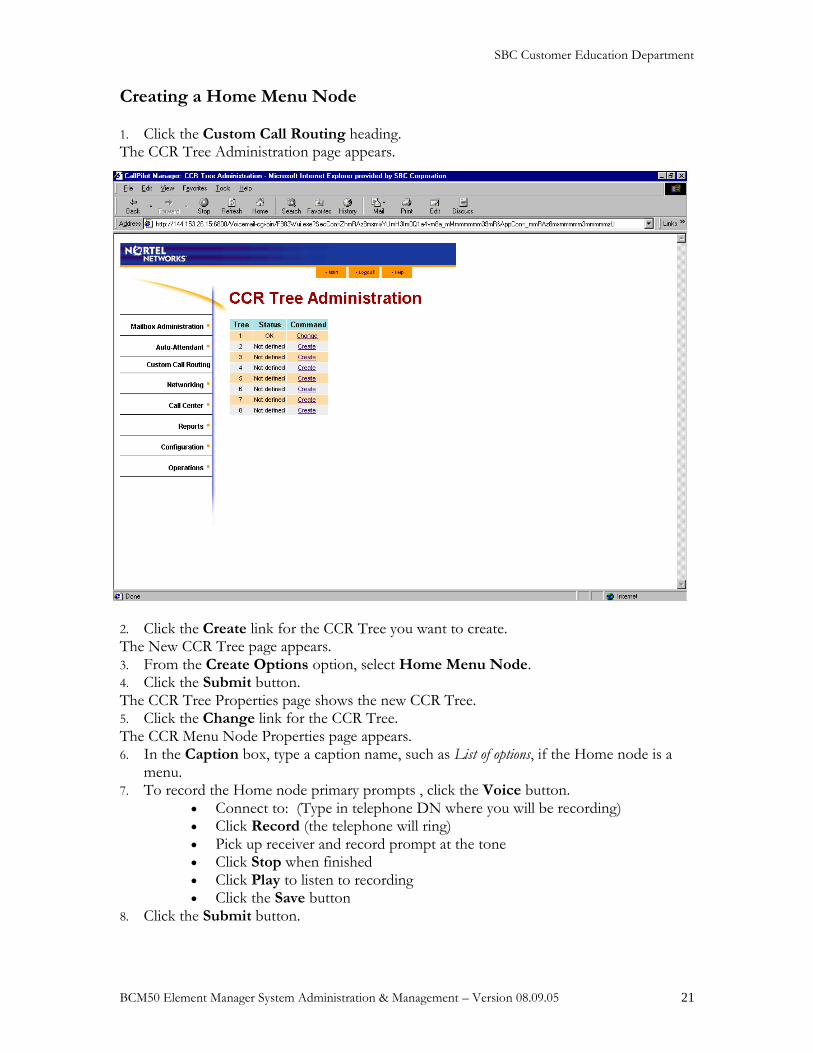
Creating a Home Menu Node 1. Click the Custom Call Routing heading. The CCR Tree Administration page appears.
2. Click the Create link for the CCR Tree you want to create. The New CCR Tree page appears. 3. From the Create Options option, select Home Menu Node. 4. Click the Submit button. The CCR Tree Properties page shows the new CCR Tree. 5. Click the Change link for the CCR Tree. The CCR Menu Node Properties page appears. 6. In the Caption box, type a caption name, such as List of options, if the Home node is a
menu. 7. To record the Home node primary prompts , click the Voice button.
Connect to: (Type in telephone DN where you will be recording) Click Record (the telephone will ring) Pick up receiver and record prompt at the tone Click Stop when finished Click Play to listen to recording Click the Save button
8. Click the Submit button.
SBC Customer Education Department
BCM50 Element Manager System Administration & Management – Version 08.09.05 22
Adding a Menu Node 1. Click the Custom Call Routing heading. The CCR Tree Administration page appears. 2. Click the Change link for the CCR Tree that you want to add a Menu node to. The CCR Tree Properties page appears. 3. Click the Menu link. The new Menu node appears on the CCR Tree Properties page. 4. Click the Change link for the Menu node. The CCR Menu Node Properties page appears. 5. In the Caption box type a caption for the node. 6. To record the Primary prompt, click the Voice button.
Connect to: (Type in telephone DN where you will be recording) Click Record (the telephone will ring) Pick up receiver and record prompt at the tone Click Stop when finished Click Play to listen to recording Click the Save button
7. Click the Submit button.
Adding an Information Node 1. Click the Custom Call Routing heading. The CCR Tree Administration page appears. 2. Click the Change link for the CCR Tree that you want to add an Information node to. The CCR Tree Properties page appears. 3. Click the Information link. The new Information node appears on the CCR Tree Properties page. 4. Click the Change link for the Information node. The CCR Information Node Properties page appears. 5. In the Caption box type a caption that describes the information, for example, Store
Location and Hours. 6. From the Destination list box, select a destination:
Previous: returns to the Previous menu node Home: returns the call to the Home node prompt Disconnect: disconnects the call
7. To record the Primary prompt, click the Voice button. Connect to: (Type in telephone DN where you will be recording) Click Record (the telephone will ring) Pick up receiver and record prompt at the tone Click Stop when finished Click Play to listen to recording Click the Save button
8. Click the Submit button.
SBC Customer Education Department
BCM50 Element Manager System Administration & Management – Version 08.09.05 23
Adding a Mailbox Node 1. Click the Custom Call Routing heading. The CCR Tree Administration page appears. 2. Click the Change link for the CCR Tree that you want to add a Mailbox node to. The CCR Tree Properties page appears. 3. Click the Mailbox link. The new Mailbox node appears on the CCR Tree Properties page. 4. Click the Change link for the Mailbox node. The CCR Mailbox Node page appears. 5. In the Mailbox Number box type the mailbox number of the Subscriber, Information,
or Fax on Demand mailbox you want the call to transfer to. 6. From the Destination list box, select a destination:
Previous: returns to the Previous menu Home: returns the call to the Home node prompt Disconnect: disconnects the call
7. Click the Submit button.
Adding a Transfer Node 1. Click the Custom Call Routing heading. The CCR Tree Administration page appears. 2. Click the Change link for the CCR Tree that you want to add a Transfer node to. The CCR Tree Properties page appears. 3. Click the Transfer link. The new Transfer node appears on the CCR Tree Properties page. 4. Click the Change link for the Transfer node. The CCR Transfer Node page appears. 5. In the Caption box type where you are transferring the caller to, for example Support
Hotline. 6. From the Outdial Method list box select an outdial method:
Select Line to use an external line to transfer the caller to an external telephone number
Select Pool to use a line pool to transfer the caller to an external telephone number
Select Route to use a Routing Code to transfer the caller to an external telephone number.
Select Intercom to transfer the caller to an extension. 7. In the Phone Number box, type the extension or external telephone number. 8. Click the Submit button.
________________________________________________________
_________________________________________________________________________________________________________________________________________________________________________________________________________________________________________________________________________________________________________________
SBC Customer Education Department
BCM50 Element Manager System Administration & Management – Version 08.09.05 24
Adding a Park and Page Node 1. Click the Custom Call Routing heading. The CCR Tree Administration page appears. 2. Click the Change link for the CCR Tree. The CCR Tree Properties page appears. 3. Click the Park &Page link. The new Park&Page node appears on the CCR Tree Properties page. 4. Click the Change link for the Park and Page node. The CCR Park and Page Node Properties page appears. 5. In the Caption box type a name for where you are paging the caller to, for example
Support Hotline. The caption can be a maximum of 50 characters. 6. In the Transfer DN box:
type the extension you want to transfer the call to. If the call is not answered at this extension it returns to the CCR Tree and a Park and Page is performed.
If you leave this box clear the call is immediately parked and paged.
Select the Transfer Before Page check box if you want to transfer the call to the extension you specify in the Transfer DN box before it is parked and paged.
If you define a Transfer DN but do not select the Transfer before page check box, the call is parked, and is transferred to the DN after all of the page retries are tried.
7. From the Page Type list, select the page type you want to use: internal zone, overhead
paging or both. 8. From the Paging Zone list, select a number from 1 to 6, or All. 9. From the Page Retries list, select a number from 1 to 5 that is the number of times the
system will try to page to the paging zone. 10. In the Retry Interval box, type the number of seconds between paging retries. The
range is 5-300 seconds. 11. To record the Primary prompt, click the Voice button.
Connect to: (Type in telephone DN where you will be recording) Click Record (the telephone will ring) Pick up receiver and record prompt at the tone Click Stop when finished Click Play to listen to recording Click the Save button
12. Click the Submit button.
_________________________________________________________________________________________________________________________________________________________________________________________________________________________________________________________________________________________________________________________________________________________________________
SBC Customer Education Department
BCM50 Element Manager System Administration & Management – Version 08.09.05 25
Changing a Node 1. Click the Custom Call Routing heading. The CCR Tree Administration page appears. 2. Click the Change link of the CCR Tree that contains the node you want to change. The node properties page appears. 3. Click the Change link for the node you want to change, and change the properties of
the node. 4. Click the Submit button.
Deleting a Node 1. Click the Custom Call Routing heading. 2. Click the Change link for the CCR Tree that has the node you want to delete. The CCR Tree Properties page appears. 3. Click the Delete link for the node you want to delete. A message appears that asks you to confirm the deletion. 4. Click the OK button.
Assigning a CCR Tree to a Greeting Table 1. Click the Auto-Attendant heading. 2. Click the Greeting Tables link. The Greeting Tables page appears. 3. Click the Change link for the Greeting Table you want to assign a CCR Tree to. The Greeting Table Setup page appears. 4. Select from each CCR Tree list box the CCR Tree you want calls to route to for each
time of day. If you do not want calls to route to a CCR Tree select None. 5. Click the Submit button.
_________________________________________________________________________________________________________________________________________________________________________________________________________________________________________________________________________________________________________________________________________________________________________
SBC Customer Education Department
BCM50 Element Manager System Administration & Management – Version 08.09.05 26
CallPilot User Quick Reference
Message Notification “Message for you” will appear in the LCD window display when there are new messages in your mailbox. The message waiting light at the top of your telephone set will also illuminate red.
Accessing Your Mailbox From Your Extension:
1. Press 9 8 1 2. When prompted, enter your password then press #
Guest Mailbox, Information Mailbox, or From Another Extension
1. Press 9 8 1 2. Press * or OTHR
3. When the display shows “Log:”, enter your mailbox number and password
then press # From An Outside Line:
1. Dial Main Company Number 2. When the system answers, press * * 3. Enter your mailbox number and password then press #
Playing Messages After you have logged in your mailbox: To play a message, press PLAY or 2
To delete a message, press ERASE or 8
To save a message, press 7 7 To play the current message again, press << < << < or 1 1
To back up nine seconds within the message, press << < or 1
To skip forward nine seconds within the message, press > >> or 3
To skip to the end of the message, press > >> > >> or 3 3 or #
To play the previous message, press 4 To skip to the next message, press NEXT or 6 or #
To pause, press STOP or 2, to continue, press PLAY or 2
To listen to the message time/date stamp, press 7
SBC Customer Education Department
BCM50 Element Manager System Administration & Management – Version 08.09.05 27
To Reply To The Message Sender 1. After listening to the message, press REPLY or 9
2. Press MSG or 1
3. Record reply then press OK or #
4. To accept the recording press OK or #
5. Press SEND or # to deliver the message
To Forward A Message 1. To forward a copy of the message, press COPY or 5
2. Press YES or 1 to record an introduction
3. Press OK or # to end the recording
4. Press SEND or # to accept the recording
5. Enter the mailbox number of the person to which you want to forward the message 6. Press SEND or # to deliver the message
To Record A Message 1. While logged in, press REC or 3 to record a message
2. Press OK or # to end the recording
3. Press OK or # to accept the recording
4. Enter the mailbox number of the person to which you want to deliver the message 5. Press SEND or # to deliver the message
Message Delivery Options This option must be used before pressing SEND to deliver a message! After recording a message:
For Certified delivery, press 3 1 For Urgent delivery, press 3 2 For Private delivery, press 3 3 For Timed Delivery, press 3 4
Leave Message 1. Press 9 8 0 2. Enter the mailbox number of the person to which you want to deliver the message 3. Press OK or # to accept the mailbox number
4. Press OK or # to end the recording
5. Press SEND or # to deliver the message
SBC Customer Education Department
BCM50 Element Manager System Administration & Management – Version 08.09.05 28
Transfer To Voicemail 1. With the caller on the line, press 9 8 6 2. Dial the intercom/mailbox number of the person you wish to transfer the caller to
Voicemail Interrupt 1. Press 9 8 7 2. Begin speaking with caller
To Record A Mailbox Greeting After you have logged in your mailbox: 1. While logged in, press ADMIN or 8 key.
2. Press GREET or 2 key.
3. Press REC or 1 key. (press 2 to CHOOSE)
4. Press PRIME or 1 key. (press 2 for ALT, or 3 for PERS)
5. Press YES or 1 key to record your greeting.
6. At the tone, record your greeting. 7. Press OK or # to end your recording.
8. Press OK or # to accept your recording.
To Record Your Name 1. While logged in, press ADMIN or 8 key.
2. Press 1 to record your name. 3. At the tone, record your name. 4. Press OK or # to end your recording.
5. Press OK or # to accept your recording.
To Change Your Mailbox Password
1. While logged in, press ADMIN or 8 key.
2. Press PSWD or 4 key.
3. Enter your new password. Note: A password must be between four to eight digits in length and cannot start with the digit zero. 4. Press OK or # to end your password.
5. Re-enter your new password again, then press #.
SBC Customer Education Department
BCM50 Element Manager System Administration & Management – Version 08.09.05 29
Setting up Target Attendant
1. While logged in, press ADMIN or 8 key.
2. Press 5 to open the Target Attendant Menu. 3. Press CHNG or 1 to change the Target Attendant.
4. Enter the extension number of the new Target Attendant.
Setting up Outbound Transfer
1. While logged in, press ADMIN or 8 key.
2. Press 8 to open the Outbound Transfer Menu. 3. Press ADMIN or 1 to set up Outbound Transfer
4. Press PHONE to select an external phone as the destination.
5. Enter the telephone number . 6. Press OK or # when you have finished entering the number.
7. Press OK or # to accept the destination.
8. Press CHNG or 1 to activate Outbound Transfer.
9. Press QUIT or * when finished.
Setting up Off-premise Message Notification to a Phone
1. While logged in, press ADMIN or 8 key.
2. Press 6 to open the Off-premise Message Notification Menu. 3. Press ADMIN or 1 to set up Off-premise Message Notification
4. Press PHONE or 1 to select an external phone as the destination.
5. Enter the telephone number . 6. Press OK or # when you have finished entering the number.
7. Press OK or # to accept the destination.
8. Enter the start time (hh:mm) for notification 9. Select AM or 1, or PM or 2
10. Enter the stop time (hh:mm) for notification 11. Select AM or 1, or PM or 2
12. Press YES or 1 to set-up additional destinations, or NO or 2 when finished entering
destinations. 13. Press NEXT or # to accept the start time
14. Press NEXT or # to accept the stop time.
15. Press OK or # to be notified of new messages, or CHNG or 1 to be notified of urgent
messages. 16. Press SELECT or 2 to set up Off-premise Message Notification.
17. Press CHNG or 1 to toggle notification on or off.
18. Press OK or * to accept.
SBC Customer Education Department
BCM50 Element Manager System Administration & Management – Version 08.09.05 30
Setting up Off-premise Message Notification to a Pager
1. While logged in, press ADMIN or 8 key.
2. Press 6 to open the Off-premise Message Notification Menu. 3. Press ADMIN or 1 to set up Off-premise Message Notification
4. Press PAGER or 3 to select a pager as the destination.
5. Enter the telephone number . 6. Press OK or # when you have finished entering the number.
7. Press OK or # to accept the destination, or press ADD or 2 to include special characters
such as a Pause. 8. Press NEXT or # to accept the default pager message of the CallPilot extension number,
or press CHNG or 1 to modify the pager message.
9. Press YES or 1 to set-up additional destinations, or NO or # when finished entering
destinations. 10. Press OK or # to be notified of new messages, or CHNG or 1 to be notified of urgent
messages. 11. Press SELECT or 2 to set up Off-premise Message Notification.
12. Press CHNG or 1 to toggle notification on or off.
13. Press OK or * to accept.
___________________________________________________________________________________________________________________________________________________________________________________________________________________________________________________________________________________________________________________________________________________________________________________________________________________________________________________________________________________________________