beekeeping level - ii standardize and sustain 3s
TRANSCRIPT

BEEKEEPING Level - II
Standardize and sustain 3S NTQF Level II
Unit of Competence: Standardize and sustain 3S
Module Title: Standardizing and sustaining 3S
Standardize and sustain 3S NTQF Level II
Unit of Competence: Standardize and sustain 3S
Module Title: Standardizing and sustaining 3S
LG Code: AGR BKG1 MO4-LO1-LG1
TTLM Code: AGR BKG1 TTLM 0919v1
LO 1: Prepare for work
Instruction Sheet Learning Guide #1
This learning guide is developed to provide you the necessary information regarding the following content coverage and topics –
Job requirements
OHS requirements
Tools and Equipment Preparation for 3S
3S Implementation
This guide will also assist you to attain the learning outcome stated in the cover page. Specifically, upon completion of this Learning Guide, you will be able to –
Use work instruction, work manual and job requirements.
Use OHS requirements (Safety policies /Legislation/ regulations/codes of practice, Safe operating procedures, Emergency procedures, Personal protective equipment).
Prepare tools and equipment for sorting, set in order and shining activities.
Check if 3S is implemented. Learning Instructions:
1. Read the specific objectives of this Learning Guide.
2. Follow the instructions described in number 3 to 15.
3. Read the information written in the “Information Sheets 1”. Try to understand what are being discussed. Ask you trainer for assistance if you have hard time understanding them.
4. Accomplish the “Self-check 1”.
5. Ask from your trainer the key to correction (key answers) or you can request your trainer to correct your work. (You are to get the key answer only after you finished answering the Self-check 1).
6. If you earned a satisfactory evaluation proceed to “Information Sheet 2”. However, if your rating is unsatisfactory, see your trainer for further instructions or go back to Learning Activity #1.
7. Submit your accomplished Self-check. This will form part of your training portfolio.
8. Read the information written in the “Information Sheet 2”. Try to understand what are being discussed. Ask you trainer for assistance if you have hard time understanding them.
9. Accomplish the “Self-check 2” .
10. Ask from your trainer the key to correction (key answers) or you can request your trainer to correct your work. (You are to get the key answer only after you finished answering the Self-check 2).
11. Read the information written in the “Information Sheets 3. Try to understand what are being discussed. Ask you trainer for assistance if you have hard time understanding them.
12. Accomplish the “Self-check 3” .
13. Ask from your trainer the key to correction (key answers) or you can request your trainer to correct your work. (You are to get the key answer only after you finished answering the Self-check 3).
14. Read the information written in the “Information Sheets 4. Try to understand what are being discussed. Ask you trainer for assistance if you have hard time understanding them.
15. Accomplish the “Self-check 4”
16. Ask from your trainer the key to correction (key answers) or you can request your trainer to correct your work. (You are to get the key answer only after you finished answering the Self-check 3).

17. If you earned a satisfactory evaluation proceed to “Operation Sheet 1” in page 58.
However, if your rating is unsatisfactory, see your trainer for further instructions or go back to Learning Activity #1.
18. Do the “LAP test” (if you are ready). Request your trainer to evaluate your performance and outputs. Your trainer will give you feedback and the evaluation will be either satisfactory or unsatisfactory. If unsatisfactory, your trainer shall advice you on additional work. But if satisfactory you can proceed to Learning Guide #8.
Information Sheet-1 Job Requirements
Job Requirements A Job can be defined as:
A piece of work, especially a specific task done as part of the routine of one's occupation or for an agreed price.
A post of employment; full-time or part-time position
Anything a person is expected or obliged to do; duty; responsibility
An affair, matter, occurrence, or state of affairs.
The material, project, assignment, etc., being worked upon.
The process or requirements, details, etc., of working.
The execution or performance of a task. The requirements for a job vary according to the nature of the job itself. However, a certain work ethic must be cultivated to succeed in any job and this is fundamental to an individual’s sense of himself as a worker, as part of production relations and a fundamental economic being. The basic requirements for a job remain the same no matter what the job is, where it is located or what professional and educational qualifications are required for it. These are as follows: Discipline: Nothing is possible without discipline. Any job requires a fundamental core of discipline from the worker or the employee and this is a quality which is independent of age, post, stature, job and so on. Discipline is absolutely indispensable and provides the impetus for work that can be strenuous, repetitive, boring and even unsatisfactory at times. Enthusiasm: Enthusiasm for work is also a pre-requisite for any job. An innate love for the job, which in modern parlance is known as job satisfaction, is a core requirement for any job. The drive to succeed, to innovate, to do well and to make one’s profession into one’s livelihood is a critical drive which needs to be present in the employee or cultivated as soon as possible. No job, however perfectly carried out, can evoke the feeling of satisfaction of a job well done without the instinct for success. Qualifications: This is a more material, tactile need for a job which can be conveyed through degrees and certificates. However education is not limited to what is taught in colleges or vocational training courses. It is the burning desire to learn more, to reach the depths of knowledge about a particular field of interest, to complete the job and learn from it that marks the true enthusiast and the truly learned. Soft Skills: Soft skills include those skills which ensure that a job is executed well, and the employee can carry himself in the proper manner too. For example, good and smooth communication, computer skills, proficiency in language if needed, presentable appearance, the ability to manage crises are all soft skills which are fundamentally important in any job and which must be cultivated consciously. Thus, the requirements of a job, though specific to it, cover also a general spectrum. These make for better employees and better individuals.
1. Work Instruction Information about the work
Describe what workers need to be able to do on the job Work functions Key activities of each work function Performance indicators
Describe what task to be done or work roles in a certain occupation Work instruction is a description of the specific tasks and activities within an organization. A work instruction in a business will generally outline all of the different jobs needed for the operation of the firm in great detail and is a key element to running a business smoothly. In other words it is a document containing detailed instructions that specify exactly what steps to follow to carry out an activity. It contains much more detail than a Procedure and is only created if very detailed instructions are needed. For example, describing precisely how a Request for Change record is created in the Change Management software support tool.
Procedures vs. Work Instructions
Many people confuse “procedures” with “work instructions”. In fact, most people write
work instructions and call them procedures. Knowing the differences of procedures vs
work instructions can help you understand the documentation process much better and,
therefore, procedure documentation.
Procedures describe a process, while a work instruction describes how to perform the
conversion itself. Process descriptions include details about the inputs, what conversion
takes place (of inputs into outputs), the outputs, and the feedback necessary to ensure
consistent results. The PDCA process approach (Plan, Do, Check, Act) is used to capture
the relevant information.
Questions that need to be answered in a procedure include:
Where do the inputs come from (suppliers)?
Where do the outputs go (customers)?
Who performs what action when (responsibilities)?
How do you know when you have done it right (effectiveness criteria)?
What feedback should be captured (metrics)?
How do we communicate results (charts, graphs and reports)?
What laws (regulations) or standards apply (e.g., ISO 9001, 8th EU Directive, IFRS,
Sarbanes-Oxley)? Job Specification A statement of employee/workers characteristics and qualifications required for satisfactory performance of defined duties and tasks comprising a specific job or function.
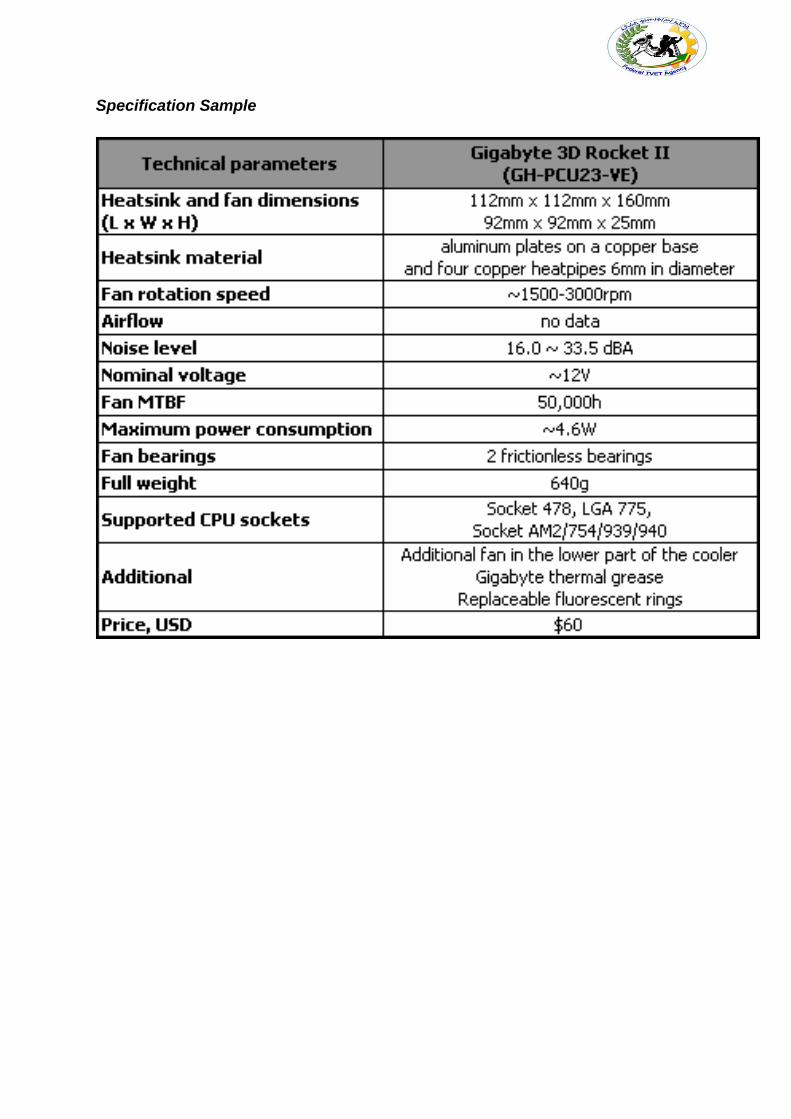
Specification Sample

Work Manual Self-Check 1
Written Test
Directions: Answer all the questions listed below. Use the Answer sheet provided in the next page:
1. What is job (1 point)
2. What is a job requirement? (2 points)
3. List the requirements of job. (5 points)
4. What is work? (2 points)
5. Describe work instruction by your own words. (5 points)
6. Describe the difference between procedure and work instruction? (5 points)
7. Define job specification? (2 points)
8. Prepare specification samples (10 points)
Note: Satisfactory rating - 18points Unsatisfactory - below 18 points You can ask you trainer for the copy of the correct answers.

Answer Sheet
Name: _________________________ Date: _______________ Short Answer Questions
1. ________________________________________________________________
________________________________________________________________
2. ________________________________________________________________
________________________________________________________________
________________________________________________________________
3. ________________________________________________________________
________________________________________________________________
________________________________________________________________
4. ________________________________________________________________
________________________________________________________________
________________________________________________________________
5. ________________________________________________________________
________________________________________________________________
________________________________________________________________
6. ____________________________________________________________
________________________________________________________________
________________________________________________________________
7. ____________________________________________________________
________________________________________________________________
________________________________________________________________
8. ____________________________________________________________
Score = ___________
Rating: ____________

________________________________________________________________
________________________________________________________________

Information Sheet 2 OHS Requirements
OHS Requirements
OHS requirements are legislation/regulations/codes of practice and enterprise safety policies and procedures. This may include protective clothing and equipment, use of tooling and equipment, workplace environment and safety, handling of material, use of firefighting equipment, enterprise first aid, hazard control and hazardous materials and substances. Personal protective equipment include those prescribed under legislation/ regulations/codes of practice and workplace policies and practices. Safe operating procedures include the conduct of operational risk assessment and treatments associated with workplace organization. Emergency procedures include emergency shutdown and stopping of equipment, extinguishing fires, enterprise first aid requirements and site evacuation. Occupational safety and health (OSH) also commonly referred to as occupational health and safety (OHS) or workplace health and safety (WHS) is an area concerned with the safety, health and welfare of people engaged in work or employment. The goals of occupational safety and health programs include fostering a safe and healthy work environment. OSH may also protect co-workers, family members, employers, customers, and many others who might be affected by the workplace environment. In the United States the term occupational health and safety is referred to as occupational health and occupational and non-occupational safety and includes safety for activities outside work. Occupational safety and health can be important for moral, legal, and financial reasons. In common-law jurisdictions, employers have a common law duty (reflecting an underlying moral obligation) to take reasonable care for the safety of their employees. Statute law may build upon this to impose additional general duties, introduce specific duties and create government bodies with powers to regulate workplace safety issues: details of this will vary from jurisdiction to jurisdiction. Good OSH practices can also reduce employee injury and illness related costs, including medical care, sick leave and disability benefit costs. As defined by the World Health Organization (WHO) "occupational health deals with all aspects of health and safety in the workplace and has a strong focus on primary prevention of hazards." Health has been defined as "a state of complete physical, mental and social well-being and not merely the absence of disease or infirmity. Occupational health is a multidisciplinary field of healthcare concerned with enabling an individual to undertake their occupation, in the way that causes least harm to their health. It contrasts, for example, with the promotion of health and safety at work, which is concerned with preventing harm from any incidental hazards, arising in the workplace. Since 1950, the International Labour Organization (ILO) and the World Health Organization (WHO) have shared a common definition of occupational health. It was adopted by the Joint ILO/WHO Committee on Occupational Health at its first session in 1950 and revised at its twelfth session in 1995. The definition reads: "The main focus in

occupational health is on three different objectives: (i) the maintenance and promotion of workers’ health and working capacity; (ii) the improvement of working environment and work to become conducive to safety and health and (iii) development of work organizations and working cultures in a direction which supports health and safety at work and in doing so also promotes a positive social climate and smooth operation and may enhance productivity of the undertakings. The concept of working culture is intended in this context to mean a reflection of the essential value systems adopted by the undertaking concerned. Such a culture is reflected in practice in the managerial systems, personnel policy, principles for participation, training policies and quality management of the undertaking." Joint ILO/WHO Committee on Occupational Health: those in the field of occupational health come from a wide range of disciplines and professions including medicine, psychology, epidemiology, physiotherapy and rehabilitation, occupational, occupational medicine, human factors and ergonomics, and many others. Professionals advise on a broad range of occupational health matters. These include how to avoid particular pre-existing conditions causing a problem in the occupation, correct posture for the work, frequency of rest breaks, preventative action that can be undertaken, and so forth. "Occupational health should aim at: the promotion and maintenance of the highest degree of physical, mental and social well-being of workers in all occupations; the prevention amongst workers of departures from health caused by their working conditions; the protection of workers in their employment from risks resulting from factors adverse to health; the placing and maintenance of the worker in an occupational environment adapted to his physiological and psychological capabilities; and, to summarize, the adaptation of work to man and of each man to his job.
History
Harry McShane, age 16, 1908. Pulled into machinery in a factory in Cincinnati and had his arm ripped off at the shoulder and his leg broken without any compensation. The research and regulation of occupational safety and health are a relatively recent phenomenon. As labor movements arose in response to worker concerns in the wake of the industrial revolution, worker's health entered consideration as a labor-related issue. In 1833, HM Factory Inspectorate was formed in the United Kingdom with a remit to inspect factories and ensure the prevention of injury to child textile workers. In 1840 a Royal Commission published its findings on the state of conditions for the workers of the mining industry that documented the appallingly dangerous environment that they had to

work in and the high frequency of accidents. The commission sparked public outrage which resulted in the Mines Act of 1842. The act set up an inspectorate for mines and collieries which resulted in many prosecutions and safety improvements, and by 1850, inspectors were able to enter and inspect premises at their discretion. Otto von Bismarck inaugurated the first social insurance legislation in 1883 and the first worker's compensation law in 1884 – the first of their kind in the Western world. Similar acts followed in other countries, partly in response to labor unrest. Workplace hazards Although work provides many economic and other benefits, a wide array of workplace hazards also present risks to the health and safety of people at work. These include "chemicals, biological agents, physical factors, adverse ergonomic conditions, allergens, a complex network of safety risks," and a broad range of psychosocial risk factors. Physical and mechanical hazards
At-risk workers without appropriate safety equipment
Physical hazards are a common source of injuries in many industries. They are perhaps unavoidable in certain industries, such as construction and mining, but over time people have developed safety methods and procedures to manage the risks of physical danger in the workplace. Employment of children may pose special problems. Falls are a common cause of occupational injuries and fatalities, especially in construction, extraction, transportation, healthcare, and building cleaning and maintenance. An engineering workshop specializing in the fabrication and welding of components has to follow the Personal Protective Equipment (PPE) at work regulations 1992. It is an employer’s/workers duty to provide ‘all equipment (including clothing affording protection against the weather) which is intended to be worn or held by a person at work which protects him against one or more risks to his health and safety’. In a fabrication and welding workshop an employer would be required to provide face and eye protection, safety footwear, overalls and other necessary PPE. Machines are commonplace in many industries, including manufacturing, mining, construction and agriculture, and can be dangerous to workers. Many machines involve moving parts, sharp edges, hot surfaces and other hazards with the potential to crush, burn, cut, shear, stab or otherwise strike or wound workers if used unsafely. Various safety measures exist to minimize these hazards, including lockout-tag out procedures for machine maintenance and roll over protection systems for vehicles.

According to the United States Bureau of Labor Statistics, machine-related injuries were responsible for 64,170 cases that required days away from work in 2008. More than a quarter of these cases required more than 31 days spent away from work. That same year, machines were the primary or secondary source of over 600 work-related fatalities. Machines are also often involved indirectly in worker deaths and injuries, such as in cases in which a worker slips and falls, possibly upon a sharp or pointed object. The transportation sector bears many risks for the health of commercial drivers, too, for example from vibration, long periods of sitting, work stress and exhaustion. These problems occur in Europe but in other parts of the world the situation is even worse. More drivers die in accidents due to security defects in vehicles. Long waiting times at borders cause that drivers are away from home and family much longer and even increase the risk of HIV infections. Confined spaces also present a work hazard. The National Institute of Occupational Safety and Health defines "confined space" as having limited openings for entry and exit and unfavorable natural ventilation, and which is not intended for continuous employee occupancy. Spaces of this kind can include storage tanks, ship compartments, sewers, and pipelines. Confined spaces can pose a hazard not just to workers, but also to people who try to rescue them. Noise also presents a fairly common workplace hazard: occupational hearing loss is the most common work-related injury in the United States, with 22 million workers exposed to hazardous noise levels at work and an estimated $242 million spent annually on worker's compensation for hearing loss disability. Noise is not the only source of occupational hearing loss; exposure to chemicals such as aromatic solvents and metals including lead, arsenic, and mercury can also cause hearing loss. Temperature extremes can also pose a danger to workers. Heat stress can cause heat stroke, exhaustion, cramps, and rashes. Heat can also fog up safety glasses or cause sweaty palms or dizziness, all of which increase the risk of other injuries. Workers near hot surfaces or steam also are at risk for burns. Dehydration may also result from overexposure to heat. Cold stress also poses a danger to many workers. Over-exposure to cold conditions or extreme cold can lead to hypothermia, frostbite, trench foot, or chilblains. Electricity poses a danger to many workers. Electrical injuries can be divided into four types: fatal electrocution, electric shock, burns, and falls caused by contact with electric energy. Vibrating machinery, lighting, and air pressure (high or low) can also cause work-related illness and injury. Asphyxiation is another potential work hazard in certain situations. Musculoskeletal are avoided by the employment of good ergonomic design and the reduction of repeated strenuous movements or lifts. Ionizing (alpha, beta, gamma, X, neutron), and non-ionizing radiation (microwave, intense IR, RF, UV, laser at visible and non-visible wavelengths), can also be a potent hazard In Victoria, workplace health and safety is governed by a system of laws, regulations and compliance codes which set out the responsibilities of employers and workers to ensure that safety is maintained at work.

The Act The Occupational Health and Safety Act 2004 (the Act) is the cornerstone of legislative and administrative measures to improve occupational health and safety in Victoria. The Act sets out the key principles, duties and rights in relation to occupational health and safety. The general nature of the duties imposed by the Act means that they cover a very wide variety of circumstances, do not readily date and provide considerable flexibility for a duty holder to determine what needs to be done to comply. The Regulations The Occupational Health and Safety Regulations 2007 are made under the Act. They specify the ways duties imposed by the Act must be performed, or prescribe procedural or administrative matters to support the Act, such as requiring licenses for specific activities, keeping records, or notifying certain matters. Guidance Effective OHS regulation requires that Work Safe provides clear, accessible advice and guidance about what constitutes compliance with the Act and Regulations. This can be achieved through Compliance Codes, Work Safe Positions and non-statutory guidance ("the OHS compliance framework"). For a detailed explanation of the OHS compliance framework, see the Victorian Occupational Health and Safety Compliance Framework Handbook. Policy Not every term in the legislation is defined or explained in detail. Also, sometimes new circumstances arise (like increases in non-standard forms of employment, such as casual, labour hire and contract work, or completely new industries with new technologies which produce new hazards and risks) which could potentially impact on the reach of the law, or its effective administration by Work Safe. Therefore, from time to time Work Safe must make decisions about how it will interpret something that is referred to in legislation, or act on a particular issue, to ensure clarity. In these circumstances, Work Safe will develop a policy. A policy is a statement of what Work Safe understands something to mean, or what Work Safe will do in certain circumstances.
Work Manual Self-Check 2
Written Test
Directions: Answer all the questions listed below. Use the Answer sheet provided in the next page:

1. What is OHS represents for (2 point)
2. What is OSH represents for? (1 point)
3. What is WHS represents for. (1 point)
4. What are the goals of OHS? (2 points)
5. List some examples of OHS requirements in your work areas. (10 points)
Note: Satisfactory rating – 09 points Unsatisfactory - below 09 points You can ask you trainer for the copy of the correct answers.

Answer Sheet
Name: _________________________ Date: _______________ Short Answer Questions
1. ________________________________________________________________
________________________________________________________________
________________________________________________________________
2. ________________________________________________________________
________________________________________________________________
________________________________________________________________
3. ________________________________________________________________
________________________________________________________________
________________________________________________________________
________________________________________________________________
4. ________________________________________________________________
________________________________________________________________
________________________________________________________________
________________________________________________________________
5. ________________________________________________________________
________________________________________________________________
________________________________________________________________
________________________________________________________________
________________________________________________________________
Score = ___________
Rating: ____________

Information Sheet 3 Tools and Equipment Preparation for 3S
Tools and Equipment used to implement 3S
You are required to prepare and use tools and equipment to implement sort, set in order and shine activities in to your work station. The following are some tools and equipment that help you in the implementation of 3S.
Tools and materials used to implement Sort activity
Tools and materials are required to implement sort, set in order and shine activities in work stations. The following are some tools and materials used to implement the first pillar of 5S-Sort.
● red tags sticker ● hook nails ● shelves chip wood ● sponge broom ● pencil shadow board/ tools board ● formats (for recording necessary and unnecessary items, plans etc…)
Tools and materials used to implement set in order
The following are some tools and materials used to implement the second pillar of 5S-Set in order.

Tools and materials used to implement shine
The following are some tools and materials used to implement the third pillar of 5S-Shine.
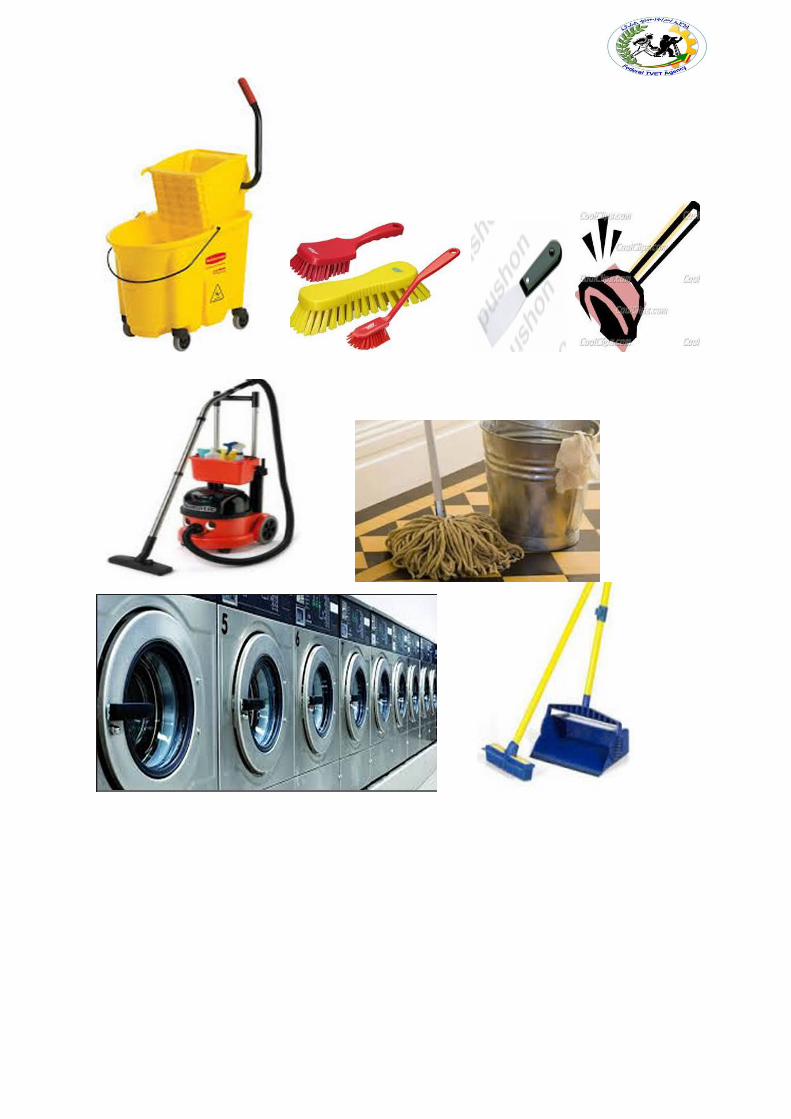
● sponges ● brooms ● brushes ● spades ● vacuum cleaners ● waste baskets ● dust bins ● gloves ● dust masks ● detergents ● containers ● oils ● bolts ● screws ● boots shoes ● Etc…


Self-Check 3 Written Test
Instructions: Perform the following tasks. Write your answers in the answer sheet provided:
1. List at least 10 tools and materials used to implement Sort. (10 points)
2. List at least eight tools and materials used to implement Set in order. (8 points)
3. List at least eight tools and materials used to implement Shine. (8 points)
Note: Satisfactory rating - 08 points Unsatisfactory - below 08 points You can ask your trainer for the copy of the correct answers.

Answer Sheet
Name: _________________________ Date: _______________
1. _______________________________________________________________
________________________________________________________________
________________________________________________________________
________________________________________________________________
2. ________________________________________________________________
________________________________________________________________
________________________________________________________________
________________________________________________________________
3. ________________________________________________________________
________________________________________________________________
________________________________________________________________
________________________________________________________________
________________________________________________________________
________________________________________________________________
Score = ___________
Rating: ____________

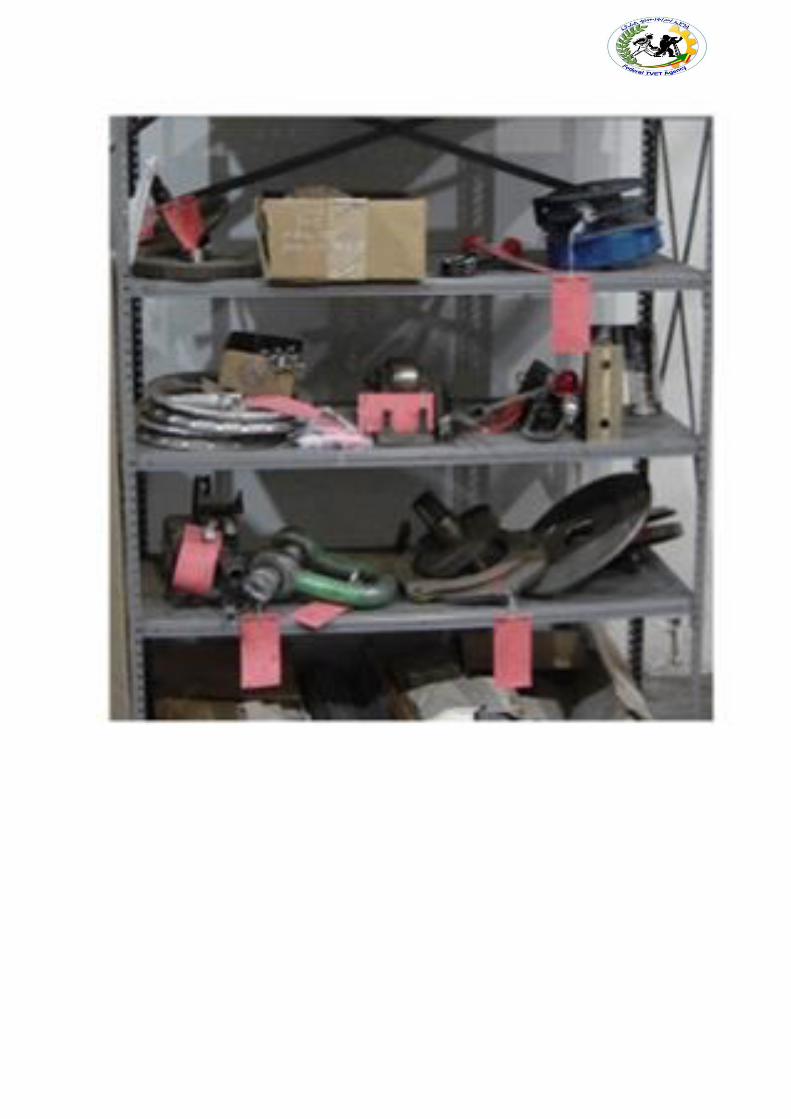
SORT Overview of red tagging The Red-Tag Strategy is a simple method for identifying potentially unneeded items in the factory or workshop, evaluating their usefulness and dealing with them appropriately. Red-tagging means putting red tags on items in the factory or workshop that need to be evaluated as being necessary or unnecessary. A Red tag is a red colored tag used to identify items no longer needed in a particular
work area. The red tags catch people’s attention because red is a colour that stands out. An item
with a red tag is asking three questions:
Is this item needed?
If it is needed, is it needed in this quantity?
If it is needed, does it need to be located here? Once these items are identified, they can be held in a “Red Tag Holding Area” for a period of time to see whether they are needed, disposed of, relocated, or left exactly where they are. Red-tag Holding areas In order to implement the red-tag strategy effectively, a red-tag holding area must be created. A red-tag holding area is an area set aside for use in storing red-tagged items that need further evaluation. Red-tagging is helpful when the need or frequency of need for that item is unknown. When an item is set aside in a red-tag holding area and watched for an agreed-upon period of time people tend to be more ready to let it go when that time is over. There are two red-tag holding areas: local and central holding areas. Local red-tag holding area is used to manage the flow of red-tagged items with in a local department or production area. Central red-tag holding area is used to manage the flow of items that cannot or should not be disposed of by individual departments or production area. Usually central red-tag holding area is used by an organization that is launching a companywide red-tagging effort. Red-tag Holding Area
Information Sheet 4 3S Implementation

Steps/procedures in Red tagging The red-tagging process in a department or work area can be broken down into seven steps.
Step 1: Launch the red-tag project. Step 2: Identify the red-tag targets. Step 3: Set red-tag criteria. Step 4: Make red tags. Step 5: Attach red tags. Step 6: Evaluate red-tagged items. Step 7: Document the results of red-tagging.
Step 1: Launch the red-tag project Red-tag campaigns are started and coordinated by the upper-level management of a company. Even when a red-tag campaign is companywide, local campaigns need to be organized in each department or production area. This involves
Organizing a team
Organizing supplies
Organizing a time or schedule to perform red-tagging
Deciding a local-tag holding area
Planning for disposal of red-tagged items
People from outside a department can be valuable members on a red-tagging team since they tend to see the area with a fresh eye. Hence, it is helpful to partner with other departments or production areas in creating red-tagging teams. Step 2: Identify red-tag targets There are two red-tag targets:
a) Items: in the manufacturing area items like inventory (warehouse and in-process inventory), equipment, and space are targets for red tags. Warehouse inventory include material, parts, products etc.
b) Areas: It is better to define a smaller area and evaluate it well than to define a larger area and not be able to evaluate it fully in available time.

Step 3: Set red-tag criteria As already mentioned, the most difficult thing about red-tagging is differentiating what is needed from what is not. This issue can be managed by establishing clear-cut criteria for what is needed in particular area and what is not. The most common criterion is the next month’s production schedule.
Items needed for that schedule are kept in that location.
Items not needed for the schedule can be disposed of or stored in a separate location. Three main factors determine whether an item is necessary or not. These factors are:
The usefulness of the item to perform the work at hand. If the item isn’t needed it should be disposed of.
The frequency with which the item is needed. If it is needed infrequently it can be stored away from the work area.
The quantity of the item needed to perform this work. If it is needed in limited quantity the excess can be disposed or stored away from the work area.
Each company must establish its own red-tagging criteria and each department may customize this standard to meet its local needs. Step 4: Make red-tags Each company has specific needs for documenting and reporting the movement, use, and value of materials, equipment, tools, inventory and products. The company’s red tags should be designed to support this documentation process. Various types of information on a red tag may include:
Category: provides a general idea of the type of item (e.g., a warehouse item or machine). Categories include raw materials, in-process inventory, products, equipment, jigs, tools and dies.
Item name and manufacturing number.
Quantity: indicates the number of items included under this red tag.
Reason: describes why a red tag has been attached to this item.
Division: includes the name of the division responsible for managing the red-tagged item.
Value: includes the value of the red-tagged item.
Date: includes the red-tagging date.

Red Tag
Item Information
Date:
Tagged By:
Item Name:
Location:
Category
Equipment Raw Materials
Tools & JigsWork-in-Process
Finished Goods Other
Gauges & Instruments Consumables
Machine Parts
Reason for Red Tag
Not Required Obsolete
Defect Unknown object
Scrap
Suggested Action Required
Return to
Scrap
Relocate Sell
Comments
Log No.

The material used for red tags can be red paper, thick red tape, or others. Red tags can be laminated with plastic or another material to protect them during repeated use.
Step 5: Attach the red tags

The best way to carry out red-tagging is to do the whole target area quickly, if possible, in one or two days. In fact, many companies choose to red-tag their entire factory during a one or two day period. Red-tagging should be a short and powerful event. You should red-tag all items you question, without evaluating what to do with them. Step 6: Evaluate the red-tagged items In this step, the red-tag criteria established in step 3 are used to evaluate what to do with red-tagged items. Options include:
Keep the item where it is.
Move the item to a new location in the work area.
Store the item away from the work area.
Hold the item in the local red-tag holding area for evaluation.
Dispose of the item.
Disposal methods include:
Throw it away.
Sell it.
Return it to the vendor.
Lend it out.
Distribute it to a different part of the company.
Send it to the central red-tag holding area. The next table shows disposal methods.
Treatment Description
Throw it away
Dispose of as scrap or incinerate items that are useless or unneeded for any purpose.
Sell Sell off to other companies items that are useless or unneeded for any purpose.
Return Return items to the supply company.
Lend out Lend items to other sections of the company that can use them on a temporary basis.
Distribute Distribute items to another part of the company on a permanent basis.
Central red-tag area
Send items to the central red-tag holding area for redistribution, storage, or disposal.
Evaluation format for red-tag items (sample)

Ideally, unnecessary equipment should be removed from areas where daily production activities take place. However, large equipment and equipment or machine attached to the floor may be expensive to move. It is sometimes better to leave this equipment where it is unless it interferes with daily production activities or prevents workshop improvements. Label this unneeded and difficult to move equipment with a “freeze” red tag, which indicates that its use has been “frozen,” but that it will remain in place for the time being. Step 7: Document the results of red-tagging Each company or organization needs to create its own system for logging and tracking necessary information as red-tagging takes place. The documentation system may involve a written logbook in each department and in the central red tag holding area. Or it may involve entering data from the red-tags into a computer system. Whatever the system, documenting results is an important part of the red-tagging process. It allows the company to measure the improvement and savings produced as a result of the red-tagging effort. As it is indicated in step 4, the red-tags should be designed to support the documentation process. Determine in advance approximately how many red-tags each workplace should use. An average of four red-tags per employee should be used. This means a workshop with 30 employees should need about 120 red tags. In addition when you find a shelf full of items which are difficult to decide, we don’t have to be tempted to attach one red-tag for the whole shelf. Because this can lead to confusion when we want to dispose of these items in the shelve. Therefore, avoid this temptation and attach individual tags to individual items. When red-tagging is completed the factory or workshop is usually dotted with empty spaces – a sign of real progress. Then the layout of equipments and worktables can be changed to occupy the

free space. Companies or organizations who think they need to build a new factory for a production of new products/ services should first apply the sort activity or the red-tag strategy so that they could get plenty of free space.

Red Tagged Items
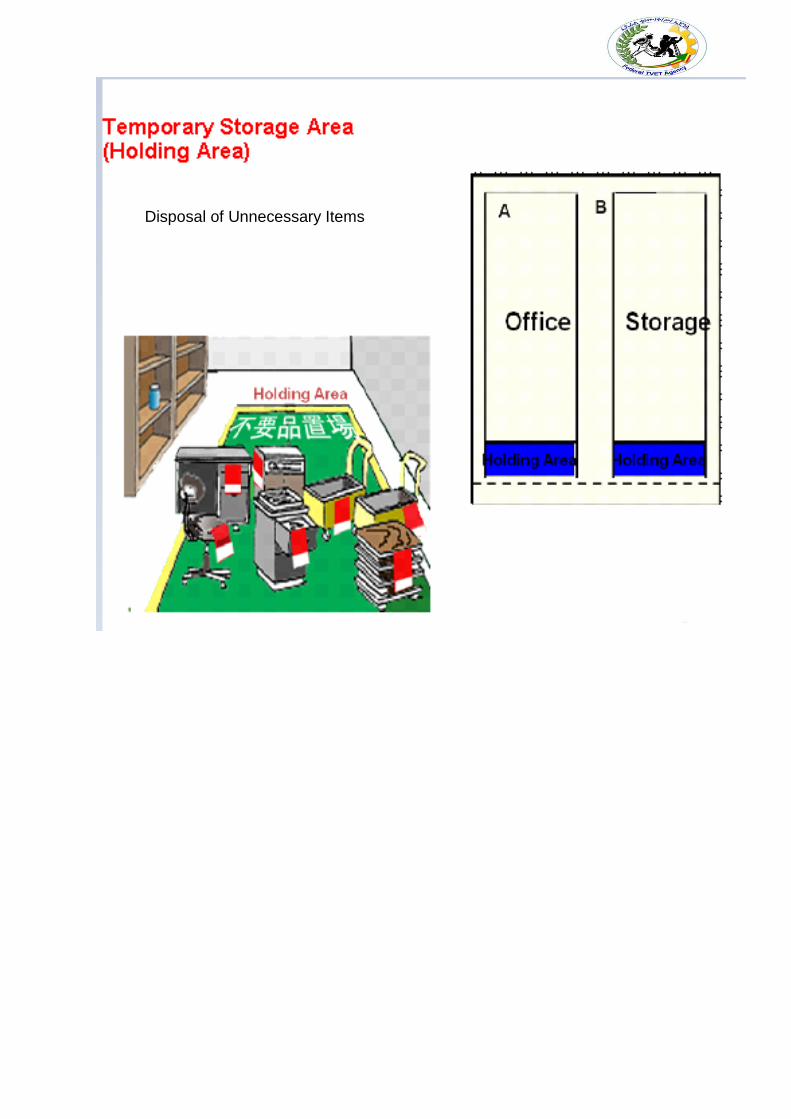
Disposal of Unnecessary Items

SET IN ORDER
There are some principles for deciding best locations for tools and equipments. Jigs, tools and dies differ from materials, equipments, machinery and parts in that they must be put back after each use. Some of the principles for jigs, tools and dies also apply to parts, equipments, and machinery. These are:
Locate items in the workplace according to their frequency of use. Place frequently used items near the place of use. Store infrequently used items away from the place of use.
Store items together if they are used together, and store them in sequence in which they are used.
Fig. Tools kept at hand and stored in the order used.
Device a “just let go” arrangement for tools. This approach involves suspending tools from a retractable cord just within reach so that they will automatically go back in to their correct storage position when released.
Make storage places larger than the items stored there so that they are physically easy to remove and put back.
Eliminate the variety of jigs, tools and dies needed by creating a few jigs, tools and dies that serve multiple functions.
Store tools according to function or product. Function-based storage means storing tools together when they have similar functions. This works best for job-shop production. Product-based storage means storing tools together when they are used on the same product. This works best for repetitive production.
There are principles helpful in deciding the best locations for parts, equipments, and machinery, as well as tools by removing motion wastes. Motion wastes are unnecessary movements created when people move their trunks, feet, arms, and hands more than needed to perform a given operation. These wastes lead to waste of time, energy and effort. These motion wastes can be minimized by locating parts, equipments, and machinery in the best locations possible. More important than removing motion wastes is asking why it occurs. By asking ‘why’ we can find the methods of manufacturing that work and approach the zero-waste mark. Eliminating the

unnecessary motions from existing operations is called Motion improvement. And finding ways to eliminate the whole operations to remove the wastes is called Radical improvement.
The principles that are helpful to eliminate or reduce motions that operators make are:
Principle 1: Start and end each motion with both hands moving at once.
Principle 2: Both arms should move symmetrically and in opposite directions.
Principle 3: Keep trunk motions to a minimum.
Principle 4: Use gravity instead of muscle.
Principle 5: Avoid zigzagging motions and sudden changes in direction.
Principle 6: Move with a steady rhythm.
Principle 7: Maintain a comfortable posture with comfortable motions.
Principle 8: Use the feet to operate on and off switches for machines where practical.
Principle 9: Keep materials and tools close and in front.
Fig. Guidelines for locating parts, equipments, and machinery to maximize motion efficiency.
Principle 10: Arrange materials and tools in the order of their use.
Principle 11: Use inexpensive methods for feeding in and sending out materials.
Principle 12: Stand at a proper height for the work to be done.
Principle 13: Make materials and parts easy to pick up.
Principle 14: Make handles and grips in efficient, easy-to-use shapes and positions.
Fig. Motion wastes Fig. No waste of motion
Example of eliminating motion wastes
Improving the retrieval of parts
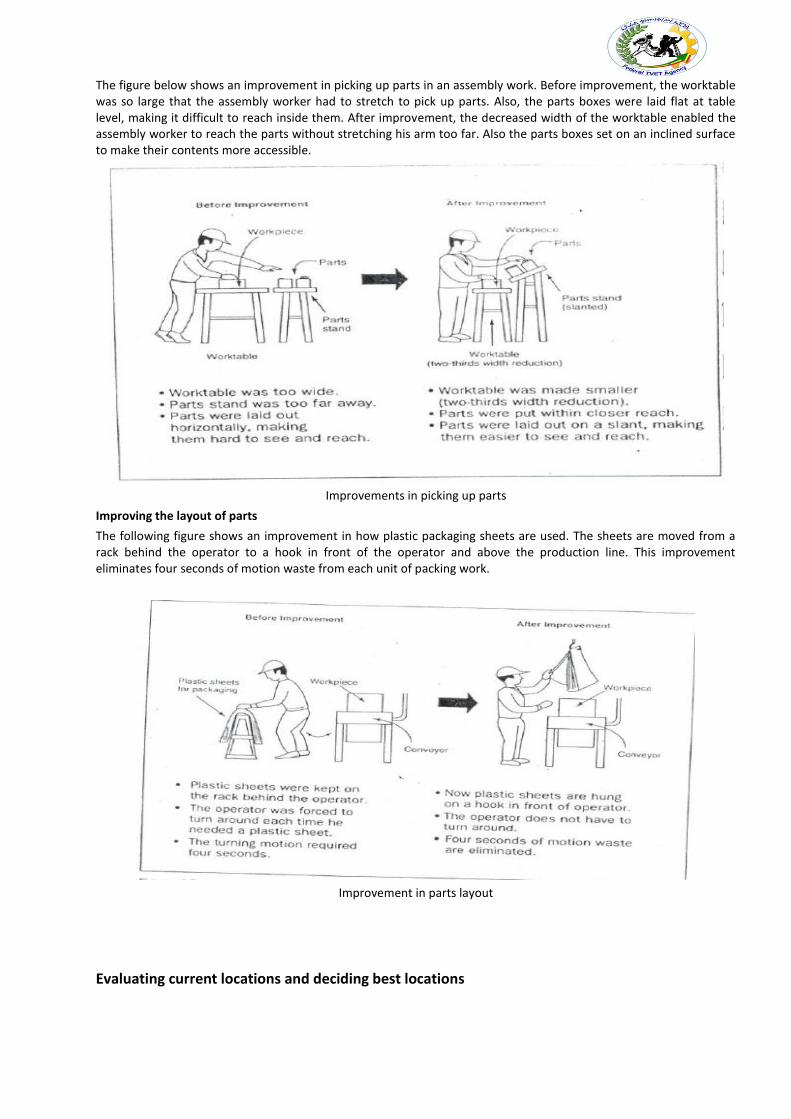
The figure below shows an improvement in picking up parts in an assembly work. Before improvement, the worktable was so large that the assembly worker had to stretch to pick up parts. Also, the parts boxes were laid flat at table level, making it difficult to reach inside them. After improvement, the decreased width of the worktable enabled the assembly worker to reach the parts without stretching his arm too far. Also the parts boxes set on an inclined surface to make their contents more accessible.
Improvements in picking up parts
Improving the layout of parts
The following figure shows an improvement in how plastic packaging sheets are used. The sheets are moved from a rack behind the operator to a hook in front of the operator and above the production line. This improvement eliminates four seconds of motion waste from each unit of packing work.
Improvement in parts layout
Evaluating current locations and deciding best locations

The 5S Map is a tool that can be used to evaluate current locations of parts, jigs, tools, dies, equipment, and machinery, and to decide best locations. 5S Map involves creating two maps ‘before map’ and ‘after map’. The ‘before map’ shows the layout of the workplace before implementing set in order. The ‘after map’ shows the workplace after implementing set in order. The 5S Map can be used to evaluate the locations in a small or large workplaces, like in a single workstations, on a production line, or in a department.
The steps of using the 5S Map:
1. Make a floor plan or area diagram of the workplace you wish to study. Show the location of specific parts, inventory, tools, jigs, dies, equipment and machinery.
2. Draw arrows on the plan showing the work flow between items in the workplace. There should be at least one arrow for every operation performed. Draw the arrows in the order that the operations are performed, and number them as you go.
Fig. 5S Map of old layout in machining operations (‘before map’)
3. Look carefully at the resulting “spaghetti diagram”. Can you see places where there is congestion in the work flow? Can you see ways to eliminate waste?
4. Make a new 5S Map to experiment with a better layout for this work place. Again, draw and number arrows to show the flow of operations performed.
5. Analyze the efficiency of the new layout (the after map), based on the principles explained in the above.
6. Continue to experiment with possible layouts (after maps) using the 5S Map until you find one which you think will work well.
Fig. 5S Map of new layout (the after map) in machining operations

7. Implement this new layout in the work place by moving parts, tools, jigs, dies, equipment,
and machinery to their new locations.
8. Continue to evaluate and improve the layout in the workplace.
1.1 Set in order strategies
Once best locations have been decided, it is necessary to mark these locations so that everyone knows what goes where, and how many of each item belongs in each location. There are several strategies for marking or showing what, where and how many.
1.1.1 Motion Economy strategy Following the principles explained in the above, we can remove motion waste from existing operation. By using human body appropriately, by organizing the workplace and by redesigning of tools and equipments, we can minimize motion waste.
1.1.2 Visual control Strategy A visual control is any communication device used in the work environment that tells us at a glance how work should be done. There are several strategies for setting in order items so that to easily identify what, where and how many (visual control). These visual control strategies are discussed in the next contents.
1.1.2.1 Signboard strategy The signboard strategy uses signboards to identify what, where, and how many. The three main types of signboards are:
Location indicators that show where items go.
Item indicators that show what specific items go in those places.
Amount indicators that show how many of these items belong there.
Fig. Amount indicators
Signboards are often used to identify:
Names of work areas
Inventory locations
Equipment storage locations
Standard procedures

Machine layout
For example, in order to identify inventory stored on shelves in a warehouse, a whole system of signboards may be used. Every section of shelving may have a signboard identifying the section. Within that section, vertical and horizontal addresses on shelves can be identified with additional signboard. Each item stored on the shelve may also have a signboard showing the “return address” for that item. The “return address” allows the item to be put back in the proper location once it has been removed.
Fig. Location indicators on shelves
The ‘after 5S Map’ discussed before is a kind of signboard. It shows the location of parts, tools, jigs, dies, equipment, and machinery in a given work area after set in order is implemented. When posted in the work place, it is useful in communicating the standard for where items are located.
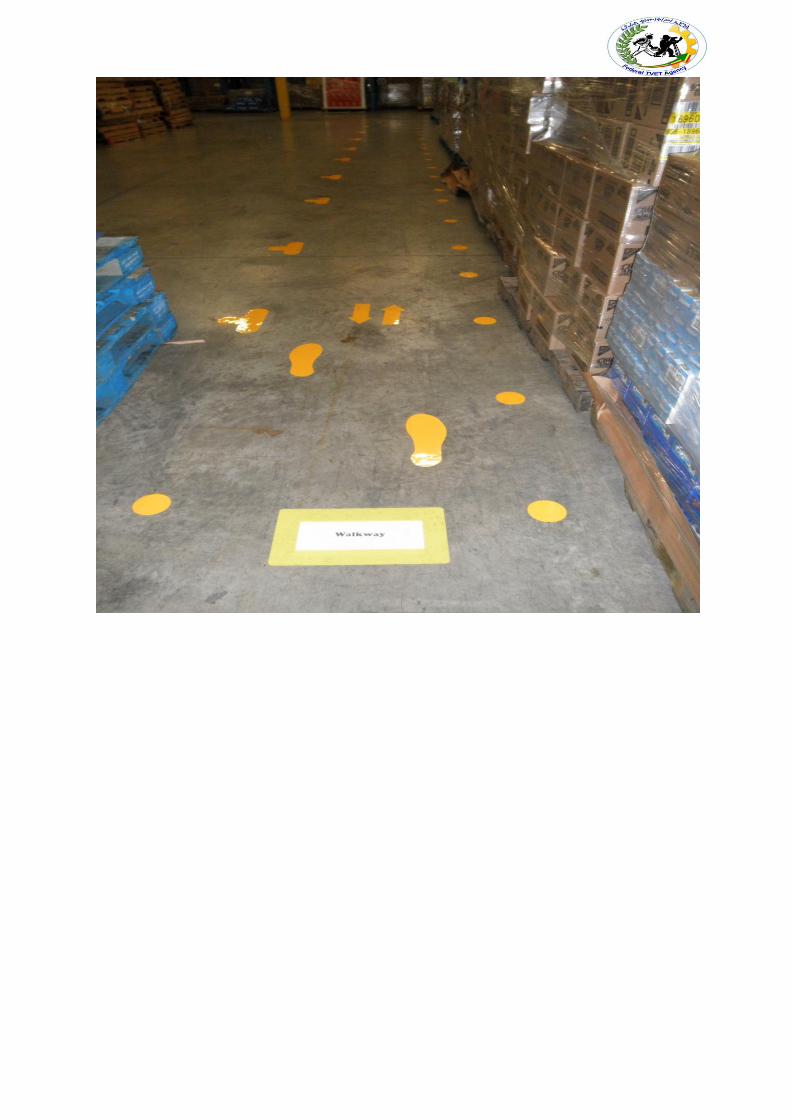
1.1.2.2 Painting strategy
The painting strategy is a method for identifying locations on floors and walkways. It is called the Painting strategy because paint is the material generally used. But also plastic tape, cut in to any length, can be used. Plastic tape, although more expensive, shows up just as clearly as paint and can be removed if the layout is changed. The painting strategy is used to divide the factory’s or workshop’s walking areas (walkways) from the working areas (operation areas). When putting lines to divide walkways from operation areas, the following factors should be considered:
U-shaped cell designs are generally efficient that straight production lines.
In-process inventory should be positioned carefully for best production flow.
Floors should be levelled or repaired before we put lines.
Walkways should be wide enough to avoid twists and turns and for safety and a smooth flow of goods.
The dividing lines should be between 2 and 4 inches in width.
Paint colors should be standardized. For example o operation areas are painted by green; o walkways are fluorescent orange or red;

o Lines that divide the walkways from operation areas are yellow in color.
Dividing lines can be used to show:
Cart storage locations,
aisle directions,
door range, to show which way a door swings open,
for worktables,
tiger marks, to show areas where inventory and equipment should not be placed, or to show hazardous areas.
Fig. Aisle direction line Fig. Door-range line
1.1.2.3 Color-code strategy Color-coding is used to show clearly which parts, tools, jigs and dies are to be used for which purpose. For example, if certain parts are to be used to make a particular product, they can all be color-coded with the same color and even stored in a location that is painted with that color. Similarly, as shown the picture in below, if different types of lubricants are to be used on different parts of a machine, the supply containers, oil cans, and machine parts can be color-coded to show what is used where.
Fig. Color-coding for lubrication

1.1.2.4 Outlining strategy Outlining is used to show which jigs and tools are stored where. Outlining simply means drawing outlines of jigs and tools in their proper storage positions. When you want to return a tool, the outline provides an additional indication of where it belongs.
Fig. Outlining of tools to show their locations

1.1.2.5 Visual Management Board (Kaizen board) Strategy
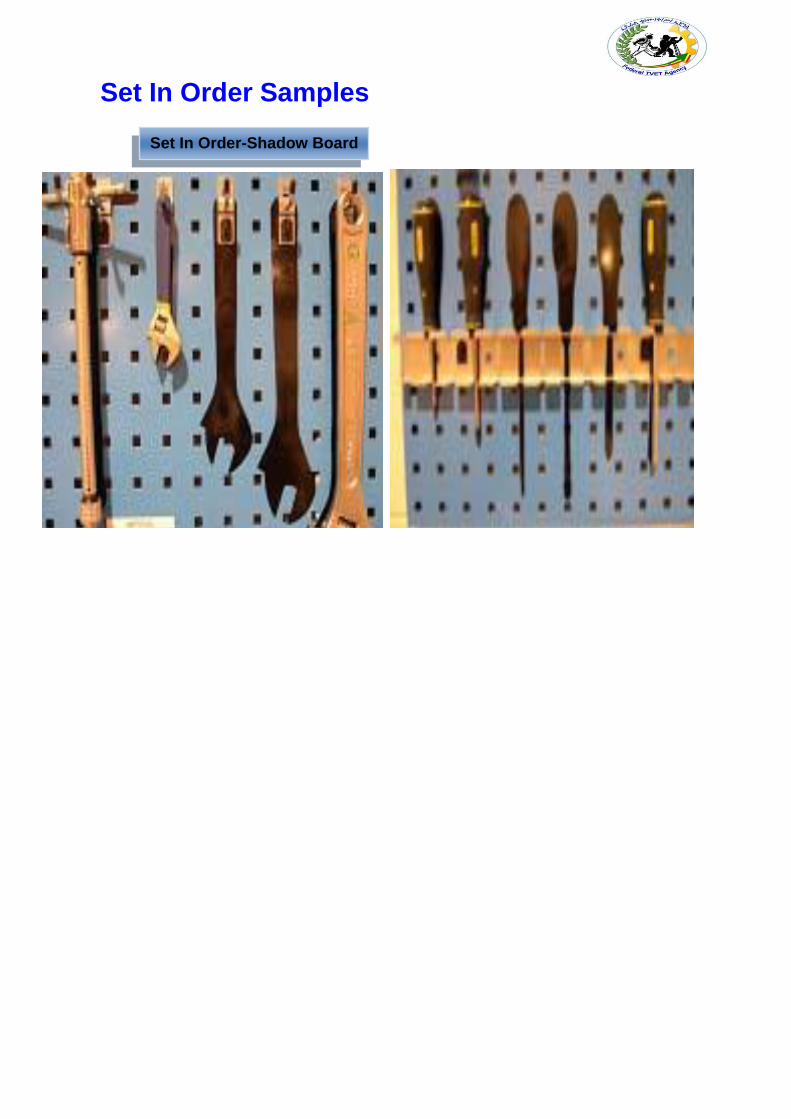
Set In Order Samples
Set In Order-Shadow Board

AFTER
BEFORE

SHINE
Shine activities should be taught as a set of steps and rules that employees learn to maintain with discipline.
Step 1: Determine shine target areas
Shine target areas are grouped in to three categories: warehouse item, equipments and space. Warehouse items include raw materials, procured subcontracted parts, parts made in-house, and assembly components, semifinished and finished products. Equipment includes machines, welding tools, cutting tools, conveyance tools, general tools, measuring instruments, dies, wheels and casters, worktables, cabinets, desks, chairs and spare equipment. Space refers to floors, work areas, walkways, walls, pillars, ceilings, windows, shelves, closets, rooms and lights. Step 2: Determine Shine Assignments Workplace cleanliness is the responsibility of everyone who works there. Each employee should be assigned specific area to clean. To do this two methods can be used:
A 5S Assignment Map – shows all the target areas for shine activity and who is responsible for cleaning them. By marking on 5S Map, the shine assignments can be shown.
A 5S schedule – shows in detail who is responsible for cleaning which areas on which days and times of the day. Then this schedule should be posted in the work area.
Example 1:
Example 2:

Step 3: Determine shine methods Shine activities should be a natural part of the daily work. Shine activities and inspection should be done before a shift starts, during work time and at the end of the shift. Determining shine methods include:
Choosing targets and tools – define what will be cleaned in each area and what supplies and equipments will be used.
Performing the five-minute shine – cleaning should be practiced daily and should not require a lot of time.
Creating standards for shine procedures – people need to know what procedures to follow in order to use their time efficiently. Otherwise, they are likely to spend most of their time getting ready to clean.
Step 4: prepare tools The cleaning tools should be placed properly or set in order where they are easy to find, use and return. Step 5: Start to shine When implementing the shine procedures, consider the following suggestions:
Be sure to sweep dirt from floor cracks, wall corners, and around pillars.
Wipe off dust and dirt from walls, windows, and doors.
Be thorough about cleaning dirt, scraps, oil, dust, rust, cutting shavings, sand, paint, and other foreign matter from all surfaces.
Use cleaning detergents when sweeping is not enough to remove dirt.
1.2 Inspection As discussed earlier, it is natural to do a certain amount of inspection while implementing shine activities. Once daily cleaning and periodic major cleanups become a habit, we can start incorporating systematic inspection procedures in to the shine procedures. Even when equipment in the workplace appears to function normally, it may be developing many problems. Always when machines or other equipment begin to show sign of minor, sporadic malfunctions, the operators not the maintenance people notice it first. Therefore, it is important to consider the operators information about the equipment. The following types of equipment problems frequently exist in factories:

1. Oil leaks from the equipment on to the floor. 2. Machines are so dirty that operators avoid touching them. 3. Gauge displays and other indicators are too dirty to be read. 4. Nuts and bolts are either loose or missing. 5. Motors overheat. 6. Sparks flare from power cords. 7. V-belts are loose or broken. 8. Some machines make strange noises.
Daily cleaning or inspection can help to find these problems and solve them.
Before Shine After Shine
1.2.1 Inspection steps The steps of inspection and shine procedures are parallel. But the steps of inspection give greater emphasis on the maintenance of machines and equipment. These steps are: Step 1: Determine inspection targets The targets for inspection are similar to the targets of shine activities. These include machines, equipments, jigs, dies, cutting tools and measuring instruments. Step 2: Assign inspection activities In principle, the people who carry out inspection on a particular machine should be the same people who operate the machine. But most often one person can operate several machines at a time (as in multi-process handling). In this case, it is good to involve line supervisors and group leaders in the inspection duties. Once inspection activities are assigned, they have to be written up on a large signboard for the workshop or on small signboards that are attached to each target machine. Step 3: Determine inspection methods First all of the items to be inspected should be listed then an inspection checklist should be prepared based on the listed inspection items. The following shows an example of an inspection checklist.
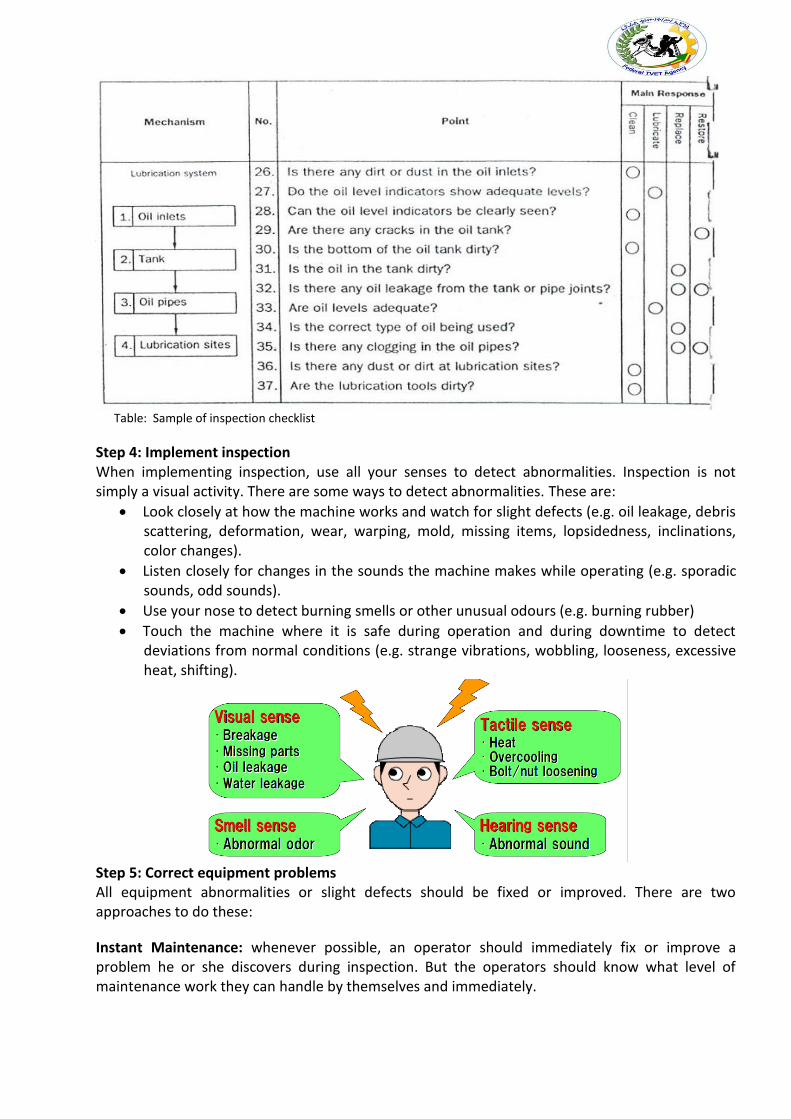
Table: Sample of inspection checklist
Step 4: Implement inspection When implementing inspection, use all your senses to detect abnormalities. Inspection is not simply a visual activity. There are some ways to detect abnormalities. These are:
Look closely at how the machine works and watch for slight defects (e.g. oil leakage, debris scattering, deformation, wear, warping, mold, missing items, lopsidedness, inclinations, color changes).
Listen closely for changes in the sounds the machine makes while operating (e.g. sporadic sounds, odd sounds).
Use your nose to detect burning smells or other unusual odours (e.g. burning rubber)
Touch the machine where it is safe during operation and during downtime to detect deviations from normal conditions (e.g. strange vibrations, wobbling, looseness, excessive heat, shifting).
Step 5: Correct equipment problems All equipment abnormalities or slight defects should be fixed or improved. There are two approaches to do these:
Instant Maintenance: whenever possible, an operator should immediately fix or improve a problem he or she discovers during inspection. But the operators should know what level of maintenance work they can handle by themselves and immediately.

Requested Maintenance: In some cases, a defect or problem may be difficult for the operator to hand alone and immediately. In this situation, the operator should attach a maintenance card to the site of the problem in order to make it visible. He or she can also issue a maintenance kanban to request help from the maintenance department. It is also good to log requested maintenance on to a checklist of needed maintenance activities. Once a requested maintenance is taken care and its result confirmed, the activity should be checked off in the ‘confirmation’ column of the checklist. The maintenance card should then be retrieved from the machine where it is attached.
Fig. Two approaches for solving equipment problems

Work Manual Self-Check 3
Written Test
Directions: Answer all the questions listed below. Use the Answer sheet provided in the next page:
4. Describe 3S (1 point)
5. What is red tagging? (1 point)
6. Describe red tag holding area. (1 point)
7. List steps in red tagging? (7 points)
8. Describe steps to set in order. (5 points)
9. What is motion economy? (5 points)
10. List principles that helps to reduce motion (7 points)
11. List steps to shine activities. (5 points)
12. List types of problems frequently exist in factories. (4 points)
13. Describe shine targets. (5)
14. Describe steps in cleaning/inspection. (4 points)
Note: Satisfactory rating – 27 points Unsatisfactory - below 27 points You can ask you trainer for the copy of the correct answers.

Answer Sheet
Name: _________________________ Date: _______________
Score = ___________
Rating: ____________

Short Answer Questions
1. ________________________________________________________________
________________________________________________________________
________________________________________________________________
2. ________________________________________________________________
________________________________________________________________
________________________________________________________________
3. ________________________________________________________________
________________________________________________________________
________________________________________________________________
________________________________________________________________
4. ________________________________________________________________
________________________________________________________________
________________________________________________________________
________________________________________________________________
5. ________________________________________________________________
________________________________________________________________
________________________________________________________________
________________________________________________________________
6. ________________________________________________________________
________________________________________________________________
________________________________________________________________
7. ________________________________________________________________
________________________________________________________________
________________________________________________________________
8. ________________________________________________________________
________________________________________________________________
________________________________________________________________
9. ________________________________________________________________
________________________________________________________________
________________________________________________________________
10. ________________________________________________________________
________________________________________________________________
________________________________________________________________
11. ________________________________________________________________
________________________________________________________________
________________________________________________________________

Operation Sheet 1 Procedures in Implementing 3S
Sequence of 3S
1. Sort
1.1 Plan and procedures for sort activity Sort activity plan sheet (sample)
1.1 Implementation

2. Set in order
2.1 Plan and procedures for set in order
Set in order activity plan sheet (sample)
2.2 Implementation stage

3. Shine
3.1 Plan
Shine activity plan sheet (sample)

3.2 Implementation

LAP Test Practical Demonstration
Name: _____________________________ Date: ________________
Time started: ________________________ Time finished: ________________
Instructions: Given necessary templates, workshop, tools and materials you are required to perform the following tasks within ------ hours.
Task 1: identify and prepare tools and techniques to the sort activities. Task 2: identify and prepare tools and techniques to the set in order activities.
Task 3: identify and prepare tools and techniques to the shine activities.
Task 4: using the identified, prepared and given tools and techniques perform 3S to your/ the given work area.
identify the:
person -in-charge
technology workshop
work station
consider the:
OHS procedures
workplace procedures and standards (work area)
frequency of maintenance activities
List of Reference Materials
5S for operators (1995)
Journals/publications/magazines
Reference Book
Job specifications
Safety Manual and Guide
Learning Guide #1

Unit of Competence: Standardize and sustain 3S
Module Title: Standardizing and sustaining 3S LG Code: AGR BKG1 MO4-LO2-LG2
TTLM Code: AGR BKG2 TTLM 0919v1
LO 2: Standardize 3S
Instruction Sheet Learning Guide #1

This learning guide is developed to provide you the necessary information regarding the following content coverage and topics –
Prepare Plan used to standardize 3S activities.
Use relevant procedures and tools and techniques to standardize 3S
follow checklists for standardize activities and reported to relevant personnel
keeping workplace to the specified standard
Avoiding Problems by standardizing activities
This guide will also assist you to attain the learning outcome stated in the cover page. Specifically, upon completion of this Learning Guide, you will be able to –
Prepare Plan used to standardize 3S activities.
Use relevant procedures and tools and techniquesto standardize 3S
follow checklists for standardize activities and reported to relevant personnel
keep workplace to the specified standard
Avoiding Problems by standardizing activities Learning Instructions:
19. Read the specific objectives of this Learning Guide.
20. Follow the instructions described in number 3 to 13.
21. Read the information written in the “Information Sheets 1”. Try to understand what are being discussed. Ask you trainer for assistance if you have hard time understanding them.
22. Accomplish the “Self-check 1” in page 6.
23. Ask from your trainer the key to correction (key answers) or you can request your trainer to correct your work. (You are to get the key answer only after you finished answering the Self-check 1).
24. If you earned a satisfactory evaluation proceed to “Information Sheet 2”. However, if your rating is unsatisfactory, see your trainer for further instructions or go back to Learning Activity #1.
25. Submit your accomplished Self-check. This will form part of your training portfolio.
26. Read the information written in the “Information Sheet 2”. Try to understand what are being discussed. Ask your trainer for assistance if you have hard time understanding them.
27. Accomplish the “Self-check 2” in page 24.
28. Ask from your trainer the key to correction (key answers) or you can request your trainer to correct your work. (You are to get the key answer only after you finished answering the Self-check 2).
29. If you earned a satisfactory evaluation proceed to “Operation Sheet 1” in page 27.
However, if your rating is unsatisfactory, see your trainer for further instructions or go back to Learning Activity #1.
30. Read the “Operation Sheet 1” and try to understand the procedures discussed.
31. Do the “LAP test” in page 28 (if you are ready). Request your trainer to evaluate your performance and outputs.Your trainer will give you feedback and the evaluation will be either satisfactory or unsatisfactory. If unsatisfactory, your trainer shall advice you on additional work. But if satisfactory you can proceed to Learning Guide #3.

Information Sheet 1 Preparing Plan used to standardize 3S activities.
Definition of the Standardize
Standardize, the fourth pillar of our visual workplace, differs from Sort, Set in Order,
and Shine. This is because it is the method- you use to maintain the first three pillars
of 5S. Building on this definition, we may define Standardize the result that exists
when the first three pillars-Sort, set in order and Shine-are properly maintained.
Benefits from Standardize
1. Lead to workplace standardization
prevent setbacks in the first three pillars
Make implementing them a daily habit
Ensure that all the three pillars are maintained in their fully implemented state.
2. Lead to work standardization
Muda elimination
Quality improvements
Cost improvements
Delivery time improvements
Process improvements
Here are some of the problems that result when we do not implement
Standardization well:
Conditions go back to their previous and undesirable levels even after a
companywide 5S implementation campaign.
At the end of the day, piles of unneeded items are left from the day's
production and lie scattered around the production equipment.
Tool storage sites become disorganized and must be put back in order at the
end of the day.
Cutting shavings constantly fall on the floor and must be swept up.

Even after implementing Sort and Set in order, it does not take long for office
workers to start accumulating more stationery supplies than they need.
These problems and others reveal backsliding in gains made from implementing Sort
Set in Order, and Shine Activities. The basic purpose of the Standardize pillar is to
prevent setbacks in the first three pillars, to make implementing them a daily habit,
and to make sure that all three pillars are maintained in their fully implemented state.
How to Implement Standardize
The three steps to making Sort, Set in Order and Shine activities (the three pillars or
3S) a habit are:
Step 1: Decide who is responsible for which activities with regard to maintaining
3S conditions.
Step 2: To prevent backsliding, integrate 3S maintenance duties in to regular work
activities.
Step 3: Check on how well 3S conditions are being maintained.
As you read this section, you will discuss some of the tools for implementing
Standardize of the Sort, Set in Order, and Shine activities. This is because in order to
standardize we must use these same tools in a more systematic way to make sure
that the first three pillars are maintained.
Self-Check 1 Written Test
Directions: Answer all the questions listed below. Use the Answer sheet provided in the next page:
9. Define the fourth pillar of 5S? (2 point)
10. Describe the benefits from standardize. (5 points)
11. What by mean standardize leads to work standardization? (5 points)
12. List problems that avoided by implementing standardize activities (10 points)
13. What are the three steps to making the 3S a habit? (8 points)
Note: Satisfactory rating - 16 points Unsatisfactory - below 16 points You can ask you trainer for the copy of the correct answers.

Answer Sheet
Name: _________________________ Date: _______________
9. ________________________________________________________________
________________________________________________________________
________________________________________________________________
________________________________________________________________
10. ________________________________________________________________
________________________________________________________________
________________________________________________________________
________________________________________________________________
11. ________________________________________________________________
________________________________________________________________
________________________________________________________________
________________________________________________________________
________________________________________________________________
12. ________________________________________________________________
________________________________________________________________
________________________________________________________________
________________________________________________________________
13. ________________________________________________________________
Score = ___________
Rating: ____________

________________________________________________________________
Information Sheet 2
Use relevant procedures and tools and techniques to standardize 3S
Common Tools and Techniques to standardize 3S are:
5S Job Cycle Charts
Visual 5S
The Five Minute 5S
Standardization level checklist
5S checklist
The five Whys and one How approach(5W1H)
Suspension
Incorporation
Use Elimination
The Three Steps to Make the 3S Activities a Habit/Standardize using the Tools
and Techniques of 3S Standardization
1. Assign 3S Responsibilities
When it comes to maintaining three pillar conditions, everyone must know exactly
what they are responsible for doing and exactly when, where and how to do it. If
people are not given clear 3S job assignments based on their own workplaces, the
Sort, Set in Order, and Shine activities will not have much meaning. Similarly, clear
3S instructions must be given to the people who deliver goods from outside suppliers.
The delivery sites should be clearly marked and a 5S Map posted to show where
each supplier's goods are to be unloaded. At each unloading site, signboards should
make it clear whose things go where and in what amount. The suppliers should be
made responsible for maintaining 3S conditions at their own unloading sites and
encouraged to join in full 5S implementation.

Tools for assigning 3S responsibilities include:
5S Maps
5S schedules
5S job cycle charts, which list the 5S jobs to be done in each area, and set
frequency cycle for each job (see the figure below). In the example shown
in the figure below, 5S duties are sorted out according to the first three
pillars and the scheduling cycle. In the figure, code letters are used for the
various cycle periods:
A is for 'continuously," B for "daily (mornings)," C for "daily (evenings), " D
for "weekly," E for "monthly" and F for "occasionally." Each 5S job assignee
can then use these charts as 5S Checklists. This particular example shows
clearly who is responsible for each job, which area, what to do, and when
to do it.
Figure: A 5S Job Cycle Chart
2. Integrate 3S Duties into Regular Work Duties

If people carry out three pillar maintenance duties only when they see three pillar
conditions slipping, then the five pillar implementation has not yet taken root.
Maintenance must become a natural part of everyone’s regular work duties. In other
words, the five pillars -centered on maintaining 3S conditions-must be part of the
normal work flow. We sometimes refer to this as "5S line integration" or establishing a
five pillars flow. Visual 5S and Five-Minute 5S are two approaches that help make
maintenance work part of the everyday work routine. .
Visual 5S
The Visual 55 approach makes the level of five pillar conditions obvious at a glance.
This is particularly helpful in factories that handle a great variety and number of
materials.
The main point of Visual 5S is that anyone should be able to distinguish between
abnormal and normal conditions at a glance.
As a factory example, consider a drill-press process where Set in order has been
applied so that the position and amount of each finished work piece is clearly
indicated. As an additional visual aid, the place where the last batch item goes can be
marked with a thick red line to indicate that it is time to stop and send the batch to the
next process.

Figure: Visual 5s Method for Indicating Maximum Batch Size

Five-Minute 5S
When using the Visual 5S approach, instant visibility can act as a trigger for taking
immediate three pillar action(Sort, Set in Order, and Shine activities) against the
discovered abnormalities (i.e., overproduction, disorder, and contamination). We
must also deal with the question of how skillfully and efficiently these actions are
carried out. Instead of following two hours for removing all of the cutting shavings
from the floor, we can set up a half-hour or a one-hour Shine procedure that
accomplishes the same task. The term "Five-Minute 5S" is a loose one-the actual
time can be three minutes, six minutes, or whatever is appropriate. The point is to
make the five pillar work brief, efficient, and habitual. In figure below shows a
signboard that was made as part of a Five-Minute 5 campaign.
Figure: Five-Minute 5s Signboard
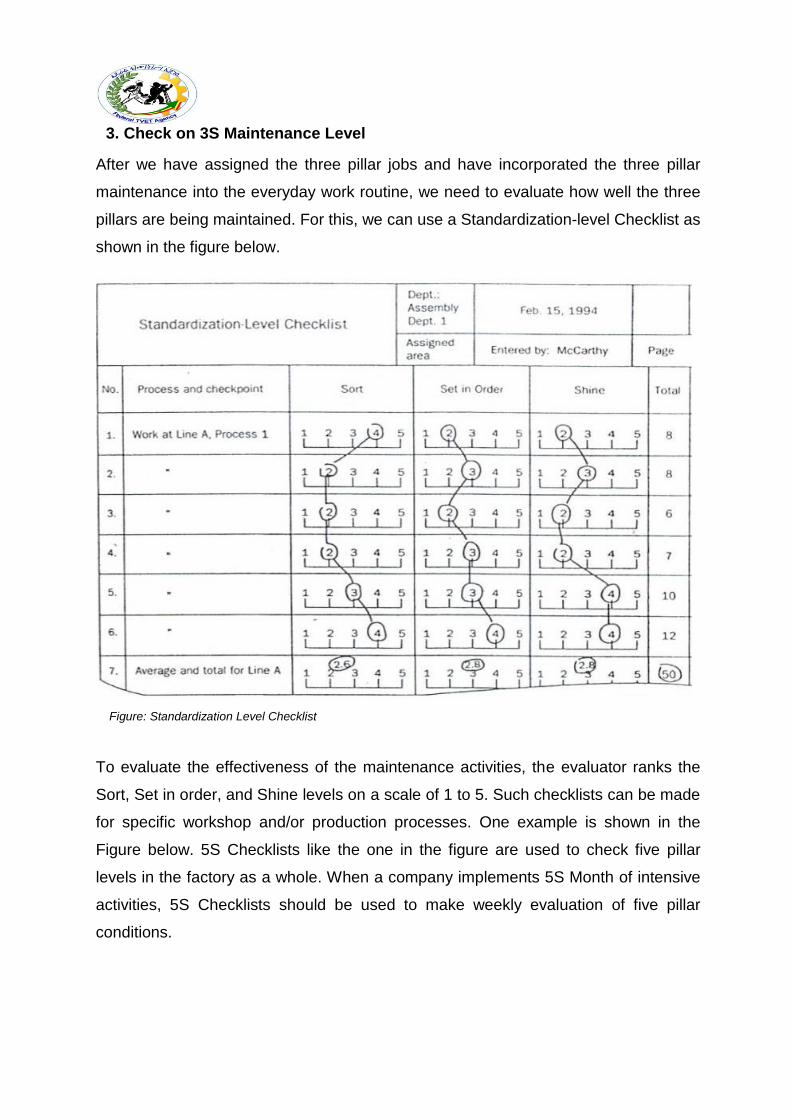
3. Check on 3S Maintenance Level
After we have assigned the three pillar jobs and have incorporated the three pillar
maintenance into the everyday work routine, we need to evaluate how well the three
pillars are being maintained. For this, we can use a Standardization-level Checklist as
shown in the figure below.
Figure: Standardization Level Checklist
To evaluate the effectiveness of the maintenance activities, the evaluator ranks the
Sort, Set in order, and Shine levels on a scale of 1 to 5. Such checklists can be made
for specific workshop and/or production processes. One example is shown in the
Figure below. 5S Checklists like the one in the figure are used to check five pillar
levels in the factory as a whole. When a company implements 5S Month of intensive
activities, 5S Checklists should be used to make weekly evaluation of five pillar
conditions.

Figure: checklists for an entire factory The Concept of Prevention When we find that tools have not been put back correctly, we immediately take care
of them. When we find an oil puddle on the floor, we immediately mop it up. Making
these actions habit is the foundation of Standardize. However, when the same
problems keep on happening over and over again, it is time to take the concept of
Standardize to the next level: prevention.
To take this pillar to a higher level, we must ask "why?" Why do unneeded items
accumulate (despite Sort procedures)? Why do tools get put back incorrectly (despite
Set in order procedure? Why do floors get dirty (despite Shine procedures)? When
we ask "why" repeatedly, we eventually find the source of the problem and can
address that source with a fundamental improvement. Such improvements can help
us develop Unbreakable standardization, which means:
Unbreakable sorting
Unbreakable setting in order
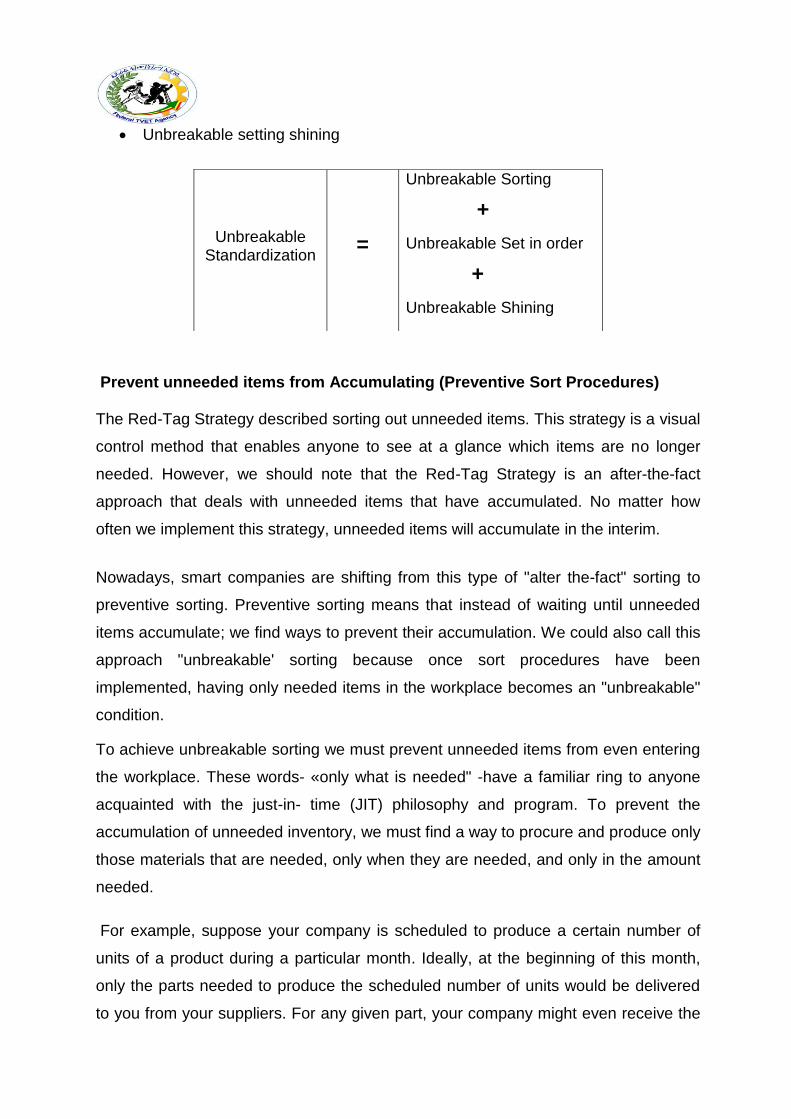
Unbreakable setting shining
Prevent unneeded items from Accumulating (Preventive Sort Procedures) The Red-Tag Strategy described sorting out unneeded items. This strategy is a visual
control method that enables anyone to see at a glance which items are no longer
needed. However, we should note that the Red-Tag Strategy is an after-the-fact
approach that deals with unneeded items that have accumulated. No matter how
often we implement this strategy, unneeded items will accumulate in the interim.
Nowadays, smart companies are shifting from this type of "alter the-fact" sorting to
preventive sorting. Preventive sorting means that instead of waiting until unneeded
items accumulate; we find ways to prevent their accumulation. We could also call this
approach "unbreakable' sorting because once sort procedures have been
implemented, having only needed items in the workplace becomes an "unbreakable"
condition.
To achieve unbreakable sorting we must prevent unneeded items from even entering
the workplace. These words- «only what is needed" -have a familiar ring to anyone
acquainted with the just-in- time (JIT) philosophy and program. To prevent the
accumulation of unneeded inventory, we must find a way to procure and produce only
those materials that are needed, only when they are needed, and only in the amount
needed.
For example, suppose your company is scheduled to produce a certain number of
units of a product during a particular month. Ideally, at the beginning of this month,
only the parts needed to produce the scheduled number of units would be delivered
to you from your suppliers. For any given part, your company might even receive the
Unbreakable Standardization
=
Unbreakable Sorting
+
Unbreakable Set in order
+
Unbreakable Shining
part in several deliveries, depending on the type of part and the delivery
considerations.
Receiving parts just-in-time for production rather than storing large quantities of parts
in advance eliminates many of the potential costs associated with maintaining
inventory. As well, receiving parts just-in- time is a preventive measure that avoids
the accumulation of parts that needed to be sorted.
Prevent Things from Having to Be Put Back (Preventive Set in Order
Procedures)
Preventive setting in order means keeping set in order procedure from breaking
down. To achieve preventive setting in order, we must somehow prevent the
inefficiency that results from the lack of orderly control of any specific item. There are
two ways to do this: (1) make it difficult to put things in the wrong place and (2) make
it impossible to put things in the wrong place.
The first method relies heavily on discipline and visual controls. Clearly marked
storage sites show at a glance what goes where and in what amount. When it is
obvious what goes where and in what amount. When it is also obvious that things are
not put back properly. As people practice returning things, such visual setting in order
becomes habitual. This condition supports setting in order that is difficult to break.
However, there is still a big difference between setting in order that is difficult to break
and setting in order that is unbreakable. 'Why settle for the first when the second is
possible? But how we achieve unbreakable setting in order?
The 5 Whys and 1How (5W1H) Approach
We begin by asking "why?" until we identify the underlying causes- for every answer
we gel we must ask "why" again. Usually we ask "why" at least five times to get to the
root of the problem. When we do find the underlying cause, we ask "how" we call fix
it. Accordingly, this method is called the "5W1H' approach.
When we ask "why" setting in order is breakable, we find that one answer is because
people make mistakes putting things back. At this point, we need to identify what
types of items are not being returned correctly. Once we identify this, the question is
how to achieve unbreakable setting in order by making it impossible to return them to

the wrong place. If we can somehow eliminate the need to return items at all, we can
achieve unbreakable setting in order.
Three techniques for doing this are:
Suspension
Incorporation
Use elimination.
Suspension
In the Suspension technique, tools are literally suspended from above, just within
reach of the user. Figure above shows this method in practice. Here a weighted
pulley device is used to suspend tools from an overhead rack. When the operator
finishes using the tool, he merely releases it and it automatically returns to its proper
storage place.
While this technique does not eliminate the need to return items to a specific place, it
does effectively eliminate the need for people to return them. People may make
mistakes in returning things, but suspension devices do not. This technique achieves
unbreakable setting in Order.
Figure: Tools Suspended from an Overhead Rack

Incorporation
Incorporation means creating a flow of goods or operations in a factory process in
which (1) jigs, tools, and measuring instruments are smoothly integrated into the
process and (2) such devices are stored where they are used and therefore do not
have to be returned after use. The figure below shows an example where a
measuring gate has been incorporated into a cutting process for an automobile part.
The measuring gate catches any pieces that have not been machined to the correct
height. This measuring procedure is an example of "mistake-proofing’' (or poka-
yoke). The incorporation of the measuring gate into the cutting process means that its
storage place is also its place of use. It is therefore used (for full-lot inspection)
without having to be put back anywhere.
Figure: Incorporating a Measuring Gate into the Process Flow
Use Elimination
Suspending or incorporating jigs, tools, or measuring instruments effectively
eliminates the need to return them after each use. However, these items are still
being used. The question is whether there is some way to serve the function of the
tool without using the jig, tool or measuring instrument. A set in order approach that

eliminates the use of a particular jig, tool or measuring instrument is in fact
unbreakable setting in order.
There are three techniques for eliminating the use of certain tools:
Tool unification
Tool substitution
Method substitution
Tool unification
Tool unification means combining the functions of two or more tools into a single tool.
It is an approach that usually reaches back to the design stage. For example, we can
reduce the variety of die designs to unify dies or make all fasteners that require a
screw-driver conform to the same kind of screw-driver, flat-tip or Phillips.
Tool substitution
Tool substitution means using something other than a tool to serve the tool's function,
thereby eliminating the tool. For example, it is sometimes possible to replace wrench-
turned bolt with hand-turned butterfly-grip bolts, thereby eliminating the need for a
wrench.
Method substitution
If we substitute ordinary wrench-turned bolts with hand-turned butterfly-grip bolts, we
have eliminated the wrench, but we have not eliminated the method (bolt fastening).
Bolt fastening is just one way to fasten things. Fastening pins, clamps and cylinders
can also be used for this purpose. We may find we can improve efficiency even more
by replacing one method with another. This is "method substitution."

Standards for Location Indicators

Indications on Shelves
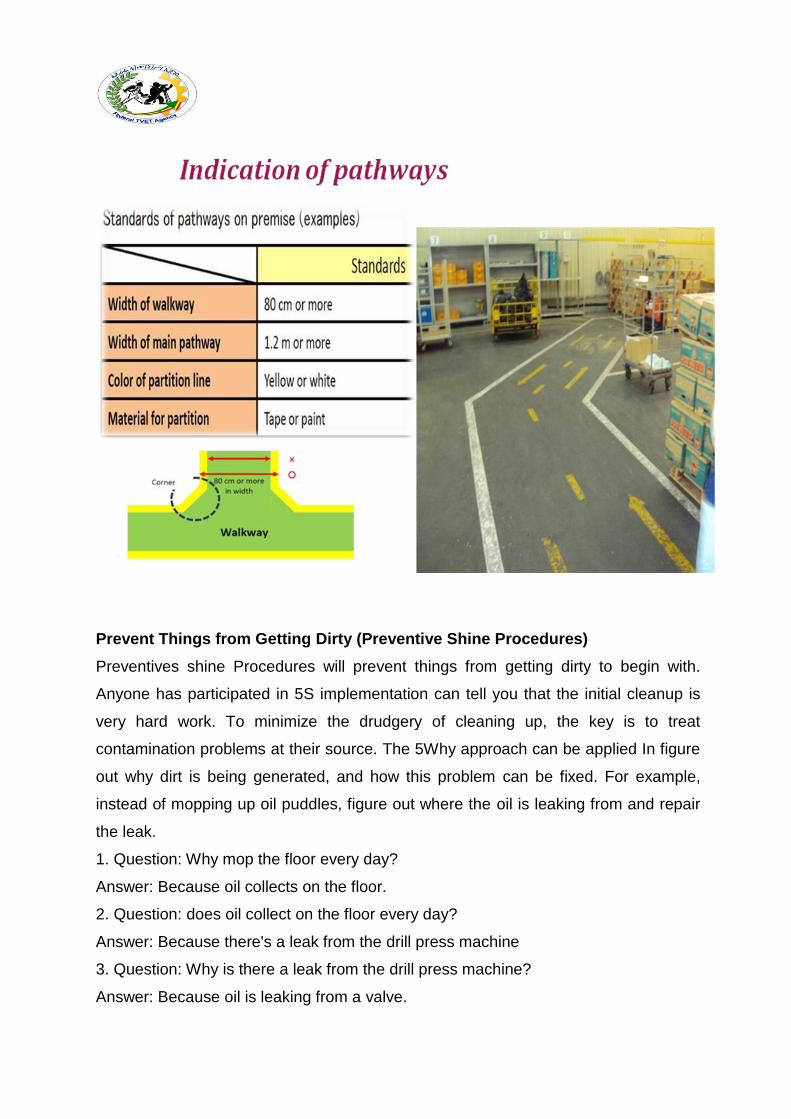
Prevent Things from Getting Dirty (Preventive Shine Procedures)
Preventives shine Procedures will prevent things from getting dirty to begin with.
Anyone has participated in 5S implementation can tell you that the initial cleanup is
very hard work. To minimize the drudgery of cleaning up, the key is to treat
contamination problems at their source. The 5Why approach can be applied In figure
out why dirt is being generated, and how this problem can be fixed. For example,
instead of mopping up oil puddles, figure out where the oil is leaking from and repair
the leak.
1. Question: Why mop the floor every day?
Answer: Because oil collects on the floor.
2. Question: does oil collect on the floor every day?
Answer: Because there's a leak from the drill press machine
3. Question: Why is there a leak from the drill press machine?
Answer: Because oil is leaking from a valve.

4. Question: Why is oil leaking from a valve?
Answer: Because it's broken.
5. Question: Why hasn’t the valve been replaced?
Answer: because we didn’t notice it was broken
6. Question: How can we coordinate getting the valve fixed?
Answer: The maintenance team will order the part and the operator will replace it.
Figure: A Preventive Cleanliness Device of a Drill Press

Summary
The fourth pillar is Standardize, which is the result of properly maintaining the first
three pillars Sort, Set in Order, and Shine. The basic purpose of Standardize is to
prevent setbacks in the first three pillars to make them a daily habit, and to make sure
they are maintained in their fully implemented state.
The first part of implementing the fourth pillar involves making sort, Set in Order, and
Shine a habit. The three steps in this process are:
(1) Assigning the three pillar job responsibilities;
(2) Integrating three pillar duties in to regular work duties; and
(3) Checking on the maintenance of the three pillars. When it comes to maintaining
three pillar conditions, everyone must know exactly what they are responsible for
doing and exactly when, where, and how to do it. The five pillars must become part of
the normal work flow. And 5S work must be brief, efficient, and habitual. Some of the
tools in making sort, set in order, shine procedure habit are: 5S Job Cycle Charts,
Visual 5S, Five –Minute 5S, a Standardization Level Checklist, and 5S Checklist for
factories.
The second part of implementing the fourth pillar involves taking standardize to the
next level: prevention. Unbreakable standardization means making Sort, Set in Order,
and Shine procedure unbreakable. The three aspects of unbreakable standardization
are preventive sort procedures, preventive set in order procedures, and preventive
shine procedures.
Preventive sorting means that instead of waiting until unneeded items accumulate we
find ways to prevent their accumulation. To do this, we must prevent unneeded items
from even entering the work place. Preventive setting in order means keeping the set
in order procedure from breaking down. We do this by making it difficult or impossible
to put things back in the wrong place. Several techniques for accomplishing this are:
the 5W and 1H approach, suspension, incorporation, and use elimination. Finally,
preventive shining means preventing things from getting dirty. The key to preventive
shining is treating contamination problems at their source. The closer you can get to
the source of contamination, the better you will be able to implement preventive
shining.

Self-Check 2 Written Test
Directions: Answer all the questions listed below. Use the Answer sheet provided in the next page:
1. What is the result of implementing 3S without standardization? (4 points)
2. List at least five tools and techniques used to standardize the 3S.
3. What are the tools used to assign 3S responsibilities? (3 points)
4. How the 5 whys and 1 how (5W1H) approach are used to sustain the 3S? (6 points)
5. What is suspension in terms of sustaining of the 3S? (3 points)
6. Define incorporation. (3 points)
7. Describe Use Elimination in sustenance of the 3S. (3 points)
8. What will result implementing 3S without standardization? (4 points)
Note: Satisfactory rating - 17 points Unsatisfactory - below 17 points You can ask your trainer for the copy of the correct answers.

Answer Sheet
Name: _________________________ Date: _______________
1. _________________________________________________________________
________________________________________________________________
________________________________________________________________
2. ________________________________________________________________
________________________________________________________________
________________________________________________________________
________________________________________________________________
3. ________________________________________________________________
________________________________________________________________
________________________________________________________________
________________________________________________________________
________________________________________________________________
4. ________________________________________________________________
________________________________________________________________
________________________________________________________________
________________________________________________________________
5. ________________________________________________________________
________________________________________________________________
________________________________________________________________
Score = ___________
Rating: ____________

6. ________________________________________________________________
________________________________________________________________
________________________________________________________________
________________________________________________________________
________________________________________________________________
7. ________________________________________________________________
________________________________________________________________
________________________________________________________________
8. ______________________________________________________________
________________________________________________________________
________________________________________________________________
________________________________________________________________

Operation Sheet 1 Procedures in Implementing Standardize
Sequence of Standardize
1. Planning for Standardization
2. Assign 3S Responsibilities for everyone in the work place by using the tools by
using the tools such as 5S Maps, 5S schedules, 5S job cycle charts
3. Integrate 3S Duties into Regular Work Duties by using the two approaches:
visual 5S and five- minute 5S
4. Check on 3S Maintenance Level by using Standardization-level Checklist and
5S checklist and make maintenance/correction on back sliding the 3S.
5. Prevention of back sliding of the first three pillars by using 5W1H approach,
suspension, incorporation and use elimination.

LAP Test Practical Demonstration
Name: _____________________________ Date: ________________
Time started: ________________________ Time finished: ________________
Instructions: Given necessary templates, workshop, tools and materials you are required to perform the following tasks within -------- hours.
Task 1: Prepare standard to the sort activities in your workplace. Task 2: Prepare standard to the set in order activities in your workplace.
Task 3: Prepare standard to the shine activities in your workplace.
consider the:
OHS procedures

List of Reference Materials
5S for operators (1995)
Journals/publications/magazines
Reference Book
Job specifications
Safety Manual and Guide
Learning Guide #2
Unit of Competence: Standardize and sustain 3S Module Title: Standardizing and sustaining 3S
LG Code: AGR BKG1 MO4-LO3-LG3
TTLM Code: AGR BKG2 TTLM 0919v1
LO 3: Sustain 3S
Instruction Sheet Learning Guide #3

This learning guide is developed to provide you the necessary information regarding
the following content coverage and topics:
Prepare Plan used to standardize 3S activities
Prepare tools and techniques to sustain and implemented 3S
Inspect Workplace regularly for compliance to specified standard
Cleaning Workplace after completion of job and before next job
Identifying Situations where compliance to standards is unlikely and actions specified in procedures are taken.
Recommending Improvements to lift the level of compliance in the workplace
Follow Checklists to sustain activities and report to relevant personnel
Avoiding Problems by sustaining activities
This guide will also assist you to attain the learning outcome stated in the cover page.
Specifically, upon completion of this Learning Guide, you will be able to –
Prepare Plan used to standardize 3S activities
Prepare tools and techniques to sustain and implemented 3S
Inspect Workplace regularly for compliance to specified standard
Clean Workplace after completion of job and before next job
Identify Situations where compliance to standards is unlikely and actions specified in procedures are taken.
Recommend Improvements to lift the level of compliance in the workplace
Follow Checklists to sustain activities and report to relevant personnel
Avoid Problems by sustaining activities Learning Instructions:
32. Read the specific objectives of this Learning Guide.
33. Follow the instructions described in number 3 to 13.
34. Read the information written in the “Information Sheets 1”. Try to understand what
are being discussed. Ask you trainer for assistance if you have hard time
understanding them.
35. Accomplish the “Self-check 1” .
36. Ask from your trainer the key to correction (key answers) or you can request your
trainer to correct your work. (You are to get the key answer only after you finished
answering the Self-check 1).
37. If you earned a satisfactory evaluation proceed to “Information Sheet 2”.
However, if your rating is unsatisfactory, see your trainer for further instructions or
go back to Learning Activity #2.
38. Submit your accomplished Self-check. This will form part of your training portfolio.
39. Read the information written in the “Information Sheet 2”. Try to understand what
are being discussed. Ask you trainer for assistance if you have hard time
understanding them.
40. Accomplish the “Self-check 2” .
41. Ask from your trainer the key to correction (key answers) or you can request your
trainer to correct your work. (You are to get the key answer only after you finished
answering the Self-check 2).
42. If you earned a satisfactory evaluation proceed to “Operation Sheet 1” in page 31.
However, if your rating is unsatisfactory, see your trainer for further instructions or
go back to Learning Activity #1.
43. Read the “Operation Sheet 1” and try to understand the procedures discussed.
44. Do the “LAP test” (if you are ready). Request your trainer to evaluate your
performance and outputs. Your trainer will give you feedback and the evaluation
will be either satisfactory or unsatisfactory. If unsatisfactory, your trainer shall
advice you on additional work. But if satisfactory you can proceed to Learning
Guide #3.

The fifth pillar is Sustain. In the context of the five pillars, to sustain means to make a
habit of properly maintaining correct procedures. In your life in general, what do you
mean when you talk about sustaining something? Usually, you think of it as drawing
on something from inside yourself in order to maintain a course of action-even when
forces in your life challenge in this effort.
Means making a habit of properly maintaining correct procedures
Problems Avoided by Implementing Sustain
Here are some of the things that happen in a company when Commitment to the five
pillars is not sustained.
1. Unneeded items begin piling up as soon as sorting is completed
2. No matter how well Set in Order is planned and implemented, tools and jigs do
not get returned to their designated place after use.
3. No matter how dirty equipment becomes, little or nothing is done to clean it.
4. Terms are left protruding into walkways, causing people to trip and get injured.
5. Dirty machines start to malfunction and produce defective goods.
6. Dark, dirty, disorganized workplaces lower workers' morale.
These 5S related problems and others are likely to occur in any factory or office that
lacks a commitment to sustain the five pillar gains over time.
Information Sheet-1 Prepare Plan used to standardize 3S activities

Figure showing contemplating the rewards of sustain behavior
Why Sustain Is Important
Usually you commit yourself to sustain a particular course of action because the
rewards for keeping to the course of action are greater than the rewards for departing
from it (see figure above). Viewed another way, the consequences of not keeping to
the course of action may be greater than the consequences of keeping to it. For
example, suppose you want to start an exercise program –say you decide you want to
work out at a gym three times a week. You probably have difficulty sustaining this
course of action. This is because forces in your life, such as limits on your time and
energy as well as the power of inertia, challenge this plan. However, if the rewards of
sticking to your exercise program (for example, feeling and looking better) are greater
than the rewards of not sticking to it (for example, having more time for other things
that you need to do), your commitment will increase and you will probably sustain this
program over lime.

Figure: The sustain pillar holds the first four pillars together.
The same principle applies in your 55 implementation. Without your commitment to
sustain the benefits of the 5S activities, implementation of the first four pillars quickly
falls apart (see Figure above). However, if the rewards of implementing the first four
pillars are greater for you than the rewards of not implementing them, sustaining
them through the fifth pillar should be some- thing you take to naturally.
So, what are the rewards for you of implementing the first four pillars? You've
probably discovered them for yourself at this point. Implementation of the first four
pillars should make your workplace mare pleasant to work in, your job more satisfying
and communication with your coworkers easier. it should also make your work more
efficient and of better quality, which will hopefully lead to reward of your efforts by
your company. It' true that that the five pillars take time to implement, but this
investment of time will bring a great return, for both you and your company.
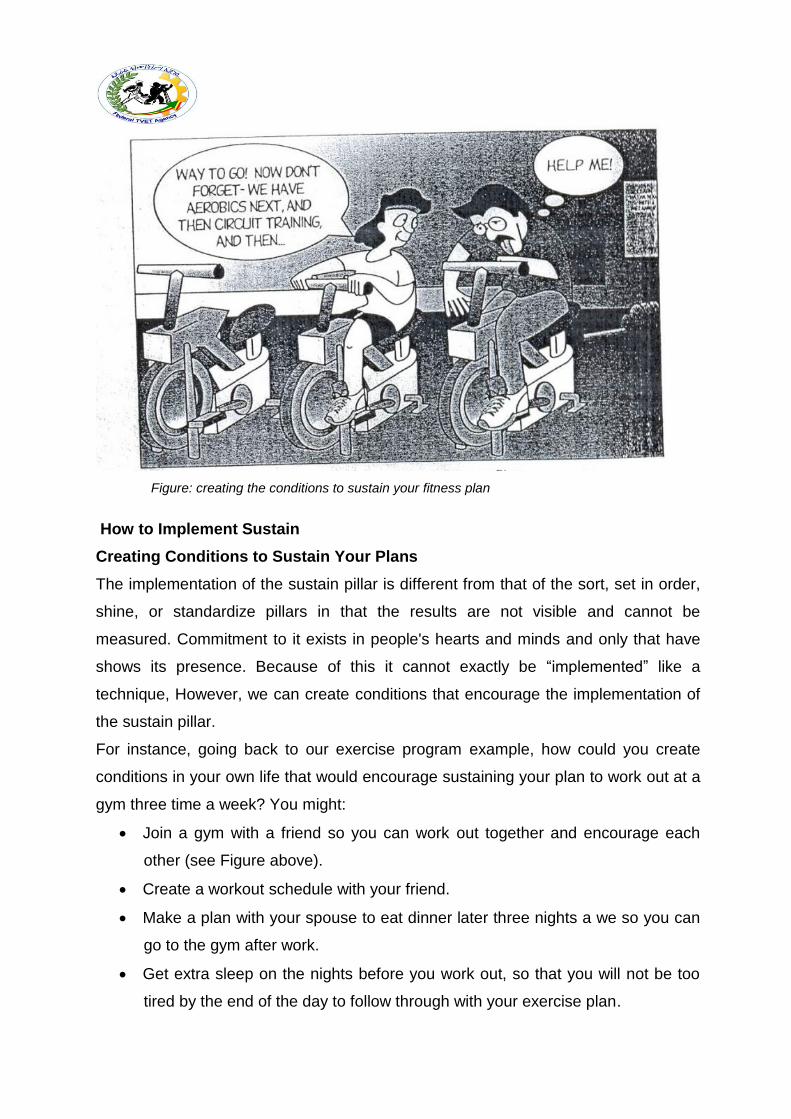
Figure: creating the conditions to sustain your fitness plan
How to Implement Sustain
Creating Conditions to Sustain Your Plans
The implementation of the sustain pillar is different from that of the sort, set in order,
shine, or standardize pillars in that the results are not visible and cannot be
measured. Commitment to it exists in people's hearts and minds and only that have
shows its presence. Because of this it cannot exactly be “implemented” like a
technique, However, we can create conditions that encourage the implementation of
the sustain pillar.
For instance, going back to our exercise program example, how could you create
conditions in your own life that would encourage sustaining your plan to work out at a
gym three time a week? You might:
Join a gym with a friend so you can work out together and encourage each
other (see Figure above).
Create a workout schedule with your friend.
Make a plan with your spouse to eat dinner later three nights a we so you can
go to the gym after work.
Get extra sleep on the nights before you work out, so that you will not be too
tired by the end of the day to follow through with your exercise plan.

These conditions would make it easier for you to sustain your schedule for exercising
at the gym three times a week.
Similarly, you and your company can create conditions or structure that will help
sustain to the five pillars. The types of conditions that are most useful for this are:
Awareness. You and your coworkers need to understand what the five pillars
are and how important it is to sustain them.
Time. You need to have or make enough time in your work schedule to
perform 5S implementation.
Structure. You need to have a structure for how and when 5S activities will be
implemented.
Support. You need to ha e support for your efforts from management in terms
of acknowledgement, leadership, and resource
Rewards and Recognition. Your efforts need to be rewarded.
Satisfaction and Excitement. The implementation of the five pillars needs to
be fun and satisfying for you and the company. This excitement and
satisfaction gets communicated from person to person, allowing 5S
implementation to build as it involves more people.
Roles in Implementation
In order to sustain 5S implementation in your company, both you and the company
management have important roles to play. Part of this role involves creating the
conditions that sustain 5S activities. The other part involves demonstrating a
commitment to 5S yourself.
The Role of Management
The supervisors and managers in your company have a major role to play in ensuring
the success of the five pillars by creating conditions that help sustain 5S activities.
This role includes:
educating you and your coworkers about 5S concepts, tools, and techniques;
creating team for implementation
allowing time for implementation and creating schedules for this work
Providing resources for 5S implementation. such as supplies-s
acknowledging and supporting 5S efforts

Encouraging creative involvement by all workers, listening to their ideas, and
acting on them.
creating both tangible and intangible rewards for 5S efforts
promoting ongoing 5S efforts
Your supervisors and managers also have an important role to play in implementing
the fifth pillar in their own work. When they sustain the first four pillars, they perform
three very important functions.
improving the quality and efficiency of their own work
teaching by example
demonstrating the company's commitment to 5 implementation
Yours Role
Similarly, you have an important role to play in creating the conditions that Sustain 5S
activities. This role includes:
continuing to learn more about 5S implementation
helping to educate your coworkers about the 5S
being enthusiastic about 5S implementation
helping to promote 5S implementation efforts
You also have an important role to play in order to sustain 5S activities in your own
work. This role includes:
taking the initiative to figure out ways to implement the five pillars in your work
on a daily basis
asking your supervisor or manager for the support or resources you need to
implement the five pillars
participating fully in company 5S implementation efforts
bringing to your supervisor or manager your creative ideas for promoting or
implementing the five pillars
participating fully in company 5S promotion efforts

Figure: 5S map used to gather improvement suggestions
Directions: Answer all the questions listed below. Use the Answer sheet provided in
the next page:
14. Define the fifth pillar of 5S? (2 point)
15. List problems avoided by implementing sustain. (6 points)
16. Why sustain is important? (4 points)
17. Explain how to implement sustain? (7points)
18. What are the roles of you and your management in implementation of sustain
? (9points)
Self-Check 1 Written Test
Note: Satisfactory rating - 15 points Unsatisfactory - below 15 points You can ask you trainer for the copy of the correct answers.

Answer Sheet
Name: _________________________ Date: _______________
14. ________________________________________________________________
________________________________________________________________
________________________________________________________________
15. ________________________________________________________________
________________________________________________________________
________________________________________________________________
________________________________________________________________
16. ________________________________________________________________
________________________________________________________________
________________________________________________________________
________________________________________________________________
17. ________________________________________________________________
________________________________________________________________
________________________________________________________________
18. ________________________________________________________________
________________________________________________________________
Score = ___________
Rating: ____________

________________________________________________________________
________________________________________________________________

Information Sheet-2 Prepare tools and techniques to sustain and
implemented 3S
Common Tools and techniques to sustain 3s are:
There are many tools and techniques your company can use to help sustain
commitment to 3S implementation. We offer these below so you will be aware of
them. At some point in your 3S implementation work, you may be called upon to use
or even coordinate the use of these techniques. These are:
5S slogans
5S posters
5S photo exhibits & storyboards
5S newsletter
5S maps
5S pocket manuals
5S department/benchmarking tours
5S months
5S audit
Awarding system
Big cleaning day
Patrolling system
Top management Patrol
5S Committee members and Promotion office Patrol
Mutual patrol
Self patrol
Checklist patrol
Camera patrol
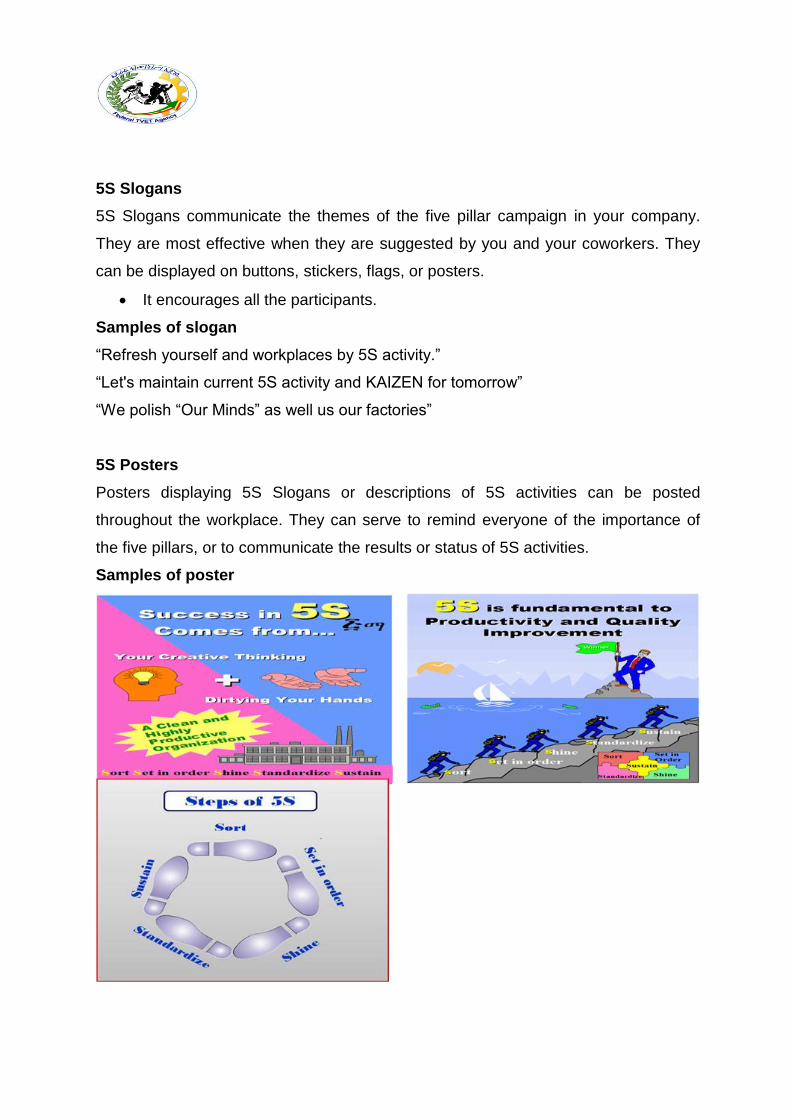
5S Slogans
5S Slogans communicate the themes of the five pillar campaign in your company.
They are most effective when they are suggested by you and your coworkers. They
can be displayed on buttons, stickers, flags, or posters.
It encourages all the participants.
Samples of slogan
“Refresh yourself and workplaces by 5S activity.”
“Let's maintain current 5S activity and KAIZEN for tomorrow”
“We polish “Our Minds” as well us our factories”
5S Posters
Posters displaying 5S Slogans or descriptions of 5S activities can be posted
throughout the workplace. They can serve to remind everyone of the importance of
the five pillars, or to communicate the results or status of 5S activities.
Samples of poster

5S Photo Exhibits and Storyboards
When it comes to communication about 5S implementation, the old saying that a
"picture is worth a thousand words" is definitely true. Photo Exhibits and Story boards
showing the before and after of 5S implementation activities are powerful tools for
promoting the five pillars. Photos and Storyboards can also communicate the status
of five pillar activities.
5S Newsletters
55 Newsletters are in-house news bulletins centered on five pillar topics. They carry
factory reports on 5S conditions and activities. 5S Newsletters are most effective
when issued on a regular basis, perhaps once or twice a month and at staff meetings.
55 Maps
5S Maps can also be used to get employees involved in five pillar improvement on an
ongoing basis. 5S improvement Maps should be hung in a central location with
suggestion cards attached so anyone can suggest improvements.
55 Pocket Manuals
A 5S Pocket Manual can be created that contains five pillar definitions and
descriptions, and is small enough to fit into the pocket of work clothes. Shop floor
workers, supervisors, and managers can all use SS Pocket Manuals for easy
reference to the 5S essentials.
55 Department Tours
When one department in a company has implemented the five pillars successfully, it
can serve as a model area for other departments to come visit. Since "seeing is
believing," this technique is extremely effective for promoting 5S implementation
throughout a company.
55 Months
Companies should designate two, three, or four months every year as "5S Months.”
During these months, various activities such as 5S seminars, field trips, and contests
can be carried out of further promote 5S implementation in the company.
5s Audit
The purpose of this audit is to outline an approach making 5S a success in
industrial as well as our working areas.
Enable 5S teams to design and establish a simple, effective and visual
workplace organization, which creates a professional workplace and culture
that is effective, organized and disciplined.
Continual Improvement internal audit program enhance excellent service
delivery
Audit findings can be used to identify trends and the key issues.


Performing Audit
Preparation
1. All 5S auditors gather at the meeting room ½ hour before audit
2. Briefing by 5S audit chairman :-
Activities of the day
Highlight any new criteria to be checked
Action date on sticker (2 weeks from audit date)
Time to report back
3. Wearing 5S auditor tag
4. Every auditor is only allowed to use up to 3 stickers at each audit to each 5S
zone. It is purposely not put burden to 5S team to make improvement in very
drastic manner.
5. Previous audit summary report will be distributed to the auditors’ team as a
reference in order to avoid in consistency auditing.
During Audit
1. Bring all audit materials e.g. checklist, stickers, file holder & audit summary
report
2. Get the KPT leader or facilitator to accompany auditor
3. Good public Relation
4. Check outstanding matter from the previous audit summary report
5. Proper issue of stickers & justified
6. Propose idea for improvement and justified.
7. Close matter when action has been taken. Remove sticker
8. Issue new sticker when action is not fully satisfied (old sticker still remain) and
also for new matter noted
9. Take photo as an example in case of the 5S team has shown very creative
idea to make the 5S initiative significantly effective, safe work place, cost
saving
10. Only use maximum 3 stickers of each type for each working area / zone

11. Listen to the feedback given by workers
12. Provide positive suggestion for improvement if stickers is not appropriate
13. Prepare audit report of each working area on the Audit summary
14. Document must be signed by auditor & team leader
15. Audit to the next area
16. You may take 10 – 15 minutes for one zone.
Twelve Focal Points 5S Auditors Should Examine
Do the Top and Middle managers support 5S program?
Are people proud of their workplaces?
Are workplaces clean and organized?
Are workplaces safe for people to work in?
Are machines and equipment clean and well maintained?
Are items easy to retrieve?
Are machines and tools conveniently located?
Are inventories stored for FIFO retrieval?
Are products free from dust?
Do people clean daily without prompting?
Are the uniforms worn by people clean and tidy?
Is a good image of the enterprise reflected in its people?


Awarding System
Awarding for 5S promotion results according to evaluation is recommended.
Awards may be:
For Good performance
Award for efforts
Award for good Ideas
Prize winner
Group
Individual
Big Cleaning Day
It is a cleaning that carried out from two to four hours by the organization.
Example: Before national holidays
Patrolling System
Top management Patrol
Check Up the activities Comprehensively
Give emphasis on sustaining of the activity
consider committees feedback
5S Committee members and Promotion office Patrol
Evaluate “5S Check List”
Record problems on”5S check findings”
Tack picture of 5S problems
Mutual patrol
Check mutually among KPT
Self patrol
5S leader and members check the results of activity by themselves.
Checklist patrol
Point out the problems by themselves at site as well as evaluate the
results and encourage members to urge KAIZEN.
Camera patrol

Visibly highlight the problems and progress of the activity using
photographs.

SUMMARY
The fifth pillar, sustain, means to make a habit of properly maintaining correct
procedures over time. No matter how well implemented the first for pillars are, the 5S
system will not work for long without a commitment to sustain it.
In your life in general, why do you commit yourself to sustain a particular course of
action? Usually you do this because the rewards of keeping to the course of action
are greater than the rewards of not implementing them, sustaining them through the
fifth pillar should be something you take to naturally.
Unlike the first four pillars, the sustain pillar cannot be implemented by a set of
techniques, nor can it be measured. However, you and your company can create
conditions or structures that will help sustain the commitment to 5S implementation.
To sustain 5S activities in your company, both you and the company management
have important roles to play. Part of this role involves creating the conditions that
sustain 5S activities. The other part involves demonstrating that you are committed to
sustain these activities, too. Some of the tools to help sustain 5S activities in your
company include: 5S Slogans, 5S Posters, 5S Photo Exhibits and Storyboards, 5S
Newsletters 5S Months, 55 Pocket Manuals, 55 Department Tours, 55 Maps, and 5s
Audit

Directions: Answer all the questions listed below. Use the Answer sheet provided in
the next page:
1. What are the common tools and techniques to sustain 3S? (13 points)
2. How 5S slogans are used to sustain 3S? (2 points)
3. Why 5S photo exhibits and storyboards are used to implement sustain activities
(3 points)
4. Describe 5S newsletters? (2 points)
5. What are the 5S pocket manuals? (3 points)
6. How 5S months are scheduled? (3 points)
7. Describe 5S audit. (4 points)
8. What are the activities performed during preparation of audit and during audit
(4 points)
9. Why awarding is necessary in sustain implementation? (2 points)
10. List types of patrolling system. (6 points)
Self-Check 2 Written Test
Note: Satisfactory rating - 22 points Unsatisfactory - below 22 points You can ask you trainer for the copy of the correct answers.
Answer Sheet
Name: _________________________ Date: _______________
1. ______________________________________________________________
________________________________________________________________
________________________________________________________________
2. ______________________________________________________________
________________________________________________________________
________________________________________________________________
________________________________________________________________
3. ________________________________________________________________
________________________________________________________________
________________________________________________________________
________________________________________________________________
4. ________________________________________________________________
________________________________________________________________
________________________________________________________________
5. ________________________________________________________________
Score = ___________
Rating: ____________

________________________________________________________________
________________________________________________________________
________________________________________________________________
6. ________________________________________________________________
________________________________________________________________
________________________________________________________________
________________________________________________________________
7. ________________________________________________________________
________________________________________________________________
________________________________________________________________
8. ________________________________________________________________
________________________________________________________________
________________________________________________________________
9. ________________________________________________________________
________________________________________________________________
________________________________________________________________
10. ________________________________________________________________
________________________________________________________________
________________________________________________________________

Operation Sheet 1 Procedures in Implementing Sustain
Sequence of Sustain
6. Planning
Set schedules for sustaining techniques
7. Prepare sustaining Tools and Techniques
8. Implement sustaining activities
9. Feedback comments on the sustain results

LAP Test Practical Demonstration
Name: _____________________________ Date: ________________
Time started: ________________________ Time finished: ________________
Instructions: Given necessary templates, workshop, tools and materials you are
required to perform the following tasks within ------ hours.
Task 1: Prepare slogans and posters for your work area.
Task 2: Evaluate your work place by using the 5S check list and use stickers.
Task 3: Prepare audit summary report by using the given template.
identify the:
person -in-charge
technology workshop
work station
consider the:
OHS procedures
workplace procedures and standards (work area)
frequency of maintenance activities

List of Reference Materials
5S for operators (1995)
Journals/publications/magazines
Reference Book
Job specifications
Safety Manual and Guide
Learning Guide #3