beekeeping made easy by marcus williams small file
DESCRIPTION
Beekeeping Made Easy by Marcus WilliamsTRANSCRIPT


Beekeeping Made Easy, by Marcus Williams
2 | P a g e
Contents About Beekeeping ....................................................................................................................................... 13
Is beekeeping for me? ............................................................................................................................. 13
Time and commitment ........................................................................................................................ 14
What is the cost to start? .................................................................................................................... 14
What now? .......................................................................................................................................... 14
Starting Beekeeping .................................................................................................................................... 15
How do I start beekeeping? .................................................................................................................... 15
How do I learn? ....................................................................................................................................... 15
Books ....................................................................................................................................................... 15
Internet ................................................................................................................................................... 15
Magazines ............................................................................................................................................... 15
Leaflets and booklets .............................................................................................................................. 16
Beekeeping Associations ......................................................................................................................... 16
Should I join a Beekeeping Association? ............................................................................................. 16
Do it yourself ........................................................................................................................................... 16
Diseases................................................................................................................................................... 16
What do I need to acquire? .................................................................................................................... 16
Protective clothing .............................................................................................................................. 17
Hive Tool ............................................................................................................................................. 17
Smoker ................................................................................................................................................ 17
Hives .................................................................................................................................................... 17
Bees ..................................................................................................................................................... 18
Secondhand bees and hives ................................................................................................................ 18
Other equipment ................................................................................................................................ 18
Stings ....................................................................................................................................................... 18
Bee Fever ................................................................................................................................................ 18
First Steps in Beekeeping ............................................................................................................................ 19
The Honeybee Colony ............................................................................................................................. 19
Obtaining Bees ........................................................................................................................................ 19
Choosing a Hive ....................................................................................................................................... 20
How Much Honey? .................................................................................................................................. 20
Beekeeping Made Easy, by Marcus Williams
3 | P a g e
Honey Bee Keeping Hints and Tips ......................................................................................................... 20
Buckets: ............................................................................................................................................... 20
Wooden Wedges: ................................................................................................................................ 20
CD's: .................................................................................................................................................... 20
Collecting Young Bees: ........................................................................................................................ 21
Bait Hives: ........................................................................................................................................... 21
Finding Queens: .................................................................................................................................. 21
Drone Culling Frames: ......................................................................................................................... 22
Capturing Swarms from Difficult Places:............................................................................................. 22
Crownboard Slots: ............................................................................................................................... 22
Robbing: .............................................................................................................................................. 22
Filling Holes and Gaps: ........................................................................................................................ 22
Protecting Hives from Birds: ............................................................................................................... 23
Foundation Fitting: .............................................................................................................................. 23
Cleaning Up Supers: ............................................................................................................................ 23
Bees and Neighbours .................................................................................................................................. 23
Stings ....................................................................................................................................................... 23
Drinking Bees .......................................................................................................................................... 23
Overflying ................................................................................................................................................ 23
Cleansing Flights...................................................................................................................................... 24
Swarms .................................................................................................................................................... 24
Numbers of Hives or Colonies ................................................................................................................. 24
Rights ...................................................................................................................................................... 24
Avoiding Confrontation ........................................................................................................................... 24
Bee Stings .................................................................................................................................................... 25
Treatment for Stings ............................................................................................................................... 25
Bee sting shock ....................................................................................................................................... 26
What to do .......................................................................................................................................... 26
Practical Suggestions ........................................................................................................................... 26
About Bees .................................................................................................................................................. 28
Pollination ............................................................................................................................................... 28
Bee Flight: ............................................................................................................................................... 29

Beekeeping Made Easy, by Marcus Williams
4 | P a g e
Bees and humans: ................................................................................................................................... 29
The Bee Family ............................................................................................................................................ 30
The Sub-species of Honeybees ............................................................................................................... 31
Bee Facts - Did you know? .......................................................................................................................... 33
Bee-haviour ................................................................................................................................................. 34
Installing Bees ............................................................................................................................................. 35
Install bees from a beekeeper: ............................................................................................................... 35
Installing bees from a box or package (loose bees): ............................................................................... 35
Installing bees from a nucleas or nuc: .................................................................................................... 35
Getting bees from your local association: .............................................................................................. 35
Uniting Bees ................................................................................................................................................ 36
Feeding Bees ............................................................................................................................................... 37
Breeding Bees ............................................................................................................................................. 38
Hygienic Behaviour ................................................................................................................................. 38
House Cleaning Behaviour ...................................................................................................................... 38
Grooming Behaviour ............................................................................................................................... 38
Propolising Behaviour ............................................................................................................................. 38
Following Behaviour ............................................................................................................................... 39
Cool Weather Clustering (cool air clustering) ......................................................................................... 39
Apiary Vicinity Mating ............................................................................................................................. 39
Head Butting Behaviour .......................................................................................................................... 39
Biting and Hair Pulling ............................................................................................................................. 39
Guarding Behaviour ................................................................................................................................ 39
Robbing Propensity ................................................................................................................................. 39
Large Honey Producers ........................................................................................................................... 39
Rearing Your Queen Bee ............................................................................................................................. 40
Grafting tools and aids ............................................................................................................................ 40
Use of incubators .................................................................................................................................... 41
Types of mini-nucs .................................................................................................................................. 41
Overcoming the limitations of mini-nucs................................................................................................ 41
Choosing and using mating sites ............................................................................................................. 41
Introducing a Queen Bee ............................................................................................................................ 42

Beekeeping Made Easy, by Marcus Williams
5 | P a g e
Finding the site ........................................................................................................................................ 42
Situations to avoid .................................................................................................................................. 42
The Butler queen introduction cage ....................................................................................................... 42
Introduction ............................................................................................................................................ 43
Some factors which may affect acceptance. .......................................................................................... 43
Timing problems ..................................................................................................................................... 43
Swarming in Honey Bees............................................................................................................................. 44
The Swarming Process: ........................................................................................................................... 44
Preparation ............................................................................................................................................. 44
Capturing a swarm: ................................................................................................................................. 45
Swarm Control ........................................................................................................................................ 45
Collection ................................................................................................................................................ 46
Marking and clipping the queen ............................................................................................................. 46
Giving enough room ............................................................................................................................... 46
Inspect for queen cells ............................................................................................................................ 46
On finding queen cells ............................................................................................................................ 47
Uniting the colonies ................................................................................................................................ 48
Managing Bees Through Spring and Winter ............................................................................................... 49
Mesh Floors vs Sold Floors ...................................................................................................................... 49
Wintering ................................................................................................................................................ 49
Recipe for candy: ................................................................................................................................ 51
Spring Management ................................................................................................................................ 51
Spring forage: .......................................................................................................................................... 51
Pollen Substitute ..................................................................................................................................... 52
First inspection ........................................................................................................................................ 52
Evaluation ............................................................................................................................................... 53
Bee Diseases & Disorders............................................................................................................................ 54
Brood Diseases ........................................................................................................................................ 54
Sacbrood ............................................................................................................................................. 54
Chalk Brood ......................................................................................................................................... 54
American Foul Brood (AFB) ................................................................................................................. 54
European Foul Brood (EFB) ................................................................................................................. 54

Beekeeping Made Easy, by Marcus Williams
6 | P a g e
Varroasis ............................................................................................................................................. 55
Stone Brood ........................................................................................................................................ 55
Neglected Drone Brood ...................................................................................................................... 55
Adult Diseases ......................................................................................................................................... 55
Acarine ................................................................................................................................................ 55
Nosema ............................................................................................................................................... 56
Amoeba ............................................................................................................................................... 56
Viruses and CBPV ................................................................................................................................ 56
Management ........................................................................................................................................... 56
Chilled Brood ....................................................................................................................................... 56
Dysentery ............................................................................................................................................ 56
Poisoning ............................................................................................................................................. 57
Starvation ............................................................................................................................................ 57
Pests ........................................................................................................................................................ 57
Bald Brood ........................................................................................................................................... 57
Oxalic Acid Cleansing .................................................................................................................................. 59
How Oxalic Acid operates ....................................................................................................................... 59
Integrated pest management ................................................................................................................. 59
Storage .................................................................................................................................................... 59
When to use ............................................................................................................................................ 59
The operation .......................................................................................................................................... 60
Records ................................................................................................................................................... 60
Shelf Life .................................................................................................................................................. 60
Safety Advice ........................................................................................................................................... 60
Trees, Shrubs & Plants Useful To Bees ....................................................................................................... 61
Fruit Trees ............................................................................................................................................... 61
Less Common Trees ................................................................................................................................ 61
Bush Fruits .............................................................................................................................................. 61
Beekeeping in a Suburban or Urban Area................................................................................................... 62
Beekeeping Record Book ............................................................................................................................ 63
Hive Records ........................................................................................................................................... 63
The Record Book ..................................................................................................................................... 63

Beekeeping Made Easy, by Marcus Williams
7 | P a g e
The apiary layout .................................................................................................................................... 63
Records of the season ............................................................................................................................. 64
Example of Hive Record Card .................................................................................................................. 64
Managing the show/display of live bees .................................................................................................... 65
Preparation before the show .................................................................................................................. 65
Preparation of a colony ........................................................................................................................... 65
Preparation of the site ............................................................................................................................ 65
Briefing medical personnel ..................................................................................................................... 65
Demonstrating ........................................................................................................................................ 65
Removal .................................................................................................................................................. 66
Observation Hives ................................................................................................................................... 66
Types of Hive ............................................................................................................................................... 68
Making a Hive.............................................................................................................................................. 69
Materials ................................................................................................................................................. 69
What size hive to build? .......................................................................................................................... 69
Making The Top Bars ........................................................................................................................... 70
The Assembly ...................................................................................................................................... 70
The Legs .............................................................................................................................................. 73
The Roof .............................................................................................................................................. 79
The Comb Holder ................................................................................................................................ 80
Hive Ventillation .......................................................................................................................................... 81
Hive Branding .............................................................................................................................................. 81
Hive Maintenance ....................................................................................................................................... 82
Spring ...................................................................................................................................................... 82
1st Month of Spring ............................................................................................................................. 82
2nd Month of Spring............................................................................................................................. 82
3rd Month of Spring ............................................................................................................................. 82
Summer ................................................................................................................................................... 83
1st Month of Summer .......................................................................................................................... 83
2nd Month of Summer ......................................................................................................................... 83
3rd Month of Summer.......................................................................................................................... 83
Autumn ................................................................................................................................................... 83

Beekeeping Made Easy, by Marcus Williams
8 | P a g e
1st Month of Autumn .......................................................................................................................... 83
2nd Months of Autumn ........................................................................................................................ 84
3rd Month of Autumn .......................................................................................................................... 84
Winter ..................................................................................................................................................... 84
1st Month of Winter ............................................................................................................................ 84
2nd Month of Winter ........................................................................................................................... 84
3rd Month of Winter ............................................................................................................................ 84
Preserving Your Beehive ............................................................................................................................. 85
1. Choice of Timber ................................................................................................................................. 85
2. Equipment design ............................................................................................................................... 85
3. Using hive stands ................................................................................................................................ 86
4. Choice of preservative ........................................................................................................................ 86
5. Choice of exterior ................................................................................................................................ 86
Hive Roofs ........................................................................................................................................... 87
Moving Hives ............................................................................................................................................... 88
1. Closing the bees inside the hive at the old location ........................................................................... 88
2. Securing the hive components so the hive won’t come apart during the move ................................ 88
3. Carrying, loading, and transporting the hive ...................................................................................... 89
4. Unloading and opening the hive at the new location ......................................................................... 89
Choosing an Apiary Site .............................................................................................................................. 90
1. Consideration for the public. .............................................................................................................. 90
2. Forage ................................................................................................................................................. 90
3. Environment ........................................................................................................................................ 90
4. Access .................................................................................................................................................. 91
5. Space ................................................................................................................................................... 91
Finding the site ........................................................................................................................................ 91
Situations to avoid .................................................................................................................................. 91
Apiary Hygiene ............................................................................................................................................ 92
Aims ........................................................................................................................................................ 92
1. Disease transmission and its prevention. ........................................................................................... 92
2. Inspection Routine. ............................................................................................................................. 93
3. Cleaning and caring for equipment ..................................................................................................... 93

Beekeeping Made Easy, by Marcus Williams
9 | P a g e
4. Treatment agents for equipment. ...................................................................................................... 94
Organising an Apiary Meeting .................................................................................................................... 95
Who is in charge of the meeting? ........................................................................................................... 95
What is the purpose of the meeting? ..................................................................................................... 95
Identify the objectives of the meeting .................................................................................................... 95
Arrange the apiary site ............................................................................................................................ 96
Apiary hygiene ........................................................................................................................................ 96
Precautionary arrangements .................................................................................................................. 96
Check list For Your Next Apiary Meeting ................................................................................................ 97
Preparation ......................................................................................................................................... 97
At the meeting .................................................................................................................................... 97
Beekeeping Equipment ............................................................................................................................... 99
Beekeeping Escape Boards ....................................................................................................................... 103
Beekeeping Parts and Accessories ............................................................................................................ 103
Queen Excluder: .................................................................................................................................... 103
Crown Board: ........................................................................................................................................ 103
Snelgrove Board: ................................................................................................................................... 103
Clearer Boards: ...................................................................................................................................... 103
Bee Escapes: .......................................................................................................................................... 103
Mouse Guards: ...................................................................................................................................... 103
Travelling Boxes and Screens: ............................................................................................................... 103
Skep: ...................................................................................................................................................... 103
Beekeeping Clothing ................................................................................................................................. 104
The Suit: ................................................................................................................................................ 104
Gloves: .................................................................................................................................................. 104
Veils: ...................................................................................................................................................... 104
Bee Feeders ............................................................................................................................................... 105
Bee Smokers.............................................................................................................................................. 105
Bee Hive Tools ........................................................................................................................................... 106
Red 'J' Type............................................................................................................................................ 106
Orange 'J' Type ...................................................................................................................................... 106
Yellow Type ........................................................................................................................................... 106

Beekeeping Made Easy, by Marcus Williams
10 | P a g e
Traps and Trapping used in Beekeeping ................................................................................................... 107
Pollen Trapping: .................................................................................................................................... 107
Dead Bee Traps: .................................................................................................................................... 107
Wasp Trap: ............................................................................................................................................ 107
Waxmoth Trap: ..................................................................................................................................... 107
Honey ........................................................................................................................................................ 109
Pure & Wholesome ............................................................................................................................... 109
Nectar Production ................................................................................................................................. 109
From Nectar Into Honey ....................................................................................................................... 109
Honey in the Hive .................................................................................................................................. 109
Storing Honey........................................................................................................................................ 110
Honey on the Comb .............................................................................................................................. 110
Selling Honey......................................................................................................................................... 110
Honey as a Sweetner ............................................................................................................................ 110
Honey Facts ............................................................................................................................................... 111
Nutrition: ............................................................................................................................................... 111
Formation:............................................................................................................................................. 111
Preservation and Strorage: ................................................................................................................... 111
Mead: .................................................................................................................................................... 112
Ye Olde Mead Recipe: ........................................................................................................................... 112
Organic Honey: ..................................................................................................................................... 112
Processing Variety: ................................................................................................................................ 113
Manuka Honey: ..................................................................................................................................... 113
Well being elixir: ................................................................................................................................... 114
Honey Energy Boost: ............................................................................................................................. 114
Homemade Cough and Cold Remedy: .................................................................................................. 114
Treating Cuts and Grazes: ..................................................................................................................... 114
Digestion Healer: ................................................................................................................................... 114
Better Baking with Honey: .................................................................................................................... 114
What flavours honey: ............................................................................................................................ 114
Producing Honey ....................................................................................................................................... 115
Honey in Easy Sections.............................................................................................................................. 118

Beekeeping Made Easy, by Marcus Williams
11 | P a g e
Harvesting/Extracting Honey .................................................................................................................... 119
Building a 4 Frame Honey Extractor ......................................................................................................... 120
Honey Testing ....................................................................................................................................... 122
Pesticides .............................................................................................................................................. 122
Antibiotics ............................................................................................................................................. 122
Enzymes and breakdown products ....................................................................................................... 122
Pesticide Residue Testing ...................................................................................................................... 123
Acrylamide Testing ................................................................................................................................ 123
Mycotoxin Testing ................................................................................................................................. 124
Veterinary Drug Residue Testing .......................................................................................................... 124
Melamine Testing ................................................................................................................................. 125
FDA Import Alerts ................................................................................................................................. 125
Analytes................................................................................................................................................. 125
Test Method .......................................................................................................................................... 125
Quality Assurance ................................................................................................................................. 126
Selling Honey............................................................................................................................................. 126
Regulations ........................................................................................................................................... 126
Labelling. ............................................................................................................................................... 127
1. Description of product. ................................................................................................................. 127
2. Name and address of producer, importer, packer etc. ................................................................ 127
3. Country of origin. .......................................................................................................................... 127
4. Best before date. ........................................................................................................................... 128
5. Lot Number. .................................................................................................................................. 128
6. The weight. .................................................................................................................................... 128
Printing of labels. .................................................................................................................................. 128
Food hygiene. ........................................................................................................................................ 128
Beeswax - A Beekeepers Resource ........................................................................................................... 129
Uses of Beeswax: .................................................................................................................................. 129
Important hints and tips: ...................................................................................................................... 129
Value of beeswax: ................................................................................................................................. 129
Wax Extraction: ..................................................................................................................................... 130
Appendix – Blank Record Cards ................................................................................................................ 131

Beekeeping Made Easy, by Marcus Williams
12 | P a g e
INTRODUCTION

Beekeeping Made Easy, by Marcus Williams
13 | P a g e
About Beekeeping Beekeeping is for most beekeepers a pastime or hobby. There are of course commercial beekeepers, but the vast majority of them use beekeeping as only part of their income, and the number who rely entirely on bees are very small. This book is intended to help beekeepers of all levels, whatever the reason for their interest in keeping bees. If you ask a group of beekeepers their reason for keeping bees they will come up with a variety of answers and I list some common ones here:- Hobby As mentioned above most beekeepers are hobbyists, and a very interesting, relaxing, and rewarding hobby it is. You will never stop learning, and providing you grasp the basics you can stop where you want to. There is an opportunity to involve other people, as there are many things connected with beekeeping that don‘t involve getting too close to a beehive. To pollinate the garden Many beekeepers are keen gardeners and have noticed the decline in pollinating insects, bees in particular. A couple of colonies will certainly improve the pollination in your own garden and the surrounding area. Honey for friends and family This is probably the greatest reason why bees are kept. Depending on the area you could reasonably expect 40-60lb of honey on an average year, with good areas yielding 100lb or more per colony. Once you have a good supply of honey it is surprising what uses you will find for it. A jar of honey is a good thank you for a favour, or it can be bartered for eggs, fruit, vegetables, etc, and there are many other uses too. Uses of hive products Honey can be used to replace sugar in many recipes, and fermented into mead which is one of the simplest drinks to make, but beeswax is another hive product which is very valuable and can be used for all sorts of things including making candles, polish, soap, and cosmetics. All these things can be made with equipment that is available in most households. Instructions and recipes are readily available on the internet if you do a quick google search. Interest in nature Bees themselves are very interesting, but so is the wildlife in and around the hive. Inspecting the inside of a hive roof when taken off the hive will often reveal a wide range of things, and the surrounding area is often worth exploring, especially if the bees are kept in woodland or a meadow. Further interest There are many things of interest that beekeeping will lead to including microscopy and photography.
Is beekeeping for me? There are surprisingly few restrictions to keeping bees and almost anyone can start beekeeping with the minimum of training or equipment. However, if you are considering keeping bees, there are some pre-requisites that I would suggest. For example, the modern day beekeeper should be reasonably fit as there can be some heavy lifting to do, but this can of course be shared if you feel the task at hand is too big for one person. Obviously if someone is allergic to bee stings it would be foolish to take up beekeeping! On the subject of stings, you should expect to get stung a couple of times every season, and a beginner is likely to get a few more than an experienced person. Most stings are caused by poor handling and/or poor bees, both of which can be overcome, but accidental stings are a common part of beekeeping. Some people are genuinely frightened of bees and unless this fear can be overcome it would be foolish to think seriously about keeping bees.

Beekeeping Made Easy, by Marcus Williams
14 | P a g e
Many gardens will accommodate a couple of hives providing they are sited sensibly, but don‘t risk problems with your family or neighbours. Some people have a fear of insects and may not share your enthusiasm, so please be responsible. Education can help to overcome any fears, but if this doesn‘t work a careful search of your own area could provide you with a suitable site on a farm, or similar place where there is often a small area of waste ground. Many people in towns and cities keep bees, often unknown to their neighbours, and they often do well because of the flowers in parks and gardens. Before investing in equipment you will have to dispose of if you decide beekeeping is not for you, it would be a good idea to visit several practical bee demonstrations if you can.
Time and commitment Beekeeping is seasonal and the amount of time needed varies. During the summer you should expect to spend an hour on one colony, and 20-30 minutes on subsequent colonies per week for an inexperienced beekeeper, and half that for those who have been keeping bees for a year or so. A reasonably experienced beekeeper will only make fortnightly inspections, which further reduces the time needed. Swarming is the main problem during the summer and there are times when colonies must be inspected, and it is no good putting inspections off until tomorrow, otherwise your swarm could be causing a nuisance to someone else, and possibly sour relations, as well as causing a possible loss of honey. Winter work is generally maintenance of equipment which takes up little time, and there are no short deadlines.
What is the cost to start? Beekeeping is difficult to cost because there are so many ways to start. It is certainly much cheaper than many hobbies, and if you take into account the honey that you haven‘t got to buy it becomes quite reasonable. To start out you should have approximately $500, but you can begin with much less if you are prudent about your expenses and don‘t rush out buying all the latest equipment. Later in this book, I show you how to build your own beehive, which can save you a lot of money.
What now? If you have decided to pursue beekeeping as a hobby, then as already suggested it is a good idea to make contact with a local Beekeeping Association. Once again, a quick google search will show you the associations closest to your location. Many have a membership category for non beekeepers. This usually has a much smaller fee than a full member and could be a good way to start out, whilst you are ―testing the waters‖. Remember, you are looking to learn as much about beekeeping as possible, so seek out something that is vibrant, welcoming and friendly. Before you jump headfirst into beekeeping, I would suggest doing as much research, keep a notebook and talk to as many beekeepers as you can. It is not always the person who has been keeping bees for many years who knows the most. There are some good young people coming into beekeeping at the moment, and many of them are learning the theory very quickly. Be careful not to look to build up a relationship with anybody too soon, just keep your doors open. I would not go charging ahead and buy anything before speaking to a successful beekeeper, as many people have bought a lot of kit only to find it doesn‘t suit them or they don‘t need it. The bee catalogues are full of a lot of things you could easily do without. Beekeepers in general are friendly and helpful, so you could probably borrow or improvise if you actually need something. It is my view that beekeeping should be fun, not the chore some people try to make it. I hope these words will enthuse you and encourage you go to the next step.

Beekeeping Made Easy, by Marcus Williams
15 | P a g e
Starting Beekeeping
How do I start beekeeping? As with all subjects there are widely differing opinions on every aspect of beekeeping and although you will form your own views about what works best, I would advise that you always keep an open mind and try and listen and learn from as many beekeepers as possible. Despite the general perception of a beekeeper the truth is that a cross section of beekeepers is probably no different than a cross section of any other group of people. At the present time there is a surge in interest in beekeeping, and many new beekeepers are coming into the field at a younger and younger age. I believe that is because beekeeping is actually a very easy pastime to get into. All you need to keep bees is to be reasonably fit, have somewhere to keep them, and be able to understand the basics which will help you understand much of what happens inside a colony.
How do I learn? This is a major problem to a non–beekeeper. There is so much information available and a lot of it is rather poor, with much being factually incorrect. There are many differing views on the same subject, so what does the would-be beekeeper believe? I would suggest you look at factual things that are consistent wherever you read them and gain enough knowledge to make your own mind up. In this book you will be presented with a complete beekeeping blueprint, which has worked for me for many years. However, there may be things that you learn later on that you feel fits better with your particular style of beekeeping. That‘s totally fine. My opinion is that there are many ways of beekeeping and the relationship you have with your bees is a private affair between you and them. If something works really well for you, then do it. Similarly if you‘ve been told to do something but it‘s not working, then stop doing it.
Books Books are a great way to learn and there are many books on the subject of beekeeping. This is just one of the many that are out there and I hope you will find everything you need to know within these pages, but should you wish to continue your reading you could easily pop into your local library and find a range of publications on the subject. Don‘t think beekeeping is difficult because you don‘t understand what you are reading. Be prepared to leave sections that don‘t apply to your needs, and concentrate on what you will need to get you started. There are several management systems and each author has their favourite. For that reason it wouldn‘t pay to mix different ways of doing things. Pick one method and stick to it until you learn more. The key is to actually understand what is happening in the colony which will help you understand the method.
Internet There are many websites, and as with books there are good and bad. Find the sites that you find are friendly and useful. You will find plenty of forums where you can share knowledge with other beekeepers (both junior and senior). These can be very useful.
Magazines Most magazines are of a general nature, but some do have sections for beginners. Bee Craft is a monthly publication and – whilst it is probably more suited to those who have already started beekeeping – it does have articles on a wide variety of beekeeping subject, which is always a useful resource. There are several other magazines and they are widely advertised, although some may be of a specialist nature.

Beekeeping Made Easy, by Marcus Williams
16 | P a g e
Leaflets and booklets There are several leaflets from a wide variety of sources and you are sure to find something fromn your local Beekeeping Association. Many are downloadable from their websites.
Beekeeping Associations Most Associations will have regular demonstrations with bees during the active season, and follow up with lectures during the inactive season. Take every opportunity you can to handle bees, and watch others closely, as you can often see why some are better handlers of bees than others by the way the bees behave. This is where you should get a good grounding, and if the tutors are good your own handling and colony management techniques will be developed.
Should I join a Beekeeping Association? I would say yes. In the past it was possible to do what was called ―Let Alone Beekeeping‖ where many beekeepers did very little other than put their hives together in Spring and then went back in Autumn to extract the honey. Whilst this can work, its success is limited and the modern beekeeper has to be much more knowledgeable and responsible. It is often much easier to learn when you are part of an organized group and for that reason alone joining a good association will offer you access to member with a wide variety of knowledge, skill, and ability. Check to see if your local association has a mentoring system. This can be a very good way to learn firsthand from an experienced beekeeper.
Do it yourself You can of course do everything on your own, and some of the most successful beekeepers have done exactly that. If you are going to ―do it alone‖, I would suggest reading and researching as much as possible.
Diseases Bees are susceptible to diseases and as a beekeeper you should expect your hive to experience diseases from time to time. The important thing is to know how to recognize these diseases and understand the appropriate course of action. There are two notifiable diseases, European Foul Brood (EFB), and American Foul Brood (AFB). As their names suggest they are both brood diseases, and are both quite rare, and that is the problem. Many beekeepers never see them, so when they do have an outbreak they are often unable to recognise it, and if nothing is done their bees could be a source of infection to others for some time. The best approach is to recognise what a healthy brood should look like, and if there is anything wrong that you can‘t handle, then call in your local Bee Inspector. Varroa is in every colony and must be dealt with in some way. It is essential to understand the life cycle in order to use the various treatments. Monitoring for mites should be studied and practiced, firstly to tell you when to treat, and secondly to indicate if the treatment has been successful.
What do I need to acquire? If you were to look at various beekeeping appliance catalogues you would find them packed with equipment, most of which you could easily do without. You may well be encouraged to buy things you will only use a few times before discarding them. I have detailed below the minimum I think is necessary for somebody keeping a few colonies. Consider these items as tools of the trade. With globalisation there are items that may be cheap, but are often of inferior quality. You are better off deciding what you really do need and then buying good quality items.

Beekeeping Made Easy, by Marcus Williams
17 | P a g e
Protective clothing I have put this first because I believe it is very important. I have seen many beekeepers handle colonies with no protective clothing at all, but in general they have been very good handlers of bees (probably because they have learnt how not to get stung). As a minimum I would suggest an old fashioned hat and veil, but as a beginner I would also suggest you seriously consider a tunic rather than a beesuit. These are comfortable and often have large pockets in the front. Make sure the cuffs are elasticated, and the hat and veil are detachable. Make sure your trousers are tucked in your socks to prevent bees from entering. Gloves could either be with gauntlets as supplied by the appliance dealers, or household rubber gloves. Bees will probably sting through most gloves so you won‘t get a high level of protection, but they will help cover your most vulnerable part of the body (because you‘ll be using your hands a lot when beekeeping). However, gloves do make handling more difficult and there are some operations where you may need to take them off. If you wish, you can try operating without gloves. I have seen many beginners quickly dispense with gloves and they usually quickly become good handlers. There is nothing like a sting or two to focus the mind!
Hive Tool Make sure you purchase a good one with a thin end which will be much easier to use, and kinder on your boxes than some of the thick ended ones that are available.
Smoker If you are buying new then look at all those available, as there are very few really good ones. Many are poorly made and the bellows are very stiff to operate. Make sure you are comfortable with it and it doesn‘t tire you out.
Hives The first question you will need to ask is which type to buy. The appliance catalogues will list about six different options. Many a beginner has started with a type of hive they have subsequently cursed, then got rid of. There are many things that influence a beginner‘s choice and these include price, materials, advice, availability, and what appears to be logic based on what might be written. Later in this book, I list those 6 hives and also give you instructions on how to build your own hive (if you want to save money). Many people start beekeeping because they have been given an opportunity where they inherit hives, or someone is giving up. These offers are sometimes too good to miss and are often without much initial cost, in which case I suggest you continue along these lines until you have enough experience to make a good decision. Ask yourself a few questions, such as are they readily available new or second-hand, or will the frames fit the hives of your colleagues. At the moment the most popular hive is the national made from wood, but in recent years there are some other options you may wish to consider. Polystyrene hives are becoming available, but you will need to make sure they are compatible with wooden hives, and if the colony has Foul Brood disease they can‘t be flamed out in the same way wooden ones can, and there may be a disposal problem. Remember, a beehive is only a tool that suits the beekeeper, as bees don‘t mind too much what home they are given. If you had any other hobby such as photography or tennis, you would probably select your camera or racket with some care, and I suggest you do exactly the same with your choice of hive. All hives are different sizes and suit different kinds of bees. I go into a lot my detail in later chapters.

Beekeeping Made Easy, by Marcus Williams
18 | P a g e
Bees The types of bees and the hives they are kept in probably cause more beekeeping arguments than anything else, but it is actually quite simple. The more prolific bees need a large broodchamber, and the less prolific need a smaller one. Don‘t be fooled into thinking the more prolific the queen, the more bees there are in a hive, therefore the more honey you get, because it doesn‘t work like that, or not over a reasonable timescale it doesn‘t. It would make sense to speak to your local Beekeeping Association and see if a member could let you have some bees, or make it known that you would like a swarm if one became available. Seasons do vary and some years there is an abundance of swarms, yet others there are very few. If you do get to hear about a swarm then make sure they are actually honeybees. Also, if they are in the top of a tree, in a chimney, or a similar inaccessible place then you would be wise to leave them alone. If you have never handled bees before then seek help. It is often suggested that beginners start with a nucleus, which is a small colony with 3-5 frames of bees. The theory is that it is easier for a beginner to handle a small colony, but remember… they won‘t stay small for very long!
Secondhand bees and hives Although the risk is slight there is a possibility secondhand equipment may be infected with either of the Foul brood‘s. It is easier to spot if there are bees involved, but difficult if the bees are dead. It might be worth making enquiries if you are offered any. It would always pay to invite an experienced beekeeper to look at equipment you are thinking of purchasing. The risks are very slight, but not worth taking.
Other equipment There is little else that will be needed in your early stages. If your choice is to run your bees for extracted honey then extracting and honey handling equipment will be needed at some stage, and I go into what you will need for extracting honey later in this book.
Stings You must expect to receive stings as they are a part of beekeeping and unavoidable. Even if you take every precaution when handling bees there will be times when you receive accidental stings. Swelling is a natural reaction and does not mean you are allergic. In general the more fleshy the area the more it will swell. It would make sense to cover your head at least when near a hive, and always smoke a colony before touching it in any way. If you wear rings I would suggest removing them when handling bees.
Bee Fever Now you are hooked it is possible that enthusiasm may cloud your judgement, as it has many others. Beekeeping is so fascinating it is understandable that beginners want to increase the number of hives quickly, but beware, beginners luck was invented for beekeeping! I always recommend that everybody keeps at least two hives, so there is always a backup if something goes wrong with one of them, but to get into double figures as many have before they have even learnt the basics is plain stupid. I think you should understand what is going on inside a hive and develop good handling skills before expanding your enterprise too greatly.

Beekeeping Made Easy, by Marcus Williams
19 | P a g e
First Steps in Beekeeping Beekeeping impinges on many aspects of our lives. It brings together those interested in improved agricultural production and the well-being of the countryside, gardening and education, food and cooking, and ancient craft skills as well as scientific work. In the following chapters we will take a look at some of the basic knowledge you need before embarking on your beekeeping endeavours.
The Honeybee Colony In summer there may be as many as 50,000 honeybees in a strong colony. One of them is a queen, capable of laying over 2000 eggs per day. There are also several hundred drones, male bees whose major function is to mate with the young queens, and the remainder are female worker bees. The workers' role changes during their adult life. At first they tend and feed larvae, then clean or construct the wax comb cells. After serving as guards at the hive entrance, they forage for nectar, pollen and propolis from plants and also for water. Honeybees turn the plant nectar into honey, store and use pollen to feed their larvae and employ a mixture of natural resins (propolis) to strengthen and waterproof the hive. The honeybee colony behaves as a single unit and, although the modern hive permits the beekeeper to perform many manipulations, the colony is not 'domesticated' in the way that farm animals are. The successful beekeeper will therefore learn to work with his bees, to handle them with gentle firmness but without fear. He also learns to observe, interpret and assess quickly and to be alert to the needs of the colony.
Obtaining Bees The source from which the beginner gets his or her bees is important. Many honeybee colonies are of uneven temper, they may carry one or more adult or even brood diseases, and have poor honey-getting abilities. Professional bee breeders and the beekeeping appliance trade select bees for yield, docility and freedom from disease. This may not be true of the local beekeeper who is selling off surplus stock. Local bees will, however, be adapted to the climatic pattern of the area and are to be preferred, if from a good source. These are the things to consider when obtaining bees:
1. A complete colony may be purchased. This consists of ten or eleven combs and is a complete 'going concern' with a fertile queen, workers, drones (at the appropriate time of year), stores of food, and brood. Such a colony should produce a surplus of honey in the first year, if it is obtained in the spring or early summer months. This is a good option if you want to buy something that is up and running and requires minimum ―start up‖ work.
2. A nucleus is a small colony of four to six combs, with a fertile queen, workers, possibly some
drones, and some brood and, stores. Because it is small, the number of bees involved is limited and it will be easy to handle. The nucleus will grow into a full colony during the course of the year and it may even produce a little honey. As the nucleus grows, so does the confidence and ability of the beginner beekeeper. This is a great option for the beginner beekeeper, because it allows you to gain experience as your colony grows.
3. The value of a natural swarm (a free living colony without combs) depends on its size and
whether it is headed by a queen of a previous season or an unmated queen of the current year. Early swarms will develop well, but late swarms and casts (second or third swarms produced in the current year) will need heavy feeding if they are to survive the winter. Unless of known origin, any swarm should be regarded with suspicion until it has been proved disease-free and of even temper.
4. A package is an artificial swarm 'packed' in a wood and wire gauze container by a beekeeper
offering bees for sale. It will need careful management and feeding, but can also be a good cheap way to buy a full colony with minimum fuss.

Beekeeping Made Easy, by Marcus Williams
20 | P a g e
Choosing a Hive In the past, bees were kept in straw or wicker hives called skeps, from which at the end of the season, the honeycomb was removed after the bees had been killed or driven from the hive. Some colonies were retained as stock hives for the following year. Nowadays, this wasteful way of keeping bees is seldom if ever practiced. Instead, the modern beekeeper uses moveable frame hives, of which there are several kinds. All can be manipulated so that the beekeeper can observe what the bees are doing and exercise a measure of control over them. Unless the source is known, all second hand hives and other equipment must be sterilized before use, as it is easy to transmit honeybee disease on old combs and equipment. The construction of hives is well within the capacity of the woodworker who can work to accurate measurements.
How Much Honey? As much as 150 lb of honey can be obtained from one hive in a season, but this is exceptional. Much will depend on the season and the district as well as the skill of the beekeeper and the manipulations undertaken. In an average year, 20-40 lbs can be regarded as a reasonable amount.
Honey Bee Keeping Hints and Tips
Buckets: Buckets are very useful to beekeepers especially if they have tight fitting lids. Use a small bucket with a well fitting lid as a wax bucket and a medium sized one as a washing bucket (water tight lid essential). Use the wax bucket to collect any brace comb pieces/fragments during an apiary visit. The lid will prevent any of the sticky fragments embedding themselves in your car upholstery or spilling anywhere else. Making sure all comb fragments are collected from around the hives as its good for hygeine, preventing robbing and when the pieces mount up they are a valuable resource when melted down. Fill the washing bucket with a teaspoon of caustic soda (NaOH) crystals and a drop of washing up detergent dissolved in warm water. The solution is useful for washing hive tools and any other kit. The caustic soda will help get through wax and propolis deposits and provides a minor sterilising effect.
Wooden Wedges: Wooden wedges are very useful and can be implemented in a number of ways to help the beekeeper. Sometimes if you haven‘t been vigilant with vaseline on woodwork and squirting some liquid parafin then boxes and frames can get stuck together. Sometimes resulting in lifting a heavy super and the top bars of the box below being pulled up too. However if caught early you can jemmy the box up with your hive tool and use a handy wedge to hold it in place, then take your hive tool again and drift some smoke in. Then you can get on your knees and gently free the stuck frames without hassle to you or the bees. Other times wedges come in useful is when a hive is found to be a bit unstable. Jamming a wedge under one or two of the legs should steady it. Wedges should be not much shorter than your hive tool and cut at shallow angle.
CD's: Everyone has old scratched cd's that will not play anymore. Dont throw them out! Why not use them to cover up feeder holes in the cover board? The holes can be filled by glueing a coin over it. CD's can also be used to put bee candy on instead of grease proof paper.

Beekeeping Made Easy, by Marcus Williams
21 | P a g e
Collecting Young Bees: If young bees are required for the purpose of building a nucleus, non-flying bees are required, otherwise the bees wil simply fly back to the original hive. Collecting these non-flying bees can be done by laying a cloth, sack or sheet on the ground. Then shake several frames of bees onto it, be careful not to shake a frame with the queen on it, keep her inside the hive. Leave the bees on the sheet/sack for 15 minutes, the older bees will have returned home leaving the younger non-flyers for collection.
Bait Hives: Setting up a 'bait hive' is when a beekeeper sets up an empty hive in the hope of catching a local swarm. When bees swarm they send out scouts to look for suitable locations for the new hive. These scouts fins suitable places and convey their findings via a dance. Each scout will visit the other scouts location and do the dance of the best location until all the scout bees are doing the same dance. So the hive must be as attractive as possible to the scout bees so they guide the swarm there. Bees prefer a cavity that is large enough for them to make a nest that will provide space for honey storage to get them through the winter. A broodbox is about the right size. The hive should be easy to defend, so the entrance should be quite small, less than 2 square inches. Use a hive that has had bees in it before making sure it has been cleaned of wax and propolis. Place one to four old combs in the broodbox. Foundation is not attractive and should be avoided as it may go stale. Makes sure and check the hive regularly for greater wax moths as they wil destroy old combs in hot weather. Make sure the bait hive is set up in the shade and cover up all the feedholes in the crown board. If at all possible placing the hive at or above head height could also be appealing to scout bees. When you see bees visiting the bait hive you can be sure there is a colony locally that is preparing to swarm. Make sure it isn‘t one of yours! There could be frantic activity for several days, and then you will either end up with a swarm or all activity will instantly stop. This will be because the swarm has found somewhere else, or the beekeeper has dealt with the swarming colony. If a swarm does arrive try to remove the old drawn comb as quickly as possible by shaking the bees off it, fill the broodchamber up with frames of fresh foundation, and clip the queen as it is always possible the swarm will abscond until there is brood to 'hold' them. It is possible that a swarm could bring foul brood spores with their honey supplies, so avoid feeding for about 3 days so they convert all their honey into wax. Pheromone lures can be used to increase the likelihood of capturing swarms or retaining them in your own hives. 'Swarmit' is commercially available, the lure is a synthetic pheromone that mimics the nasanov scent. Simply dab it on the woodwork of the hive.
Finding Queens: Finding virgin queens is notoriously difficult as they can be anywhere in the hive. However there are some tricks to help the beekeeper:
Virgin queens shy away from the light and can normally be found on frames of brood.
It is rare that laying queens can‘t be found but occasionally they can be very small and difficult to find. Check through the hive including the crownboard, floor and inside the broodchamber. If the queen is still proving illusive then leave the hive for 30mins and try again. If you are still unsuccessful then take a spare empty broodchamber and place it on a floorboard. Split the frames into pairs and put them in both broodchambers, with a gap between each pair. This is an attempt to drive the queen away from the light so she will go between the frames, so don‘t cover them up. After 20-30 minutes the bees on the pair of frames where the queen is will be quiet and all the rest will be agitated. You have narrowed it down to one pair of frames.

Beekeeping Made Easy, by Marcus Williams
22 | P a g e
Another method is to shake all the bees off the frames onto a cloth or sack. Put the frames back into the broodchamber with a queen excluder above and an empty broodchamber on top of that. Shake the bees into the empty broodchamber and the bees will go down to tend the brood, and leave the queen behind. Unless she is small enough to fit through.
Drone Culling Frames: The culling of drone brood is an accepted technique for helping to control varroa, but some beekeepers are concerned that if done as a matter of course could reduce the number of healthy drones. The usual method is to put one shallow frame in every broodchamber, then when the bees have built drone comb on the bottom and it is sealed cut it out. A variation on this is to take a standard empty brood frame and slightly modify two extra side bars, and nail them in the frame vertically so there are three equal parts. In the first part put a full sheet of drone foundation, in the second put a half sheet, and in the third put a starter. When put in the hive the bees will complete them at different times, allowing the beekeeper to deal with each section on a three visit cycle. If the varroa level is low then the comb can be left, but if high it can be cut out. Leave just enough for the bees to rebuild the comb. It should be noted that occasionally young queens are reluctant to lay drone eggs, but this is a problem with any drone culling method.
Capturing Swarms from Difficult Places: Swarms will often get into difficult places such as a thick hedge. In this case an old brood frame can often be used to entice them out. If you can get some bees from the swarm and put them on the comb they may start fanning and attract the swarm out of the difficult place.
Crownboard Slots: Many beekeepers have the slots in crownboards running parallel with the frames. If the broodchamber has an odd number of frames, then one frame is directly under the slot and in winter you won‘t be able to see if there is any sealed food. If you turn the crownboard so the slot is at right angles to the frame then it is easy to see the food situation.
Robbing: If robbing starts in a colony or when extracting honey it can be stopped by moving the colony or extracted honey and replacing it with a teaspoonful of honey in the same spot. This is important because if you simply remove the source the bees will continue to look for it and if it cant be found they may start robbing another nearby hive. Replacing the source with just a teaspoonful of honey allows the bees to deplete the source quickly and calm down when the source is gone.
Filling Holes and Gaps: Propolis is used by bees and readily available so why not make use of it? Warm the propolis in your hand, rolling it until it‘s softer and pliable. Repair leaks in hive roofs by placing the propolis in and over the hole, spread and flatten it over the area. Small holes and gaps in the boxes can similarly be treated until permanent repairs can be carried out. These repairs will often last for several years.

Beekeeping Made Easy, by Marcus Williams
23 | P a g e
Protecting Hives from Birds: Some birds (including woodpeckers) can cause a lot of damage to hives (especially in Winter months). To avoid this use builders polythene sheeting to protect the broodchambers by cutting it to fit and pinning it with drawing pins. Make sure the polythene is tight and will not flap in the wind.
Foundation Fitting: Wax foundation expands and contracts considerably due to temperature variation. For this reason make sure it moves freely in the bottom bars otherwise buckling may result. Often on a warm day the foundation won‘t go in the grooves of the frame side bars, and it will have to be trimmed with a knife or scissors. Foundation that is fitted on a cold day should be a loose fit otherwise it will expand when warm and will buckle. If the loops of the wiring stick through the bottom bars they will cause problems at extracting time, and will not allow you to run the uncapping knife along the bottom bars. To avoid this pinch the bottom bars together by the wire, and with a hive tool fold the wire back between the bars.
Cleaning Up Supers: If you replace wet supers directly on the colony after extracting the bees will probably put most of the honey in the bottom super above the broodnest. To avoid this take a piece of thickish polythene, such as an animal food bag, and cut it slightly larger than the outside dimensions of the broodchamber. Cut a small hole in it just large enough to get your finger in, and place that over the broodchamber before replacing the supers. The bees will think they are divorced from the honey and will clear it from the supers. Make sure the hole isn‘t covered up by the frames below, and do it at dusk to avoid excitement.
Bees and Neighbours Beekeeping is a wonderful hobby. Bees are interesting creatures, with a fascinating life, but unfortunately, not everyone appreciates this and, unless care is taken in keeping bees and sitting colonies, trouble can result.
Stings The only fact about bees that most people seem to know is that they sting. The closer a person is to an active colony, the more likely they are to be stung. The possibility of non-beekeepers being stung is reduced if:
bees are not kept in small gardens or close to houses
the bees kept are known to be docile
manipulation of colonies is performed whilst neighbours are at work
colonies are kept in sheltered apiaries behind naturally high barriers
Drinking Bees Bees need to drink like any other creature. Non-beekeepers can view this harmless activity with alarm since bees often choose to drink from places like the edges of ornamental ponds. The beekeeper can help by providing water for his bees. The simplest way to do this is by standing a large plant pot full of peat in a reservoir of water. Bees will drink from the wet surface, especially if this arrangement stands in a sunny spot. Do not let it dry up. It cannot be emphasised too strongly that drinking bees are harmless.
Overflying Bees normally fly about 5m above the ground but problems can occur from bees flying out from their hives and returning to them. In windy weather over open ground, bees fly very low because it is less effort. They only rise to fly over obstacles in their path. The beekeeper can help by sheltering the apiary

Beekeeping Made Easy, by Marcus Williams
24 | P a g e
site with hedges or shrubs. It also helps if hives can be faced away from neighbouring properties. In addition, the height of the boundary fence can be raised by allowing hedges to grow to about two metres in height. A temporary barrier can be formed from sparrow-proof netting which bees will not readily fly through.
Cleansing Flights After winter confinement in the cluster, bees‘ early flights on sunny spring days can result in anything in the vicinity of the hives being spotted with faeces. If this includes neighbours‘ laundry or cars, then their resentment is understandable. This nuisance can be reduced by making sure that the bulk of the winter stores is well-ripened sugar syrup. Feeding should be finished by mid-September. High barriers round the garden will also help to keep the bees on cleansing flights circling near their hives.
Swarms Neighbours will not necessarily welcome swarms onto their property. No beekeeper can guarantee preventing all swarms. However, the chance of swarms can be reduced to a very small percentage indeed. You need:
to keep all queens clipped
to have adequate spare equipment
to use a simple, effective method of swarm control
to make sure hives are not over-heated by the summer sun
to seek help from a really experienced beekeeper if required
Numbers of Hives or Colonies There have been cases brought to court where the beekeeper kept an enormous number of colonies in his garden. Sheer numbers of colonies can worsen all the problems touched on so far. It is impossible to give any definitive figure. Modern suburban gardens are not suitable at all. Larger gardens, depending on their size, could safely house up to six colonies. Gardens which could house more are few and far between.
Rights Beekeepers have the right to keep bees. Their neighbours have the right to enjoy their property in peace. Badly kept and positioned colonies can be a nuisance. Unfortunately, what the neighbour might see as a nuisance is likely to be given more consideration in a court than what the beekeeper sees as an interesting characteristic in his bees. Bees harmlessly drinking water from a pond may well, therefore, be deemed a real nuisance, even if all the beekeepers called to give evidence state the opposite. Also, the fact that the bees were there before the complaining neighbour will hold little importance in a court of law.
Avoiding Confrontation Any beekeepers confronted with an angry neighbour should not meet aggression with more aggression. Try to talk the problem through and take some positive action to attempt to allay the problem. It could well help to talk through with your neighbours the intention to keep bees. Share some of your honey with them and always emphasise the pollinating value of bees to the environment. If the neighbour is the sort of person who is constantly worried about the bees, wants to grow plants to ‗repel‘ them or remove plants that ‗attract‘ them, and is worried if the bees will join him when he breakfasts al fresco, then it is likely that beekeeping next door will never be a pleasant experience. It would be simpler to keep your bees in out-apiaries and avoid any problems.

Beekeeping Made Easy, by Marcus Williams
25 | P a g e
Bee Stings When a honey bee stings someone, the sting, venom sac and venom pump are left in the skin after the bee pulls away. Most of the venom will be injected in the first 20 seconds but the pump can continue for up to two minutes. It is important to get the sting out fast to minimize the dose of venom. It is generally thought that a bee sting should not be squeezed for fear of forcing more venom into the skin, but experiments in America have shown that as long action is taken quickly there is no difference at all between scraping, tweaking or squeezing. Time can be wasted finding a penknife or scraper, so the best method is to scratch out the sting with a fingernail or hive tool quickly. Then smoke the area to mask the alarm pheromone in the sting to stop any more bees from stinging in the same area. If possible, close the hive gently, move away for a few minutes and apply a soothing lotion, such as Witch Hazel or calamine lotion onto the affected area. It is useful to keep a small bottle handy with your beekeeping tools. On returning home, an ice pack or packet of frozen peas will help to reduce any pain or swelling resulting from the sting. Sometimes a bee will sting through the bee suit or gloves. Then it only takes a moment to shift the clothing and dislodge the sting, smoke the area and remove the sting from the clothing. Some beekeepers react very little to bee stings and carry on regardless but it is wiser to wear protective clothing and just take the gloves off for delicate work such as queen marking and clipping. This also has the advantage of keeping your hands clean and free from propolis. I would encourage beginners to wear as much protective clothing as they feel comfortable with while they gain confidence and find how they react to bee stings. Some beekeepers like to get stung a few times a year to keep up their ‗immunity‘ to stings or to ‗protect‘ themselves from rheumatism and arthritis. These points are debatable and must be the personal decision of the beekeeper concerned. Bee stings can be avoided best by having gentle bees, choosing sensible times and weather to open the hives, by correct use of smoke and gentle handling. Frequent washing of bee suits and gloves will remove any residual sting pheromone and reduce the likelihood of subsequent bee stings. Remember, if stung – get the sting out fast.
Treatment for Stings If a beekeeper has a fairly severe reaction to stings with some degree of pain and swelling, he may choose to take medication before going to the apiary. Aspirin and anti-histamines are the tablets to consider here, but nothing should be taken without consulting your own doctor first.

Beekeeping Made Easy, by Marcus Williams
26 | P a g e
Bee sting shock If a person is stung and shows some distress it is important to follow a few basic guidelines. Bee sting anaphylactic shock is rare and you may never see it, but if you know what to do you can react quickly and calmly to help.
What to do
Move the person away from the hives
Scrape out the sting/s as quickly as possible in order to stop any further injection of venom
Get the person to sit down and encourage him/her to remain calm
Loosen tight clothing at the waist and neck
Sit him/her on the ground, leaning against a wall, tree or something solid
Make the person as comfortable as possible to help breathing
The person may be short of breath, feeling sick or feeling faint and may be very frightened so stay with the person, talk quietly and encourage him/her to breathe in and out regularly.
If the person becomes unconscious, loosen tight clothing and place him/her in the recovery position on his/her side
Tilt the head back for a good airway
Put underneath arm behind the back
Check that s/he is breathing
Check that he has a pulse in the side of the neck
If there is another person, send him to flag down the ambulance
Do not try to give the person stung any food or drink
If the person‘s heart stops or the breathing stops, resuscitation should be provided by a trained person
Remember Anaphylactic shock is very rare, but it does happen, very quickly and calm procedure is essential.
Practical Suggestions
Post these instructions in your apiary shed in a prominent place. Include the address, post code of the apiary, grid reference and telephone number, if there is one. Also provide directions to the nearest phone.
Write out this information about the apiary site on a card and put it in a ‗plastic pocket‘ beside the instruction sheet.
The person telephoning can grab this card and take it to the nearest phone to inform the ambulance service.
If possible, take a mobile phone to the apiary whenever working with bees so that help can be called in case of an emergency.

Beekeeping Made Easy, by Marcus Williams
27 | P a g e
MANAGING YOUR BEES
Beekeeping Made Easy, by Marcus Williams
28 | P a g e
About Bees Bees are flying insects closely related to wasps and ants. There are nearly 20,000 known species of bees in nine recognized families, though many are undescribed and the actual number is probably higher. They are found on every continent except Antarctica, in every habitat on the planet that contains insect-pollinated flowering plants. Bees are adapted for feeding on nectar and pollen, the former primarily as an energy source and the latter primarily for protein and other nutrients. Most pollen is used as food for larvae. Bees have a long proboscis (a complex "tongue") that enables them to obtain the nectar from flowers. They have antennae almost universally made up of 13 segments in males and 12 in females, as is typical for the superfamily. Bees all have two pairs of wings, the hind pair being the smaller of the two; in a very few species, one sex or caste has relatively short wings that make flight difficult or impossible, but none are wingless. The smallest bee is Trigona minima, a stingless bee whose workers are about 2.1 mm (5/64") long. The largest bee in the world is Megachile pluto, a leafcutter bee whose females can attain a length of 39 mm (1.5"). Bees are the favorite meal of Merops apiaster, the bee-eater bird. Other common predators are kingbirds, mockingbirds, bee wolves and dragonflies.
Pollination Bees play an important role in pollinating flowering plants, and are the major type of pollinator in ecosystems that contain flowering plants. Bees either focus on gathering nectar or on gathering pollen depending on demand, especially in social species. Bees gathering nectar may accomplish pollination, but bees that are deliberately gathering pollen are more efficient pollinators. It is estimated that one third of the human food supply depends on insect pollination, most of which is accomplished by bees. Contract pollination has overtaken the role of honey production for beekeepers in many countries. Monoculture and the massive decline of many bee species (both wild and domesticated) have increasingly caused honey bee keepers to become migratory so that bees can be concentrated in seasonally-varying high-demand areas of pollination. Most bees are fuzzy and carry an electrostatic charge, which aids in the adherence of pollen. Female bees periodically stop foraging and groom themselves to pack the pollen into the scopa, which is on the legs in most bees, and on the ventral abdomen on others, and modified into specialized pollen baskets on the legs of honey bees and their relatives. Many bees are opportunistic foragers, and will gather pollen from a variety of plants, while others are oligolectic, gathering pollen from only one or a few types of plant. A small number of plants produce nutritious floral oils rather than pollen, which are gathered and used by oligolectic bees. One small subgroup of stingless bees, called "vulture bees," is specialized to feed on carrion, and these are the only bees that do not use plant products as food. Pollen and nectar are usually combined together to form a "provision mass", which is often soupy, but can be firm. It is formed into various shapes (typically spheroid), and stored in a small chamber (a "cell"), with the egg deposited on the mass. The cell is typically sealed after the egg is laid, and the adult and larva never interact directly (a system called "mass provisioning"). Visiting flowers can be a dangerous occupation. Many assassin bugs and crab spiders hide in flowers to capture unwary bees. Other bees are lost to birds in flight. Insecticides used on blooming plants kill many bees, both by direct poisoning and by contamination of their food supply. A honey bee queen may lay 2000 eggs per day during spring buildup, but she also must lay 1000 to 1500 eggs per day during the foraging season, mostly to replace daily casualties, most of which are workers dying of old age. Among solitary and primitively social bees, however, lifetime reproduction is among the lowest of all insects, as it is common for females of such species to produce fewer than 25 offspring.

Beekeeping Made Easy, by Marcus Williams
29 | P a g e
The population value of bees depends partly on the individual efficiency of the bees, but also on the population itself. Thus while bumblebees have been found to be about ten times more efficient pollinators on cucurbits, the total efficiency of a colony of honey bees is much greater due to greater numbers. Likewise during early spring orchard blossoms, bumblebee populations are limited to only a few queens, and thus are not significant pollinators of early fruit.
Bee Flight: In 2005 Michael Dickinson and his Caltech colleagues studied honey bee flight with the assistance of high-speed cinematography and a giant robotic mock-up of a bee wing. Their analysis revealed sufficient lift was generated by "the unconventional combination of short, choppy wing strokes, a rapid rotation of the wing as it flops over and reverses direction, and a very fast wing-beat frequency". Wing beat frequency normally increases as size decreases, but as the bee's wing beat covers such a small arc, it flaps approximately 230 times per second, faster than a fruitfly (200 times per second) which is 80 times smaller.
Bees and humans: Bees figure prominently in mythology and have been used by political theorists as a model for human society. The image of a community of honey bees occurs from ancient to modern times, in Aristotle and Plato; in Virgil and Seneca; in Erasmus and Shakespeare; Tolstoy, as well as by social theorists Bernard Mandeville and Karl Marx. Despite the honey bee's painful sting and the stereotype of insects as pests, bees are generally held in high regard. This is most likely due to their usefulness as pollinators and as producers of honey, their social nature, and their reputation for diligence. Bees are one of the few insects regularly used on advertisements, being used to illustrate honey and foods made with honey (such as Honey Nut Cheerios). In North America, yellowjackets and hornets, especially when encountered as flying pests, are often misidentified as bees, despite numerous differences between them. Although a bee sting can be deadly to those with allergies, virtually all bee species are non-aggressive if undisturbed and many cannot sting at all. Humans are often a greater danger to bees, as bees can be affected or even harmed by encounters with toxic chemicals in the environment.

Beekeeping Made Easy, by Marcus Williams
30 | P a g e
The Bee Family There are two main groups of bees: solitary and social. Solitary bees, as the name suggests, do not live together in a colony. A typical example is the mason bee, Osmia rufa. The female is attracted to old buildings with soft mortar, where she can drill a hole in which to lay an egg. Suitable mortar may attract many solitary bees - some are gregarious if not social. But scare stories of houses falling down because of the attentions of mason bees is nonsense! Honeybees are the only bees that live together in a complex well-organised society and store food to enable the colony to survive the winter, when forage is no longer available. Wasps and bumblebees do not accumulate surplus stores of food and do not survive the cold of winter. In the autumn, queens are reared and these leave to find suitable sites where they hibernate until the following spring when they emerge and the colony cycle begins again. The four species of honeybees are obviously closely related, their anatomy and behaviour being very similar. However, no member of one species can mate with a member of another, the true mark of a species. Apis florea (the little honeybee) and Apis dorsata (the giant honeybee) are both indigenous to India. They both build a single free-hanging comb. The difference is in the size of the built comb - the former is very small and the latter very large. Apis florea tends to abscond when disturbed. This "flight instead of fight" strategy is the main factor which has prevented the domestication of Apis florea, since quite minor interference, readily tolerated by our bees can induce it to desert. Honey is harvested from both Apis florea and dorsata. In Nepal, for example, the method used to collect the huge combs of Apis dorsata involves hanging from ropes over cliff faces. Apis cerana (the Eastern honeybee) is kept in hives - being smaller than the Western honeybee, the hives are a smaller version of the Langstroth design. It is native to India and South East Asia. Apis mellifera is the Western honeybee - the honeybee of this country. Apis mellifera probably originated as a successful species in the central part of North Africa. From here it spread to the south to colonise the greater part of Africa, to the east to colonise the Middle East and South East Europe and to the west. Many sub-species evolved in response to environmental conditions - including the Italian (Apis mellifera ligustica), Carniolan (A. m. carnica), Caucasian (A. m. caucasica) and the Dark European (A. m. mellifera) honeybees. It has been introduced into almost every country in the world. There were no indigenous honeybees in any part of the New World - the Americas and Australasia. European colonists introduced honeybees, probably early in the seventeenth century. Honeybees quickly became an essential part of the local fauna living in the forests of New England and Virginia in large numbers. Honeybees from Europe reached Australia in 1822 on the convict ship Isabella. And the first Italian bees to arrive in Australia were sent out by Thomas Woodbury of Exeter, England, in 1862. In New Zealand, Mary Anna Bumby (sister of a missionary) arrived on 20th March, 1838 bringing two straw skeps of bees from Thirsk, Yorkshire. Two more hives were brought from Australia two years later. In 1844, the Reverend William Cotton left England for New Zealand. He took with him beehives packed inside ventilated barrels resting on racks above blocks of ice with cinders filling the space in the upper half. Unfortunately, the sailors thought the bad weather they encountered was caused by the bees and threw them overboard! In 1986, a sample of dark bees from an isolated apiary in Tasmania were examined and recognised as mellifera, probably descendants from colonies taken out by the early settlers.
Beekeeping Made Easy, by Marcus Williams
31 | P a g e
The Sub-species of Honeybees Most people have heard of the so-called "Killer Bees" from stories in the popular press and films. Up to about thirty years ago the aggressive bees of Africa were little known outside that continent. In 1956, mated Apis mellifera scutellata (previously referred to as A. m. adonsonii) queens from Africa were introduced into colonies in Brazil. The object was to improve the Dark European bees Apis mellifera mellifera (q.v.), introduced by the Portuguese a century or more ago. The expectation was that the honey-getting vigour of Apis mellifera scutellata allied to the gentle behaviour of Apis mellifera mellifera would improve honey yields. This objective was seemingly achieved: honey production has risen from 5,000 tons a year in 1956 to five times that quantity thirty years later. But the effect on beekeeping has been far-reaching. Inadvertently, several of the queens mated in Africa were allowed to swarm. Since then, they and their descendants have crossed with the local bees, retaining in full measure their tropical, aggressive nature. It is probable that they have not crossed with the local bees - it is more likely that the African bees have dominated and replaced the indigenous bees. Their propensity to swarm has enabled them to spread rapidly - from Brazil the Africanized or African bees have spread out over the whole of South America and have reached the United States, much to the concern of the many honey producers in that country. Swarms of Africanized bees have been found from Brownsville to Larado Texas. The US media widely reported the first stinging attack, when a Brownsville man received 18 stings. Of course, the sensational stories of Killer Bees have exaggerated the facts. Their aggression (evolved in response to harsh conditions in their country of origin) is expressed by the large number of bees that attack and the area they are prepared to defend - they will follow victims 100 yards. But the effect of a sting is the same as with all bees - fatalities have occurred mainly resulting from the larger number of stings inflicted rather than a particular sting being more dangerous. The Cape bee, Apis mellifera capensis, occurs in a restricted area of the Cape of Good Hope. It is unique among all the honeybees. When queenless, the worker bees lay eggs and from these unfertilized eggs develop female bees and not drones as happens with our bees. Queens can be reared from these worker-laid eggs, enabling the colony to survive queenlessness. Thelytoky, parthenogenetic reproduction where unfertilized eggs develop into females, is common in the Cape honeybee but is not strictly unique. In colonies with queens, most worker ovaries are suppressed by the pheromones produced by the queen and the presence of unsealed brood. In rare instances, virgin queens and laying workers produce eggs that develop into females. The indigenous bee of Britain is the British "black", Apis mellifera mellifera, also known as the British "brown". Included in this group are the Dutch, German and French dark brown and black bees. A better term is the Dark European bee. The original homeland was Europe, north and west of the Alps, and central Russia to the Urals. It was a bee that had evolved over millions of years to survive in cool climates and was suited to a fickle climate and scanty nectar flows. Opinions of the British black bee vary, especially regarding their temper - probably due to the influence of imports on the purity of the race. It is generally agreed that the chief characteristic was their ability to produce surplus under adverse conditions. The queens were not prolific and the bees were long-lived. They were good comb-builders and they sealed their honey with a smooth white capping which was of great value in the production of comb honey. They wintered well on the minimum of stores. Italian bees were then imported into the UK in 1814 and were much sought after by the European beekeepers. The Italian bees were (and still are by some beekeepers) favoured because of their reputed docility. However, Italian bees are better suited to the Mediterranean countries - the queen continues laying in poor weather, colonies often need feeding as a result and they do not winter well when conditions are harsh. More importantly, matings with local bees (over which there can be no control) often produce bad-tempered crosses.

Beekeeping Made Easy, by Marcus Williams
32 | P a g e
There are many sub-species that have evolved to cope with the conditions of the area in which they live. Apis mellifera ligustica, the Italian bee, has been mentioned. The bee is recognised by yellow or tan bands on the abdomen. In spite of many excellent qualities, it has never become properly naturalised north of the Alps and does not take kindly to northerly winters. Finally, mention must be made of the Buckfast bee. Brother Adam of Buckfast Abbey in Devon spent his long life attempting to breed the "perfect bee". Different opinions are given of its qualities and there appears to be variability in the queens supplied. This is not surprising since the Buckfast queen has been produced by mixing different races of bees. But however good the Buckfast queen and its progeny may be, later generations are unlikely to exhibit the same qualities and are likely to prove bad-tempered - as with all such crosses. Since it is not a stable sub-species, it cannot breed true and the drones are free to fly and mate with the local queens, thereby influencing many colonies in a wide area. It is interesting to compare honey yields in the past with the present day. Opinions, again, differ and whilst some beekeepers will advocate a certain type of bee because of the their honey yield, others will prefer a more docile breed of bee.

Beekeeping Made Easy, by Marcus Williams
33 | P a g e
Bee Facts - Did you know?
Bees fly 24,000 miles collectively and visit between three and nine million flowers to make just one
pound of honey. Some of the flowers include dandelion, raspberry, blackberry, coneflower, bluebells,
wallflower, poppy, white clovers, goldenrod, and heather. If someone has allergies to these flowers, it
is believed there is a beneficial anti-allergy effect by taking raw honey which contains trace amounts
of their pollen. It is preferable to purchase honey from a local beekeeper near to your home, to ensure
it contains the pollen you may be allergic to.
According to fossil records, bees first appeared on earth about 150 million years ago, whereas us
humans have probably only been around for 200,000. Bees are far more evolved than we are.
Bees can live without us but we cannot live without them. Plans are being developed for us to move
to another planet and when we do, the honeybee will be coming with us.
There are more than 2000 species of bee in the world, but only four of them produce honey.
Bees cruise at about 15 mph but can fly at speeds of up to 20 mph.
Bees never sleep.
When flying, a bee will beat its wings about 180 times per minute.
The chemical that makes a bee sting itch is called mellitin.
A bee can see 300 frames per second.
Honey bees have hair on their eyes.
A full pollen load weighs about 1/6th of the weight of a bee.
A full load of nectar weighs about ½ the weight of a bee.
The oldest known record of humans interest in honeybees is a drawing on a cave wall in eastern
Spain, which is dated to approximately 8,000-11,000 years old. It depicts a man climbing a ladder to
collect honey from a nest. Similar drawings have also been found in caves in Zimbabwe and South
Africa.
Ancient records show that beekeeping originated about 6,000 years ago in both China and Egypt.
The pollen baskets on a honey bee are situated on their legs and are called 'corbicula'.
Nectar is carried in the crop/honey stomach.
The average worker bee will fly approximately 500 miles before it wears out and dies.
A queen bee has to eat 80 times her own weight to produce 2,000 eggs per day.
A bee will visit 50-100 flowers during one trip.
Honey can range in colour from white to gold to dark brown and it usually has a stronger taste when
it's colour is darker.
A bee must tap 2 million flowers to make 1lb of honey and would have to fly 55,000 miles to get it.
One bee will make 0.8g (1/10 of a teaspoon) of honey during her lifetime.
Mead is made from fermented honey.
Drambuie is a Scottish liquer which is made from honey.

Beekeeping Made Easy, by Marcus Williams
34 | P a g e
Bee-haviour Bees are social insects and are successful because the behaviour of each individual bee is in tune with her sisters. The behaviour of hives is an amplification of the individuals behaviour. Hive behaviour can vary greatly, some hives can be especially angry and fierce while others are very passive. Observation is the key to recognising behaviours. This can be done as you conduct your business as a beekeeper. The behaviour of bees is of most importance to bee breeders. Behaviour list:
Swarming Behavior
Anarchic Behavior
Rosette Capping Behaviour
Cell Building Propensity
Cell Numbers Built
Running Behaviour
Jumping Behaviour
Following Behaviour
Cool Weather Clustering
Mating Behaviour
Multiple Mating
Mating Frequency
House Cleaning Behaviour
Grooming Behaviour
Mite Damaging Behaviour
Propolising Behaviour
Hygienic Behaviour
Head Butting Behaviour
Biting and Hair Pulling
Guarding Behaviour
Robbing Behaviour
Supersedure
Drifting Behaviour
Working Day Length
Queen Balling
Pollen Storage Behaviour
Umbrella Behaviour
Undertaking Behaviour

Beekeeping Made Easy, by Marcus Williams
35 | P a g e
Installing Bees
Install bees from a beekeeper: If you have obtained bees from a local bee keeper then they will hopefully help you with the installation, they might even supply you with brood frames and queen (called a nucleas or nuc). If not they should supply you with a box or package of loose bees, hopefully with a queen seperated in its own cage. If this is the case see below for installation instructions.
Installing bees from a box or package (loose bees): Your hive should contain 10 frames within the super. Take out 4 of these frames, remove the lid and feeding can (if there is one) from the shipping box. Next dump the bees into space in the super you created by removing the frames. The process of dumping the bees may seem a bit ruff but it is necessary to give the box a forceful jerk to get the bees in the hive. Replace the 4 frames in the super, next remove the small cork plug found on the queen cage and have a small wire attached to the non drilled end. Then slide the vertical queen cage between two frames toward the center of the super. If you like you can anchor the wire hanger on the queen cage with a staple to stop it moving. Place the inner cover and lid back on the hive. Place a feeder bottle at the hive entrance so that the bees can immediately go to work producing wax and filling in foundation to make space for the queen to lay eggs. Some bees will remain in the box or package just leave this next to the hive and the others should join the hive Check back in a 2 days to make sure the queen has been removed from her cage by the workers.
Installing bees from a nucleas or nuc: The first thing to remember is not to let the bees get cold as you move them from the nuc box into their new home. Its better to pick a warm unwindy day and make sure you have assembled all the equipment you will need. Place the nuc box right beside the hive, to lessen the chances of losing your queen on the ground while you‘re moving the frames. Light your smoker (make sure the smoke isnt too hot) and lift the lid of the nuc box and puff a little smoke across the top of the nuc frames. Make sure all the frames in the nuc are loosened with your hive tool and that your super is empty. Lift out a frame from the nuc (best to start with the second one in) and place it gently in the super, do this for all the frames. Some beekeepers prefer to add the frames to the centre and some prefer to keep them all to one side. That way, the bees are only exposed to cold air on one side of the cluster, the other side being insulated by the wood of the box. Which ever way you choose you should definitely keep all the new frames together. Fill the super with empty frames or if you have ones with disease free drawn come then use them. This will save the bees a lot of work. There will still be a good number off bees in the nuc box, lift it and shake them out over the super. The bees that remain should eventually find their way into the hive, so just leave the nucleus next to the hive entrance. Place a feeder at the hive entrance or on top of the super to help the bees get to work faster.
Getting bees from your local association: Some associations can provide starter colonies for beginners. This could be the best and easiest option as you will get a good tempered breed and an experienced beekeeper to help you install them and advise you.

Beekeeping Made Easy, by Marcus Williams
36 | P a g e
Uniting Bees Beekeepers have always found it necessary to unite two swarms, two colonies or a swarm and a colony when they are either short of beehives or when a colony needs strengthened. Before uniting bees, you should judge the performance of the two colonies being united and eliminate the one which performs poorly. Sometimes when a colony loses its queen, you may decide to unite it with a colony that has a good queen (a 'queen-right' colony) instead of waiting for it to produce its own. If queens have been allowed to be raised, you may take a limited number of bees from each of the hives to form the nucleus of a colony. After swarming, some colony populations may be so reduced that the brood can be left uncovered. If this occurs, more bees must be added to clothe the brood combs left inside the hive. If this is not done, the exposed brood is quickly cooled and will die of cold. In this case, bees from any source, but preferably from a strong colony, should be collected and united with the weakened colony. When colonies or swarms are united, one of them must be queenless because two queens cannot live in the same colony. If two queens are left together they will fight to the death and the survivor may be severely injured during the combat. Beekeepers can prevent this by removing or killing one of the queens 24 hours before carrying out the operation. The decision as to which queen to eliminate rests with the beekeeper, but he should always try to keep the better of the two. Some beekeepers will put the two queens in a jar and let them fight until the stronger is victorious thus providing you with the strongest queen, this is not recommended as it could possible kill both queens. Another step in preparing for unification is to place some fragrant material (oil of lemon, lavender, camphor, etc.) in both hives. This makes the bees familiar with one another's smell, making them less aggressive to each other. Evening is the best time to unit bees, after they have stopped flying. This prevents robbing and makes unification easier. When uniting a swarm and a colony, the beekeeper carries the swarm to the colony. If uniting two colonies or two swarms, always carry the weaker to the stronger. If uniting a queenless to a queen-right colony, carry the queenless to the queen-right. Uniting this way disturbs the stronger group less than the other and interferes less with their production. Before uniting the two groups the beekeeper should smoke them both in order to calm them and make them more receptive. After uniting them more smoke should be used to make sure they have a homogeneous smell so that fighting among workers will not occur. The next day check whether there are dead bees at the entrance of the hive. If there are no casualties, then they have accepted each other peacefully. When uniting a queenless to a queen-right colony, or in forming a nucleus, it is advisable to carry the new colony three kilometres away so that the bees added cannot find their way to rejoin the parent nest. If the hives were originally next to each other however, the new colony does not have to be moved but the empty hive must be taken away after the exercise. Uniting bees with white paper is the best method of all but can only be applied when the Langstroth frame hive is used. Smoke both colonies, open the top cover of the hive and spread the white paper with two or three holes punched in it above the combs. Add another super and pour or shake the bees onto the paper. The bees under and above the paper will start to chew the paper and will merge gradually without fighting. If both colonies are in Langstroth hives, put just one box (without bottom) on the paper above the other hive. How to judge a queen bee? Good queens are always judged by their ability to lay. Therefore there should be a rapid increase of population before the main honey-flow season, producing a good crop. The size of the queen should be regularly observed, because when it dwindles, this suggests that something adverse is happening. Her wings or legs can also be clipped (not by the beekeeper), causing her to limp, affecting her movement and ability to lay.

Beekeeping Made Easy, by Marcus Williams
37 | P a g e
The age of the queen is also important. Normally, colonies with young queens swarm less and produce about 30% more honey than those with queens two years old. There are some young queens that will do poorly, while some older queens produce eggs rapidly, sometimes there is no accounting for experience. Another thing to watch is the progeny. Some colonies are more aggressive than others. Some will swarm more rapidly, wasting resources to the detriment of the beekeeper. When choosing to divide in order to multiply colonies, the beekeeper should consider dividing the very good colonies, which of course suggests that the queens are good. In temperate climates, the queen is controlled. The beekeeper marks and puts her into the hive. When he feels he has to change her, he does so. However, due to the nature of the tropical bee, African beekeepers do not disturb their colonies much to find the queen, remove and replace her. Requeening therefore has not been a common practice. The tropical beekeeper relies much on swarming, and nature does the requeening for him.
Feeding Bees Feeding bees is both beneficial and essential at certain times of the year. In the Autumn after the honey crop has been taken it is necessary to supplement their food to see the bees through the winter and into the spring when nectar will be available again. If the bees dont get fed in the early spring the beekeeper risks slowing the colony growth or even causing starvation. Its rare for hives to starve in the Winter but in the early Spring. Spring feeding results in more bees but feeding unnecessarily at this time may encourage the tendency to swarm in May. Check in early March by lifting the hive at the rear, if it feels light they may be in trouble and require feeding or a more detailed inspection. Freshly hived swarms or installed bees require feeding to stimulate wax production and replenish the bees who have been living off what they could carry during the swarming process. If not fed they may decide to leave or take longer to establish themselves. In June after the spring flowers and before the summer yields, there is in the UK what is referred to as the June gap. This period is when colonies can starve either because of the lack of nectar and/or because swarming has reduced the stores and the number of flying bees to critical levels. Queen rearing and other manipulations require feeding. Bees are fed a substitute for nectar which is made by mixing and dissolving white sugar in hot water. Make sure all the sugar is dissolved. For autumn feeding mix one kilo of sugar with half a litre of water (2lbs:1Pint). For spring and summer feeding mix one kilo of sugar with one litre of water (1lb:1 Pint). The Winter feed requires a higher ratio of sugar to water. If winter feeds have too high a water content the bees might not be able to dehydrate it enough to prevent fermentation before winter sets in. Another way to feed in the winter months it to use baker's fondant (the soft icing on cakes) as this won't ferment and the bees can eat it straight away. Never use unrefined or brown sugar as this causes dysentery in the bees. There is no evidence that refined beet sugar is any better or worse than refined cane sugar. Sugar syrup has no smell to the bees, so add a little honey to make it more attractive and give it an aroma. A honey and water mixture can also be used as feed but be careful the honey you use is from a known and trusted source or you could infect your bees with foul brood or nosema spoors.

Beekeeping Made Easy, by Marcus Williams
38 | P a g e
Liquid feed is given to the bees in containers placed above the brood box from which the bees can help themselves. Access to the syrup is restricted to prevent the bees from falling in and drowning. Never put an open container of syrup in a hive or you will lose hundreds of bees. Most beekeepers use purpose made containers made of plastic and holding approximately one litre (2Pints) of syrup. Ensure the bees cant enter the hive under the roof or you will encourage robbing. The feeders should be put on in the evening when the bees have stopped flying. Doing this allows the initial excitement of the bees to subside over night and reduces the risk of robbing. Reduce the entrance size to allow the bees an advantage when fending off robbers. Also, be careful not to spill syrup around the outside of the hive. Remember, pure sugar syrup has no smell and it is possible that bees will ignore thef food just above their heads. To avoid this problem either dribble a little syrup into the brood to provide a trail to the feed or add honey or do both!
Breeding Bees Bee breeding is the pursuit of the perfect hive. Selecting hives with certain desirable attributes and propogate them with other hives with desirable attributes. Bee breeding and queen rearing are not the same, queen rearing is the process of producing queen honey bees, whereas breeding is the process of selection that brings about the lines to be propagated by queen rearing. Even when the queens are reared, there is still further selection required to ensure that the progeny are up to specification. Drone rearing is also of prime importance, but is often not properly considered. So what are some bee attributes?
Hygienic Behaviour Any race or line of bees can be bred for hygienic behavior. We recommend that bee breeders select for hygienic behavior from among their best breeder colonies; i.e., from those that have proven to be productive, gentle, and that display all the characteristics desired by the breeder. A breeder can get a head start on selecting for hygienic behavior simply by rearing queens from colonies that do not have chalkbrood.
House Cleaning Behaviour This is separate and distinct from, but often confused with, "Hygienic" behaviour simply because of the links in human life between hygiene and cleaning.
Grooming Behaviour This is the ability of individual workers to remove mites (and other contaminants) from their bodies, combined with similar action performed by pairs or groups of workers. Mite Damaging Behaviour This is another item that is confused with both grooming behaviour and hygienic behaviour. In it's simplest form it is counting the total mite drop, then microscopically examining each mite for signs of mutilation and bite marks by the bees. Then a score is generated on the number of damaged mites compared to the total originally counted.
Propolising Behaviour Excessive propolis causes sticky hands and makes frame removal difficult during colony examination.

Beekeeping Made Easy, by Marcus Williams
39 | P a g e
Following Behaviour Bees following a beekeeper back to his or her vehicle may encounter other humans that are not wearing protective clothing. It does not matter whether these following bees sting or not, they still give beekeeping a bad name and should be de-selected wherever possible.
Cool Weather Clustering (cool air clustering) This is exhibited strongly by Apis Mellifera Mellifera colonies and is a characteristic that beekeepers positively select for. It is often described as "drippy" bees and some beekeepers consider the behaviour as "nervous".
Apiary Vicinity Mating This is not very often observed directly, but may be inferred due to knowledge of local weather.
Head Butting Behaviour Bees bouncing off the front of your veil or battering your head may seem trivial if you consider the smallness of a bee's mass, but it soon becomes a nuisance and should not be tolerated.
Biting and Hair Pulling These uses of the bees mandibles are fairly rare and it is uncertain as to whether it is a good or bad trait.
Guarding Behaviour Categorise as mainly neutral trait.
Robbing Propensity This is one thing that tends to be disliked in bees, and is culled, although some commercial beekeepers consider it to their benefit to propagate such robber bees.
Large Honey Producers Obviously a good factor.

Beekeeping Made Easy, by Marcus Williams
40 | P a g e
Rearing Your Queen Bee To rear good queens requires a strong colony with an abundance of nurse bees, plenty of pollen and open stores. Preparing such a colony starts the previous season, for it should go into winter as a double brood box colony without a queen excluder and with a young queen and with an abundance of winter bees, by that I mean bees raised in August to October, for these are the bees that will kick-start the colony next Spring. In Spring ensure the colony is healthy and the queen is present and in the bottom box and laying and with room to lay. Fit the queen excluder between the two brood boxes. Once the colony has an abundance of nurse bees (that is newly hatched workers) and plenty of open brood, the colony can be made ready to accept transferred larvae. The day before the larvae are to be given, go through the colony and rearrange the combs so that all the frames of open brood are in the top box together with frames of pollen and open stores. The queen should be caged while this is being done, or if the queen cannot be found then brush all the bees off the frames that are being transferred from the bottom box to the top box. The nurse bees will quickly move up from the bottom box to cover the open brood. The bottom brood box should have some frames of drawn comb that the queen can continue to lay in. If there are frames of open brood left in the bottom box that cannot be accommodated in the top box, then the bees should be brushed from these and the frames given to other colonies. The next day the bottom brood box is set up on its own on a new site facing the opposite direction on a new floor with a cover board and roof. The top box stays on the original site. If grafts are to be given using cell cups the a frame of cups should be placed in the middle of the box, the cups having been lightly sprayed beforehand with a weak sugar syrup. The next day the frame of cups can be removed and larvae transferred into them. These are left for a minimum of 18 hours, then the two brood boxes are restored to their previous positions, that is the box with the queen in at the bottom, a queen excluder in place and the box with the grafts in on top. Six days later the cells will be sealed and these can be removed and transferred to an incubator or to a cell finishing colony, or can be left as they are to go on to completion. If an incubator in not being used then the cells can be used by inserting them into nucs on the 10th day after grafting, or they can be left in the colony by caging the cells and allowing the queens to emerge. It is advisable to use the queens the same day by introducing them into nucs at the same time as the bees. I‘ve described in detail one method of queen rearing, but there are many variations using the natural forces that trigger bees to raise queens. The set up may be designed as a one-off queen rearing event in the season if only a few queens are required, or it can be designed as a continuous cycle over several weeks to produce numerous queens. This year we have used a continuous method we call the ‗John Harding‘ method. This is based on a system similar to one designed by one of our members, John Harding. This uses three units connected together by plastic tubing that allows free passage of workers from one unit to any of the others. Queen excluders are fitted to prevent queens from moving out of the boxes they are in. The centre unit is queenless and the two outer units are queenright. A special cover board on the centre unit has rows of holes drilled to accept the type of cells being used. Prior to grafting the frames in the units are manipulated so as to give the centre unit frames of open brood and frames of pollen and open stores. The grafted cups are inserted into the holes in the cover board that previously had corks. The tubes are blocked by slides for 48 hrs to induce queenlessness. Using this system we were able to remove the cups when the cells were sealed, or as we often did, remove them as started cells to give to visiting beekeepers after 24 hours then grafting again for our own use. There are lots of variations such as the ‗Cloake‘ method that can be used to raise queens but the basic principles are used by all of them.
Grafting tools and aids There are a variety of tools that can be used for grafting, but fine tipped ones such as the Swiss gafting tool are the best. A good light makes it easier to see larvae and a magnifier too is useful for aging eyes. The larvae selected must be very small, not much bigger than an egg, these are actually easier to pick up than older larvae.

Beekeeping Made Easy, by Marcus Williams
41 | P a g e
Use of incubators These can be made by a handyman or purchased. An incubator is essentially an insulated box with a heater element controlled by a thermostat and a fan to ensure an even temperature throughout the unit. Water is necessary to give humidity. These should be run at 34° + or – 1 degree. Humidity should be between 60 – 70%. The queen cells should be put into individual cages that have slots in the base to hold a small amount of liquid honey. This ensures that when the queens emerge they have access to food immediately. As queens hatch they should be removed from the incubator as they quickly die in the high temperature. They can be kept for two days without worker attendants if required by placing them in a warm place such as an airing cupboard. Check daily that they still have food available.
Types of mini-nucs There are the commercial nucs such as Apidea, Kirchhain and Warnholz. Small units can be made by dividing up brood boxes, or small nucs can be made with half frames that can be joined together to make full frames that can be put into standard brood boxes when required.
Overcoming the limitations of mini-nucs Mini-nucs need certain requirements to ensure they function well. These include:
The right amount of bees. 300ml for Apideas and 500 ml for Kirchhain and Warnholz.
Suitable food.
Positioning on the mating site near a natural marker such as a tree, bush or some other feature.
Confinement after being made up for three or four days in a cool place.
liberating on the mating site at dusk.
After the first queen is mated removing her leaving queenlees for a few days before inserting a ripe queen cell.
Providing room for the second queen to lay.
Choosing and using mating sites The aim should be to have a site that gives some degree of isolation. This is not so difficult as one might imagine. One only has to look at a large scale map to see areas that are sparsely populated, this often means few beekeepers. Moorlands are typical places that are often suitable as mating sites, that is until the heather is in bloom, but by then one can be finished for the season. Coastal areas can often be found to have possibilities. A mating site may be 50 miles away from one‘s apiary, but can be worthwhile. Obviously full colonies that have been selected as good breeding stock have to be taken to the site, and the maintenance of these and attention to the nucs mean reqular weekly visits. Such projects become easier if a group of beekeepers work together.

Beekeeping Made Easy, by Marcus Williams
42 | P a g e
Introducing a Queen Bee
Finding the site Establishing good relations with neighbours, local farmers, land owners and the general public is a major factor in finding and maintaining a successful site for your bees. Talk to them about the value of bees as pollinators; educate them about swarms, flight paths etc. Try to capture their interest and co-operation, gaining respect for the bees and the beekeeper. Most beekeepers are tempted by the familiar and convenient location of their own garden where they can watch their bees at work and attend to them easily, but small gardens, particularly those surrounded by houses are not likely to be a successful solution. With careful management a small garden in open countryside or a garden at least the size of a tennis court could provide a suitable site for two or three hives.
Situations to avoid
A small suburban garden, adjacent to areas where children play may cause instant complaints, when a beekeeper clad head to toe in protective gear ventures forth to inspect a newly sited colony.
A cloud of roaring bees swarming into a neighbour‘s garden.
Bees drinking at neighbours bird baths or garden ponds.
Bees soiling the neighbours washing as they make their cleansing flights in early spring.
A hive on a flat and possibly slippery roof accessible either by ladder or through an upstairs window. In the country-side local farmers and gamekeepers can be very helpful in finding a good site. You may have noticed an attractive situation; it is the farmer who will direct you to the owner whom you must approach for permission to use the site. The traditional payment for use of an apiary site is a pot of honey per year per hive although other agreements may be reached. If your selected site is not possible you will usually be offered a choice of other sites. It is then that you must be quite clear and single minded about the criteria for a satisfactory site. Visit the possible places with a beekeeping friend and discuss the points reviewed in this leaflet. It will be time well spent. Moving site is no joke.
The Butler queen introduction cage This is one such cage specifically designed for the purpose. It is made of 3 mm. wire mesh, formed into a rectangular sectioned tube approximately 90 mm. long and 20 mm by 13 mm. in cross-section. One end is permanently plugged with a small wood block. Such cages can be home made or purchased from the appliance dealers. Similar plastic cages can also be obtained. The size of the mesh is important as the holes should be big enough for the bees to make contact with their antennae but small enough to prevent the workers getting to the queen and damaging her. On arrival It is best to introduce a queen to the new colony soon after she arrives but if this is not possible the travelling cage should be unpacked to allow ventilation through the mesh and two or three small drops of water placed on the mesh for the bees to drink. The cage can then be left in a cool ventilated cupboard for a day or two. The travelling cage is unsuitable for introduction as it will be soiled with bee excreta and could transfer disease. Furthermore the attendants would antagonize the new colony. If the queen has been imported from abroad, the workers, cage and all packaging should be sent to the NBU for examination. Transfer of travelled queen to introduction cage Young queens not in lay are liable to fly! The safest place to open the travelling cage is therefore in a closed room with the windows shut. The queen can be picked up and put into the introduction cage, or gently coaxed into it while holding the cage against a window. Great care should be taken when handling a queen. She should only be picked up gently by the thorax or wings, and never grasped by her abdomen. An alternative method is to open the travelling cage with the exit hole towards the light near a closed window and allow the bees to come out,

Beekeeping Made Easy, by Marcus Williams
43 | P a g e
placing the introduction cage over the exit hole when the queen is seen to enter the tunnel. She may be reluctant to oblige and patience is required. In the field the transfer can be done inside a transparent plastic bag which can hold the travelling cage of bees, an introduction cage and the beekeepers hands Many beekeepers do it inside a car with the windows closed. but make sure to block up ventilation slots below windscreen to prevent her dropping down inside! The queen can be kept in the cage using a wooden plug that fits the cage opening.
Introduction Before introduction a plug of very stiff candy should be prepared by mixing a little honey with icing sugar. The honey must be disease free, do not use imported honey. The queen-less recipient colony should be opened with as little disturbance as possible. The wooden plug on the queen introduction cage is replaced with a plug made of candy and the cage is supported horizontally between two brood combs in the centre of the brood nest amongst young brood. The queen will only be able to escape when the bees have chewed through the candy during which time they will have become accustomed to her scent. After introducing the queen in her cage the hive should be carefully re-assembled and not disturbed for nine days. At the next inspection remove the empty introduction cage and examine the brood combs carefully for eggs. It is not necessary to find the queen.
Some factors which may affect acceptance.
Genetic differences like replacement of a lighter Italian queen with a dark N. European bee
Colony stress due to lack of food, bad weather, robbing etc
Time of year; it is easier at the beginning of the season in April or early May when colonies are not in their prime, or during September when colony activity is diminishing. In mid-summer when colonies are large and swarming may be imminent, direct introduction of a new queen often fails.
Timing problems When the colony becomes queenless and the replacement is not offered within an hour the workers may start to construct queen cells which will jeopardize acceptance of the new queen. Acceptance may still be achieved if the queen is first introduced in a cage sealed with a wooden plug into a super that is largely worked by young bees as they are not aggressive. It can be left for 1 or 2 days giving more time for the scents of the queen and colony to mingle. The cage can be taken from the super, the seal exchanged for a plug of candy and the queen in her introduction cage placed in the brood chamber. However if the colony is left queenless for 7-9 days emergency queen cells will be evident. If these are all removed the colony will be hopelessly queenless and may well accept the new queen directly from the cage. But, if left longer than this there could be one or more virgins present which are difficult to catch and have to be removed. So be warned! If you have just removed queen cells from a problem hive and you have a ripe queen cell in a well behaved colony preparing to swarm you could introduce this instead of a laying queen. Such queen cells should be protected using a spring type queen cell protector which can be spiked into a comb in the problem hive. Once again we are replacing like with like. Colonies that have developed laying workers present a greater problem. The simplest thing is to unite with a swarm or another colony. If re-queening has to be undertaken in the middle of the year it is much safer to establish the new queen in a small nucleus colony first. Make up the nucleus from a healthy colony which could be the one to be requeened. At least two combs should contain plenty of brood preferably sealed and be well covered with bees but no queen. Put in another two frames of food and shake in more bees from a frame from the parent hive, again making sure the queen is not on the frame selected. Place the nucleus next to the hive to be requeened but facing in the opposite direction. Twelve to 24 hrs later introduce the new queen in an

Beekeeping Made Easy, by Marcus Williams
44 | P a g e
introduction cage (as in Introduction on page 3). Feed with sugar syrup from a contact feeder but do not disturb for at least a week. When the queen is established and there is a good patch of unsealed brood the old queen that is to be replaced should be removed and the new colony in the nucleus united using the newspaper method. In conclusion, it must be noted that even in the most experienced hands Queen introduction can fail. There is no method that is 100% effective. Transferring bees or frames from one colony to another can spread disease. All beekeepers should be aware of what healthy brood looks like and the signs of disease.
Swarming in Honey Bees Swarming is the honey bees way expanding and reproducing. Swarming bees are not dangerous unless provoked. They can however make some members of the general public threatened. DONT PANIC! Contact a local beekeeper, the police or fire department. Honey bees have facinating and complex social behaviours. Swarming is a good example of how amazing bees are. Lets go through the process:
The Swarming Process: New queens are reared in special queen cells. Before the new queens emerge the current queen communicates with them through the cell walls with vibration. Scientists dont yet know what the communications relate too. Once a new queen emerges swarming will ensue. Normally the swarm will collect on a nearby tree branch or similar. They will stay here for upto five days while they investigate the surrounding area. A number of scouts are sent out from the swarm to investigate the surrounding area for new hive sites. The returning scouts perform a dance which indicates where an appropriate site is. The scouts then visit the sites their counterparts have found. The scouts will change their dance if they encouter a more suitable site. Eventually every scout will be performing the same dance to the best of the new possible hive locales. Once all the scouts are in agreement this initiates the swarm to relocate to the new hive location.
Preparation Before attending to remove a swarm
Explain to the owner what will be happening and emphasise that whilst every care and skill will be exercised you cannot guarantee a successful outcome.
Agree a time to attend.
Confirm any costs/charges that collection will incur.
Ask that the immediate area be cleared of people prior to your arrival.
If you are going to need help get another beekeeper to assist you.
Make sure you have ALL the equipment you are likely to need (ladder, secateurs, large sheet, skep or swarm box, string, smoker, fuel, matches, protective clothing, mobile telephone etc).

Beekeeping Made Easy, by Marcus Williams
45 | P a g e
Capturing a swarm: Presuming that you are a beekeeper and that you have stumbled upon or been told about a swarm of bees, here is how to capture them and re-hive them. Generally swarms are docile so it is not usually necessary to wear a complete bee suit but wearing protective clothing is advised. The first thing to do is have a good look at the bees, if there are a lot of mites and the swarm looks unhealthy then best to leave it or if it is in a populated area remove it to a more secluded location. Once it has been determined that the swarm is worth keeping check for any obstacles directly below the swarm. Complete clearnace below the swarm is ideal but not always available. Where possible build a platform underneath the swarm and place a cardboard box (large enough to hold the swarm) on it. Try and use one good, sharp jerk to dislodge the majority of the bees. Swarms on branches are ideal for this as the branch can be sharply jerked in a downward motion but bees will land on anything and sometimes will have to be scooped or scraped. The key is dislodge the majority of the swarm including the queen (normally in the middle of the swarm). Seal the box with tape and transport it to the apiary or a lot of beekeepers like to have a nuc box (5 framed super) readily accessable at this point to transfer the newly captured swarm into. If catching your own swarm, you can often re-introduce them into the hive they came from by adding additional 10 frame hive supers on top of the colony. Remember, swarming is caused by over population and giving the colonies more room is a great way to prevent swarming. It's much cheaper to go upwards then to go outwards. Either way, once the bees have been transported to the apiary remove a few of the frames from the super in an empty hive and dump the bees in (if using a nuc box take the 5 frames from it and replace 5 which inhabit the hive already then dump the reamining bees in). Carefully replace the frames and cover with the inner cover and lid. Leave the cardboard box or nuc by the hive and the rest of the bees should make their way into the hive. Or shake the rest out the cardboard box near the hive. By nightfall all the bees will be in the hive and hopefully they stay. This can be encouraged by providing food.
Swarm Control Swarming is the reproduction of a honeybee colony achieved by the old queen leaving the nest with a large proportion of the bees after the colony has made provision for new queens to be raised to replace her, to ensure survival of the colony. Swarm control is the measures taken to prevent this. A swarm issuing from a hive generally collects and hangs near the hive before moving off to its new nest site. While this situation can be dealt with by a beekeeper collecting and removing the swarm, this is not ideal. It presupposes that a beekeeper is available at the appropriate time and that the person in whose garden the swarm settles is amenable. These days, members of the public are increasingly afraid of bees, wasps etc., if not for themselves, then for their children, and it is the action of a responsible beekeeper to take all steps possible to control the swarming instinct in his/her bees and to prevent the swarm issuing from the hive. Factors which will help prevent swarm preparations by a colony include:
Using a strain of bee with a low tendency to swarm
Using a young and vigorous queen to head the colony
Giving the developing colony ample room in the brood-nest and supers
Ensuring good ventilation in the hive

Beekeeping Made Easy, by Marcus Williams
46 | P a g e
Collection Once you approach a swarm with the intention of collection and removal it becomes your property and your responsibility to protect bystanders.
• Advise the closure of all nearby windows and doors (including vehicles). • Wearing protective clothing, approach the swarm and shake/brush/detach it from its position,
directly into the skep if possible, or on to a large sheet laid on the ground below. • Place the skep on the sheet, raised at one side by about 100 mm and leave until the remaining
bees in the cluster and the flying scout bees have followed the queen into the skep. This might well be later in the day or early evening, and could require a re-visit.
• Tie the sheet over the skep to make it bee-tight and remove to your vehicle. • Make every effort to ensure all bees are captured; do not remove the skep too early in the
evening. • Leave your phone number in case of unexpected problems (e.g. you did not collect the queen!)
Disposal
In most cases there will be a ready taker for a new swarm, either as a new colony or as reinforcement for a weak one. However, certain precautions should be observed.
• Re-hive the swarm on clean frames and new foundation, in a nucleus hive if small, and after 48 hours feed until wax-building and foraging are well in progress. This ensures that any honey brought by the bees from the parent colony which might be contaminated with disease organisms is used immediately to initiate wax secretion and will not be stored. However if the swarm had been hanging for some time in cold conditions immediate feeding will be necessary. If the new colony shows any adverse characteristics (aggression, following etc), re-queen from a known colony.
• Manage the new colony, and all others in your apiary, to reduce the incidence of swarming and so reduce the need for future swarm collection by yourself or someone else.
Marking and clipping the queen Many swarm control measures involve finding the queen. This is much easier if she is marked with paint or a numbered disk on her thorax. Do this early in the season when there are fewer bees in the colony and she is easier to spot. Get help from an experienced beekeeper if necessary. Clipping one of the queen‘s wings stops her from flying and leading off the swarm. It can increase the maximum time that can be left between inspections of the brood nest, but in order to practice effective swarm control, you need to be able to work out what is happening in the colony. As a beginner, you will probably find it easier not to clip queens.
Giving enough room When the colony contains seven combs with brood on (eggs, larvae or sealed brood), make more room by adding a queen excluder and super. The super should contain at least some frames of drawn comb if at all possible. When the (first) super is full of bees (not honey), add another. Bees need room to store nectar until they evaporate water from it to turn it into honey.
Inspect for queen cells The swarming season varies with the weather and in different parts of the country. Generally, it begins in late April and continues until late June. Inspect the brood nest of your colony at least every nine days. Most beekeepers find it convenient to make inspections on a weekly basis. This ties in with the development life cycle of the new queen and enables you to take preventative measures in time to stop swarming. During the summer, a colony usually builds queen cell cups or play cells. These look like acorn cups. If you find these, it does not necessarily mean that the colony is preparing to swarm. Check these cups, you will soon learn to recognise if one being used to produce a new queen. Swarm control measures should begin when queen cells contain eggs or young (small) larvae.

Beekeeping Made Easy, by Marcus Williams
47 | P a g e
On finding queen cells If you find sealed queen cells, it is possible (although not inevitable) that the swarm has left. To determine if this has happened, make a thorough search for the old queen. This is much easier if she has been marked! If you are sure that she has gone, check through the brood box to make sure that there are eggs or young larvae in worker cells or in queen cells. If so, remove all the sealed queen cells and those containing large larvae. Leave the ones containing eggs or very young/small larvae. Gently shake or brush the bees off each comb back into the brood box so that you can see all parts of the comb. Pay particular attention to the edges of the comb as bees will often ‗hide‘ queen cells at the side or bottom bars. This puts you in control of the swarming timetable. If all of the queen cells you find are unsealed, inspect again after 7 or 8 days and follow the steps from 9 onwards to allow the production of one good queen.
1. Find the queen. 2. Take the comb she is on, together with bees, and place it in another box. This can be another
brood box or a purpose built nucleus hive. 3. Transfer two more combs containing stores and bees to the nucleus box. 4. Shake or brush bees from other brood combs into the box. The aim is to add enough bees to the
nucleus to cover the brood and keep it warm. 5. Push the frames together, with the normal spacing between them, against one side of the box.
Place a dummy board against the exposed comb to separate the nucleus colony from the rest of the empty box.
6. In the parent colony fill up the brood box with drawn comb or foundation. It is important to fill the gap with frames or wild comb will be built.
7. Give the nucleus a small entrance so that the bees can easily defend it, and move it elsewhere at least two metres away. Face the entrance close to a hedge bottom or other barrier to confuse robber bees.
8. Leave the nucleus for three days to get established before feeding it (if necessary) with syrup (equal weights of sugar and water) This will stimulate the queen to keep laying.
9. As the nucleus develops, add empty combs to expand the brood nest. To choose a queen cell – (in the original brood box)
10. Eight days later (seven if this is the convenient time), examine all brood combs carefully for queen cells. Do not break any down at this point.
11. Select a queen cell which is well placed on the face of the comb, is a good size and has dimples on the surface. Mark the position of the cell by placing a drawing pin in the top bar, vertically above the cell.
12. Carefully brush all the bees off this comb into the brood box, and destroy other queen cells on the frame. Treat this frame gently. Do not jar or shake it or you may damage your chosen future queen.
13. Shake or brush the bees off all the other brood combs into the brood box and break down all the queen cells. Check in the corners and break down all possible queen cells. Better safe than sorry.
14. Re-assemble the hive with the excluder and supers. Be patient Do not open up the original colony that is raising a new queen for at least 14–21 days. Doing so, particularly during the time the virgin queen is on her mating flight, will cause confusion. If the young queen is in the hive, you may cause the bees to ball and kill her. If she is on her mating flight, she may be confused when she returns to find the hive open and may fly into an adjacent colony or get lost. Vital inspections that cannot be avoided should take place after 5 pm, that is, when the virgin queen is inside the hive. When you do inspect to check if your new queen is laying, try to do so quickly. Look for a patch of eggs or very young larvae swimming in Royal Jelly, failing this check for an area of cells that have been highly polished by the workers ready for the queen to lay. Close up the hive, be patient, and check again in a few days. A young queen will generally start laying 10–14 days after she emerges, longer in a larger colony. However, the smaller the larva in your chosen queen cell, the younger it is and the longer the new queen has to develop. The younger the larva, the longer it will be fed Royal Jelly and the better

Beekeeping Made Easy, by Marcus Williams
48 | P a g e
developed will be the resulting queen. However, this could mean that the new queen did not emerge the day after you broke down the other queen cells, and it will take her longer to start to lay. The weather also influences when the virgin queen can go on her mating flight, and bad weather will result in a delay in the start of laying. If your new queen has not started laying after three weeks, seek advice from an experienced beekeeper, as she may have been lost or failed to mate. A drone-laying queen When your queen is laying check the sealed cells to make sure it is worker brood, with even, flattish cappings. If you find uneven domed cappings with the comb misshapen, your new queen has probably failed to mate and is laying unfertilised, drone eggs. Seek advice about replacing her as soon as possible or your colony will dwindle and die out.
Uniting the colonies If you don‘t want to increase your total number of colonies, the nucleus with the old queen can be united back to the original colony with the new queen. It is best to do this in the evening, just after the bees have stopped flying.
1. Remove the roof etc. from the original colony with the new queen. 2. Place one large sheet of newspaper to completely cover the frames and cover it with an excluder
to stop the paper blowing away! 3. Place an empty brood box on top. 4. Find the old queen in the nucleus hive and kill her. 5. Transfer the combs from the nucleus, with their adhering bees, into the top brood box in the same
relative positions to each other. 6. Replace the inner cover and roof on top. 7. As the bees chew through the newspaper their scents will mix and they will amalgamate without
fighting. 8. After 7 days, check whether any queen cells have been started in the top box.
Break them down. All the brood combs can be put down into the bottom box, if room. Surplus combs that are free of brood can be shaken clear of bees and taken away. If there are too many combs of brood for one box, surplus ones can be given to other colonies. Summary - when queen cells are seen:
1. Remove the old queen and make up a nucleus. 2. Remove all queen cells that are sealed or contain large larvae. 3. Re-assemble the hive. 4. After 7–8 days, select one good queen cell and remove the rest. 5. Do not open the hive again for at least two weeks. 6. Unite the two parts if you do not want to increase colony numbers
Ask an experienced beekeeper for help if you have any problems.
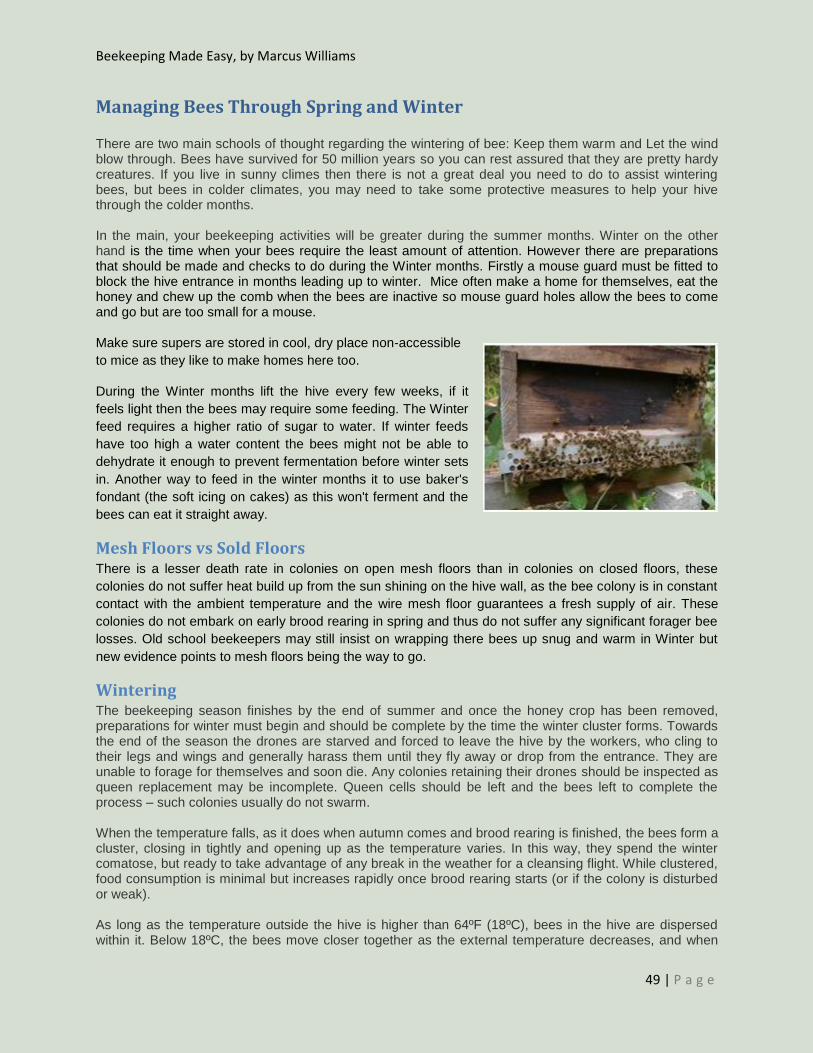
Beekeeping Made Easy, by Marcus Williams
49 | P a g e
Managing Bees Through Spring and Winter There are two main schools of thought regarding the wintering of bee: Keep them warm and Let the wind blow through. Bees have survived for 50 million years so you can rest assured that they are pretty hardy creatures. If you live in sunny climes then there is not a great deal you need to do to assist wintering bees, but bees in colder climates, you may need to take some protective measures to help your hive through the colder months. In the main, your beekeeping activities will be greater during the summer months. Winter on the other hand is the time when your bees require the least amount of attention. However there are preparations that should be made and checks to do during the Winter months. Firstly a mouse guard must be fitted to block the hive entrance in months leading up to winter. Mice often make a home for themselves, eat the honey and chew up the comb when the bees are inactive so mouse guard holes allow the bees to come and go but are too small for a mouse. Make sure supers are stored in cool, dry place non-accessible
to mice as they like to make homes here too.
During the Winter months lift the hive every few weeks, if it
feels light then the bees may require some feeding. The Winter
feed requires a higher ratio of sugar to water. If winter feeds
have too high a water content the bees might not be able to
dehydrate it enough to prevent fermentation before winter sets
in. Another way to feed in the winter months it to use baker's
fondant (the soft icing on cakes) as this won't ferment and the
bees can eat it straight away.
Mesh Floors vs Sold Floors There is a lesser death rate in colonies on open mesh floors than in colonies on closed floors, these
colonies do not suffer heat build up from the sun shining on the hive wall, as the bee colony is in constant
contact with the ambient temperature and the wire mesh floor guarantees a fresh supply of air. These
colonies do not embark on early brood rearing in spring and thus do not suffer any significant forager bee
losses. Old school beekeepers may still insist on wrapping there bees up snug and warm in Winter but
new evidence points to mesh floors being the way to go.
Wintering The beekeeping season finishes by the end of summer and once the honey crop has been removed, preparations for winter must begin and should be complete by the time the winter cluster forms. Towards the end of the season the drones are starved and forced to leave the hive by the workers, who cling to their legs and wings and generally harass them until they fly away or drop from the entrance. They are unable to forage for themselves and soon die. Any colonies retaining their drones should be inspected as queen replacement may be incomplete. Queen cells should be left and the bees left to complete the process – such colonies usually do not swarm. When the temperature falls, as it does when autumn comes and brood rearing is finished, the bees form a cluster, closing in tightly and opening up as the temperature varies. In this way, they spend the winter comatose, but ready to take advantage of any break in the weather for a cleansing flight. While clustered, food consumption is minimal but increases rapidly once brood rearing starts (or if the colony is disturbed or weak). As long as the temperature outside the hive is higher than 64ºF (18ºC), bees in the hive are dispersed within it. Below 18ºC, the bees move closer together as the external temperature decreases, and when
Beekeeping Made Easy, by Marcus Williams
50 | P a g e
their temperature falls to 57ºF (14ºC) - the outside temperature then being perhaps 9ºC (48ºF) - they start to form a well defined cluster, with a compact outer shell of rather cold, inactive bees. Bees in the cluster occupy the passage-ways between combs, and also empty cells in the combs. The centre of the cluster is both warmer and less crowded than the outer shell. Bees there have space to move about and feed on honey in the cells. As outside temperatures drop further the cluster contracts, bees being packed more tightly. The temperature of the outside bees may be as low as 46ºF (8ºC), but bees frequently change positions between the cold periphery and the warmer centre. Food consumption is least when the outside temperature is about 39ºF (4ºC), especially when the temperature is steady. Small sized colonies should be united to make larger colonies better able to survive the winter – the best protection for bees is bees. The general rule is to unite a colony occupying six or fewer combs by the middle of September – you should ensure the weakness is not due to disease. Unite by placing one brood box over the other with a sheet of newspaper in between. Weak colonies can alternatively be transferred to nucs. or the empty frames can be removed and a dummy board used. Two nucs. can be placed under a single roof, entrances facing in different directions. Similarly, nucs. or a weak colony can be placed over the crown board of a strong colony. Remember that almost all winter stock losses are avoidable, the colony just need to be protected from enemies, starvation and the elements. Mice are a problem when the bees have clustered and are lethargic. Remove the entrance block when robbing is no longer a problem (to give ventilation) and fit a mouse guard (commercial type, builder‘s mesh or queen excluder) – or use a narrow full width floor (but check during the winter that debris has not blocked the entrance). The use of varroa screens provides a narrow entrance. Don‘t remove entrance block and fit mouse guard until wasps are no longer a problem – bees need a small entrance to guard. If mice can get into the hive via the roof, store the queen excluder over the crown board. Stored combs should be protected from mice and wax moth. Place queen excluders/crown boards (holes sealed) at the top and bottom of a stack - seal sides with tape – or place in a sealed plastic sack. Treat combs without honey with PDB (paradichlorobenzene) crystals - 1 tsp. per super on card – the fumes are heavier than air (PDB is probably no longer available as a treatment). A biological treatment, Certan, is also available. Combs may be sterilized by placing ¼ pint (100 ml) 80% acetic acid on a wad of cloth over each super – metal spacers should be removed. Combs must be aired for several days before use. The colony will require about 40 lb of stores (and pollen) to survive a cold winter. A frame full of honey will contain approx. 3 to 5 lb. The best food is honey although there is disagreement about granulated stores (e.g. ivy & rape honeys) and heather honey. Unsuitable food such as stores that were not ‗ripened‘ and consequently fermented may cause dysentery and aggravate nosema disease. Unsealed honey is hygroscopic and will absorb moisture. If a super of food is left on the hive, it is usually recommended that the queen excluder is removed to avoid ‗isolation starvation‘. Bees can also starve in the midst of plenty. Bees move upwards – cold weather may prevent sideways movement. Italian type bees may require a double brood box and a super! A good compromise is to supplement their winter honey with sugar syrup – fed in time for the bees to ripen and seal. 1 kg of white sugar should be dissolved in 1 litre of water. Do not use brown or any other type of sugar. Only feed honey from a known disease-free source. Sugar syrup may be given to the bees in a contact feeder or a tray type – bees are sometimes reluctant to use the latter type in cool weather. Feed all colonies (at the same time) when flying has ceased – do not spill sugar syrup – reduce entrances. Invert filled feeder over a container until a vacuum has formed. Temperature changes may cause sugar syrup to flow from contact feeders. In cold weather bees will be clustered just below their next meal. If you can‘t see them and you can see sealed stores at the tops of the upper frames, things are fine. A glass quilt enables inspections to be made with minimum disturbance. If feeding becomes necessary in the winter, you will need to use a solid form of food. Your choice includes:

Beekeeping Made Easy, by Marcus Williams
51 | P a g e
Baker‘s fondant.
Candy – commercial or home-made.
Bag of dampened white sugar.
Icing sugar made into a thick paste with water. Feeding candy became unfashionable – an admission of failure to ensure sufficient stores in the autumn. Bees do have to find water to dissolve solid honey and may become chilled. However, a colony produces 1 gal water vapour from consuming 10 lb honey.
Recipe for candy: Sugar 3lb. Water ½pint. Salt pinch (optional). Cream of tartar pinch (optional). Bees prefer slightly salted water. Sugar is inverted by boiling with cream of tartar and produces a finer texture – some sources claim that cream of tartar creates toxic candy. Put sugar in pan. Add boiling water and stir the thick mixture. Continue to stir while heating until the mixture becomes thin. Do not allow the sugar to burn or caramelise as this will produce toxic candy. Add the salt and cream of tartar and simmer for 20 minutes. Stir the mixture as it cools and when it begins to thicken pour into greased dishes. Another recipe says to boil 4 lb sugar in 1 pint of water until it reaches 243ºF – allow to cool and then beat until it goes thick and white. There are numerous variations. The candy should be soft. Bees can survive long periods of cold – the real danger is dampness. The old adage that bees never freeze to death, only starve to death, is very accurate. Apart from anything else, dampness will cause stored pollen to go mouldy. The practice of packing hives with blankets etc. is no longer recommended, but you should certainly keep your hive warm and ventilated. In particular, you should also pay close attention to the state of your hives during winter. This is a great time to repair hives and get yourself ready for spring. Don‘t forget – you need strong healthy colonies ready to take advantage of early crops. As long as you take care of your bees, they will do the rest and the honey will take care of itself.
Spring Management Resist the temptation to open up hives until a really suitable day arrives, which means when the temperatures reach over 14°C otherwise you risk chilling your brood. When bees are foraging, it is safe to carry out a detailed inspection. Until then, spend some time observing the level of activity at entrances and note variations. On a warm day, bees will make cleansing flights and early flowers will provide pollen. If you see pollen being taken into the hive, the bees are alive and the queen is probably laying.
Spring forage: If one colony is active and another one is not, a quick inspection may be necessary. If the colony has died, remove or seal to prevent robbing – ascertain the cause of death (starvation/disease). Heft hives. One way is to use a spring balance and lift opposite sides of the hive from under the floor, noting the weight on each side. Add the two together and this gives an approximation of the hive weight. Do this at the start of the winter and then every month and record the weight loss. An average colony will consume about 2 kg of stores per month during this period, depending on the weather. If short of food, feed syrup (1 kg sugar/1 litre water) in a contact feeder or fondant/candy/icing sugar in the evening (emergency feeding straightaway) – more colonies die in early spring from starvation than during the winter so your minimum reserves should be about 10 lb (2 full deep frames). Provide a source of
Beekeeping Made Easy, by Marcus Williams
52 | P a g e
water to avoid conflict with neighbours – 150g needed daily to dilute stores to 50% solution, which can be metabolised, 1 kg/day needed in the summer for cooling. It has been shown that the stimulative feeding of syrup in the spring has little or no effect upon established colonies – more effect can be obtained by feeding pollen supplements or substitutes from about the second week of February. This stimulates the queen (which should laying by this time) to continue to lay and to increase the brood area, resulting in a considerably larger adult population by the time the rape is in flower. A pollen substitute is any material that can be fed to colonies to replace its need for pollen. A pollen supplement is a pollen substitute that contains about 10% (dry weight) pollen. Pollen traps can be used during the summer to harvest pollen, which will then need to be stored in a fridge/deep freezer.
Pollen Substitute Toasted soya flour 1 part by weight. Dry brewer‘s or baker‘s yeast 1 part by weight. Dissolve 2 lb sugar in 1 pint water. Add sufficient sugar syrup to dry ingredients to make a stiff dough. Place the patty over the combs where the bees are clustered. Cover the surface with waxed paper to prevent drying. A pollen supplement can be made by adding 1 part pollen.
First inspection Once the ambient temperature around your hive is over 14°C or 60°F then it is time to inspect the hive after the winter months. Before inspecting:
Have a good reason for opening hive - plan.
Have everything to hand.
Be as quick as possible.
Use cover cloths. By early mid Spring, depending on the weather, colonies should start to expand with increasing amounts of brood and increasing demands on food reserves. When the temperature is consistently over 14°C, a quick preliminary check can be made. Remove the roof & look through the holes in the crownboard. Note smell coming from inside the hive. If it smells yeasty/musty check whether the colony has died. A torch is useful to illuminate the frames. A colony that has died from starvation will have workers with their heads deep in cells trying to access the last of the stores. Are the bees at the top of the frames (i.e. stores consumed)? Bees can starve even when surrounded by stores - isolation starvation occurs when it is too cold for the bees to move to food. Larvae may be thrown out of the hive, but may go unnoticed – birds enjoy these tasty morsels! Close hive entrances of dead colonies & remove asap to avoid robbing. Remember, it takes 3 weeks from egg to adult worker. Small colonies will build up on OSR, but will not produce a surplus honey crop.

Beekeeping Made Easy, by Marcus Williams
53 | P a g e
When the temperature is >14°C, you can carry out a full inspection.
Inspect area in front of hive – are there dead or crawling bees? Are there signs of dysentery (brown streaks on outside of hive)? Clear area around hive – check hive stands. Remove mouse guards.
Lower crown board, if raised. Scrape top bars/queen excluder. Clean or replace floor (note damp patches). Put all scrapings into a container. Move damaged/old frames to be removed to outside – avoid splitting the brood nest.
Is the queen present or is there evidence of her presence (eggs/larvae/sealed brood)? Check sealed brood – flat (worker) or domed (drone). If all the sealed brood is domed and in a regular pattern, suspect a drone laying queen. If the brood pattern is irregular with domed worker cells and cells containing several eggs on the walls, suspect a laying worker. Test by inserting a frame of eggs/larvae from another colony. If no queen cells are raised, a queen is probably present. If queen cells are raised, the colony is queenless. Since there will be no drones for mating, the colony should be united to a queenright colony using the newspaper method. Alternatively, move the hive approximately 200 yards (180 metres) and shake the bees on the ground, allowing them to find their way into other colonies – if laying workers are present, it is advisable to cage the queen for 2-3 days to prevent the laying workers killing her. The colony to be united should be free of disease.
Does the brood look healthy?
Are there sufficient stores (honey & pollen)? Feed syrup in a contact feeder if less than 10 lb (2 BS deep frames).
Unite weak colonies (disease-free). Swap weak with strong colonies (pollen coming in). Split strong colonies. Equalise colonies.
Mark/clip the queen – easier when the colony is still small.
Assess varroa level – put floor debris in methylated spirits to float mites. Treat if necessary.
Prepare supers & frames – super by about mid-March.
Record.
Evaluation
• Has the colony sufficient room? Do you have supers/frames ready? • Is the queen present and laying well? Is drone brood present? • Is the colony building up as fast as other colonies in the apiary? • Are there signs of disease or abnormality? • Are there sufficient stores until the next inspection? • Are queen cells present?

Beekeeping Made Easy, by Marcus Williams
54 | P a g e
Bee Diseases & Disorders
Brood Diseases It is essential to be able to recognize healthy brood – anything that deviates from this is suspect. Many causes of disease are to be found in most colonies, but infection is not usually apparent until the colony becomes stressed. Avoid stressing colonies and unhygienic procedures e.g. exchanging combs, spilling sugar syrup, etc.
Sacbrood is a virus disease (Morator aetatulae) found in 30% of colonies, usually noticed from May to early summer, when the ratio of brood to bees is high. Old beekeeping books refer to Addled Brood now identified as Sacbrood (Yates). Sacbrood disease prevents larvae from pupating (5 th moult) once they have been sealed in their cells. Larvae that have died from sacbrood become fluid-filled sacs stretched on their backs with their heads towards the top of their cells. Adult worker bees eventually uncap them. Diseased larvae turn from pearly white colour to pale yellow and the head curls up as the body dries to a thin, dark brown scale. Unlike American Foul Brood, the scale has a distinctive Chinese slipper shape and is easily removed in one piece. Adult bees recognize and remove affected larvae. Adult bees can be infected by feeding on contaminated pollen or by ingesting larval body fluids – the virus multiplies and collects in the hypopharyngeal glands that produce the food given to young larvae. However, infected bees cease to eat pollen and cease to feed larvae. Sacbrood is usually transitory and not a matter of concern. Combs can be re-used – the virus becomes non-infectious within a few weeks.
Chalk Brood is caused by the fungus Ascophaera apis, widespread and found in seemingly unaffected colonies – often appears in the Spring in expanding colonies. The trigger is not completely understood. High carbon dioxide levels in the brood nest, as may occur if there are insufficient bees to ventilate the colony, and deficiencies of pollen are possible factors. It may also be genetic, in which case re-queening may be the cure. The fungal spores are ingested by the larvae and germinate in the gut. Strands of fungus invade the larval tissue and the larva dies, frequently after the cell has been capped. The dead larva is chalky white at first, often with a yellow centre, and becomes very hard and loose in the cell (mummies). Additional black/grey spores may develop on the surface. Mummies are removed by house bees and can be seen outside the hive or on the floor. Chalk Brood mummies should not be confused with discarded mouldy pollen, which has coloured layers. Combs can be sterilized using acetic acid.
American Foul Brood (AFB) is caused by the spore forming bacterium Paenibacillus larvae larvae. The spores contaminating the brood food develop into bacteria that penetrate the gut wall and multiply in the larval body tissues. The larvae usually die after the cell is sealed from ‘blood poisoning‘. The comb has a pepper box appearance where diseased larvae have been removed. Cappings may appear moist, sunken and perforated. Initially the dead larvae are slimy and dry to form brown scales, which can be seen if the comb is tilted to the light. The scales are difficult to remove and are highly infective – spores have been known to be viable after many years. Diagnosis can be confirmed by the ‗ropiness test‘: a matchstick is inserted into a suspect cell, twisted and withdrawn slowly. If AFB is present the larval remains will be drawn out as a brown mucus thread. AFB is a notifiable disease – the BDO will arrange for bacteriological confirmation. A standstill order will be put in place. If confirmed, the BDO will supervise the burning of bees and combs. Bee Disease Insurance provides compensation. Do not feed foreign honey or honey of unknown origin, which may contain AFB spores. Swarms, drifting and robbing may bring AFB. You are not allowed to treat with antibiotics.
European Foul Brood (EFB) is caused by the bacterium Melissococcus plutonius. The bacteria feed on food in the larval gut and starve the larvae. Larvae usually die before the cell is sealed. Affected larvae are seen in unnatural positions (‗stomach ache‘), colour changes from pearly white to cream and eventually dry to form a brown scale (removable by the bees). In early stages, infected larvae have a melted wax appearance. Cell contents do not rope. EFB is a notifiable disease. The BDO will obtain microscopic confirmation. If confirmed, treatment with antibiotics by the BDO may be used if the infection is light – a shook swarm method of treatment may be recommended.

Beekeeping Made Easy, by Marcus Williams
55 | P a g e
N.B. American & European are not geographical terms – both occur in Europe & America. Foul refers to the smell associated with the decomposition of the brood.
Varroasis is not a disease but an infestation by the parasitic mite Varroa destructor (previously
jacobsoni). Since reaching this country in 1992, it has become endemic throughout the U.K. and most of the world. Your colonies will have varroa mites. Doing nothing is not an option – without treatment colonies will die within 3 years (there are no long-standing feral colonies). You must learn to monitor colonies for levels of infestation and treat when necessary with the approved varroacides in the correct manner – failure to keep to the time-scale has resulted in resistant mites. Fit varroa screens to hives in order to monitor levels of infestation. Uncap drone brood. Place a super frame in the middle of the brood box and destroy the drone brood built under the frame (varroa mites prefer drone brood). You must remove the brood traps – leaving them will have the opposite effect! 1,000 mites is now taken to be the highest acceptable population. Treat with Apistan/Bayvarol or Apiguard – other treatments may be time-consuming, temperature dependent, ineffective or pose a health risk to bees or humans (especially formic acid). Mite resistance requires Integrated Pest Management, a combination of methods used at different times of the year. There is no 100% knockdown treatment. Varroa breeds in sealed cells of brood – since a newly hived swarm has no brood, it can be treated to give a clean start. Apart from seeing mites, you may see stunted bees with distorted wings resulting from the varroa mite sucking the larval ‗blood‘ – this is usually an indication of a high level of infestation. The puncturing of the larvae enables non-apparent viruses to take hold such as Slow Paralysis Virus and Deformed Wing Virus (Acute, Chronic, Cloudy Wing Viruses) – the colony dies from virus infection. Although varroa is now endemic in the UK and from 2005 will no longer be a statutory notifiable disease, the NBU will continue to offer advice on its control as it does for other serious nonstatutory diseases. Average Daily Natural Mite Mortality Jan – March <2 no action 2-7 plan future control 7> consider control April – June <1 no action 1-7 light control 7> severe risk July – Aug <2 no action 2-8 light control 8> severe risk Sept – Dec <6 no action 6-8 light control 8> severe risk Light control might be drone brood culling, artificial swarming, dusting with icing sugar, etc. rather than heavy control using chemicals.
Stone Brood is caused by a fungus, either Aspergillus flavus or Aspergillus fumigatus. It is extremely rare and only mentioned because you will come across it in books!
Neglected Drone Brood is not a disease but a condition, which can be confused with EFB during the discoloured larvae stage or AFB at the scaling stage. The cause is a drone laying queen or laying workers. Drone brood is raised on worker cells resulting in stunted and malformed drones. The colony is usually small and will have dwindled, the bees eventually neglect the drone brood in worker cells, which then die of starvation before sealing. They decompose and become yellow to brown. The decomposing larva becomes a brown watery mass (which does not rope) and eventually dries to a scale which can be removed by the bees.
Adult Diseases Acarine is an infestation by the mite Acarapis woodi. The Isle of Wight disease in 1904 – 1920s was
probably acarine. Despite the signs of acarine given in beekeeping books, there are no visible external signs – the signs usually given (crawling bees, dislocated wings, etc.) are those of Chronic Bee Paralysis associated with acarine (although not proved as a vector). The mites infest the trachea. Dissection and microscopic examination (20x) of the first thoracic trachea can confirm diagnosis. Send a sample to a microscopist (in a paper container not plastic). There is no approved medicament in the U.K since FolbexVA was withdrawn in early 1990 and Frow Mixture was banned. Oil of Wintergreen and menthol have been used as a treatment and creosote! The life of an infected bee is shortened. It usually has little

Beekeeping Made Easy, by Marcus Williams
56 | P a g e
effect in the active season. The mite is spread from old bees to very young bees. A severe winter may cause an infected colony to dwindle in the spring. Some strains of bees are more susceptible than others – the ‗tracheal mite‘ is a huge problem in the U.S.A which uses Italian/NZ crosses. There are external acarine mites: A. exturnus, A. dorsalis & A. vagans – little is known about them.
Nosema is caused by Nosema apis, a spore forming protozoa. The protozoa multiply in the ventriculus
(30 – 50 million spores) and impair the digestion of pollen thereby shortening the life of the bee. The spores are later excreted. There are no obvious signs of nosema, although Dysentery (q.v.), excreta on combs and hive, frequently accompanies heavy infections. Bees normally defecate away from the hive – sometimes the bees defecate in and about the hive because of the excessive build up of waste matter in their guts. The excreta containing spores is cleaned up by the bees and they become infected. Infected colonies fail to build up normally in the spring. Dead bees may be seen outside the hive after cleansing flights. Confirmation of Nosema is by microscopic examination (400x): 30 bees are crushed in water and a droplet is examined for white, rice-shaped bodies. Send a sample to a microscopist in a paper container (not plastic). Nosema is the most common disease and is to be found in seemingly healthy colonies. In Infectious Diseases of the Honey Bee (Dr. Bailey & Brenda Ball), it is stated that of 80 apparently healthy colonies, 79 contained the spores of nosema. Avoid crushing bees which can release millions of spores. Replace and sterilize combs with 80% acetic acid (100 ml./brood box for one week – air before use). Treatment with the antibiotic Fumidil B (prepared from Aspergillis fumigatus the causative agent of Stone Brood!) inhibits the spores reproducing in the ventriculus, but does not kill the spores.
Amoeba is caused by a protozoan amoeba-like parasite Malpighamoeba mellificae. Cysts are ingested with food and germinate in the rectum. They migrate to the malpighian tubules (the ‗kidneys‘) to create more cysts that then accumulate in the rectum and are excreted. The infection seems to have no effect on the colony, there are no specific symptoms and no treatment. Often seen under a microscope when examining a sample for nosema – grainy circular cysts, larger than the rice shaped nosema spores. The spores are destroyed by acetic acid. Since colonies have been treated for varroa, you are unlikely to see a similar (and harmless) parasite Braula coeca, the bee louse, a wingless fly. Braula (which has 6 legs, varroa has breeds under cell cappings. Adults feed on honey taken as queen or workers are feeding. Tunnels can spoil appearance of comb honey.
Viruses and CBPV, such as nosema, acarine, varroa, etc. in themselves do not kill a colony – they weaken it and thereby allow viral infections to take over. There are no cures for viral infection, they are immune from any antibiotic treatment. Viruses only multiply in living cells of their hosts and any medicament which kills the virus would kill the host. In practice, most colonies terminally weakened with nosema or acarine exhibit signs of Chronic Bee Paralysis Virus (CBPV), particularly clustering on top bars and continual trembling.
Management Chilled Brood is not caused by a pathogen. The optimum brood temperature is 35º – 37ºC. If there are
insufficient bees to maintain this temperature, the brood will die. In the Spring the queen may have laid a patch of brood that the bees can‘t cover if the temperature drops. Spray poisoning (q.v.) may reduce the number of bees. A characteristic is that brood of all stages, sealed and unsealed are affected. The outer boundaries of the brood cluster are affected first as the bees retreat to maintain the inner core at the correct temperature.
Dysentery is not a disease but a condition caused by excessive build up of waste matter in the rectum i.e. diarrhoea. It is usually due to unripe honey/late feeding, granulated stores, fermenting stores, feeding brown sugar, etc. The signs are fouling of combs, hive parts and around the entrance. Dysentery is usually associated with nosema. A badly affected colony will be weakened and may succumb to viral infection. Soiled comb should be replaced and sterilized.

Beekeeping Made Easy, by Marcus Williams
57 | P a g e
Poisoning. A sudden reduction in the number of foraging bees, a large number of dead or dying bees outside the hive, may indicate poisoning by bees alighting on sprayed crops. Legislation has reduced the number of incidents. Apart from the evidence of dead bees, the colony may become bad tempered and shivering, staggering and crawling bees may be seen (similar to CBPV). Returning foragers spin around on the ground until they die. Dead bees usually have their proboscis (‗tongue‘) extended. If you suspect poisoning, contact your association‘s Spray Liaison Officer. Note time and day and try to locate location and time of spraying and witnesses. If possible take 3 samples of 200 dead bees – use a paper or cardboard container not plastic – bees carrying pollen loads are useful in identifying the source of the problem. Send one sample to the National Bee Unit, Sand Hutton, Yorkshire, YO4 1BF, including all known details. Keep the remaining two samples in the deep freezer for future use. Do not expect a speedy response. If the colony is badly depleted reduce the entrance to guard against robbing.
Starvation. A preventable ‗disease‘ – the beekeeper should never allow colonies to starve because of mismanagement. Many years ago, MAFF (as it then was) conducted a survey on winter losses and found starvation to be the major cause. Heft your hives! Starvation can occur at any time of the year, but especially in the spring when there is brood and little food coming in. Poisoning will reduce foraging. The signs are sucked larvae being thrown out, drones evicted, and immobile bees. When regular inspections are being undertaken, check that there is a minimum of 10 lb. of stores each week – this is based on a conservative estimate of 1 – 1.5 lb. per day. A full brood comb holds about 5 lb. and a super comb about 3 lb. of honey. In the autumn, colonies have to be fed sufficiently and early enough for them to ripen and store food, where they can reach it when conditions are freezing. Bees can starve surrounded by plenty. ―Spring feeding should be done in the autumn‖! Ensure colonies have about 40 lb. sealed stores to see the colony through the winter. Emergency action involves spraying warm syrup on immobile but living bees, pouring sugar syrup into empty comb cells, and feeding with a contact feeder. It is generally too cold for bees to take down syrup (1 kg/1 litre) until early March. The simplest alternative method of feeding is to make a hole in the side of 1 kg. bag of sugar, dunk the bag briefly in water, then place it over the feed hole of the crown board, just above the cluster (add another super or eke & top crown board). Fondant, homemade candy and commercial feeds may also be used. Healthy but weak colonies (3-4 seams) should be combined in the autumn. ―The best packing for bees is bees‖. Be careful not to overfeed and, therefore, overwork the bees in a nucleus. The loss of, say, 1,000 bees in a full colony can be supported. The same number dying in a small nucleus could be more than it can bear. The classic signs of starvation are of bees with their heads in the cells and their abdomens protruding. Some bees in the middle of the cluster will have crawled into empty cells. So when the clustered bees die and fall away, these cell dwellers are left behind. Dead bees in cells are therefore thought to be indicative of starvation. Colonies deemed to have died from starvation usually have no food or food out of reach.
Pests Bald Brood. The Greater Wax Moth (Galleria mellonella) larva hatches among the brood and chews its way through brood cappings in a straight line. The bees remove the silky tunnels and leave the bee larvae bare which are not recapped. Bald Brood may also be caused by a genetic trait. There is no treatment – the brood emerges normally but is sometimes crippled with deformed wings and legs due to faecal pellets from the wax moth larvae. Stored comb is vulnerable to damage since the larvae feed on wax, larval skins and pollen. Protect stored comb by stacking boxes, placing newspaper between each box, and using Paradichloro-Benzine crystals (eggs are not killed) – there is a slight risk of contaminating honey. PDB is probably no longer available. Certan is a solution of Bacillus thuringiensis and is sprayed on the combs – the larvae die after ingesting the insecticide. Deep freezing kills all stages of wax moth. Acetic acid kills all stages. Greater Wax Moth has become more evident in recent years – maybe resulting from the loss of feral colonies and the use of varroa screens under which they pupate. The larva scoops out a boat-shaped depression in a wooden part of the hive and in this spins its cocoon and pupates.

Beekeeping Made Easy, by Marcus Williams
58 | P a g e
Combs can be attacked in weak colonies. The Lesser Wax Moth (Achroia grisella) can cause similar problems. The Greater Wax Moth has a wingspan of up to 3.6 cm. and the Lesser Wax Moth a wingspan of 1.8 cm. Beekeepers opening hives in the cold, ‗spreading brood‘, filling observation hives, moving bees, removing honey … and Vandals. Autumn preparations should include taking precautions against pest damage to hives and colonies. Wasps and bumblebees should be kept out of hives. In the winter all outside hives are at risk from mice and in many locations hives are also vulnerable to damage by woodpeckers and badgers, etc. If a colony dies, the hive should be closed to prevent robbing and the cause of death ascertained. The combs from dead colonies need assessment. Dispose of any combs that are really dark coloured or unsatisfactory – if you can not see sunlight through a brood comb, then it is too old. You can save the wax. Frames can be cleaned by immersion in boiling water and washing soda (an old Burco boiler is ideal). You could burn the lot and start again! Usable combs can be exposed to the fumes of 80% acetic acid (but don‘t expose yourself) which will kill nosema spores, EFB bacteria, the early stages of wax moth larvae and chalk brood spores in about 10 days. The hives should be cleaned and scorched with a blowlamp – don‘t be over-enthusiastic. Colonies that appear sick, e.g. not building-up in the spring, should be left alone. Feeding may help if they are short of food. Otherwise, give them a small entrance and leave them alone. In April, sick colonies can be united. Don‘t unite sick colonies to healthy ones. Keep only the combs with brood and deal with the rest as above. As soon as the queen in the united colony is laying, the broodnest can be lifted above an excluder leaving the queen below. Three weeks later, the old brood combs can be removed. The movement of food as well as bees around the world may bring more problems. Tropilaelaps clareae is a mite which has been found infesting colonies of Apis dorsata and Apis mellifera in the Far East. The Small Hive Beetle (Aethina tumida Murray), native to southern Africa, was found in the USA in 1998 and is causing widespread damage to colonies. Both are notifiable diseases. I hope you are one of those lucky ones who never lose a colony. If you are, I expect that when you toss a coin you can guarantee it will land on its edge. The rest of us will be doing some cleaning up in the meantime.

Beekeeping Made Easy, by Marcus Williams
59 | P a g e
Oxalic Acid Cleansing Oxalic acid is a naturally occurring substance and is normally found at very low concentrations in Honey. Oxalic acid cleansing has been shown to be effective at controlling varroa numbers in a colony of bees. It is used extensively in Europe, USA and New Zealand as part of a programme of Integrated Pest Management when resistance to the pyrethroids (Apistan and Bayvarol) has been found.
How Oxalic Acid operates There have been a number of articles written about the methods of application of Oxalic Acid to control varroasis. This advisory leaflet has been produced to give simple, effective and safe guidance on one method of application because oxalic acid can be dangerous to bees and humans and inappropriate use could contaminate honey. In common with all acids it is corrosive to organic material It is harmful if swallowed, inhaled or absorbed through the skin. Dilute formulations have a reduced corrosive effect. Research has shown that using very small doses of acid will damage the claspers on the probosis of the varroa mites, preventing them from sucking the haemolymph from the bees. This, coupled with damage to the mites respiratory apparatus kills them. This small dose will cause minimal harm to the bees. The oxalic acid should only be applied once per year because the bees themselves could be harmed by continuous application or by using too much Oxalic Acid. Oxalic acid does not penetrate wax so it will not kill mites on capped brood. It does dissolve in honey and indiscriminate use could produce unacceptable levels in honey stores. So it should not be used on stores of honey that may later be extracted.
Integrated pest management Oxalic acid should only be used as PART of a process of Integrated Varroa Management. This is based on the knowledge that Varroa will not be eradicated in the hive but can be kept below a level that causes damage to the colony. The latest advice from the National Bee Unit (NBU) indicates that there should be less than 750 mites in the colony for this condition to be reached. In simple terms if you find more than 7 mites dropping onto a screen floor each day then there is a need to remove some mites from the colony. The NBU has produced an advisory leaflet on Integrated Pest Management for the control of Varroa. This approach should be followed once you are aware that pyrethroid resistant mites exist in your colonies. Obtaining the oxalic acid Because the concentration is very critical the BBKA advice is to obtain a PREPARED SOLUTION of Oxalic Acid in sugar. There are some available on the market from bee suppliers such as
Oxalic Acid from Endolapi SRL (Italy) which is 6% of oxalic acid in a 30% sugar solution
Oxuvar from Andermatt. Which is a 3% solution of oxalic acid supplied with sugar to make up the desired concentration for application to the colony.
Storage The oxalic acid should be kept in the container in which it is supplied and this should be placed in a plastic sealed container and stored in a safe, dark, cool place. It should be supplied with a 50 ml plastic syringe that is used to dribble the solution onto the bees. Keep the equipment together and safely sealed until needed
When to use Oxalic acid should only be used in the WINTER when the quantity of brood in the colony is at its lowest levels or non existent. Choose a bright and warmish day when the bee cluster is breaking up.

Beekeeping Made Easy, by Marcus Williams
60 | P a g e
The operation Before opening the container put on your bee suit, Wellingtons and rubber (washing up gloves) so that you are protected from the bees and also protected from any inadvertent spillage of the solution. The solution should be lukewarm to avoid chilling the bees so if necessary stand the acid bottle in a bucket of hot water for a few minutes. The colony should be lightly smoked and opened to expose the brood nest. Bees will be seen between the top bars of the hive. Each gap between the top bars is called a ‗seam‘. The dosage required is 5 ml (millilitres) per seam of bees. This can be achieved by counting the number of seams where there are significant numbers of bees. Multiply this figure by 5 and this will give the quantity in ml of oxalic acid solution that should be applied to the colony. (e.g. 5 seams of bees = 25 ml [or cc] of solution). Draw this quantity into the syringe supplied with the solution from the container, making sure not to spill any acid on you, your bee suit or anywhere else that might come into contact with you or the bees. Never point the nozzle of the syringe towards you or any other person and always remember that the solution is harmful to your skin and clothing. The solution should then be dribbled gently over the seams of bees. Once complete the syringe should be placed into the safe receptacle and the colony closed with as little disturbance as possible.
5 Seams of Bees Being Treated
Records If you have open mesh floors you will be able to monitor the mite drop over the next few days. Oxalic acid applied this way will normally kill up to 90% of the varroa mites on adult bees. It will have no effect on any mites that are in brood cells. This is the reason for not applying it when there is significant brood in the colony. It is NOT appropriate to apply the oxalic acid a second time as this could damage the bees. Do not forget to record in your hive record book that you have used oxalic acid on the hive, giving the overall dose and the date on which the solution was applied.
Shelf Life The solution has a short shelf life once mixed with sugar because the HMF level in the solution rises and can become toxic to bees. Our advice is to use the solution once in winter and then safely dispose of the remainder down the drain. The solution remains effective longer if it is kept out of the light and at low temperatures (say less than 10°C) but do not try to store for more than 6 months.
Safety Advice Oxalic acid is poisonous; also the fumes can severely damage lungs if breathed in. If any solution is spilt on the skin it should be washed off with copious quantities of water and medical help should be sought. Mixing oxalic crystals with water to produce an appropriate concentration can be dangerous. BBKA advice is to buy oxalic acid solutions that have been preprepared for application to control varroa. Some advisory notes from other sources advocate the use of evaporators to heat oxalic acid crystals within the hive so that it sublimates as a deposit on to the bees in the colony. There is no evidence that this approach is significantly more effective than the use of a solution of oxalic acid. The use of an evaporator can subject the operator to additional hazards and is not recommended by the BBKA for use by beekeepers inexperienced in the practice.

Beekeeping Made Easy, by Marcus Williams
61 | P a g e
Trees, Shrubs & Plants Useful To Bees This leaflet lists a number of trees useful for providing pollen and/or nectar for bees and other pollinating insects. The list includes a wide range of plants suitable for a range of habitats, including small and large gardens and the wild. Brief details are given of the less common species. Possible sizes are not given as these can vary dramatically according to the situation, soil, altitude, exposure to wind, etc. Check with a good book (see back of leaflet) before buying trees for small gardens. There are many new cultivars which may vary from the usual species. All of these trees will normally flower in the UK, although some will need a good summer to flower well. In most cases pollen production is relatively reliable, but nectar production is not, being more affected by the location, soil and weather. Lime and hawthorn are especially fickle in their production of nectar, ranging from profuse to nothing! There is an increasing number of species now being grown in the UK which originate from hotter countries and these may be highly variable in flowering and nectar production. Some of the trees listed are not reliably hardy in colder parts of the country but with warmer summers and milder winters they are able to be grown far more widely, and may produce more nectar in good weather, being good sources of honey in their native countries.
Fruit Trees All are good sources of pollen and many are also excellent nectar producers. Almond Prunus dulcis Earliest to flower. Profuse nectar producer. Apple Malus pumila Can be grown as cordons and ‗bush‘ forms suitable for small gardens. Range of varieties, flowering from early April to late May. Good nectar producers. Cherries Prunus cerasus Large trees, good nectar producers. Medlar Mespilus germanica May Large white flowers. Peach & nectarine Prunus persica Early flowering, good nectar producer. Pear Prunus communis Mar–Apr Weak nectar, rarely collected. Plum Prunus domestica Early Apr Good nectar source. Quince Cydonia oblonga Spring Good nectar source.
Less Common Trees These are less widely grown but are not difficult and are good bee trees. Some flower when there is little other nectar available. Eucryphia glutinosa, E. nyamansensis Aug–Sep NP Evergreen. Large, beautiful, single white flowers. Snowdrop tree Halesia carolina May NP Pretty, small tree. Bunches of flowers along branches. Golden Rain tree Koelreuteria paniculata Jul–Aug (N) Large, loose panicles yellow flowers. Hop tree Ptelea trifoliata Jun–Jul N Related to Tetrodium. Aromatic leaves, small white flowers, highly scented. Profuse nectar source. Pagoda tree Sophora japonica Sep NP Creamy flowers S. tetraptera Smaller, needs shelter. Spring NP Deep yellow bunches of flowers. Chinese bee tree Aug–Oct NP Tetrodium (Euodia) danielli, (hupehensis) Small tree with strongly scented small white flowers. Profuse nectar source.
Bush Fruits Most bush fruits are valuable bee plants, some producing copious nectar (marked §). Flowering time varies with thevariety. Bilberry Whortle berry Black, red & white currants Blackberries Wild & cultivated Blueberries Gooseberries Hybrid berries: Boysenberry, Worcester berry, Jostaberry

Beekeeping Made Easy, by Marcus Williams
62 | P a g e
Beekeeping in a Suburban or Urban Area There are many areas within or near cities and towns where honey bees can obtain an abundance of nectar and pollen. Ornamental trees and shrubs many times can provide early forage for bees. However, beekeepers must always keep in mind, many people are frightened by the sight of a bee hive. As a result beekeepers need to position, keep and manage their bees to avoid any problems. Property lines should be an important consideration. In confined locations, placing the colonies on or near the property line in clear view by neighbours is not recommended. A responsible person should always consult their neighbours and determine if any are allergic to bee stings. If you do have allergic neighbours then it may be prudent to keep a hive elsewhere. The bee hives should be concealed by hiding them behind a solid fence or dense shrubbery. In urban areas hives can even be placed on a flat roof away from public view and above pedestrian traffic. The hive placement should be made so the bees normal flight pattern does not interfere with a busy street, pavement or clothesline. Good management practices by beekeepers are also important. Knowing when and how to manage correctly can make beekeeping acceptable to your neighbours. Beekeepers should observe the following:
1) Practice swarm control 2) Provide bees with a constant water supply. 3) Do not overpopulate an apiary location. Consider your location and available forage sources. 4) Usually a suburban or urban apiary can support from two to six colonies. 5) Inspect and manipulate your bee hives when the bees are foraging. This will cause less
disturbance and be more acceptable by neighbours. 6) Keep colonies with good behavior characteristics. This may require requeening.
Neighbours can always be sweetened with a jar of honey!

Beekeeping Made Easy, by Marcus Williams
63 | P a g e
Beekeeping Record Book A requirement for attaining the ‗Certificate in Beekeeping Husbandry‘ is to maintain a record book of beekeeping for at least a season. Most beekeepers develop their own approach over the years and find that keeping records help them to manage their stocks more effectively. There is no specific format of records required for the Certificate in Beekeeping Husbandry as long as the records are sufficiently comprehensive to show the work the beekeeper has done over a season and how the colonies have progressed. This leaflet gives guidance to those who have not developed their own recording system and is a good starting point. There are no foolproof ways of keeping records. Some beekeepers use computers, others use Filofaxes or filing cards and diaries. The important aspect is to record adequate and useful information in a readily accessible format. Records comprise two elements: Hive or colony records that indicate the state of the colony each time it is inspected. Record books that identify the location of your hives in your apiaries and are used to plan the management programme for the coming season.
Hive Records A hive record is a convenient way of showing the state of the colony each time it is inspected or manipulated. A simple marking system will give sufficient information to make decisions on what needs to be done next time and whether the colony will be useful for breeding new queens etc. The diagram on the next page illustrates a record card with columns that can be used to record the state of a colony. The columns are also described with a suggested marking system that you may find helpful. In time, beekeepers who keep records will develop their own marking system to suit their approach to the bees. This is fine. The important point is that records are kept.
The Record Book The record book is used to give an overview of the beekeeper‘s beekeeping activities and to help plan the work in the season. If it is kept as a Filofax it is possible to insert the hive record cards into the book to provide a complete record of the beekeeping season. However, many beekeepers prefer to keep their hive record cards with their hives. If this is done it is important to keep the cards dry and away from the bees otherwise they will chew up the card and the records will be lost. The record book comprises three parts:
The apiary layout This can be a pictorial record to show the location of each colony in the apiary and its identifying mark. Hives on out-apiaries should be marked to reduce the possibility of theft and so that the owner can be identified. Talk to your local beekeeping Association about the marking system used in your area. Individual record cards may also be kept with this section. Plans for work in the season This section will hold your plans for managing the colonies in the apiary. It is particularly useful to record the activities and timing you plan to use for queen rearing and swarm control. It can also be used as a reminder for repairing hives or buying new equipment. There is no special format for this section but most record keepers find it useful to plan activities using a simple diary approach. If there is any concern over the general vigour or health of the colonies it can be marked here as a reminder to replace certain queens or resite colonies. Information may also include the dates when specific operations must be carried out e.g. for queen rearing or preparation of an observation hive for a particular occasion.

Beekeeping Made Easy, by Marcus Williams
64 | P a g e
Records of the season This will give information on the quantity of honey collected during the season and the quality of the queens. Records will also include the state of the hives and the work needed during the winter months to prepare for the next season.
Example of Hive Record Card At the back of this book there are several blank record cards which you can print out and photocopy for your own use
Name: (Apiary 2 Colony 1) Queen bred from Apiary 1 Colony 1 2007
DA
TE
Q
QC
Bro
od
Sto
res
Room
Health
Varr
ao
Tem
per
Feed
Sup
ers
Wea
ther
Note
s
1/01/2008
√ 10x
e√3
10 5 √ L 10 1 ls
-1 R Removed mouse guards
15/1/2008
X 2L x 15 5 cb H 8 2 hs
+2 S Roof needs painting & Grass under
hive needs cutting
LEGEND:
Date Date of the inspection Q Presence of the Queen √ = Queen seen, x = Queen not found, c = Queen clipped, W,Y,R,G,B Queen marked with appropriate colour code QC Presence of Queen cells x = none seen, 10X = 10 seen but all removed, 2L = 2 seen and left alone Brood State of the brood
e = eggs seen, √= brood pattern ok, 3 = brood
covering 3 frames, x = no brood Stores The quantity of stores available 10 = equivalent of 10 super frames available Room The available space for the queen to lay eggs 5 = equivalent of 5 brood frames available Health The state of the brood and adult bees √ = all ok, CB? = Possible chalk brood, EFB? = Possible EFB, etc. If you are not sure whether a disease is present, it is advised that you consult a more experienced beekeeper.
Varroa The number of Varroa mites in colony l,m,h = low, medium or high, (say) 1000 = the estimated Varroa population in the hive calculated from natural drop, or other estimation methods. It is recommended that the mite drop is checked regularly and a numerical value of the Varroa population estimated. Temper The docility of the colony 10 = nice calm bees, 8 = bees agitated, 6 = bees sting, 4 = bees that follow too much, etc Feed How much feed given 2 LS = 2 litres of light syrup, 1 HS = 1 litre of heavy syrup, etc. Supers How many supers removed or added +1 = one super added, -0.5 = 5 frames removed, etc Weather The temperature and cloud cover c = cloudy, s = sunny, r = rainy, f = fair Notes Anything of interest to add lot of propolis, brood box needs repair, etc.

Beekeeping Made Easy, by Marcus Williams
65 | P a g e
Managing the show/display of live bees If you are going to be showing or putting your bees on display at any time, then there are some important preparations you need to make.
Preparation before the show Be clear about the purpose of showing your bees and have a mental note of the risks in the activity. For example, check with the show organiser that the site for the hives is compatible with activities such as children's play areas, tethered animals, candy floss sellers, etc. Agree the number of colonies to be placed on the site. Check also that there is adequate insurance cover.
Preparation of a colony Select a compact, healthy colony, well - provisioned with stores and with bees of known docility. It should contain foundation, partly-drawn comb, etc. Inspect the colony for diseases and reject any colony in which disease is found. Ensure that the hive is of good, sound construction and is secure and well-ventilated for travel. Bleed off the flying bees by moving the hive within the apiary 2-3 days prior to removal to the show. Allow longer if the weather is poor. If there is no adjacent stock to take the flying bees, place a weak stock on the original stand.
Preparation of the site The screened area must be large enough to contain the hive(s) when dismantled and give the demonstrator space to work and move around unhindered. The screen at the demonstration site should be erected before the bees are released and should be a minimum of 2 metres high. It should be secured against casual entry by the public. The bees should be flying on site at least 24 hours prior to public access. Avoid any danger of robbing (which will put the bees into a defensive state) by restricting the entrance at all times. If other bees are present or wasps are prevalent, use cover cloths when demonstrating. Bees should be given water within the hive/enclosure if there is any danger of them seeking water from unsuitable sources. Ensure that adequate beekeeping equipment is available at the demonstration site at all times.
Briefing medical personnel If a Doctor or First Aider is available at the show, he/she should be briefed in advance as to when and where the demonstrations will be held. Establish an agreed means of communication should medical assistance be required urgently. When medical assistance is not readily available, ensure that a suitably qualified person will be available to attend and is able to give artificial respiration. Ask the Red Cross to check that those who will be attending are competent to give the necessary medical attention. Suitable treatment for severe reaction should be available near to the demonstration area.
Demonstrating When more than one stock is present, the demonstration should be carried out on only one colony at a time and demonstrators should alternate the stocks used unless there is an overriding reason not to do so. All equipment should be made ready before the demonstrations and a soapy water sprayer should be placed in the screened area (for use in emergencies). At least two competent beekeepers should be present at all times. One should carry out the demonstration. The other should act as a steward outside the screened area to describe what his/her associate is doing and also to deal with any spectator problems. The steward should also observe conditions (including weather) both inside and outside the screened area and advise the termination of the demonstration, should conditions become unsatisfactory.

Beekeeping Made Easy, by Marcus Williams
66 | P a g e
Such advice should always be complied with, since it is easy for a fully-protected demonstrator who is concentrating on the performance to miss warning signs of agitation. This may be of little consequence in an apiary but could be catastrophic when the public is present. The demonstrator should not wear gloves, if at all possible. This ensures that the first signs of agitation are felt. In the event of complete loss of control, close up the colony completely (suffocation of the bees is not a consideration). Simultaneously, clear the public from the area. Use soapy water spray to destroy bees returning to the hive and remove the colony or colonies as soon as possible from the site.
Removal Prepare the hive(s) for travelling. Leave the bees until the evening and after the public has left the site. Try to ensure that all flying bees have returned to the hive(s) before closing the entrance(s) and removing from the site.
Observation Hives Many of the foregoing considerations apply to the management of observation hives at shows. In addition:
Ensure that the hive and conduits are secured against upset and dislocation
Ensure the conduit exit is well above head height or is suitably screened
The hive ventilator must be resistant to mischievous probing
A suitably qualified and properly equipped attendant should be present at all times when the public is nearby
Closing screens must be available in case of an accident such as broken glass or a damaged ventilator. A large sheet can be used to wrap up the whole hive
The beekeeper in charge should ensure that the hive does not overheat, especially if the bees are not allowed to fly. A water spray should be available

Beekeeping Made Easy, by Marcus Williams
67 | P a g e
BEEHIVES & APIARIES

Beekeeping Made Easy, by Marcus Williams
68 | P a g e
Types of Hive Beginners will often wonder which hive to get. There are a number of different designs out there but which one is the best? Below are pictures of the 6 most commonly found hives, there are of course variations and home made ones available:
The most popular hive in the United Kingdom in general is the National hive with the Smith more so in Scotland. The National and Smith are square hives, not very pretty but practical. The cottage garden traditional hive is the WBC. If you want a couple of hives in your garden, want them to look good and dont want/need to move them then go for the WBC. Don‘t be put off by some beekeepers who will say they‘re impractical. Yes, they are awkward to move to a field of rape or a heather covered mountain, but if you want to stay with a small-scale hobby, you probably won‘t want to move them. The Commercial hive is slightly larger than the National, still square but with a bigger brood area. This means that beekeepers can fit a stronger colony of bees into the hive with a smaller risk of swarming. People in Essex or Ireland prefer this hive, where it is used quite widely. The only reason for this is that one or more local experts have promoted it in the past. The Langstroth is similar in size to the Commercial. It is the most popular hive in other countries of the world. The Dadant hive is the biggest of all and not as commonly found in the UK. The smallest hive is the Smith. Invented and widely used in Scotland. To complicate things yet further, the National, WBC, Smith and Langstroth have a jumbo brood body option. These are useful if you are in a warmer part of the country and you have a strong colony. Our advice would be to start with a National or WBC or a Smith if in Scotland.
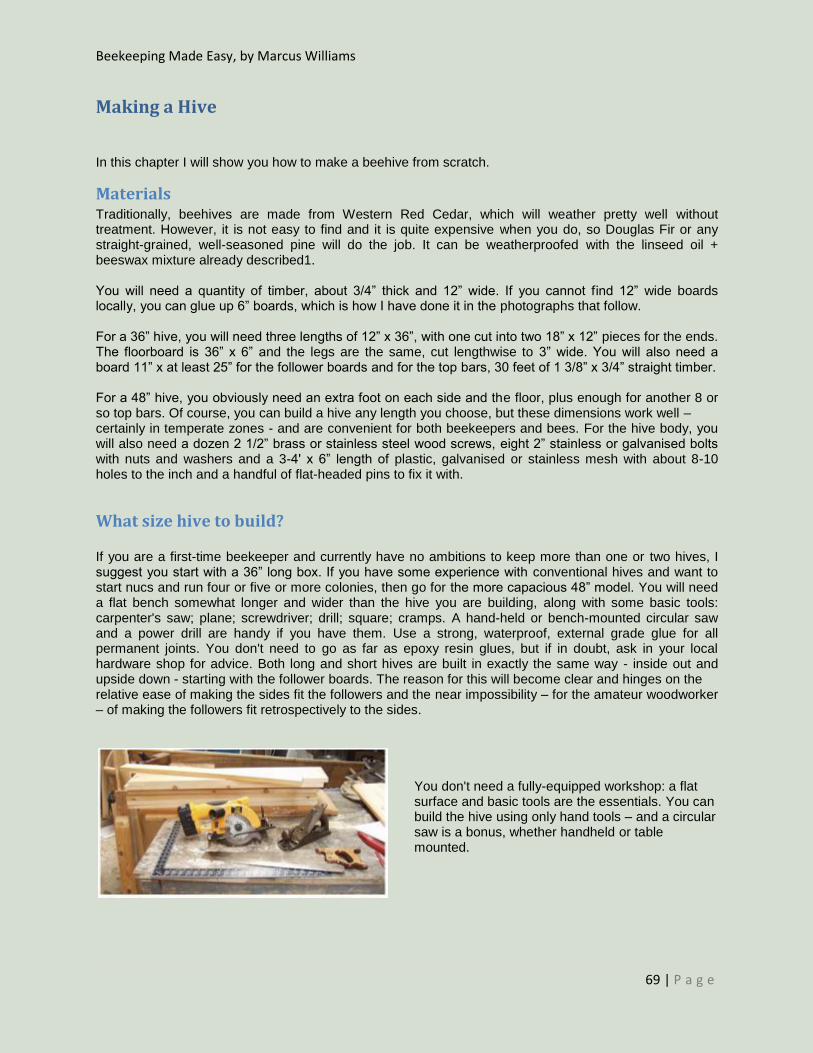
Beekeeping Made Easy, by Marcus Williams
69 | P a g e
Making a Hive
In this chapter I will show you how to make a beehive from scratch.
Materials Traditionally, beehives are made from Western Red Cedar, which will weather pretty well without treatment. However, it is not easy to find and it is quite expensive when you do, so Douglas Fir or any straight-grained, well-seasoned pine will do the job. It can be weatherproofed with the linseed oil + beeswax mixture already described1. You will need a quantity of timber, about 3/4‖ thick and 12‖ wide. If you cannot find 12‖ wide boards locally, you can glue up 6‖ boards, which is how I have done it in the photographs that follow. For a 36‖ hive, you will need three lengths of 12‖ x 36‖, with one cut into two 18‖ x 12‖ pieces for the ends. The floorboard is 36‖ x 6‖ and the legs are the same, cut lengthwise to 3‖ wide. You will also need a board 11‖ x at least 25‖ for the follower boards and for the top bars, 30 feet of 1 3/8‖ x 3/4‖ straight timber. For a 48‖ hive, you obviously need an extra foot on each side and the floor, plus enough for another 8 or so top bars. Of course, you can build a hive any length you choose, but these dimensions work well – certainly in temperate zones - and are convenient for both beekeepers and bees. For the hive body, you will also need a dozen 2 1/2‖ brass or stainless steel wood screws, eight 2‖ stainless or galvanised bolts with nuts and washers and a 3-4' x 6‖ length of plastic, galvanised or stainless mesh with about 8-10 holes to the inch and a handful of flat-headed pins to fix it with.
What size hive to build? If you are a first-time beekeeper and currently have no ambitions to keep more than one or two hives, I suggest you start with a 36‖ long box. If you have some experience with conventional hives and want to start nucs and run four or five or more colonies, then go for the more capacious 48‖ model. You will need a flat bench somewhat longer and wider than the hive you are building, along with some basic tools: carpenter's saw; plane; screwdriver; drill; square; cramps. A hand-held or bench-mounted circular saw and a power drill are handy if you have them. Use a strong, waterproof, external grade glue for all permanent joints. You don't need to go as far as epoxy resin glues, but if in doubt, ask in your local hardware shop for advice. Both long and short hives are built in exactly the same way - inside out and upside down - starting with the follower boards. The reason for this will become clear and hinges on the relative ease of making the sides fit the followers and the near impossibility – for the amateur woodworker – of making the followers fit retrospectively to the sides.
You don't need a fully-equipped workshop: a flat surface and basic tools are the essentials. You can build the hive using only hand tools – and a circular saw is a bonus, whether handheld or table mounted.

Beekeeping Made Easy, by Marcus Williams
70 | P a g e
Making The Top Bars The one critical dimension in this whole design is the width of the top bar, which is, according to people who have been doing this longer than I have, 1 3/8‖ or 35mm for most bees. If local knowledge or your own experience say otherwise, then follow that. Otherwise, I suggest you start with these dimensions and watch how the bees build their comb.
You will get more even and predictable results if you provide the bees with a straight comb-building guide of some kind. There are a number of ways to do this, perhaps the simplest being a saw kerf down the centre of one face of the bar, made with a circular saw. This does not have to extend to the ends, but it may be easier to cut longer lengths like this. The groove should be about 1/8‖ deep and the width of your saw blade. Fill it with molten wax and allow to cool. If you do not have access to a circular saw, you can pin thin strips of wood, about 9‖ long, centrally onto the bars, as in the second diagram. Rubbing the bottom edge with beeswax is generally thought to be a good idea. For this particular design, the top bars are 17‖ long, which seems to be a convenient length for both bees and beekeeper. Make them about 3/4‖ thick.
The Assembly
The first step is to assemble your materials and cut and glue the boards to their final sizes. Make up the sides and ends as shown and while the glue is setting, make the all important follower boards. Glue and screw or pin a standard 17" top bar to the top edge of each follower board. Placing thin strips of wood underneath ensures that it is laterally centred. Clamp it up and leave to set. The extra bits of scrap wood prevent the boards 'springing' while clamped.

Beekeeping Made Easy, by Marcus Williams
71 | P a g e
This 11‖ board, here made up from three pieces, will become the follower boards. 1/2" timber is adequate for this job: mark 15" across the top edge and halfway at 7 1/2".
Draw a centre line to the bottom edge
Mark 2.5 inches either side of centre on the bottom edge
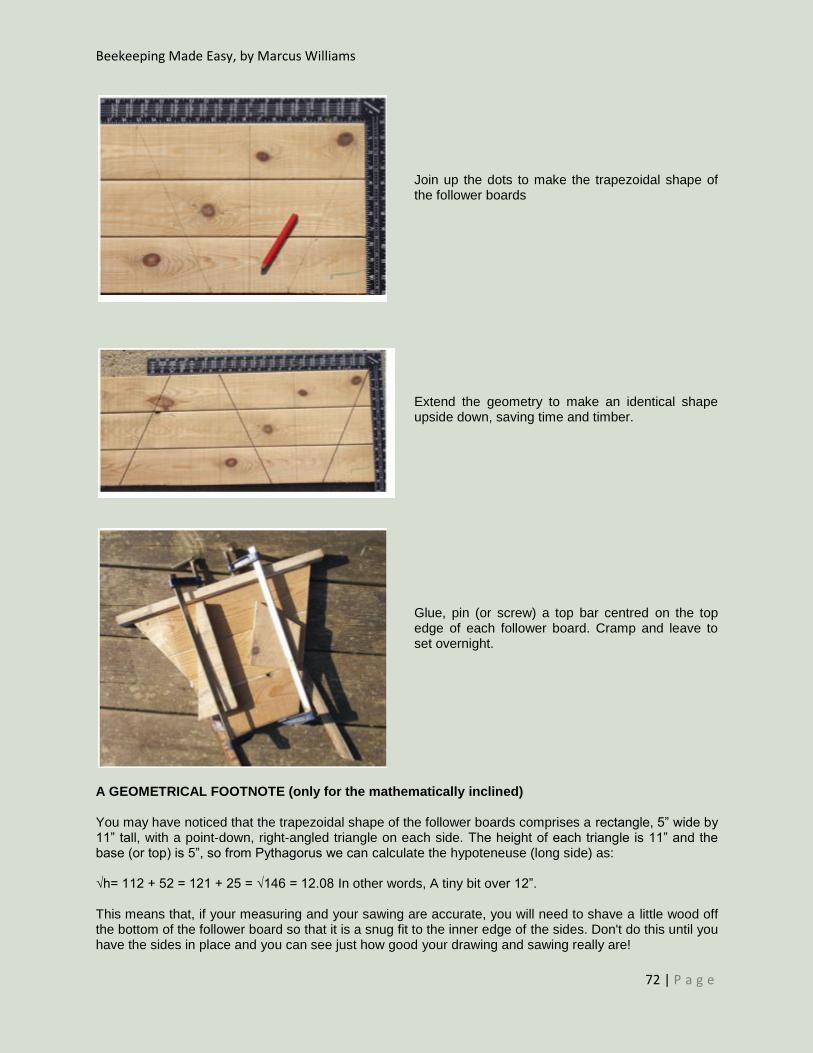
Beekeeping Made Easy, by Marcus Williams
72 | P a g e
Join up the dots to make the trapezoidal shape of the follower boards
Extend the geometry to make an identical shape upside down, saving time and timber.
Glue, pin (or screw) a top bar centred on the top edge of each follower board. Cramp and leave to set overnight.
A GEOMETRICAL FOOTNOTE (only for the mathematically inclined) You may have noticed that the trapezoidal shape of the follower boards comprises a rectangle, 5‖ wide by 11‖ tall, with a point-down, right-angled triangle on each side. The height of each triangle is 11‖ and the base (or top) is 5‖, so from Pythagorus we can calculate the hypoteneuse (long side) as: √h= 112 + 52 = 121 + 25 = √146 = 12.08 In other words, A tiny bit over 12‖. This means that, if your measuring and your sawing are accurate, you will need to shave a little wood off the bottom of the follower board so that it is a snug fit to the inner edge of the sides. Don't do this until you have the sides in place and you can see just how good your drawing and sawing really are!

Beekeeping Made Easy, by Marcus Williams
73 | P a g e
The Legs You will need to let the glue set overnight before you move on to the main assembly, but if you have time in hand today, you may as well cut and drill the legs. You need four legs (obviously), each about 3‖ x 1‖ and a length to suit your height. For example, man of average height will need the top of the hive to be around 30-31‖ for comfortable working, so the legs will need to be about 32-33‖ long. If you are a wheelchair user, you may want the top of the hive to be about 24‖ from the ground, so make the legs 26‖. The rule of thumb: decide a working height for the top of the hive and add 2‖ to arrive at the length of the legs. They will be trimmed a little to accommodate the roof – see below. You do not have to use legs – you could put these hives on various types of stand as used by conventional hives – but this is a cheap and convenient way of achieving a stable, level, rodent-proof and probably more-or-less raccoon-proof hive at the right working height. The legs will be bolted to the end pieces, using galvanised or stainless steel nuts and 2‖ bolts. I advise you to put washers under the head of the bolts and the nuts to prevent them cutting into the wood. Do not be tempted to use wood screws to attach the legs: disaster will inevitably follow and you will regret not spending the extra few pence. The lower ends of the legs can be left cut square for maximum stability on a grassed site, or cut level if you intend to keep your hives on hard standing.
Begin the main assembly by inverting the follower boards and squaring them up on your bench about 18‖-24‖ apart. They should be parallel.
The hive is built upside down and inside out. The follower boards represent the 'inside' and now you are about to add the outer skin. Position one of the side panels against the follower boards, resting on the top bars.

Beekeeping Made Easy, by Marcus Williams
74 | P a g e
A small nail tapped into the top bar prevents the side panel from slipping off.
Place the other side in position and square up the structure, ready for the ends.
Position one of the end pieces centrally against one end. Its bottom edge rests on the bench, giving clearance for top bars.

Beekeeping Made Easy, by Marcus Williams
75 | P a g e
Make a line where the end touches the sides, inside and out.
Remove the end and mark three points each side for drilling clearance holes for screws. Actual positions are not as important as making them on the centre line and away from the ends.
Use a drill bit slightly bigger than the shank of the screw, which should be brass and at least 2 1/2" long. Drill both ends together, using the marked end as a pattern. (The nails are dropped into two drilled holes to ensure alignment.)
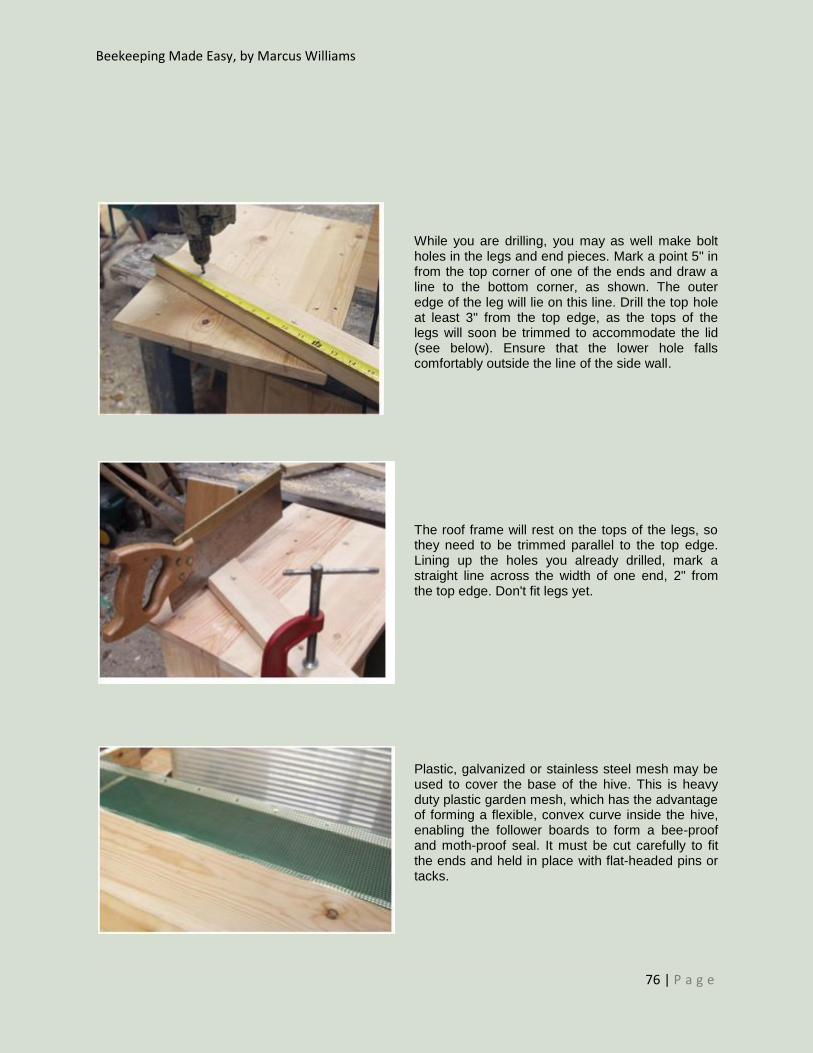
Beekeeping Made Easy, by Marcus Williams
76 | P a g e
While you are drilling, you may as well make bolt holes in the legs and end pieces. Mark a point 5" in from the top corner of one of the ends and draw a line to the bottom corner, as shown. The outer edge of the leg will lie on this line. Drill the top hole at least 3" from the top edge, as the tops of the legs will soon be trimmed to accommodate the lid (see below). Ensure that the lower hole falls comfortably outside the line of the side wall.
The roof frame will rest on the tops of the legs, so they need to be trimmed parallel to the top edge. Lining up the holes you already drilled, mark a straight line across the width of one end, 2" from the top edge. Don't fit legs yet.
Plastic, galvanized or stainless steel mesh may be used to cover the base of the hive. This is heavy duty plastic garden mesh, which has the advantage of forming a flexible, convex curve inside the hive, enabling the follower boards to form a bee-proof and moth-proof seal. It must be cut carefully to fit the ends and held in place with flat-headed pins or tacks.

Beekeeping Made Easy, by Marcus Williams
77 | P a g e
Glue and pin strips of thin wood inside at the ends, to ensure there are no gaps. Cut them to the shape of the lower ends of the follower boards.
A solid floor board is a great addition, especially in places which have cold winters. This one is a length of 6" x 3/4" timber and can be fixed in place using brass snap-locks or some other method of your own device. Corrugated plastic sheet (as may be used for the roof) is a lightweight and inexpensive alternative.
Don‘t forget to make the bees an entrance! Drill three 1" (25mm) diameter holes, 2" from the floor, with one in the centre and the other two about 3" either side. Champagne and wine corks are excellent stoppers, allowing you to regulate the openings.

Beekeeping Made Easy, by Marcus Williams
78 | P a g e
If you are building the longer (48") version, make another two entrances on the opposite side of the hive to the main entrances, about 4-5" from each end. This provides for making splits, nuclei and artificial swarming and is one of the unique features of this design.
This is what your hive should look like now. The follower boards are a good, sliding fit and the whole thing looks sturdy and almost ready for bees!
You can see here how the roof frame is made - a simple, rectangular frame of 3" x 3/4" timber, glued and screwed at the corners. Be sure to leave about 1/4" slack in both directions to allow movement in the wood. Jamming roofs are a nuisance.

Beekeeping Made Easy, by Marcus Williams
79 | P a g e
The Roof
This one is a simple roof using corrugated plastic, available from DIY stores.
Adding triangular gables makes a more elegant roof that will shed water quickly and be hard even for strong winds to lift, but easy for the beekeeper. The roof covering is plastic sandwich sheeting - the type used by estate agents for their signs. You can get offcuts of this stuff for nothing at signmakers' shops. You could use a number of materials here, including thatch, but make sure you keep it reasonably light.
Your last job is to coat the outer surface of the hive with something to keep the weather out. Creosote, Cuprinol and various paints and varnishes will be suggested by old beekeeping hands, but I prefer not to put anything onto or into the hive that I would not be willing to put on my skin, so I use a bee-friendly coating made as follows: To 1 litre linseed oil (raw or boiled, it matters not as you are about to boil it anyway) add 50 ml melted beeswax (use 1:20 ratio with whatever units suit you). Heat in a double boiler (bain marie; or one sucepan inside another – the larger one containing a couple of inches of water). Get it as hot as boiling water will allow and stir for 10 minutes. Allow to cool and while still on the hottish side of warm, paint it on the outside of your hive, paying special attention to end grain, nail heads (underneath) and joints. There is no need to coat the inside of the hive: the bees will do that for themselves with propolis. You will also need some bees!

Beekeeping Made Easy, by Marcus Williams
80 | P a g e
The Comb Holder This device is easy to build and a very useful 'third hand' for examining comb, especially when you need to do more than just look at it. The base is the same width as a top bar – 17‖ - and about 6‖ wide. The wire is about the same guage used for coat hangers, bent to accommodate the width of a top bar. A slight inward 'spring' is an advantage, as this grips the comb and helps to keep the top bar in position.
This is a picture of the comb holder sitting on the top of the bee hive with a comb lodged between the wire.
This is what it looks like folded down. As you can see, the two arms fold up and the comb is placed on the wire holders…

Beekeeping Made Easy, by Marcus Williams
81 | P a g e
…like so!
Hive Ventillation Hive ventillation is very important issue with differing opinions. A lot of American beekeepers believe theat ventillation should be controlled with entrances at the top of hives, non-insulated roofs and even custom built chimneys. In the UK we insulate our hive roofs and have the entrance at the bottom. This is certainly more like what the bees would do in the wild as a wild hive entrance is normally 100mm squared and positioned well below the half way point of the hive. Now mesh floors are becoming more and more popular offering extra ventillation, with the added benefits of allowing mites to fall out the hive. The mesh floors will allow for a better circulation of air allowing more warm, moist air to escape. Bees are capable of fanning their wings to cause a draught, or movement of air, for regulating the hive temperature or evaporating moisture from nectar but there must be a supply of fresh air so the bees can utilise the currents and control temperature more effectively. Our advice is to use a hive with an insulated roof, entrance at the bottom and mesh floor. The mesh floor is being advised by more and more beekeepers as they discover that their hives that have not suffered colony collapse are the ones with mesh floors.
Hive Branding Unfotunately hive thefts do happen and if anything are becoming more common. Essentially there isnt much you can do to stop this but hive branding could help police and other beekeepers trace the hive. A brand could be your initials, a symbol or code; something that is unique and easily recognisable as being connected with you.

Beekeeping Made Easy, by Marcus Williams
82 | P a g e
Branding should be done to all sections of hive, even down to each frame. Creating the brand can be done a variety of ways;
A permanent marker pen is probably the easiest option but also one than can be erased most easily.
Using a knife to carve the brand is a more permanent fixture but is time consuming and potentially dangerous, requiring some level of skill. Choose a simple symbol or similar if choosing this option to reduce the skill and time required.
The quickest and best way is to burn the brand in. This takes some time to prepare the brander but will save time in the long run
Hive Maintenance Maintaining your hives is essential. It makes the beekeepers life easier and will hopefully result in healthier colonies.
Spring Early spring management is primarily concerned with sufficient food stores and secondly with disease and mite control. Colonies are most likely to starve in Spring than Winter.
1st Month of Spring
Anytime that a colony has less than 20 pounds of food (3 full depth frames of honey), feed with a sugar syrup solution. Early feeding will stimulate the colony to build a large early population. Continue feeding until they stop taking syrup. Feed pollen supplements or substitutes, if necessary.
Apply any treatments deemed necessary.
Remember to stop all treatments of medication five to six weeks before adding honey supers to the colony to prevent contamination of the honey that may be harvested.
Check for and clean up dead colonies.
Clean out entrances and bottom boards.
Unite weak colonies.
2nd Month of Spring
Inspect hives weekly. Strengthen weak colonies with queenless packages.
Introduce package bees on drawn combs.
Monitor colony stores, especially if weather is cold and wet.
Requeen colonies with failing queens.
Remove entrance reducers.
Reverse brood chambers when weather moderates.
Continue checking colonies for disease.
Add supers to strong colonies at the time of extra tree and plant bloom.
Equalize colony strength.
Set out bait hives with pheromones.
3rd Month of Spring
Inspect hives weekly. Monitor colonies for queen cells and control swarming, adding more space if necessary.
If you decide to use queen excluders, place it below shallow honey super. It is a must for colonies for comb honey.

Beekeeping Made Easy, by Marcus Williams
83 | P a g e
Install packages on foundation.
Split strong colonies.
Capture swarms.
Summer
1st Month of Summer
Inspect weekly.
Continue to check for queen cells.
Rear queens if you prefer your own stock.
Check colonies for disease.
Remove comb honey supers when properly sealed.
Provide plenty of super space.
Control swarming.
Capture swarms.
Replace defective combs with full sheets of foundation.
2nd Month of Summer
Remove comb honey supers when properly sealed.
Check for queen cells.
Add sufficient super space for Sourwood .
Check mite levels.
Remove and extract early season honey crop.
Freeze comb honey to prevent wax moth damage.
Inspect colonies ,look for presence of queen and new brood,remove queen cells,check for mites,congestion in the hive,remove burr comb and the bees should be making plenty of stores this year.
3rd Month of Summer Remove and extract summer honey crop. Please leave the bees sufficient winter stores. Remove section supers. Do not work bees unless necessary to avoid robbing. Add more space if needed.
Autumn Typically colonies are treated for mites in the late summer or early Autumn. Various treatments include Apistan, CheckMite+ and Formic acid.
1st Month of Autumn
Provide Supers for Autumn Goldenrod and Aster flow.
Do not remove honey after start of Autumn medication.
May need to requeen colonies.
Unite weak colonies.

Beekeeping Made Easy, by Marcus Williams
84 | P a g e
Remove queen excluders. If the queen excluder is left on in the winter, the colony runs the risk of having the cluster move through the excluder leaving the queen below to freeze to death.
Check colonies for disease.
Placing grease patties of sugar and grease in the hive is a holistic treatment for tracheal mites.
2nd Months of Autumn
Begin Autumn feeding.
Feed and medicate your colony.
Apply any treatments deemed necessary
Unite weak colonies.
Prepare colonies for winter.
Put on entrance reducers to keep out mice.
Extract honey from Autumn flow taken prior to Autumn medication.
3rd Month of Autumn
Continue late Autumn feeding
Ventilation in bee hives is very important at all times, but more so in the winter when cold temperatures keep the colony confined. Make sure air can enter the hive from the top and bottom, thereby allowing oxygen to flow in and carbon dioxide to flow out.
Finish handling honey crop.
Develop your honey marketing program.
Winter
1st Month of Winter
Be sure that the hive has adequate ventilation, especially in the winter when cold temperatures keep the colony confined.
Monitor the hive entrance. Brush off any dead bees or snow that block the entrance.
Repair and assemble hive parts.
Develop a marketing program for the holiday season.
Order new equipment for the coming season.
2nd Month of Winter
Check honey stores, begin emergency feeding if necessary.
Clean, paint and repair equipment.
Check apiary for hive condition.
Order packages, nucs, queens.
Read past years‘ diary and prepare for the coming year.
3rd Month of Winter
Check honey stores.
Continue emergency feeding.
Clean up dead colonies.

Beekeeping Made Easy, by Marcus Williams
85 | P a g e
Preserving Your Beehive It is important that new hives and beekeeping equipment remain in service for as long as possible to recover the initial cost and to provide a return on the investment. Hives normally require little maintenance. Regular treatment with preservatives and finishes will help to ensure that your hives are good for use over many years, even a lifetime. Hives that are dry inside and well ventilated provide the honey bee colony with the best conditions in which to develop and prosper. Hive timber that has become porous through age and weathering will absorb water. This reduces its thermal insulation properties. Evaporation of this water by wind will cool the hive markedly. Cold hive walls cause condensation and dampness inside the hive. Damp is considered to be a significant danger to the health of bee colonies. Fungal attack occurs in the UK when the moisture content of wood exceeds 22% for a period of time. It will be aided if the hive timber has non-durable sapwood or a low durability heartwood. Woodworm can be established if the hive components are left undisturbed for years. The object of this leaflet is to indicate means by which hives can be protected against rot; there are five basic considerations:
1. Use durable species of timber in the construction. 2. Build the equipment to a good design and construct it well. 3. Use hive stands to keep hives out of contact with the ground. 4. Use a wood preservative treatment. 5. Allow moisture to escape and prevent further ingress by using moisture vapour permeable or
non-film forming exterior waterrepellent treatment.
1. Choice of Timber Western Red Cedar is usually the preferred material for the construction of beehives but is expensive. It is stable out of doors, it is light in weight and has some natural resistance to decay and insect attack. Hives can be constructed from softwood, preferably redwood (Scots pine). Whitewood (a knotting compound if a paint finish is to be used. Water-resistant, exterior grade plywood can be used, but take care when cutting it to avoid splintered edges. Hives made from plywood will be heavier than Red Cedar. Plywood has little absorbency for preservative treatments. Do not use blockboard or MDF since these materials lack exterior durability. spruce) and larch are best avoided, as they are less durable and not as receptive to preservative treatment. Hardwoods such as oak are rarely used. They are more difficult to work, usually heavier, and are expensive. Whichever kind of timber is selected it should be straight grained and knot free as far as possible. If it contains sapwood it will require protection to prevent decay. Knots should be sealed with Pressure treated timber can be bought from timber merchants or DIY centres: but check the treatment chemicals used are not harmful to bees (insecticidal). Since pressure treatment does not always reach the centre of large pieces of timber, untreated parts may be exposed when cutting to size. Cut ends and joints should therefore, always be treated with a preservative. (See 4. below.)
2. Equipment design Hives should be made to recognised designs such as a Modified National, Commercial, Langstroth or Smith. Well made joints and the use of waterproof glues will help stop moisture penetrating the timbers. When assembling or repairing hives using nails, use only galvanised or sheradised nails. Screws are often better than nails in preventing the wood from warping at vulnerable joints. Bee equipment suppliers sell hives as flat-pack kits. Always follow the instructions and use waterproof glue to ensure strong and durable joints.

Beekeeping Made Easy, by Marcus Williams
86 | P a g e
3. Using hive stands Single walled hives, such as the Modified National, should be stood on hive stands well clear of the ground. In this way the floorboards remain dry and there is good air circulation under the hive. Hive stands can be permanent structures or moveable with the hives. They can be made from pressure treated wood or metal frames or porous building blocks Ensure that the hive stand is large enough to support the whole hive. A narrow stand can put unnecessary strain on the floor and may cause the hive to collapse. It is as well to place the hive stand onto a paving slab to ensure a flat and stable base for the hive.
4. Choice of preservative Before purchasing any wood preservative product you should:
Check the label for the HSE number, which indicates official approval regarding the safety of the chemicals for use by the general public.
Read the label carefully to be certain that the product is NOT HARMFUL TO BEES and does not contain an INSECTICIDE. Do not use a harmful product under any circumstance, as it will be impossible to remove it from the wood later.
There is a wide range of wood preservative products available but at present the only manufacturer known to make specific tests on their products for the preservative treatment of beehives is Cuprinol, part of ICI Paints. They have arranged for new formulations to be tested at the National bee Unit. Following these tests, Cuprinol Garden Wood Preserver (DP) Red Cedar, Cuprinol Trade Decorative Wood Preserver (T), Red Cedar or Cuprinol Trade Low Odour Wood Preserver Clear (T), are recommended for use on beehives However it is important that the hives are allowed to dry and air for at least two weeks after application. Some beekeepers with a large number of hives treat hive parts by dipping into hot liquid paraffin wax. There is a high fire risk to this operation and the equipment is well beyond the needs of the majority of beekeepers.
5. Choice of exterior Coating or finish Water-based Acrylic paints and stains can be used. They have good weather resistance but are soft and prone to physical damage. Waterbased shed and fence treatments should not be used on smooth timber normally used for the construction of hives. Microporous finishes work well on hives. These treatments allow water vapour to escape from the wood without peeling or blistering the finish. They are also highly water repellent and flexible. The use of paints based on these principles gives an excellent and durable finish. Woodstains may contain fungicides but no insecticides are used and these products can be used safely on beehives. Woodstains and microporous finishes have a distinct maintenance advantage over conventional paints. After 3 to 4 years it is only necessary to clean down and recoat. Woodstains are classified as low or medium build according to their resin content. Low build finishes are preferable for migratory beekeeping. Varnishes are unsuitable for use on hive parts. Under prolonged exposure to sunlight the finish breaks down and restoration is difficult. Note: hive parts that have been treated should be dry and free from odour before the bees are housed in the hive.

Beekeeping Made Easy, by Marcus Williams
87 | P a g e
Hive Roofs Galvanised metal is the most suitable material for use in covering hive roofs. It does not need much maintenance. When the galvanised metal starts to fail a metal primer followed by a metal paint can be applied. If heat reflection is wanted then an aluminium or heat reflective paint can be used. Thin aluminium sheeting is a good alternative to galvanised material as it is corrosion resistant and needs no maintenance. Consider using silicone mastic to fix metal sheeting to the underlying structure, then you don‘t have to make holes in it for nails. Roofing felt can be used to cover roofs, but it is not very durable and the wood underneath can rot before it is obvious that the felt is damaged. When roofing felt has been used, the felt can be painted with a heat reflective paint recommended by the felt manufacturer. Any holes or small tears can be repaired using a suitable mastic sealant. It is best to remove the whole covering if any part of the roof needs to be re-felted.

Beekeeping Made Easy, by Marcus Williams
88 | P a g e
Moving Hives Moving hives can be tricky, especially if the hives are WBC. There are tools available to buy and ones that can be home made that will make the job a whole lot easier. There will be instances when moving a hive must be done but in general if the beekeeper chooses the apiary site carefully there may never have to move it. However there may be the offer of a free hive if collected or some other reason. So below is some info to help: Moving hives involves four general steps:
1. Closing the bees inside the hive at the old location 2. Securing the hive components so the hive won‘t come apart during the move 3. Carrying, loading, and transporting the hive 4. Unloading and opening the hive at the new location
1. Closing the bees inside the hive at the old location This step involves sealing the hive in some way that still allows the bees enough air for ventilation. If possible, you should close the hive either in the evening after the bees stop flying or early in the morning before they leave the hive. Beekeeping books often suggest that you use a piece of screen wire that is roughly 6‖ wide by 14 1/2‖, the latter dimension being the width of the opening in the bottom board. You fold the screen in half long ways and insert the screen far enough into the entrance so that its springiness holds it in place, theoretically keeping the bees from escaping. There are occasional problems with this technique that allow bees to escape. Sometimes the width of the opening of the bottom board is bigger or smaller than the length of the wire, or the screen is not stiff enough and sags at some point along its length. Or, in pushing the screen in, you turn it slightly, deforming it just enough to create an opening that the bees take advantage of. I sometimes use the screen method, but I make sure to use stiff screen wire or fine mesh hardware cloth. I carefully measure the bottom board opening in each hive I‘m moving and cut a screen just for that hive. I also staple the screen in place to keep it from shifting or being jarred loose during the move. Finally, I keep a roll of duct tape handy to seal any unforeseen leaks between the screen and the hive, as well as to seal any openings that are often present in old hives. If you don‘t want to make screened entrance closures, you can purchase fancy versions from the beekeeping supply companies. Rather than using an entrance screen, I prefer a different method for sealing a hive. I make screened covers that go on top of the hive in place of the regular cover. (More about how to make them below). To close a hive, I just remove the regular cover, replace it with the screened top, and then completely seal the entrance with duct tape. That way, the screen securely covers the top, and the duct tape makes a bee-proof seal for the entrance. To make a screen top, I start with a wooden frame the same dimensions as the top of a bee hive. It can be either a frame from an inner cover or an Imrie shim, a rectangular frame made from 1‖ (3/4‖ nominal) stock and available from Brushy Mountain Bee Farm for $2.00. I make a cross brace for the frame and then cover both sides with screen or, even better, fine mesh hardware cloth. The result is a rigid screened top.
2. Securing the hive components so the hive won’t come apart during the move Having a hive shift off of its bottom board during a move is not the most pleasant experience of beekeeping. Moving shakes the hive, and shaking agitates the bees. If they escape during the move, they are usually highly defensive and sting anyone within range. Once I was helping a friend move a couple of

Beekeeping Made Easy, by Marcus Williams
89 | P a g e
hives. We had used a single strap to secure the boxes to the bottom board. All was well until we started to load the last hive on my truck and realized that it was just an inch or so too tall to fit under the rack on the bed. We decided to tilt it just a little so that it would clear. Well, that little tilt was just enough to cause the bottom board to shift and allow the bees an opening. Fortunately I was wearing a veil, so I did not get stung on the face. Unfortunately, I was not wearing a bee suit or gloves, only a short sleeve shirt. I got about 50 stings before we got the hive sealed back up. The other guy was wearing a bee suit but was working with bare hands. He got a couple of dozen stings. I learned a lesson from that. Bee catalogs sell hives staples. These work okay, but I prefer nylon straps because I think they hold the hive together more securely. To secure a hive, I use two nylon straps, preferably at least one with a ratchet lock that will get much tighter than an ordinary nylon or metal buckle. If the hive is taller than three or four boxes I separate it, not only because a high stack is less stable and more likely to shift, but also because it can be very heavy. To move a hive in parts, I usually move the supers separately from the brood chamber by using a screened top for each part. I set the supers onto the upturned top to keep bees from escaping from the bottom and use the screened top to provide ventilation. I use two straps for each part.
3. Carrying, loading, and transporting the hive Hives are heavy and awkward, and they are full of bees that tend to sting when agitated. While it is sensible to wear a veil while moving a hive, and even better to wear a full bee suit and gloves, that clothing is cumbersome and makes seeing difficult. If you move hives often, a metal hive carrier is a wise investment. They are available for about $60 from the beekeeping equipment companies. (The bee club might want to buy one to be shared among the members.) The hive carrier allows the two movers to hold the hive firmly and still see where they are walking, and its metal handle offers a better grip than the just the rectangular box of the hive itself. If you don‘t have help moving a hive, or don‘t have access to a truck or van, you can break the hive into individual boxes that you can lift by yourself. Just use a screen on the top of each box for ventilation and an inverted cover on the bottom to keep the bees in. Again, make sure that you use two straps to secure the screen and bottom on each box. Individual boxes fit in a car truck or the back of a station wagon, or even the back seat of a car. In transporting hives, it is important to make sure that the hive is secured so that it won‘t shift or, heaven forbid, tip over. There is no problem with a single box, but a stack of two or more should be tied to the side of the vehicle.
4. Unloading and opening the hive at the new location Unloading is straightforward. First, remember to have a hive stand already set up and leveled at the new location. Opening is easy, too. The most important aspect of opening a hive you‘ve just moved is to realize that the bees are more likely to be defensive and have a tendency to sting. If the new location is near to a neighbor or if you are concerned about someone getting stung, wait until dark to open the hive. Also, make sure you are wearing a veil. Pull the screen out or duct tape off in a single movement as you move away from the hive to the side or rear. Come back the next day to remove the top screen and moving straps. If you are moving a hive in sections, be sure to don your bee suit before you remove the top screens and restack the components. The bees usually aren‘t as agitated as you might think, but they still will have a tendency to sting. Although I haven‘t tried it, I think that you could lift each component off the inverted top and stack it on top of the moving screen of the lower component. Just remember to leave the top screen in place so that the bees in the intermediate sections have adequate ventilation. Then the next day, after the bees are settled down, you could come back and remove the screens between each component, restoring the hive to its normal configuration. An important point that should also be taken into consideration is how far the bees are to be moved. It should either be less than 3 feet or more than 3 miles!

Beekeeping Made Easy, by Marcus Williams
90 | P a g e
Choosing an Apiary Site Choosing a place to keep your beehives is comparable to finding a home for yourself. You need to sort out what you really want and then weigh this against what is possible. It will always be a compromise. This leaflet is to help you make a good choice and avoid some of the pitfalls. Good Luck! Factors to be considered in selecting an Apiary site: 1. Will the site cause a nuisance to neighbours or the general public? Is it safe from vandals? 2. Is there forage for the honey bees? Are there any apiaries nearby? 3. Is the environment of the site suitable for bees? 4. Is there convenient access, with minimal carrying for the beekeeper to bring in equipment and remove honey supers? 5. Is the space suitable for the number of hives envisaged?
1. Consideration for the public. The general public are often ignorant and frightened of insects. If they become alarmed about the presence of bee hives, their complaints can result in your bees being considered a ‗nuisance‘ with the consequent loss of apiary sites for yourself and other beekeepers. Bees establish regular ‗flight paths‘ en route to adjacent forage. Enclosing an apiary with hedges or a trellis to lift them above head height is good practice. This also reduces the visibility of beekeeper activity. Avoid sites which border roads or public paths especially bridleways, where mounted riders may pass. Keep only good tempered bees. Culling bad tempered stock and replacing with more docile strains is beneficial to both beekeeper and public. Damage to hives from thieves and vandals can occur, so hives need to be well guarded or unobtrusive. Out of sight out of mind is a good maxim.
2. Forage Honeybees mostly forage for both nectar and pollen within a kilometre of their hive and up to about five kilometres for exceptionally rewarding sources. An apiary site may be permanent, where forage during all growing seasons is desirable, or temporary to exploit a crop or seasonal source such as oil-seed rape, lime, heather or Himalayan balsam. Arable farmland may provide an excellent source for a month but then nothing for the rest of the year. Gardens are usually planted with year-round flowering plants, shrubs and trees. An apiary within flying range of these but sited in an area of low population density can be ideal. It is a good idea to find out the location and size of other apiaries that might provide competition for forage in the area. Talk to members of your local association who may be able to help. There are no problems with small numbers of hives and vast farm crops but field margins and gardens provide much smaller though continuous forage. It is sensible not to compete with large beekeepers.
3. Environment The hives should be sheltered from the prevailing wind, so that foragers can land easily at the hive
entrance and roofs are not blown off in gales. Avoid sites open to cold northerly or easterly wind.
A generally southerly aspect will provide warm and dry conditions, especially helpful in winter.
Avoid sites in a frost pocket which will check spring development or on low or damp ground that could become flooded.
Sites under trees are unsuitable because they are usually damp.
The area should be fenced from livestock which may kick over hives.
Bees need water to dilute honey stores for use in spring and to cool the hive in hot weather. If this is not naturally available then consideration should be given to providing a suitable source, away from the main flight paths to avoid fouling.
You may find it helpful to discuss potential sites with your local bee inspector, who can advise if there are any disease problems in the area.

Beekeeping Made Easy, by Marcus Williams
91 | P a g e
4. Access Convenient access is essential. Easy movement of equipment in and out of the apiary ensures that your routine inspections will be productive. Adding and removing supers, controlling swarming, feeding and treating the colonies is a pleasure when it is not physically demanding or hazardous. Do not consider a site which entails climbing fences or crossing ditches to enter. It is ideal to have vehicular access right up to the hives when necessary. Remember, dry grassland may become impassable mud in wet weather. A level site is easier to manage.
5. Space It is sensible to increase the number of hives envisaged, by at least two to allow for contingencies. Then make measurements and a rough plan of the site to confirm that you will have sufficient space. Guidelines when making the plan.
It is vital to have access to manipulate the colonies within the apiary, without working in the flight paths.
It is more ergonomic if the orientation of the frames in the hive are across your body from where you plan to stand.
There should be space to stack the removed supers and roof without the beekeeper moving away from the hive.
Placing the hives on stands about 35 cm above the grounds makes for a comfortable working height for the beekeeper.
The hive entrances should face in different directions to avoid drifting of bees between hives.
Allow a distance of at least two hive widths between each hive.
Finding the site Establishing good relations with neighbours, local farmers, land owners and the general public is a major factor in finding and maintaining a successful site for your bees. Talk to them about the value of bees as pollinators; educate them about swarms, flight paths etc. Try to capture their interest and co-operation, gaining respect for the bees and the beekeeper.Most beekeepers are tempted by the familiar and convenient location of their own garden where they can watch their bees at work and attend to them easily, but small gardens, particularly those surrounded by houses are not likely to be a successful solution. With careful management a small garden in open countryside or a garden at least the size of a tennis court could provide a suitable site for two or three hives.
Situations to avoid A small suburban garden, adjacent to areas where children play may cause instant complaints, when
a beekeeper clad head to toe in protective gear ventures forth to inspect a newly sited colony.
A cloud of roaring bees swarming into a neighbour‘s garden.
Bees drinking at neighbours bird baths or garden ponds.
Bees soiling the neighbours washing as they make their cleansing flights in early spring.
A hive on a flat and possibly slippery roof accessible either by ladder or through an upstairs window! In the country-side local farmers and gamekeepers can be very helpful in finding a good site. You may have noticed an attractive situation; it is the farmer who will direct you to the owner whom you must approach for permission to use the site. The traditional payment for use of an apiary site is a pot of honey per year per hive although other agreements may be reached. If your selected site is not possible you will usually be offered a choice of other sites. It is then that you must be quite clear and single minded about the criteria for a satisfactory site. Visit the possible places with a beekeeping friend and discuss the points reviewed in this leaflet. It will be time well spent. Moving site is no joke.

Beekeeping Made Easy, by Marcus Williams
92 | P a g e
Apiary Hygiene
Aims The purpose of good apiary hygiene is to prevent the spread of disease between honey bee colonies and so maintain healthy bees. Good hygiene can also help to ensure the production of unadulterated honey. Low levels of disease are not always recognised and their presence can stress bees, making them even more susceptible to other diseases. A wide variety of diseases can be avoided by adopting hygienic practices.
1. Disease transmission and its prevention. The major agent in the spread of brood diseases is the beekeeper. If any contaminated combs or hive equipment are transferred to a healthy colony it becomes infected. Action
When manipulating hives, avoid placing frames or supers on the ground or grass to minimise the chance of contaminating honey or wax.
Wash your bee suit and boots regularly to remove pathogens and promote a clean image of beekeeping.
Be scrupulous in following the instructions provided with veterinary products and use only those which have low risk of contaminating the products of the hive.
Beekeepers could introduce pathogens or chemicals into the honey. The risk is low but causing human disease has a high public profile. Action
Avoid moving frames between hives, this includes both brood and super frames.
Replace supers after extracting back to same hive for cleaning
Keep all equipment (hive tools, queen cages, brushes etc) as clean as possible, as explained in sections 2 & 4
The bees also have a part to play. Bees attracted by the scent of honey will rob out weak infected colonies and forage round dirty comb and equipment left lying around carrying the infection back to their own hive. Action
Don‘t leave old combs or wax lying around near hives, always collect it into a container that can be closed and remove it from the area of the hives keeping it sealed.
Seal hives where colonies have died. Move well away from flying bees, dismantle and treat as in 3c, also burning the dead bees.
In certain circumstances bees alone can transport infection. Although worker bees usually stay with their parent colony, drones do move from hive to hive. Drifting of infected workers can occur and carry infection to neighbouring colonies. Action
To minimise drifting hives should be arranged to enable the bees to find their own colony with ease. It helps to have coloured roofs and entrances facing in different directions
They should be well spaced. (1.2 to 1.5 metres) suggested.

Beekeeping Made Easy, by Marcus Williams
93 | P a g e
Bees from another apiary could bring in disease. Swarms from an infected hive may carry infection and become diseased after they have been hived. Bees from a colony infested with varroa have been known to abscond and take refuge in neighbouring hives. Action
Swarms of unknown provenance should be housed in an isolation apiary on new foundation and not fed for 48 hours so that all the honey they carry is used for wax production. They should be treated for varroa and need to be kept in isolation until the health of the brood can be properly assessed.
Regular monitoring of the drop rate of varroa in all colonies will alert the beekeeper to a sudden infestation. He can then take appropriate steps according to the season.
2. Inspection Routine. Take a bucket of washing soda solution to the Apiary to rinse tools and gloves between each hive.
Use rubber or latex gloves as they can be washed easily. Replace regularly.
Take a box with lid in which to put brace comb, propolis scrapings, queen cells etc and plastic sacks for frames that you need to seal off and remove from the site.
3. Cleaning and caring for equipment Have a routine for separating used items needing cleaning from clean stock. Try to store all cleaned stock in a separate building. a. Clean all used equipment (supers, brood boxes etc) in between re-use. If solid floors are used or there is a solid sheet below the varroa mesh these should be changed and treated regularly. A blow torch is a convenient way of sterilising these wooden parts. Fumigation with Acetic acid or Sulphur dioxide is very effective if reuse is not urgent. (see section 4}. Second hand equipment should be thoroughly sterilized before taking to the apiary and any second hand comb should be burned. b. The wax from older super comb can be cut out and recycled and the frames boiled in soapy washing soda solution to clean and disinfect them. (An electric boiler or old tea-urn is a valuable piece of equipment for the bee-keeper) c. The wax from old brood comb should be cut out and destroyed by burning, preferably in an incinerator. Take care when burning a large quantity of wax as it is highly inflammable. The frames can be boiled in soapy washing soda solution as above. d. Super frames with clean unbroken comb should be preserved. Good quality drawn comb is a valuable asset for the beekeeper and must be stored carefully to avoid damage by wax moth or mould. e. Supers with good comb usually winter well if stacked outside with a queen excluder on the bottom and another as a crown board below the roof. This allows air to circulate but keeps out the mice. It prevents mould and allows spiders to get in to control wax moth. The freezing winter temperatures kill off the wax moth too. f. Brood comb is more susceptible to wax moth although about 5 days in a freezer then sealing the boxes containing the combs to avoid further infestation should solve the problem. Acetic acid, Certan or Sulphur dioxide can be used to disinfect and control wax moth.( see section 4) This treatment may need to be repeated during the winter.

Beekeeping Made Easy, by Marcus Williams
94 | P a g e
4. Treatment agents for equipment. Washing Soda [NOT caustic soda] Used for washing tools, gloves, wooden frames etc. It helps to remove wax, propolis, and honey and is a mild disinfectant. Washing soda crystals are widely available and cheap. Make up a solution by dissolving 0.5 Kg in a gallon of water. Use with care; it is mildly corrosive. Sulphur Dioxide It is produced by burning sulphur strips, (obtainable from beekeeping suppliers) and is used for treating wax moth in stored combs. Six supers containing the frames are stacked and 2 strips placed in a metal container which is suspended from the top of an additional empty box. The strips are lit and the roof put on quickly. The fumes are heavier than air and will fall through the stacked combs. Avoid inhaling the smoke. Sulphur dioxide is not fat soluble and so its use poses very little risk to wax and honey. Certan Certan is a safe biological treatment for wax moth obtainable from beekeeping suppliers. It is a spore suspension of Bacillus thuringiensis which infects and kills wax moth larvae. It is mixed according to the instructions and sprayed on both sides of the frames. After drying, the frames are then stored in supers or brood boxes. It is fairly expensive. It has to be kept dispersed while spraying otherwise it can block the sprayer. Acetic Acid Used for sterilization of comb and boxes. Obtainable from beekeeping suppliers at strength of 80%. Make a stack of boxes and combs needing treatment. On top of each set of frames place an absorbent pad on a saucer or plastic tray and pour about a third of a cup of acetic acid onto the pad. Place a solid cover board on the top of the stack and seal all joints; packing tape is suitable. Let the fumigation proceed for about a week then air the combs thoroughly for another week. Acetic acid is very corrosive. It will remove skin very quickly. Wear overalls, rubber gloves, eye protection and a breathing mask. Don‘t place the stack on a concrete or brick floor and remove metal ends.

Beekeeping Made Easy, by Marcus Williams
95 | P a g e
Organising an Apiary Meeting This leaflet is provided as guidance for beekeepers who have the responsibility of organising or managing apiary meetings. It highlights some of the do‘s and don‘ts of apiary meetings. It is not however a definitive list of all the issues and does not absolve the individual beekeeper from exercising all sensible precautions.
Who is in charge of the meeting? This is the first issue that needs to be addressed: there can only ever be one person in charge. It may be the apiary manager if the apiary is an Association apiary, or it may be an official of the association, the apiary owner or an invited guest. Whoever it is, there must be only one person.
What is the purpose of the meeting? Meetings are sometimes held without any defined purpose - often they are a convenient event for beekeepers to meet together on a nice summer afternoon. But as with all aspects of beekeeping, a little thought in advance will be of benefit. The prime objective may be to assess the strength or health of colonies, to demonstrate a particular technique or item of equipment, to host a visit from your Regional Bee Inspector or to hold a beginners‘ meeting. Whatever the purpose, advance preparation will help. Some of the questions which could be asked beforehand include:
Will they all be experienced beekeepers?
Will there be any beginners or members of the public attending?
How many people are expected to attend?
Will everyone have protective clothing?
What are the forecast weather conditions?
Is there adequate parking and access generally?
Has permission been sought from the landowner?
What is the temperament of the bees at the site?
Is there a nectar flow on? Each of these questions could potentially provide information which would make the meeting different from any other. For example, it is rarely a worthwhile exercise to manipulate bees when there is no nectar flow. More particularly, these (and other) questions will enable the organiser or manager of the meeting to decide exactly what he or she is seeking to achieve at the meeting.
Identify the objectives of the meeting Unless the notice of the meeting has given a clear indication of it‘s purpose or intent, attendees will have come along with very varied expectations of the outcomes. It can therefore be very helpful to list the objectives of the meeting and make sure that those attending are in agreement from the outset. This can have the added advantage of establishing firmly who is in charge of the meeting. Always clarify the objectives before opening any hives. There is no harm in revising them if some of those attending want to achieve extra or different objectives, but make sure that this is done before the bees become aware that they are the subject of a meeting. Confused bees do not make a good recipe for a successful apiary meeting.

Beekeeping Made Easy, by Marcus Williams
96 | P a g e
Arrange the apiary site Give some thought in advance as to where all the visitors will stand and how they will all get the opportunity to see what is to be demonstrated. Arrange the viewing area so the flight path of any colony is not blocked. Often, whilst everyone is absorbed with the colony which is currently open, no thought is given to the returning or departing bees at the next colony. Everybody then comments on how bad tempered the bees are when that colony is opened. Consider keeping all of the attendees behind the hives or well in front so that the bees can come and go unhindered. Rope off a ‗no go‘ area if necessary. Rarely can about more than four people adequately observe manipulations within a hive at close range, so it may be appropriate to consider taking items of interest to the audience to ensure that all have an equal chance of seeing the key points. But remember that this approach will take longer and a delicate balance must be struck between answering all of the questions and keeping the hive open for an unduly long period. Assess which questions can be dealt with after the hive has been reassembled.
Apiary hygiene Good bee husbandry demands that the use of equipment from other beekeepers or sites should be avoided. Make sure that if other persons are carrying out manipulations, they do not use any of their own equipment (particularly hive tools or cover cloths). Always practise the same standards of hygiene as you would at any apiary site. Leave the site clean and tidy with all hives in a sound, weatherproof condition. It is particularly important to ensure that any smoker materials are fully extinguished if left in the apiary. Do not leave brace or burr comb lying around the site - this can be a cause of robbing and spreading disease quite apart from being a waste of a valuable resource. Make sure that any security or access arrangements are restored as you leave the site.
Precautionary arrangements A few simple arrangements can help the success of the meeting.
Even if you have the landowner's permission for the apiary site, be sure that you have specific permission for the meeting.
Talk in advance to any neighbours who may be affected.
Clearly understand the terms of any insurance which is applicable.
Carry a mobile phone or know the location of the nearest public phone.
Identify if any of the attendees have a known allergy to bee venom. Most beekeepers who exhibit an allergic reaction are aware of it and will also be aware of the extent of their reaction. Persons with a known allergy should not be permitted to attend meetings unless they have with them any medication which has been prescribed and are capable of administering it themselves. Occasionally, the allergic reaction in some individuals can become suddenly worse or an allergy can develop where none was present before. However, unless you are qualified to diagnose any unexplained condition you should not assume that it is a reaction to bee venom; the symptoms may be due to some entirely unrelated condition. Organisers should familiarise themselves with the information provided in the BBKA Advisory leaflet B2 ‗Bee Stings‘. This gives advice on how to deal with stings including severe reactions.

Beekeeping Made Easy, by Marcus Williams
97 | P a g e
Check list For Your Next Apiary Meeting
Preparation
Plan and organise the meeting carefully.
Determine who will run the meeting – one person only.
List all essential equipment and who will provide it.
Inform attendees what protective clothing is needed and arrange for them to borrow some if necessary.
Make sure the landowner knows your plans.
Make sure any neighbours who could be affected are aware of the meeting.
Have a mobile phone to hand and know the exact location of the apiary and the nearest public phone.
Identify whether any of the attendees have a known allergy to bee venom.
At the meeting
If any of the circumstances are not right, cancel the meeting.
Make sure that people do not stand in the flight path of the bees.
Watch that the apiary is not over-congested.
Do not attempt to administer any medical treatment unless you are qualified to do so.
Put all brace comb, etc, in a container and remove it from the site.

Beekeeping Made Easy, by Marcus Williams
98 | P a g e
BEEKEEPING TOOLS & EQUIPMENT

Beekeeping Made Easy, by Marcus Williams
99 | P a g e
Beekeeping Equipment Plan for two colonies of bees - if one dies, the other will hopefully survive. However, try to cater eventually for more, for more there will be when the 'bug bites', especially when your bees swarm! Starting in a small way enables you to assess the suitability of your area, locate sites for out-apiaries and build up experience and equipment. If possible, decide on one type of hive so that your equipment is interchangeable - unfortunately, perhaps, there is no standard hive. There are several commercially available designs of hives in this country: the WBC, Modified National, Smith, Modified Commercial, Langstroth and Modified Dadant (it is interesting that designs have to be "modified"), the Langstroth hive being the most widely used hive in the world - but not in this country! The WBC is a double-walled hive, whilst all the others are single-walled. There is no evidence that a double-walled hive has any advantage over a single-walled hive. Bees can be kept successfully in any type of hive that provides sufficient space and protection from the weather. The most popular hive in this country is the Modified National. The earlier WBC hive (named after the designer, William Broughton Carr), is the type often associated with beekeeping and depicted in cottage garden pictures. It still has its adherents, but it is more costly and cumbersome in use, especially if you want to move your hives. There is no agreed Best Buy. More detailed information is to be found in Len Heath's book A Case of Hives. Although one type of hive is desirable, if second-hand equipment comes your way, grab it! It will be cheaper than buying new, but there is a risk that it may harbour disease. All hive parts, if not new, must be sterilized by going over the surfaces with a blowlamp. Do not buy and use old combs. Although it is possible to sterilize combs using acetic acid, it is not something a beginner should consider. It's not worth the risk of spreading disease to your bees and the low cost of new frames fitted with sheets of wax foundation makes it a false economy. Another drawback to buying second-hand equipment is that you can come across non-standard sizes (especially with WBC hives) - and some beekeepers are convinced that their hive design (or modification) is better than anything on the market! New equipment is expensive but it will last - sizes are standard and you should be able to sell more easily if you later wish to do so. It is possible, of course, if you are a DIY type to make your own hives. Plans of common hives (including the National) are readily available, but accuracy is essential if the bee space is to be maintained - failure in this respect will create many problems when examining bees. The hive must be soundly constructed and waterproof – an important quality, especially with single-walled hives. In the past, old wooden food boxes were used by 'cottagers' to make hives. Plans for cottage or cottager hives from scrap timber appear in The Beekeepers Quarterly (No. 35 Autumn 1993). The brood box can be made compatible with National supers (see below). Hives are designed to give a bee-space either above or below the frames. The Smith, Langstroth and Dadant hives have top bee-space. The WBC, National and the Commercial have bottom bee-space so that the tops of the frames are flush with the top edges of the box and the bottom bars are 9 mm (3/8") short of the lower edges. In addition, the Smith and Commercial hives are fitted with short lug frames - the others have long lug frames. The single-walled hive consists of a floor with an entrance on which is placed the brood box. As the name suggests, the brood box is the part of the hive in which brood is reared and is, therefore, the area where the queen resides. The queen is restricted to the bottom brood box by placing a queen excluder over the top. The most commonly used type is a flexible zinc sheet with slots of a size which allow the workers through into the boxes placed above. The queen being larger is unable to pass through. The excluder is placed on top of the brood box with the slots at right angles to the top bars of the frames underneath. This type of excluder can be used only on bottom bee-space hives. If you have a choice of long slot or short slot
choose a short slot excluder - if the slots are damaged when scraping the excluder free of wax and propolis, the queen may be able to squeeze through into the boxes above. Nowadays, excluders can be obtained in a thicker more rigid form or in plastic. For top bee-space hives, the excluder is mounted in a wooden frame to give rigidity and a bee-space underneath. In summer, to provide more space for the

Beekeeping Made Easy, by Marcus Williams
100 | P a g e
growing number of bees and for the storage of nectar, the hive is enlarged by adding boxes above the brood box - the supers. In a good year, bees will accumulate more honey than they need in the supers. It is from the supers that surplus honey is harvested. These are usually less deep than the brood box to reduce the weight of each box to make lifting and carrying full supers easier. A deep frame can hold 5 lb of honey, a shallow frame can hold 3 lb. A box holding 9 or 10 shallow frames is obviously to be preferred. One beekeeper, as he got older and less able to lift heavy boxes, used shallow boxes as brood boxes - this has the additional advantage of using the same sized frame throughout the hive. Anyone having difficulty lifting should investigate the Long Hive in which frames are added horizontally rather than vertically - plans have been published. The brood box usually contains 11 deep frames each holding a sheet of wax foundation impressed with the hexagonal cell pattern of natural honeycomb. Because of the way bees produce wax and manipulate it into comb, natural comb is rounded in shape (a catenary curve - a fact made use of in the Catenary hive. See Home Honey Production by W B Bielby for details). Providing them with foundation encourages the bees to construct rectangular combs within the frames, enables them to build combs evenly and quickly and saves them energy. It is estimated that bees may need to consume 6 lb honey to produce 1 lb of wax. The bees draw out the foundation and add wax to build cells in which either the queen will lay her eggs or the workers will store honey and pollen. The relatively small size of the British standard frame was fixed in 1882 by the BBKA when the non-prolific English black bee was the common bee. To accommodate more prolific queens, beekeepers resort to using two brood boxes - double brood - or a brood box and a shallow box - brood and a half - to provide a greater brood rearing area. This complicates routine inspections - either use a non-prolific bee or a larger hive. Comparative Brood Box Capacities: Hive Type No. of Size of Frames Comb Area Total Comb No. of Equiv- Frames (inches) (sq. ins.) Area (sq. ins.) Cells alent no.BS Frames Dadant 11 17 5/8 x 11 1/4 396 4362 93,000 18 Commercial 11 16 x 10 320 3520 75,000 15 Langstroth 10 17 5/8 x 9 1/8 322 3220 68,000 14 National/Smith 11 14 x 8 1/2 238 2618 58,000 11 WBC 10 14 x 8 1/2 238 2380 53,000 10 If the frames are placed so that they are parallel to the entrance they are said to be warm way. When the frames are at right angles to the entrance, i.e. the frames are parallel to the hive sides, they are cold way - presumably cold way because draughts can blow straight back and through the combs, whereas when warm way the combs in front protect those behind. Fierce arguments have raged over this matter in the past. Most beekeepers prefer to work at the back of the open hive and this necessitates having the frames arranged warm way. Whichever way you choose (and the bees don't seem to care!), make sure the supers are placed with the combs aligned in the same direction as the brood box. The supers are usually fitted with 9 or 10 shallow frames fitted with foundation. The sizes of the frames depend on the type of hive being used. British Standard frames (both deep and shallow) will fit National and WBC hives - and the Smith hive if the frame lugs are shortened. It is necessary that the frames are kept the correct distance apart to produce even combs and maintain the bee-space. There are several methods of doing this, but metal or plastic spacers which fit on the ends of the top bars are commonly used. It is also possible to buy self-spacing frames called Hoffmans, which are to be preferred, at least in the brood box. In these the upper part of the frame side bar is expanded to form a shoulder to hold the combs at the correct distance apart. The brood frames are fitted with 'narrow' spacing and the super frames with 'wide' spacing - the latter to enable fatter combs to be built. To facilitate the building of even combs from foundation in super frames, the frames are put on narrow spacing until the bees have drawn out the comb. This can be achieved by overlapping the wide spacers which will give narrow spacing.

Beekeeping Made Easy, by Marcus Williams
101 | P a g e
Alternatively, use 10 frames rather than 9 in the super on wide spacing. All foundation used in the brood box and the supers should be worker base (5 cells to the inch), reinforced with imbedded wires. It used to be recommended that drone base foundation be used in the supers (4 cells to the inch) to make extraction of honey easier, but this is not recommended for the beginner. If the queen manages to get through a damaged queen excluder into the super, you will have a lot of drones! It is possible to make your own foundation from your own wax using a commercially available press or by making one. Details may be found in Backyard Beekeeping by William Scott (Prism Press). A wiring board for imbedding wire into the foundation is also easily constructed. A wooden board (the crown board, cover board or inner cover) is placed on the top box under the roof. When the super is required for extraction and the supers have to be removed, bee escapes are fitted and it becomes a clearer board - it is then placed under the super to be cleared. The Porter bee escape, the commonest type, allows the bees to go down, but springs prevent their return. Instead of using a wooden board, a frame fitted with glass may be used – which enables examination of the bees without removing the cover. Strangely, it is called a glass quilt - quilts or pieces of calico or cloth were used as covers. Wooden hive parts should be treated externally with a suitable preservative, free of insecticide, to extend their use. Creosote should not be used. Vaseline may be smeared on frame runners to prevent the frames being glued with propolis. Propolis may be removed from spacers by boiling them in water to which washing soda is added - Mangers Soap or methylated spirits may also be used. If propolised queen excluders are left out in the winter to get cold, the propolis becomes brittle and may be knocked off. Propolis screens may be purchased in order to harvest propolis - the same method may be used or they can be put in the freezer! A smoker is a device for generating smoke. When bees detect smoke, they rush to gorge on honey from open cells in readiness to flee - presumably an instinct evolved when they were naturally tree-dwelling. However, a puff of smoke usually subdues the bees and makes them easier to handle - "usually" because some bees become more agitated when smoked! The minimum of smoke should be used to control the bees - it is often difficult to see a beginner (and some ‗experienced‘ beekeepers) because of the clouds of smoke belching from their smoker! Most books recommend smoking into the entrance - this drives the bees to the top to meet the beekeeper, when the roof and cover are removed! Smoke through the feed hole in the cover, wait a couple of minutes, and remove the cover giving a little smoke over the frames as you do so. As you become more experienced, you should be assessing your bees for such qualities as temper - this needs to be done with the minimum of control. It is also worth remembering that our neighbours will not have the advantage of being able to subdue your bees with smoke. And your smoker will go out - and you will forget it!! Like your hive tool, never put it down or you will tread on it - keep it between your thighs! If you have an outapiary, keep a disposable lighter (matches become damp), fuel and even a spare smoker under the roof of a hive. Do buy the largest smoker you can afford, especially if you have several colonies to examine. 'Improve' your smoker by screwing a coat hook onto the back so that you can hang it from the side of the hive, add a tobacco tin for storing matches and a cork for extinguishing the smoker - much better than stuffing the nozzle with grass and it improves visibility when driving home! Write your name and 'phone number on the back to avoid arguments at association apiary meetings. Try to use fuel that produces pleasant smelling smoke and keeps alight. Corrugated cardboard from boxes is often treated with fire retardant and is quite useless. Wood shavings, sacking and (best of all) dry rotten wood are satisfactory fuels. If your smoker is burning too fiercely, put it down on its side. Spring clean your smoker with oven cleaner - repair with Plastic Padding! An alternative to using smoke is to wet the bees with a fine mist of water from a spray bottle - not universally popular (I have known only two beekeepers who used this method), but useful in an emergency. It is now possible to buy a sachet of Liquid Smoke – a black liquid that is added to the water to be sprayed on the bees. The water smells of smoke, but I am sure it is the wetting effect that is important! The use of carbolic cloths was once a recommended method, but is no longer allowed because of the risk of contaminating honey and the risk to health. Other chemical repellents have been used to subdue bees and to remove them from the super: viz proprionic anhydride (more effective when mixed with propionic acid), butric anhydride (sold under the trade name Bee-Go), and benzaldehyde. Although smelling pleasantly of almonds, inhalation of benzaldehyde may cause convulsions and is narcotic in high doses - contact may cause dermatitis. But

Beekeeping Made Easy, by Marcus Williams
102 | P a g e
why run the risk of tainting honey and, in my experience, giving oneself a bad headache - stick with smoke and the clearer board! In my collection of beekeeping snippets I find the following recipe for Anaesthetising Vicious Bees: Methylated Spirits 1 part. Ether 2 parts. Chloroform 2 parts. Don't ever keep bees that need this sort of treatment. Killing them with petrol would be a better method of dealing with them! A veil is worn to protect the most sensitive parts of the body - a sting in the eye or mouth would, at least, be very painful. The increased confidence complete protection gives a beginner makes it worthwhile spending a bit more and buying a combined jacket, veil and hat (or hood). However, when experience and confidence have been achieved, you should not need to prepare yourself for warfare every time you go near your bees. Too much protection can isolate you from the mood of your bees and you may continue doing things when the bees are telling you to stop and go away! It is very important to remember that you may be well protected, but your neighbours are not and are likely to be attacked by very angry bees. If your bees always require you to wear battledress, then get rid of them and replace them with a more docile strain. Gloves give confidence in handling bees - with experience many beekeepers prefer to work with bare hands. Commercial beekeepers having to examine many hives wear gloves mainly to keep their hands free of propolis - also known as bee glue! It is brown and sticky and difficult to remove, especially when it gets on clothing, the car's steering wheel, etc. A hive tool is used to prise frames apart after they have been stuck together with propolis and to scrape frames clean of wax. The first rule of beekeeping is "Never put your hive tool down". You will – and you will lose it! Paint your hive tool a bright colour - not green! Incidentally, the second rule of beekeeping is "Never do a temporary repair - it will become permanent"! Adequate protection, judicious use of smoke, docile bees and a calm approach keep stings to a minimum. Disposable gloves or rubber washing-up gloves are a cheap alternative to bee gloves and have the advantage that they can be replaced when soiled. An old chisel or a wide screwdriver can be used as a hive tool. However, using the right equipment will greatly aid your learning. The parts to make a hive are usually bought ‗in the flat‘ and need to be assembled – easier than building a wardrobe, but some knowledge is required. Seek the help of an experienced beekeeper – Thorne‘s catalogue gives instructions. As your interest develops you will be tempted to buy more equipment – not all of it essential! You will eventually need to have such items as a queen cage, queen marker, etc. You will certainly need an extractor, jars & labels for the honey you will harvest. The following, then, is a list of essential equipment for one hive:
Floor and entrance block.
Brood box.
11 deep frames fitted with wired foundation and narrow spacers (or use Hoffman frames).
9/10 shallow frames fitted with foundation (wired or unwired) and wide spacers (or use Hoffman frames or castellations).
Queen excluder.
Crown board/clearer board fitted with bee escapes.
Roof.
Varroa screen. In addition to the hive you will need:
Veil.
Smoker.
Gloves.
Hive tool.
Feeder (used to feed sugar syrup in times of shortage etc. A 1 lb. honey jar or lever-lid tin with holes made in the lid is satisfactory

Beekeeping Made Easy, by Marcus Williams
103 | P a g e
Beekeeping Escape Boards Escape boards or clearer boards are primarily used to empty the super of bees when harvesting honey. The bee escape acts as a one way door for the bees to leave the super but not come back in. They are placed in or over the entrance to the super. Once the escape board is in place it should be left for a period of time. Some beekeepers prefer to leave it over night in an attempt to completely empty the super of bees, others prefer just to leave it for an hour and remove the remaining bees with a brush or blower.
Beekeeping Parts and Accessories There are loads of parts and accessories that can prove useful to the beekeeper here are just a few:
Queen Excluder: Excluders can be made from plastic or metal and are used as a selective barrier, allowing worker bees through but not the larger queens. The openings should be limited to 0.163 inch (4.14 mm). Excluders are used to limit access of the queen to honey supers. If the queen lays eggs in the honey supers and a brood develops it is difficult to harvest a clean honey product and it makes fall management more difficult. Queen excluders should be in use in Spring and Summer only.
Crown Board: The Crown board separates the supers from the roof and stops the bees from sticking the roof down. It can also be used with bee escapes to remove the bees from the supers.
Snelgrove Board: An ingenious invention that helps stop your bees from swarming.
Clearer Boards: Clearer boards are used to clear the bees from the super when wishing to extract the honey crop.
Bee Escapes: Like the clearer boards, beekeepers use bee escapes to allow bees to leave the super but not return, thus emptying the super ready for honey extraction. They come in a variety of shapes and sizes; porter, rhombus, canadian, cone.
Mouse Guards: Use mouse guards in the months where the bees are innactive to keep the mice out of the hive.
Travelling Boxes and Screens: Used to move bees and give them plenty of ventillation.
Skep: Very useful large straw bowl with tight fitting lid used to catch swarms of bees.

Beekeeping Made Easy, by Marcus Williams
104 | P a g e
Not to mention frame spacers, foam entrance enclosures, hoffman converter clips, narrow and wide plastic/metal ends, eyelets, frame wire and hive nails.
Beekeeping Clothing Beekeeping clothing is essential, especially for the beginner. Some more experienced beekeepers will only wear a hat and veil but we would advise the full suit and gloves when manipulating hives. You will notice that bee suits tend to be white (some are not, we would avoid these). This is a good colour to wear as the bees do not see it as a threat. If we think about natural predators of bees i.e. bears, we can see that bees would react more aggressively to darker colours and shapes. So make sure to wear light coloured clothes if no suit is being worn.
The Suit: You should really try and get the best that you can afford. If you are a beginner it is best to feel as safe as possible so you enjoy the experience all the more. It is not advisable to buy a veil only, try and get a full suit or atleast a jacket or smock with built in veil. The older style veils have netting all around the back and can cause problems when the netting folds inwards letting the odd bee sting the back of your neck. Try and get one that has a fabric back and looks a bit like a fencing helmet, it is sometimes called the astronaut suit.
Gloves: Normally a suit will come packaged with gauntlet type gloves. These will certainly protect your hands from stings but are very cumbersome, making it difficult to manipulate the hive efficiently, thus causing more stress and aggrevation to the bees. A better solution is to use marigolds or even blue medical gloves if you can lay your hands on them. Anyway the odd sting on the hand isnt too bad....is it? It may even help ease arthritis.
Veils: Advised for the more experienced bee keeper that requires less protection. Most of the veils resemble the one in the picture above entitled 'Good'.

Beekeeping Made Easy, by Marcus Williams
105 | P a g e
Bee Feeders There are of course times when beekeepers have to supplement the bees food. For more information on what to feed bees and when see the Feeding Bees section. This page deals with the mechanism/equipment needed to feed bees. Some feeders are specific to certain hives so make sure you are looking at the right thing. A design that can be used on most hives is called the Contact Feeder and can be purchased by Thorne who first invented it in the 1960's. Its basically a white plastic bucket with a 3‖ phosphor bronze mesh disc is sealed into the centre of the lid. Fill it with sugar to about 1‖ from the top and add warm water. Stir to mix and release air trapped in the sugar. Continue until fully dissolved. Add more water until the feeder is completely full. Press lid on firmly and securely and quickly invert the feeder. Place over the feed hole of the crownboard on the hive. Inside the feeder a vacuum forms so the sugar solution remains in the feeder until the bees feed through the mesh. There are also frame feeders, entrance feeders, jar attachment feeders, drop in feeders, rapid feeders, jumbo rapid feeders......yes there is a lot. Personally I like the contact feeders. Simple, cheap and effective but have a look around some stores online and get whichever you like. Then get on our forum and tell us if its any good or not.
Bee Smokers Smokers mostly come in two sizes: large and small. They are manufactured in three types of metal:
Tin plated steel: Cheapest option but expect it to look pretty tired within two seasons.
Copper: More resistant to corrosion but has a tendency to get easily dented.
Stainless steel: These are the best but the most expensive option.
A wire guard will stop you from burning yourself but is a less common option on a small smoker. The large smoker used to be the smoker of choice for beekeepers but with the advent of compressed cotton as a fuel the small smoker comes into its own. Using the compressed cotton means a small smoker will burn for a lot longer. This means it is more suited to beginners with only a few hives as its easier to hold and maneuver.

Beekeeping Made Easy, by Marcus Williams
106 | P a g e
Bee Hive Tools Hive tools are specially designed levers with scraping edges and other features that aid the beekeeper when manipulating hives. They help with dismantling of hives, removal of frames and can also be used to scrape accretions of propolis or brace comb from hive parts.
Red 'J' Type A very popular tool as it is the least expensive of commercially available types. It is also narrow, enabling it to be crooked in the little finger of one hand, so that it is always available, yet does not interfere with holding frame lugs. The curved portion gives rise to the name 'J' type and is used as a hook to lever out a frame using the shoulder to rest on an adjacent frame.
Orange 'J' Type This is similar to the red type, but is broader and more substantial in strength. The curved portion is used in the same way as with the red type. Another feature that is shared with the red type is the rectangular sideways extension near the chisel end. This is inserted between frames and is used, with a twisting motion, to separate them and to break any propolising that has occurred between frames.
Yellow Type This type is broad at both ends, with one end curled round in a scroll. The separating action is performed by dropping the curved portion between adjacent frame top bars and rotating the tool to left or right. A levering action can be performed by lipping the curved portion under a lug and rocking the tool backwards so that the rounded portion rests on the adjacent lug. The unusually shaped hole is intended for removing nails. To complicate matters the yellow type is sometimes blue, red and even orange. The bright colours help you to find it after dropping in the long grass. The hole in all the hive tools can also be used to attach a belt clip. This allows the tool to dangle within easy reach when not actually in use. Stainless steel types are available. These are made in all of the shapes shown above as well as a slimmer version of the yellow type. The use of stainless material renders them stronger and as they often have a highly polished finish they can be more easily cleaned. They can also be sterilised with more vigorously active disinfectants.

Beekeeping Made Easy, by Marcus Williams
107 | P a g e
Traps and Trapping used in Beekeeping
Pollen Trapping: Using pollen traps the beekeeper can provide a protein source that can be supplemented to bee's feed when raising queens or drones. This is considered by some to be a "black art" but there are no mysteries here. If queen rearing is to be taken seriously there is no point in producing substandard or inferior queens and drones too. By feeding pollen along with honey and syrup beekeepers can ensure that full nutrition is available (whether the bees will avail themselves of it depends somewhat on how it is presented within the hive). Pollen traps are not just gizmos for the gadget freaks. They serve an important purpose in providing spare pollen for breeding purposes as well as giving the beekeeper some idea of which crops their bees are actually foraging on. The collected pollen can be fed to colonies that are raising queens or drones for a breeding program, whether open mating or mating is controlled by instrumental insemination.
Dead Bee Traps: Collecting the bees that are ejected from the hive can give the beekeeper a lot of valuable information. If dead bees are removed and counted a pattern will form of the frequency of deaths at any particular time. Comparisons can then be made on the possible damage to bees from agricultural spraying operations.
Wasp Trap: The common wasp (Vespa Vulgaris) and the German wasp (Vespa or Vespula Germanica) are guilty of much robbing of honey stores in bee hives and are a nuisance in the Autumn when there are few caterpillars for them to feed on. However traps can be simply made using materials that are to hand.
The image to the left shows the general idea in cross section. The container is a screw topped jar and the cone is soldered into the jar top is a brass WBC type, but any similar cone will do. There are versions that have an "X" cut in the lid and the resulting four triangles are bent inwards to form the cone (care should be taken that the wasps cannot escape through the triangular slots that are formed by this method). You can use jam dissolved in water as the liquid that serves both as an attractant and as the media in which the wasps drown. Honey bees seem not to be attracted to the sticky jam liquid. You can also use half water half honey as long as the honey has been left to start fermenting. The bees will show no interest in the mixture if the honey has started to ferment. The wasps however will literally die for it.
Waxmoth Trap: The wax moths Achroia Grisella and Galleria Mellonella can be very damaging. A very simple and effective trap can be constructed to catch them though. Take a 2 litre drinks bottle (with lid) and cut a 30mm diameter hole just below the shoulder neck of the bottle, then tie some twine around the neck making sure the knot opposes the 30mm hole. Now put in the attracting mixture which consists of 1 cup white vinegar, 1 cup sugar and 1 banana peel. Top up with water until 75% of the bottle is full. Now hang it up nearby the apiary.

Beekeeping Made Easy, by Marcus Williams
108 | P a g e
HONEY

Beekeeping Made Easy, by Marcus Williams
109 | P a g e
Honey
Pure & Wholesome From the remotest times honey has been valued as a delicacy, an article of food, and as a sweetener. We have not to go back many centuries in the history of our European civilization to get to the times when sugar was a very rare import, and in those days the straw skep of bees was the means of supplying honey for home use. The production of honey by the bees is part of an exchange in which flowers provide nectar, enabling the bees to develop up thriving colonies in the spring and gather sufficient food in the summer to store away enough to live through the winter to next year's Spring flowers. In return, the bees while working the flowers pick up pollen on the hairs of their legs and body transferring it fortuitously to a flower at a later stage of development, fertilising the bloom, so that fruit and seeds are formed.
Nectar Production Plants live by the moisture and the nutrients they collect from the soil and from the materials they absorb from the atmosphere. Within the green parts of the plant an involved process known as photosynthesis takes place. Chlorophyll is present in the cells which can use light energy, particularly sunlight, to split some of the water liberating oxygen and using carbon dioxide from the atmosphere to form complex food substances including several sugars. A high proportion is sucrose. The liquid secreted by the nectary, which is associated with the flower, contains these sugars varying both in number and proportions according to the species of the plant, the soil and climatic conditions. The nectar also contains traces of protein, salts, acids, enzymes and aromatic substances all in a watery solution, so that there is some justification for calling Honey the "bottled sunshine" tag. This sweet liquid is offered at specific times in a regular daily cycle according to the species of the flower. Its secretion is influenced by the weather, particularly temperature and humidity, and also by soil moisture. Nectars vary considerably in flavour and sweetness, plum nectar has a sugar concentration of only 15%, lime 32-35%, white clover 40% and marjoram reaches 76%.
From Nectar Into Honey Having gathered some nectar, hard gotten bare sustenance for the colony at times, rising to full loads in a flow, it is carried back to the hive in the bee's honey sac, a non digestive crop and passed on to the house bees. Two things have to be done to convert the nectar into honey, firstly the water content, anything up to 80% has to be reduced to prevent fermentation. The house bees do this by exposing small quantities of the liquid to the warmth (over 90°F-33°C) of a well ventilated part of the hive, secondly and at the same time the sucrose in the nectar is being changed by the addition of the enzyme "invertase" produced in the glands of the bee, into two sugars Fructose and Glucose. The object of these changes is to produce a food which when scaled over in the cells of the comb will keep until needed, and is suitable with the addition of water for feeding to larvae when rearing starts in the spring. Strong colonies in good foraging areas can store two to four times as much honey as they need for winter survival; it is this surplus that the beekeeper can take.
Honey in the Hive As packed away in the comb by the bees honey is a clear liquid, its storage is a model of hygienic food preservation, each cell is filled with pure, well ripened, translucent honey, and covered with an individual wax capping. This is an example to the beekeeper when processing extracted honey, which being sticky stuff can pick up all sorts of minute debris, small pieces of wax, dust from the air, or from the vessels in which it is being handled, even fibres from the wrong sort of towel used for drying the jars. The best beekeepers set themselves a high standard.

Beekeeping Made Easy, by Marcus Williams
110 | P a g e
Storing Honey Most honey is a blend containing a mixture of flavours gathered in the working area round the hive. Honey varies in colour, willowherb is one of the lightest, the range goes through the golden shades from a pale straw to strong hues, darker colours come from hawthorn and field beans, but the depth of the hue is also affected by the kind of soil, heavy clay will give a darker honey from the same plants than that produced on a sandy soil. When taken from the hive fully sealed, most honey is liquid but after a period of storage, particularly after extraction, it will granulate. This is a normal sign of maturity. Clover honey granulates with a fine smooth quality; this honey is much sought after, and is an excellent component of any blend. Some types of honey set rather hard with a coarse structure, which can be avoided by a process of warming and stirring-in some partly melted crystallised honey of a good type as a seed to give a smooth texture. Later on the honey can be warmed and stirred to produce a spreadable honey, known as creamed or soft set. Both soft set and granulated can be made clear again by warming gently. Heather honey is in a separate class, it is a jelly with bubbles in it which liquefies when stirred, it is usually a rich reddish amber in colour and is the honey of the connoisseur. It is obtainable in the jar as described; it is also sold in the comb.
Honey on the Comb One of the traditional forms of honey is in the comb. In skep beekeeping days the sealed honey storage comb was just cut out and sold in the country markets, then the "Section" came in. This is a wooden frame just over 4" square carrying about a pound of honey. A more recent method of presentation is "cut comb'', small pieces of sealed virgin comb, from 8 to 12 ozs., packed in transparent topped plastic cases. The attraction of comb honey is that it retains its full flavour and aroma, some of which is inevitably lost in the extraction process.
Selling Honey These are the main types of honey available in the British Isles from home production, their flavour and quality do justify the premium prices obtainable provided they are matched by a similar standard of presentation. There is never enough good home produced honey to meet the demand, for though fairly regular high grade crops can be taken, the crop per hive is very much less than overseas beekeepers get.
Honey as a Sweetner Honey is an easily digested and assimilated energy food for all who can take their normal quota of sugar. Its use as a sweetener is largely governed by personal preference, just a little mild flavoured honey added to cooked or bottled fruit, or to a fresh fruit salad, will mellow and improve the dish, too much added will mask the natural flavours.

Beekeeping Made Easy, by Marcus Williams
111 | P a g e
Honey Facts
Nutrition: Honey is a mixture of sugars and other compounds. With respect to carbohydrates, honey is mainly fructose (about 38.5%) and glucose (about 31.0%), making it similar to the synthetically produced inverted sugar syrup which is approximately 48% fructose, 47% glucose, and 5% sucrose. Honey's remaining carbohydrates include maltose, sucrose, and other complex carbohydrates. Honey contains trace amounts of several vitamins and minerals. As with all nutritive sweeteners, honey is mostly sugars and is not a significant source of vitamins or minerals. Honey also contains tiny amounts of several compounds thought to function as antioxidants, including chrysin, pinobanksin, vitamin C, catalase, and pinocembrin. The specific composition of any batch of honey will depend largely on the mix of flowers available to the bees that produced the honey. Typical honey analysis: Fructose: 38.5% Glucose: 31.0% Sucrose: 1.0% Water: 17.0% Other sugars: 9.0% (maltose, melezitose) Ash: 0.17% Other: 3.38% Honey has a density of about 1.36 kilograms per liter (36% denser than water). The best honey is in the uncut honey combs. After being pumped out from there it is very vulnerable, and the main losses of quality take place during preservation and distribution. Heating up to 37°C causes loss of nearly 200 components, part of which are antibacterial. Heating up to 40°C destroys the invertase—the main bee enzyme, thanks to which the nectar becomes honey; heating up to 50°C turns the honey into caramel (the most valuable honey sugars become analogous to synthetic sugar). Generally any larger temperature fluctuation (10°C is ideal for preservation of ripe honey) causes decay.
Formation: Honey is created by bees as a food source. In cold weather or when food sources are scarce, bees use their stored honey as their source of energy. By manipulating bee swarms to nest in artificial hives, people have been able to semi-domesticate the insects, and harvest excess honey. In the hive the bees use their "honey stomachs" to ingest and regurgitate the nectar a number of times until it is partially digested. The bees work together as a group with the regurgitation and digestion until the product reaches a desired quality. It is then stored in honeycomb cells. After the final regurgitation, the honeycomb is left unsealed. However, the nectar is still high in both water content and natural yeasts which, unchecked, would cause the sugars in the nectar to ferment. The process continues as bees inside the hive fan their wings, creating a strong draft across the honeycomb which enhances evaporation of much of the water from the nectar. This reduction in water content raises the sugar concentration and prevents fermentation, then the bees cap the honeycomb cells. Ripe honey, as removed from the hive by a beekeeper, has a long shelf life and will not ferment if properly sealed.
Preservation and Strorage: Because of its unique composition and the complex processing of nectar by the bees which changes its chemical properties, honey is suitable for long term storage and is easily assimilated even after long preservation. Honey should not be preserved in metal containers, because the acids in the honey may promote oxidation of the vessel. This leads to increased content of heavy metals in honey, decreases the amount of nutrients, and may lead to stomach discomfort or even poisoning.

Beekeeping Made Easy, by Marcus Williams
112 | P a g e
Traditionally honey was stored in ceramic or wooden containers, however glass and plastic are now the favored material. While ceramic vessels are still a viable option, honey stored in wooden containers may be discolored or take on flavors imparted from the vessel. Traditionally honey was preserved in deep cellars, but not together with wine or other products. As honey has a strong tendency to absorb outside smells and moisture, it is advisable to keep it in clean, hermetically sealed vessels. For the same reasons, it is not advisable to preserve honey uncovered in a refrigerator, especially together with other foods and products. It is also advisable to keep it in opaque vessels, or stored in a dark place. Optimal preservation temperature is +4 to +10 °C (39 to 50 °F). Honey should be stored in a dark, dry place, preventing it from absorbing any moisture. If excessive moisture is absorbed by the honey, it can ferment. When conventional preservation methods are applied, it is not recommended to preserve the honey for longer than 2 (maximum 3) years.
Mead: Mead is a typically alcoholic beverage, made from honey and water via fermentation with yeast. Its alcoholic content may range from that of a mild ale to that of a strong wine. It may be still, carbonated, or sparkling. It may be dry, semi-sweet, or sweet. Depending on local traditions and specific recipes, it may be brewed with spices, fruits, or grain mash. It may be produced by fermentation of honey with grain mash; mead may also, like beer, be flavored with hops to produce a bitter, beer-like flavor. Mead is independently multicultural. It is known from many sources of ancient history throughout Europe, Africa and Asia, although archaeological evidence of it is ambiguous.
Ye Olde Mead Recipe: Take of spring water what quantity you please, and make it more than blood-warm, and dissolve honey in it till 'tis strong enough to bear an egg, the breadth of a shilling; then boil it gently near an hour, taking off the scum as it rises; then put to about nine or ten gallons seven or eight large blades of mace, three nutmegs quartered, twenty cloves, three or four sticks of cinnamon, two or three roots of ginger, and a quarter of an ounce of Jamaica pepper; put these spices into the kettle to the honey and water, a whole lemon, with a sprig of sweet-briar and a sprig of rosemary; tie the briar and rosemary together, and when they have boiled a little while take them out and throw them away; but let your liquor stand on the spice in a clean earthen pot till the next day; then strain it into a vessel that is fit for it; put the spice in a bag, and hang it in the vessel, stop it, and at three months draw it into bottles. Be sure that 'tis fine when 'tis bottled; after 'tis bottled six weeks 'tis fit to drink.
Organic Honey: Certified Organic Honey is honey or honey combs produced, processed, and packaged in accordance with national regulations, and certified as such by some government body or an independent organic farming certification organisation. In the United Kingdom, the standard covers not only the origin of bees, but also the siting of the apiaries. These must be on land that is certified as organic, and within a radius of 4 miles from the apiary site, nectar and pollen sources must consist essentially of organic crops or uncultivated areas. According to TheOrganicReport.com, organic honey is quite scarce to find because most beekeepers "routinely use sulfa compounds and antibiotics to control bee diseases, carbolic acid to remove honey from the hive, and calcium cyanide to kill colonies before extracting the honey, not to mention that conventional honeybees gather nectar from plants that have been sprayed with pesticides."

Beekeeping Made Easy, by Marcus Williams
113 | P a g e
Processing Variety:
Crystallized honey is honey in which some of the glucose content has spontaneously crystallized from solution as the monohydrate. Also called "granulated honey."
Pasteurised honey is honey that has been heated in a pasteurization process.Pasteurisation in honey reduces the moisture level, destroys yeast cells, and liquefies crystals in the honey. While this process sterilizes the honey and improves shelf-life, it has some disadvantages. Excessive heat-exposure also results in product deterioration, as it increases the level of hydroxymethylfurfural (HMF) and reduces enzyme (e.g. diastase) activity. The heat also affects appearance, taste, and fragrance. Heat processing can also darken the natural honey color (browning).
Raw honey is honey as it exists in the beehive or as obtained by extraction, settling or straining without adding heat above 120 °F. Raw honey contains some pollen and may contain small particles of wax. Local raw honey is sought after by allergy sufferers as the pollen impurities are thought to lessen the sensitivity to hay fever.
Strained honey is honey which has been passed through a mesh material to remove particulate material (pieces of wax, propolis, other defects) without removing pollen, minerals or valuable enzymes.
Ultrafiltered honey is honey processed by very fine filtration under high pressure to remove all extraneous solids and pollen grains. The process typically heats honey to 150–170 °F to more easily pass through the fine filter. Ultrafiltered honey is very clear and has a longer shelf life, because it crystallizes more slowly because of the high temperatures breaking down any sugar seed crystals, making it preferred by the supermarket trade. The heating process degrades certain qualities of the honey similar to the aforementioned pasteurization process.
Ultrasonicated honey is honey that has been processed by ultrasonication, a non-thermal processing alternative for honey. When honey is exposed to ultrasonication, most of the yeast cells are destroyed. Yeast cells that survive sonication generally lose their ability to grow. This reduces the rate of honey fermentation substantially. Ultrasonication also eliminates existing crystals and inhibits further crystallization in honey. Ultrasonically aided liquefaction can work at substantially lower temperatures of approx. 35 °C and can reduce liquefaction time to less than 30 seconds.
Whipped honey, also called creamed honey, spun honey, churned honey, candied honey, and honey fondant, is honey that has been processed to control crystallization. Whipped honey contains a large number of small crystals in the honey. The small crystals prevent the formation of larger crystals that can occur in unprocessed honey. The processing also produces a honey with a smooth spreadable consistency.
Manuka Honey: Manuka honey is produced by honeybees which gather nectar from the flowers of wild Manuka bushes that are indigenous to New Zealand. This particular honey is distinctively flavoured, with a rich taste and dark appearance. Although all types of honey contain hydrogen peroxide (particularly known for its antibacterial properties), Professor Peter Molan of the Honey Research Centre at Waikato University in New Zealand has undertaken extensive research into maunka honey and believes it contains unique properties which provide additional support to the body's natural healing process. Molan's research has shown that manuka honey has a high antibacterial potency which heals a range of conditions, from external skin infections to aiding digestion. Molan has also shown that manuka honey can help to fight throat infections and reduce gum disease. When eaten regularly it can aid memory, increase energy levels, improve well-being and reduce feelings of anxiety.

Beekeeping Made Easy, by Marcus Williams
114 | P a g e
Well being elixir: Honey is an all-round healing elixir which can promote general health and well-being. A daily dose of honey, whether as a sweetener in hot drinks, by the spoonful or spread on toast, will boost the body's supply of antioxidants - essential for protecting the body against free radicals. Flush out your system and give yourself a daily boost with this cleansing tonic: mix a spoonful or two of honey and the juice of half a lemon into a cup of hot water and drink each morning before breakfast.
Honey Energy Boost: Next time you go to the gym, have a spoonful of honey beforehand. Honey is a source of natural unrefined sugars and carbohydrates, which are easily absorbed by the body, providing an instant energy boost with long-lasting effects. For this reason, many athletes include honey in their daily diets. It was even used by runners in the original Olympic Games in ancient Greece.
Homemade Cough and Cold Remedy: Honey is widely used as a complementary remedy for the relief of the symptoms of colds, coughs, sore throats and flu. For a sore throat, take it on its own or gargle with a mixture of two tablespoons of set honey, four tablespoons of cider vinegar and a pinch of salt. A traditional drink made from hot water, lemon juice and honey will help to soothe cold and flu symptoms. Adding a little eucalyptus oil or root ginger will help to ease congestion and, to help enhance sleep, try a drop of whiskey in the mixture. A home made cough mixture can be achieved by mixing roughly chopped onion with honey, let it sit like this for 24 hours. Strain out the chunks of onion using a colander or a metal grid from the grill. The resulting onion infused honey can be used to treat coughs!
Treating Cuts and Grazes: Honey is a mild antiseptic and can help to keep external wounds, such as cuts and minor burns, clean and free from infection. By absorbing the moisture around the wound, honey can help to prevent the growth of bacteria.
Digestion Healer: It was the Romans who first discovered the beneficial effects of honey on digestive disorders when they would prescribe honey as a mild laxative. Funnily enough, honey has also been used as a treatment for diarrhoea. The principle behind these theories is that honey is believed to help destroy certain bacteria in the gut by acting as a 'preserving' agent.
Better Baking with Honey: You can use honey in cooking instead of sugar. Because it is sweeter than sugar, you need to use less. If you are experimenting with honey in a recipe, try replacing half the sugar with honey as the flavour can be very strong. Honey is hygroscopic (meaning it attracts water) so it is good for baking cakes as it keeps them moister for longer. Look on our recipe pages for some delicious recipes using honey.
What flavours honey: Honey is produced all over the world, from the heat of the tropics to the crisp cold of Scandinavia, Canada and Siberia. The warm climate of equatorial countries allows honey to be produced for most of the year, whilst beekeepers in Finland have a short season of just 2-3 weeks each year!

Beekeeping Made Easy, by Marcus Williams
115 | P a g e
The distinct aroma, flavour and colour is determined by the type of flower from which the bee collects the nectar. Some honey closely mimics the characteristics of the herb or tree whose flower the bee has visited, such as Orange Blossom and Lime Blossom, or Rosemary and Thyme. Most honey comes from bees foraging on many different floral sources, and are known as polyfloral. However some plants provide enough nectar during their short flowering season, and are so irresistible to the local bee population, that a hive can yield honey from one single type of flower. This honey, known as monofloral, is keenly sought by beekeepers. Here in Britain, honey is produced primarily for the local market. With over 35,000 beekeepers throughout the country harvesting honey from Apple Blossom, Cherry Blossom, Hawthorn, Lime Blossom, Dandelion, and the more popular and commercially viable Borage and Heather; an excellent range of different honey types are available on our own doorstep. The beekeeper also plays an important role in the pollination of fruit crops, and he travels for miles with his bees in a season to help pollinate plants and trees that produce the fruit we see in our supermarkets. Unfortunately production in Britain is limited due to the unpredictable climate in this country. In a normal year around 4,000 tonnes is produced in Britain, but we consume over 25,000 tonnes per year spread on bread, in cereals, in baking and cooking, or simply by the spoonful! Fortunately, this demand is met thanks to areas of the world with longer production seasons, and a surplus of honey available to trade. This also introduces us to a whole new range of aromas and exotic flavours from different parts of the world.
Producing Honey The main reason for keeping bees is to harvest the honey they produce. Before the nectar collected from flowers becomes honey, the bees bring about several changes. Enzymes are added and excess water is evaporated until the water content is reduced to about 18%. The latter is essential if the stored honey is not going to spoil because of fermentation. The bees achieve this in several ways. In particular, currents off air are distributed around the hive by the bees fanning their wings, thus bringing in dry air and expelling moist warm air. When the honey is 'ripe', the bees seal each cell with a wax capping. When the combs in a super have been mostly capped in this way, the super is cleared of bees and removed for extraction. The cappings are cut off with a knife to expose the honey before extraction. To remove the honey from the combs you will need an extractor - most designs consist of a drum in which several frames can fit and these are then spun round to throw the honey out of the combs by centrifugal force. The first centrifugal extractor was invented by the Austrian Major Francesco de Hruschka in 1865. The idea came to the inventor, according to legend, as he watched his son swinging some honeycomb in a basket round his head! There are two basic types of extractors. The tangential type has the faces of the combs placed at right angles to the radii or tangentially. Honey is removed from the outer face – the combs have to be reversed to complete the extraction. The radial type removes honey from both side in one operation. The frames are arranged like the spokes of a wheel on radii of the rotor. New extractors are expensive so don't buy one until you are certain of your interest. Your local association may have one you can borrow or hire. Since their invention, much beekeeping equipment, including extractors, has been made from tin-plate. However, recent legislation prohibits their use - don't, therefore, be tempted into buying second-hand equipment, unless it is made from food-grade plastic or stainless steel. The third rule of beekeeping: "You will leave the extractor tap open (only once!) and have your precious honey on the floor". Be warned - honey flows silently! And however careful you are, every door handle and surface will be sticky. The extraction of heather honey is somewhat different to other honeys. Heather

Beekeeping Made Easy, by Marcus Williams
116 | P a g e
honey is thixotropic or jelly-like and has to be pressed out of the combs - alternatively, the honey can be eaten in the comb. Agitation of the honey in the cells causes the honey to become temporarily fluid, so that it can be extracted in a conventional extractor. Small-scale beekeepers use a device called a Perforextractor - more sophisticated equipment is available but it is expensive. I recall seeing a demonstration of an adapted discarded spin drier being used to extract heather honey with great efficiency. Heather honey does command a higher price . If you don't want extracted honey, an alternative is to cut comb into pieces and use and sell it as 'cut comb' for which there is a ready market. You do, however, lose the honeycomb that could have been re-used, but cut-comb fetches a higher price. Farmers in most areas are now cultivating large acreages of oil seed rape. Honey from this source granulates or crystallises rapidly, which is said to be undesirable in cut-comb - but there are customers who seem not to mind. You can purchase a comb cutter to give either 8 oz or 12 oz pieces and plastic cases in which to package them. It is necessary to use thin unwired foundation in the supers if you intend to produce cut comb. Supers containing rape honey must be removed and extracted when the water content has been reduced sufficiently to avoid subsequent fermentation and before it sets solid in the comb preventing extraction in the usual manner. This is usually when about 2/3 rds of the comb have been capped. Don't try straining straight from the extractor. Fill suitable containers and use as required. The solidified honey will need melting before straining through muslin and will be warm enough to strain easily. An insulated cabinet for melting honey can easily be constructed for this purpose. A refrigerator from the local tip can provide an insulated body - a bulb provides the heat. Refinements include a thermostat and fan to circulate the air. A honey warming kit is available and provides a thermostat, heating element and thermometer. If you have solidified honey, the whole comb will have to be removed from the frame and melted - the wax will form a solid cake on the surface of the honey and can be lifted off. If you have a lot of honey to process, it may be worthwhile investing in a melting tray such as the Easy-Bee or the Strainaway Filter System. A Pratley tray can cope with cappings, but not much more if overheating is not to be a problem. It is possible to scrape the comb down to the mid-rib rather than destroying the whole comb. Heating must be done carefully if the honey is not to be spoiled. The loss of volatile elements and the taste of caramel or wax do not enhance the flavour. In particular, the HMF level must not exceed the permitted level. HMF, 5-hydroxymethyl-2-furfuraldehyde, is a substance produced by the chemical breakdown of the sugar fructose in the presence of acids. The level of HMF increases with heating and storage time. Although generally believed to be harmless to the consumer, it is used as a measure of over-heating or age. However, Laurie Croft in Honey and Health (Thorsons Publishing Group) cites evidence suggesting that HMF is harmful to human health - and to bees. He also found that mass-produced honey had HMF levels well above the legal maximum - even though the UK was allowed twice the amount permitted in the EC – new regulations (September 2003) has reduced the HMF content from 80 ppm to 40 ppm. HMF is not peculiar to honey. Some jams, for example, contain very high quantities, perhaps 500 ppm or more.. If your honey is "Cold Pressed" you could use this as a selling point - it is more valid than "Organic Honey"! Similarly, the enzyme diastase is destroyed by heating and age and is used as an indicator of quality. Neither HMF nor diastase can be analysed easily by the beekeeper - therefore, the heating of honey must be kept to a minimum. Honey that exceeds the limits for HMF or diastase can be sold only as bakers honey i.e. for general manufacturing purposes - at a lower price. You can, of course, simply leave the supers of rape honey on the hives for the bees to consume. The experts tell you that this is not good practice. As the honey crystallises, a weak solution of sugar is left around the crystals. This, it is frequently stated, causes dysentery (diarrhoea). In addition the bees have to fly out to find water to dilute the solid honey, causing mortality if the weather is cold. Fortunately, bees do not read beekeeping books. I never used to admit to this heinous crime until I heard a well-respected speaker say that he always left a super of granulated honey on each hive as winter feed! I can only say that my bees winter well and show no signs of dysentery. I assume many wild colonies have similar stores. The best food for bees is the honey they produce for that purpose. There is a lot of moisture produced during the winter which they can utilise. It used to be standard practice to feed a block of candy during the winter until it became unfashionable. My bees always get a block of baker's fondant on Christmas Day when I wish them "Happy Christmas"! When preparing your bees for the winter, it is

Beekeeping Made Easy, by Marcus Williams
117 | P a g e
usually recommended that the queen excluder be removed in case the queen is left behind, when the cluster moves up into the super. I never seem to get around to removing excluders, but I don't think I have lost a queen because of "isolation starvation". It perhaps shows that the right management is the one that works for you - the bees that survive your management are the ones for you! An expert, after all, is simply x "the unknown quantity" and spurt "a drip under pressure"! Rape honey can set to knife bending consistency, not liked by most customers - and it tastes gritty because of the coarse crystals. To produce a more acceptable product, the honey should be creamed: Cool the strained honey to 75 deg F (24 deg C). Stir in a finely grained seed honey saved from a previous occasion. Mix thoroughly. Leave for 24 hours to allow air bubbles to escape and bottle. This used to be sold as Creamed Honey but I think the EC regulations insist that we now call it Soft Set Honey - because it does not contain cream! When honey is allowed to granulate naturally in the jar frosting can occur. As the honey crystallises it shrinks and leaves a gap between the jar and the honey and displays the crystals. The honey remains wholesome but may look unattractive. To overcome this problem, one producer packages honey in dimpled glass to disguise the problem! The only solution is to re-liquefy the honey carefully. A microwave oven can be used for small quantities, but you will need to experiment - stir the contents in between periods of heating. Be careful the honey does not boil over the top of the jar! If you are bottling extracted honey for your own use you may use cleaned jam jars etc, but you should buy standard jars if you sell your honey. Various shapes and sizes, in plastic and glass, are available. Fancy containers are also available. Whether you sell or give your honey away, it must comply with the food regulations. In particular, you must label your jars correctly. For example, a producer of "Heather Honey" was prosecuted successfully because it was shown that the honey so labelled was not predominantly heather honey - the bees had also collected nectar from a late crop of clover. Moorland Honey may be a safer description. However, if you state your honey is Heather Honey, Northamptonshire Honey, English Honey etc, such claims must be true. Apart from fraud such as adding corn syrup to honey, unscrupulous packers have been known to pack foreign honey as English Honey and sell at a higher price. However, each flower has pollen that is unique. If the pollen is extracted from a sample of honey, an expert (a melissopalynologist!) is able to deduce the source of the nectar - a large proportion of eucalyptus pollen in a sample of English honey would be highly suspect! If you depict a flower on your label, the honey must be predominantly from that source. Another beekeeper was fined for putting too much honey in the jar! The Food Act and EC regulations have in recent years caused concern among beekeepers - especially those who simply sell the odd jar of honey with no intention of making a living from their hobby. Neverthe- less, whether you sell one jar of honey or tonnes (or give it away), the laws still apply - and the fines can be high. There remains some confusion over the intention, interpretation and application of the new regulations. Trading Standards Officers are always helpful and willing to advise. Your local association should be able to keep you up-to-date - they usually produce their own label to which you can add your name and address using a rubber stamp or an "Able Label". It is worth remembering that honey is a very safe food product. In experiments, bacteria (including those causing typhoid fever, chronic bronchopneumonia and dysentery) placed in honey were killed after a few hours. In a good year you can expect at least 40-50 lb of honey from each colony - in a poor year, none at all and you may have to feed sugar to keep your bees alive. The latter makes it difficult to satisfy customers who want honey from bees that have not been fed "artificial" sugar. When beekeepers were given a special allowance of sugar during the Second World War, it was coloured green to prevent it getting onto the black market. It was then realised that bees move honey stores around the hive and green honey was on sale! It would be illegal to sell adulterated honey. In contrast, in America and Australia, for example, each colony might produce an average of 200 lb. In 1954, Rob Smith's hives sited in the Australian Karri Forest country averaged 629 lb. It is the reason why English honey is more expensive than imported honey - but it is the best! English honey should be marketed as a quality product. If customers are to be persuaded to buy English honey rather than cheaper imports, your honey must be processed properly and packaged attractively. Too often one sees poor quality honey on sale and prices that are too low. Less often one sees honey that is rather

Beekeeping Made Easy, by Marcus Williams
118 | P a g e
expensive, usually when sold in small containers or from "up-market" outlets. Comb honey attracts a higher price as does 'chunk honey' - a piece of comb placed in a jar of honey. Both are only feasible if the honey does not granulate. The market for "enhanced" honey products has not been fully exploited eg honey with added pollen or "Royal Jelly". There is a good market for other hive products - wax can be sold in 1 oz blocks or made into candles, polish and hand cream. Propolis (used by Stradivarius in his violin varnish) is made into an antiseptic for sore throats. Beekeeping suppliers will buy wax and, sometimes, propolis. Customers sometimes request pollen and wax cappings. A pollen trap can be fitted to a hive and the collected pollen used in the spring to feed bees or processed for sale. Selling mead would require a license. Much more needs to be done to advertise and market hive products. Proper advertising can influence the demand for English honey. When rape honey first came on the market, it was not universally liked (even by the beekeepers) - customers now ask for rape honey - sometimes they even want rock hard honey rather than the honey that you have spent hours producing in a creamed state! Process and present your honey properly. Don't sell cheaply in glut years - the lean years will follow. Honey properly processed and stored in suitable sealed containers in cool conditions will keep without harm. Rather than selling your surplus cheaply, make mead and toast your good fortune! Sell at a price that takes into account your time, effort and costs. Your local association should be able to recommend a satisfactory price – remember, other beekeepers in your area will not benefit if you sell too cheaply. A large-scale beekeeper was promoting British honey at a Food Fair in Hyde Park in London. He had considerable difficulty in convincing some potential lcustomers from the Middle East that his honey was a quality product because he was selling it at £2 per pound. At home they expect to pay £20! It is important to keep a record of income and expenditure, however small your sales. One beekeeper received a substantial tax demand based on the assumed profit from his hives - the onus was on the beekeeper to show that he did not owe tax. Bee prepared!
Honey in Easy Sections The production of honey in sections is notoriously difficult, some books in the past have indicated 'crowding' is the way to do it. If you have the bees outside your back door then you may, or may not, catch the swarms that will result. There is a way that produces well filled sections that have no travel stain and almost no propolis on the woodwork. The best way of getting sections completed well is to have them filled and capped by bees that are working with a sense of urgency. So Instead of trying to get them filled as the honey comes in, we gather our honey in shallow combs as usual. Then we extract the honey when it is capped (so that we know it is fully evaporated). The preferred time is as a flow is coming to an end, then we replace the supers with two section crates and a Miller feeder on the top of them and fill the miller feeder with the honey we have extracted. The bees will store this honey rapidly as they have no need to process it in any way, the timing keeps the bees in good spirits as this work is to them an extension of the flow that is petering out. As the job is completed swiftly there is no travel stain or propolising of woodwork. It works with round or square sections and each one is filled right out to the edge. It does entail a little extra work by the beekeeper, but the rewards are high. The sections fetch a premium price as they are such good quality. There is a modification that we can make to our section crates that make them more readily used by the bees. Work has been done that indicates that it was beneficial if an extra bee space passageway around the outer periphery of the box was provided to improve 'transport and communication'.
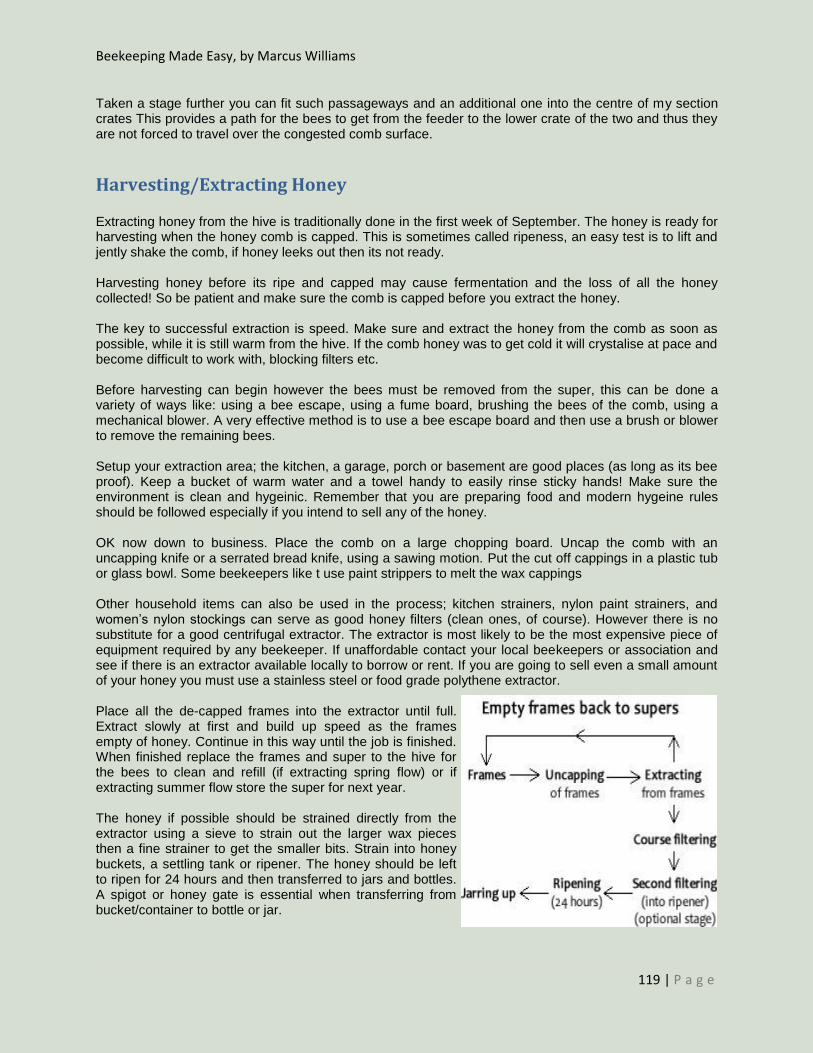
Beekeeping Made Easy, by Marcus Williams
119 | P a g e
Taken a stage further you can fit such passageways and an additional one into the centre of my section crates This provides a path for the bees to get from the feeder to the lower crate of the two and thus they are not forced to travel over the congested comb surface.
Harvesting/Extracting Honey Extracting honey from the hive is traditionally done in the first week of September. The honey is ready for harvesting when the honey comb is capped. This is sometimes called ripeness, an easy test is to lift and jently shake the comb, if honey leeks out then its not ready. Harvesting honey before its ripe and capped may cause fermentation and the loss of all the honey collected! So be patient and make sure the comb is capped before you extract the honey. The key to successful extraction is speed. Make sure and extract the honey from the comb as soon as possible, while it is still warm from the hive. If the comb honey was to get cold it will crystalise at pace and become difficult to work with, blocking filters etc. Before harvesting can begin however the bees must be removed from the super, this can be done a variety of ways like: using a bee escape, using a fume board, brushing the bees of the comb, using a mechanical blower. A very effective method is to use a bee escape board and then use a brush or blower to remove the remaining bees. Setup your extraction area; the kitchen, a garage, porch or basement are good places (as long as its bee proof). Keep a bucket of warm water and a towel handy to easily rinse sticky hands! Make sure the environment is clean and hygeinic. Remember that you are preparing food and modern hygeine rules should be followed especially if you intend to sell any of the honey. OK now down to business. Place the comb on a large chopping board. Uncap the comb with an uncapping knife or a serrated bread knife, using a sawing motion. Put the cut off cappings in a plastic tub or glass bowl. Some beekeepers like t use paint strippers to melt the wax cappings Other household items can also be used in the process; kitchen strainers, nylon paint strainers, and women‘s nylon stockings can serve as good honey filters (clean ones, of course). However there is no substitute for a good centrifugal extractor. The extractor is most likely to be the most expensive piece of equipment required by any beekeeper. If unaffordable contact your local beekeepers or association and see if there is an extractor available locally to borrow or rent. If you are going to sell even a small amount of your honey you must use a stainless steel or food grade polythene extractor. Place all the de-capped frames into the extractor until full. Extract slowly at first and build up speed as the frames empty of honey. Continue in this way until the job is finished. When finished replace the frames and super to the hive for the bees to clean and refill (if extracting spring flow) or if extracting summer flow store the super for next year. The honey if possible should be strained directly from the extractor using a sieve to strain out the larger wax pieces then a fine strainer to get the smaller bits. Strain into honey buckets, a settling tank or ripener. The honey should be left to ripen for 24 hours and then transferred to jars and bottles. A spigot or honey gate is essential when transferring from bucket/container to bottle or jar.

Beekeeping Made Easy, by Marcus Williams
120 | P a g e
Dont forget about the wax cappings as they can hold 10% of the honey. Drain them through screening or filter. Any tools or utensils that are used with melted wax can not be used for anything else, as the wax creates a thin film over everything it touches. Wash down all equipment outside with a hose or pressure washer if you have one. If there is no way of getting a extractor a good way to extract, use or sell the honey is by cutting the comb into rectangles and packaging in clear top plastic tubs. Normal super frames are fitted with unwired foundation and when drawn out and capped, pieces of comb are simply cut out ready for eating, either with a knife or Price comb cutter. The Price comb cutter cuts the comb to the exact size to fit into cut-comb containers (special plastic containers with clear tops).
Building a 4 Frame Honey Extractor

Beekeeping Made Easy, by Marcus Williams
121 | P a g e

Beekeeping Made Easy, by Marcus Williams
122 | P a g e
Honey Testing Quality control and honey testing should be carried out if the honey is intended for sale. Knowing that you are producing a wholesome and a non injurious product is essential to any food producing business, beekeeping is no different. The standards laid down for the sale of food products have to be upheld. Beekeeping must meet standards of hygiene and food safety that exist today. Some testing can be done simply at home, but other tests are a laboratory job and will cost considerable sums to achieve, although having a certificate may convince people for the batch tested, any subsequent batches cannot be linked back to any certification without re-testing. Tests can be carried out in order to detect levels of individual substances as listed in the classes below.
Pesticides Chlordimeform
Coumaphos
Fluvalinate
Amitraz
Antibiotics Chloramphenicol
Oxytetracycline (OTC)
Streptomycin
Enzymes and breakdown products Diastase (Amylase)
Hydroxymethylfurfural (HMF)
Moisture content The Profile or ratio of sugars present in a sample can also be determined. Adulteration of honey with other sweeteners can be detected as can the use of ultra filtering. Microbiological analysis can be done. Yeasts or moulds can be tested for aswell as bacterial forms - APC, Botulinum, Coliforms, Salmonella and others are testable, but mostly this requires laboratory analysis. The U.S. Food and Drug Administration prohibits the use of certain antibiotics in food production. Treatment of bees with these antibiotics may result in residues in bee products, potentially causing increased drug resistance and allergic reaction in humans.
Chloramphenicol
Fluoroquinolones (Enrofloxacin, Ciprofloxacin, Sarafloxacin, Difloxacin, Norfloxacin)
Metabolites of nitrofurans (Furazolidone - AOZ, Nitrofurantoin - AH, Nitrofurazone - SC, Furaldtadone - AMOZ)
Pesticide residues and bee repellant chemicals are also a concern in bee products. ECAL offers testing of selected pesticide residues known to be a risk in bee products, based on FDA residue surveys and known agricultural practices. Please contact us for more information and an updated list of these offerings.

Beekeeping Made Easy, by Marcus Williams
123 | P a g e
Pesticide Residue Testing Eurofins Central Analytical Laboratories (ECAL) offers a variety of pesticide screening services that are based on industry or government accepted screens and also tailored to individual customers.
Pesticide screens using methodology for common agricultural products published in the U.S. FDA Pesticide Analytical Manual, and unpublished FDA methods in the form of Laboratory Information Bulletins (LIB) obtained from established workers, such as Jon Wong, Greg Mercer, and Milton Luke. We have an ongoing dialog with these FDA workers to resolve problems with difficult food matrices.
Technical information published by the California Department of Food and Agriculture is used for quick screens on routine produce and food commodities.
European Methods such as S-19 and the European Pharmacopeia.
Methods for botanicals and botanical extracts based on USP methods with GC-MS or LC-MSMS determination.
Methods published in the Journal of AOAC International for many of the herbicide classes which are somewhat polar, and / or require LC-MSMS determination.
AOCS methods for nonpolar pesticides in fats and oils, which we find to be an excellent cleanup method for vegetable oils.
Japanese regulatory methods for screening produce for pesticides.
ECAL‘s scientists have also developed in-house modifications of published methods for the analysis of • animal-derived or plant-derived products used in food ingredients, nutraceuticals, or pharmaceuticals. These are difficult matrices for which published method frequently do not exist.
Because of this broad experience with various sample types, our chemists can usually develop a custom method for a new product or ingredient without delays. ECAL has an active pesticide inventory of over 500 agricultural chemical compounds and uses a variety of specialized equipment to perform these analyses. We also offer method development services, usually based on an hourly rate. The scope of these projects can range from a simple validation of an existing method for a new chemical or new product, to a full GMP-compliant or ICH method development project. Pricing for these projects are by request.
Acrylamide Testing Acrylamide was first discovered to be present in certain foods cooked at high temperatures as the result of work announced in Sweden in April 2002. Since then, a joint panel of the United Nations Food and Agriculture Organization (FAO) and the World Health Organization (WHO) has concluded that more research is needed to achieve a better understanding of its health implications. While acrylamide is known to cause cancer in laboratory animals, no studies of the relationship between acrylamide and cancer in humans have been done. In response to recent industry concerns regarding the presence of acrylamide in foods, Eurofins Central Analytical Laboratories (ECAL) has implemented an analytical method for providing reliable and highly sensitive detection and quantification of acrylamide. Using the API 4000, one of the most sensitive Triple Quad LC-MS-MS systems in the world, a method employed by ECAL is sensitive to 10 parts per billion. This LC-MS-MS method has been validated in most foods of concern both by European researchers and by the Food and Drug Administration. The method is based on High Pressure Liquid Chromatography with tandem mass spectrometer detection. It is highly sensitive, and is completely specific for acrylamide in many difficult food matrices, even at low concentrations. It is the method of choice for all food safety and research needs.

Beekeeping Made Easy, by Marcus Williams
124 | P a g e
Mycotoxin Testing Mycotoxins are toxic chemicals produced naturally by certain mold species that are commonly found in many grain products, nuts, and feeds. The molds primarily responsible for producing mycotoxins are Aspergillus, Fusarium, and Penicillin. Mycotoxin contamination found in bulk grain storage can be very poorly distributed. One kernel of highly contaminated corn in a 10 lb sample can result in as much as 10 ppb of Aflatoxin. Thus, sampling requires experience, good technique, and adherence to industry recommended practices. In the laboratory, proper handling is just as critical to accurate testing results. Procedures at Eurofins Central Analytical Laboratories (ECAL) for grinding, mixing, and splitting the sample go well beyond published methods. Sample weight selection for grinding and weighing is based on proven demonstrations of homogeneity and test reproducibility. Modern ELISA technology provides sensitive and accurate data necessary to meet most commercial contractual specifications. ECAL commonly uses Neogen Veratox ELISA technology. Confirmation of ELISA results, or where the highest level of accuracy is required, other methods may also be performed, especially in mixed feeds and grain by-products. ECAL performs published AOAC methods and modern HPLC and GC equipment to perform these confirmations, including:
Thermo Separation HPLCs with fluorescence detectors for aflatoxin analysis.
Applied Biosystems LC-MSMS for analysis of aflatoxin, zearalenone, fumonisin, ochratoxin, DON, tricothecenes and citrinin. This instrument provides the ultimate selectivity and sensitivity for these difficult classes. Typical detection limits of less than 1ppb are routine.
Veterinary Drug Residue Testing Eurofins Central Analytical Laboratories (ECAL) offers the most comprehensive array of veterinary drug residues in seafood, milk, honey, meat, and feed products. Because of our broad experience with a variety of sample types, our scientists can provide solutions to your commercial needs. ECAL has an active veterinary drug inventory of over 100 assay-certified chemical compounds. We participate in international ring-trials and validate our methods internally with other global Eurofins Labs. ECAL scientists are active members of the AOAC Subgroup Community for Veterinary Drug Residues. Veterinary Drug Residue testing required for FDA Seafood Import Alert System
Fluoroquinolones by FDA Method LIB 4405
Malachite Green, Crystal Violet, Brilliant Green by FDA Method LIB 4395
Nitrofuran Metabolites by FDA Method
Chloramphenicol by FDA Method LIB 4302
Private Lab Analytical data packages for FDA Import Detentions Veterinary Drug residues in Meat Products by USDA methodology
Aminoglycosides by USDA CLG-AMG1.02
Beta-Lactams by USDA CLG-BLAC.02
Chloramphenicol by USDA CLG-CAM1.00
Macrolides and Lincosamides by USDA CLG-MAL1.01
Mectin Residues by USDA CLG-AVR.02
Nitroimidazole Residues by USDA CCG-NIMZ 2.00
Gentamycin, Novobiocin, Virginiamycin, Carbadox
Ractopamine, Diethylstilbestrol, and others Veterinary Drug Residue Testing required for Japanese Positive List System Notification No. 499 chemicals
DES, Carbadox, Chlorpromazine, Chloramphenicol, Nitrofurans, Nitroimidazoles

Beekeeping Made Easy, by Marcus Williams
125 | P a g e
Melamine Testing In the spring of 2007 several dogs and cats died in North America due to the adulteration of wheat gluten with melamine, the basic ingredient in melamine resins. The pets died due to damage from crystals formed in their kidneys by the combination of melamine and its metabolite cyanuric acids. A year and a half later, adulteration of milk products with melamine in China led to one of the biggest food scandals of the last decades. This led to kidney problems in thousands of babies and infants and in some cases even resulted in deaths. Currently, contaminated candy and cookies from East Asia are being exported and have been found in the EU. Accordingly, the EU has imposed an import ban on all baby and infant food from China and requires the analysis of melamine on all imported food containing either more than 15 % or an unknown amount of milk or milk powder. In response to the melamine crisis, Eurofins Central Analytical Laboratories offers advanced melamine testing services. The established methods utilized are based on US Food and Drug Administration‘s LC-MSMS methods. Due to high equipment capacities, Eurofins laboratories are now able to analyze globally over 250 samples per day. The standard turn-around-time is 5 to 7 days. Express analysis is also available with reports issued within 24 to 36 hours of receipt of sample.
FDA Import Alerts Eurofins CAL has the most appropriate testing strategies and sampling services for FDA Detention Import Alerts #99-29, #99-30 and #99-31. We can provide a complete testing solution for the importer, including sampling, testing , FDA submittal package and consulting on FDA intervention issues.
Analytes The following compounds are among those covered by the current FDA GC-MS method:
Melamine
Cyanuric Acid
Ammeline
Ammelide
Test Method FDA method LIB 4421 by LC-MSMS: This method is best used for milk, infant formula, and samples containing milk products. This method includes, Melamine, Cyanuric Acid, Ammeline, and Ammelide. Our present Limit of Quantification (LOQ) for melamine is 0.25 ppm. The turnaround is 5 to 10 working days. We offer a rush option of 3 working day turnaround time. The rush option includes a 50% up charge. FDA method LIB 4422 by LC-MSMS: This method can achieve an LOQ as low as 0.05 ppm for melamine in dry products and 0.01 ppm in fish and is best used for all general food and feed samples. The turnaround is 5 to 10 working days. This method is recommended to meet international regulations that require the lowest possible detection limits. We offer a rush option of 3 working day turnaround time. The rush option includes a 50% up charge. The method of choice will have to be determined depending on each individual sample type and importing or exporting circumstances. The LC-MSMS methods are used for infant formula, milk powder, most preservatives, vitamins, fertilizers, amino acids, etc.

Beekeeping Made Easy, by Marcus Williams
126 | P a g e
Quality Assurance Method cross validated within multiple Eurofins laboratories worldwide
Use of a labelled melamine compound as an internal standard
Recovery of the internal standard is monitored
Use of blanks, and spikes for each sample type within an analytical batch
Continuing calibration verification every 15 samples
Selling Honey This leaflet has been produced to help small scale beekeepers who wish to sell their honey It picks out and explains relevant honey, and health and safety regulations and makes practical suggestions to enable the beekeeper to stay within the law. If you have any doubts or concerns don‘t hesitate to contact your local Trading Standards department who are always ready to help.
Regulations The regulations specify:- • The water content of the honey must be less than 20%. If it is higher it is liable to ferment. If you extract only honey from comb that has been capped there should be no problem.

Beekeeping Made Easy, by Marcus Williams
127 | P a g e
• The percentages of invert sugars and sucrose must be consistent with that expected from the floral source. No problem here if you use your own honey. • The honey shall not have been heated in such a way as to significantly destroy enzymes and drive off the volatile aromatic compounds which give each type of honey its unique quality. If honey is warmed for extraction and bottling it is advisable to keep the temperature below 35°C and to cool quickly when the job is done. For pasteurisation a temperature of 63°C is needed for 30 minutes followed by rapid cooling. The composition of honey is best preserved by storing at low temperatures. • The honey should be free from mould, insects, insect debris, brood and any other organic or inorganic substance foreign to the composition of honey. Take care to minimise the introduction of foreign materials from the field into the extraction room. The extraction room and all equipment should be washed thoroughly before extraction. The honey must be filtered to remove these foreign materials. The recommended mesh size is 0.2 mm. which will ensure that some pollen remains. •Containers should be made of materials which under normal and foreseeable conditions of use do not transfer their constituents to the honey in quantities which could endanger human health or bring about a deterioration in its aroma, taste, texture or colour. Equipment made of food grade stainless steel, food grade plastic and glass meet these criteria.
Labelling. The label should indicate- 1. The description of the product, 2. The name and address of the producer (within the EU) 3. The country of origin 4. A ‗best before‘ date 5. A lot mark 6. The weight
1. Description of product. This must be one of the following reserved descriptions: • Honey • Comb honey • Chunk honey • Baker‘s honey intended for cooking only • The word ‗honey‘ with any other true description eg Honeydew honey, Pressed honey, Blossom honey • The word 'honey' with a regional, topographical or territorial reference If there is any reference to a particular plant or blossom (this includes both pictures and words), the honey must have come wholly or mainly from that blossom or plant - i.e. the honey must be characterised by that blossom or plant. If reference is made to a geographical origin the honey must come wholly from that place.
2. Name and address of producer, importer, packer etc. Sufficient information is needed in order to trace the producer by an address within the EU.
3. Country of origin. Honey must be labelled with the country/ies in which the honey was harvested. This may be a member state of the EU. In our case it could be ‗Product of the UK ‗ or ‗Product of England‘ but must be IN ADDITION to the address.

Beekeeping Made Easy, by Marcus Williams
128 | P a g e
4. Best before date. Honey lasts for many years but an appropriate durability or 'best before' date must be given. Two years is reasonable. If this specifies day. month and year a lot number is not required.
5. Lot Number. A lot means a batch of sales units of food produced, manufactured or packaged under similar conditions. It enables problems to be traced. The lot number is preceded by the letter L to distinguish it from other indicators. The number may be a short code comprising letters and/or numbers identifying the appropriate batch. It is prudent to have small lot sizes. The beekeeper is required to keep a record of each batch with its provenance and destination and retain this for the shelf life plus 6 months. For direct sales like farmers markets or sales at the door Lot numbers and ‗Best before‘ date are not needed.
6. The weight. From April 2008, honey can be sold in any weight, (including the traditional UK ones). Imperial units can be added after the metric ones but must not be in larger type and there must be no other print between them. The abbreviation for gram is g and for kilogram is kg. An s must not be added. There must be one type space between the numerical value and the unit or its abbreviation.
Printing of labels. Printing must be clearly legible and permanent. Labels should be fixed to the side of the container. The lettering must be 3 mm high for weights between 50 and 200 g, 4 mm high for weights between 200 g and a kg and 6 mm high for greater weights. Only the weight declarations have to be a certain size. The criterion for the size of all the other statutory information is that it must be easy to understand, clearly legible, indelible, not interrupted by other written or pictorial matter and in a conspicuous place such as to be easily visible. The information given on the label must be true in every respect and in no way misleading.
Food hygiene. 'Registration of premises does not apply to the direct supply by the producer of small quantities of primary products to the final consumer or to local retail establishments directly supplying the final consumer.‘ However the BBKA do recommend that beekeepers who offer honey for sale familiarise themselves with the basic hazards and practices in food handling.

Beekeeping Made Easy, by Marcus Williams
129 | P a g e
Beeswax - A Beekeepers Resource Beeswax is a natural wax produced by the honey bees in their hives. Worker bees (the females) have eight wax-producing mirror glands on the inner sides of the sternites (the ventral shield or plate of each segment of the body) on abdominal segments 4 to 7. The new wax scales are initially glass-clear and colorless, becoming opaque after mastication by the worker bee. The wax of honeycomb is nearly white, but becomes progressively more yellow or brown by incorporation of pollen oils and propolis. The wax scales are about 3 millimetres (0.12 in) across and 0.1 millimetres (0.0039 in) thick, and about 1100 are required to make a gram of wax. Western honey bees use the beeswax to build honeycomb cells in which their young are raised and honey and pollen are stored. For the wax-making bees to secrete wax, the ambient temperature in the hive has to be 33 to 36 °C (91 to 97 °F). To produce their wax, bees must consume about eight times as much honey by mass. It is estimated that bees fly 150,000 miles to yield one pound of beeswax (530,000 km/kg), roughly 6 times around the earth. Its color varies from nearly white to brownish, but most often a shade of yellow, depending on purity and the type of flowers gathered by the bees. Wax from the brood comb of the honey bee hive tends to be darker than wax from the honeycomb. Impurities accumulate more quickly in the brood comb. Due to the impurities, the wax has to be rendered before further use. The leftovers are called slumgum.
Uses of Beeswax: Beeswax has a multitude of uses and can be clarified by heating in water and can then be used for candles, a lubricant for drawers and windows, a wood polish, in soap and skin care products. It is also used to coat pills and sweets, in batik art, polishing boots and lubricating zips. As with petroleum waxes, it may be softened by dilution with vegetable oil to make it more workable at room temperature.
Important hints and tips: When melting beeswax always use a water bath by placing the container of wax; probably a small saucepan or glass bowl inside a larger pan of water. Never place a pan of wax directly onto a heat source. Beeswax can easily become damaged by localised overheating and if it ignites can burn more ferociously than a chip pan fire. Beeswax does not boil, it just gets hotter and hotter until it ignites. Wax should only be melted in stainless steel, plastic, or tin plated containers. Iron rust and containers of galvanised iron, brass or copper all impart a colour to beeswax and aluminium is said to make the wax dull and mud coloured. The next time you see a very orange wax in may have been melted in a copper pan.
Value of beeswax: As can be seen by the large variety of uses for beeswax it is of course a valuable substance. Ethiopia is one of the biggest exporters of beeswax in the world. The beeswax can be sold in its raw form or purified or indeed as one of the many products already mentioned above. So please dont waste your beeswax, make something useful with it, give it away or sell it if you have enough of it!

Beekeeping Made Easy, by Marcus Williams
130 | P a g e
Wax Extraction: A brood frame newly drawn out from foundation is usually light in colour and light in weight. After some years the the frames tend to become very heavy with a build up of cocoon skins and propolis and become unsuitable for further use. When they are replaced the old comb can be thrown out or burnt or an attempt can be made to recover some of the wax still in it. At about 145°F (62°C) beeswax melts, becomes liquid and runs. The old comb can be heated to this temperature on a warm sunny day by making an insulated box, covering it with two layers of glass, and setting it at an angle to catch the sun rays. If the comb is placed on a sloping metal tray with a perforated metal grid to keep the old comb in place, the wx will (when the sun shines) become liquid and run out into a bowl of some sort, which should be positioned below the tray. The wax will set in the bowl and by night the wax will have formed a solidified cake that can be knocked out by upturning the bowl and banging the base. You can buy solar powered wax extractors new but why not recycle some old windows from the dump. The cappings can also be melted down but must be clear of honey first. Ideally the cappings should be washed in rain water before melted down.

Beekeeping Made Easy, by Marcus Williams
131 | P a g e
Appendix – Blank Record Cards
Name: Queen:
DA
TE
Q
QC
Bro
od
Sto
res
Ro
om
Healt
h
Varr
ao
Tem
per
Feed
Su
pers
Weath
er
No
tes