bike security - jersey road safetyjerseysaferoads.com/wp-content/uploads/ebook/ebook_web.pdfleft and...
TRANSCRIPT
Road Safety Officer Philip Blake
Test About Facts & Stats Seatbelts 2 Wheels News Your Comments Contact
Jersey Safe Roads / Cycling / Ch.1 Your Bike & Bike Security
If you are going on a cycling course, ideally you should have a proper road riding bike. This means a proper sized bikethat fits you, with gears that helps you to ride for a distance. BMX bikes are very popular at the moment, especially withboys. But remember they aren’t really suitable for riding on the road.
If you’re getting a new bike, it’s always a good idea to talk to someone at a bike shop first, about what kind of cycling youare going to do on your bike.
Your bike should cleaned and checked regularly for damage.
Bike Security
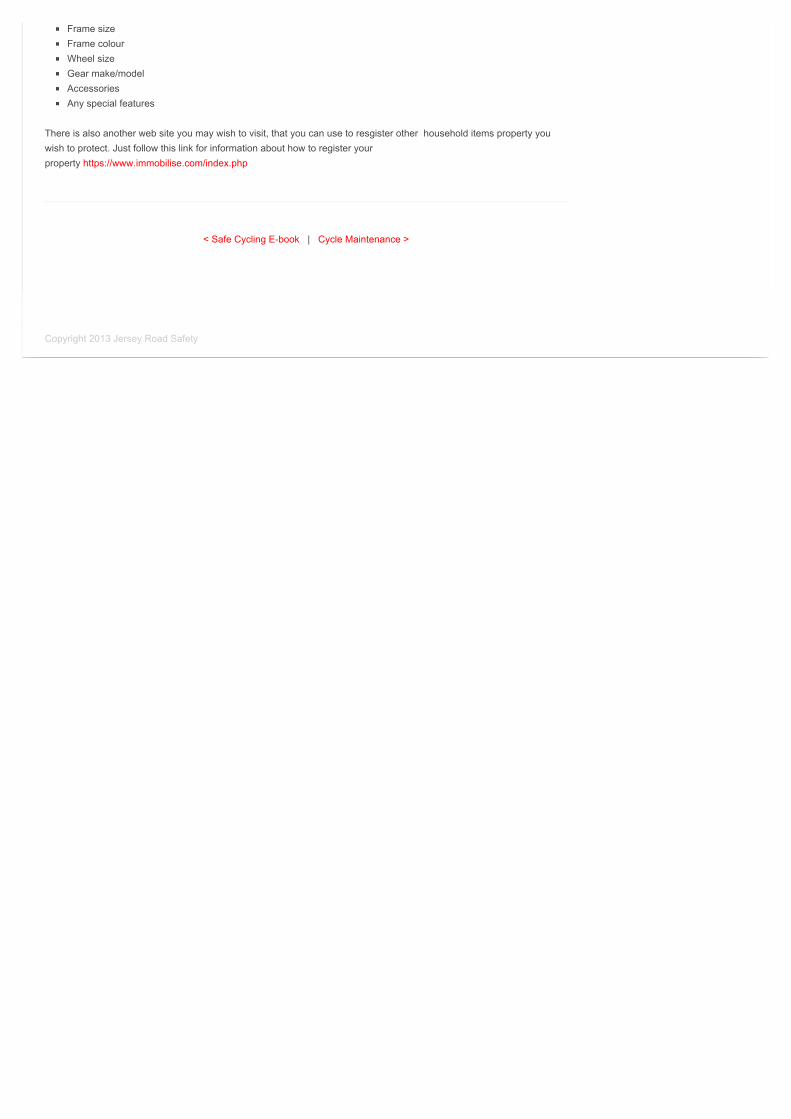
If you are going to leave your bike so you can’t see it, you need to make sure you have a good bike lock with you to makesure someone doesn’t try to steal it. If you have a bike where the wheels can be taken off without a spanner (these areknown as ‘quick release’ wheels) you might need two locks. The lock needs to go through each tyre, the bike frame and abike stand or secure rail or something similar. If the saddle doesn’t need a spanner to remove it (known as a quickrelease saddle), you can buy a lock for this also.
Park your bike carefully so it can’t fall down and people don’t fall over your bike.
It’s also a good idea to make sure your bike is registered, so if it is stolen, it can help the police to get your bike to you.Presently we recommend www.bikeregister.com The States Police will provide marking kits FREE of charge and help youmark your bike. You will need to forward security details of your bike to bike register.
Some of the details you should know about and maybe keep safe at home about your bike are:
Make & ModelFrame number
Cycling E-book Contents
Safe Cycling E-book
Ch.1 Your Bike & Bike Security
Ch.2 Cycle Maintenance
Ch.3 Does Your Bike Fit You?
Ch.4 Are You Ready to Ride?
Ch.5 Signs & Markings
Ch.6 Lights & Signals
Ch.7 How to Use Your Gears
Ch.8 Starting a Journey
Ch.9 Road Positioning & Signalling
Ch.10 Stopping, Overtaking & SideRoads
Ch.11 Left & Right Hand Turning
Ch.12 Crossroads (Level 3)
Ch.13 Traffic Islands & Lights(Level 3)
Ch.14 Roundabouts & LaneChange (Level 3)
Ch.15 Riding in Groups, Routes &Facilities
Frame sizeFrame colourWheel sizeGear make/modelAccessoriesAny special features
There is also another web site you may wish to visit, that you can use to resgister other household items property youwish to protect. Just follow this link for information about how to register yourproperty https://www.immobilise.com/index.php
< Safe Cycling E-book | Cycle Maintenance >
Copyright 2013 Jersey Road Safety
Road Safety Officer Philip Blake
Test About Facts & Stats Seatbelts 2 Wheels News Your Comments Contact
Jersey Safe Roads / Cycling / Ch.2 Cycle Maintenance
It’s important you keep your bike well maintained. Don’t try and fix things you don’t know how to, this can be verydangerous. Take it to a bike shop and get a trained bike mechanic to do it for you.
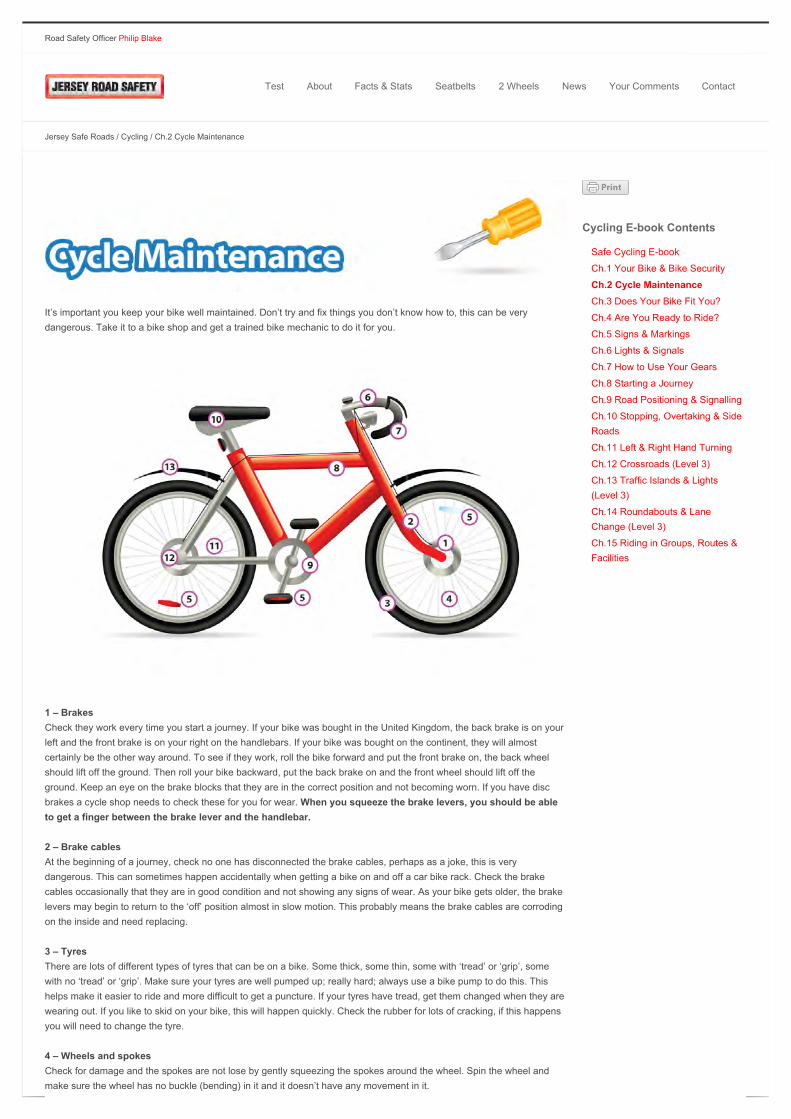
1 – BrakesCheck they work every time you start a journey. If your bike was bought in the United Kingdom, the back brake is on yourleft and the front brake is on your right on the handlebars. If your bike was bought on the continent, they will almostcertainly be the other way around. To see if they work, roll the bike forward and put the front brake on, the back wheelshould lift off the ground. Then roll your bike backward, put the back brake on and the front wheel should lift off theground. Keep an eye on the brake blocks that they are in the correct position and not becoming worn. If you have discbrakes a cycle shop needs to check these for you for wear. When you squeeze the brake levers, you should be ableto get a finger between the brake lever and the handlebar.
2 – Brake cablesAt the beginning of a journey, check no one has disconnected the brake cables, perhaps as a joke, this is verydangerous. This can sometimes happen accidentally when getting a bike on and off a car bike rack. Check the brakecables occasionally that they are in good condition and not showing any signs of wear. As your bike gets older, the brakelevers may begin to return to the ‘off’ position almost in slow motion. This probably means the brake cables are corrodingon the inside and need replacing.
3 – TyresThere are lots of different types of tyres that can be on a bike. Some thick, some thin, some with ‘tread’ or ‘grip’, somewith no ‘tread’ or ‘grip’. Make sure your tyres are well pumped up; really hard; always use a bike pump to do this. Thishelps make it easier to ride and more difficult to get a puncture. If your tyres have tread, get them changed when they arewearing out. If you like to skid on your bike, this will happen quickly. Check the rubber for lots of cracking, if this happensyou will need to change the tyre.
4 – Wheels and spokesCheck for damage and the spokes are not lose by gently squeezing the spokes around the wheel. Spin the wheel andmake sure the wheel has no buckle (bending) in it and it doesn’t have any movement in it.
Cycling E-book Contents
Safe Cycling E-book
Ch.1 Your Bike & Bike Security
Ch.2 Cycle Maintenance
Ch.3 Does Your Bike Fit You?
Ch.4 Are You Ready to Ride?
Ch.5 Signs & Markings
Ch.6 Lights & Signals
Ch.7 How to Use Your Gears
Ch.8 Starting a Journey
Ch.9 Road Positioning & Signalling
Ch.10 Stopping, Overtaking & SideRoads
Ch.11 Left & Right Hand Turning
Ch.12 Crossroads (Level 3)
Ch.13 Traffic Islands & Lights(Level 3)
Ch.14 Roundabouts & LaneChange (Level 3)
Ch.15 Riding in Groups, Routes &Facilities
5 – ReflectorsIf you ride on the road in the dark you must have a red reflector on the back of your bike and two pedal reflectors on eachpedal. There should also be a white reflector at the front, and one reflector on each wheel.
6 – SteeringThis can become loose and should be tightened. To check, put the front wheel between your legs and try turning thehandle bars. If the bar moves, it needs tightening.
7 – HandlebarsMake sure they have good handle grips. The plugs in the side of the grips often come out. This can be very dangerousand they should be replaced as soon as possible. The handle bar should be lined up correctly.
8 – FrameCheck occasionally for cracks and bends and all nuts are tight.
9 – PedalsShould have good grip and spin freely. If you hold the peddal shaft and try and move the peddal from side to side, thereshould be no movement. Oil the moving parts regularly.
10 – SaddleShould be set at the correct height and tight (see section: Does Your Bike Fit You?)
11 – ChainShould be oiled regularly with a ‘bike oil’ NOT WD40 or similar. There should be no sign of rust.
12 – GearsMake sure they are adjusted and they all work. It is usually best to take this to the bike shop if they need adjustment, it isa skilled job.
13 – MudguardsThey aren’t very popular at the moment, but in the winter they will stop you getting dirty when the roads are wet. Makesure they don’t catch on any of the moving parts.
< Your Bike & Bike Security | Does Your Bike Fit You? >
Copyright 2013 Jersey Road Safety
Road Safety Officer Philip Blake
Test About Facts & Stats Seatbelts 2 Wheels News Your Comments Contact
Jersey Safe Roads / Cycling / Ch.3 Does Your Bike Fit You?
Your bike needs to fit you. A bike that is too big or too small can be dangerous. It will be more difficult for you tocontrol your bike, more likely you will wobble as well as it being more difficult to signal.
Below is some advice to help you understand how to fit your bike, but the most important thing is that you should feel safeand comfortable.
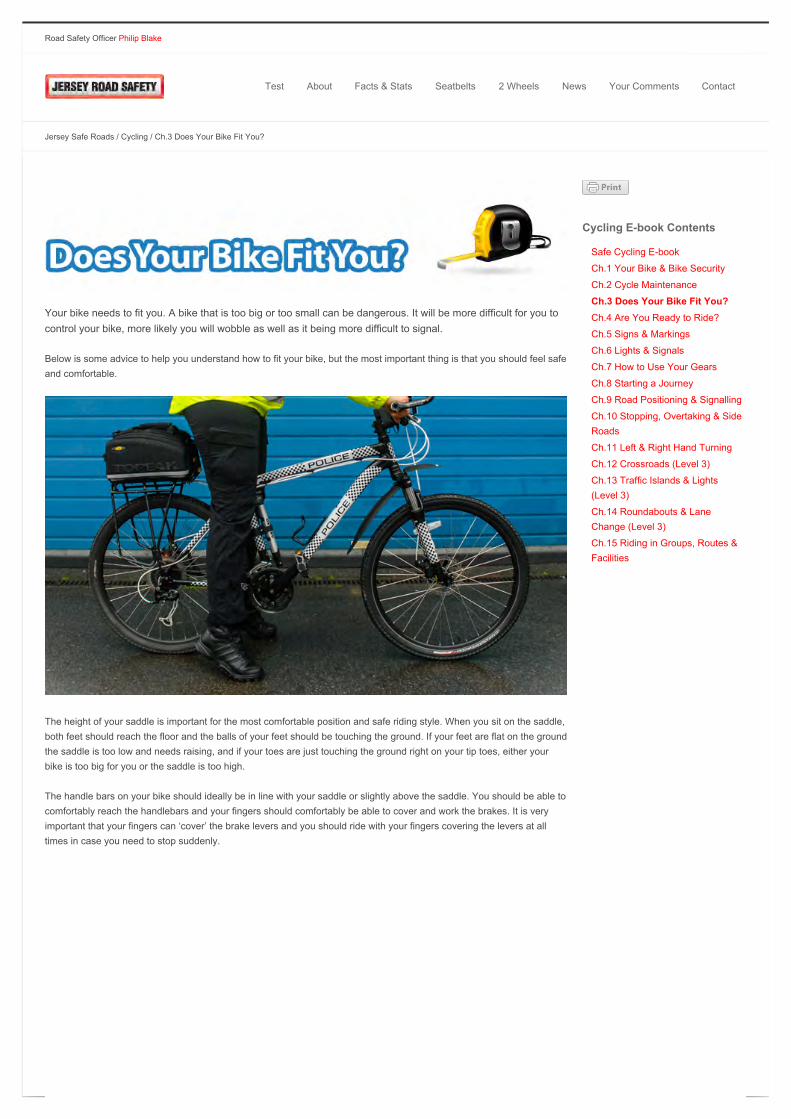
The height of your saddle is important for the most comfortable position and safe riding style. When you sit on the saddle,both feet should reach the floor and the balls of your feet should be touching the ground. If your feet are flat on the groundthe saddle is too low and needs raising, and if your toes are just touching the ground right on your tip toes, either yourbike is too big for you or the saddle is too high.
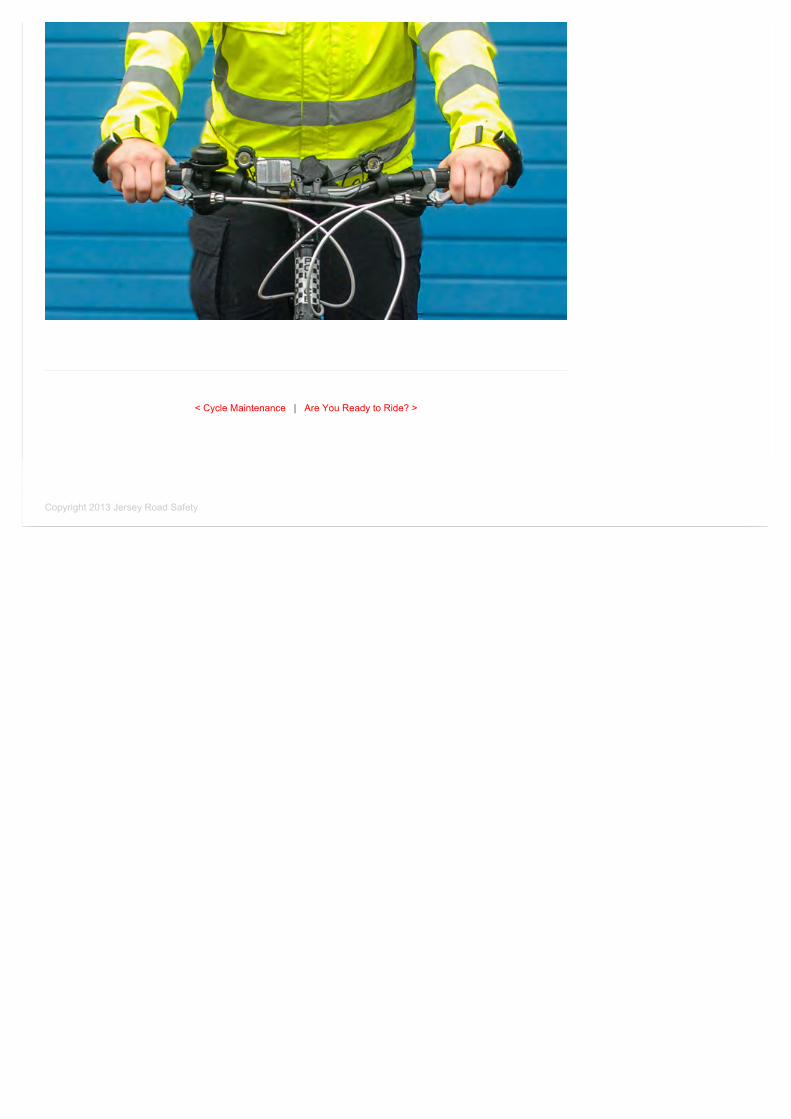
The handle bars on your bike should ideally be in line with your saddle or slightly above the saddle. You should be able tocomfortably reach the handlebars and your fingers should comfortably be able to cover and work the brakes. It is veryimportant that your fingers can ‘cover’ the brake levers and you should ride with your fingers covering the levers at alltimes in case you need to stop suddenly.
Cycling E-book Contents
Safe Cycling E-book
Ch.1 Your Bike & Bike Security
Ch.2 Cycle Maintenance
Ch.3 Does Your Bike Fit You?
Ch.4 Are You Ready to Ride?
Ch.5 Signs & Markings
Ch.6 Lights & Signals
Ch.7 How to Use Your Gears
Ch.8 Starting a Journey
Ch.9 Road Positioning & Signalling
Ch.10 Stopping, Overtaking & SideRoads
Ch.11 Left & Right Hand Turning
Ch.12 Crossroads (Level 3)
Ch.13 Traffic Islands & Lights(Level 3)
Ch.14 Roundabouts & LaneChange (Level 3)
Ch.15 Riding in Groups, Routes &Facilities
< Cycle Maintenance | Are You Ready to Ride? >
Copyright 2013 Jersey Road Safety
Road Safety Officer Philip Blake
Test About Facts & Stats Seatbelts 2 Wheels News Your Comments Contact
Jersey Safe Roads / Cycling / Ch.4 Are You Ready to Ride?
Make Sure You are Wearing the Right Kind of Clothes
Bright clothes that help you to be seen are great.Wear fluorescent accessories if you have them by day, reflectivehelps you at night.If it’s cold, wear warm clothes.If it looks like rain, make sure you have clothes to keep you dry and warm.Make sure any cords that are dangling are tied up and out of the way of any of the moving parts of your bike like thewheels for instance.Wear cycle clips or use something like a slap band if you are wearing long trousers that are loose and might getcaught in the chain or maybe tuck them into your sock.Make sure your shoes have good grip for the pedals so your feet don’t slip off and they cover your feet and give yougood protection. Make sure laces are tied up and tucked out of the way so they don’t get caught in the chain. Flipflops are a definite NO.Cycling glasses are great for protecting your eyes. If you are cycling down hill for instance, they may stop a flygetting in your eye.Fingerless cycling gloves to help protect the palms of your hands if you have a fall.Wear an approved cycle helmet that is in good condition. If the plastic outside of the helmet is cracked, this isn’treally a problem as long as you can’t cut your finger on it, but if the polystyrene is cracked, the helmet needsreplacing. It needs to have at least one of the following approved safety standards; BSEN 1078: 1997; SNELL B-95;AS/NZS 2063 and displays the CE mark.
How to Fit Your Cycle Helmet
The helmet should fit your head snugly, not loose or too tight. There is an adjuster that you can use to help fit makesure it fits properly. On some helmets, they have small sponges provided that are used to stick on the inside of thehelmet to get the best fit.It should sit on your head so that it is straight and not sitting on the back of your head for instance.The straps coming from the helmet, there should be one to the front of your ears and one behind and they should betight.There is a plastic ‘toggle’ on the straps, that should be adjusted so the rest just under the ear lobes to keep thestraps tight to the front and back of the ears.The strap should be done up under the chin and adjusted so it is secure, not too tight, but not too loose. You shouldbe able to put your finger between your chin and the helmet strap.
Cycling E-book Contents
Safe Cycling E-book
Ch.1 Your Bike & Bike Security
Ch.2 Cycle Maintenance
Ch.3 Does Your Bike Fit You?
Ch.4 Are You Ready to Ride?Ch.5 Signs & Markings
Ch.6 Lights & Signals
Ch.7 How to Use Your Gears
Ch.8 Starting a Journey
Ch.9 Road Positioning & Signalling
Ch.10 Stopping, Overtaking & SideRoads
Ch.11 Left & Right Hand Turning
Ch.12 Crossroads (Level 3)
Ch.13 Traffic Islands & Lights(Level 3)
Ch.14 Roundabouts & LaneChange (Level 3)
Ch.15 Riding in Groups, Routes &Facilities
The Law
To ride on the road on your bike you MUST HAVE:
A working set of brakes that work.A working bell.At night have lights on your bike, a white light at the front and a red one at the back.At night you must have a red reflector at the back of your bike, pedal reflectors and additionally you should have awhite reflector at the front and one on each wheel.You cannot give someone a lift on your bike unless it is designed for two people, such as a tandum.You must not ride on a pavement unless there is a sign saying you can.You should not ride through a red traffic light.You must not ride more than two abreast (more than two cyclists next to each other) on a main road.You should not ride the wrong way up a ‘No Entry’ unless there is a sign saying you can, and then make sure you dothis very carefully.You must obey all traffic signs in the Highway Code.You must not ride carelessly or dangerously.You cannot ride an electric bike until you are 14 years old.The motor on an electric bike should not be able to propel you at more than 15mph.Adults can be prosecuted for riding a bike under the influence of alohol or drugs.You must follow the rules set out in the Highway Code.
< Does Your Bike Fit You? | Signs & Markings >
Copyright 2013 Jersey Road Safety
Road Safety Officer Philip Blake
Test About Facts & Stats Seatbelts 2 Wheels News Your Comments Contact
Jersey Safe Roads / Cycling / Ch.5 Signs & Markings
No right turn No pedestrians No motor vehicles No left turn No cycling Priority to traffic
Turn left Segregated use forcycles andpedestrians
Mini roundaboutahead
Keep left Cycle path Ahead only
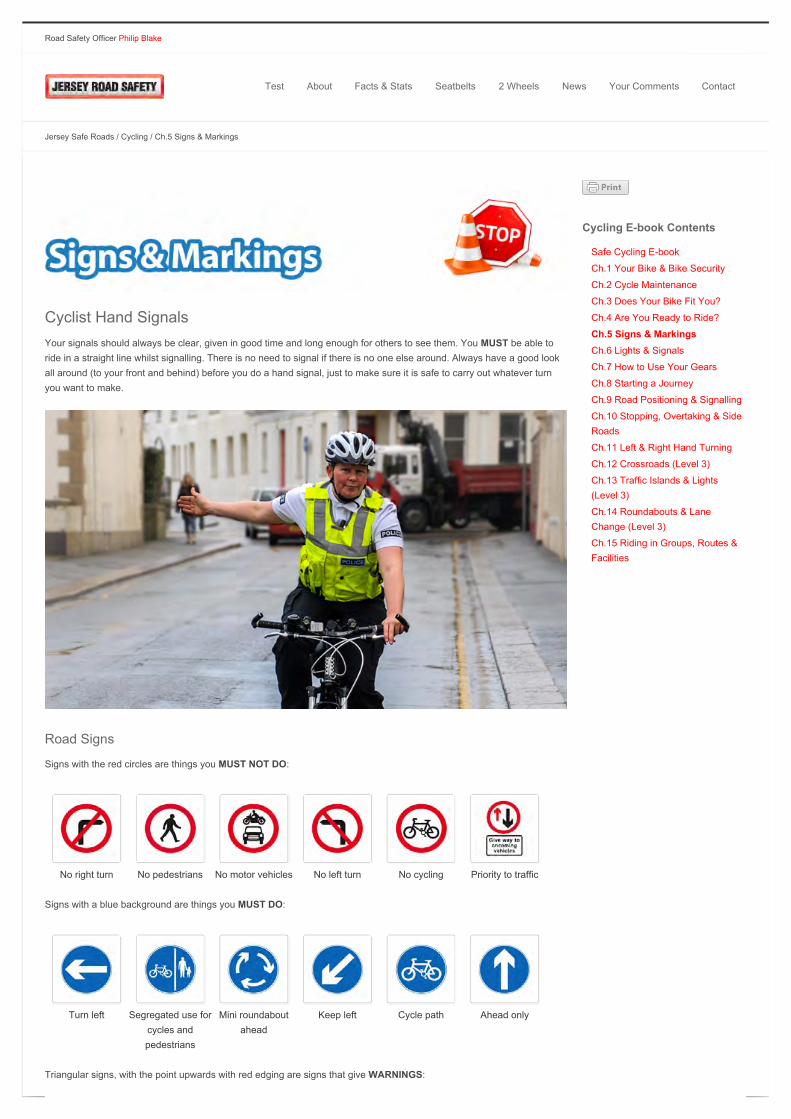
Cyclist Hand SignalsYour signals should always be clear, given in good time and long enough for others to see them. You MUST be able toride in a straight line whilst signalling. There is no need to signal if there is no one else around. Always have a good lookall around (to your front and behind) before you do a hand signal, just to make sure it is safe to carry out whatever turnyou want to make.
Road Signs
Signs with the red circles are things you MUST NOT DO:
Signs with a blue background are things you MUST DO:
Triangular signs, with the point upwards with red edging are signs that give WARNINGS:
Cycling E-book Contents
Safe Cycling E-book
Ch.1 Your Bike & Bike Security
Ch.2 Cycle Maintenance
Ch.3 Does Your Bike Fit You?
Ch.4 Are You Ready to Ride?
Ch.5 Signs & MarkingsCh.6 Lights & Signals
Ch.7 How to Use Your Gears
Ch.8 Starting a Journey
Ch.9 Road Positioning & Signalling
Ch.10 Stopping, Overtaking & SideRoads
Ch.11 Left & Right Hand Turning
Ch.12 Crossroads (Level 3)
Ch.13 Traffic Islands & Lights(Level 3)
Ch.14 Roundabouts & LaneChange (Level 3)
Ch.15 Riding in Groups, Routes &Facilities
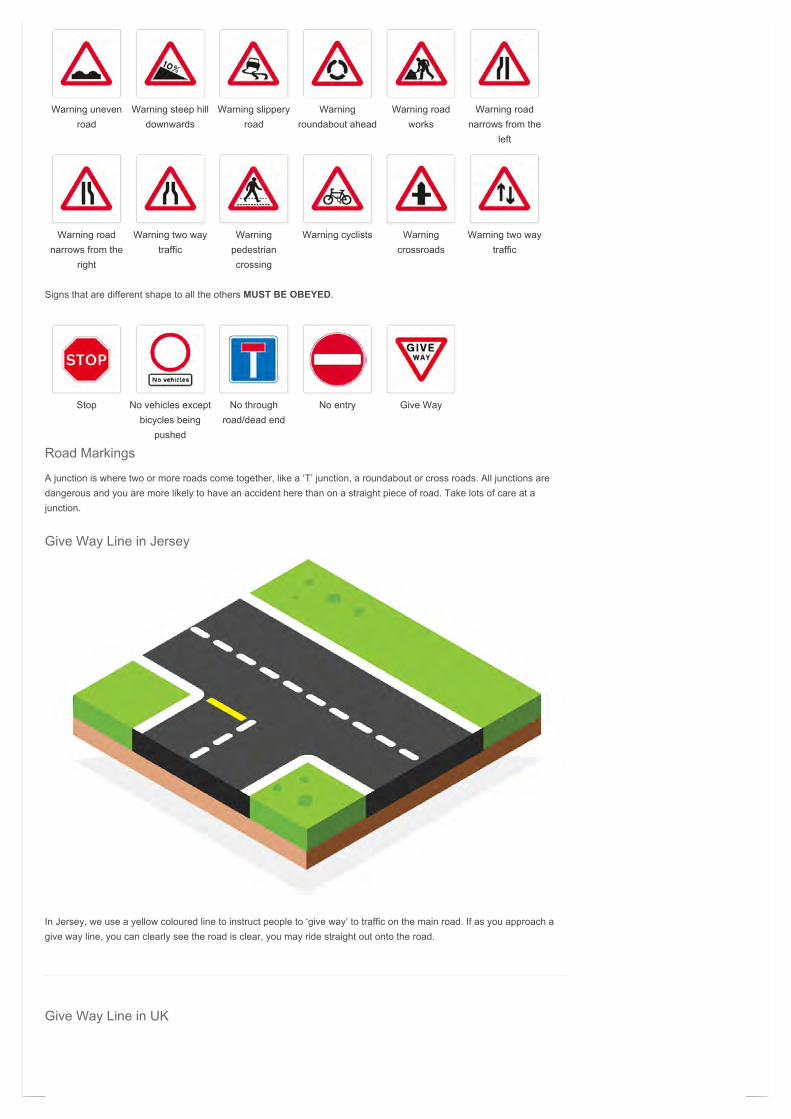
Warning unevenroad
Warning steep hilldownwards
Warning slipperyroad
Warningroundabout ahead
Warning roadworks
Warning roadnarrows from the
left
Warning roadnarrows from the
right
Warning two waytraffic
Warningpedestriancrossing
Warning cyclists Warningcrossroads
Warning two waytraffic
Stop No vehicles exceptbicycles being
pushed
No throughroad/dead end
No entry Give Way
Signs that are different shape to all the others MUST BE OBEYED.
Road Markings
A junction is where two or more roads come together, like a ‘T’ junction, a roundabout or cross roads. All junctions aredangerous and you are more likely to have an accident here than on a straight piece of road. Take lots of care at ajunction.
Give Way Line in Jersey
In Jersey, we use a yellow coloured line to instruct people to ‘give way’ to traffic on the main road. If as you approach agive way line, you can clearly see the road is clear, you may ride straight out onto the road.
Give Way Line in UK
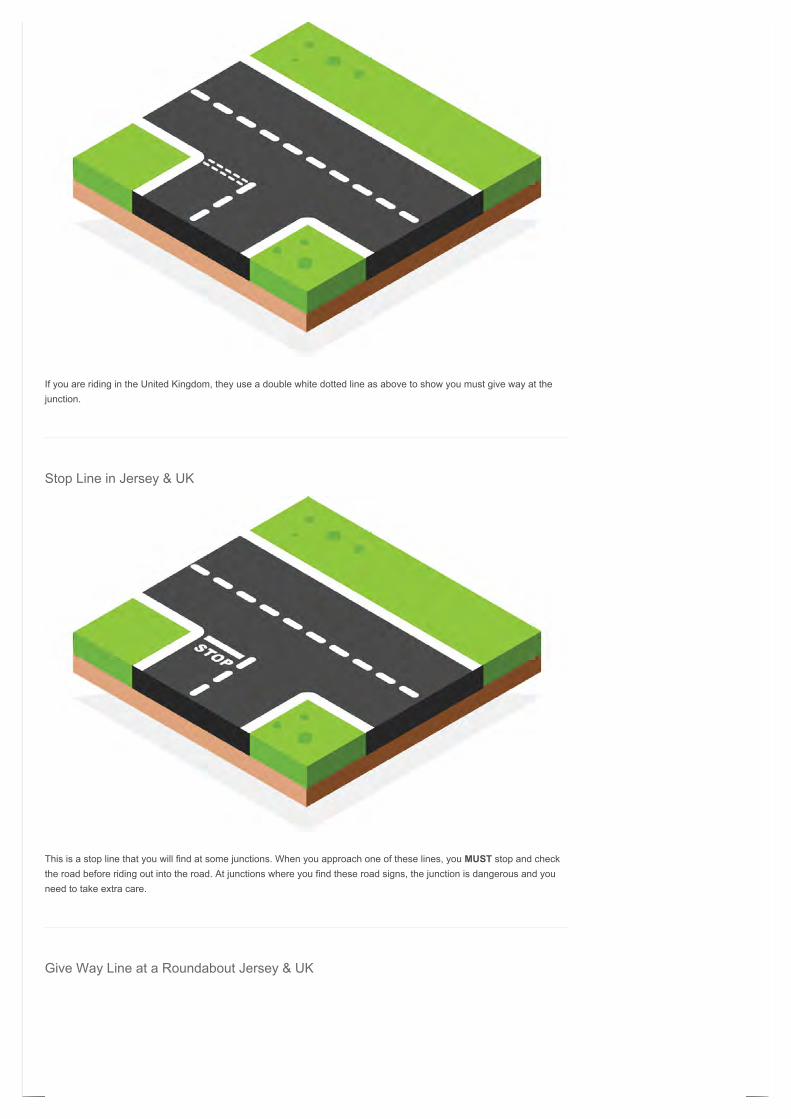
If you are riding in the United Kingdom, they use a double white dotted line as above to show you must give way at thejunction.
Stop Line in Jersey & UK
This is a stop line that you will find at some junctions. When you approach one of these lines, you MUST stop and checkthe road before riding out into the road. At junctions where you find these road signs, the junction is dangerous and youneed to take extra care.
Give Way Line at a Roundabout Jersey & UK
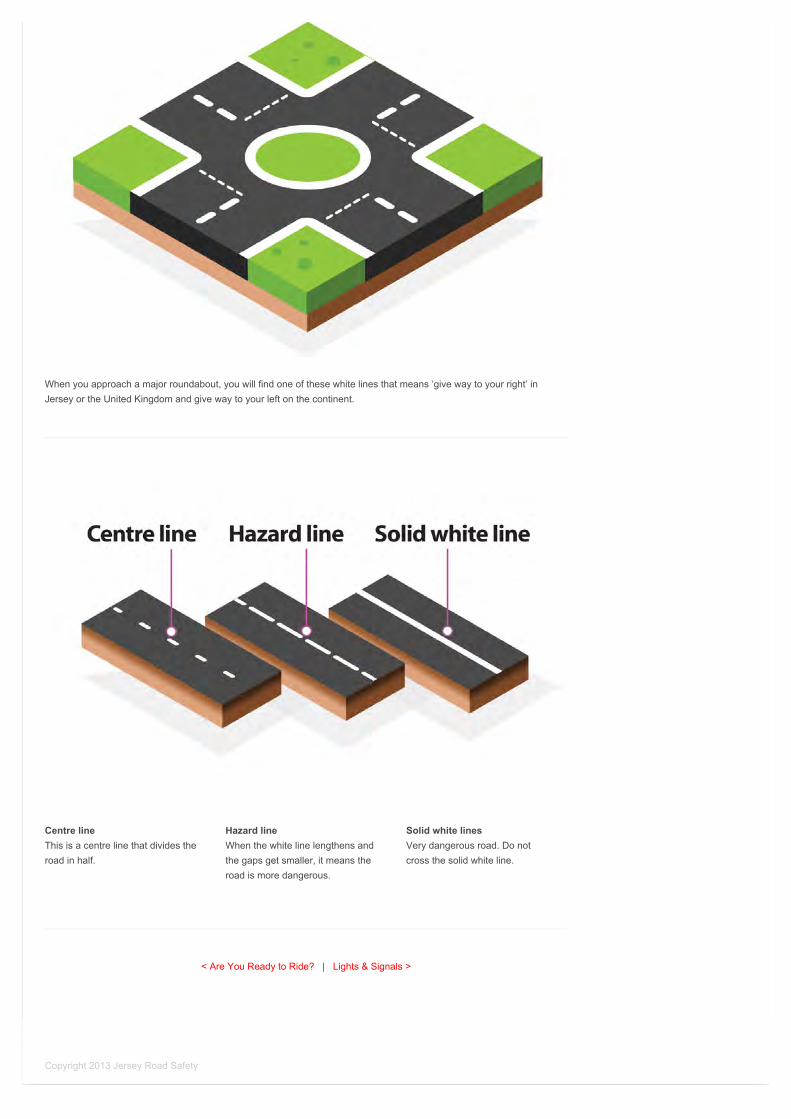
When you approach a major roundabout, you will find one of these white lines that means ‘give way to your right’ inJersey or the United Kingdom and give way to your left on the continent.
< Are You Ready to Ride? | Lights & Signals >
Centre lineThis is a centre line that divides theroad in half.
Hazard lineWhen the white line lengthens andthe gaps get smaller, it means theroad is more dangerous.
Solid white linesVery dangerous road. Do notcross the solid white line.
Copyright 2013 Jersey Road Safety
Road Safety Officer Philip Blake
Test About Facts & Stats Seatbelts 2 Wheels News Your Comments Contact
Jersey Safe Roads / Cycling / Ch.6 Lights & Signals
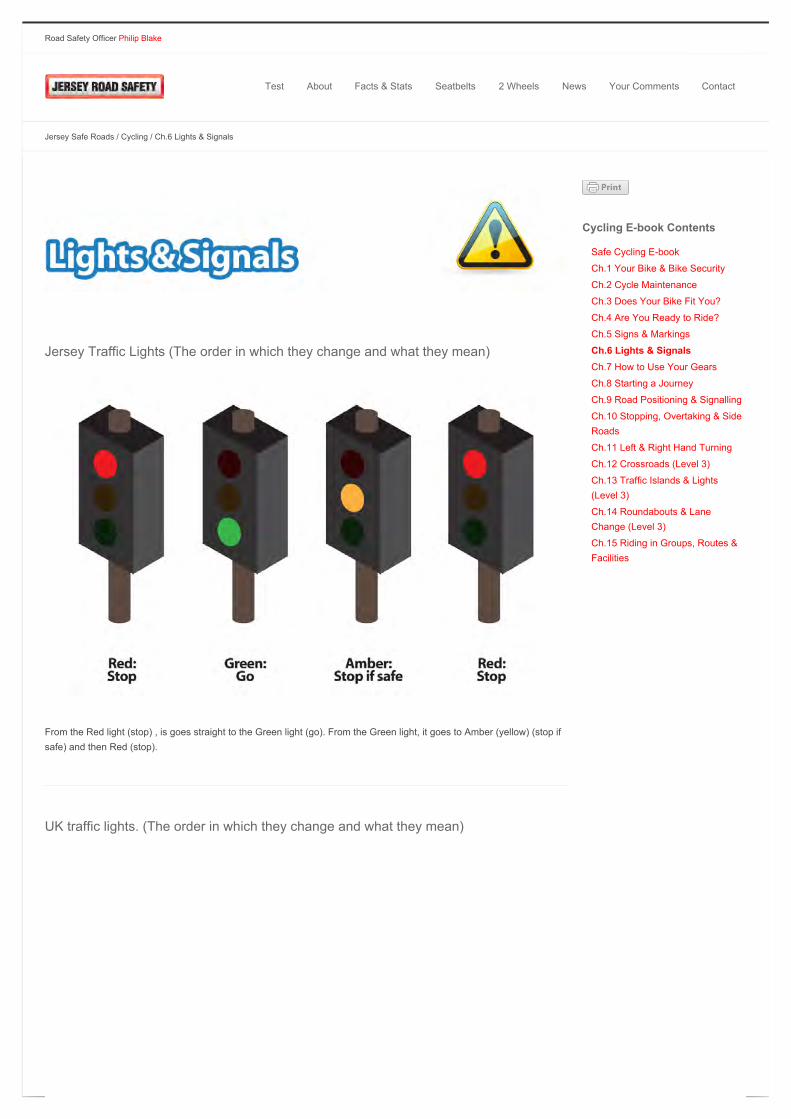
Jersey Traffic Lights (The order in which they change and what they mean)
From the Red light (stop) , is goes straight to the Green light (go). From the Green light, it goes to Amber (yellow) (stop ifsafe) and then Red (stop).
UK traffic lights. (The order in which they change and what they mean)
Cycling E-book Contents
Safe Cycling E-book
Ch.1 Your Bike & Bike Security
Ch.2 Cycle Maintenance
Ch.3 Does Your Bike Fit You?
Ch.4 Are You Ready to Ride?
Ch.5 Signs & Markings
Ch.6 Lights & Signals
Ch.7 How to Use Your Gears
Ch.8 Starting a Journey
Ch.9 Road Positioning & Signalling
Ch.10 Stopping, Overtaking & SideRoads
Ch.11 Left & Right Hand Turning
Ch.12 Crossroads (Level 3)
Ch.13 Traffic Islands & Lights(Level 3)
Ch.14 Roundabouts & LaneChange (Level 3)
Ch.15 Riding in Groups, Routes &Facilities
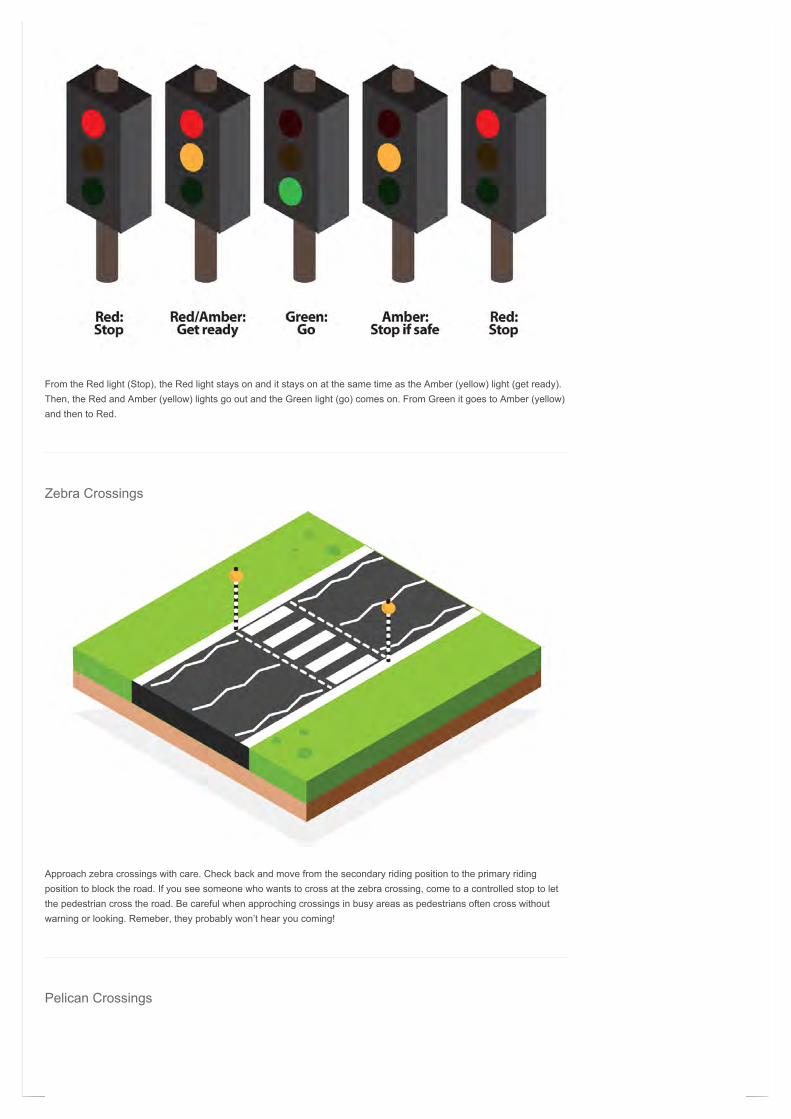
From the Red light (Stop), the Red light stays on and it stays on at the same time as the Amber (yellow) light (get ready).Then, the Red and Amber (yellow) lights go out and the Green light (go) comes on. From Green it goes to Amber (yellow)and then to Red.
Zebra Crossings
Approach zebra crossings with care. Check back and move from the secondary riding position to the primary ridingposition to block the road. If you see someone who wants to cross at the zebra crossing, come to a controlled stop to letthe pedestrian cross the road. Be careful when approching crossings in busy areas as pedestrians often cross withoutwarning or looking. Remeber, they probably won’t hear you coming!
Pelican Crossings
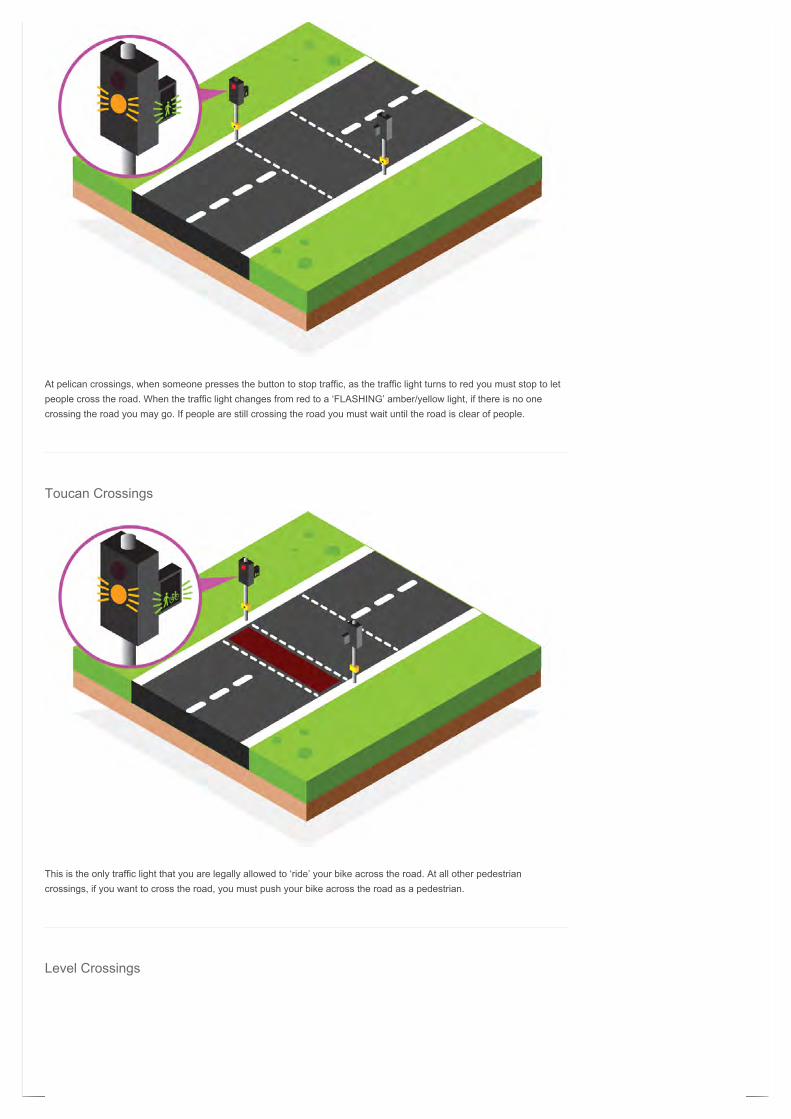
At pelican crossings, when someone presses the button to stop traffic, as the traffic light turns to red you must stop to letpeople cross the road. When the traffic light changes from red to a ‘FLASHING’ amber/yellow light, if there is no onecrossing the road you may go. If people are still crossing the road you must wait until the road is clear of people.
Toucan Crossings
This is the only traffic light that you are legally allowed to ‘ride’ your bike across the road. At all other pedestriancrossings, if you want to cross the road, you must push your bike across the road as a pedestrian.
Level Crossings
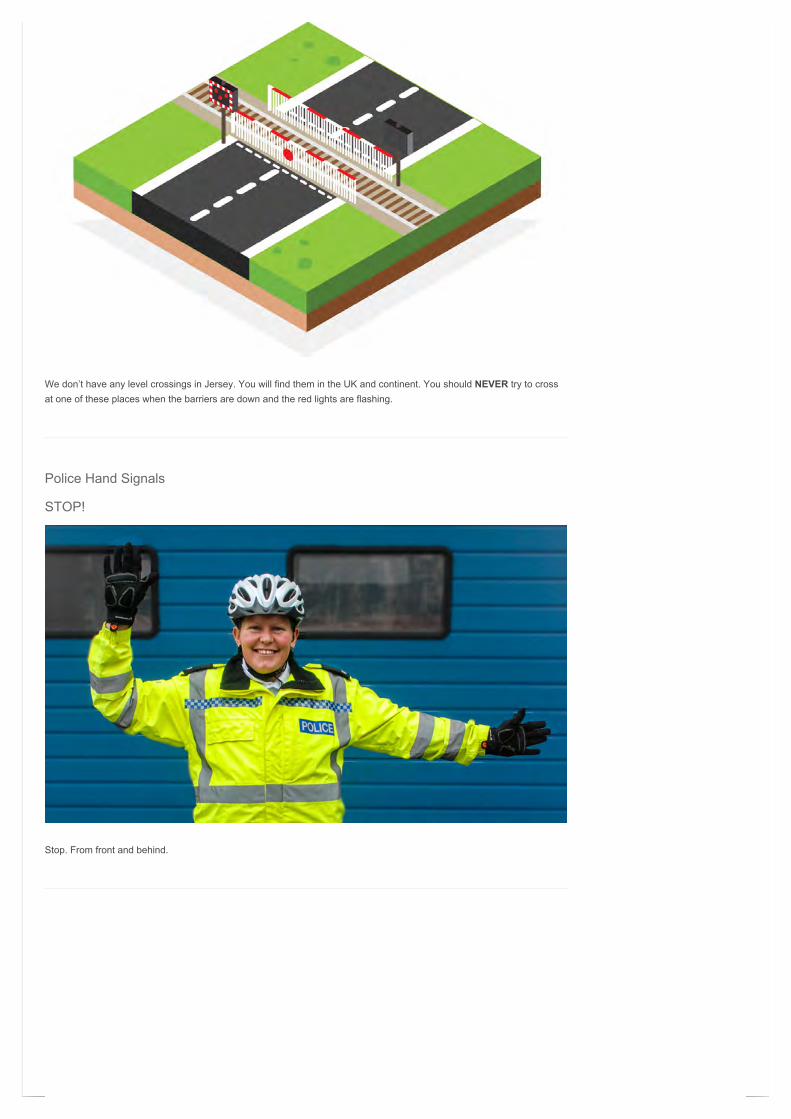
We don’t have any level crossings in Jersey. You will find them in the UK and continent. You should NEVER try to crossat one of these places when the barriers are down and the red lights are flashing.
Police Hand Signals
STOP!
Stop. From front and behind.
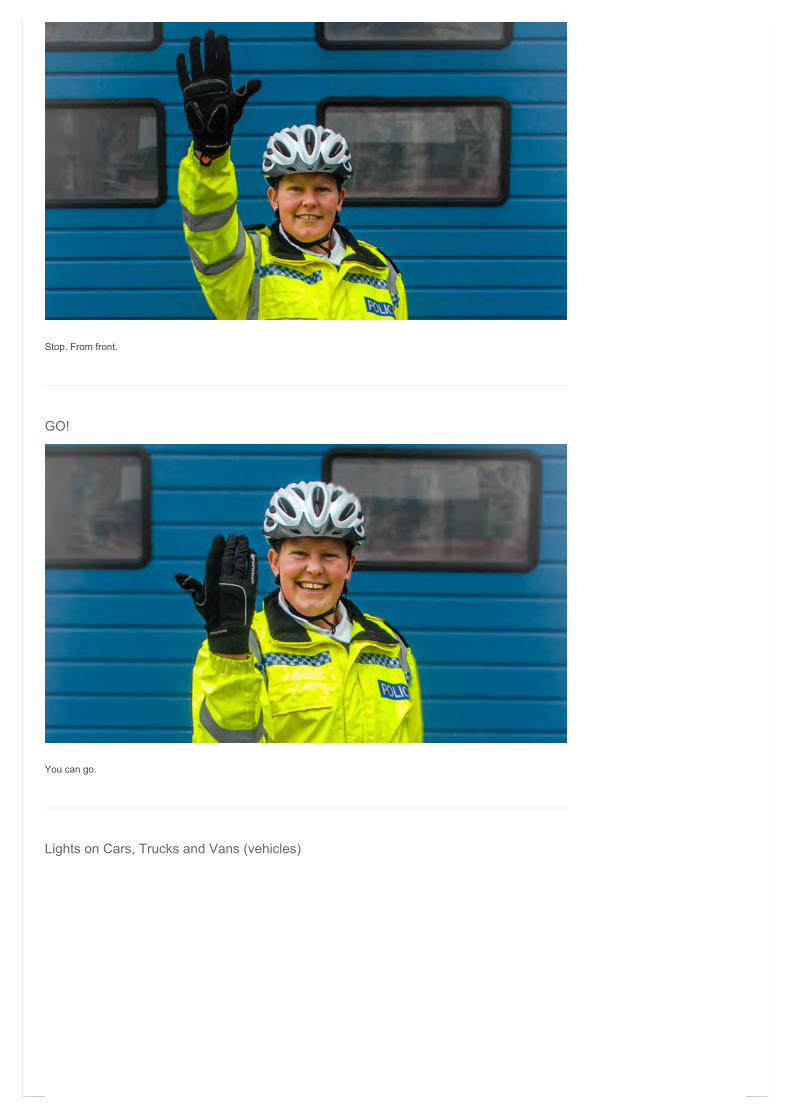
Stop. From front.
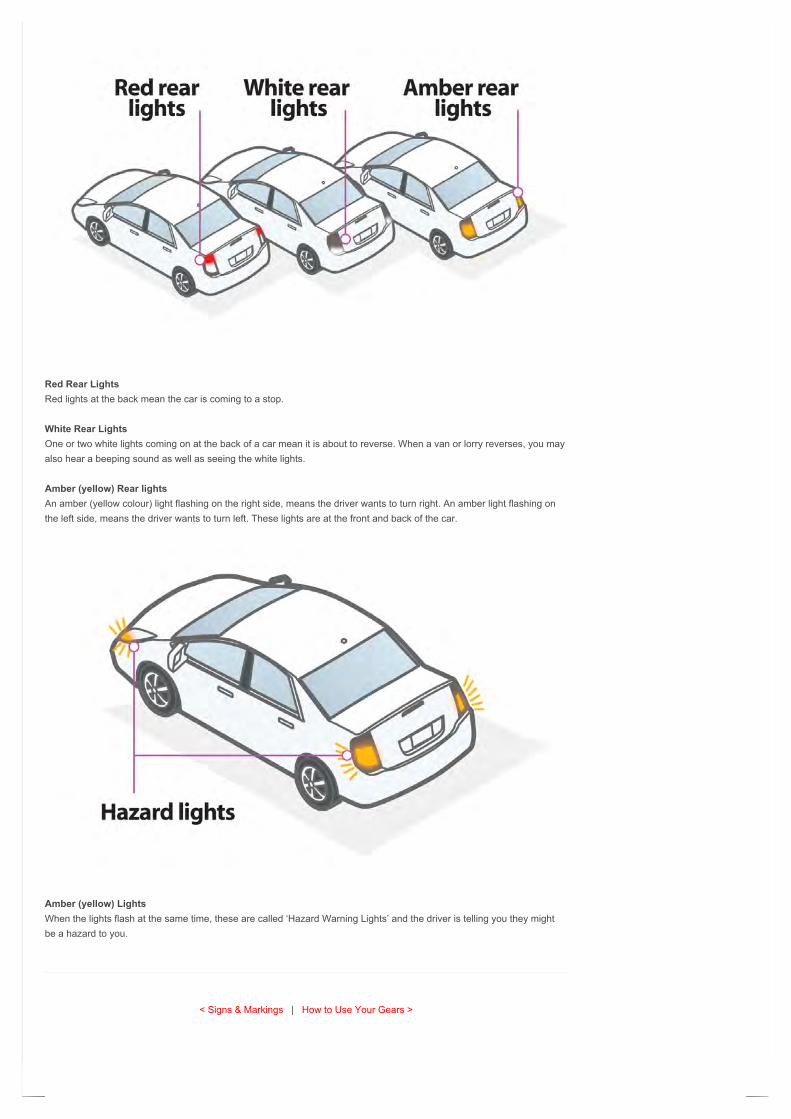
GO!
You can go.
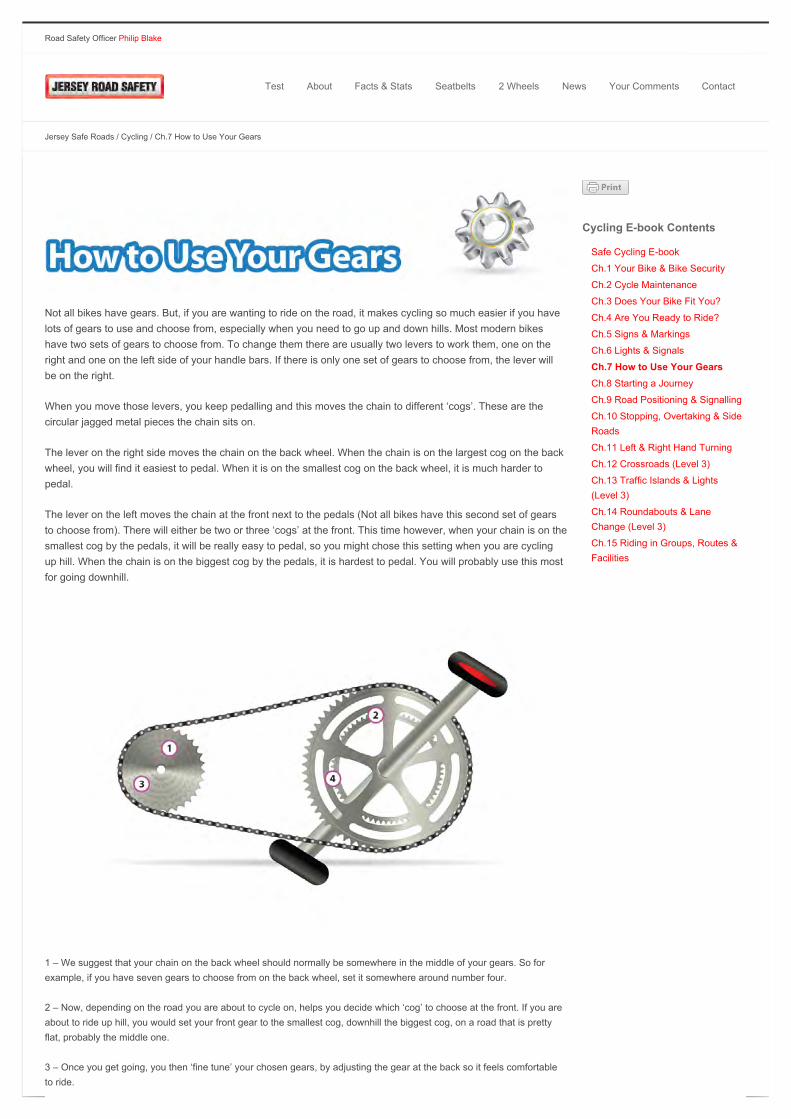
Lights on Cars, Trucks and Vans (vehicles)
Red Rear LightsRed lights at the back mean the car is coming to a stop.
White Rear LightsOne or two white lights coming on at the back of a car mean it is about to reverse. When a van or lorry reverses, you mayalso hear a beeping sound as well as seeing the white lights.
Amber (yellow) Rear lightsAn amber (yellow colour) light flashing on the right side, means the driver wants to turn right. An amber light flashing onthe left side, means the driver wants to turn left. These lights are at the front and back of the car.
Amber (yellow) LightsWhen the lights flash at the same time, these are called ‘Hazard Warning Lights’ and the driver is telling you they mightbe a hazard to you.
< Signs & Markings | How to Use Your Gears >
Road Safety Officer Philip Blake
Test About Facts & Stats Seatbelts 2 Wheels News Your Comments Contact
Jersey Safe Roads / Cycling / Ch.7 How to Use Your Gears
Not all bikes have gears. But, if you are wanting to ride on the road, it makes cycling so much easier if you havelots of gears to use and choose from, especially when you need to go up and down hills. Most modern bikeshave two sets of gears to choose from. To change them there are usually two levers to work them, one on theright and one on the left side of your handle bars. If there is only one set of gears to choose from, the lever willbe on the right.
When you move those levers, you keep pedalling and this moves the chain to different ‘cogs’. These are thecircular jagged metal pieces the chain sits on.
The lever on the right side moves the chain on the back wheel. When the chain is on the largest cog on the backwheel, you will find it easiest to pedal. When it is on the smallest cog on the back wheel, it is much harder topedal.
The lever on the left moves the chain at the front next to the pedals (Not all bikes have this second set of gearsto choose from). There will either be two or three ‘cogs’ at the front. This time however, when your chain is on thesmallest cog by the pedals, it will be really easy to pedal, so you might chose this setting when you are cyclingup hill. When the chain is on the biggest cog by the pedals, it is hardest to pedal. You will probably use this mostfor going downhill.
1 – We suggest that your chain on the back wheel should normally be somewhere in the middle of your gears. So forexample, if you have seven gears to choose from on the back wheel, set it somewhere around number four.
2 – Now, depending on the road you are about to cycle on, helps you decide which ‘cog’ to choose at the front. If you areabout to ride up hill, you would set your front gear to the smallest cog, downhill the biggest cog, on a road that is prettyflat, probably the middle one.
3 – Once you get going, you then ‘fine tune’ your chosen gears, by adjusting the gear at the back so it feels comfortableto ride.
Cycling E-book Contents
Safe Cycling E-book
Ch.1 Your Bike & Bike Security
Ch.2 Cycle Maintenance
Ch.3 Does Your Bike Fit You?
Ch.4 Are You Ready to Ride?
Ch.5 Signs & Markings
Ch.6 Lights & Signals
Ch.7 How to Use Your Gears
Ch.8 Starting a Journey
Ch.9 Road Positioning & Signalling
Ch.10 Stopping, Overtaking & SideRoads
Ch.11 Left & Right Hand Turning
Ch.12 Crossroads (Level 3)
Ch.13 Traffic Islands & Lights(Level 3)
Ch.14 Roundabouts & LaneChange (Level 3)
Ch.15 Riding in Groups, Routes &Facilities

4 – If you get to a set of traffic lights or a stop line, if you are in a ‘high’ gear, it can be quite hard to cycle away again.Rather than trying to change the gears on the back wheel, which can take a bit of time, to quickly change down, changeto the gear at the front from the big cog to the middle for instance or the middle to the smallest one. If you do this, it will bemuch easier to cycle away when it is safe to do so.
< Signs, Markings, Lights & Signals | Starting a Journey >
Copyright 2013 Jersey Road Safety
Road Safety Officer Philip Blake
Test About Facts & Stats Seatbelts 2 Wheels News Your Comments Contact
Jersey Safe Roads / Cycling / Ch.8 Starting a Journey
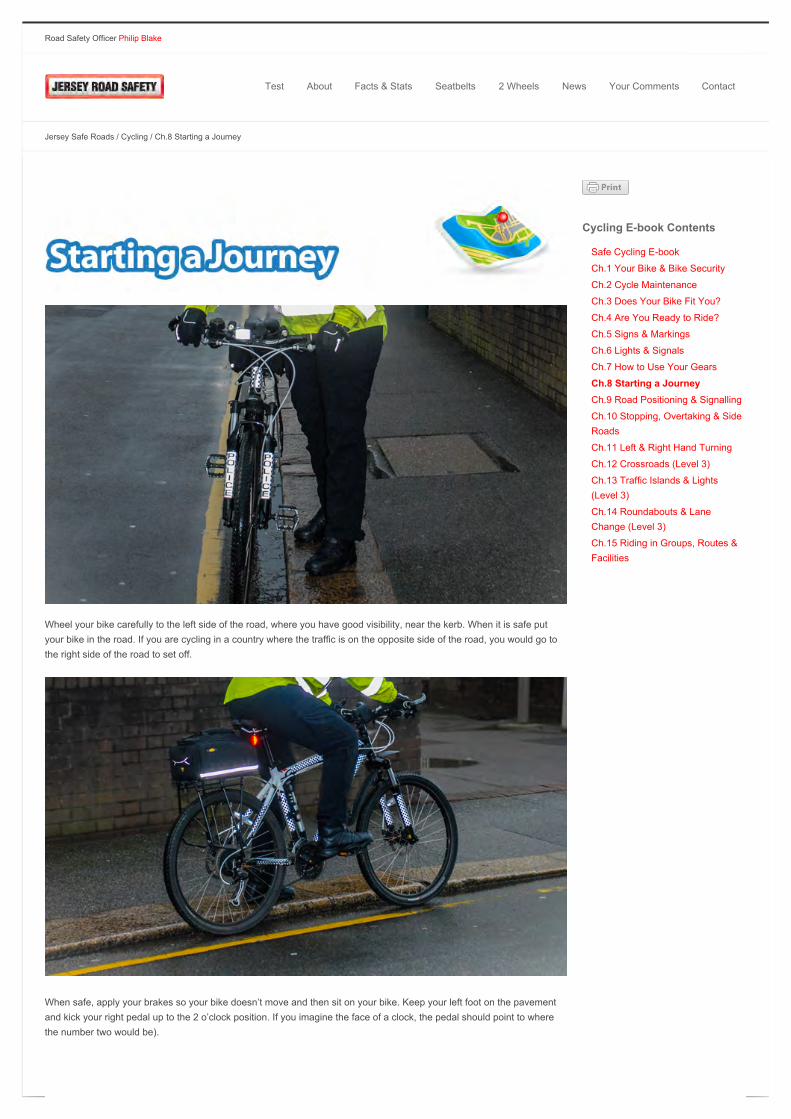
Wheel your bike carefully to the left side of the road, where you have good visibility, near the kerb. When it is safe putyour bike in the road. If you are cycling in a country where the traffic is on the opposite side of the road, you would go tothe right side of the road to set off.
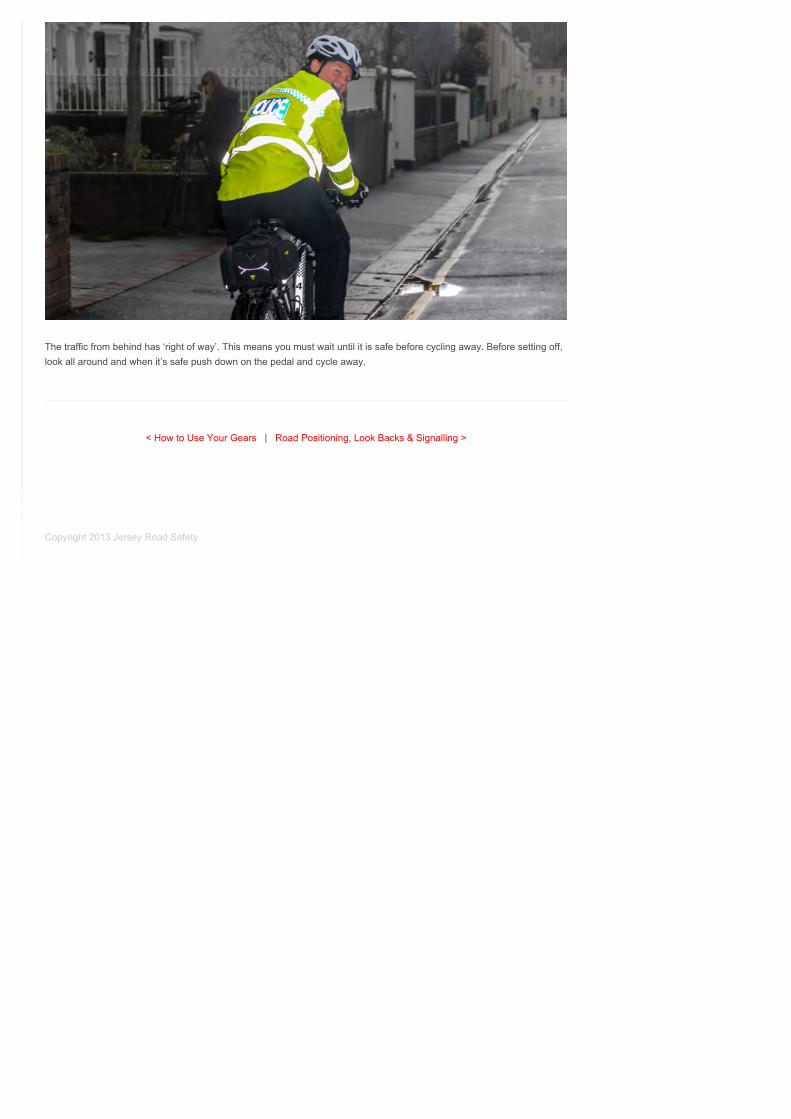
When safe, apply your brakes so your bike doesn’t move and then sit on your bike. Keep your left foot on the pavementand kick your right pedal up to the 2 o’clock position. If you imagine the face of a clock, the pedal should point to wherethe number two would be).
Cycling E-book Contents
Safe Cycling E-book
Ch.1 Your Bike & Bike Security
Ch.2 Cycle Maintenance
Ch.3 Does Your Bike Fit You?
Ch.4 Are You Ready to Ride?
Ch.5 Signs & Markings
Ch.6 Lights & Signals
Ch.7 How to Use Your Gears
Ch.8 Starting a Journey
Ch.9 Road Positioning & Signalling
Ch.10 Stopping, Overtaking & SideRoads
Ch.11 Left & Right Hand Turning
Ch.12 Crossroads (Level 3)
Ch.13 Traffic Islands & Lights(Level 3)
Ch.14 Roundabouts & LaneChange (Level 3)
Ch.15 Riding in Groups, Routes &Facilities
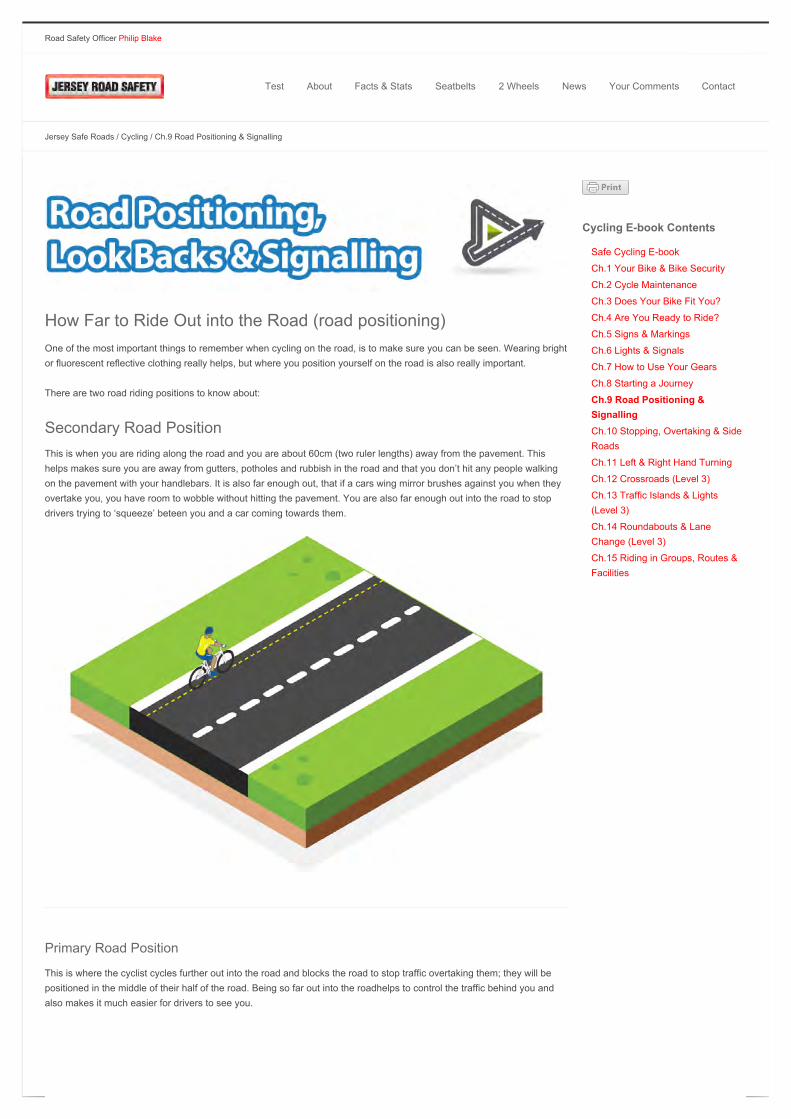
The traffic from behind has ‘right of way’. This means you must wait until it is safe before cycling away. Before setting off,look all around and when it’s safe push down on the pedal and cycle away.
< How to Use Your Gears | Road Positioning, Look Backs & Signalling >
Copyright 2013 Jersey Road Safety
Road Safety Officer Philip Blake
Test About Facts & Stats Seatbelts 2 Wheels News Your Comments Contact
Jersey Safe Roads / Cycling / Ch.9 Road Positioning & Signalling
How Far to Ride Out into the Road (road positioning)One of the most important things to remember when cycling on the road, is to make sure you can be seen. Wearing brightor fluorescent reflective clothing really helps, but where you position yourself on the road is also really important.
There are two road riding positions to know about:
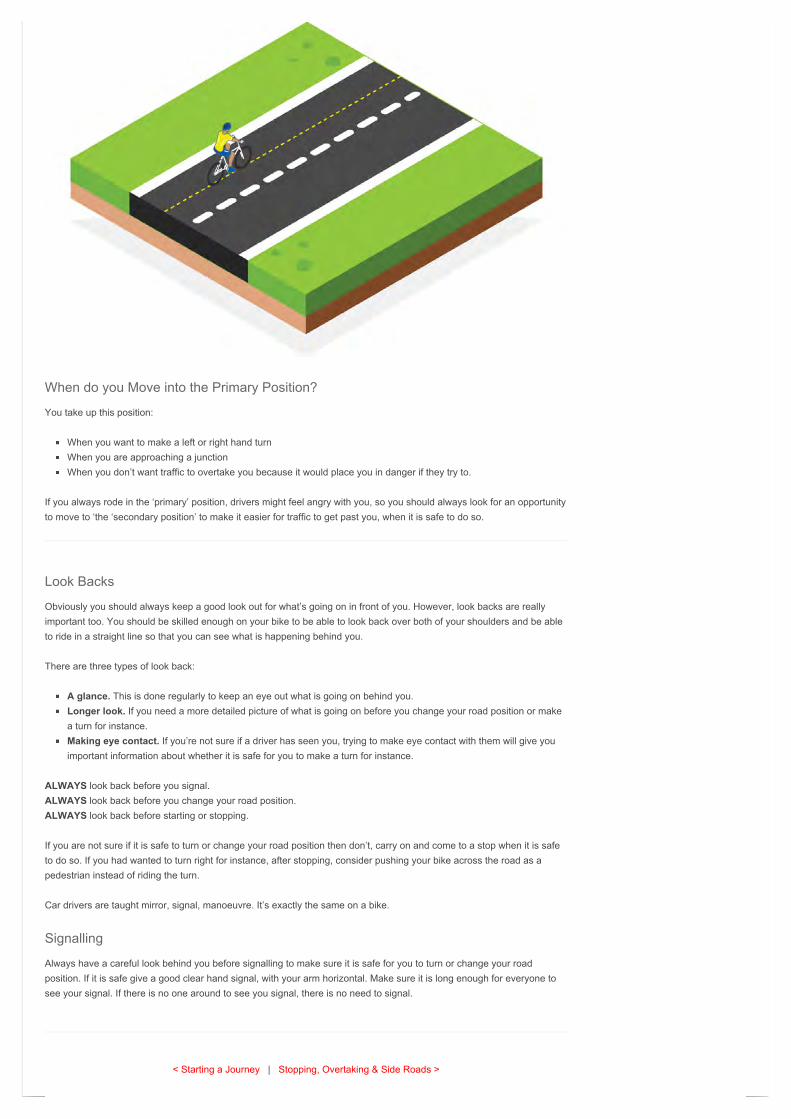
Secondary Road PositionThis is when you are riding along the road and you are about 60cm (two ruler lengths) away from the pavement. Thishelps makes sure you are away from gutters, potholes and rubbish in the road and that you don’t hit any people walkingon the pavement with your handlebars. It is also far enough out, that if a cars wing mirror brushes against you when theyovertake you, you have room to wobble without hitting the pavement. You are also far enough out into the road to stopdrivers trying to ‘squeeze’ beteen you and a car coming towards them.
Primary Road Position
This is where the cyclist cycles further out into the road and blocks the road to stop traffic overtaking them; they will bepositioned in the middle of their half of the road. Being so far out into the roadhelps to control the traffic behind you andalso makes it much easier for drivers to see you.
Cycling E-book Contents
Safe Cycling E-book
Ch.1 Your Bike & Bike Security
Ch.2 Cycle Maintenance
Ch.3 Does Your Bike Fit You?
Ch.4 Are You Ready to Ride?
Ch.5 Signs & Markings
Ch.6 Lights & Signals
Ch.7 How to Use Your Gears
Ch.8 Starting a Journey
Ch.9 Road Positioning &Signalling
Ch.10 Stopping, Overtaking & SideRoads
Ch.11 Left & Right Hand Turning
Ch.12 Crossroads (Level 3)
Ch.13 Traffic Islands & Lights(Level 3)
Ch.14 Roundabouts & LaneChange (Level 3)
Ch.15 Riding in Groups, Routes &Facilities
When do you Move into the Primary Position?
You take up this position:
When you want to make a left or right hand turnWhen you are approaching a junctionWhen you don’t want traffic to overtake you because it would place you in danger if they try to.
If you always rode in the ‘primary’ position, drivers might feel angry with you, so you should always look for an opportunityto move to ‘the ‘secondary position’ to make it easier for traffic to get past you, when it is safe to do so.
Look Backs
Obviously you should always keep a good look out for what’s going on in front of you. However, look backs are reallyimportant too. You should be skilled enough on your bike to be able to look back over both of your shoulders and be ableto ride in a straight line so that you can see what is happening behind you.
There are three types of look back:
A glance. This is done regularly to keep an eye out what is going on behind you.Longer look. If you need a more detailed picture of what is going on before you change your road position or makea turn for instance.Making eye contact. If you’re not sure if a driver has seen you, trying to make eye contact with them will give youimportant information about whether it is safe for you to make a turn for instance.
ALWAYS look back before you signal.ALWAYS look back before you change your road position.ALWAYS look back before starting or stopping.
If you are not sure if it is safe to turn or change your road position then don’t, carry on and come to a stop when it is safeto do so. If you had wanted to turn right for instance, after stopping, consider pushing your bike across the road as apedestrian instead of riding the turn.
Car drivers are taught mirror, signal, manoeuvre. It’s exactly the same on a bike.
Signalling
Always have a careful look behind you before signalling to make sure it is safe for you to turn or change your roadposition. If it is safe give a good clear hand signal, with your arm horizontal. Make sure it is long enough for everyone tosee your signal. If there is no one around to see you signal, there is no need to signal.
< Starting a Journey | Stopping, Overtaking & Side Roads >
Road Safety Officer Philip Blake
Test About Facts & Stats Seatbelts 2 Wheels News Your Comments Contact
Jersey Safe Roads / Cycling / Ch.10 Stopping, Overtaking & Side Roads
Stopping and Emergency Stops
You should be able to sit comfortably on your bike and be able to reach the handlebars without leaning too for forwardand your fingers should easily cover and work the brakes. It is very important that your fingers can ‘cover’ the brakelevers and you should ride with your fingers covering the levers at all times in case you need to stop suddenly.
Whenever you decide to stop, make sure you look back first to make sure it is safe to do so. Pick somewhere out of theway of traffic or pedestrians if you can. If you need to, make a signal to let traffic know what you intend to do.
Use both brakes to stop. You should apply your back brake before your front brake. Use your back brake to slow youdown and gently apply the front brake to bring you to a stop to ensure you aren’t thrown over the handlebars.
If your bike was bought in Jersey or the United Kingdom, your back brake is on your left and the front brake on the right.However, if your bike was bought on the continent, your brakes will almost certainly work the other way around.
Sometimes it is necessary to apply your front brake only when you are showing a left hand signal. This can be quite trickyand so you should practise ‘feathering’ the brake to control the speed of your bike while signalling. Feathering is justgently applying one of the brakes to control your speed.
You should practise emergency stops away from traffic and people. Apply your back brake first. Take care not to apply somuch pressure on either brake to skid or lose control.
Overtaking Parked Cars
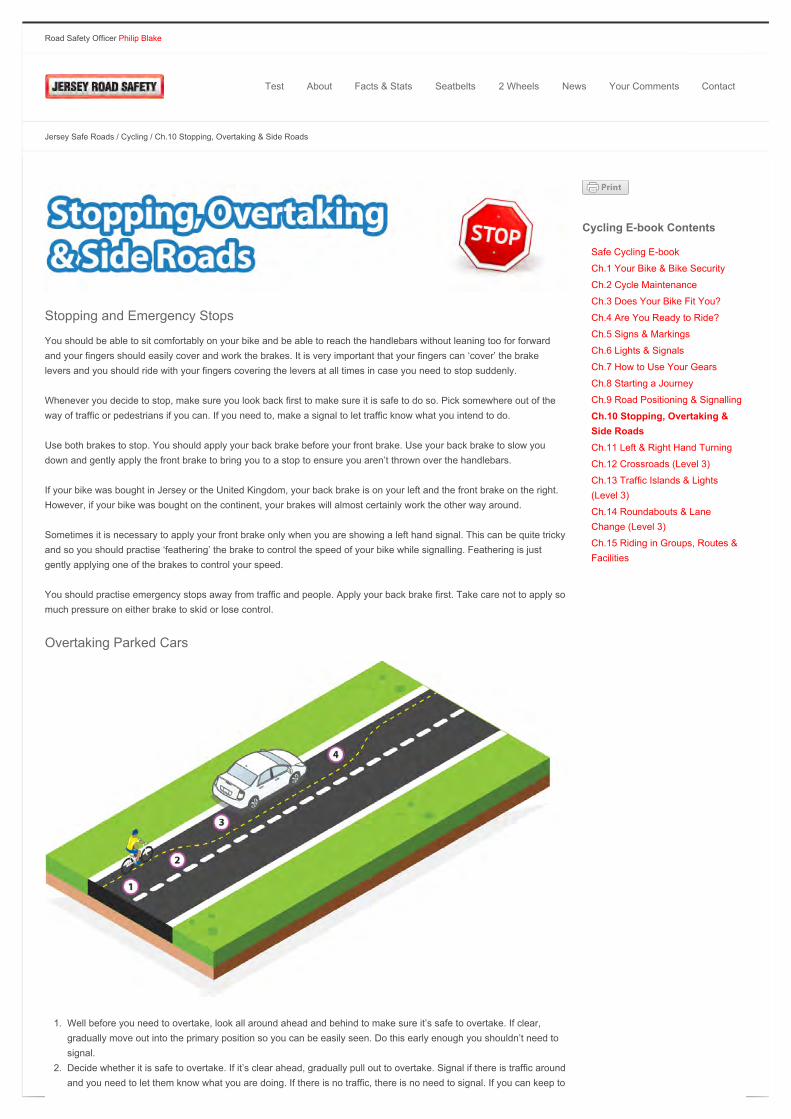
1. Well before you need to overtake, look all around ahead and behind to make sure it’s safe to overtake. If clear,gradually move out into the primary position so you can be easily seen. Do this early enough you shouldn’t need tosignal.
2. Decide whether it is safe to overtake. If it’s clear ahead, gradually pull out to overtake. Signal if there is traffic aroundand you need to let them know what you are doing. If there is no traffic, there is no need to signal. If you can keep to
Cycling E-book Contents
Safe Cycling E-book
Ch.1 Your Bike & Bike Security
Ch.2 Cycle Maintenance
Ch.3 Does Your Bike Fit You?
Ch.4 Are You Ready to Ride?
Ch.5 Signs & Markings
Ch.6 Lights & Signals
Ch.7 How to Use Your Gears
Ch.8 Starting a Journey
Ch.9 Road Positioning & Signalling
Ch.10 Stopping, Overtaking &Side RoadsCh.11 Left & Right Hand Turning
Ch.12 Crossroads (Level 3)
Ch.13 Traffic Islands & Lights(Level 3)
Ch.14 Roundabouts & LaneChange (Level 3)
Ch.15 Riding in Groups, Routes &Facilities
the left of the white centre line, do so. This can be difficult on many of our smaller roads in Jersey where they arequite narrow. When it is like this, you must make absolutely sure there is a big enough gap to get passed the car. If itisn’t safe to overtake, you will need to stop behind the car. Make sure you are far enough out and far enough backfrom the parked car so drivers can see you and you can see them.Remember, if it’s dangerous to overtake, there isno shame in stopping and getting off your bike and pushing to somewhere safer.
3. Overtake leaving plenty of room between you and the parked car.4. Once past the car, check over your left shoulder to make sure it’s safe before moving back to the secondary
position.
Dangers when Overtaking
If someone is sitting in the car on the driver’s side, they may not see you and open the door in front of you.If the engine starts or is already running, the may pull out in front of you or reverse into you.Unseen children or animals may run out in front of the parked car.Traffic coming toward you.If there are more parked cars ahead of you and there is a short gap in between them, it is normally safer to stay outin the road where you can be seen and it is easier for you to see what is going on. However, if there is a car comingtoward you and it is not safe to stay out in the road, you must pull in as the car coming toward you will have the ‘rightof way’.
Overtaking Queuing Traffic
You may find yourself queuing in traffic waiting for traffic lights for instance. It is very tempting to overtake and go to thefront of the queue.
As a new rider in Jersey, NEVER be tempted to do this, it can be VERY dangerous, especially on our busy narrowroads in Jersey. In the United Kingdom and in Europe, because many of their roads are much wider than ours, specialcycle lanes and ‘advanced stop lines’ are sometimes available to help you get passed stationary or slow moving traffic.
NEVER EVER try to overtake any queuing or slow moving traffic on the side next to the pavement. People have beenkilled or seriously hurt doing this.
NEVER overtake at a junction (where two roadds come together), drivers will often turn in front of you without warning orindicating, or they may possibly let waiting traffic at side roads out as you try to overtake.
It is much safer to check around and when safe get off your bike and push it to the next road.
If you are queuing behind a lorry or van, where the driver cannot see behind them, because they have no windows to seethrough at the back of their lorry or van, then make sure you stop well back and that you are positioned so you can seethe drivers ‘wing mirror’. If you can see the drivers wing mirror, the driver will be able to see you.
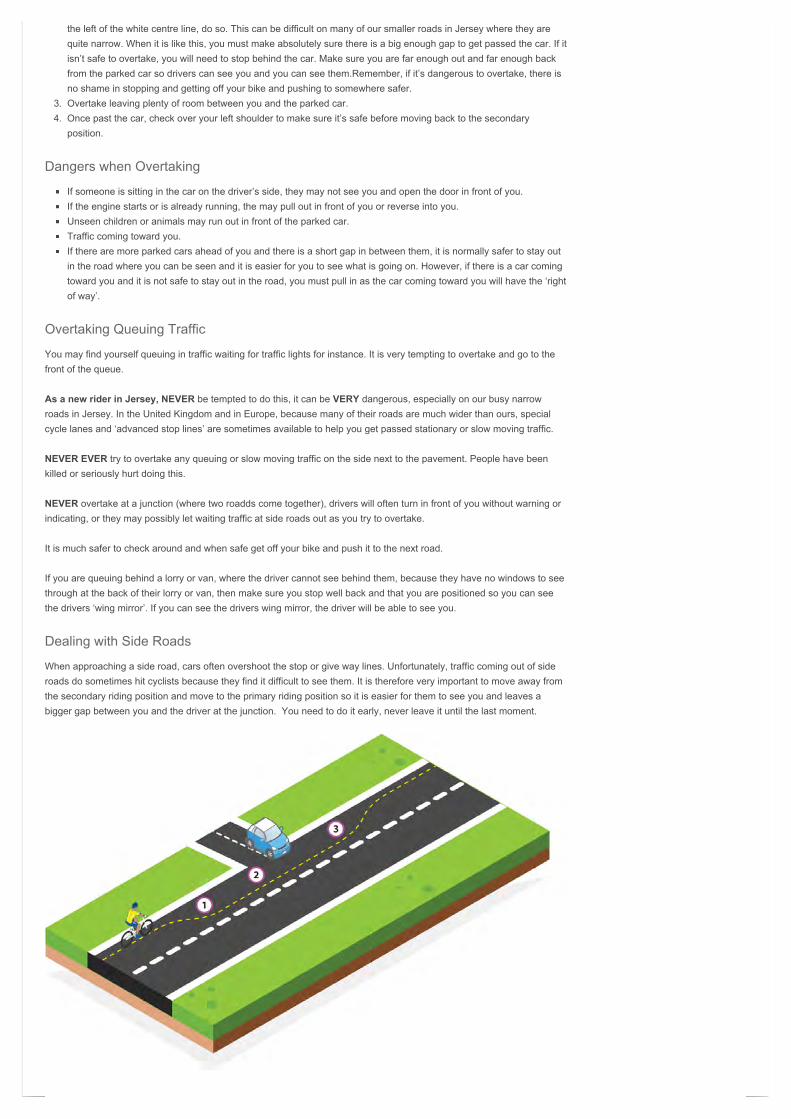
Dealing with Side Roads
When approaching a side road, cars often overshoot the stop or give way lines. Unfortunately, traffic coming out of sideroads do sometimes hit cyclists because they find it difficult to see them. It is therefore very important to move away fromthe secondary riding position and move to the primary riding position so it is easier for them to see you and leaves abigger gap between you and the driver at the junction. You need to do it early, never leave it until the last moment.

1. Look back and make sure it’s safe to move into the primary position. If safe to do so, gradually move to the primaryposition.
2. As you pass the side road keep a good eye out for traffic turning right into the side road (you have the right of way,ride confidently, just be careful) and traffic coming out of the side road. Get eye contact if you can.
3. Once you are past the side road, look back over bother shoulders and gradually return to the secondary ridingposition.
< Road Positioning, Look Backs & Signalling | Left & Right Hand Turning >
Copyright 2013 Jersey Road Safety

Road Safety Officer Philip Blake
Test About Facts & Stats Seatbelts 2 Wheels News Your Comments Contact
Jersey Safe Roads / Cycling / Ch.11 Left & Right Hand Turning
Left Hand Turn from a Main Road to a Side Road
1. Well before the turn; check all around to make sure it is safe to carry out the turn.2. If safe, move from the secondary riding position to the primary riding position to block your lane and control traffic.3. Give a good left hand signal if you need to let other road users know what you are doing. It should be long enough to
make sure people see the signal. Adjust your speed if you need to.4. Make sure both hands are back on the handlebars for the turn, fingers covering both brakes. Check back over your
left shoulder to make sure it is safe to make the turn, if safe, make a controlled turn.5. As you turn into the minor road, stay in the primary position until it is safe to return to the secondary position.
Left Turn from a Side Road to a Main Road
Cycling E-book Contents
Safe Cycling E-book
Ch.1 Your Bike & Bike Security
Ch.2 Cycle Maintenance
Ch.3 Does Your Bike Fit You?
Ch.4 Are You Ready to Ride?
Ch.5 Signs & Markings
Ch.6 Lights & Signals
Ch.7 How to Use Your Gears
Ch.8 Starting a Journey
Ch.9 Road Positioning & Signalling
Ch.10 Stopping, Overtaking & SideRoads
Ch.11 Left & Right Hand Turning
Ch.12 Crossroads (Level 3)
Ch.13 Traffic Islands & Lights(Level 3)
Ch.14 Roundabouts & LaneChange (Level 3)
Ch.15 Riding in Groups, Routes &Facilities
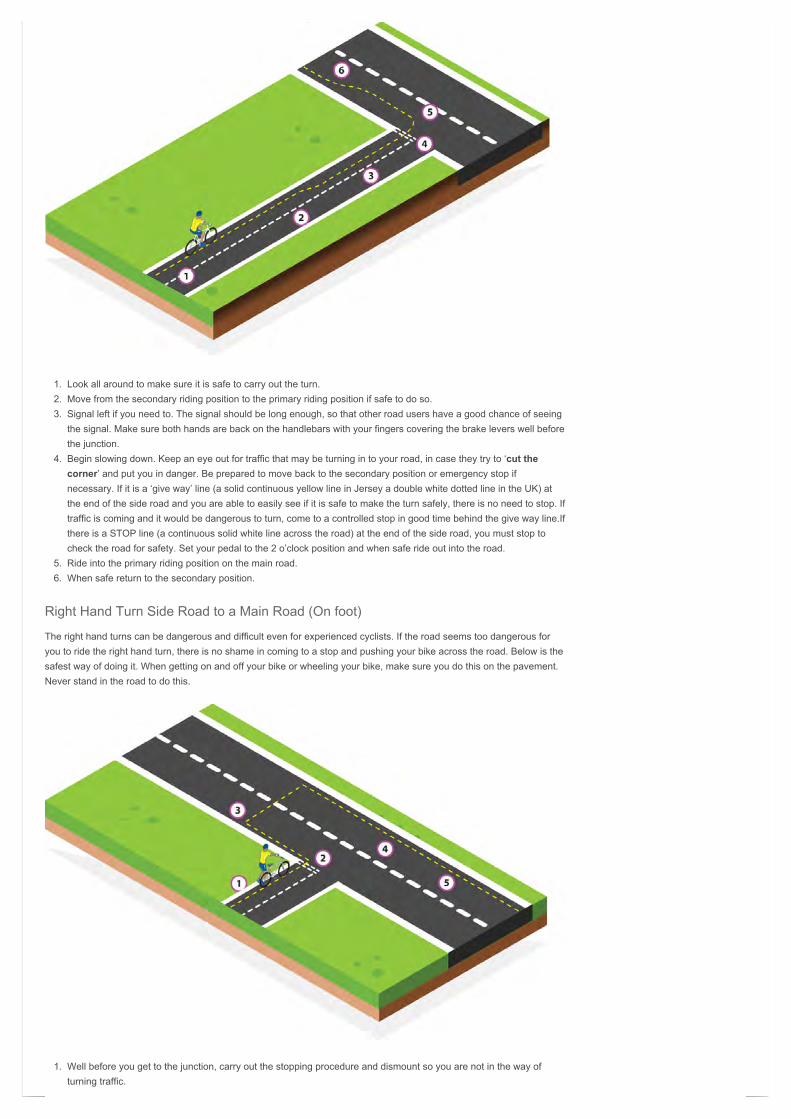
1. Look all around to make sure it is safe to carry out the turn.2. Move from the secondary riding position to the primary riding position if safe to do so.3. Signal left if you need to. The signal should be long enough, so that other road users have a good chance of seeing
the signal. Make sure both hands are back on the handlebars with your fingers covering the brake levers well beforethe junction.
4. Begin slowing down. Keep an eye out for traffic that may be turning in to your road, in case they try to ‘cut thecorner’ and put you in danger. Be prepared to move back to the secondary position or emergency stop ifnecessary. If it is a ‘give way’ line (a solid continuous yellow line in Jersey a double white dotted line in the UK) atthe end of the side road and you are able to easily see if it is safe to make the turn safely, there is no need to stop. Iftraffic is coming and it would be dangerous to turn, come to a controlled stop in good time behind the give way line.Ifthere is a STOP line (a continuous solid white line across the road) at the end of the side road, you must stop tocheck the road for safety. Set your pedal to the 2 o’clock position and when safe ride out into the road.
5. Ride into the primary riding position on the main road.6. When safe return to the secondary position.
Right Hand Turn Side Road to a Main Road (On foot)
The right hand turns can be dangerous and difficult even for experienced cyclists. If the road seems too dangerous foryou to ride the right hand turn, there is no shame in coming to a stop and pushing your bike across the road. Below is thesafest way of doing it. When getting on and off your bike or wheeling your bike, make sure you do this on the pavement.Never stand in the road to do this.
1. Well before you get to the junction, carry out the stopping procedure and dismount so you are not in the way ofturning traffic.
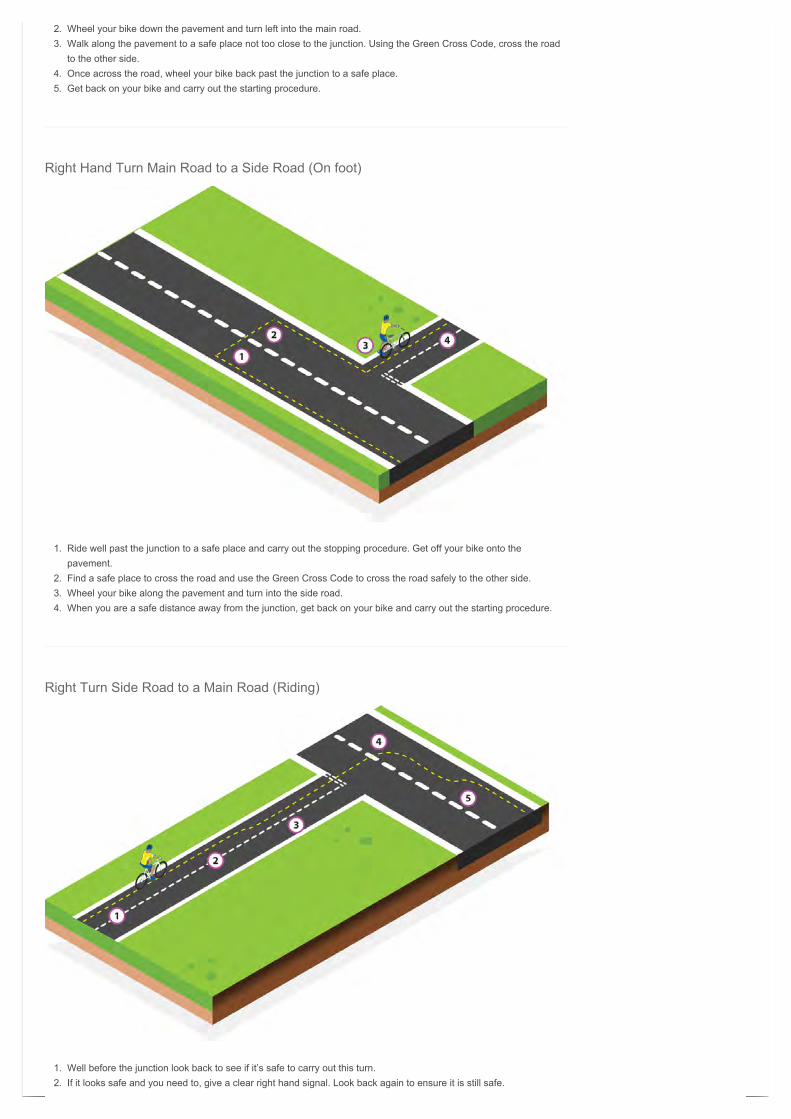
2. Wheel your bike down the pavement and turn left into the main road.3. Walk along the pavement to a safe place not too close to the junction. Using the Green Cross Code, cross the road
to the other side.4. Once across the road, wheel your bike back past the junction to a safe place.5. Get back on your bike and carry out the starting procedure.
Right Hand Turn Main Road to a Side Road (On foot)
1. Ride well past the junction to a safe place and carry out the stopping procedure. Get off your bike onto thepavement.
2. Find a safe place to cross the road and use the Green Cross Code to cross the road safely to the other side.3. Wheel your bike along the pavement and turn into the side road.4. When you are a safe distance away from the junction, get back on your bike and carry out the starting procedure.
Right Turn Side Road to a Main Road (Riding)
1. Well before the junction look back to see if it’s safe to carry out this turn.2. If it looks safe and you need to, give a clear right hand signal. Look back again to ensure it is still safe.
3. With your arm still out (if you needed to signal), gradually move from the secondary position to the primary position.Put your hand back on the handle bars, fingers covering the brake levers and begin to slow down. Keep an eye outfor traffic that may ‘cut the corner’ when turning into your road.
4. With this turn, even if it is a ‘give way’ line, you should come to a stop to check if it is safe to turn into the road. Setyour pedal ready to go.
5. Have a good look around, when it is safe, ride ‘straight’ out into the road. Make sure you don’t cut the corner, if youdo, it places you in danger for longer. Begin the turn when you get to the opposite side of the road. Take up theprimary position and when safe gradually move to the secondary position.
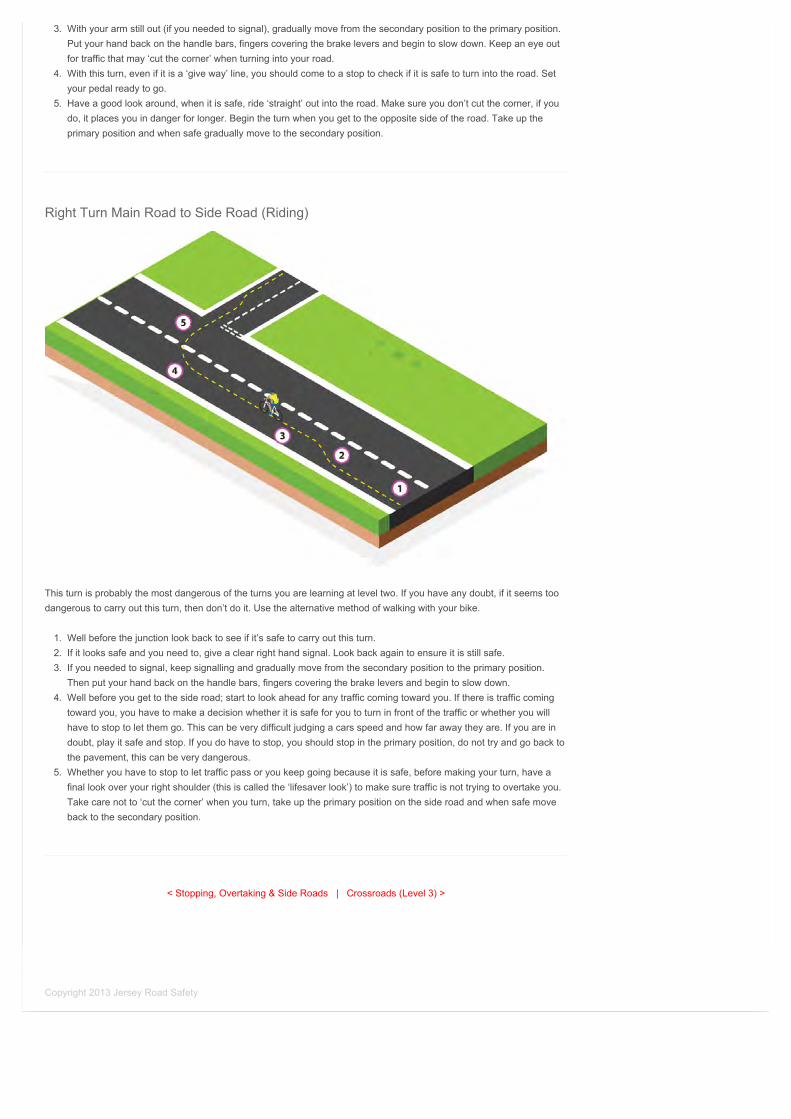
Right Turn Main Road to Side Road (Riding)
This turn is probably the most dangerous of the turns you are learning at level two. If you have any doubt, if it seems toodangerous to carry out this turn, then don’t do it. Use the alternative method of walking with your bike.
1. Well before the junction look back to see if it’s safe to carry out this turn.2. If it looks safe and you need to, give a clear right hand signal. Look back again to ensure it is still safe.3. If you needed to signal, keep signalling and gradually move from the secondary position to the primary position.
Then put your hand back on the handle bars, fingers covering the brake levers and begin to slow down.4. Well before you get to the side road; start to look ahead for any traffic coming toward you. If there is traffic coming
toward you, you have to make a decision whether it is safe for you to turn in front of the traffic or whether you willhave to stop to let them go. This can be very difficult judging a cars speed and how far away they are. If you are indoubt, play it safe and stop. If you do have to stop, you should stop in the primary position, do not try and go back tothe pavement, this can be very dangerous.
5. Whether you have to stop to let traffic pass or you keep going because it is safe, before making your turn, have afinal look over your right shoulder (this is called the ‘lifesaver look’) to make sure traffic is not trying to overtake you.Take care not to ‘cut the corner’ when you turn, take up the primary position on the side road and when safe moveback to the secondary position.
< Stopping, Overtaking & Side Roads | Crossroads (Level 3) >
Copyright 2013 Jersey Road Safety
Road Safety Officer Philip Blake
Test About Facts & Stats Seatbelts 2 Wheels News Your Comments Contact
Jersey Safe Roads / Cycling / Ch.12 Crossroads (Level 3)
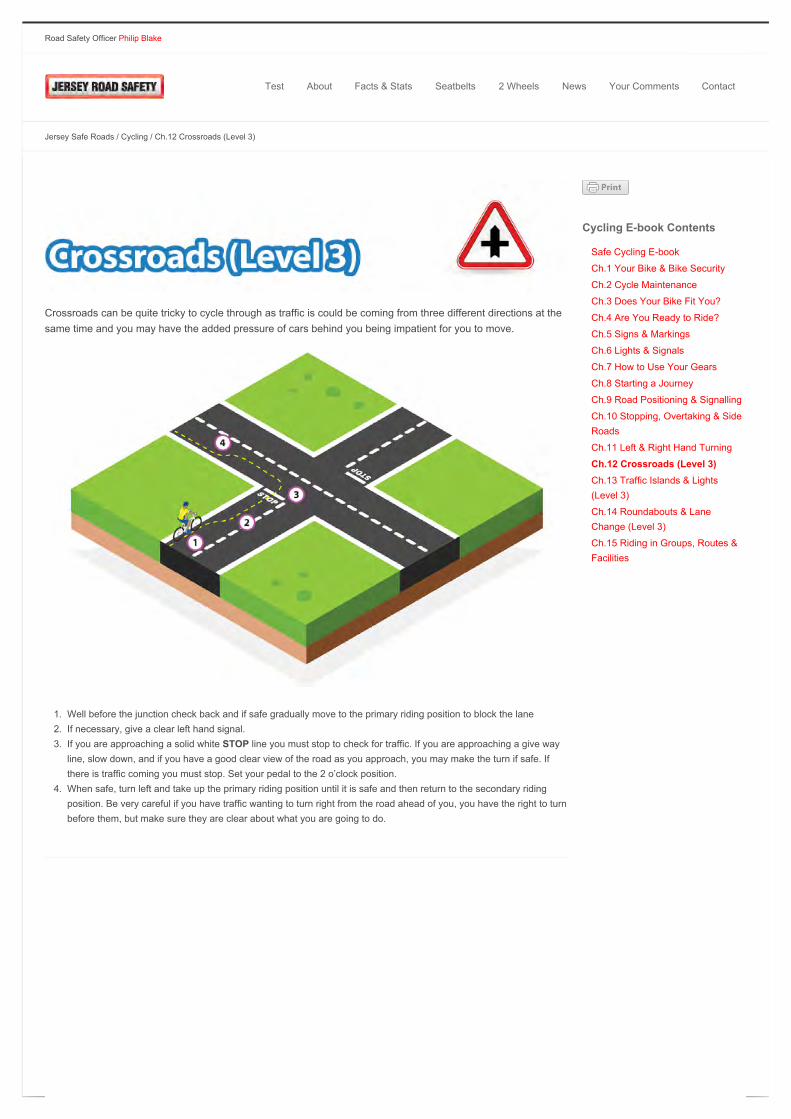
Crossroads can be quite tricky to cycle through as traffic is could be coming from three different directions at thesame time and you may have the added pressure of cars behind you being impatient for you to move.
1. Well before the junction check back and if safe gradually move to the primary riding position to block the lane2. If necessary, give a clear left hand signal.3. If you are approaching a solid white STOP line you must stop to check for traffic. If you are approaching a give way
line, slow down, and if you have a good clear view of the road as you approach, you may make the turn if safe. Ifthere is traffic coming you must stop. Set your pedal to the 2 o’clock position.
4. When safe, turn left and take up the primary riding position until it is safe and then return to the secondary ridingposition. Be very careful if you have traffic wanting to turn right from the road ahead of you, you have the right to turnbefore them, but make sure they are clear about what you are going to do.
Cycling E-book Contents
Safe Cycling E-book
Ch.1 Your Bike & Bike Security
Ch.2 Cycle Maintenance
Ch.3 Does Your Bike Fit You?
Ch.4 Are You Ready to Ride?
Ch.5 Signs & Markings
Ch.6 Lights & Signals
Ch.7 How to Use Your Gears
Ch.8 Starting a Journey
Ch.9 Road Positioning & Signalling
Ch.10 Stopping, Overtaking & SideRoads
Ch.11 Left & Right Hand Turning
Ch.12 Crossroads (Level 3)Ch.13 Traffic Islands & Lights(Level 3)
Ch.14 Roundabouts & LaneChange (Level 3)
Ch.15 Riding in Groups, Routes &Facilities
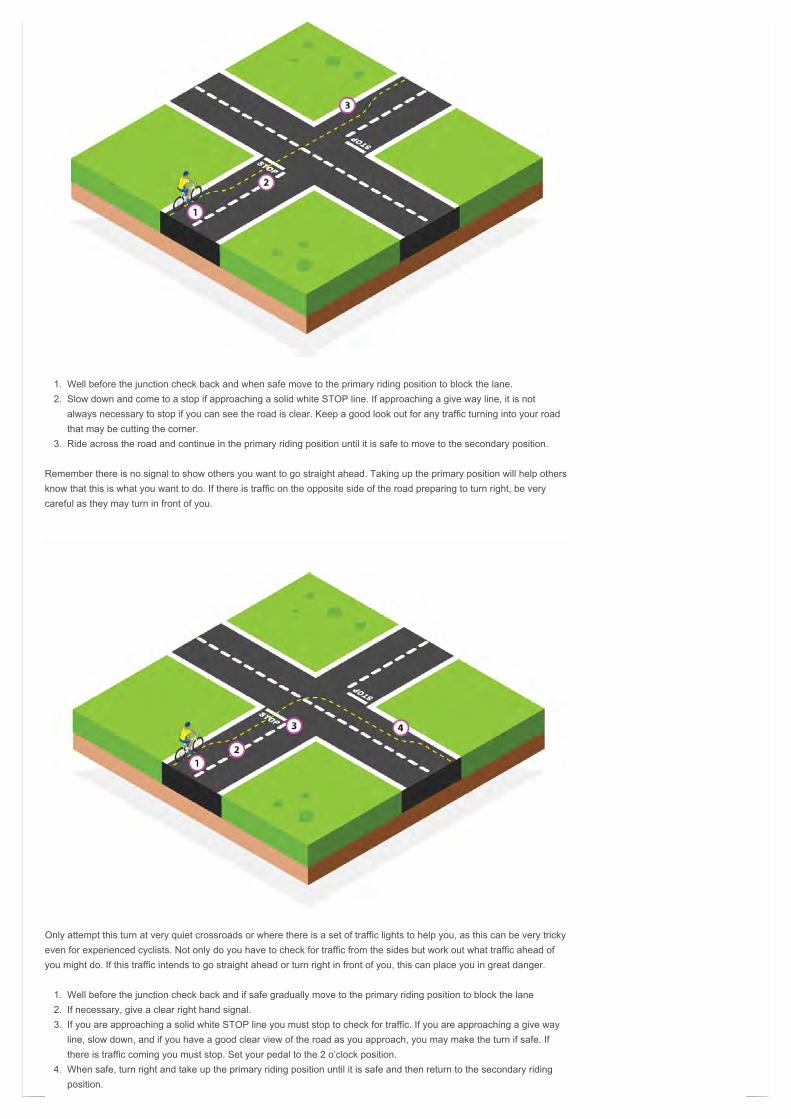
1. Well before the junction check back and when safe move to the primary riding position to block the lane.2. Slow down and come to a stop if approaching a solid white STOP line. If approaching a give way line, it is not
always necessary to stop if you can see the road is clear. Keep a good look out for any traffic turning into your roadthat may be cutting the corner.
3. Ride across the road and continue in the primary riding position until it is safe to move to the secondary position.
Remember there is no signal to show others you want to go straight ahead. Taking up the primary position will help othersknow that this is what you want to do. If there is traffic on the opposite side of the road preparing to turn right, be verycareful as they may turn in front of you.
Only attempt this turn at very quiet crossroads or where there is a set of traffic lights to help you, as this can be very trickyeven for experienced cyclists. Not only do you have to check for traffic from the sides but work out what traffic ahead ofyou might do. If this traffic intends to go straight ahead or turn right in front of you, this can place you in great danger.
1. Well before the junction check back and if safe gradually move to the primary riding position to block the lane2. If necessary, give a clear right hand signal.3. If you are approaching a solid white STOP line you must stop to check for traffic. If you are approaching a give way
line, slow down, and if you have a good clear view of the road as you approach, you may make the turn if safe. Ifthere is traffic coming you must stop. Set your pedal to the 2 o’clock position.
4. When safe, turn right and take up the primary riding position until it is safe and then return to the secondary ridingposition.
Road Safety Officer Philip Blake
Test About Facts & Stats Seatbelts 2 Wheels News Your Comments Contact
Jersey Safe Roads / Cycling / Ch.13 Traffic Islands & Lights (Level 3)
Traffic Islands
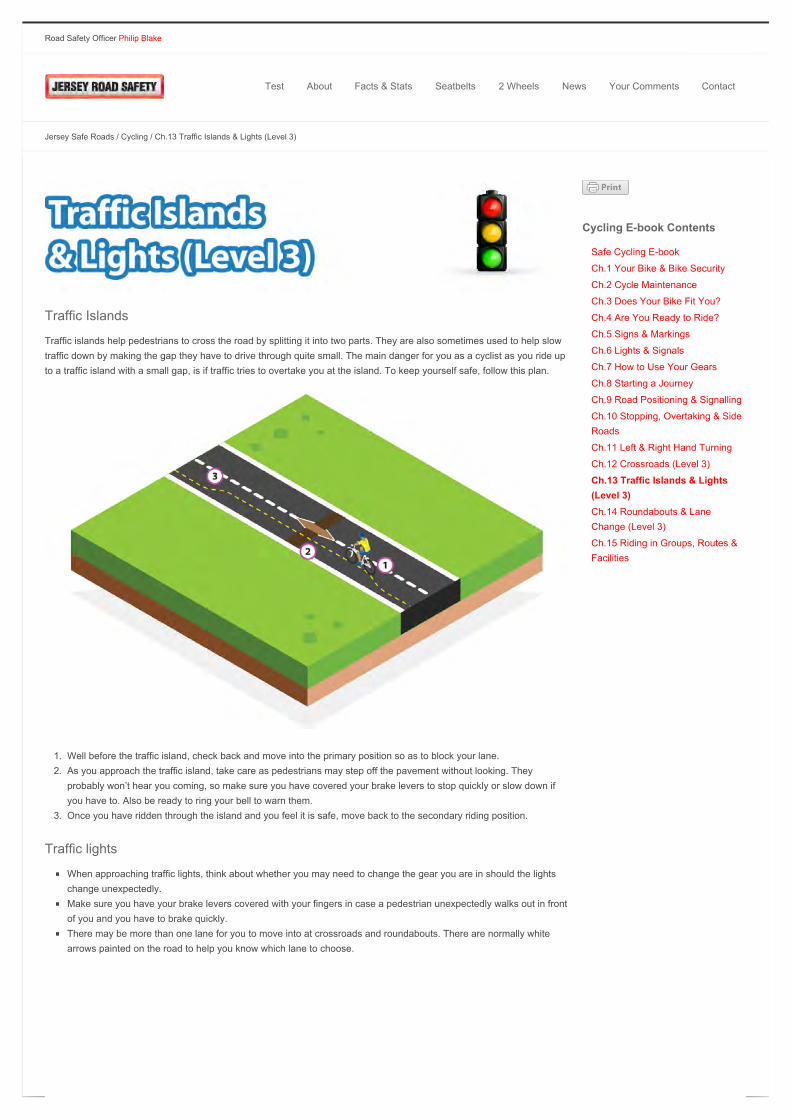
Traffic islands help pedestrians to cross the road by splitting it into two parts. They are also sometimes used to help slowtraffic down by making the gap they have to drive through quite small. The main danger for you as a cyclist as you ride upto a traffic island with a small gap, is if traffic tries to overtake you at the island. To keep yourself safe, follow this plan.
1. Well before the traffic island, check back and move into the primary position so as to block your lane.2. As you approach the traffic island, take care as pedestrians may step off the pavement without looking. They
probably won’t hear you coming, so make sure you have covered your brake levers to stop quickly or slow down ifyou have to. Also be ready to ring your bell to warn them.
3. Once you have ridden through the island and you feel it is safe, move back to the secondary riding position.
Traffic lights
When approaching traffic lights, think about whether you may need to change the gear you are in should the lightschange unexpectedly.Make sure you have your brake levers covered with your fingers in case a pedestrian unexpectedly walks out in frontof you and you have to brake quickly.There may be more than one lane for you to move into at crossroads and roundabouts. There are normally whitearrows painted on the road to help you know which lane to choose.
Cycling E-book Contents
Safe Cycling E-book
Ch.1 Your Bike & Bike Security
Ch.2 Cycle Maintenance
Ch.3 Does Your Bike Fit You?
Ch.4 Are You Ready to Ride?
Ch.5 Signs & Markings
Ch.6 Lights & Signals
Ch.7 How to Use Your Gears
Ch.8 Starting a Journey
Ch.9 Road Positioning & Signalling
Ch.10 Stopping, Overtaking & SideRoads
Ch.11 Left & Right Hand Turning
Ch.12 Crossroads (Level 3)
Ch.13 Traffic Islands & Lights(Level 3)
Ch.14 Roundabouts & LaneChange (Level 3)
Ch.15 Riding in Groups, Routes &Facilities
1. Well before you get to the traffic lights, check back and move into the primary riding position to block the lane andstop traffic getting past you. (If there are lanes to choose from, make your decision and move into the lane, taking upa primary position in that lane).
2. Maintain the position until you are through the junction.3. When you think it is safe, check back over your left shoulder and move back to the secondary position.
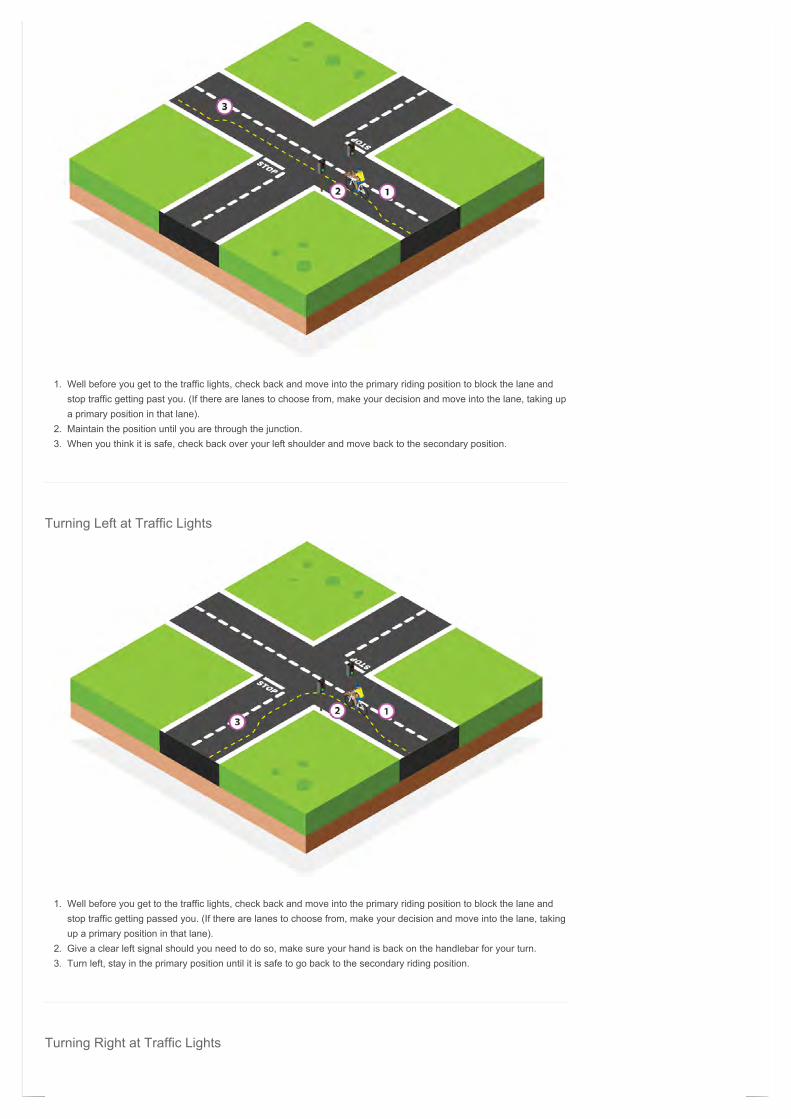
Turning Left at Traffic Lights
1. Well before you get to the traffic lights, check back and move into the primary riding position to block the lane andstop traffic getting passed you. (If there are lanes to choose from, make your decision and move into the lane, takingup a primary position in that lane).
2. Give a clear left signal should you need to do so, make sure your hand is back on the handlebar for your turn.3. Turn left, stay in the primary position until it is safe to go back to the secondary riding position.
Turning Right at Traffic Lights
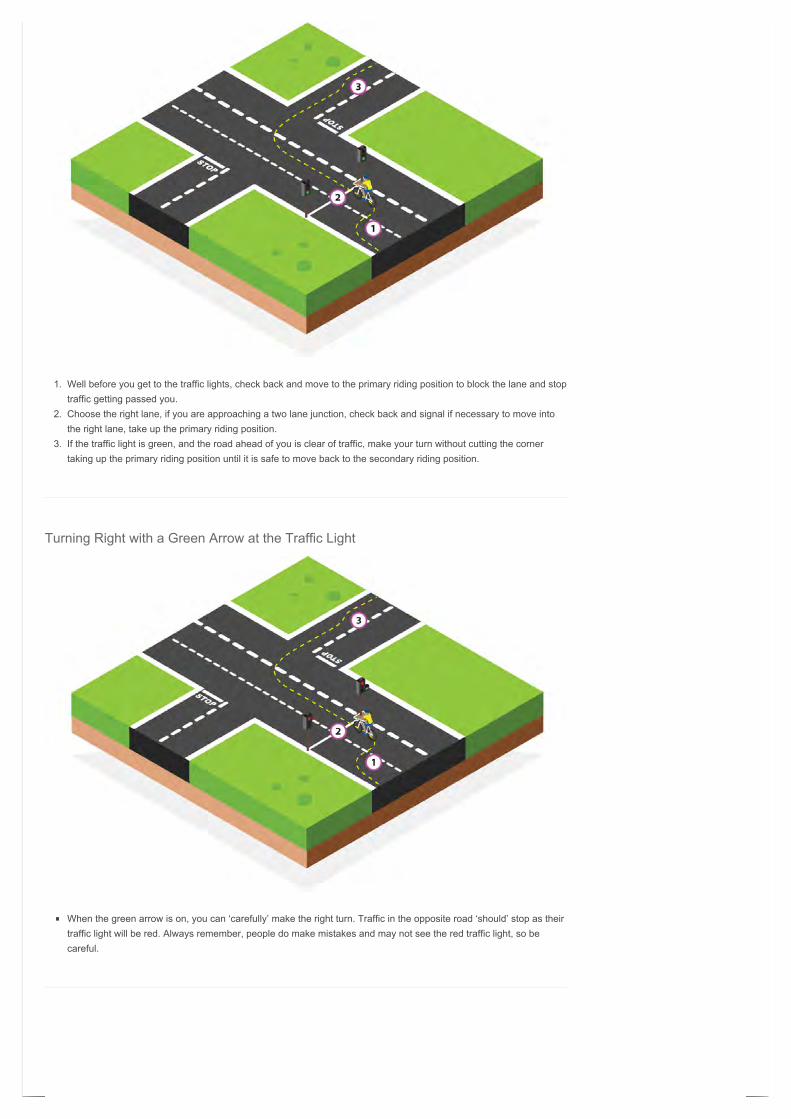
1. Well before you get to the traffic lights, check back and move to the primary riding position to block the lane and stoptraffic getting passed you.
2. Choose the right lane, if you are approaching a two lane junction, check back and signal if necessary to move intothe right lane, take up the primary riding position.
3. If the traffic light is green, and the road ahead of you is clear of traffic, make your turn without cutting the cornertaking up the primary riding position until it is safe to move back to the secondary riding position.
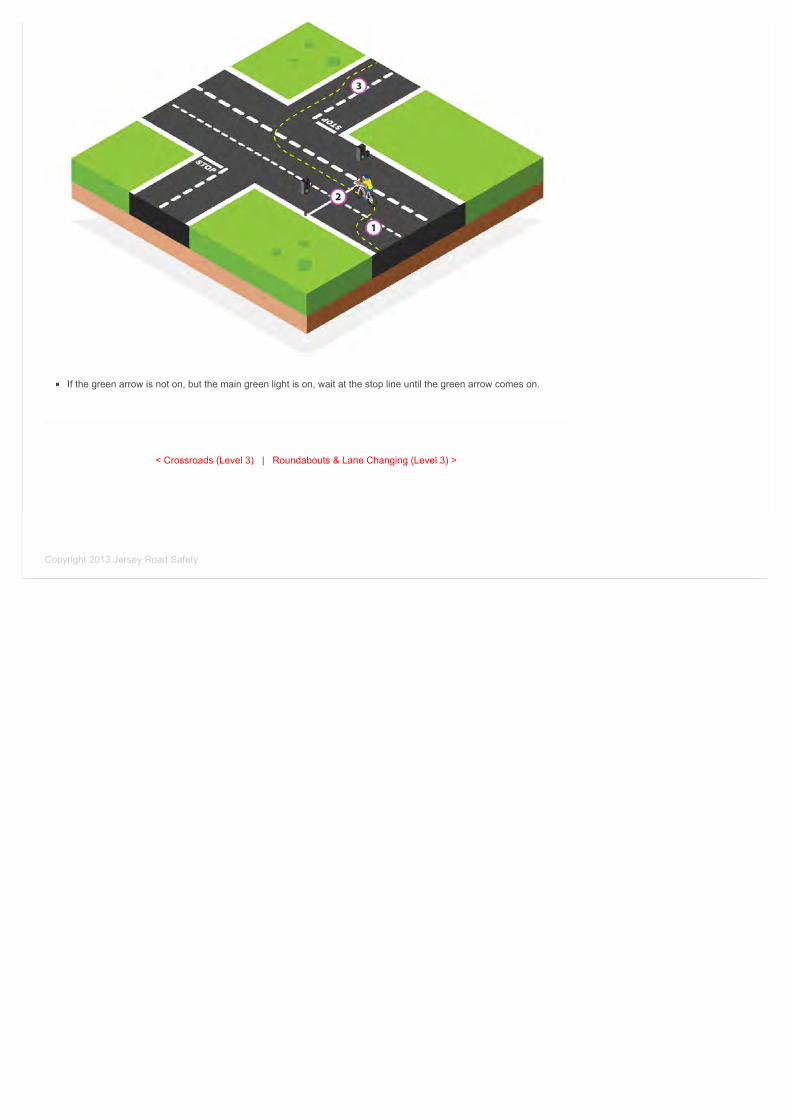
Turning Right with a Green Arrow at the Traffic Light
When the green arrow is on, you can ‘carefully’ make the right turn. Traffic in the opposite road ‘should’ stop as theirtraffic light will be red. Always remember, people do make mistakes and may not see the red traffic light, so becareful.
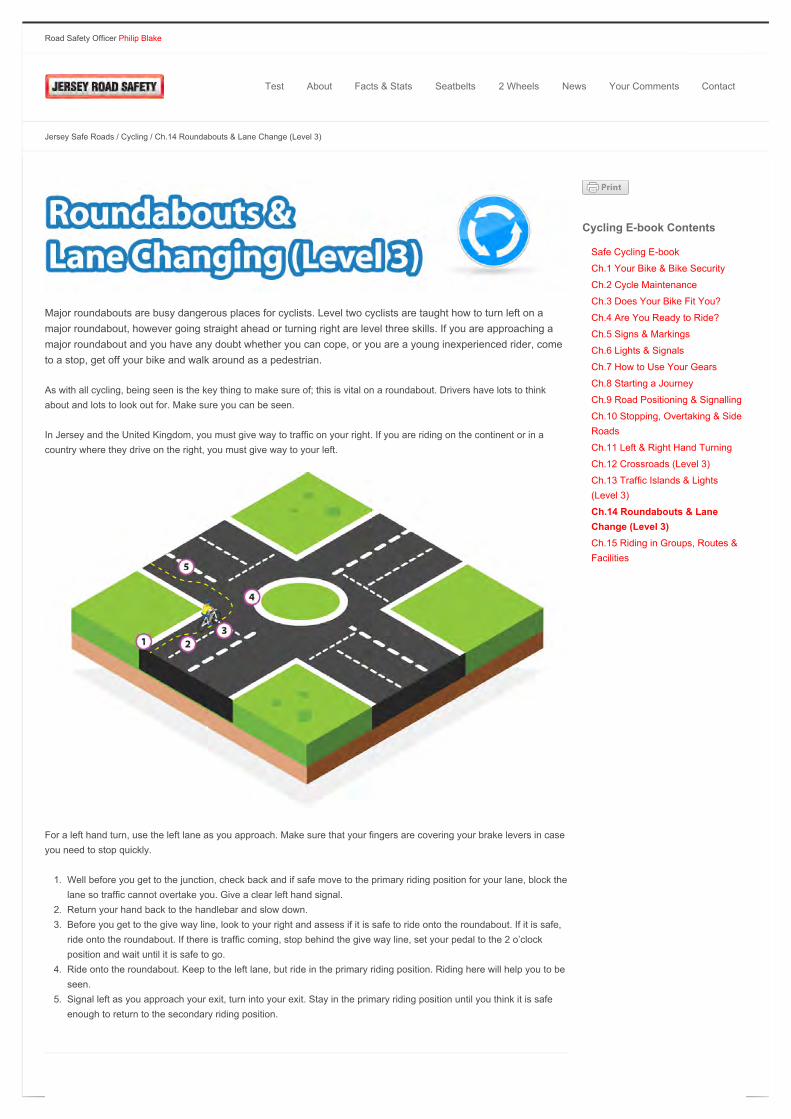
If the green arrow is not on, but the main green light is on, wait at the stop line until the green arrow comes on.
< Crossroads (Level 3) | Roundabouts & Lane Changing (Level 3) >
Copyright 2013 Jersey Road Safety
Road Safety Officer Philip Blake
Test About Facts & Stats Seatbelts 2 Wheels News Your Comments Contact
Jersey Safe Roads / Cycling / Ch.14 Roundabouts & Lane Change (Level 3)
Major roundabouts are busy dangerous places for cyclists. Level two cyclists are taught how to turn left on amajor roundabout, however going straight ahead or turning right are level three skills. If you are approaching amajor roundabout and you have any doubt whether you can cope, or you are a young inexperienced rider, cometo a stop, get off your bike and walk around as a pedestrian.
As with all cycling, being seen is the key thing to make sure of; this is vital on a roundabout. Drivers have lots to thinkabout and lots to look out for. Make sure you can be seen.
In Jersey and the United Kingdom, you must give way to traffic on your right. If you are riding on the continent or in acountry where they drive on the right, you must give way to your left.
For a left hand turn, use the left lane as you approach. Make sure that your fingers are covering your brake levers in caseyou need to stop quickly.
1. Well before you get to the junction, check back and if safe move to the primary riding position for your lane, block thelane so traffic cannot overtake you. Give a clear left hand signal.
2. Return your hand back to the handlebar and slow down.3. Before you get to the give way line, look to your right and assess if it is safe to ride onto the roundabout. If it is safe,
ride onto the roundabout. If there is traffic coming, stop behind the give way line, set your pedal to the 2 o’clockposition and wait until it is safe to go.
4. Ride onto the roundabout. Keep to the left lane, but ride in the primary riding position. Riding here will help you to beseen.
5. Signal left as you approach your exit, turn into your exit. Stay in the primary riding position until you think it is safeenough to return to the secondary riding position.
Cycling E-book Contents
Safe Cycling E-book
Ch.1 Your Bike & Bike Security
Ch.2 Cycle Maintenance
Ch.3 Does Your Bike Fit You?
Ch.4 Are You Ready to Ride?
Ch.5 Signs & Markings
Ch.6 Lights & Signals
Ch.7 How to Use Your Gears
Ch.8 Starting a Journey
Ch.9 Road Positioning & Signalling
Ch.10 Stopping, Overtaking & SideRoads
Ch.11 Left & Right Hand Turning
Ch.12 Crossroads (Level 3)
Ch.13 Traffic Islands & Lights(Level 3)
Ch.14 Roundabouts & LaneChange (Level 3)
Ch.15 Riding in Groups, Routes &Facilities

When you are intending to ride straight on use the left hand lane.
1. Well before the junction, check back and move to the primary riding position in the left lane, block the lane so trafficcannot overtake you.
2. As you approach the junction, begin to decide if it is safe to ride onto the roundabout, if it is safe, ride onto theroundabout and take up the primary riding position in the left lane. If it isn’t safe, wait behind the give way line. Setyour pedal to the 2 o’clock position and wait until it is safe.
3. As you approach a lane of traffic waiting to drive onto the roundabout, try and get eye contact with them, if you thinkit necessary, give a clear right hand signal so that they know you are continuing around.
4. Signal left as you approach your exit, turn into your exit. Stay in the primary riding position until you think it is safeenough to return to the secondary riding position.
For a right hand turn, use the right lane as you approach. Make sure that your fingers are covering your brake levers incase you need to stop quickly.
1. Well before the junction, check back and move to the primary riding position in the right lane, give a clear right handsignal right and block the lane so traffic cannot overtake you.
2. As you approach the junction, begin to decide if it is safe to ride onto the roundabout, if it is safe, ride onto theroundabout and take up the primary riding position in the right lane. If it isn’t safe, wait behind the give way line. Setyour pedal to the 2 o’clock position and wait until it is safe.
3. As you cycle around the roundabout in the right lane, stay in the primary riding position.
4. As you are approaching your exit, check back over your left shoulder, give a clear left hand signal and exit theroundabout.
5. Stay in the primary riding position until you think it is safe and then return to the secondary riding position.
Lane changing
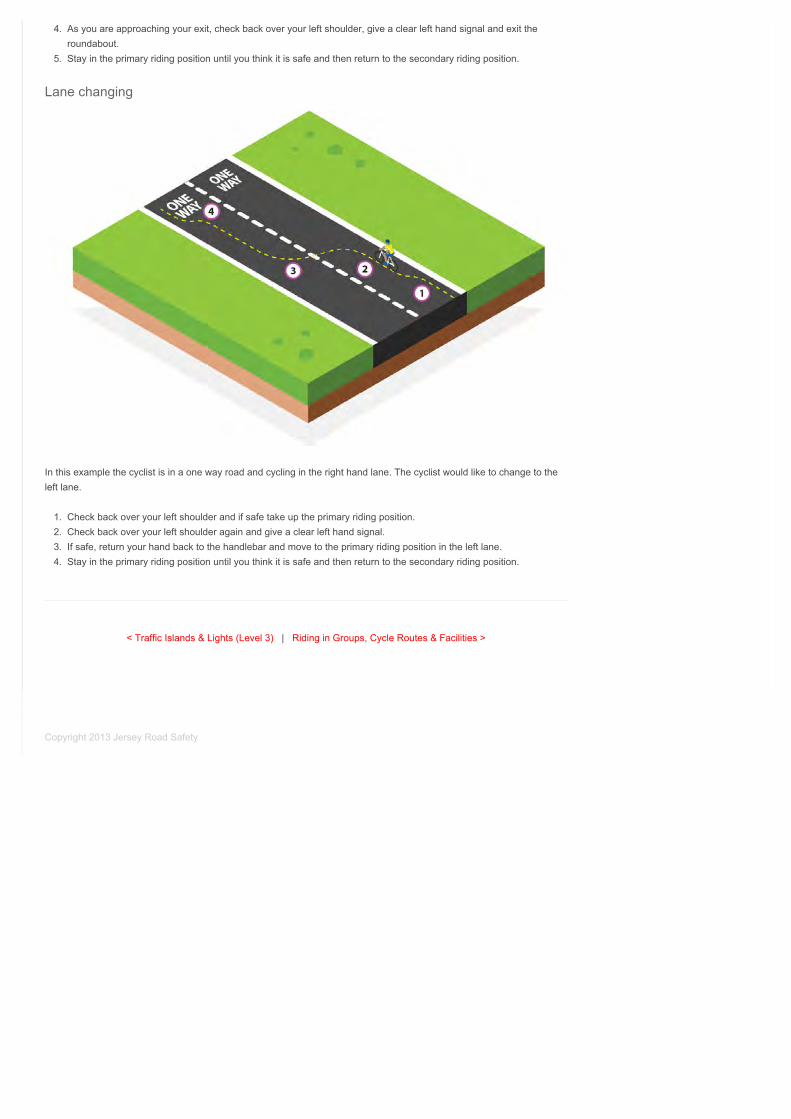
In this example the cyclist is in a one way road and cycling in the right hand lane. The cyclist would like to change to theleft lane.
1. Check back over your left shoulder and if safe take up the primary riding position.2. Check back over your left shoulder again and give a clear left hand signal.3. If safe, return your hand back to the handlebar and move to the primary riding position in the left lane.4. Stay in the primary riding position until you think it is safe and then return to the secondary riding position.
< Traffic Islands & Lights (Level 3) | Riding in Groups, Cycle Routes & Facilities >
Copyright 2013 Jersey Road Safety
Road Safety Officer Philip Blake
Test About Facts & Stats Seatbelts 2 Wheels News Your Comments Contact
Jersey Safe Roads / Cycling / Ch.15 Riding in Groups, Routes & Facilities
Riding in Groups
You must not ride more than two abreast (more than two riders beside each other) on a main road and single file(one behind the other) in small country lanesKeep a good distance from the bike in front of you, so if the bike stops without warning, you can come to a safe stop.When you are riding on the main road with a group of friends, you must be very careful and it is best to not havemore than six of you riding together two abreast, so that drivers have a good chance to overtake if they wish.Telling other riders what you are going to do really helps to. If you do something no one expects and you haven’t toldthem or given a clear signal, you are much more likely to have an accident.
Cycle Routes and Facilities
Jersey has many cycle routes and these are being continuously improved and developed. Some of these take you offroad, but even then, you still have to careful when using these routes, as many people get hurt when using them. You stillneed to wear a cycle helmet and ride with care and be considerate of others who may be walking or cycling.
Green Lanes and Tourist Areas
There are also some suggested leisure routes that have been developed by Jersey Tourism, many lead through our‘green lane’ system where vehicles are not meant to drive at more than 15mph. Unfortunately, many vehicles do drive atspeeds greater than this, so you still have to be very careful when using these lanes.
Cycle lanes
We do now have some cycle lanes painted on the road. They have white edging and a white picture of a cycle, greenpaint may be used to help them to be seen by road users. These should not be confused with the cycling signs used tohelp guide tourists in St Helier. Although this has been marked especially for cyclists, you still have to be fully aware ofwhat is going on, and follow the ‘rule of the road’.
Paths & Tracks
Most of our cycle paths & tracks are shared with pedestrians, many of whom may have a dog with them that might not beon a lead or children who may be running free as well as some in buggies. On our railway walk, there may additionally bepot holes and pine cones to keep out of the way of. Ride very carefully in these areas, never ride too fast where it wouldbe difficult for you to stop quickly.
Pavements
You are not allowed to ride your bike on a pavement unless there is a sign allowing you to. Some of our routes take youalong pavements, be careful to do this slowly as you will come across pedestrians also using the pavement who will needyou to avoid them. Sometimes you will have to cross the road from one pavement to another. If you are coming up behindpedestrians on any of these facilities, sound a warning with your bell.
Bus lanes
We don’t have bus lanes in Jersey, but of course you may end up riding somewhere else in the United Kingdom or theContinent where you can.
Cycling E-book Contents
Safe Cycling E-book
Ch.1 Your Bike & Bike Security
Ch.2 Cycle Maintenance
Ch.3 Does Your Bike Fit You?
Ch.4 Are You Ready to Ride?
Ch.5 Signs & Markings
Ch.6 Lights & Signals
Ch.7 How to Use Your Gears
Ch.8 Starting a Journey
Ch.9 Road Positioning & Signalling
Ch.10 Stopping, Overtaking & SideRoads
Ch.11 Left & Right Hand Turning
Ch.12 Crossroads (Level 3)
Ch.13 Traffic Islands & Lights(Level 3)
Ch.14 Roundabouts & LaneChange (Level 3)
Ch.15 Riding in Groups, Routes& Facilities
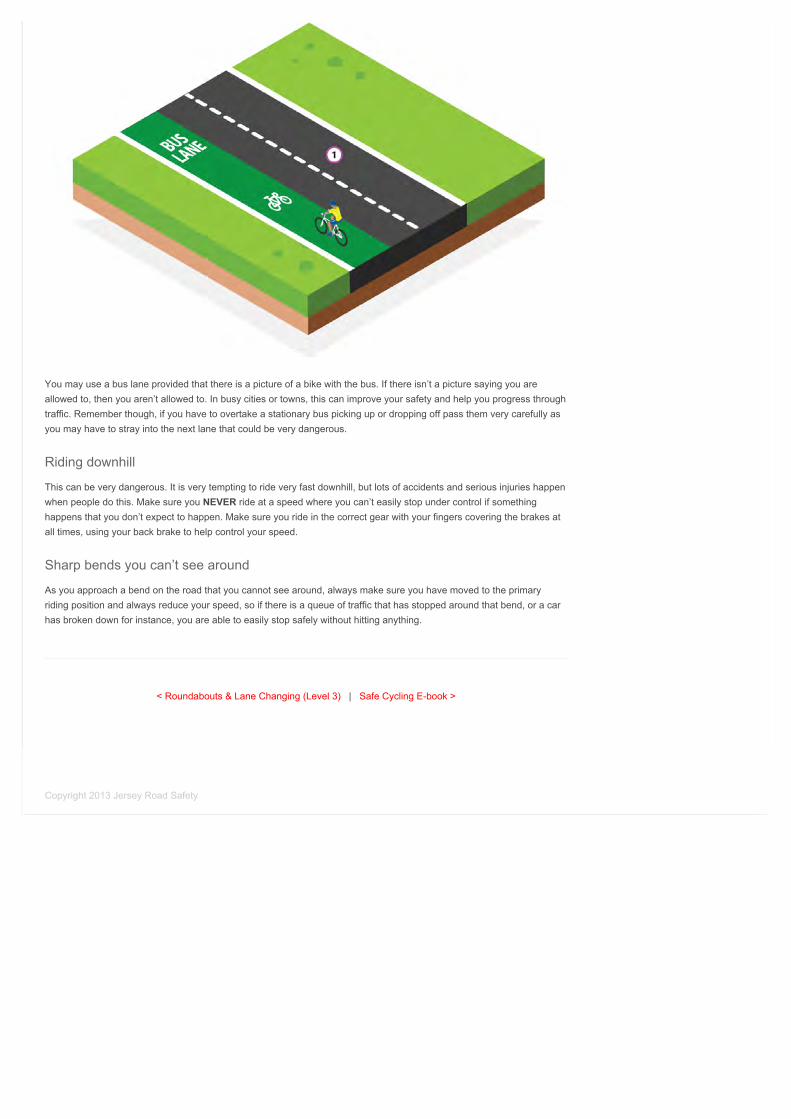
You may use a bus lane provided that there is a picture of a bike with the bus. If there isn’t a picture saying you areallowed to, then you aren’t allowed to. In busy cities or towns, this can improve your safety and help you progress throughtraffic. Remember though, if you have to overtake a stationary bus picking up or dropping off pass them very carefully asyou may have to stray into the next lane that could be very dangerous.
Riding downhill
This can be very dangerous. It is very tempting to ride very fast downhill, but lots of accidents and serious injuries happenwhen people do this. Make sure you NEVER ride at a speed where you can’t easily stop under control if somethinghappens that you don’t expect to happen. Make sure you ride in the correct gear with your fingers covering the brakes atall times, using your back brake to help control your speed.
Sharp bends you can’t see around
As you approach a bend on the road that you cannot see around, always make sure you have moved to the primaryriding position and always reduce your speed, so if there is a queue of traffic that has stopped around that bend, or a carhas broken down for instance, you are able to easily stop safely without hitting anything.
< Roundabouts & Lane Changing (Level 3) | Safe Cycling E-book >
Copyright 2013 Jersey Road Safety