bioanalyzer tips & tricks - agilent · key essentials of chip and ... • protocol for standard...
TRANSCRIPT

Bioanalyzer Tips & Tricks
Agilent Technologies
February 14, 2014 1

Bioanalyzer Tips & Tricks - Outline
System Maintenance
Chip Preparation
Hardware
Software
Assays
Troubleshooting assay runs
Help and Support
Additional Information
February 14, 2014 2

System maintenance
3 February 14, 2014

Cleaning of the Electrode Cartridge
The following quick and easy steps show how to maintain the Electrode Cartridge and assure proper functionality
• Remove chip immediately after run is completed.
• Clean the electrode pinset between each run with a dedicated cleaning chip containing 350 µL of RnaseZAP/water (refer to protocol).
• Empty the cleaning chip in between each run and replace with fresh liquid.
• Perform a thorough cleaning every 3 months or sooner if the electrode is suspected to be dirty.
February 14, 2014 4
***Demonstrate next steps with actual cartridge***

• Turn off the Bioanalyzer instrument, remove the cartridge, remove the electrode pin set and soak for 15 minutes in deionized water.
• Sonicate the pinset in a clean beaker with deionized water and/or use a soft toothbrush.
• RNA assay users: Use half strength RNaseZap as this will be much easier to rinse when finished cleaning. Rinse very well after the cleaning – residual RNaseZap will negatively impact RNA Pico, Small RNA, and High Sensitivity DNA results.
• To verify that the pinset is dry, run the short circuit test from the Diagnostics tab of the 2100 Expert Software.
Cleaning of the Electrode Cartridge
5 February 14, 2014

Chip Priming Station
February 14, 2014 Confidentiality Label
6
There are specific settings established for each DNA, RNA, and Protein assay. Refer to manual for appropriate positions.

Priming station: steps to proper chip priming Incomplete priming can cause a run to abort, late migration, and/or leak current issues.
1. Change the syringe with each new kit or after running 25. Sooner if priming station is suspected to be clogged or dirty.
2. Perform a regular maintenance of your priming station (every 3 months at latest). It is recommended to have a spare gasket kit available (p/n G2938-68716).
3. Inspect the white O-ring under the priming station‘s lid for any dried-out gel. Clean or replace if needed.
4. If the adapter is clogged (check with a backlight), priming will likely be incomplete. Replace the syringe adapter (the part onto which the syringe attaches). The syringe adapter is part of gasket kit (G2938-68716).
7 February 14, 2014

Chip preparation
8
Key essentials of chip and sample preparation.
February 14, 2014

DNA assays – important points
• Make sure the buffer composition matches the specifications of the assay (applies to all assays)
• Equilibrate the reagents at room temperature for 30 min (applies to all assays)
• Vortex the vials and spin down before use (applies to all assays).
• Extraction of the samples uses a wide number of chemicals which can affect the results on the Bioanalyzer. It is best practice to run the samples in TE buffer. For HS DNA, do not run samples in water.
• Standard DNA assays chips are interchangable. For the high-sensitivity DNA assay, the HS DNA Chip is required.
• For HS DNA assay, do not use RNaseZap for cleaning the pinset in between runs. (Residual RNaseZap or SDS on the pins will result in white bands on the gel-like image)
9 February 14, 2014

RNA assays - important points
• Wear gloves when handling RNA samples and reagents.
• Use RNase-free microfuge tubes, tips and water.
• Heat-denature RNA samples and Ladder at 70°C for 2 min and keep them on ice to reduce formation of secondary structure. This is especially important for the ladder as this is used for quantification.
10 February 14, 2014
Ladder Properly denatured Ladder not properly denatured

RNA assays – important points
• For RNA Pico and Small RNA assays, do not use RNaseZap for cleaning in between runs. Residual RNaseZap will show up as an overwhelming strong peak in the electropherogram.
• Small RNA gel is very viscous, therefore when preparing the gel /dye mix for this assay, it is important that add the dye first and then the gel is added on top.
• Every assay (RNA Nano, RNA Pico, Small RNA) uses its own chip.
11 February 14, 2014
Protein assays - important points
• Do not vortex Protein Chips. Due to detergents, this will cause liquid spillage on the chip and leak currents.
• Use 0.5 µL tubes for the denaturation. Using larger tubes may lead to poor results.
• Protein analysis under reducing conditions requires a 1 M DTT solution. If you want to analyze the proteins under non-reducing conditions, replace the amount of DTT required with MilliQ water.
• Protocol for standard Protein assays are different from High Sensitivity Protein assay. It is recomended that you check and follow the protocol prior to chip preparation.
• The High Sensitivity Protein gel matrix comes pre-filtered. It is ready to use after thawing.
12 February 14, 2014
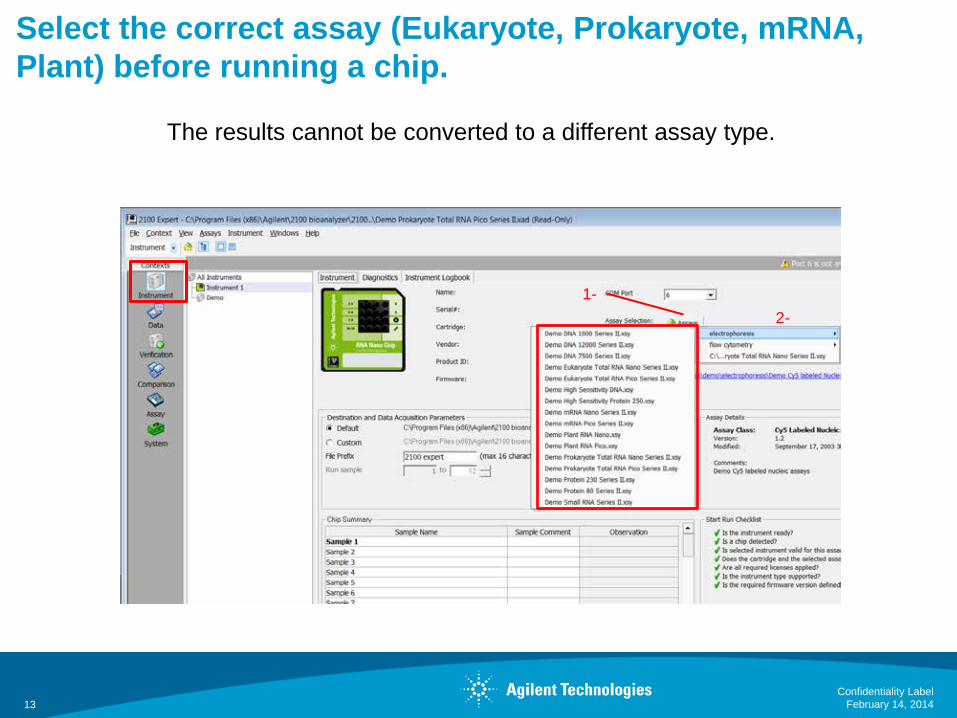
Select the correct assay (Eukaryote, Prokaryote, mRNA, Plant) before running a chip.
February 14, 2014 Confidentiality Label
13
The results cannot be converted to a different assay type.
1- 2-

February 14, 2014 Confidentiality Label
14
Starting a chip run It is recommended to run the chip within 5 min after preparation

Troubleshooting: My chip does not start At the beginning of each run there is a brief conductivity check to assure that all wells are completely filled and that there are no leak currents on the chip due to spilled liquid.
However, there can be multiple things happening to prevent this check from completing successfully:
February 14, 2014 15
How it should look like !
Bubble at channel entrance or no
connection Bubble in channel
network Dirty electrodes Spillage accross
the chip
Pipetting sample Pipetting gel; cold gel; priming
No regular maintenance of electrode catridge
Vortexer; vortexer settings

Troubleshooting: Run aborted Hint: Look at the Log Book of the actual data file.
February 14, 2014 16
If the error occurs on one or several channels: • Check volumes of respective wells
- Visually or by pipetting the liquid out - add further liquid (gel/marker), but attention! quantitation will be wrong
• Check if vortexing spills liquid out, reduce speed or • Check if electrode pins are ok, bend, broken or coated. • Press on the lid of the BioA to get the pins in the liquid. • If available - consider a different cartridge

Hardware
17
The 2100 Bioanalyzer instrument – Tips & Tricks for best performance
February 14, 2014

Hardware If the instrument hardware has a problem it might go into a not ready state. There are a few steps to try:
• Close the software, turn off the 2100 Bioanalyzer instrument and turn it back on, wait for the green LED and restart the software.
• If status indicator remains red, please contact Agilent Tech Support.
• If status indicator is green, but there is suspicion whether it is not functioning as expected, you may run Diagnostic tests.
18 February 14, 2014

Hardware Diagnostic tests A set of self Hardware Diagnostic Tests can be found within the Software (Instrument context > Diagnostics)
• Performing the hardware diagnostics requires dedicated test chips for electrophoresis (G2938-68300) and flow cytometry (G2938-68200) tests.
• The chips come with an expiration date and should not be used after that. Using expired test chips may lead to a false positive or false negative test result.
19 February 14, 2014
1- 2-
3-

PC and software Few important points to consider...
• The latest revision of the 2100 Expert software requires 1024 MB RAM. Especially, if you have other applications in use, you may drain off too much RAM to operate reliably. Restart the PC from time to time to free up enough RAM to restore functionality.
• If the free HD space is below 20 GB, the 2100 Expert software can run very slowly. It is recommended to archive old data and defragment your PC to free up disk space.
• If the PC is networked, regularly use a utility like CleanSweep, CleanUp or the Windows accessory to get rid of temp files, cookies etc.
• Keep the software updated with the current Software version available
21 February 14, 2014

Where to look for the Software version on your PC??
February 14, 2014 Confidentiality Label
22

2100 Expert Software Upgrade http://www.genomics.agilent.com/article.jsp?pageId=2354
February 14, 2014 Confidentiality Label
23
Make sure the PC meets the specifications required and listed on the Agilent webpage

Software
24
The 2100 Expert software offers great functionality.
February 14, 2014

Software overview
February 14, 2014 Confidentiality Label
25
Icons and tabs available to make software user-friendly

Not available for Cell Assays
1-
Electropherogram overlay
Legend for electropherogram overlay
Single gel lane for selected E-gram
2-
Switch between comparison summary, gel and electropherogram view
2100 Expert Software Comparison context • Easy comparison of multiples chip run from the same assay class • Samples need to be open in the data context of the expert software
26 February 14, 2014

February 14, 2014 Confidentiality Label
27
Library prep: Using the comparison context to assess sucessful library preparation
2
3
1

Save Selected Samples
February 14, 2014 Confidentiality Label
28
1
2
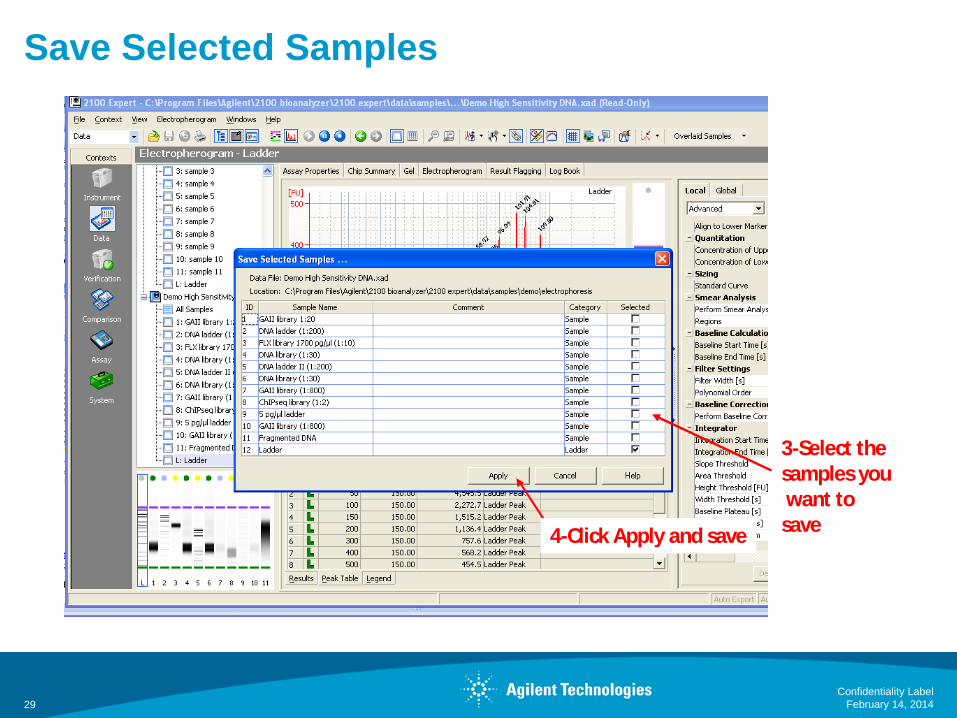
Save Selected Samples
February 14, 2014 Confidentiality Label
29
4-Click Apply and save
3-Select the samples you want to save

2100 Expert Software
Open and collapse setpoint explorer
Setpoint explorer – allows to change defaut settings in order to modify the data evaluation for sample analysis: • Change setpoints locally (selected
electropherogram) or globally (all electropherograms)
• Accessible parameters Normal mode Advanced mode Slope threshold Smear Analysis (RNA) Area threshold Calibrate all (Protein) Height threshold Peak filter width
30 February 14, 2014

When setpoint explorer feature is needed?
31
Analyze the run data and need to modify default parameters
Ø Peak height for individual samples Ø Enabling smear analysis Ø Align to upper and/or lower marker Ø Adding/deleting ribosomal fragments (for RNA
assays only)

February 14, 2014 Confidentiality Label
32
2100 Expert Software Setpoint explorer-

February 14, 2014 Confidentiality Label
33
Changes in the setting will be recorded in the results
2100 Expert Software
Setpoint explorer-

February 14, 2014 Confidentiality Label
34
Questions?