biomaterials for middle school science - engineering · 3 c. students will understand that basic...
TRANSCRIPT

1
Society For Biomaterials Education Challenge 2013
Biomaterials for Middle School Science
Calcium Alginate Hydrogels
Prepared by
Helena Chia, Abigail Parks, Chase Linsley
The University of California, Los Angeles
© 2013

2
I. Science Education Standards
a. Focus on Physical Sciences (California: Grade Eight)
i. Each of the more than 100 elements of matter has distinct
properties and a distinct atomic structure. All forms of matter are
composed of one or more of the elements. As a basis for
understanding this concept, students know atoms and molecules
form solids by building up repeating patterns, such as the crystal
structure of NaCl or long-chain polymers.
ii. Scientific progress is made by asking meaningful questions and
conducting careful investigations. As a basis for understanding this
concept and addressing the content in the other three strands,
students should develop their own questions and perform
investigations. Students will: Distinguish between variable and
controlled parameters in a test.
b. Focus on Life Sciences (California: Grade Seven)
i. All living organisms are composed of cells from just one to many
trillions, whose details usually are visible only through a
microscope. As a basis for understanding this concept: Students
know the characteristics that distinguish plant cells from animal
cells, including chloroplasts and cell walls.
ii. The anatomy and physiology of plants and animals illustrate the
complementary nature of structure and function. As a basis for
understanding this concept: Students know plants and animals
have levels of organization for structure and function, including
cells, tissues, organs, organ systems, and the whole organism.
II. Learning Objectives
a. Students will be able to explain what a polymer is and identify polymers in
their daily life.
b. Students will learn that polymers exist in nature, including the human
body.
Teacher Lesson Plan
University of California, Los Angeles
Student Chapter of Society for Biomaterials
SFB Education Challenge 2013

3
c. Students will understand that basic science and new technologies (applied
science & engineering) are linked.
d. Students will understand what an experimental control is and why it is
important.
e. Students will use appropriate tools to create their own hydrogels and
make observations.
III. Background
The seaweed you find on the beach is a natural source of Alginate. This is
because alginate is one of the materials found in the cell wall of seaweed
cells. Alginate is found in many of the products you come across every day,
including: beverages, ice cream and cosmetics. At your local pharmacy, you
will find that alginate is one of the main ingredients in heart burn pills. For
today’s experiments, your source of alginate will be heart burn pills.
As you learned during the lesson, alginate is a polymer. It has single units
(monomers) that are held together to make a polymer chain. These chains of
alginate, which have a negative one (1) charge, can be held together to make
a solid when mixed with calcium ions, which have a positive two (2) charge.
This is how alginate hydrogels – a solid material filled with water – are made.
In this hands-on experiment, you will be making your own alginate hydrogels
by polymerizing alginate with calcium. You will also examine why hydrogels
are good for delivering medicine (by adding food coloring) and cells (by
adding glitter). Get ready for some fun!
IV. Lesson Presentation
a. Recommended Timing
i. Presentation Slides 1-8 8 minutes
ii. Hands-On Experiment 20 minutes
iii. Observation Questions & Clean-Up 13 minutes
iv. Presentation Slides 9-10 4 minutes
Total: 45 minutes
b. Script
i. Slide 1: Let’s review what you’ve learned about polymers. What is
a polymer? As the name suggests, “poly” means many while “mer”
means a unit, therefore a polymer many units together. Each unit
is called a monomer, and when you think a bunch of monomers
together it forms a polymer chain.

4
ii. Slide 2: There are a lot of things that are made out of polymers!
QUESTION: Can you think of anything in your lunchbox that might
be a polymer? If you use a plastic bag to hold your sandwich,
you’re using a polymer! QUESTION: What about your dresser? If
the shirt you have on today is made out of cotton (or polyester), you
are wearing a polymer!
iii. Slide 3: TRANSITION: Because there are so many polymers and
they are all so different, they can be used to help people in various
ways. One of the ways they are used is in the field of medicine. As
seen here, some polymers are used inside the body or come in
close contact with the body. EXAMPLES: For a hip implant (Right
picture), the polyethylene cup is smooth and allows for easy
movement of the ball attached to the stem. The intubation tubing
(center picture) is stiff enough to keep its shape but soft enough to
bend into the throat. Lastly, contact lenses are made of polymers
that are see-through (transparent) to correct our vision. The
polymers that are used in the body need to be “Biocompatible”.
QUESTION: What do you think biocompatible means?
Biocompatible: The body won’t attack the material, thinking it’s bad
or harmful. QUESTIONS: How many of you have had a splinter?
What happens to the area around the splinter? (Answers: it gets
red, swollen, hurts, etc.). Splinters are not ‘Biocompatible’ but what
about contact lenses?

5
iv. Slide 4: TRANSITION: There are other kinds of materials that are
also considered ‘biocompatible’. They can be made out of metal,
like a hip implant, or ceramics in addition to polymers (which we’ve
been talking about). We call these materials: biomaterials,
because they interact with the body in a helpful way.
v. Slide 5: Take a polymer, crosslink it, add water to make a hydrogel!
“Hydro” hints that there’s a lot of water involved. Jell-O is a great
example of a hydrogel, it keeps its shape but it’s a network swollen
with water. A biomaterial that is a hydrogel is contact lenses.
Contact lenses are hydrogels to keep your eye from drying out;
your eye is made of a lot of water.
vi. Slide 6: Could we make a hydrogel ourselves? What are the
materials we would need? A polymer, a way to join polymer chains
to create a solid network, and water to swell the network. We will be
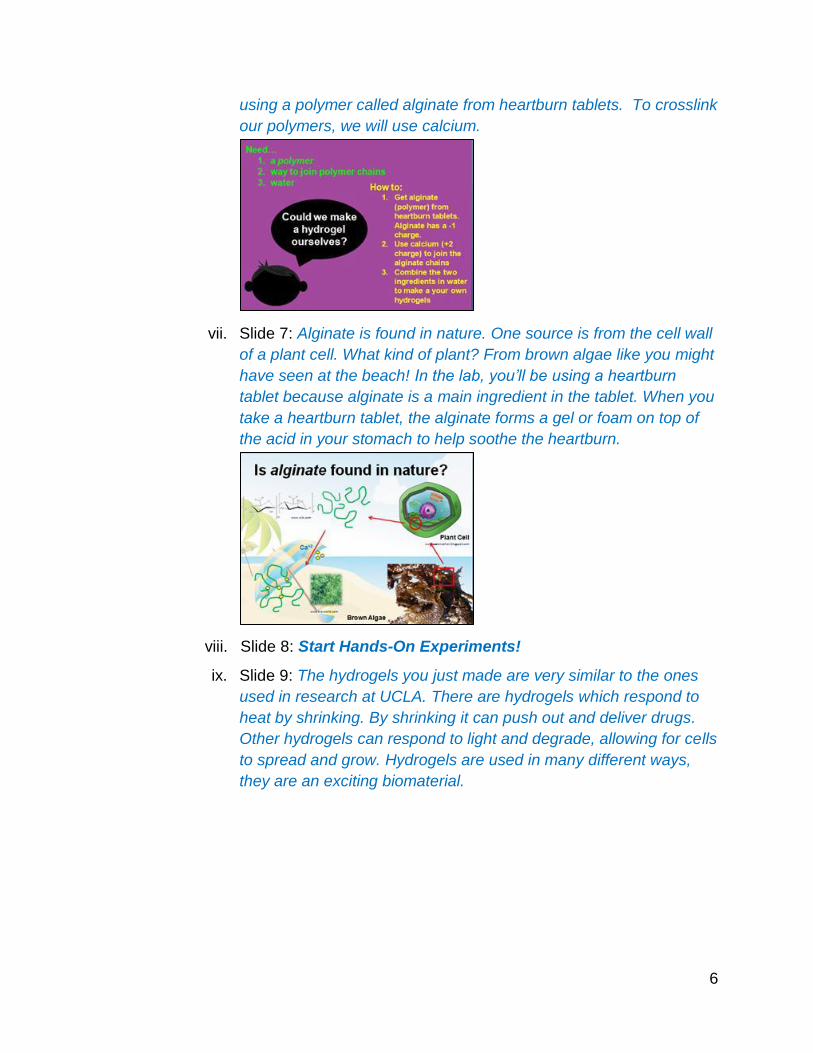
6
using a polymer called alginate from heartburn tablets. To crosslink
our polymers, we will use calcium.
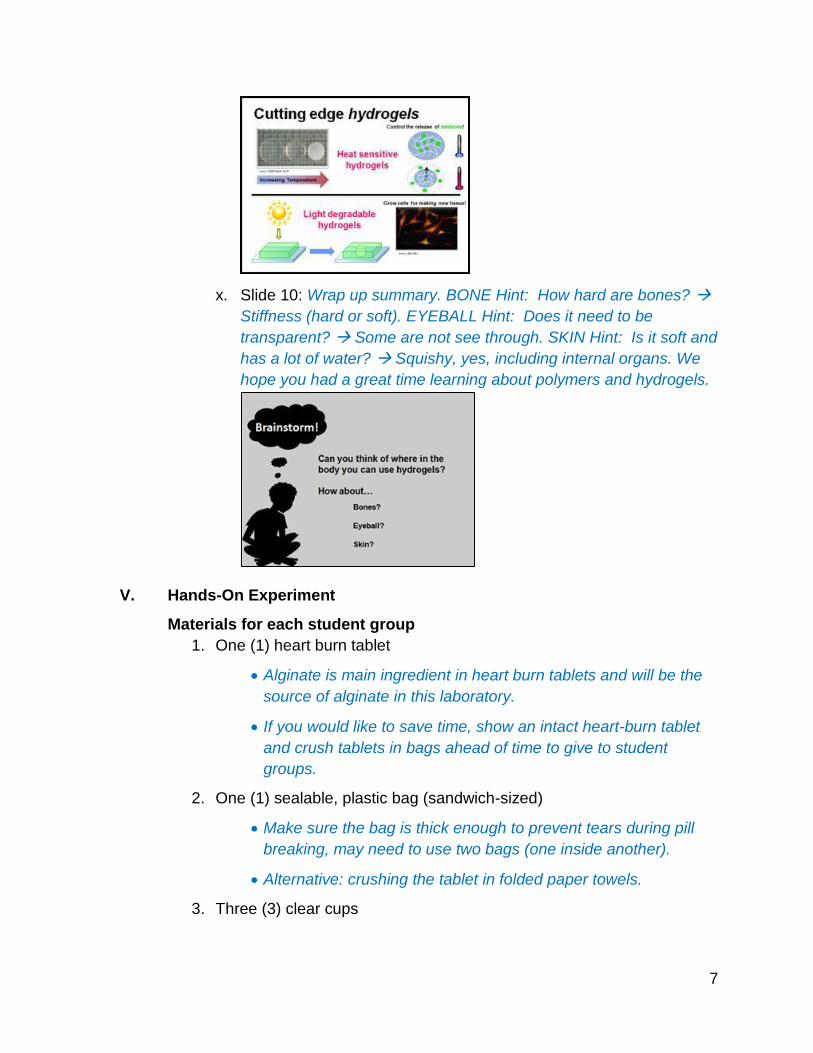
vii. Slide 7: Alginate is found in nature. One source is from the cell wall
of a plant cell. What kind of plant? From brown algae like you might
have seen at the beach! In the lab, you’ll be using a heartburn
tablet because alginate is a main ingredient in the tablet. When you
take a heartburn tablet, the alginate forms a gel or foam on top of
the acid in your stomach to help soothe the heartburn.
viii. Slide 8: Start Hands-On Experiments!
ix. Slide 9: The hydrogels you just made are very similar to the ones
used in research at UCLA. There are hydrogels which respond to
heat by shrinking. By shrinking it can push out and deliver drugs.
Other hydrogels can respond to light and degrade, allowing for cells
to spread and grow. Hydrogels are used in many different ways,
they are an exciting biomaterial.
7
x. Slide 10: Wrap up summary. BONE Hint: How hard are bones?
Stiffness (hard or soft). EYEBALL Hint: Does it need to be
transparent? Some are not see through. SKIN Hint: Is it soft and
has a lot of water? Squishy, yes, including internal organs. We
hope you had a great time learning about polymers and hydrogels.
V. Hands-On Experiment
Materials for each student group
1. One (1) heart burn tablet
Alginate is main ingredient in heart burn tablets and will be the
source of alginate in this laboratory.
If you would like to save time, show an intact heart-burn tablet
and crush tablets in bags ahead of time to give to student
groups.
2. One (1) sealable, plastic bag (sandwich-sized)
Make sure the bag is thick enough to prevent tears during pill
breaking, may need to use two bags (one inside another).
Alternative: crushing the tablet in folded paper towels.
3. Three (3) clear cups

8
Would recommend a longer, thinner cup if possible so the
solution heights are tall.
4. Eyedropper
Alternative: straws
Materials at the Front of the Room/Teacher’s Bench
1. Deionized/Distilled water
2. Spoons/Measuring cup
Would recommend one for water and one for the calcium
chloride solution
3. Bottle of Calcium Booster (Concentrated Calcium Chloride Solution)
Would recommend the teacher puts some of the solution into
a labeled cup for the students to take from so the main
source is not contaminated or spilled
To save time, you can dilute calcium chloride solution ahead
of class
4. Food coloring and/or glitter
Very little (1-2 drops) of each is needed since food coloring
is so strong.
This is a nice visual representation of how one could
encapsulate drugs and cells into a hydrogel.
Hypothesis
Alginate dropped into a solution with calcium will form hydrogels while a
solution without calcium will not allow for polymerization and formation of
solids.

9
Cups A, B, and C contain three different solutions. Cup A is the alginate solution,
Cup B is the calcium chloride solution, and Cup C is water. We will try to make
hydrogels by adding alginate (Cup A) to calcium chloride (Cup B) and water (Cup C).
Methods
Prepare Alginate Solution
1. Take your three (3) small cups and label them A, B, and C.
2. Take Cup A, add 5 mL (1 teaspoon) of water.
3. Put a single heartburn tablet in a plastic, sealable bag, remove excess air, and
seal it.
4. Use textbook to break the tablet into smaller pieces/powder inside the bag.
5. Open the bag, pour the broken tablet into Cup A and swirl contents for 1
minute until powder dissolves.
6. Add glitter and/or one (1) drop of food coloring.
Prepare Calcium Chloride Solution
1. Take Cup B and add 20 mL (1½ tablespoons) of water
2. Add to Cup B 2 mL (½ teaspoon) of Calcium Booster
3. Swirl cup to mix contents
Prepare Control (water)
1. Take Cup C and add 20 mL (1½ tablespoons) of water
Making Hydrogels
1. Place Cups A, B, and C in front of you
2. Take the eyedropper and drop the alginate (Cup A) slowly into the calcium
chloride solution (Cup B), let it sit for 10 seconds

10
3. Take the eyedropper and drop the alginate (Cup A) slowly into the control
(water solution) Cup C, let it sit for 10 seconds.
4. Play around with the way you add alginate (Cup A) to Cups B and C to see if
you can make different shaped hydrogels
VI. Observation Questions
1. What color is the solution in Cup B?
Short answer: Clear
Expanded explanation: Immediately after adding the alginate solution to
the calcium, the solution should be clear or close to clear. The food
coloring that was added to the alginate solution gets trapped in the
hydrogel. This is why the solution remains clear initially. However, as time
passes, the food coloring will slowly escape from the alginate hydrogel to
the surrounding solution. This is due to diffusion or the spreading out of
the food coloring molecules. This question is asked again (Question #7)
because the students should see over time that solution should begin to
turn into the color of the food coloring.
2. Draw the shapes you were able to make in Cups B and C.
3. Did Cups B and C make hydrogels? Was your hypothesis correct?
Short answer: Cup B should only have hydrogels. Yes, the hypothesis
was correct.
Expanded explanation: Our hypothesis was that: Alginate dropped into a
solution with calcium will form hydrogels while a solution without calcium
will not allow for polymerization and formation of solids. This hypothesis
was made because the monomers on the alginate polymer chain have a
negative one (-1) charge in room temperature water. By adding an ion with
a positive two (+2) charge, such as calcium, to the alginate, the chains
should be held together by ionic bonds between the alginate and the

11
calcium. This experiment proves that the hypothesis is correct. The
calcium in Cup B allows the alginate to polymerize and form a network. As
a control for this hypothesis, a water solution without calcium, Cup C, was
also tested. Since no calcium ions are present to allow for crosslinking
between the alginate chains, no hydrogels formed. This confirms that it is
indeed the presence of calcium that causes the crosslinking of the alginate
chains (and subsequent hydrogel formation) and not water itself, for
example.
4. Cup C is a control since it had no calcium in it. Why is having a control
important when conducting experiments?
Short answer: A control in an experiment is a condition to show that the
variable being tested is actually responsible for the observed effect.
Expanded explanation: A control allows for the scientist to determine
whether a variable is solely responsible for the observed results.
Therefore the effect of a variable is isolated and proven to exhibit a result
that is not due to other variables the scientist has already accounted for.
There are both positive and negative controls. A positive control verifies
that the variable being studied actually behaves as expected. For
instance, now that the students know that calcium can be used to ionically
crosslink alginate to make a hydrogel, they could use calcium as a positive
control in an experiment where they test other ions’ ability to crosslink
alginate into a hydrogel. In this experiment, a negative control was used. It
demonstrates that the variable being tested is solely responsible for the
effect by having the variable be absent from the control set.
5. Are the hydrogels hard or soft?
Short answer: Soft
Expanded explanation: Hydrogels can have a range of stiffnesses. This
depends on a number of factors, including: the material used to make the
hydrogel, the amount of water in the hydrogel, and the number of
crosslinks between the polymer chains (degree of crosslinking). Hydrogels
are mainly soft because they are swollen with water. How much water
they can hold is dependent on how many crosslinks exist between the
polymer chains - many crosslinks physically prevent the hydrogel from
expanding while fewer crosslinks between the polymer chains allows for
greater expansion and therefore more swelling in water. If hydrogels dry
out, they become stiffer than their hydrated state. A good example of this
is Jell-O. The ‘skin’ or hard layer that forms on top of Jell-O if it is left in the
fridge too long is just Jell-O that has less water than the Jell-O below. The

12
tissues and organs in the body can be considered hydrogels – very
complex hydrogels. Scientist and engineers that work to replace lost or
damaged tissues and organs often use hydrogels because they are soft
like the original tissues and organs they are trying to replace. This field of
study is called Tissue Engineering and it is a subfield of
Bioengineering/Biomedical Engineering.
6. Do you see glitter? Are the hydrogels the color of the food coloring? If
glitter represented cells, can you image how the hydrogel would
encapsulate the cells?
Short answer: The glitter and food coloring should be trapped in the
hydrogels because the hydrogel formed too quickly for the glitter and food
coloring to escape the alginate solution.
Expanded explanation: The glitter and the food coloring were physically
trapped within the hydrogel by the alginate chains crosslinking together.
This technique is used to trap or encapsulate medicine or cells for medical
applications. It demonstrates that a variety of different sizes can be
encapsulated within a hydrogel, with food coloring mimicking medicine
(small) and glitter as cells (large). As previously mentioned (Expanded
explanation for Question #5), tissues and organs are polymer networks
swollen with water that contain cells. The addition of glitter further
highlights why hydrogels are often used to tissue engineer new tissues
and organs that have been lost or damaged. Explaining that glitter
represents cells, students can visualize and start to understand how
hydrogels could be used to fill a large defect in the tissue and deliver cells
to that defect to repair it. If cells were injected into a person, they could go
anywhere (like the glitter in the alginate solution that is added to Cup C),
but cells encapsulated in a hydrogel can be better controlled and delivered
to a specific location in the body. Students can be asked why a hydrogel
might make a good environment for cells. It has a lot of water and is a
structure for the cells to live in. The cells in our tissues and organs need a
structure to attach to, move on, undergo mitosis, and survive.
7. What color is the solution in Cup B now? Compared to Question 1, why do
you think there is or is not a change?
Short answer: The color of the solution should now be the same as the
food coloring. The food coloring has diffused out of the alginate hydrogel
into the surrounding solution as time has passed.
Long answer: As discussed in Question #1, the solution should now be
the color of the food coloring since it is diffusing out of the alginate

13
hydrogel over time. Small molecules, like the dye in food coloring, can fit
between the pores created by the crosslinking sites in the hydrogel unlike
larger things like cells, which have to use enzymes to degrade the
hydrogel to escape. Since the crosslinked polymer chains are highly
disorganized, it takes time for the food coloring to move through the pores
and make it into the surrounding solution. It is like navigating a maze to
get from point A to point B versus walking in straight line. Besides using
hydrogels to deliver cells, Bioengineers use hydrogels to deliver medicine
in the body (which the food coloring represents). Since it takes a long time
for the medicine to escape the hydrogel, medicine can be delivered in
controlled manner over time to help patients. There are other factors that
influence the rate at which small molecules (like food coloring dyes)
escape from the hydrogel, such as temperature. Students can be asked to
hypothesize what would happen if the cup was put in the fridge or under
the sun. The decrease in temperature would slow down the random
molecular motion and therefore diffusion of the food coloring out of the
hydrogel. Increasing the temperature by exposing it to the sun would
increase the molecular motion and therefore quicken diffusion.
VII. Troubleshooting
a. Alginate hydrogels do not form when alginate solution is added to calcium
solution.
i. The alginate concentration in solution may not be great enough to
form a hydrogel. More alginate (i.e. crushed heartburn pill) should
be added to the alginate solution.
ii. There may not be enough Ca+2 in the calcium solution to crosslink
the alginate hydrogel. More calcium should be added to solution.
b. Alginate solution gels/solidifies before mixing with the calcium solution.
i. Alginate increases the viscosity of a solution. If too much alginate
(i.e. crushed heartburn pill) is dissolved in water or not enough
water is mixed with the alginate, the concentration of alginate in
solution may be too great. Dilute the solution.
ii. There may be ions present in the water you’re using to dissolve the
alginate (i.e. heartburn pill). Use either distilled or deionized water
for the experiment.
c. A hydrogel forms in the control solution (which is not supposed to form a
hydrogel because there is no calcium present).

14
i. There may be ions present in the water you’re using for the control
solution. Use either distilled or deionized water for the experiment.
VIII. References
a. Images from Presentation
Slide 2: www.ziploc.com, www.wiki.com
Slide 3: www.avantgardeeyecare.com, www.anaesthesiacases.com,
www.gentili.net
Slide 4: www.sciencemag.org, www.lawilshireperio.com,
www.avantgardeeyecare.com, www.shortwhitecoats.com,
www.nebraskafootandankle.com, www.dreamstime.com
Slide 5: http://kids.britannica.com, www.avantgardeeyecare.com,
www.warrenfencecompany.com, www.wiki.com
Slide 7: www.wiki.com, www.eaaroncohen.blogspot.com,
www.bio-world.com, www.tolweb.com
Slide 9: www.intechopen.com, www.udel.edu
IX. Appendix
a. Itemized costs and vendors are provided on the table (below). The most
expensive items are the concentrated calcium chloride solution which can be
found at a pet store (Petsmart, used for fish tanks, $9.99) and heartburn tablets
found at the local pharmacy store (CVS, $8.99). These two items will last you at
least 50 experiments or 100 students (working in pairs). The other items have
more economical options provided; you can also use any available lab glassware
or equipment. To run an experiment for 30 students, to buy all the materials for
the first time startup costs would be ~$30 but afterwards it would be ~$15 . The
main materials would last much longer.

15
b. Teachers who choose to use pure sources of alginate and calcium
chloride (potential vendors provided in the Alternate Vendors column of
the table above) can use the following measurements for the hands-on lab
experiment:
i. Recommended: prepare stock solutions of both the alginate and
the calcium chloride that students can take aliquots from.
1. Alginate (2% w/v solution): 2 grams (~1 teaspoon) dissolved
in 100 mL (½ cup) of deionized water. Stir well and/or let sit
overnight.
2. Calcium chloride (0.1M concentration): 14 grams (1½
teaspoon) calcium chloride dissolved in 1 liter (~4 cups) of
deionized water.
X. Acknowledgements
a. Thank you to Brent Rojo and Jessica Broussard for their feedback and
advice during the development of this education module.
b. Thank you to Jessica Broussard for graciously opening her 7th and 8th
grade classrooms to us so we could conduct our module with students.
c. Thank you to Dave and Jaclyn Dorn for loaning us their camera which was
used to film the hands-on component of the education module.
XI. Authors
a. This educational module was developed and prepared by Helena Chia,
Abigail Parks, and Chase Linsley. All three are graduate students at The
University of California, Los Angeles in the Bioengineering Department
and members of the UCLA Society For Biomaterials Student Chapter.