black dog - guitarpcb.com dog.pdf · black dog the black dog is a ... gain: best setting is from...
TRANSCRIPT
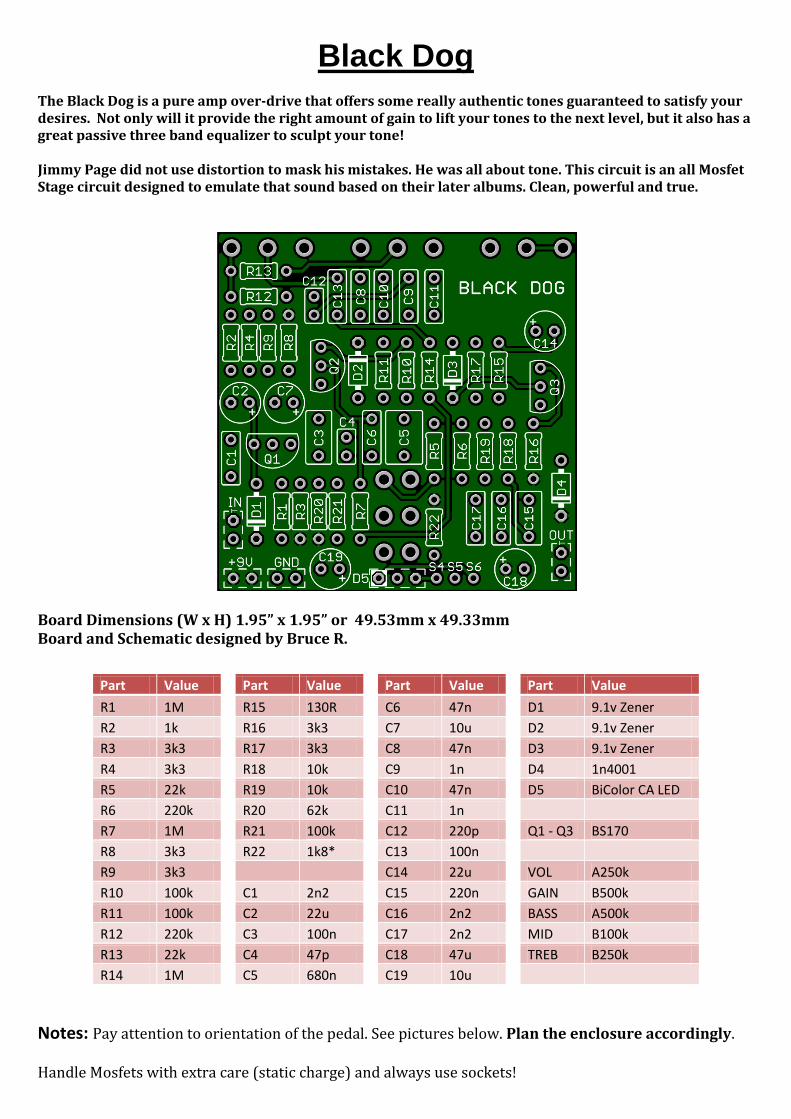
Black Dog The Black Dog is a pure amp over-drive that offers some really authentic tones guaranteed to satisfy your desires. Not only will it provide the right amount of gain to lift your tones to the next level, but it also has a great passive three band equalizer to sculpt your tone! Jimmy Page did not use distortion to mask his mistakes. He was all about tone. This circuit is an all Mosfet Stage circuit designed to emulate that sound based on their later albums. Clean, powerful and true.
Board Dimensions (W x H) 1.95” x 1.95” or 49.53mm x 49.33mm Board and Schematic designed by Bruce R.
Notes: Pay attention to orientation of the pedal. See pictures below. Plan the enclosure accordingly.
Handle Mosfets with extra care (static charge) and always use sockets!
Part Value
Part Value
Part Value
Part Value
R1 1M
R15 130R
C6 47n
D1 9.1v Zener
R2 1k
R16 3k3
C7 10u
D2 9.1v Zener
R3 3k3
R17 3k3
C8 47n
D3 9.1v Zener
R4 3k3
R18 10k
C9 1n
D4 1n4001
R5 22k
R19 10k
C10 47n
D5 BiColor CA LED
R6 220k
R20 62k
C11 1n R7 1M
R21 100k
C12 220p
Q1 - Q3 BS170
R8 3k3
R22 1k8*
C13 100n R9 3k3
C14 22u
VOL A250k
R10 100k
C1 2n2
C15 220n
GAIN B500k
R11 100k
C2 22u
C16 2n2
BASS A500k
R12 220k
C3 100n
C17 2n2
MID B100k
R13 22k
C4 47p
C18 47u
TREB B250k
R14 1M
C5 680n
C19 10u

Controls: Volume: The best setting which is interactive with the Gain Control is just past unity volume - usually around 1:00. Many people find an additional boost or amp gain in tandem is an excellent creative option. Gain: Best setting is from 3:00 to max for the best Zep-like response. But for a cleaner response you may want to try lower gain settings. Jimmy Page did not rely on distortion to cover his playing! All tone. Tone Controls: The three bands of the tone section of the Black Dog function just like many power amp tone controls. They are passive instead of active. Therefore they do not increase the signal in their respective band but rather they decrease the signal. These bands are overlapping. So, a change in one band will also have an effect on the adjacent band. For example, if you start with the MIDDLE control at full CW, you will notice that the TREBLE control does not have as much effect on the tone. For this reason, we suggest that you start with all three tone controls at the mid-point and adjust from there. You are sure to find a tonal setting that is just what you want!
Stompbox Profile: Bass, Mid and Treble on top. Volume and Gain underneath. Please note you may always choose to “hand wire” your potentiometers as well.
When printing the drill template use a resolution of 300dpi and be sure to size it with the actual Black Dog board before drilling your enclosure. As always drill at your own risk.

Other important notes: Share your finished pedal in the “Show off your Finished Pedal” section of the forum
A YouTube Demo is available
ICs and transistors can be damaged by heat from soldering and should not be directly soldered to the PCB. For transistors, diodes, and LED’s, use SIP (Single inline package) sockets. You simply cut the number of sockets required with a utility knife or by gripping and rocking with pliers. This allows for easy changes and troubleshooting.
Add-On Build Guides for all GuitarPCB Builds
Soldering Tutorial on Youtube
Crash Course [Basic] - Guide #1 for all things GuitarPCB.
Crash Course [Level 2] - Guide #2 for all things GuitarPCB.
Tips, Tricks and Tutorials - contains many innovative pedal building tips and ideas.
Additional Details on LED and Footswitch Wiring
*How to Build a Combo Pedal Guide by Playsforfun
Build Documents and Demos may be viewed in the PCB Shop without needing Free Membership.
Need a kit?
USA – Check out PedalPartsAndKits for all your needs.
Europe – Das Musikding carries both boards and kits as a service to our Europeans friends.
If they do not have a KIT listed send them a note asking if they can help you out.
Das Musikding do not participate in any GuitarPCB sales however their shipping time is greatly improved and Customs delays are not an issue. We are two separate companies. They must also pay additional costs and fees in order to offer our boards and kits direct from Europe.
This document, PCB, Artwork and Schematic Artwork © GuitarPCB.com. Schematic and PCB design by Bruce R. Build Document by Bruce R. Wilkie1 and Barry. All copyrights, trademarks, and artworks remain the property of their owners. Distribution of this document is prohibited without written consent from GuitarPCB.com. GuitarPCB.com claims no rights or affiliation to those names or owners.