blackboard learn - nebraskacba.unl.edu/class/tutorials/bb9/bb9handout.pdfitem- any type of file,...
TRANSCRIPT
Blackboard Learn
CBA Instructional Technology Services

CBA Instructional Technology 2
Blackboard 9 Window

CBA Instructional Technology 3
Edit Mode- To edit your course Edit Mode should be on. To view your course from a student’s
perspective, turn Edit Mode off.
Create the Course Navigation
You can rename the navigation buttons or add additional areas to your course menu. To rename a course area, click the chevron and choose Rename Link. Type in the new name of the content area and click the green checkmark to save your changes.
You can follow the same steps and delete menu areas that you don’t need. To add additional areas to your course menu, click the plus sign and choose the type of area you want to add.

CBA Instructional Technology 4
Content Area Create content areas like previous versions of Blackboard. Content areas can be for the syllabus, assignments, course documents, exams, etc.
Blank Page Use for frequently accessed items. Puts the item on the Course Menu (syllabus, schedule, etc.)
Tool Link Create links to course tools. Course tools include the Course Calendar, Discussion Board, grades, Wikis, etc.
Course Link Create a link to a document or folder that is in your course.
Web Link Create links to websites outside of Blackboard
Module Page Module pages let you set up a page to include tools for the student such as a calculator, dictionary, grades (report card), textpad, etc. By default the Home Page is the module page set as the entry point to the course.
Subheader Create subheaders to organize your course. When you create a subheader it includes a horizontal line above the subheader title.
Divider Create horizontal lines to organize the Navigation frame

CBA Instructional Technology 5
Add Content to the Navigation Areas
Click on the course menu item that you want to add content to
The double-headed arrows allow you to move items up and down by dragging and dropping. The gray box indicates that there isn't any content in that item. If a course item does not contain content, the item is not visible to the student. The gray box with the slash indicates the item is hidden from the student. To unhide the item, click the chevron to the right of it and choose Unhide. The chevrons next to course items allow you to rename, hide/unhide, and delete the item.
Content Types
Build Content You can either type in the item information (Step 1) or upload an existing document (Step 2). You also have the options to view/hide the item and to set date and time restrictions.

CBA Instructional Technology 6
Item- any type of file, text image or link; will open in a new window; can add descriptive text. File- same as an Item; by default opens in the same window, but can be changed to open in a new window; cannot add descriptive text. Web link- a link to an external website Learning Module- create a set of items with a path for progressing through them Lesson Plan- combines information about the lesson and with the curriculum resources to teach it. Course link- create links to content within your Blackboard course Content Folder- create folders and subfolders for organizing content Blank Page- Similar to an Item, but no description appears below the Title. Module Page- customized page that can contain elements such as alerts, grades, dictionary, calculator, etc. Tools Area- link to any of the Blackboard tools such as email, roster, discussion board, etc. Mashups- embed multimedia elements so that they open in Blackboard Assessments
Test- Create a new test or add an existing test. Survey- Create an anonymous survey or add an existing one. Assignment- create an assignment link for students to upload their work. Automatically creates a column in the grade center. Self and Peer Assessment- create an assignment where students upload their work and it is reviewed by the other students. McGraw-Hill Assignment- use McGraw-Hill Connect for assignments and exams. SafeAssignment- use to prevent plagiarism by checking submitted assignments against several databases of academic papers. Mobile Compatible Test- create a test that students can view on mobile devices.

CBA Instructional Technology 7
Tools
Discussion Board- Tool for sharing thoughts and ideas Groups- Instructors and students can create groups within a course. Each group has their own area in Blackboard Chat- text-based messaging tool Virtual Classroom- includes a shared White board, Group Browser and a Q&A box to hold class or office hours online Maple TA Assignment- MapleTA is exam software supported by UNL. CafeScribe Content- Access your publisher digital course materials. Campus Pack Wiki- allows students to contribute and modify one or more page of materials. Campus Pack Blog- personal online journal that can be viewed by others Campus Pack Journal- personal online journal between students and the instructor. Students only see their own entries. Campus Pack Podcast- audio files Campus Pack Content- create a Blog, Journal, Podcast or Wiki
Publisher Content
Search for your textbook to put the information in Blackboard. If the search does not result in your textbook, you can enter your textbook information manually. Access publisher modules for Blackboard.

CBA Instructional Technology 8
Create Folders Create folders by clicking the Build Content button in the content area and choosing Content Folder from the list
Create Assignments Create assignments for the student to upload by clicking the Assessment button and choosing Assignment from the list. When an assignment is created a column is automatically created in the Grade Center. After the student uploads the assignment they will see a “Needs Grading” icon in their My Grades which assures them the assignment was received.

CBA Instructional Technology 9
You can attach a file for the student to download and complete, such as a data file, in Step 2.
You can set the assignment for students to take multiple times (Step 4). You can set the date and time that the assignment will be available to the students (Step 4) and specify a due date (Step 5). For multiple attempts, files are added, not replaced with the latest attempt.

CBA Instructional Technology 10
The link is created for the assignment and a column is automatically added to the Grade Center. The student clicks on the link to turn in the assignment.
When the student slicks Submit, they will be presented with a preview of the document they uploaded.

CBA Instructional Technology 11
To view the assignments the students hand in, in the Grade Center click Needs Grading. Click on the student’s name to open their submission. Enter the grade and any feedback. You can also download the assignment to see complete detail (the Blackboard view is similar to a pdf).
You can download all of the student submissions which will put them in a Zip file that you can save to your computer. In the Grade Center, click the chevron for the column heading and choose Assignment File Download.
If you are downloading all of the submissions, you enter student grades in the cells just as you would an Excel spreadsheet. If you want to provide feedback to the student, click the chevron for his submission and click View Grade Details. Click the Edit Grade button.

CBA Instructional Technology 12

CBA Instructional Technology 13
Safe Assignment Blackboard’s Safe Assignment is used to check student papers for plagiarism. Safe Assignment can determine if the text in the paper matches the text from another source. SafeAssignments are compared against several databases that contain millions of articles (Global Reference Database) from the 1990’s to present. After a paper has been processed a report is generated detailing the percentage of text in the submitted paper matches existing sources. The report also shows the suspected source that returns a match. Students treat Safe Assignment assignments much like they treat regular assignments in Blackboard. However, with the Safe Assignment, you can set the options so that students can check their assignment before they turn it in (self check). Once they turn their paper in, the paper is automatically placed in a queue to be scanned and evaluated by the Safe Assignment software. Creating a Safe Assignment automatically creates a gradebook column and pulls the points possible and the assignment title into the gradebook. Create a Safe Assignment Decide where you want to place the assignment in your course. Click the location in the navigation panel and then click Safe Assignment under the Assessments button.
CBA Instructional Technology 14
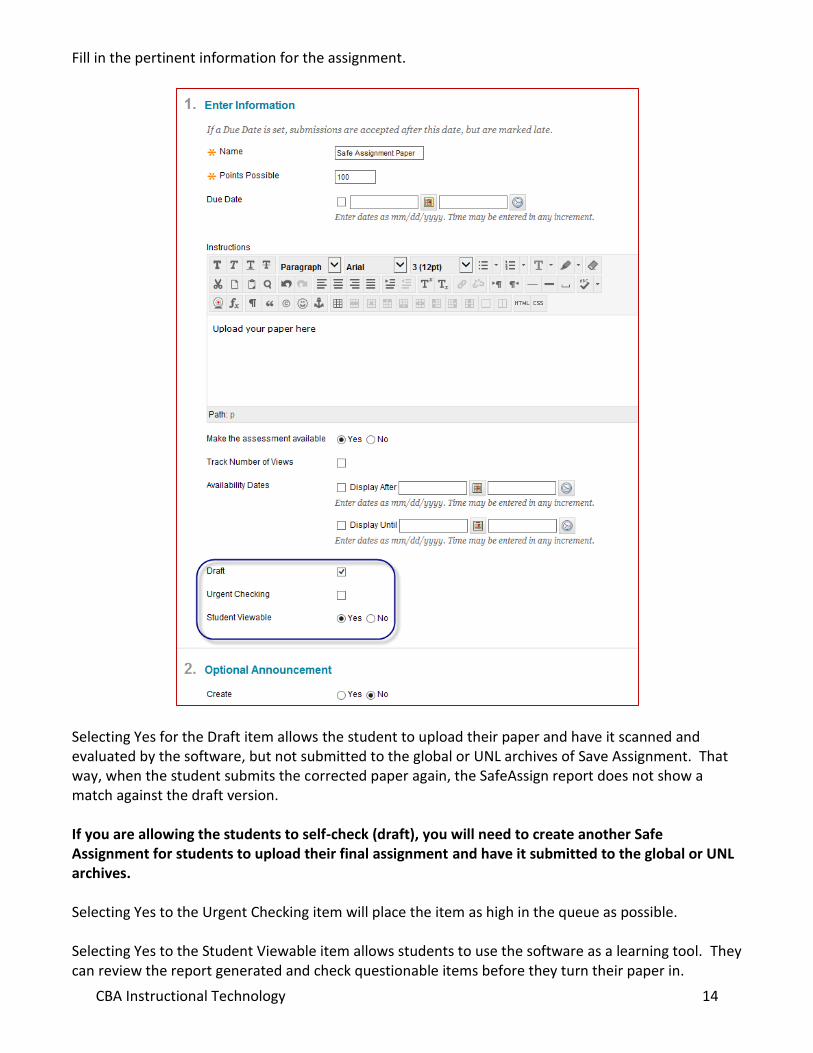
Fill in the pertinent information for the assignment.
Selecting Yes for the Draft item allows the student to upload their paper and have it scanned and evaluated by the software, but not submitted to the global or UNL archives of Save Assignment. That way, when the student submits the corrected paper again, the SafeAssign report does not show a match against the draft version. If you are allowing the students to self-check (draft), you will need to create another Safe Assignment for students to upload their final assignment and have it submitted to the global or UNL archives. Selecting Yes to the Urgent Checking item will place the item as high in the queue as possible. Selecting Yes to the Student Viewable item allows students to use the software as a learning tool. They can review the report generated and check questionable items before they turn their paper in.

CBA Instructional Technology 15
Student Instructions Students submit their paper by clicking on the View/Complete link for the assignment. And uploading their paper in Step 2 and then clicking submit.

CBA Instructional Technology 16
If the Student Viewable item has been selected, the student can view the results of the report. They click on the View/Complete link to see the results of the report. The report is not immediately available. It has to go through the scanning process before it will be available.
The Safe Assignment report

CBA Instructional Technology 17
**Note If students will be submitting papers that include images, the images must not exceed 2MB or the submission may fail. Grading Safe Assignment Papers In the Grade Center select the paper to be graded (using the View Attempt in the gradebook or using the Needs Grading link in the Grade Center). Using the View Attempt in the gradebook
Using the Needs Grading link in the Grade Center

CBA Instructional Technology 18
You can view the file, download the file, or review the report (same as the student view above). Enter the grade and any feedback to the student and click Submit.

CBA Instructional Technology 19
Using Safe Assignment for Your Own Papers You can use Safe Assignment for a private submission. In the Control Panel under Couse Tools select Safe Assign and click Submit A Paper. You can use folders to organize your papers.

CBA Instructional Technology 20
Editing Content To edit your content click the chevron next to the content item.
Customizing Your Course In the Control Panel click Style under Customization

CBA Instructional Technology 21
If you add a banner, it will only appear on the Home Page and Announcements page, so you would want to set Announcements or the Home Page as your course entry point.

CBA Instructional Technology 22
Changing the Course Entry Page to The default course entry page when you enter your course is Announcements
You can change the course entry page to any area listed in the navigation pane. If you want the entry page to be something not listed, you need to create the navigation area first.
1. Add an area by clicking the Add Content button and choosing the applicable navigation type.

CBA Instructional Technology 23
2. Name the link and check the box to make the tool available to your students.
3. In the Control Panel under Customization choose Teaching Style.

CBA Instructional Technology 24
4. Under step 2, Select Course Entry Point, select the area from the drop down list. You can also change the appearance of your course menu in Step 3, Select Menu Style. You can set the menu items as text or buttons, and change the colors. In Step 6 you can add a banner to your course. The banner will only appear on the course entry page.
5. Use the Move handle to drag and drop your entry area to the desired location

CBA Instructional Technology 25
Users and Groups
You can create a list of the students in your course, including their Blackboard username and email address. You can add and remove users from your course, and change the role for a user. You can also create groups and assign students to a group, allow students to manually enroll in a group, or randomly assign students to a group. Click Users and Groups in the Control Panel
Users To create a list of your students, click Users. By default it shows a list of the students in your course. You can also search for an individual student. Add and Remove Users You can add anyone at UNL (faculty, staff, or student) to your course. Click Users and then Find Users to Enroll.

CBA Instructional Technology 26
If you know their Blackboard User name type it in the Username field. If not, click the Browse button and search for them by last name. Check the box next to their name and click Submit. Change the role you want them to have in your course, and then click Submit
**Note- If a student is enrolled in your course, and then drops it, you will not be able to use this method to re-add them to your course. You will need to contact the UNL Help Desk and have the student added to the side file at Records and Registration that updates Blackboard every midnight. To remove a user from your course click on Users and then check the box next to their name and click the Remove Users from Course button.
Groups There are two ways to create groups; you can create a single group and manually enroll students or let students self-enroll. Self-Enroll has an optional sign-up sheet which limits the number of group members. You can also create a group set where you create multiple-groups at one time, and students can be enrolled manually, self-enroll, or be randomly assigned to groups.

CBA Instructional Technology 27
Create a single group that you manually enroll students into, or that they can enroll themselves.

CBA Instructional Technology 28
Create multiple groups and manually enroll students, or let Blackboard create the enrollment, or let students enroll themselves using the sign-up sheet.

CBA Instructional Technology 29
Downloading the Course Roster and Gradebook You can download your course roster from the Grade Center into Excel. You can also download the Grade Center into Excel and upload grades from the spreadsheet back to Blackboard. In the Grade Center click Full Grade Center
Download the roster or gradebook by clicking Download from the Work Offline button.

CBA Instructional Technology 30
Click User Information Only if you just want student names. Click Full Grade Center if you want to use an Excel spreadsheet to calculate grades and upload them to Blackboard. Make sure to read the instructions for saving the Excel file in a format that can be read by Blackboard.

CBA Instructional Technology 31
Dropping the Lowest or Highest Grade in the Blackboard Grade Center
Before you can use this feature it is suggested that you have the Grade Center items that you are going to use assigned to a category. You can use the individual columns, however, it is easier to assign all of the items to a category and then drop the lowest or highest grade in that category. To see a list of the existing categories, go to the Full Grade Center under the Control panel. Click Categories under the Manage menu.
If you don’t see a category you want to use, click the Create Category button to add categories to your Grade Center.

CBA Instructional Technology 32
You can check that all of your Grade Center items have been assigned to categories by clicking Column Organization under the Manage menu. If you need to assign an item to a category, locate the column in the gradebook for that item. Click the chevron, then click Edit Column Information from the drop-down menu. Set the Category from the dropdown list.
Looking at the Column Organization in the Grade Center, this example has 4 assignments worth 100pts each and 2 exams worth 100pts each. The assignments have been defined with the Assignments category and the exams with the Test category.
The student scores are as follows:
In this example we will drop the lowest Assignment score.

CBA Instructional Technology 33
Create a Total Calculated Column. Click the Create Calculated Column button and choose Total Column.
Give the total column a name. In the example the column name is Assignment Score. Set the Display to Score (or whatever value you are using).

CBA Instructional Technology 34
Under Select Columns, choose Selected Columns and Categories. Select the category that has the lowest/highest score that you want to drop (or select the individual columns) and click the triangle to move it over to the Selected Columns area. In this example it is Assignments.
In the Selected Columns box enter the number of lowest/highest grades you want to drop for that category of items. In this example the lowest grade will be dropped by entering 1.

CBA Instructional Technology 35
Choose to calculate the column as a running total.
Click Submit.
In our example the calculated column Assignment Sc… shows 230 points. This is the total of Assignments 1, 2 and 3. Assignment 4 was the lowest score, so it was dropped. Modify the Total Column The Running Total column includes all of the scores, including the dropped assignment. Modify the Running Total column to correct this.

CBA Instructional Technology 36
Click the chevron for the Running Total column and choose Edit Column Information.
Under Select Columns check the Selected Columns and Categories button. Move all of the columns over to the Selected Columns area EXCEPT for the columns of the category that you dropped the highest/lowest scores for. In this example it would be the Assignment columns.
The Running Total now correctly reflects the students’ score which includes their exams and the Assignment Score. It does not include the individual Assignment columns.
Note- If you add another column that is in the category you are using to drop a score, it will automatically recalculate. You should go back in to the Running Total and check that the added item is not included.
CBA Instructional Technology 37
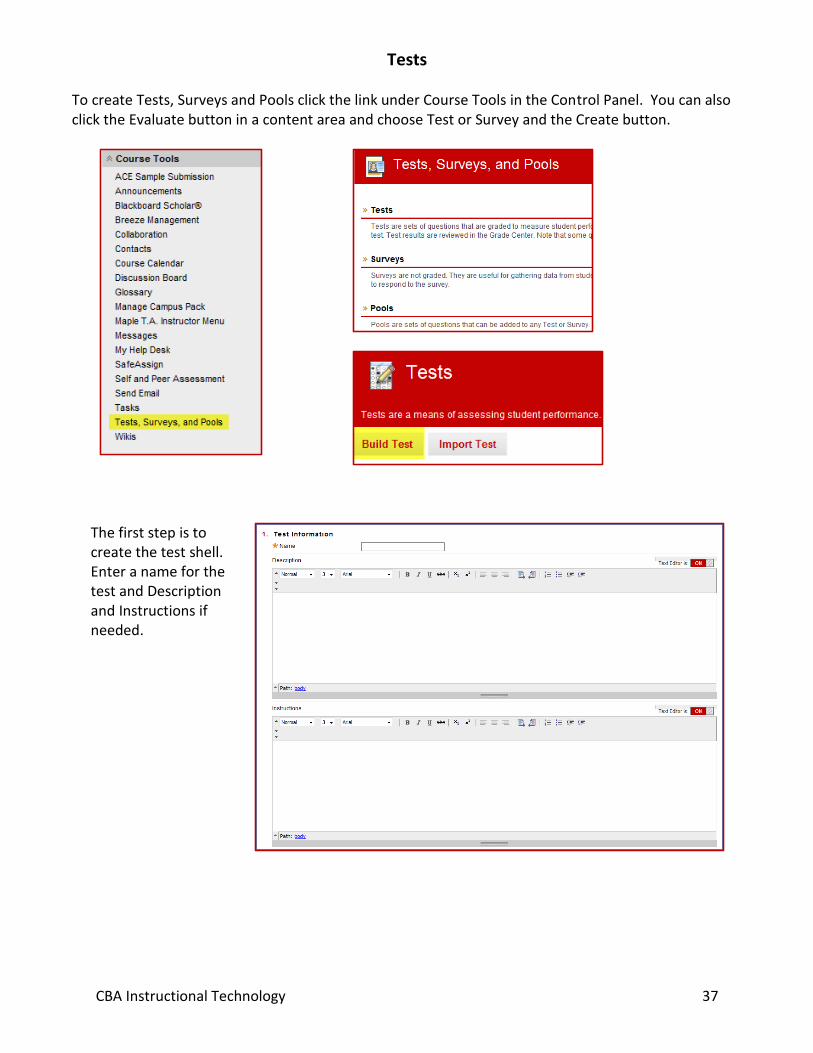
Tests To create Tests, Surveys and Pools click the link under Course Tools in the Control Panel. You can also click the Evaluate button in a content area and choose Test or Survey and the Create button.
The first step is to create the test shell. Enter a name for the test and Description and Instructions if needed.

CBA Instructional Technology 38
After creating the test shell you use the Test Canvas to create your test questions.
You can create new questions
You can reuse questions that are in a different test or in the Test Pool.
You can tell Blackboard to randomly select questions from Test Pools based on the question type and the number of questions to include.
You can upload Test Bank questions from the publisher that are in the Blackboard format.
After you have created your test you need to deploy it in a content area. Click the content area and then choose Test under the Create Assessment menu.
You will be presented with a list of tests that have not yet been deployed. Select the test and click Submit.

CBA Instructional Technology 39
After adding the test to a content area the Test Options window opens where you can set options for the test such as how many attempts are allowed, time span when the test is available, password, and what feedback the student receives when the test is completed.
For tests set to multiple attempts, you can use the Grade Center column settings to choose which grade should be recorded in the gradebook- Last Attempt, First Attempt, Highest, Lowest, or Average. Click Full Grade Center or Tests under Grade Center in the Control Panel. Click the chevron for the column and choose Edit Column Information.
Random Block of Questions Test A random block is a group of questions retrieved from a question pool. You need to have existing tests residing under Pools in Tests, Surveys and Pools. Using a random block, students will be presented with different groups of questions. For example, you have a pool of 100 questions and you create a test of 15 questions at 5 points each. Blackboard will present a different set of 15 questions from the 100 total questions each time the test is accessed. Notes
A random block test can only pull questions from pools (they can’t pull questions from a test).
If a pool has 15 questions and a test of 15 questions is created, students will receive the same questions but in a different order.
Each question will be set for the same amount of points. You can’t set the point value for individual questions.
Process

CBA Instructional Technology 40
1. Create your pool(s). You can upload a publisher’s test bank into Blackboard or you can create the questions individually. Check with your publisher for instructions on uploading their test banks.
2. Create a test, or edit an existing test to add question to 3. Add a random block of questions to the test 4. Set the number of questions to display and the points per question
Create the test Under Course Tools in the Control Panel select Tests, Surveys, and Pools. Then select Tests. Click the Build Test button.
Give the test a name. You can also type in a description of the test and instructions for the student. When done, click Submit. In the test canvas, click the Reuse Question button and choose Create Random Block.

CBA Instructional Technology 41
Under Choose Criteria, select the tests that you want the questions pulled from.

CBA Instructional Technology 42
Scroll down and select the types of questions you want included in your test. Then click Submit.
You are brought back to the Test Canvas. Change the Number of Questions to Display to the number of questions you want on the test. Click in the box to open the data entry box. The default is one.

CBA Instructional Technology 43
Set the number of points for each question by clicking Select All to select all of the questions in the test and typing in the points. The default is 10 points per question. Click Update when done. Click OK at the bottom of the window to take you back to the Tests list.
Using this example, the test will have a total of 10 random questions for each student worth a total of 50 points. Each question is worth five points. There are a total of 164 available questions for Blackboard to choose from.

CBA Instructional Technology 44
Deploy the Test Place a link to the test in one of the content areas of Blackboard. In this sample it will be placed under Course Content. Click the content area in the navigation bar where you want the link to the test to be located. Click the Assessments button and choose Test
A list of the tests that have not been deployed yet will appear. Chose the test you want to deploy and click Submit.
CBA Instructional Technology 45
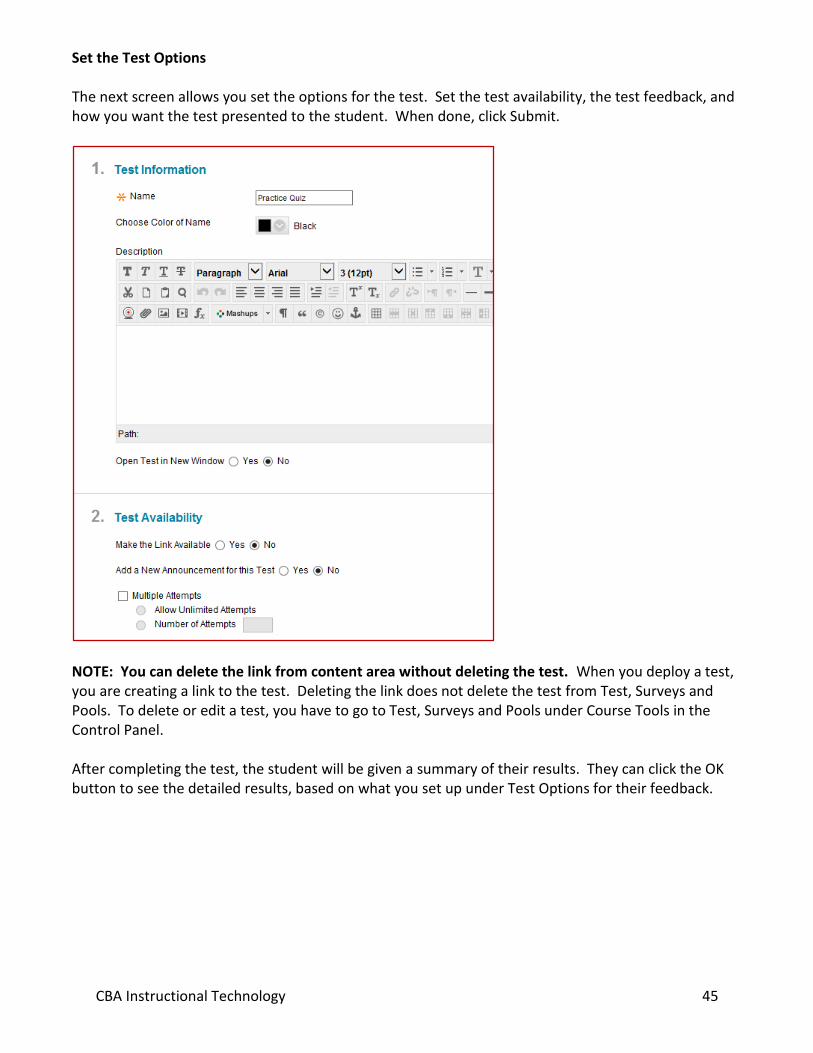
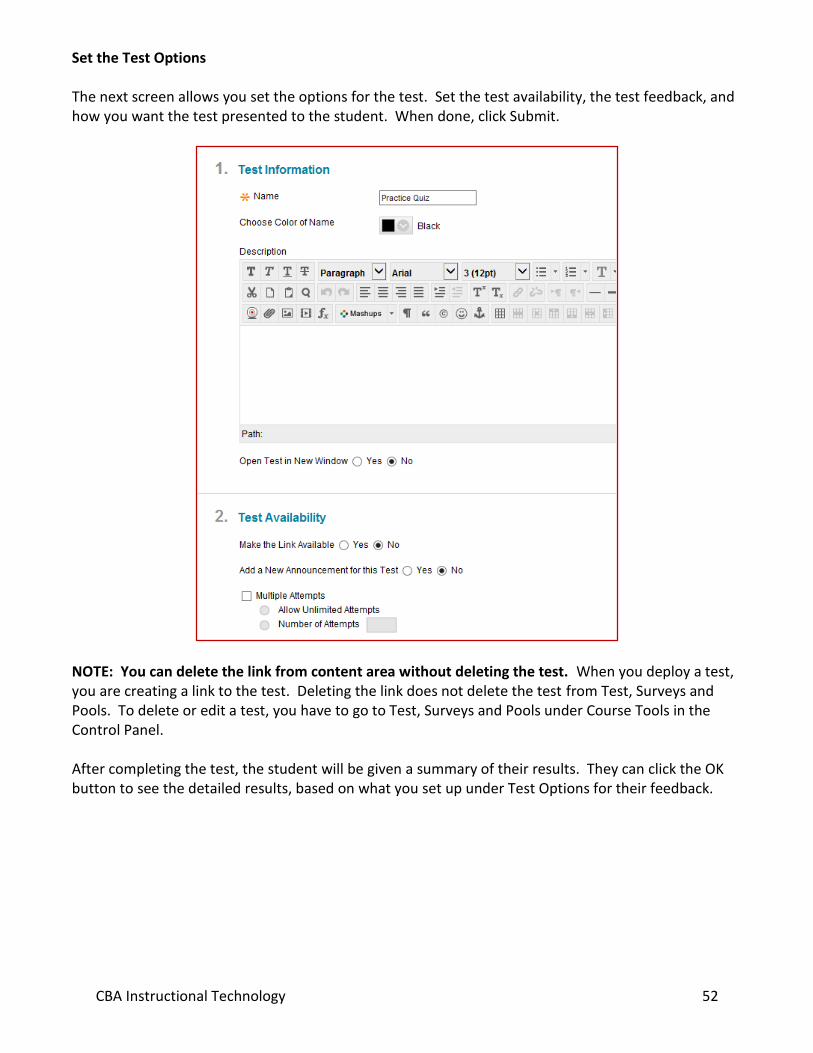
Set the Test Options The next screen allows you set the options for the test. Set the test availability, the test feedback, and how you want the test presented to the student. When done, click Submit.
NOTE: You can delete the link from content area without deleting the test. When you deploy a test, you are creating a link to the test. Deleting the link does not delete the test from Test, Surveys and Pools. To delete or edit a test, you have to go to Test, Surveys and Pools under Course Tools in the Control Panel. After completing the test, the student will be given a summary of their results. They can click the OK button to see the detailed results, based on what you set up under Test Options for their feedback.

CBA Instructional Technology 46
Checking the Students’ Submission Blackboard will automatically grade the test and put the score in the gradebook. You can view individual student results. You can also view a list of students and their scores, and the overall test performance. To view a list of students and their scores, go to the Full Grade Center under Grade Center in the Control Panel. Locate the column for the test and click the chevron.
Choose View All Attempts to see a list of students and their scores. Choose Item Analysis for statistics on the overall test performance and individual test questions.

CBA Instructional Technology 47
To view an individual student’s attempt, click the chevron in the cell containing their score. Chose View Grade Details from the list.
Click View Attempts or Grade Attempt to see the student’s answers. If you want to remove the attempt so that the student can take it again, click Clear Attempt

CBA Instructional Technology 48
Tests Using Algorithms Under Course Tools in the Control Panel select Tests, Surveys and Pools. Select Tests and then click the Build Test button. Give the test a name and enter a description or instructions for the student if needed. Click Submit. Click the Create Question button and choose Calculated Formula.

CBA Instructional Technology 49
Give the question a title and type in the question text. Use square brackets [x] to define the variables in the question text that corresponds to the variable in the formula that will be used to calculate the answer to the question.
In Step 2 define the correct answer range using plus or minus a numeric or using a percentage variation from the correct answer. Click Next.

CBA Instructional Technology 50
Set the minimum and maximum value for each variable. In Step 2 set the number of decimal places and the number of answer sets you want to generate. Click Next when done.
Click the Calculate button and check that there aren’t any errors, such as DIV/0.
In step 2 indicate any feedback you want to give the student for correct and/or incorrect answers. When done click Submit.

CBA Instructional Technology 51
Deploy the Test Place a link to the test in one of the content areas of Blackboard. In this sample it will be placed under Course Content. Click the content area in the navigation bar where you want the link to the test to be located. Click the Assessments button and choose Test
A list of the tests that have not been deployed yet will appear. Chose the test you want to deploy and click Submit.
CBA Instructional Technology 52
Set the Test Options The next screen allows you set the options for the test. Set the test availability, the test feedback, and how you want the test presented to the student. When done, click Submit.
NOTE: You can delete the link from content area without deleting the test. When you deploy a test, you are creating a link to the test. Deleting the link does not delete the test from Test, Surveys and Pools. To delete or edit a test, you have to go to Test, Surveys and Pools under Course Tools in the Control Panel. After completing the test, the student will be given a summary of their results. They can click the OK button to see the detailed results, based on what you set up under Test Options for their feedback.

CBA Instructional Technology 53
Checking the Students’ Submission Blackboard will automatically grade the test and put the score in the gradebook. You can view individual student results. You can also view a list of students and their scores, and the overall test performance. To view a list of students and their scores, go to the Full Grade Center under Grade Center in the Control Panel. Locate the column for the test and click the chevron.
Choose View All Attempts to see a list of students and their scores. Choose Item Analysis for statistics on the overall test performance and individual test questions.
CBA Instructional Technology 54
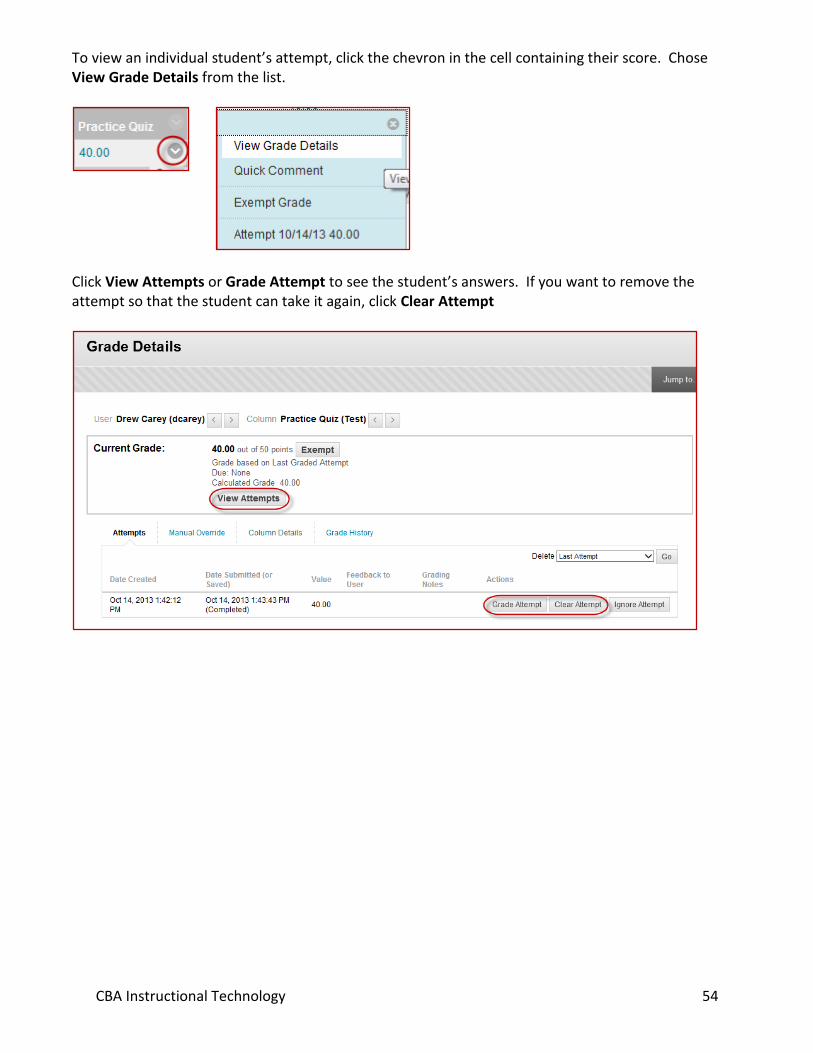
To view an individual student’s attempt, click the chevron in the cell containing their score. Chose View Grade Details from the list.
Click View Attempts or Grade Attempt to see the student’s answers. If you want to remove the attempt so that the student can take it again, click Clear Attempt

CBA Instructional Technology 55
Importing Tests You can create your tests outside of Blackboard and then import the questions into Blackboard. They must be in a specific format in order to be read by the system. You can also export tests from one course and import them into another course. Creating Tests in Excel You can author your test questions in Microsoft Excel and save the file as a text file. Create your Excel file in this format:
Column A- indicate the question type Column B- the question text Column C and beyond- enter the answer to the question. If this is multiple choice or multiple answer, enter each answer and whether or not that answer is correct in the next column. When you are done, save the file as a Text (Tab delimited) file (.txt extension)
You can upload the question file into an existing test, or you can create a test and then import the questions into the new test.

CBA Instructional Technology 56
Go to the Control Panel and choose Tests, Surveys and Polls from Course Tools.
Select Tests to add them to an existing test or to create a test to add the questions to. You can select Pools and add them to an existing pool or create a new pool to add the questions to.

CBA Instructional Technology 57
To add the questions to an existing test, click the chevron next to the test and choose Edit. Click the Upload Questions button and locate the text file that you saved.
To create a new test for the questions, click access Tests, Surveys and Pools under Course Tools in the Control Panel. Select Tests and then click the Build Test button. Create the shell for your test as explained above with the name, description and instructions for the test. Go back to Tests, Surveys and Pools and click Tests. You will see your new test listed. Click the chevron next to the test and choose Edit. Click the Upload Questions button and locate the text file that you saved. For more information on importing an excel file, see this Blackboard video- http://ondemand.blackboard.com/r91/movies/bb91_tests_surveys_upload_test_questions_excel.htm Creating tests in Word You can author your test questions in Microsoft Word and use the online Test Generator from BYU- Idaho. Your Word document must be in a specific format. You will copy/paste your Word document into the Test Generator and it will create the text file that you will save and upload to Blackboard. Instructions on formatting your Word document http://www.cba.unl.edu/class/Tutorials/Bb9/FormatWordBbTest.pdf Once you have created your Word document, copy and paste the document into the Test Generator at this website and click the Save as text file button in Step 2 http://www.byui.edu/ats/testgen.htm

CBA Instructional Technology 58
When the Save dialog box comes up, save the text file on your computer with a distinguishable name. This is the file you will upload to Blackboard to create the test. With the Save dialog box open click Open to view the file contents and check for errors (if the Save dialog box was closed, open the file using Notepad which is found in the Accessories folder under All Programs in the Start menu). If there are no errors, it will look similar to the first example. If there are errors, it will have question marks in the left column as seen in the second example. Question marks mean that the Test Generator didn’t understand what kind of question you were asking. You will need to go back and make sure you formatted your Word document correctly.

CBA Instructional Technology 59
Create the shell for your test as instructed above, and then upload the text file in Blackboard by entering the course and in the Control Panel choose Test, Surveys, and Pools under Course Tools.
Click Tests to create a new test, or click Pools to create a new pool of questions from which you can tests. Click the Import Test (or Import Pool) button and upload the text file.

CBA Instructional Technology 60
Save Your Course Content You can save your course content by using the Export/Archive feature. This process puts your course content into a zip file that you can save for archiving purposes, or you can upload it into another Blackboard course or section to populate a course (copying content from one semester to another or one section to another). Go into the course you want to copy the content from. Go to Export/Archive Course under Packages and Utilities in the Control Panel.

CBA Instructional Technology 61
Click Export to create a zip package of your course. Select the items you want to export by clicking the box. Click Submit when you're done.
You will receive an email when your zip package has been created. You will need to save the zip package somewhere on your computer and then upload it into your other course or section.

CBA Instructional Technology 62
Go back into the course you are copying from and go to Packages and Utilities in the Control Panel. Click on Export/Archive Course. You will see a link for the zip file.
Click on the link and choose Save from the File Download dialog box. Save the file someplace on your computer.

CBA Instructional Technology 63
Importing Content from one Course/Semester to Another Once you have the zip package created, you can upload the content you saved into another course, or the course in a different semester. Go into the course/section you want to add the content to. Go to Packages and Utilities in the Control Panel and click on Import Package/View Logs.
Click the Import Package button and locate the package file you saved on your computer in Step 2. Select the items you want to import into your course in Step 4. When done, click Submit.

CBA Instructional Technology 64
You will receive an email when the import process has been completed. When you import material from one course/section to another it does not replace what is already there. It adds to the existing content.
Copying Content from one Course/Semester to Another You can copy your course into another course. The steps are similar to the Export/Archive process. With Course Copy you have the option of copying your enrollment as well. In the Control Panel, click Course copy under Packages and Utilities. Choose Copy Materials into an Existing Course. If you want to copy the enrollment, choose Copy Course with Users. Click the Browse button next to Destination Course ID and locate the course/section you want to copy into. Select the content that you want to copy and then click Submit.
You will receive an email notification when the copy is complete. When you copy material from one course/section to another it does not replace what is already there. It adds to the existing content.