blood pressure training system - amazon s3 · blood pressure training system s415 ... slowly...
TRANSCRIPT
User Guide 12.7.1© Gaumard Scientific Company, 2012
All Rights Reservedwww.Gaumard.com
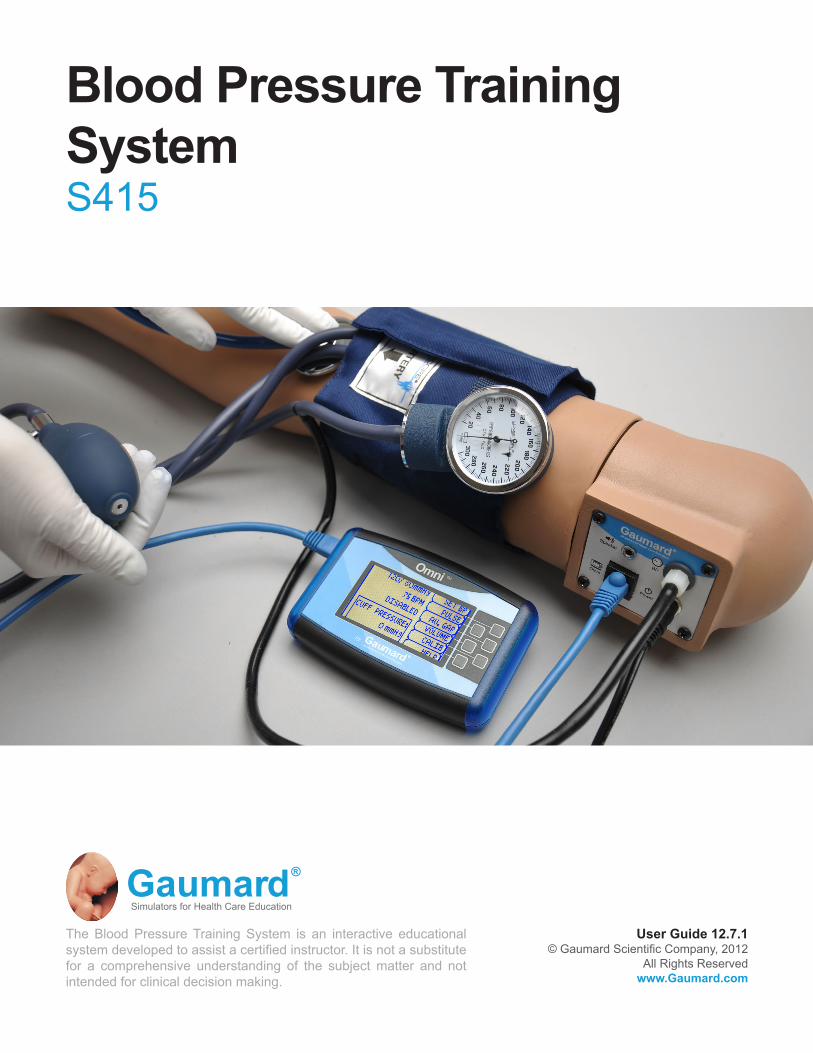
Blood Pressure Training SystemS415
®GaumardSimulators for Health Care Education
The Blood Pressure Training System is an interactive educational system developed to assist a certified instructor. It is not a substitute for a comprehensive understanding of the subject matter and not intended for clinical decision making.

2 | User Guide | Blood Pressure Training System |
| Blood Pressure Training System | User Guide | 3
Care and CautionsOverall Warnings .................................................................................................. 5General ................................................................................................................... 5Latex warning ......................................................................................................... 5Cleaning ................................................................................................................. 5Operating Conditions .............................................................................................. 5Storage Conditions ................................................................................................. 5
BP Arm Set UpControl Panel ........................................................................................................ 7
Power Supply ........................................................................................................ 7
Omni™ Setup ........................................................................................................ 7
Blood Pressure Arm Setup .................................................................................. 8
BP Arm FeaturesPalpable Pulse .................................................................................................... 10
Korotkoff Sounds ............................................................................................... 10
Auscultation ....................................................................................................... 10Instructions for use ............................................................................................... 10
Using the Omni™ Blood Pressure ControllerOmni™ ................................................................................................................ 12Main Screen ......................................................................................................... 12Omni Menus ......................................................................................................... 12Pulse Menu........................................................................................................... 13Au. Gap menu ...................................................................................................... 13Volume menu........................................................................................................ 13Calib menu ........................................................................................................... 13Help ...................................................................................................................... 14

4 | User Guide | Care and Cautions |
Care and Cautions

| Care and Cautions | User Guide | 5
Overall WarningsDamage caused by misuse may void the manufacturer’s warranty. Failure to comply with the following guidelines may result in injury or damage to the equipment. Additional warnings are found throughout the document.
GENERAL
• This simulator is constructed of material that approximates skin texture. Therefore, in handling the model, use the same gentle techniques as you would in working with a patient.
• Do not wrap this or any other Gaumard product in newsprint.
• Indelible marks made with ballpoint pens, ink or marker cannot be removed.
• Do not use alcohol, acetone, Betadine® or any other antiseptic which contains iodine in this or any Gaumard® simulator. These products could damage or stain the skin of the simulator.
LATEX WARNING
• Vein tubing contains latex which may cause allergic reactions. Users allergic or sensitive to latex should avoid contact. Discontinue use of this product and seek medical attention if an allergic reaction occurs.
CLEANING
• Clean the skin of the simulator after every training session. The skin should be cleaned with a cloth, dampened with diluted liquid dish washing soap.
• Do not clean with harsh abrasives.
• Do not use povidone iodine on the simulator.
• The simulator is “splash-proof” but not water-proof. Do not submerge or allow water to enter the interior of the simulator.
OPERATING CONDITIONS
Operating the Blood Pressure Training System outside these ranges may affect performance:
• Operating temperature: 50°- 95° F (10°- 35° C).
• Humidity: 5%-95% (non-condensing).
STORAGE CONDITIONS
• Improper storage may damage the simulator.
• Keep it stored in the box and/or bag provided.
• Do not stack or store heavy materials on top of the box and/or bag.
• Storage temperature: 32°- 113° F (0°- 45° C).
• Humidity: 40%-60% (non-condensing).

6 | User Guide | BP Arm Set Up |
BP Arm Set Up
| BP Arm Set Up | User Guide | 7
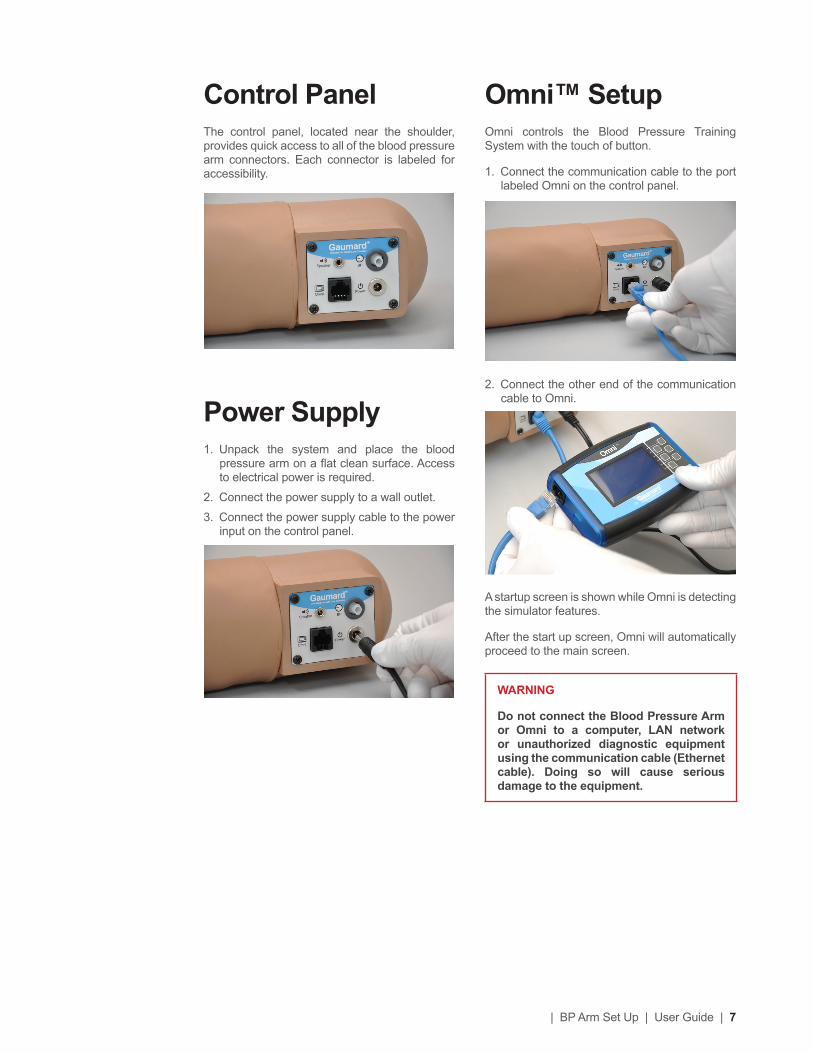
Omni™ SetupOmni controls the Blood Pressure Training System with the touch of button.
1. Connect the communication cable to the port labeled Omni on the control panel.
2. Connect the other end of the communication cable to Omni.
A startup screen is shown while Omni is detecting the simulator features.
After the start up screen, Omni will automatically proceed to the main screen.
WARNING
Do not connect the Blood Pressure Arm or Omni to a computer, LAN network or unauthorized diagnostic equipment using the communication cable (Ethernet cable). Doing so will cause serious damage to the equipment.
Control PanelThe control panel, located near the shoulder, provides quick access to all of the blood pressure arm connectors. Each connector is labeled for accessibility.
Power Supply1. Unpack the system and place the blood
pressure arm on a flat clean surface. Access to electrical power is required.
2. Connect the power supply to a wall outlet.
3. Connect the power supply cable to the power input on the control panel.

8 | User Guide | BP Arm Set Up |
Blood Pressure Arm Setup1. Wrap the blood pressure cuff around the arm,
midway between the deltoid and elbow.
Ensure the arrow on the cuff points toward the elbow following the direction of blood flow in the artery.
2. Connect the blood pressure cuff extension to the connector labeled BP on the control panel.
Reverse the setup steps to disassemble the simulator and turn off Omni.

| BP Arm Features | User Guide | 9
BP Arm Features

10 | User Guide | BP Arm Features |
4. Slowly release the cuff and listen for Korotkoff sounds.
5. Ask the provider to record the systolic pressure, the diastolic pressure, the limits of the auscultation gap (if any) and the pulse rate.
6. Compare the values recorded by the provider with those originally programmed in Omni.
OverviewThe Blood Pressure Training System consists of a full-size adult left arm. This is a versatile training tool developed to assist health professionals teach the processes and skills required to perform blood pressure auscultation procedures and techniques.
Features
PALPABLE PULSE
Programmable, palpable radial pulse is present when the cuff pressure is less than the selected systolic blood pressure.
KOROTKOFF SOUNDS
Korotkoff sounds, K1 through K4 (K5 is silence)are audible between systolic and diastolic pressures. The sounds are automatically silenced if the auscultation gap is enabled, and adjusted depending on the selected heart rate and the rate of cuff deflation.
AUSCULTATION
The simulator operates with a modified blood pressure cuff. Connect the BP cuff extension to the arm’s control panel before use. Use a conventional stethoscope to auscultate Korotkoff sounds in the antecubital area.
INSTRUCTIONS FOR USE
1. Follow the instructions listed in the Set Up section to assemble the simulator.
2. Place the bell of the stethoscope on the antecubital region of the arm.
3. Pump up the cuff until the radial pulse is absent.

| Using the Omni™ Blood Pressure Controller | User Guide | 11
Using the Omni™ Blood Pressure Controller

12 | User Guide | Using the Omni™ Blood Pressure Controller |
NAVIGATION MENUS
Edit Blood Pressure settings using the navigation menus. Select a menu item by pressing the soft key buttons located on the right side of the controller. Each menu has additional submenus. Use the submenus to decrease, increase, accept, or cancel values.
OMNI MENUS
SET BP MENU
Use this menu to set the blood pressure in the simulator.
Select systolic or diastolic and adjust the pressure using the + and - buttons. Press OK to save the changes and return to previous screen. The default value for the blood pressure is 120/80 mmHg.
Omni™ Omni was designed to assist health professionals teach the processes and skills required to perform blood pressure auscultation procedures and techniques.
MAIN SCREEN
The Omni main screen is divided into three sections which are, Current Settings, Feedback Graphics and Navigation Menus.
CURRENT SETTINGS
Current settings information is listed in the upper center of the screen.
FEEDBACK GRAPHICS
The feedback graph located in the lower center of the screen displays, in real time, the BP cuff pressure.

| Using the Omni™ Blood Pressure Controller | User Guide | 13
PULSE MENU
Use this menu to set the heart rate. Adjust the beats per minute using the + and - buttons. Press OK to save the changes and return to previous screen.
AU. GAP MENU
Enable and set an interval of pressure where Korotkoff sounds dissipate. The auscultatory gap is disabled by default.
Pressing the ENABLE button activates the UPPER and LOWER menus. Use these menus to set the limits of the auscultatory gap.
Adjust the limits of the auscultatory gap using the + and - buttons. Press OK to save the changes and return to previous screen. The default upper and lower limits for the auscultatory gap are 100 mmHg and 90 mmHg, respectively.
VOLUME MENU
Increase or lower the volume of Korotkoff sounds using the VOLUME menu. Press OK to save the changes and return to previous screen. The default value for the Korotkoff sounds volume is 5.
CALIB MENU
Calibrate the sensors inside the simulator using this option. Set the standard against which auscultation will be evaluated during the exercise. Blood pressure cuff calibration should be performed only when the Korotkoff sounds do not match the systolic and diastolic values set from Omni.
It is not necessary to re-calibrate Omni for each training session. Omni will remember previous calibration settings.
CALIBRATION INSTRUCTIONS
1. Assemble the system and turn Omni on.
2. Place the blood pressure cuff on the arm.
3. Connect the cuff’s extension to connector on the control panel.

14 | User Guide | Using the Omni™ Blood Pressure Controller |
After pressing the DEFAULT button, a message on the screen will notify the user about the status of the reset.
HELP
The help window provides access to global settings such as backlight time and Omni/Simulator serial number. This menu is available in the main screen and throughout the control menus for convenience.
BACKLIGHT
The default value for Omni’s backlight timer is 10 minutes. After 10 minutes the backlight will turn off.
To alter the backlight duration, adjust the backlight timer with the plus or minus sign. Press OK to accept the changes.
SERIAL NUMBER
View Omni and simulator serial number. Press OK to return to the HELP menu.
4. Select the CALIB menu from the main screen.
5. Press NEXT to begin the calibration procedure.
6. You will be prompted to set the BP cuff to a certain pressure. Hold that pressure constant and press the NEXT button.
7. Omni will now prompt you to set the BP cuff to 20 mmHg. Hold that pressure constant and press the NEXT button.
Follow the text cue on the screen and repeat the procedure for each pressure level. The facilitator should follow the text cue on the screen to inflate the cuff just one value at a time, until finished.
After calibrating the sensor, Omni will return to the main screen and display the reading shown on the sphygmomanometer.
FACTORY SETTING
The DEFAULT option is used to restore sensors back to factory settings, erasing any calibrations performed by users. When restoring the sensors to factory settings, do not practice auscultation. This action will interfere with the reset.

| Appendix | User Guide | 15
Appendix

16 | User Guide | Appendix |
Consumables and Replacements
SELECTED PARTS LIST
Contact Gaumard Scientific for a complete list of consumable and replacement parts and their prices.
Item ID Description
S415.002 Blood Pressure Cuff Kit
S415.003 Soft Carrying Bag fir Arm
S415.008 2 Arm Skins
S415.009 Synthetic Blood Concentrate
S415.010 Speakers
S415.180 Omni Controller
S415.005 Power Supply 100-240 VAC
S415.180.1 Communication Cable
S415.180.2 USB Cable
Troubleshooting
GENERAL TROUBLESHOOTING GUIDE
Use the following table to find causes and solutions to a number of possible problems.
Symptom Possible Cause Solution
Communication never gets established or is lost
Data cable is not connected
Ensure the Ethernet cable is plugged into Omni and the simulator
Ethernet cable is damaged
Verify the power cable is connected to the simulator
No radial pulsePulse rate was set to 0 BPM
Increase the pulse rate using the pulse menu
The readings from the simulator do not match Omni
Improper calibration
Calibrate simulator following the calibration instructions listed in the Using the Omni section
Korotkoff sounds are absent or not heard at desired volume level
Volume level is set to low
Adjust the volume control to get it to desired level

| Appendix | User Guide | 17
Warranty
EXCLUSIVE ONE-YEAR LIMITED WARRANTY
Gaumard warrants that if the accompanying Gaumard product proves to be defective in material or workmanship within one year from the date on which the product is shipped from Gaumard to the customer, Gaumard will, at Gaumard’s option, repair or replace the Gaumard product.
This limited warranty covers all defects in material and workmanship in the Gaumard product, except:
• Damage resulting from accident, misuse, abuse, neglect, or unintended use of the Gaumard product;
• Damage resulting from failure to properly maintain the Gaumard product in accordance with Gaumard product instructions, including failure to property clean the Gaumard product; and
• Damage resulting from a repair or attempted repair of the Gaumard product by anyone other than Gaumard or a Gaumard representative.
This one-year limited warranty is the sole and exclusive warranty provided by Gaumard for the accompanying Gaumard product, and Gaumard hereby explicitly disclaims the implied warranties of merchantability, satisfactory quality, and fitness for a particular purpose. Except for the limited obligations specifically set forth in this one-year limited warranty, Gaumard will not be liable for any direct, indirect, special, incidental, or consequential damages, whether based on contract, tort, or any other legal theory regardless of whether Gaumard has been advised of the possibilities of such damages. Some jurisdictions do not allow disclaimers of implied warranties or the exclusion or limitation of consequential damages, so the above disclaimers and exclusions may not apply and the first purchaser may have other legal rights.
This limited warranty applies only to the first purchaser of the product and is not transferable. Any subsequent purchasers or users of the product acquire the product “as is” and this limited warranty does not apply.
This limited warranty applies only to the products manufactured and produced by Gaumard. This limited warranty does not apply to any products provided along with the Gaumard product that are manufactured by third parties. For example, third-party products such as computers (desktop, laptop, tablet, or handheld) and monitors (standard or touch-screen) are not covered by this limited warranty. Gaumard does not provide any warranty, express or implied, with respect to any third-party products. Defects in third-party products are covered exclusively by the warranty, if any, provided by the third-party.
Any waiver or amendment of this warranty must be in writing and signed by an officer of Gaumard.
In the event of a perceived defect in material or workmanship of the Gaumard product, the first purchaser must:
1. Contact Gaumard and request authorization to return the Gaumard product. Do NOT return the Gaumard product to Gaumard without prior authorization.
2. Upon receiving authorization from Gaumard, send the Gaumard product along with copies of (1) the original bill of sale or receipt and (2) this limited warranty document to Gaumard at 14700 SW 136 Street, Miami, FL, 33196-5691 USA.
3. If the necessary repairs to the Gaumard product are covered by this limited warranty, then the first purchaser will pay only the incidental expenses associated with the repair, including any shipping, handling, and related costs for sending the product to Gaumard and for sending the product back to the first purchaser. However, if the repairs are not covered by this limited warranty, then the first purchaser will be liable for all repair costs in addition to costs of shipping and handling.
Extended Warranty In addition to the standard one year of coverage, the following support plans are available:
• Two-Year Extension (covers second and third years)
• Call for pricing (USA only)
Contact UsE-mail Technical Support: [email protected]
Before contacting Tech Support you must:
1. Have the simulator’s Serial Number
2. Be next to the simulator if troubleshooting is needed.
E-mail Sales and Customer Service: [email protected]
Phone: Toll-free in the USA: (800) 882-6655
Worldwide: 01 (305) 971-3790
Fax: (305) 667-6085
Post: Gaumard Scientific
14700 SW 136 Street
Miami, FL 33196-5691
USA
Office hours: Monday-Friday, 8:30am - 4:30pm EST (GMT-5, -4 Summer Time)
General Information
Gaumard®, ZOE®, Michelle®, Mike®, PEDI®, Susie Simon®, Susie®, Simon® Code Blue®, SIMA Models®, SIMA GYN/AID®, Virtual Instruments®, Codemaker®, Code Blue®, NOELLE®, Simulation Made Easy™, HAL®, CPRLink™, Zack™, RITA™, Chloe™, Seatbelt Susie™, Krash Kids™, Premie™, GIGA®, Omni™, SmartSkin™ are Trademarks of
© Gaumard Scientific Company, 2012All rights reserved.Gaumard®, NOELLE®, HAL® are trademarks of Gaumard Scientific Company, Inc.Patented; Other Patents PendingAlways dispose of this product and its components in compliance with local laws and regulations.