broward college policies and … college policies and procedures for infection and hazard control...
TRANSCRIPT

BROWARD COLLEGE
POLICIES AND PROCEDURES FOR
INFECTION AND HAZARD CONTROL
AND BLOODBORNE AND INFECTIOUS
DISEASES
DENTAL ASSISTING PROGRAM
DENTAL HYGIENE PROGRAM
BROWARD DENTAL RESEARCH CLINIC
20151 - 20153
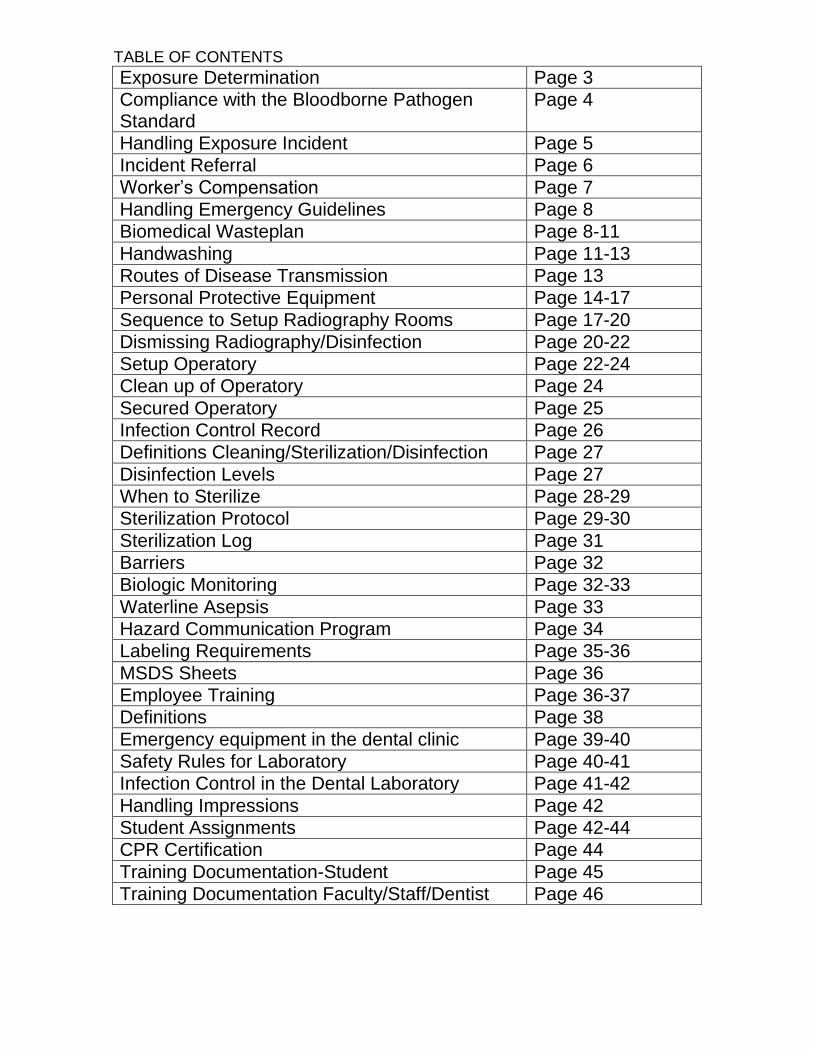
TABLE OF CONTENTS
Exposure Determination Page 3
Compliance with the Bloodborne Pathogen Standard
Page 4
Handling Exposure Incident Page 5
Incident Referral Page 6
Worker’s Compensation Page 7
Handling Emergency Guidelines Page 8
Biomedical Wasteplan Page 8-11
Handwashing Page 11-13
Routes of Disease Transmission Page 13
Personal Protective Equipment Page 14-17
Sequence to Setup Radiography Rooms Page 17-20
Dismissing Radiography/Disinfection Page 20-22
Setup Operatory Page 22-24
Clean up of Operatory Page 24
Secured Operatory Page 25
Infection Control Record Page 26
Definitions Cleaning/Sterilization/Disinfection Page 27
Disinfection Levels Page 27
When to Sterilize Page 28-29
Sterilization Protocol Page 29-30
Sterilization Log Page 31
Barriers Page 32
Biologic Monitoring Page 32-33
Waterline Asepsis Page 33
Hazard Communication Program Page 34
Labeling Requirements Page 35-36
MSDS Sheets Page 36
Employee Training Page 36-37
Definitions Page 38
Emergency equipment in the dental clinic Page 39-40
Safety Rules for Laboratory Page 40-41
Infection Control in the Dental Laboratory Page 41-42
Handling Impressions Page 42
Student Assignments Page 42-44
CPR Certification Page 44
Training Documentation-Student Page 45
Training Documentation Faculty/Staff/Dentist Page 46

Exposure Determination Job titles of those who are exposed to bloodborne pathogens. OSHA Category I Dental Assisting / Dental Hygiene Clinicians Dental Assisting Instructors Dental Hygiene Instructors Dentists Dental Assisting / Dental Hygiene Students Clinical Coordinators Job titles of those who might have some exposure to bloodborne pathogens. OSHA Category II Dental Clinic Business Staff Custodial Staff Tasks and procedures in which exposure to bloodborne pathogens can potentially occur but not limited to: Direct Patient Care X-rays and Examinations Preventive Procedures--Ex. Scaling, Polishing, Sealants, Fluoride Treatment, etc.… Restorative Procedures--Ex. Amalgam, Composite, Root Canal, etc.… Surgical Procedures--Ex. Extractions, Periodontal Surgery, etc.…. Indirect Patient Care Sterilizing / Disinfecting Instruments Disinfecting Operatory Clinical Laboratory Procedures--Ex. Pouring of Alginate Impressions

METHODS OF COMPLIANCE WITH THE BLOODBORNE PATHOGEN
STANDARD
1. Universal Precautions a. All body fluids, instruments, environmental surfaces, materials, etc., with the
potential to be contaminated with blood or other infectious materials, shall be
treated as if they are infectious.
b. BC and BDRC shall provide to the employee, student or dentist with
occupational exposure, personal protective equipment (PPE) i.e., goggles,
disposable gloves, face mask, face shield and disposable protective clothing.
The students will purchase approved goggles. Dentists and employees will be
provided with goggles at no cost.
2. Engineering and Work Practice Controls
a. Engineering Controls serve to isolate or remove the bloodborne pathogens
hazard from the workplace. Engineering controls we use, but not limited to are
needle recapping devices, sharps containers, and scalpel blade removers.
b. Work Practice Controls means controls that reduce the likelihood of
exposure by altering the manner in which a task is performed.
Standard clinical procedures are taught and adhered to throughout both dental auxiliary
programs. For dental health care workers, knowledge and understanding of infection
control with regard to transmissible diseases is necessary in order to protect patients,
dental personnel and others that may be exposed to infectious materials in the dental
environment.
The dental auxiliary must have knowledge regarding the following areas of the disease
process:
1. Microorganisms in the oral cavity
2. The infectious process
3. Prevention of transmission
4. Personal protective items
5. Handwashing techniques
6. Infection control in the treatment room
7. Disinfection and sterilization of instruments
8. Patient management in the operatory

Broward Dental Research Clinic Procedures for Handling Exposure Incidents
** Any accident/exposure incident that takes place off campus must be reported to BC personnel immediately. 1. All faculty, staff, students or dentists involved in an accident / incident shall
notify a clinical instructor immediately. If the person involved in the accident / incident can not notify someone because of their injury, whoever is in the area should immediately inform a clinical instructor.
2. If the accident / incident involves a puncture wound or abrasion with no exposure to body fluids:
a. Report incident to an instructor or clinician b. Wash area with an antimicrobial soap and water. c. Apply an antiseptic medication such as betadine or neosporin. d. Apply a dry sterile dressing e. Fill out and sign department accident / incident report. f. Contact Campus Safety to fill out an accident report and insurance
consortium report. No further action is necessary
If the injury is minor, self-treatment is acceptable. If in doubt always seek professional medical treatment.
3. If the accident / incident involves an exposure to bloodborne
pathogens (i.e. needle stick, scraped by a contaminated bur):
a. Report what happened to an instructor or clinician. Give patients’ name if known.
b. Wash area with an antimicrobial soap and water. c. Apply an antiseptic medication such as Betadine or a Triple Antibiotic
Ointment. d. Apply a dry sterile dressing. e. Student exposures will be immediately referred to Doctor’s 365, 1368
N University Dr., Plantation, FL 33322. The telephone number for students is 954-577-0001. Explain to the staff in the clinic that immediate attention is required because of a blood borne pathogen exposure. Broward College insurance covers student exposures during class sessions only.
f. Faculty and staff exposures will be immediately referred to Workers’ Compensation. Please see list of facilities at bottom of this section.
g. Fill out and sign department accident / incident report. h. Contact Campus Safety to fill out an accident report and insurance
consortium report.

BROWARD COLLEGE
INCIDENT REFERRAL
Student exposures will be immediately referred to:
DOCTOR’S 365
1368 N University Dr., Plantation, FL 33322
Ph: (954) 577-0001
They have extended hours available. Broward College insurance covers student
exposures during class sessions only. Students use their own insurance
including making copayments and then submit to Broward College insurance.

WORKERS COMPENSATION FACILITIES
Workers Compensation Facilities Address City St ZiP Telephone
Concentra Medical Center 6521 N. Andrews Ave Fort Lauderdale
FL
33309
954-941-6301
1347 S. Andrews Ave Fort Lauderdale
FL
33316
954-767-9999
Care Spot 9035 Pines Blvd Pembroke Pines
FL
33024
954-532-8928
1611 South Federal Highway
Pompano Beach
FL
33062
954-543-0104
4450 State Rd 7 Coconut Creek FL
33073
954-399-5970
1025 West Commercial Blvd
Tamarac FL
33321
954-543-1835
Neurological Rehabilitation Center 7777 N. University Dr Ste 101-5
Tamarac FL
33321
954-722-2110
US Healthworks 7676 Peters Rd Ste C Plantation FL
33324
954-474-4403
8290 N. University Dr Tamarac FL
33321
954-722-7186
1100 W. Commercial Blvd #120
Fort Lauderdale
FL
33309
954- 564-2592

GUIDELINES FOR HANDLING EMERGENCIES An emergency telephone is located in the dental clinic, dental reception, dental laboratory, and administrative assistant’s office. Dial “1” for Campus Safety and Dial “2” for 911. If a severe injury is sustained or a condition develops that requires immediate medical attention, take the following actions (i.e. anaphylactic shock, allergic reactions, syncope, etc.) These steps will be posted next to clinic phones.
a. Notify your supervisor of the incident as soon as possible. b. DO NOT TREAT PERSON (S) or TOUCH ANY BODY FLUID
UNLESS PERSONAL PROTECTIVE EQUIPMENT IS WORN. Personal protective Equipment (PPE) includes goggles, face mask, disposable gloves, and protective disposable clothing. Clinic supplies or the emergency barrier kits in sterilization may be utilized.
c. If a dentist is present the emergency medical kits may be utilized. These are located in the black covered plastic cart with three drawers in the supply room in the back of the clinic. The kit contains various medications such as nitroglycerin, glucose tablets, and benadryl. There is a first aid kit located on the clinic wall to the left of the sterilization room.
d. An Ambu Bag, oxygen tank, CPR mask, and backboard will be provided for CPR. They are located across from units 11 and 12.
e. The AED is located across from units 11 and 12 in the clinic area. f. Disposable PERSONAL PROTECTIVE EQUIPMENT or other items
exposed to body fluids shall be discarded in any red biomedical in the Dental Research Clinic.
g. Cleanup may be done utilizing the Biological Spill Kit located in sterilization on top of the cabinet.
h. For additional cleanup contact the dental clinic front office and ask for a custodian at X6622.
i. Security shall complete the BC Accident / Incident form which includes a description of the incident and area exposed.
j. Sign department accident / incident form. (See Appendix for sample)
BIOMEDICAL WASTE PLAN A copy of this plan shall be maintained in the Dental Department’s front desk area (Room 177). This plan will be distributed to all employees and used as part of the employee training program. Biomedical waste shall be identified and segregated in the room in which it is generated. The following examples are considered biomedical waste and shall be disposed of as follows: 1. Sharps:
scalpels, needles, microscope slides, broken glass, orthodontic wires, suture needles, burs and any other item that would puncture through a red bag.
Disposal: Placed directly into leak and puncture resistant, rigid, labeled container designed to contain sharps. Container is located in each operatory.
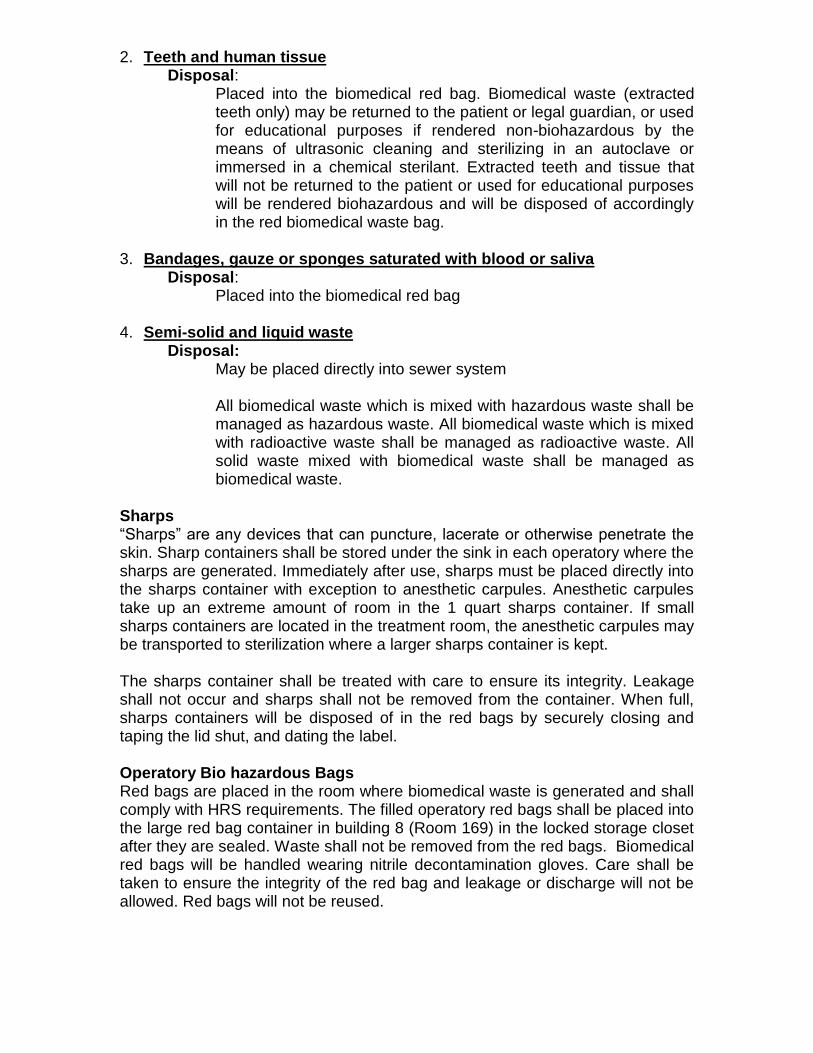
2. Teeth and human tissue Disposal:
Placed into the biomedical red bag. Biomedical waste (extracted teeth only) may be returned to the patient or legal guardian, or used for educational purposes if rendered non-biohazardous by the means of ultrasonic cleaning and sterilizing in an autoclave or immersed in a chemical sterilant. Extracted teeth and tissue that will not be returned to the patient or used for educational purposes will be rendered biohazardous and will be disposed of accordingly in the red biomedical waste bag.
3. Bandages, gauze or sponges saturated with blood or saliva Disposal: Placed into the biomedical red bag 4. Semi-solid and liquid waste Disposal: May be placed directly into sewer system
All biomedical waste which is mixed with hazardous waste shall be managed as hazardous waste. All biomedical waste which is mixed with radioactive waste shall be managed as radioactive waste. All solid waste mixed with biomedical waste shall be managed as biomedical waste.
Sharps “Sharps” are any devices that can puncture, lacerate or otherwise penetrate the skin. Sharp containers shall be stored under the sink in each operatory where the sharps are generated. Immediately after use, sharps must be placed directly into the sharps container with exception to anesthetic carpules. Anesthetic carpules take up an extreme amount of room in the 1 quart sharps container. If small sharps containers are located in the treatment room, the anesthetic carpules may be transported to sterilization where a larger sharps container is kept. The sharps container shall be treated with care to ensure its integrity. Leakage shall not occur and sharps shall not be removed from the container. When full, sharps containers will be disposed of in the red bags by securely closing and taping the lid shut, and dating the label. Operatory Bio hazardous Bags Red bags are placed in the room where biomedical waste is generated and shall comply with HRS requirements. The filled operatory red bags shall be placed into the large red bag container in building 8 (Room 169) in the locked storage closet after they are sealed. Waste shall not be removed from the red bags. Biomedical red bags will be handled wearing nitrile decontamination gloves. Care shall be taken to ensure the integrity of the red bag and leakage or discharge will not be allowed. Red bags will not be reused.

Labeling Sharps containers and red bags shall have the international biohazardous waste symbol of a specific size and the words “Biohazardous Waste” or “Infectious Waste” shall be clearly legible. Sharps containers and red bags that are to be disposed of off-site shall be clearly labeled and packaged.
New sharps containers will be labeled when put into use. Dated when they are sealed and ready for disposal. If a nonsharp item is placed into the sharps container for example, teeth or tissue, then the date that item was placed must be put on the label, and that sharp container can only be used for 30 days.
Large biomedical waste bags shall be labeled when they are put into use. The label shall be securely attached or permanently printed on the container. Small operatory biomedical waste bags do not need to be labeled since they will be placed into the larger bag. Indelible ink shall be used to print the label and the label shall contain the following information:
Broward College Dental Assisting / Hygiene Programs 3501 SW Davie Road, Bldg. 8 Davie, FL 33314 954-201-6779 Date 1st item placed in the box, and date the box is sealed Storage Full red bags and sharps containers shall be stored in building 8 (Room 169) in the locked storage closet. This area is accessible only to authorized persons and is so designated. All biomedical waste will be removed daily from the treatment areas. Waste shall not be stored longer than 30 days. Our biomedical waste disposal company, is scheduled for weekly pick up during our generating times (usually September - August). Areas used primarily for biomedical waste storage shall be constructed of a smooth, easily cleanable material that is impervious to liquids. These areas shall be regularly maintained in a sanitary condition. The storage area shall also be vermin / insect free. Specifically, the following storage area will be used: Building 8 (Room 169) small locked storage closet on the right. Disposable waste containers shall be destroyed during the disposal process and will not be re-used. Reusable containers shall be disinfected after each use as outlined below. If re-usable, the container shall be made of smooth, easily cleanable, impermeable material that resists corrosion by disinfectant chemicals. Contaminated Objects Any surface which has come in contact with biomedical waste shall be cleaned immediately after contact and disinfected / rinsed as follows:
a. Sodium hyperchlorite (Bleach) solution with minimum 100ppm free chlorine for a minimum of 10 minutes.
b. Cavicide disinfectant for 10 minutes or per manufacturers direction.

Spills If an accidental spill occurs it shall be cleaned immediately or as soon a feasible with the proper absorption material. A mercury spill kit, chemical spill kit, and biological spill kit are located in sterilization on top of the cabinet above the ultra sonic on the contaminated counter. Manufacturer recommendations on the p proper use and disposal of these materials shall be followed. Transporting No employees will transport biomedical waste for off-site disposal. All biomedical waste transported off-site by our medical waste hauler shall be enclosed in a rigid container supplied by our biomedical waste transporter. Inspections All employees shall cooperate fully with DOH officials who appear at the clinic for purposes of conducting an on-site inspection or who require information about this facilities compliance with the state’s biomedical waste rule. Record Keeping Records maintained shall include this written disposal plan, the manufacturer’s proof that red bags comply with DOH requirements, sterilization logs, receipts of biomedical waste pickup, and the contract with an off-site transporter, if applicable. Copies of the disposal or incineration documents of our biomedical waste will be kept by the department. Evidence of the bag manufacturer’s testing and bag quality shall be retained on file in the Biomedical Waste Manual. Proof that all bio hazardous bags used meet DOH requirements and records documenting pick up of biomedical waste (including contracts for off-site disposal) shall be maintained for three years and made available to DOH upon request. A permit to generate biomedical waste for this facility is necessary. A copy of the permit or the original will be kept in the supply room, on the wall next to the biomedical waste boxes. This permit is renewed yearly. All paperwork is kept by the Dental Clinic front office administrator.
HANDWASHING Handwashing is one of the most important actions that can be taken to prevent the transfer of microorganisms from one person to another person. Handwashing removes microorganisms from the folds and grooves of the skin by lifting and rinsing them from the skin surface.
Every dental team member should begin the day with two consecutive 15 second handwashes with soap and water. The thumbs, fingertips, and areas between fingers and around the fingernails should receive particular attention.
During the day, wash your hands for a full 30 seconds between patients and before and after going to lunch, taking a break, using the bathroom or any time they become contaminated.
Hands should also be washed before and after using gloves. Although requirements exist for the manufacture of gloves, even the best quality control cannot guard against a small percentage of defects. Treatment procedures may also inadvertently cause tears and punctures in gloves that permit

microorganisms to be transferred to the hands. If a glove tears during patient care, hands should be washed before regloving.
At the end of the day, hands should be thoroughly washed to prevent carrying microorganisms outside of the operatory.
The basic handwashing procedure should be altered in preparation for surgical procedures. The team should wash their hands and arms up to the elbows with an antimicrobial surgical handwashing product for 5-7 minutes. After the hands have been scrubbed, they should be dried with a sterile towel.
When washing times are too short or technique is poor several problems may occur:
* Fingertips, thumbs and the areas between the fingers are washed poorly or may be skipped entirely.
* The dominant hand is generally washed less thoroughly than the non-dominant hand.
* Microbe counts under the fingernails have been found to remain high even after surgical scrubs.
Hands free dispensers for soap and water are located at each dental station. This is to avoid contamination that takes places with “touching”.
If you have problems with skin irritation due to the effects of soap or frequent hand washing, try another handwashing product. Allergic reactions to gloves or glove powder may be corrected by trying a different brand of gloves or by the use of hypoallergenic gloves. Finally, hand lotions can be helpful to prevent hands from chapping as a result of weather or frequent handwashing.
Many antimicrobial handwashing products are now commercially available. Should you regularly use these products instead of plain soap or detergents? There is no simple answer to this question. Hands contain two types of microflora. Resident microorganisms are those that survive and multiply on the skin and can be repeatedly cultured. Transient microorganisms are recent contaminants that can survive or remain on skin for only a limited period of time. Most of the resident microorganisms are found in the top layers of skin, however
some are found in deeper layers. Many resident microoganisms are not highly infectious
and are not implicated in infections other than skin infections. However, some can cause
infections in patients when invasive procedures, such as surgery, allow then to enter deep
tissues or when a patient is severely immuno compromised as in AIDS. In contrast, the
transient microorganisms can be pathogens (such as HBV) acquired from infected
patients.
Washing times of 15 seconds with plain soaps or detergents appear to be effective in
removing many transient microorganisms as well as resident microorganisms in the top
layers of skin. Resident microorganisms in deeper layers of skin may be killed with
antimicrobial handwashes. These handwashes may also inhibit the growth of resident
microorganisms for prolonged periods (residual inhibitory effect) when regularly used.

Whether you should use antimicrobial handwashes instead of plain soaps or detergents is
not known at present because of the lack of well controlled studies comparing infection
rates with different products. For most routine nonsurgical activities, handwashing with
plain soaps or detergents appears to be sufficient, since most of the transient micro
organisms on the skin will be washed off.
SHORT SCRUB
The short scrub procedure may be recommended for the initial handwashing in a dental
office or clinic before the first appointment of the day.
A. Wet your hands and apply soap and work into a lather.
B. Rinse the hands thoroughly allowing water to flow towards the wrist.
C. Repeat steps A and B, but utilize friction thoroughly around fingernails and
fingertips.
D. Rinse the hands thoroughly allowing water to flow towards the wrist.
E. Dry the hands using disposable paper towels.
F. Using the disposable towel, turn off the water faucet and wipe the soap dispenser
handle.
G. Clean up sink area of water splash.
H. Dispose of towel in trash.
I. Place correct gloves according to directed dental procedure.
Routes of Disease Transmission Didactic information regarding microorganisms and disease transmission is provided in
both the general education course, Microbiology, and in Pre-clinical courses.
Direct Transmission
Contact with infectious lesions or infected blood and / or saliva.
Indirect Transmission
Contact with contaminated object such as instruments, surfaces, or dental equipment.
Splash or Spatter
Blood, saliva, or other body fluids onto broken or non intact skin or mucosa.
Airborne Transmission
Airborne transfer of microorgamisms, i.e., sprays, mists, aerosol.
Dental Unit Waterlines
Ingestion or inhalation of water containing pathogenic microorganisms released from the
biofilm within dental unit waterlines.
Parenteral Transmission
Piercing the skin or skin barrier, i.e., needle sticks, cuts, abrasions, or any break in the
skin.
Bloodborne Transmission
Occurs through direct or indirect contact with blood and other body fluids.
Cross-Contamination
Indirect route of transmission by coming in contact with a contaminated surface,
instrument, or substance.

PERSONAL PROTECTIVE EQUIPMENT
Purpose:
PPE is designed to prevent blood or other body fluids from reaching work clothes, skin,
eyes and mouth. It is the responsibility of each employee to use PPE, and to ensure
students are also abiding by these guidelines. Appropriate PPE will be provided to all BC
employees and dentists of the Broward Dental Research Clinic. PPE will include
examination gloves, utility gloves, disposable gowns, masks and face shields. Safety
goggles will be provided to the employees and the dentists. Students will be required to
buy approved safety goggles and other necessary PPE. Appropriate PPE is required by
faculty, staff and students in order to remain in the clinical setting where patient
treatment is ongoing. Unprepared students will be counted as absent for the day.
EYE SAFETY
ANSI (American National Standards Institute) approved safety goggles or glasses in
combination with side shields will be worn for all procedures likely to generate splash or
spray of blood or other potentially infectious or hazardous material. Combinations of
normal street wear frames with safety lenses are not in compliance. Safety glasses,
goggles or face shields must meet the following requirements:
Guidelines for Eye Safety
1. Provide adequate protection against particular hazards for which they are
designated.
2. Be reasonably comfortable when worn under the designated conditions.
3. Fit snugly without interfering with the movement of the wearer.
4. Be durable and in good repair.
5. Be capable of being disinfected and easily cleaned.
Eye Safety for those with Prescription Lenses
1. Safety goggles worn over regular glasses must be comfortable
and not disturb the adjustment of corrective lenses.
All employees, students, and dentists should check their safety goggles
before each wearing as follows
1. The brow protector should fit snugly against the face. This helps protect
against particles entering the eye from above the glasses.
2. The goggles should fit snugly, not tightly, without eyelashes hitting the
lenses. Lenses should be clean. Clean with disinfectant and then Windex.
3. Lenses should be free of scratches, cracks or pitting.
4. The brow and side protectors should be in good condition.
Care of safety goggles 1. Safety goggles will be disinfected after each use.

2. Allow to sit for 10 minutes
3. Dry with tissues (paper towels may scratch lenses).
4. Do not hang safety goggles on gown, or prop them up on head.
Face Shields
1. A disposable face shield may be used in conjunction with approved
goggles and a mask.
2. All surgical procedures involving the use of a handpiece will require the
use of a face shield. The face shield will be discarded after use in a red
biomedical bag.
3. Face shields will be utilized with the prophy jet, cavitron or air abrasion
units. They may be disinfected and reused until the face shield is
compromised.
4. New face shields will be issued for reuse when the old one becomes
ineffective, and at the beginning of each term.
Eye Safety for the Patient
1. All patient procedures except radiographs will require the patient to wear
safety goggles.
2. If the patient is wearing prescription lenses they may utilize those
as their eye safety.
3. Disinfect patient’s eyewear after each procedure.
GLOVES
Gloves must be worn during all patient treatment or when it is likely that there may be
contact with blood or other potentially infectious materials, and when handling or
touching potentially contaminated items or surfaces.
Examination Gloves
1. Nitrile gloves are available and must be worn for all patient treatment.
2. Sterile surgical gloves are available for all surgical procedures including
periodontal and oral surgery.
3. Nitrile exam gloves are available for people with latex sensitivity or
allergies.
Care of Examination Gloves
1. Do not wash gloves.
2. If a glove becomes torn, discard and wash hands. Replace with a new

glove immediately.
Decontamination Gloves
1. Utility decontamination gloves known as utility gloves will be worn
during all disinfection, ultrasonic cleaning, packaging procedures and the
handling of chemicals.
2. Utility gloves will be washed with an antimicrobial soap and water and
then disinfected after each use. Sterilization of utility gloves will
periodically be done.
3. In an off campus facility if decontamination gloves are unavailable,
quadruple gloving of the facility gloves are required.
MASKS
Splatter, aerosols and airborne debris can create bacterial mist that can be highly
detrimental to the dental personnel that are exposed to it repeatedly. A mask must be
worn to protect the mucous membranes of the nose and mouth since the microbes
originate from the patient’s saliva and/or blood and may be infectious. The mask should
be capable of filtering particle sized down to 3.0-3.5 microns.
Criteria for Masks
1. Face masks will be worn for all patient treatment.
2. Face masks will be worn during all disinfecting and instrument
cleaning procedures.
3. Face masks will be worn when laboratory lathes and model trimmers
are used, and during dental material laboratory sessions.
4. Face masks will be worn during the handling of any contaminated dental
material.
5. Face mask must fit well and close to the skin.
6. Face masks will be changed between patients or whenever it gets wet.
7. Face masks must either be in place on the face or removed. Pulling mask
down and wearing around the neck is not permitted.
PROTECTIVE CLOTHING
Employees, students and dentists working in the clinic will wear appropriate protective
clothing when occupational exposure is anticipated. All clinical and sterilization
procedures will require the use of protective clothing. :
Criteria for Protective Clothing
1. Long sleeve and go to the knees.
2. It is recommended that the gowns have an elastic or knit cuff to help

keep the sleeve in place.
3. Gloves should be put over the wrist of the gown.
4. The clothing must not allow blood or other potentially infectious materials
to penetrate.
5. If blood or other potentially infectious material penetrates a garment, the
gown shall be removed immediately or as soon as feasible.
6. All protective clothing will be disposable.
7. Non disposable lab coats are not allowed for patient treatment. There
are no on-site laundering facilities.
OTHER PPE INFORMATION
1. All contaminated PPE must be removed prior to dismissal of your patient
or leaving the treatment area.
2. No one is allowed in the front office, restrooms or break room with PPE.
3. PPE may be worn to the laboratory (i.e. polish a denture)
4. Gowns utilized during the dental material laboratory sessions and are not
contaminated may be placed in your locker and reused.
SEQUENCE TO SET-UP THE RADIOGRAPHY ROOMS
1. Scrub your hands and fingernails.
2. Check the following for supplies:
The cabinet above the sink must contain: cups gloves masks paper towels
The mobile cart must contain:
Inside top slide: fee schedule medical alert stickers Ziploc bags for dentures ammonia inhalent
First drawer:
Patient napkins and towel clip Paper tray covers

Second drawer:
Package of 2x2 gauze Cotton rolls Mouth mirrors (2) Tissues Crown and bridge scissors
Top: Bard Parker container with solution
Under sink: lined trash can disinfectant spray bottle utility gloves Scrubbing Bubbles
Student brings: red/blue pencil black ink pen pencil
3. Put on PPE (includes gown, mask, glasses and utility gloves)
4. Disinfect all the surfaces in the roomwhich may be touched during the
radiographic procedure.
Spray – wipe - spray procedure for the following:
all counter tops and cabinet handles
entire cabinet above sink
lead apron with thyroid collar (both sides
pens, pencil
entire mobile cabine
Bard Parker holding containe
outside and inside of the biomedical waste container (at end only)
Disinfectant saturated paper towel procedure for the following
dental chair (tray, arms and back headrest)
x-ray unit (extension arm, room box and tubehead
operating light handles and switch
chair control
door knobs
control panel
stethoscope
all delivery systems
Paper towel saturated with water only
dental light plastic covering
Spray only for the following:
sink
5. Fill Bard-Parker holding container with disinfectant (for the first patient only).
6. Wash utility gloves with soap and water. Remove and place under sink. Remove
PPE, hang gown on back of door, place glasses and mask on paper towel on the
sink countertop.

7. Rewash hands with antimicrobial soap.
8. With clean bare hands, obtain and place barriers on the following:
chair tubehead operating light handles and switch pens and pencils outside door knob and control panel operator and assistant stools viewbox power switch paper tray cover over dental chair tray barrier sterilized xray mounts
9. Place the following item on a covered dental chair tray:
2x2 gauze (1) Patient bib
10. Place the following on a paper towel on the sink countertop:
mouth mirror in sterilized bag antimicrobial rinse cup
11. On the mobile cabinet place a sterilized wrapped cassette/sterilized pouch of XCP
rings.
12. Check the room for the lead apron, thyroid collar, (use the disinfectant wipe or
cavicide on a towel).
13. Turn on the master switch using clean bare hands and check the machine settings.
14. Lower arm of the chair. (This signifies that the radiology room is ready for a
patient in the BC Dental Clinic)
15. When patient chart is ready radiographic area will be notified. Pick up chart at
front desk.
16. Go to the reception area, call the patient and escort him/her to the assigned area.
17. Seat your patient and place the patient napkin.
18. Proceed to take the medical-dental history and blood pressure.
19. Inform your instructor that you are ready.
20. Instructor will interview the patient.
21. Instructor will authorize you to give antimicrobial rinse to your patient and ask the
patient to expectorate back into the cup. This cup is disposed of into the
biomedical waste basket by the patient. (Student will appropriately place the
basket in proximity of the patient.)

22. Wash hands and open mouth mirror packet and drop contents on the covered
dental chair tray.
23. Student/instructor will put on PPE
24. The instructor will proceed with the cursory oral inspection / examination and
dentition charting. (Term II dental assisting student performs dental charting)
25. After instructor approval of radiography patient, student will remove latex gloves,
wash and dry hands and open the sterilized cassette/sterilized pouch in front of the
patient and place it on the mobile cabinet outside the radiography room. (Take care
not to touch cassette with bare hands)
26. Obtain correct amount of radiographs from instructor and place in cup on mobile
cabinet outside the radiography room.
27. Put lead apron on patient
28. Wash and dry hands and put on latex gloves
29. Proceed to take the radiographs. (after each exposure place radiograph in the Bard
Parker container)
DISMISSING THE RADIOLOGY PATIENT AND DISINFECTION OF THE
DENTAL OPERATORY
1. Check the patient’s face for necessary clean up and ask patient to remain seated
2. Remove the PPE, wash and dry your hands
3. Remove lead apron from patient.
4. Remove clipboard from hot file and record the following:
date
medical history taken or any medical history changes
type of examination done
quantity, type, kvp and ma of radiographs
charting the procedure on the charting diagram
signatures of instructor and student
5. Instructor sign and check radiology chart write-up
6. Retrieve patient’s personal items
7. Lower arm rest and ask patient to follow you to front desk for rescheduling
8. Return to operatory and determine if final clean up or reset up for another
patient is necessary.
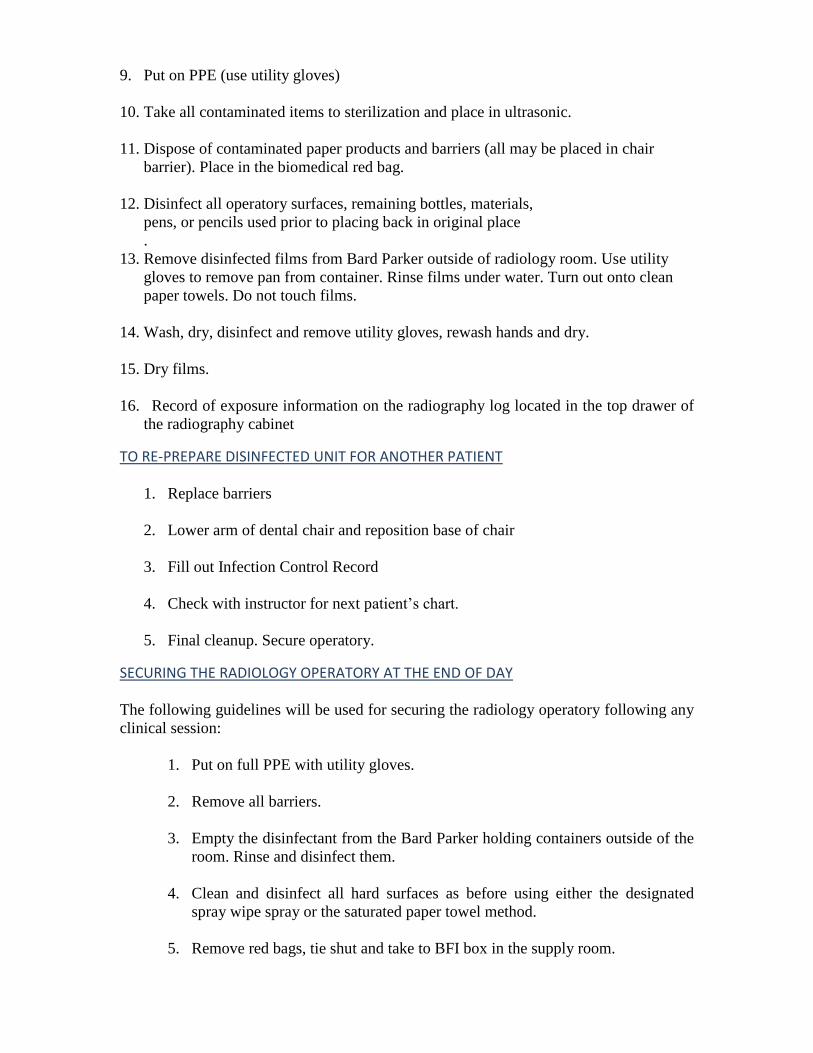
9. Put on PPE (use utility gloves)
10. Take all contaminated items to sterilization and place in ultrasonic.
11. Dispose of contaminated paper products and barriers (all may be placed in chair
barrier). Place in the biomedical red bag.
12. Disinfect all operatory surfaces, remaining bottles, materials,
pens, or pencils used prior to placing back in original place
.
13. Remove disinfected films from Bard Parker outside of radiology room. Use utility
gloves to remove pan from container. Rinse films under water. Turn out onto clean
paper towels. Do not touch films.
14. Wash, dry, disinfect and remove utility gloves, rewash hands and dry.
15. Dry films.
16. Record of exposure information on the radiography log located in the top drawer of
the radiography cabinet
TO RE-PREPARE DISINFECTED UNIT FOR ANOTHER PATIENT
1. Replace barriers
2. Lower arm of dental chair and reposition base of chair
3. Fill out Infection Control Record
4. Check with instructor for next patient’s chart.
5. Final cleanup. Secure operatory.
SECURING THE RADIOLOGY OPERATORY AT THE END OF DAY
The following guidelines will be used for securing the radiology operatory following any
clinical session:
1. Put on full PPE with utility gloves.
2. Remove all barriers.
3. Empty the disinfectant from the Bard Parker holding containers outside of the
room. Rinse and disinfect them.
4. Clean and disinfect all hard surfaces as before using either the designated
spray wipe spray or the saturated paper towel method.
5. Remove red bags, tie shut and take to BFI box in the supply room.
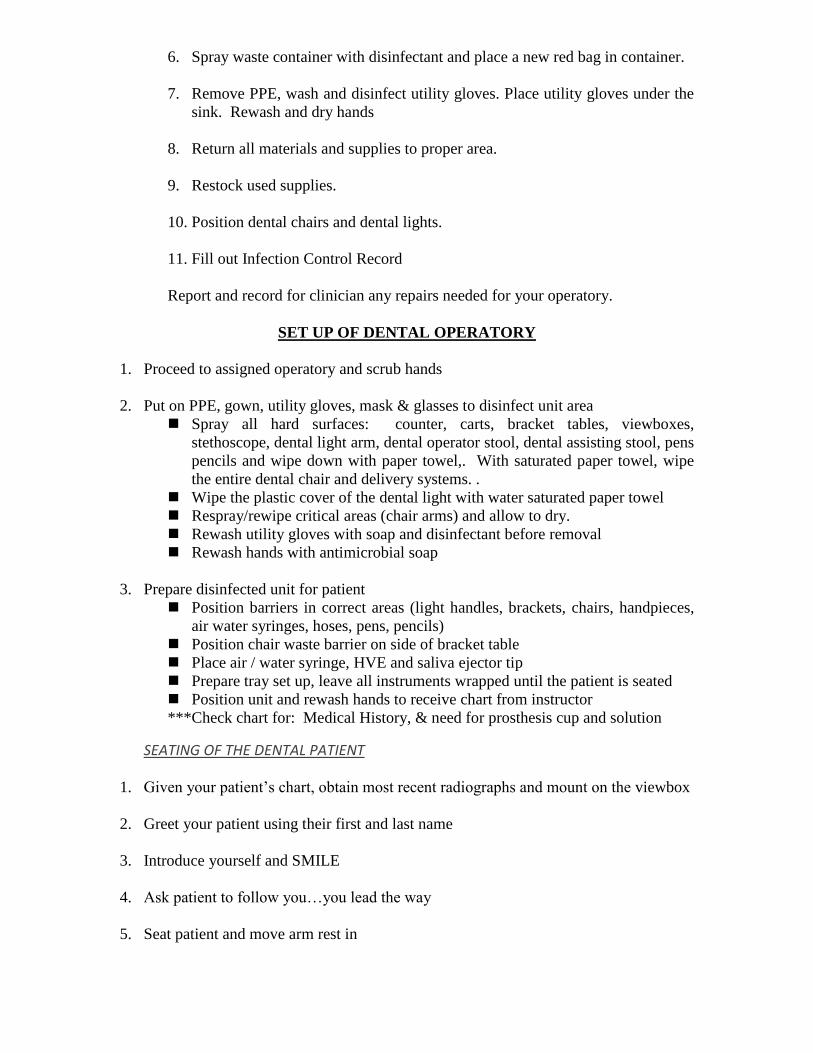
6. Spray waste container with disinfectant and place a new red bag in container.
7. Remove PPE, wash and disinfect utility gloves. Place utility gloves under the
sink. Rewash and dry hands
8. Return all materials and supplies to proper area.
9. Restock used supplies.
10. Position dental chairs and dental lights.
11. Fill out Infection Control Record
Report and record for clinician any repairs needed for your operatory.
SET UP OF DENTAL OPERATORY
1. Proceed to assigned operatory and scrub hands
2. Put on PPE, gown, utility gloves, mask & glasses to disinfect unit area
Spray all hard surfaces: counter, carts, bracket tables, viewboxes,
stethoscope, dental light arm, dental operator stool, dental assisting stool, pens
pencils and wipe down with paper towel,. With saturated paper towel, wipe
the entire dental chair and delivery systems. .
Wipe the plastic cover of the dental light with water saturated paper towel
Respray/rewipe critical areas (chair arms) and allow to dry.
Rewash utility gloves with soap and disinfectant before removal
Rewash hands with antimicrobial soap
3. Prepare disinfected unit for patient
Position barriers in correct areas (light handles, brackets, chairs, handpieces,
air water syringes, hoses, pens, pencils)
Position chair waste barrier on side of bracket table
Place air / water syringe, HVE and saliva ejector tip
Prepare tray set up, leave all instruments wrapped until the patient is seated
Position unit and rewash hands to receive chart from instructor
***Check chart for: Medical History, & need for prosthesis cup and solution
SEATING OF THE DENTAL PATIENT
1. Given your patient’s chart, obtain most recent radiographs and mount on the viewbox
2. Greet your patient using their first and last name
3. Introduce yourself and SMILE
4. Ask patient to follow you…you lead the way
5. Seat patient and move arm rest in

6. Place personal items out of way
7. Put on the patient bib and give antimicrobial mouthwash with tissue to follow
8. Adjust headrest for comfort if needed
9. Organize your clipboard and mount radiographs if not done before
10. Update medical history / radiographic history with patient
any new allergies
any new medications that you are now taking
any type of x-rays taken since last visit
11. Take vital signs
12. Wash hands and glove
13. Mount evacuation tips, air / water syringe, HVE and saliva ejector tips
14. Open instrument setup. Leave blue denison wrap on counter as the sterile field.
15. As D.D.S./Instructor enters operatory, introduce yourself and your patient to him/her
16. Inform D.D.S./Instructor of any medical alerts by pointing to the history form and
inform him/her of any dental problem quoted by patient to you…place chart in hot file
17. Give the patient protective eyewear for the procedure.
18. Put up your PPE and position the patient and yourself for the procedure
19. Recline the dental chair…pull over the light (turn on)… pull over bracket table
20. Pick up the mirror and explorer to anticipate the transfer (assisting only)
21. Recognize any patient management needed during this procedure
PATIENT CARE PROCEDURE
1. Patient napkin is to remain clear of all materials, gauze and instruments.
2. Instruments passed over patient chest or behind patient.
3. All contaminated items are to be kept out of the site of the patient, and discarded
immediately in the biomedical waste can.
4. Items that fall on the floor must be properly discarded at the completion of the current
procedure. Wash hands and reglove.
DISMISSING THE DENTAL PATIENT
1. Check the patient’s face for necessary clean up

2. Ask the patient to remain seated while the chart is being written up and checked by
instructor
3. Remove the treatment gloves and wash your hands
4. Remove clipboard and record from hot file and record procedure
5. Recording the procedure should include the following:
date
any medical history changes
type of examination done
any radiographs or study models taken
any patient instructions given
the fee for procedure
the identified procedure completed, detailed according to sequential materials
used
charting the procedure on the charting diagram
name of D.D.S. and student
6. Fill in Infection Control Record for unit and procedure
7. Have instructor review and sign chart.
8. Retrieve personnel items / removable prosthesis for patient
9. Move arm rest and ask patient to follow you to front desk for rescheduling
CLEAN UP OF THE DENTAL OPERATORY
1. Return to operatory and determine if final clean up or reset up for another patient. Put
on PPE.
2. Place remaining contaminated instruments in the holding pan
3. Dispose of contaminated paper products and barriers (all may be placed in chair
barrier)
4. Spray and wipe disinfectant on all surfaces, remaining bottles, materials, pens, or
pencils used before placing them back in D.A. cart
5. Clean, dry and lubricate any used handpieces
6. Wash, disinfect and remove utility gloves
7. TO RE-PREPARE DISINFECTED UNIT FOR ANOTHER PATIENT:
replace barriers
replace chair barriers
place air water tip, HVE tip, and saliva ejector on bracket tray cover
retrieve handpieces
raise arm of dental chair and reposition base of chair
rewash hands with antimicrobial soap (minimum 15 seconds)
8. Check with instructor for next patient’s chart
SECURED OPERATORY - END OF DAY
The following guidelines will be used to determine if your operatory is secured following
any laboratory or clinical session:
1. Unit is turned off (all switches)
2. All barriers have been removed
3. All materials and supplies have been returned to proper areas with restocking
items
4. Handpieces bagged for sterilization
5. Areas cleaned with designated cleaners:
a. viewbox face
b. dental light face and back
c. base of dental chair
d. patient’s mirror
6. Hoses flushed with evacuation cleaner
7. Evacuation screens / traps replaced as required
8. Empty the holding containers (rinse and respray) place back under sink neatly
9. Cleaned and disinfected all hard surfaces. Resprayed and allowed to air dry
10. Wash and disinfect utility gloves
11. Position dental chairs, dental lights, cuspidor, bracket tray and carts in proper
positions
12. Remove red bags (combine bags if necessary) tie shut and take to BFI box in
the supply room
13. Spray waste container with disinfectant and place a new red bag in container
** Report and record for clinician any repairs needed for your operatory

INFECTION CONTROL RECORD
PATIENT'S NAME: _____________________ OPERATORY NUMBER: __________
STUDENT'S NAME: ____________________ DATE: ______________________
The following procedures were completed both pre and post-operatively for this patient:
______ washed hands with antimicrobial soap
______ utilized utility gloves
______ prepared disposable/barrier items
______ prepared antimicrobial mouthwash for patient
______ utilized sterile set-up for procedure
______ discard all contaminated and disposable debris
______ flushed or replaced handpieces/syringes
______ flushed and replaced evacuation system tips
______ cleaned and disinfected all hard surfaces
______ removed and disinfected utility gloves
______ rewashed hands with antimicrobial soap
______ replaced disposable/barrier items as necessary

DEFINITIONS OF CLEANING, STERILIZATION, AND DISINFECTION
Cleaning is the physical removal of debris. It has two major effects. First, it results in a
reduction in the number of microorganisms present. Second, it removes organic matter,
such as blood and tissue, and other debris, which may interfere with sterilization or
disinfection. In some instances, cleaning is all that is necessary. Most often, however, it
is the preliminary step before sterilization of disinfection. In these instances it is referred
to as precleaning. Pre-cleaning is an essential step because sterilization and disinfection
procedures may not be effective if items have not been cleaned first.
Sterilization is the process which destroys all types and forms of microorganisms,
including viruses, bacteria, fungi, and bacterial endospores. Major methods of
sterilization include the use of moist heat under pressure (steam autoclave), dry heat,
chemical vapor under pressure, ethylene oxide gas, and immersion in liquid chemical
disinfectant/sterilants. The advantages and disadvantages of each of these methods will
be discussed in a later section of this unit.
Disinfection is a less lethal process than sterilization. Three levels of disinfection have
been differential, depending upon the type and form of microorganisms destroyed. Micro
organisms vary in their resistance to chemical agents. At the one extreme are highly
resistant bacterial endospores. These micro organisms are not easily destroyed by
chemical disinfectants. At the other end of the spectrum are some types of vegetative
bacteria and lipid viruses (including HBV and HIV). There micro organisms are
relatively easily destroyed by chemical agents. The microorganism Mycobacterium
tuberculosis var.bovis, it will also be able to destroy less resistant microorganisms as
well. When a product has a label claim that it is tuberculocidal, it means that it is capable
of killing Mycobacterium tuberculosis var.bovis.
DISINFECTION LEVELS
High-level disinfection is a process that can kill some, but not necessarily all, bacterial
spores. It is also tuberculocidal. High-level disinfection is accomplished using an EPA
registered disinfectant/sterilant agent at the recommended time that is less than that
required for sterilization. Products capable of destroying bacterial spores will have the
term sporicidal on the label.
Intermediate-level disinfection is a process that kills Mycobacterium tuberculosis
var.bovis. Intermediate-level disinfection will also kill the hepatitis B virus (HBV) and
the human immunodeficiency virus (HIV), but may not be capable of killing bacterial
spores.
Low-level disinfection is the process that kills most bacteria, some fungi and some
viruses. It does not kill bacterial spores or Mycobacterium tuberculosis var.bovis.
The effectiveness of any disinfection procedure is influenced by several factors, including
the type and number of microorganisms present, the concentration and length of exposure

to the disinfecting agent, and the amount of organic matter or other debris present on the
item being disinfected.
WHEN TO STERILIZE, DISINFECT, OR CLEAN
The dental health care environment contains many different items and they are not all
treated the same way. How an item is used is the major factor determining whether it
must be sterilized, disinfected, or simply cleaned.
ITEMS TO BE STERILIZED
Instruments that penetrate oral soft tissue (the mucosa or skin) or bone must be sterilized.
These items are termed critical items. This category includes items such as surgical
instruments, periodontal knives, and scaling instruments.
Instruments that come into contact with mucous membranes should also be sterilized
whenever possible. These items are termed semi-critical items. Instruments not able to
withstand heat, (eg. plastic impression trays, amalgam carriers, plastic instruments) may
be sterilized with ethylene oxide gas or by immersion in an EPA registered liquid
chemical disinfectant/sterilant according to the manufacturer's instructions. At a
minimum, semi-critical items should be subjected to high-level disinfection. In most
cases, thorough cleaning, followed by high-level disinfection will give reasonable
assurance that an item is free of pathogenic organisms.
ITEMS TO BE DISINFECTED
Items and equipment that do not normally penetrate or contact mucous membranes
(non-critical items) but which are exposed to spatter, spray or splashing of blood, or are
touched by contaminated hands require intermediate-level disinfection. This includes
items such as amalgamators, tubing for handpieces and air/water syringes, highvelocity
evacuator, x-ray apparatus, cabinet and drawer pulls, tray tables, countertops, light
handles, chair switches, phase microscope and medicament bottles. Because of the
difficulty involved in cleaning and disinfecting many of these items, precovering surfaces
with barriers impervious to liquid may be used as an alternative whenever possible. See
Unit Two for a discussion of the relative merits of barriers versus disinfection.
ITEMS TO BE CLEANED
Items that are not directly associated with treatment (e.g. sinks, walls, floors and
furnishings) should be cleaned routinely with a detergent and water. There is, at present,
no data associating these surfaces with the transmission of infection to patients or health
care personnel. Consequently, it is not necessary to routinely disinfect these items. Of
course, if a blood spill occurs, or an area is visibly soiled with blood or other body fluids,
it should be first cleaned and then disinfected.
DISINFECTION
A large variety of liquid chemical products are available today, and it is probable that
many new ones will become available in the future. The Environmental Protection
Agency registers chemicals used as disinfectants or sterilants. When selecting any

chemical for use in your infection control program:
The product must be registered by the Environmental Protection Agency (EPA)
and have an EPA number on the label.
For high-level disinfection, use an EPA registered "disinfectant/ sterilant"
(indicated on the product label).
For intermediate-level disinfection, use an EPA registered "hospital disinfectant"
with a label claim for tuberculocidal activity (i.e. the product kills Mycobacterium
var.bovis). It should also be labeled virucidal and fungicical. Virucidal efficacy
should include, at a minimum, both lipophilic and hydrophilic viruses.
Products carrying the American Dental Association seal of acceptance have been
accepted by the Council on Dental Therapeutics for use in dentistry. A current
list is available from the Council on Dental Therapeutics.
Regardless of the product selected, label directions must be precisely followed. Strict
attention must be given to the proper use of the product with regard to mixing, dilution,
method and duration of application, temperature requirements, shelf life, activated use
life, and, if applicable, reuse life.
Because dental health care personnel use disinfectants daily, it is easy to become casual
about label precautions and safety. Many disinfectants are irritating and harmful to skin
and eyes, and breathing the vapors can cause additional problems. So whenever you use
these products, remember to be careful and read the label to determine how to best
protect yourself.
STERILIZATION PROTOCOL
All items able to be sterilized will go through the sterilization process. This includes all
personal and department cassettes and bagged instruments wrapped in either permanent
or disposable autoclavable bags and wraps.
Steps for sterilization process and monitoring are as follows:
1. All items to be sterilized are contained in cassettes and/or bags. The student must
follow protocol for ultrasonic/Miele cleaning and/or disinfection as directed in
individual course handouts.
2. All items must be packaged for sterilization using the proper permanent or
disposable autoclavable bags and wraps.
3. STERILIZATION LEADER
The sterilization leader will be responsible for insuring the Sterilization and
Infection control protocols are maintained. There will be a sterilization leader
appointed for each clinic day. The student assigned to the sterilization duty will
have a shortened patient appointment for each clinic session that day as follows:
morning patient will be 9-10:45 AM; afternoon patient will be from 2-3:45 PM.
The student sterilization leader will report directly to faculty member assigned to
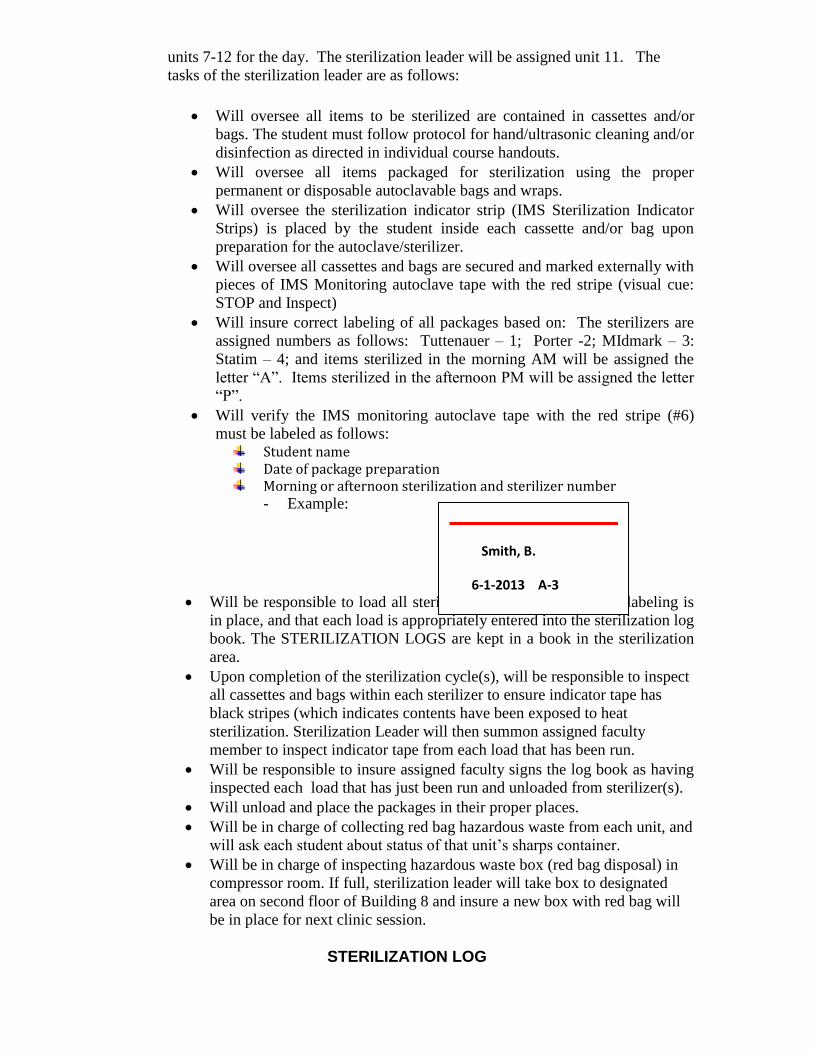
units 7-12 for the day. The sterilization leader will be assigned unit 11. The
tasks of the sterilization leader are as follows:
Will oversee all items to be sterilized are contained in cassettes and/or
bags. The student must follow protocol for hand/ultrasonic cleaning and/or
disinfection as directed in individual course handouts.
Will oversee all items packaged for sterilization using the proper
permanent or disposable autoclavable bags and wraps.
Will oversee the sterilization indicator strip (IMS Sterilization Indicator
Strips) is placed by the student inside each cassette and/or bag upon
preparation for the autoclave/sterilizer.
Will oversee all cassettes and bags are secured and marked externally with
pieces of IMS Monitoring autoclave tape with the red stripe (visual cue:
STOP and Inspect)
Will insure correct labeling of all packages based on: The sterilizers are
assigned numbers as follows: Tuttenauer – 1; Porter -2; MIdmark – 3:
Statim – 4; and items sterilized in the morning AM will be assigned the
letter “A”. Items sterilized in the afternoon PM will be assigned the letter
“P”.
Will verify the IMS monitoring autoclave tape with the red stripe (#6)
must be labeled as follows: Student name Date of package preparation Morning or afternoon sterilization and sterilizer number
- Example:
Will be responsible to load all sterilization units, ensure proper labeling is
in place, and that each load is appropriately entered into the sterilization log
book. The STERILIZATION LOGS are kept in a book in the sterilization
area.
Upon completion of the sterilization cycle(s), will be responsible to inspect
all cassettes and bags within each sterilizer to ensure indicator tape has
black stripes (which indicates contents have been exposed to heat
sterilization. Sterilization Leader will then summon assigned faculty
member to inspect indicator tape from each load that has been run.
Will be responsible to insure assigned faculty signs the log book as having
inspected each load that has just been run and unloaded from sterilizer(s).
Will unload and place the packages in their proper places.
Will be in charge of collecting red bag hazardous waste from each unit, and
will ask each student about status of that unit’s sharps container.
Will be in charge of inspecting hazardous waste box (red bag disposal) in
compressor room. If full, sterilization leader will take box to designated
area on second floor of Building 8 and insure a new box with red bag will
be in place for next clinic session.
STERILIZATION LOG
Smith, B. 6-1-2013 A-3


Barriers
The following is a comprehensive list of all items that will have barriers placed upon them. Not
all barriers will be placed for every procedure.
Dental chair
Operating light handles and switches
Pens and pencils
Outside doorknobs
Doctor and assistant stool
Viewbox powerswich
X-Ray tube head
X-Ray control panel
Countertop
Handles
Bracket table
Handpiece hoses
Evacuation tips and hoses
Air / water syringe and hose
Light curing unit and shield
Cavitron unit
Prophy Jet unit
Computer
BIOLOGICAL MONITORING PROCEDURES
All sterilizers that are utilized on a routine basis will be monitored weekly to ensure
effectiveness. The biological monitoring is testing for the spores B. stearothermophilus and B.
subtillis. A clinical instructor or clinician will perform this procedure and if applicable the
student will be informed to do the procedure and an instructor / clinician will oversee the
process.
The sterilizers include: Porter, Tuttenauer, Midmark and Statim sterilizers. If a new or recently
repaired sterilizer is used to process instruments it must be tested before processing instruments.
The process is as follows:
1. Remove the 2 test strips from the envelope. Save the envelope.
2. Place in separate paper/plastic autoclave sterilization pouches.
Note: If cassettes are being sterilized, open a cassette and place
one test strip inside, rewrap. Write “Test” on outside of wrapped cassette.
Place the remaining test strip in an autoclave bag.
3. Place both test strips in the same sterilization cycle. Place one strip on
the top shelf and one strip on the bottom shelf.

4. When cycle is complete and instruments are dry, remove test strips
from sterilizer and place back into the envelope.
5. Fill out all necessary information on the envelope and mail.
Positive Reports
If a report comes back positive the testing facility will notify us immediately stating instruments
did not achieve sterilization. All instruments processed on that date are to be resterilized. Check
sterilization log contents to see what type of instruments were processed on that day.
Note: Hands and test strips must be completely dry before placing the test strips in the envelope.
Reports
The biological monitoring company will send quarterly reports. These reports include the date,
sterilizer and results. These will be kept in the sterilization area.
DENTAL UNIT WATERLINE ASEPSIS PROCEDURE
A. Initial start-up treatment procedure utilizing PUREVAC: Add 2 ounces
PUREVAC (60 ml or 2 pumps) to 1 quart of water five consecutive nights and
then follow the guidelines for daily water line treatment.
Daily Procedure (1 – 3 done at end of day, 4 done ate beginning of day):
1. Add 1 ounce (30 ml or 1 pump) to each quart of water.
2. Aspirate solution through the high speed evacuation line and saliva ejector lines.
3. Aspirate each treatment room.
4. At the beginning of next work day, flush all waterlines, air/water syringes, high
speed hand pieces and ultrasonic units with water.
Monthly Procedure:
1. Utilize RAMCLEAN DENTAL LINE CLEANER
2. Aspirate solution through high speed evacuation and saliva ejector lines.
3. Aspirate each treatment room monthly.
4. At the beginning of the next workday, flush all water lines with water.

HAZARD COMMUNICATION PROGRAM
Employers shall develop, implement, and maintain at each workplace a written hazard
communication program which at least describes how the criteria specified in paragraphs (f), (g)
and (h) of section 6174 for labels and other forms of warning, material safety data sheets, and
employee information and training will be met, and which also included the following:
A list of the hazardous chemicals known to be present will be included using an identity
that is referenced on the appropriate MSDS. This list shall be maintained in the
sterilization area above the Statim sterilizer and will be updated when new chemicals
enter the facility.
The methods the employer will use to inform employees of the hazards of non-routine
tasks (for example, the cleaning of reactor vessels), and the hazards associated with
chemicals contained in unlabeled pipes in their work areas.
When performing any non-routine procedure the MSDS will be referenced to find out
how to properly handle the chemical, (e.g., suction traps may contain amalgam scraps
and must be disposed of properly for amalgam).
Multi-employer workplaces: Employers who produce, use, or store hazardous chemicals
at a workplace in such a way that the employees of other employer (s) may be exposed
(for example, employees or a construction contractor working on-site) shall additionally
ensure that the hazard communication programs developed and implemented under this
paragraph include the following:
The methods the employer will use to provide the other employer(s) on-
site access to material safety data sheets for each hazardous chemical the other
employer(s) employees may be exposed to while working. The methods the
employer will use to inform the other employer(s) of any precautionary measures
that need to be taken to protect employees during the workplace’s normal
operating conditions and in foreseeable emergencies; and the methods the
employer will use to inform the other employer(s) of the labeling system used in
the workplace. All outside personnel will be instructed as to the location of the
Hazardous Communication Manual that includes all MSDS’s.
LABELING REQUIREMENTS
Exemptions:
The following chemicals do not require labeling:

Any chemical substance or mixture as such terms are defined in the Toxic
Substances Control Act, when subject to the labeling requirements of the Act and
labeling regulations issued under that Act by the Environmental Protection
Agency.
Any food, food additive, color additive, drug, cosmetic, or medical or veterinary
device or product, including material intended for use as ingredients in such
products.
Any consumer product or hazardous substance as those terms are defined in the
Consumer product or hazardous substance as those terms are defined in the
Consumer Product Safety Act and Federal Hazardous Substances Act
respectively, when subject to a consumer product safety standard or labeling
requirement of those Acts, or regulations issued under those Acts by the
Consumer Product Safety Commission.
Any drug, as that term is defined in the Federal Food, Drug, and Cosmetic Act,
when it is in solid, final form for direct administration to the patient; drugs which
are packaged by the chemical manufacturer for sale to consumers in a retail
establishment; and drugs intended for personal consumption by employees while
in the workplace (e.g., over-the-counter drugs, first aid supplies).
Any consumer product or hazardous substance, as those terms are defined in the
Consumer Product Safety Act and Federal Hazardous Substances Act
respectively, where the employer can show that it is used in the workplace for the
purpose intended by the chemical manufacturer or imported of the product, and
the use results in a duration and frequency of exposure which is not greater than
the range of exposures that could reasonably be experienced by consumers when
used for the purpose intended.
The chemical manufacturer, importer, or distributor shall ensure that each container of hazardous
chemical leaving the workplace is labeled, tagged or marked with the following information:
Identity of the hazardous chemical(s), appropriate hazard warnings and name and
address of the chemical manufacturer, importer or other responsible party.
Secondary Labels:
When chemicals are removed from their original container and placed in a secondary container
the label must include the following information:
Identity of hazardous chemical(s) contained therein; and, appropriate hazard warnings, or
alternatively, words, pictures, symbols, or combination thereof, which provide at least
general information regarding the hazards of the chemical. Chemicals that are intended for
immediate use for the employee who performs the transfer are exempt (e.g., bleach used for
endodontic irrigation).

See the example of our labeling system preceding this section. Detailed information on the
interpretation of the label is also located in this section.
MATERIAL SAFETY DATA SHEETS
Employers shall have a material safety data sheet in the workplace for each hazardous chemical
in the facility. The employer shall ensure that they are readily accessible during each work shift
to employees when they are in their work area(s). Chemical manufacturers or importers shall
ensure that distributors and employers are provided an appropriate material safety data sheet with
their initial shipment, and with the first shipment after a MSDS is updated. MSDS’s may be kept
in any form, including operating procedures, and may be designed to cover groups of hazardous
chemical in a work area where it may be more appropriate to address the hazards of a process
rather than individual hazardous chemicals. All our MSDS’s are in written form and can be
found in the front office.
EMPLOYEE TRAINING
Employers shall provide employees with effective information and training on hazardous
chemicals in their work area at the time of their initial assignment, and whenever a new physical
or health hazard the employees have not previously been trained about is introduced into their
work area.
Employees shall be informed of:
The requirements of this section; any operations in their work area where hazardous
chemicals are present; and the location and availability of the written hazard
communication program including the required list of hazardous chemicals, and material
safety data sheets required by this section.
Training shall include:
The methods and observations that may be used to detect the presence or release of a
hazardous chemical in the work area (such as monitoring conducted by the employer,
continuous monitoring devices, visual appearance or odor of hazardous chemicals when
being released, etc.); the physical and health hazards of the chemicals in the work area; the
measures employees can take to protect themselves from these hazards, including specific
procedures the employer has implemented to protect employees from exposure to
hazardous chemicals, such as appropriate work practices, emergency procedures, and
personal protective equipment to be used. The details of the hazard communication
program developed by the employer, including an explanation of the labeling system and
how employees con obtain and use the appropriate hazard information.
The cross-referenced by product name sheet contains a quick reference to all
hazardous chemicals for health, flammability, reactivity, personal protective
equipment, and target organs. Detailed information can be found on the individual

material safety data sheet. Specific procedures to protect employees from
exposure to hazardous chemicals can be found on the MSDS.
After reviewing this information please sign and date the training log. This will be
reviewed annually and updated when necessary.
DEFINITIONS:
Chemical – any element chemical compound or mixture of elements and/or compounds.
Chemical Manufacturer – an employer with a workplace where chemical(s) is (are) produced for
use or distribution.
Chemical Name – scientific designation of a chemical in accordance with the nomenclature
system developed by the International Union of Pure and Applied Chemistry or indicate that a
component present in the mixture in concentrations of less than one percent (or in the case of
carcinogens, less than 0.1 percent) could be released in concentrations which would exceed an
established OSHA permissible exposure limit or ACGIH Threshold Limit Value, or could
present a health risk to employees in those concentrations, the mixture shall be assumed to
present the same hazard.
EMERGENCY EQUIPMENT IN THE DENTAL CLINC
1. FIRE DRILL MAP patient reception area to the left of the door hallway to the right of the patient reception door between operatories 1 and 2
2. FIRE EXTINGUISHER
Radiography hallway next to Rm. 8-170
Hallway to the right of the copy room door, Rm. 8-16
Clinic on wall adjacent to unit 9, next to the AED
Unit 2 on the back wall of clinic to the right of the EXIT door
3. FIRST AID KIT

Across from operatory 12.
4. AED
Located in clinic on wall across from operatory 12.
5. FIRE ALARM
Located in the back of the clinic to the right of the EXIT door
6. EYEWASH STATION
Located on the sink in the radiography processing/viewing area and unit 12. There
is no hot water turned on to this sink. To flush eyes if accidental exposure to
materials or chemicals. Turn the sink on and pull the green knob. Place eyes in
direct line with the water stream and flush.
7. EMERGENCY EXIT DOOR
Located in the back of the clinic between units 1 and 2.
EMERGENCY EQUIPMENT IN THE DENTAL LABORATORY
1. FIRE DRILL MAP
Located in the front of the laboratory. 2. FIRE EXTINGUISHER
Located on the far back wall of the laboratory to the left of Rm. 8-178. Checked yearly for proper pressurization.
3. OXYGEN LEVERS
Identified levers located at each lab station.
4. PANIC BUTTON
The large red button on the west wall of the laboratory. There is also one located at the rear of the laboratory. This button will turn off electrical equipment when pushed. It is used in case of an emergency related to the laboratory equipment. The student has permission the push the button. The instructor will need to get the key to turn the electricity back on.
5. VENTILATION SWITCH
Light switch located in the rear of the laboratory.
FIRST AID EQUIPMENT
1. FIRE BLANKET
Located in metal box on the west wall of the laboratory.
2. EMERGENCY EYE WASH STATION
Located on the east wall. There is no hot water turned on to this sink. To flush eyes if accidental exposure to materials or chemicals. Turn the sink on and pull the green knob. Place eyes in direct line with the water stream and flush.
3. FIRST AID KIT
Located on the east wall.
SAFETY RULES FOR LABORATORY

1. Safety glasses must be worn at all times in the dental laboratory. Clinical dress code
along with lab coat must be followed in the laboratory. This includes the hair being
fastened back according to department guidelines.
2. Eating, drinking and smoking are prohibited in the laboratory.
3. The location of the first aid equipment will be explained the first day of a laboratory
class.
4. Consider all material and liquids to be toxic unless otherwise instructed.
5. An instructor or dentist must be present in order to operate any laboratory equipment.
Only authorized procedures are permitted.
6. If chemicals come into contact with eyes, immediately go to the eye wash station and
consult an instructor.
7. Each student must notify an instructor when leaving the laboratory. Please tell instructor
in case of an emergency.
8. During the laboratory session, please keep talking down to a minimum due to equipment
making noise. Please wait patiently if you need help in the laboratory.
9. If you do have an accident with equipment, etc. let the instructor know immediately.
10. At the end of laboratory session, push your chairs under the lab benches, wipe down all
tables, sweep the floor and clean the excess dental materials out of the sink.
11. Return all equipment and supplies to their proper places.
12. Please share equipment and supplies. This includes trimmers, lathes and materials.
13. Be conservative with materials. Avoid being wasteful.
INFECTION CONTROL IN THE DENTAL LABORATORY
Cross-contamination in the laboratory is an important as controlling cross-contamination in the
operatory. Please follow these guidelines for infection control when working in the laboratory
(with patients / students / dentists).
1. Protective eyewear must be worn by everyone in the laboratory at all times when
equipment and materials are being utilized.
2. Gloves will be worn when handling any contaminated objects, working with patients, and
manipulation of materials.

3. Masks will be worn by everyone in the laboratory when utilizing equipment that
produces dust or vapors (ex. model trimmers, dental lathes, and dental engines), and the
manipulation of dental materials.
4. Disposable gowns or lab coats are to be worn over street clothing. When working with
patients and contaminated objects the use of disposable gowns is required.
5. All impressions are to be rinsed in running tap water, shaken, and sprayed with a
disinfectant.
6. Stone models should be disinfected with a spray disinfectant.
7. Work surfaces should be kept clean and routinely disinfected. Large sheets of paper will
be placed on the counters and vibrators will be covered with saran wrap. Working
surfaces should be covered with a barrier, the barriers should be discarded after use on
one case.
8. Work surfaces and exposed equipment will be disinfected after working with
contaminated objects.
9. When polishing, use a sterile rag wheel and fresh pumice for each case (a piece of
aluminum foil or saran wrap can be used as a container to hold fresh pumice).
10. When using pumice for a patient, utilize the prepared aluminum foil packets and place
directly in the tray. Do not reuse the pumice. Discard both the pumice and foil after one
use.
11. Use separate sets of instruments, attachments, and materials for new prosthesis and for
those cases that have already been in the mouth.
12. Laboratory equipment including mixing spatulas and rag wheels are to be sterilized after
each patient use.
13. Solid laboratory waste that is visibly contaminated with blood or other body fluids should
be placed in a red biomedical bag and taken into the clinic.
BY FOLLOWING THE GUIDELINES ABOVE, YOU WILL PROTECT YOUR
HEALTH AND THE HEALTH OF THOSE AROUND YOU.
HANDLING IMPRESSIONS
In the clinic, the impression is rinsed and sprayed with a disinfectant solution and placed in a
sealed plastic bag with a disinfection label attached to the bag.

In the laboratory, the impression is removed from the bag and the bag is discarded. If the
impression has not already been disinfected, it is disinfected at this time.
STUDENT ASSIGNMENTS
STERILIZATION ASSIGNMENT
One or two students will be assigned to sterilization per clinic day and will have the following
duties and responsibilities:
Beginning of the Clinic 1. Report to the Clinic Instructor at the beginning of the clinic.
2. Assist the Clinic instructor in preparing for the operation of the dental assisting and
dental hygiene clinics.
3. Prepare fresh solution:
IMS Detergent for the ultrasonic cleaners
Purevac for cleaning the evacuation system
Surgical Milk Oil for hinged instruments
Middle of the Clinic 4. Ensure each operatory contains a Cavicide bottle.
5. Assist students and Clinician in cleaning and packaging of instruments.
6. Load and run sterilizers as required.
7. Put sterilized instruments in their appropriate places.
8. Run sterilization monitoring tests during sterilization cycles (see clinician).
9. Assist in restocking clinic supplies.
10. Assist the Clinical Dentist, Instructor, and Clinician upon request.
End of the Clinic 11. Ensure the sterilization area is neat and clean. Empty trash and biomedical trash.
12. Disinfect countertops with Cavicide.
13. Dispose of unused chemicals (see clinician for possible use in the afternoon).
14. At the end of each clinic session, inspect the sterilization area and ensure that it is in
order. Receive dismissal from an instructor.

15. Obtain faculty signature on any necessary forms.
16. Replace empty water bottle on unit and run handpiece lines for one minute.
17. Remove water bottle from unit and store in sterilization room.
COORDINATOR ASSIGNMENT
One or more students will be assigned as a coordinator per clinic day and will have the following
duties and responsibilities:
Beginning of Clinic 1. Report to the Clinician.
2. Assist in preparing for the operation of the Dental Assisting and Dental Hygiene Clinics.
3. Set out sterile instruments and supplies
Middle of Clinic 4. Ensure that the Dental Assisting and Dental Hygiene carts contain adequate materials and
supplies. Refer to “Cart Supply Lists:.
5. Dispense additional materials and supplies as requested by students, instructors, or
dentists.
6. Set up for the next clinical sessions.
7. Prepare tray set ups as requested by the Clinician.
8. Assist in restocking the clinical areas.
9. Upon request, assist students, instructors, or dentists with patient treatment.
End of Clinic 10. Ensure that all clinical areas are neat and clean.
11. Receive dismissal from an Instructor.
12. Obtain faculty signature on Clinic Requirement Forms when necessary.
GUIDELINES FOR CPR BASIC LIFE SUPPORT CERTIFICATION

Certification
All students, faculty and staff must be currently certified in CPR Basic Life Support. No patient
care will be permitted without current certification. Certification must be renewed bi annually,
and continuous CPR certification must be maintained.
Students Students must have a current certification upon entry into the Dental Assisting or Dental Hygiene
Programs. No patient care will be permitted without current certification. It is the student’s
responsibility to maintain current CPR certification.
Exemptions from Certification
As this is required by Florida state law, the program administrator would need to be contacted.

INFECTION CONTROL PLAN AND PROCEDURES
FOR
BROWARD COLLEGE’S
DENTAL ASSISTING / DENTAL HYGIENE PROGRAMS
AND THE
BROWARD DENTAL RESEARCH CLINIC
STUDENT
TRAINING DOCUMENTATION
I, (print name) _________________________________ have received and reviewed the said
Infection Control Plan, Guidelines and Procedures of Broward College’s Dental Assisting /
Dental Hygiene Program and the Broward Dental Research Clinic which include the following:
Exposure Control Plan
Biomedical Waste Plan
Hazard Communication Program
Infection Control Guidelines
Infection Control Procedures
Emergency Procedures
I understand that I am not required at this time to have knowledge on the information presented
in this manual and will be receiving lecturers during the program. I agree to abide by these
guidelines and procedures set forth.
___________________________ ___________________________
Students’ Signature Date
REV. 6/14
INFECTION CONTROL PLAN AND PROCEDURES
FOR
BROWARD COLLEGE’S
DENTAL ASSISTING / DENTAL HYGIENE PROGRAMS
AND THE
BROWARD DENTAL RESEARCH CLINIC
FACULTY / STAFF / DENTIST
TRAINING DOCUMENTATION
I, (print name) _________________________________ have received and read the said
Infection Control Plan, Guidelines and Procedures of Broward College’s Dental Assisting /
Dental Hygiene Program and the Broward Dental Research Clinic which include the following:
Exposure Control Plan
Biomedical Waste Plan
Hazard Communication Program
Infection Control Guidelines
Infection Control Procedures
Emergency Procedures
I agree to abide by these guidelines and procedures set forth.
___________________________ ___________________________
Signature Date
Rev. 6/14
Exhibit 5-1-3 Bloodborne and Infectious Disease Policy

BROWARD COLLEGE HEALTH SCIENCE EDUCATION INFECTIOUS DISEASE POLICY HEALTH SCIENCE STUDENTS DOING HEALTH CARE WORK The risk of contracting hepatitis B virus or other infectious diseases is greater than
the risk of contracting HIV. Therefore, recommendations for the control of hepatitis B infections will effectively prevent the spread of AIDS. All such recommenda-tions are therefore incorporated herein. 1. Sharp items (needles, scalpel blades and other sharp instruments) shall be considered as potentially infective and be handled with extraordinary care to prevent accidental injuries. Proper disposal of sharp items according to OSHA guide-lines shall be followed. 2. Disposable syringes and needles, scalpel blades and other sharp items should be placed in puncture-resistant contain-ers located as close as practical to the area in which they were used. To prevent needle-stick injuries, needles shall not be recapped, purposely bent, broken, removed from disposable syringes, or otherwise manipulated by hand. 3. When the possibility of exposure to blood or other body fluid exists, routinely recommended universal precautions should be followed. The anticipated exposure may require gloves alone, as in handling items soiled with blood or other body fluids, or may also require gowns, masks and eye coverings when performing procedures or post-mortem exami-nations. Hands should be washed thoroughly and immediately if they accidentally become contaminated with blood or body fluids. 4. To minimize the need for emergency mouth-to-mouth resuscitation, mouthpieces, resuscitation bags or other ventilation devices should be located and available for use in areas where the need for resuscitation is predictable. 5. Pregnant health science students or students engaged in health care are not known to be at greater risk of contracting the HIV virus than students who are not pregnant. However, if a student develops infection with the HIV virus during pregnancy, an infant has an increased risk of infection through prenatal or perinatal transmission. Because of this risk, pregnant students should be especially familiar with precautions of the HIV virus. 6. Health Science students engaged in health care who are infected with the HIV virus and who are not involved in inva-sive procedures need not be restricted from work unless they have some other illness for which any health care worker would be restricted. 7. For Health Science students engaged in health care who have been diagnosed as HIV positive, there is an increased danger from infection due to disease. Students who are HIV infected are at risk of acquiring or experiencing serious complications of such diseases. Of particular concern is the risk of severe infection following exposure to patients with easily transmitted infectious diseases (e.g., tuberculosis or chicken pox). HIV-infected students will be counseled about potential risk associated with exposure to or taking care of patients with transmissible infections and should continue to follow universal precautions to minimize their risk of exposure to other infectious agents. 8. The Health Science student’s physician, in conjunction with the appropriate college official, will determine on an indi-vidual basis whether the student who is HIV positive, with symptoms, can adequately and safely perform patient care. 9. A student with an infectious disease who cannot control bodily secretions and students who have uncoverable oozing lesions will not be permitted to participate in health care services. The determination of whether an infectious student should be excluded from providing health care shall be made on a case-by-case basis by the student’s physician and the appropriate college officials. 10. Students who are exposed to infectious body fluids in the clinical area must report to the clinical instructor immediately. The hospital shall be notified and the hospital protocol for such exposure followed. I have read and understand this policy: Student Signature ___________________________________________ Date _______ Student Name Printed_____________________________________