bsd magazine 10 2012. network security auditing
TRANSCRIPT


Unified. Scalable. flexible.
Across all industries the demands of data infrastructure have soared to new heights.
As capacity requirements continue to rise at an ever-increasing rate, performance must not be compromised. The hybrid
architecture and advanced software capabilities of the TrueNAS appliance enable users to be more agile, effectively
manage the explosion of unstructured data and deploy a centralized information storage infrastructure. Whether it’s
backing virtual machines, business applications, or web services, there’s a TrueNAS appliance suited to the task. Intel, the Intel logo, and Xeon Inside are trademarks or registered trademarks of Intel Corporation in the U.S. and other countries.
call ixsystems toll free or visit our website today!
1-855-GREP-4-IX | www.iXsystems.com
TruenaS™ Storage appliances: Harness The cloud iXsystems’ TrueNAS Appliances offer scalable high-throughput, low latency storage
Key Features:One or Two Six-core intel® xeon® Processors •5600 series
Share data over cifS, nfS and iScSi•
Hybrid storage pool increases performance and •decreases energy footprint
128-bit ZfS file system with up to triple parity •software Raid
All TrueNAS Storage Appliances feature the Intel® Xeon® Processors 5600 series, powering the fastest data transfer
speeds and lowest latency possible. TrueNAS appliances come in three lines: Performance, Archiver, & High Availability.
High-performance, high-capacity ioMemory modules from Fusion-io are available in the TrueNAS Enterprise, Ultimate,
and Archiver Pro models.
PERfoRmancE aRchIvER hIGh avaIlabIlItyFusion-io Card X X X
Deduplication X
High Availability X X X
Gigabit NICs Quad Dual Dual Dual Dual Quad Quad Dual
10 Gigabit NICs Dual* Quad* Dual* Dual
Max Main Memory 48Gb 96Gb 192Gb 48Gb 192Gb 48Gb 96Gb 192Gb
Max Capacity 220TB 500TB 450TB 580TB 2.2PB 250TB 310TB 1.4PB
Rack Units 2U 2U/4U 4U 2U 4U 3U 3U Dual 3U
*Optional component
truenaS Ultim
ate-ha
truenaS Enterp
rise-h
a
truenaS Pro
-ha
truenaS arch
iver Pro
truenaS file
share
truenaS Ultim
ate
truenaS Enterp
rise
truenaS Pro

10/20124
Contents
Editor in Chief: Ewa Dudzic
Supportive EditorPatrycja Przybyłowicz
Contributing: Rob Somerville, Paul McMath, Martin Matuska,
Charles Rapenne, Lars Wittebrood, Luca Ferrari, Erwin Kooi, Diego Montalvo, Eric Geissinger
Top Betatesters & Proofreaders:Paul McMath, Barry Grumbine, Babak Farrokhi,
Eric Geissinger, Luca Ferrari, Imad Soltani, Zander Hill, Pablo Halamaj, Michael Dexter
Special Thanks:Denise Ebery
Art Director: Ireneusz Pogroszewski
DTP: Ireneusz Pogroszewski
Senior Consultant/Publisher: Paweł Marciniak [email protected]
CEO: Ewa Dudzic
Production Director: Andrzej Kuca
Executive Ad Consultant: Ewa Dudzic
Advertising Sales: Patrycja Przybyłowicz
Publisher :Software Press Sp. z o.o. SK
ul. Bokserska 1, 02-682 WarszawaPoland
worldwide publishingtel: 1 917 338 36 31www.bsdmag.org
Software Press Sp z o.o. SK is looking for partners from all over the world. If you are interested in cooperation with us,
please contact us via e-mail: [email protected].
All trade marks presented in the magazine were used only for informative purposes. All rights to trade marks
presented in the magazine are reserved by the companies which own them.
Mathematical formulas created by Design Science MathType™.
Dear Readers,The Autumn is coming as well as some great BSD events like EuroBSDcon or MeetBSD. We hope, that many of you will take part in those conferences and will enjoy the time spent with other BSD lovers and developers.
According to reviewers in October issue you should find some really nice articles served just the way you like – practical but easy to follow. The title is promising somehow, but you could ask how much about network is there... Well, from this issue you will find out how to capture session data with Argus – a tool for network auditing. You will read about securing network with pfSense and IPSec. Finally, learn about secure Internet browser – Xombrero. We also tested the Virtual Security Router by Halon. The company has some free software available and although it has some limitations it’s definitely worth checking out. You will be also introduced to VX ConnectBot, which is an Open Source SSH client for Android devices. So, one could say you will have some software to try on your BSDs and indeed a bit of network oriented topics inside October issue.
However, this is not all yet. We have two articles about indexing – one about the PostgreSQL and other about MySQL, so you can be choosy this time in the matter. And for those who enjoyed the article about pipes published last month I have a good news as well – the author comes back with FIFOs! Well, if you don’t know what it is you should definitely read it:)
As always we are looking for your feedback, so please keep in mind that you have a big influence on the magazine’s content. If you enjoyed some topic or articles of particular author, just let us know on [email protected]. Your opinion matters to us.
Wish you a good read!Patrycja Przybylowicz
& BSD Team

www.bsdmag.org 5
Contents
PostgreSQL: Indexes (Part 1)By Luca Ferrari
In this article readers will learn the kind of indexes that are available in PostgreSQL and how they can be defined on existing data. Moreover, readers will be learn how to check the efficacy of indexes, an essential topic for im-proving query performance. All the examples shown here have been tested on a PostgreSQL 9.1 cluster running on a FreeBSD 8.2-RELEASE machine; all source code ex-amples are available in a GitHub repository.
Unix IPC with FIFOsBy Paul McMath
FIFOs were developed to overcome the limitation of pipes. Pipes use the syscalls pipe() and fork() to set up IPC be-tween processes, and their use is therefore limited to pro-cess having a common ancestor.
Tips & TricksCapture Session Data with Argus on FreeBSD By Lars Wittebrood
In this article we will explore the use of Argus, a power-ful network auditing tool that helps you understand and take control of your network. We will briefly explain four different methods of network auditing, then install Argus on FreeBSD, talk about the tools provided with Argus and show some examples of its use in the real world.
SecuritySecuring your Family wirh pfSense and IPSecBy Erwin Kooi
As the family tech guy, they started to call me more and more for removing viruses and botnet infections. I fixed this by installing pfSense boxes as their primary Internet gateway.
ReviewInstallation and Setup of the Halon Virtual Security RouterBy Eric Geissinger
Halon offers the software to run the VSR on your own hardware (physical or virtual), as well as a hardware ap-pliance. I have been looking for a router/firewall solution for my home network for the last few months, so when an opportunity to try the Halon Virtual Security Router (VSR) came about, I jumped at it.
What’s NewVX ConnectBot: Open Source SSH Client for Android DevicesBy Martin Matuska
VX ConnectBot was published on Google Play in Decem-ber, 2011 and enjoys now more than 10.000 active device installs. It receives a 4+ star rating from its users. One of the typical tasks of a BSD or Linux systems administrator is to be able to be able to remotely monitor and access systems while on the road. The remote access is usu-ally performed using a terminal application and the SSH protocol. A device is required to perform these tasks and a notebook is not something to carry with all the time. In-stead you can make a good use of your smartphone.
Get StartedInstalling Xfce Desktop Environment on OpenBSD 5.1By Diego Montalvo
This article is intended for beginners wanting to install and run a desktop environment on OpenBSD. Anyone with a little time on their hands can have a cool desktop environ-ment installed on OpenBSD 5.1. Here we will be installing Xfce 4.8, a free lightweight desktop environment which is fast, low on system resources and best of all visually ap-pealing and easy to use.
How ToBrowse the Internet DifferentlyBy Charles Rapenne
In this article we will discuss xombrero (formerly xxxterm), an easy-to-use internet browser that focuses on security, privacy and minimalism. We will see how to configure it with different use cases and learn some of this browser’s useful vi-style commands.
FreeBSD Enterprise Search with Apache Solr (Part 2)By Rob Somerville
The key to a powerful and efficient search is indexing, interpretation and presentation. The first generation of search engines presented the user with a text field, and literally searched for that exact term. With the evolution of advanced search techniques the possibility of fulfilling this dream comes closer. How to set up synonyms, stem-ming and the data handler to extract data from a MySQL database.
06
0832
38
44
14
10
20
26

What’s NeW
10/2012 6
One of the typical tasks of a BSD or Linux systems administrator is to be able to be able to remotely monitor and access systems while on the road.
The remote access is usually performed using a terminal application and the SSH protocol. A device is required to perform these tasks and I don’t think a notebook or net-book is something to carry with all the time. In my opinion the best companion for this task is a smartphone, ideally with a full hardware keyboard.
My first device delivering the required functionality was the Nokia N830 internet tablet running the Maemo Linux distribution in combination with a bluetooth-enabled phone. This device was equipped only with 128 mega-bytes of RAM, had no was not very suitable for viewing webpages. But on the other side, its software was cus-tomizable (Linux) and it was extremely useful for SSH. In late 2011 I was searching for a replacement smartphone device. The only device that matched my needs was the Sony Ericcson Experia Pro, with Android 2.3 (today run-ning 4.0), 512 megabytes of ram and a 1GHz ARM pro-cessor.
As of SSH I have installed the open-source SSH client named ConnectBot by Kenny Root and Jeffrey Sharkey.
VX ConnectBotOpen Source SSH Client for Android Devices
What you will learn…• what is VX ConnectBot and where to get it• how does VX ConnectBot differ from original ConnectBot
What you should know…• how to work with Android devies (user-level)• basics of working with terminal applications and SSH
VX ConnectBot was published on Google Play in December, 2011 and enjoys now more than 10.000 active device installs. It receives a 4+ star rating from its users.
Figure 2. GNU nano editor via VX ConnectBotFigure 1. VX ConnectBot on Sony Ericsson Experia Pro (MK16i)

www.bsdmag.org 7
VX ConnectBot
As no one was paying attention to these patches I start-ed my own fork named “VX ConnectBot”. The program is available free via Google Play (or directly via homep-age) and its source code is maintained on GitHub. At the beginning I only wrote patches adding better support for my smartphone but then I integrated several cool features from the Irssi ConnectBot fork and wrote a couple of my own enhancements. These include SCP file transfer, a set of on-screen menus and better support for hardware key-boards.
The software comes with internationalization support – the majority of translations have been inherited from the original ConnectBot, but as of the new features I person-ally maintain only the English, German and Slovak ver-sions. Volunteers for translating to other languages are welcome. I am also open to suggestions and patches for new features.
In the future I plan adding support for pressing multi-ple keys at once, especially useful on full keyboards like the dock of Asus Transformer series or external bluetooth keyboards.
The software was usable, completely written in Java and bundled the Trilead ssh2 library. Unfortunately the de-velopment was stalled, there were unfixed bugs and my hardware keyboard was not really usable because I was unable to type some crucial shell-keys like Ctrl, Alt and Esc. On the other hand, there are keys that are of no use for ConnectBot, e.g. the language setting key. So I started coding in Java and submitting patches for ConnectBot.
Figure 3. Character picker dialog of VX ConnectBot
Features of original Connectbot• protocols: ssh, telnet and local android shell• keyboard and public-key authentication• ssh features: compression, port forwarding, key generation,
key agent• terminal emulatioms: xterm, xterm-color, vt100, ansi, screen• encodings: UTF-8 and many more• terminal history• portrait and landscape modes• automatic screen size adjustment
Features added in VX ConnectBot• background file transfer (via the SCP protocol)• console screenshots (PNG format)• dialog for special characters (SYM-window)• single-line input using the standard Android text field
• long-press menu to toggle full screen mode or change font size
• bottom-line on-screen menus with tap and hold support• improved hardware keyboard support• pre-defined key mappings for Sony Ericcson Xperia (mini) pro
and Samsung Captivate Glide• ssh-agent by Roberto Tyley• generated SSH keys can be saved as files• several bugfixes including screen resizing and font size
change
VX ConnectBot links• Project homepage: http://connectbot.vx.sk• Source code: https://github.com/vx/connectbot• Google Play: https://play.google.com/store/apps/details?id=sk.
vx.connectbot
MARtin MAtušKAMartin Matuška ([email protected]) is an IT expert, senior sys-tems administrator and developer. He is part of the FreeB-SD ZFS team, maintainer of several FreeBSD ports and head of the system administration company VX Solutions s. r. o. (http:// www.vx.sk). His company focuses on deploying and maintaining ZFS systems and providing solutions based on FreeBSD, Linux and IllumOS operating systems. He writes at http://blog.vx.sk.Figure 4. Saving screenshots in VX ConnectBot

Get Started
10/2012 8
A nyways, if I was able to write this tutorial it means anyone with a little time on their hands can have a cool desktop environment installed on OpenBSD
5.1. I will be installing Xfce 4.8, a free lightweight desktop environment which is fast, low on system resources and best of all visually appealing and easy to use.
This tutorial will provide the steps needed to have a light-weight desktop environment running on OpenBSD 5.1.
What you will need: OpenBSD 5.1, text Editor and an internet Connection Step 1I am assuming you already have OpenBSD and the mini-mal X Windows System installed.
Test your X windows installation
$ startx
Step 2Locate your nearest FTP server and add the following path to the ~/.profile file using your editor of choice “I am using Easy Editor or ee”.
$ ee ~/.profileexport PKG_PATH=ftp://your.ftp.mirror/pub/OpenBSD/5.1/
packages/`machine -a`/
Step 3In this step we will be installing Xfce packages for a basic desktop setup.
noteIt is not necessary to add the version number and the file extension in order to install packages see below.
$ sudo -v pkg_add xfce-utils-4.8.3p1.tgz
$ sudo -v pkg_add xfce-utils
Package installation begins “-v option is not needed but it is helpful for debugging”
installing Xfce Desktop Environment on OpenBSD 5.1
What you will learn…• How to Install a Desktop Environment in OpenBSD• How to run Xfce in OpenBSD
What you should know…• Shell Basics• OpenBSD Basics• How to install packages
This article is intended for beginners wanting to install and run a desktop environment on OpenBSD. I am an amateur on OpenBSD, hence you all might have spotted me in the OpenBSD IRC channel asking newbie questions.
Figure 1. One very basic desktop environment circa 1980

www.bsdmag.org 9
installing Xfce Desktop Environment on OpenBSD 5.1
• xfce4-mixer • xfprint
Step 4Once the packages are downloaded and installed Xfce can be launched. But we will go a step further and enable both us-er and root to launch Xfce as the default desktop environment.
Starting X Server and Xfce Commands
• $ startx• $ startxfce4
If you want to launch Xfce by default when using the “startx” command, create a file named “.xinitrc” in your home directory. This file will be launched automatically when X is starting. We will create a file for a user and root.
# echo ‘exec startxfce4’ > /root/.xinitrc
# chmod +x /root/.xinitrc
# exit
$ echo ‘exec startxfce4’ > .xinitrc
$ chmod +x .xinitrc
noteThis may not be the case in your installation, I had to chown <my_user> .xinitrc in order for “startx” to launch Xfce as user.
Step 5I recommend logging out of your account or rebooting. Once logged in type “startx” and you should see Xfce loaded as your default desktop environment in OpenBSD. Cheers!
Step 6Xfce comes loaded with Firefox as the default browser. Click on the world icon on the bottom taskbar and you are you are ready to surf the Internet on your new OpenBSD desktop environment. Enjoy!
$ sudo -v pkg_add xfce-utils xfce4-panel xfce4-
session xfdesktop xfwm
$ sudo -v pkg_add xfwm4-themes gtk-xfce-engine
xfce4-terminal
$ sudo -v pkg_add orage notification-daemon-xfce
ristretto mousepad
xfce4-appfinder xfce4-mixer x4xfprint
installed Packages
• xfce-utils• xfce4-panel• xfce4-session• xfdesktop• xfwm4• xfwm4-themes• gtk-xfce-engine• terminal • Orage• notification-daemon-xfce• ristretto • mousepad• xfce4-appfinder
Figure 2. Xfce at Your Fingertips
Figure 3. Running Firefox on Xfce
DiEGO MOntALVODiego Montalvo is the founder of Hwdy.in a soon to be released so-cial | collaborative search engine. Diego is a web guru and technical writer who enjoys the beach, socializing, staying up late, exercising and taking shots. Feel free to contact: [email protected].
References• http://www.openbsd.org/• http://www.xfce.org/• http://openbsd.org/ftp.html#ftp• http://www.freebsd.org/doc/en/books/handbook/editors.html

how to
10/2012 10
Xombrero, formerly xxxterm, is a young web brows-er developed in order to provide full control to the user. It was originally developed on OpenBSD but
now it works also on FreeBSD, Linux and DragonFly BSD. Unfortunately, the NetBSD port is broken at the moment I’m writing this article. Like every piece of OpenBSD soft-ware, it comes with a very nice man page describing ev-
ery variable and command available. It is licensed under the ISC license. The browser uses webkit-gtk to render the pages, so it should have the same behavior that with Google Chrome or chromium. Xombrero configuration is made with text files and we will see later what to add to the config file. It uses a vi-style keyboard commands and we will look at some shortcuts to navigate between pages, using tabs and managing the whitelist.
installationThe browser is available in every BSD ports tree. OpenBSD 5.1 users will find the package “xxxterm” in-stead of “xombrero” because the project changed its name.
On FreeBSD
• installs www/xombrero
On OpenBSD
• installs “xxxterm” package• www/xombrero for the latest version
On DragonFly
• installs wip/xombrero (it requires pkgsrc-wip)
Browse the internet Differently
What you will learn…• How to install xombrero on your system• How to configure xombrero• How to to browse the internet with a strict private policy
What you should know…• What are cookies and javascript• How to install a package
In this article we will be deal with xombrero (formerly xxxterm), an easy-to-use internet browser which focus on security, privacy and minimalism. We will see how to configure it with different uses cases and learn some useful commands of this vi-style browser.
table 1. Some useful keyboard to know
Text typed What happens/my text Search “my text” forward in the page
n Look at the next occurrence of the last search
?my text Search “my text” backward in the page
N Look at the previous occurrence of the last search
f Active link hinting mode, allowing you to navigate with the keyboard by typing the number you want to click or typing the text of the link. Try it !
Escape Drop the focus and back to command mode
F6 Edit the address bar
F7 Edit the search bar
p Use the clipboard as url
y Copy the url in the clipboard
s Active contrast mode
Ctrl – I Open the field into your external editor set in the config file
www.bsdmag.org 11
Browse the internet Differently
Browse AnonymouslyI think the most interesting feature of xombrero is its white-listing abilities. Others browsers let you do it with a lot of tweaks and extensions. To activate white-list mode, you have to use the following settings in your config file (~/.xombrero.conf)
browser_mode = whitelist
enable_plugins = 0
cookies_enabled = 0
enable_cookie_whitelist = 1
enable_scripts = 0
enable_js_whitelist = 1
Once running Xombrero with this configuration, you won't save any cookie or execute any javascript from any website if you didn't pre-authorize it. The whitelist offers two commands: toggle and save. If you type: cookie save or: js save you add in the file ~/.xombrero/runtime the actual website on the whitelist, it’ll be kept across restarts of the browser. If you use the toggle command, the setting will be saved only during the ses-sion, if you restart the browser you’ll have to toggle it again.
Remember that when you add a website to the whitelist, you add the domain, for example, if you add cookie support for www.mysite.com, if you go to mail.mysite.com cookies aren’t allowed! If you want to al-low a domain and all its sub-domains, like *.mysite.com you must edit ~/.xombrero/runtime and add js_
wl=.mysite.com for javascripts and cookie_wl=.mysite.com for cookies. Don’t forget to make backup before any change!
On netBSD
• fix wip/xombrero because it’s broken at the moment
Now that you have installed the package, we can contin-ue with the basics commands !
Commands and ShortcutsXombrero behaves like the vi text editor, there is a com-mand mode and an input mode. When you have the fo-cus in field, you are in input mode, else you are in com-mand mode. If you know some basics commands of vi, you should feel comfortable with xombrero. In command mode, just type your “:yourcommand” and you will see the text appear on the bottom of the page, if you don’t use “:” xombrero will try to execute shortcuts (Table 1).
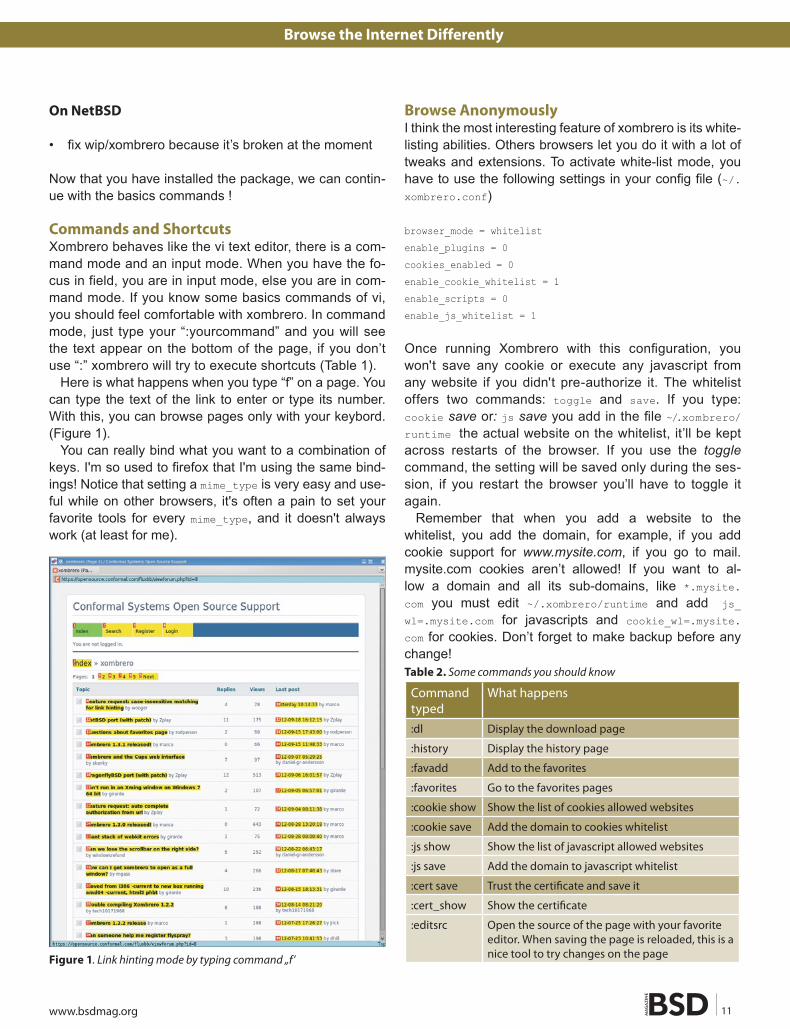
Here is what happens when you type “f” on a page. You can type the text of the link to enter or type its number. With this, you can browse pages only with your keybord. (Figure 1).
You can really bind what you want to a combination of keys. I'm so used to firefox that I'm using the same bind-ings! Notice that setting a mime_type is very easy and use-ful while on other browsers, it's often a pain to set your favorite tools for every mime_type, and it doesn't always work (at least for me).
table 2. Some commands you should know
Command typed
What happens
:dl Display the download page
:history Display the history page
:favadd Add to the favorites
:favorites Go to the favorites pages
:cookie show Show the list of cookies allowed websites
:cookie save Add the domain to cookies whitelist
:js show Show the list of javascript allowed websites
:js save Add the domain to javascript whitelist
:cert save Trust the certificate and save it
:cert_show Show the certificate
:editsrc Open the source of the page with your favorite editor. When saving the page is reloaded, this is a nice tool to try changes on the pageFigure 1. Link hinting mode by typing command „f’

how to
10/2012 12
Using the whitelist mode may appear annoying and diffi-cult because you’ll have to manually add a lot of websites that you visit, but if you are only viewing those websites, you certainly don’t want to be tracked or have ads pop-up on your page. If you encounter websites that don’t work at all with javascript disabled, you’ll have to choose between authorizing them or avoiding the website. Disabling javas-cript speeds browsing up a lot but you may lose some “user friendly” features.
If you feally want to be anonymuous with xombrero, you should consider using a http proxy like Tor. I won’t cover installation and usage of Tor here because it would need another entire article.
Lastly, I would like to recommend you to take a look to the fabulous xombrero manpage from xombrero itself by simply typing F1.
Why shouldn’t i use Xombrero?Xombrero is not very “user-friendly”. If you like to keep all your passwords stored on your computer so you never fill a form again. If you like browsing your history and use a lot of extensions or plugins, you will be dis-appointed.
Why should i use Xombrero?There are a few reasons that you should use xombrero. On BSD systems, you don’t have much choices when looking for a decent web browser, other than Mozilla Firefox. Xombrero is very lightweight, could be compiled using gtk2 or gtk3. It depends on webkit which is con-tinuously updated, and the core system is so light that the compilation takes less that a minute. It’s also a nice tool for web development, it displays pages like Google Chrome (for the most part) and it comes with the same debugging tool as Google Chrome. Finally, if you really
feel concerned about your privacy and security on-line, you would prefer using xombrero than the others brows-ers.
ConclusionXombrero is a competitive web browser needing low require-ments and compiling on nearly all BSD. It makes a viable alter-native to other web browsers. It has good documentation, the core system has very clean code and is actively developed. I’ve been using it successfully for more than six months as my main navigator on both DragonFly BSD and OpenSuse. I had a little hard time at the beginning, reading the documentation to find some commands and configure it, this is why I made a summary in this article so you could start quickly. The official website of xombrero is a wiki, also, most bug reports and fea-tures request happens on the forum: https://opensource.con-formal.com/wiki/xombrero.
table 3. Example config in ~/.xombrero.comf
Config line Value What happensexternal_editor = gedit <file> Open source or field with gedit
home = about:favorites Define your homepage to the favorites page
guess_search = 1 Remove the search bar and search directly when typing in the address bar
color_visited_uris = 0 Remove the “purple” color of visited links
download_mode = ask Ask when downloading a file
autofocus_onload = 0 Don’t get the focus directly on a field when loading a page, preventing use of commands
mime_type = @application/pdf,evince Associate PDF files with evince when download a pdf file
keybinding = favadd,C-d Add a new favorite with Ctrl+D
keybinding = tabedit www.pastebin.com,M1-r Open a new tab on pastebin.com with left ALT+r
http_proxy = http://192.168.1.254:8123/ Use a http proxy
CHARLES RAPEnnECharles Rapenne is a Linux system administrator in a small com-pany in France. He enjoys trying new software and different op-erating systems. He is misunderstood by his colleagues when he uses command line tools on his laptop.


how to
10/2012 14
The key to a powerful and efficient search is in-dexing, interpretation and presentation. The first generation of search engines presented the user
with a text field, and literally searched for that exact term. Depending on the amount of power available to process requests and the size of the dataset, free text search was often not available and the end user had to know exactly what they were looking for. While various algo-rithms were used to rank and sort data (e.g. number of
occurrences, popularity, relevancy etc.) this still left the dream of serendipitous search a long way off. With the evolution of advanced search techniques the possibility of fulfilling this dream comes closer (Table 1 – Search evolution).
Serendipitous Search?Serendipity – A pleasant surprise or a happy accident – is key closing the loop in delivery high quality results to
FreeBSD Enterprise Search with Apache Solr (Part 2)
What you will learn…• How to set up synonyms, stemming and the data handler to extract
data from a MySQL database
What you should know…• BSD administration skills, FreeBSD Apache Solr Part 1 article
Continuing with our series on Apache Solr we will look at expanding the functionality of our search engine.
table 1. Example search evolution
Search term Result CommentsSearch Document → The quick brown fox jumped over the lazy dog and ran rapidly away grinning wildly.
Primitive searcha NULL Cannot search at start of words
inn NULL Cannot search in words
running NULL Cannot equate ran → running
canine NULL Cannot equate dog → cannine
dog dog Word found as separated by token / delimiter / white-space
Advanced searcha and, away Returns start of words (e.g. via Ajax)
inn grinning Searches in words
running ran Can equate ran → running (Stemming)
canine dog Can equate dog → canine (Synonyms)
dog dog Word found as separated by token / delimiter / white-space

www.bsdmag.org 15
FreeBSD Enterprise Search with Apache Solr (Part 2)
the search query. Ethics aside, where search engines keep a record of an individuals search history and us-es this to profile, rank and distribute the results, clearly this is a major advance as often we do not know exactly what we are looking for. When we stumble upon fresh content, it enriches and enlightens us, especially where we have been held captive by our own understanding or limitation of our language. While we may be looking for
table 2. Evaluating synonym value
Word Synonym ValueTaxicab Minicab, taxi, mini-cab,
taxi-cab, black-cabHigh – Strong 1 → 1 relationship
Dog Canine, Canus Lupus High – Strong 1 → 1 relationship
Taxi Minicab, taxicab, mini-cab, taxi-cab, black-cab
Low – Taxi could apply to an aircraft on a runway
Listing 1. collection2/conf/schema.xml
<?xml version=”1.0” encoding=”UTF-8” ?>
<schema name=”example” version=”1.5”>
<fields>
<field name=”id” type=”int” indexed=”true”
stored=”true” />
<field name=”name” type=”text_general” indexed=”true”
stored=”true” />
<field name=”email” type=”text_general” indexed=”true”
stored=”true”/>
<field name=”address” type=”text_general”
indexed=”true” stored=”true”/>
<field name=”content” type=”text_general”
indexed=”true” stored=”true”/>
<field name=”text”
type=”text_general”
indexed=”true”
stored=”true”
multiValued=”true”
/>
</fields>
<uniqueKey>id</uniqueKey>
<copyField source=”id” dest=”text”/>
<copyField source=”name” dest=”text”/>
<copyField source=”email” dest=”text”/>
<copyField source=”address” dest=”text”/>
<copyField source=”content” dest=”text”/>
<types>
<fieldType name=”int”
class=”solr.TrieIntField”
precisionStep=”0”
positionIncrementGap=”0”
/>
<fieldType name=”string” class=”solr.StrField”
sortMissingLast=”true” />
<fieldType name=”text_general” class=”solr.TextField”
positionIncrementGap=”100”>
<analyzer type=”index”>
<tokenizer class=”solr.StandardTokenizerFactory”/>
<filter class=”solr.SynonymFilterFactory”
synonyms=”synonyms.txt”
ignoreCase=”true”
expand=”true”
/>
<filter class=”solr.StopFilterFactory”
ignoreCase=”true”
words=”lang/stopwords_en.txt”
enablePositionIncrements=”true”
/>
<filter class=”solr.LowerCaseFilterFactory”/>
<filter class=”solr.
EnglishPossessiveFilterFactory”/>
<filter class=”solr.KeywordMarkerFilterFactory”
protected=”protwords.txt”/>
<filter class=”solr.PorterStemFilterFactory”/>
</analyzer>
<analyzer type=”query”>
<tokenizer class=”solr.StandardTokenizerFactory”/>
<filter class=”solr.SynonymFilterFactory”
synonyms=”synonyms.txt”
expand=”true”/>
<filter class=”solr.StopFilterFactory”
ignoreCase=”true”
words=”lang/stopwords_en.txt”
enablePositionIncrements=”true”
/>
<filter class=”solr.LowerCaseFilterFactory”/>
<filter class=”solr.
EnglishPossessiveFilterFactory”/>
<filter class=”solr.KeywordMarkerFilterFactory”
protected=”protwords.txt”/>
<filter class=”solr.PorterStemFilterFactory”/>
</analyzer>
</fieldType>
</types>
</schema>

how to
10/2012 16
“Dog” a biologist or vet would use the term “Canine”. If we are not cognisant of the term “Canine”, a vast array of data is closed off to us unless the document contains both words. This concept is vital in opening up data sets where specialised or vertical terminology is used either to more clearly define words, or possibly to obfuscate the true meaning from the uninitiated. Leveraging tech-nology, we can enter the specialized realm of language interpretation.
the SynonymSynonyms are words with almost the same or identical meanings. It is important to note the context and relation-ship between synonyms before assuming there would be a good match. If not closely matched, search results could be misleading or worse still inaccurate (Table 2 – Syn-onym value).
The synonyms.txt file – like all of the Solr configura-tion files – is well documented with examples. We can add synonyms, synonym groups or even correct common spelling mistakes.
StemmingStemming is process for removing the commoner mor-phological and inflexional endings from words in English. For example, using the Porter stemming algorithm: “rid-ing”, “rides”, “horses” ==> “ride”, “ride”, “hors”.
the import Data Handler (DiH)The goal of the Data Import Handler is one of the major building-blocks of Solr’s power. It can:
• Read data residing in relational databases
• Build Solr documents by aggregating data from multi-ple columns and tables according to configuration
• Update Solr with such documents• Provide ability to do full imports according to configu-
ration• Detect inserts/update deltas (changes) and do delta
imports • Schedule full imports and delta imports
Figure 1. Second Solr core collection 2
Listing 2. collection2/conf/elevate.xml<?xml version=”1.0” encoding=”UTF-8” ?>
<elevate>
<query text=”TEST”>
<doc id=”2” />
</query>
</elevate>
Listing 3. collection2/conf/solrconfig.xml
<!-- DIH -->
<requestHandler name=”/dataimport”
class=”org.apache.solr.handler.dataimport.
DataImportHandler”>
<lst name=”defaults”>
<str name=”config”>/usr/home/solr/collection2/
conf/data-config.xml</str>
</lst>
</requestHandler>
Listing 4. collection2/conf/data-config.xml
<dataConfig> <dataSource driver=”com.mysql.jdbc.
Driver”
url=”jdbc:mysql://localhost/solrdb”
user=”root”
/>
<document name=”quotes”>
<entity name=”quotes” query=”select
ID,NAME,EMAIL,ADDRESS,CONTENT from
quotes”>
<field column=”ID” name=”id” />
<field column=”NAME” name=”name” />
<field column=”EMAIL” name=”email” />
<field column=”ADDRESS” name=”address” />
<field column=”CONTENT” name=”content” />
</entity>
</document>
Listing 5. collection2/conf/synonyms.txt
Canine, Canus\ Lupus => Dog

www.bsdmag.org 17
FreeBSD Enterprise Search with Apache Solr (Part 2)
rm collection2/data/index/*
Edit the collection2/conf/schema.xml to match Listing 1. Edit collection2/conf/elevate.xml to match Listing 2.Restart Solr:
/usr/local/etc/rc.d/tomcat7 onestart
Point your browser at http://yourserverip:8080/solr/#/ ~cores/collection2 and you should see a new core in-stalled (Figure 1).
Stop Solr:
/usr/local/etc/rc.d/tomcat7 stop
Configure the data import handler and synonymsDownload the JDBC driver from http://www.mysql.com/downloads/connector/j/ and extract the mysql-connector-java-5.1.22-bin.jar into /home/solr/collection2/lib:
• Read and Index data from xml/(http/file) based on configuration
• Make it possible to plugin any kind of datasource (ftp,scp etc) and any other format of user choice (JSON,csv etc)
RequirementsWe will continue to develop our Solr installation from the last article. Another core will be added to Solr, and test data imported from a MySQL database.
installation and ConfigurationCreate a new core and flush the indexAs root:
/usr/local/etc/rc.d/tomcat7 stop
cd /home/solr
cp -R collection1 collection2
chown -R www:www /home/solr/collection2
Figure 2. MySQL table loaded
Figure 3. Data Import Handler Figure 4. Successful import

how to
10/2012 18
tar -xvzf mysql-connector-java-5.1.22.tar.gz
cp mysql-connector-java-5.1.22/mysql-connector-java-
5.1.22-bin.jar \
/home/solr/collection2/lib/
Edit /home/solr/collection2/conf/solrconfig.xml and add Listing 3 just before the </config> tag at the end of the file.
Edit /home/solr/collection2/conf/data-config.xml to match Listing 4.
Edit /home/solr/collection2/conf/synonyms.txt and add the text in Listing 5.
Ensure tomcat can read the files:
cd /home/solr
chown -R www:www /home/solr/collection2
Install MySQL:
pkg_add -r mysql55-server
pkg_add -r mysql55-client
echo ‘mysql_enable=”YES”’ >> /etc/rc.conf
/usr/local/etc/rc.d/mysql-server onestart
rehash
Create the file /home/solr/solr.sql as per Listing 6 then import into MySQL:
cd /home/solr
mysql -uroot < solr.sql
Check that the table is present in MySQL:
mysql -uroot
use solrdb; select ID,NAME,EMAIL,ADDRESS,CONTENT from
quotes;
\q
You should see the table & data present (Figure 2).Restart Solr:
/usr/local/etc/rc.d/tomcat7 onestart
import data and testPoint your browser at: http://yourserveripaddress:8080/solr/#/collection2/dataimport//dataimport.
You should see a dataimport screen similar to (Figure 3). Click on Verbose, Optimise, select quotes as the entity then click on Execute Import. The MySQL data should be imported successfully (Figure 4).
Browse to the Collection2 query page, with fl set to text, search for the following terms: Table 3.
You should see Solr return your results as expected (Figure 5).
table 3. Search terms & filters used with Solr
Search request Request handler Filter / algorithm“Canus Lupus” /select Synonym
Canine /select Synonym
Jumping /select Stemming
Jump /select Stemming
TEST /select
TEST /elevate Elevated search
Figure 5. Search for “Canus Lupus” returns “Dog”
ROB SOMERViLLERob Somerville has been passionate about technology since his early teens. A keen advocate of open systems since the mid eighties, he has worked in many corporate sectors including fi-nance, automotive, airlines, government and media in a vari-ety of roles from technical support, system administrator, devel-oper, systems integrator and IT manager. He has moved on from CP/M and nixie tubes but keeps a soldering iron handy just in case.


how to
10/2012 20
A ll the examples shown here have been tested on a PostgreSQL 9.1 cluster running on a FreeBSD 8.2-RELEASE machine; all source code examples
are available in a GitHub repository.
introduction to indexes and Query OptimizationEach time a query is issued, PostgreSQL processes it in order to “understand” what the user has requested before it begins executing the instruction. Commands are ex-pressed in SQL which is a declarative language, meaning the user can only tell the database engine “what” to do, but not “how” to do it. For instance, when the user issues a SELECT statement she does not specify how to access the data and which files to read and how to load tuples into memory; rather, she specifies simply which tuples are to be returned and in what order. However, by using indexes the DBA can specify possible “paths” by which the data can be accessed and retrieved. An index is a special type of relation that describes which tuples in a target table match a condition.
The database decides how to access physical data through the query optimizer, a component that analyses a query and determines the best way to retrieve the data. Here, the “best way” means the fastest way depending on the data status (i.e., how many tuples are in the storage, how many of them are going to be retrieved, and so on).
Of course on large datasets the decision is critical and must be made before the data fetch begins. If there are no indexes, the decision is straightforward: a sequential scan is required. If one or more indexes are available the optimizer has to choose the right one, that is, the one that requires the least amount of I/O.
To accomplish this, the query optimizer considers a set of statistical information updated by the VACUUM com-mands (and by auto-vacuum) that provide information about the “status” of each table. Knowing in advance how many tuples are stored in a table and the distribu-tion of per-column values allows the query optimizer to make the right decision about which access method to use.
It is worth noting that the best access path cannot al-ways be computed within a finite amount of time, and this is the reason behind the adoption of a Genetic Que-ry Optimizer (geqo) that PostgreSQL uses for large and complex queries (those that typically involve joins of ma-ny tables): in this case the optimizer computes a near-to-best path in a short time, providing a trade-off between a good path to the data and a small time required to com-pute it.
Application ScenarioIn order to test indexes and their usage an ad-hoc appli-cation scenario has been built: Listing 1 shows the defi-
PostgreSQL indexes (Part 1)
What you will learn…• which indexes can be defined on existing data• how to analyze the effectiveness of an index
What you should know…• basic shell commands• basic PostgreSQL concepts• server-side programming with PostgreSQL
In this article readers will learn the kind of indexes that are available in PostgreSQL and how they can be defined on existing data. Moreover, readers will be learn how to check the efficacy of indexes, an essential topic for improving query performance.
www.bsdmag.org 21
PostgreSQL: indexes (Part 1)
so that at the end the result will be as follows:
bsdmagdb=# SELECT relname, reltuples, relpages
FROM pg_class WHERE relname like ‘articles%’ AND relkind = ‘r’;
relname | reltuples | relpages
----------+-----------+----------
articles | 2e+06 | 26667
Explain and Explain AnalyzeAssume it is required to retrieve the titles from all articles of a medium level of difficulty (difficulty = ‘AVG’) which have at least one code listing (listing > 0): the SQL query is the following:
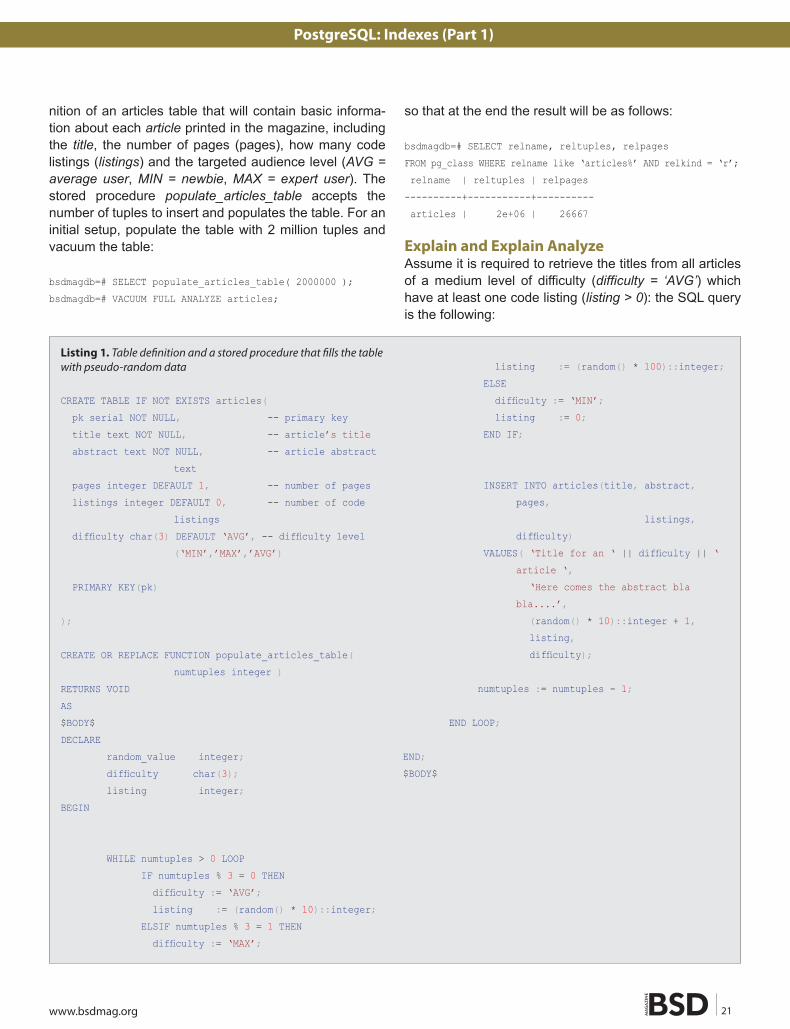
nition of an articles table that will contain basic informa-tion about each article printed in the magazine, including the title, the number of pages (pages), how many code listings (listings) and the targeted audience level (AVG = average user, MIN = newbie, MAX = expert user). The stored procedure populate_articles_table accepts the number of tuples to insert and populates the table. For an initial setup, populate the table with 2 million tuples and vacuum the table:
bsdmagdb=# SELECT populate_articles_table( 2000000 );
bsdmagdb=# VACUUM FULL ANALYZE articles;
Listing 1. Table definition and a stored procedure that fills the table with pseudo-random data
CREATE TABLE IF NOT EXISTS articles(
pk serial NOT NULL, -- primary key
title text NOT NULL, -- article’s title
abstract text NOT NULL, -- article abstract
text
pages integer DEFAULT 1, -- number of pages
listings integer DEFAULT 0, -- number of code
listings
difficulty char(3) DEFAULT ‘AVG’, -- difficulty level
(‘MIN’,’MAX’,’AVG’)
PRIMARY KEY(pk)
);
CREATE OR REPLACE FUNCTION populate_articles_table(
numtuples integer )
RETURNS VOID
AS
$BODY$
DECLARE
random_value integer;
difficulty char(3);
listing integer;
BEGIN
WHILE numtuples > 0 LOOP
IF numtuples % 3 = 0 THEN
difficulty := ‘AVG’;
listing := (random() * 10)::integer;
ELSIF numtuples % 3 = 1 THEN
difficulty := ‘MAX’;
listing := (random() * 100)::integer;
ELSE
difficulty := ‘MIN’;
listing := 0;
END IF;
INSERT INTO articles(title, abstract,
pages,
listings,
difficulty)
VALUES( ‘Title for an ‘ || difficulty || ‘
article ‘,
‘Here comes the abstract bla
bla....’,
(random() * 10)::integer + 1,
listing,
difficulty);
numtuples := numtuples - 1;
END LOOP;
END;
$BODY$

how to
10/2012 22
bsdmagdb=# SELECT title, pages, listings
FROM articles WHERE difficulty = ‘AVG’
AND listings > 0;
How is the data actually retrieved from local stor-age? Since there is no index on either of the columns listings or difficulty the database has no alternative but to do a sequential scan of all tuples and test each against the WHERE clause. This is also shown by the EXPLAIN command, which accepts a query and returns a “query plan”, which is an explanation of what the da-tabase “thinks” is the best way to retrieve data. So let’s see the EXPLAIN in action with the above query: Listing 2.
Reading a query plan can be very complex, so let’s re-view each part of this plan in detail to understand what kind of information it provides. Each row in the EXPLAIN output represents a “node”, that is, a way of handling data retrieval. Each node specifies an initial cost and a final cost required to retrieve all the tuples, as well as the num-ber of tuples that the node will produce in output and how long those tuples are in bytes. A node is formatted as fol-lows:
<scan-type> on <table-or-view>
( cost = <initial-cost>...<final-cost>, rows =
<num-rows>, width = <bytes> )
where:
• scan-type represents how the node will be execut-ed, that is, how the data on mass storage will be ac-cessed to retrieve tuples. Table 2 shows the main nodes that will be explained in this two-part article;
• table-or-view is the target object for this node;• initial-cost is the cost required before the node can
start its execution, that is, the cost of preliminary op-erations (if any);
• final-cost is the cost to complete the node execution;• num-rows is the number of tuples retrieved by the
node execution;• width is the size (in bytes) of each retrieved tuple.
In the above example, the node execution can start im-mediately (the initial cost is zero) and will perform a se-quential scan (i.e., it will read each data page since no index is available) and will retrieve around 436000 tu-
table 1. Query execution cost variables defined in PostgreSQL
Variable Meaning Default valueseq _ page _ cost Cost of the I/O required to retrieve a single page in a sequential mode. 1
random _ page _ cost Cost of the I/O required to retrieve a single page in a not-sequential mode. It should not be less than seq_page_cost and can be the same value if the database is on a memory disk.
4
cpu _ tuple _ cost Cost of the CPU to process a single tuple. 0.01
cpu _ index _ tuple _ cost Cost of the CPU to process an index entry. 0.005
cpu _ operator _ cost Cost of the application of an operator to a tuple. 0.0025
geqo Enables or disables the Genetic Query Optimizer (geqo). on
geqo _ thresolhod Minimun number of tables involved in a join operation to activate the Genetic Query Optimizer (geqo).
12
table 2. A few EXPLAIN output nodes
Node type Meaning Best applies whenSeq Scan Sequential Scan. All data pages are read sequentially
without accessing any index at all.There is not a WHERE condition(s) at all or the condition(s) do not filter enough with respect to the size of the whole relation.
Index Scan Fetch one tuple pointer at a time from the index and immediately visit the tuple in the table.
The filtering conditions provide a very low set of resulting tuples (i.e., filtering is excellent).
Bitmap Index Scan Fetch all the tuple pointers in a single step, place them in a in-memory bitmap and sort them in order to access tuples in on-storage physical order.
The filtering conditions provide a number of output tuples that is reasonably less than the total number (i.e., the filtering is good) and there is more than one condition/index to to use.
Bitmap Heap Scan Use an already ordered bitmap of tuple pointers to visit the data pages in a sequential way.
Using more conditions or indexes.

www.bsdmag.org 23
PostgreSQL: indexes (Part 1)
cpu_operator_cost
-------------------
0.003
In the above query example the EXPLAIN command re-ported a final cost of 56667. This figure is produced by adding the following costs:
• 26667 data pages at cost of 1 unit each for a total of 26667;
• the cost of analysing each tuple to see if it has the right condition (cpu_tuple_cost + cpu_operator_cost); in this case, 2 million tuples at the cost of 0.015 each for a total of 30000.
The final cost is the cost of the disk I/O (retrieving all the data pages) plus the cost of “visiting” each tuple in mem-ory (cpu_tuple_cost) plus the cost of performing an in-memory check (cpu_operator_cost).
The EXPLAIN command does not actually execute a que-ry, but provides a plan for its execution It is possible to get the plan and execute the query using the EXPLAIN ANALYZE command. EXPLAIN ANALYZE provides slightly different out-put, including the execution plan (as part of the standard EXPLAIN) as well as the “real” execution time and data in-formation about every node in the plan. The above exam-ple query returns output as follows: Listing 3.
ples each 34 bytes long. The cost to complete the op-eration is of 56667. But what does this number mean? In other words, how is the cost expressed? The cost is expressed in arbitrary units, in particular in CPU and I/O operations. As shown in Table 1, the basis is a sin-gle I/O operation to retrieve a data page from mass storage in sequential mode (the most common I/O op-eration). All other operations are expressed relative to this, and therefore the cost for a random page retriev-al is supposed to be four times the cost of a sequen-tial access; similarly the cost of a CPU operation (i.e., in memory) is supposed to be 0.0025 times the cost of a sequential I/O. Thanks to the adoption of this ar-bitrary unit of measure, the optimizer can choose what is supposed to be the best access plan without hav-ing to worry about the underlying hardware. The vari-ables in Table 1 are defined in the postgresql.conf con-figuration file which be edited by DBAs in order to change the optimizer behaviour. Usually the default val-ues are appropriate when running on commodity hard-ware. The values in Table 1 can also be inspected and altered from a psql terminal using the SHOW and SET. For instance:
bsdmagdb=# SET cpu_operator_cost = 0.0030;
SET
bsdmagdb=# SHOW cpu_operator_cost;
Listing 2. Using Explain to see the path to the data
bsdmagdb=# EXPLAIN SELECT title, pages, listings
FROM articles WHERE difficulty = ‘AVG’
AND listings > 0;
QUERY PLAN
------------------------------------------------------------------
Seq Scan on articles (cost=0.00..56667.00 rows=433435 width=34)
Filter: ((listings > 0) AND (difficulty = ‘AVG’::bpchar))
Listing 3. Forcing the query execution and seeing the path to data using EXPLAIN ANALYZE
bsdmagdb=# EXPLAIN ANALYZE SELECT title, pages, listings
FROM articles WHERE difficulty = ‘AVG’
AND listings > 0;
QUERY PLAN
-------------------------------------------------------------------------------------------------------
Seq Scan on articles (cost=0.00..56667.00 rows=425522 width=34) (actual time=32.984..10113.570 rows=633407
loops=1)
Filter: ((listings > 0) AND (difficulty = ‘AVG’::bpchar))
Total runtime: 15597.446 ms

how to
10/2012 24
As readers can see, the plan includes information about the sequential scan, and for each node, the actual time in milliseconds from the beginning of the node to its end, as well as the number of rows effectively retrieved and the number of loops (i.e., how many time the node was ex-ecuted).
Why is the number of the output rows different between the plan estimation (i.e., EXPLAIN) and the real query ex-ecution (i.e., EXPLAIN ANALYZE)? The reason is that the op-timizer makes decisions based upon statistical data de-rived from each column in the target table: in particular the default is to get statistical information from 100 samples of values for each column. In other words, the planner does not know exactly which values are contained in each column and how they are arranged, but has an general overview so that it can do a good guess; but always just a guess.
The EXPLAIN command has a lot of output modes, in-cluding YAML, XML and JSON, that allow for an automat-ed analyses of the execution plan.
Sequential scans suffer from table bloating due to the MVCC (see the previous articles in this series): in fact if a table is not maintained properly its data pages will be filled by expired tuples, and since a sequential scan has no way to exclude expired tuples (and expired pages) the I/O will traverse all the expired data too.
indexesPostgreSQL provides different type of indexes in or-der to adapt as much as possible to several data types and their usage in user’s tables. The supported indexes are:
• B-Tree: can be used either on text or numeric data types, allows the search for a specific value (e.g., a key) or a range, supports less than/greater than oper-ations. Since PostgreSQL version 8.4 this index can also be used to identify NULL values;
• Hash: can be used only for equality clauses with not-nullable values. It is less robust than a b-tree index and requires maintenance in the case of a database crash;
• GIN (Generalized Inverted Index): stores a list of keys by a set of pointing rows where such keys appear, do-ing essentially the opposite of a normal index (hence “inverted”). It is used to index array columns and im-plement full text search;
• GiST (Generalized Search Tree): provides a platform for building custom tree-based indexes that allow for operations more complex than the equality or range scan of a “normal” index. For instance, it is used to in-dex geometric types and search for distance among points and shapes.
Indexes are created with the CREATE INDEX command which takes an index name, the target table and column list, the optional type of index (default to B-Tree) and op-tional clauses.
The optional clauses allow the creation of so called “partial indexes” which are indexes that do not cover the whole data set (i.e., all the values in the columns list) but only a specific set of values, and are expressed via a WHERE statement as in a normal SELECT query. For instance the following is a full index on the difficulty column of the articles table:
Listing 4. Inspecting and altering the system catalog for a specific index
bsdmagdb=# SELECT indnatts, indisunique, indisprimary, indisclustered, indisready, indisvalid FROM pg_index WHERE
indexrelid = ‘idx_difficulty’::regclass;
indnatts | indisunique | indisprimary | indisclustered | indisready | indisvalid
----------+-------------+--------------+----------------+------------+------------
1 | f | f | f | t | t
bsdmagdb=# UPDATE pg_index SET indisvalid = false WHERE indexrelid = ‘idx_difficulty’::regclass;
Listing 5. Inspecting a table with an unusable index
bsdmagdb=# \d articles
...
Indexes:
“articles_pkey” PRIMARY KEY, btree (pk)
“idx_difficulty” btree (difficulty) INVALID

www.bsdmag.org 25
PostgreSQL: indexes (Part 1)
As for normal relations, indexes have a fillfactor that can be specified at the index creation time and that al-lows for index data page free space to later add new index tuples without having the index grow in size. PostgreSQL provides a specific command, REINDEX, to start an index check and rebuild process without having to drop and cre-ate the same index again.
The catalog pg_index provides basic information about an index status, including all the above properties and a valid status. The latter is especially useful to disable an index without having to drop it, a trick that can help to make PostgreSQL forget an index without having to drop it (Listing 4).
An invalid index shows up in the table summary (\d in psql) cleary as invalid just to inform the user that the in-dex is in place but it will not be considered as an access method for any query: Listing 5.
Finally, a table can be “clustered” using an index, that is the table data is re-ordered so that it can be accessed sequentially using an index. Only full indexes can be ex-ploited for table clustering, which is a heavy operation that requires maintenance, since the clustering is not guaran-teed to survive a set of table changes and/or insertions.
Summary and Coming nextThis article introduced the reader to indexing and the cost of accessing data stored in the database. Even if mainly theoretical, this article presented the main command to in-spect the execution plan, EXPLAIN, and how to read its out-put. The next article will show to the reader examples of how indexes can be applied and how the planner decides on the access method to use and how it computes costs.
bsdmagdb=# CREATE INDEX idx_difficulty_full ON
articles(difficulty);
and the following is a partial index on the same column:
bsdmagdb=# CREATE INDEX idx_difficulty_max ON
articles(difficulty) WHERE difficulty = ‘MAX’;
Of course partial indexes cannot be used in all the que-ries but make sense for those special queries that work on a specific subset of the data; the advantage of having partial indexes is that the resulting index will be smaller (and therefore easier to maintain and to walk) than a full index.
Indexes can also be built on top of column expressions. For instance the following builds an index on the lower-case difficulty value:
bsdmagdb=# CREATE INDEX idx_difficulty_lowercase ON
articles( lower(difficulty) );
So for each tuple and thus value of the difficulty column, the index will map the tuple against the return value of the expression lower(difficulty), which is of course the lower case of the value. This would make sense if you wanted to make the index usable in case-insensitive searches or, in another scenario, if you want to search for a computation made on a tuple value.
Each time a table requires an unique constraint, ei-ther declared as PRIMARY KEY or UNIQUE constraint, Post-greSQL will create a B-Tree index to check for such uniqueness. It is worth reminding that NULL values will not honour the unique constraint, that is they are consid-ered different.
When the CREATE INDEX is executed the backend ac-quires an exclusive lock on the target table, that is other processes will be able to read tuples but not UPDATE, INSERT, or DELETE. Since the creation of an index can require a lot of time on large tables, there is the CONCURRENTLY option of the CREATE INDEX command that allows an index to be built without acquiring a write lock on the target table:
bsdmagdb=# CREATE INDEX CONCURRENTLY idx_difficulty_full ON
articles(difficulty);
The above is a lot less efficient than the regular not-con-current index creation: the process performs a first walk on the target table to build the initial index, and then per-forms a second walk to look for changes and adjusts the created index. Of course this means that using con-current index creation for unique indexes can cause the second pass to fail.
On the Web• PostgreSQL official Web Site: http://www.postgresql.org• ITPUG official Web Site: http://www.itpug.org• PostrgeSQL Explain Documentation: http://www.post-
gresql.org/docs/current/static/sql-explain.html• GitHub Repository containing the source code of the ex-
amples: https://github.com/fluca1978/fluca-pg-utils
LuCA FERRARi Luca Ferrari lives in Italy with his wife and son. He is an Adjunct Professor at Nipissing University, Canada, a co-founder and the vice-president of the Italian PostgreSQL Users’ Group (ITPUG). He simply loves the Open Source culture and refuses to log-in to non-Unix systems. He can be reached on line at http://fluca1978.blogspot.com

how to
10/2012 26
The process then calls fork() which spawns a child process. The default behavior is for all open de-scriptors in a process to be duplicated in the chil-
dren after a call to fork(). The result is two processes which can write to and read from the same two descrip-tors that are returned by the single invocation of the sys-tem call pipe(). Then, depending on the desired flow of communication, the child needs to close the descriptor opened for writing (or reading) and the parent needs to close the descriptor opened for reading (or writing). What is left is a single half-duplex channel for communication between the two processes. What the parent writes to its end of the pipe can read by the child at the other end.
Pipes have one major shortcoming: because they rely on the behavior of fork() to set up the two communication end points, they can only enable IPC between related process-es, that is, processes having a common ancestor. FIFOs, also called named pipes, were implemented to overcome this limitation and first appeared in System III Unix (1982).
Unix FIFOs are like pipes in that they are a half-duplex form of IPC. The most significant difference is that FIFOs have a name associated with them, and this provides a rendez-vous point for unrelated processes that wish to ex-change data. For this reason, FIFOs are frequently called named pipes. FIFOs live in the file system namespace, and within the file system a FIFO is its own type (exam-ples of other types being a link, directory or regular file,
etc). /bin/ls -l identifies pipes using the letter p in the output. /bin/ls -F will also include a vertical bar (e.g., |’ after the name of a FIFO in its output.
FIFOs are created by either the mkfifo(2) system call or the /sbin/mkfifo(1) command. Both take as arguments the name of the FIFO and the read-write-execute permis-sions it ought to have.
Because FIFOs have names in the file system namespace, any process which knows the name and has the proper permissions can open the FIFO and read from or write to it. Processes accessing a FIFO can use most of the system calls they would use if they were operating on a regular file (open(), read(), write(), close(), etc.). In most cases, shell commands and shell output redirec-tion treats FIFOs the same as regular files. For example, sending data into a FIFO is done using echo(1) as in:
#echo “some text” > /path/to/fifo
To read from from a FIFO, one typically uses cat(1):
#cat /path/to/fifo
If the above two commands are executed in that order, the first command, which echos data into the pipe, will not immediately return but block, waiting for the opera-tion to complete.
unix iPC with FiFOs
What you will learn…• What FIFOs are• How processes use FIFOs• The fstat(1) command
What you should know…• Basic command line operations
The article in the previous issue explained how pipes are created and used to facilitate local inter-process communication (IPC). To review, pipes are created by a process invoking the pipe() system call, which returns two descriptors, one open for reading, the other open for writing.

www.bsdmag.org
The problem is that no other process has the FIFO open for reading; therefore the write operation on the pipe blocks. Once the second command is executed, cat will read from the FIFO, echo will complete its operation, and the shell will return to the prompt. Reversing the order of the two commands produces the reverse behavior: the cat command will block, waiting for a process to open the pipe for writing.
The blocking behavior is a default, but programs can choose to change this when opening the file by specifying that read/write operations should not block. (echo and cat uses the default behavior.)
A common use case for FIFOs is a daemon that needs to provide an interface for unrelated processes that wish to modify the daemon’s configuration or modify state infor-mation. The nagios daemon is an example. During initial-ization, the daemon creates the FIFO from which it will pe-riodically read for input (this is called the command file in Nagios parlance). If there is data in the FIFO, the daemon will read it, processes it, and if it is a properly formatted command, the Nagios daemon will execute it. OpenBSD’s isakmpd(8) daemon uses this exact same method to allow a user (with proper permissions) to send commands to the running daemon to modify its behavior or change the state of existing connections.
Another use is when the output of a program needs to be sent to two different processes. Assume for instance,
Figure 1. Duplicating program output using a FIFO

how to
10/2012 28
that you have a program which accepts incoming log mes-sages from remote hosts on a network. All the incoming log data needs to be written to the appropriate files on the local host. It also needs to be scanned for exception-al conditions which may require immediate notification of administrators. By using FIFOs it is possible to decouple these to processing requirements.
Figure 1 illustrates this design. The server receives the incoming log data over the network. It writes it back out to the tee(1) utility, which duplicates its standard input to standard output and to the FIFO. Prog 1 reads the data, does some processing and writes it to local disk. Prog 2 reads from the FIFO, processing the data and then dis-carding it by sending it to /dev/null.
Another possibility is to use FIFOs for client-server com-munication. In this case, clients send requests to the serv-er via the FIFO and the server returns data to the client. The data sent by the server can’t be sent back through the same FIFO however, because the client would have no way of determining whether the data it reads is intend-ed for it or for another client. Also, the client could read from the FIFO and get a request sent by another client intended for the server. If this were to happen, then the request is lost and the client that sent it never receives a response.
The solution to bi-directional communication is to use two FIFOs. The server’s is ‘well-known’, i.e., previously known by the clients; the client creates its own FIFO and sends the name as part of the request to the server. The server then replies to the request by writing the data to the FIFO supplied by the client.
Figure 2 shows the relationships between the process-es for a simple file server. Clients 1 and 2 first created FI-FOs in /tmp using their PIDs as part of the file name. The requests that are sent to the server consist of the name of the client’s FIFO and the name of the file the client wants to read. It is sent to the server’s FIFO where it will remain until the server performs a read operation on the FIFO. The server, after reading and parsing the input and vali-
dating the request, returns the contents of the file (or an error message) by writing it to the clients FIFO.
Listing 1 is a shell script implementation of the server. Listing 2 is the client. These will be used to illustrate some properties of the FIFOs related to I/O activity. The non-blank lines are numbered to facilitate the explanation. Starting with Listing 1.
Line 3 – 8: define the path of the server’s FIFO. Check if the FIFO already exists and if so, remove it.
Line 10: call /sbin/mkfifo to create the FIFOLine 12: an infinite while loop. The script loops indefi-
nitely giving the process the characteristics of a real dae-mon.
Line 14 – 18: a ‘read from the bottom’ while loop at-tempts to read input from the FIFO. If no clients processes have the FIFO open for writing, then the server will block until input becomes available. Once input is available, it will be parsed by the script. The first portion of the input (up to the first blank space) is expected to be the name of the client’s FIFO (stored in the variable ‘out_file’); the second portion is the path name of the file requested by the client.
Line 20 – 30: This block of code validates the input and services the request. First, the script verifies that the path of the client’s FIFO exists and it is a FIFO. Then, if the file requested by the client exists, it is opened using the cat(1) utility and the output is redirected to the client’s FIFO.
Line 32: The next read operation on the server’s FIFO occurs at the bottom of the loop.
Notice that while the server is sending data to the client, it isn’t able to check its own FIFO to see if there is already another request from another client. This limitation makes this an iterative server. Listing 2 is the client.
Line 2: the client creates a FIFO in /tmp using its own PID for uniqueness.
Line 3: the client reads the file name passed as an ar-gument.
Line 6 – 11: the function ‘cleanup’ is called by the trap function. If we want to stop the client with a CTRL-C, then
Figure 2. Bi-directional data flow using FIFOs; 1 server with multiple clients

www.bsdmag.org 29
unix iPC with FiFOs
#/bin/ksh fifo_server.ksh &
After it we start the client, requesting that the we get the contents of /var/log/messages:
#/bin/ksh /fifo_client.ksh /var/log/messages
The fstat command can be used to monitor the through-put of the client’s FIFO. Reviewing the basic fstat(8) us-age and options (some may be OpenBSD specific):
The options are:
s – report file I/O statistics – the number of transfers and number of kilobytes transferred. This option produces no output unless fstat is run as the super-user, or the UID of the process is the same as the UID of the us-er running fstat.
o – report file offset. This is the byte offset from the be-ginning of the file where the process is either reading or writing.
p – the pid of the process
the signal will be caught and the ‘cleanup’ function re-moves the FIFO created by the client.
Line 15: The client sends the request by ‘echo’ing the name of the client’s FIFO and file name into the server’s FIFO.
Line 17 – 22: The loop which reads each line of input from the FIFO. The call to sleep is only for didactic pur-poses. It slows down the iterations so that we can use fstat(8) to monitor the activity while the server is sending data to the client.
We now start the server and put it in the background:
Listing 1. Interative file server listening on a FIFO
1 #!/bin/ksh
3 PATH=”/tmp/fifo_server”
5 if [ -e $PATH ]
6 then
7 /bin/rm $PATH
8 fi
10 /sbin/mkfifo $PATH
12 while (true)
13 do
14 while read line
15 do
16 input=$( echo $line | /usr/bin/sed -e ‘s/\(*
*\).*/\1/;’ )
17 out_pipe=${input%% *}
18 file=${input##* }
20 if [ -p $out_pipe ]
21 then
22 if [ -f $file ]
23 then
24 /bin/cat $file > $out_pipe
25 else
26 echo “1, $file doesn’t exist” > $out_pipe
27 fi
28 else
29 echo “$out_pipe doesn’t exist or isn’t
a named pipe”
30 fi
31
32 done < $PATH
33 done
Listing 2. Client
1 #!/bin/ksh
3 TMPFILE=”/tmp/${0}.${$}”
4 FILE=$1
6 function cleanup
7 {
8 rm $TMPFILE
9 }
11 trap ‘cleanup; exit’ 1 2 3 6 15
13 /sbin/mkfifo $TMPFILE
15 echo “$TMPFILE $FILE” > /tmp/fifo_server
17 while read line
18 do
19 echo $line
20 /bin/sleep 1
22 done < $TMPFILE
24 rm $TMPFILE

how to
10/2012 30
The column headings in the output are:
USER – the owner of the processCMD – the commandPID – the process IDFD – the file descriptor number, or one of the following
special names:text – executable text inodewd – current working directoryroot – root inodetr – kernel trace file (the output file if ktrace is run-
ning)MOUNT – mount point for file system where the particu-
lar file residesINUM – inode number for the particular fileMODE – file type and permissions on the fileR/W – whether file is open for reading and/or writingSZ/DV:OFFSET – if a regular file, this will be the size of
the file followed by the current offset into the file where the next read or write will occur; if a character or block special file, the name of the device file in /dev
XFERS – the number of times data has been transferred in either direction.
KBYTES – number of kilobytes transferred.
The client’s FIFO has the process’s PID appended to it, so we can easily look there to find the PID to use when calling fstat.
Listing 3 is the output of fstat -sop 8014. Descriptor 0 is associated with inode 7 under /tmp. The first letter in the ‘MODE’ column for this descriptor is ‘p’ meaning the file is a FIFO (or ‘named pipe’). By re-executing the fstat command several times, one will see the numbers for the XFERS and KBYTES increase as more data is read.
FIFOs have many of the attributes of pipes. The size of the kernel buffer is the same (4k), and writes less than or equal to 512 bytes are guaranteed to be atomic. After the final close() of a FIFO, any remaining data which hasn’t been read is discarded.
FIFOs are stream oriented, meaning there are no bound-aries in the data sent through it. Read and write opera-tions do not examine the data at all. There is nothing to indicate where successive input operations occurred in the data stream. Therefore, a process reading data has no way to determine anything about how the data was put in the FIFO, including whether the input came from single or multiple clients. Typical the newline character is used as a message delimiter in the data stream. This is what happens when using the shell scripts in Listing 1 and 2. The echo command executed in the client appends a newline char-acter by default to its output. The while loop in the server reads in data up to the first newline character, then iterates through the loop using the data. This allows multiple clients to connect simultaneously to the server. Nevertheless, the server can only respond to one client at a time. Many of the same designs for handling client-server concurrency in net-work servers can be applied to servers which use FIFOs.
ConclusionTo sum it up, FIFOs (or named pipes ) were developed to overcome the limitation of pipes. Pipes use the sys-calls pipe() and fork() to set up IPC between process-es, and their use is therefore limited to process having a common ancestor. FIFOs have a name in the file system namespace. They are therefore accessible to any process which knows the name of the FIFO in the filesystem. I/O operations on FIFOs use most of the same commands/functions which are used for I/O on regular files.
FIFOs are often used by daemons to receive messages from other processes.These message could contain com-mands to change the current state or running configura-tion of the daemon. FIFOs can also be used in redirected output to multiple processes.
Listing 3. Output of fstat
USER CMD PID FD MOUNT INUM MODE R/W SZ|DV:OFFSET XFERS KBYTES
paul ksh 8014 text / 16533 -r-xr-xr-x r 429720:0 0 0
paul ksh 8014 wd /home 987392 drwxr-xr-x r 5120:0 0 0
paul ksh 8014 0 /tmp 7 prw-r--r-- r 0:1689 1689 1
paul ksh 8014 1 / 958 crw--w---- rw ttyp6 3849 100
paul ksh 8014 2 / 958 crw--w---- rw ttyp6 3849 100
paul ksh 8014 10 /home 987431 -rw-r--r-- r 260:260 1 0
paul ksh 8014 11 / 958 crw--w---- rw ttyp6 3849 100
PAuL MCMAtHPaul McMath has worked as a Unix admin for 10+ years in Eu-rope and the United States. He has been using one BSD variant or another as his OS of choice since 2002.


Tips&Tricks
10/2012 32
C apture network traffic can be done in many ways with many different tools. The captured network traffic data can be categorized based on the char-
acteristics of the captured data and the tools with which the data was captured. The different types of network data are: full content data, session data, statistical data and alert data.
With full content data all the parameters of the source and the target as well as the data exchanged between the two are captured. Every element of the packet is available for analysis. Tools used to capture full content data are i.e. Tcpdump and Wireshark. Statistical data provide numeri-cally calculated information from captured network traffic. An example is i.e. 80% of my total traffic is HTTP traffic. An example of a tool able to show you statistical data is NTOP. Alert data is data which is generated by tools which are programmed to make judgement based on the traffic they inspect. Examples of tools which produce this kind of data are i.e. Bro, Prelude and Snort.
Now lets have a more detailed look at the one item left from our list above, session data.
Session DataHave you ever seen a phone bill? A detailed phone bill will show a listing of the communications that happened. But the actual audio of the conversations is not shown. Similar to the phone bill network session data provides you the in-
formation of the network communications that happened using the IP address of the two end points communicat-ing, the ports involved, how long the communication took and how many bytes were transferred. An example of a session record might look like this:
Time Src:port Dst:port Proto Bytes Flows12-04-18 13:23 172.16.1.140:3128 192.168.1.2:80 TCP 62218 33
The mother of all network session data capture software is Cisco's Netflow. Open source Netflow like tools also exist, like i.e. flow-tools. Although available for FreeBSD, flow-tools is to rich and complex for my requirements. In-stead I use Argus to capture network session data on my DMZ.
ArgusThe word Argus (http://www.qosient.com/argus/) is an abbreviation for Audit Record Generation and Utiliza-tion System. The total Argus software package consists of a collector and a set of Argus clients. The Argus sen-sor processes packets (either capture files or live pack-et data) and generates detailed status reports of the ‘flows’ that it detects in the packet stream. To capture network traffic with Argus, the system Argus is installed on must have a network interface card connected to a
Capture Session Data with Argus on FreeBSD
What you will learn…• what Argus is, • how to run Argus on FreeBSD,• how the author uses Argus.,• show some basic usage of Argus clients.
What you should know…• good general understanding of the FreeBSD operating system, • have FreeBSD administration skills,• have general networking knowledge.
Do you know what happens on your network? That’s the question I asked myself a while ago. What happens on my network? To see what happens on your network you need to capture the traffic passing through your network.

www.bsdmag.org 33
Capture Session Data with Argus on FreeBSD
/usr/ports/net-mgmt/argus3 and the Argus clients can be found in /usr/ports/net-mgmt/argus3-clients.
To install the Argus sensor do: Listing 1.The Argus sensor port comes with one configure option
which is enabled by default: SASL support. For the config-uration used here this option was disabled (deselected). This port requires the following ports: Bison, Gettext, Libi-conv and m4.
And to install the Argus clients do: Listing 2.The Argus client port comes with three configure op-
tions: SASL, authentication support (default enabled), MySQL database support (default enabled) and GeoIP
network port on which you can capture network traffic of your intended network i.e. a switch span port or a tab or a hub.
Argus is available in the FreeBSD ports tree or as a FreeBSD package. How to install and setup Argus on FreeBSD is explained next.
Argus on FreeBSDThe latest version Argus version 3 is used here although the older version 2 also still resides in the FreeBSD ports tree. A FreeBSD 8 Stable system is used with a standard GENERIC kernel. The Argus sensor ports directory is
Listing 1. Install the Argus sensor using the ports tree
user@host user $ cd /usr/ports/net-mgmt/argus3
user@host argus3 $ sudo make install clean
Listing 2. Install the Argus clients using the ports tree
user@host argus3 $ cd ../argus3-clients/
user@host argus3-clients $ sudo make install clean
Listing 3. Listing of Argus clients on a FreeBSD system after port install.
user@host argus3-clients $ ls -sla /usr/local/bin/ra*
496K -r-xr-xr-x 1 root wheel 479412 Jun 27 16:00 /usr/local/bin/ra
496K -r-xr-xr-x 1 root wheel 483508 Jun 27 16:00 /usr/local/bin/rabins
496K -r-xr-xr-x 1 root wheel 479444 Jun 27 16:00 /usr/local/bin/racluster
496K -r-xr-xr-x 1 root wheel 479412 Jun 27 16:00 /usr/local/bin/racount
10K -r-xr-xr-x 1 root wheel 10221 Jun 27 16:00 /usr/local/bin/radark
784K -r-xr-xr-x 1 root wheel 776084 Jun 27 16:00 /usr/local/bin/radump
480K -r-xr-xr-x 1 root wheel 471220 Jun 27 16:00 /usr/local/bin/rafilteraddr
62K -r-xr-xr-x 1 root wheel 61987 Jun 27 16:00 /usr/local/bin/ragraph
496K -r-xr-xr-x 1 root wheel 479412 Jun 27 16:00 /usr/local/bin/rahisto
6K -r-xr-xr-x 1 root wheel 5460 Jun 27 16:00 /usr/local/bin/rahosts
480K -r-xr-xr-x 1 root wheel 471220 Jun 27 16:00 /usr/local/bin/ralabel
496K -r-xr-xr-x 1 root wheel 485556 Jun 27 16:00 /usr/local/bin/ranonymize
496K -r-xr-xr-x 1 root wheel 479412 Jun 27 16:00 /usr/local/bin/rapath
496K -r-xr-xr-x 1 root wheel 475380 Jun 27 16:00 /usr/local/bin/rapolicy
4K -r-xr-xr-x 1 root wheel 4012 Jun 27 16:00 /usr/local/bin/raports
480K -r-xr-xr-x 1 root wheel 471444 Jun 27 16:00 /usr/local/bin/raservices
496K -r-xr-xr-x 1 root wheel 475316 Jun 27 16:00 /usr/local/bin/rasort
496K -r-xr-xr-x 1 root wheel 481812 Jun 27 16:00 /usr/local/bin/rasplit
496K -r-xr-xr-x 1 root wheel 487636 Jun 27 16:00 /usr/local/bin/rastream
496K -r-xr-xr-x 1 root wheel 475348 Jun 27 16:00 /usr/local/bin/rastrip
496K -r-xr-xr-x 1 root wheel 475316 Jun 27 16:00 /usr/local/bin/ratemplate
480K -r-xr-xr-x 1 root wheel 471476 Jun 27 16:00 /usr/local/bin/ratimerange
560K -r-xr-xr-x 1 root wheel 541332 Jun 27 16:00 /usr/local/bin/ratop
496K -r-xr-xr-x 1 root wheel 475316 Jun 27 16:00 /usr/local/bin/ratree
496K -r-xr-xr-x 1 root wheel 479444 Jun 27 16:00 /usr/local/bin/rauserdata

Tips&Tricks
10/2012 34
Listing 4a. My own home grown Argus startup script
#!/bin/sh
########################################################
#
# Filename : capture-session-data.
# Description : Script to capture session data with
Argus
# Usage : ‘basename $0’
#
#-------------------------------------------------------
# Revision History
#
# Date Initiator Description
#
########################################################
#-------------------------------------------------------
# Define some variables.
#-------------------------------------------------------
DATE=’/bin/date “+%Y%m%d-%H%M%S”’
HOSTNAME=”’hostname’”
NIC=em0
PREFACE=”$DATE.$HOSTNAME.$NIC.arg”
PORT=561
BIND=”127.0.0.1”
LOG=”/tmp/_capture-session-data.log”
TARGET=”/nsm/argus/”
PROG=”/usr/local/sbin/argus”
KILLALL=”/usr/bin/killall -9”
PKILL=”/bin/pkill”
TOUCH=”/usr/bin/touch”
CHMOD=”/bin/chmod”
PROCESS=0
VERSION=”Version 1”
AUTHOR=”(c) 2012 Lars Wittebrood”
PROGNAME=’/usr/bin/basename $0’
STATE_OK=0
STATE_WARNING=1
STATE_CRITICAL=2
STATE_UNKNOWN=3
#-------------------------------------------------------
# Some functions
#-------------------------------------------------------
print_revision () {
echo “$PROGNAME - $VERSION”
}
print_usage () {
echo “Usage: $PROGNAME
<start|stop|restart|status|-h|-help>”
}
print_help () {
print_revision
print_usage
cat << EOF
Options:
help
Print detailed help
start
Start Argus session data capture.
stop
Stop Argus session data capture.
restart
Restart Argus session data capture.
status
View status of Argus session data capture.
EOF
}
#-------------------------------------------------------
# The script
#-------------------------------------------------------
if [ ‘ps ax | grep $PROG | grep -v grep | wc -l’ -eq 1
]; then
PROCESS=1
fi
ARGV=”$@”

www.bsdmag.org 35
Capture Session Data with Argus on FreeBSD
called argus and resides in the /usr/local/sbin directo-ry. The FreeBSD Argus3 port makes a script called argus available in the /usr/local/etc/rc.d directory to startup your Argus daemon. To enable this you have to put one line in the /etc/rc.conf file of your system:
argus_enable=”yes”
The Argus startup script in /usr/local/etc/rc.d expects a Argus configuration file called argus.conf in the /usr/local/etc directory to start Argus with. The Argus port
(default disabled). For the configuration used here all op-tions were disabled (deselected). The Argus clients port requires the same ports as the Argus sensor port: Bison, Gettext, Libiconv and m4.
All the Argus clients start with the letters ‘ra’ and reside in the /usr/local/bin directory:
The output of some Argus clients will be shown later on in this article. The daemon part of Argus will be described first.
Argus can run as a process, a daemon or a sensor on your FreeBSD system. The main Argus executable is
Listing 4b. My own home grown Argus startup scriptERROR=0
if [ “x$ARGV” = “x” ] ; then
ARGV=”-h”
fi
case $ARGV in
-h | -help )
print_help
exit $STATE_OK
;;
start )
if [ $PROCESS -eq 1 ]; then
echo “$PROGNAME is already
running, cannot start process again!”
exit $STATE_WARNING
else
echo “PROCS IS ZERO. START
ENGINES.”
$TOUCH “$TARGET$PREFACE”
$CHMOD 0644 “$TARGET$PREFACE”
$PROG -d -B $BIND -P $PORT -i
$NIC -w $TARGET$PREFACE - ip
echo “Argus started.”
exit $STATE_OK
;;
stop )
if [ $PROCESS -eq 1 ]; then
kill ‘cat /var/run/argus.
em0.0.pid’
echo “Argus stopped.”
exit $STATE_OK
fi
;;
restart )
if [ $PROCESS -eq 1 ]; then
kill ‘cat /var/run/argus.
em0.0.pid’
echo “Argus stopped.”
sleep 2
$PROG -d -B $BIND -P $PORT -i
$NIC -w $TARGET$PREFACE - ip
echo “Argus restarted.”
exit $STATE_OK
fi
;;
status )
if [ $PROCESS -eq 1 ]; then
echo “Argus is running.”
else
echo “Argus is not running.”
fi
;;
* )
echo “$PROGNAME: Invalid option ‘$1’.”
print_usage
exit $STATE_UNKNOWN
;;
esac

Tips&Tricks
10/2012 36
doesn’t provide this or an example configuration file, i.e. argus.conf.example. If you want to use an argus.conf file you have to make one by yourself and put this in the /usr/local/etc directory. See the manual page of argus.conf for all the details (man argus.conf) or the argus.conf file in the Argus ports directory /usr/ports/net-mgmt/argus3/work/argus-3.0.4/support/Config. Without an ar-
gus.conf file Argus will start but not in daemon mode and listening on your first network interface card.
All the items you can set with the argus.conf configura-tion file you can also set with the command line options of the Argus daemon.
One of the drawbacks of using the argus.conf configura-tion file is that you can’t easily specify a log file with variables.
Listing 5. The Argus capture files
user@host user $ cd /nsm/argus
user@host argus $ ll
total 1193844K
drwxr-xr-x 2 root wheel 2048 Aug 9 00:30 .
drwxr-xr-x 4 root wheel 512 Apr 28 19:47 ..
-rw-r--r-- 1 root wheel 56794840 Jul 13 00:00 20120712-000000.host.intra.domain.com.em0.arg
-rw-r--r-- 1 root wheel 48633924 Jul 14 00:00 20120713-000000.host.intra.domain.com.em0.arg
-rw-r--r-- 1 root wheel 25674304 Jul 14 13:55 20120714-000000.host.intra.domain.com.em0.arg
-rw-r--r-- 1 root wheel 33876900 Jul 17 00:00 20120716-155058.host.intra.domain.com.em0.arg
-rw-r--r-- 1 root wheel 13012240 Jul 17 06:42 20120717-000000.host.intra.domain.com.em0.arg
-rw-r--r-- 1 root wheel 41346564 Jul 18 00:00 20120717-065253.host.intra.domain.com.em0.arg
-rw-r--r-- 1 root wheel 49377580 Jul 19 00:00 20120718-000000.host.intra.domain.com.em0.arg
-rw-r--r-- 1 root wheel 53981144 Jul 20 00:00 20120719-000000.host.intra.socruel.nu.em0.arg
-rw-r--r-- 1 root wheel 48500412 Jul 21 00:00 20120720-000000.host.intra.domain.com.em0.arg
-rw-r--r-- 1 root wheel 49109360 Jul 22 00:00 20120721-000000.host.intra.domain.com.em0.arg
-rw-r--r-- 1 root wheel 49626880 Jul 23 00:00 20120722-000000.host.intra.domain.com.em0.arg
-rw-r--r-- 1 root wheel 54173952 Jul 24 00:00 20120723-000000.host.intra.domain.com.em0.arg
-rw-r--r-- 1 root wheel 51922708 Jul 26 00:00 20120725-000000.host.intra.domain.com.em0.arg
-rw-r--r-- 1 root wheel 41921548 Jul 27 00:00 20120726-000000.host.intra.domain.com.em0.arg
-rw-r--r-- 1 root wheel 40257324 Jul 28 00:00 20120727-000000.host.intra.domain.com.em0.arg
-rw-r--r-- 1 root wheel 42479508 Jul 29 00:00 20120728-000000.host.intra.domain.com.em0.arg
-rw-r--r-- 1 root wheel 40505760 Jul 30 00:00 20120729-000000.host.intra.domain.com.em0.arg
-rw-r--r-- 1 root wheel 40920744 Jul 31 00:00 20120730-000000.host.intra.domain.com.em0.arg
-rw-r--r-- 1 root wheel 38011408 Aug 1 00:00 20120731-000000.host.intra.domain.com.em0.arg
-rw-r--r-- 1 root wheel 40405104 Aug 2 00:00 20120801-000000.host.intra.domain.com.em0.arg
-rw-r--r-- 1 root wheel 38112752 Aug 3 00:00 20120802-000000.host.intra.domain.com.em0.arg
-rw-r--r-- 1 root wheel 40585496 Aug 4 00:00 20120803-000000.host.intra.domain.com.em0.arg
-rw-r--r-- 1 root wheel 34510700 Aug 5 00:00 20120804-000000.host.intra.domain.com.em0.arg
-rw-r--r-- 1 root wheel 38157284 Aug 6 00:00 20120805-000000.host.intra.domain.com.em0.arg
-rw-r--r-- 1 root wheel 41144744 Aug 7 00:00 20120806-000000.host.intra.domain.com.em0.arg
-rw-r--r-- 1 root wheel 44163204 Aug 8 00:00 20120807-000000.host.intra.domain.com.em0.arg
-rw-r--r-- 1 root wheel 46095484 Aug 9 00:00 20120808-000000.host.intra.domain.com.em0.arg
-rw-r--r-- 1 root wheel 21639620 Aug 9 12:21 20120809-000000.host.intra.domain.com.em0.arg
Listing 6. A ra example
user@host argus $ ra -n -r date.hostname.em0.arg -L0 host webserver and port 80
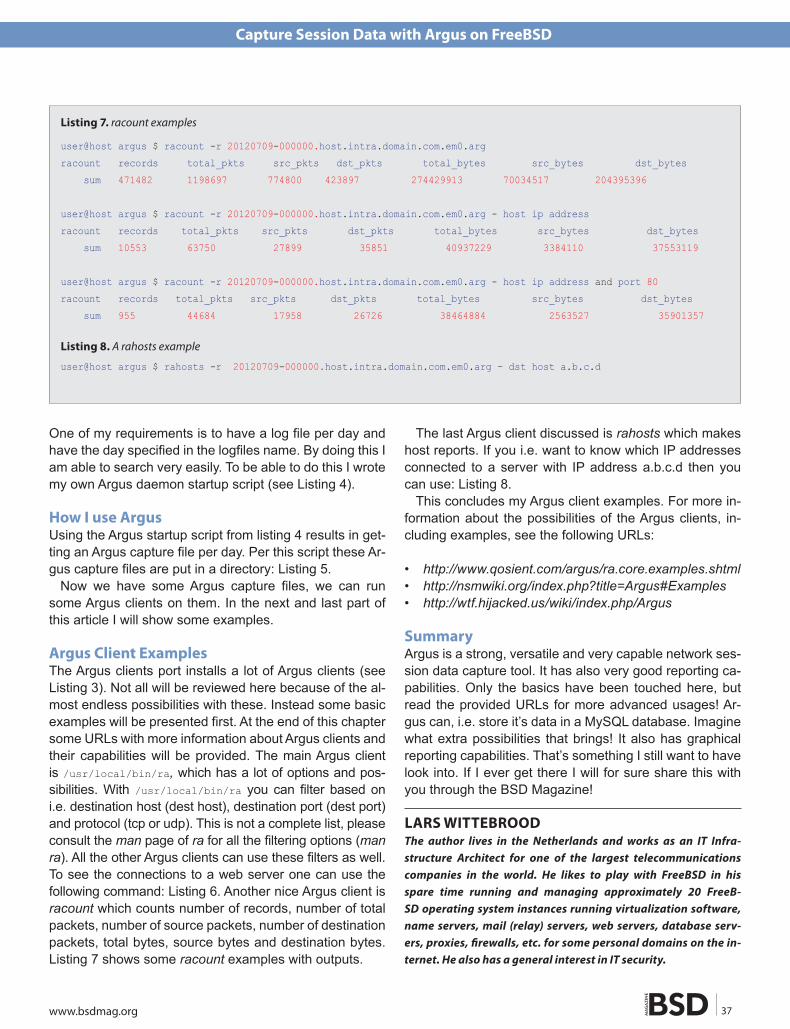
www.bsdmag.org 37
Capture Session Data with Argus on FreeBSD
The last Argus client discussed is rahosts which makes host reports. If you i.e. want to know which IP addresses connected to a server with IP address a.b.c.d then you can use: Listing 8.
This concludes my Argus client examples. For more in-formation about the possibilities of the Argus clients, in-cluding examples, see the following URLs:
• http://www.qosient.com/argus/ra.core.examples.shtml• http://nsmwiki.org/index.php?title=Argus#Examples• http://wtf.hijacked.us/wiki/index.php/Argus
SummaryArgus is a strong, versatile and very capable network ses-sion data capture tool. It has also very good reporting ca-pabilities. Only the basics have been touched here, but read the provided URLs for more advanced usages! Ar-gus can, i.e. store it’s data in a MySQL database. Imagine what extra possibilities that brings! It also has graphical reporting capabilities. That’s something I still want to have look into. If I ever get there I will for sure share this with you through the BSD Magazine!
One of my requirements is to have a log file per day and have the day specified in the logfiles name. By doing this I am able to search very easily. To be able to do this I wrote my own Argus daemon startup script (see Listing 4).
How i use ArgusUsing the Argus startup script from listing 4 results in get-ting an Argus capture file per day. Per this script these Ar-gus capture files are put in a directory: Listing 5.
Now we have some Argus capture files, we can run some Argus clients on them. In the next and last part of this article I will show some examples.
Argus Client ExamplesThe Argus clients port installs a lot of Argus clients (see Listing 3). Not all will be reviewed here because of the al-most endless possibilities with these. Instead some basic examples will be presented first. At the end of this chapter some URLs with more information about Argus clients and their capabilities will be provided. The main Argus client is /usr/local/bin/ra, which has a lot of options and pos-sibilities. With /usr/local/bin/ra you can filter based on i.e. destination host (dest host), destination port (dest port) and protocol (tcp or udp). This is not a complete list, please consult the man page of ra for all the filtering options (man ra). All the other Argus clients can use these filters as well. To see the connections to a web server one can use the following command: Listing 6. Another nice Argus client is racount which counts number of records, number of total packets, number of source packets, number of destination packets, total bytes, source bytes and destination bytes. Listing 7 shows some racount examples with outputs.
Listing 7. racount examples
user@host argus $ racount -r 20120709-000000.host.intra.domain.com.em0.arg
racount records total_pkts src_pkts dst_pkts total_bytes src_bytes dst_bytes
sum 471482 1198697 774800 423897 274429913 70034517 204395396
user@host argus $ racount -r 20120709-000000.host.intra.domain.com.em0.arg - host ip address
racount records total_pkts src_pkts dst_pkts total_bytes src_bytes dst_bytes
sum 10553 63750 27899 35851 40937229 3384110 37553119
user@host argus $ racount -r 20120709-000000.host.intra.domain.com.em0.arg - host ip address and port 80
racount records total_pkts src_pkts dst_pkts total_bytes src_bytes dst_bytes
sum 955 44684 17958 26726 38464884 2563527 35901357
Listing 8. A rahosts example
user@host argus $ rahosts -r 20120709-000000.host.intra.domain.com.em0.arg – dst host a.b.c.d
LARS WittEBROODThe author lives in the Netherlands and works as an IT Infra-structure Architect for one of the largest telecommunications companies in the world. He likes to play with FreeBSD in his spare time running and managing approximately 20 FreeB-SD operating system instances running virtualization software, name servers, mail (relay) servers, web servers, database serv-ers, proxies, firewalls, etc. for some personal domains on the in-ternet. He also has a general interest in IT security.

Security
10/2012 38
I really love the ALIX embedded boards and pfSense has a special NanoBSD build for them. The board is a 2D13 model with a Geode 800 LX 500 MHz processor,
256MB RAM, on-board crypto accelerator, three ethernet ports and a Compact Flash socket. A 1GB Compact Flash card provides more than enough space for pfSense with some additional packages. The complete firewall will only draw about 7 Watt of power (Figure 1).
pfSenseFrom the website: “pfSense is a free, open source cus-tomized distribution of FreeBSD tailored for use as a fire-wall and router. In addition to being a powerful, flexible firewalling and routing platform, it includes a long list of related features and a package system allowing further expandability without adding bloat and potential security vulnerabilities to the base distribution.”
pfSense is a fork of the M0n0wall project and the inter-face looks similar in many, many places. I switched from M0n0wall to pfSense for one feature: fail-over capabilities. Both M0n0wall and pfSense are actively maintained dis-tributions and my setup could also be created with M0n-0wall in the same way.
The version I am using is 2.1-BETA0, available at the snapshot server of the pfSense project.
PfSense comes with a pretty decent working default in-stallation. Vr0 (left network socket) is defined as LAN in-
terface with 192.168.1.1 as default address and a running DHCP server. Vr1 (middle network socket) is defined as WAN interface and will be listening for DHCP servers of-fering it an IP address.
For my setup, I changed the LAN IP addresses and DHCP server to avoid conflicting IP ranges in different
Protecting your Family with pfSense and iPSec
What you will learn…• pfBlocker• IPsec connections in pfSense
What you should know…• Basic networking• How to install pfSense• Your way around its GUI• (See BSD Magazine 2011/02)
As the family tech guy, they started to call me more and more for removing viruses and botnet infections. I fixed this by installing pfSense boxes as their primary Internet gateway. This gave them a more secure Internet connection and me some remote pfSense boxes to play with. All firewalls are connected via IPsec tunnels for remote management of the firewall and remote management of their home networks.
Figure 1. A scheme of the network

www.bsdmag.org
networks. This can be done through the serial console of through the web GUI. Please take note that the dhcp server will be disabled if you change the LAN IP through the web GUI. You need to – assign yourself a static IP address in the new IP range, in order to reconnect to the firewall’s LAN address.
pfBlockerI choose the pfBlocker package with IP lists from Emerg-ing Threats and ZeuS tracker to actively block known compromised IP addresses, both from entering the net-work or leaving the network.
If my family becomes infected with a botnet (eg. by brows-ing to a site with a Java exploit), their infected computer cannot access the Command&Control server on the Inter-net and cannot be used or misused by the botnet controller.
pfBlocker is a new 2.x package that merged the older 1.x Countryblock and IPblocklist packages. It creates an alias and a firewall rule to block traffic to and/or from the IP addresses in the alias. It is installed under System > Packages by clicking the + next to the pfBlocker package.
After installation, pfBlocker can be configured under Firewall > pfBlocker.
I do not use the features to block known spammer IP’s, as my family does not run SMTP servers and use the POP/IMAP/SMTP servers provided by their ISP, instead aFirewall rules drop all SMTP traffic arriving at the firewall.
The IP lists I configured are publicly available from Emerging Threats and iBlocklist. After enabling pfBlocker on the General tab, lists can be configured on the List tab. Click on the + to create a new list.
Alias name ET
List description Emerging Threats
Lists txt + http://rules.emergingthreats.net/fwrules/
emerging-Block-IPs.txt
txt + http://rules.emergingthreats.net/blockrules/
compromised-ips.txt
List action Deny both
Update freq Every 12 hours
This will create a new list called “ET” with two sources of IP addresses. You can look into iblocklist.com for more publicly available lists. I recommend blocking DROP (Don’t Route On Peer), ZeuS and DShield as minimum lists. iblocklist.com will offer p2p-style lists without sub-scription. pfBlocker can read these if they are added as txt lists. If you would like .gz or native .txt lists, consider taking a $9.99 yearly subscription.
Finally, pfBlocker has a widget for the dashboard to show the status and hits for each configured list.

Security
10/2012 40
iPsec for Remote ManagementpfSense is managed through the GUI (via http(s)) or the console (ssh). Both protocols are secure and can be used for management over the Internet.
To decrease the number of interesting open ports from port scans (and for fun), I choose to perform management over a vpn connection. I used OpenVPN at first, but at crucial times (like family calling for support) it dropped the connection and would not reconnect. Therefore I decided to give IPsec a try. pfSense uses IPsec-Tools, a port of KAME’s libipsec, setkey, and racoon. These tools are fully integrated in the GUI and have proven to be rock-solid.
iPsec termsInternet Protocol Security (IPsec) is a protocol suite for securing Internet Protocol (IP) communications by au-thenticating and encrypting each IP packet. It oper-ates at the IP layer (OSI layer 3). Some important terms are:
Security Associations (SA)A SA is a one-way encrypted tunnel. For bi-directional traf-fic (like a TCP connection), we need two tunnels, one for each direction. The tunnel is created between the public IP addresses of the tunnel endpoints.
Figure 2. IP tunnel phase2
Listing 1. Phase 1 main site
Interface WAN (on which interface should pfSense establish IPsec connections)
Remote Gateway <IP address> (public IP address or fqdn of remote site)
Auth. Method Mutual PSK (I will be using pre-shared symmetric keys)
My Identifier Distinguished Name + “Main” (unique name of main site)
Peer Identifier Distinguished Name + “Remote1” (unique name of remote site)
Pre-shared Key <the key> (mine is 256 bits in hex)
Policy Generation Default (the default)
Encryption Algorithm AES-128 (AES-128 is offloaded to the on-board crypto accelerator)
Hash Algorithm SHA-1
DH Key Group 2 (1024 bits)
NAT Traversal Enable (the main site is behind a NAT router)
Listing 2. Phase 1 remote site
Most settings are the same, but in reverse. So:
Remote Gateway <IP address> (public IP address or fqdn of main site)
My Identifier Distinguished Name + “Remote1” (unique name of remote site)
Peer Identifier Distinguished Name + “Main” (unique name of main site)
Policy Generation Unique (I found this to work reliable with Default at the main site)
All other settings like key and algorithm must be identical to phase 1 on the main site.

www.bsdmag.org 41
Protecting your Family with pfSense and iPSec
Setup in pfSenseIPsec connections are negotiated in two phases. In phase 1, a SA is created using the ISAKMP.
Upon successful completion, both endpoints have au-thenticated each other, exchanged keys and can commu-nicate securely. In phase 2, the actual tunnel is created for transferring data between hosts and routed networks. This tunnel is created based on the SP for the specific tun-nel (Figure 2).
I will only list the relevant fields that will create the con-nection between the main site and remote1.
Remote2 and Remote3 are done in the same way, but with their own IP addresses and their own preshared keys. IPsec connections are defined under VPN > IPsec in the GUI. First, check the box and “Save” to enable IP-sec. This will start the necessary tools. Then click the + to add connections. (Listings 1-2)
Now that phase 1 has been setup, we can decide what traffic we want to send over it. Click on “+ Show 0 Phase-2
Security Policy (SP)The SP will determine the specifications of the IPsec tun-nel, like encryption algorithms and lifetime.
Authentication Header (AH)The AH provides integrity and data origin authentication for IP datagrams by calculating a hash value of the header of the packet.
Encapsulation Security Payload (ESP)ESP provides mainly confidentiality, integrity and data-origin authentication by encrypting the payload of the IP packet.
internet Security Association and Key Management Protocol (iSAKMP)The ISAKMP provides a framework for authentication and key exchange, with authenticated keying material pro-vided often by pre-shared keys or Internet Key Exchange (IKE and IKEv2).
Listing 3. Phase 2 main site
Mode Tunnel IPv4 (tunnel mode will encapsulate the original IP packet)
Local network 192.168.2.0/24 (IP range of the main site)
Remote network 192.168.11.0/24 (IP range of the remote site)
Protocol ESP (Encapsulate Security Payload, encrypt and authenticate packet)
Encryption Algorithm AES-128
Hash algorithm SHA-1
PFS group 2 (1024 bit) (Perfect Forward Secrecy)
Listing 4. Phase 2 remote site
Most settings are the same, but in reverse. So:
Local network 192.168.11.0/24 (IP range of the remote site)
Remote network 192.168.2.0/24 (IP range of the main site)
All other settings like algorithm and PFS group must be identical to phase 2 on the main site.
Listing 5. Routing firewall traffic through the IPsec tunnel
Interface LAN (local traffic originates from this interface before being routed)
Address family IPv4
Name GW_IPsec
Gateway 192.168.11.254 (the IP address of the LAN interface)
Default Gateway No (regular Internet traffic is sent to the Internet)
Disable Gateway Monitoring Yes (no need to ping the local LAN interface, its up...)
Now the gateway is defined, we can use it in a static route. Go back to System > Routing in the GUI.
On the Routing tab, click the + button to add a new static route
Destination Network 192.168.2.0/24 (the IP range of the main site)
Gateway GW_IPsec

Security
10/2012 42
entries” to show any phase 2 entries and click on its + to add the phase-2 entry. (Listings 3-4)
If you want to route more networks over the same IP-sec connection, you will have to define them as separate phase 2 definitions under the existing phase 1. My DMZ for example has its own phase 2 definition on the main site and each remote site with the IP ranges of the DMZ, 192.168.1.0/24 instead of the 192.168.2.0/24.
Remember to Clic on “Apply Changes” at the top of the Page in order for them to take effect.
Routing FirewallBecause of the way IPsec is implemented in the BSD ker-nel, it is not possible to route traffic that originates from the firewall directly into the IPsec tunnel. It simply does not know where to go. This can be fixed by adding a stat-ic route. Traffic from the remote network arriving at the LAN interface has no problems and will be routed directly through the IPsec tunnel.
First add a new gateway. This is done under System > Routing in the GUI.
On the Gateways tab, click the + button and add a new gateway (Listing 5).
Now the gateway is defined, we can use it in a static route. Go back to System > Routing in the GUI.
On the Routing tab, click the + button to add a new static route
Destination Network 192.168.2.0/24 (the IP range of the
main site)
Gateway GW_IPsec
Now pfSense knows where the local packets destined for the main site should be delivered to (LAN interface) and how they should be routed (through the IPsec tunnel).
nAt PortsIf your box is is behind a firewall, you should open two ports for IPsec traffic.
500 udp ISAKMP
4500 udp IPsec NAT Traversal
My main site is behind NAT, so I added these ports to its NAT gateway.
Firewall RulesPfSense creates hidden firewall rules on the incoming in-terface for udp ports 500 and 4500 to allow incoming SA’s.
PfSense creates one new firewall interface for all IPsec connections. In order to allow traffic to pass through the
tunnel, you will have to add relevant firewall rules to this new interface. Allowing ssh and https from the main net-work 192.168.2.0/24 to the remote firewall 192.168.11.254 is a start.
ResultConnected to my network 192.168.2.0/24, I can browse to the address for a remote firewall (eg. https://192.168.11.254), a IPsec tunnel will be created over the Internet and the traffic is routed through the re-mote firewall and back as if they were connected to my own network. Nice.
Where do we go from here?In future Articles i will show you how to send all logfiles from the remote firewalls to a Splunk server that is located in the DMZ. For this reason, I added new phase 2 entries to all remote sites, so the remote sites can route traffic to this DMZ server via the existing SA.
Managing three remote firewalls is doable, but more will become a hassle. pfSense requires very little main-tenance, but doing the same task more than three times should be automated. One option is to script those chang-es. This will also allow to automate defenses. If one fire-wall detects a port scan, the others should add the offend-ing IP in a drop list for 12 hours.
Special thanks• pfSense for getting me interested in NanoBSD and for pro-
viding all my firewall needs: http://www.pfsense.org, snap-shots can be found at http://snapshots.pfsense.org
• Emerging Threats for their research and blocklists: http://www.emergingthreats.net
• iBlocklist for their aggregation of blocklists: http://www.iblocklist.com
• PC-Engines for their nifty ALIX boards: http://www.pcen-gines.ch/
• Varia Store for distributing ALIX boards with useful cases: http://www.varia-store.de
ERWin KOOiErwin Kooi is an information security manager for a large grid operator. He started with FreeBSD 4.5 and is an avid fan ever since.


Review
10/2012 44
I have run several different firewall/routers in the past, mostly using the self contained modem/firewall/router hardware required by my ISP for my DSL connection.
They generally work out of the box, but can be hard to cus-tomize if you don’t like the canned configuration. As well, most of the older models do not allow for IPv6. Halon offers the software to run the VSR on your own hardware (physical or virtual), as well as a hardware appliance. I downloaded the image file from their download site at http://dl.halon.se/vsr/. They have a nice wiki with all the information one needs to get started at http://wiki.halon.se/SR/Getting_started.
Accordingly, I followed their instructions to write the image file to a spare 2GB USB stick I had.
Halon does not specify the hardware requirements, but says that anything that runs OpenBSD will work. The hard-ware I chose was an old Compaq D510 in a small form factor case. It has a 2Ghz Pentium 4 processor, 512MB of memory and I added an additional Intel 10/100 network card to go along with the existing internal one. As the VSR software runs from the USB stick, I was able to disconnect the hard drive and CD-ROM in the computer to reduce the power consumption and keep it cooler.
installation and Setup of the Halon Virtual Security Router
I have been looking for a router/firewall solution for my home network for the last few months, so when an opportunity to try the Halon Virtual Security Router (VSR) came about, I jumped at it. I have a basic understanding of routers and firewalls, but I have not spent much time configuring them beyond that.
Figure 1. Start Screen

www.bsdmag.org
The computer booted from the USB stick and the VSR software, which is based on OpenBSD, did some system checks and then started into the configuration setup. It al-lows you to setup a static IPv4 or IPv6 address for the live network card, and also allows you to use DHCP.
Once the system had an IP address, it went to a Halon website to get a serial number and the latest version. It takes a couple of minutes to download the software and, after a reboot, it’s ready to configure. The console screen displays the URL for documentation, an e-mail address for support and the URL for you to configure your system. System configuration and management default to using either HTTPS or SSL secure connections.
After the logon, one is presented with a EULA followed by a few tutorial screens. Eventually, you end up on nice-ly designed home screen (Figure 1). Halon offers differ-ent features in the software by way of license. Clicking on the license icon displays information about the different licenses available. (Figure 2) The Demo license is the de-fault and is unlimited, but will halt the system every four hours. This is great if you want to test some of the high-er end features like BGP and VLANs, but obviously not something you can put into production. The free version of the license allows for up to 10 firewall rules and 1 IPsec instance. VLANs, VPNs, and BGP routing are not avail-able in the free license. For a home network, the absence of the ability to setup a VPN is a minor inconvenience, but I would not miss the other features. Interestingly, the Free license option allows for software updates, but charges $19 per update. Once the Free license is installed, the software can run completely offline from Halon. The serial number is simply a text value that would be used if you want to purchase a license or software update.
Having set the license, clicking on the admin icon al-lows you to change the default administrator password, and also to set the default admin account to read-only. The Users screen then allows you to add additional ac-counts. After making a change to the admin account, the Configuration menu lights up. You must open this menu and click on “Deploy working copy” to save your changes to the configuration file.
I then setup the second network card for the LAN side of the router. Under the Network menu, the Basic Setup shows both the WAN and LAN sides. The WAN side was already configured with the initial configuration, but any fur-ther changes can be made there now. The LAN side allows you to select the network interface you want to use and al-lows for basic configuration. Both sides allow for both IPv4 and IPv6 addressing. For the WAN side, the connection can be a static IP, DHCP, or PPPoE. The LAN side is static IP only, and allows for configuration of a basic DHCP server.

Review
10/2012 46
The system includes NAT (network address translation) for the IPv4 clients already enabled in the firewall.
Once the basic network configuration was completed, the connected workstation pulled a DHCP address from the router and was able to access the Internet as expect-ed. The default firewall configuration contains the basic rules to deal with NAT, to allow traffic on the LAN out to the Internet, and to allow management only though SSH or https. According to the license, I can add an additional six rules to the firewall, but I doubt I’d ever need that many.
What i LikeThe Overview screen shows the system at a glance. CPU usage and WAN bandwidth charts are alongside the net-work interfaces showing their current input and output bandwidth.
The system logging is always enabled by default and it has the option to store the logs elsewhere.
For monitoring the system in more detail, the graphs screen shows system hardware usage (memory and CPU), and the network interface stats in real time.
The Firewall screen shows the rules in easy to read graphics. Adding a port forwarding rule has it’s own icon and is simple to do. Flushing the states and viewing the firewall log are easy to access icons.
The configuration management of this software is really good. It allows you to easily view, edit, and deploy your configuration file. The revision management keeps a his-tory of all the changes made and it allows you view the configuration, compare changes, and return to previous versions with a couple of mouse clicks.
The Diagnostics menu allows you to drop to the Halon H/OS command line, view any of the system logs and net-
work interface traffic in real time, and has basic toruble-shooting tools for looking at the routing, ARP, and NDP tables.
This software is secure. Even as the admin user, you are still only allowed to interact with the OS through the SOAP API. The only way to directly execute commands from a shell is to enable logon of the root user. Using the root logon is great for trouble shooting, and Halon details how to do this easily in their wiki.
The support is great. I was trying to get the VSR working with IPv6 and was having no luck. I e-mailed support and they replied quickly with suggestions and troubleshooting tips. I have not been able to get IPv6 to work, but I believe the issue is with my modem hardware and my lack of time.
What i DislikeThey charge $19 for each software update after the initial installation.
Final thoughtsThe installation and setup of this software was straight for-ward and simple, but it also has the ability to have more complex configurations. It worked right away and the in-terface is well thought out and easy to navigate. Although I was not able to test this feature, the software supports IPv4 and IPv6 as dual-stack configuration and supports PPPoE which should allow users to bridge their old DSL modems and move to IPv6.
All in all, I like this VSR software.
Figure 2. License Options
ERiC GEiSSinGEREric Geissinger lives in London, Ontario, Canada and likes to tin-ker with BSD and open source software in his spare time.

EuroBSDcon
201219-21 October, Warsaw, Poland
Talks:
Saturday 20th of October
• An Overview of Locking in the FreeBSD Kernel – Kirk McKusick
• Config Management in FreeBSD using Puppet – Edward Tan• Using routing domains / routing tables in a production
network – Peter Hessler• FreeNAS system architecture – John Hixson• The pivot_root system call for BSD systems (NetBSD)
– Adrian Steinmann• How to put FreeBSD power into small MIPS switch/router
– Aleksandr Rybalko• Improvements in the IPsec stack and OpenBSD
cryptographic framework – Mike Belopuhov• A call for authentication reform – Dag-Erling Smørgrav• FreeBSD and NetBSD on APM86290 system on chip
– Zbigniew Bodek• BSD/Unix CLI and TUI Ecology – Andrew Pantyukhin• OpenBSD’s new queueing subsystem – Henning Brauer• The Warden – FreeBSD and Linux Jail Management
– Kris Moore• Advances in packages and ports in OpenBSD – Marc Espie
Sunday 21st of October
• The BHyVe Hypervisor In Depth – Michael Dexter• Extension to veriexec which uses digital signatures to verify
the provenance of a file – Alistair Crooks• Tuning ZFS on FreeBSD – Martin Matuska• Tips on running a conference for 250 people all by yourself
– Dan Langille• Running BSD-licensed Software on BSD-licensed Hardware
– Marius Strobl• OpenBSD and ‘real’ threads – Philip Guenther• mplementation of SCTP in Go (FreeBSD) – Olivier Van Acker• Touch your NetBSD – Pierre Pronchery• A Fault Aware Global Server Load Balancer in DNS
– Stefan D. Caunter, Allan C. Jude• NetBSD/usermode – Reinoud Zandijk
Talks schedule available on: http://2012.eurobsdcon.org/agenda/talks/
On 18th and 19th of October tutorials by: Dru Lavigne, Kirk McKusick, Chris Buechler, Ermal Luci, Radoslaw Kujawa, Tod McQuilin, Peter N. M. HansteenTutorial schedule on: http://2012.eurobsdcon.org/agenda/tutorials/
http://2012.eurobsdcon.org/Platinium Sponsors Gold Sponsor
Media

The event is being held at in Sunnyvale, CA
Registration is available at www.MeetBSD.com/registration
MeetBSD California 2012 promises to be an experience unlike any other.
MeetBSD California is not your average conference - it’s a meeting of the minds from all over the BSD community. MeetBSD California 2012 will feature community - driven break - out sessions, discussion groups, and 5 -10 minute “ lightning talks,” as well as longer talks from seasoned BSD experts.
Register Today!Register Today!
@MeetBSDCA www.facebook.com/MeetBSDCalifornia