build the uss constitution
TRANSCRIPT

USS CONSTITUTIONB u i l d t h e
The world’s oldest commissioned naval vessel afloat
10

Contents
Editorial and design by Continuo Creative, 39-41 North Road, London N7 9DP.Published in the UK by De Agostini UK Ltd, Battersea Studios 2, 82 Silverthorne Road, London SW8 3HE. Published in the USA by De Agostini Publishing USA, Inc.,121 E. Calhoun Street, Woodstock, IL 60098.All rights reserved © 2017
Warning: Not suitable for children under the age of 14. This product is not a toy and is not designed or intended for use in play. Items may vary from those shown.
STAGE PAGE91 Two cannons and fittings 201
92 A cannon and fittings 203
93 A cannon and fittings 205
94 A cannon and fittings 207
95 Bowsprit plan, masts and fittings 209
96 Booms, netting and fittings 211
97 The foremast 213
98 Yards and fittings 215
99 Yards, battens and fittings 217
100 Booms, fittings and rigging 219
USS CONSTITUTIONB u i l d t h e

201
USS CONSTITUTIONS T A G E : 9 1
91A Retrieve the bulwark ends from Stages 87, 88 and 89. Each set comes as a pair – separate them from one another, but keep the pairs together.Short 87Medium 88Long 89 x 2Medium (angled) 89
12
6
7
89
4
5
3
91C Now paint the ten bulwark ends with the same ochre colour as used on other parts.
91D Glue the ends from Stage 88 at the fronts of the bulwarks, and the two shorter ends from Stage 89 to the aft edges of the same section. Make sure the sides with the projecting parts are turned inwards.
E
D
91B File away the flash that was joining the two ends.
1. Natural thread 0.15mm2. Carriage bases3. Carriages4. Cannons5. Cannon wedges
B
6. Eyepins7. 4mm blocks8. 4mm double blocks9. Pins
Two cannons and fittings
91E Glue the four longer bulwark ends (Stage 89) to the sides of the entry ports, as shown.
A
C

202
USS CONSTITUTION
K
F
J
G
91H This is how the two 15mm lengths should look.
91K This stage is now complete. Store any materials that you haven’t used, because they will be needed in future stages.
91I Paint the two wedges, using the same green paint as on the inside of the bulwarks.
H
I
91J Glue each wedge to the bulwarks underneath the large bulwark ends, to create ramps for the entry ports.
91F Glue the two ends from Stage 87 to the gunwale, in line with the end of the pin rail nearest the stern (dotted line). Make sure they are aligned with each other.
91G Now take a 2 x 6 x 300mm ramin strip, and cut two 15mm lengths from it. Shape these two lengths along the long side into wedges, as shown in Step H.
15mm

203
USS CONSTITUTIONS T A G E : 9 2
92A Retrieve one of the frets containing the gun port lids, and remove the crescent-shaped frames from it.
1
2
6
7
8
4
5
3
92C Now glue five of the frames over the gun ports at the stern, as shown.
92D Collect the rest of the frets, and prepare the other frames. When the paint has dried, continue gluing them along the port side gun ports. Then repeat on the starboard side.
E
D
92B Smooth the frames with sandpaper, and then paint them black.
1. Natural thread 0.15mm2. Carriage base3. Carriage4. Cannon
B
5. Cannon wedge6. Eyepins7. 4mm blocks8. Cleats
A cannon and fittings
92E Now cut two 28mm lengths from a 1 x 11 x 300mm ramin strip.
A
C
28mm

204
USS CONSTITUTION
92G Cut four 28mm lengths of 1 x 3 x 200mm ramin strip. Carefully smooth the four pieces and paint them white. Then, when dry, use a marker pen to colour the edges of each strip black.
92K This stage is now complete. Store any materials that you haven’t used, because they will be needed in future stages.
K
F
H
G
92J Paint the lids black and leave them to dry. Then paint one side of each of them white. Glue one set to the gap in the white wale, as shown. Repeat on the other side of the hull.
I92F Test-fit one of the 28mm lengths against the side of the stem, as shown. It should be aligned with the white wale above it. Adjust the fit of the piece if necessary. Repeat on the other side of the stem, then paint the two pieces black and glue into place.
J
92H Test-fit the strips above and below those from Step F, as shown. Adjust the forward edges so that they are flush with the stem, and aligned with the white lines of the trailboard.
92I Remove two gun port lid sets from one of the frets, and smooth them with sandpaper.
205
USS CONSTITUTIONS T A G E : 9 3
93A Retrieve the gig from Stage 78, and smooth the hull with sandpaper. Then paint the outer hull white and the inner brown.
12
67
8
4
5
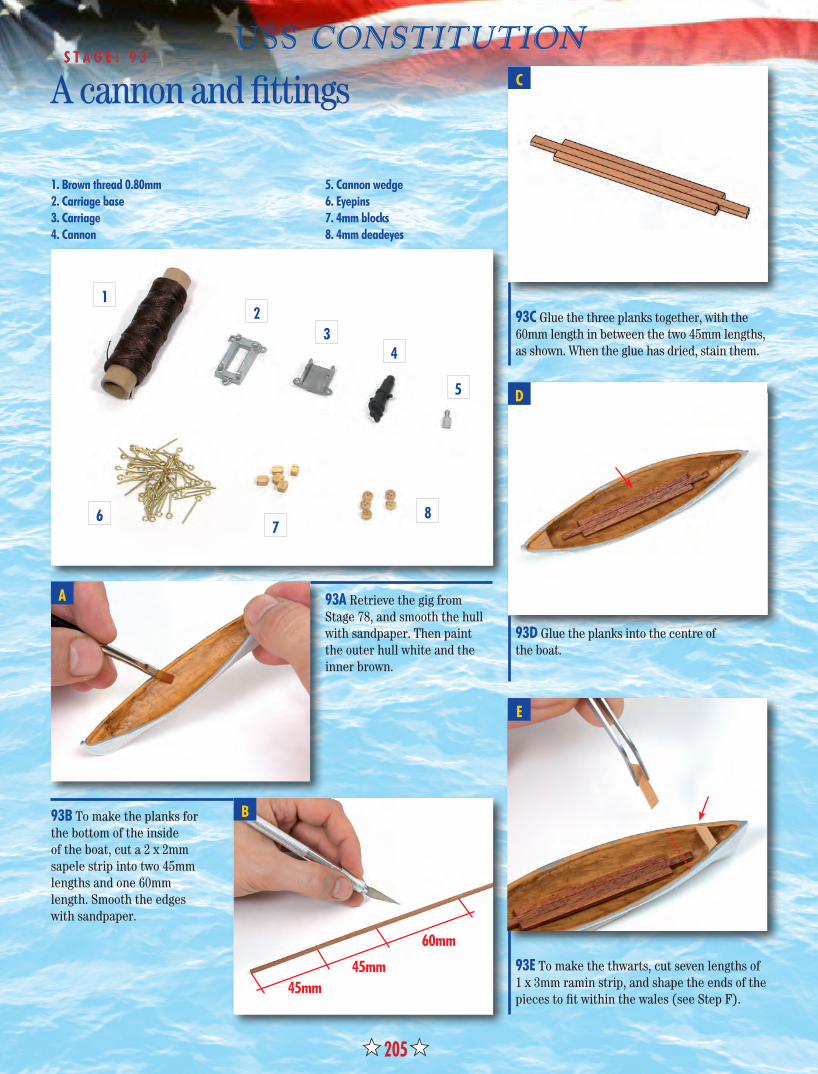
393C Glue the three planks together, with the 60mm length in between the two 45mm lengths, as shown. When the glue has dried, stain them.
93D Glue the planks into the centre ofthe boat.
E
D
93B To make the planks for the bottom of the inside of the boat, cut a 2 x 2mm sapele strip into two 45mm lengths and one 60mm length. Smooth the edges with sandpaper.
1. Brown thread 0.80mm2. Carriage base3. Carriage4. Cannon
B
5. Cannon wedge6. Eyepins7. 4mm blocks8. 4mm deadeyes
A cannon and fittings
93E To make the thwarts, cut seven lengths of 1 x 3mm ramin strip, and shape the ends of the pieces to fit within the wales (see Step F).
A
C
45mm45mm
60mm

206
USS CONSTITUTION
K
F
JG
93H Glue the gunwale into place. Make sure you place it the correct way around.
93K This stage is now complete. Store any materials that you haven’t used, because they will be needed in future stages.
93I Drill a hole at each end of the gunwale with a 0.75mm bit.
H
I
93J Now cut off most of the shanks of two eyepins, and glue them into the holes at each end of the gunwale, as shown.
93F Glue the thwarts into the positions shown, equal distances apart and sitting just below the top edge.
93G Remove the gunwale from the fret and smooth with sandpaper. Colour the edges of it so that it has a uniform colour all over, then stain it.
0.75mm
Bow
207
USS CONSTITUTIONS T A G E : 9 4
94A On one side of the ship, drill 14 pairs of holes along the aft gunwales, using a 0.75mm bit. The first and last holes should be positioned 15mm away from the bulwark ends, and the rest of the holes should be 20mm apart.
1
2
6
7
8
9
4
5
3
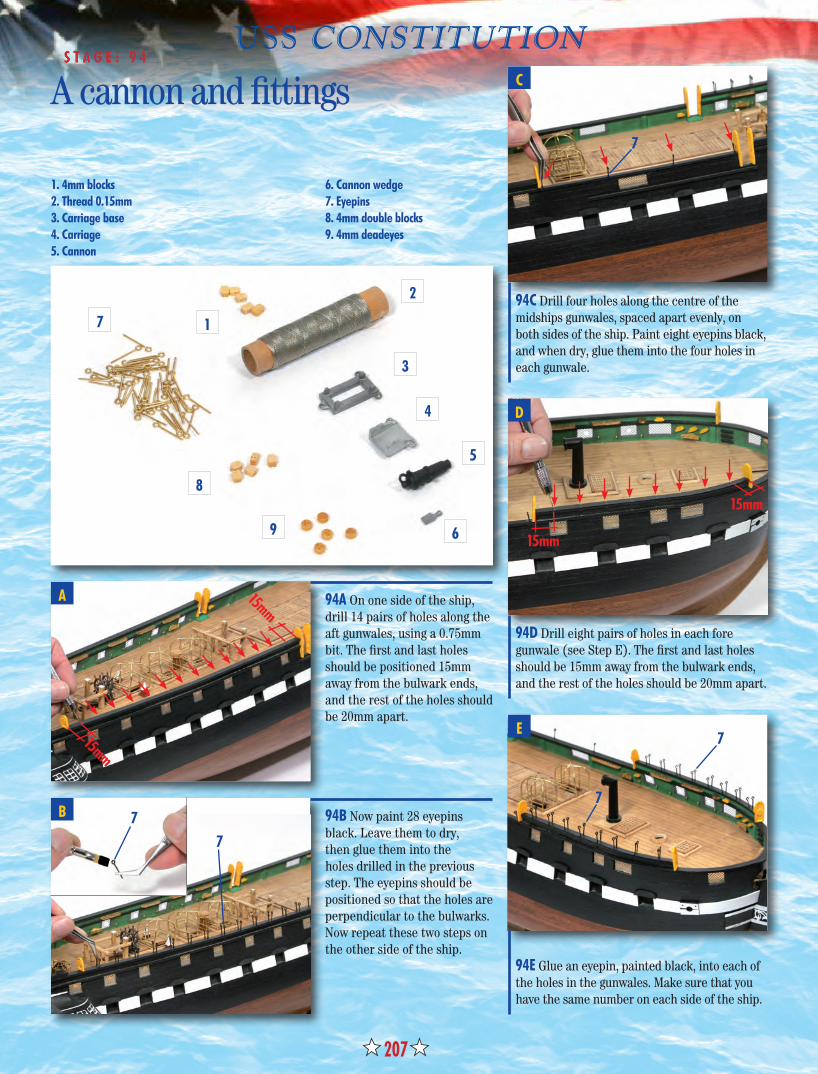
94C Drill four holes along the centre of the midships gunwales, spaced apart evenly, on both sides of the ship. Paint eight eyepins black, and when dry, glue them into the four holes in each gunwale.
94D Drill eight pairs of holes in each fore gunwale (see Step E). The first and last holes should be 15mm away from the bulwark ends, and the rest of the holes should be 20mm apart.
E
D
94B Now paint 28 eyepins black. Leave them to dry, then glue them into the holes drilled in the previous step. The eyepins should be positioned so that the holes are perpendicular to the bulwarks. Now repeat these two steps on the other side of the ship.
1. 4mm blocks2. Thread 0.15mm3. Carriage base4. Carriage5. Cannon
6. Cannon wedge7. Eyepins8. 4mm double blocks9. 4mm deadeyes
A cannon and fittings
94E Glue an eyepin, painted black, into each of the holes in the gunwales. Make sure that you have the same number on each side of the ship.
A
C
15mm
15mm
B 77
7
7
7
15mm
15mm

208
USS CONSTITUTION
K
F
J
G
94H Drill holes in the corners of the frames with a 0.75mm bit.
94K This stage is now complete. Store any materials that you haven’t used, because they will be needed in future stages.
94I Paint eight eyepins black. When the paint has dried, glue the pins into the holes in the corners of the frames.
H
I
94J Glue the two gratings to the outsides of the fore gunwales, as shown, in line with the second and third pairs of eyepins.
94F Retrieve a previously assembled grating, or glue some grating strips together to create a new one. Remove two 2 x 4 sections from it, as shown. Sand the sides smooth.
94G Cut eight lengths of 2 x 3 x 300mm strip to create the frames for the grating sections. Paint the lengths ochre, and then, when dry, glue them to the gratings.
0.75mm diameter
7

209
USS CONSTITUTIONS T A G E : 9 5
95A Cut long strips of netting 7mm wide. You can find the exact lengths needed by measuring the distances between the bulwark ends on the fore and aft gunwales.
95B The fore gunwale netting is made up from four lengths (arrowed): one along the inside, one around the platform, and one forward and one aft of the platform. Glue these lengths to the eyepins, below the loops, and the bulwark ends where possible.
95C Cut two strips to fit along the aft eyepins and glue into place. Fit the lengths of netting on the starboard side.
D
C
1. Bowsprit2. Jibboom4. Bowsprit cap5. Knee7. Steps18. Fairlead20. Spritsail yard43. Foremast cap51. Fore topmast cap
79. Fore royal yard103. Mainmast cap110. Main topmast cap159. Mizzenmast cap167. Mizzen topmast capA. EyepinsD. Double blocksBowsprit plan
Bowsprit plan, masts and fittings
95D Pass four lengths of 0.8mm brown thread through the eyepin loops, to match the four lengths of netting. Glue the ends of the thread to the bulwark ends or the eyepin loops.
A
B
7mm
2
5-7
12079
4
167
110
51
10343
18 D
A
159
From this stage on, the numbers in the parts photos refer to those listed on the 1:1 scale mast diagrams supplied with Stages 95, 97, 101, 105. The diagrams will also be referred to in the steps. The details of the parts (names, dimensions, materials etc.) are also listed on the plans.
I M P O R T A N T N O T I C E

210
USS CONSTITUTION
K
F J
G
95H Smooth the two parts with sandpaper. Then file four small grooves in both of them, as shown.
95K This stage is now complete. Store any materials that you haven’t used, because they will be needed in future stages.
95I Paint the two parts black. When they have dried, paint one face of each piece green. Leave to dry before proceeding.
H
I
95J Glue the two parts to the gunwale at the bow, ending halfway across the ports, as shown. Glue two lengths of 2 x 2mm strip, painted black, on top of the two parts, as shown.
95F Repeat the process in Step D to fit 0.8mm brown thread through the eyepin loops of the aft netting sections, on both sides of the ship.
95G Remove the two parts shown from the fret supplied with Stage 74.
95E Pass a length of 0.8mm brown thread through the eyepin loops, as shown.Secure the ends of the thread to the bulwark ends (inset). Repeat on the other side.
E
211
USS CONSTITUTIONS T A G E : 9 6
96A Remove the chocks from the fret (Stage 68) and smooth with sandpaper. Cut three lengths of 2 x 3 x 300mm strip to fit along the bottom of the chocks and glue in place (inset). Stain the chocks and leave to dry.
B-17
74
3-14
G
F
C
11
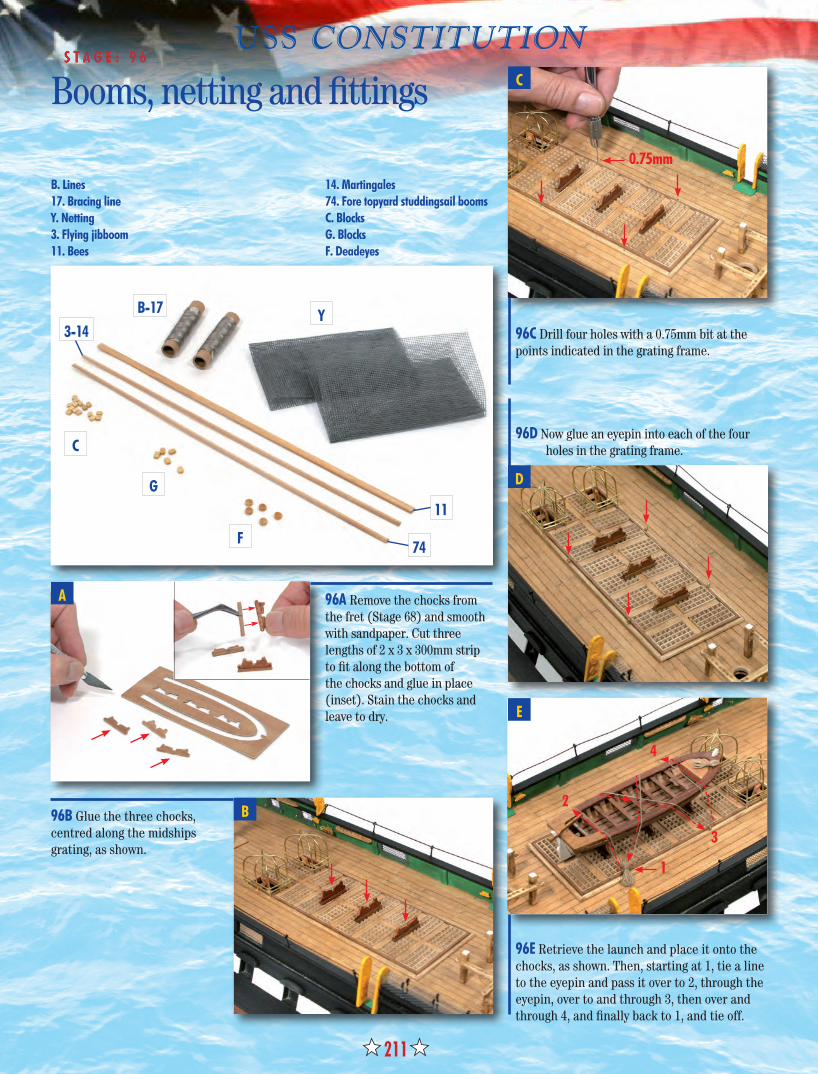
Y96C Drill four holes with a 0.75mm bit at the points indicated in the grating frame.
96D Now glue an eyepin into each of the four holes in the grating frame.
E
D
96B Glue the three chocks, centred along the midships grating, as shown.
B. Lines17. Bracing lineY. Netting3. Flying jibboom11. Bees
14. Martingales74. Fore topyard studdingsail boomsC. BlocksG. BlocksF. Deadeyes
Booms, netting and fittings
96E Retrieve the launch and place it onto the chocks, as shown. Then, starting at 1, tie a line to the eyepin and pass it over to 2, through the eyepin, over to and through 3, then over and through 4, and finally back to 1, and tie off.
A
C
B
0.75mm
1
2
3
4

212
USS CONSTITUTION
K
F
J
G
96H The masts are slightly tapered, as shown on the plan. Using a sanding block, recreate this on your bowsprit, rolling it back and forth as you move the block over it. Stop sanding when your bowsprit matches the dimensions of the one on the plan.
96K This stage is now complete. Store any materials that you haven’t used, because they will be needed in future stages.
96I The forward end of the bowsprit has to engage with the cap (4). Shape the end of it to fit with the hole in the cap, supplied with Stage 95, and that it matches the angle marked in Step F. The squared end should be 5mm long, as shown.
H
I
96J Test-fit the end of the bowsprit into the square hole in the cap. When you have the correct fit, glue the cap in place.
96F Take the bowsprit (1) and lay it on the bowsprit plan. Mark the angle of the front of the bowsprit, as indicated by the dotted line, about 5mm back from the end (see Step I).
96G Cut the aft end of the bowsprit to match the length of the one on the plan.
4
1
5mm

213
USS CONSTITUTIONS T A G E : 9 7
97A Drill four holes with a 0.75mm bit in the join between the bulwarks and the deck at the bow, in the positions shown.
97B Shorten the shanks of four eyepins, and glue them into the holes drilled in the previous step.
97C Repeat Steps A and B nine times all the way aft to the stern. Then repeat on the port side.
D
C
24. Foremast28. Rubbing paunch29. Hounds31. Bibs32. Trestle trees33. Crosstrees34. Chock35. Bolsters37. Fore top45. Fore topmast
48. Hounds49. Bibs53. Fore topgallant mast54. Hounds56. Hounds63. Fore yard studdingsail booms73. Jaws76. Jaws77. Fore topgallant yard studdingsail boomsForemast plan
The foremast
97D Retrieve the assembled carronadesand the 0.15mm natural thread (Stage 87). Cut a length of thread about 150mm long. Tie the middle of the line to the breach ring with an overhand knot, and secure it there with a drop of glue. Then repeat this for all the remaining carronades.
A
B
32
29-48
33-34-35
73
763749
2453
54
56
45
63-77
28
31
0.75mm

214
USS CONSTITUTION
K
F J
G
97H Shape the steps according to the plan. Then cut the strip to length, and glue it onto the bowsprit.
97K This stage is now complete. Store any materials that you haven’t used, because they will be needed in future stages.
97I Now prepare the knee (5) according to the bowsprit plan. Cut the piece to the rough dimensions, and then use a file to shape it. Test-fit the knee in place on the bowsprit, up against the steps, make any adjustments necessary, and then glue into position.
H
I
97J Drill five 1.5mm diameter holes through the underside of the steps. Pass three lengths of 0.8mm brown thread through the forward three holes to create the bindings (8).
97F Secure the knots with glue, and trim away the excess line.
97G To prepare the bowsprit steps (7), retrieve a 3 x 5mm strip and mark the length of the steps on the plan onto it.
97E Place two carronades at the stern, in the positions shown. Pass the breach line through the eyepins in the bulwarks, then back, and tie it off to the middle of the carriages. Tie lines from the eyepins in the deck to the loops at the rear of the carriages.
E
7
7
5
8
1.5mm

215
USS CONSTITUTIONS T A G E : 9 8
98A Drill three 5mm holes in the bow, at the positions shown.
30-39-44
50
98C Paint all of the parts black, and leave to dry. Glue the rails to the bulwarks so you have two assemblies that mirror each other.
98D Complete rails using two lengths of 2 x 5mm strip painted black, as shown. Keep these assemblies to one side.
E
D
98B Now retrieve the frets from Stages 62 and 69. Remove the parts from them and sand smooth.
9, 16, 38, 47 and 70. Cleats12. Ring13. Boom iron15. Straps26, 30, 44 and 52. Brackets, bolsters and fairleads27. Struts39. Foretop rims
41. Handrail46. Fid50. Fore topmast crosstrees57. Fore yard68. Fore topyardE. DeadeyesC. Blocks
Yards and fittings
98E Retrieve the fairlead (18) and cut it in half. Drill seven holes with a 1mm bit through one half of the fairlead and then glue that half to the bowsprit, in the position indicated on the plan.
A
C
B 1mm
68
9-26-38-41-47-52-70
C
12-13-15-16-27-46
E
57
10mm
10mm
5mm
18
216
USS CONSTITUTION
K
F
J
G
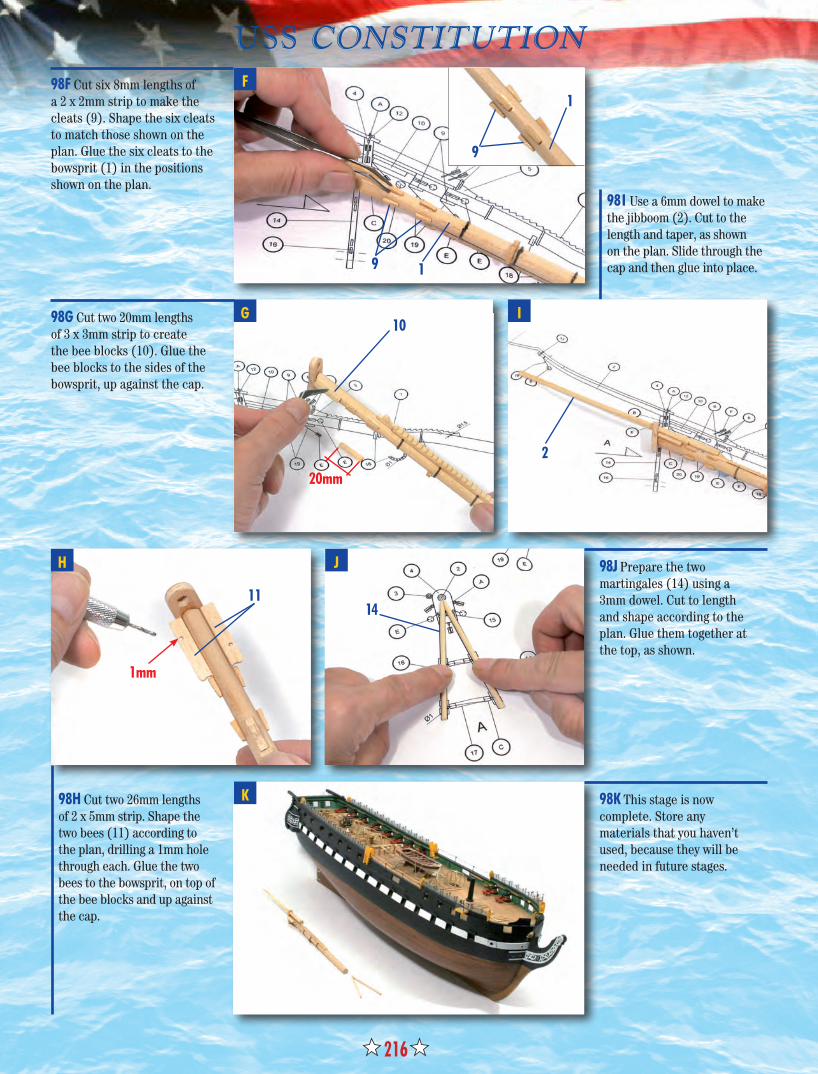
98H Cut two 26mm lengths of 2 x 5mm strip. Shape the two bees (11) according to the plan, drilling a 1mm hole through each. Glue the two bees to the bowsprit, on top of the bee blocks and up against the cap.
98K This stage is now complete. Store any materials that you haven’t used, because they will be needed in future stages.
98I Use a 6mm dowel to make the jibboom (2). Cut to the length and taper, as shown on the plan. Slide through the cap and then glue into place.
H
I
98J Prepare the two martingales (14) using a 3mm dowel. Cut to length and shape according to the plan. Glue them together at the top, as shown.
98F Cut six 8mm lengths of a 2 x 2mm strip to make the cleats (9). Shape the six cleats to match those shown on the plan. Glue the six cleats to the bowsprit (1) in the positions shown on the plan.
98G Cut two 20mm lengths of 3 x 3mm strip to create the bee blocks (10). Glue the bee blocks to the sides of the bowsprit, up against the cap.
14
10
20mm
2
9 1
9
1
11
1mm

217
USS CONSTITUTIONS T A G E : 9 9
99A Remove the knees from the fret supplied with Stage 65, and smooth them with sandpaper. Cut two 20mm lengths of 6 x 6mm wooden strip, and glue them to the knees, as shown (inset). These are the catheads.
99C Look at Step E to see where the catheads fit. Drill five holes in one side of each cathead (above left) and one in the other side (above right). Glue a shortened eyepin into each of the six holes.
99D Retrieve the ornaments supplied with Stage 69. Glue them to the ends of the catheads and paint them white.
E
D
99B Paint the catheads black. When the paint has dried, drill four evenly spaced holes at the end with a 1mm bit.
75. Fore topgallant yard79. Fore royal yard58. Fore yard battens69. Fore topyard battens71. Boom irons
61. Boom irons62. Boom irons59. Sling cleats55. Fore topgallant mast crosstrees
Yards, battens and fittings
99E Glue the catheads just below the gunwale, and just aft of the forward bulwark ends, as shown above.
A
C
B
7579
58-69
20mm
1mm
62
59
55
71
61

218
USS CONSTITUTION
K 99K This stage is now complete. Store any materials that you haven’t used, because they will be needed in future stages.
F
JG
99H Use 1mm brass rod to create the boom iron (6). Glue the boom iron over the jibboom, as shown.
99I Centre the martingale on the front of the bowsprit cap and glue it into place.
H
I
99J Create the straps (15) with a 1mm brass rod, and glue into place.
99F Now drill six 1mm holes through the martingales at the points shown on the plan.
99G Cut 16 4mm-lengths of 1mm brass rod, and glue them to the sides of the martingales according to the plan.
1mm
16
6
15
14

219
USS CONSTITUTIONS T A G E : 1 0 0
100A Retrieve the beakhead platform from Stage 77. Test-fit it in place at the bow with the bulwarks from Stage 98. Make any necessary adjustments to the fit, and then glue it into place.
100C Cut four 110mm lengths of 0.5mm brass wire and four 135mm lengths. Paint the eight lengths white.
100D Chamfer the ends of the struts (Step B), so that they fit flush with the trailboards and platform. Glue lengths of the brass wire (Step C) to the outer edges of the struts, as shown in Step E.
E
D
100B Retrieve a 2 x 4mm strip, and paint it black. Place the strip above the white wale and mark it where it intersects the beakhead platform. Repeat this nine more times to create the beakhead struts. See Step E for their positions.
8, 25 and 82. Bindings19. Slings21 and 66. Braces22, 65, 72, 78, 80, 124 and 131. Footropes23 and 67. Parrels36 and 96. Slings
60. Sling64. Stirrups122. Main yard studdingsail boomsB. LinesD. Double blocksG. Blocks
Booms, fittings and rigging
100E Glue the 10 struts in position on either side of the stem.
A
C
B
B
G
122
8-25-36-65-7282-96-124-131
D
19-21-22-23-6064-66-67-78-80
110mm
135mm

220
USS CONSTITUTION
K
100K This stage is now complete. Store any materials that you haven’t used, because they will be needed in future stages.
F
JG
100H Shape the stepped section at the end of the flying jibboom, according to the plan, with a file.
100I Paint the flying jibboom, and the section of the jibboom forward of the cap, with wood stain or brown paint, as shown.Allow them to dry before proceeding.
H
I
100J Paint the rest of the bowsprit white.
100F Shape lengths of 0.5mm brass wire to fit on the rails of the bulwarks (Stage 98). Paint the lengths white, then glue them into place, as shown.
100G Use a 3mm dowel to create the flying jibboom (3). Cut it to length and taper it as necessary.