building css navigation systems -...
TRANSCRIPT

4Building CSS NavigationSystems
Understanding CSS and Navigation 57
Crafting Horizontal Navigation Bar 58
Building Tabbed Navigation 64
Sliding CSS Navigation Panels with JavaScript 69
CSS has expanded the realm of possibilities when it comes to Web
site navigation. Designers now have a choice between navigation bars
consisting completely of graphics or those built with a mix of text,
graphics, and CSS.
CSS navigation has several key advantages. First, CSS navigation is
extremely easy to manage: You can quickly add and remove entire navi-
gation elements and just as easily adjust labels. Second, the flexibility
inherent in CSS is highly useful when it comes to navigation—you can
change a navigation bar from horizontal to vertical by switching a few
CSS declarations. And with just a little more CSS magic, your horizontal
navigation bar can become a tabbed interface.
In this chapter, you’ll learn how to structure your pages to set them up
properly for CSS navigation techniques. I’ll describe various navigation
styles—horizontal, vertical, and tabbed—in detail so you can apply the
techniques to your own pages. In addition, you can accomplish more
elaborate navigation designs by adding JavaScript to the mix. This chapter
details the JavaScript code and CSS necessary to add a sliding panel to
your site for on-demand navigation.
Macromedia Dreamweaver 8 Beyond the Basics : H•O•T56
04_DWRBB_HOT_(56-75)2.qxd 08/25/2006 12:56 PM Page 56

CSS-based navigation typically relies on the bul-leted, or unordered, list to form the HTML content.The unordered list is a perfect candidate to betransformed into graphical navigation becauseyou can render such lists without leading bulletsand in either orientation—vertical or horizontal.Additionally, you can easily display backgroundgraphics behind the list.
Each item in a list used for navigation is an HTMLlink, which allows for multistate formatting. Inaddition to the default state, linked list items alsooffer hover, visited, and active (clicked) modes.Most commonly, the a:link and a:visited CSSselectors are grouped, as are a:hover and a:active.This strategy leads to a two-state button depict-ing the default (mouse off) and hover (mouseover) conditions.
Perhaps the best reason to use lists as the basisfor CSS navigation is their potential hierarchicalstructure. Any list item can include multiplesubitems, just as a main navigation element canhave a submenu with numerous elements. You canuse many techniques for displaying such complexlist navigation through a combination of CSS andJavaScript. Patrick Griffiths and Dan Webb devel-oped one of the first versions (www.htmldog.com/articles/suckerfish/dropdowns).
The final reason for using unordered lists to createCSS navigation is what happens when CSS is dis-abled. The linked list degrades cleanly, and evencomplex navigation with multiple subitems remainsperfectly navigable.
57Chapter 4 : Building CSS Navigation Systems
Understanding CSS and Navigation
04_DWRBB_HOT_(56-75)2.qxd 08/25/2006 12:56 PM Page 57

1E X E R C I S E
Crafting Horizontal Navigation Bars
In this exercise, you’ll build a horizontal navigation bar from scratch. After you’ve inserted the unorderedlist using HTML, you’ll focus on styling the list with CSS. In addition to creating standard styles for thenavigation list items, you’ll also create a style to apply to the navigation item representing the currentpage. Once you’re done, you’ll be able to modify the button labels easily and, if desired, add a new navi-gation element or remove an existing one—all as easily as changing a bulleted list item.
Copy the chap_04 folder from the Dreamweaver 8 HOT CD-ROM onto your desktop.
In the Files panel, open horizontal_nav.htm from the chap_04 folder you copied to your desktop.Place your cursor in the text Content for “navbar” div goes here.
So you have a good starting point for this exercise file, I have removed the main navigation; only a <div>tag with the ID navbar remains. The <div> tag is absolutely positioned with the header <div>. In addition, I previously created and imported all the graphics for this exercise into the Dreamweaver 8 site so youcan focus on the navigation.
2
1
58 Macromedia Dreamweaver 8 Beyond the Basics : H•O•T
04_DWRBB_HOT_(56-75)2.qxd 08/25/2006 12:56 PM Page 58

In the navbar <div> tag, delete theplaceholder text. In the Property Inspector,click Unordered List, and type the followingfive items, each as a separate list item: destinations, properties, specials, aboutus, and contact. Select the destinationsitem, and in the Property Inspector, type #(a number sign) in the Link field to create alink; repeat this process for the other fourlist items you created.
Believe it or not, that’s all the HTML you’llneed to create the horizontal navigationbar—all the remaining steps are CSS ori-ented. The first CSS task is to set the generalfont characteristics for the navigation items.
From the Tag Selector, choose <div#navbar>. In the CSS Styles panel,switch to Current mode. In the Properties pane, click the Add Propertylink, type font-family, and then press Enter (Windows) or Return (Mac).Choose Geneva, Arial, Helvetica, sans-serif from the list. Click the AddProperty link again, type font-size, and then press Enter (Windows) or Return (Mac). Type 0.9em, and then press Enter (Windows) or Return (Mac).
Because the #navbar CSS rule already existed, you have to add only a couple of declarations to specify thelook and feel of the font for the navigation items. The CSS Current mode is great for quickly targeting aspecific style affecting a selected area.
The other timesaving action included in this step is the shortcut to typing a measurement unit. For manyCSS properties requiring a measurement value, Dreamweaver 8 has two input fields: a text field for thenumber and a list for the measurement unit (pixels, percent, and so on). Although you could have typed0.9 in the font-size text field and then chosen ems from the list, it’s much faster to type 0.9em, pressEnter (Windows) or Return (Mac), and let Dreamweaver 8 handle the rest.
Place your cursor anywhere in the unordered list, andfrom the Tag Selector, choose <ul>. In the CSS Stylespanel, click New CSS Rule. In the New CSS Rule dialog box, delete everything except #navbar ul from the Selectorpop-up menu, and click OK. In the CSS Rule definition for#navbar ul dialog box, click the List category, and choose none from the Bullet image list. Click OK.
When you create a new CSS rule, Dreamweaver 8 automatically includes the full selector identifying anyselected item. Often, it’s overkill, and you just need to remove a number of the initial items. Here, youwant to affect just the unordered list within the #navbar <div> tag and remove any bullet symbols for thelist items. Your unordered list has begun to metamorphose into a navigation bar! Next, you’ll prepare thelist items for displaying side-by-side.
5
4
3
59Chapter 4 : Building CSS Navigation Systems
04_DWRBB_HOT_(56-75)2.qxd 08/25/2006 12:56 PM Page 59

Place your cursor in any list item, andfrom the Tag Selector, choose <li>. Inthe CSS Styles panel, click New CSSRule. In the New CSS Rule dialog box,delete everything except #navbar li fromthe Selector pop-up menu, and click OK.In the CSS Rule definition for #navbar lidialog box, click the Block category, andchoose no-wrap from the Whitespacelist. Click the Box category, and chooseleft from the Float list. Click OK.
CSS at an intermediate stage isn’t alwayspretty. Here, before you add any otherstyles, all the list items run together. You’llfix this design with the next applied style,but it’s important to understand that sometimes you have to go through seemingly unwanted appearancesto get the effect you want. The whitespace: no-wrap declaration ensures all navigation labels, includingthose with two or more words, appear in a single line.
The next step spaces out the individual links and adds the graphic button-like background—all by stylingthe <a> tags in the list.
Make sure your cursor is in the string of listitems. From the Tag Selector, choose <a>. In theCSS Styles panel, click New CSS Rule. In the NewCSS Rule dialog box, delete everything except#navbar a from the Selector pop-up menu. ClickOK. In the CSS Rule definition for #navbar a dia-log box, click the Background category, and clickthe folder icon for Background image. Navigateto the assets/topNav folder, and choosemain_short.gif. From the Repeat pop-up menu,choose no-repeat. Keep the CSS Rule definitionfor #navbar a dialog box open.
This is the heart of the technique for converting a text link to a graphic image with an embedded label.By adding a background image to the link selector, you begin to create the illusion of a button. However,you won’t see any real change until you complete the styling of the #navbar a selector in the next step.
7
6
60 Macromedia Dreamweaver 8 Beyond the Basics : H•O•T
04_DWRBB_HOT_(56-75)2.qxd 08/25/2006 12:56 PM Page 60

In the CSS Rule definition for #navbar adialog box, click the Block category, andchoose center from the Text align pop-upmenu. From the Display list, choose block.Click the Box category, set Width to 110pixels, and set Height to 31 pixels. Turn offthe Same for all check box under Padding,and in the Top field, type 10 pixels. Click OK.
Now you’re cooking! The display: blockdeclaration is key to achieving button-likebehavior and actually separates the list itemsinto individual entities. The remaining decla-rations (width: 110px, height: 31px, andpadding-top: 10px) all serve to shape thebutton area. Next, you’ll style the label textmore appropriately.
In the CSS Styles panel, click New CSSRule. In the New CSS Rule dialog box, makesure Selector Type is set to Advanced. In theSelector field, type #navbar a:link, #navbara:visited, and click OK. In the CSS Rule defi-nition #navbar a:link, #navbar a:visited dialog box, click the Type category, set color to #4b4b4b, and turn on the Decoration: none check box. Click OK.
With the underline gone and the color adjusted for both the link and visited states, the navigation list islooking good. It’s important that the styles for the various link states appear in a particular order: link, visited, hover, and active. (The standard mnemonic for remembering this order is the somewhat cynicalLoVe, HA!) So, the next task is to set the values for the hover and active states.
In the CSS Styles panel, clickNew CSS Rule. In the New CSSRule dialog box, type #navbara:hover, #navbar a:active in theSelector field, and click OK. Clickthe Type category, set color to#4b4b4b, and turn onDecoration: none. Click theBackground category, and clickthe folder icon for Backgroundimage. Navigate to theassets/topNav folder, andchoose main_short_f2.gif. Fromthe Repeat pop-up menu,choose no-repeat. Click OK.
10
9
8
61Chapter 4 : Building CSS Navigation Systems
04_DWRBB_HOT_(56-75)2.qxd 08/25/2006 12:56 PM Page 61

This style combines the same color and text-declaration values applied to both the link and visited stateswhile swapping a green-tinged background image for the gray version. Notice this CSS-based navigationbar uses only two graphic images: main_short.gif and main_short_f2.gif. A similar, purely graphic naviga-tion bar would use ten images.
Press Ctrl+S (Windows) or Cmd+S (Mac) to save your file, and press F12. When your primarybrowser opens, move your cursor over the navigation “buttons” to see the hover effect.
In the next step, you’ll use the same graphic, and in fact the same styles, as you applied for the hoverand active states to indicate the current page.
In the CSS Styles panel, switch to Allmode, and right-click (Windows) orCtrl+click (Mac) the #navbar a:hover,#navbar a:active selector. ChooseDuplicate from the contextual menu. In theDuplicate CSS Rule dialog box, type #sellink a:link, #sellink a:visited, #sellinka:hover, #sellink a:active in the Selectorfield. Click OK. To apply the style, placeyour cursor in the specials navigation link,and from the Tag Selector, right-click(Windows) or Ctrl+click (Mac) <li>, andchoose Set ID: sellink.
The transformation from an unordered listto a fully graphical navigation bar is nowcomplete. In this step, you created a style to indicate the current or selected navigation element. Thestyle selector encompasses all the states of the navigation button to ensure the image does not change,regardless of the cursor position.
Choose File > Save, or press Ctrl+S (Windows) or Cmd+S (Mac). Press F12 to preview the page inyour browser. When your browser opens, move your cursor over the navigation to see the rollover effect.Close your browser; back in Dreamweaver 8, close horizontal_nav.htm.
In this exercise, you created a horizontal navigation bar by combining CSS styles and an unordered list. Inthe next exercise, you’ll see how you can create tabbed navigation with CSS.
13
12
11
62 Macromedia Dreamweaver 8 Beyond the Basics : H•O•T
04_DWRBB_HOT_(56-75)2.qxd 08/25/2006 12:56 PM Page 62

63Chapter 4 : Building CSS Navigation Systems
N O T E : Creating Vertical CSS NavigationYou can convert an unordered list into a vertical CSS navigation bar in much the samemanner as you create the horizontal navigation bar—in fact, it’s even simpler. Becausethe unordered list is already in a vertical format, it requires less CSS styling. The key CSSselector to change is #container li, where #container is the ID of the enclosing style. Inthe horizontal navigation bar example, you styled the #navbar li selector like this:
#navbar li {float: left;white-space: nowrap;
}
You’ll recall the float: left declaration brought all the list items onto a single, run-online. The corresponding vertical navigation bar style is #navColumn li:
#navColumn li {margin-bottom: 10px;white-space: nowrap;
}
This replaces the float: left declaration with a bit of margin adjustment. If your verticalnavigation bar uses background images, the rest of the CSS is basically the same—just substitute #navColumn for #navbar, and make whatever spacing adjustments (suchas width) are necessary to fit the column.
Remember, you don’t have touse graphics to indicate navi-gation—simple, clean text withhighlighting borders can be justas effective. The vertical naviga-tion bar shown in the illustrationhere uses an unordered list(with the bullets removed) withthin top and bottom borders toindicate the current link.
V I D E O : vertical_nav.movTo learn more about building your CSS vertical navigation from scratch, check outvertical_nav.mov in the videos folder on the Dreamweaver 8 HOT CD-ROM.
04_DWRBB_HOT_(56-75)2.qxd 08/25/2006 12:56 PM Page 63
2E X E R C I S E
Building Tabbed Navigation
You can extend CSS navigation bars to create another popular Web site look: tabs. Tabbed navigationgives the appearance of a single, unified file whose view switches whenever a site visitor selects a tabfrom those at the top of the page. To accomplish this effect, you’ll need a different “current selection”image—one that appears to be open at the bottom. You’ll also need to adjust your design to includeborders around the content area. The combination of the two—the current selection image and the page design—gives the illusion of the current tab opening into the content. A bit of CSS positioningmagic ties it all together. That’s why a successful tabbed navigation design encompasses both the navi-gation (the images) and the page design (the CSS). In this exercise, you’ll learn how to add the CSS tocreate a tabbed navigation effect.
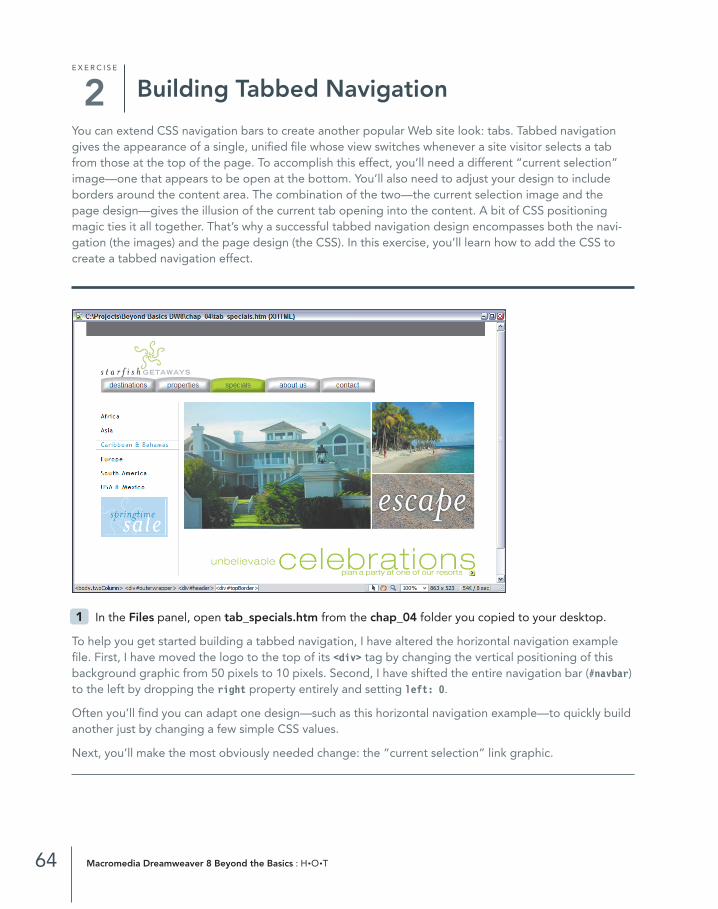
In the Files panel, open tab_specials.htm from the chap_04 folder you copied to your desktop.
To help you get started building a tabbed navigation, I have altered the horizontal navigation examplefile. First, I have moved the logo to the top of its <div> tag by changing the vertical positioning of thisbackground graphic from 50 pixels to 10 pixels. Second, I have shifted the entire navigation bar (#navbar)to the left by dropping the right property entirely and setting left: 0.
Often you’ll find you can adapt one design—such as this horizontal navigation example—to quickly buildanother just by changing a few simple CSS values.
Next, you’ll make the most obviously needed change: the “current selection” link graphic.
1
64 Macromedia Dreamweaver 8 Beyond the Basics : H•O•T
04_DWRBB_HOT_(56-75)2.qxd 08/25/2006 12:56 PM Page 64

Place your cursor in specials, the currently selected link. In the CSS Stylespanel, switch to Current mode. In theProperties pane, select the background-image value, and click the folder icon. Inthe Select Image Source dialog box,navigate to the chap_04/assets/topNavfolder, and select main_tab.gif. Click OK.
Rather than use a different color to indicate the current page, the tab graphic appears to remove thebottom portion of the image. One key point to remember is it’s important to use the same color for theinterior of the tab as the background color of the content area. In this example, both are white.
Although setting up the current selection creates the right look, you might notice the significant gapbetween the navigation bar and the top of the content area. In the next step, you’ll modify the CSS styles to move them closer.
If your CSS layout outlines are not visible, in the Document toolbar, choose Visual Aids > CSSLayout Outlines. In the CSS Styles panel, switch to All mode, and select the navbar a selector. In the Properties pane, change the height value to25px. Click the Add Property link, type margin-bottom, press Enter (Windows) or Return (Mac),and type—2px.
As you make the CSS adjustments, you can see the#navbar <div> moving closer to the content area.Although reducing the height of the style does thebulk of the work—effectively removing the unusedwhitespace below the images—it’s often necessaryto fine-tune your spacing with negative margins.Trial and error is the best way to find the precisedesired value. Now, you’re ready to add the first of your borders below the #navbar <div> and make sure it spans the page.
3
2
65Chapter 4 : Building CSS Navigation Systems
04_DWRBB_HOT_(56-75)2.qxd 08/25/2006 12:56 PM Page 65

Place the cursor any-where in the navigation bar,and choose <div#navbar>from the Tag Selector. In the CSS Styles panel,switch to Current mode. Inthe Properties pane, clickthe Add Property link, typewidth, and press Enter (Windows) or Return (Mac). Type 100%, and press Enter (Windows) or Return(Mac). Click the Add Property link again, type border-bottom, and press Enter (Windows) or Return (Mac).Type solid 1px #CCC, and press Enter (Windows) or Return (Mac).
To achieve the appearance of the border encompassing all the content, you set the width of the #navbar<div> to 100%. You typed the border itself in shorthand: solid 1px #CCC. Why didn’t you have to use thefull six-figure value, #CCCCCC? Full hexadecimal color numbers consist of three hexadecimal pairs. Ifboth members of the pair are the same—such as CC—you can represent it with just a single letter. Thus,#FFF is the same as #FFFFFF.
Even with the #navbar border, the illusion is not complete. You’ll add the missing side borders in the next step.
Place your cursor anywhere in the navigation column on the left side of the page. From the TagSelector, choose <div#content>. In the CSS Styles panel, switch to Current mode, and click the AddProperty link from the Properties pane. Type border-left, and press Enter (Windows) or Return (Mac).Type solid 1px #CCC, and press Enter (Windows) or Return (Mac). Before you confirm the entry, select it,and press Ctrl+C (Windows) or Cmd+C (Mac). Click the Add Property link again, and type border-right.Press Enter (Windows) or Return (Mac), and then press Ctrl+V (Windows) or Cmd+V (Mac) to paste solid 1px #CCC into the value field.
5
4
66 Macromedia Dreamweaver 8 Beyond the Basics : H•O•T
04_DWRBB_HOT_(56-75)2.qxd 08/25/2006 12:56 PM Page 66

Place your cursor in the footer links, and choose <div#footerText> from the Tag Selector. In theCSS Styles Properties pane, click the Add Property link, and type border-left; press Enter (Windows) or Return (Mac), and then press Ctrl+V (Windows) or Cmd+V (Mac) to paste solid 1px #CCC. Click theAdd Property link one last time, and type border-right. Press Enter (Windows) or Return (Mac), andthen press Ctrl+V (Windows) or Cmd+V (Mac) to again paste solid 1px #CCC.
Although you might find the repetition a bit tedious, these steps add the necessary borders along theouter edges of the content area and the footer, which consolidates the page as a whole and completesthe tabbed visual effect. Continuing the side borders from the content to the footer area has the addedadvantage of blurring the divisions the page is constructed from because it connects the content andfooter areas.
Next, you’ll see how to leverage all your work so far and begin building other pages in your tabbed set.
In the main navigation bar,select the specials navigationlabel. In the Property Inspector,type tab_specials.htm in the Linkfield. Select the properties label,and in the Link field, type tab_properties.htm. Press Ctrl+S (Windows) or Cmd+S (Mac) to save yourdocument. Choose File > Save As, and in the Save As dialog box, type tab_properties.htm in the Filename field.
In a real-world situation, it’s likely you would already have links set up for your primary navigation. To seethe tabs in action, you’ll need a minimum of two pages, each linked to the other.
In the main navigation bar, select the specials navigationlabel. From the Tag Selector, right-click (Windows) orCtrl+click (Mac) <li#sellink>, and choose Set ID > Nonefrom the contextual menu. Select the properties navigationlabel, and right-click (Windows) or Ctrl+click (Mac) <li>, andchoose Set ID > sellink from the contextual menu.
See how easy it is to switch from one indicated tab toanother? In a production setting, you’d need to perform this operation for the major navigation items, each on their own page. You’ll now see how it all works.
8
7
6
67Chapter 4 : Building CSS Navigation Systems
04_DWRBB_HOT_(56-75)2.qxd 08/25/2006 12:56 PM Page 67

Press Ctrl+S (Windows) or Cmd+S (Mac), and then press F12 to preview the page in your browser.Click from the properties page to the specials page to see the tabs move from one page to the other.
In a real-world situation, the content would change on each page, but you can see how the tabbed navi-gation is effective at simultaneously indicating the current page while retaining a connection to all theother navigation elements.
Close tab_specials.htm.
In this exercise, you learned how to create a tabbed navigation bar with CSS. Next, you’ll learn how tocombine JavaScript with CSS to create a sliding navigation panel.
10
9
68 Macromedia Dreamweaver 8 Beyond the Basics : H•O•T
04_DWRBB_HOT_(56-75)2.qxd 08/25/2006 12:56 PM Page 68

3E X E R C I S E Sliding CSS Navigation Panels
with JavaScriptNavigation, especially in a sidebar, can take up a lot of screen real estate. Sometimes the site design callsfor more emphasis on content areas and less on always-visible secondary navigation. One solution is toput your side navigation on a separate panel, which a site visitor can display or hide with the click of abutton. Although the panel simply repositions from offscreen to onscreen, the site visitor sees a slidingmotion. In this exercise, you’ll learn how to produce this action by combining JavaScript (to move thepanel in and out) with CSS (to display the interactive area).
In the Files panel, open sliding_nav.htm from the chap_04 folder you copied to your desktop.
For this starting point, I have replaced the usual series of side navigation links with additional content. Alink at the bottom of the column (More Locations) indicates where first-time visitors can find additionalchoices. Whenever you expand your navigation into new—somewhat nonstandard—designs, it’s alwaysgood to point the way for your site visitors.
In this example, the left-pointing angle bracket indicates where you can find the sliding panel control.The first step in creating the panel is to define a number of CSS styles that comprise the sliding panel; an outer wrapper is first necessary to contain the sliding panel’s contents and its handles. As you’ll see,you’ll need two handles: one for when the sliding panel is on the screen (the onHandle) and another forwhen it is off (the offHandle).
1
69Chapter 4 : Building CSS Navigation Systems
04_DWRBB_HOT_(56-75)2.qxd 08/25/2006 12:56 PM Page 69

In the CSS Styles panel, click New CSS Rule.In the New CSS Rule dialog box, set SelectorType to Advanced, and type #navWrapper in theSelector field. Click OK. In the CSS Rule definitionfor #navWrapper dialog box, click the Backgroundcategory, and set Background color to white.Click the Border category, turn on all the Samefor all check boxes, and then for Top, Bottom,and Left, set Style to Solid, Width to 1 pixel, andColor to #CCC. Click the Positioning category,and set Type to absolute, Width to 186 pixels,and Z-Index to 20. Under Placement, set Leftto –176 pixels. Click OK.
Obviously, a lot is going on with this rule. Although its main purpose is to hold together two other <div>tags, it also has some secondary functions. First, it must cover the existing side panel; this is why youexplicitly set the background to white and assign a higher z-index value. Additionally, the #navWrappercontrols the actual positioning of the sliding panel. Initially most of the panel—all but the handles—willbe offscreen, which is why you set the Left value to a negative number.
Next, you’ll define the style for the #navColumn.
In the CSS Styles panel, click New CSS Rule. In the New CSS Ruledialog box, set Selector Type to Advanced, and type #navColumn in theSelector field. Click OK. In the CSS Rule definition for #navColumn dia-log box, click the Type category. Set Line height to 100%. Click theBlock category, and set Letter spacing to .1em. Click the Box category,set Width to 146 pixels, and set Float to left. Turn off the Same for allcheck box under Padding, and type 30 pixels for both Top and Left.Click OK.
Aside from the float: left declaration, almost all the setup for this styleconcerns formatting and placing text. If you compare it to previous#navColumn rules, you’ll notice it’s a bit narrower. You do this to accommo-date the two styles for the handle, defined in the next step.
3
2
70 Macromedia Dreamweaver 8 Beyond the Basics : H•O•T
04_DWRBB_HOT_(56-75)2.qxd 08/25/2006 12:56 PM Page 70
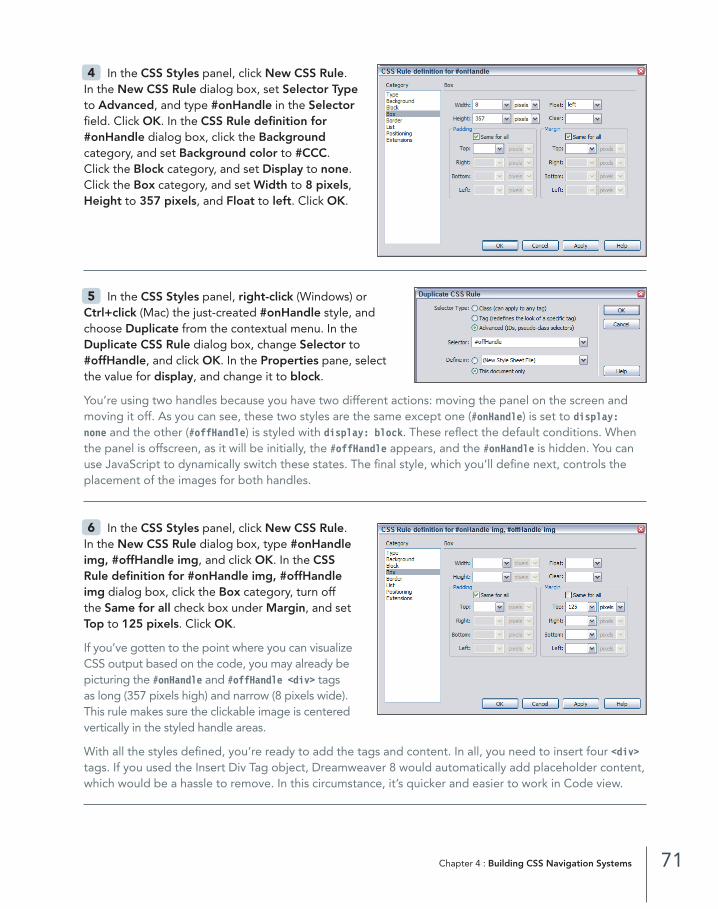
In the CSS Styles panel, click New CSS Rule.In the New CSS Rule dialog box, set Selector Typeto Advanced, and type #onHandle in the Selectorfield. Click OK. In the CSS Rule definition for#onHandle dialog box, click the Backgroundcategory, and set Background color to #CCC.Click the Block category, and set Display to none.Click the Box category, and set Width to 8 pixels,Height to 357 pixels, and Float to left. Click OK.
In the CSS Styles panel, right-click (Windows) orCtrl+click (Mac) the just-created #onHandle style, andchoose Duplicate from the contextual menu. In theDuplicate CSS Rule dialog box, change Selector to#offHandle, and click OK. In the Properties pane, selectthe value for display, and change it to block.
You’re using two handles because you have two different actions: moving the panel on the screen andmoving it off. As you can see, these two styles are the same except one (#onHandle) is set to display:none and the other (#offHandle) is styled with display: block. These reflect the default conditions. Whenthe panel is offscreen, as it will be initially, the #offHandle appears, and the #onHandle is hidden. You canuse JavaScript to dynamically switch these states. The final style, which you’ll define next, controls theplacement of the images for both handles.
In the CSS Styles panel, click New CSS Rule.In the New CSS Rule dialog box, type #onHandleimg, #offHandle img, and click OK. In the CSSRule definition for #onHandle img, #offHandleimg dialog box, click the Box category, turn offthe Same for all check box under Margin, and setTop to 125 pixels. Click OK.
If you’ve gotten to the point where you can visualizeCSS output based on the code, you may already bepicturing the #onHandle and #offHandle <div> tagsas long (357 pixels high) and narrow (8 pixels wide).This rule makes sure the clickable image is centeredvertically in the styled handle areas.
With all the styles defined, you’re ready to add the tags and content. In all, you need to insert four <div>tags. If you used the Insert Div Tag object, Dreamweaver 8 would automatically add placeholder content,which would be a hassle to remove. In this circumstance, it’s quicker and easier to work in Code view.
6
5
4
71Chapter 4 : Building CSS Navigation Systems
04_DWRBB_HOT_(56-75)2.qxd 08/25/2006 12:56 PM Page 71

If necessary, in the Document toolbar, chooseVisual Aids > CSS Layout Outlines. In the Documentwindow, select the #leftColumn outline, and switch toCode view. Press the left arrow key once, and thenpress Enter (Windows) or Return (Mac) to create anew line. Type the following code:
<div id=”navWrapper”><div id=”navColumn”></div><div id=”onHandle”></div><div id=”offHandle”></div>
</div>
The sliding panel is really a mini-version of the two-column layout used in Chapter 3, “Creating CSSColumn Layouts.” You insert the outer <div> tag to hold all the pieces together, and then you add thecolumns, each floated left. The wrinkle here, of course, is you actually have three side-by-side columns—#navColumn, #onHandle, and #offHandle—but JavaScript ensures only two are on the page at any one time.Now, you’re ready to add content for the navigation column.
Place your cursor after the code <divid=”navColumn”>, press Enter (Windows) orReturn (Mac), and then type the following code:
<p>Africa</p><p>Asia</p><p class=”currentLink”>Caribbean &Bahamas</p><p>Europe</p><p>South America</p><p>USA & Mexico</p>
Although it’s almost always easier to add text in Design view, in this situation it’s not. As you’ll remember,the #navColumn is currently hidden from view. Certain operations, however, are just as easy in Code view asin Design view—such as adding images, as you’ll see in the next step when inserting the handle graphics.
8
7
72 Macromedia Dreamweaver 8 Beyond the Basics : H•O•T
04_DWRBB_HOT_(56-75)2.qxd 08/25/2006 12:56 PM Page 72

Place your cursor after the code <div id=”onHandle”>, and in the Insertbar, click Image. In the Select Image Sourcedialog box, navigate to chap04/assets/, andselect handle.gif. Place your cursor after thecode <div id=”offHandle”>, and in theInsert bar, click Image. In the Select ImageSource dialog box, select handle_f2.gif.
You can add almost all objects using theInsert bar in Code view; Dreamweaver 8gives you the same convenience of point-and-click coding while allowing your posi-tioning to be precise. You can even add alink, as you’ll see next.
Select the code <img src=”assets/handle.gif” border=”0” />, and then in the Insert bar, click Hyperlink. In theHyperlink dialog box, type javascript:; in the Link field,and click OK. Select the code <img src=”assets/handle_f2.gif” border=”0” />. Again, in the Insert bar,click Hyperlink, and in the Hyperlink dialog box, typejavascript:; in the Link field. Click OK.
Using the Hyperlink object gets around typing the full <a> tag; here, you’re setting the link to a null value.Note this value—javascript:;—has both a colon and a semicolon. This is the code for invoking JavaScriptbut not calling any functions. Coincidentally, the next step is to call two JavaScript functions for each ofthe just-inserted links.
Press F5 to refresh Code view, and place your cursor in thecode <img src=”assets/handle.gif” border=”0” />. Choose <a>from the Tag Selector, and then choose Window > Behaviors. Inthe first column, choose onClick, and in the second column, typeslideSide(‘in’). In the second row, choose onClick again, and in thesecond column, type changeVisibility(‘offHandle’).
11
10
9
73Chapter 4 : Building CSS Navigation Systems
04_DWRBB_HOT_(56-75)2.qxd 08/25/2006 12:56 PM Page 73

Place your cursor in the code <img src=”assets/handle_f2.gif”border=”0” />. Choose <a> from the Tag Selector, and then chooseWindow > Behaviors. In the first column, choose onClick, and in thesecond column, type slideSide(‘out’). In the second row, choose onClickagain, and in the second column, type changeVisibility(‘onHandle’).
Although you may be more familiar with Dreamweaver 8’s built-in JavaScript behaviors, such as SwapImage and Open Browser Window, you can also add calls to custom functions through the Behaviorspanel. Two custom JavaScript functions power the sliding panel. The first, slideSide(), moves the panelback and forth. If the argument passed to the function is in, the panel moves offscreen; if it’s out, thepanel moves onscreen. The second function, changeVisibility(), swaps which handle <div> tag(#offHandle or #onHandle) displays.
The remaining elements to add to the page are the JavaScript functions themselves.
Switch to Design view, and choose View > Head Content. Select the head content area, and thenchoose Insert > HTML > Script Objects > Script. In the Script dialog box, make sure the Languagepop-up menu is set to JavaScript, and click the folder icon for Source. In the Select File dialog box, nav-igate to the chap_04/assets/ folder, and select slideCSS.js. Click OK to confirm your choice, and clickOK again to close the Script dialog box.
Although you could include the JavaScript functions directly in the <head> tag, it’s best to link to an exter-nal file whenever possible. This is especially important when you’re using navigation functions that arelikely to affect multiple pages.
13
12
74 Macromedia Dreamweaver 8 Beyond the Basics : H•O•T
04_DWRBB_HOT_(56-75)2.qxd 08/25/2006 12:56 PM Page 74

Press Ctrl+S (Windows) or Cmd+S (Mac) to save your page, and then press F12 to preview it. Whenthe page opens in your browser, click the button on the side navigation panel once. After the panel opens,click it again to close it.
With a few simple modifications to the CSS, you could easily set the sliding panel to be open by default.All you would need to do is change the #navWrapper’s left property and switch the initial values of thedisplay property for both #onHandle and #offHandle.
In this exercise, you learned how to create a sliding navigation panel with CSS and JavaScript.
In this chapter, you learned how to use CSS to build several navigation systems, including both horizontaland vertical navigation bars, tabbed navigation, and sliding navigation panels. In the next chapter, you’llexplore advanced CSS further and see how to integrate CSS in templates, highlight sections with nestedtemplates, build a magazine-style layout, and integrate CSS hacks.
14
75Chapter 4 : Building CSS Navigation Systems
04_DWRBB_HOT_(56-75)2.qxd 08/25/2006 12:56 PM Page 75