building keys for speedlist 1
DESCRIPTION
Building Keys For Speedlist 1. Getting Started. Open Speedlist by clicking Right click the blank area to bring up the context menu Click Create New Key . New Key Interface. Key Name Key Description Key Shortcut Key Function (code window) Key Function composers Code window font selector - PowerPoint PPT PresentationTRANSCRIPT

By Adrian Gardener
Date 9 July 2012
Building Keys For Speedlist 1
2
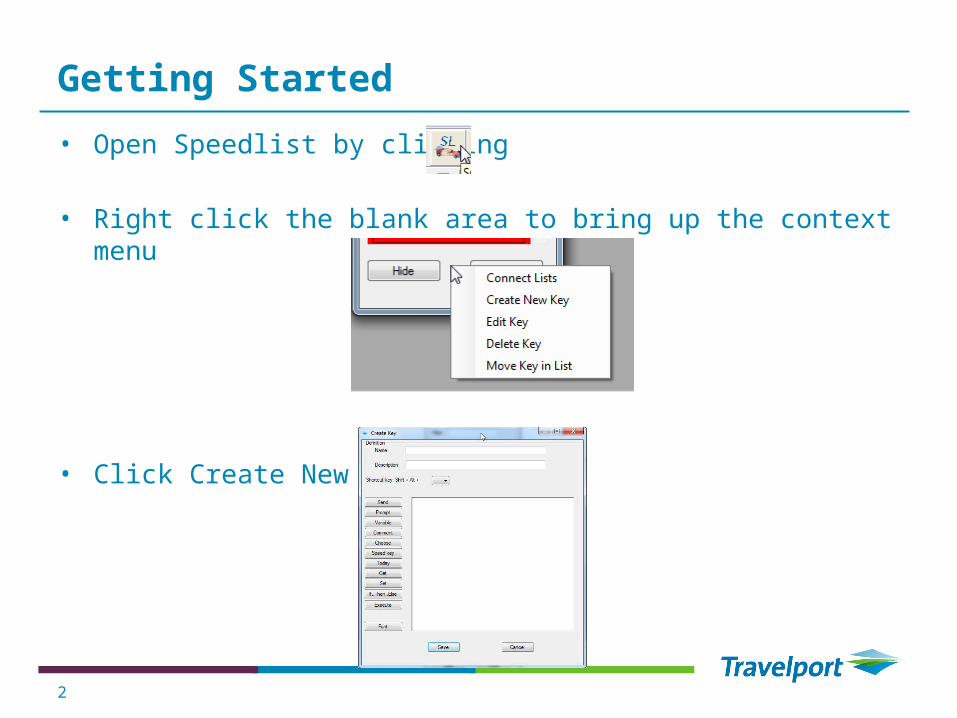
Getting Started• Open Speedlist by clicking
• Right click the blank area to bring up the context menu
• Click Create New Key
3
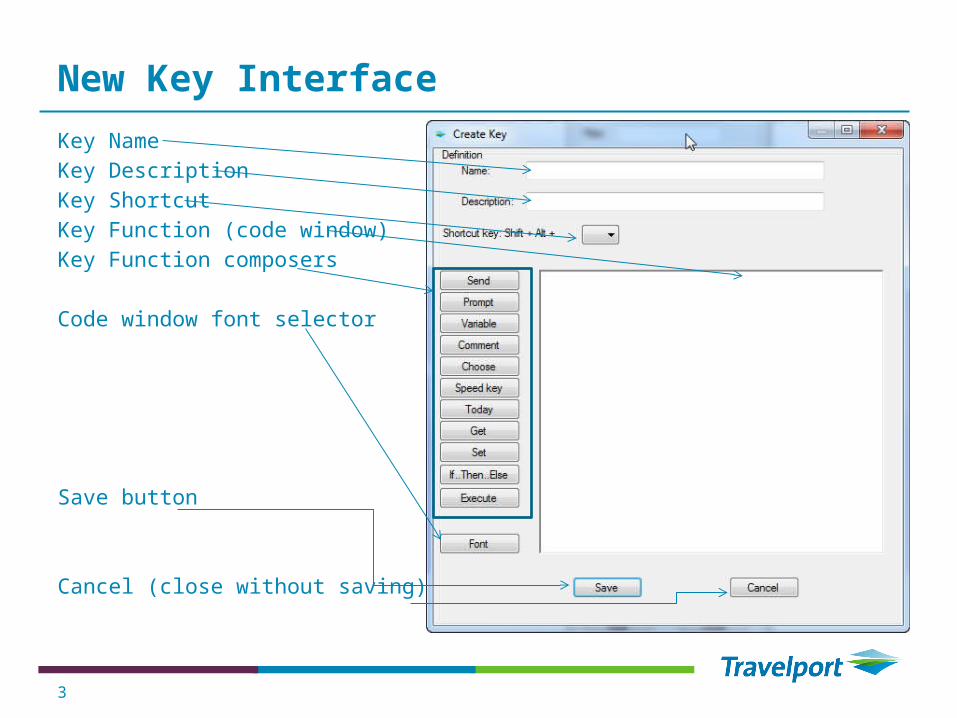
New Key InterfaceKey NameKey DescriptionKey ShortcutKey Function (code window)Key Function composers
Code window font selector
Save button
Cancel (close without saving) button
4
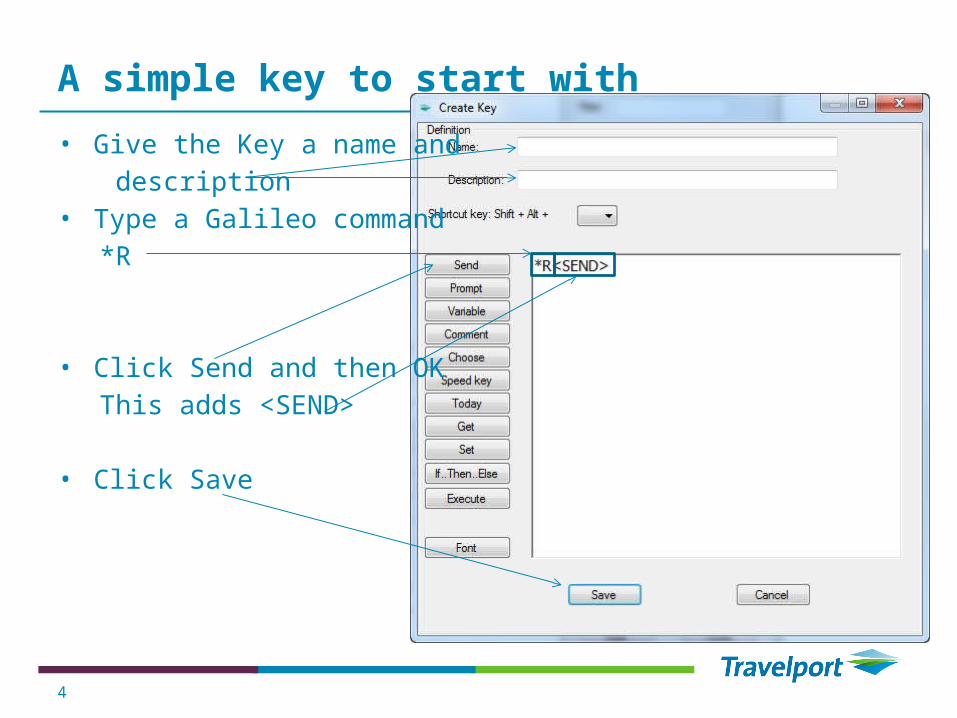
A simple key to start with• Give the Key a name and
description• Type a Galileo command
*R
• Click Send and then OKThis adds <SEND>
• Click Save
5
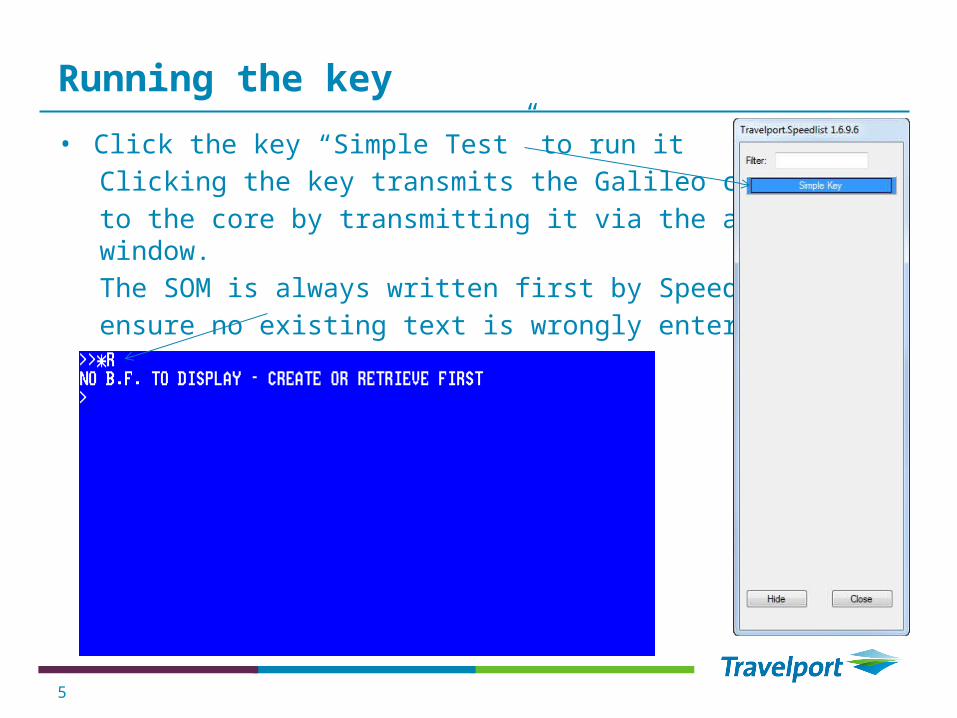
Running the key• Click the key “Simple Test” to run it
Clicking the key transmits the Galileo command to the core by transmitting it via the active window.The SOM is always written first by Speed list to ensure no existing text is wrongly entered.
6
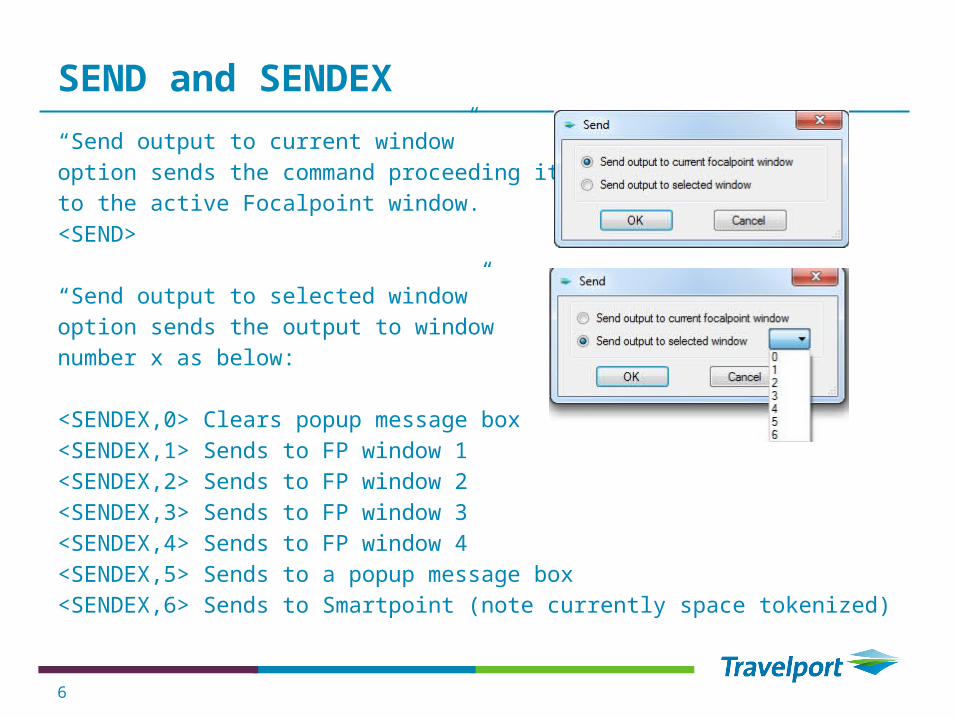
SEND and SENDEX“Send output to current window”option sends the command proceeding itto the active Focalpoint window.<SEND>
“Send output to selected window”option sends the output to windownumber x as below:
<SENDEX,0> Clears popup message box<SENDEX,1> Sends to FP window 1<SENDEX,2> Sends to FP window 2<SENDEX,3> Sends to FP window 3<SENDEX,4> Sends to FP window 4<SENDEX,5> Sends to a popup message box<SENDEX,6> Sends to Smartpoint (note currently space tokenized)
7
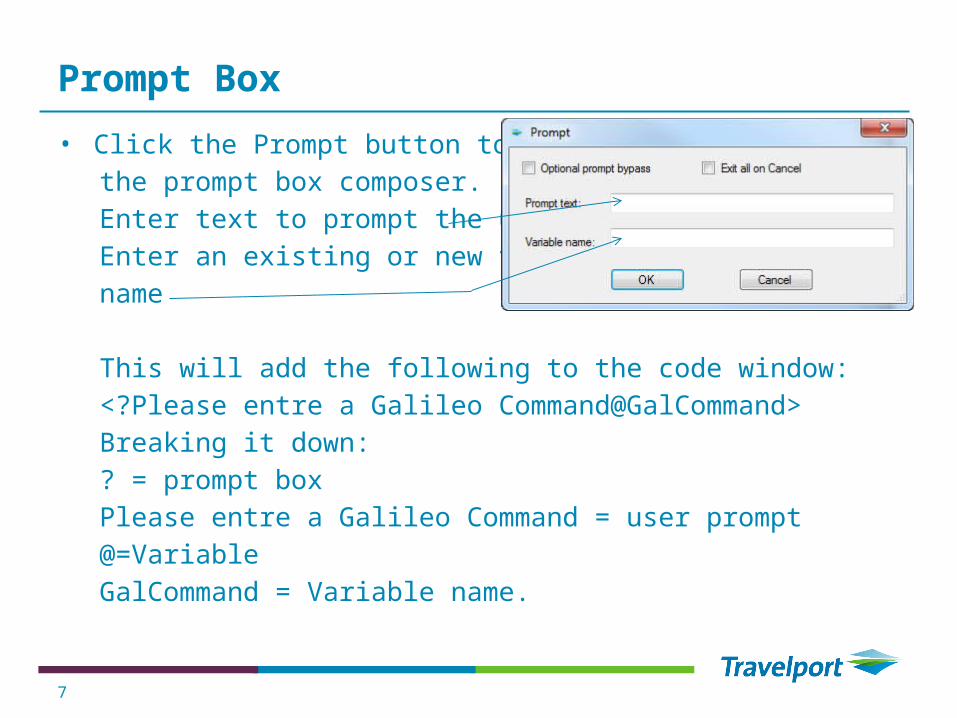
Prompt Box• Click the Prompt button to open
the prompt box composer.Enter text to prompt the userEnter an existing or new variablename
This will add the following to the code window:<?Please entre a Galileo Command@GalCommand>Breaking it down:? = prompt boxPlease entre a Galileo Command = user prompt@=VariableGalCommand = Variable name.
8
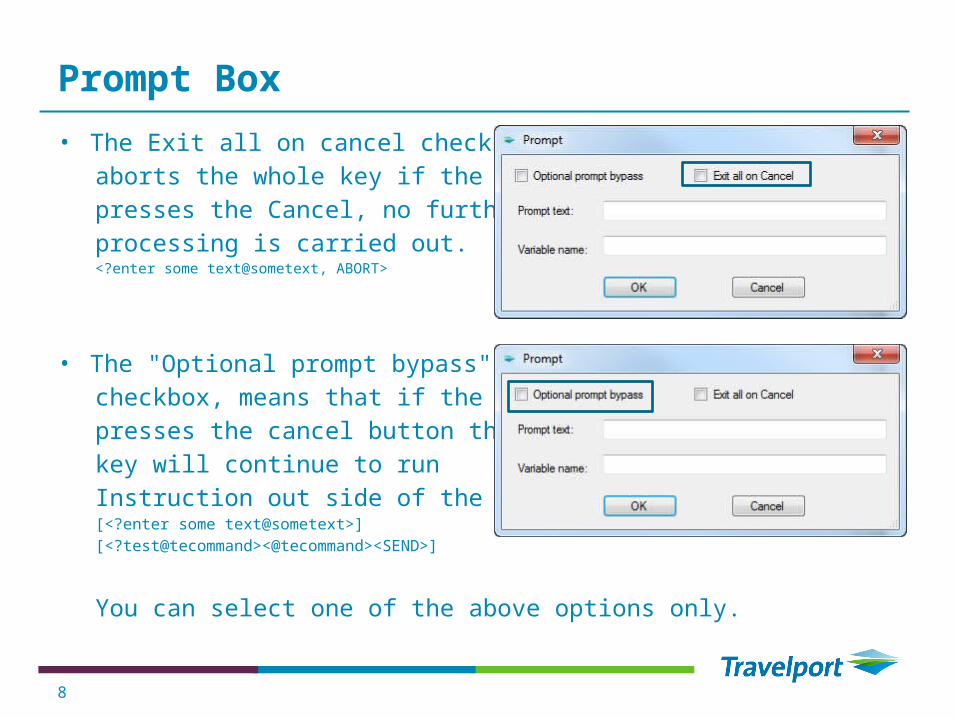
Prompt Box• The Exit all on cancel checkbox
aborts the whole key if the user presses the Cancel, no further processing is carried out.<?enter some text@sometext, ABORT>
• The "Optional prompt bypass" checkbox, means that if the userpresses the cancel button the key will continue to run Instruction out side of the brackets.[<?enter some text@sometext>] [<?test@tecommand><@tecommand><SEND>]
You can select one of the above options only.
9
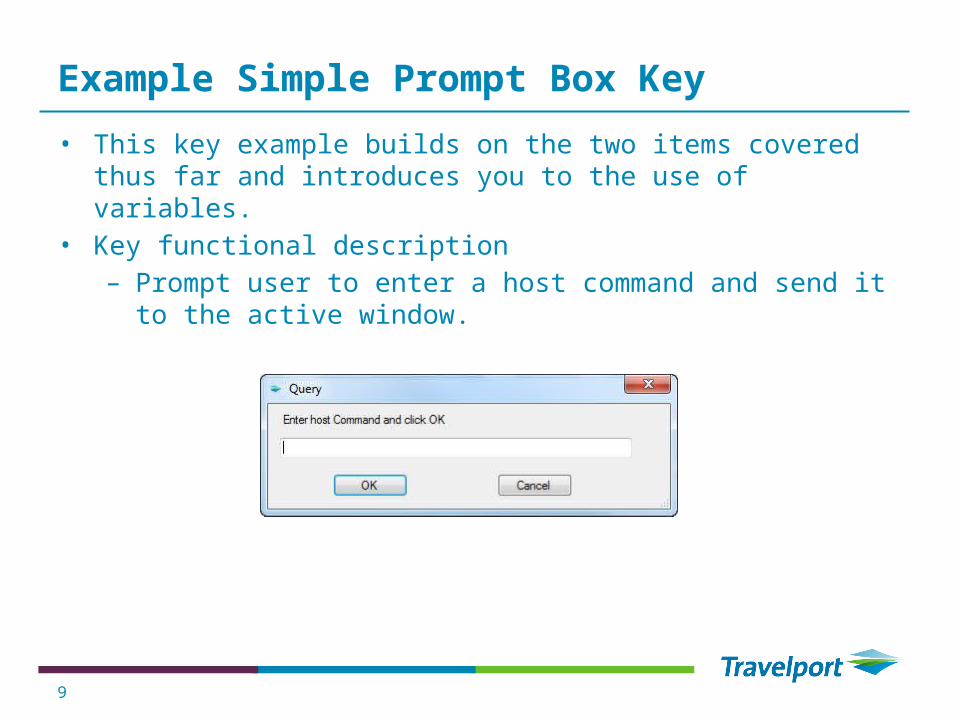
Example Simple Prompt Box Key• This key example builds on the two items covered thus far and
introduces you to the use of variables.• Key functional description
– Prompt user to enter a host command and send it to the active window.
10
Simple Prompt Key explained• The key should look like the following:<?Enter host Command and click OK@TECommand><@TECommand><SEND>
• We know “?Enter host Command and click OK” means prompt use and the text to prompt with.
• What ever is entered is stored in the variable @TECommand.• On the next line we use TECommand thus <@TECommand> whenever
a variable is seen its value is substituted in its place. So if a user types *R it is assigned to TECommand and used by <@TECommand>.
• We know <SEND> transmits what proceeds it to the core on the active window so: <@TECommand><SEND> transmits *R in the above example.
• What happens if Cancel is clicked?
11
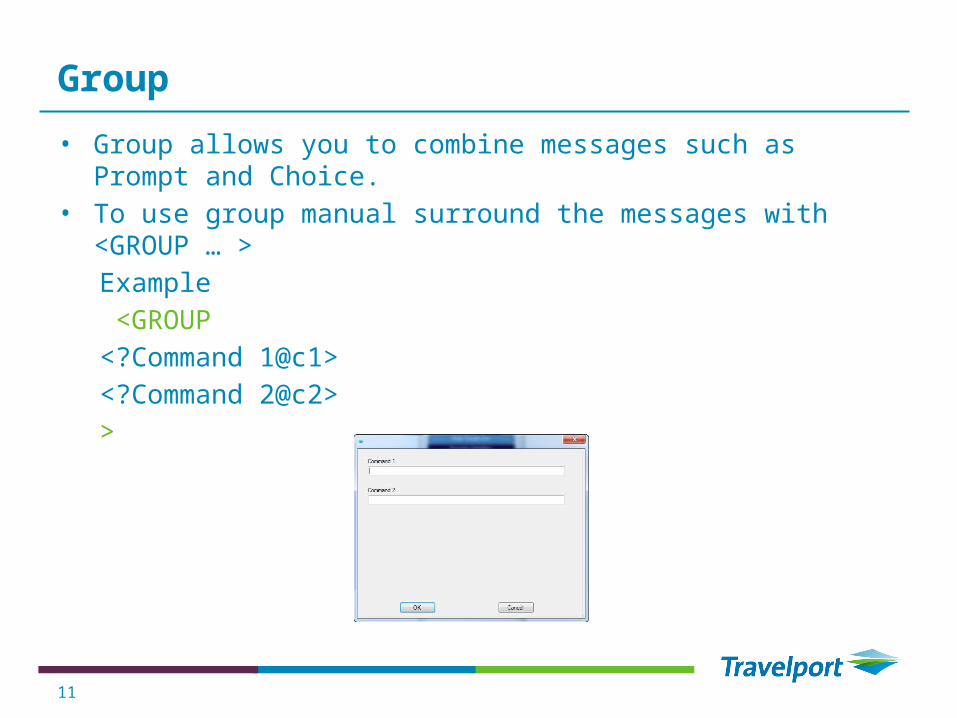
Group• Group allows you to combine messages such as Prompt and
Choice.• To use group manual surround the messages with <GROUP … >
Example <GROUP<?Command 1@c1><?Command 2@c2>>
12
Variables • Variables are temporary stores of information as we saw in the last example.• It is good practice to have variables defined at the beginning of a Key.• In the previous example clicking cancel sent a blank entry to the host if
wanted a default value we would have declared the variable TECommand and assigned a value to it at the top of the key, which is good practice.
<@TECommand,string,*R><?Enter host Command and click OK@TECommand><@TECommand><SEND>
RESETVARRESETVAR allows you reset a variable to a new value as below:<RESETVAR,@VariableName,2>
Variable types in Speed keys are String (the default) and number.
13
Comments• Comments allow you explain what each section of the key does.• Comments are very useful to others and the author who returns to
the key sometime later and I would suggest they are used as the key is built.<*This section gets the user data*>
<*@TECommand is used to store the Terminal Emulation Command throughout this key*><@TECommand,string,>
<*The following only sends if the user does not cancel the prompt*>[<?test prompt@TECommand><@TECommand><SEND>]
14
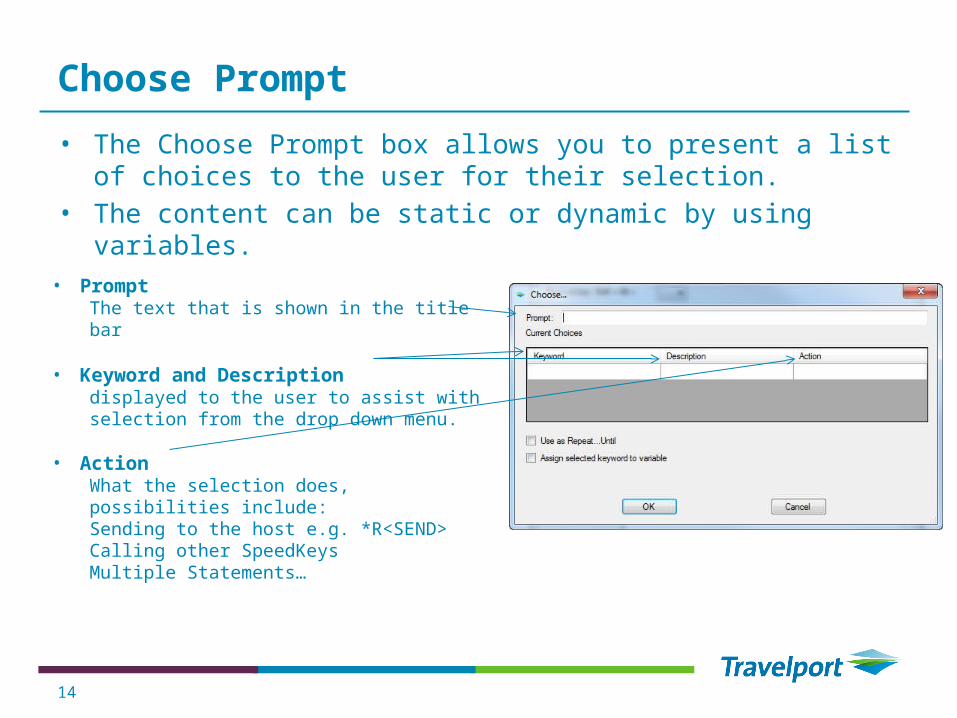
Choose Prompt• The Choose Prompt box allows you to present a list of choices to
the user for their selection.• The content can be static or dynamic by using variables.
• PromptThe text that is shown in the title bar
• Keyword and Descriptiondisplayed to the user to assist with selection from the drop down menu.
• Action What the selection does, possibilities include: Sending to the host e.g. *R<SEND>Calling other SpeedKeysMultiple Statements…
15
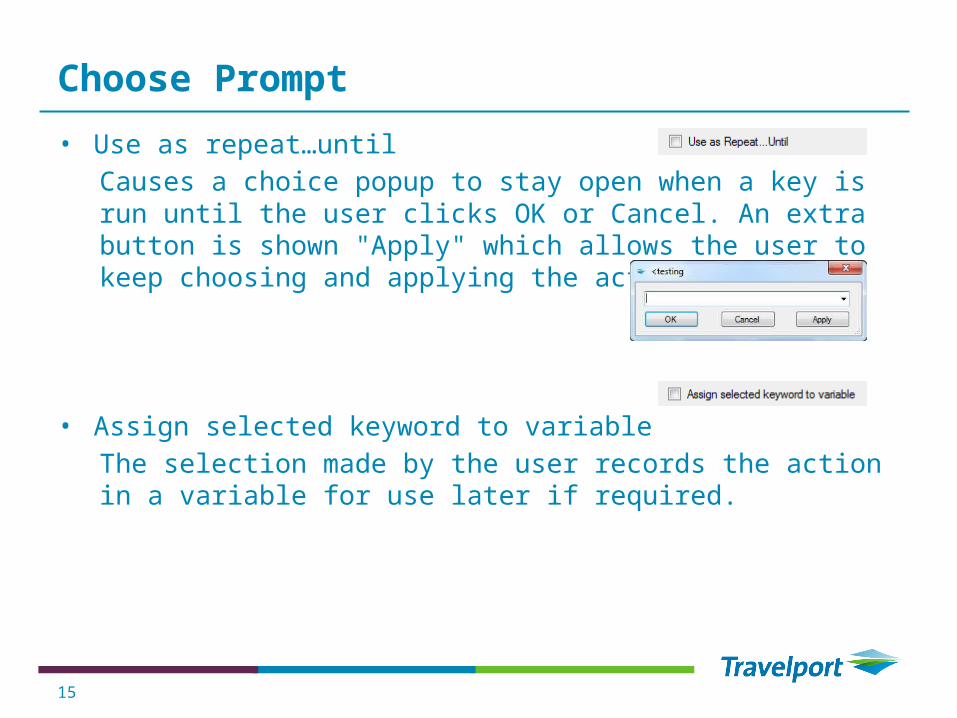
Choose Prompt• Use as repeat…until
Causes a choice popup to stay open when a key is run until the user clicks OK or Cancel. An extra button is shown "Apply" which allows the user to keep choosing and applying the action.
• Assign selected keyword to variable The selection made by the user records the action in a variable for use later if required.
16
Choose Prompt• The code added by the Prompt box looks like the following:• <CHOOSE<Test Choose Key>Selection 1::one<*R<SEND>>Selection 2::Two <*MCO<SEND>>>
• Breaking it down:<CHOOSE The key type<Test Choose Key> Text for the title barSelection 1 The text to display, Key word.:: the separator.One the description appears as (One) next the to key word.<*R<SEND>> Action if the key is selected.The sequence is then selected for the next key and finally closed by >If the “Assign to Variable” option is selected =@VariableName is added before the closing >If the repeat until option is selected the key type is replaced with <REPEAT UNTIL
17
Dynamic Choose Prompt• The prompt text and actions can be made dynamic by using
variables.<CHOOSE<Test Choose Key>Selection 1:: This is the one to pick <*R<SEND>>Selection 2::Two <*MCO<SEND>>>The above could be rewritten as:
<@myPrompt1,string, This is the one to pick><CHOOSE<Test Choose Key>Selection 1::<@myPrompt1><*R<Send>>Selection 2::Two <*MCO<SEND>>>
Note: variables cannot be used in the Keyword field.
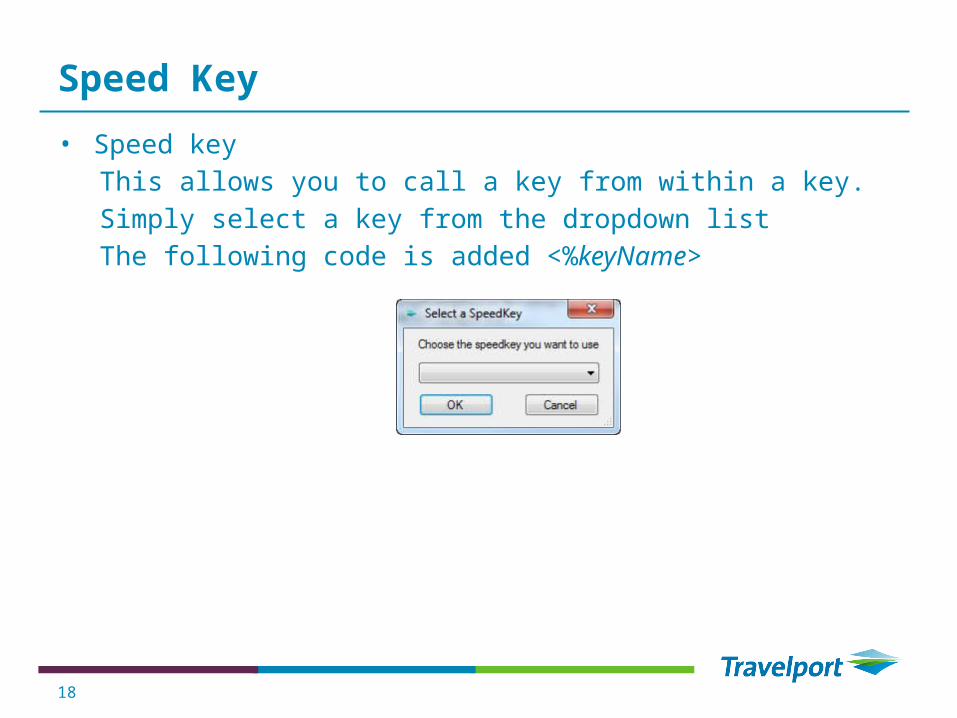
18
Speed Key• Speed key
This allows you to call a key from within a key.Simply select a key from the dropdown listThe following code is added <%keyName>
19
Today• Clicking Today places <TODAY> in the code, the date entered is in
the format ddMMM i.e. 14DEC
20
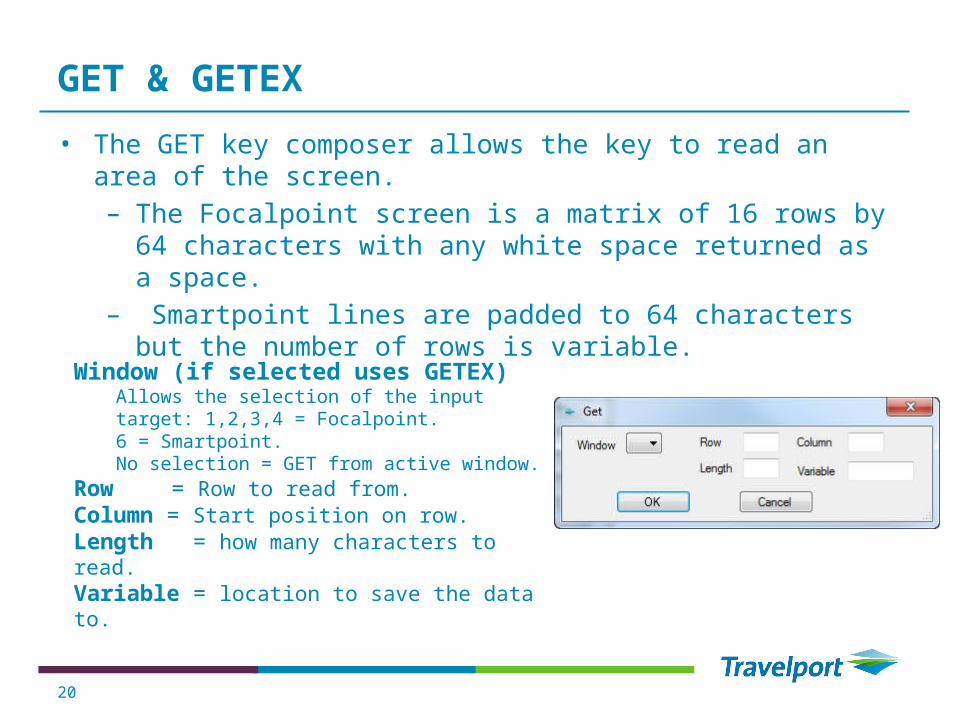
GET & GETEX• The GET key composer allows the key to read an area of the
screen.– The Focalpoint screen is a matrix of 16 rows by 64 characters
with any white space returned as a space.– Smartpoint lines are padded to 64 characters but the number of
rows is variable.
Window (if selected uses GETEX)Allows the selection of the input target: 1,2,3,4 = Focalpoint.6 = Smartpoint.No selection = GET from active window.
Row = Row to read from.Column = Start position on row.Length = how many characters to read.Variable = location to save the data to.
21
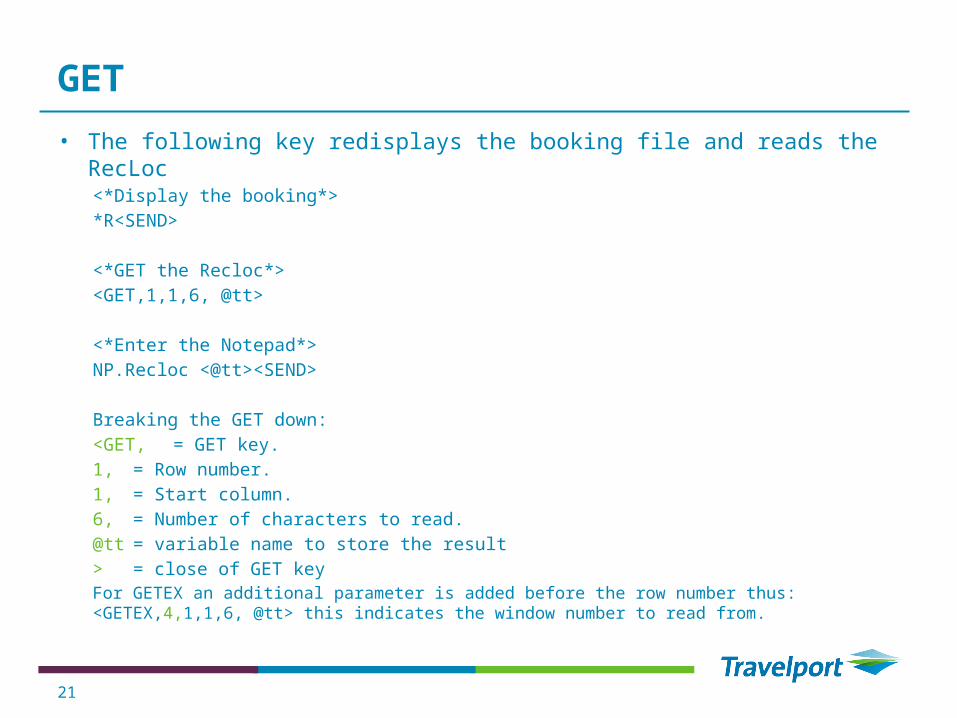
GET• The following key redisplays the booking file and reads the RecLoc
<*Display the booking*>*R<SEND>
<*GET the Recloc*><GET,1,1,6, @tt>
<*Enter the Notepad*>NP.Recloc <@tt><SEND>
Breaking the GET down:<GET, = GET key.1, = Row number.1, = Start column.6, = Number of characters to read.@tt = variable name to store the result> = close of GET keyFor GETEX an additional parameter is added before the row number thus: <GETEX,4,1,1,6, @tt> this indicates the window number to read from.
22
SET & SETEX• SET reads text from the clipboard.• Clicking SET adds <SET> to the code
• Example Write a key with the following<SET><SEND>copy (Ctrl+C) some text from Word or another application and run the key. The text that is copied is then transmitted to the host.
SETEX sets the cursor position and text or text from a variable following it.<SETEX,windownumber, column,row,textToWrite>
23
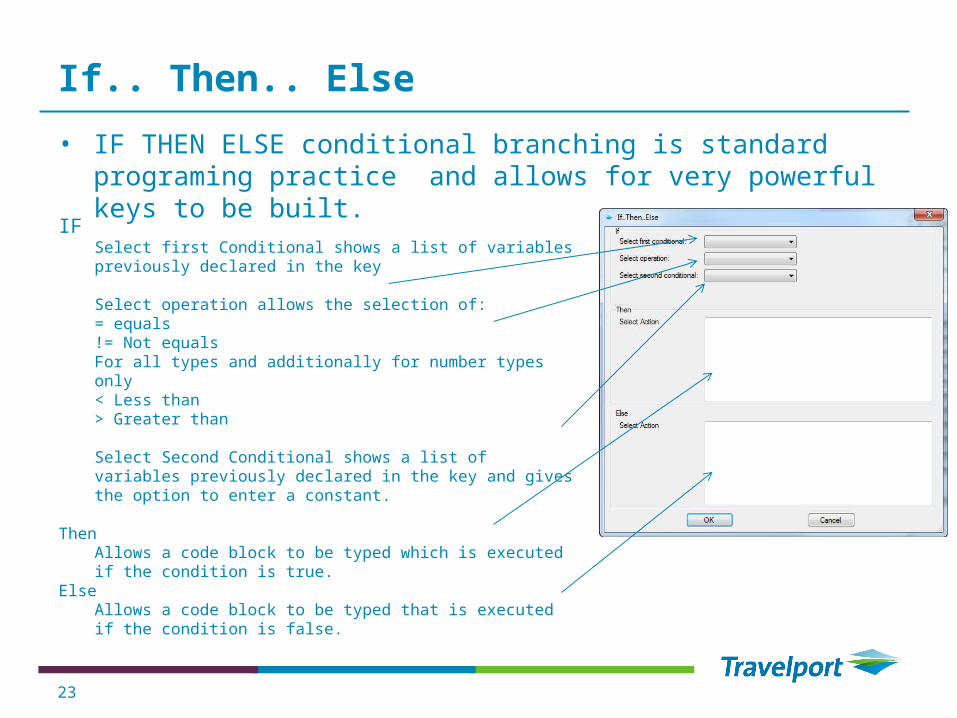
If.. Then.. Else• IF THEN ELSE conditional branching is standard programing
practice and allows for very powerful keys to be built.
IFSelect first Conditional shows a list of variables previously declared in the key
Select operation allows the selection of:= equals!= Not equalsFor all types and additionally for number types only< Less than > Greater than
Select Second Conditional shows a list of variables previously declared in the key and gives the option to enter a constant.
ThenAllows a code block to be typed which is executed if the condition is true.
ElseAllows a code block to be typed that is executed if the condition is false.
24
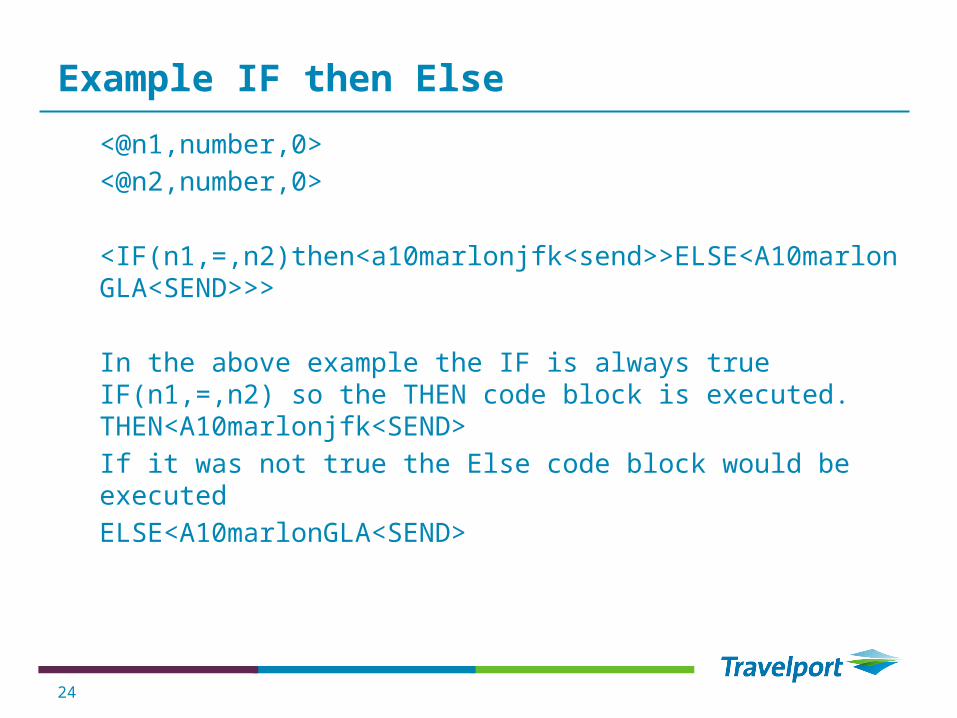
Example IF then Else<@n1,number,0><@n2,number,0>
<IF(n1,=,n2)then<a10marlonjfk<send>>ELSE<A10marlonGLA<SEND>>>
In the above example the IF is always true IF(n1,=,n2) so the THEN code block is executed. THEN<A10marlonjfk<SEND>If it was not true the Else code block would be executed ELSE<A10marlonGLA<SEND>

25
Execute• The Execute Key composer allows you to run any external exe.
<EXECUTE:,C:\Windows\System32\notepad.exe>
Program sets the path and application name to run this should be set by clicking the Find Button to ensure no typos are made!
Arguments any command line arguments that need passing to the executable.
26
Clear• <CLEAR> Clears the active FP window