ca91 part names and functions - kawai europa gmbh · part names and functions 1 listening to the...
TRANSCRIPT

1
Par
t Nam
es
and
Fun
ctio
ns
2
List
enin
g to
the
Pia
no
4
Usi
ng th
e R
ecor
der
5
Usi
ng
the
Less
on F
unct
ion
6
Pla
ying
w
ith C
once
rt M
agic
7
Usi
ng th
e V
irtua
l Te
chni
cian
Fun
ctio
ns
8
Men
u F
unct
ions
9
App
endi
x
3
Pla
ying
the
Pia
no
CA91CA71CA51Owner's Manual

THANK YOU FOR PURCHASING A KAWAI Concert Artist DIGITAL PIANO!Your KAWAI digital piano is a revolutionary new keyboard instrument that combines the latest in technology with traditional piano craftsmanship inherited from KAWAI’s many years of experience in building fi ne acoustic pianos. Its 88 key wooden keyboard provides the touch response and full dynamic range required for a superb performance on the piano, harpsichord, organ, and other instruments. The CA’s piano sound has been created through stereo-sampling of concert grand pianos, and is reproduced by KAWAI’s Harmonic Imaging sound technology. The CA91 is also equipped with a revolutionary sound board speaker system, providing an even more realistic piano experience.Your CA piano is equipped with a Lesson function which, in addition to basic fi nger exercises, includes etudes from Czerny, Burgmuller, and others or songs from Alfred's Basic and Premier Piano lesson books (USA, Canada, UK, AU only). The CA piano is also equipped with reverb and a digital effect processor for an even fuller sound. Industry-Standard MIDI (Musical Instrument Digital Interface) jacks and a USB interface are included which allow you to play other electronic instruments at the same time or connect your CA piano to a personal computer—opening a whole new world of musical possibilities.There are many other features and functions inside your new piano. This Owner’s Manual contains valuable information that will help you make full use of this instrument’s many capabilities. Please read all sections carefully and keep this manual handy for further reference.

Page
3
Please read this Owner's Manual before using CA91 / CA71 / CA51.
Important Safety Instructions ..............4
1. Part Names and Functions .................8 Panel ............................................................................ 8
Using the pedals .......................................................... 8
Headphone .................................................................. 9
2. Listening to the Piano .......................101) Basic Operation .............................................................. 10
2) Demo Songs ................................................................... 11
3) Piano Music .................................................................... 12
3. Playing the Piano ..............................121) Selecting a Sound .......................................................... 13
2) Dual Mode ...................................................................... 15
3) Split Mode....................................................................... 16
4) Four Hands Mode ........................................................... 18
5) Reverb / Effects / Tone Control ....................................... 19
Using REVERB .......................................................... 19
Using EFFECTS ........................................................ 20
Editing the settings for the Chorus / Delay / Tremolo /
Rotary effect .............................................................. 21
Using TONE CONTROL *CA91/CA71 Only ...................... 22
User tone control settings *CA91/CA71 Only .................... 23
6) Transpose ....................................................................... 24
7) Using the Registration Function *CA91/CA71 Only ............... 25
Selecting a registration .............................................. 25
Memorizing a registration ........................................... 26
Resetting the registration settings .............................. 26
8) Using Metronome / Rhythm ............................................ 27
Starting the metronome and setting the tempo .......... 27
Changing the metronome time signature and rhythm ........ 27
Setting the sound volume for the metronome / rhythm ....... 28
Rhythm list ................................................................. 29
4. Using the Recorder ...........................301) Recording a Song (REC Button) .................................... 30
Selecting a song and part to be recorded .................. 30
2) Playing Back a Song (PLAY/STOP Button) .................... 32
3) Deleting a Song or Part .................................................. 33
5. Using the Lesson Function ...............351) Using the Etudes or Alfred Lesson Books (USA, Canada, UK, AU only) .. 35
Selecting a Etude category or Alfred book and an etude
or song ....................................................................... 35
Listening to an etude or song ..................................... 36
Playing an etude or song from a specifi c bar ............. 37
Practicing the right / left-hand part while listening to the
other part ................................................................... 38
Repeating and practicing specifi c sections of an etude
or song ....................................................................... 39
Playing along with an etude or song and recording your
own performance ....................................................... 40
Exiting the lesson function ......................................... 40
2) Using the Finger Exercises ............................................. 41
Selecting an exercise ................................................. 41
Listening to an exercise ............................................. 42
Playing along with an exercise, recording your own per-
formance, and checking the evaluation result ............ 43
Exiting the lesson function ......................................... 44
6. Playing with Concert Magic ..............451) Selecting a Song ............................................................ 45
2) Listening to the Song ...................................................... 46
3) Performing a Song .......................................................... 47
4) Part Volume Balance for Concert Magic ......................... 47
5) Concert Magic Song Arrangement Types ....................... 48
6) Steady Beat .................................................................... 49
7) Concert Magic Song Demo ............................................ 50
8) Adjusting the Playback Speed for the Concert Magic
Songs ............................................................................. 50
7. Using the Virtual Technician Functions ...511) Voicing ............................................................................ 51
2) Damper Resonance........................................................ 52
3) String Resonance ........................................................... 53
4) Key-off Effect .................................................................. 54
5) Touch Curve.................................................................... 55
Using the user touch curve function ........................... 56
6) Temperament Setting ...................................................... 57
Creating a user temperament .................................... 58
7) Key of Temperament ....................................................... 59
8) Stretch Tuning ................................................................. 60
8. Menu Functions ................................611) Wall EQ (CA91 Only) ...................................................... 61
1) Brilliance (CA51 Only) .................................................... 62
2) Lower Octave Shift ......................................................... 63
3) Lower Pedal On / Off ...................................................... 63
4) Layer Octave Shift .......................................................... 64
5) Layer Dynamics .............................................................. 65
6) Damper Hold On / Off ..................................................... 66
7) Tuning ............................................................................. 67
About MIDI ................................................................. 68
8) MIDI Transmit / Receive Channel ................................... 70
9) Sending Program (Sound Type) Change Numbers ..............71
10) Local Control ................................................................ 72
11) Transmit Program Change (Sound Type) Numbers On / Off ... 73
Transmitting a program change number using the
SOUND SELECT buttons .......................................... 73
12) Multi-timbral Mode ........................................................ 75
13) Channel Mute ............................................................... 76
14) User Memory ................................................................ 76
15) Factory Reset ............................................................... 77
9. Appendix ...........................................78 Connecting to other devices ....................................... 78
CA91 stand assembly instructions ............................. 80
CA71 stand assembly instructions ............................. 82
CA51 stand assembly instructions ............................. 84
Specifi cations ............................................................. 86
MIDI exclusive data format ......................................... 87
KAWAI [Model CA91 / CA71 / CA51]
MIDI implementation chart ......................................... 88
Table of Contents

Page
4
Important Safety Instructions
denotes that care should be taken.The example instructs the user to take care not to allow fingers to be trapped.
denotes a prohibited operation.The example instructs that disassembly of the product is prohibited.
denotes an operation that should be carried out.The example instructs the user to remove the power cord plug from the AC outlet.
Examples of Picture Symbols
Read all the instructions before using the product.
CAUTIONRISK OF ELECTRIC SHOCK
DO NOT OPEN
AVIS : RISQUE DE CHOC ELECTRIQUE - NE PAS OUVRIR.
TO REDUCE THE RISK OF ELECTRIC SHOCK, DO NOT REMOVE COVER (OR BACK).NO USER-SERVICEABLE PARTS INSIDE. REFER SERVICING TO QUALIFIED SERVICE PERSONNEL.
The lighting flash with arrowhead symbol, within an equilateral triangle, is intended to alert the user to the presence of uninsulated "dangerous voltage" within the product's enclosure that may be of sufficient magnitude to constitute a risk of electric shock to persons.
The exclamation point within an equilateral triangle is intended to alert the user to the presence of important operating and maintenance (servicing) instructions in the leterature accompanying the product.
WARNINGTO REDUCE THE RISK OF FIRE OR ELECTRIC SHOCK, DO NOT EXPOSE THIS PRODUCT TO RAIN OR MOISTURE.
INSTRUCTIONS PERTAINING TO A RISK OF FIRE, ELECTRIC SHOCK, OR INJURY TO PERSONS
SAVE THESE INSTRUCTIONS
1) Read these instructions.
2) Keep these instructions.
3) Heed all warnings.
4) Follow all instructions.
5) Do not use this apparatus near water.
6) Clean only with dry cloth.
7) Do not block any ventilation openings. Install in accordance with the manufacturer's instructions.
8) Do not install near any heat sources such as radiators, heat registers, stoves, or other apparatus (including amplifiers) that produce heat.
9) Do not defeat the safety purpose of the polarized or grounding-type plug. A polarized plug has two blades with one wider than the other. A grounding type plug has two blades and a third grounding prong. The wide blade or the third prongs are provided for your safety. If the provided plug does not fit into your outlet, consult an electrician for replacement of the obsolete outlet.
10) Protect the power cord from being walked on or pinched particularly at plugs, convenience receptacles, and the point where they exit from the apparatus.
11) Only use attachments/accessories specified by the manufacturer.
12) Use only with the cart, stand, tripod, bracket, or table specified by the manufacturer, or sold with the apparatus. When a cart is used, use caution when moving the cart/apparatus combination to avoid injury from tip-over.
13) Unplug this apparatus during lightning storms or when unused for long periods of time.
14) Refer all servicing to qualified service personnel. Servicing is required when the apparatus has been damaged in any way, such as power-supply cord or plug is damaged, liquid has been spilled or object have fallen into the apparatus, the apparatus has been exposed to rain or moisture, does not operate normally, or has been dropped.

Page
5
The product is not completely disconnected from the power supply even when the power switch is turned off. If the product will not be used for a long time, unplug the AC power cord from the AC outlet.
● Failure to do so may cause fire in case of lightning.● Failure to do so may over-heat the product, resulting in fire.
Do not disassemble, repair or modify the product.
Doing so may result in product breakdown, electric shock or short-circuit.
This product may be equipped with a polarized line plug (one blade wider than the other). This is a safety feature. If you are unable to insert the plug into the outlet, contact an electrician to replace your obsolete outlet.Do not defeat the safety purpose of the plug.
When disconnecting the AC power cord's plug, always hold the plug and pull it to remove it.
● Pulling the AC power cord itself may damage the cord, causing a fire, electric shock or short-circuit.
Doing so may cause the product to fall over, resulting in injury.
Do not lean against the keyboard.
When using the headphones, do not listen for long periods of time at high volume levels.
Doing so may result in hearing problems.
It is a good practice to have the instrument near the AC outlet and the power cord plug in a position so that it can readily be disconnected in an emergency because electricity is always charging while the plug is in the AC outlet even in a power switch off condition.
The chair must be used properly (it must be used only when playing the product).● Do not play with it or stand on it.● Only one person is allowed to sit on it.● Do not sit on it when opening the lid.● Re-tighten the bolts occasionally.
Doing so may cause the chair to fall over or your fingers to be trapped, resulting in injury.
WARNINGThe product should be connected to an AC outlet of the specified voltage.
● If you are going to use an AC power cord, make sure that its has the correct plug shape and conforms to the specified power voltage.● Failure to do so may result in fire.
120V 240V230V
Indicates a potential hazard that could result in death or serious injury if the product is handled incorrectly.
Do not insert or disconnect the powercord plug with wet hands.
Doing so may cause electric shock.
WARNING - When using electric products, basic precautions should always be followed,including the following.

Page
6
● Doing so may cause the product to become deformed or fall over, resulting in breakdown or injury.
Do not stand on the product or exertexcessive force.
● Doing so may result in discoloration or deformation of the product.● When cleaning the product, put a soft cloth in lukewarm water, squeeze it well, then wipe the product.
Do not wipe the product with benzene or thinner.
Failure to do so may damage them, resulting in fire, electric shock or short-circuit.
When connecting the AC power cord and other cords, take care not to get them tangled.
● Doing so may cause the product to generate noise.● If the product generates noise, move the product sufficiently away from the electrical appliance or connect it to another AC outlet.
Do not place the product near electricalappliances such as TVs and radios.
Please lift up the product when moving it.Please note that the product is heavy and must be carried by more than two persons.Dropping the product may result in breakdown.
Do not drag the product on the floor.Take care not to drop the product.
Entry of water, needles or hair pins may result in breakdown or short-circuit.The product shall not be exposed to dripping or splashing. No objects filled with liquids, such as vases, shall be placed on the product.
Take care not to allow any foreign matter to enter the product.
Doing so may cause the illumination to fall over, resulting in fire.
Do not place naked flame, such as lighted candles on the product.
CAUTIONIndicates a potential hazard that could result in injury or damage to the product or other property if the product is handled incorrectly.
Using the product in such areas may result in product breakdown.Use the product only in moderate climates (not in tropical climates).
Do not use the product in the following areas.● Areas, such as those near windows, where the product is exposed to direct sunlight● Extremely hot areas, such as near a heater● Extremely cold areas, such as outside● Extremely humid areas● Areas where a large amount of sand or dust is present● Areas where the product is exposed to excessive vibrations
Closing it roughly may trap your fingers, resulting in injury.
When you close the keyboard cover,close it gently.
Failure to do so may cause breakdown of this product and other devices.
Before connecting cords, make sure that the power to this product and other devices is turned OFF.
OFF

Page
7
Notes on RepairShould an abnormality occur in the product, immediately turn the power OFF, disconnect the power cord plug, and then contact the shop from which the product was purchased.
CAUTION:To prevent electric shock, match wide blade of plug to wide slot, fully insert.
ATTENTION:Pour éviter les chocs électriques, introduire la lame la plus large de la fiche dans la borne correspondante de la prise et pousser jusqu'au fond.
Instruction for AC power cord (U.K.)Do not plug either terminal of the power cord to the ground of the AC outlet on the wall.
FCC InformationThis equipment has been tested and found to comply with the limits for a Class B digital device, pursuant to Part 15 of the FCC Rules. These limits are designed to provide reasonable protection against harmful interference in a residential installation. This equipment generates, uses and can radiate radio frequency energy and, if not installed and used in accordance with the instructions, may cause harmful interference to radio communications.If this equipment does cause harmful interference to radio or television reception, which can be determined by turning the equipment off and on, the user is encouraged to try to correct the interference by one or more of the following measures:
• Reorient or relocate the receiving antenna.• Increase the separation between the equipment and receiver.• Connect the equipment into an outlet on a different electrical circuit from the receiver.• Consult the dealer or an experienced radio/TV technician for help.
Canadian Radio Interference RegulationsThis instrument complies with the limits for a class B digital apparatus, pursuant to the Radio Interference Regulations, C.R.C., c. 1374.
An information on Disposal for users If your product is marked with this recycling symbol it means that, at the end of its life, you must dispose of it separately by taking it to an appropriate collection point. You should not mix it with general household waste. Disposing of this product correctly will prevent potential negative effects on the environment and human health which could otherwise arise due to inappropriate waste handling. For further details, please contact your local authority. (European Union only)
The product should be serviced by qualified service personnel when:
● The power supply cord or the plug has been damaged.● Objects have fallen, or liquid has been spilled into the product.● The product has been exposed to rain.● The product does not appear to operate normally or exhibits a marked change in
performance.● The product has been dropped, or the enclosure damaged.
The product should be located so that its location or position does not interfere with its properventilation. Ensure a minimum distance of 5cm around the product for sufficient ventilation.
Failure to do so may over-heat the product, resulting in fire.
Ensure that the ventilation is not impeded by covering the ventilation openings with items, such as newspaper, table-cloths, curtains, etc.

Page
8
1
Par
t Nam
es
and
Fun
ctio
ns 1. Part Names and FunctionsThis section explains the locations and functions of the various panel sliders and buttons.
Panel
CA91/CA71
Using the pedals
The CA piano has three pedals—just like a grand piano. They are Sustain,
Soft and Sostenuto.
Sustain pedal
Sustains the sound after lifting your hands from the keyboard. The sustain pedal
is capable of responding to half pedaling.
Sostenuto pedal
Depressing this pedal after playing the keyboard and before releasing the keys sustains the sound of only the keys just
played.
Soft pedal
Depressing this pedal softens the sound and reduces its volume. When the rotary effect is active the soft pedal is used
to change the speed of the rotor between slow and fast.
Soft pedal
Sostenuto pedal
Sustain pedal
CA51
CONCERT MAGICPress the CONCERT MAGIC button to enjoy listening or performing a collection of prepro-grammed piano songs. Concert Magic will provide the correct melody and accompaniment notes, regardless of which keys you press. Anybody, young or old, can enjoy Concert Magic from the moment they sit down at the CA piano regardless of their previous musical experience (page 45).
MASTER VOLUME
The MASTER VOL-UME slider controls the master volume level of the built-in speakers and headphones. Move this slider to the right to increase the volume and move to the left to decrease the volume.
Sound buttonsUse these buttons to select the different preset sounds. Press the SOUND SELECT button under the name of the instrument you would like to listen to. When the button is pressed, the LED indicator will be turned on to indicate that this sound category is selected. Multiple sound types are assigned to each button. Repeatedly pressing a SOUND SELECT button selects the different sounds assigned to that button. The name of the selected sound will be displayed in the LCD display (page 13).
REGISTRATIONA registration is a setup that memorizes most of the panel settings such as sound selections or effects settings so that you can recall them at the touch of a button. 10 different regis-trations can be saved and accessed using this button (page 25). * CA91 / CA71 only
PIANO MUSICPressing the DEMO and LESSON buttons together lets you enter the piano music mode. The CA piano provides some hours of pre-recorded classical piano music for your listening pleasure (page 12).
MENUThese buttons are used to access the vari-ous virtual technician and menu functions that control the CA piano’s tuning, system and MIDI functions.
LCD displayThe LCD display provides useful information such as the currently selected sound type. It also shows values or status when other functions are active.* A protective plastic fi lm is provided on the display. Re-
move it before use.
DEMOPress the DEMO button to listen to the various different demo songs (page 11).
LESSONPress the LESSON button to access the etudes, Alfred lesson books (USA, Canada, UK, AU only), and the finger exercises. Listen or practice along with the various etudes, songs, and exercises (page 35).

Page
9
1
Par
t Nam
es
and
Fun
ctio
ns
Headphone
Headphone jack (x 2)
Use this Jack to connect a pair of headphones.
Up to two pairs of headphones can be connected.
VALUEThese two buttons are used to change the value settings for the various functions.
EFFECTSPress the EFFECTS button to turn the effects ON/OFF for the selected sound. The EFFECTS button is used to select the different effect types and adjust their settings (page 20).
REVERBPress the REVERB button to turn the reverb ON/OFF for the selected sound. The REVERB button is used to select the different reverb types (page 19).
TONE CONTROLPress the TONE CONTROL button to access the CA piano’s built in EQ section. This button is used to turn on/off the tone control and select/edit the various different EQ types. Use the tone control function to adjust the sound character of the CA piano to your taste (page 22). * CA91 / CA71 only
BALANCEUse the BALANCE slider to adjust the volume balance between two sounds in dual or Split mode. The BALANCE slider is also used to adjust the balance of the two parts in the Concert Magic and lesson modes (pages 15, 17, 38, and 47).
SPLITThe split function divides the keyboard into two sections—upper and lower—and lets you play each part with a different sound (page 16).
RECORDERThe REC button is used for recording your own songs and when using the lesson function, to record your playing and compare with the built in songs, etudes, and exercises.The PLAY/STOP button is used to select a song and part to play, and to start and stop play back of the re-corded songs. It is also used to start / stop playback when using the lesson function (page 30).
METRONOMEUse these buttons to turn on / off the metronome, and to set the tempo, beat, and volume (page 27).
rewind forward resetUse these buttons to play a song from a specific bar or to find the beginning of a song in the lesson function (pages 36 and 37).
A B (AB repeat)Press this button to play back a specific section of a song repeatedly in the lesson function (page 39).
POWERPress the POWER to turn the power on / off. Turn the power off after use (page 10).
VIRTUAL TECHNICIANThe virtual technician provides a set of spe-cial functions that make it possible for you to customize the CA piano to your personal taste. CA91 / CA71 / CA51 (page 51).
TRANSPOSEThe transpose function lets you raise or lower the piano’s key in half steps. This is especially useful when you have learned a song in one key and have to play it in another key. The transpose feature allows you to play the song in the original key, but hear it in another key (page 24).
Some headphones are designed with a re-movable adapter that is used to connect to different sized jacks. Sound may not be heard from the built-in speakers if this adapter re-mains in the CA headphone jack when the plug is removed.
Caution

Page
10
2
List
enin
g to
the
Pia
no
2. Listening to the Piano1) Basic Operation
This section provides the basic procedures for turning the power on and playing the CA piano.
Step 1
Connect the CA pianos’ power cable to an AC outlet.
Step 2
You will fi nd the POWER SWITCH at the right end of the front panel. Press this button to turn on the power. Pressing it again will turn off the power.
When the power is fi rst turned ON you will hear the CA’s main piano sound. The name of the
sound, “Concert Grand” is shown in the LCD Display.
The REVERB button will also be turned on.
Step 3
Use the MASTER VOLUME slider to set the volume to a comfortable listening level. The MASTER VOLUME slider controls the volume level of the speakers and the headphones. Setting the volume slider to the middle is a good starting point.
The CA91 is equipped with top speakers on the left and right sides of the unit,
behind the top board. To avoid damage to these speakers or other parts of the
CA piano do not place liquids such as water or coffee on or near these speakers.
Caution
Top speakers
Concert Grand

Page
11
2
List
enin
g to
the
Pia
no
2) Demo Songs
The CA has a variety of built-in sound demo songs. 33 for the CA91, 32 for the CA71, and 27 for the CA51.
Each of the demo songs presents a musical piece to introduce the different sounds.
Press the DEMO button and then use the SOUND SELECT buttons to select and play the different demo songs.
Step 1
Press the DEMO button and the LED indicator for the DEMO button will be turned on.
The LED indicators for the SOUND SELECT buttons will fl ash and the demo song for the Piano 1 category will
start. After the Piano 1 demo songs are fi nished playing, the demo songs for another sound category will be se-
lected at random.
The LCD display shows the sound name for the demo that is currently being played.
Step 2
If you would like to listen to the demos for a particular category, just press the desired SOUND SELECT button while the demo is playing. When you press the button, the demo songs for the newly selected category will be played. Then the demo songs for another category will be selected at random.
Some SOUND SELECT buttons have more than one demo assigned to them. Press the same SOUND SELECT
button repeatedly to select the other demos assigned to that button.
Step 3
Press the DEMO button again to exit the demo mode.
You can also exit demo mode by pressing the PLAY / STOP button of the recorder.
Button lights
Demo Concert Grand
PIANO 1Concert Grand : Valse Romantique / DebussyStudio Grand : KAWAIMellow Grand : La Fille aux Cheveux de Lin / DebussyModern Piano (PIANO 2 for CA51) : KAWAIRock Piano : KAWAI (CA91 only)
PIANO 2Concert Grand 2 : KAWAI (CA91/CA71 only)
New Age Piano 2 : KAWAI ELECTRIC PIANOClassic E.Piano : KAWAIModern E.P. : KAWAIModern E.P. 2 : KAWAI DRAWBARJazz Organ : KAWAIDrawbar Organ : KAWAIDrawbar Organ 2 : KAWAI CHURCH ORGANChurch Organ : Toccata / Eugene GigoutDiapason : Wohl mir, daß ich Jesum habe / BachFull Ensemble : KAWAI
HARPSI & MALLETSHarpsichord : French Suite No.6 / BachVibraphone : KAWAIClavi : KAWAI
Harpsichord Oct. : Prelude in A / Bach (CA91 only)
STRINGSSlow Strings : KAWAIString Pad : KAWAIString Ensemble : Le quattro stagioni La primavera / Vivaldi VOCALSChoir : KAWAIChoir 2 : KAWAIJazz Ensemble : KAWAI (CA91/CA71 only)
PADSNew Age Pad : KAWAIAtmosphere : KAWAI BASS & GUITARWood Bass : KAWAIFretless Bass : KAWAIW. Bass & Ride : KAWAIBallad Guitar : KAWAI (CA91/CA71 only)
Pick Nylon Gt. : KAWAI (CA91/CA71 only)
KAWAI regret that sheet music for KAWAI original demo songs is not available.

Page
12
2
List
enin
g to
the
Pia
no
3) Piano Music
Pressing the DEMO button and the LESSON button simultaneously lets you enter the piano music mode. The
CA piano provides over two hours of pre-recorded classical piano music for your listening pleasure.
All of the song titles are listed in a separate reference booklet entitled "Internal Song Lists."
Step 1
Press the DEMO and LESSON buttons simultaneously.
The LED indicators for these buttons will be turned on, and the piano music selection screen will be displayed.
Step 2
Use the VALUE buttons or to select your desired song.
Songs can be changed while the selected song is being played.
Step 3
Start the song by pressing the PLAY / STOP button.
To stop the song, press the same button again.
Step 4
Press the DEMO and LESSON buttons simultaneously again to exit the piano music mode.
Press them at the same time.

Page
13
3
Pla
ying
the
Pia
no
3. Playing the Piano1) Selecting a Sound
The panel has 10 SOUND SELECT buttons.
The CA91 has 8 sounds assigned to each SOUND SELECT button for a total of 80 different sounds.
The CA71 has 6 sounds assigned to each SOUND SELECT button for a total of 60 different sounds.
The CA51 has 4 sounds assigned to each SOUND SELECT button for a total of 40 different sounds.
Sound Button CA91 CA71 CA51Piano 1 Concert Grand Concert Grand Concert Grand
Studio Grand Studio Grand Studio GrandMellow Grand Mellow Grand Mellow GrandJazz Grand Jazz Grand Jazz GrandModern Piano Modern PianoHonky Tonk Honky TonkRock PianoNew Age Piano
Piano 2 Concert Grand 2 Concert Grand 2 Modern PianoStudio Grand 2 Studio Grand 2 Honky TonkMellow Grand 2 Mellow Grand 2 New Age Piano 2Jazz Grand 2 Jazz Grand 2 New Age Piano 3New Age Piano 2 New Age Piano 2New Age Piano 3 New Age Piano 3New Age Piano 4New Age Piano 5
Electric Piano Classic E.Piano Classic E.Piano Classic E.PianoModern E.P. Modern E.P. Modern E.P.60's E.P. 60's E.P. 60's E.P.Modern E.P. 2 Modern E.P. 2 Modern E.P. 2New Age E.P. New Age E.P.Crystal E.P. Crystal E.P.Modern E.P. 3New Age E.P. 2
Drawbar Jazz Organ Jazz Organ Jazz OrganDrawbar Organ Drawbar Organ Drawbar OrganDrawbar Organ 2 Drawbar Organ 2 Drawbar Organ 2Be 3 Be 3 Be 3Jazzer JazzerOdd Man Odd ManHi Lo4' Drawbar
Church Organ Church Organ Church Organ Church OrganDiapason Diapason DiapasonFull Ensemble Full Ensemble Full EnsembleDiapason Oct. Diapason Oct. Diapason Oct.Chiffy Tibia Chiffy TibiaStopped Pipe Stopped PipePrincipal ChoirBaroque
Harpsi & Mallets Harpsichord Harpsichord HarpsichordHarpsichord 2 Harpsichord 2 Harpsichord 2Vibraphone Vibraphone VibraphoneClavi Clavi ClaviMarimba MarimbaCelesta CelestaHarpsichord OctBell Sprit
Strings Slow Strings Slow Strings Slow StringsString Pad String Pad String PadWarm Strings Warm Strings Warm StringsString Ensemble String Ensemble String EnsembleSoft Orchestra Soft OrchestraChamber Strings HarpHarpPizzicato Str.
Vocals Choir Choir ChoirPop Ooh Pop Ooh Pop OohPop Aah Pop Aah Pop AahChoir 2 Choir 2 Choir 2Jazz Ensemble Jazz EnsemblePop Ensemble Pop EnsembleSlow ChoirBreathy Choir
Pads New Age Pad New Age Pad New Age PadAtmosphere Atmosphere AtmosphereItopia Itopia ItopiaBrightness Brightness BrightnessNew Age Pad 2 New Age Pad 2Brass Pad Brass PadHalo PadBright Warm Pad
Bass & Guitar Wood Bass Wood Bass Wood BassFinger Bass Finger Bass Finger BassFretless Bass Fretless Bass Fretless BassW. Bass & Ride W. Bass & Ride W. Bass & RideE. Bass & Ride Ballad GuitarBallad Guitar Pick Nylon Gt.Pick Nylon Gt.Finger Nylon Gt.

Page
14
3
Pla
ying
the
Pia
no
Step 1
Selecting a sound.
Press the SOUND SELECT button under the name of the instrument you would like to listen to. When the button
is pressed, the LED indicator will be turned on to indicate that this sound is selected.
Multiple sounds are assigned to each button. Press the selected button repeatedly to select the different sounds
assigned to that button.
The sound selections you make can be saved by using the registration function (page 25).
The VALUE buttons can also be used to select sounds.
Step 2
Try playing the keyboard.
You will hear your selected sound as you play.
Use the MASTER VOLUME slider to adjust the volume.
The CA piano is capable of playing up to 192 notes simultaneously (192-note polyphony). When playing in dual mode,
or when playing the stereo piano sound, the polyphony will be reduced by half since the piano has to produce two
sounds for each note.
SOUND SELECT buttons

Page
15
3
Pla
ying
the
Pia
no
2) Dual ModeAnother feature of the CA piano is the ability to layer two preset sounds together to create a more complex
sound. For example, piano layered with strings, electric piano with choir sound, and so on.
Settings made in the dual mode can be saved by using the registration function (page 25).
Step 1
To layer two sounds, press the SOUND SELECT buttons for both sounds simultaneously.
The LED indicators for each button will be turned on to indicate the two sounds you have chosen. You will fi nd
the selected sound names are also shown in the LCD display. (the sound assigned to the button that is pressed
fi rst will be displayed in the top line).
For example, To layer a piano sound and a string sound, press the PIANO 1 and STRINGS buttons simultane-
ously as shown in the diagram.
Pressing either of the SOUND buttons again will select the other sounds assigned to that button. For example if
you want to change the String Ensemble sound to Slow Strings, while holding down the PIANO 1 button press
the STRINGS button again until Slow Strings is displayed in the LCD.
If you want to layer two sounds assigned to the same SOUND SELECT button, while pressing the desired
SOUND SELECT button use the VALUE buttons to select your desired layered sound.
For example, if you wish to layer Concert Grand and Mellow Grand, fi rst press the PIANO 1 button to select
Concert Grand, and then use the VALUE buttons to select Mellow Grand while still holding down the PIANO 1
button.
Step 2
Try playing the keyboard.Two different sounds are played at the same time.
Step 3
Use the BALANCE slider to adjust the volume balance between the two sounds.
Step 4
To exit dual mode, simply press any individual SOUND SELECT button and dual mode will be cancelled.
Press them at the same time
Increases the volume of the sound assigned to the leftmost selected SOUND button.
Increases the volume of the sound assigned to the rightmost selected SOUND button.
Concert Grand String Ensemble

Page
16
3
Pla
ying
the
Pia
no
3) Split Mode
The split function divides the keyboard into two sections—upper and lower—and lets you play each section with
a different sound.
Settings made in split mode can be saved by using the registration function (page 25).
Step 1
First press the desired SOUND SELECT button to select the upper sound, then press the SPLIT button.
The LED indicator on the SPLIT button will be turned on.
The LED Indicator for the upper sound will be turned on and the LED for the lower sound will start fl ashing.
To change the lower sound, while holding down the SPLIT button, press the desired SOUND SELECT button to
select the lower sound.
The LCD display shows the selected sound for the upper and lower sections.
The "/" symbol will be displayed at the bottom left corner of the LCD display to
show that split mode has been activated.
The default split point is set between B2 and C3. The split point can be moved
to anywhere on the keyboard.
Step 2
Press a key while holding down the SPLIT button to change the split point.
The key you pressed becomes the lowest note of the upper section.
Step 3
Try playing the keyboard.
Different sounds are produced in the upper and lower sections.
Hold down the SPLIT button.
(Upper sound)(Lower sound)
Split point
Button lights
Concert Grand/ Wood Bass

Page
17
3
Pla
ying
the
Pia
no
Step 4
To change the upper sound while in split mode, press the desired SOUND SELECT button to select the desired sound.
The LED indicator turns on for the selected SOUND SELECT button.
Press the same button repeatedly to select a different sound type assigned to that button.
Step 5
To change the Lower sound, Press the desired SOUND SELECT button while holding down the SPLIT button to select the desired sound.
The LED indicator fl ashes for the selected SOUND SELECT button.
Press the same button repeatedly to select a different sound type assigned to that button.
Step 6
Use the BALANCE slider to adjust the volume balance between the upper and lower sections.
Step 7
Press the SPLIT button to exit the split mode.
The LED indicator on the SPLIT button will be turned off.
"Lower Octave shift" can be used to adjust the octave range for the lower section. (page 63).
The Sustain pedal can be turned ON / OFF for the lower section. (page 63).
Increases the vol-ume of the sound assigned to the upper section.
Increases the vol-ume of the sound assigned to the lower section.

Page
18
3
Pla
ying
the
Pia
no
4) Four Hands Mode
It is possible to divide the keyboard into left and right sections at the default split point, and to play both sections
in the same key range using the four hands mode.
When four hands mode is active, the sustain pedal (right pedal) acts as the sustain pedal for the right section,
and the soft pedal (left pedal) acts as the sustain pedal for the left section. When four hands mode is active the
CA functions as two pianos, so you can enjoy duet performances or use one CA piano for two students.
Step 1
To enter the four hands mode, depress the Sustain pedal (right pedal) and the Soft pedal (left pedal) while holding down the SPLIT button.
The LED indicator on the SPLIT button will fl ash to indicate four hands mode is active.
On the LCD display, the top line indicates the sound for the right sec-
tion, and the lower line indicates the sound for the left section.
Concert Grand is the default sound for both sections.
As with SPLIT mode, left and right sounds, split point, and the volume balance can be set (pages 16 and 17).
Compared to the normal operation of the CA piano, the key range is lowered by two octaves for the right section, and
raised by two octaves for the left section. "Lower octave shift" can be used to adjust the octave range of the lower
section (page 63).
The settings made for four hands mode are independent of those made in split mode; therefore, making these settings
will not change the split mode settings.
Step 2
Press the SPLIT button to exit four hands mode.The LED indicator for the SPLIT button will be turned off.
Hold down the button.
Depress the pedals
Sustain pedal Soft pedal
Concert Grand/Concert Grand

Page
19
3
Pla
ying
the
Pia
no
5) Reverb / Effects / Tone Control
You might have noticed that when you select some of the preset sounds, the LED indicator for the EFFECTS or
the REVERB button is turned on. The reason for this is some of the sounds are set up with reverb or an effect
on as their initial setting. Adding an effect to the sound enhances tonal quality and improves acoustical realism.
The CA piano is equipped with two separate groups of effects. There are fi ve different reverbs, seven different
effects and a tone control section that contains four preset and one user EQ.
Settings made in the reverb, effects, and tone control sections can be saved by using the registration function
(page 25).
Using REVERB
Reverb adds reverberation to the sound, simulating the acoustic environment of a recital room, stage, or concert
hall.
Five types of reverb are available as follows:
ROOM1, ROOM2 : Simulates the ambiance of a living room or small rehearsal room.
Room2 simulates a larger room than Room1.
STAGE : Simulates the ambiance of a small hall or live stage.
HALL1, HALL2 : Simulates the ambiance of a concert hall or theater.
Hall2 simulates a larger hall or theater than Hall1.
Step 1
Press the REVERB button to turn the reverb on / off. The LED indicator will be turned on to indicate that reverb is in use. Press and hold the REVERB button and the currently selected reverb type will be shown in the LCD display.To change the reverb type, while holding the REVERB button use the VALUE buttons to change the reverb type. Release the REVERB button once the desired reverb type is displayed.
The currently selected reverb type is displayed while the REVERB
button is held down.
Reverb will be turned off when the REVERB button is pressed and its
LED indicator turns off.
To turn the selected reverb on, press the REVERB button once again
to turn its LED indicator on.
Hold down the button.
Reverb = Room 1
Reverb = Room 2
Reverb = Stage
Reverb = Hall 1
Reverb = Hall 2

Page
20
3
Pla
ying
the
Pia
no
Using EFFECTS
Seven different effect types are available as follows:
Chorus : Chorus is an effect that simulates the rich character of a vocal choir or string ensemble, by layering a
slightly detuned version of the sound over the original to enrich it.
Delay : Adds echoes to the sound. There are three types of delay available (delay 1 - 3), each of which has a
different length of delay between the echoes.
Tremolo : Adds vibrato to the sound.
Rotary : This effect simulates the sound of the Rotary Speaker cabinet commonly used with electronic organs.
Rotary 1 is a normal rotary effect and Rotary 2 adds distortion to the rotary effect.
The soft pedal is used to change the speed of the rotor between SLOW and FAST (page 8).
Step 1
Press the EFFECTS button to turn the effects on / off. The LED indicator will be turned on to indicate that the effects are in use. Press and hold the EFFECTS button and the currently selected effect type will be shown in the LCD display.To change the effect type, while holding the EFFECT button use the VALUE buttons to change the effect type. Release the EFFECTS button once the desired effect type is displayed.
The currently selected effect type is displayed while the EFFECTS
button is held down.
Effects will be turned off when the EFFECTS button is pressed and
its LED indicator turns off.
To turn the selected effect on, press the EFFECTS button once again
to turn its LED indicator on.
Hold down the button.
Effect Type = Chorus
Effect Type = Delay 1
Effect Type = Delay 2
Effect Type = Delay 3
Effect Type = Tremolo
Effect Type = Rotary 1
Effect Type = Rotary 2

Page
21
3
Pla
ying
the
Pia
no
Editing the settings for the Chorus / Delay / Tremolo / Rotary effect
The following parameters can be edited for each effect type:
Chorus : Modulation speed – Higher values produce a faster modulation, Depth- higher values produce a
deeper chorus.
Delay : Delay Time – Higher values add longer delays, Delay Depth – Higher values create louder echoes.
Tremolo : Rate – Higher values produce faster tremolo, Depth - Higher values produce a deeper tremolo.
Rotary : Acceleration speed – higher values produce a faster change from slow to fast, Rotary Speed- higher
values produce a faster rotor speed.
Step 1
While Holding the EFFECTS button and use the VALUE buttons to select the effect type you wish to edit.
Step 2
With the EFFECTS button still held down, use the MENU buttons to select the parameter to be edited.
Effect type Item
Chorus Depth, Speed
Delay 1, 2, 3 Depth, Time
Tremolo Depth, Rate
Rotary 1, 2
Acceleration speed (time required to change the ro-tor speed from "SLOW" to "FAST" or from "FAST" to "SLOW"), Rotary Speed (this setting only affects the "FAST" speed)
Step 3
With the EFFECTS button still held down, use the VALUE buttons to adjust the value for the selected parameter.
As the value is set higher:
Depth : The effect becomes deeper or louder.
Rate : The speed becomes faster.
Time : The time length becomes longer.
Speed : The speed becomes faster.
Step 4
Release the EFFECTS button when you are fi nished editing.
Hold down the button.
Delay 1 Depth = 5
Delay 1 Depth = 6

Page
22
3
Pla
ying
the
Pia
no
Using TONE CONTROL *CA91/CA71 only
Tone control allows you to adjust the sound character of the CA piano to your taste. It can also be used to opti-
mize the sound of the CA piano for the best sound quality within the area that it is located.
The following preset EQ settings and one user setting are provided:Loudness : Use this EQ to help retain the normal sound character of the CA piano when listening at lower vol-
umes.
Bass boost : Low frequencies are emphasized.
Treble boost : High frequencies are emphasized.
Mid cut : Mid frequencies are reduced creating a clearer sound.
User : The three available frequency bands can be separately adjusted to your taste.
Step 1
To change the EQ setting, while holding the TONE CONTROL button use the VALUE buttons to select an EQ type. Release the TONE CONTROL button once the desired EQ type is displayed.
The currently selected setting is displayed while the TONE CON-
TROL button is held down.
The tone control EQ will be turned off when the TONE CONTROL
button is pressed and its LED indicator turns off.
To turn the selected tone control EQ on, press the TONE CONTROL
button once again to turn its LED indicator on.
If you wish to adjust the each frequency band separately refer to " User
tone control settings" (page 23).
Hold down the button.
Tone Control = Loudness
Tone Control = Bass Boost
Tone Control = Treble Boost
Tone Control = Mid Reduce
Tone Control = User

Page
23
3
Pla
ying
the
Pia
no
User tone control settings *CA91/CA71 only
This screen appears only when "User" is selected in tone control.
Step 1
While holding down the TONE CONTROL button, use the VALUE buttons to select "User."
Step 2
While holding down the TONE CONTROL button, use the MENU buttons to select the user setting function.Repeatedly pressing the MENU button or selects each of the user frequency bands and displays current value.
Step 3
Without releasing the TONE CONTROL button, use the VALUE buttons or to adjust the level of the selected frequency band within a range of -6 and +6.
Step 4
Release the TONE CONTROL button when you have completed editing the user EQ settings.
Sound board speakers (CA91)As with an upright piano, sounds are produced from the backside of the sound board.
If you wish to lower the sound volume of the sound board, set the Low value to -6.
Hold down the button.
User Low = -2
User Mid = 3
User High = 1

Page
24
3
Pla
ying
the
Pia
no
6) Transpose
The transpose function lets you raise or lower the piano’s key in half steps. This is especially useful when you
have learned a song in one key and have to play it in another key. The transpose feature allows you to play the
song in the original key, but hear it in another key.
Step 1
While holding down the TRANSPOSE button, use the keys to specify a transpose value (between -12 and +12 (two octaves)).
Notes will be transposed according to the set transpose value when the LED indicator for the TRANSPOSE but-
ton is on. The current transpose value is displayed in the display while the TRANSPOSE button is held down.
The default setting is C major.
The "C" key at the middle of the keyboard corresponds
to the value 0.
The value is displayed in the second line on the display.
Step 2
Transpose can be turned on or off by pressing the TRANSPOSE button.
Transpose is active when the LED indicator is on, and the notes are transposed according to the set transpose
value.
The LED indicator will not turn on when the set value is 0.
Notes can also be transposed by pressing the VALUE buttons while holding down the TRANSPOSE button.
Hold down the button.
Hold down the button.
Transpose = 0

Page
25
3
Pla
ying
the
Pia
no
7) Using the Registration Function *CA91/CA71 Only
A registration is a special set up that memorizes most of the panel settings such as sounds and effect settings
so that you can recall them at the touch of a button.
10 Registrations can be memorized and saved. The settings and functions below can be memorized to a regis-
tration.
Sound type (including settings made in dual or split
mode)
Dual / split balance, split point
Effect, reverb, tone control settings
Virtual technician functions (page 51)
Voicing
Damper Resonance
String resonance
Key-off effect
Touch curve
Temperament
Stretch tuning
Menu functions (page 61)
Wall EQ (CA91 only)
Brilliance (CA51 only)
Lower octave shift
Lower pedal
Layer octave shift
Layer dynamics
Damper hold
Tuning
Selecting a registration
Step 1
Press the REGISTRATION button.
The REGISTRATION button LED indicator will be turned on, and the
display will show the sound or sounds for the currently active regis-
tration.
Step 2
To select a different registration, press any one of the REGISTRATION SELECT buttons (= SOUND SELECT buttons) numbered from 1 to 10.
Step 3
Press the REGISTRATION button again to return to normal operation. The LED indicator for the REGISTRATION button will be turned off.
⎧ ⎪ ⎪ ⎪ ⎪ ⎪ ⎪ ⎪ ⎪ ⎪ ⎨ ⎪ ⎪ ⎪ ⎪ ⎪ ⎪ ⎪ ⎪ ⎪ ⎪ ⎩Press one of them.
Concert Grand Slow Strings

Page
26
3
Pla
ying
the
Pia
no
Memorizing a registration
Step 1
To memorize the current panel settings, press and hold the REGISTRATION button for a few seconds until the REGISTRATION/SOUND SELECT buttons start fl ashing.
Step 2
Press any one of the REGISTRATION/SOUND SELECT buttons marked 1-10 to select a location for your new registration.
A beep sound confi rms that your registration has been memorized to your selected location.
Resetting the registration settings
Step 1
Turn on the power while holding down the TRANSPOSE and VIRTUAL TECHNICIAN buttons.
The registrations will be reset to the factory default settings.
Hold them down at the same time.
⎧ ⎪ ⎪ ⎪ ⎪ ⎪ ⎪ ⎪ ⎪ ⎪ ⎨ ⎪ ⎪ ⎪ ⎪ ⎪ ⎪ ⎪ ⎪ ⎪ ⎪ ⎩
Hold it down for a few seconds.
Buttons fl ash
Save Regist toSelect 1 -10

Page
27
3
Pla
ying
the
Pia
no
8) Using Metronome / Rhythm
Rhythm is one of the most important elements when learning music. It is important to practice playing the piano
at the correct tempo and with a steady rhythm. The CA piano’s metronome is a tool that helps you to achieve
this by providing a steady beat for you play along with. In addition to regular metronome beats, the CA piano
contains a wide variety of drum beats such as pop, rock, ballad, and jazz.
Starting the metronome and setting the tempo
Step 1
Press the TEMPO button.
You will see the LED indicator for the TEMPO button turn on and
hear the metronome begin counting with a steady beat.
The current tempo is displayed on the LCD display in beats per minute.
Step 2
Use the VALUE buttons to set the tempo.
The tempo can be set within a range of = 10 to 400.
( = 20 to 800 for 3/8, 6/8, 7/8, 9/8, and 12/8 times)
Step 3
To stop the metronome, press the TEMPO button again. The LED indicator for the TEMPO button will be turned off. The metronome function cannot be used when Concert Magic is active.
Changing the metronome time signature and rhythm
You probably noticed that there are two types of clicks and the louder one comes every fourth beat. The met-
ronome is capable of giving you a down beat to indicate the beginning of the measure. You are now hearing a
4-beat or 4/4 time signature. You can select a different time signature, if you want to. There are ten different time
signatures available on the CA piano—1/4, 2/4, 3/4, 4/4, 5/4, 3/8, 6/8, 7/8, 9/8 and 12/8. You can also select one
of the 100 built-in rhythm styles instead of a simple metronome click.
Step 1
Press the BEAT button.You will see the LED indicator turn on and hear the metronome begin counting. The
LCD display shows the time signature and a visual indicator of beats per measure.
The LED indicator for the BEAT button turns on, the set beat is displayed on the LCD
display, and then the metronome starts. When a rhythm is selected, the currently se-
lected rhythm is shown on the LCD display, and the rhythm starts.
Tempo Œ= 120 ~|||
Beat = 4/4 ~|||
8 Beat 1 ~|||

Page
28
3
Pla
ying
the
Pia
no
Step 2
Use the VALUE buttons to change the beat / rhythm.
The beat can be selected from 1/4, 2/4, 3/4, 4/4, 5/4, 3/8, 6/8, 7/8, 9/8, 12/8.
The rhythm can be selected from 100 patterns (see page 29 for the rhythm list).
Step 3
To stop the metronome or rhythm, press the BEAT button again. The LED indicator for the BEAT button will be turned off.
Setting the sound volume for the metronome / rhythm
Step 1
Press the TEMPO and BEAT buttons at the simultaneously.
You will see the LED indicators for these buttons turn on and hear
the metronome begin counting.
The Metronome volume is displayed on the LCD display.
Step 2
Use the VALUE buttons to set the volume.
The volume can be set within a range of 1 to 10.
Step 3
To stop the metronome or rhythm, press the TEMPO and BEAT buttons simultaneously again. The LED indicators for the TEMPO and BEAT button will be turned off.
Volume = 5 ~|||

Page
29
3
Pla
ying
the
Pia
no
Rhythm list
No. Rhythm
1 8 Beat 1
2 8 Beat 2
3 8 Beat 3
4 16 Beat 1
5 16 Beat 2
6 16 Beat 3
7 16 Beat 4
8 16 Beat 5
9 16 Beat 6
10 Rock Beat 1
11 Rock Beat 2
12 Rock Beat 3
13 Hard Rock
14 Heavy Beat
15 Surf Rock
16 2nd Line
17 50 Ways
18 Ballad 1
19 Ballad 2
20 Ballad 3
21 Ballad 4
22 Ballad 5
23 Light Ride 1
24 Light Ride 2
25 Smooth Beat
26 Rim Beat
27 Slow Jam
28 Pop 1
29 Pop 2
30 Electro Pop 1
31 Electro Pop 2
32 Ride Beat 1
33 Ride Beat 2
34 Ride Beat 3
35 Ride Beat 4
36 Slip Beat
37 Jazz Rock
38 Funky Beat 1
39 Funky Beat 2
40 Funky Beat 3
41 Funk 1
42 Funk 2
43 Funk 3
44 Funk Shuffl e 1
45 Funk Shuffl e 2
46 Buzz Beat
47 Disco 1
48 Disco 2
49 Hip Hop 1
50 Hip Hop 2
No. Rhythm
51 Hip Hop 3
52 Hip Hop 4
53 Techno 1
54 Techno 2
55 Techno 3
56 Heavy Techno
57 8 Shuffl e 1
58 8 Shuffl e 2
59 8 Shuffl e 3
60 Boogie
61 16 Shuffl e 1
62 16 Shuffl e 2
63 16 Shuffl e 3
64 T Shuffl e
65 Triplet 1
66 Triplet 2
67 Triplet 3
68 Triplet 4
69 Triplet Ballad 1
70 Triplet Ballad 2
71 Triplet Ballad 3
72 Motown 1
73 Motown 2
74 Ride Swing
75 H.H. Swing
76 Jazz Waltz 1
77 Jazz Waltz 2
78 5/4 Swing
79 Tom Swing
80 Fast 4 Beat
81 H.H. Bossa Nova
82 Ride Bossa Nova
83 Beguine
84 Mambo
85 Cha Cha
86 Samba
87 Light Samba
88 Surdo Samba
89 Latin Groove
90 Afro Cuban
91 Songo
92 Bembe
93 African Bembe
94 Merenge
95 Reggae
96 Tango
97 Habanera
98 Waltz
99 Ragtime
100 Country & Western

Page
30
4
Usi
ng th
e R
ecor
der
4. Using the Recorder1) Recording a Song (REC Button)
The CA piano’s recorder is a 10 song (5 songs in the CA51), two track recorder. It records your playing much
like a tape recorder, and it is just as easy to use. The CA piano records a song as digital data instead of audio
data and stores the song inside the piano. Because the song is stored as digital information you can modify the
song when you play it back. You can, for example, record each of the two tracks separately, adjust the tempo
without changing the pitch or use a different effect setting from one you have recorded. Once you understand
the recorder, you will fi nd it to be a useful tool for both practicing and playing the piano.
Selecting a song and part to be recorded
Step 1
Press the REC button.
The display shows the song and part numbers.
The LED indicator on the REC button fl ashes.
If you just want to record a song without making any changes you can proceed to step 4 at this time.
Step 2
Use the MENU buttons to select a song to be recorded.
RecordSong 1 Part=1
…
MENU buttons
RecordSong 1 Part=1
RecordSong 2 Part=1
RecordSong 5 Part=1

Page
31
4
Usi
ng th
e R
ecor
der
Step 3
Use the VALUE buttons to select a part to be recorded.
The symbol appears on the second line on the display
if the selected part has already been recorded.
If you select a part with previously recorded data to re-
cord, the previously recorded data will be overwritten by
the new performance data.
Step 4
Play the keys to start recording.
Recording starts automatically when you play the keys.
At the same time, the LED indicators of the REC and
PLAY / STOP buttons will be turned on.
Recording can also be started by pressing the PLAY /
STOP button.
Any changes made to the sound while you are recording
will also be recorded.
Step 5
When you fi nish playing a song, press the PLAY / STOP buttons to stop recording.
The LED indicators of the PLAY / STOP and REC buttons turn off, and recording stops.
After showing that the recording has been stopped, the display shows that the CA piano is ready to play the re-
corded performance.
The maximum recording capacity is approximately 90,000 notes (15,000 notes in CA51). When the storage capacity
becomes full during recording, the LED indicators of the PLAY / STOP and REC buttons turn off, and recording stops.
Performance up to that point that will be recorded.
Performance data stored in the CA piano will be saved even after turning off the power.
You can record a second part in the second track (part) of the same song. After recording the fi rst part, use the VAL-
UE buttons to select the other track and record your second part. You will hear the fi rst part playing as you record the
second part. If you want to record a second part without hearing the fi rst part please read step 3 of the next section: “2)
Playing Back a Song (PLAY/STOP Button)” for more information on selecting the different parts for playback.
Panel operations during recording:
Any changes made to the sound type will be stored in memory.
Shifts between dual and split modes will be stored in memory.
Changes made to the effect settings will not be stored in memory; the selected effect will be applied to the
selected sound type.
Changes made to tempo will not be stored in memory.
Changes made using the BALANCE slider in dual and split modes will not be stored in memory. The volume
balance set immediately before recording will be stored in memory.
Turning the touch curve or transpose functions ON or OFF will not be stored in memory. Regardless of the
transpose settings, the performance will be replayed at the pitch that had been used for recording.
VALUE buttons
RecordSong 1 Part=1
RecordSong 1 Part=2
RecordSong 1 Part=1*
Record StoppingSong 1 Part=1
PlaySong 1 Part=1&2*

Page
32
4
Usi
ng th
e R
ecor
der
2) Playing Back a Song (PLAY/STOP Button)The PLAY/STOP button is used to select a song and part to play, and to start and stop play back of the recorded
songs.
To play back a recorded performance immediately after recording, proceed to Step 2.
Step 1
Press the PLAY / STOP button.
The currently selected song and parts are displayed, and the CA
piano is ready to play back the song.
Step 2
Use the MENU buttons to select a song.
The symbol appears on the second line on the
display if the selected part has already been re-
corded.
Step 3
Use the VALUE buttons to select a part.
Part 1 & 2 : Both parts will be played back.
Part 1 : Only the fi rst part will be played back.
Part 2 : Only the second part will be played
back.VALUE buttons
Select Song/PartSong 1 Part=1&2*
Select Song/PartSong 1 Part=1*
Select Song/PartSong 1 Part=2*
Select Song/PartSong 1 Part=1&2*
…
MENU buttons
Select Song/PartSong 1 Part=1&2*
Select Song/PartSong 2 Part=1&2
Select Song/PartSong 5 Part=1&2
Select Song/PartSong 1 Part=1&2*

Page
33
4
Usi
ng th
e R
ecor
der
Step 4
After you have made any desired settings, press the PLAY / STOP button to play back the song.
Step 5
To stop, press the PLAY / STOP button again.
The CA piano enters standby mode.
While the recorder is in standby mode, you may select a song and part to be played back next.
Step 6
To exit the recorder and return to the normal operation, press any SOUND SELECT button.
3) Deleting a Song or PartYou can delete songs or parts within a song that were not recorded as you wished or that you do not want to
keep any more.
Step 1
Press the PLAY / STOP and REC buttons at the simultaneously.
The LED indicators of the PLAY / STOP and REC buttons fl ash.
Step 2
Select a song by using the MENU buttons, and then select a part using the VALUE buttons.
Select a tune. Select a part.
To Del Press RECSong 1 Part=1&2*
To Del Press RECSong 1 Part=1&2*
Press them at the same time.
Button fl ashes Button fl ashes

Page
34
4
Usi
ng th
e R
ecor
der
Step 3
Press the REC button to delete. The LCD display will ask you if you’re sure.
Step 4
Press the REC button again to delete the selected song and part data.
* To cancel the delete operation in Step 3, press the PLAY / STOP button.
The display returns to the play back standby screen when the PLAY / STOP button is pressed again.
Repeat the same procedures to delete multiple songs / parts.
If you wish to delete all the recorded songs, turn on the power while pressing the PLAY / STOP and REC buttons at
the same time.
Sure? Press RECSong 1 Part=1&2*
Delete CompletedSong 1 Part=1&2*
Select Song/PartSong 1 Part=1&2*
To Del Press RECSong 1 Part=1&2*
Delete CanceledSong 1 Part=1&2*

Page
35
5
Usi
ng
the
Less
on F
unct
ion
5. Using the Lesson FunctionThe CA piano’s Lesson function helps you practice the piano with either a collection of etudes from Czerny,
Burgmuller, and others or songs from Alfred’s Basic and Premier Piano lesson books (USA, Canada, UK, AU
only). In addition to the etudes or songs, basic fi nger exercises and a companion music book are also provided.
You can listen to any etude, song, or the fi nger exercises and practice along with them. You may practice each
hand separately at various tempos, and even record your practice. The lesson function can also evaluate your re-
corded performances for note accuracy, timing, and evenness of playing to help you further improve your skills.
(Alfred’s Basic Piano Library lesson books are sold separately. Please check with your dealer or contact Alfred’s
Customer service at 818-892-2452 <USA, Canada> or 0 -95240033 <Australia> or, +44 (0)1279828960 <Alfred
UK >, or by E-mail at [email protected]).
1) Using the Etudes or Alfred Lesson Books (USA, Canada, UK, AU only)
You can choose one of the etudes or songs and:
1. Listen to study the overall performance.
2. Practice the right-hand part while listening to the left-hand part of the etude/song.
3. Practice the left-hand part while listening to the right-hand part of the etude/song.
4. Practice with different tempos.
5. Practice a specifi c section of the etude/song.
6. Play, record, and listen to the right-hand performance while playing the left-hand part of the example etude/song.
7. Play, record, and listen to the left-hand performance while playing the right-hand part of the example etude/song.
Selecting a Etude category or Alfred book and an etude or song
Step 1
Press the LESSON button.
The Lesson selection screen appears. The fi rst line shows the Cat-
egory (etudes) or Book (Alfred) and the etude/song number. The
second line shows the current bar, beat, and tempo.
Step 2
Use the MENU buttons to select the book you wish to practice.
You may change the category or book while an etude or song is being played. Note, however, that you cannot
change the category or book while you are recording your performance.
Book Name -01Bar= 1- 1 Œ=092

Page
36
5
Usi
ng
the
Less
on F
unct
ion
Step 3
Use the VALUE buttons to select an etude or song number.
You may change etude/songs while an etude/song is being played. Note, however, you cannot change the
etude/songs while you are recording your performance.
Listening to an etude or song
Step 1
Press the PLAY / STOP button of the RECORDER.
There will be a one bar count-in before the etude/song begins playing.
The bar and beat number is displayed during the count-in before
the fi rst bar of the etude/song.
The fi rst bar number of the etude/song is zero if there are pick up
notes before the fi rst bar.
The metronome will not continue after the count-in bar, but you may
turn it on by pressing the TEMPO or BEAT button of the metronome.
To change the tempo, use the VALUE buttons while holding down the
TEMPO button.
Press the button to decrease the tempo, and press the button
to increase the tempo.
To reset the tempo, press the VALUE and buttons at the same
time.
Step 2
Press the PLAY / STOP button of the RECORDER once again.
The etude/song play back stops.
If the PLAY / STOP button is pressed again, there will be a one bar count-in, and the etude/song play back resumes.
If you wish to listen to the etude/song from the beginning, fi rst stop the etude/song by pressing the PLAY / STOP
button, and then press the and buttons at the same time.
Press this button fi rst.
Book Name -01Bar= 1- 1 Œ=092
Song number
TempoBar and beat number
Book Name -01Bar= 0- 1 Œ=092
Book Name -01Bar= 5- 3 Œ=092

Page
37
5
Usi
ng
the
Less
on F
unct
ion
Playing an etude or song from a specifi c bar
Step 1
Press the or button to locate the bar in which you want to begin play back.
Press the button to advance the etude/song one bar at a time. Press the button to rewind the etude/song
one bar at a time. To fast-forward or fast-rewind the etude/song, hold down the corresponding button.
You may use this function while an etude/song is being played.
Step 2
Press the PLAY / STOP button.
After the one bar count-in, the music starts from the specifi ed bar number.

Page
38
5
Usi
ng
the
Less
on F
unct
ion
Practicing the right / left-hand part while listening to the other part
Playing the only right / left-hand part of an example etude/song is called "minus-one play," and practicing the
right / left-hand part while listening to the other part is called "minus-one practice."
Step 1
After selecting an etude or song, move the BALANCE slider to the right or to the left.
To practice the right-hand part while listening to the left-hand part of an etude/song.
Move the slider to the left. The volume of the right-hand part of the etude/song is decreased, so that you can still hear
the right hand part playing softly as guide for you to play along with. When the slider is moved all the way to the left
end, the right-hand part is completely muted and you can try playing without a guide.
To practice the left-hand part while listening to the right-hand part of an etude/song.
Move the slider to the right. The volume of the left-hand part of the etude/song is decreased, so that you can still hear
the left hand part playing softly as guide for you to play along with. When the slider is moved all the way to the left end,
the left-hand part is completely muted and you can try playing without a guide.
Step 2
Press the PLAY / STOP button of the RECORDER.
After the one bar count-in, the etude/song starts with the slider setting applied. You may practice the right / left-
hand parts along with the etude/song.
To change the tempo, use the VALUE and buttons while holding down the TEMPO button.
If you wish to practice with a lower tempo, press the VALUE button. To practice with a faster tempo, press the
VALUE button.
To reset the tempo, press the VALUE and buttons at the same time.
Decreases the volume of the
right-hand part
Decreases the volume of the
left-hand part

Page
39
5
Usi
ng
the
Less
on F
unct
ion
Repeating and practicing specifi c sections of an etude or song
You can play back (loop) a specifi c section of an etude/song repeatedly between a defi ned A and B point.
Step 1
Press the PLAY / STOP button of the RECORDER.
After the count-in, the etude/song starts.
Step 2
Press the A B button when the etude/song reaches to the point where you wish to specify the start point of the loop.
The fi rst bar for the loop is set, and the LED indicator for the A B
button fl ashes.
Step 3
Press the A B button again when the etude/song reaches to the point where you wish to specify the end point of the loop.
The last bar for the loop is set, and the LED indicator for the A B
button turns on.
The section to be repeated (looped) is now defi ned. The section of
the etude/song defi ned by the start (A) and end (B) points will be re-
peated (looped).
Step 4
Press the A B button once again to cancel the loop play and return to the regular play mode.The LED indicator for the A B button turns off.
The loop section (the fi rst and the last bars) specifi ed here will be
stored in the CA piano unless loop play is cancelled, a different etude/
song is selected, or you exit the lesson mode.
The loop section can also be specifi ed by selecting bars with the and buttons while the etude is paused.
The last bar cannot precede the fi rst bar.
Buttons fl ash
Book Name -01Bar= 0- 1 Œ=092
Book Name -01Bar= 5- 1 Œ=092
Book Name -01Bar= 10- 2 Œ=092
Book Name -01Bar= 21- 2 Œ=092

Page
40
5
Usi
ng
the
Less
on F
unct
ion
Playing along with an etude or song and recording your own performance
Using the minus-one play function, you can play the right / left-parts of an etude/song, record your performance,
and listen to your performance afterwards.
Loop cannot be used when you are recording your performance.
Step 1
Press the REC button.
The LED indicators for the REC and PLAY / STOP buttons turn on.
After the one bar count-in, the etude/song plays and the CA piano be-
gins recording.
To change the start bar for your recording, use the or button to select the desired bar before starting to re-
cord.
The volume of the left / right-hand part of the etude/song can be adjusted with the BALANCE slider.
Step 2
To stop recording, press the PLAY / STOP button.
Etude/song play back and recording stops, and the LED indicators for the REC and PLAY / STOP buttons turn
off. The recorded performance can be deleted by pressing the REC and PLAY / STOP buttons at the same time.
The recorded performance will also be erased when a different etude/
song is selected.
Step 3
Press the PLAY / STOP button again.
After the one bar count-in, the etude/song plays and the recorded performance begins.
To change the start point for playback, use the or buttons.
The volume of the left / right-hand part of the song can be changed with the BALANCE slider.
Step 4
Press the PLAY / STOP button.Song playback and the recorded performance stops.
Exiting the lesson function
Step 1
Press the LESSON button.
Book Name -01Bar= 5- 1 Œ=092
Book Name -01Bar= 12- 3 Œ=092
Book Name -01Bar= 5- 1 Œ=092
Book Name -01Bar= 9- 1 Œ=092

Page
41
5
Usi
ng
the
Less
on F
unct
ion
2) Using the Finger ExercisesSelect one of the exercises and practice it.
When you play and record the selected exercise, your performance can be evaluated by the CA piano:
Mistakes (wrong notes)
Uneven timing
Uneven note volume
The evaluation result will be shown on the LCD display to allow you to objectively review your own performance.
Use the included music book "FINGER EXERCISES" for practice.
Selecting an exercise
Step 1
Press the LESSON button.
The Lesson selection screen appears. The fi rst line shows the
exercise category name and exercise number. The second
line shows the current bar, beat, and tempo.
Step 2
Press the MENU button to select Hanon.
Step 3
Use the VALUE buttons to select an exercise.
Book Name -01Bar= 1- 1 Œ=092
Hanon -01Bar= 1- 1 Œ=060
Hanon -12Bar= 1- 1 Œ=060

Page
42
5
Usi
ng
the
Less
on F
unct
ion
Listening to an exercise
Step 1
Press the PLAY / STOP button of the RECORDER.
There will be a one bar count-in before the exercise begins playing.
The bar and beat number is displayed during the count-in before the fi rst bar of the exercise.
The fi rst bar number of the exercise is zero if there are pick up notes before the fi rst bar.
The metronome will not continue after the count-in bar, but you may turn it on by pressing the TEMPO or BEAT
button of the metronome.
To change the tempo, use the VALUE buttons while holding down the TEMPO button.
Press the button to decrease the tempo, and press the button to increase the tempo.
To reset the tempo, press the VALUE and buttons at the same time.
Step 2
Press the PLAY / STOP button of the RECORDER once again.
The exercise play back stops.
If the PLAY / STOP button is pressed again, there will be a one bar count-in, and the exercise play back re-
sumes.
If you wish to listen to the exercise from the beginning, fi rst stop the exercise by pressing the PLAY / STOP but-
ton, and then press the and buttons at the same time.
As with the etudes or Alfred songs, you may play an exercise from a specifi c bar or use the loop function. Refer
to page 37 ( Playing an etude or song from a specifi c bar) and page 39 ( Repeating and practicing specifi c
sections of an etude or song) for details.
Press this button fi rst.
Hanon -12Bar= 0- 1 Œ=060
Hanon -12Bar= 7- 1 Œ=060
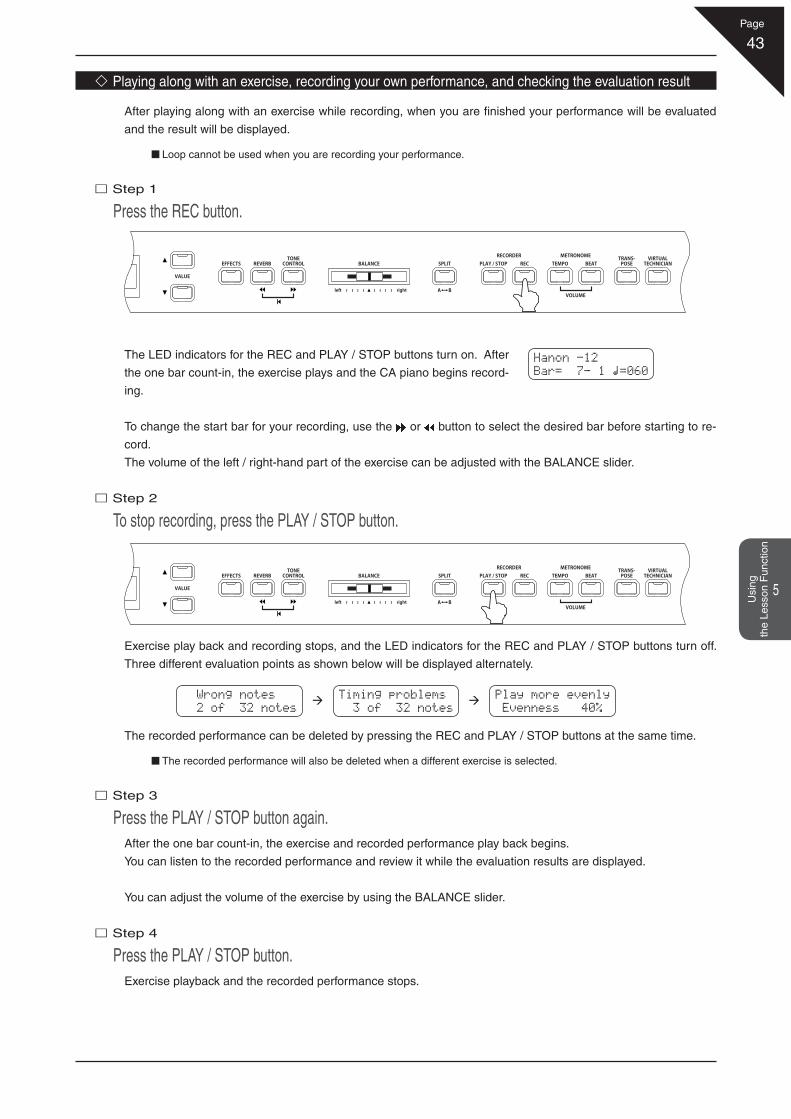
Page
43
5
Usi
ng
the
Less
on F
unct
ion
Playing along with an exercise, recording your own performance, and checking the evaluation result
After playing along with an exercise while recording, when you are fi nished your performance will be evaluated
and the result will be displayed.
Loop cannot be used when you are recording your performance.
Step 1
Press the REC button.
The LED indicators for the REC and PLAY / STOP buttons turn on. After
the one bar count-in, the exercise plays and the CA piano begins record-
ing.
To change the start bar for your recording, use the or button to select the desired bar before starting to re-
cord.
The volume of the left / right-hand part of the exercise can be adjusted with the BALANCE slider.
Step 2
To stop recording, press the PLAY / STOP button.
Exercise play back and recording stops, and the LED indicators for the REC and PLAY / STOP buttons turn off.
Three different evaluation points as shown below will be displayed alternately.
The recorded performance can be deleted by pressing the REC and PLAY / STOP buttons at the same time.
The recorded performance will also be deleted when a different exercise is selected.
Step 3
Press the PLAY / STOP button again.After the one bar count-in, the exercise and recorded performance play back begins.
You can listen to the recorded performance and review it while the evaluation results are displayed.
You can adjust the volume of the exercise by using the BALANCE slider.
Step 4
Press the PLAY / STOP button.Exercise playback and the recorded performance stops.
Hanon -12Bar= 7- 1 Œ=060
Wrong notes 2 of 32 notes
Play more evenly Evenness 40%
Timing problems 3 of 32 notes

Page
44
5
Usi
ng
the
Less
on F
unct
ion
Step 5
Press one of the MENU buttons.The display changes from the evaluation result display screen to the
exercise selection screen.
The recorded performance can be played even after canceling the evaluation result screen.
Exiting the lesson function
Step 1
Press the LESSON button.
Hanon -12Bar= 7- 1 Œ=060

Page
45
6
Pla
ying
w
ith C
once
rt M
agic
6. Playing with Concert MagicThe great German composer Johann Sebastian Bach once said, "Playing the keyboard is simple. Just strike the
right keys at the right time."
Many people wish it were that simple. The reality is very different of course. However, there is a way to make
playing the keyboard very simple. You don't even have to strike the right keys thanks to Concert Magic.
With CONCERT MAGIC, absolutely anyone can sit at the CA piano and make real music... even if you've never
taken a piano lesson in your life.
To enjoy performing by yourself, you have only to select your favorite piece from 176 preprogrammed songs and
tap any of the 88 piano keys with a steady rhythm and tempo. CONCERT MAGIC will provide the correct melo-
dy and accompaniment notes, regardless of which keys you press. Anybody, young or old, can enjoy CONCERT
MAGIC from the moment they sit down at the CA piano.
Now let's see how CONCERT MAGIC works.
1) Selecting a SongThe 176 Concert Magic songs are assigned to each of the 88 piano keys, two songs for each key. There are two
banks of songs, Bank A and Bank B. Each bank contains 88 songs. (CA51 has only Bank A.)
The songs are also classifi ed in eight groups by song category such as Children's Songs, American Classics,
and Christmas Songs.
All of the song titles are listed in separate volume "Internal Song Lists." To make it easier to fi nd which song is
assigned to which key, there is a key strip that can be placed between the end of black keys and the front panel.
The key strip indicates song categories, and note names.
Step 1
To select a song, press the key to which your desired song is assigned while holding down the CONCERT MAGIC button.
The LCD display shows you the song number and abbreviated song title.
You have selected a song in Bank A.
Step 2
To select a song in Bank B, press the same key again.
The LCD display shows you another song title with "B" at the beginning.
Repeatedly pressing the key switches between the two banks.
A01Twinkle Twinkle
Hold down the button.
Tune No.

Page
46
6
Pla
ying
w
ith C
once
rt M
agic
2) Listening to the SongIf you have selected a song you are familiar with, you may want to play by yourself right away. However you may
want to listen to the song fi rst before playing it.
Step 1
After selecting a Concert Magic song to play back, press the PLAY/STOP button.
The CA piano will start playing back the selected song.
You can adjust the speed or tempo of the song by using the VALUE buttons while holding down the TEMPO button.
While you are listening you can select a different Concert Magic song by using the VALUE buttons.
You probably noticed that the circles in the LCD display turn into smaller plus signs as the song is played back.
This is called the Note Navigator. These circles and plus signs provide a visual guide that shows you when to
press the next key. The space between the circles and position of the circles in the LCD shows you the approxi-
mate timing between each key press.
The circles turn into small plus signs as the song is playing.
The key to performing using Concert Magic is to know the rhythm of the song. The Note Navigator provides a
rough outline of the songs rhythm, that will help you to learn the song's rhythm and then perform it by yourself.
If you want to listen to a different song, press the key to which your desired song is assigned while holding down the
CONCERT MAGIC button. To listen, press the PLAY/STOP button.
Step 2
When you are fi nished listening to the song, press the PLAY/STOP button again to stop.
Twinkle Twinkle+ + ~ ~
Hold down the button.
Tune No.
Button lights

Page
47
6
Pla
ying
w
ith C
once
rt M
agic
3) Performing a SongNow you're ready to play yourself.
Step 1
Tap out the rhythm of the selected song on any one of the 88 black or white keys on the piano's keyboard.
Use the Note Navigator (the circles and plus signs) to learn the
rhythm of the Concert Magic song.
As you tap harder, the notes will get louder; as you tap softer, the notes will get quieter. As you tap faster, the
notes speed up; as you tap slower, they will slow down correspondingly, just like regular piano playing.
Isn't it fun? You can sound like you've been playing for years just by pressing one key with one fi nger.
Concert Magic is a perfect method for small children to learn music, especially to develop a sense of rhythm.
For older people who may think it is too late to learn the keyboard, Concert Magic is a good fi rst step for them
to begin with. With Concert Magic, your CA piano can be enjoyed by anyone in the family, even those who have
never touched a musical instrument in their life.
4) Part Volume Balance for Concert MagicWhen used with Concert Magic, the balance slider adjusts the volume balance of the melody part and the ac-
companiment.
Step 1
Move the balance slider to the right or left to adjust the volume balance.
As the slider is moved to the right, the sound of the melody becomes louder and the accompaniment becomes
softer. The balance changes in the opposite way when the slider is moved to the left.
Accompaniment Melody
~ ~ ~+ + ~ ~

Page
48
6
Pla
ying
w
ith C
once
rt M
agic
5) Concert Magic Song Arrangement TypesAfter playing for a while with Concert Magic you may think that it's too easy and there is very little to learn.
While it is true that some of the songs are very easy to play, even for beginners, there are also some which will
challenge you and require practice to play beautifully. Each of the 176 Concert Magic songs falls into one of
three different arrangement types depending on the skill level required to perform them.
Easy Beat
These are the easiest songs to play. To perform them, simply tap out a constant steady beat on any key on the
keyboard.
Look at the following example, "Für Elise". The Note Navigator indicates that you should keep a constant steady
rhythm all the way through the song. This is the distinguishing character of an Easy Beat song.
Press any key with a steady rhythm.
Melody Play
These songs are also quite easy to play, especially if they are familiar to you. To perform them, tap out the
rhythm of the melody on any key on the keyboard. Singing along as you tap the rhythm can be helpful.
Play "Twinkle, Twinkle, Little Star" for example. Follow the melody's rhythm as shown.
When performing fast songs with Concert Magic, it is sometimes easier to tap two different keys with two fi ngers
alternating. This allows you to play twice as fast as you can using only one fi nger on one key.
Fur Elise~~~~~~<
Key on X X X X X X X X X XX X X X X X X X X X
Key on X X X X X X X X X X X X X X
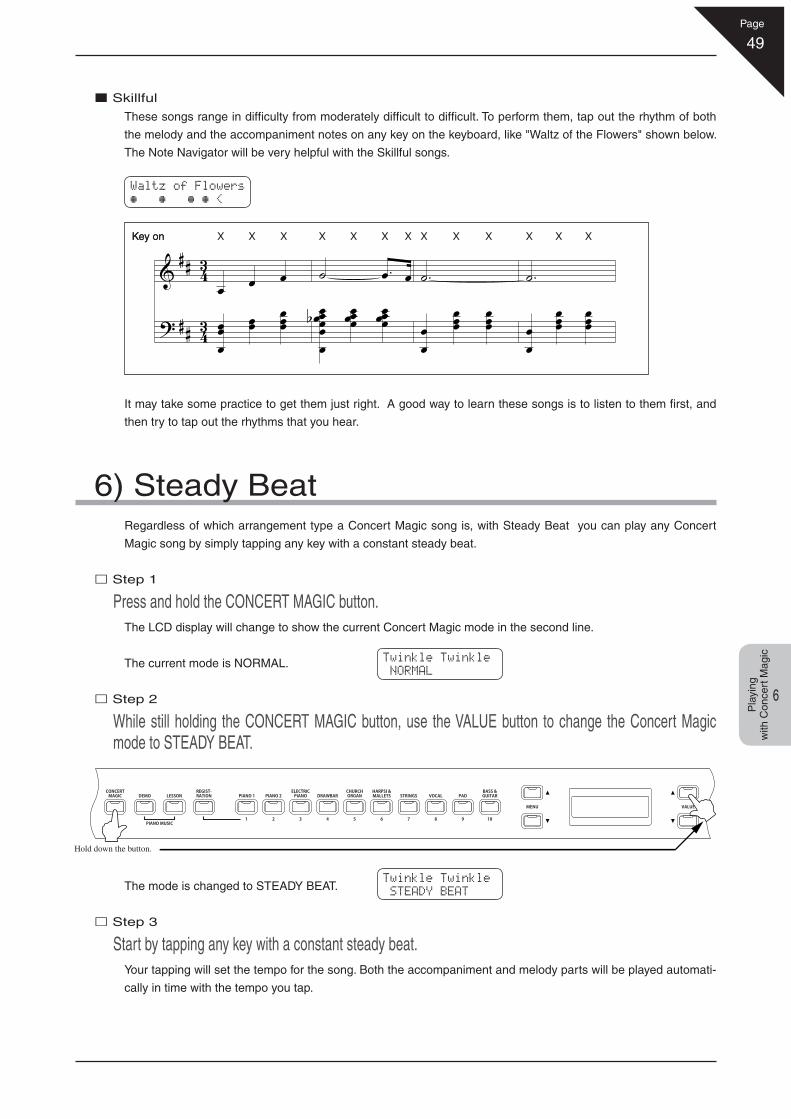
Page
49
6
Pla
ying
w
ith C
once
rt M
agic
Skillful
These songs range in diffi culty from moderately diffi cult to diffi cult. To perform them, tap out the rhythm of both
the melody and the accompaniment notes on any key on the keyboard, like "Waltz of the Flowers" shown below.
The Note Navigator will be very helpful with the Skillful songs.
It may take some practice to get them just right. A good way to learn these songs is to listen to them fi rst, and
then try to tap out the rhythms that you hear.
6) Steady BeatRegardless of which arrangement type a Concert Magic song is, with Steady Beat you can play any Concert
Magic song by simply tapping any key with a constant steady beat.
Step 1
Press and hold the CONCERT MAGIC button.The LCD display will change to show the current Concert Magic mode in the second line.
The current mode is NORMAL.
Step 2
While still holding the CONCERT MAGIC button, use the VALUE button to change the Concert Magic mode to STEADY BEAT.
The mode is changed to STEADY BEAT.
Step 3
Start by tapping any key with a constant steady beat.Your tapping will set the tempo for the song. Both the accompaniment and melody parts will be played automati-
cally in time with the tempo you tap.
Waltz of Flowers~ ~ ~ ~ <
Twinkle Twinkle NORMAL
Twinkle Twinkle STEADY BEAT
Hold down the button.
Key onKey on X X X X X X X X X X X X X
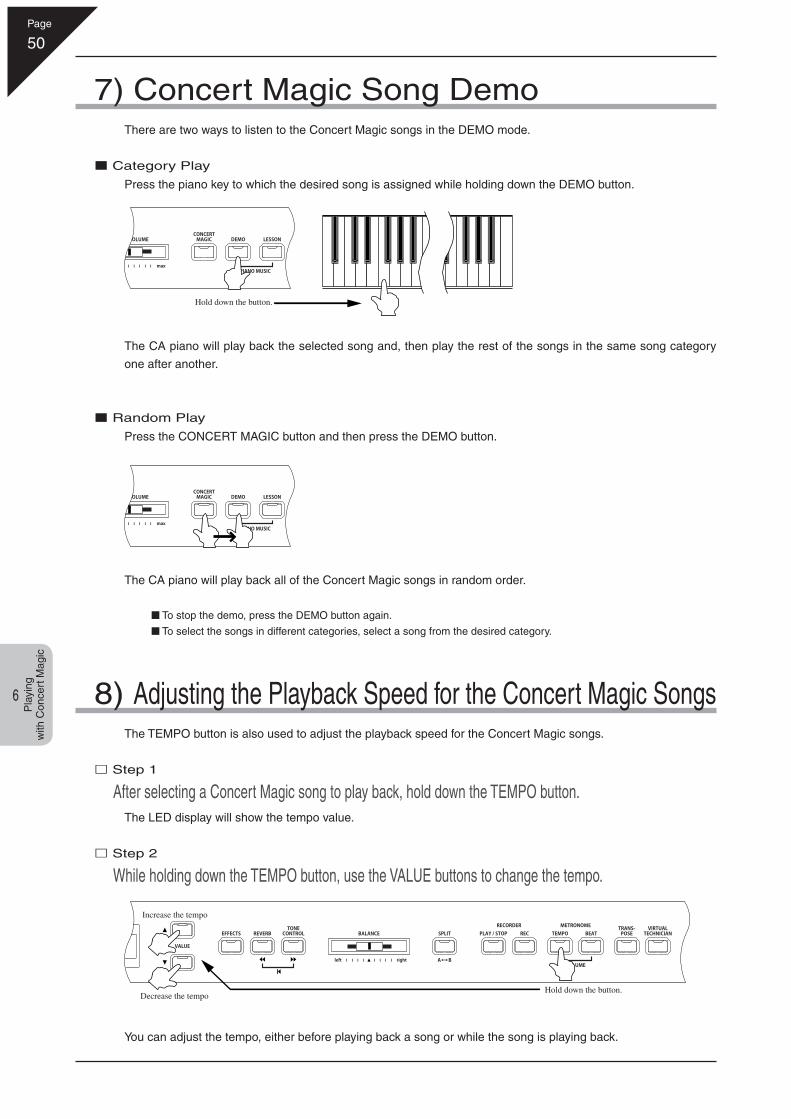
Page
50
6
Pla
ying
w
ith C
once
rt M
agic
7) Concert Magic Song DemoThere are two ways to listen to the Concert Magic songs in the DEMO mode.
Category Play
Press the piano key to which the desired song is assigned while holding down the DEMO button.
The CA piano will play back the selected song and, then play the rest of the songs in the same song category
one after another.
Random Play
Press the CONCERT MAGIC button and then press the DEMO button.
The CA piano will play back all of the Concert Magic songs in random order.
To stop the demo, press the DEMO button again.
To select the songs in different categories, select a song from the desired category.
8) Adjusting the Playback Speed for the Concert Magic SongsThe TEMPO button is also used to adjust the playback speed for the Concert Magic songs.
Step 1
After selecting a Concert Magic song to play back, hold down the TEMPO button.The LED display will show the tempo value.
Step 2
While holding down the TEMPO button, use the VALUE buttons to change the tempo.
You can adjust the tempo, either before playing back a song or while the song is playing back.
Hold down the button.
Hold down the button.Decrease the tempo
Increase the tempo

Page
51
7
Usi
ng th
e V
irtua
l Te
chni
cian
Fun
ctio
ns
7. Using the Virtual Technician FunctionsA Piano technician is essential for an acoustic piano. He not only tunes the piano but also performs regulation
and voicing adjustments to make the piano sound and play better. Virtual technician simulates the work of a
piano technician electronically and allows you to customize the CA piano to your personal taste.
Settings made here to the virtual technician functions can be saved by using the registration function (page 25).
These are the functions of virtual technician.
1) Voicing 6) Temperament2) Damper resonance 7) Key of Temperament3) String resonance 8) Stretch tuning (when equal temperament
(piano) or equal temperament is selected)4) Key-off effect5) Touch curve
1) VoicingVoicing is a technique used by piano technicians to mold the character of a piano’s sound. The voicing function
lets you adjust the CA piano’s tone quality by choosing one of six types of voicings.
Step 1
Press the VIRTUAL TECHNICIAN button. Voicing is the fi rst function in the virtual technician menu.
Step 2
Use the VALUE buttons to select the desired voicing type from Normal, Mellow 1, Mellow 2, Dynamic, Bright 1, and Bright 2.
The second line on the display shows the selected voicing type.
Normal : Produces the normal tone character of an acoustic piano throughout the entire dynamic
range. This is the default voicing.
Mellow 1, 2 : Produces a softer mellow tone character throughout the entire dynamic range. Mellow 2 is
softer than Mellow 1.
Dynamic : The tone character will change dramatically from mellow to bright depending on how soft or
loud you play.
Bright 1, 2 : Produces a brighter tone character throughout the entire dynamic range. Bright 2 is brighter
than bright 1.
Step 3
After selecting the desired voicing, you can exit the virtual technician function by pressing the VIRTUAL TECHNICIAN button.
You can also select other virtual technician functions at this point by using the MENU buttons.
The voicing setting defaults to "Normal" each time the power is turned off. You can use the user memory function (page
76), to save your selected voicing. This way your current voicing selection will remain even after the power is turned off.
1 Voicing = Normal

Page
52
7
Usi
ng th
e V
irtua
l Te
chni
cian
Fun
ctio
ns
2) Damper ResonanceWhen the sustain pedal (page 8) is depressed on an acoustic piano, all the dampers are lifted up allowing the
strings to vibrate freely. When you play note or chord on the piano with the sustain pedal depressed, not only will
the strings for the notes you played vibrate but other strings will vibrate in sympathetic resonance. The damper
resonance function simulates the phenomenon.
Step 1
After pressing the VIRTUAL TECHNICIAN button, use the MENU buttons to select the damper resonance function. You can adjust the volume of the damper resonance.
Step 2
Use the VALUE buttons to set the volume within a range of "Off, 1 to 10. 5 is the default setting.
Damper resonance will not be active when "Off" is selected.
Step 3
After setting the desired damper resonance volume, you can exit the virtual technician function by pressing the VIRTUAL TECHNICIAN button.
The damper resonance volume defaults to "5" each time the power is turned off. You can use the user memory func-
tion (page 76), to save your desired volume. This way your current damper resonance volume will remain even after
the power is turned off.
The damper resonance function is effective only for the following piano sounds:
SOUND SELECT button CA91 CA71 CA51PIANO 1 Concert Grand Concert Grand Concert Grand
Studio Grand Studio Grand Studio GrandMellow Grand Mellow Grand Mellow GrandJazz Grand Jazz Grand Jazz Grand
PIANO 2 Concert Grand 2 Concert Grand 2Studio Grand 2 Studio Grand 2Mellow Grand 2 Mellow Grand 2Jazz Grand 2 Jazz Grand 2
2 Damper Reso. = 5

Page
53
7
Usi
ng th
e V
irtua
l Te
chni
cian
Fun
ctio
ns
3) String ResonanceThe string resonance function simulates the phenomenon of string resonance on an acoustic piano.
Step 1
After pressing the VIRTUAL TECHNICIAN button, use the MENU buttons to select the string resonance function. You can adjust the volume of the string resonance.
Step 2
Use the VALUE buttons to set the volume within a range of "Off, 1 to 10. 5 is the default setting.
String resonance will not be active when "Off" is selected.
Step 3
After setting the desired string resonance volume, you can exit the virtual technician function by pressing the VIRTUAL TECHNICIAN button.
About string resonance
Even when the sustain pedal is not depressed on an acoustic piano, the strings for any notes you are holding will be
un-damped and will resonate freely in sympathy with the strings of other notes that you play if they are part of the
same harmonic series. In addition, adjacent notes will also be resonated. The string resonance function simulates this
phenomenon. This is called "string resonance."
For example, when you play the keys shown below while holding down the C key, the string of the C key resonates
and produces a sound.
(Quietly press and hold down the C key, and then quickly tap each of the keys shown below. You can hear the string
resonate.)
When you play a key while holding down an adjacent key, an acoustic piano produces a sound as a result of string
resonance. The CA91 / CA71 / CA51 simulates this phenomenon.
The string resonance volume defaults to "5" each time the power is turned off. You can use the user memory func-
tion (page 76), to save your desired volume. This way your current string resonance volume will remain even after the
power is turned off.
String resonance is not active when the sustain pedal is depressed.
The string resonance function is effective only for the acoustic piano sounds.
3 String Reso. = 5
Hold down the key.
A F F G C G C E G D G CB C

Page
54
7
Usi
ng th
e V
irtua
l Te
chni
cian
Fun
ctio
ns
4) Key-off EffectEspecially for low-pitched tones, when a key is played and released quickly and strongly, there will be the sound
of the damper touching the strings immediately before the sound stops. The key-off effect simulates this phe-
nomenon, and you can adjust the key-off volume to your taste.
Step 1
After pressing the VIRTUAL TECHNICIAN button, use the MENU buttons to select the key-off effect function. You can adjust the volume of the key-off effect.
Step 2
Use the VALUE buttons to set the volume within a range of "Off", 1 to 10. 5 is the default setting.
The key-off effect will not be active when "Off" is selected.
Step 3
After setting the desired key-off volume, you can exit the virtual technician function by pressing the VIRTUAL TECHNICIAN button.
The key-off volume defaults to "5" each time the power is turned off. You can use the user memory function (page 76),
to save your desired volume. This way your current key-off volume will remain even after the power is turned off.
The key-off effect is effective only for the acoustic piano sounds.
4 KeyOff Effect = 5

Page
55
7
Usi
ng th
e V
irtua
l Te
chni
cian
Fun
ctio
ns
Step 1
After pressing the VIRTUAL TECHNICIAN button, use the MENU buttons to select the touch curve function.
Step 2
Use the VALUE buttons to select a touch curve from Heavy+, Heavy, Normal, Light, Light+, Off, User 1, and User 2.
The selected touch curve is shown on the second line on the display.
See the next page for information on creating a user touch curve.
Step 3
After selecting the desired touch curve, you can exit the virtual technician function by pressing the VIRTUAL TECHNICIAN button.
The touch curve setting defaults to "Normal" each time the power is turned off. You can use the user memory func-
tion (page 76), to save your desired touch curve. This way your current touch curve will remain even after the power is
turned off.
5) Touch CurveThe CA piano responds just like a real acoustic piano when you play it. It produces a louder sound when you
play hard and a softer sound when you play soft. The volume level and sound character changes in relation to
how strongly and quickly the keys are pressed. This system is called “touch sensitivity” on a digital piano. The
CA piano’s Touch Curve function lets you select a different touch sensitivity for the keyboard from the standard
touch of an acoustic piano. You can change the touch sensitivity to one of six different preset touch curves and
two user touch curves.
Light + : For players with a delicate touch. Requires less striking force to achieve a forte note.Light : For those still developing fi nger strength. A louder volume is produced even when playing
with a soft touch. This curve is recommended for children and organ players.
Normal : Reproduces the standard touch sensitivity of an acoustic piano.
Heavy : Perfect for those with strong fi ngers. Requires a heavier touch to produce a loud volume.
Heavy + : Requires more striking force to achieve a loud volume.Off : A constant volume is produced regardless of how hard
the keys are struck. This setting is suitable for sounds that have a fixed dynamic range such as Organ and Harpsichord.
User 1} : You can create your own custom touch curve to fi t your playing style. Two user touch curves can be saved.User 2
StrongGentle
Soft
Loud
Sound volume
Force applied to the keys
5 Touch= Normal

Page
56
7
Usi
ng th
e V
irtua
l Te
chni
cian
Fun
ctio
ns
Using the user touch curve function
The user touch curve function analyzes your playing and creates a custom touch curve for you based upon your
playing style.
Step 1
After pressing the VIRTUAL TECHNICIAN button, use the MENU buttons to select the touch curve function. Then, use the VALUE buttons to select User 1 or User 2.
Step 2
Press the REC button.
Step 3
Play the keys.
Begin playing the piano dynamically from soft to loud in order to let the CA piano analyze you playing style.
The screen shown below will be displayed a few seconds after the REC button is pressed. While you are play-
ing, a musical note will blink in the right corner of the display.
Proceed to Step 4 when you are fi nished playing.
Step 4
Press the PLAY / STOP button.
Once the CA piano has analyzed your playing the message shown above will be displayed and your new user
touch curve is ready to be used.
Both user touch curves will be saved even after the power is turned off.
5 Touch=User1≥Press REC
Start PlayingSoft ≥ Loud
Press STOPwhen finished Œ
Analyze Completed

Page
57
7
Usi
ng th
e V
irtua
l Te
chni
cian
Fun
ctio
ns
6) Temperament SettingThe CA piano offers not only equal temperament (the modern standard) but also immediate access to tempera-
ments popular during the Renaissance and Baroque periods. It should be interesting and educational to try
some of the different temperaments, although the equal temperament is dominant today.
The following temperaments are available:
Equal temperament (piano)(Equal P. only)
This is the default temperament. If a piano sound is selected the tuning is stretched like an acoustic piano (EQUAL TEMPERAMENT). If any other type of sound is selected the tuning will be EQUAL (FLAT). An explanation of EQUAL TEMPERAMENT and EQUAL TEMPERAMENT (FLAT) is provided later in this section. If a piano sound is used in a layer with any other sound then both sounds will use the EQUAL TEMPERAMENT (Stretched) tuning.
Pure temperament <major>(Pure major)
In this temperament, dissonance for thirds and fi fths is eliminated. Performance using this temperament can be frequently observed in choral music.
Pure temperament <minor>(Pure minor)
Pure temperament <major> and pure temperament <minor> are different. The same result can be obtained for minor keys.
Pythagorean temperament(Pythagorean)
In this temperament, dissonance for fifths is eliminated. This temperament is characterized by the fact that it produces more beautiful melody sounds than chords.
Meantone temperament(Meantone)
In this temperament, dissonance of thirds is eliminated, and the extreme discordance of the fifth in pure temperaments has been corrected. This temperament produces more beautiful chords than pure temperaments.
Werckmeister III temperament(Werckmeister) Kirnberger III temperament(Kirnberger)
For music with few accidentals, this temperament produces beautiful chords that are similar to those of the meantone temperament, and as accidentals increase, the temperament produces beautiful melody sounds that are similar to those of the Pythagorean temperament. This temperament can realize the "nature of tonality" intended by composers of classical music.
Equal temperament (fl at)(Equal Flat)
This is an “unstretched” equal temperament that divides the scale into twelve equal semitones. This produces the same chordal intervals in all twelve keys, and has the advantage of limitless modulation of the key. However the tonality of each key becomes less characteristic and no chord is in pure consonance.
Equal temperament(Equal Stretch)
This is the most popular piano temperament. The hearing ability of a human is uneven and is not as accurate with high frequency and low frequency as it is with the middle range. This temperament’s tuning is stretched to compensate for this so the sound will be heard naturally to the ears. This “Stretched” equal temperament is a practical variation of the “unstretched” equal temperament which was invented on a mathematical basis.
User temperament(USER)
You can create your own temperament by raising or lowering the pitch for each half step.
Step 1
After pressing the VIRTUAL TECHNICIAN button, use the MENU buttons to select the temperament function.
The second line shows the temperament type.
6 Temperament = Equal(P.only)

Page
58
7
Usi
ng th
e V
irtua
l Te
chni
cian
Fun
ctio
ns
Step 2
Use the VALUE buttons to select a temperament type.
Step 3
After selecting the desired temperament type, you can exit the virtual technician function by pressing the VIRTUAL TECHNICIAN button.
The temperament type defaults to "equal temperament (piano)" each time the power is turned off. You can use the
user memory function (page 76), to save your desired temperament type. This way your current temperament type will
remain even after the power is turned off.
Creating a user temperament
This screen appears only when user temperament is selected.
Each half step can be set within a range of -50 to +50 (100 cents = half step).
Step 1
After selecting the user temperament type, use the MENU buttons to select the cent value setting screen.
A different half step tone is displayed each time the MENU button is pressed.
…
MENU buttons
6 Temperament C = 0
6 Temperament C# = 0
6 Temperament B = 0
To create a user temperament, please read the section " Creating a user temperament" be-
low.
After selecting a desired temperament type read the section "7) Key of Temperament" (page
59) on selecting a key signature for the temperament before continuing.
Equal temperament
Pure temperament <major> Pure temperament <minor> Pythagorean temperament Meantone temperament
Equal temperament (stretch)
User temperament
Equal temperament (fl at) Kirnberger III temperament Werckmeister III temperament
VALUE buttons
6 Temperament = Equal(P.only)
6 Temperament = Pure(minor)
6 Temperament = Pythagorean
6 Temperament = Meantone
6 Temperament = Equal
6 Temperament = Equal(Flat)
6 Temperament = Kirnberger
6 Temperament = Werckmeister
6 Temperament = User
6 Temperament = Pure(Major)

Page
59
7
Usi
ng th
e V
irtua
l Te
chni
cian
Fun
ctio
ns
Step 2
Use the VALUE buttons to set the cent value (-50 to +50).
Step 3
After you have finished creating a user temperament, you can exit the virtual technician function by pressing the VIRTUAL TECHNICIAN button.
The user temperament data is saved automatically even after the power is turned off. However, you must re se-
lect the user temperament each time you turn the power on unless you save it as your default temperament by
using the user memory function (page 76).
7) Key of TemperamentLimitless modulation of the key became available only after the invention of Equal temperament. When we use
a temperament other than equal temperament, we must carefully choose the key signature to play in. For ex-
ample, if the song you are going to play is written in D major, choose “D” as the temperament key.
Step 1
After pressing the VIRTUAL TECHNICIAN button, use the MENU buttons to select the key of temperament function.
Step 2
Use the VALUE buttons to select the desired key within the range of C to B.
The second line on the display shows the selected key.
Please note that changing the key of the temperament will only change the “balance” of the tuning, the pitch of
the keyboard remains unchanged.
The key of temperament function will not have any effect when equal temperament has been selected.
Step 3
After you have selected the desired key, you can exit the key of temperament function by pressing the VIRTUAL TECHNICIAN button.
The key of temperament type defaults to "C" each time the power is turned off. You can use the user memory function
(page 76), to save your desired key of temperament. This way your current key of temperament will remain even after
the power is turned off.
7 Key of Temper = C
…
VALUE buttons
…
6 Temperament C = 0
6 Temperament C = -50
6 Temperament C = +50

Page
60
7
Usi
ng th
e V
irtua
l Te
chni
cian
Fun
ctio
ns
8) Stretch TuningStretch tuning is a piano-specifi c tuning method in which the tuning for the lower notes is slightly lower and the
tuning for the higher notes is slightly higher than the settings made in the equal temperament. The stretch tun-
ing function determines the level of stretch tuning. The CA piano has two kinds of stretch tuning available, Nor-
mal and Wide. The stretch tuning screen appears only when equal temperament (piano) or equal temperament
is selected (page 57).
Step 1
After pressing the VIRTUAL TECHNICIAN button, use the MENU buttons to select the stretch tuning function.
The second line on the display shows either Normal or Wide.
Step 2
Use the VALUE buttons to select either Normal or Wide.
The tuning adjustment for the lower and higher notes is more pronounced when "Wide" is selected.
Step 3
After you have set the stretch tuning level, you can exit the stretch tuning function by pressing the VIRTUAL TECHNICIAN button.
The stretch tuning setting defaults to "Normal" each time the power is turned off. You can use the user memory func-
tion (page 76), to save your desired stretch tuning setting. This way your current stretch tuning setting will remain even
after the power is turned off.
8 StretchTuning = Normal

Page
61
8
Men
u F
unct
ions
8. Menu FunctionsThe menu functions allow you to adjust the various functions that control the CA piano’s tuning, system and
MIDI functions. You can adjust the settings for the following functions. Also, functions 1) to 7) can be memorized
as part of a registration (page 25).
1) Wall EQ (CA91), Brilliance (CA51) 10) Local control2) Lower octave shift 11) Program (sound type) number transmission on /
off3) Lower pedal on / off4) Layer octave shift 12) Multi timbre mode5) Layer dynamics 13) Channel mute (only in multi timbre mode)6) Damper hold 14) Memory backup7) Tuning 15) Factory reset
(only when memory backup is executed)8) MIDI transmit / receive channel9) Program (sound type) number transmission
When the MENU button is pressed, the fi rst menu item is displayed. When the MENU is pressed, the 15th
(14th for CA71) menu item is displayed. You can scroll through the various menu items in ascending / descend-
ing order by repeatedly pressing the MENU buttons.
1) Wall EQ (CA91 Only)
The Wall EQ function is used to optimize the CA91’s sound depending on whether it is located against a wall or
in a location away from a wall.
Step 1
Press the MENU button to select the wall EQ function.
The second line on the display shows the current setting.
Step 2
Use the VALUE buttons to turn the wall EQ function on or off.When set to on, the sound character is optimized for placement with the back of the piano against a wall.
When set to off, sound character is optimized for placement with the back of the piano away from a wall.
The wall EQ function does not affect the sound when using headphones.
Step 3
When you are fi nished, press any one of the SOUND SELECT buttons to exit the menu. The Wall EQ setting defaults to "Off" each time the power is turned off. You can use the user memory function (page
76), to save your desired Wall EQ setting. This way your current Wall EQ setting will remain even after the power is
turned off.
1 Wall EQ = Off

Page
62
8
Men
u F
unct
ions
1) Brilliance (CA51 Only)
Brilliance lets you adjust brightness of the sounds.
Step 1
Use the MENU buttons to select the brilliance function.
The second line on the display shows the value.
Step 2
Use the VALUE buttons to select the value within the range of -10 to +10.Plus settings produce a brighter tone, minus settings produce a mellower tone.
Step 3
When you are fi nished, press any one of the SOUND SELECT buttons to exit the menu.
The Brilliance setting defaults to "0" each time the power is turned off. You can use the user memory function (page
76), to save your desired brilliance setting. This way your current brilliance setting will remain even after the power is
turned off.
1 Brilliance = 0

Page
63
8
Men
u F
unct
ions
2) Lower Octave Shift
This allows the octave of the lower section to be shifted up one, two, or three octaves higher when you use the
split function.
Step 1
Use the MENU buttons to select the lower octave shift function.
The second line on the display shows the value.
Step 2
Use the VALUE buttons to set the value.Set the octave range within a range of 0 to + 3.
Step 3
When you are fi nished, press any one of the SOUND SELECT buttons to exit the menu.
The lower octave shift function setting defaults to "0" each time the power is turned off. You can use the user memory
function (page 76), to save your desired lower octave shift setting. This way your current lower octave shift setting will
remain even after the power is turned off.
3) Lower Pedal On / Off
This determines if the sustain pedal will be active for the lower sound when in SPLIT mode. The default setting
is Off which means the sustain pedal is not active for the lower sound.
Step 1
Use the MENU buttons to select the lower pedal on/off function.The second line on the display shows ON or Off.
Step 2
Use the VALUE buttons to turn the lower pedal function on or off.
2 LowerOctShift = 0
3 Lower Pedal = Off

Page
64
8
Men
u F
unct
ions
When set to on, the sustain pedal is active for the lower sound when the pedal is depressed.
When set to off, the sustain pedal will not be active for the lower sound when the pedal is depressed. The sus-
tain pedal will still be active for the upper sound.
Note that damper resonance (page 52) can be used regardless of on or off setting for the lower pedal.
Step 3
When you are fi nished, press any one of the SOUND SELECT buttons to exit the menu. The lower pedal on/off function setting defaults to "Off" each time the power is turned off. You can use the user memo-
ry function (page 76), to save your desired lower pedal on/off setting. This way your current lower pedal on/off setting
will remain even after the power is turned off.
4) Layer Octave Shift
This allows the octave of a layered sound (the sound displayed in the second line on the display) to be shifted
up or down when you use the dual function (page 15).
For example, when you play in dual mode using Concert Grand Piano and String Ensemble, you can adjust the
octave range for the String Ensemble sound up or down.
Step 1
Use the MENU buttons to select the layer octave shift function.
The second line on the display shows the value.
Step 2
Use the VALUE buttons to set the value.
Set the octave value within a range of -2 to + 2.
Minus values select an octave range one or two octaves lower. Positive values select an octave range one or
two octaves higher.
The octave for the sound displayed in the second line on the display in dual mode will be changed.
For some sounds it may not be possible to select a higher octave range.
Step 3
When you are fi nished, press any one of the SOUND SELECT buttons to exit the menu. The layer octave shift function setting defaults to "Off" each time the power is turned off. You can use the user memory
function (page 76), to save your desired layer octave shift setting. This way your current layer octave shift setting will
remain even after the power is turned off.
4 LayerOctShift = 0

Page
65
8
Men
u F
unct
ions
5) Layer Dynamics
In Dual mode sometimes simply adjusting the volume balance between the two layered sounds is not enough
to create the desired sound character if both sounds are very dynamic. Two equally dynamic sounds can be
diffi cult to control and play comfortably. The layer dynamics function allows you to limit the overall dynamic sen-
sitivity of the layered sound to create a perfect blend between both sounds in a layer. In addition to reducing the
volume of the layered sound, limiting the dynamic sensitivity of the layered sound also makes the layered sound
easier to control in relation to the main sound as you play. With this function, you can comfortably play as dy-
namically as you like with the main sound while maintaining control of the layered sound.
For example, when you play in dual mode using Concert Grand Piano and String Ensemble, you can use the
layer dynamics function to adjust the String Ensemble dynamics to your taste.
Step 1
Use the MENU buttons to select the layer dynamics function.
The second line on the display shows the value.
Step 2
Use the VALUE buttons to set the value.You can select the level of dynamics from 1 to 10. A value of 1 produces the greatest reduction in dynamics and
a value of 10 produces no change in the dynamics. The default value is 10.
Step 3
When you are fi nished, press any one of the SOUND SELECT buttons to exit the menu. The layer dynamics function setting defaults to "10" each time the power is turned off. You can use the user memory
function (page 76), to save your desired layer dynamics setting. This way your current layer dynamics setting will re-
main even after the power is turned off.
5 LayerDynamics = 10

Page
66
8
Men
u F
unct
ions
6) Damper Hold On / Off
This determines if the sound such as organ or strings should be held (on) or gradually decayed (off) when the
damper pedal is depressed.
Step 1
Use the MENU buttons to select the damper hold function.
The second line on the display shows On or Off.
Step 2
Use the VALUE buttons to select on or off.When set to on and the sustain pedal is depressed, sustained sounds will be sustained even after the keys are
released.
When set to off and the sustain pedal is depressed, sustained sounds will begin to decay (fade out) after the
keys are released.
Step 3
When you are fi nished, press any one of the SOUND SELECT buttons to exit the menu. The damper hold function setting defaults to "Off" each time the power is turned off. You can use the user memory
function (page 76), to save your desired damper hold setting. This way your current damper hold setting will remain
even after the power is turned off.
6 Damper Hold = Off

Page
67
8
Men
u F
unct
ions
7) Tuning
Tuning allows you to adjust the piano’s pitch. You may need to adjust the tuning when you play with other instru-
ments.
Step 1
Use the MENU buttons to select the tuning function.
The second line on the display shows the value.
Step 2
Use the VALUE buttons to set the pitch within a range of 427.0 to 453.0 (Hz).The pitch can be changed by 0.5 Hz each time one of the VALUE buttons is pressed.
Step 3
When you are fi nished, press any one of the SOUND SELECT buttons to exit the menu. The tuning function setting defaults to "440.0 Hz" each time the power is turned off. You can use the user memory
function (page 76), to save your desired tuning setting. This way your current tuning setting will remain even after the
power is turned off.
7 Tuning = 440.0

Page
68
8
Men
u F
unct
ions
About MIDI
This section briefl y explains MIDI.
The term MIDI is an acronym for Musical Instrument Digital Interface, an international standard for connecting
keyboards, sequencers, and other MIDI devices so that they can exchange performance data. The CA piano is
equipped with three MIDI jacks for exchanging data:
MIDI IN, MIDI OUT and MIDI THRU. Each uses a special cable with a DIN connector.
MIDI IN : For receiving note, program change and other data.
MIDI OUT : For sending note, program change and other data.
MIDI THRU : For passing along MIDI data received to another MIDI device without processing.
MIDI uses channels to exchange data back and forth between MIDI devices. There are receive (MIDI IN) and
transmit (MIDI OUT) channels. Most musical instruments or devices with MIDI functions are equipped with both
MIDI IN and OUT jacks and are capable of transmitting and receiving data via MIDI. There are 16 MIDI channels
available to choose from on the CA piano. In addition to channel-to-channel connection, it is possible to receive
on multiple channels.
The receive channels are used to receive data from another MIDI device and the transmit channels are used to
transmit data to another MIDI device.
For example, if you were to connect three musical instruments together to play music:
Transmitting instrument sends transmit channel and keyboard information to receiving instruments and .
The information arrives at the receiving instruments and . Receiving instruments and will respond to
MIDI data that is sent if their receive channel is the same the transmit channel of transmitting instrument . If
the channels do not match, then the receiving instruments and will not respond to any data that is sent.
For both receiving and transmitting, channel 1 through channel 16 can be used.
INTHRUINOUT
Receiving instrument Transmitting instrument Receiving instrument

Page
69
8
Men
u F
unct
ions
Example of MIDI use
Recording / playing with a sequencer
By connecting CA piano to a sequencer as shown
in the diagram, the sequencer can record and
playback your performance to help your practice.
When you record / playback your performance
using the multi -timbral function on (page 75), you
can receive multiple parts on multiple channels
each played with a different sound simultaneously.
For example, the CA piano might receive the mel-
ody on channel 1, the chords on 2, the bass on
3, and assign a different sound to each channel.
Piano for channel 1, strings for 2, electric bass for
3.
MIDI functions of CA91 / CA71 / CA51
The MIDI functions of CA91 / CA71 / CA51 are as follows:
Transmit / receive keyboard note information
By transmitting MIDI data from the CA piano (MIDI OUT) you can play a MIDI-connected keyboard from the CA
piano or by receiving MIDI data (MIDI IN) , you can play the CA piano from another MIDI-connected keyboard.
Transmit / receive channel setting
You can specify the channels within the range of 1 to 16.
Transmit / receive Program change (sound type) number
You can transmit to or receive program change data from a MIDI-connected musical instrument or device.
Transmit / receive pedal data
You can transmit to or receive sustain, soft, and sostenuto pedal data from a MIDI-connected musical instru-
ment or device.
Receive volume data
The CA piano will respond to MIDI volume data sent from a MIDI-connected musical instrument or device.
Multi-timbral setting
When Multi-timbral mode is ON, the CA piano can receive MIDI data from a MIDI-connected musical instrument
or device on multiple channels.
Transmit / receive exclusive data
You can transmit / receive front panel or menu function settings as exclusive data.
Transmit recorder playback data
Songs recorded using the recorder can be played back from a MIDI-connected musical instrument or can be re-
corded by an external sequencer via the MIDI OUT jack.
Refer to the "MIDI implementation chart (page 88)" for details about the CA91 / CA71 / CA51 MIDI functions.
MIDI IN MIDI OUT MIDI IN MIDI OUT
Sequencer

Page
70
8
Men
u F
unct
ions
8) MIDI Transmit / Receive ChannelThis determines on which MIDI channel the CA piano will exchange MIDI data with an external MIDI device or a
personal computer. The selected channel will function both as the transmit and receive channel.
Step 1
Use the MENU buttons to select the MIDI channel function.
The second line on the display shows the current channel.
Step 2
Use the VALUE buttons to select a MIDI channel 1 to 16.
Step 3
When you are fi nished, press any one of the SOUND SELECT buttons to exit the menu. At power-on, CA piano will receive MIDI channel information of all channels from 1 to 16. This is called "omni mode
on". The mode shifts to "omni mode off” once a specifi c channel is selected using the MIDI channel function. Then
data will be received only on the specifi ed channel. When you want to specify channel 1 in the "omni mode off" state,
fi rst set it to 2 and then put it back to 1.
When multi-timbral mode is on (page 75):
When playing in split mode with Multi-timbral mode ON
: Notes played in the lower section of the keyboard will be transmitted on the channel
that is one channel higher than the selected channel. For example, with the MIDI
channel is set to 3 notes played in the lower section of the keyboard will be transmit-
ted on channel 4.
When playing in dual mode : The notes you play will be transmitted on two channels, the selected channel and
the channel that is one channel higher. When channel the selected MIDI channel is
16, channel 1 will be used to transmit notes for the layered part.
8 MIDI Channel= 1 (TRS/RCV)

Page
71
8
Men
u F
unct
ions
9) Sending Program (Sound Type) Change Numbers
This function allows the CA piano to transmit program change numbers.
You can send any number from 1 to 128.
Step 1
Use the MENU buttons to select the send PGM # function.
The second line on the display shows the program number.
Step 2
Use the VALUE buttons to specify the program change number to be transmitted within the range of 1 to 128.
Step 3
To send the program change number, press both VALUE buttons ( ) simultaneously.
Step 4
When you are fi nished, press any one of the SOUND SELECT buttons to exit the menu.
9 Send PGM #= 1 (UP+DOWN)
Press them at the same time.

Page
72
8
Men
u F
unct
ions
10) Local Control
This determines whether the CA piano’s sound will be played from the piano’s keyboard (“ON”) or only from an
external MIDI device (“OFF”). Even with local control “off” the CA piano’s keyboard will still transmit on the se-
lected MIDI channel to an external MIDI device or personal computer.
Step 1
Use the MENU buttons to select the local control on/off function.
The second line on the display shows On or Off.
Step 2
Use the VALUE buttons to select On or Off.
Step 3
When you are fi nished, press any one of the SOUND SELECT buttons to exit the menu. The local control setting defaults to "On" each time the power is turned off. You can use the user memory function (page
76), to save your desired local control setting. This way your current local control setting will remain even after the
power is turned off.
10 Local Control = On

Page
73
8
Men
u F
unct
ions
11) Transmit Program Change (Sound Type) Numbers On / Off
Transmitting a program change number using the SOUND SELECT buttons
This determines whether or not the CA piano will transmit program change information via MIDI when press-
ing the SOUND SELECT buttons. When set to on and with Multi-Timbral Mode set to off or on 1, pressing the
SOUND SELECT buttons will send the program change numbers listed in the left half of the chart on the next
page.
When multi-timbral mode is set to on 2, program numbers listed in the right half of the chart on the next page
will be transmitted via MIDI.
In addition to SOUND SELECT buttons, other button operations such as touch curve, dual, digital effect, and
reverb settings can be transmitted as MIDI exclusive data when the corresponding buttons are pushed.
When set to off no program change or other panel information will be transmitted via MIDI.
Refer to page 75 for multi-timbral mode.
Step 1
Use the MENU buttons to select the sending program change on/off function.
The second line on the display shows On or Off.
Step 2
Use the VALUE buttons to select On or Off.
Step 3
When you are fi nished, press any one of the SOUND SELECT buttons to exit the menu.
The sending program change on/off setting defaults to "On" each time the power is turned off. You can use the user
memory function (page 76), to save your desired sending program change on/off setting. This way your current send-
ing program change on/off setting will remain even after the power is turned off.
When using dual / split mode, on / off information and sound type settings for each mode are transmitted as exclusive
data, but program numbers will not be transmitted.
Program numbers will also be transmitted when multi-timbral mode is on.
11 Transmit PGM = On

Page
74
8
Men
u F
unct
ions
Sound types and their corresponding transmit / receive program numbers
Sound typeWhen multi timbre mode is set to off or on 1 When multi timbre mode is set to on 2
Program number Program number BankCA91 CA71 CA51 MSB LSB
Piano 1Concert Grand 1 1 1 1 121 0Studio Grand 2 2 2 1 121 1Mellow Grand 3 3 3 1 121 2Jazz Grand 4 4 4 1 95 8Modern Piano 5 5 5 (Piano 2) 2 121 0Honky Tonk 6 6 6 (Piano 2) 4 121 0Rock Piano 7 2 121 1New Age Piano 8 2 95 5
Piano 2Concert Grand 2 9 7 1 95 16Studio Grand 2 10 8 1 95 17Mellow Grand 2 11 9 1 95 18Jazz Grand 2 12 10 1 95 19New Age Piano 2 13 11 7 1 95 9New Age Piano 3 14 12 8 1 95 10New Age Piano 4 15 1 95 11New Age Piano 5 16 1 95 15
Electric PianoClassic E.Piano 17 13 9 5 121 0Modern E.P. 18 14 10 6 121 060's E.P. 19 15 11 5 121 3Modern E.P. 2 20 16 12 6 121 1New Age E.P. 21 17 6 95 2Crystal E.P. 22 18 6 95 1Modern E.P. 3 23 6 121 2New Age E.P. 2 24 6 95 3
DrawbarJazz Organ 25 19 13 18 121 0Drawbar Organ 26 20 14 17 121 0Drawbar Organ 2 27 21 15 17 121 1Be 3 28 22 16 17 95 2Jazzer 29 23 18 95 1Odd Man 30 24 17 95 6Hi Lo 31 17 95 34' Drawbar 32 19 95 4
Church OrganChurch Organ 33 25 17 20 121 0Diapason 34 26 18 20 95 7Full Ensemble 35 27 19 21 95 1Diapason Oct. 36 28 20 20 95 6Chiffy Tibia 37 29 20 95 17Stopped Pipe 38 30 20 95 21Principal Choir 39 20 95 23Baroque 40 20 95 19
Harpsi & MalletsHarpsichord 41 31 21 7 121 0Harpsichord 2 42 32 22 7 121 3Vibraphone 43 33 23 12 121 0Clavi 44 34 24 8 121 0Marimba 45 35 13 121 0Celesta 46 36 9 95 1Harpsichord Oct 47 7 121 1Bell Sprit 48 15 95 5
StringsSlow Strings 49 37 25 45 95 1String Pad 50 38 26 49 95 8Warm Strings 51 39 27 49 95 1String Ensemble 52 40 28 49 121 0Soft Orchestra 53 41 50 95 1Chamber Strings 54 49 95 14Harp 55 42 47 121 0Pizzicato Str. 56 46 121 0
VocalsChoir 57 43 29 53 121 0Pop Ooh 58 44 30 54 95 39Pop Aah 59 45 31 54 95 40Choir 2 60 46 32 54 95 53Jazz Ensemble 61 47 54 95 2Pop Ensemble 62 48 54 95 7Slow Choir 63 53 95 2Breathy Choir 64 53 95 1
PadsNew Age Pad 65 49 33 89 121 0Atmosphere 66 50 34 100 121 0Itopia 67 51 35 92 121 1Brightness 68 52 36 101 95 1New Age Pad 2 69 53 89 95 2Brass Pad 70 54 62 95 2Halo Pad 71 95 121 0Bright Warm Pad 72 90 95 1
Bass & GuitarWood Bass 73 55 37 33 121 0Finger Bass 74 56 38 34 121 0Fretless Bass 75 57 39 36 121 0W. Bass & Ride 76 58 40 33 95 1E. Bass & Ride 77 34 95 2Ballad Guitar 78 59 26 95 6Pick Nylon Gt. 79 60 25 95 3Finger Nylon Gt. 80 25 95 4
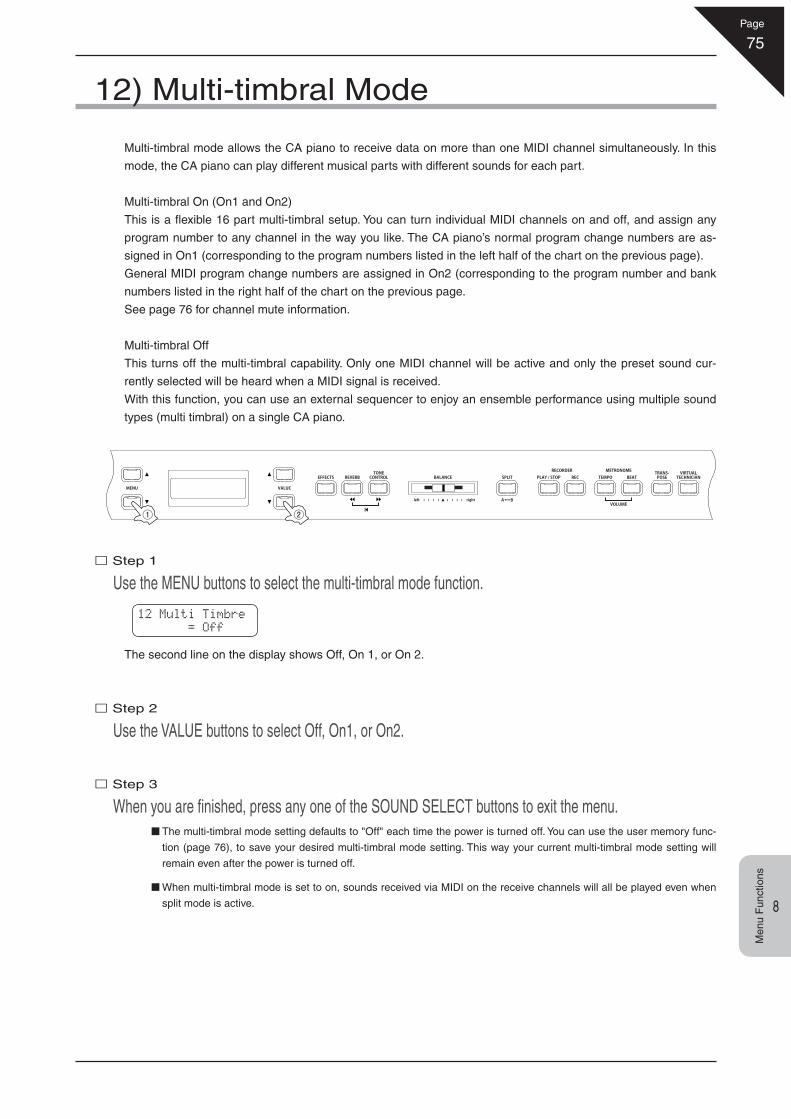
Page
75
8
Men
u F
unct
ions
12) Multi-timbral Mode
Multi-timbral mode allows the CA piano to receive data on more than one MIDI channel simultaneously. In this
mode, the CA piano can play different musical parts with different sounds for each part.
Multi-timbral On (On1 and On2)
This is a fl exible 16 part multi-timbral setup. You can turn individual MIDI channels on and off, and assign any
program number to any channel in the way you like. The CA piano’s normal program change numbers are as-
signed in On1 (corresponding to the program numbers listed in the left half of the chart on the previous page).
General MIDI program change numbers are assigned in On2 (corresponding to the program number and bank
numbers listed in the right half of the chart on the previous page.
See page 76 for channel mute information.
Multi-timbral Off
This turns off the multi-timbral capability. Only one MIDI channel will be active and only the preset sound cur-
rently selected will be heard when a MIDI signal is received.
With this function, you can use an external sequencer to enjoy an ensemble performance using multiple sound
types (multi timbral) on a single CA piano.
Step 1
Use the MENU buttons to select the multi-timbral mode function.
The second line on the display shows Off, On 1, or On 2.
Step 2
Use the VALUE buttons to select Off, On1, or On2.
Step 3
When you are fi nished, press any one of the SOUND SELECT buttons to exit the menu. The multi-timbral mode setting defaults to "Off" each time the power is turned off. You can use the user memory func-
tion (page 76), to save your desired multi-timbral mode setting. This way your current multi-timbral mode setting will
remain even after the power is turned off.
When multi-timbral mode is set to on, sounds received via MIDI on the receive channels will all be played even when
split mode is active.
12 Multi Timbre = Off

Page
76
8
Men
u F
unct
ions
13) Channel Mute
This screen will be displayed only when multi-timbral mode is on.
Play / mute settings can be made individually for each MIDI channel.
Step 1
Use the MENU buttons to select the channel mute function.A different channel number and its play/mute status will be shown on
the display each time one of the MENU buttons is pressed.
Step 2
Use the VALUE buttons to select play or mute.
Step 3
When you are fi nished, press any one of the SOUND SELECT buttons to exit the menu.
The channel mute settings default to "On" each time the power is turned off. You can use the user memory function (read
the section below), to save your desired channel mute setting. This way your current channel mute setting will remain
even after the power is turned off.
14) User Memory
This function allows the CA piano to save the user-defi nable settings when the power is turned off. Once written
to the memory, the saved settings will be recalled every time you turn the power on.
The following settings can be saved.
Sound type including starting sound and primary sound for each cat-
egory.
Effects/Reverb/Tone Control settings
Menu function settings
Virtual technician settings
Transpose
Tempo, beat, and sound volume of the metronome
…
MENU button
13 Channel MuteChannel 1= Play
13 Channel MuteChannel 2= Play
13 Channel MuteChannel16= Play
VALUE button
13 Channel MuteChannel 1= Play
13 Channel MuteChannel 1= Mute

Page
77
8
Men
u F
unct
ions
Step 1
Use the MENU buttons to select the user memory function.
Step 2
Press the REC button to execute the save operation.
The save operation is completed when the display shows "Save complete."
Step 3
When you are fi nished, press any one of the SOUND SELECT buttons to exit the menu.
15) Factory Reset
This screen will be displayed only when the user memory function has been used.
This function resets the CA piano to the factory settings. All parameters you saved in “User Memory” will be re-
set to the factory preset values.
Step 1
Use the MENU buttons to select the factory reset function.
Step 2
Press the REC button to restore factory settings, and exit the menu.
14 User Memory Save ≥Press REC
14 User Memory Save Completed
15 Factory Reset Reset≥Press REC

Page
78
9
App
endi
x
9. Appendix Connecting to other devices
Connect the CA piano to am-plifi ers, speakers, recorders
or similar equipment.Connect the stereo out-puts from other audio
equipment or electronic instruments to the CA
piano’s speakers.
Connect external MIDI devices to the CA piano.
Connect the CA piano to a Computer and
exchange MIDI data.
A pin
B pin
Caution Before connecting the CA91 / CA71 / CA51 to other devices, make sure that the
power to the CA piano and any other devices is turned OFF. If connections
are established while the power is on, extraneous noise that can damage the CA
piano may occur and activate the protection circuit for the CA’s digital amplifi er,
preventing the CA piano from producing sounds. If this occurs, turn off the power
and then turn it on again.
Do not directly connect the LINE IN and LINE OUT jacks of the CA91 / CA71 /
CA51 together with a cable. An audio loop (oscillation sound) will occur, resulting
damage to the unit.

Page
79
9
App
endi
x
1. LINE OUT JACK <phone jack>These jacks provide stereo output of the piano’s sound to amplifi ers, recorder devices or similar equipment. The audio signal coming through the LINE IN jacks is also routed to these jacks. The piano’s sound is mixed with the LINE IN signals. The CA piano’s VOLUME slider can control the output level of its own sound while it does not control the LINE IN signal. Mono signals will be output only if a cable is inserted into the L/MONO jack.
2. LINE IN JACKS <phone jack>These jacks are used to connect a pair of stereo outputs from other audio equipment or electronic instruments to the CA piano’s speakers. The audio signal coming through these jacks bypasses the piano’s volume control. To adjust the volume level, use the level knob on the right hand side of the LINE IN jacks or use the output control of the external device. To connect a device in mono, insert the connecting cable into the L/MONO jack only.
3. MIDIUse these jacks to connect external MIDI devices to the CA piano. There are three terminals: MIDI IN, MIDI OUT, and MIDI THRU.
4. USB port When the CA piano is connected to a computer via a commercially available USB cable, the CA piano will be recognized as a MIDI
device. As with a regular MIDI interface, the CA piano will be able to transmit and receive MIDI messages. There are A USB port and B USB port. Connect a computer to the A port and digital piano to the B port.
About a USB driver
For data exchange between a computer and digital piano via USB connection, software (USB-MIDI driver) must be installed on the computer for proper digital piano operations. Please read the following instructions carefully as a different USB-MIDI driver may be necessary depending on the computer OS.
Windows XP / Me users:The standard USB-MIDI driver installed on Windows will be used. This USB-MIDI driver will be automatically installed when the unit is connected to the computer.To establish MIDI communications with the unit by using an application, select "USB audio device" to defi ne the unit as a MIDI device.
Windows 2000 / 98SE users:You need to install the specifi ed, special USB-MIDI driver. Download the special USB driver from the KAWAI site as shown be-low, and install it on the computer.
http://www.kawai.co.jp/download_demo/driver/
Read the instruction manual thoroughly before connecting the unit to the computer, and make sure to install the driver. If you connect the unit to the computer without installing the driver, the USB-MIDI driver may not operate properly. If
this occurs, use the driver update function of the OS to install the appropriate USB-MIDI driver, or delete the driver by using the driver delete function and then install the driver again.
To establish MIDI communications with the unit by using an application, select "KAWAI USB MIDI IN" and "KAWAI USB MIDI OUT" to defi ne the unit as a MIDI device.
Macintosh OS X users:When the unit is used with Macintosh OS X, the unit will be recognized as a MIDI device automatically; therefore, no special driver is needed.
To establish MIDI communications with the unit by using an application, select "USB-MIDI" to defi ne the unit as a MIDI device.
Users of Macintosh OS9 or earlier:The unit does not support Macintosh OS9 or earlier. Please establish a MIDI connection by using a commercially available MIDI interface.
Notes on USB
When MIDI and USB are connected simultaneously, USB will be prioritized. When connecting a digital piano to a computer by using a USB cable, fi rst connect the cable and then turn on the power of the
digital piano. When a digital piano is connected to a computer by using a USB cable, it may take some time before communications start. When a digital piano and a computer are connected via a hub, and the operation is not stable, connect the digital piano directly
to the USB port of the computer. Operations of a computer or a digital piano may become unstable if the power of the piano is turned on or off, or if the USB
cable is pulled out or inserted during:* Driver installation* Computer power-up* MIDI application operations* Communication with the computer* Standby in power-saving mode
USB may not operate properly depending on the settings of your computer. Read the computer instruction manual thoroughly before use and ensure that appropriate settings are made.
"MIDI" is a registered trademark of the Association of Manufacturers of Electronic Instruments (AMEI). Windows is a registered trademark of Microsoft Corporation. Macintosh is a registered trademark of Apple Computer. Inc. Other company names and product names mentioned referenced herein may be registered trademarks or trademarks of re-spective owners.

Page
80
9
App
endi
x
Important points: · When placing the piano on the stand, make sure the dowels fi t in the
holes provided on the bottom surface of the piano.· When placing the piano on the stand, the piano and the stand will not
be perfectly aligned; the piano should be offset by approximately 3 cm towards the back.
CA91 stand assembly instructions
Thank you for purchasing a KAWAI Concert Artist digital piano.First, read this instruction manual and make sure that all the parts are included, and assemble the unit while being careful not to scratch or damage thestand. (Follow the procedures in reverse order when disassembling the unit.)
Assembly sequence
1. Remove the stand from the box.
(1) Insert the pedal support (E) about 1 cm into the bottom of the stand.(2) Pull out the pedal cord and speaker cord, hang over the back of the
stand.
2. Remove the piano from the box, and temporarily place it onto the stand.
Place the piano onto the stand temporarily.
3. Connecting the cables.
While the piano is temporarily placed on the stand, connect the pedal cord and speaker cord to the piano.
Important points: · Place the piano in the manner that the dowels fi t in the holes provided
on the bottom surface of the piano.· Place the piano on the stand in the manner that the piano part and
the stand will not be perfectly aligned; the piano part must be off by approximately 3 cm towards the back.
4. Correcting the piano position.
Using the rear most holes for the dowels, correct the piano position by moving the piano forward on the stand 3 cm.
Important points: · Make sure that the locking tabs are facing the correct direction.· Insert the connector straight. Do not apply too much force; it may cause unit failure.
* To pull out the cord, remove the connector while pressing the locking tab.
Parts (included items) Assembling screwsUse a Phillips-head screwdriver (+) to assemble the unit.
Side panel (left)
Stand
Piano
Side panel (right)
Score stand Back panel
L-shaped bracket (x 2)
Headphone hook
Headphone hook mounting screw
4 x 14 (x 2)
Power cord
(with a fl at end)
A. M4 x 35 (x 8)
B. M4 x 16 (x 6)
(with a sharp end)
C. 4 x 12 (x 2)
[Others]
D. Cord clamp (x 2)
E. Adjuster (x 1)
Pedal cord
Speaker cord
Pedal support insert hole
(back of the pedal stand)
Piano
Stand
Dowel
About 3 cm
Locking tab Locking tab
Connector Connector
Speaker cord Pedal cord
Dowel
Caution When correcting the piano position, do not pull the pedal cord and speaker cord.
Caution Make sure that more than two people work on unit assembly.
Make sure that your hands are not caught between the piano and the stand when you place the piano on top of the stand.
Caution Make sure that more than two people work on unit assembly.

Page
81
9
App
endi
x
5. Securing the piano to the stand.
(1) Place the L-shaped bracket as shown in the diagram, and use screws A (M4 x 35) to fasten the bracket to the piano and the stand.
(2) Use screws B (M4 x 16) to fasten the bracket to the piano.
9. Connecting the power cord
(1) Connect the power cord to the piano.(2) Use the cord clamp to secure the power cord screw C (M4 x 12).
8. Adjusting the pedal support
Turn the pedal support (E) at the bottom of the stand until it reaches the fl oor.
7. Attaching the end panels.
(1) Fit the rung of the end panel into the depression on the side of the stand.
(2) Insert the front attachment on the end panel into the channel on the side of the piano.
(3) Fasten the end panel, and then press hard where hook and loop fasteners are used.
6. Attaching the back panel
(1) Place the pedal cord and speaker cord in the gap between the piano and the stand.
(2) Fasten the back panel with two screws B (M4 x 16).
Important point: · Make sure that the front attachment of the end panel overlaps the front
surface of the stand.
Important point: · Place the L-shaped bracket in the depression on the side of the stand,
and align the holes.
Attaching the headphone hookUsing two screws with a sharp end (M4 x 14) that come with the headphone hook, you can attach the headphone hook beside the headphone jack. * This step is optional. If you do
not need the hook, keep it with the instruction manual.
10. Attaching the score stand.
11. Remove the protective plastic fi lm on the display.
Screws with a fl at end B. M4 x 16
Screws with a fl at end A. M4 x 35
Place the L-shapedbracket in this depres-sion.
L-shaped bracket
Screws with a fl at endB. M4 x 16
Channel on the side of the piano
Depression on the side of the stand
Front attachment on the end panel
Screw with a sharp endC. 4 x 12
Power cord
Sound board
Score stand
Display
Headphone jack
Headphone hook
Screws for attaching the headphone hook
Assembly is now complete
Caution Make sure that all the screws have been properly tightened.
Caution Use the screws provided in order to securely fasten the piano to the stand. Failure to do so may result in the piano falling off from the stand, causing great danger.
Do not force the screws in. Insert them straight into the hole without excessive force and tighten them there.
Lightly tighten the screws by hand fi rst to make sure that they are threaded correctly.
Caution The pedal stand may be damaged if the pedals are used when the pedal support is not touching the fl oor. Make sure that the pedal support is touching the fl oor.
Once the pedal support touches the floor, stop turning it. Failure to do so may result in damage to the stand.
When you move the unit, remove the pedal support before moving. Readjust the pedal support after moving is complete.
Caution Use the cord clamp to secure the power cord so that the cord will not touch the sound board. Noises may be generated if the power cord touches the sound board.
Caution <When moving the unit> When you move the unit, make sure to remove the end panels and the pedal support before moving.
Do not drag the unit. When you remove the piano from the stand, first disconnect the pedal cord, speaker cord, and power cord.
<Sound board at the back of the stand> Natural wood is used on the surface of the sound board, and its color may be therefore different from the artifi cial panel color.

Page
82
9
App
endi
x
CA71 stand assembly instructions
Thank you for purchasing a KAWAI Concert Artist digital piano.First, read this instruction manual and make sure that all the parts are included, and assemble the unit while being careful not to scratch or damage the fl oor, piano or stand. (Follow the procedures in reverse order when disassembling the unit.)
Parts (included items)
Assembly sequence1. Attaching the pedal board.(1) From the bottom of the pedal board, insert the pedal support (F) about 1 cm.(2) Untie and pull out the connection cord from the bottom of the pedal board.(3) Insert the screws loosely into the pedal board through the bottom of the
steel bracket. Line up the pedal board front to fi t into the groove of the side panel. Press the side panel against the pedal board, and tighten the screws.
(4) Tighten screws D (4 x 16) in the remaining threaded holes.(5) When the left and right side panels are both fastened, slowly raise the
assembly while keeping the side panels parallel.
Assembling screwsUse a Phillips-head screwdriver (+) to assemble the unit.
2. Temporarily attach the back panel (select method A or B).A. When placing the cords in the side panels:(1) Place the pedal cord in the groove provided on the side panel (L), and
place the power cord in the groove provided on the side panel (R) (make sure to pull the cords through to a length of about 12 cm outside the side panels).
(2) Place the back panel in the groove of the side panels.(3) Align the holes of the bracket at the top of the side panels with the
holes provided on the back panel, and temporarily fasten them by using screws B with a fl at end (M4 x 12).
(4) Fasten the back panel to the pedal board by using screws C with a sharp end (4 x 25).
The attached cord clamps will not be used.
B. When the cords will not be placed in the side panels:(1) Place the back panel in the groove of the side panels.(2) Align the holes of the bracket at the top of the side panels with the
holes provided on the back panel, and temporarily fasten them by using screws B with a fl at end (M4 x 12).
(3) Fasten the back panel to the pedal board by using screws C with a sharp end (4 x 25).
3. Attaching the piano
(1) Place the piano on the front half of the stand (so that the metal bracket holes are seen when viewed from the top) (the piano hooks will be placed between the two side panel brackets).
(2) While supporting the piano, slide the piano towards the back to engage the hooks on the piano with the metal brackets on the side panels.
(3) Press both the side panels against the piano, and tighten the temporarily-tightened screws B (M4 x 12) on the back panel.
(4) Fasten the piano part with screws A with a fl at end (M6 x 25).
Important point: When using screws B with a fl at end (M4 x 12), loosely tighten them so that the side panels are loosely fastened.
Important point: · Loosely attach the side panels so that the piano can be placed between
them.· When attaching the piano to the side panels, press the side panels
inward for a tight fi t against the piano.
Important point: Attach the side panels fi rmly to the pedal board.
Piano
Pedal board
Speaker box
Back panel
Side panel (L) Side panel (R)
Score stand
Relay cord Power cord
Headphone hook
Headphone hook fi xing screw
4 x 14 (x 2)
(with a fl at end)
A. M6 x 25 (x 8)
B. M4 x 12 (x 4)
(with a sharp end)
C. 4 x 25 (x 4)
D. 4 x 16 (x 10)
E. Cord clamp (x 2)
F. Adjuster (x 1)
Not used if the cords are placed in the side panels.
Screw with a sharp endD. 4 x16
Assemble the right side in the same manner.
Screws with a fl at endB. M4 x 12
Screw with a sharp endC. 4 x 25
Pedal cord
Power cord Approximately 12 cm
Approximately 12 cm
Screws with a fl at endA. M6 x 25
Hook provided on the piano
(Side view)
Caution Make sure that more than two people work on unit assembly.
Caution Make sure that more than two people work on unit assembly.
Make sure that your hands are not caught between the piano and the stand.
Use the screws provided in order to securely fasten the piano to the stand. Failure to do so may result in the piano falling off from the stand, causing great danger.
When the cords are placed in the side panel, make sure that the cords are not pinched between parts.
Do not force the screws in. Insert them straight into the hole without excessive force and tighten them securely.
Lightly tighten the screws by hand fi rst to make sure that they are threaded correctly.

Page
83
9
App
endi
x
4. Connecting the cords (select method A or B).A. When the cords are placed in the side panels:
(1) Connect the pedal cord and the power cord to the piano.(2) Connect the relay cord to the piano. Place the other end of the relay
cord at the backside of the back panel.
Attaching the headphone hookUsing two screws with a sharp end (φ4 x 14) that come with the Headphone hook, you can attach the headphone hook beside the headphone jack. This step is optional. If you do not need the hook, keep it with the
instruction manual.
5. Attaching the speaker box.
(1) Place the speaker cord over the top of the speaker box.(2) Place the speaker box on top of the metal brackets on the side panels,
and align the threaded holes.(3) By using screws A with a fl at end (M6 x 25), attach the side panel.(4) Pull the speaker cord towards the backside of the back panel, and
connect it with the relay cord.(5) Place both the speaker cord and the relay cord between the speaker
box and the back panel.
6. Adjust the pedal support.
Turn the pedal support (E) at the bottom of the stand until it reaches the fl oor.
B. When the cords are not placed in the side panels:
(1) Connect the power cord and place its other end at the backside of the back panel.
(2) Connect the pedal cord from the backside of the back panel.(3) Fasten the pedal cord with the cord clamp.(4) Connect the relay cord to the piano.
Place the other end of the relay cord at the backside of the back panel. * This is not necessary when the cords are placed in the side panels.
Important point: · Make sure that the locking tab of the connectors is facing the correct
direction.· Insert the connector straight. Do not apply too much force; it may
cause unit failure.* To pull out the cord, remove the connector while pressing the
locking tab.
7. Check the screws.
Confi rm that all the screws are properly tightened.
8. Attach the score stand.
9. Remove the protective plastic fi lm on the display.
Connector
Locking tab
Connector
Locking tab
Pedal cord Relay cord Power cord
* This is not necessary when the cords are placed in the side panels.
Speaker cord
Relay cord
Metal fi ttings
Screws with a fl at endA. M6 x 25
Score stand
Display
Assembly is now complete
Headphone jack
Headphone hook
Screws for attaching the headphone hook
Caution Make sure that more than two people work on unit assembly.
Make sure that your hands are not caught between the speaker box and the stand when placing the speaker box.
Use the screws provided in order to securely fasten the speaker box to the stand. Failure to do so may result in the speaker box falling off from the stand, causing great danger.
Do not force the screws in. Insert them straight into the hole without excessive force and tighten them there.
Lightly tighten the screws by hand fi rst to make sure that they are threaded correctly.
Caution <When moving the unit> When you move the unit, make sure to remove the end panels and the pedal support before moving.
Do not drag the unit. When you remove the piano part from the stand, fi rst disconnect the pedal cord, speaker cord, and power cord.
The pedal stand may be damaged if the pedals are used when the pedal support is not touching the fl oor. make sure that the pedal support is touching the fl oor.
Once the pedal support touches the fl oor, stop turning it. Failure to do so may result in damage to the stand.
When you move the unit, remove the pedal support before moving. Readjust the pedal support after moving is complete.
Caution
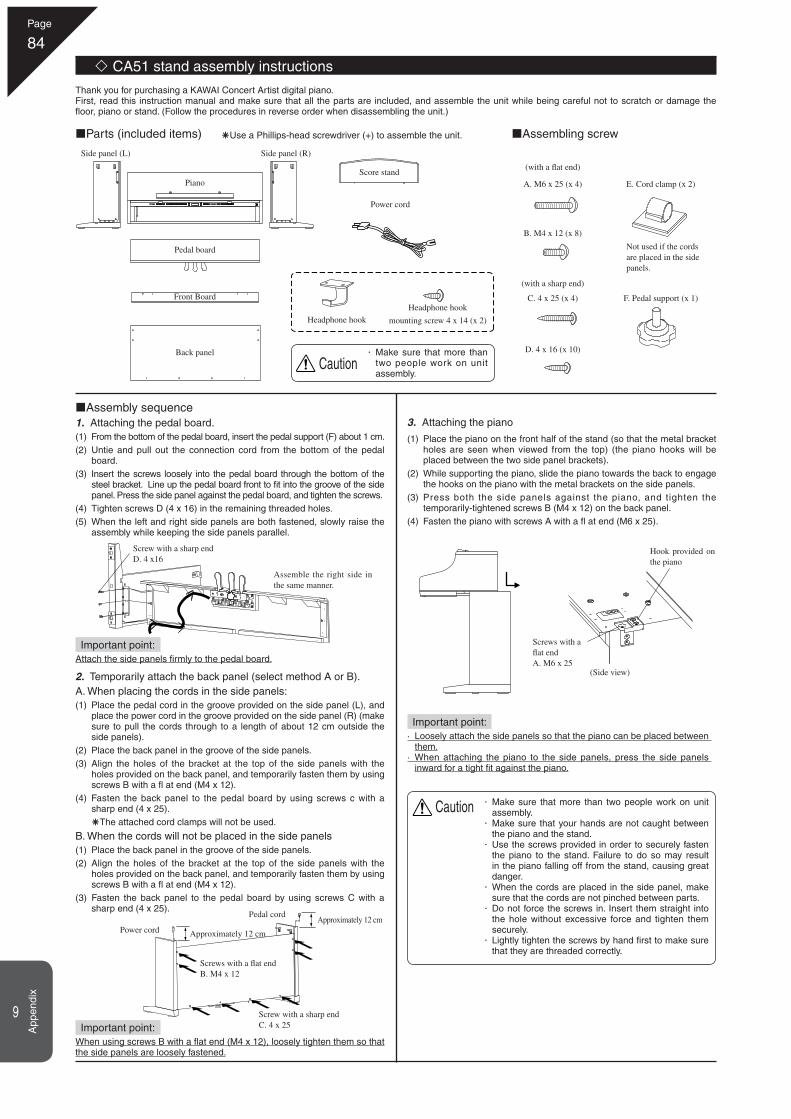
Page
84
9
App
endi
x
CA51 stand assembly instructions
Thank you for purchasing a KAWAI Concert Artist digital piano.First, read this instruction manual and make sure that all the parts are included, and assemble the unit while being careful not to scratch or damage the fl oor, piano or stand. (Follow the procedures in reverse order when disassembling the unit.)
Parts (included items)
Assembly sequence1. Attaching the pedal board.(1) From the bottom of the pedal board, insert the pedal support (F) about 1 cm.(2) Untie and pull out the connection cord from the bottom of the pedal
board.(3) Insert the screws loosely into the pedal board through the bottom of the
steel bracket. Line up the pedal board front to fi t into the groove of the side panel. Press the side panel against the pedal board, and tighten the screws.
(4) Tighten screws D (4 x 16) in the remaining threaded holes.(5) When the left and right side panels are both fastened, slowly raise the
assembly while keeping the side panels parallel.
Assembling screwUse a Phillips-head screwdriver (+) to assemble the unit.
2. Temporarily attach the back panel (select method A or B).A. When placing the cords in the side panels:(1) Place the pedal cord in the groove provided on the side panel (L), and
place the power cord in the groove provided on the side panel (R) (make sure to pull the cords through to a length of about 12 cm outside the side panels).
(2) Place the back panel in the groove of the side panels.(3) Align the holes of the bracket at the top of the side panels with the
holes provided on the back panel, and temporarily fasten them by using screws B with a fl at end (M4 x 12).
(4) Fasten the back panel to the pedal board by using screws c with a sharp end (4 x 25).
The attached cord clamps will not be used.
B. When the cords will not be placed in the side panels(1) Place the back panel in the groove of the side panels.(2) Align the holes of the bracket at the top of the side panels with the
holes provided on the back panel, and temporarily fasten them by using screws B with a fl at end (M4 x 12).
(3) Fasten the back panel to the pedal board by using screws C with a sharp end (4 x 25).
3. Attaching the piano
(1) Place the piano on the front half of the stand (so that the metal bracket holes are seen when viewed from the top) (the piano hooks will be placed between the two side panel brackets).
(2) While supporting the piano, slide the piano towards the back to engage the hooks on the piano with the metal brackets on the side panels.
(3) Press both the side panels against the piano, and tighten the temporarily-tightened screws B (M4 x 12) on the back panel.
(4) Fasten the piano with screws A with a fl at end (M6 x 25).
Important point: When using screws B with a fl at end (M4 x 12), loosely tighten them so that the side panels are loosely fastened.
Important point: · Loosely attach the side panels so that the piano can be placed between
them.· When attaching the piano to the side panels, press the side panels
inward for a tight fi t against the piano.
Important point: Attach the side panels fi rmly to the pedal board.
Piano
Pedal board
Front Board
Back panel
Side panel (L) Side panel (R)
Score stand
Power cord
Headphone hook
Headphone hook
mounting screw 4 x 14 (x 2)
(with a fl at end)
A. M6 x 25 (x 4)
B. M4 x 12 (x 8)
(with a sharp end)
C. 4 x 25 (x 4)
D. 4 x 16 (x 10)
E. Cord clamp (x 2)
F. Pedal support (x 1)
Not used if the cords are placed in the side panels.
Screw with a sharp endD. 4 x16
Assemble the right side in the same manner.
Screws with a fl at endB. M4 x 12
Screw with a sharp endC. 4 x 25
Pedal cord
Power cord Approximately 12 cm
Approximately 12 cm
Screws with a fl at endA. M6 x 25
Hook provided on the piano
(Side view)
Caution Make sure that more than two people work on unit assembly.
Caution Make sure that more than two people work on unit assembly.
Make sure that your hands are not caught between the piano and the stand.
Use the screws provided in order to securely fasten the piano to the stand. Failure to do so may result in the piano falling off from the stand, causing great danger.
When the cords are placed in the side panel, make sure that the cords are not pinched between parts.
Do not force the screws in. Insert them straight into the hole without excessive force and tighten them securely.
Lightly tighten the screws by hand fi rst to make sure that they are threaded correctly.
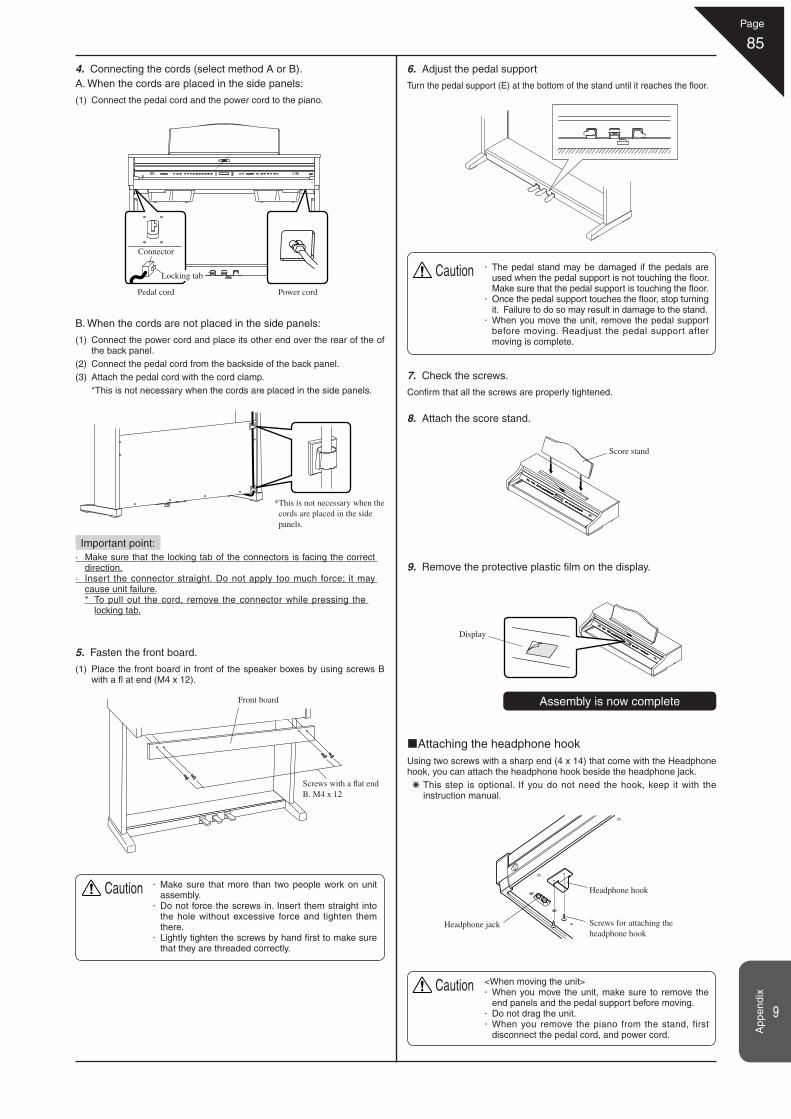
Page
85
9
App
endi
x
4. Connecting the cords (select method A or B).A. When the cords are placed in the side panels:
(1) Connect the pedal cord and the power cord to the piano.
Attaching the headphone hookUsing two screws with a sharp end (4 x 14) that come with the Headphone hook, you can attach the headphone hook beside the headphone jack. This step is optional. If you do not need the hook, keep it with the
instruction manual.
5. Fasten the front board.
(1) Place the front board in front of the speaker boxes by using screws B with a fl at end (M4 x 12).
6. Adjust the pedal support
Turn the pedal support (E) at the bottom of the stand until it reaches the fl oor.
B. When the cords are not placed in the side panels:
(1) Connect the power cord and place its other end over the rear of the of the back panel.
(2) Connect the pedal cord from the backside of the back panel.(3) Attach the pedal cord with the cord clamp. * This is not necessary when the cords are placed in the side panels.
Important point: · Make sure that the locking tab of the connectors is facing the correct
direction.· Insert the connector straight. Do not apply too much force; it may
cause unit failure.* To pull out the cord, remove the connector while pressing the
locking tab.
7. Check the screws.
Confi rm that all the screws are properly tightened.
8. Attach the score stand.
9. Remove the protective plastic fi lm on the display.
Connector
Locking tab
Pedal cord Power cord
* This is not necessary when the cords are placed in the side panels.
Score stand
Display
Assembly is now complete
Headphone jack
Headphone hook
Screws for attaching the headphone hook
Caution Make sure that more than two people work on unit assembly.
Do not force the screws in. Insert them straight into the hole without excessive force and tighten them there.
Lightly tighten the screws by hand fi rst to make sure that they are threaded correctly.
Caution <When moving the unit> When you move the unit, make sure to remove the end panels and the pedal support before moving.
Do not drag the unit. When you remove the piano from the stand, first disconnect the pedal cord, and power cord.
The pedal stand may be damaged if the pedals are used when the pedal support is not touching the fl oor. Make sure that the pedal support is touching the fl oor.
Once the pedal support touches the fl oor, stop turning it. Failure to do so may result in damage to the stand.
When you move the unit, remove the pedal support before moving. Readjust the pedal support after moving is complete.
Caution
Front board
Screws with a fl at endB. M4 x 12

Page
86
9
App
endi
x
CA91 CA71 CA51 Keyboard 88 key wooden action
Max Polyphony 192 96
Number of Sounds 80 (page 13) 60 (page 13) 40 (page 13)
Display 16 letters x 2 lines, LCD
Effects Reverb (Room 1, Room 2, Stage, Hall 1, Hall 2), Chorus, Delay 1, Delay 2, Delay 3, Tremolo, Rotary 1, Rotary 2, Tone control (CA91 / CA71 only)
Lesson Please see the separate reference booklet entitled "Internal Song Lists" for information regarding the Lesson etudes, songs, and exercises.
Metronome Beat: 1/4, 2/4, 3/4, 4/4, 5/4, 3/8, 6/8, 7/8, 9/8, 12/8 Rhythm: 100 types
Recorder CA91/71 = 2 par ts x 10 songs to ta l memor y capac i ty : approximately 90,000 notes
CA51 = 2 par ts x 5 songs t o t a l m e m o r y c a p a c i t y : approximately 15,000 notes
Demo Songs 33 tunes 31 tunes 27 tunes
Piano Music Please see the separate reference booklet entitled "Internal Song Lists" for more information.
Concert Magic 176 tunes 88 tunes
Virtual Technician Voicing (6 types), Damper resonance, String resonance, Key-off effect, Touch curve (6 preset types, 2 user-defined curves), Temperament (9 types, and user-defined temperament), Stretch tuning (2 types)
Transpose From -12 to +12 halftones
Other Functions Dual, Split, Duet performance, Balance slider, Wall EQ (CA91 only), Brilliance (CA51 only), Lower octave shift, Lower pedal, Layer octave shift, Layer dynamics, Damper hold, Tuning, MIDI function settings, User memory, Factory reset
Pedal Sustain (8 levels), soft, sostenuto
Key Cover Slide type
External Jacks Headphone (2) MIDI (IN, OUT, THRU), LINE OUT (L/MONO, R), LINE IN (L/MONO, R), LINE IN, volume (CA91 / CA71 only), USB
Output Power 40 W x 2 + 30 W x 1 40 W x 2
Speaker 7 cm x 4 (top speakers)1.9 cm x 2 (dome tweeters)Sound board speaker
13 cm x 4 (with wooden enclosure)1.9 cm x 2 (dome tweeters)
13 cm x 2 (with enclosure)5 cm x 2 (tweeters)
Power Consumption 115 W 85 W 80 W
Finish Rosewood, Mahogany, European Cherry
Dimensions (WxDxH)(Not including Music Rack)
142 x 52 x 95 (cm)57” x 21” x 38”
139 x 52 x 95 (cm)56” x 21” x 38”
138 x 52 x 91 (cm)56” x 21” x 38”
Weight (without bench) 87.0 Kg, 192 LB’s 83.0 Kg 183 LB’s 71.5 Kg 158 LB’s
Specifi cations

Page
87
9
App
endi
x
MIDI exclusive data format
1 F0 ..........................Start code2 40...........................KAWAI's ID number3 00 - 0F ...................MIDI channel4 10, 30.....................Function code (30 when setting MULTI TIMBRE ON/OFF)5 04...........................Indicates that the instrument is Electronic Piano6 02...........................Indicates that the piano is one of "CA" series7 data 18 data 2.....................(See the table below.)9 data 3
10 F7 ..........................End code
data 1 data 2 data 3 Function
00 00 ---------- Multi Timbre Off
00 01 ---------- Multi Timbre On 1
00 02 ---------- Multi Timbre On 2
0D 00-07 ---------- 00: Effect Off, 01: Chorus, 02: Delay 1, 03: Delay 2, 04: Delay 3,
05: Tremolo, 06: Rotary 1, 07: Rotary 2
0E 00-03, 06, 07 ---------- 00: Reverb Off, 01: Room 2, 02: Stage, 03: Hall 1, 06: Room 1,
07: Hall 2
14 00-7F ---------- Dual/Split balance
16 1F-60 ---------- Tune, 40: 440 Hz
17 00, 7F ---------- 00: Program Change Off, 7F: Program Change On
18 00-07 ---------- 00: Light, 01: Normal, 02: Heavy, 03: Off, 04: Light +, 05: Heavy +,
06: User 1, 07: User 2
19 00-03 ---------- Lower Octave Shift
20 00-4F(3C/27) 00-4F(3C/27) Dual, data 2: Right sound, data 3: Left sound, ( ) for CA71/51
21 00-4F(3C/27) 00-4F(3C/27) Split, data 2: Upper sound, data 3: Lower sound, ( ) for CA71/51
25 00-08 00-0B data 2: Temperament, data 3: Key
26 00, 7F 00-0F Multi Timbre, data 2: 00 (On), 7F (Off), data 3: channel
1st byte
1 2 3 4 5 6 7 8 910th byte
102nd byte 3rd byte 4th byte 5th byte 6th byte 7th byte 9th byte 9th byte

Page
88
9
App
endi
x
KAWAI [Model CA91 / CA71 / CA51] MIDI implementation chart
Date : Aug '06Version : 1. 0
Mode 1: omni mode On, Poly, Mode 2: omni mode On, Mono
Mode 3: omni mode Off, Poly, Mode 4: omni mode Off, Mono
: Yes
: No
Function Transmit Receive Remarks
Basic channelAt power-upSettable
11 - 16
11 - 16
ModeAt power-upMessageAlternative
Mode 3 Mode 1Mode 1, 3**
** Omni mode is on at power-up. Omni mode c a n b e t u r n e d o f f through MIDI channel setting operations.
Note number Range21 - 108* 0 - 127
0 - 127* 9-120, including
transpose
VelocityNote onNote off
9nH v=1-127 9nH v=0
After touchKey specifi cChannel specifi c
Pitch bend
Control change
0,32 71011646667
(Right pedal) (Middle pedal) (Left pedal)
Bank selectVolumePanpotExpression pedalDamper pedalSostenute pedalSoft pedal
Program change settable range
(0 - 127) (0 - 127)
ExclusiveTransmission can be selected
CommonSong positionSong selectionTune
Real timeClockCommands
Other functions
Local On / OffAll notes OffActive sensingReset
(123 - 127)
Remarks


CA91/CA71/CA51 Owner's ManualOW999E-S0712Printed in Japan
Copyright © 2007 KAWAI Musical Instruments Mfg. Co.,Ltd. All Rights Reserved.