call center solutions - welcome to the ccds centcom assistance page
TRANSCRIPT

Call Center Solutions
Supervisor Manual
1

Table of ContentsIntroduction................................................................................................................................................4Supervisor Window....................................................................................................................................5
Under the Campaigns Header................................................................................................................5Configuring the Centcom Supervisor Application.....................................................................................6
Supervisor Settings................................................................................................................................6Adjusting Security.................................................................................................................................7Changing Grid Colours.........................................................................................................................8Setting Warnings...................................................................................................................................9
Running Campaigns.................................................................................................................................10Status Indicators for Campaigns..........................................................................................................12Starting, stopping and pausing a campaign.........................................................................................12Setting Campaign Parameters.............................................................................................................13
General Info Tab.............................................................................................................................13Type Tab.........................................................................................................................................14Pacing Tab.......................................................................................................................................15Timers Tab......................................................................................................................................16Records Tab....................................................................................................................................17Recalls Tab......................................................................................................................................18Line Initialization Tab.....................................................................................................................19Line Adjust Tab...............................................................................................................................20
Rebuilding the Campaign....................................................................................................................21Resetting Statistics..............................................................................................................................22Flashing the dialing buffer...................................................................................................................22
Line Management....................................................................................................................................23Obtaining Campaign Information............................................................................................................25
Dial Table............................................................................................................................................25Active Calls.........................................................................................................................................25History.................................................................................................................................................26Active Agents......................................................................................................................................27
Hiding Agents and Their Statistics...........................................................................................................28Monitoring Campaign Activity................................................................................................................29Monitoring Agent Instant Messages........................................................................................................30Fixing Callbacks......................................................................................................................................30Adding a Temporary Dial Record............................................................................................................31Adding a Phone Number to the Do Not Call List....................................................................................32Generating Reports..................................................................................................................................33
Project Stats.........................................................................................................................................33Dial File...............................................................................................................................................34Calls.....................................................................................................................................................34History.................................................................................................................................................35Active Agents......................................................................................................................................35System Messages.................................................................................................................................35Agent Messages...................................................................................................................................36IVR Routines.......................................................................................................................................36
2

CRC by Campaign...............................................................................................................................36CRC by Agent.....................................................................................................................................37
Generating Graphs...................................................................................................................................38Agents..................................................................................................................................................38Dial Records........................................................................................................................................40History.................................................................................................................................................41
3

Introduction
The Centcom supervisor application is to be used by call center supervisors. It is installed on the supervisor’s desktop PC and provides the supervisor the ability to accomplish:
● Simple drag and drop campaign initialization● Campaign management such as: Start, Stop, Remove, Blend, Configure, etc.● Line resource allocation● Communication via agent text messaging using a simple “chat” interface● Real time monitoring of campaign information● On-the-fly campaign configuration and pacing control
The Centcom Supervisor Application allows how you to control your call center after your agents, dial files,and campaigns have been built. Most of the campaign settings that are adjustable using the Centcom Administrator are also adjustable here.
This application allows you to:
● Determine which campaigns are running● Ascertain statistics about the different campaigns● Control the campaigns once they are running● Maintain the parameters for all of your existing campaigns.
4

Supervisor Window
This window will appear upon logging into the application. It is possible for more than one Supervisor application to run at once.
Under the Campaigns Header
● On the left side is a list of all of the available campaigns.● On the right side is a list of "active" campaigns.
Active campaigns may be stopped, paused, or running, as denoted by the red, yellow, or green light on the right side.
You must first stop a campaign before clicking and dragging it back over to the available campaign list onthe left side.
5
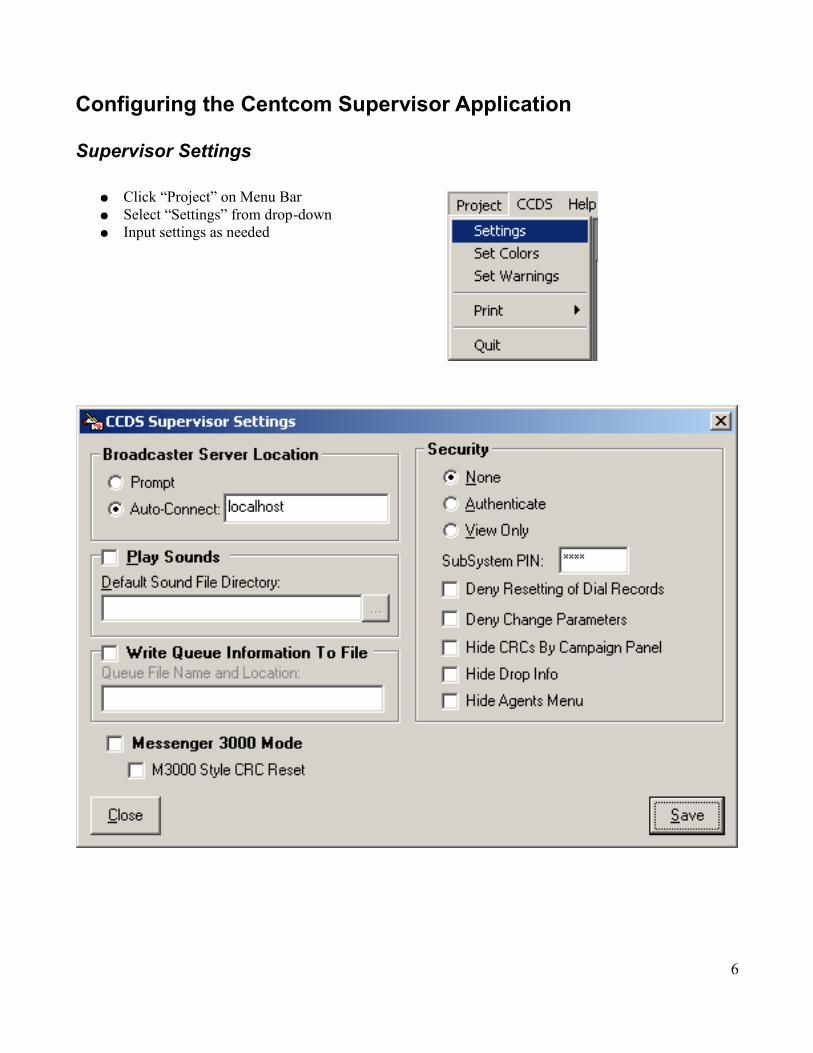
Configuring the Centcom Supervisor Application
Supervisor Settings
● Click “Project” on Menu Bar● Select “Settings” from drop-down● Input settings as needed
6

Adjusting Security
● If “None” is selected, you will be able to access the supervisor without a password.● If “Authenticate” is selected, a Security Login screen will appear.
7

Changing Grid Colours
This feature allows you to change the grid colours in the Centcom supervisor application.
● Select “Set Colours” from the project menu.● The top half of this window is for changing the colours in the “Dial File/Calls” tab of the campaigns
and agents tab. You can change both the background and the foreground (text) colours.● The bottom half is for the lines screen, and allows you to differentiate the types of lines at glance.
8

Setting Warnings
To set warnings, select “Project” from the menu bar and select “Set Warnings”. The “Warnings” window will appear.
Setting warnings will help you keep track of the statuses under the Management and Active Agents sections. For instance, you might want to keep track of how long a caller has been in queue, or how long an agent has been waiting for a call.
Double click in the first warning field next to the property you want to change. Select in seconds the amount of time you want to set for the first warning.
9

Running Campaigns
After you have correctly set all of the parameters for your campaign, it is time to run the campaign. In orderfor a campaign to run and make calls, you need to have dial records in the dial file, all of the Centcom components running, the telephony system running and connected to phone lines. Depending on the type of campaign, agents are ready to log on.
● To run a campaign, you need to first drag it from the column where it resides to the grid on the right. There are two ways that campaigns can be active on the right. They can be either a parent campaign or a child campaign. Child campaigns allow agents to log in to one campaign and still receive calls from more than one campaign.
● To create a parent/child campaign structure, drag and drop the parent campaign to the right side; then, drag and drop its child campaigns on top of it. When you run a parent campaign, all of its childcampaigns run automatically. Any agent that is logged into a parent campaign will receive calls from the children.
Example: Single child Campaign
10

Example: Parent and child Campaigns
Example: Multiple parent and child Campaigns
11
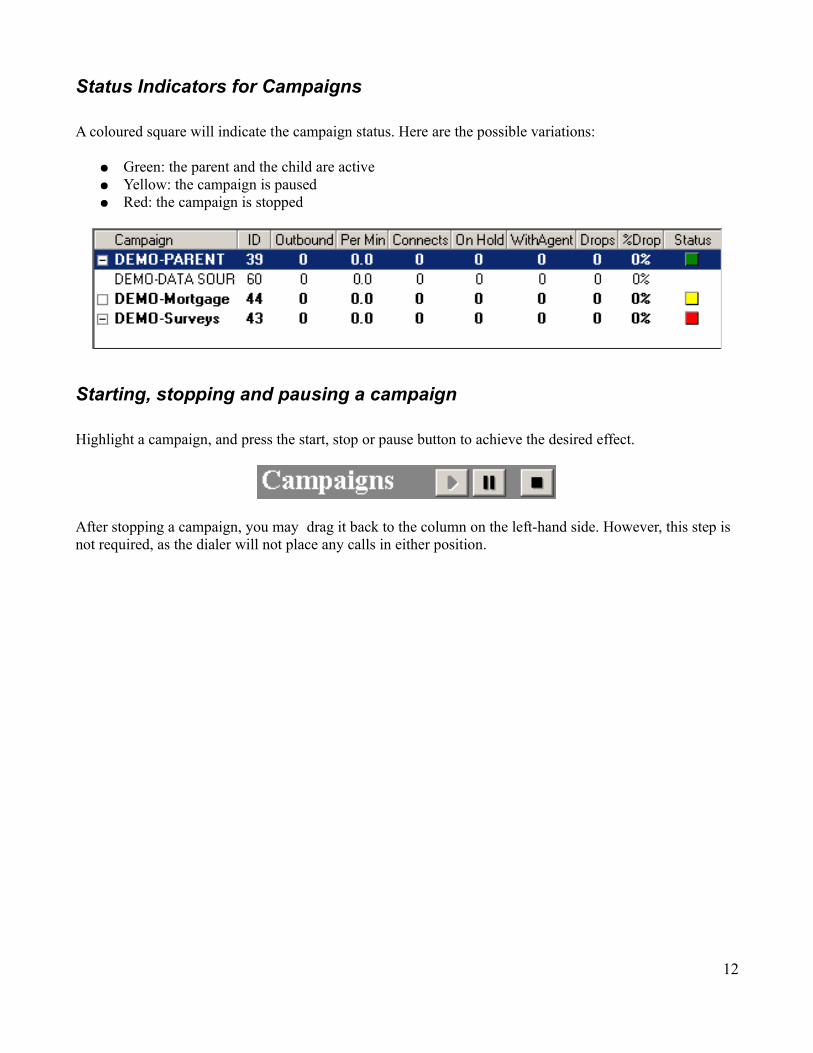
Status Indicators for Campaigns
A coloured square will indicate the campaign status. Here are the possible variations:
● Green: the parent and the child are active● Yellow: the campaign is paused● Red: the campaign is stopped
Starting, stopping and pausing a campaign
Highlight a campaign, and press the start, stop or pause button to achieve the desired effect.
After stopping a campaign, you may drag it back to the column on the left-hand side. However, this step is not required, as the dialer will not place any calls in either position.
12

Setting Campaign Parameters
To adjust the parameters for a specific campaign, right-click on the desired campaign and select “Parameters”. This screen gives you the basic information about the campaign: Campaign ID, Name, Description, Created, Modified & Last Import Dates and Times.
General Info Tab
“General Info” displays the campaign name and description. It also shows the date on which the campaign was created and last modified. Lastly, it shows the date on which the last batch of data was imported.
13

Type Tab
“Type” determines how the dialer will behave.
● “Predictive” tells the dialer to predict when an agent will become available so that the dialer will dial numbers even if all of the agents are busy.
● “Non-Predictive” disables this feature so that the dialer only starts dialing when an agent is free. This type is useful for small groups of agents or when it is important to minimize the number of dropped calls.
● An “IVR” campaign does not depend on agents. Instead, the dialer dials when a line is free and routes connected calls to the Centcom Call Control application for IVR handling (playing messages,prompting for digits, etc.).
● A “Bridge” is a special type of IVR campaign used to connect two calls. An IVR routine will add a dialing record to the bridge campaign, and upon connection, will connect the original call to the bridged call.
● “Preview” sends un-dialed numbers to agents. The agent will receive a pop-up screen that allows the agent to view customer information while counting down the selected time until it dials the number.
14

Pacing Tab
When you adjust the pacing, you modify the algorithm used to predict the availability of agents. This shouldnormally be left at normal speed and will only affect predictive campaigns.
● If you are dropping a lot of calls, you can set the pacing below normal in order to increase the delay before the system dials each number.
● If agents are waiting for calls, you can set the pacing above normal in order to decrease the delay before each number is dialed.
15

Timers Tab
To use timers, select the timer that you wish to use. A campaign can automatically start and stop with no supervisor interaction, based on the specified date and time. Timers can also be used to dial alternate numbers on campaigns.
Please note: Campaigns that are not in the active campaign field will not be auto started. The system will only stop (not remove) campaigns and the child campaigns will also stop.
16

Records Tab
This panel controls how many records will be sent to the queue for fetching. When the campaign is first started, the system will fetch records until it has two times the fetch amount, and then every time the amount that has been sent falls below that number, it will send another batch of the fetch amount.
● Allows you to set your Child campaign’s behavior.● Quotas also allow you to set the number of records to be fetched from each campaign daily, for the
life of the campaign and for a decreasing number throughout the campaign.
17

Recalls Tab
The system can automatically reset certain types of calls after a specified interval. The system will start a timer for each of these types of calls and call back in exactly X minutes, it will add that record to the fetch queue after X minutes, so that the next time it sends records to the dialer, that record will be sent with it.
18

Line Initialization Tab
If you choose to start a campaign with a specific number of lines, it will reserve those lines and assign them to this campaign until either all are assigned, or no more lines are available to assign. If you assign using a range, the campaign will attempt to re-assign the lines within that range.
● Choose “Over-ride lines in use,” to over-ride any lines that are within that range, whether that means taking away all of the lines for a certain campaign or not.
● Choose “Can replace my lines with other campaigns,” to make the campaign “Step-able.” In this mode, when another campaign wants another line and all available lines have been taken, this campaign will clear out so that the new campaign can take over.
● “Replace me when line is free,” means that if a line was taken away from this campaign, it will automatically be reassigned to the old campaign when it becomes free again.
However, if you choose to Over-ride lines in use, it will assume all of the lines within that range.
● “When shutdown, replace line with _______________” will replace a campaign that is working with another campaign, when the original campaign is shut down.
19

Line Adjust Tab
Automatic line adjustment is a feature that significantly cuts down on system management. The industry standard ratio of lines to agent is 2:1.
There are two ways to set “Line Adjust”:
● “Re-calc lines on Agent login/logoff”: The system will recalculate how many lines should be in use each time an agent logs on or off based on to the ratio set by the slider bar.
The system does not recalculate the number of lines when you change the setting, an agent must either logon or log off before the system will adjust the lines to fit the new ratio.
● “Direct ratio increase/decrease”: Each time an agent logs on or off, it will adjust the lines for that campaign according to the ratio set with the slider bar. This setting makes it possible for lines to be assigned with no agents.
If all lines are assigned, there may be more agents than there are lines
Options from the “Line Adjust” tab:
● Adjust lines automatically or manually depending on your needs● Use slide bar to manually assign a desired percentage
20

Rebuilding the Campaign
To rebuild your campaign, right-click on the desired campaign and select “Reset Dial.”
This option is useful if you choose not to have the system automatically reset them after a certain amount ofminutes. This is the manual way to reset calls that could have connected but did not, and is most often used to reset dropped calls.
In certain instances, you may also want to reset other types of call results that normally would have been connected, or that you want to ignore; this is where you can reset people, operator intercepts, fax/modems, invalids, or skipped.
By clicking on the CRC’s tab within the “Update Dial File Window”, you will be able to reset any of the CRC’s you created for this specific campaign.
21

Resetting Statistics
The “Reset Stats” option may be accessed by right-clicking on the campaign. This option simply resets all of the stats back to zero in the dialer window. This is good if you have, for instance, just sped up the pacing in the parameters or made any changes that would affect the agent’s statistics. Know that you will not see anything visibly happen until you look at the agent's screen.
Flashing the dialing buffer
Selecting “Flash buffer” gets rid of all calls in the buffer and prevents more records from being retrieved. You know this has taken effect when there is an “X” in the Status box on the dialer screen.
Select this option again to undo the “Flash buffer” and continue dialing.
22

Line Management
To view or adjust lines, click on the button on the left side of the screen. This allows you to see which lines are being used for which campaigns, as well as which line each agent is using.
You can assign a previously blank line to a campaign, clear or change the campaign in use by double-clicking on that line and selecting the new desired setting.
Note: You cannot set agent lines to be used for a campaign and you cannot set campaign lines to be usedfor agents.
When you change the setting for or clear a line, either “[pending]” or “[in use]” will appear in that space. This means that the system is waiting for the application to set the line, but it will eventually revert to the setting you chose.
23

If the agent is forced down and you are using dynamic line assignment, you can block a line from being used by agents as they log back on.
● You know if you need to do this if agents receive a “Group not found” or “Local dial failed” error message when they try to log in.
● You can block the line to which the system is assigning the agent by double clicking on that line andselecting “[XX BLOCKED XX]”.
24

Obtaining Campaign Information
When a campaign is running, it will start generating statistics and other information that you will need to access in order to keep it running as smoothly as possible. To access this information, click on the Management tab at the top of the window.
Dial Table
The “Dial Table” option allows you to view the number of call records per campaign, number of dial records that have not been called, number of dials waiting in the queue, number of dials that have been called, and the call-back information for that campaign.
If you do not see the campaign you are looking for, it probably means the campaign does not contain any records. Select “Centcom” from the menu bar and unselect “Hide Zero Call Records” to show all campaigns.
Active Calls
“Active Calls” lists all the active calls. Different types of calls appear in different colours.
25

History
Clicking on the History button gives you a list of all of the campaigns and their calls since midnight. In order to associate the information with the correct campaign, you must know the campaign's name.
26

Active Agents
Clicking on the “Active Agents” button will give you a list of campaigns currently running and their stats and active and inactive agents and their statistics for today. This allows you to get an overall idea of how the agents have been spending their time, how many calls they’ve taken, how they compare to each other, etc.
The headings and descriptions under “Active Agents” are:
● Agent Name: Agent name● Time in Status: How long the agent has been in current status (talking, ready, not ready, etc.)● Status: Talking, ready, not ready, wrapping up, break, at meal, other● Campaign: Campaign from which agent is dialing records● Session Start: The time of agent's first log-in for that day● Calls: # of calls (inbound and outbound) for that agent● Contacts: # of dials that reached intended person; determined by CRC’s.● Succ: Successes - # of successful calls, determined by CRC’s.● IB: # of inbound calls● OB: # of outbound calls● PV: # of preview calls● AG: Agent generated - # of manually dialed numbers● CB: Call back - # of scheduled callbacks completed● Conv Rate: Conversion rate – percentage of successful calls versus contacts● Log on time: How long an agent has been logged in, excluding breaks● Talk time: Amount of talk time● Avg talk: Average talk time● Wrap time: Wrap-up time. The time in which an Agent chooses a call disposition● Avg wrap time: Average wrap-up time.● Wait time: Amount of spent by agent in ready mode, waiting for the next call● Avg wait time: Average wait time● Dead time: Amount of time not spent in ready mode● Avg dead time: Average dead time● Hold time: Hold time● Break time: When an agent is logged out for a break, meal, meeting, etc.● Preview time: Amount of time spent previewing calls before dialing● Avg preview: Average preview time
27

Hiding Agents and Their Statistics
Click on “CCDS” in the menu bar, and then choose “Hide Agents” to hide the agents and statistics you do not want to see.
28

The window will look like this:
● On the left side of the screen under “Hide Agents in Campaign” is a list of all the currently active campaigns.
● On the right side of the screen under “Hide Agent Stats” is a list of all the agent statistics.
In this example, the “DEMO-080807” campaign is selected in the Hide Agents in the Campaign section. In the Hide Agent Stats section, “Time In Status” has been selected. Click on “Apply” to hide all the campaigns and statistics selected.
Monitoring Campaign Activity
Clicking on the “Activity Log” icon, then the System Activity icon will give you all of the messages that it is sending to the Centcom broadcaster application. This tab is most useful when it comes to resolving system issues but can also be used as a method for watching the results of every call and the system progress.
29

Monitoring Agent Instant Messages
All of the messages that the agents type to one another using the agent application's chat feature are displayed here. Both the “System Activity” and the “Agent Instant Msgs” sections, display the messages that have been sent since you opened your copy of the Supervisor application.
Fixing Callbacks
The icon in the bottom left-hand corner of the Supervisor Application indicates a broken “Call Back.” Callbacks break according to the following rules:
1. If the agent schedules a “Private” callback, and he/she is not logged in at the time for which he/she scheduled it, it becomes broken.
2. If the agent schedules a “Public” callback, and the campaign for which he/she scheduled it is not running at the scheduled time, it becomes broken.
Broken callbacks will stay broken until they are fixed. Double-click on the flashing icon to bring up the window.
Steps for fixing a broken Call Back:1. Highlight desired callback.2. Indicate if it is a Private or Public
Callback.3. Assign to Agent for another time or4. Assign to a Campaign for callback
based on desired time.5. The callback can be deleted or retried at
a later time.
30

Adding a Temporary Dial Record
If you need to add a dialing record to a campaign, you can do so by selecting “Add Temp Dial Record” from the Centcom menu. Enter the phone number you wish to add and the campaign name to which you wish to add it. The call will then be sent to the system with the next fetch, and it will be handled like a normal call for that campaign.
31
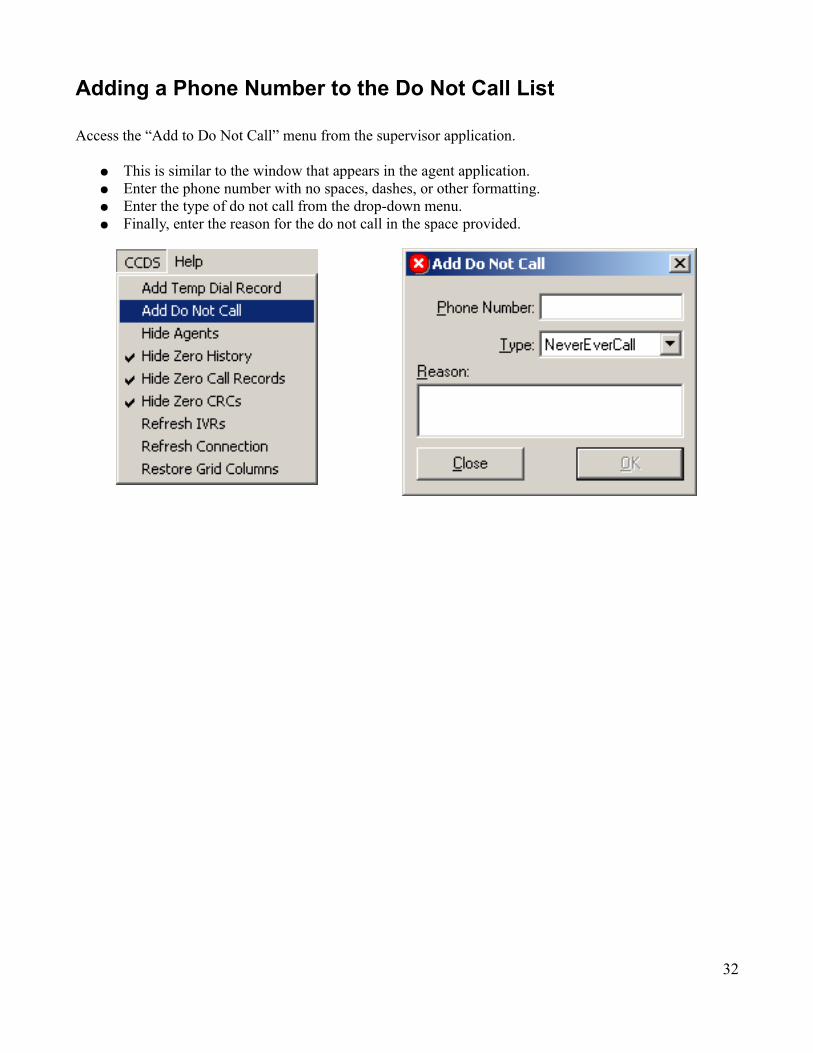
Adding a Phone Number to the Do Not Call List
Access the “Add to Do Not Call” menu from the supervisor application.
● This is similar to the window that appears in the agent application.● Enter the phone number with no spaces, dashes, or other formatting.● Enter the type of do not call from the drop-down menu.● Finally, enter the reason for the do not call in the space provided.
32

Generating Reports
The reports can be accessed from the 'Project' menu.
Here is a brief description of some of the reports available:
Project Stats
This report will generate a summary of the campaigns status, as seen in the “Management” section.
33

Dial File
This report will generate a summary of the campaign records, as seen in the “Dial Table” section.
Calls
This report will generate a list of all calls placed by the dialer.
34
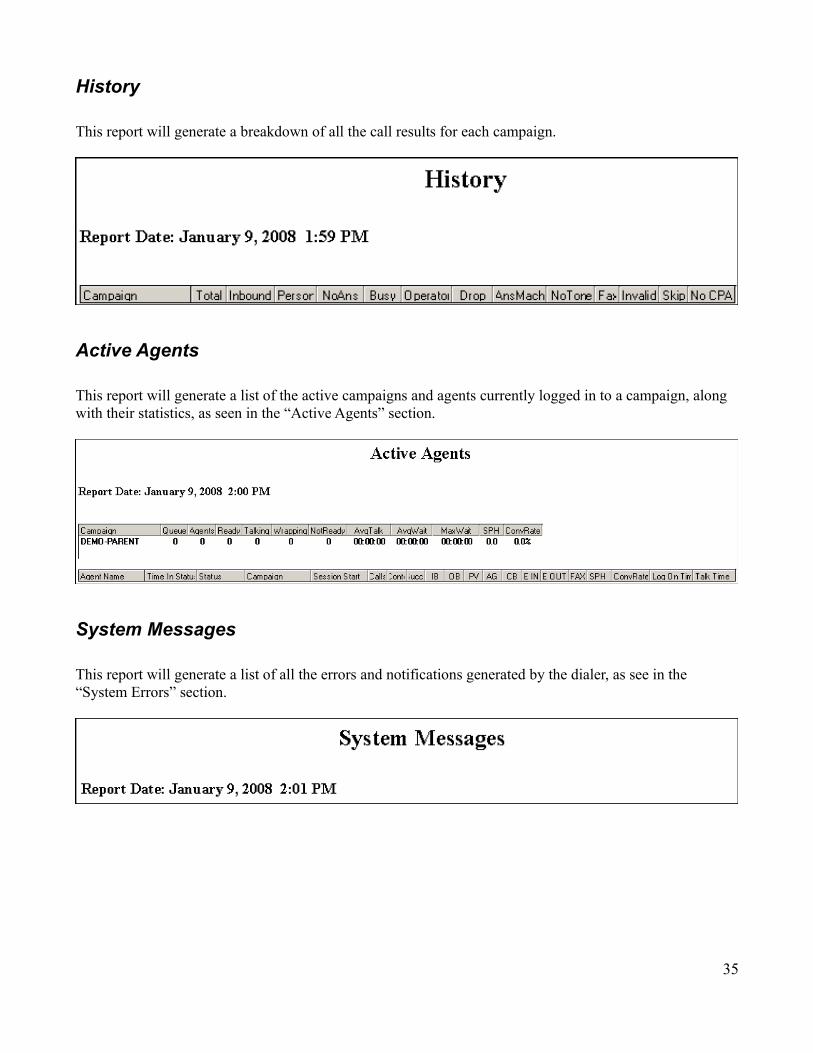
History
This report will generate a breakdown of all the call results for each campaign.
Active Agents
This report will generate a list of the active campaigns and agents currently logged in to a campaign, along with their statistics, as seen in the “Active Agents” section.
System Messages
This report will generate a list of all the errors and notifications generated by the dialer, as see in the “System Errors” section.
35

Agent Messages
This report will generate a list of all the text messages sent to and from the agents on the system, as seen in the “Agent Instant Messages” section.
IVR Routines
This report will generate a list of the existing IVR routines and the number of times they've been used so far, as seen in the “IVR Routines” section.
CRC by Campaign
This report will generate a breakdown of all the dispositions used by the agents and detected by the dialer for each campaign, as seen in the “CRC's by Campaign” section.
36

CRC by Agent
This report will generate a breakdown of all the dispositions used by the agents, as seen in the “CRC's by Agent” section.
37

Generating Graphs
Graphs can be generated in several contexts.
Agents
The following statistics are available from the “Active Agents” section:
38

39

Dial Records
The following statistics are available from the “Dial Table” section:
40
History
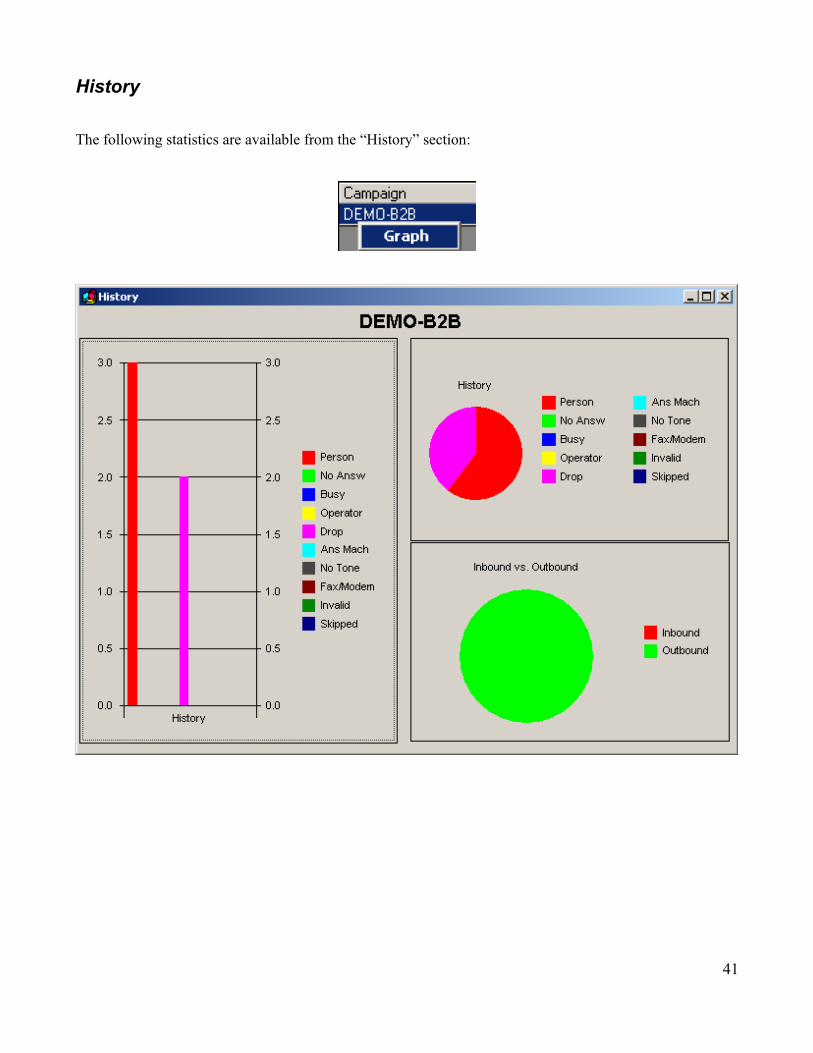
The following statistics are available from the “History” section:
41