callshaper outbound software manual 2 - creating a campaign
TRANSCRIPT

MANUAL 2 – CREATING YOUR CAMPAIGN
MANAGE TRAINING MANUAL

Last Update 8/26/2016

MANUAL 2 – CREATING YOUR CAMPAIGN
Contents
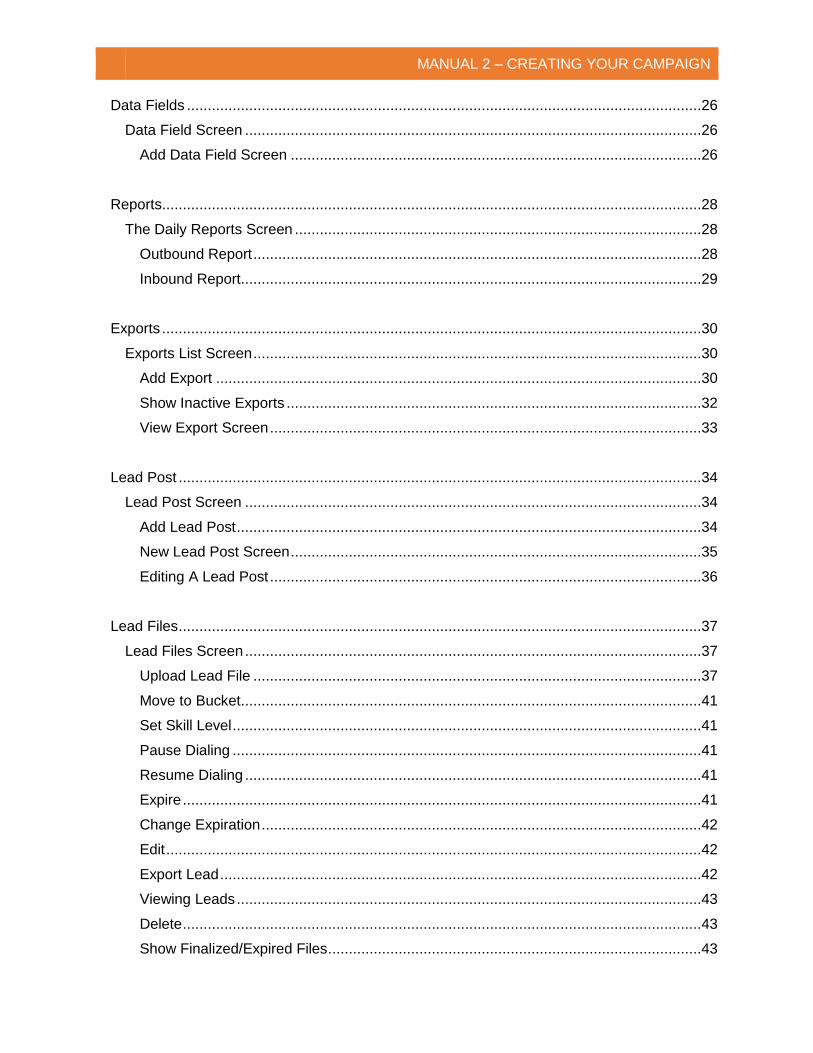
Campaigns ................................................................................................................................. 2
New Campaign Checklist ........................................................................................................... 3
Campaigns Screen .................................................................................................................... 5
Show Inactive Campaigns ...................................................................................................... 5
Add Campaign ........................................................................................................................ 5
Add Campaign Screen ........................................................................................................ 6
Campaign Configuration Screen ............................................................................................. 7
Pausing the Dialer ............................................................................................................... 8
Deactivate A Campaign ...................................................................................................... 8
Switch to Test Mode ........................................................................................................... 9
Configuration Section ............................................................................................................10
Callbacks ...............................................................................................................................10
Callbacks Screen ...............................................................................................................10
Voicemail ...............................................................................................................................11
Enable Voicemail Screen ...................................................................................................11
Agent Skill Levels ..................................................................................................................12
Agent Skill Level Screen ....................................................................................................12
Do Not Call ............................................................................................................................13
Do Not Call List Screen ......................................................................................................13
Inbound Numbers ..................................................................................................................14
Inbound Number Screen ....................................................................................................14
Add Number .......................................................................................................................14
Show Released ..................................................................................................................14

MANUAL 2 – CREATING YOUR CAMPAIGN
Callback IVR ......................................................................................................................15
Agent Delivery Mode ..........................................................................................................15
Active Record Screen ........................................................................................................15
Edit Inbound Number .........................................................................................................16
General Tab ...................................................................................................................16
Sounds Tab ....................................................................................................................16
Queue Tab .....................................................................................................................17
View History .......................................................................................................................17
Move To .............................................................................................................................17
Release .............................................................................................................................18
Switch to Callback IVR .......................................................................................................18
Caller ID ................................................................................................................................19
Caller ID Screen.................................................................................................................19
Permissions ...........................................................................................................................20
Permissions Screen ...........................................................................................................20
Edit Permissions .............................................................................................................20
Add User Permissions ....................................................................................................21
Dispositions ...........................................................................................................................22
Disposition Screen .............................................................................................................22
Add Disposition ..............................................................................................................22
Show Inactive .................................................................................................................23
Conversions ..........................................................................................................................24
Conversion Screen ............................................................................................................24
Add Conversion ..............................................................................................................24
New Conversion Screen .................................................................................................25
Show Inactive .................................................................................................................25
MANUAL 2 – CREATING YOUR CAMPAIGN
Data Fields ............................................................................................................................26
Data Field Screen ..............................................................................................................26
Add Data Field Screen ...................................................................................................26
Reports ..................................................................................................................................28
The Daily Reports Screen ..................................................................................................28
Outbound Report ............................................................................................................28
Inbound Report ...............................................................................................................29
Exports ..................................................................................................................................30
Exports List Screen ............................................................................................................30
Add Export .....................................................................................................................30
Show Inactive Exports ....................................................................................................32
View Export Screen ........................................................................................................33
Lead Post ..............................................................................................................................34
Lead Post Screen ..............................................................................................................34
Add Lead Post ................................................................................................................34
New Lead Post Screen ...................................................................................................35
Editing A Lead Post ........................................................................................................36
Lead Files ..............................................................................................................................37
Lead Files Screen ..............................................................................................................37
Upload Lead File ............................................................................................................37
Move to Bucket ...............................................................................................................41
Set Skill Level .................................................................................................................41
Pause Dialing .................................................................................................................41
Resume Dialing ..............................................................................................................41
Expire .............................................................................................................................41
Change Expiration ..........................................................................................................42
Edit .................................................................................................................................42
Export Lead ....................................................................................................................42
Viewing Leads ................................................................................................................43
Delete .............................................................................................................................43
Show Finalized/Expired Files ..........................................................................................43
MANUAL 2 – CREATING YOUR CAMPAIGN
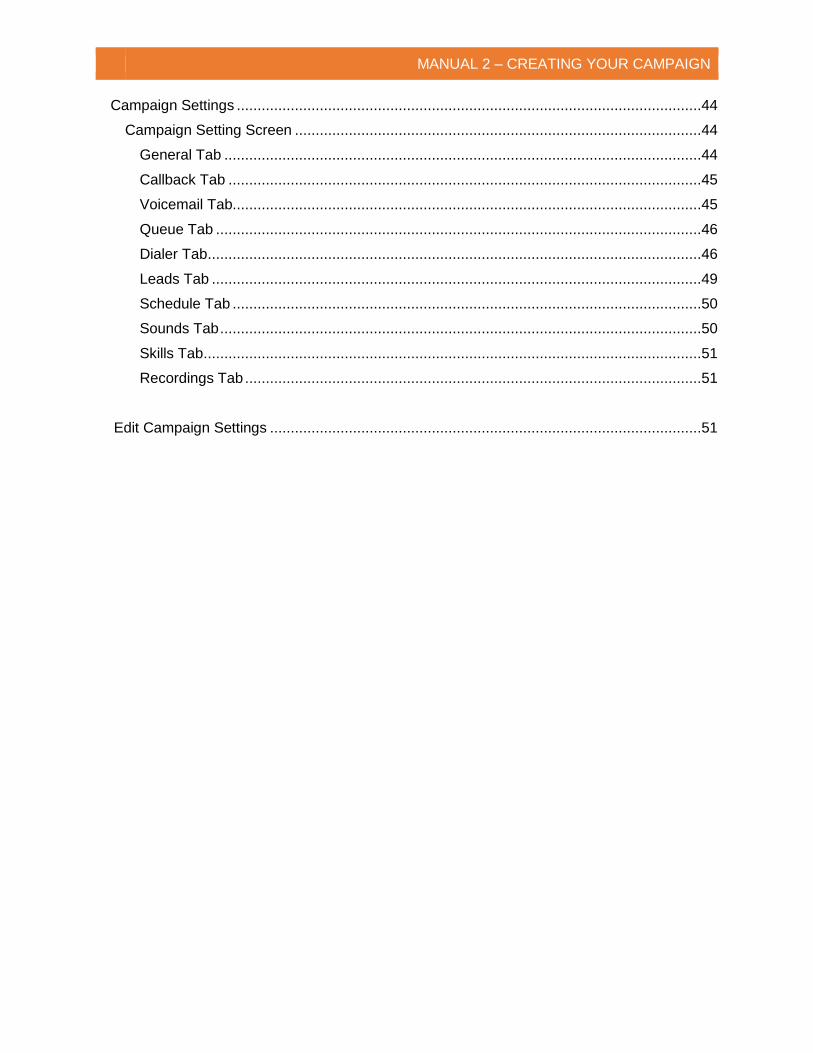
Campaign Settings ................................................................................................................44
Campaign Setting Screen ..................................................................................................44
General Tab ...................................................................................................................44
Callback Tab ..................................................................................................................45
Voicemail Tab.................................................................................................................45
Queue Tab .....................................................................................................................46
Dialer Tab .......................................................................................................................46
Leads Tab ......................................................................................................................49
Schedule Tab .................................................................................................................50
Sounds Tab ....................................................................................................................50
Skills Tab ........................................................................................................................51
Recordings Tab ..............................................................................................................51
Edit Campaign Settings ........................................................................................................51
MANUAL 2 – CREATING YOUR CAMPAIGN
CALLSHAPER 1
Manual 2 – Creating A Campaign
In Manual 1, we set up your account by creating users,
team, DNC lists, Media Attributes, Scorecards, Sounds,
Hold Music and Phone Numbers. In Manual 2, we
will configure your first campaign.
Not only will we learn how to configure the campaign,
we will learn how to add, view and deactivate
campaigns, how to put campaigns in test mode and how
to pause campaigns allowing you to make the necessary
changes.
To prepare for this Manual, think about the following:
Do you want to receive daily reports for your individual campaigns? If yes, who should
receive them? Will you need to create a report specific to your clients or organizational
needs? If yes, how often will this report be run?
What type of sales (conversions) will be made on this campaign? Conversions are also
used when your campaign goal is met. Such as; gathering data or setting an appointment.
Do you want the agent to select the conversion, or do you want this conversion to be
automated?
What type of call results (dispositions) will be on this campaign? Your account does come
with “canned” dispositions such as dialer results, but you will need to add other typical
results you have seen regarding a campaign such as; not interested or wrong number.
What data entry (data fields) will the agents need to complete in the scripting?
Do you have lead files that will be upload or are you receiving real-time leads?
Do you want this campaign to have voicemail? If yes, do you want the agents to have their
own voicemail boxes or do you want all voicemails to go to a general e-mailbox?
Will the campaign be outbound, inbound or both? Will the inbound calls be treated different
than the outbound calls (different team, script, etc.)?
Will this campaign require multiple caller ID’s or inbound numbers?
What messages (sounds) will be included in this campaign for hold, abandon, closed, etc.?
What will the hours of operation be for this campaign?
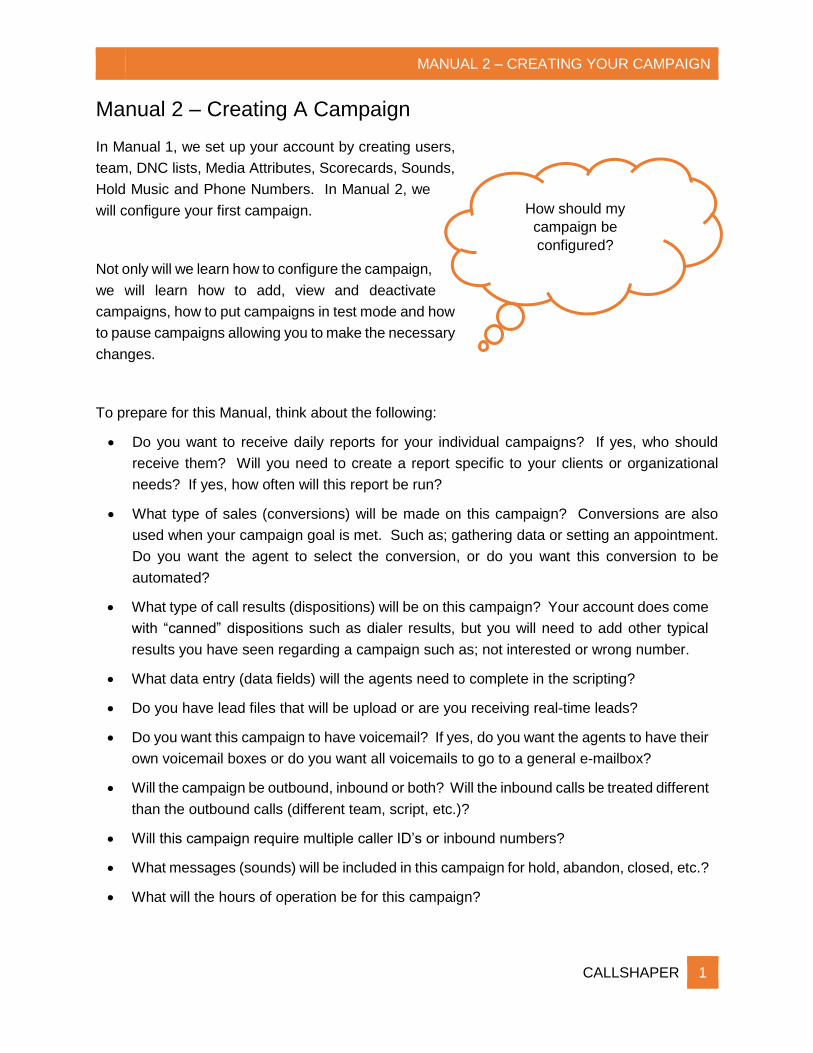
How should my
campaign be
configured?

MANUAL 2 – CREATING YOUR CAMPAIGN
CALLSHAPER 2
Campaigns
A campaign is created to make outbound calls or receive inbound calls designed to sell a
specific product, service or business. They can also be used for fund-raising calls, as well as
calls for list updating, data collection, surveys or verification services.
Within your CallShaper account, you are not limited to the number of campaigns you can create
and each campaign can be configured differently.
The configuration includes:
A Caller ID and Inbound Numbers,
Voicemail designated to the general mailbox and/or the agents,
Scripts will provide the agent with the information needed to handle a call from hello to
goodbye (covered in Manual 3),
Data fields used to populate reports or scripting,
Conversions representing sales or a specific goal of the call,
Dispositions representing call results when a sale or goal is not achieved,
Lead files that are either uploaded or received as real-time leads,
Do not call lists that can be specific to a campaign or account,
How the queue behaves when it has reached its limits or is closed,
How often the leads are attempted,
The hours of operation,
What sounds are associated with the campaign,
Controlling when and who records the calls,
What restrictions are put on wrap-up, manual calls and callbacks, and
What dialer type is used to make calls and how many active calls can the dialer have
going at one time.
On the next page, you will find a New Campaign Checklist. This checklist is designed to assist
you while creating each campaign to ensure all topics mentioned above have been completed
or verified that they do not apply to the individual campaign.
MANUAL 2 – CREATING YOUR CAMPAIGN
CALLSHAPER 3
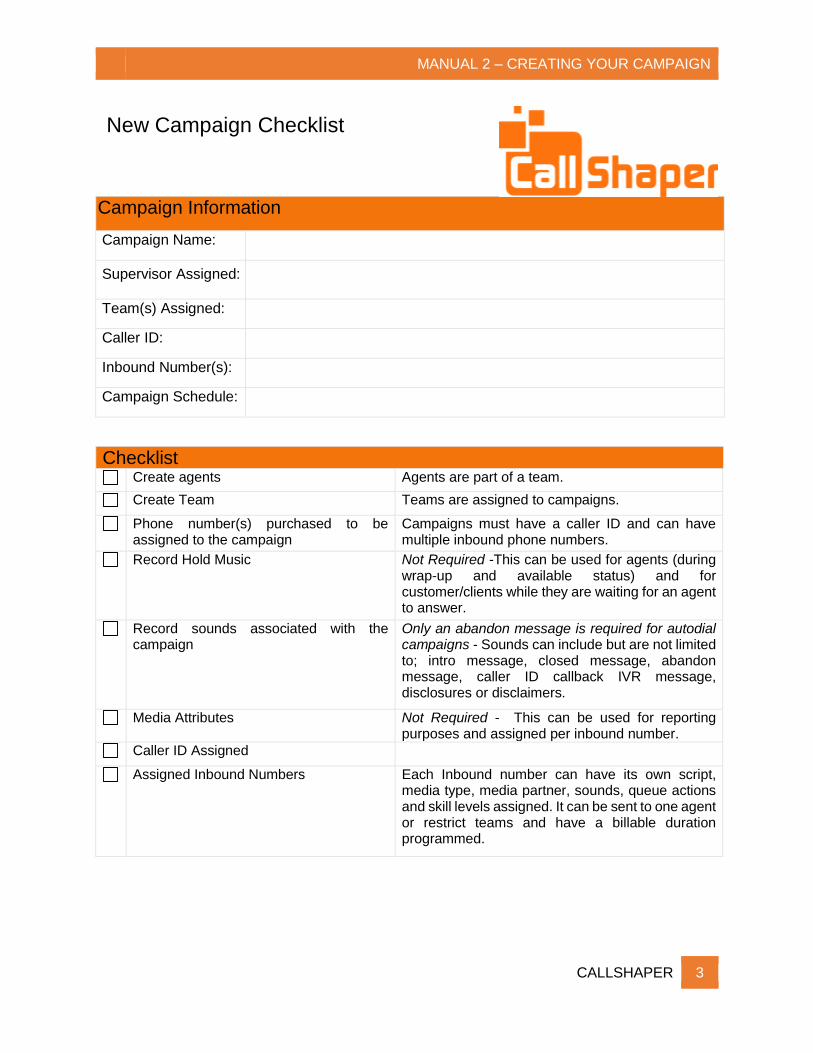
New Campaign Checklist
Campaign Information
Campaign Name:
Supervisor Assigned:
Team(s) Assigned:
Caller ID:
Inbound Number(s):
Campaign Schedule:
Checklist Create agents Agents are part of a team.
Create Team Teams are assigned to campaigns.
Phone number(s) purchased to be assigned to the campaign
Campaigns must have a caller ID and can have multiple inbound phone numbers.
Record Hold Music Not Required -This can be used for agents (during wrap-up and available status) and for customer/clients while they are waiting for an agent to answer.
Record sounds associated with the campaign
Only an abandon message is required for autodial campaigns - Sounds can include but are not limited to; intro message, closed message, abandon message, caller ID callback IVR message, disclosures or disclaimers.
Media Attributes Not Required - This can be used for reporting purposes and assigned per inbound number.
Caller ID Assigned
Assigned Inbound Numbers Each Inbound number can have its own script, media type, media partner, sounds, queue actions and skill levels assigned. It can be sent to one agent or restrict teams and have a billable duration programmed.

MANUAL 2 – CREATING YOUR CAMPAIGN
CALLSHAPER 4
New Campaign Checklist
Created Data Fields All Data fields completed by agents must be added. They can be inserted into a script and are reportable.
Created Dispositions Dispositions are used to describe specific call results.
Created Conversions Conversions are typically used for sales and specific call results that complete the goal of the call.
Completed Script(s) Separate scripts can be created for inbound and outbound.
Completed Campaign Setting – General Tab
Completed Campaign Setting – Callback Tab
Completed Campaign Setting – Voicemail Tab
Completed Campaign Setting – Queue Tab
Completed Campaign Setting – Dialer Tab
Completed Campaign Setting – Leads Tab
Completed Campaign Setting – Schedule Tab
Completed Campaign Setting – Sounds Tab
Completed Campaign Setting – Skills Tab
Completed Campaign Setting – Recordings Tab
Uploaded lead files or created lead post Only required for outbound autodialed campaigns.
Import DNC lists Not Required
Create Scorecard(s) for campaign Not Required
Voicemail Enabled Not Required
Turned On Daily Reports Not Required -You can have daily campaign reports sent by email for inbound and outbound calls to employees and/or clients.
Exports Report Not Required - Customizable reports that use information from the campaigns data fields.
This document can be found in the Help Center Library in the Campaigns section
titled “New Campaign Checklist”.

MANUAL 2 – CREATING YOUR CAMPAIGN
CALLSHAPER 5
Campaigns Screen
The Campaigns screen is where you will go to add campaigns, view existing active or inactive
campaigns, and edit the configuration settings of existing campaigns.
Buttons Section
Show Inactive Campaigns
When a campaign has been made inactive, it can be viewed but not reactivated. To see a list of
inactive campaigns or to view their settings, click the button.
If you are not currently calling on a campaign but plan to use it at a later date, do not
deactivate the campaign. Campaigns cannot be reactivated. If a campaign is
deactivated accidently, please contact Support.
Add Campaign
Before adding a campaign, think about the type of calls you will be taking and/or making.
Campaigns can be created using the Auto Dialer or the campaign can be manually dialed. To
add a campaign, click the button.
MANUAL 2 – CREATING YOUR CAMPAIGN
CALLSHAPER 6
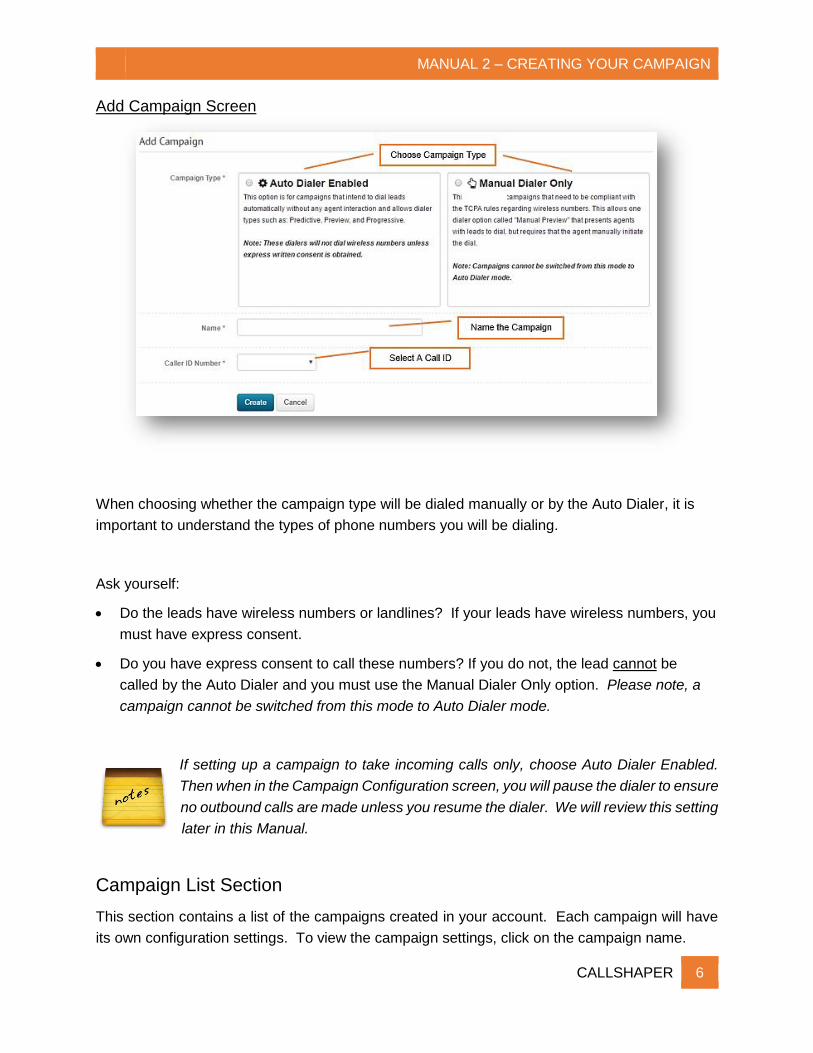
Add Campaign Screen
When choosing whether the campaign type will be dialed manually or by the Auto Dialer, it is
important to understand the types of phone numbers you will be dialing.
Ask yourself:
Do the leads have wireless numbers or landlines? If your leads have wireless numbers, you
must have express consent.
Do you have express consent to call these numbers? If you do not, the lead cannot be
called by the Auto Dialer and you must use the Manual Dialer Only option. Please note, a
campaign cannot be switched from this mode to Auto Dialer mode.
If setting up a campaign to take incoming calls only, choose Auto Dialer Enabled.
Then when in the Campaign Configuration screen, you will pause the dialer to ensure
no outbound calls are made unless you resume the dialer. We will review this setting
later in this Manual.
Campaign List Section
This section contains a list of the campaigns created in your account. Each campaign will have
its own configuration settings. To view the campaign settings, click on the campaign name.

MANUAL 2 – CREATING YOUR CAMPAIGN
CALLSHAPER 7
Campaign Configuration Screen
This screen is where you will make all of the changes and adjustments to your campaign. In
addition to configuring your campaign, from this screen you can deactivate, change to test mode
and live mode, pause and resume dialing on a campaign
Warning Section
The warning section will provide detail of missing information or if a specific setting is stopping
the dialer from dialing on this campaign.
If a setting needs to be corrected,
click the “Fix this Problem” link to be
taken directly to that setting.
Campaign Stats and Dialer Information Section
This section will give you a high level overview of your campaign statistics and dialer information.
The campaign statistics will not change while you are on this page.
MANUAL 2 – CREATING YOUR CAMPAIGN
CALLSHAPER 8
Button Section
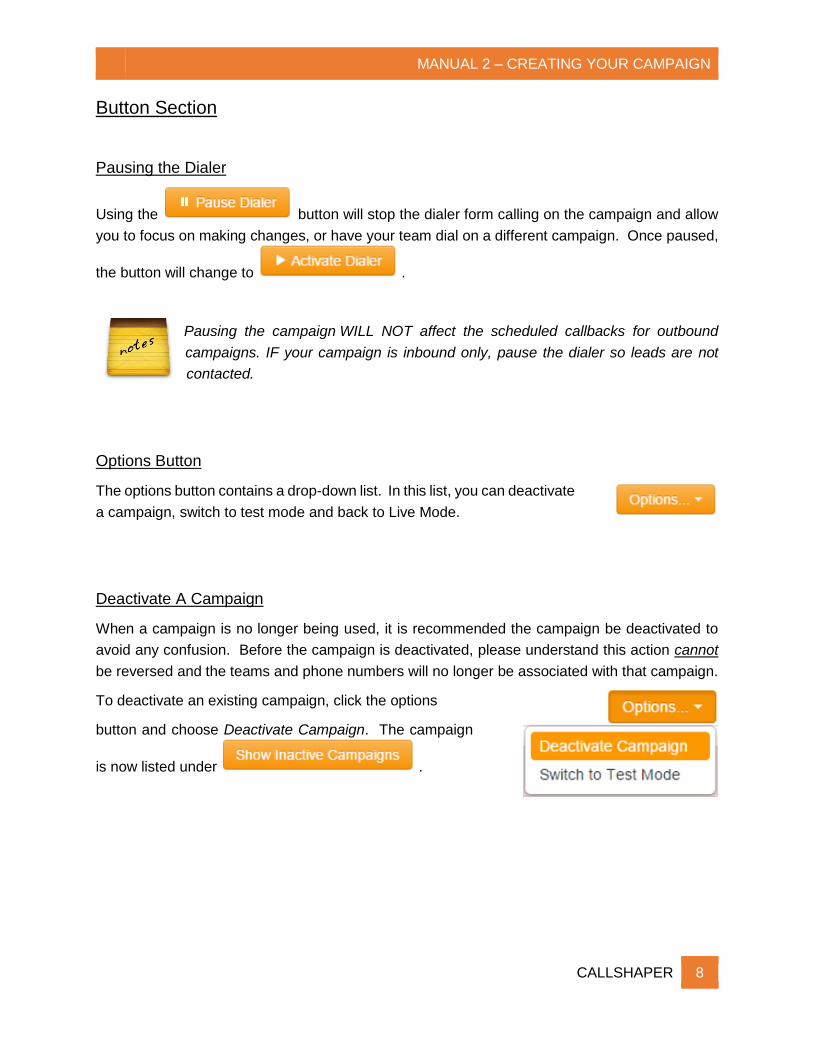
Pausing the Dialer
Using the button will stop the dialer form calling on the campaign and allow
you to focus on making changes, or have your team dial on a different campaign. Once paused,
the button will change to .
Pausing the campaign WILL NOT affect the scheduled callbacks for outbound
campaigns. IF your campaign is inbound only, pause the dialer so leads are not
contacted.
Options Button
The options button contains a drop-down list. In this list, you can deactivate
a campaign, switch to test mode and back to Live Mode.
Deactivate A Campaign
When a campaign is no longer being used, it is recommended the campaign be deactivated to
avoid any confusion. Before the campaign is deactivated, please understand this action cannot
be reversed and the teams and phone numbers will no longer be associated with that campaign.
To deactivate an existing campaign, click the options
button and choose Deactivate Campaign. The campaign
is now listed under .
MANUAL 2 – CREATING YOUR CAMPAIGN
CALLSHAPER 9
Switch to Test Mode
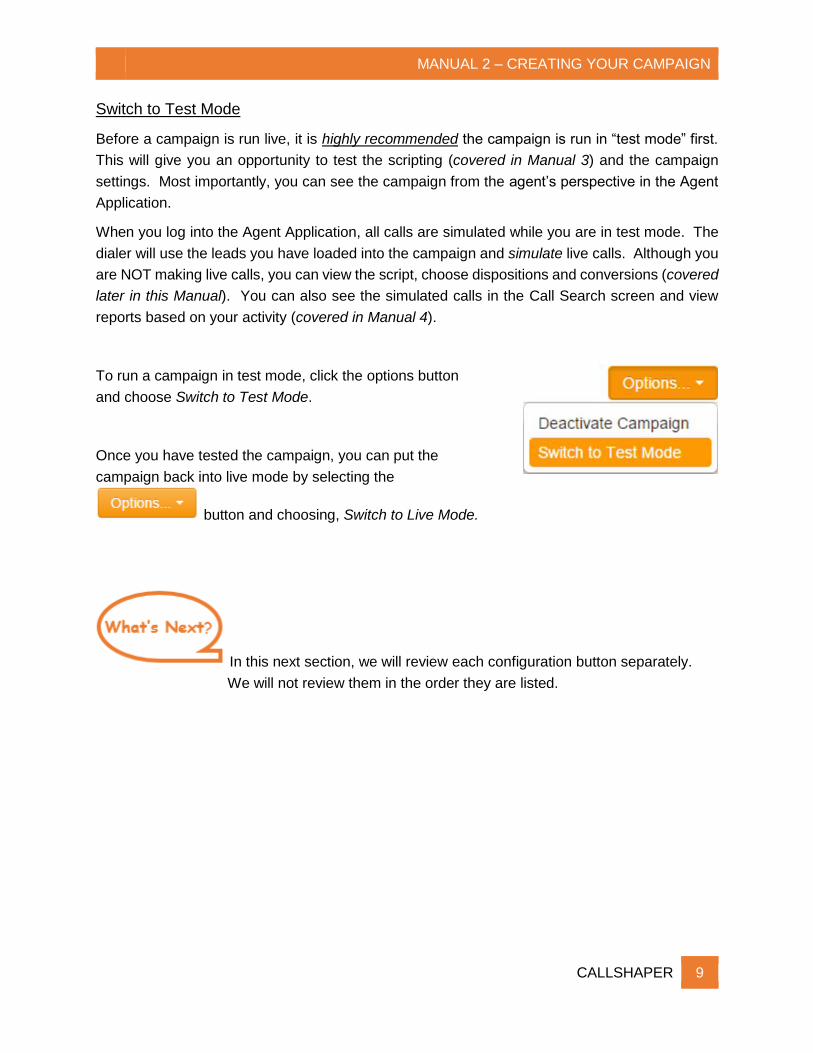
Before a campaign is run live, it is highly recommended the campaign is run in “test mode” first.
This will give you an opportunity to test the scripting (covered in Manual 3) and the campaign
settings. Most importantly, you can see the campaign from the agent’s perspective in the Agent
Application.
When you log into the Agent Application, all calls are simulated while you are in test mode. The
dialer will use the leads you have loaded into the campaign and simulate live calls. Although you
are NOT making live calls, you can view the script, choose dispositions and conversions (covered
later in this Manual). You can also see the simulated calls in the Call Search screen and view
reports based on your activity (covered in Manual 4).
To run a campaign in test mode, click the options button
and choose Switch to Test Mode.
Once you have tested the campaign, you can put the
campaign back into live mode by selecting the
button and choosing, Switch to Live Mode.
In this next section, we will review each configuration button separately.
We will not review them in the order they are listed.
MANUAL 2 – CREATING YOUR CAMPAIGN
CALLSHAPER 10
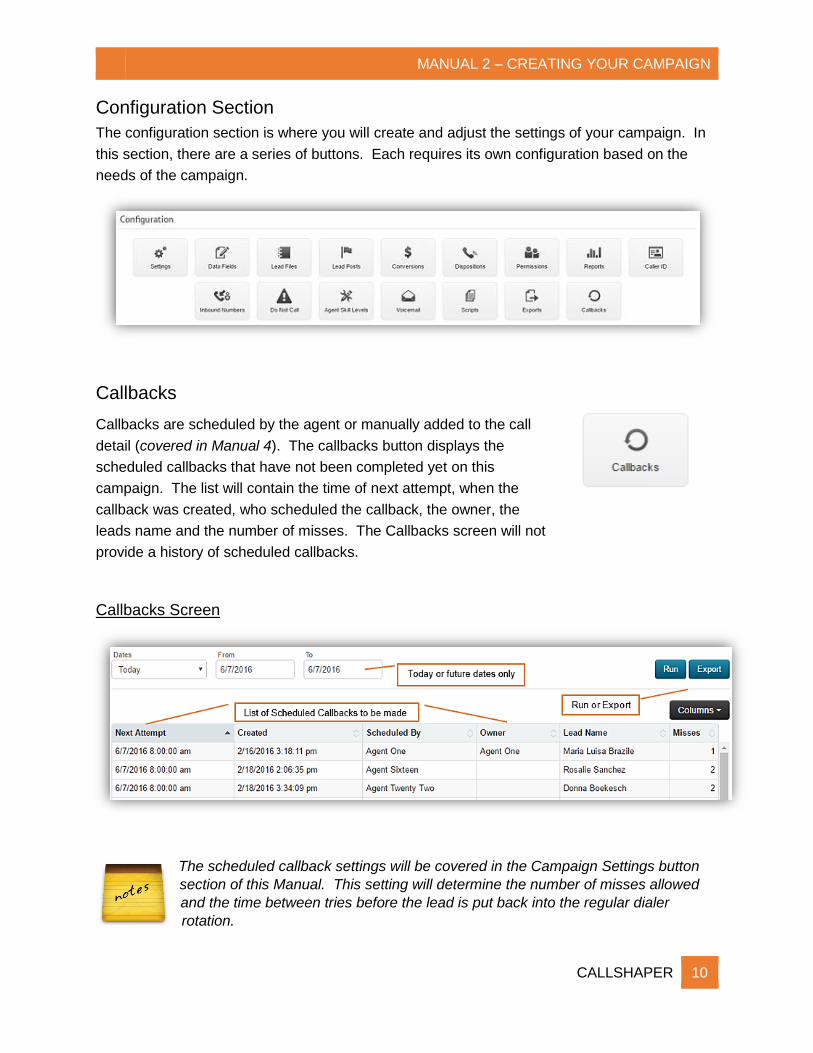
Configuration Section
The configuration section is where you will create and adjust the settings of your campaign. In
this section, there are a series of buttons. Each requires its own configuration based on the
needs of the campaign.
Callbacks
Callbacks are scheduled by the agent or manually added to the call
detail (covered in Manual 4). The callbacks button displays the
scheduled callbacks that have not been completed yet on this
campaign. The list will contain the time of next attempt, when the
callback was created, who scheduled the callback, the owner, the
leads name and the number of misses. The Callbacks screen will not
provide a history of scheduled callbacks.
Callbacks Screen
The scheduled callback settings will be covered in the Campaign Settings button
section of this Manual. This setting will determine the number of misses allowed
and the time between tries before the lead is put back into the regular dialer
rotation.

MANUAL 2 – CREATING YOUR CAMPAIGN
CALLSHAPER 11
Voicemail
Each campaign can have its own voicemail for incoming calls in
cases where an agent is not available to answer, the queue is
closed or maxed out (if programmed in the campaign settings).
Any messages left will be sent as a recording to each email address listed in the email
distribution field. If the agent extension mailboxes are enabled, the recording can go to the
email address of the agent and the Email Distribution list.
When you select the voicemail button, you will be asked to click the
button.
Enable Voicemail Screen
Once the voicemail has been set up, it can be edited by clicking the button or disabled
by clicking the button.

MANUAL 2 – CREATING YOUR CAMPAIGN
CALLSHAPER 12
Agent Skill Levels
Skill Levels are used to determine the priority of call types an agent
will receive. When an agent is added as a user, their Skill Level
defaults to the Skill Level of the campaign they are assigned to.
Agent Skill Level Screen
Click the link to change the skill level
from the drop-down list. Then click the
button to accept the changes.
The prioritization order is below:
If the campaign default is High, the agent prioritization is - High-Medium-Low
If the campaign default is Medium, the agent prioritization is - Medium-High-Low
If the campaign default is Low, the agent prioritization is - Low-Medium-High
Skill levels will NOT prevent an agent from taking calls on a campaign they are
assigned to.
MANUAL 2 – CREATING YOUR CAMPAIGN
CALLSHAPER 13
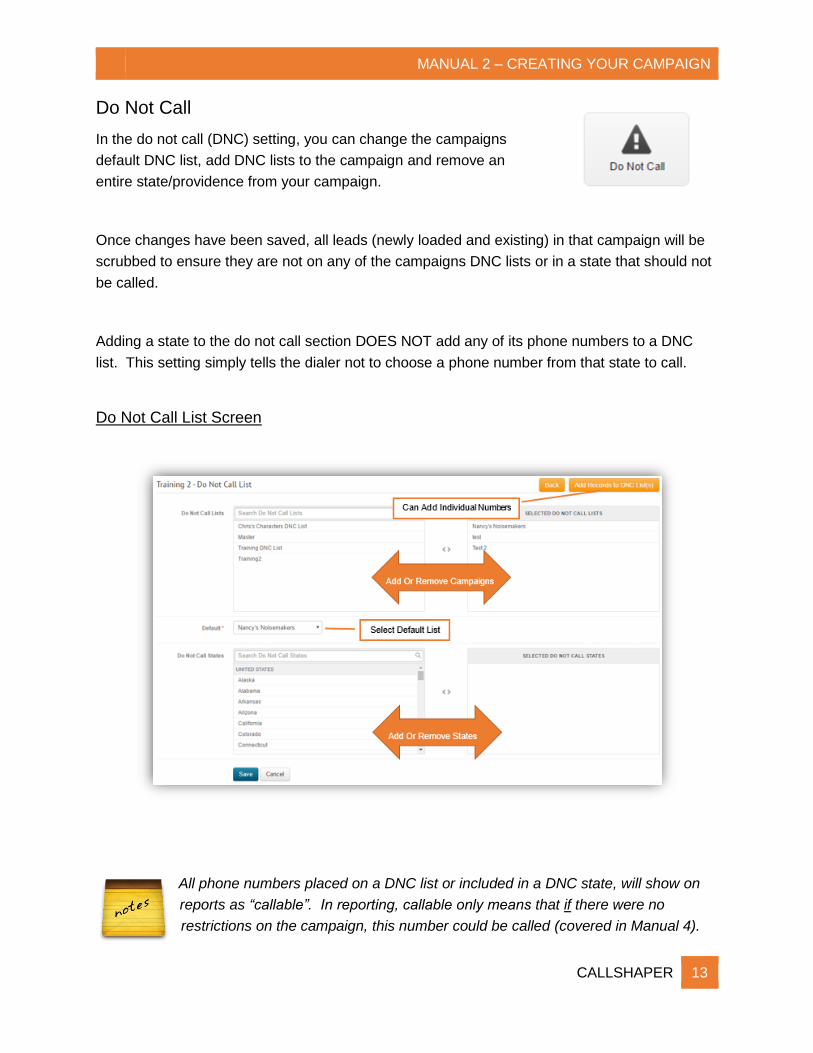
Do Not Call
In the do not call (DNC) setting, you can change the campaigns
default DNC list, add DNC lists to the campaign and remove an
entire state/providence from your campaign.
Once changes have been saved, all leads (newly loaded and existing) in that campaign will be
scrubbed to ensure they are not on any of the campaigns DNC lists or in a state that should not
be called.
Adding a state to the do not call section DOES NOT add any of its phone numbers to a DNC
list. This setting simply tells the dialer not to choose a phone number from that state to call.
Do Not Call List Screen
All phone numbers placed on a DNC list or included in a DNC state, will show on
reports as “callable”. In reporting, callable only means that if there were no
restrictions on the campaign, this number could be called (covered in Manual 4).

MANUAL 2 – CREATING YOUR CAMPAIGN
CALLSHAPER 14
Inbound Numbers
In the inbound numbers setting, you can add new inbound numbers,
view and edit existing inbound numbers, move the number to a
different campaign, release and switch to Agent Delivery Mode or
Callback IVR Mode.
Inbound Number Screen
Buttons Section
Add Number
Once you click the button, you can select an unassigned number in your
account or purchase a new number by clicking the button.
Show Released
The button will show a list of released phone numbers. The only options
available with a released phone number are; View History and Switch to Callback IVR.

MANUAL 2 – CREATING YOUR CAMPAIGN
CALLSHAPER 15
Inbound Number List Section
This list will display the name, number, when the number was active, status, media partner and
media type. From here, you can edit the inbound number by selecting it. Editing an inbound
number will override the campaign default settings.
Once selected, the phone number will be in one of two modes. They are:
Callback IVR If the phone number is in callback IVR mode, the calls received to
this inbound phone number will NOT be queued for delivery to an
agent. The caller is presented with an IVR message and is given the
option to press 1 to be automatically added to the campaigns DNC
list.
You can by clicking the button.
Agent Delivery Mode If a phone number is in agent delivery mode, all of the calls received
to this phone number will be queued and delivered to an agent based
on the queue settings (covered in the campaign settings section) of
the campaign or the inbound number settings.
Active Record Screen
The Active Record screen will appear if the phone number is in agent delivery mode. It contains
three tabs; General, Sounds and Queue tab and two orange buttons; and the
drop-down.
MANUAL 2 – CREATING YOUR CAMPAIGN
CALLSHAPER 16
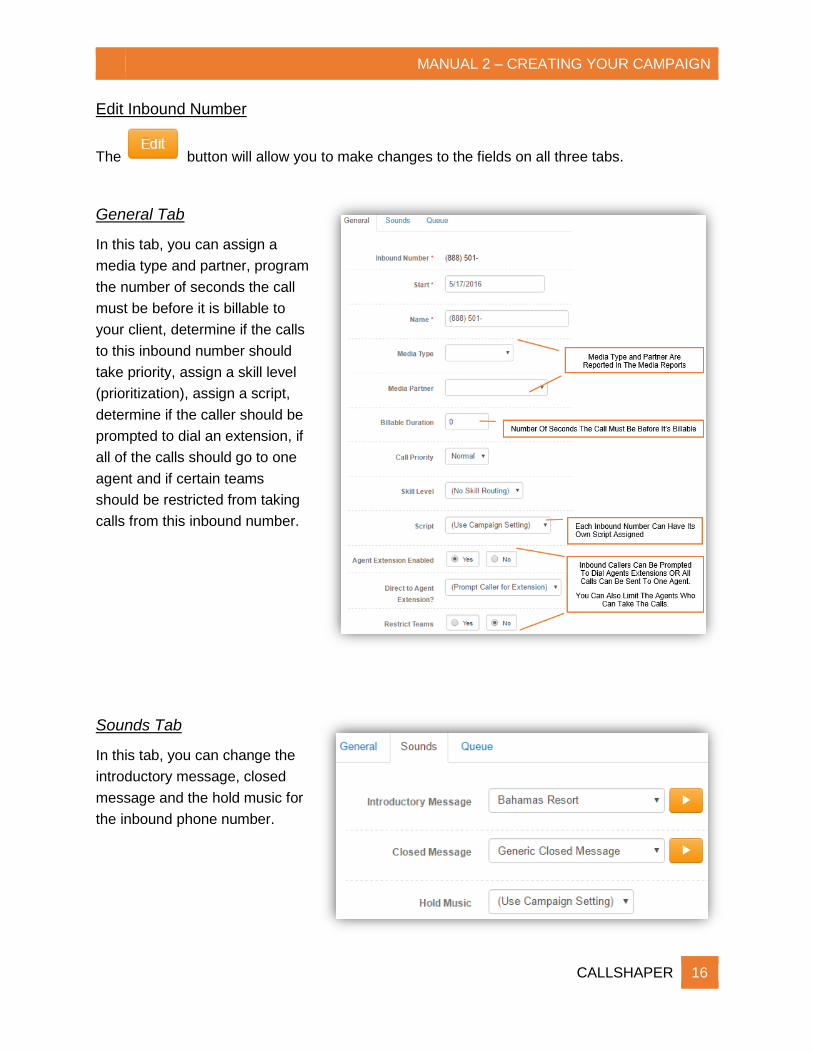
Edit Inbound Number
The button will allow you to make changes to the fields on all three tabs.
General Tab
In this tab, you can assign a
media type and partner, program
the number of seconds the call
must be before it is billable to
your client, determine if the calls
to this inbound number should
take priority, assign a skill level
(prioritization), assign a script,
determine if the caller should be
prompted to dial an extension, if
all of the calls should go to one
agent and if certain teams
should be restricted from taking
calls from this inbound number.
Sounds Tab
In this tab, you can change the
introductory message, closed
message and the hold music for
the inbound phone number.

MANUAL 2 – CREATING YOUR CAMPAIGN
CALLSHAPER 17
Queue Tab
In this tab, you can change
how the inbound call performs
if the queue is closed, hits its
queue limit, if the queue is
timed out or change the IVR
message.
Options Button
The options button drop-down has four options. If the inbound
number is also a caller ID, some options may not be available.
View History – This option will provide a history of when
changes were made to the inbound number.
Move To – Phone numbers that have been purchased on your account can be moved between
campaigns. Before choosing this option, understand that it may affect your media reporting and
inbound calls received, for the new and/or the old campaign the number was assigned to. This
option is not available if the number is also a caller ID.

MANUAL 2 – CREATING YOUR CAMPAIGN
CALLSHAPER 18
Release - When a phone number is no longer being used for a campaign, you can release it.
When a phone number is released, CallShaper will moved it over to the quarantine category for
15 days. After the 15 days have passed, the phone number will then be move to the
unassigned category where you can remove the phone number from your account or reassign it
to another campaign.
Switch to Callback IVR – If the phone number is in callback IVR mode, the calls received to
this inbound phone number will NOT be queued for delivery to an agent. The caller is
presented with an IVR message and is given the option to press 1 to be automatically added to
the campaigns DNC list.

MANUAL 2 – CREATING YOUR CAMPAIGN
CALLSHAPER 19
Caller ID
The caller ID is the phone number displayed to the lead before the
call is answered. A caller ID is assigned when a campaign is
created.
When using the Caller ID setting, you can change the default caller ID, change the caller ID per
attempt and purchase additional phone numbers.
Caller ID Screen
If the per attempt setting is enabled, the per attempt section will appear.

MANUAL 2 – CREATING YOUR CAMPAIGN
CALLSHAPER 20
Permissions
Users permissions can be edited or added to a campaign within the
user’s profile or by using the permissions button. Either option will
allow you to add or remove the user access to admin, reports, QA or
user admin on a specific campaign or at the account level.
Permissions are only assigned to users that should have access to the Supervisor
and/or the Manage Application.
Permissions Screen
The Permissions screen will display a list of users that have permissions in the campaign, their
email address and what permissions they have.
Edit Permissions
Select the user to edit their permissions. The Edit User Permissions window will open.

MANUAL 2 – CREATING YOUR CAMPAIGN
CALLSHAPER 21
In this window, you can change
the account level and the
campaign level permissions of
the user.
A user should only have permissions at one of the two levels.
Add User Permissions
To add permissions, click the button located at the top of the
Permissions screen. In this window, select a user from the drop-down list, then you will have
the same options as the edit user permissions window.
The next few sections are about preparing information that the agents will
need to complete the call. Turn the page and we will review data fields,
conversions and dispositions.

MANUAL 2 – CREATING YOUR CAMPAIGN
CALLSHAPER 22
Dispositions
Dispositions are descriptions of what happened on a call and if/when the
phone number will be redialed. Your account includes "required and un-
editable" dispositions. These dispositions are assigned by the dialer.
In addition to the required dispositions, customizable dispositions can be added to the campaign.
The disposition you create for a campaign tells CallShaper if the correct party was reached, who
can see the disposition, if the disposition completes the lead/number or when the next call should
be made.
Disposition Screen
The Disposition screen will provide a list of dispositions available in your campaign. From here,
you can add new dispositions, edit existing dispositions or view inactive dispositions
Button Section
Add Disposition
To add a disposition, click the button. The New Disposition screen will open.

MANUAL 2 – CREATING YOUR CAMPAIGN
CALLSHAPER 23
New Disposition Screen
The only editable
field in a required
disposition is the
client code.
Show Inactive
To view the list of inactive dispositions, click the button. The disposition can
be reactivated by selecting it, clicking the edit button and choosing “active” in the status field.
List of Dispositions Section
This section displays a list of the dispositions available in your campaign. To edit a disposition,
select it and click the button. The Edit Disposition screen will open with the
same options as the New Disposition screen.

MANUAL 2 – CREATING YOUR CAMPAIGN
CALLSHAPER 24
Conversions
Conversions represent a sale or a desired call result. Once created,
conversions can be automatically assigned through scripting, selected
by the agents during wrap up or, manually assigned to a call in the call
detail (covered in Manual 4).
The results of the conversions and their point values are reflected in the Top Ten Agents list in
both the Manage Site and the Agent Application.
Conversion Screen
The Conversion screen will provide a list of conversions available in your campaign along with
the detail of what they are being reported as (sales, downsell, nothing). From here, you can add
new conversions or edit existing conversions.
Buttons Section
Add Conversion
To add a conversion, click the button. The New Conversion screen will open.

MANUAL 2 – CREATING YOUR CAMPAIGN
CALLSHAPER 25
New Conversion Screen
The point value for each conversion is
optional. This is only used when you have
sales and downsells.
The point total will be reflected in the Top
Ten Lists in the Agent Application and the
Manage Application
Only Sales and Downsells
are reportable.
Show Inactive
To view the list of inactive conversions, click the button. The conversion can
be reactivated by selecting it, clicking the edit button and choosing “active” in the status field.
List of Conversions Section
This section provides a list of list of conversions available in your campaign. To edit a
conversion, select it and click the button. The Edit Conversion screen will
open with the same options as the New Conversion screen.

MANUAL 2 – CREATING YOUR CAMPAIGN
CALLSHAPER 26
Data Fields
Data fields are used to populate reports, and to gather data through
scripting. Each CallShaper account comes with basic data fields
specific to a lead. These data fields will have an * next to their name
and cannot be edited or removed.
Additional data fields can be added from lead files, or manually. Once Data fields are created,
they can be edited but they cannot be removed from a campaign.
Data Fields Screen
Buttons Section
Add Data Fields Screen
The Add Data Field screen will open. Complete all fields to ensure the agent has access to the
data field and they are using the correct format.
The validation options are:
Free-Form Text – The agent can freely type the information into the data field based on
the maximum length allowed.
Phone number – The validation for this field is a 10-digit number.
Email Address – The validation will check for the @ symbol and the .com, .org, etc.
Number – Choose; Decimal Places, Minimum Value and Maximum Value.
MANUAL 2 – CREATING YOUR CAMPAIGN
CALLSHAPER 27
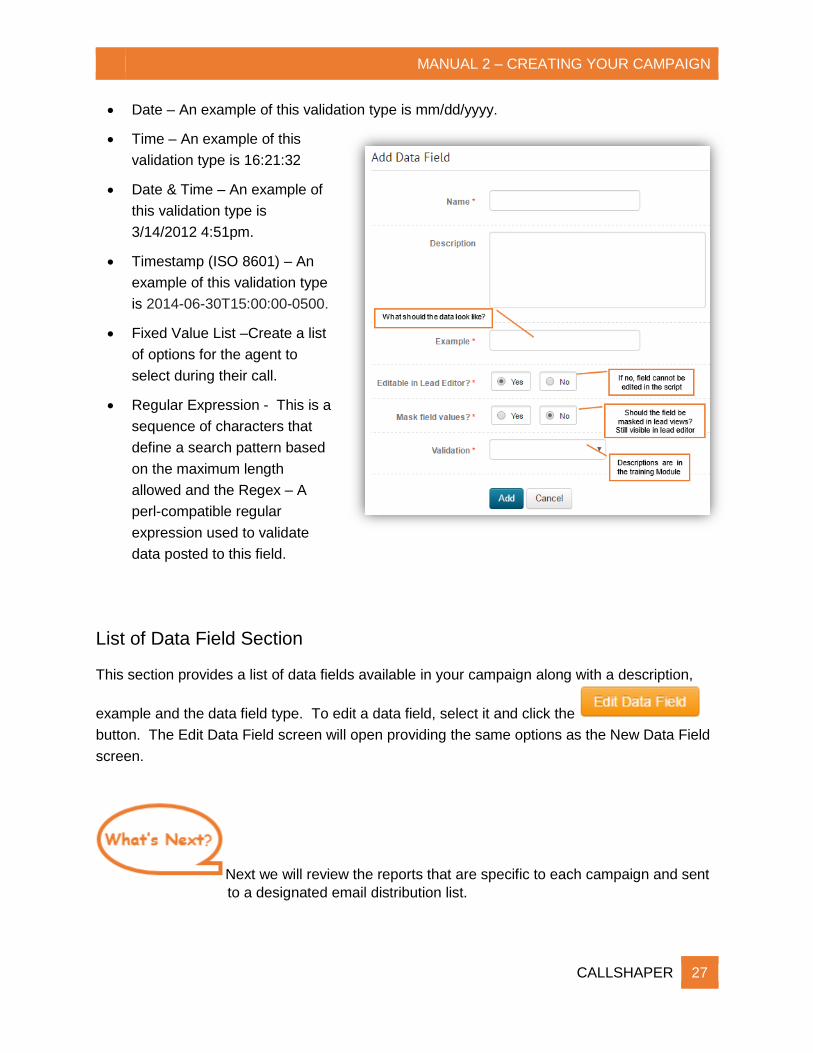
Date – An example of this validation type is mm/dd/yyyy.
Time – An example of this
validation type is 16:21:32
Date & Time – An example of
this validation type is
3/14/2012 4:51pm.
Timestamp (ISO 8601) – An
example of this validation type
is 2014-06-30T15:00:00-0500.
Fixed Value List –Create a list
of options for the agent to
select during their call.
Regular Expression - This is a
sequence of characters that
define a search pattern based
on the maximum length
allowed and the Regex – A
perl-compatible regular
expression used to validate
data posted to this field.
List of Data Field Section
This section provides a list of data fields available in your campaign along with a description,
example and the data field type. To edit a data field, select it and click the
button. The Edit Data Field screen will open providing the same options as the New Data Field
screen.
Next we will review the reports that are specific to each campaign and sent
to a designated email distribution list.

MANUAL 2 – CREATING YOUR CAMPAIGN
CALLSHAPER 28
Reports
The Daily report is an automated report sent to designated email
addresses. It is a comprehensive overview of the campaigns inventory
(leads), sales (conversions), and performance activity as of the
previous days outbound and/or inbound calls.
The Daily Reports Screen
The daily report will be delivered to the recipients email each morning. The report is in Excel
format and will include the following tabs.
Outbound Report
Inventory Report tab – This report contains a list of lead files that have been uploaded to a
campaign and the status of those lead file. The details include: number of dials, calls
handled, contact, completes, sales, calls remaining, and penetration.
Sales tab – This report provides the information on all sales made (conversions labeled
sales) for the campaign. The details will include: the lead name, lead ID number, phone
number, date of sale, name of agent, media type and the type of sale made

MANUAL 2 – CREATING YOUR CAMPAIGN
CALLSHAPER 29
Downsells tab – This report has information on all downsells made (conversions labeled
downsells) on the campaign. The details will include: the lead name, lead ID number, phone
number, date of downsell, name of agent, the lead file and the type of downsell made.
Performance Report tab - Here you will see detail of the overall performance on the
campaign for each day of the current week, week to date, month to date and performance
to date. The performance report will specify the number of total hours, per hour stats,
conversion rate, penetration rate, totals of all conversion, dispositions, callbacks and total
dials.
Inbound Report
Performance Report tab - Here you will see detail of the overall performance on the
campaign for each day of the current week, week to date, month to date and performance
to date. The performance report will specify the number of total hours, per hour stats,
conversion rate, penetration rate, totals of all conversion, dispositions, callbacks and total
dials.
Timesplit tab – This report contains the call volume stats of a campaign in 30 minute
intervals. The details will include: the number of calls received, abandon, calls handled, the
average wait and talk time, sales and agent hours.
Media tab – This report offers details of calls received to a specific phone number normally
initiated from a TV, radio or print advertisement. The details will include: the calls received,
calls handled, abandon, wait time, talk time and how many of those calls were converted.
Sales tab – This report provides the information on all sales made (conversions labeled
sales) for the campaign. The details will include: the lead name, lead ID number, phone
number, date of sale, name of agent, media type and the type of sale made.
Downsells tab – This has information on all downsells made (conversions labeled
downsells) on the campaign. The details will include: the lead name, lead ID number, phone
number, date of downsell, name of agent, the lead file and the type of downsell made.

MANUAL 2 – CREATING YOUR CAMPAIGN
CALLSHAPER 30
Exports
The Exports report is a customizable report that is created by the
user. This report is populated using the data fields that have been
added to a campaign.
Users can create one or multiple reports per campaign and have it delivered to an FTP site or
by email. The report can be delivered on an hourly, daily, weekly or monthly basis at a specified
time of day.
In addition, the Exports report can be run on demand, edited, deactivated, reactivated and
recreated by a simple click of a button.
Exports List Screen
The Export List screen will display a list of all active Exports reports on that campaign. The
detail will include; the name of the report, the day(s) and time the report will be sent to the
recipients and the date of the last export.
Buttons Section
Add Export
Before adding an Exports report, make sure all of the data fields you intend to use have been
added to the campaign. To add an Exports report, click the button.
MANUAL 2 – CREATING YOUR CAMPAIGN
CALLSHAPER 31
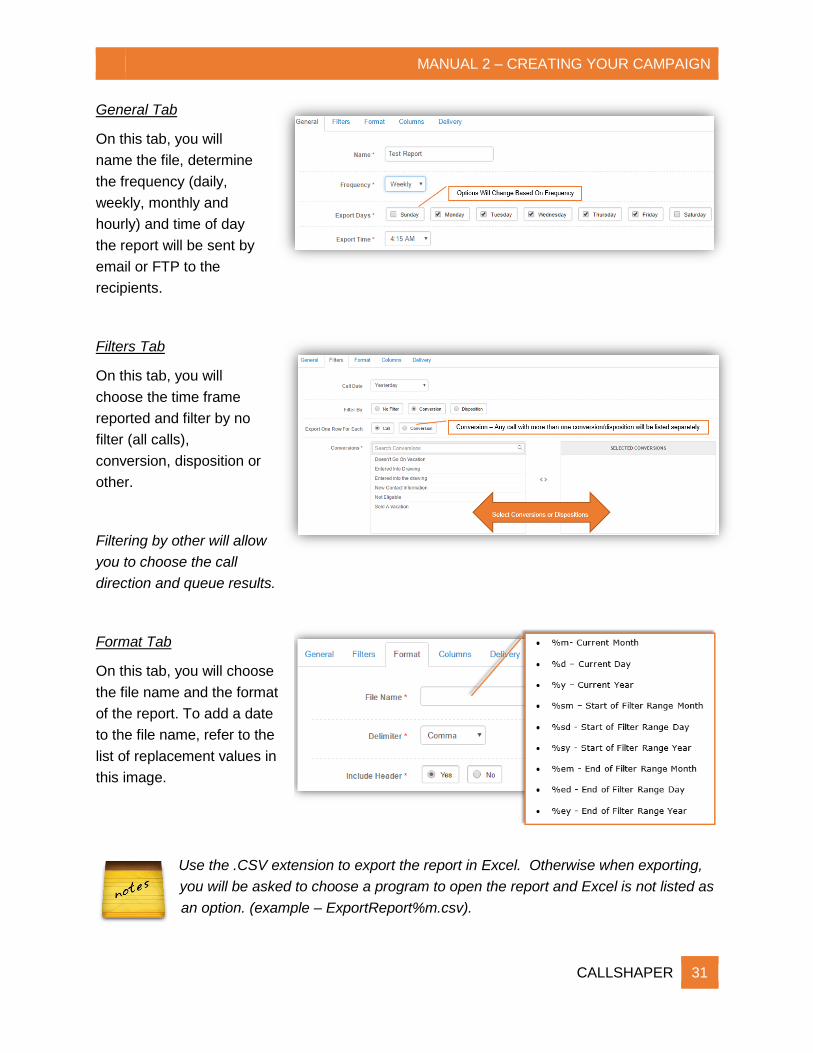
General Tab
On this tab, you will
name the file, determine
the frequency (daily,
weekly, monthly and
hourly) and time of day
the report will be sent by
email or FTP to the
recipients.
Filters Tab
On this tab, you will
choose the time frame
reported and filter by no
filter (all calls),
conversion, disposition or
other.
Filtering by other will allow
you to choose the call
direction and queue results.
Format Tab
On this tab, you will choose
the file name and the format
of the report. To add a date
to the file name, refer to the
list of replacement values in
this image.
Use the .CSV extension to export the report in Excel. Otherwise when exporting,
you will be asked to choose a program to open the report and Excel is not listed as
an option. (example – ExportReport%m.csv).
MANUAL 2 – CREATING YOUR CAMPAIGN
CALLSHAPER 32
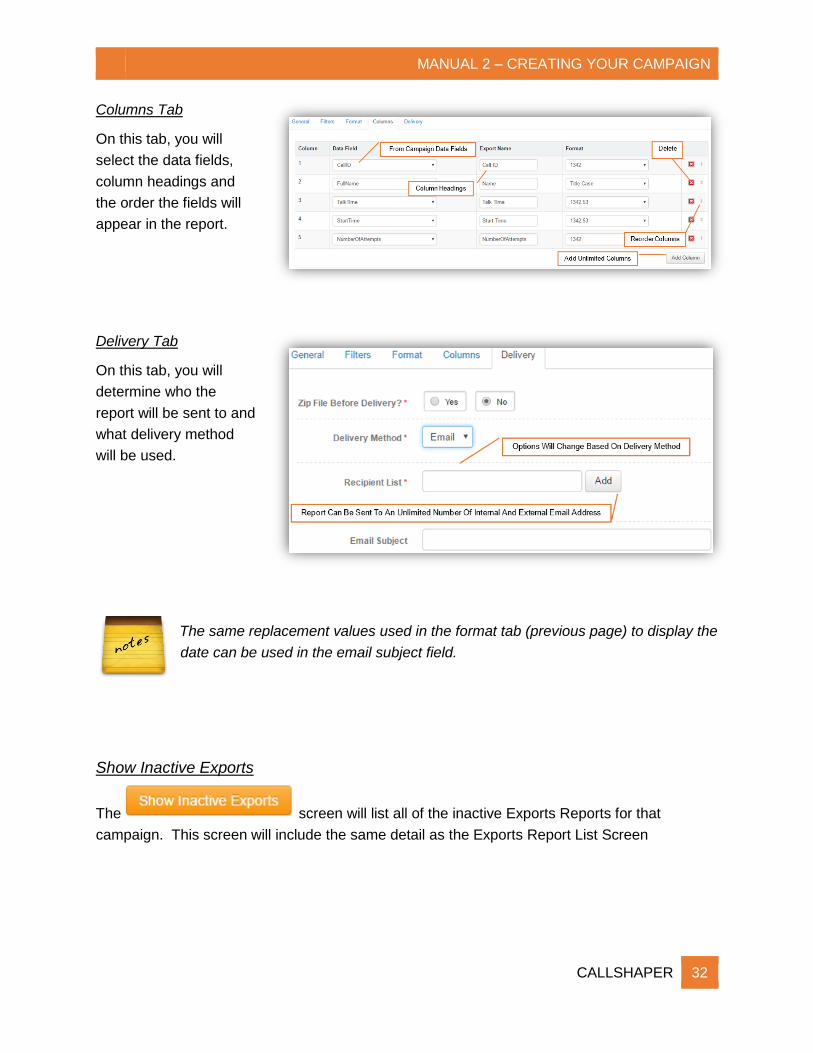
Columns Tab
On this tab, you will
select the data fields,
column headings and
the order the fields will
appear in the report.
Delivery Tab
On this tab, you will
determine who the
report will be sent to and
what delivery method
will be used.
The same replacement values used in the format tab (previous page) to display the
date can be used in the email subject field.
Show Inactive Exports
The screen will list all of the inactive Exports Reports for that
campaign. This screen will include the same detail as the Exports Report List Screen

MANUAL 2 – CREATING YOUR CAMPAIGN
CALLSHAPER 33
Report List Section
In the report list section, select an Exports report to edit, deactivate, run or see the report
history.
View Export Screen
The View Export screen will contain four orange buttons; , ,
and .
The button will open the Edit Exports screen which will have the same options as
the Add Exports screen.
The button will move the Exports report to the inactive exports reports list.
Once deactivated, you will have the option to .
The button will run the report on demand. The report will be sent directly to
the recipients on the distribution list.
The button will provide a list of each report that has been generated.
Individual reports can be downloaded using the button.
Are you curious how to get the lead information into your account? That’s
what is next.

MANUAL 2 – CREATING YOUR CAMPAIGN
CALLSHAPER 34
Lead Post
The lead post is used when receiving real-time lead information. For
example, if someone is putting their contact information into your or
your client’s website to be contacted, the lead post will send the lead
information directly to your outbound campaign so an agent can
contact them.
You can determine the frequency, skill level, expiration, data fields and how/if the real time data
is filtered. Once the parameters have been set, instructions are created and can be sent to your
client or IT department.
Lead Post Screen
Button Section
Add Lead Post
To add a new lead post, click the button. The New Lead Post screen will
open containing three tabs.

MANUAL 2 – CREATING YOUR CAMPAIGN
CALLSHAPER 35
New Lead Post Screen
General Tab
The general tab provides the file information
such as; lead ping, frequency, filtering
options, bucket placement, skill level, Caller
ID, expiration date, DNC scrub and file status.
Enabling Lead Ping will allow a
vendor to check your lead data
before posting new leads. The
details will be included in the
posting instructions.
Fields Tab
The fields tab is where you
choose or
to indicate which
fields of information will be
required.
Advanced Tab
The advanced tab is where
you can choose to split your
files by PubID, PubID and
SubID or do not split.
If you choose to split by
PubID or PubID and SubID,
you will be given additional
options to assign buckets and
skill assignments.

MANUAL 2 – CREATING YOUR CAMPAIGN
CALLSHAPER 36
Posting Instructions
Posting instructions and ping instructions (if enabled) are created and are ready to send to your
client or IT department. To access the instructions, click the button.
List of Lead Post Section
This section will display a list of the lead post that have been created on the campaign. The
detail will include the name of the lead post, frequency, post key and the bucket it has been
assigned to.
Editing A Lead Post
To edit a lead post or to review posting instructions, select the lead post. On the View Lead Post
screen, you will have two options; the button, which will give you the
posting instructions needed to send to your client or IT department and the
button, which will open the Edit Lead Post screen.

MANUAL 2 – CREATING YOUR CAMPAIGN
CALLSHAPER 37
Lead Files
Files containing lead information can be uploaded into your campaign
enabling your agents to make outbound calls using the autodialer.
Because each lead file is different depending on the needs of the campaign, the only
requirements are; all lead files must be in a .CSV format and include a column for the leads
phone number. If the file includes cell phone numbers, you must have a column for express
consent and one for inquiry date.
Lead Files Screen
The Lead Files Screen displays a list of the lead files uploaded into a campaign that have not
been finalized or expired. From this screen, you can get a quick view of the status, bucket
assignment, skill level, expiration date, net leads, callable leads and the number of dials for
each file.
Buttons Section
Upload Lead File
To upload a lead file into the campaign, click the button. Remember that
lead files must be in CSV format, include a phone number column and if the file contains cell
phone numbers, you must have a column for express consent and one for inquiry date.
MANUAL 2 – CREATING YOUR CAMPAIGN
CALLSHAPER 38
Before uploading a file, verify all data fields you would like available for scripting and
reporting purposes within the lead file have been created in the campaign first. If
you do not have a data field available to match the column to, the data in that
column will not upload.
The upload process will go through three screens, Upload File, Sample Results and the Lead
File Preview. When finished, an email will be sent to the person who uploaded the file.
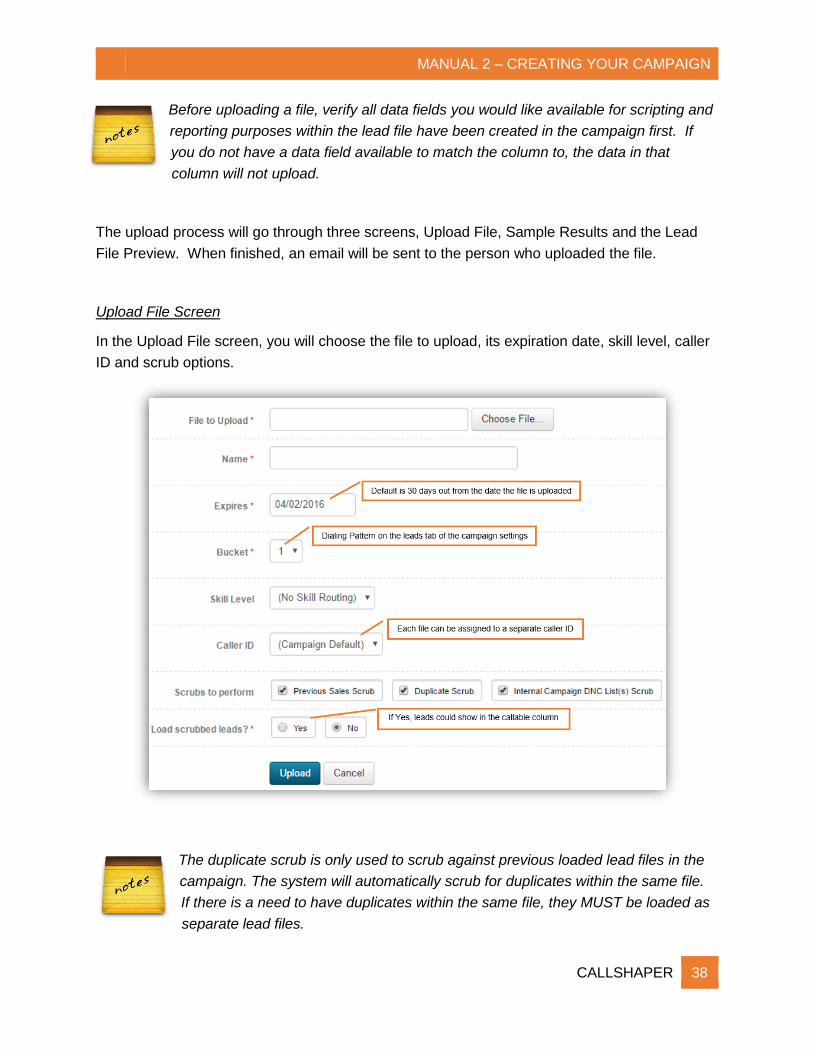
Upload File Screen
In the Upload File screen, you will choose the file to upload, its expiration date, skill level, caller
ID and scrub options.
The duplicate scrub is only used to scrub against previous loaded lead files in the
campaign. The system will automatically scrub for duplicates within the same file.
If there is a need to have duplicates within the same file, they MUST be loaded as
separate lead files.

MANUAL 2 – CREATING YOUR CAMPAIGN
CALLSHAPER 39
Sample Results Screen
In the Sample Results screen, select the format of the file and choose the proper column
heading for each column using their drop-down lists. If you cannot find the matching header,
you can choose the <Ignore> option. CallShaper will NOT upload columns with <Ignore> as the
header. If the data in the column should be uploaded, you must create a data field before
uploading the lead file.
Lead File Preview Screen
In the Lead File Preview screen, verify the column headings match the data being uploaded.

MANUAL 2 – CREATING YOUR CAMPAIGN
CALLSHAPER 40
Every time a lead file is uploaded into CallShaper, an
email titled Lead File Loaded –name of file, will be
sent to the user who uploaded the lead file.
The email will contain the Lead File Import Report,
detailing the number of original records, duplicates,
invalid numbers, scrubbed files, net loaded and
callable leads.
The email will also contain attachments showing you
the records that were not loaded because they were
duplicates, invalids, scrubbed and wireless.
Callable records are records that “could” be called if there were no restrictions set
up in the campaign. For example; if a lead is on a DNC list or in a state that you
have restricted from calling on in this campaign, they will show as callable.
Lead File Actions
Once a lead file has been loaded into CallShaper, changes
can be made from the lead file actions menu to the buckets,
skill level, file name, dialing status and expiration date. The
lead files can also be viewed, exported, expired and deleted.
To make changes to, view or export a lead file, select the
lead file, then the drop-down
menu.
Some options may not be available based on the files current status. In the menu
above, Resume Dialing and Change Expiration options are not available.

MANUAL 2 – CREATING YOUR CAMPAIGN
CALLSHAPER 41
Move to Bucket
During the upload process, the lead file is assigned to buckets 1-4. Each bucket is given a
calling percentage in the campaign settings (covered in the next section). The move to bucket
option will allow you to change the current bucket the lead file is assigned to.
Set Skill Level
During the upload process, the lead file can be assigned to a skill level. The skill levels are a
prioritization that will match the skill level of the lead file to the skill level of the agent.
Adjusting the skill level of the lead file does not stop an agent from taking or making calls from
that particular lead file. Setting the skill level only prioritizes who will get the calls first.
Pause Dialing
You can pause dialing on specific files when you want to stop using the file temporarily or
permanently.
Pausing the lead file WILL NOT affect the scheduled callbacks within the file.
Resume Dialing
The resume dialing option is used to START dialing on a new file, or used to resume dialing on
a paused file.
Expire
Lead files can be expired if the file is not performing or you no longer want to use the lead file.
Using this option will expire the file as of the day you perform this task. The file can then be
accessed using the button.
If you do not want the expiration date to be “today’s” date, choose the edit option in
the File Actions menu to manually input an expiration date.
MANUAL 2 – CREATING YOUR CAMPAIGN
CALLSHAPER 42
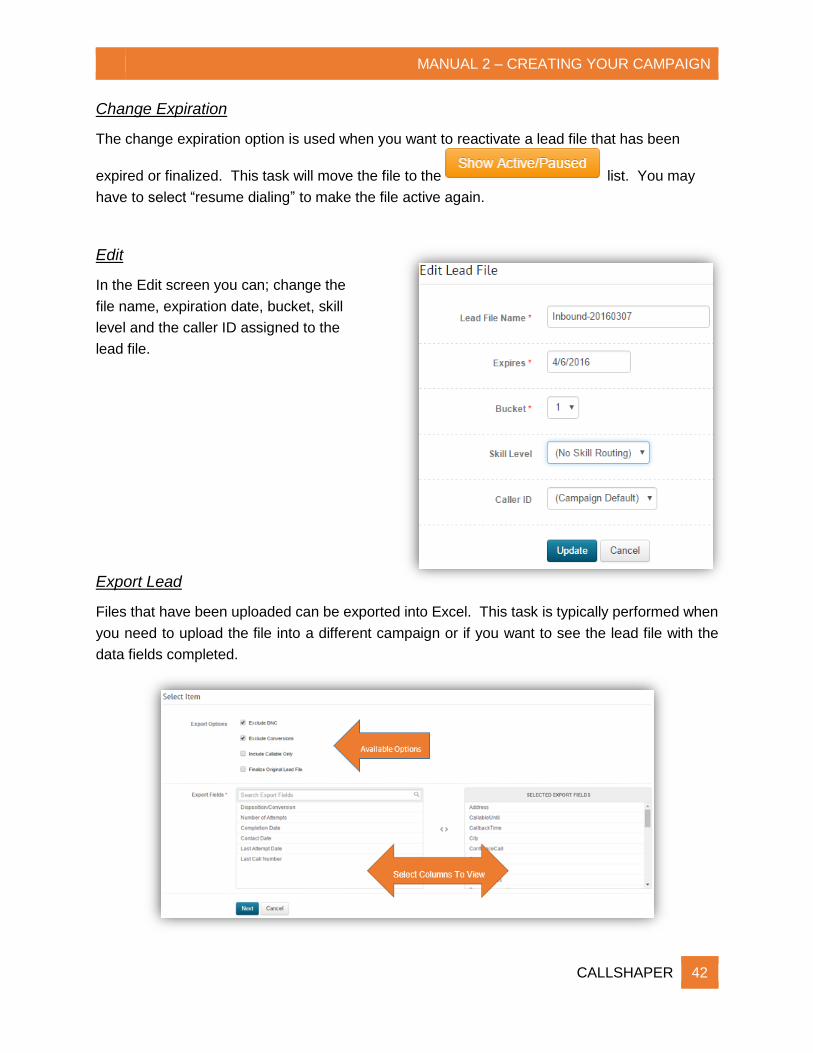
Change Expiration
The change expiration option is used when you want to reactivate a lead file that has been
expired or finalized. This task will move the file to the list. You may
have to select “resume dialing” to make the file active again.
Edit
In the Edit screen you can; change the
file name, expiration date, bucket, skill
level and the caller ID assigned to the
lead file.
Export Lead
Files that have been uploaded can be exported into Excel. This task is typically performed when
you need to upload the file into a different campaign or if you want to see the lead file with the
data fields completed.
MANUAL 2 – CREATING YOUR CAMPAIGN
CALLSHAPER 43
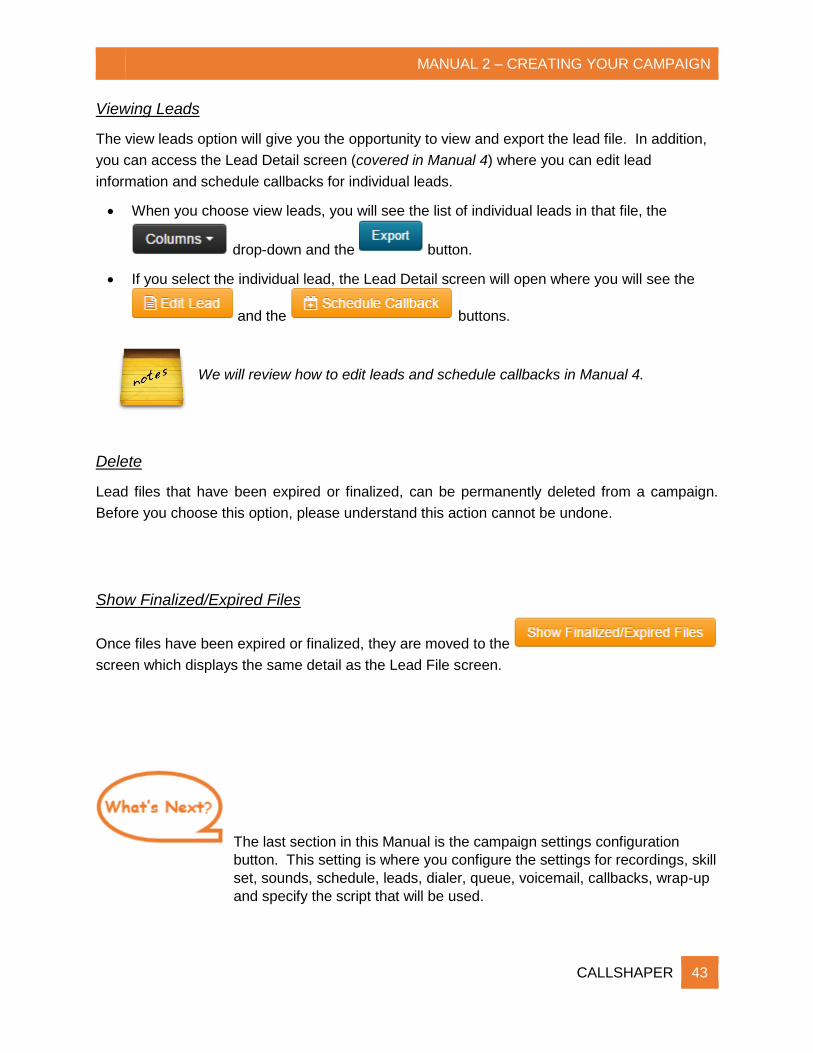
Viewing Leads
The view leads option will give you the opportunity to view and export the lead file. In addition,
you can access the Lead Detail screen (covered in Manual 4) where you can edit lead
information and schedule callbacks for individual leads.
When you choose view leads, you will see the list of individual leads in that file, the
drop-down and the button.
If you select the individual lead, the Lead Detail screen will open where you will see the
and the buttons.
We will review how to edit leads and schedule callbacks in Manual 4.
Delete
Lead files that have been expired or finalized, can be permanently deleted from a campaign.
Before you choose this option, please understand this action cannot be undone.
Show Finalized/Expired Files
Once files have been expired or finalized, they are moved to the
screen which displays the same detail as the Lead File screen.
The last section in this Manual is the campaign settings configuration
button. This setting is where you configure the settings for recordings, skill
set, sounds, schedule, leads, dialer, queue, voicemail, callbacks, wrap-up
and specify the script that will be used.
MANUAL 2 – CREATING YOUR CAMPAIGN
CALLSHAPER 44
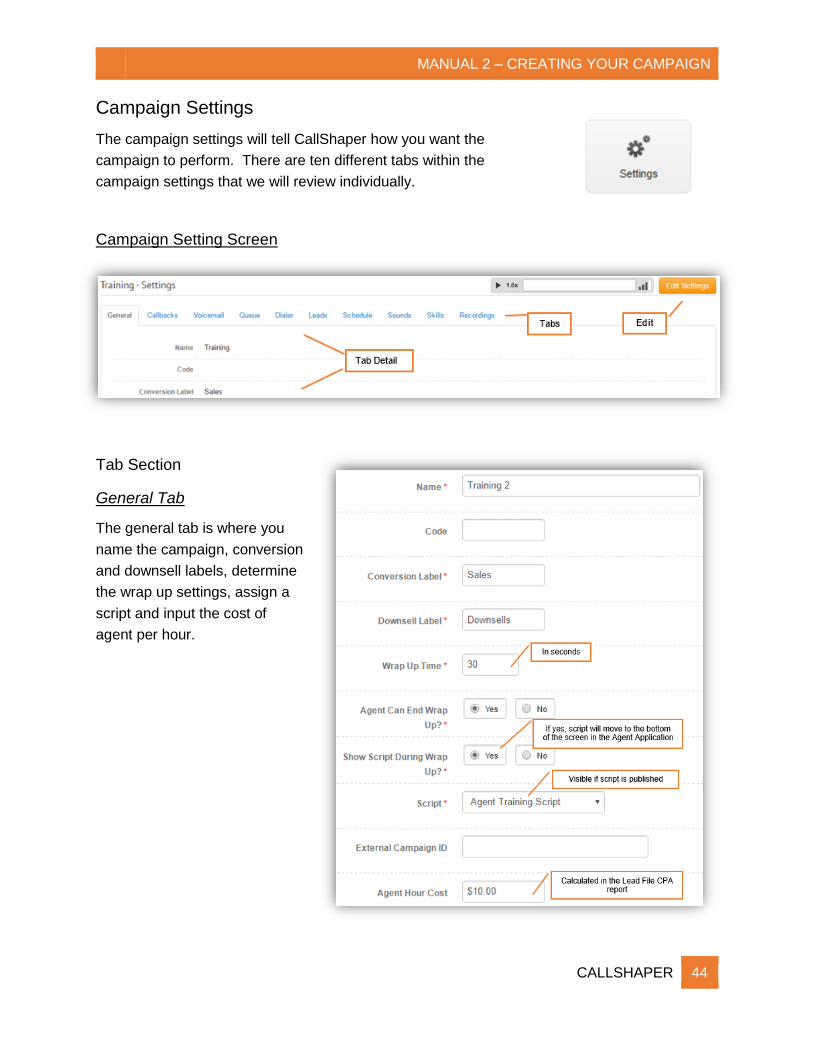
Campaign Settings
The campaign settings will tell CallShaper how you want the
campaign to perform. There are ten different tabs within the
campaign settings that we will review individually.
Campaign Setting Screen
Tab Section
General Tab
The general tab is where you
name the campaign, conversion
and downsell labels, determine
the wrap up settings, assign a
script and input the cost of
agent per hour.
MANUAL 2 – CREATING YOUR CAMPAIGN
CALLSHAPER 45
Callback Tab
The callback tab tells CallShaper if callbacks are enabled on the campaign. If enabled; when,
how often and how many times the dialer will try a lead with a scheduled callback before putting
the lead back into the regular dialing rotation.
Voicemail Tab
The voicemail tab is where you choose whether or not to leave a voicemail when an answering
machine is detected.
This setting will also allow the agent to leave the recorded voicemail for calls that pass through
the answering machine detection.
If the proper voicemail recording is not available, see the instructions for Adding A
New Sound (Manual 1). To hear the voicemail recording, click the button.

MANUAL 2 – CREATING YOUR CAMPAIGN
CALLSHAPER 46
Queue Tab
The queue tab tells CallShaper
what actions to take when the
press 1 IVR is enabled, when
the queue is closed, the queue
has reached its max number of
calls and the length of time a
call is allowed to hold within a
queue.
Press 1 IVR Message - This
message is played to callers
after an intro message. This
message should instruct the
caller to press 1 to continue. If
they do not press 1, they will
timeout and be disconnected
in the specified time.
In this tab, there are fields that require sounds to be selected. If the sound is not
available, see instructions for Adding A New Sound. To hear a recorded sound on
this tab, click the button.
Dialer Tab
The dialer tab contains six different dialer setting. Each tells the dialer to perform in a specific
way. CallShaper recommends the Predictive Dialer Types for best results.
MANUAL 2 – CREATING YOUR CAMPAIGN
CALLSHAPER 47
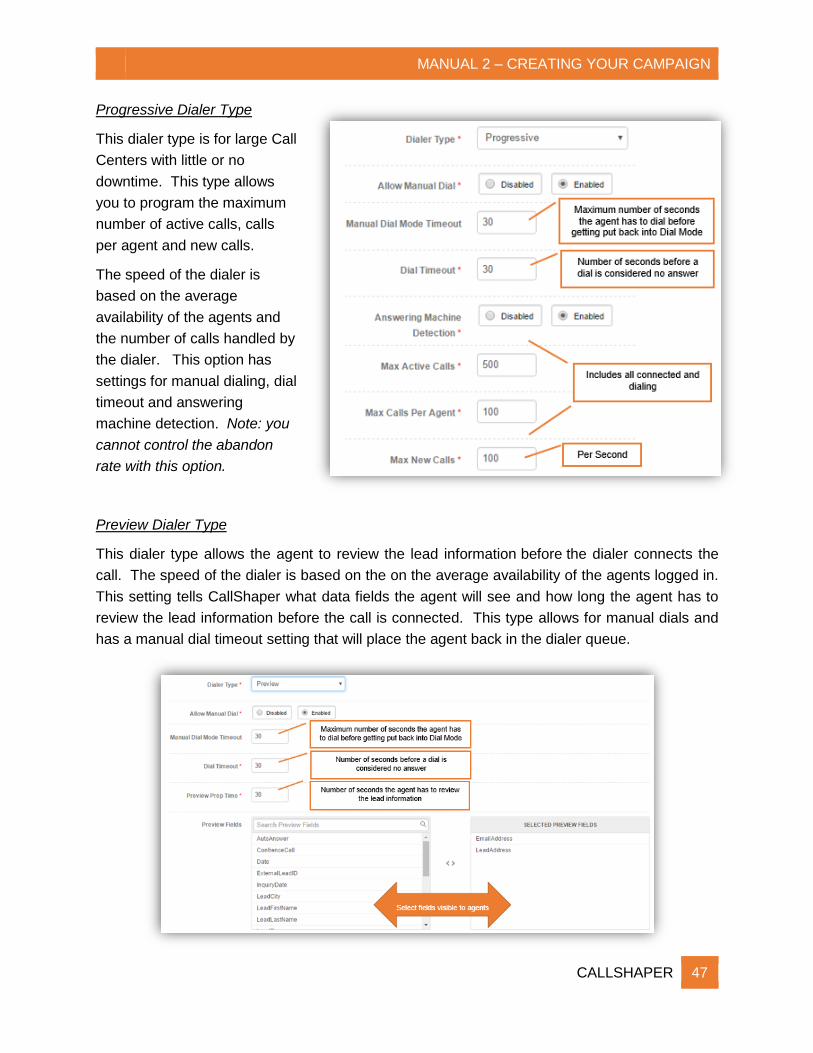
Progressive Dialer Type
This dialer type is for large Call
Centers with little or no
downtime. This type allows
you to program the maximum
number of active calls, calls
per agent and new calls.
The speed of the dialer is
based on the average
availability of the agents and
the number of calls handled by
the dialer. This option has
settings for manual dialing, dial
timeout and answering
machine detection. Note: you
cannot control the abandon
rate with this option.
Preview Dialer Type
This dialer type allows the agent to review the lead information before the dialer connects the
call. The speed of the dialer is based on the on the average availability of the agents logged in.
This setting tells CallShaper what data fields the agent will see and how long the agent has to
review the lead information before the call is connected. This type allows for manual dials and
has a manual dial timeout setting that will place the agent back in the dialer queue.

MANUAL 2 – CREATING YOUR CAMPAIGN
CALLSHAPER 48
There are three types of Predictive dialing types. They are:
Predictive Dialer Type
This dialer type is the
recommended setting for
most Call Centers. This
setting will constantly adjust
based on the abandon rate,
max call settings, availability
of the agent and calls handled
by the dialer.
This option has settings for
manual dialing, dial timeout,
answering machine detection,
abandon rate (max 3%) and
max active calls.
Please refer to the TCPA Regulations and Guidelines regarding the abandon rate
limits using an auto-dialer for calling campaigns.
Predictive (Experimental) Dialer Type
This dialer type is recommended for campaigns with six or less agents logged in. This
option performs in the same manner and has the same settings as the Predictive dialer type.
Predictive (Experimental Y) Dialer Type
This dialer type focuses on the connection rate. This setting is recommended for campaigns
that have started with the Predictive Dialer type and have found an unusually high or low
connection rate and need to make adjustments. This option has the same settings as the
Predictive dialer type.

MANUAL 2 – CREATING YOUR CAMPAIGN
CALLSHAPER 49
Manual Dialer Type
This dialer type allows all dials to
be made manually by the
agents. The Manual Dialer
setting determines if the agent
will have inbound call screen-
pop enabled, the amount of time
the agent has to make an
outbound call and when the call
is considered a "no answer".
Leads Tab
The lead tab is where you select
the lead prioritization, max attempts
settings, calling times and the
buckets dialing patterns.
Dialing Pattern - This field tells
CallShaper what percentage of dials
to give each bucket (between 0-
100). When a lead file is uploaded,
it is assigned to a “bucket” (1-4). All
lead files for a campaign can be put
into the same bucket or separate
buckets.

MANUAL 2 – CREATING YOUR CAMPAIGN
CALLSHAPER 50
Schedule Tab
The schedule tab is used to
determine the hours CallShaper will
accept incoming calls to a
campaign, the hours an outbound
campaign is active and when
callbacks can be scheduled. The
schedule on this page is set to
Eastern Time Zone.
Inbound calls received outside of
this schedule will follow the queue
action closed setting in the
campaign settings – queue tab.
Manual dialed calls are not
restricted by this setting.
Sounds Tab
The sound tab is used to add hold
music and recorded messages to a
campaign. Each field contains a
drop-down list of the sounds that
have been uploaded or recorded in
your Sounds Library. If the sound
is not available, see instructions for
Adding A New Sound.
To hear a recorded message on
this tab, click the button.
Caller ID Callback IVR Message - This sound is played to all calls received on the
Caller ID number. This message is played after the introduction message. The
purpose of the IVR message is add an additional message to the callers who dial the
caller ID inbound number directly.

MANUAL 2 – CREATING YOUR CAMPAIGN
CALLSHAPER 51
Skills Tab
The skills tab is used
to prioritize the skill level of an
agent with the skill level specific
to a campaign. An agent who
has a personal skill level of
default, will receive the skill level
setting of the campaign they are
assigned to.
The skill level setting will not stop
agents from making or receiving
calls on a campaign, regardless
of their personal skill level setting.
The skill level only sets the
prioritization of how the calls will
be routed to agents.
See Skill Level section for prioritization order
Recordings Tab
The recordings tab is used to tell
CallShaper whether or not the calls for
a campaign will or will not be recorded
and if an agent will have the ability to
mute a call recording in the Agent
Application.
Edit Campaign Settings
To make changes to any of the settings, click the button.

MANUAL 2 – CREATING YOUR CAMPAIGN
CALLSHAPER 52
Notes
MANUAL 2 – CREATING YOUR CAMPAIGN
CALLSHAPER 53