campaign 14-01-777 technical service bulletin - … vi and … · technical service bulletin group...
TRANSCRIPT

Circulate To: General Manager, Service Manager, Parts Manager, Warranty Manager, Service Advisors, Technicians, Body Shop Manager, Fleet Repair
Technical Service Bulletin
GROUP NUMBER
CAMPAIGN 14-01-777
DATE MODEL(S)
SEPTEMBER 2014 GENESIS (BH), EQUUS (VI)
SUBJECT: DIS NAVIGATION SYSTEM MAP UPDATE
INSTALLATION PROCEDURE
DESCRIPTION: This bulletin provides the procedure to install the Genesis Sedan and Equus map update software to the DIS Navigation System.
Applicable Vehicles: 2012 GENESIS (BH) equipped with DIS(Jog Dial) 2012 EQUUS (VI)
Inform the customer that all navigation, Bluetooth, and audio settings (previous destinations, home, addresses, phone numbers, radio presets, etc.) will be erased during the map software update procedure.
IMPORTANT
Make a copy of the acknowledgement form on the last page of this bulletin for the customer to
sign and include with the repair order.
IMPORTANT
The map update procedure will take approximately 3 hours.
IMPORTANT
*** Retailed Vehicles***
Dealers must perform this Service Campaign whenever an affected vehicle is in the shop for any maintenance or repair.
When a vehicle arrives at the Service Department, access Hyundai Motor America's "Warranty Vehicle Information" screen via WEBDCS to identify open Campaigns.
IMPORTANT

DIS NAVIGATION SYSTEM MAP UPDATE INSTALLATION PROCEDURE
TSB #: 14-01-777 Page 2 of 15
SUBJECT:
PARTS INFORMATION: A set of the programming discs has been sent to each dealer to be used for the navigation system map update. Additional sets of the programming discs can be ordered by contacting MapNSoft 1(888)757-0010.
Part Description Figure Installation Time
OPERATION S/W DISC
ORANGE (GENESIS Type 1)
40 minutes
YELLOW (GENESIS Type 2)
40 minutes
GREY (EQUUS)
40 minutes
MAP DATA DISC
BLUE (Disc 1/3)
40 minutes
BLUE (Disc 2/3)
40 minutes
BLUE (Disc 3/3)
40 minutes

DIS NAVIGATION SYSTEM MAP UPDATE INSTALLATION PROCEDURE
TSB #: 14-01-777 Page 3 of 15
SUBJECT:
WARRANTY INFORMATION:
OP CODE OPERATION OP TIME
TBA DIS NAVIGATION MAP UPDATE 1.0 M/H
NOTE: Submit claim using the Campaign Claim Entry Screen.
Service Procedure:
MAP UPDATE AUTHORIZATION CODE RETRIEVAL PROCEDURE:
RETRIEVING HW DEVICE ID:
1.1 GENESIS/EQUUS: (Retrieving Hardware Device ID) Enter the software update menu by simultaneously pressing the [B] DISC/AUX, [C] BACK, [D] NAVI/MENU buttons while pressing the [A] VOL KNOB.
1.2 Using the CCP (Center Control Panel), scroll the focus bar down to ‘Software Update’ on the left side of the display screen, and ‘jog’ the CCP to the right. Select ‘HW Device ID’.
Refer to steps 3.19 – 3.21 to check the current map version. If the
version is 03.00.00 2014.09.02.01, then an update is not necessary.
IMPORTANT

DIS NAVIGATION SYSTEM MAP UPDATE INSTALLATION PROCEDURE
TSB #: 14-01-777 Page 4 of 15
SUBJECT:
1.3 The HW Device ID will be displayed on screen.
A From the designated web site: http://www.mapnsoft.com/hyundai/2014vds Type in your dealer code, VIN, HW device ID and email address, then click on “Submit”. The server displays the code and will send it by email (only if checked). After getting the authentication code from the call center, write it down in the repair order.
B From the designated Call Center: Make a call to the following number and ask to get the “Map Authentication Code”. You will be asked for the “VIN”, “HW Device ID” and Dealer code. Call Center # : 1(888)757-0010
POTENTIAL UPDATE ERRORS
A.
The software update can be interrupted or fail under the following conditions: The software discs have significant surface scratches. This can lead to data loss or discs that simply cannot be read. If this is the case, remove the disc and wipe clean with a clean soft cloth from the center of the disc straight out to the edge of the disc. Never wipe a disc in a circular pattern. If the disc still causes an error, use a new software disc.
B. The vehicle’s battery voltage is interrupted or falls below 9V. If this is the case, the system will attempt to re-start the update automatically when a stable power supply is attached to the vehicle. If it does not re-start automatically, repeat the steps for that disc.
C. If a serious error occurs during the update process, the system will enter an emergency recovery mode. If this is the case, an emergency application loading message will appear on the screen. This process can take between 1.5 to 4 minutes.
If the HW Device ID is not shown on screen, then proceed with updating the operating software in the next section. After updating the operating software, then the device ID will be shown on the screen.
NOTICE

DIS NAVIGATION SYSTEM MAP UPDATE INSTALLATION PROCEDURE
TSB #: 14-01-777 Page 5 of 15
SUBJECT:
OPERATING SOFTWARE DISC SELECTION AND INSTALLATION PROCEDURE:
OPERATING SOFTWARE DISC SELECTION:
2.1A GENESIS: Repeat Step 2.1 to enter the software update Menu. Check unit version under ‘HyundaiBH’. If the unit version starts with NUMBERS and NO LETTERS, then use the ORANGE disc (Type 1).
2.1B If the unit version under ‘HyundaiBH’ shows LETTERS (ex. R or RH), then use the YELLOW disc (Type 2).
OPERATING SOFTWARE UPDATE consists of an ORANGE, YELLOW, OR GREY disc. Follow the procedure below to determine which disc to use for your vehicle.
Ensure the OPERATING SOFTWARE is updated first before proceeding to
navigation map update.
CAUTION NOTICE

DIS NAVIGATION SYSTEM MAP UPDATE INSTALLATION PROCEDURE
TSB #: 14-01-777 Page 6 of 15
SUBJECT:
2.1C EQUUS: All Equus vehicles will use the GRAY disc.
2.2 OPERATING SOFTWARE DISC INSTALLATION: Start the vehicle’s engine or turn to IGN ON and connect a battery charger (10 A/Hr setting recommended). If the engine is not started and the vehicle is connected to a battery charger, ensure that the headlamp switch is in the OFF position, and the HVAC blower fan is OFF.
2.3 Press the CCP (Center Control Panel) knob DOWN to acknowledge the caution screen message.
2.4 Ensure that there are no discs in the changer mechanism by pressing and holding the eject button [B] for 3 seconds. This will eject ALL discs that may be in the mechanism. Verify that the message, ‘No Disc’ is displayed on the screen. [A] Vol Knob [B] Eject Button [C] Load Button.
2.5 Press the load button [C] and only insert one operating software disc(Orange, Yellow, or Gray)
Complete operating software update first, and then follow with Map Disc1 (PURPLE), Map Disc2 (PURPLE) and Map Disc3 (PURPLE).
NOTE
Never turn the vehicle ignition OFF
during the update process.
CAUTION
Turn the vehicle ON and let the engine idle before starting the software upload.
NOTE
Record the customer’s AM, FM
and XM radio stations.
NOTE NOTICE
NOTICE
NOTICE

DIS NAVIGATION SYSTEM MAP UPDATE INSTALLATION PROCEDURE
TSB #: 14-01-777 Page 7 of 15
SUBJECT:
2.6 Repeat Step 2.1 to enter the software update Menu. Using the CCP (Center Control Panel), scroll the focus bar down to ‘Software Update’ on the left side of the display screen, and ‘jog’ the CCP to the right. Select ‘Update from CD’.
2.7 Select ‘Start selected update’. A pop up message will appear, then select ‘Yes’ to start software download.
2.8 The system will then re-boot. You will see the system’s splash screen momentarily. The software update process will begin and a download progress indicator will appear for a few moments.

DIS NAVIGATION SYSTEM MAP UPDATE INSTALLATION PROCEDURE
TSB #: 14-01-777 Page 8 of 15
SUBJECT:
2.9 The installation progress indicator will now be displayed and the installation will begin. After the successful download and installation of the operating software, the system will re-boot and display the splash screen for a few seconds.
NAVIGATION MAP UPDATE INSTALLATION PROCEDURE:
3.1 You may now install the map software update, after completing the operating software update. Ensure the engine is still running, or connected to a battery charger as stated in step 3.2 and turn to IGN ON.
3.2 Press the CCP (Center Control Panel) knob DOWN to acknowledge the caution screen message.
Never turn the vehicle ignition OFF
during the update process.
CAUTION
Turn the vehicle ON and let the engine idle before starting the software
upload.
NOTE
When beginning the OPERATING SOFTWARE UPDATE, carefully watch the start of the process for 3 minutes, and then return after
20 minutes (total time).
IMPORTANT
NOTICE

DIS NAVIGATION SYSTEM MAP UPDATE INSTALLATION PROCEDURE
TSB #: 14-01-777 Page 9 of 15
SUBJECT:
3.3 Ensure that there are no discs in the changer mechanism by pressing and holding the eject button [B] for 3 seconds. This will eject ALL discs that may be in the mechanism. Verify that the message, ‘No Disc’ is displayed on the screen. [A] Vol Knob [B] Eject Button [C] Load Button.
3.4 Press the load button [C] and insert Map Disc1/3 (BLUE) when prompted.
3.5 After a few moments, the LCD screen will display a “Disc Error” message indicating the disc is a “non-playable format” disc. This is normal.
Wait 10 seconds after the disc is inserted before proceeding
to the next step.
NOTE
Do not insert 2/3 or 3/3 Map
disc at this time.
NOTE NOTICE
NOTICE
DIS NAVIGATION SYSTEM MAP UPDATE INSTALLATION PROCEDURE
TSB #: 14-01-777 Page 10 of 15
SUBJECT:
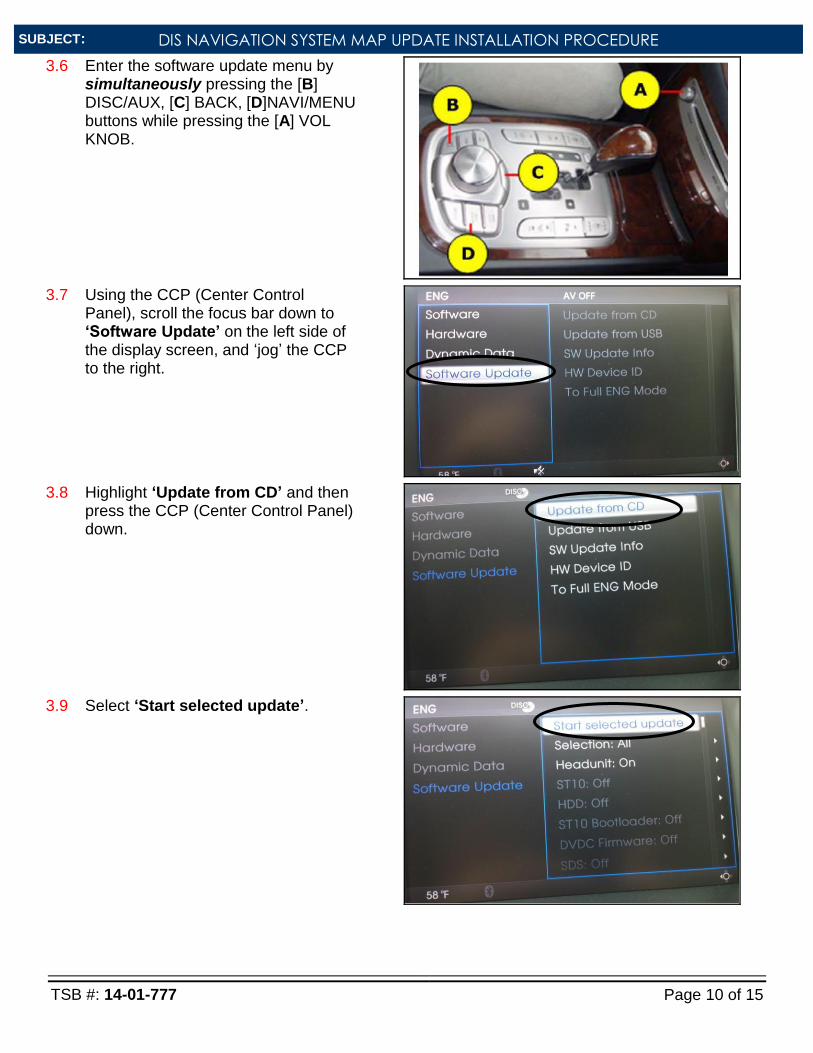
3.6 Enter the software update menu by simultaneously pressing the [B] DISC/AUX, [C] BACK, [D]NAVI/MENU buttons while pressing the [A] VOL KNOB.
3.7 Using the CCP (Center Control Panel), scroll the focus bar down to ‘Software Update’ on the left side of the display screen, and ‘jog’ the CCP to the right.
3.8 Highlight ‘Update from CD’ and then press the CCP (Center Control Panel) down.
3.9 Select ‘Start selected update’.

DIS NAVIGATION SYSTEM MAP UPDATE INSTALLATION PROCEDURE
TSB #: 14-01-777 Page 11 of 15
SUBJECT:
3.10 The user authentication guide screen will display.
3.11 The authentication code should be entered on the pop-up screen as shown to the right, using the CCP (Center Control Panel), and then select ‘OK’.
3.12 The system will then re-boot. You will see the system’s splash screen momentarily. The software update process will begin and a download progress indicator will appear for a few moments.

DIS NAVIGATION SYSTEM MAP UPDATE INSTALLATION PROCEDURE
TSB #: 14-01-777 Page 12 of 15
SUBJECT:
3.13 The installation progress indicator will now be displayed and the installation will begin.
3.14 After the successful download and installation of the Map Disc 1/3 (BLUE), the system will re-boot once again and display the splash screen.
3.15 The caution screen disclaimer will be displayed. Press the CCP (Center Control Panel) down to acknowledge the disclaimer.
3.16 Press the Eject button and remove Map Disc1/3 (BLUE).
If you get error “0x1101” on the screen, press (H) XM/DISC, (E) BACK, (F) NAVI MENU, Rotate knob CCP (G) at the same time to reset the head unit. Begin step 4.6 again to enter the S/W update menu and re-enter the
Authentication Code.
NOTE
When beginning the Map Disc1/3 (PURPLE) update, carefully watch the start of the process for 3 minutes, return after 20 minutes and watch for 3 minutes, and then return after 25 minutes.
IMPORTANT
NOTICE

DIS NAVIGATION SYSTEM MAP UPDATE INSTALLATION PROCEDURE
TSB #: 14-01-777 Page 13 of 15
SUBJECT:
3.17 Repeat steps 4.6 – 4.9 to perform the installation of Map Disc 2/3 (BLUE) and Map Disc 3/3 (BLUE).
3.18 After completing the installation of Map Disc 3/3 (BLUE), the system will re-boot once again and display the splash screen. Press the Eject button and remove Map Disc3/3 (BLUE).
3.19 The caution screen disclaimer will be displayed. Press the CCP (Center Control Panel) down to acknowledge the disclaimer.
3.20 Enter the software update menu by simultaneously pressing the [B] DISC/AUX, [C] BACK, [D]NAVI/MENU buttons while pressing the [A] VOL KNOB.
Map Disc 2/3 (BLUE) and Map Disc 3/3 (BLUE) installation procedures DO NOT require the input of the authentication
code.
NOTE
When beginning the Map Disc 2/3 (BLUE) and 3/3 (BLUE) update, carefully watch the start of the process for 3 minutes, return after 20 minutes and watch for 3 minutes, and then return after 25 minutes.
IMPORTANT NOTICE
DIS NAVIGATION SYSTEM MAP UPDATE INSTALLATION PROCEDURE
TSB #: 14-01-777 Page 14 of 15
SUBJECT:
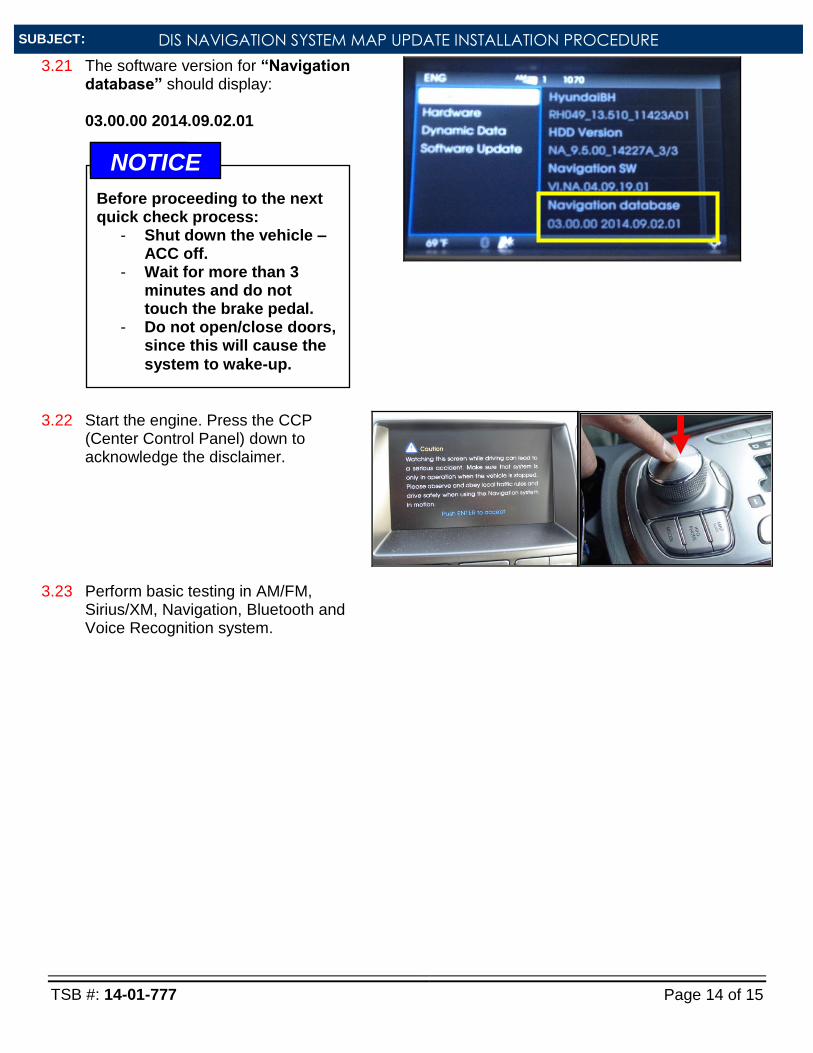
3.21 The software version for “Navigation database” should display: 03.00.00 2014.09.02.01
3.22 Start the engine. Press the CCP (Center Control Panel) down to acknowledge the disclaimer.
3.23 Perform basic testing in AM/FM, Sirius/XM, Navigation, Bluetooth and Voice Recognition system.
Before proceeding to the next quick check process:
- Shut down the vehicle – ACC off.
- Wait for more than 3 minutes and do not touch the brake pedal.
- Do not open/close doors, since this will cause the
system to wake-up.
NOTE NOTICE

DIS NAVIGATION SYSTEM MAP UPDATE INSTALLATION PROCEDURE
TSB #: 14-01-777 Page 15 of 15
SUBJECT:
I_ _ _ _ _ _ _ _ _ _ _ _ _ _ _ _ _ _ _ _ _ _ _ acknowledge that all Navigation, Bluetooth and audio settings (previous destinations, home addresses, phone numbers, radio presets, etc. will be erased during the map software update procedure. _ _ _ _ _ _ _ _ _ _ _ _ _ _ _ _ _ _ _ _ _ _ _ _ _ _ _ (Customer Signature) (Date) _ _ _ _ _ _ _ _ _ _ _ _ _ _ _ _ _ _ _ _ _ _ _ _ _ _ _ (Dealer Personnel Signature) (Date) _ _ _ _ _ _ _ _ _ _ _ _ _ _ _ _ _ _ _ _ _ _ _ _ _ _ _ (Dealer Name) (Date) (Please provided a signed copy to the customer along with the Repair Order, retain the original for Dealer records)