change management user guide, release r1 - telus
TRANSCRIPT

Change Management User Guide
© 2021 TELUS Health Inc.
TELUS Health is a registered trademark of TELUS Corporation and is used under license. All other trademarks are the property of their respective owners.
Release: R1.1 V.1.1
Release Date: 23/11/2021

Proprietary NoticeCopyright © 2006-2021 TELUS Health Solutions Inc.
All rights reserved. Information provided in this publication is proprietary and confidential. No part of this publication may be distributed, reproduced, stored in a retrieval system, or transmitted, in any form or by any means (electronic, mechanical, recording, or otherwise) without the express written permission of TELUS Health Solutions Inc.
DISCLAIMER
This publication, as well as the software described in it, is furnished under license and may only be used or copied in accordance with the terms of such license. TELUS Health Solutions Inc. makes no representation or warranties with respect to the contents of this publication, and specifically disclaims any express or limited warranties which may result from misuse of the software and failure to comply with the procedures and/or operating instructions provided herein.
Furthermore, TELUS Health Solutions Inc. reserves the right to make changes to the software and any part of this publication at any time, without obligation to notify any person or entity of such changes.
REVISIONS
The information contained in this publication is subject to change without notice and does not represent a commitment on the part of TELUS Health Solutions Inc. Changes to this publication will be made, as required, to ensure that the contained data reflects the latest configuration of the software, procedures and/or operating instructions. These changes may be the result of design improvements and/or customer requests.
Every effort will be made to inform users of these changes as soon as possible, provided that the changes affect the performance and operation of the software.

Table of Contents
Table of Contents 3
Preface 4Purpose 4Audience 4Typographic conventions 4Related documentation 5
Introduction 6Icons 7Field types 7
Mandatory fields 7Text fields 8Options 8Drop-down lists 8Date fields 9
TELUS Provider ID 10WSIB Provider ID 12
Health and Non-Health Bill Submission 13eProvider Reporting 13
Accessing the Change Management application 14
Updating your provider profile 16Deactivating a provider profile 35
Updating your business profile 40Deactivating an organizational profile 62
Updating your head office profile 67Deactivating a head office profile 77
Table of Contents
ChangeManagement User Guide © 2021 TELUS Health 3

PurposeThe purpose of the Change Management User Guide is to describe how users can notify the Provider Management Group (PMG) about changes to their provider, organization, or head office profile.
AudienceThe Change Management User Guide is intended for providers, as well as representatives of organizations and head offices.
To use this application and this document, you require a basic knowledge and understanding of Windows applications and Web browsers.
Typographic conventionsThe typographic conventions used in this guide help you to identify the type of information that is presented.
Convention Use
Bold Bold text highlights items you can select in the interface, including buttons, tabs, and menu selections. It is also used to identify dialog boxes and screens.
Purple Italic Purple Italic text indicates that the text is linked to a related section of the document. When you click a link, the related text is displayed.
Italic Italic text indicates a book title.
Preface
Preface
ChangeManagement User Guide © 2021 TELUS Health 4
Related documentationYou may want to refer to the following documents for more information about associations and managing user profiles:
The Associate Head Office and Organization User Guide describes how users registered to use WSIB online billing can associate a head office to an organization, or an organization to a head office.
The Associate Provider User Guide describes how users registered to use WSIB online billing can associate existing or new providers to your organization.
The User Access & Permissions User Guide describes how administrators can use the User Access & Permissions module to manage user profiles within the Provider Portal.
Preface > Related documentation
5 © 2021 TELUS Health ChangeManagement User Guide
Within the Provider Portal there is a link to the Change Management application, which you can use to notify the Provider Management Group (PMG) about changes to your provider, organization, or head office profile. These changes are not made automatically; they are reviewed and implemented by PMG before they "go live". PMG will contact you should they need additional information or clarification.
If you are a provider, you can report changes to the following:
Name and contact information
Roles and licenses
Address and hours for your registered service location, but not your associated locations
If you represent a business, you can report changes to the following:
Business name and contact information
Providers and their roles and licenses (removal and modification only)
Business addresses and hours
Associated head office
If you represent a head office, and provide WSIB services, you can report changes to the following:
Head office name and contact information
Head office address
Associated businesses
eClaims services are used by providers and organizations only; only the WSIB supports head office registration.
After you submit your changes, you are provided with a reference number and the contact information for the PMG, should you require any additional support.
Chapter1
Introduction
ChangeManagement User Guide © 2021 TELUS Health 6

IconsThe following table describes the icons used in this application. Some of these icons are displayed as buttons that you can click to perform actions.
Icon Name Description
Add item Click to add another value to a section that allows multiple values, such as the site accessibility features.
Calendar Click to select a date from the calendar.
Delete Click to delete the adjacent item.
Help Click to display information about a field.
Mandatory Identifies mandatory fields.
Field typesThis section describes the different types of fields used in the Change Management application.
Mandatory fields
Mandatory fields are not indicated by default on the screens in the Change Management application. Mandatory fields include:
fields necessary to properly identify the requester
all fields pertaining to new provider roles
all fields pertaining to a new address when changing or adding an address.
If you move to the next step in your workflow without having populated all mandatory fields, the mandatory fields are marked with in-field exclamation marks and a highlighted message below the field.
Figure 1-1: A mandatory field
Introduction > Icons
7 © 2021 TELUS Health ChangeManagement User Guide

Text fields
You may be able to enter letters, numbers, and symbols in text fields. There may be rules associated with the amount of text you can enter or the type (for example, some text fields accept only numbers). You can click the information button, if present, to display help about a specific text field.
Figure 1-2: A text field
Options
Options are presented in groups of two or more, only one of which can be selected at a time. In some instances, changing which option is selected also changes the fields that are displayed beneath it.
Figure 1-3: Options
Drop-down lists
You can use drop-down lists to select one of a list of pre-set values.
Figure 1-4: A drop-down list
Introduction > Field types
ChangeManagement User Guide © 2021 TELUS Health 8

Date fields
You can use date fields to select a date from a calendar. When you click the calendar button, the calendar is displayed. You can use the drop-down boxes to choose which month and year are displayed, then click a date to select it.
Figure 1-5: The calendar
Introduction > Field types
9 © 2021 TELUS Health ChangeManagement User Guide

TELUS Provider IDYour TELUS and WSIB Provider IDs were supplied in your welcome package. Only the TELUS Provider ID is required to use this application.
Figure 1-6: TELUS Provider ID in the WSIB welcome package
Introduction > TELUS Provider ID
ChangeManagement User Guide © 2021 TELUS Health 10

The following image illustrates the eClaims welcome package.
Figure 1-7: TELUS Provider ID in the eClaims welcome package
If you no longer have your welcome package at hand, you can also find your TELUS Provider ID under the My Account ( ) of the provider portal.
Figure 1-8: TELUS Provider ID in the Provider Portal
Introduction > TELUS Provider ID
11 © 2021 TELUS Health ChangeManagement User Guide

WSIB Provider IDIf you offer WSIB services, then the WSIB Provider ID was assigned to you when you registered, and included in your welcome package.
Figure 1-9: The WSIB Provider ID in the Welcome Package
If you no longer have your welcome package at hand, you can also find your WSIB Provider ID within the Health and Non-Health Provider Bill Submission and eProvider Reporting applications.
Introduction > WSIB Provider ID
ChangeManagement User Guide © 2021 TELUS Health 12

Health and Non-Health Bill Submission
The WSIB Provider ID is displayed under Provider Information on the Submit Payment screen.
Figure 1-10: The WSIB Provider ID
eProvider Reporting
The WSIB Provider ID is displayed in the header of the eProvider Reporting application.
Figure 1-11: The WSIB Provider ID in eProvider Reporting
Introduction > WSIB Provider ID
13 © 2021 TELUS Health ChangeManagement User Guide
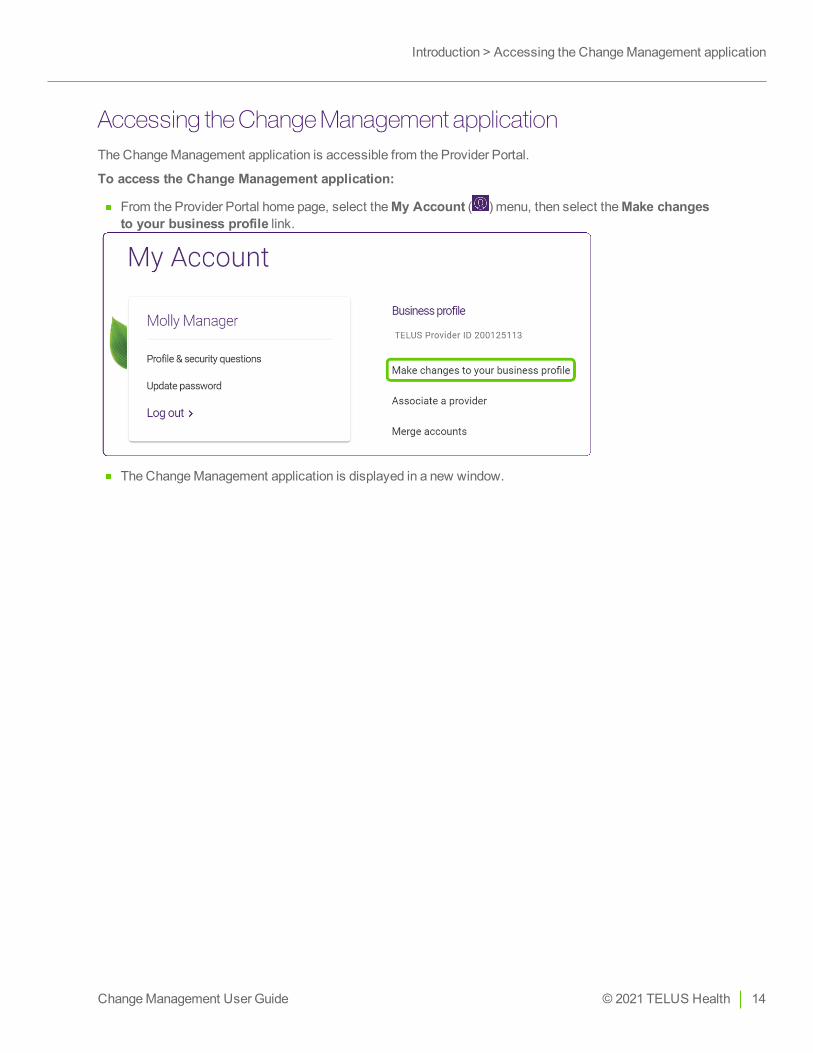
Accessing the Change Management applicationThe Change Management application is accessible from the Provider Portal.
To access the Change Management application:
From the Provider Portal home page, select the My Account ( ) menu, then select the Make changes to your business profile link.
The Change Management application is displayed in a new window.
Introduction > Accessing the ChangeManagement application
ChangeManagement User Guide © 2021 TELUS Health 14

Head offices are not supported for eClaims.
Introduction > Accessing the ChangeManagement application
15 © 2021 TELUS Health ChangeManagement User Guide

Type of change The WSIB eClaims
Update name and contact information X X
Add location(s) X
Add location(s) and business hours X
Remove location(s) X X
Update a location address X
Update a location address and its business hours X
Add additional roles to profile X X
Remove roles from profile X X
Update licenses associated with current roles X X
At the start of this process, you must identify yourself. Only authorized users are permitted to update profiles.
Chapter2
Updating your provider profileThe changes you can request vary depending on whether you provide WSIB and/or eClaims services.
ChangeManagement User Guide © 2021 TELUS Health 16

To update your provider profile
1. Launch the Change Management application as described in "Accessing the Change Management application" (page 14).
2. Within the Select your profile type section, select Independent provider.
Updating your provider profile >
17 © 2021 TELUS Health ChangeManagement User Guide

3. Within the Select the service you are registered to section, select one or both of the services.
The What do you want to do today section is displayed.
4. Within the What do you want to do today section, select the applicable check box(es).
5. Within the Effective date to apply these changes section, click the calendar button to display the calendar, then select the date that these changes were, are, or will be effective.
Updating your provider profile >
ChangeManagement User Guide © 2021 TELUS Health 18

6. Click the Next step button.
The Identification (Independent provider) screen is displayed.
As this website does not require that you log in, you will need to provide information that the PMG can use to identify you.
Enter the identifying information that is currently registered in your profile. You can update it further on in this procedure.
7. Enter your TELUS Provider ID or your WSIB Provider ID.
8. Enter your name in the First name and Last name fields.
9. Enter your email address in the Email address field.
10. Read the text associated with the two check boxes, then select them. You must agree to these statements to proceed.
Updating your provider profile >
19 © 2021 TELUS Health ChangeManagement User Guide

11. Click the Next step button.
If, in step 4, you selected the Manage my name and contact information check box, a screen of that name is displayed.
Updating your provider profile >
ChangeManagement User Guide © 2021 TELUS Health 20

12. Select Yes or No to indicate if you are reporting a change of ownership.
If you select Yes, the following message will appear. You will need to stop this process, and register as indicated below. If you are registering to provide WSIB services, then during the registration process, you can specify that the new organization is the result of a change of ownership, and identify the existing WSIB Provider ID.
If you select No, the Change my name and contact information section is displayed.
Updating your provider profile >
21 © 2021 TELUS Health ChangeManagement User Guide

13. In the change my name and contact information section:
Enter the new Provider first name, Provider middle name, Provider last name, and/or Business name.
Select one or more Service language(s).
Click the Add another language link to add additional Service language drop-down boxes, or the trash button to delete additional drop-down boxes, if you add them in error.
Note that language changes are additive i.e. newly selected languages will be added to the provider's existing list of languages. To remove a language, you must contact PMG.
Enter the new GST/HST number and/or Email address.
Updating your provider profile >
ChangeManagement User Guide © 2021 TELUS Health 22

14. Click the Next step button.
If, in step 4, you selected the Manage my address information and hours check box, a screen of that name is displayed. The tasks that you can perform vary according to which service(s) you selected earlier: eClaims and/or the WSIB.
Select the check boxes that apply.
For each check box you selected, a new section is added to the screen.
Updating your provider profile >
23 © 2021 TELUS Health ChangeManagement User Guide

15. To add location(s) for eClaims:
Navigate to the Add location(s) to eClaims section.
Enter the optional Suite, as well as the Street no (street number), Street Name, and City of the new address.
Select the Province/State, and enter the Postal/ZIP Code (optional except for Canada and the United States), Phone, and optional Ext (extension).
To add another location, click the Add another location button.
A new set of fields is added. Repeat the above bullets for the new location.
Updating your provider profile >
ChangeManagement User Guide © 2021 TELUS Health 24

16. To add a location and business hours for the WSIB:
Navigate to the Add location(s) to WSIB section.
Select the Country, enter the optional Suite, as well as the Street no (street number), Street Name, and City of the new address.
Select the Province/State, enter the Postal/ZIP Code (optional except for Canada and the United States) and enter the optional Fax number.
Enter the Phone, and optional Ext (extension), then select the Type of address.
Each location can only have one service address and one mailing address.
In the Additional service address information section, for each day of the week, select or enter the Open and Closed times.
Updating your provider profile >
25 © 2021 TELUS Health ChangeManagement User Guide

In the Site accessibility features section, optionally click the Choose features link to display the pop-up window of the same name. Select the check boxes to the left of the applicable features, or select the check box to the left of a section to select all features within it, then click the Done button.
Note that site accessibility feature changes are additive, i.e. newly selected features will be added to the provider's existing list of features. To remove a feature, you must contact PMG.
To add another location, click the Add another location button.
A new set of fields is added. Repeat the above bullets for the new location.
Updating your provider profile >
ChangeManagement User Guide © 2021 TELUS Health 26

17. To remove a location:
Navigate to the Remove location(s) from WSIB or Remove location(s) from eClaims section. These sections are the same for both services, except for the label, which specifies WSIB or eClaims.
Select the Country, enter the optional Suite, as well as the Street no (street number), Street Name, and City of the address to be removed.
Select the Province/State and enter the Postal/ZIP Code (optional except for Canada and the United States).
To remove another location, click the Remove another location button. A new set of fields is added. Repeat the above bullets for the new location.
Updating your provider profile >
27 © 2021 TELUS Health ChangeManagement User Guide

18. To change a location address for eClaims:
Navigate to the Change a location address for eClaims section.
Within the From section, identify the address that is currently registered within the profile. Enter the optional Suite, as well as the Street No (street number), Street name, and City. Select the Province/State, and enter the Postal Code, Phone, and optional Ext (extension).
Within the To section, identify the new address. Enter the optional Suite, as well as the Street No (street number), Street name, and City. Select the Province/State, and enter the Postal Code, Phone, and optional Ext (extension).
To change another location, click the Change another location button. A new set of fields is added. Repeat the above bullets for the new location.
Updating your provider profile >
ChangeManagement User Guide © 2021 TELUS Health 28

19. To change a location address and business hours for the WSIB:
Navigate to the Change a location address for WSIB section.
Updating your provider profile >
29 © 2021 TELUS Health ChangeManagement User Guide

Within the From section, identify the address that is currently registered within the profile. Select the Country, enter the optional Suite, as well as the Street No (street number), Street name, and City. Select the Province/State, enter the Postal/ZIP Code (optional except for Canada and the United States), and enter the optional Fax number, the mandatory Phone, and the optional Ext (extension).
Within the To section, identify the new address. Select the Country, enter the optional Suite, as well as the Street No (street number), Street name, and City. Select the Province/State, enter the Postal/ZIP Code (optional except for Canada and the United States), and enter the optional Fax number, the mandatory Phone, and the optional Ext (extension).
Select the Type of address: Service or Mailing.
In the Additional service address information section, for each day of the week, select or enter the Open and Closed times.
In the Site accessibility features section, optionally click the Choose features link to display the pop-up window of the same name. Select the check boxes to the left of the applicable features, then click the Done button.
To change another location, click the Change another location button. A new set of fields is added. Repeat the above bullets for the new location.
20. Click the Next step button.
If, in step 4, you selected the Manage my provider role(s) option, a screen of that name is displayed. Select one or more of the check boxes.
For each check box you selected, a new section is added to the screen.
If you cannot find your role in the drop-down, select Misc. Practitioner and enter your role in the Role Description field once it appears.
Updating your provider profile >
ChangeManagement User Guide © 2021 TELUS Health 30

21. To add a role:
Navigate to the Add new role(s) section.
Select the Role,Country and Province/State
Select the License issuer (if applicable).
Enter the License number (if applicable).
Click the calendar button to display the calendar, then select the License Date (if applicable).
To add more than one role, click the Add another role button. A new set of fields is added. Repeat the above bullets for the new role.
22. To remove a current role:
Navigate to the Remove current role(s) section.
Select the Country, Province/State, Role of the role to be removed.
Select the License issuer (if applicable) of the role to be removed.
Enter the License number (if applicable).
Click the calendar button to display the calendar, then select the License Date (if applicable).
To remove more than one role, click the Remove another current role. A new set of fields is added. Repeat the above bullets for the new role.
Updating your provider profile >
31 © 2021 TELUS Health ChangeManagement User Guide
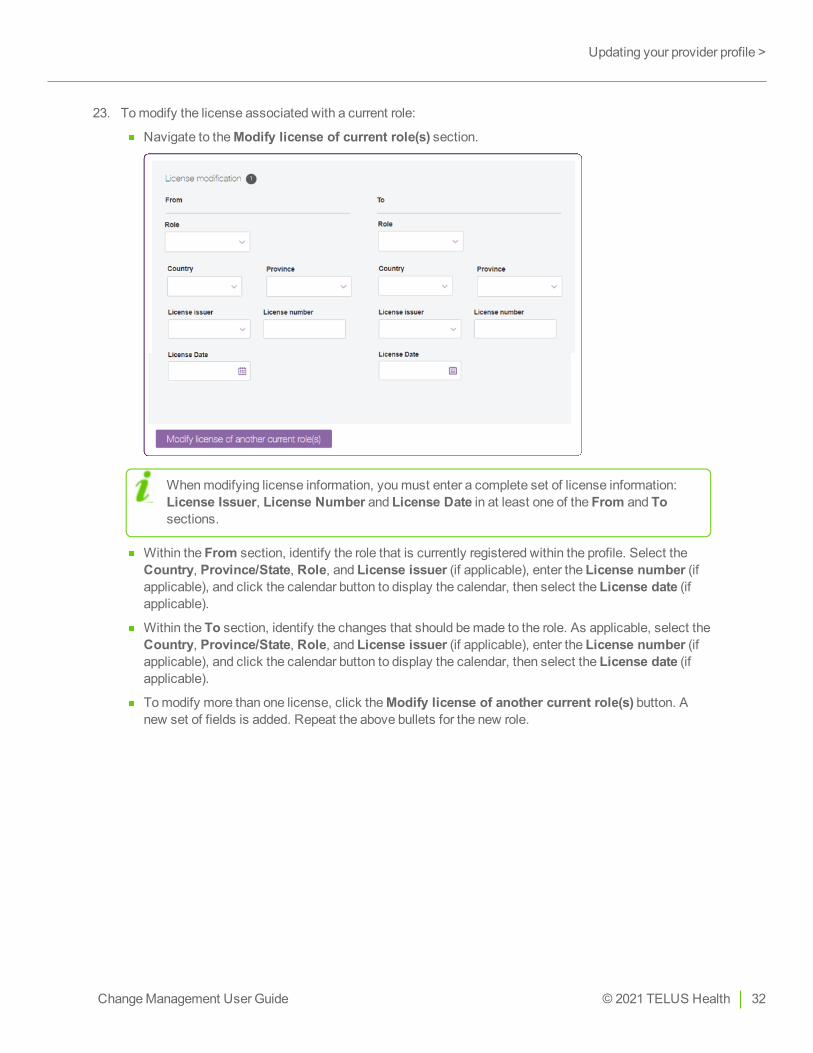
23. To modify the license associated with a current role:
Navigate to the Modify license of current role(s) section.
When modifying license information, you must enter a complete set of license information: License Issuer, License Number and License Date in at least one of the From and To sections.
Within the From section, identify the role that is currently registered within the profile. Select the Country, Province/State, Role, and License issuer (if applicable), enter the License number (if applicable), and click the calendar button to display the calendar, then select the License date (if applicable).
Within the To section, identify the changes that should be made to the role. As applicable, select the Country, Province/State, Role, and License issuer (if applicable), enter the License number (if applicable), and click the calendar button to display the calendar, then select the License date (if applicable).
To modify more than one license, click the Modify license of another current role(s) button. A new set of fields is added. Repeat the above bullets for the new role.
Updating your provider profile >
ChangeManagement User Guide © 2021 TELUS Health 32

24. Click the Next step button.
The Review my information screen is displayed. Its contents vary according to the type of information you changed.
Updating your provider profile >
33 © 2021 TELUS Health ChangeManagement User Guide

25. Click the Confirm and Send button.
The Confirmation screen is displayed. Click the Print button to print this page or record your confirmation reference number.
Your request is submitted to the PMG where it is reviewed and added to the TELUS Provider Registry (TPR) system. If any issues arise during this review, the PMG will contact you directly.
Updating your provider profile >
ChangeManagement User Guide © 2021 TELUS Health 34

Deactivating a provider profileYou can use the Change Management application to notify the PMG that you want to deactivate your provider profile.
To deactivate a provider profile
1. Launch the Change Management application as described in "Accessing the Change Management application" (page 14).
2. Within the Select your profile type section, select Independent provider.
3. Within the Select the service you are registered to section, select one or both of the services.
Updating your provider profile > Deactivating a provider profile
35 © 2021 TELUS Health ChangeManagement User Guide

4. Within the What do you want to do today section, select the Deactivate my profile(s) check box.
5. Within the Effective date to apply these changes section, click the calendar button to display the calendar, then select the date that these changes were, are, or will be effective.
Updating your provider profile > Deactivating a provider profile
ChangeManagement User Guide © 2021 TELUS Health 36

6. Click the Next step button.
The Identification (Independent provider) screen is displayed.
As this website does not require that you log in, you will need to provide information that the PMG can use to identify you.
7. Enter your TELUS Provider ID or your WSIB provider ID.
Updating your provider profile > Deactivating a provider profile
37 © 2021 TELUS Health ChangeManagement User Guide
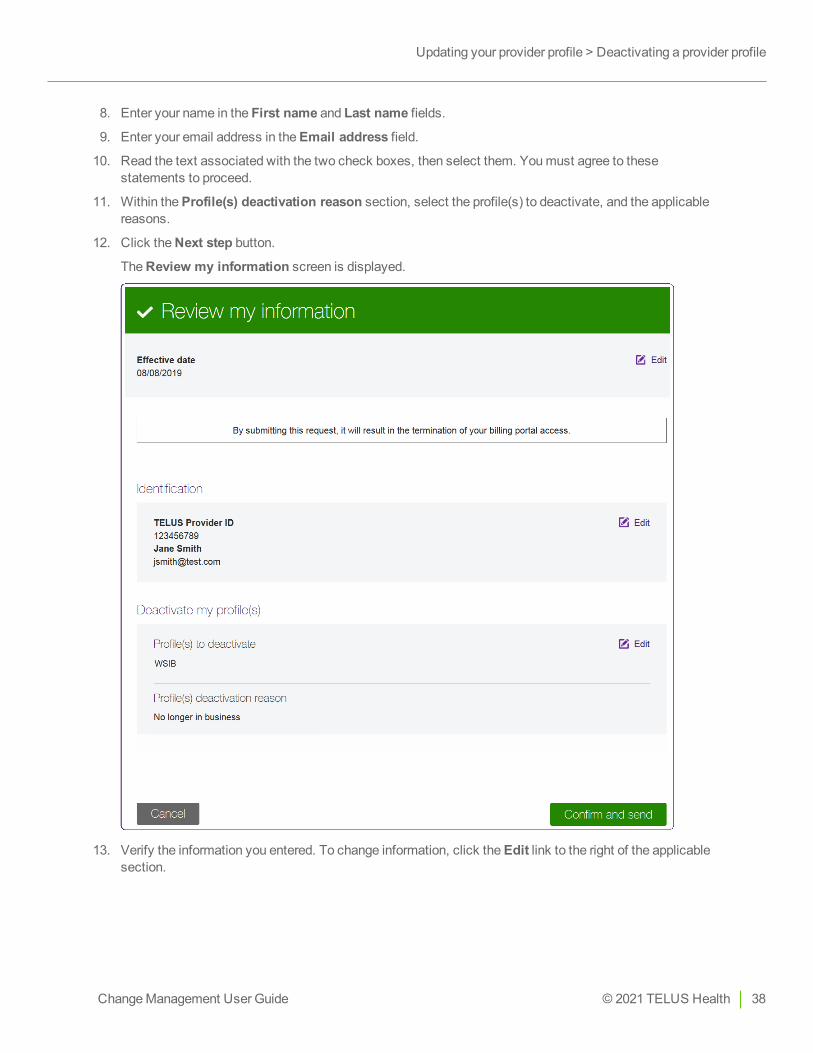
8. Enter your name in the First name and Last name fields.
9. Enter your email address in the Email address field.
10. Read the text associated with the two check boxes, then select them. You must agree to these statements to proceed.
11. Within the Profile(s) deactivation reason section, select the profile(s) to deactivate, and the applicable reasons.
12. Click the Next step button.
The Review my information screen is displayed.
13. Verify the information you entered. To change information, click the Edit link to the right of the applicable section.
Updating your provider profile > Deactivating a provider profile
ChangeManagement User Guide © 2021 TELUS Health 38

14. Click the Confirm and send button.
The Confirmation screen is displayed. Click the Print button to print this page or record your confirmation reference number.
Your request is submitted to the PMG where it is reviewed and added to the TELUS Provider Registry (TPR) system. If any issues arise during this review, the PMG will contact you directly.
Updating your provider profile > Deactivating a provider profile
39 © 2021 TELUS Health ChangeManagement User Guide
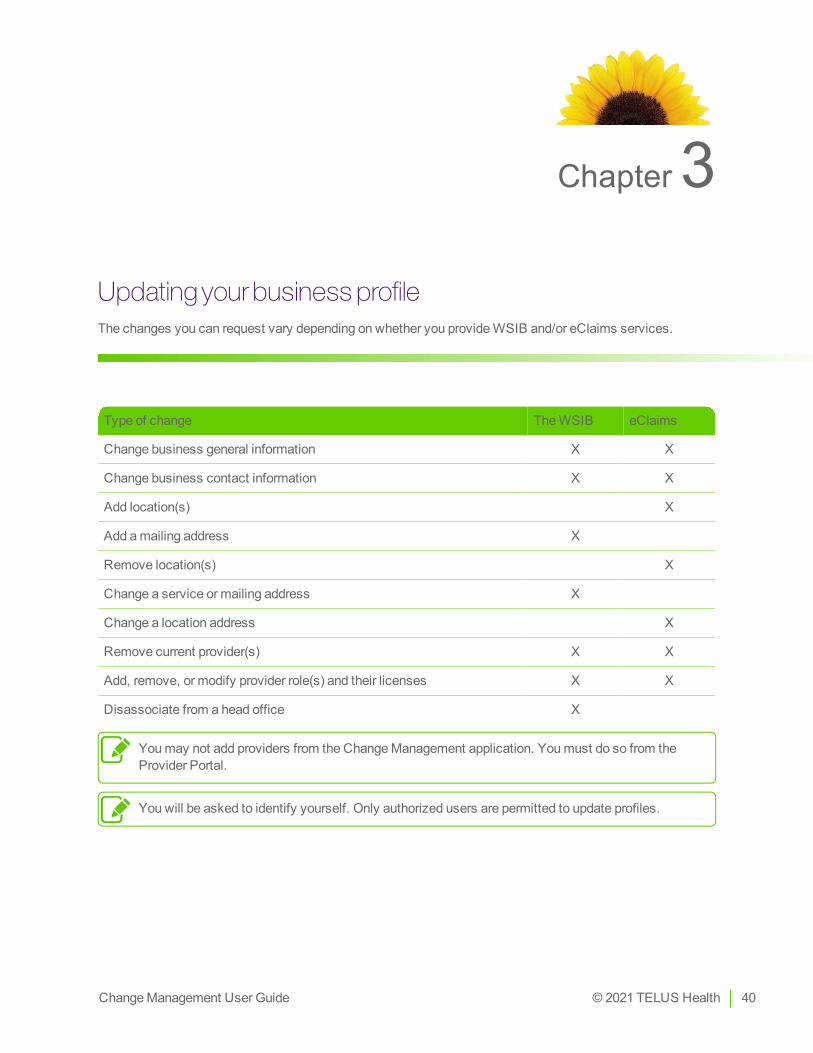
Type of change The WSIB eClaims
Change business general information X X
Change business contact information X X
Add location(s) X
Add a mailing address X
Remove location(s) X
Change a service or mailing address X
Change a location address X
Remove current provider(s) X X
Add, remove, or modify provider role(s) and their licenses X X
Disassociate from a head office X
You may not add providers from the Change Management application. You must do so from the Provider Portal.
You will be asked to identify yourself. Only authorized users are permitted to update profiles.
Chapter3
Updating your business profileThe changes you can request vary depending on whether you provide WSIB and/or eClaims services.
ChangeManagement User Guide © 2021 TELUS Health 40

To update your business profile
1. Launch the Change Management application as described in "Accessing the Change Management application" (page 14).
2. Within the Select your profile type section, select Business or clinic.
Updating your business profile >
41 © 2021 TELUS Health ChangeManagement User Guide

3. Within the Select the service you are registered to section, select one or both of the services.
4. Within the What do you want to do today section, select the applicable management option(s).
5. Within the Effective date to apply these changes section, click the calendar button to display the calendar, then select the date that these changes were, are, or will be effective.
Updating your business profile >
ChangeManagement User Guide © 2021 TELUS Health 42

6. Click the Next step button.
The Identification (Business or Clinic) screen is displayed.
As this website does not require that you log in, you will need to provide information that the PMG can use to identify you. Enter the identifying information that is currently registered in your profile. You can update it further on in this procedure.
7. Enter your TELUS Provider ID or your WSIB Provider ID.
8. Enter your business' name in the Business Name field.
9. In the Contact information section, enter your name in the First name and Last name fields.
Updating your business profile >
43 © 2021 TELUS Health ChangeManagement User Guide

10. Enter your email address in the Email address field.
11. Read the text associated with the three check boxes, then select them. You must agree to these statements to proceed.
12. Click the Next step button to proceed.
If, in step 4, you selected the Manage business name and contact information check box, a screen of that name is displayed.
13. Indicate if an ownership change has occurred, and select one or both of the check boxes.
If you select Yes, the following message will appear. You will need to stop this process, and register as indicated below.
14. In the What do you want to do section, select one or both of the check boxes.
Updating your business profile >
ChangeManagement User Guide © 2021 TELUS Health 44

15. To change the general information:
Navigate to the Change business general information section.
Enter the Business operating name, GST/HST number, and Email address.
16. To change the contact information:
Navigate to the Change business contact information section:
Within the From section, identify the contact that is currently registered within the profile. Enter the First name and Last name, and select the Contact role. The possible options are Manager/Office Admin and Owner.
Within the To section, identify the new contact. Enter the First name and Last name, and select the Contact role.
17. Click the Next step button.
Updating your business profile >
45 © 2021 TELUS Health ChangeManagement User Guide

18. If you selected Manage business address information and hours in step 4, a section of the same name is added to the screen. The tasks that you can perform vary according to which service(s) you selected earlier: eClaims and/or the WSIB.
Select the appropriate option(s). The section(s) you need to use to complete the above tasks are added to the screen.
Updating your business profile >
ChangeManagement User Guide © 2021 TELUS Health 46
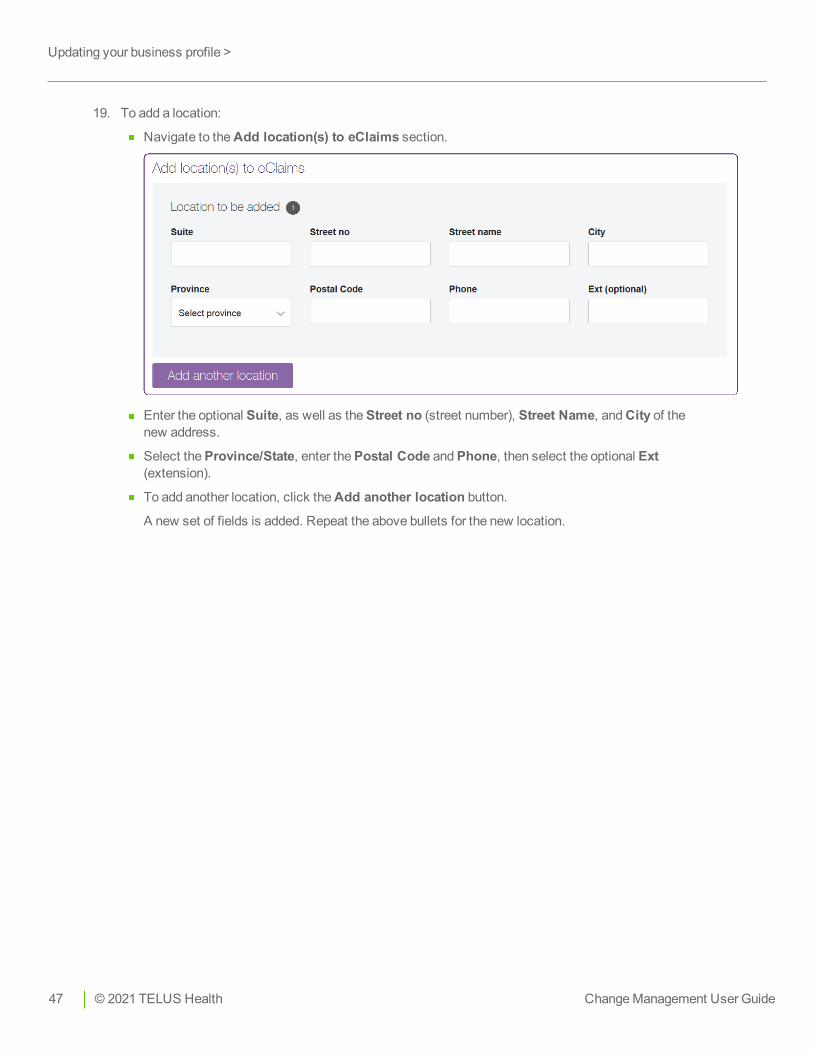
19. To add a location:
Navigate to the Add location(s) to eClaims section.
Enter the optional Suite, as well as the Street no (street number), Street Name, and City of the new address.
Select the Province/State, enter the Postal Code and Phone, then select the optional Ext (extension).
To add another location, click the Add another location button.
A new set of fields is added. Repeat the above bullets for the new location.
Updating your business profile >
47 © 2021 TELUS Health ChangeManagement User Guide

20. To remove a location:
Navigate to the Remove location(s) from eClaims section.
Enter the optional Suite, as well as the Street no (street number), Street name, and City of the address to be removed.
Select the Province/State, enter the Postal Code and Phone, then select the optional Ext (extension).
To remove another location, click the Remove another location button.
A new set of fields is added. Repeat the above bullets for the new location.
Updating your business profile >
ChangeManagement User Guide © 2021 TELUS Health 48

21. To change a location address:
Navigate to the Change a location address for eClaims section.
Within the From section, identify the address that is currently registered within the profile. Enter the optional Suite, as well as the Street no (street number), Street name, and City. Select the Province/State, enter the Postal Code and Phone, and the optional Ext (extension).
Within the To section, identify the new address. Enter the optional Suite, as well as the Street no (street number), Street name, and City. Select the Province/State, enter the Postal Code and Phone, and the optional Ext (extension).
To change another location, click the Change another location button, then repeat the above bullets for the new set of fields.
Updating your business profile >
49 © 2021 TELUS Health ChangeManagement User Guide
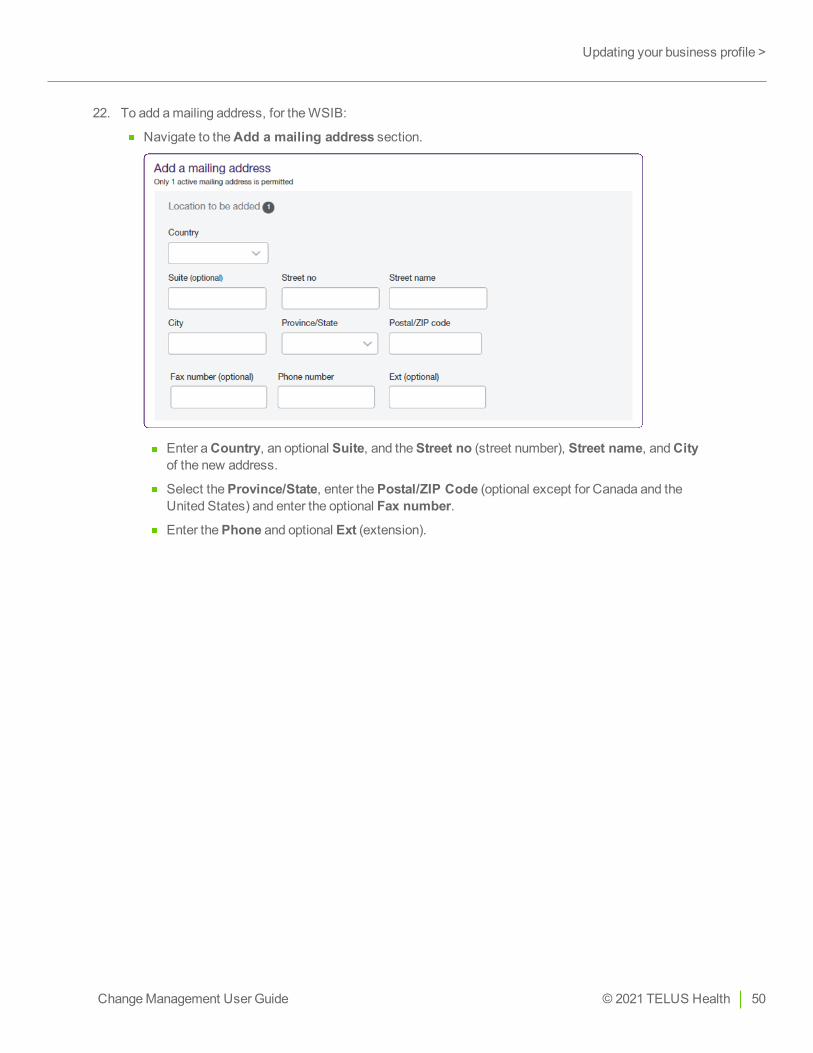
22. To add a mailing address, for the WSIB:
Navigate to the Add a mailing address section.
Enter a Country, an optional Suite, and the Street no (street number), Street name, and City of the new address.
Select the Province/State, enter the Postal/ZIP Code (optional except for Canada and the United States) and enter the optional Fax number.
Enter the Phone and optional Ext (extension).
Updating your business profile >
ChangeManagement User Guide © 2021 TELUS Health 50

23. To change a service or mailing address, for the WSIB:
Navigate to the Change a service or mailing address section.
Updating your business profile >
51 © 2021 TELUS Health ChangeManagement User Guide

Within the From section, identify the address that is currently registered within the profile. Select the Country, enter the optional Suite, as well as the Street no (street number), Street name, and City. Select the Province/State, enter the Postal/Zip Code (optional except for Canada and the United States), enter the optional Fax number, the Phone, and the optional Ext (extension). Select the appropriate Type of address.
Within the To section, identify the new address. Select the Country, enter the optional Suite, as well as the Street no (street number), Street name, and City. Select the Province/State, enter the Postal/Zip Code (optional except for Canada and the United States), enter the optional Fax number, the Phone, and the optional Ext (extension).
If you changed the Type of address from Service to Mailing in the second bullet above, the Additional service address information and Site accessibility features sections are hidden. Proceed to the next step.
In the Additional service address information section, for each day of the week, select or enter the Open and Closed times.
In the Site accessibility features section, optionally click the Choose features link to display the pop-up window of the same name. Select the check boxes to the left of the applicable features, or select the check box to the left of a section to select all features within it, then click the Done button.
24. Click the Next step button.
Updating your business profile >
ChangeManagement User Guide © 2021 TELUS Health 52

25. If, in step 4, you selected the Modify or remove providers and their roles for WSIB option, a screen of that name is displayed.
You can only remove providers from your business if at least one provider is still associated.
Select the appropriate option(s). The section(s) you need to use to complete the above tasks are added to the screen.
26. To remove current provider(s):
Navigate to the Remove current provider(s) section.
Enter the First name and Last name of the provider to be removed.
To remove additional providers, click the Remove another current provider button, then repeat the above bullet for the new set of fields that is added.
Updating your business profile >
53 © 2021 TELUS Health ChangeManagement User Guide

27. To modify existing provider(s):
Navigate to the Modify existing provider(s) section.
Select one of the following options from the drop-down list to the right of the Provider to be changed label:
Add new role(s)
Remove current role(s)
Modify license of current role(s) (if applicable)
Modify associate provider details
If you cannot find your role in the drop-down, select Misc. Practitioner and enter your role in the Role Description field once it appears.
Updating your business profile >
ChangeManagement User Guide © 2021 TELUS Health 54

If you selected to add a new role, the following fields are displayed:
Enter the First name and Last name of the provider whose role will be changed.
Select the Country,Province/State, Role, and License issuer of the new role, enter its License number, and select its License Date.
Updating your business profile >
55 © 2021 TELUS Health ChangeManagement User Guide

If you selected to remove the current role, the following fields are displayed:
Enter the First name and Last name of the provider whose role will be removed.
Select the Country, Province/State, Role, and License issuer of the role to be removed, enter its License number, and select its License Date
Updating your business profile >
ChangeManagement User Guide © 2021 TELUS Health 56

If you selected to modify the license of a current role, the following fields are displayed:
When modifying license information, you must enter a complete set of license information: License Issuer, License Number and License Date in at least one of the From and To sections.
Enter the provider's First name and Last name.
In the From section, identify the license to be modified. Select the Country, Province/State, Role, and License issuer (if applicable). Enter the License number (if applicable), and click the calendar button to select the License date (if applicable).
In the To section, identify the new license information. Select the Country,Province/State, Role, and License issuer (if applicable). Enter the License number (if applicable), and click the calendar button to select the License date (if applicable).
Updating your business profile >
57 © 2021 TELUS Health ChangeManagement User Guide

If you selected to modify associate provider details, the following fields are displayed:
In the From section, identify the provider details to be modified:
Select the Provider title.
Enter the Provider first name, Provider middle name, and Provider last name.
Select the Service language. Click the Add another language link to add additional languages.
Note that language changes are additive i.e. newly selected languages will be added to the provider's existing list of languages. To remove a language, you must contact the PMG.
In the To section, identify the new provider details:
Select the Provider title.
Enter the Provider first name, Provider middle name, and Provider last name.
Select the Service language. Click the Add another language link to add additional languages.
28. To modify another provider, click the Modify another existing provider button and repeat the previous step as needed.
29. Click the Next step button.
Updating your business profile >
ChangeManagement User Guide © 2021 TELUS Health 58

30. If in step 4, you selected the Disassociate from a head office option, a screen of that name is displayed.
This option is only available if you are registered for WSIB services.
In the Head office name field, enter the name of the head office to disassociate from the business.
Updating your business profile >
59 © 2021 TELUS Health ChangeManagement User Guide

31. Click the Next step button.
The Review my information screen is displayed. Its contents vary according to the information you changed.
32. Verify the information you entered. To change information, click the Edit link to the right of the applicable section.
Updating your business profile >
ChangeManagement User Guide © 2021 TELUS Health 60
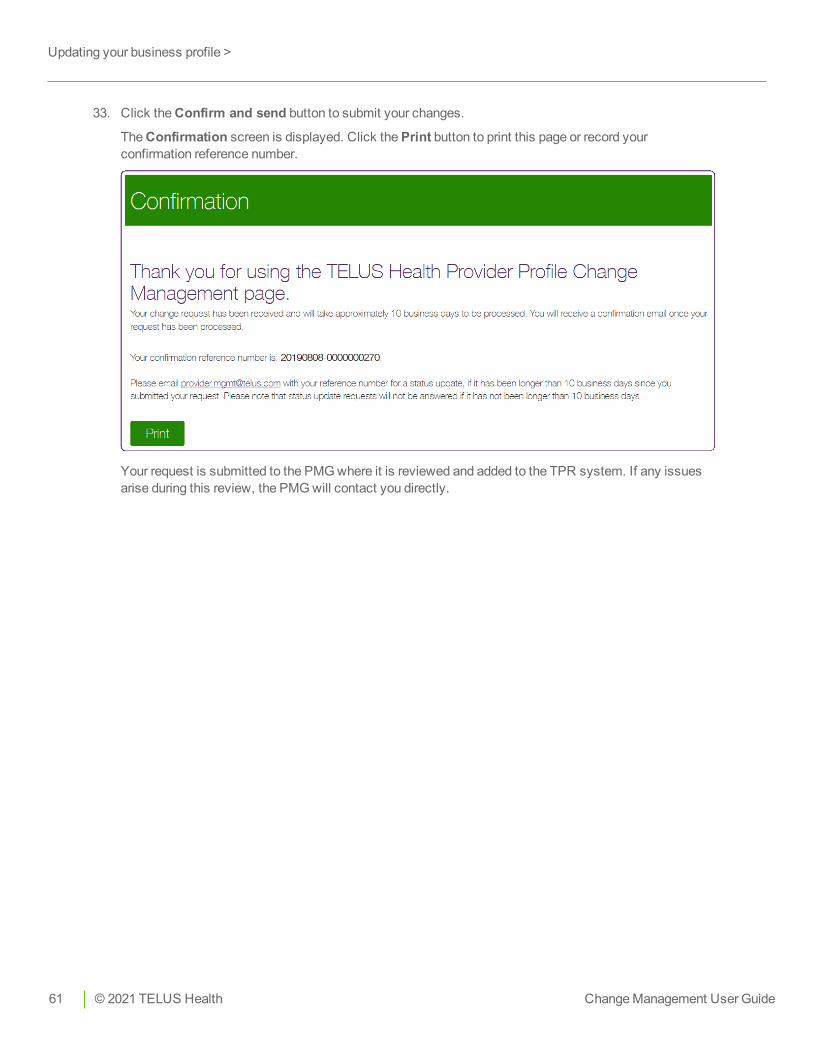
33. Click the Confirm and send button to submit your changes.
The Confirmation screen is displayed. Click the Print button to print this page or record your confirmation reference number.
Your request is submitted to the PMG where it is reviewed and added to the TPR system. If any issues arise during this review, the PMG will contact you directly.
Updating your business profile >
61 © 2021 TELUS Health ChangeManagement User Guide

Deactivating an organizational profileYou can use Change Management application to notify the PMG that you want to deactivate your organization profile.
To deactivate an organization profile
1. Launch the Change Management application as described in "Accessing the Change Management application" (page 14).
2. Within the Select your profile type section, select Business or clinic.
3. Within the Select the service you are registered to section, select one or both of the services.
Updating your business profile > Deactivating an organizational profile
ChangeManagement User Guide © 2021 TELUS Health 62

4. Within the What do you want to do today section, select the Deactivate my profile(s) check box.
5. Within the Effective date to apply these changes section, click the calendar button to display the calendar, then select the date that these changes were, are, or will be effective.
Updating your business profile > Deactivating an organizational profile
63 © 2021 TELUS Health ChangeManagement User Guide

6. Click the Next step button.
The Identification (Business or Clinic) screen is displayed.
As this website does not require that you log in, you will need to provide information that the PMG can use to identify you.
7. Enter your TELUS Provider ID or your WSIB Provider ID.
8. Enter your organization's name in the Business Name field.
9. Enter your information in the First name, Last name, and Email address fields.
Updating your business profile > Deactivating an organizational profile
ChangeManagement User Guide © 2021 TELUS Health 64

10. Read the text associated with the three check boxes, then select them. You must agree to these statements to proceed.
11. Within the Profile(s) deactivation reason section, select the profile(s) to deactivate, and the applicable reasons.
12. Click the Next step button.
The Review my information screen is displayed.
13. Verify the information you entered. To change information, click the Edit link to the right of the applicable section.
Updating your business profile > Deactivating an organizational profile
65 © 2021 TELUS Health ChangeManagement User Guide

14. Click the Confirm and send button.
The Confirmation screen is displayed. Click the Print button to print this page or record your confirmation reference number.
Your request is submitted to the PMG where it is reviewed and added to the TPR system. If any issues arise during this review, the PMG will contact you directly.
Updating your business profile > Deactivating an organizational profile
ChangeManagement User Guide © 2021 TELUS Health 66

Your head office's name and contact information
Your head office's mailing address
The head office's users
The businesses associated with the head office
Head office registration is not supported for eClaims services.
At the start of this process, you must identify yourself. Only authorized users are permitted to update profiles.
Chapter4
Updating your head office profileAs a representative of a head office that provides WSIB services, you can request changes to the following:
ChangeManagement User Guide © 2021 TELUS Health 67

To update your head office profile
1. Launch the Change Management application as described in "Accessing the Change Management application" (page 14).
2. Within the Select your profile type section, select Head office.
Updating your head office profile >
68 © 2021 TELUS Health ChangeManagement User Guide

3. Within the Select the service you are registered to section, select WSIB.
The eClaims option is disabled, as head offices are not supported for eClaims services.
4. Within the What do you want to do today section, select the applicable option(s).
5. Within the Effective date to apply these changes section, click the calendar button to display the calendar, then select the date that these changes were, are, or will be effective.
Updating your head office profile >
ChangeManagement User Guide © 2021 TELUS Health 69

6. Click the Next step button.
The Identification (Head office) screen is displayed.
As this website does not require you to log in, you will need to provide information that the PMG can use to identify you.
Enter the identifying information that is currently registered in your profile. You can update it further on in this procedure.
7. Enter your TELUS Provider ID or your WSIB Provider ID.
8. Enter the name of the head office information in the Head Office Name field.
Updating your head office profile >
70 © 2021 TELUS Health ChangeManagement User Guide

9. Enter your information in the First name, Last name, and, Email address fields.
10. Read the text associated with the three check boxes, then select them. You must agree to these statements to proceed.
11. Click the Next step button.
12. If, in step 4, you selected the Manage head office name and contact information option, a screen of that name is displayed. Select one or both of the check boxes.
For each check box you selected, a new section is added to the screen.
13. To change the general information:
Navigate to the Change head office general information section.
Enter the new Head Office name and Email address.
Updating your head office profile >
ChangeManagement User Guide © 2021 TELUS Health 71

14. To change the contact information:
Navigate to the Change head office contact information section.
Within the From section, identify the contact that is currently registered. Enter the First name and Last name, and select the Contact role.
Within the To section, identify the new contact. Enter the First name and Last name, and select the Contact role: Manager/Office Admin or Owner.
15. Click the Next step button.
Updating your head office profile >
72 © 2021 TELUS Health ChangeManagement User Guide

16. If, in step 4, you selected the Manage head office address information option, the Manage head office mailing address screen is displayed.
17. Within the From section, identify the address that is currently registered within the profile. Select the Country, enter the optional Suite, as well as the Street no (street number), Street name, and City. Select the Province/State, enter the Postal/ZIP Code (optional except for Canada and the United States), enter the optional Fax number, the Phone, and the optional Ext (extension).
18. Within the To section, identify the new address. Select the Country, enter the optional Suite, as well as the Street no (street number), Street name, and City. Select the Province/State, enter the Postal/ZIP Code, enter the optional Fax number, the Phone, and the optional Ext (extension).
19. Click Next step.
Updating your head office profile >
ChangeManagement User Guide © 2021 TELUS Health 73

20. If, in step 4, you selected the Disassociate from a business option, a screen of that name is displayed.
You can only disassociate a business from your head office if at least one business is still associated. A head office must have at least one business associated with it.
Identify the business you want to disassociate from the head office. Enter the Business name, select the Country, Suite, Street no (street number), Street name, and City. Select the Province/State, enter the Postal/ZIP Code, and select the Country.
Updating your head office profile >
74 © 2021 TELUS Health ChangeManagement User Guide

21. Click the Next step button.
The Review my information screen is displayed. Its contents vary according to which information you changed.
22. Verify the information you entered. To change information, click the Edit link to the right of the applicable section.
Updating your head office profile >
ChangeManagement User Guide © 2021 TELUS Health 75

23. Click the Confirm and send button to submit your changes.
The Confirmation screen is displayed. Click the Print button to print this page or record your confirmation reference number.
Your request is submitted to the PMG where it is reviewed by someone on that team and added to the TPR system. If any issues arise during this review, the PMG will contact you directly.
Updating your head office profile >
76 © 2021 TELUS Health ChangeManagement User Guide

Deactivating a head office profileAs a representative of a head office that provides WSIB services, you can use Change Management application to notify the PMG that you want to deactivate your head office profile.
Head office registration--and deactivation--is not supported for eClaims services.
To deactivate a head office profile
1. Launch the Change Management application as described in "Accessing the Change Management application" (page 14).
2. Within the Select your profile type section, select Head office.
3. Within the Select the service you are registered to section, select WSIB.
Updating your head office profile > Deactivating a head office profile
ChangeManagement User Guide © 2021 TELUS Health 77

4. Within the What do you want to do today section, select the Deactivate my profile(s) check box.
5. Within the Effective date to apply these changes section, click the calendar button to display the calendar, then select the date that these changes were, are, or will be effective.
Updating your head office profile > Deactivating a head office profile
78 © 2021 TELUS Health ChangeManagement User Guide

6. Click the Next step button.
The Identification (Head office) screen is displayed.
As this website does not require that you log in, you will need to provide information that the PMG can use to identify you.
7. Enter your TELUS Provider ID and/or your WSIB provider ID.
8. Enter your Head Office Name.
9. Enter your First name and Last name, and Email address.
Updating your head office profile > Deactivating a head office profile
ChangeManagement User Guide © 2021 TELUS Health 79

10. Read the text associated with the three check boxes, then select them. You must agree to these statements to proceed.
11. In the Profile(s) deactivation reason section, select the applicable profile and reason.
12. Click the Next step button.
The Review my information screen is displayed.
13. Verify the information you entered. To change information, click the Edit link to the right of the applicable section.
Updating your head office profile > Deactivating a head office profile
80 © 2021 TELUS Health ChangeManagement User Guide

14. Click the Confirm and send button to submit your changes.
The Confirmation screen is displayed. Click the Print button to print this page or record your confirmation reference number.
Your request is submitted to the PMG where it is reviewed by someone on that team and added to the TPR system. If any issues arise during this review, the PMG will contact you directly.
Updating your head office profile > Deactivating a head office profile
ChangeManagement User Guide © 2021 TELUS Health 81

© 2021 TELUS
TELUS is a registered trademark of TELUS Corporation and is used under license. All other trademarks are the property of their respective owners.