changeman ssm 8.3.4 installation guide · installation guide 9 welcome to changeman ssm this...
TRANSCRIPT

SERENA
ChangeMan SSM 8.4Installation Guide
Serena Proprietary and Confidential Information

Copyright © 2001-2013 Serena Software, Inc. All rights reserved.This document, as well as the software described in it, is furnished under license and may be used or copied only in accordance with the terms of such license. Except as permitted by such license, no part of this publication may be reproduced, photocopied, stored in a retrieval system, or transmitted, in any form or by any means, electronic, mechanical, recording, or otherwise, without the prior written permission of Serena. Any reproduction of such software product user documentation, regardless of whether the documentation is reproduced in whole or in part, must be accompanied by this copyright statement in its entirety, without modification.This document contains proprietary and confidential information, and no reproduction or dissemination of any information contained herein is allowed without the express permission of Serena Software.The content of this document is furnished for informational use only, is subject to change without notice, and should not be construed as a commitment by Serena. Serena assumes no responsibility or liability for any errors or inaccuracies that may appear in this document.
TrademarksSerena, TeamTrack, StarTool, PVCS, Comparex, Dimensions, Prototype Composer, Mariner and ChangeMan are registered trademarks of Serena Software, Inc. The Serena logo, Version Manager and Mover are trademarks of Serena Software, Inc. All other products or company names are used for identification purposes only, and may be trademarks of their respective owners.
U.S. Government RightsAny Software product acquired by Licensee under this Agreement for or on behalf of the U.S. Government, its agencies and instrumentalities is "commercial software" as defined by the FAR. Use, duplication, and disclosure by the U.S. Government is subject to the restrictions set forth in the license under which the Software was acquired. The manufacturer is Serena Software, Inc., 1850 Gateway Drive, 4th Floor, San Mateo California, 94404-4061.
Publication date: October 2013
Contents
Welcome to ChangeMan SSM . . . . . . . . . . . . . 9Manual Organization . . . . . . . . . . . . . . . . . . . . . . . . . . . . 10How to Use This Book . . . . . . . . . . . . . . . . . . . . . . . . . . . 11
The Installation Process . . . . . . . . . . . . . . . . . . . . . . 11Post-Installation Verification . . . . . . . . . . . . . . . . . . . 11
Documentation . . . . . . . . . . . . . . . . . . . . . . . . . . . . . . . . 12Using the PDF Documentation . . . . . . . . . . . . . . . . . . 13
Online Help . . . . . . . . . . . . . . . . . . . . . . . . . . . . . . . . . . 14
Chapter 1 Introduction . . . . . . . . . . . . . . . . . . . . . . . . 15Overview . . . . . . . . . . . . . . . . . . . . . . . . . . . . . . . . . . . . 16Fingerprinting Technology . . . . . . . . . . . . . . . . . . . . . . . . 16Change Tracking Component . . . . . . . . . . . . . . . . . . . . . . 17
Batch Interval Change Tracking (BICT) . . . . . . . . . . . 18Real Time Change Tracking (RTCT) . . . . . . . . . . . . . 19Sysplex Support. . . . . . . . . . . . . . . . . . . . . . . . . . . . 21Member Level Security . . . . . . . . . . . . . . . . . . . . . . 21Member Reference Tracking . . . . . . . . . . . . . . . . . . 22
Detection and Synchronization Component . . . . . . . . . . . . 25Functions for HFS Files . . . . . . . . . . . . . . . . . . . . . . . 26
Data Extraction Component . . . . . . . . . . . . . . . . . . . . . . . 26Uses of ChangeMan SSM . . . . . . . . . . . . . . . . . . . . . . . . 27
Change Tracking Component . . . . . . . . . . . . . . . . . . 28Detection and Synchronization Component . . . . . . . . 28Data Extraction Component. . . . . . . . . . . . . . . . . . . . 29
Chapter 2 Installation Requirements . . . . . . . . . . . . . . . 31Mainframe Requirements . . . . . . . . . . . . . . . . . . . . . . . . 32Memory . . . . . . . . . . . . . . . . . . . . . . . . . . . . . . . . . . . . . 32Auxiliary Storage . . . . . . . . . . . . . . . . . . . . . . . . . . . 33
Change Tracking Data Sets . . . . . . . . . . . . . . . . . . . . 33
Installation Guide 3

Contents
Compatibility With Other Serena Products . . . . . . . . . . . . . 35
Chapter 3 Installation Considerations . . . . . . . . . . . . . . 37Installation Methods. . . . . . . . . . . . . . . . . . . . . . . . . . . . . 38Upgrading ChangeMan SSM . . . . . . . . . . . . . . . . . . . . . . . 38
Licensing . . . . . . . . . . . . . . . . . . . . . . . . . . . . . . . . . 38SER10TY Licensing Process . . . . . . . . . . . . . . . . . . . . . . . . 39Serena Libraries and LINKLIST . . . . . . . . . . . . . . . . . . . . . 39Security . . . . . . . . . . . . . . . . . . . . . . . . . . . . . . . . . . . . 40
APF Authorization . . . . . . . . . . . . . . . . . . . . . . . . . . . 40Record Level Sharing (RLS). . . . . . . . . . . . . . . . . . . . . . . . 40
Required Setup for RLS Implementation. . . . . . . . . . . . 40Implementing ChangeMan SSM with RLS . . . . . . . . . . . 41Operating Issues . . . . . . . . . . . . . . . . . . . . . . . . . . . . 41
Fingerprinting or Tracking Large Objects . . . . . . . . . . . . . . 42PF Key Functionality . . . . . . . . . . . . . . . . . . . . . . . . . . . . . 42Considerations for Change Tracking Installation . . . . . . . . . 42
SERNET . . . . . . . . . . . . . . . . . . . . . . . . . . . . . . . . . . 43Refresh MLPA . . . . . . . . . . . . . . . . . . . . . . . . . . . . . . 43Multiple LPARs or Sysplex Environments . . . . . . . . . . . 44Multiple HPSPARMS Members (Optional) . . . . . . . . . . 45Multiple Change Tracking Environments (Optional) . . . 46ROLLOFF Parm Adjustment. . . . . . . . . . . . . . . . . . . . . 47DB2 Setup . . . . . . . . . . . . . . . . . . . . . . . . . . . . . . . . 48Post-Approval of Changes . . . . . . . . . . . . . . . . . . . . . 48
Chapter 4 Unloading the Distribution Media. . . . . . . . . . . 51Installation Methodology. . . . . . . . . . . . . . . . . . . . . . . . . . 52
Library Members for SMP/E Install. . . . . . . . . . . . . . . . 53Unloading the Distribution Media . . . . . . . . . . . . . . . . . . . 54
Download the Software . . . . . . . . . . . . . . . . . . . . . . . 54Copy the files to your computer . . . . . . . . . . . . . . . . . 54Edit the FTP Input File . . . . . . . . . . . . . . . . . . . . . . . . 56Edit the RECEIVE Job . . . . . . . . . . . . . . . . . . . . . . . . . 56Transfer Files to the Host . . . . . . . . . . . . . . . . . . . . . . 57Submit the Receive Job . . . . . . . . . . . . . . . . . . . . . . . 58Delete your Password . . . . . . . . . . . . . . . . . . . . . . . . 58Finish the Installation . . . . . . . . . . . . . . . . . . . . . . . . 58
4 Serena® ChangeMan® SSM 8.4

Contents
SMP/E Installation. . . . . . . . . . . . . . . . . . . . . . . . . . . . . . 59Full Install with SMP/E . . . . . . . . . . . . . . . . . . . . . . . 59ACCEPT Processing Requirements . . . . . . . . . . . . . . . 62
Chapter 5 Installation Procedures . . . . . . . . . . . . . . . . . 63Install Library Contents . . . . . . . . . . . . . . . . . . . . . . . . . . 64Upgrading from a Prior Release . . . . . . . . . . . . . . . . . . . . 67
Before You Begin . . . . . . . . . . . . . . . . . . . . . . . . . . . 67Upgrading from 8.2.3 . . . . . . . . . . . . . . . . . . . . . . . . 68Upgrading from 8.3.0 . . . . . . . . . . . . . . . . . . . . . . . . 68Upgrading from 8.3.1, 8.3.2, 8.3.3, and 8.3.4.xx. . . . . 68Upgrading to 8.4 . . . . . . . . . . . . . . . . . . . . . . . . . . . 69
Installation Overview . . . . . . . . . . . . . . . . . . . . . . . . . . 70Install ChangeMan SSM . . . . . . . . . . . . . . . . . . . . . . . . . . 71
Step 1: Authorize Load Libraries . . . . . . . . . . . . . . . 72Step 2: Apply ChangeMan SSM 8.4 License . . . . . . . . . 72Step 3: Determine Method of TSO/E Authorization . 73Step 4: HFS Detection and Synchronization (Optional) . 75Step 5: Determine Default PARMLIB Data Set . . . . 76Step 6: Edit and Save HPSPARMS . . . . . . . . . . . . . . . 77Step 7: Add Load Libraries to LINKLIST (Optional) . . . 78Step 8: Set Up SKELs . . . . . . . . . . . . . . . . . . . . . . . . 79Step 9: Set Up ISPF Interface . . . . . . . . . . . . . . . . . . 80Step 10: Connect to Primary Menu . . . . . . . . . . . 85
Install Change Tracking Component . . . . . . . . . . . . . . . . . 86Implementing Real Time Change Tracking (RTCT) . . . . 87Implementing Batch Interval Change Tracking (BICT) . 87Step 11: Define Databases . . . . . . . . . . . . . . . . . . . . 88Step 12: Set Up Starter Environment . . . . . . . . . . . 91Step 13: Edit and Save HPSPARMS for Change Tracking 98Step 14: Define Objects to Change Tracking . . . . . . . . 109Step 15: Add Post-Processing Installation Exits for SCRATCH and RENAME . . . . . . . . . . . . . . . . . . . . . . . . . . . . . . 110Step 16: Add Installation Exits for HMIGRATE, HRECALL, and HDELETE . . . . . . . . . . . . . . . . . . . . . . . . . . . . . . . . 111Step 17: COPY Intercept Modules into LPA/MLPA . . . . 112Step 18: Allocate Data Set for RTCT in a Sysplex (Optional)113
Installation Guide 5

Contents
Step 19: Copy RTCT Startup Task Members . . . . . . . . 114Step 20: Set Up RTCT Notifications (Optional) . . . . . . . 115Step 21: Make RTCT Task Non-Cancelable . . . . . . . . . . 122Step 22: Refresh LPA/MLPA . . . . . . . . . . . . . . . . . . . . 123Step 23: Member-Level Security (MLS) - Optional . . . . 124Step 24: Member Reference Tracking (MRT) - Optional . 129Step 25: Start or Shut Down RTCT Task . . . . . . . . . . . 134Step 26: Verify RTCT . . . . . . . . . . . . . . . . . . . . . . . . . 135Step 27: Set Up the Global Capture Job for RTCT (Optional)136Step 28: Set Up the Global Capture Job (non-RTCT) . . . 137
Administrative Facilities for Maintaining Change Tracking Databases140
Define GDGs for Database Backups . . . . . . . . . . . . . . 140Set Up Database Backup Job . . . . . . . . . . . . . . . . . . . 142Set Up Reorganization Jobs . . . . . . . . . . . . . . . . . . . . 143Set Up Database Integrity Verification Job . . . . . . . . . . 146Delta Master Database Maintenance . . . . . . . . . . . . . . 148MRTAUX3 Database Maintenance . . . . . . . . . . . . . . . . 153
Chapter 6 Post-Installation Verification . . . . . . . . . . . . . 157Batch Facility Installation Verification . . . . . . . . . . . . . . . . . 158Online Facility Installation Verification . . . . . . . . . . . . . . . . 159
Invoke ChangeMan SSM. . . . . . . . . . . . . . . . . . . . . . . 159Verify Comparex Installation. . . . . . . . . . . . . . . . . . . . 160Verify Setup of Initial Environment . . . . . . . . . . . . . . . 160SVC Interception. . . . . . . . . . . . . . . . . . . . . . . . . . . . 161
Verify Change Tracking Online Facility . . . . . . . . . . . . . . . . 162Perform Group Administrator Tasks . . . . . . . . . . . . . . . 162Perform User Tasks . . . . . . . . . . . . . . . . . . . . . . . . 166
Verify Detection and Synchronization Online Facility . . . . . 169Specify Defaults and User Options. . . . . . . . . . . . . . . . 169Check Synchrony Between Data Sets. . . . . . . . . . . . . . 171Synchronize Data Sets . . . . . . . . . . . . . . . . . . . . . . . . 176
Appendix A Applying a Patch . . . . . . . . . . . . . . . . . . . . . 181Step 1: Copy Patch . . . . . . . . . . . . . . . . . . . . . . . . . . . . . 181Step 2: Allocate Target Data Set . . . . . . . . . . . . . . . . . . . . 181
6 Serena® ChangeMan® SSM 8.4

Contents
Step 3: Define New Transfer Type . . . . . . . . . . . . . . . . . . 182Step 4: Transfer PC File to MVS . . . . . . . . . . . . . . . . . . . . 182Step 5: Rebuild Transferred File to LINKLIB Format . . . . . . 183Step 6: Replace Previous Modules or Members . . . . . . . . . . 183
Appendix B RACF Security for Change Tracking . . . . . . . . . 185Sample RACF Commands. . . . . . . . . . . . . . . . . . . . . . . . . 185
Appendix C RACF Security for MLS . . . . . . . . . . . . . . . . . . 189Sample RACF Commands. . . . . . . . . . . . . . . . . . . . . . . . . 189
Glossary . . . . . . . . . . . . . . . . . . . . . . . . . . 191
Index. . . . . . . . . . . . . . . . . . . . . . . . . . . . . 199
Installation Guide 7
Contents
8 Serena® ChangeMan® SSM 8.4

Welcome to ChangeMan SSMThis document describes Serena® ChangeMan® SSM (System Software Manager for z/OS), a product of SERENA Software, Inc.
ChangeMan SSM detects and tracks changes within groups of applications or system data sets, synchronizes local or remote operating environments, and restores environments to a clean and working state. ChangeMan SSM detects changes to data sets, PDS members, or full DASD volumes using a unique fingerprinting technology.
Before You Begin See the Readme for the latest updates and corrections for this manual. You can download the Readme from the Serena Customer Support Web site at http://serena.com/support.
Objective This manual provides instructions for installing any or all of the three ChangeMan SSM components. You will learn how to:
Prepare your system for installing ChangeMan SSM.
Install one or more of the ChangeMan SSM components.
Perform the installation verification process.
Audience This manual is intended for anyone responsible for the following tasks:
Installing ChangeMan SSM.
Upgrading ChangeMan SSM from a prior release.
Managing mainframe change control.
Change Bars Change bars in the left margin identify substantive changes to this manual for SSM 8.4.
Installation Guide 9

Welcome to ChangeMan SSM
Manual Organization
Thischapter… Contains this information…
1 Introduction. Provides an overview of the product, the installation process, and the installation verification process.
2 Installation Requirements. Describes requirements for installing ChangeMan SSM in your mainframe environment.
3 Installation Considerations. Describes issues you must consider and decisions you must make before installing ChangeMan SSM.
4 Unloading the Distribution Media. Explains how to unload the ChangeMan SSM components from the product download.
5 Installation Procedures. Explains how to install one or more of the ChangeMan SSM components.
6 Post-Installation Verification. Explains how to verify the ChangeMan SSM installation.
A Applying Fix Packs. Describes the steps to apply a FixPack received as an e-mail attachment.
B RACF Security for Change Tracking. Explains how to use commands to set up SAF Security Checking for the Change Tracking environment.
C MLS Security for Change Tracking. Explains how to use commands to set up SAF Security checking for Member Level Security (MLS).
Glossary Defines terms used within ChangeMan SSM.
10 Serena® ChangeMan® SSM 8.4

How to Use This Book
How to Use This BookFirst, read the Introduction for a product overview.
Before starting the installation process, read the following chapters:
Chapter 2, "Installation Requirements" on page 31
Chapter 3, "Installation Considerations" on page 37
The Installation Process Unload the ChangeMan SSM components, described in Chapter 4, "Unloading the Distribution Media" on page 51.
The installation procedures are described in Chapter 5, "Installation Procedures" on page 63. They are divided into two parts:
ChangeMan SSM Common Installation
The procedures described in "Install ChangeMan SSM" on page 71 are common to all three components. You must complete the procedures in this section to install any one or all of the components.
Once you complete these steps, the Detection and Synchronization and Data Extraction components are operational.
Change Tracking Installation
To install the Change Tracking component, first complete the ChangeMan SSM Common Installation. Then execute the procedures described in "Install Change Tracking Component" on page 86.
After you complete the Change Tracking installation, perform the tasks described in "Administrative Facilities for Maintaining Change Tracking Databases" on page 140.
Post-Installation Verification The post-installation verification process, described in Chapter 6, "Post-Installation Verification" on page 157 is designed to ensure proper installation of the ChangeMan SSM software. Because each of the ChangeMan SSM components consists of both an online and a batch facility, the verification process is structured as follows:
Installation Guide 11
Welcome to ChangeMan SSM
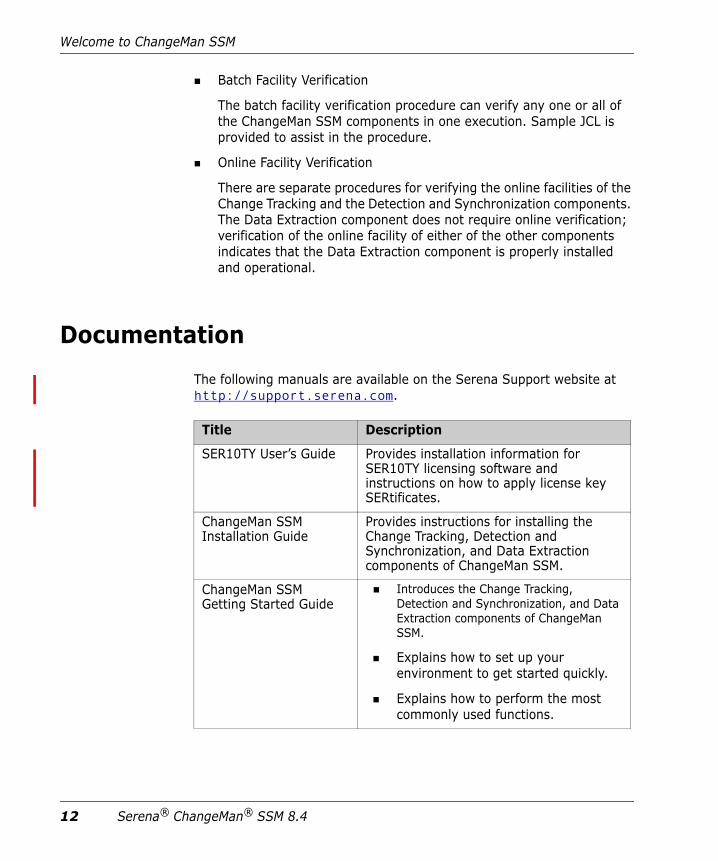
Batch Facility Verification
The batch facility verification procedure can verify any one or all of the ChangeMan SSM components in one execution. Sample JCL is provided to assist in the procedure.
Online Facility Verification
There are separate procedures for verifying the online facilities of the Change Tracking and the Detection and Synchronization components. The Data Extraction component does not require online verification; verification of the online facility of either of the other components indicates that the Data Extraction component is properly installed and operational.
DocumentationThe following manuals are available on the Serena Support website at http://support.serena.com.
Title Description
SER10TY User’s Guide Provides installation information for SER10TY licensing software and instructions on how to apply license key SERtificates.
ChangeMan SSM Installation Guide
Provides instructions for installing the Change Tracking, Detection and Synchronization, and Data Extraction components of ChangeMan SSM.
ChangeMan SSM Getting Started Guide
Introduces the Change Tracking, Detection and Synchronization, and Data Extraction components of ChangeMan SSM.
Explains how to set up your environment to get started quickly.
Explains how to perform the most commonly used functions.
12 Serena® ChangeMan® SSM 8.4

Documentation
Using the PDF DocumentationThe Serena manuals use the Adobe Portable Document Format (PDF). To view PDF files, use Adobe® Reader®, which is freely available from www.adobe.com.
This section highlights some of the main Reader features. For more detailed information, see the Adobe Reader online help system.
The online manuals include the following features:
Bookmarks. All of the online manuals contain predefined bookmarks that make it easy for you to jump to a specific topic quickly. By default, the bookmarks appear to the left of each online manual.
Links. Cross-reference links within an online manual enable you to jump to other sections within the manual and to other manuals with a single mouse click. These links appear in blue.
Printing. While viewing a manual, you can print the current page, a range of pages, or the entire manual.
Advanced search. Starting with version 6, Adobe Reader includes an advanced search feature that enables you to search across multiple PDF files in a specified directory. (This is in addition to using any search index created by Adobe Catalog—see step 3 below.)
ChangeMan SSM Change Tracking User’s Guide
Gives instructions for using the Change Tracking Component.
ChangeMan SSM Detection and Synchronization Guide
Gives instructions for using the Detection and Synchronization Component.
ChangeMan SSM Data Extraction User’s Guide
Gives instructions for using the Data Extraction Component.
ChangeMan SSM Messages Guide
Lists ChangeMan SSM error and informational messages and explains their meaning.
Title Description
NOTE Be sure to download the full version of Reader. The more basic version does not include the search feature.
Installation Guide 13
Welcome to ChangeMan SSM
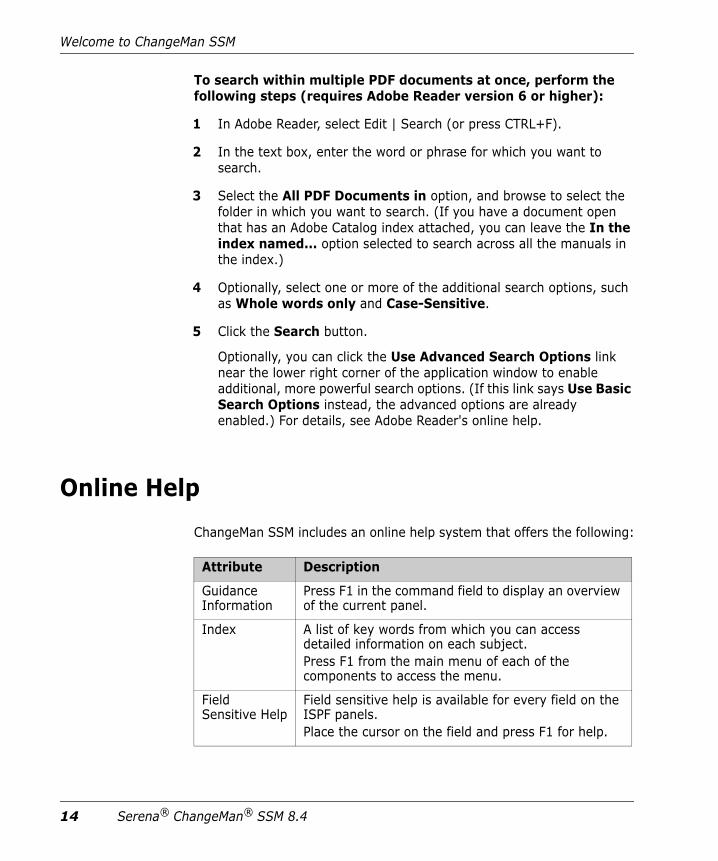
To search within multiple PDF documents at once, perform the following steps (requires Adobe Reader version 6 or higher):
1 In Adobe Reader, select Edit | Search (or press CTRL+F).
2 In the text box, enter the word or phrase for which you want to search.
3 Select the All PDF Documents in option, and browse to select the folder in which you want to search. (If you have a document open that has an Adobe Catalog index attached, you can leave the In the index named... option selected to search across all the manuals in the index.)
4 Optionally, select one or more of the additional search options, such as Whole words only and Case-Sensitive.
5 Click the Search button.
Optionally, you can click the Use Advanced Search Options link near the lower right corner of the application window to enable additional, more powerful search options. (If this link says Use Basic Search Options instead, the advanced options are already enabled.) For details, see Adobe Reader's online help.
Online HelpChangeMan SSM includes an online help system that offers the following:
Attribute Description
Guidance Information
Press F1 in the command field to display an overview of the current panel.
Index A list of key words from which you can access detailed information on each subject. Press F1 from the main menu of each of the components to access the menu.
Field Sensitive Help
Field sensitive help is available for every field on the ISPF panels. Place the cursor on the field and press F1 for help.
14 Serena® ChangeMan® SSM 8.4

Chapter 1Introduction
ChangeMan SSM is a comprehensive suite of change management solutions. Together, these solutions assist all organizational personnel in detecting, tracking, reporting, implementing, distributing, and recovering from changes to the MVS environment.
Overview 16Fingerprinting Technology 16Change Tracking Component 17Detection and Synchronization Component 25Data Extraction Component 26Uses of ChangeMan SSM 27
Installation Guide 15

Chapter 1 Introduction
OverviewChangeMan SSM provides solutions for both small data centers as well as large, complex environments with multiple LPARs, CPUs, and sites.
ChangeMan SSM also assists with data center consolidations and mergers/acquisitions.
ChangeMan SSM consists of three components:
Change Tracking
Detection and Synchronization
Data Extraction
These components provide you with toolsets to detect changes and synchronize environments at the data set, PDS member, and VSAM record level.
Fingerprinting Technology All ChangeMan SSM components use Fingerprinting technology. Like DNA mapping that uniquely identifies a human, Fingerprint technology uniquely identifies a file by creating a unique 8-byte token representing the contents (the content Fingerprint) of any PDS member or data set. When the contents of a data set or member changes, so does its token. As long as the contents of the data set or member does not change, the generated token will not change. This means that a data set can be copied to another volume, distributed to a remote site, or reblocked without incurring a change to its token.
ChangeMan SSM uses Fingerprint technology to detect differences in the contents of one or more members, an entire data set, a group of data sets, a volume, or group of volumes regardless of the naming conventions. For partitioned data sets, one token is generated for each member, and one for the entire PDS.
For VSAM KSDS clusters, ChangeMan SSM generates one token per record, and one composite token for the entire data component. These tokens are stored externally in a Fingerprint data set. The VSAM Fingerprint representations are evaluated to determine the changed
16 Serena® ChangeMan® SSM 8.4

Change Tracking Component
records. By comparing the current VSAM Fingerprint data set with a previous one, the added, updated, and deleted records are identified. To synchronize VSAM clusters, ChangeMan SSM creates a VSAM Change Basket containing only the added, deleted, and changed records. The Change Basket, created in a Base environment, is transferred to local or remote environments for Import processing to synchronize the Target cluster.
Flat files and flattened databases can also be Fingerprinted at the record level. Flat files can be Fingerprinted as either KEYED or TEXT format. A Fingerprint token is produced for each record of the flat file. The record token is a six-byte representation of the content of a record. If the flat file has a user specified key, then the token is the six-byte representation plus the key.
PDS member-level directory tokens can optionally be used as an additional determination of change (when a change occurs in the PDS directory during the comparison and synchronization processes). Refer to the EXTENDEDSYNC command in the ChangeMan SSM Detection and Synchronization Guide.
Change Tracking ComponentThis component provides two auditing/tracking facilities:
Batch Interval Change Tracking (BICT)
Real Time Change Tracking (RTCT)
Regardless of the method used (BICT or RTCT), all changes are recorded and available for reporting (online and in batch). Users can view multiple versions of the same member and restore prior versions, if needed.
Once application or system critical data sets are defined to the Change Tracking Component, any updates made (at the PDS member level) are identified and recorded in a ChangeMan SSM database. Using the Fingerprinting technology, all updates are detected, even if the MVS system on one LPAR is brought down, or the HPSRTO task is stopped for a period of time.
ChangeMan SSM also provides the functionality to track Hierarchical File System (HFS) files.
Installation Guide 17
Chapter 1 Introduction
When the Change Tracking Component detects a change, it can automatically back up the changed member to the Delta Master database (this is an optional user selection). By enabling you to recover prior versions of members, you can view and analyze changes in system, software product, or application software, for problem determination and immediate recovery.
The following optional features are available when using Real Time Change Tracking:
Notification of Change Events
Specified users can be notified when a change occurs in a tracked data set. The notification is available through email or TSO.
Member Level Security (MLS)
MLS prevents unauthorized users from updating protected entities.
Member Reference Tracking (MRT)
If you want to track “references” to data sets and members, you can use MRT to identify which users or jobs referenced the data set or member, and when.
Batch Interval Change Tracking (BICT) BICT requires that the HPSGLOBE program be executed at user-specified intervals of time to determine and identify changes to the environment being tracked. This facility does not require any intercepts to be placed on the system.
BICT identifies and captures any changes made to the tracked environment since the last GLOBAL capture. Interim changes are not captured.
The TSO and email notification facilities are not available using the BICT method of change tracking.
18 Serena® ChangeMan® SSM 8.4
Change Tracking Component
Real Time Change Tracking (RTCT) RTCT provides an automated facility to track system, software, and application changes. All changed members are stored in a ChangeMan SSM database along with specific information as to who made the change, the type of change, the program used, and the date and time the change occurred.
The ChangeMan SSM side-by-side compare facility determines the exact changes made to particular members (load or source); you can also use interfaces to COMPAREX or IBM’s SuperC to determine the changes made to particular members.
RTCT supports the following data set types:
Partitioned Data Sets (PDS and PDSE)
Physical Sequential and Extended Sequential data sets (PS)NOTE Multivolume sequential data sets are supported
Direct Access data sets (DA)
There are several intercepts that must be implemented for RTCT (described in the following topic "Dynamic SVC Interceptions" on page 20).
The TSO and email notification facilities are available using the RTCT method of change tracking.
The following topics explain the three elements supporting RTCT:
SERNET Started Task
ChangeMan SSM Subtasks
Dynamic SVC Interceptions
SERNET Started Task
SERNET (previously called SERENA/Network) provides communication and other services on the mainframe server for Serena products. SERNET
NOTE Tracking VSAM data sets (all types), however, requires a periodic run of the HPSGLOBE program with the PARM='GLOBAL,VSAMONLY', which can be initiated by your job scheduling software.
Installation Guide 19

Chapter 1 Introduction
runs as a started task on an LPAR. Multiple SERNET started tasks can be run on a single processor.
RTCT runs as an application under a SERNET instance. The ChangeMan SSM started task (SSMSTAR) consists of the SERNET started task plus the ChangeMan SSM subtasks (HPSSTART and HPSRTO).
ChangeMan SSM Subtasks
Synchronous Subtask (HPSSTART)
After initialization, SERNET first attaches the ChangeMan SSM subtask (HPSSTART) and makes the SSCVT control block known to it. The HPSSTART program then attaches a second subtask (HPSRTO) that runs asynchronously.
Asynchronous Subtask (HPSRTO)
Upon initialization, the subtask HPSRTO intercepts the CLOSE and STOW SVCs. HPSRTO uses the SVCUPDTE macro (recommended by IBM) to dynamically front-end them. Additionally, HPSRTO allocates a storage table that is made available to the front-end code.
When HPSRTO is attached, the ChangeMan SSM Site Master database is read to initialize a tracked object list in a tree data structure. Only the data sets or files (objects) in this tree are subject to tracking. This eliminates the tracking of undesired data sets or files.
When either a STOW or a CLOSE is detected for a tracked data set, the appropriate front-end code stores an information node in the storage table; this code is optimized for speed.
Asynchronously, HPSRTO compares the information in the storage table against the object tree. If an update to an object has occurred, HPSRTO triggers the CAPTURE function to record the update.
HPSRTO may attach additional subtasks as needed.
Dynamic SVC Interceptions
The HPSFCLOS and HPSFSTOW intercepts are front-ended to the current CLOSE and STOW SVCs in the SVC table. If an SVC routine is already front-ended, the ChangeMan SSM intercept is added in front of the existing front-end for that SVC.
20 Serena® ChangeMan® SSM 8.4

Change Tracking Component
When the MRT feature is being used, the intercepts (HPSFATCH, HPSFBLDL, HPSFLINK, HPSFLOAD, and HPSFXCTL) are front-ended to the current ATTACH, BLDL, LINK, LOAD, and XCTL SVCs in the same manner as HPSFCLOS and HPSFSTOW.
When the subtask HPSRTO is quiesced, the intercepts are disabled but not removed from the system. So, the front-end code remains in the system without any effect until the ChangeMan SSM started task is brought up again or the next IPL occurs.
IEBCOPY or EXCP Updates
By intercepting the CLOSE SVC, the HPSRTO subtask differentiates between standard and EXCP updates. Using the SECURE mode, data sets updated in place are fingerprinted.
The SERENA StarTool FDM product, for example, makes global updates to partitioned data sets using EXCP processing. IEBCOPY, as another example, does not issue the STOW SVC, therefore MODE=SECURE must be specified to track all member activities.
RTCT uses the fingerprinting facilities to detect all updates. Change events (ADD, UPDATE, DELETE, RENAME, ZAP and LINKEDIT) are recorded along with the time, USERID, JOBNAME and program used to make the change.
Sysplex SupportMultiple LPARs in a sysplex environment can share the same set of tracking databases across the environments. Regardless of which LPAR the change is committed on, RTCT detects the change and records the updates in the common databases.
Member Level Security Data set and member patterns can be defined to the Member Level Security (MLS) feature as protected entities. MLS prevents unauthorized users from updating protected entities. If an update is attempted by an unauthorized user, the attempted member-level change will store the member under a new internally-generated name. Alternatively, MLS can be set up to abend the job with a U913 message when the update
Installation Guide 21

Chapter 1 Introduction
attempt is made, This feature prevents unauthorized updates, renames, or deletes at the member level.
To take advantage of MLS, you only need to define protected members to the MLS feature; it is not necessary to also define the data set to Change Tracking.
For more information, refer to the MLS Administrator functions in the ChangeMan SSM Change Tracking User’s Guide.
Member Reference Tracking The Member Reference Tracking (MRT) facility is installed with the Change Tracking component. MRT allows you to detect and report references to members of PDSs. Read and update access is tracked on existing members that you define to the MRT system, and where standard I/O routines are used.
You can also define members to be excluded from MRT. This allows you to filter out references to high-activity members at the beginning of MRT processing, which greatly enhances performance. Member references that pass the exclusion check are then filtered against the PDS and member names that you defined for inclusion in MRT (by data set and member name).
NOTE Entities defined to MLS are only protected from change through standard applications (such as TSO/ISPF) that issue the standard IBM STOW SVC. MLS does not protect entities from update if the entire PDS is overlaid (such as with IEBCOPY). For more information, refer to “Member-Level Security (MLS) - Optional”.
NOTES The creation of a new member is not initially tracked by MRT; new members can be tracked using the core facilities of Change Tracking. However, subsequent references to new members will be tracked by MRT if they are defined to the MRT system.
LPA modules, which are loaded into memory at IPL time, are not tracked by MRT.
22 Serena® ChangeMan® SSM 8.4

Change Tracking Component
The following diagram illustrates the MRT configuration:
Processing flow:
1 You define which members are tracked and which are excluded by MRT, using online panels or batch commands. PDS/member names to be tracked, and member names to be excluded, are stored in the Site Master Database and also copied into two tables in storage (MRT List and MRX List).
2 The MRT system (which runs as part of the started task) collects information captured by 5 of the intercepts: HPSFATCH, HPSFBLDL, HPSFLINK, HPSFLOAD, and HPSFXCTL.
Installation Guide 23

Chapter 1 Introduction
3 MRT first checks the exclusion table (MRX List) to see if the member is excluded from MRT tracking. Members defined as excluded are not processed any further. This allows high-activity members to be filtered out at the very beginning of the process.
4 When standard I/O routines are used, member names not in the exclusion table are then filtered against the tracking table (MRT List). References to datasets/members that match a pattern in the table are written to another table in storage (Matching References) by the intercepts.
5 An asynchronous task pulls entries out of the Matching References storage table and writes them to one of the Swap files (AUX1 or AUX2). When the current Swap file is full, the task starts writing to the other Swap file, and the contents of the first Swap file is used to update the MRTAUX3 VSAM file.
For example:
When AUX1 fills up, a swap is done to AUX2, and the data on AUX1 is written to the AUX3 VSAM file. The cycle continues . . . when AUX2 fills up, a swap is done to AUX1 and the data on AUX2 is written to the AUX3 VSAM file, and so on.
A swap also occurs when the started task comes down.
To initiate a manual swap, issue the following command:
/F taskname,SYN,MRTSWAP
where taskname is the started task name, SYN is the application name, and MRTSWAP is the command name.
6 A batch report is available to see which data sets and members have been referenced; a batch program and JCL are provided. By specifying various filter parameters, you select the reference data that displays on the report. This report can also show which data sets and members have not been referenced (a Zero Reference Report). The Zero Reference report is useful for determining, for example, which software modules are seldom or never used.
NOTE If you are about to run an MRT report job to see the latest references (while the started task is up), a manual swap will ensure that the MRTAUX3 VSAM file contains the most recent data collected by the intercepts.
24 Serena® ChangeMan® SSM 8.4

Detection and Synchronization Component
7 E-mail notifications are available for the post-approval of changes. A Serena Business Manager (SBM) item can be opened after a change to a tracked item is detected.
Detection and Synchronization ComponentThis component determines whether two environments, data sets, groups of data sets, or volumes (local or remote) differ. The following types of data sets are supported:
Partitioned (PDS and PDSE)
Physical Sequential (PS)
Extended Sequential (PS)
Direct Access (DA)
ChangeMan SSM creates fingerprint data sets that consist of tokens (called base and target fingerprints) representing the contents of each environment. Evaluating these tokens reveals any differences between the data sets in each base and target environment. This process also identifies missing data sets, missing members, and newly-allocated data sets. The Detection and Synchronization component can then synchronize the two environments (base and target) to make them identical.
To synchronize the data sets, the Detection and Synchronization component creates a change basket (a single PS data set) that contains all of the data components required to make the two environments identical. The change basket can be transferred (using NDM, FTP, or other communication software), and imported into one or more target environments.
Optionally, a reverse change basket can be generated during the import process. This enables a backup of the environment components affected by the APPLY process, thereby automating the back-out process (if necessary).
By using the fingerprint tokens, the Detection and Synchronization component can compare any two environments, regardless of size or naming conventions.
Installation Guide 25

Chapter 1 Introduction
To detect changes over a period of time, a single previously-generated fingerprint data set may be referenced to provide the environment. This fingerprint data set represents the “before” change environment, while the current data sets on DASD are re-fingerprinted to represent the current environment. This is performed by the REFTARG command.
The Detection and Synchronization component provides extensive masking capabilities that enable you to look for the actual code differences in source/load modules, rather than search for superficial differences (such as an embedded date or time). In conversion projects, large groups of data sets can be scanned to locate a user-specified string. Masking is ignored during synchronization operations to ensure that the synchronized environments are identical.
Functions for HFS FilesFor HFS files, you can compare local or remote software environments, detect changes, and verify synchronization. You can perform the following tasks for HFS files:
Fingerprint a group of HFS files.
Compare two HFS fingerprint data sets and report differences.
Capture changes into an HFS change basket.
Apply an HFS change basket to synchronize environments.
Use path modeling to compare files in different locations, as well as update a location with a different path.
Data Extraction ComponentThe Data Extraction component uses record-level fingerprint tokens to detect changes in data files. This facility supports VSAM KSDS and any flattened file. Examples of flattened files are VSAM clusters (RRDS, ESDS, LDS) flattened with IDCAMS REPRO, DB2 tables flattened with DSN1COPY, and any other file type that can be flattened to a physical sequential file. VSAM KSDS is directly fingerprinted, with the keys and record-level tokens stored in a fingerprint data set. Flat files are fingerprinted as keyed or non-keyed files, depending on the nature of the data file.
26 Serena® ChangeMan® SSM 8.4
Uses of ChangeMan SSM
The Data Extraction component is capable of synchronizing KSDS files. Two local or remote clusters can be fingerprinted to determine the differences, or the same cluster can be fingerprinted at two different times to determine the files changes over time. The record-level differences are exported to a VSAM change basket, and then imported to local or remote clusters for synchronization.
The same facility can be used to identify and package the daily updates in very large VSAM KSDS files and flat files. ChangeMan SSM provides optional parameters for selecting specific record types and fields, which allow field-level changes to be detected. Changed records are extracted and exported to a change basket. This change basket can then be used to update other databases (even those residing on other platforms). A facility for editing VSAM change baskets enables additional customizing options.
A live, side-by-side comparison, can be invoked for any two text files, including PDS members (source or load) and physical sequential files or flattened databases.
Uses of ChangeMan SSM ChangeMan SSM is used primarily in the following areas:
Change tracking and audit
Systems assurance
Centralized maintenance, software distribution, disaster recovery, and production site synchronization as an alternative to mirroring.
Changed data extraction for VSAM KSDS and any flat files (unloaded DB2, IMS, and so on).
Enhanced problem determination and recovery.
Assistance with data center consolidations and mergers/acquisitions.
Each component of ChangeMan SSM has a specific design objective as outlined below.
Installation Guide 27
Chapter 1 Introduction
Change Tracking Component Use the Change Tracking Component to:
Track changes in critical application and system components at the member level.
Track data sets and members that have been referenced (Member Reference Tracking).
Generate a customizable change report or utilize online query functions.
Automatically back up changed PDS members to a central location as the changes occur.
Review prior member versions online.
Restore the desired members online without operator intervention or tape mounts.
Reconstruct an entire PDS as of a date-time.
Report authorized and unauthorized changes.
Determine the byte-level differences using ChangeMan SSM’s side-by-side report facility, COMPAREX, or IBM’s SuperC.
Detection and Synchronization Component Use the Detection and Synchronization Component to:
Compare local or remote software environments.
Detect changes in local or remote software environments.
Verify synchronization between local and remote software environments.
Report byte-level differences in large environments, passing on only the changed PDS members to ChangeMan SSM’s side-by-side compare facility, COMPAREX, or IBM’s SuperC.
Verify that current source and production load modules match.
Ensure that software has been properly distributed and installed.
Maintain all LPARs from a central location.
28 Serena® ChangeMan® SSM 8.4

Uses of ChangeMan SSM
Package software changes in a single physical sequential file (Change Basket).
Save Resources by transmitting only the changes to other sites using FTP, Connect:Direct, or your preferred software.
Apply Change Baskets using the IMPORT command.
Verify the proper installation of the change package.
Facilitate data center consolidation and migration.
Synchronize multiple LPARs, operating environments, and software packages in local or remote CPUs.
Eliminate redundant data sets and members (by content) in either a group of concatenated data sets, a pool of volumes, or the entire data center.
Avoid full volume and data set transmissions from one location to another by transferring only the changed components.
Identify mismatched/missing data sets, DCB differences, directory differences, and SPACE differences between environments.
Data Extraction Component Use the Data Extraction component to:
Fingerprint VSAM KSDS and any flat files (unloaded databases such as DB2 or IMS).
Identify differences between two local or remote VSAM KSDS files.
Compare data files at the record level for any flat files or unloaded databases.
Detect changes in data files over time (VSAM, PS, DA, and flattened databases).
Extract changed data to update other flat files or databases.
Package VSAM KSDS changes in a single physical sequential file (change basket) to synchronize other clusters at local or remote environments.
Apply VSAM change baskets using the VSAMIMPORT command.
Undo the VSAM KSDS updates imported from a VSAM change basket (if necessary) using the VSAM reverse basket.
Installation Guide 29

Chapter 1 Introduction
30 Serena® ChangeMan® SSM 8.4

Chapter 2Installation Requirements
This chapter describes requirements for installing ChangeMan SSM in your mainframe environment.
Mainframe Requirements 32Memory 32Auxiliary Storage 33Compatibility With Other Serena Products 35
Installation Guide 31

Chapter 2 Installation Requirements
Mainframe Requirements ChangeMan SSM runs without modification on all IBM and plug-compatible mainframes running z/OS.
Refer to the Compatibility section of the Readme and the Platform Matrix for the latest system and software requirements. The Readme and Platform Matrix can be found on the the Serena Customer Support Web site at http://serena.com/support.
MemoryMost of the ChangeMan SSM functions can be performed through its ISPF interface. The region size for the individual user's ISPF sessions is affected by the inclusion of ChangeMan SSM. It is recommended that the TSO region size be set to a minimum of 64MB, as some of the SSM functions require a large region size.
A region size of 64MB is also recommended for the SSM started task jobs. For batch jobs, it is recommended that you use REGION=0M; however, if that is not possible, then 64MB for Detection and Synchronization and 256MB for Change Tracking should be sufficient.
ChangeMan SSM modules are written in re-entrant assembler and given the RENT attribute. They are eligible for inclusion in the Link Pack Area (LPA), so that concurrent users may share the same copy in storage.
Dynamic areas are acquired from above the 16 megabyte line to relieve storage constraints.
The link-edit attributes for all of the modules are RMODE 24 and AMODE ANY.
ChangeMan SSM resides and runs below the 16 megabyte line, but uses 31-bit addressing. This means that it acquires storage from memory above the line.
32 Serena® ChangeMan® SSM 8.4
Auxiliary Storage
Auxiliary Storage ChangeMan SSM load modules require approximately 35 tracks, and SERCOMC load modules require approximately 23 tracks, of a 3390 DASD volume.
Data sets required for ISPF need approximately 86 tracks.
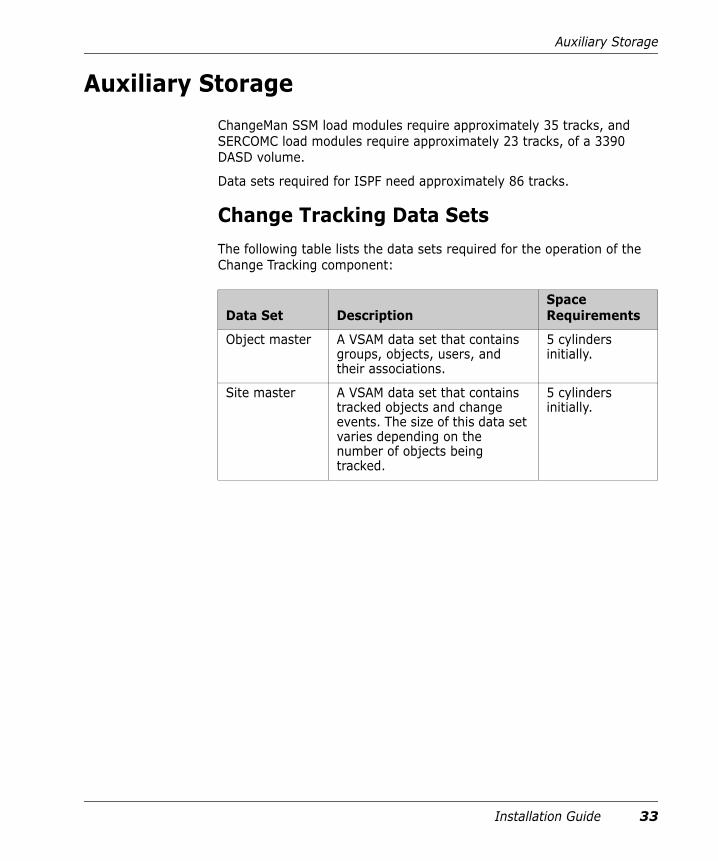
Change Tracking Data SetsThe following table lists the data sets required for the operation of the Change Tracking component:
Data Set DescriptionSpace Requirements
Object master A VSAM data set that contains groups, objects, users, and their associations.
5 cylinders initially.
Site master A VSAM data set that contains tracked objects and change events. The size of this data set varies depending on the number of objects being tracked.
5 cylinders initially.
Installation Guide 33

Chapter 2 Installation Requirements
Delta master A VSAM data set required for delta tracking. If a PDS or PDSE object is defined as a delta tracked object, a compressed copy of the members is stored in this file. Henceforward, whenever a change is detected either through RTCT, the CAPTURE command, or the HPSGLOBE program, the changed or added members are detected and automatically compressed and stored in this database. Users can recall or restore the different versions to a temporary data set, or to the original data set, for an online comparison between different versions of a member.
Initially, 100 cylinders primary and 50 cylinders secondary.The Delta Master database can also be defined to multiple volumes, due to its potential to grow to a large size.
Archive Master A VSAM data set required for archiving backups and event history. (Optional)
Initially, 100 cylinders primary and 50 cylinders secondary.
MRT swap files (MRTAUX1 and MRTAUX2)
Two physical sequential data sets, per LPAR, for the optional MRT facility. Used in conjunction with the storage tables and MRT VSAM file for storing/writing “matching reference” data during MRT processing.
1 track each.JCL is provided in the MRTINIT member of the INSTALL library.
MRT VSAM file (MRTAUX3)
Contains reference data for members being tracked by the optional MRT facility.
100 cylinders primary and 15 cylinders secondary.JCL is provided in the MRTINIT member of the INSTALL library.
Data Set DescriptionSpace Requirements
34 Serena® ChangeMan® SSM 8.4
Compatibility With Other Serena Products
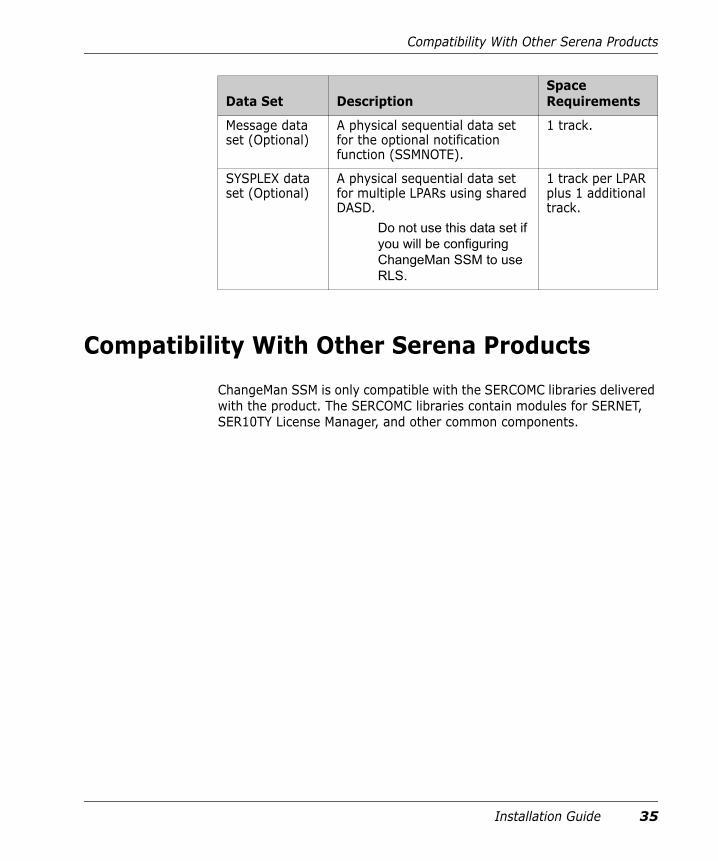
Compatibility With Other Serena Products ChangeMan SSM is only compatible with the SERCOMC libraries delivered with the product. The SERCOMC libraries contain modules for SERNET, SER10TY License Manager, and other common components.
Message data set (Optional)
A physical sequential data set for the optional notification function (SSMNOTE).
1 track.
SYSPLEX data set (Optional)
A physical sequential data set for multiple LPARs using shared DASD.
Do not use this data set if you will be configuring ChangeMan SSM to use RLS.
1 track per LPAR plus 1 additional track.
Data Set DescriptionSpace Requirements
Installation Guide 35

Chapter 2 Installation Requirements
36 Serena® ChangeMan® SSM 8.4

Chapter 3Installation Considerations
This chapter describes issues you must consider and decisions you must make before upgrading or installing ChangeMan SSM.
Installation Methods 38Upgrading ChangeMan SSM 38SER10TY Licensing Process 39Serena Libraries and LINKLIST 39Security 40Record Level Sharing (RLS) 40Fingerprinting or Tracking Large Objects 42PF Key Functionality 42Considerations for Change Tracking Installation 42
Installation Guide 37
Chapter 3 Installation Considerations
Installation MethodsTwo methods of installing the ChangeMan SSM software are supported: SMP/E installation and non-SMP/E installation. Customers should refer to IBM’s documentation for detailed planning information for the SMP/E method, if needed.
Customizable sample JCL is provided to assist installation by either method. Step-by-step instructions for installing the SSM software appear in Chapter 5, "Installation Procedures" on page 63.
Upgrading ChangeMan SSMReview this entire chapter before beginning the upgrade process.
The steps required for upgrading to version 8.4 are described in "Upgrading from a Prior Release" on page 67. Instructions are provided for upgrading from versions 8.2.3, 8.3.0, 8.3.1, 8.3.2, 8.3.3, and 8.3.4.
Licensing You must obtain a new license if you are installing ChangeMan SSM for the first time or if you are upgrading from an SSM release prior to version 8.3.4. To expedite your license key delivery, please provide the complete output from issuing the following command from the console where SSM will be running:
/D M=CPU
NOTE If you already have a license for 8.3.4, you do not need to obtain a new license; however, you must apply your 8.3.4 license using the new SER10TY components delivered with SSM 8.4.
38 Serena® ChangeMan® SSM 8.4

SER10TY Licensing Process
SER10TY Licensing Process ChangeMan SSM version 8.3 and above use SER10TY, the licensing product for Serena mainframe products. Releases of ChangeMan SSM prior to 8.3 used a SERVERAO module; this module no longer exists. SER10TY is easier to use and is described fully in the SER10TY User’s Guide.
To enable ChangeMan SSM, you must apply the license you receive from Serena Customer Support.
Refer to the SER10TY User’s Guide for instructions on how to apply the license. The load modules, JCL, and other components for running SER10TY are included in the libraries provided with ChangeMan SSM 8.4.
IMPORTANT! With the new licensing, the SERNET APL parm must be coded to enable ChangeMan SSM. This parm is already coded in the SSPARM member of the INSTALL library provided with this release of ChangeMan SSM. Be sure to use the INSTALL library provided with this release of ChangeMan SSM. If you use a previous version of the INSTALL library, ChangeMan SSM will not be enabled with the new licensing.
Serena Libraries and LINKLIST Serena recommends that you do not add load libraries for its mainframe products to the LINKLIST. If you license more than one Serena product and you do not keep the products at compatible release levels, common Serena load modules in a LINKLIST library might interfere with the proper function of some of these products. Instead, include a STEPLIB statement in the JCL for each SERNET instance, and include a JOBLIB statement in the JCL for each batch job submitted by a Serena product or run with programs from a Serena product.
Installation Guide 39

Chapter 3 Installation Considerations
Security Security measures already in place on your system are fully observed by ChangeMan SSM. When a file is fingerprinted, full track or cylinder read techniques are used instead of standard open/read. This approach, however, does not reveal any data, and does not violate security rules.
The result of a file fingerprint is a token that represents the data. Data cannot be reconstructed from a token. When a change basket is created, an open is issued to ensure the observance of security rules. At the time of applying a change basket, the same standards are observed.
For ISPF users, TSO authorization is established through the provided SVC 109 routine. ChangeMan SSM is also compatible with other authorization packages, such as RACF®, CA-ACF2®, or CA-Top Secret®.
APF Authorization ChangeMan SSM modules are link-edited with the attribute AC=1. The modules must be executed from an APF-authorized library because they perform full track reads for 3380 devices, and full cylinder reads for 3390 devices.
Record Level Sharing (RLS) RLS is an IBM facility that provides full read and write integrity for VSAM files shared across address spaces or LPARs. Implementing ChangeMan SSM with RLS enabled allows you to secure the ChangeMan SSM VSAM databases.
Required Setup for RLS ImplementationThe following tasks must be performed to set up RLS support in your sysplex environment before attempting to bring up ChangeMan SSM with RLS enabled.
1 Define and activate at least two sharing control data sets (SHCDS), and one spare SHCDS for recovery purposes.
40 Serena® ChangeMan® SSM 8.4
Record Level Sharing (RLS)
2 Define CF cache and lock structures to MVS, using the CFRM policy.
3 Define CF cache structures in the SMS base configuration.
4 Associate CF cache set names with SMS storage class definitions.
5 Update SYS1.PARMLIB member IGDSMSxx to specify RLSINIT(YES) if you want to automatically start the SMSVSAM server at IPL time.
Implementing ChangeMan SSM with RLSFollowing is a summary of the tasks required to implement ChangeMan SSM with RLS support. This is intended only as an overview. These tasks will be performed when you reach the appropriate steps in Chapter 5, "Installation Procedures" on page 63. Do not perform these tasks now.
1 The Site Master, Object Master, and Delta Master databases must be defined using an RLS-enabled storage class.
After the databases are defined, you must change the attributes (using an IDCAMS ALTER) to specify whether they are to be recoverable or non-recoverable.
These tasks will be performed in "Step 11: Define Databases" on page 88 and "Set Up Reorganization Jobs" on page 143.
2 Set the RLS parameter in the HPSPARMS member to YES. HPSPARMS is updated in "Step 6: Edit and Save HPSPARMS" on page 77.
3 Remove (or comment out) the //SYSPLEX DD in the SSM started task PROC. This task will be performed in "Step 19: Copy RTCT Startup Task Members" on page 114.
Operating IssuesWhen an RLS-managed HPSRTO subtask abends, or is stopped using “P taskname”, some locks are not released and are owned by RLS. The retention of locks by RLS in this situation is deliberate, to allow the application to complete any recovery processing. To correct this situation, shut down (gracefully) all of the other HPSRTO subtasks that are running and any ISPF sessions that may have a ChangeMan SSM database open, and then bring the HPSRTO subtasks back up again.
Installation Guide 41

Chapter 3 Installation Considerations
Fingerprinting or Tracking Large ObjectsWhen fingerprinting or tracking large objects (for example, those with a large number of events), it may be necessary to increase the region size of the job to avoid S878-10 ABENDs. Eligible jobs are those that execute HPSTRACK, HPSINTEG, HPSMAINT, HPSTRANS, and also the SSMSTAR started task.
It may be necessary to increase the REGION parameter for the job step to 256MB or higher. Performing operations on large objects in online mode also requires that you increase the SIZE parameter on the TSO LOGON screen to a minimum of 64MB. A region size of 64MB is also recommended for the SSM started task jobs.
The amount of storage required is dependent on the number of events for the object. The additional storage is only required when actually working with large objects. For example, a capture, query, or recover operation for a large object will require the larger amount of memory.
PF Key FunctionalityAs of version 8.3.2 of ChangeMan SSM, all ISPF panels that display a list of HFS file names support the use of PF10 for left scrolling and PF11 for right scrolling of the panel display area. The $SSMV8 clist in the INSTALL library has been updated to create the keylist in the user's ISPF profile data set.
The installer should review the SSMHFSK member in the PANELS library and verify that the remaining keys are mapped correctly for the installation.
Considerations for Change Tracking Installation
The topics in this section are applicable to the Change Tracking component. Some of these topics are referred to from the installation steps, where appropriate.
42 Serena® ChangeMan® SSM 8.4

Considerations for Change Tracking Installation
SERNETSERNET (previously called SERENA/Network) provides communication and other services on the mainframe server for Serena products. SERNET runs as a started task on an LPAR; multiple SERNET started tasks can be run on a single processor. The HPSRTO subtask runs as an application under a SERNET instance.
The SERNET started task obtains 64 bytes of CSA (Common System Area - subpool 245) to hold a Subsystem Communications Vector Table (SSCVT) control block. One SSCVT is required for each SERNET started task on a processor. To avoid fragmenting storage, this storage block is never released. When SERNET is cycled, it reuses the same anchor block until the next IPL clears it out.
If ChangeMan SSM is to be installed with the RTCT facility in an environment with multiple SERENA products, Serena recommends that you use the SERCOMC libraries delivered with the product; do not share the SERCOMC libraries across products.
Refresh MLPAInstallation of the RTCT facility of the Change Tracking component requires a refresh of the MLPA. The HPSRTO subtask dynamically intercepts MVS SVCs, which must be activated by an MLPA refresh or IPL.
The following two SETPROG commands may be used to do an MLPA refresh:
SETPROG LPA,ADD,MODNAME=(HPSFCLOS,HPSFSTOW,HPSFATCH,HPSFBLDL,HPSFLINK,HPSFLOAD,HPSFXCTL),DSNAME=your_mlpa_lib
SETPROG LPA,ADD,MODNAME=(HPSICLOS,HPSISTOW,HPSIDESX,HPSISCRA,HPSIDSRN,HPSIATCH,HPSIBLDL,HPSILINK,HPSILOAD,HPSIXCTL),DSNAME=your_mlpa_lib
NOTE If Change Tracking of HFS files is required, the following load modules must also be refreshed. They can be added to the second SETPROG command displayed above.
NOTE SERNET services is required only if you will be implementing Real Time Change Tracking (RTCT).
Installation Guide 43
Chapter 3 Installation Considerations
HPSIHCLO
HPSIHFD
HPSIHFP
HPSIHARR
HPSIHOP
HPSIHOPN
HPSIUNL
TIP If the dataset "your_mlpa_lib" points to the .LPA library supplied with ChangeMan SSM, then the SETPROG commands can be abbreviated as follows:
SETPROG LPA,ADD,MASK=HPSF*,DSNAME=your_mlpa_lib
SETPROG LPA,ADD,MASK=HPSI*,DSNAME=your_mlpa_lib
Multiple LPARs or Sysplex Environments If you will be using multiple LPARs and sharing a common set of databases amongst all HPSRTO started tasks, there are two methods for managing multiple concurrent users:
1 Record Level Sharing (RLS). Recommended.
2 ChangeMan SSM’s SYSPLEX facility.
Record Level Sharing (RLS)
RLS is the recommended method; it is faster and safer than the SYSPLEX facility.
RLS manages multiple concurrent users who are updating or browsing the VSAM databases. When you configure ChangeMan SSM to use RLS, the VSAM databases are protected from concurrent updates.
RLS also manages multiple concurrent TSO users with database update authority.
The implementation for RLS is described in "Record Level Sharing (RLS)" on page 40.
44 Serena® ChangeMan® SSM 8.4

Considerations for Change Tracking Installation
ChangeMan SSM’s SYSPLEX Facility
RTCT supports multiple LPARs on shared DASD, with a common set of databases amongst all HPSRTO started tasks.
To enable this feature, a //SYSPLEX DD statement must be added to the SSMSTAR PROC for each LPAR. This DD will point to a common file that is used for communication between the master HPSRTO task and the slave HPSRTO tasks.
The first HPSRTO task to come up will automatically become the master. This SYSPLEX file must be a pre-allocated physical sequential file, with one primary track for each HPSRTO started task.
Refer to ALOCPLEX in the install data set to allocate somnode.SYSPLEX to serve as the communication file.
The automatic global capture, if enabled, will be performed only by the master task. If the master task is stopped, one of the slave tasks will be automatically promoted to master.
Multiple HPSPARMS Members (Optional) If ChangeMan SSM software is installed on shared DASD, and your requirements are to have separate sets of tracking databases for each LPAR, or several iterations of ChangeMan SSM running on a single LPAR, review this and the following topic, "Multiple Change Tracking Environments (Optional)" on page 46. However, this approach is not recommended.
By default, the software points to the member HPSPARMS residing in SYS1.PARMLIB. The names of the databases that ChangeMan SSM is supposed to operate with are coded in this source member.
To direct the software to point to other PARM members, use a //HPSPLIB DD statement.
Each environment can have its own set of VSAM databases (Site Master, Object Master, Delta Master, and Archive Master).
The default member is HPSPARMS, but the user can create HPSPARM1, HPSPARM2, and so on. The last character of these modules should indicate the appropriate system. For example, HPSPARMP (production group), and HPSPARMC (change control group) are suggested names.
Installation Guide 45

Chapter 3 Installation Considerations
The appropriate member must be referenced by a DD statement; this directs ChangeMan SSM to operate in a specific environment. In the batch jobs, any execution of the HPSTRACK and HPSGLOBE programs must have the following DD statement present:
//HPSPLIB DD DSN=somnode.INSTALL(HPSPARMx),DISP=SHR
For the ISPF environment, a similar DD statement must be specified in the CLIST to invoke ChangeMan SSM. The absence of this DD statement indicates that the default HPSPARMS is in effect.
If multiple Change Tracking environments (one for each LPAR) are required, use the following procedure "Multiple Change Tracking Environments (Optional)" on page 46 (after you define the initial set of data bases).
Multiple Change Tracking Environments (Optional) Use this procedure if Change Tracking environments are required on each LPAR. First time installers can skip this section; this procedure can be performed in the future if necessary.
1 Create a new HPSPARMx member using HPSPARMS as a model. Use the CPU ID number or a meaningful letter as the last character.
2 Allocate and initialize a new set of databases using the following JCL:
somnode.INSTALL($INIT)
You should use the following database names, where lpara is the LPAR name or CPU ID:
somnode.lpara.SITE.MASTERsomnode.lpara.OBJECT.MASTERsomnode.lpara.DELTA.MASTERsomnode.lpara.ARCHIVE.MASTER
3 Create a new CLIST using your current $SSMV8 CLIST member. Provide the following DD, or the PARMLIB library name specified in "Step 3: Determine Method of TSO/E Authorization" on page 73 of the installation process:
ALLOC DD (HPSPLIB) DA (’SYS1.PARMLIB(HPSPARMx)’)SHR
46 Serena® ChangeMan® SSM 8.4

Considerations for Change Tracking Installation
4 Modify and submit the JCL in the $ADMSET member of the INSTALL library.
This JCL initializes the new databases and defines a minimum configuration for the new ChangeMan SSM environment. Make sure to provide the //HPSPLIB DD that points to the new HPSPARMx member.
5 Modify the batch jobs that execute the HPSTRACK program to include the new //HPSPLIB DD.
Modify the HPSGLOBE program that should run on a regular basis.
Use the DD statement in all batch procedures for each ChangeMan SSM environment. The member (HPSPARMx) points to the ChangeMan SSM databases. Set up the required jobs to back up the three databases before HPSGLOBE runs.
If Real Time Change Tracking is installed, repeat the following steps on each LPAR:
• Copy the intercept modules.
• IPL the system.
• Start the job, verifying that //HPSPLIB points to the appropriate PARM members.
ROLLOFF Parm AdjustmentThe ROLLOFF count parameter in the HPSPARMS parmlib member indicates the maximum number of events to be retained for each object in the Site Master. When the maximum number of events for an object has been saved, ChangeMan SSM will purge any additional events, starting with the oldest event, until the total number of events has been reduced to the value specified in the ROLLOFF parameter.
NOTE For data sets defined to Change Tracking as "Delta Tracked", the ROLLOFF count is suppressed. Thus the number of events retained by the system for these data sets is not affected by the ROLLOFF value. Instead, the retention of events is controlled by the scheduled execution of the HPSMAINT program.
Installation Guide 47

Chapter 3 Installation Considerations
The ROLLOFF count value can be any integer from 0 to 65535. The value 9999 or the value 0 can be used to suppress the ROLLOFF option, thereby retaining all events for each object in the Site Master.
A suggested value can be derived as follows:
ROLLOFF= K * (1+$Growth) * (Retain Days)
where K is the number of events for the most active PDS to be tracked, $Growth is a decimal value to indicate the growth percentage, and Retain Days is the number of days to retain the events in the database.
For example, assume that the most active partitioned data set to be tracked is SYS1.PARMLIB, with an estimated number of 50 events per day. Assume that this PDS will grow at a rate of 10% per period, and change events are retained 90 days before being purged. A suggested value for the ROLLOFF count would be:
50 * (1 + .1) * (90) = 4,950.
This value can be reset as your site requirements change.
DB2 Setup Change Tracking events and MRT reference data can be loaded into a DB2 table and queried using standard SQL calls.
The DB2SETUP job in the INSTALL library can be used to create a database, storage group, tablespace, and table.
Post-Approval of Changes To provide for the post-approval of changes, a Serena Business Manager (SBM) item must be opened after a change is detected to a tracked item. ChangeMan SSM has the ability to send an e-mail notification when a change is detected. SBM can receive this e-mail submission and create an item for post-approval of the change.
The ChangeMan SSM notification is configured in the MAIL4NFY install library member. Refer to the “Preparing Your System for E-mail
NOTE If you are upgrading from ChangeMan SSM 8.3.2 or earlier, the DB2SETUP job has changed for the YOURRTCTB table. Be sure to get the latest JCL from the new INSTALL library.
48 Serena® ChangeMan® SSM 8.4

Considerations for Change Tracking Installation
Submission” section of the SBM System Administrator Guide for instructions on configuring SBM.
The subject of the submitted email will be the title of the SBM item and the body of the email will be the description. A template can be created within SBM to allow additional fields to be specified in the email and input to SBM. The MAIL2EXE install library member must be customized to match the template. Refer to the “E-mail Submission E-mail Templates” section of the SBM System Administrator Guide for instructions on configuring the templates for SBM.
Installation Guide 49

Chapter 3 Installation Considerations
50 Serena® ChangeMan® SSM 8.4

Chapter 4Unloading the Distribution Media
This chapter describes how to unload the ChangeMan SSM components from the product download and create libraries on the mainframe.
Installation Methodology 52Unloading the Distribution Media 54
Installation Guide 51

Chapter 4 Unloading the Distribution Media
Installation MethodologyChangeMan SSM may be installed using either the SMP/E method or the non-SMP/E method.
The installation libraries are unloaded from the distribution media. After the product is installed and available, all of the product’s component libraries can be tracked for any changes, utilizing the Change Tracking component of the software.
The distribution media contains the following partitioned data sets.
Library Contents and DCB Attributes
CMNSSM.V8R4M0.INSTALL ChangeMan SSM installation JCL.PO,FB,LRECL=80,BLKSIZE=6000.
CMNSSM.V8R4M0.LOAD ChangeMan SSM load modules.PO,U,LRECL=0,BLKSIZE=6000.
CMNSSM.V8R4M0.LOADLPA ChangeMan SSM SVC intercept modules.PO,U,LRECL=0,BLKSIZE=6000.
CMNSSM.V8R4M0.MESSAGES ChangeMan SSM ISPF messages.PO,FB,LRECL=80,BLKSIZE=6000.
CMNSSM.V8R4M0.OBJECT ChangeMan SSM installation exit object modules for input to SMP/E.PO,FB,LRECL=80,BLKSIZE=6000.
CMNSSM.V8R4M0.PANELS ChangeMan SSM ISPF panels.PO,FB,LRECL=80,BLKSIZE=6000.
CMNSSM.V8R4M0.SAMPLES ChangeMan SSM sample JCL and commands.PO,FB,LRECL=80,BLKSIZE=6000.
CMNSSM.V8R4M0.SKELS ChangeMan SSM skeletons.PO,FB,LRECL=80,BLKSIZE=6000.
SERCOMC.V8R4M0.CNTL SERNET/Common/SER10TY JCL.PO,FB,LRECL=80,BLKSIZE=6000.
SERCOMC.V8R4M0.LOAD SERNET/Common/SER10TY load modules.PO,U,LRECL=0,BLKSIZE=6000.
SERCOMC.V8R4M0.XML SERNET/Common/SER10TY XML.PO,FB,LRECL=80,BLKSIZE=6000.
52 Serena® ChangeMan® SSM 8.4

Installation Methodology
The first data set (somnode.INSTALL) contains the CLIST to access the ChangeMan SSM online panels, a sample HPSPARMS to set up the ChangeMan SSM parameters, the JCL to install the software, and all the required administration JCL utilities.
The libraries starting with the node SERCOMC contain common modules for Serena products, such as SERNET and SER10TY.
In general, the executable programs start with the prefix HPS. This is the internal naming convention for ChangeMan SSM.
Library Members for SMP/E InstallThe following table describes members in the ChangeMan SSM INSTALL library that are used for an SMP/E install:
Member Name Description
SMPACCPT SMP/E ACCEPT of the ChangeMan SSM components.
SMPALLOC Allocates the ChangeMan SSM SMP/E target and distribution datasets.
SMPAPPLY SMP/E APPLY of the ChangeMan SSM components.
SMPCDDEF SMP/E DDDEFs required for a new ChangeMan SSM release.
SMPCSI Allocates the SMP/E CSI dataset and other SMP/E datasets.
SMPDDDEF SMP/E DDDEFs required for a new ChangeMan SSM release.
SMPPROC Minimum SMP/E PROC.
SMPRECV SMP/E RECEIVE of the ChangeMan SSM components. This process loads the data from the downloaded sequential datasets into the SMP/E global zone and SMPPTS.
SMPPTFAC SMP/E ACCEPT for ChangeMan SSM maintenance.
SMPPTFAP SMP/E APPLY for ChangeMan SSM maintenance.
SMPPTFRV SMP/E RECEIVE for ChangeMan SSM maintenance.
Installation Guide 53

Chapter 4 Unloading the Distribution Media
Unloading the Distribution Media
The software installer moves the files from the ChangeMan SSM product download to your host. The files are in a compressed format and become decompressed when they are copied to your PC during the unload process.
The software installer lets you create an FTP Input file that contains the FTP commands to upload the ChangeMan SSM files from your PC to the host. You use FTP to transfer the files to the host, then you run the included JCL (RECEIVE.SSM84.TXT) to receive the files on the host.
This process requires the following:
TCP/IP FTP connectivity from your PC to the host computer.
The dotted decimal IP address of the host.
A host userid and password.
Security authorization to allocate files on the host.
Download the Software1 Download the ChangeMan SSM 8.4 software, "SSM840Setup.exe",
from the Serena Support web site at http://support.serena.com and save it to a location on your PC.
Copy the files to your computer1 Double-click "SSM840Setup.exe" to start the unload process.
2 When the Welcome screen displays, click Next to continue.
3 When the End-User License Agreement displays, select “I accept the terms in the License Agreement” and click Next.
4 On the Destination Folder screen, select the folder to which you want to copy the files and click Next. (Copying the files to your local PC
NOTE After you unload the files from the product download, copy the members in the maintenance libraries to a test environment before applying them to your existing ChangeMan SSM product libraries.
54 Serena® ChangeMan® SSM 8.4

Unloading the Distribution Media
decreases the transfer time to the host and decompresses the files from their compressed format.)
5 On the Host FTP and Transmission Information screen, specify the following fields and then click Next.
Host Name or IP – Enter the dotted decimal IP address of the host.
Host Logon ID – Enter your host user ID.
Transmitted File HLQ – Specify the high-level qualifier to be added to the XMIT data sets (the sequential data sets transmitted from the PC to the host). For example, somnode.XMIT.
PDS Libraries HLQ – Specify the high-level qualifier to be added to the RECEIVE data sets (the libraries created when the RECEIVE command expands the XMIT-formatted files transmitted from the PC). For example, somnode.RECEIVE.
• For a non-SMP/E install, this value should be the HLQ for the final ChangeMan SSM installation libraries.
• For an SMP/E install, this value should be a temporary HLQ for the SMP/E input files. It should not be the HLQ for your final ChangeMan SSM installation libraries. The final installation libraries will be created by SMP/E in a later step.
Follow these rules when entering the high-level qualifiers:
• Do not choose high-level qualifiers that create data set names that already exist on the host. The transmit and RECEIVE processes overlay existing data sets.
• The Transmitted File HLQ and PDS Libraries HLQ must be different.
• Your host userid must have authority to allocate files with these names.
• Do not add leading or trailing periods.
• Do not add parentheses or quotes (single or double).
• The maximum length of the total data set name (high-level qualifier plus ChangeMan SSM library name) is 44 characters.
• The data entered in these fields is not case-sensitive.
Installation Guide 55

Chapter 4 Unloading the Distribution Media
6 On the next screen, click Install to begin the installation, which will copy the files to your PC.
7 On the final screen, you may view the Readme file by selecting “Open Readme for ChangeMan SSM 8.4.0”. Click Finish and continue to the next section to edit the FTP input file.
Edit the FTP Input File1 Go to Start > All Programs > Serena > ChangeMan SSM 8.4.0 > Edit
FTP Input, which displays the FTP command file that FTP uses to transfer the ChangeMan SSM XMIT format files to the host.
2 Add your password to the file by overtyping PASSWORD (on the third line) with your host password. You must also remove the “<” and “>” characters that precede and follow PASSWORD, otherwise the login to the host fails.
3 Save the file under the same name.
Edit the RECEIVE Job You may edit the RECEIVE job now or through your TSO session when the files have been uploaded to the host.
The installation creates the file “receive.SSM840.txt”, which contains JCL to receive the files on the host. The TXT file is transferred to the host in ASCII format. You must add your JOB statements in order for the RECEIVE job to run.
If you want to edit the job now, do the following:
1 Go to Start > All Programs > Serena > ChangeMan SSM 8.4.0 > Edit Receive JCL.
2 Add your JOB statements to the JCL.
3 Save the file under the same name.
NOTE After you finish uploading the files to the host, delete the password from your PC.
56 Serena® ChangeMan® SSM 8.4

Unloading the Distribution Media
Transfer Files to the HostAfter you edit the FTP input file by adding your password, you are ready to transfer files to the host. The target host must be connected to the network for this transfer to work. To transfer the files:
1 Go to Start > All Programs > Serena > ChangeMan SSM 8.4.0 > FTP Files to Host.
A window displays with the message:
FTP process has begun.
The transfer may take several minutes. Wait until you see the following messages, which indicate that the transfer is complete. Do not close the dialog window until you see these messages:
FTP process has completed.
FTP Execution Log: C:\ProgramData\Serena\ChangeMan SSM 8.4.0\Ftp.log
Press any key to continue . . .
2 After the transfer completes and you press any key to continue, the dialog window closes.
3 View the FTP log file to verify that the files were transferred to the host. To do this, select Start > All Programs > Serena > ChangeMan SSM 8.4.0 > View FTP log.
If any of the following errors display, you must make corrections in the FTP Input File and repeat Step 1 above.
Message Corrective Action
Unknown Host Check the IP address of your host and edit the FTP input file.
Invalid Command Verify that you entered the correct user name and password in the FTP input file.
Not Connected The FTP connection was lost so these files were not uploaded. Resubmit the program by choosing FTP Files to Host.
Installation Guide 57

Chapter 4 Unloading the Distribution Media
Submit the Receive JobAfter you complete a valid FTP transfer, run the job in "somnode.RECEIVE.SSM840.JCL" to unload the XMIT files into product libraries on the host.
1 Log on to your TSO session.
2 Find the "somnode.RECEIVE.SSM840.JCL" file (somnode is the high-level qualifier that you previously specified for Transmitted File HLQ in Step 5 on page 55).
3 If you did not edit the "receive.SSM840.txt" file on the PC ("Edit the RECEIVE Job" on page 56), edit the file now by adding your JOB statement information.
4 Submit the job contained in the file.
5 Examine the libraries created with the host high-level qualifier to ensure that they are PDS or PDSE libraries with the appropriate high-level qualifier. They may not have been created successfully despite a return code of 0 or a job sysout message that says, "Restore successful to dataset...”.
Delete your PasswordAfter unloading the CD and uploading the files to the host, delete your password from the FTP Input file (for security reasons).
1 Go to Start > All Programs > Serena > ChangeMan SSM 8.4.0 > Edit FTP Input
2 Delete your password.
3 Save the file.
Finish the InstallationFor SMP/E installations:
Go to the next section “SMP/E Installation”.
58 Serena® ChangeMan® SSM 8.4

SMP/E Installation
For non-SMP/E installations:
If you are installing a maintenance release, copy the replacement components to your product libraries, refresh your LPA as needed, and recycle ChangeMan SSM to implement the maintenance.
If you are installing a standard release, continue to the next chapter "Installation Procedures" on page 63 to install ChangeMan SSM.
SMP/E InstallationIf you are installing a full copy of ChangeMan SSM, follow the instructions under “Full Install with SMP/E”.
If APPLYing on a base release, add BYPASS(PRE,ID) if needed.
CAUTION! ChangeMan SSM must be installed into a separate CSI zone. APPLYing an SMP/E install in a shared CSI zone will cause unpredictable results.
Full Install with SMP/EThese instructions guide you through a full SMP/E installation.
NOTE When you see the node host_hlq , substitute the high-level qualifier that you specified for PDS Libraries HLQ in Step 5 on page 55.
1 Copy JCL procedure SMPPROC to a library in your site's JES2 concatenation. This procedure is referenced by the SMP/E install members for ChangeMan SSM. It resides in the newly created library host_hlq.CMNSSM.V8R4M0.INSTALL. For assistance, refer to your JES2 manuals or consult your JES2 systems programmer.
NOTE Your site may already have a SMP/E procedure defined. Consult your systems programmer for the name of your site’s SMP/E procedure. To use a different procedure name, change the SMP* members as appropriate in host_hlq.CMNSSM.V8R4M0.INSTALL. You also need to change SSMTGT to match your target zone name and SSMDLB to match your DLIB zone name.
Installation Guide 59

Chapter 4 Unloading the Distribution Media
2 To define a new CSI and new SMP/E data sets for your ChangeMan SSM installation, modify and submit JCL member SMPCSI, which resides in host_hlq.CMNSSM.V8R4M0.INSTALL. This member defines and initializes the VSAM CSI data set and defines the SMPLOG, SMPMTS, SMPPTS, SMPSCDS, and SMPSTS data sets. Check for a zero return code.
Modify the member as follows:
• Change the disk unit name (if required).
• Change the disk volume name. If you do not want a specific output volume, type "DISKVOL=," (without the quotes) to nullify this parameter.
• Change the prefix from somnode to your chosen high-level qualifier (HLQ) for the final Change SSM installation libraries created by SMP/E.
• Change product to the ChangeMan SSM product/version.
3 Modify the "define DDDEF" member SMPDDDEF, which resides in host_hlq.CMNSSM.V8R4M0.INSTALL. Define the DDNAME and data set names for SMP/E dynamic allocation.
• Change all occurrences of somnode to your chosen HLQ for the final ChangeMan SSM installation libraries.
• Change product to the ChangeMan SSM product/version.
• Update the SYSLIB definition to include other DDNAMEs as required.
4 Submit the modified SMPDDDEF member and check the return code.
• If you previously defined these data sets, you should get a return code of zero.
• If these data sets are being defined for the first time, you should get a return code of 04 since a REP is being performed.
5 Edit and run the SMPCDDEF job from the host_hlq.CMNSSM.V8R4M0.INSTALL library. Update the JCL as follows:
• The value for CDHOST should be changed to the temporary high-level qualifier host_hlq.
60 Serena® ChangeMan® SSM 8.4

SMP/E Installation
• The value for somnode should be the desired HLQ for the final ChangeMan SSM installation libraries created by SMP/E. This should not be the same value as host_hlq.
• The value for product should be the ChangeMan SSM product/version.
• Change the JOB statement and all occurrences of somnode, product, and CDHOST as appropriate for your installation.
6 Modify and submit member SMPALLOC to allocate SMP/E target and DLIB data sets. SMPALLOC resides in host_hlq.CMNSSM.V8R4M0.INSTALL.
• Change the disk unit name (if required).
• Change the disk volume name. If you do not want a specific output volume, type DISKVOL=, to nullify this parameter.
• Change somnode to the HLQ.
• Change product to the ChangeMan SSM product/version.
• Reblock the data sets (if required). The source data sets are blocked at 9040 bytes for loading to a 3380 disk volume. Use a blocksize of 13680 when loading to a 3390 disk volume. You may also want to reblock these data sets if they will be concatenated to existing data sets at your installation.
7 Submit the modified SMPALLOC job and check for a zero return code.
8 Modify the SMP/E RECEIVE job member, SMPRECV, in library host_hlq.CMNSSM.V8R4M0.INSTALL.
• Change the Global CSI name.
• Change somnode to the HLQ.
• Change product to the ChangeMan SSM product/version.
9 Further modify SMPRECV to change the mid-level qualifier CDNODE to match the high-level qualifier you specified for host_hlq.
10 Submit the modified SMPRECV and check for a zero return code.
11 Modify member SMPAPPLY (the SMP/E APPLY job) in library host_hlq.CMNSSM.V8R4M0.INSTALL to ensure that all parameters conform to your installation standards. Instructions are included in this job to perform an APPLY CHECK. (Note that the second step is
Installation Guide 61
Chapter 4 Unloading the Distribution Media
commented out – this should be changed for any release that has source updates. The Readme file will identify these updates.)
12 Submit the modified SMPAPPLY job and check for a zero return code. Your target libraries should be filled with the proper ChangeMan SSM software.
13 If you do not want to execute ChangeMan SSM out of SMP-controlled libraries, create copies of the following libraries: CSSMJCS, CSSMLOD, CSSMLPA, CSSMMSG, CSSMOBJ, CSSMPNL, CSSMSAM, and CSSMSKL.
14 After ChangeMan SSM is configured and working properly, edit member SMPACCPT (the SMP/E ACCEPT job) in host_hlq.CMNSSM.V8R4M0.INSTALL so that all parameters conform to your installation standards. Instructions are included in this job to perform an ACCEPT CHECK.
15 Submit the modified SMPACCPT job and check for a zero return code. If successful job completion is verified, installation is now complete.
16 Review the following topic, “ACCEPT Processing Requirements”, and then continue to the next chapter, "Installation Procedures" on page 63, to install ChangeMan SSM.
ACCEPT Processing RequirementsAfter testing and implementation in production, an SMP/E ACCEPT should be performed at the base level of the product. This ensures that the correct level of each component exists in the DLIB zones.
ACCEPT processing should also be performed after successfully applying and implementing each maintenance release.
CAUTION! SMP/E cannot roll back customizations and maintenance releases properly if ACCEPT processing is not performed.
62 Serena® ChangeMan® SSM 8.4

Chapter 5Installation Procedures
Before starting the upgrade or installation process, read the following chapters:
Chapter 2, "Installation Requirements" on page 31.
Chapter 3, "Installation Considerations" on page 37.
Chapter 4, "Unloading the Distribution Media" on page 51.
The following topics are covered in this chapter:
Install Library Contents 64Upgrading from a Prior Release 67Installation Overview 70Install ChangeMan SSM 71Install Change Tracking Component 86Administrative Facilities for Maintaining Change Tracking Databases 140
Installation Guide 63

Chapter 5 Installation Procedures
Install Library ContentsThe ChangeMan SSM INSTALL library, previously unloaded from the distribution media, contains members used for installation, maintenance, and operation of ChangeMan SSM.
The following table describes members in the ChangeMan SSM INSTALL library that are common to all components:
The following table describes members in the ChangeMan SSM INSTALL library for the Change Tracking component:
Member Name Description
$AUTH Job to dynamically establish TSO authorization (ESR).
$PARMSET Job to set the default PARMLIB data set and member names, referenced in the ChangeMan SSM HPSINIT1 program.
$SSMV8 CLIST to invoke ChangeMan SSM from an ISPF session.
$ZAPROUT Job to set the ESR route code for the static ESR installation method, see "Step 3: Determine Method of TSO/E Authorization" on page 73.
HPSPARMS ChangeMan SSM parameters (described in the table in "Step 6: Edit and Save HPSPARMS" on page 77).
VSLAYOUT Record layouts for the contents of a VSAM Change Basket data set.
Member Name Description
$ADMSET Job to set up a minimum administrative environment for the Change Tracking component.
$ADMSET2 Job to add additional Site Administrators after the initial install using the $ADMSET member, for non-SAF environments only.
64 Serena® ChangeMan® SSM 8.4
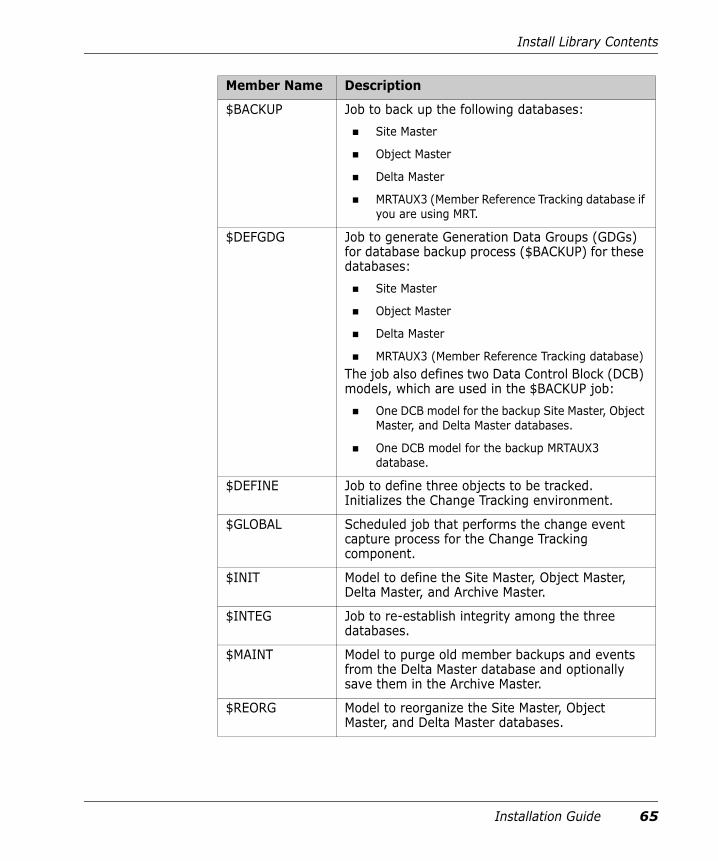
Install Library Contents
$BACKUP Job to back up the following databases: Site Master
Object Master
Delta Master
MRTAUX3 (Member Reference Tracking database if you are using MRT.
$DEFGDG Job to generate Generation Data Groups (GDGs) for database backup process ($BACKUP) for these databases: Site Master
Object Master
Delta Master
MRTAUX3 (Member Reference Tracking database)The job also defines two Data Control Block (DCB) models, which are used in the $BACKUP job: One DCB model for the backup Site Master, Object
Master, and Delta Master databases.
One DCB model for the backup MRTAUX3 database.
$DEFINE Job to define three objects to be tracked. Initializes the Change Tracking environment.
$GLOBAL Scheduled job that performs the change event capture process for the Change Tracking component.
$INIT Model to define the Site Master, Object Master, Delta Master, and Archive Master.
$INTEG Job to re-establish integrity among the three databases.
$MAINT Model to purge old member backups and events from the Delta Master database and optionally save them in the Archive Master.
$REORG Model to reorganize the Site Master, Object Master, and Delta Master databases.
Member Name Description
Installation Guide 65
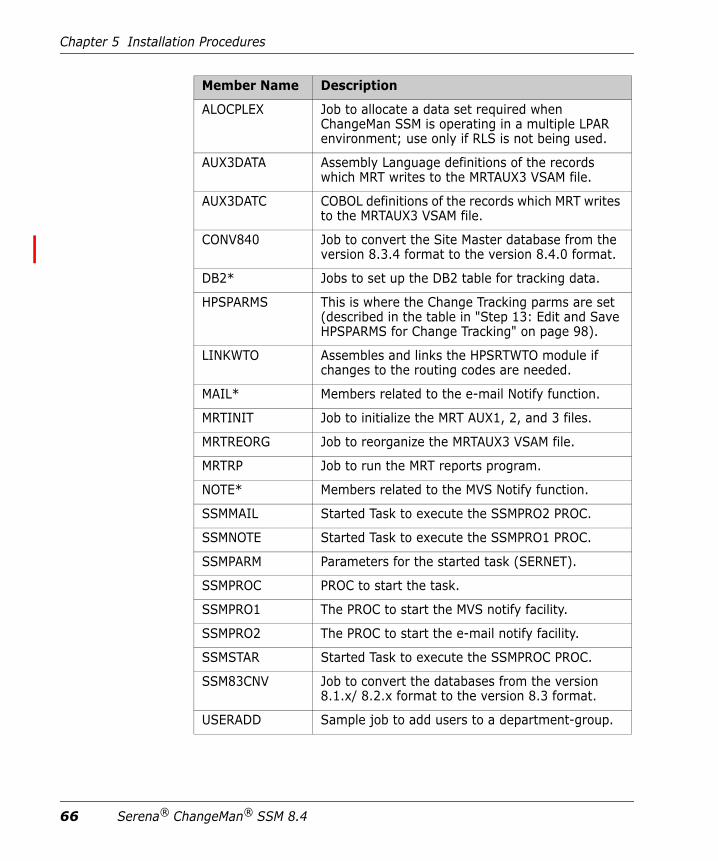
Chapter 5 Installation Procedures
ALOCPLEX Job to allocate a data set required when ChangeMan SSM is operating in a multiple LPAR environment; use only if RLS is not being used.
AUX3DATA Assembly Language definitions of the records which MRT writes to the MRTAUX3 VSAM file.
AUX3DATC COBOL definitions of the records which MRT writes to the MRTAUX3 VSAM file.
CONV840 Job to convert the Site Master database from the version 8.3.4 format to the version 8.4.0 format.
DB2* Jobs to set up the DB2 table for tracking data.
HPSPARMS This is where the Change Tracking parms are set (described in the table in "Step 13: Edit and Save HPSPARMS for Change Tracking" on page 98).
LINKWTO Assembles and links the HPSRTWTO module if changes to the routing codes are needed.
MAIL* Members related to the e-mail Notify function.
MRTINIT Job to initialize the MRT AUX1, 2, and 3 files.
MRTREORG Job to reorganize the MRTAUX3 VSAM file.
MRTRP Job to run the MRT reports program.
NOTE* Members related to the MVS Notify function.
SSMMAIL Started Task to execute the SSMPRO2 PROC.
SSMNOTE Started Task to execute the SSMPRO1 PROC.
SSMPARM Parameters for the started task (SERNET).
SSMPROC PROC to start the task.
SSMPRO1 The PROC to start the MVS notify facility.
SSMPRO2 The PROC to start the e-mail notify facility.
SSMSTAR Started Task to execute the SSMPROC PROC.
SSM83CNV Job to convert the databases from the version 8.1.x/ 8.2.x format to the version 8.3 format.
USERADD Sample job to add users to a department-group.
Member Name Description
66 Serena® ChangeMan® SSM 8.4
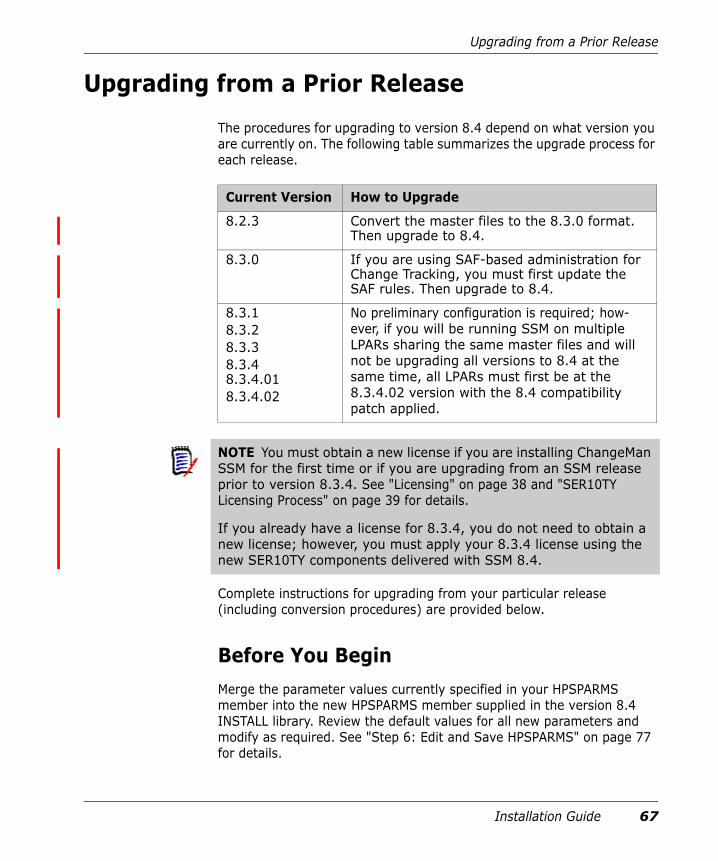
Upgrading from a Prior Release
Upgrading from a Prior Release The procedures for upgrading to version 8.4 depend on what version you are currently on. The following table summarizes the upgrade process for each release.
Complete instructions for upgrading from your particular release (including conversion procedures) are provided below.
Before You BeginMerge the parameter values currently specified in your HPSPARMS member into the new HPSPARMS member supplied in the version 8.4 INSTALL library. Review the default values for all new parameters and modify as required. See "Step 6: Edit and Save HPSPARMS" on page 77 for details.
Current Version How to Upgrade
8.2.3 Convert the master files to the 8.3.0 format. Then upgrade to 8.4.
8.3.0 If you are using SAF-based administration for Change Tracking, you must first update the SAF rules. Then upgrade to 8.4.
8.3.18.3.28.3.38.3.48.3.4.018.3.4.02
No preliminary configuration is required; how-ever, if you will be running SSM on multiple LPARs sharing the same master files and will not be upgrading all versions to 8.4 at the same time, all LPARs must first be at the 8.3.4.02 version with the 8.4 compatibility patch applied.
NOTE You must obtain a new license if you are installing ChangeMan SSM for the first time or if you are upgrading from an SSM release prior to version 8.3.4. See "Licensing" on page 38 and "SER10TY Licensing Process" on page 39 for details.
If you already have a license for 8.3.4, you do not need to obtain a new license; however, you must apply your 8.3.4 license using the new SER10TY components delivered with SSM 8.4.
Installation Guide 67
Chapter 5 Installation Procedures
Upgrading from 8.2.3If you will be using the Change Tracking component, perform the following steps to convert the databases to the version 8.3 format.
1 Bring down the ChangeMan SSM Version 8.2.3 started tasks.
2 Run the HPSINTEG program to ensure that the three databases are synchronized and to remove any damaged records. The JCL can be found in the $INTEG member in the version 8.2.3 INSTALL library.
3 Optional. Run the HPSMAINT program to remove old/obsolete backup members in the Delta Master database. The JCL can be found in the $MAINT member in the version 8.2.3 INSTALL library.
4 Run the job in the SSM83CNV member in the version 8.4.0 INSTALL library to back up the version 8.2.3 databases and convert them to the version 8.3 format.
5 Proceed to Upgrading to 8.4.
Upgrading from 8.3.0If you are using SAF-based administration for Change Tracking, you must first update the SAF rules. Refer to Appendix B, "RACF Security for Change Tracking" on page 185, which provides sample commands for setting up SAF Security checking for the Change Tracking environment.
Then proceed to Upgrading to 8.4.
Upgrading from 8.3.1, 8.3.2, 8.3.3, and 8.3.4.xxNo preliminary configuration is required; however, if you will be running SSM on multiple LPARs sharing the same master files and will not be upgrading all versions to 8.4 at the same time, all LPARs must first be at the 8.3.4.02 version with the 8.4 compatibility patch applied.
Proceed to Upgrading to 8.4.
68 Serena® ChangeMan® SSM 8.4
Upgrading from a Prior Release
Upgrading to 8.4
Convert the Site Master Database
If you will be using the Change Tracking component, perform the following steps to convert the Site Master database to the version 8.4 format. Use the JCL in the version 8.4.0 INSTALL library.
1 Bring down the ChangeMan SSM started tasks using the set of master files to be converted.
2 Run the job in the CONV840 member in the version 8.4 INSTALL library to back up the current ChangeMan SSM version 8.3.x.xx databases and convert the Site Master to the Version 8.4 format.
3 Run the HPSINTEG program to ensure that the three databases are synchronized and to remove any damaged records. The JCL can be found in the $INTEG member in the version 8.4.0 INSTALL library.
4 Optional. Run the HPSMAINT program to remove old/obsolete backup members in the Delta Master database. The JCL can be found in the $MAINT member in the version 8.4.0 INSTALL library.
Upgrade to 8.4
Follow these steps to upgrade to ChangeMan SSM 8.4.
1 Complete "Step 1: Authorize Load Libraries" on page 72.
2 If you are using the dynamic ESR installation method, submit the $AUTH job, pointing to the new authorized library.
IMPORTANT! Do not run the $AUTH job if you are using the static ESR installation method.
3 You must obtain a new license if you are installing ChangeMan SSM for the first time or if you are upgrading from an SSM release prior to version 8.3.4. If you already have a license for 8.3.4, you do not need to obtain a new license; however, you must apply your 8.3.4 license using the new SER10TY components delivered with SSM 8.4.
Complete "Step 2: Apply ChangeMan SSM 8.4 License" on page 72.
Installation Guide 69

Chapter 5 Installation Procedures
4 Edit the supplied $SSMV8 CLIST and update the ISPF data sets if necessary.
5 To set up the Real Time Change Tracking facility (RTCT), complete "Step 17: COPY Intercept Modules into LPA/MLPA" on page 112 through "Step 26: Verify RTCT" on page 135.
IMPORTANT! When you are performing the above steps to set up RTCT, an IPL is required to remove the old SVC hooks and control blocks. The instruction to IPL your system is provided in "Step 22: Refresh LPA/MLPA" on page 123. This note is just a reminder to be sure that you IPL your system when you get to that step.
6 Review "Step 23: Member-Level Security (MLS) - Optional" on page 124 and "Step 24: Member Reference Tracking (MRT) - Optional" on page 129.
7 If you have multiple LPARs using shared DASD, review "Multiple LPARs or Sysplex Environments" on page 44 and "Multiple HPSPARMS Members (Optional)" on page 45.
8 After you have completed the above steps, proceed to Chapter 6, "Post-Installation Verification" on page 157.
Installation Overview The installation instructions are divided into two main sections:
1 "Install ChangeMan SSM" on page 71
Required. Covers the installation steps common to all components. Describes how to download the ChangeMan SSM software and set up the ISPF interface.
Upon completion of this section, the Detection and Synchronization component and the Data Extraction component are operational and available to all licensed users (the Change Tracking component requires further customization). However, each user must set up their user option parameters prior to using the ChangeMan SSM online facilities (described in "Specify Defaults and User Options" on page 169).
2 "Install Change Tracking Component" on page 86
70 Serena® ChangeMan® SSM 8.4

Install ChangeMan SSM
Describes how to complete the installation of the Change Tracking component. Also covered are instructions for installing optional features, such as Member Level Security (MLS) and Member Reference Tracking (MRT).
When you have completed the Change Tracking installation, refer to "Administrative Facilities for Maintaining Change Tracking Databases" on page 140, which describes maintenance procedures required if you are using either Real Time Change Tracking (RTCT) or Batch Interval Change Tracking (BICT).
Install ChangeMan SSMThis part of the installation is common to all components. The following steps are required to download the ChangeMan SSM software and set up the ISPF interface.
Step 1: Authorize Load Libraries
Step 2: Apply ChangeMan SSM 8.4 License
Step 3: Determine Method of TSO/E Authorization
Step 4: HFS Detection and Synchronization (Optional)
Step 5: Determine Default PARMLIB Data Set
Step 6: Edit and Save HPSPARMS
Step 7: Add Load Libraries to LINKLIST (Optional)
Step 8: Set Up SKELs
Step 9: Set Up ISPF Interface
Step 10: Connect to Primary Menu
Upon completion of Step 10: Connect to Primary Menu, all components of ChangeMan SSM are operational, except for Change Tracking, which requires further customization.
You do not need to repeat Step 1 through Step 10 to install each component. For example, if you are installing both the Detection and Synchronization Component and the Data Extraction Component, you only need to execute these steps once to install both components.
Installation Guide 71

Chapter 5 Installation Procedures
Step 1: Authorize Load Libraries The ChangeMan SSM and SERCOMC load modules are link-edited with the attribute “AC=1”. The two load libraries must be APF-authorized.
The SERCOMC load library and the ChangeMan SSM load library are chained in the started task PROC (SSMPROC). The ChangeMan SSM load library must be the first in the concatenation chain.
The main programs of ChangeMan SSM must be APF-authorized. The called programs must be authorized also. To keep the authorized chain, they are all marked as AC=1.
The following is an example of authorizing the ChangeMan SSM load library. Repeat the same procedure for the SERCOMC load library (somnode.SERCOMC.LOAD).
1 Edit SYS1.PARMLIB(IEAAPFxx).
2 Add the name somnode.CMNSSM.LOAD to the APF list.
3 Verify that the volser where the data set resides is properly specified. An example of a proper volser specification is:
somnode.CMNSSM.LOAD VOL001.
Or, you can use the following procedure:
1 Edit “SYS1.PARMLIB(PROGxx)”.
2 Perform an APF ADD of the ChangeMan SSM load library.
3 Verify the dataset ’VOLUME’ or ’SMS’, if under SMS control.
Step 2: Apply ChangeMan SSM 8.4 LicenseApply the license you received from Serena Customer Support to enable ChangeMan SSM 8.4. Refer to the SER10TY User’s Guide for instructions on how to apply the license. The load modules, JCL, and other components that run SER10TY are included in the SERCOMC libraries on the ChangeMan SSM 8.4 distribution media.
NOTE The SERCOMC load library contains the SERNET load modules.
72 Serena® ChangeMan® SSM 8.4

Install ChangeMan SSM
Step 3: Determine Method of TSO/E Authorization ChangeMan SSM uses an Extended SVC Router (ESR) module to invoke authorized services. The Extended SVC Router (SVC 109) is a standard MVS SVC that routes control to an Extended Service Routine based on a routing code passed in Register 15.
At IPL, MVS creates an ESR routing table that maps entry points to ESR route codes. The ESR table entries are built by searching the Link Pack Area (LPA) for modules named IGX00nnn. Any such modules are added to the ESR routing table and assigned a routing code of nn (decimal). The ESR routing table contains null entries for those routing codes that have no corresponding IGX00xxx module.
ChangeMan SSM's ESR module is named HPSZSVC as shipped with the product. The HPSZSVC routine can be installed as either dynamic, or static.
Dynamic. This is the recommended method. Have ChangeMan SSM dynamically install the ESR service routine, assigning an unused ESR route code. This method lets the user bring up a new version of the product without an IPL.
It is sufficient to install the module HPSZSVC by submitting the $AUTH job. This job determines the ESR slot, and automatically updates the module HPSZROUT to reflect the assigned slot.
If the dynamic method is chosen, the $AUTH job must be run as part of the IPL deck to automatically authorize the ISPF sessions.
Static. Explicitly assign an ESR route code and rename HPSZSVC to IGX00nnn.
IMPORTANT! Do not run the $AUTH job if you are using the static method.
Dynamic ESR Installation (Recommended)
ChangeMan SSM dynamically locates the first available (unassigned) ESR route code and installs the ESR module (HPSZSVC) using that route code. To get authorization using this method, submit the following job:
somnode.INSTALL($AUTH)
Installation Guide 73

Chapter 5 Installation Procedures
This job installs the HPSZSVC, reports the newly assigned ESR code, and automatically updates the HPSZROUT module to reflect the dynamic ESR code just assigned. It can be submitted anytime TSO authorization is requested.
Remember that when an IPL is performed, authorization is lost; therefore, it is recommended that this job be included in the normal group of jobs executed after an IPL, to re-establish authorization.
If TSO/E authorization is not established, the ChangeMan SSM ISPF user will experience an ABEND 016D. To resolve this situation, submit the job again and check the output for the following message:
++The dynamically installed ESR route code = nn
For the update of the HPSZROUT module, the //OUTFILE DD must point to the ChangeMan SSM authorized load library.
Following is the Authorization JCL:
//* This job installs the Extended Service Routine for TSO/E//* Authorization. It can be submitted anytime authorization//* is required. The module HPSZROUT is automatically updated//* to reflect the ESR route code. The //OUTFILE DD points to//* the library where the HPSZROUT module resides.//* NOTE: This JOB must be run after each IPL //* to reinstall the HPSZSVC routine.//*----------------------------------------------------------------//STEP1 EXEC PGM=HPSZISVC//STEPLIB DD DSN=somnode.CMNSSM.LOAD,DISP=SHR <===// DD DSN=somnode.SERCOMC.LOAD,DISP=SHR <===//SYSPRINT DD SYSOUT=*//OUTFILE DD DISP=SHR,DSN=somnode.CMNSSM.LOAD <===
The dynamic approach does not require an IPL.
Static ESR Installation
Using the static method, the installation must pre-assign an ESR route code for SVC109. This code must be in the range of 200 through 255 (IBM reserves route codes 1 to 199).
The route code must not have been previously assigned (refer to the internal documentation in the $ZAPROUT job to determine the nnn).
There cannot already be an associated module IGX00nnn in the LPA or MLPA.
74 Serena® ChangeMan® SSM 8.4
Install ChangeMan SSM
ChangeMan SSM can be directed to pick up the ESR route code that has been assigned, by zapping the module HPSZROUT. Edit the INSTALL library member $ZAPROUT, and continue with the following procedure.
IMPORTANT! Do not run the $AUTH job if you are using the static ESR method.
1 Add the following line to the appropriate SYS1.PARMLIB(IEASVCnn) member.
SVCPARM nnn,REPLACE,TYPE(4),APF(NO) /* SSM SVC */
2 Rename HPSZSVC to IGX00nnn (where nnn is the available route code).
3 Install IGX00nnn into one of the following libraries to make it LPA resident:
• SYS1.LPALIB
• A library in the LPALST concatenation. Refer to SYS1.PARMLIB(LPALSTxx).
• A library in the LNKLST concatenation. Refer to SYS1.PARMLIB(LNKLSTxx).
4 Add the following lines to the appropriate SYS1.PARMLIB(IEALPAxx) member.
INCLUDE LIBRARY(SYS1.LPALIB)MODULE(IGX00nnn)
5 IPL the system or refresh your LPA or MLPA.
Step 4: HFS Detection and Synchronization (Optional) This step is only required if you will be using the HFS functions in the Detection and Synchronization component.
Issue the following command to define the HPSTRANS program to RACF and designate SYS1 as the owner. The HPSTRANS program resides in the ChangeMan SSM load library (somnode.CMNSSM.LOAD).
RDEFINE PROGRAM HPSTRANS ADDMEM('somnode.CMNSSM.LOAD') + UACC(EXECUTE) OWNER(SYS1)
Installation Guide 75
Chapter 5 Installation Procedures
Then issue the following REFRESH command:
SETROPTS WHEN(HPSTRANS) REFRESH
Step 5: Determine Default PARMLIB Data Set It is suggested that you either create a parmlib data set (somnode.SSMvrm.PARMLIB) or use an existing product parmlib library.
Copy the following members from the INSTALL library to your parmlib data set:
HPSPARMS
MAIL2EXE
MAIL3CAL
MAIL4NFY
NOTE2EXE
NOTE3CAL
NOTE4NFY
SSMPARM
HPSPARMS Considerations
Operation of any ChangeMan SSM component requires the PARM member HPSPARMS. Internally (as shipped), ChangeMan SSM opens the SYS1.PARMLIB data set and reads the HPSPARMS member to establish the user-specified parameters. This implies that all users of ChangeMan SSM must have read access to this data set. This PARMLIB default data set can be changed by modifying and submitting the job $PARMSET (found in the INSTALL library).
The RTCT facility of the Change Tracking component permits only one started task and one set of databases on any LPAR. Therefore, multiple PARM members pointing to different databases are not allowed.
76 Serena® ChangeMan® SSM 8.4

Install ChangeMan SSM
Step 6: Edit and Save HPSPARMS ChangeMan SSM requires a minimum of six parameters, which are common to all components. These parameters are in the HPSPARMS member in the INSTALL library.
The following table describes each parameter; the six required parameters are indicated with an asterisk.
If you intend to secure the ChangeMan SSM VSAM databases with RLS, be sure to set the RLS parameter to YES.
NOTE Some HPSPARMS parameters are used only for the Change Tracking component and are not listed in this table. They are described in "Step 13: Edit and Save HPSPARMS for Change Tracking" on page 98.
Parameter Description
* COMPAREPROGRAM Identifies the name of the comparison utility to be used for comparison reports.Specify COMPAREX, BUILT-IN, or SUPERC.
* PRINTUTILITY Identifies the print utility to be used by ChangeMan SSM. Specify PRINTDS, VPSPRINT, or PRINTOFF.
* SMSALLOCATION Specifies the type of allocation for temporary data sets that are dynamically allocated by ChangeMan SSM. Specify the allocation type as TRK, CYL, or BLK.
* SMSNODE Specifies the number of nodes allowed during the dynamic allocation of SMS compatible data sets by ChangeMan SSM. Specify the allowed number of nodes for temporary data sets as 3 or 4.
Installation Guide 77

Chapter 5 Installation Procedures
The pre-set parameter values are usually sufficient. Refer to "Multiple HPSPARMS Members (Optional)" on page 45 for more information about editing these parameters and maintaining multiple HPSPARM members and change tracking environments.
Step 7: Add Load Libraries to LINKLIST (Optional) Optional. This step is required only if you plan to add the load libraries to the LINKLIST. If you installed other SERENA products that include SERNET, you should use the STEPLIB in the SSMPROC task.
* SMSPRIMARY Defines the primary size of dynamically-allocated data sets. Specify the primary allocation size as a value between 1 and 15 for CYL, between 15 and 150 for TRK, and between 1 and 500 for BLK allocations. These are suggested starting values, which you can adjust as needed.
* SMSSECONDARY Defines the secondary size of dynamically-allocated data sets. Specify the secondary allocation size as a value between 0 and 15 for CYL, between 0 and 150 for TRK, and between 0 and 500 for BLK allocations. These are suggested starting values, which you can adjust as needed.
SITEMASTER Set to NULL if RTCT will not be activated.
OBJECTMASTER Set to NULL if RTCT will not be activated.
DELTAMASTER Set to NULL if RTCT will not be activated.
RLS The default is NO. Specify YES to bring up ChangeMan SSM with RLS enabled.NOTE YES is the recommended value if either the SSM Started Task will be active on multiple LPAR's, or the SSM Master files could be updated by multiple users or SSM batch jobs running on multiple LPAR's.
Parameter Description
78 Serena® ChangeMan® SSM 8.4
Install ChangeMan SSM
The executable modules invoked in batch jobs or ISPF sessions all reside in the same library. To perform this optional task:
1 Edit SYS1.PARMLIB(LNKLSTxx).
2 Add the name somnode.CMNSSM.LOAD to the LINKLIST.
3 If RTCT is to be installed, you can add the name somnode.SERCOMC.LOAD to the LINKLIST. This library is referenced only in the SSMPROC. To avoid any compatibility issues, we recommend that you provide the STEPLIB DD for the SERCOMC.LOAD library in the SSMPROC.
The LINKLIST must be refreshed. Some data centers have utilities that refresh LLA.
The MVS refresh command may not add the new data sets to the list. In this case, an IPL is required. The alternative would be a STEPLIB in the logon procedure.
Step 8: Set Up SKELs Several members are provided in the SKELS distribution library. This library must be made available to the ChangeMan SSM software for TSO users utilizing the ISPF facilities of ChangeMan SSM. The SKELS members are called by the software's ISPF facilities to build the appropriate JCL and ChangeMan SSM commands according to user specifications made through the ISPF panels.
Most of the SKELS member names are prefixed with $$. The member used to generate the JCL and commands is identified in the generated JCL, normally at the end of the first execute statement. The following example shows the EXEC statement for the $$FGP SKEL:
//STEP1 EXEC PGM=HPSTRANS,REGION=4096K SKEL $$FGP
JOBLIB Member
Update the JOBLIB member in the SKELS library with the names of the two ChangeMan SSM load libraries used at your site.
NOTE When adding the SERCOMC.LOAD library to the LINKLIST or the SSMPROC, it must be concatenated after the CMNSSM.LOAD library.
Installation Guide 79
Chapter 5 Installation Procedures
The following example shows the load libraries in the JOBLIB member:
//JOBLIB DD DISP=SHR,DSN=somnode.CMNSSM.LOAD // DD DISP=SHR,DSN=somnode.SERCOMC.LOAD
The first library contains the ChangeMan SSM load modules.
The second library contains the SERNET load modules.
STEPDD Member
Update the STEPDD member in the SKELS library with the name of the license file used at your site.
The following example shows the DD statement that must be edited:
//SERLIC DD DISP=SHR,DSN=somnode.LICENSE.DATA
Step 9: Set Up ISPF Interface
The $SSMV8 CLIST uses the LIBDEF facility of ISPF (2.3 or higher) to dynamically allocate the ChangeMan SSM/ISPF interface data sets required:
• somnode.PANELS
• somnode.MESSAGES
• somnode.SKELS
The load library can be defined in the LINKLIST. ChangeMan SSM can be called from a library specified in the CLIST. This is preferred, as opposed to updating the user's LOGON PROC for a STEPLIB. If the STEPLIB
NOTE The SERCOMC.LOAD library must be concatenated after the CMNSSM.LOAD library.
NOTE If you are using the dynamic ESR method, be sure you have run the $AUTH job before executing this step, described in "Step 3: Determine Method of TSO/E Authorization" on page 73. Otherwise, you may get an S047 ABEND.
IMPORTANT! Do not run the $AUTH job if you are using the static ESR method.
80 Serena® ChangeMan® SSM 8.4

Install ChangeMan SSM
method is used, all libraries in the concatenation must be APF-authorized.
The following sample CLIST allocates the HPSPLIB DD that points to the default member (HPSPARMS).
PROC 0CONTROL NOLIST NOMSG NOCONLIST NOFLUSH/*------------------------------------------------------------------*//* This CLIST will be invoked to start the HPSZCNTL program. *//* *//* Note 1: If "somnode.CMNSSM.LOAD' is placed in the user's *//* LOGON PROC, all libraries in the concatenation list *//* must be APF authorized. *//* *//* Note 2: A small physical sequential data set is required to log *//* the internal messages produced by ChangeMan SSM. This *//* data set is dynamically allocated for each user at LOGON.*//* The attributes of this data set (sysuid.SSM.LOG) are set *//* by the ALLOC FILE(DETECT) statement below as: *//* *//* LRECL=133,BLKSIZE=27930 *//* *//* The BLKSIZE value may be changed to any multiple of 133 *//* which suits the DASD device being used. The SPACE allo- *//* cation of 5 tracks primary & 15 tracks secondary should *//* be sufficient for most users. *//* *//* Note 3: Check the UNIT (SYSDA) to fit your allocation *//* requirements. *//* *//* Note 4: A slot in HPSINIT1 points to the default parmlib data *//* set and parmlib member: SYS1.PARMLIB(HPSPARMS); This *//* slot can be zapped if desired (use $PARMSET). *//* *//* The following DD allows for an override, if the default *//* PARMLIB and PARM member (HPSPARMS) specified in the *//* software is not going to be referenced by this CLIST. *//* *//* Example: *//* ALLOC DD(HPSPLIB) DA('SYS2.PARMLIB(HPSPARMx)') SHR *//* *//* Note 5: Depending on the licensing option, the SERLIC DD may *//* need to be allocated here. If licenses are loaded into *//* CSA, then no SERLIC DD statement is required. *//* *//* Example: *//* ALLOC DD(SERLIC) DA('somnode.LICENSE.DATA)') SHR *//* *//* Note 6: If 'somnode.COMPAREX.LOAD' is placed in the ISPLLIB *//* concatenation, it must be APF authorized. This is only */
Installation Guide 81

Chapter 5 Installation Procedures
/* necessary if COMPAREX is selected as the COMPAREPROGRAM. *//* *//*-------------------------------------------------------------------
*/FREE FI(HPSPLIB)ALLOC FI(HPSPLIB) DA('SYS1.PARMLIB(HPSPARMS)') SHR FREE FI(SERLIC)ALLOC FI(SERLIC) DA('somnode.LICENSE.DATA') SHR ERROR DO ERROR OFF FREE FILE(DETECT) ALLOC FILE(DETECT) DA('&SYSUID..SSM.LOG') SHR GOTO ALLOC2 END ALLOC FILE(DETECT) DA('&SYSUID..SSM.LOG') NEW TRACKS + SPACE (5,15) UNIT (SYSDA) DSORG(PS) RECFM(F,B) + LRECL(133) BLKSIZE(27930) CATALOG ALLOC2: +ERROR DO ERROR OFF FREE FILE(BRIDGE) ALLOC FILE(BRIDGE) DA('&SYSUID..BRIDGE.FILE') SHR GOTO DEFLIBS END ALLOC FILE(BRIDGE) DA('&SYSUID..BRIDGE.FILE') NEW TRACKS + SPACE (1,2) UNIT (SYSDA) DSORG(PS) RECFM(F) + LRECL(80) CATALOG DEFLIBS: +ERROR OFF FREE FILE(SYSPRINT) /* dynamically allocate the ispf data sets */ISPEXEC LIBDEF ISPPLIB STACK DATASET ID( + 'somnode.CMNSSM.PANELS' + )ISPEXEC LIBDEF ISPMLIB STACK DATASET ID( + 'somnode.CMNSSM.MESSAGES' + )ISPEXEC LIBDEF ISPSLIB STACK DATASET ID( + 'somnode.CMNSSM.SKELS' + )ISPEXEC LIBDEF ISPLLIB STACK DATASET ID( + 'somnode.CMNSSM.LOAD' + 'somnode.COMPAREX.LOAD' + 'somnode.SERCOMC.LOAD' +
82 Serena® ChangeMan® SSM 8.4
Install ChangeMan SSM
)ISPEXEC LIBDEF ISPTLIB STACK DATASET ID( + '&SYSUID..ISPF.ISPPROF' + )ISPEXEC LIBDEF ISPFILE STACK DATASET ID( + 'somnode.CMNSSM.SKELS' + ) FREE FI (SYSUT1,SYSUT2) ISPEXEC TBCREATE SSMXDSTC NAMES(HPSOBJL HPSOBJN) WRITEIF &LASTCC EQ 0 THEN + ISPEXEC TBCLOSE SSMXDSTC NEWCOPY ISPEXEC TBCREATE SSMXDSTS NAMES(HPSOBJL HPSOBJM) WRITEIF &LASTCC EQ 0 THEN + ISPEXEC TBCLOSE SSMXDSTS NEWCOPY ISPEXEC TBOPEN SYNCKEYS NOWRITEIF &LASTCC EQ 8 THEN + DO ALLOC FI(DTLGML) DA('somnode.CMNSSM.PANELS') SHR ALLOC FI(DTLMSG) DUMMY ISPDTLC SSMHFSK (PROFDDN=* CUASUPP) FREE FI(DTLGML) FREE FI(DTLMSG) ENDELSE + ISPEXEC TBCLOSE SYNCKEYS /* invoke */ISPEXEC SELECT + CMD(HPSZCNTL) + NEWAPPL(SYNC) PASSLIB NEWPOOL /* re-establish the allocations */FREE FILE(SYSPRINT)FREE FILE(DETECT)FREE FILE(BRIDGE)FREE FILE(SERLIC)FREE FILE(HPSPLIB)ISPEXEC LIBDEF ISPPLIBISPEXEC LIBDEF ISPMLIBISPEXEC LIBDEF ISPSLIBISPEXEC LIBDEF ISPLLIBISPEXEC LIBDEF ISPTLIBISPEXEC LIBDEF ISPFILE END
Installation Guide 83
Chapter 5 Installation Procedures
If the PARMS member name is different, this DD must reflect the appropriate member name. This specification is required only if the default PARMLIB data set was not specified in "Step 5: Determine Default PARMLIB Data Set" on page 76.
Multiple PARMs are not supported with RTCT.
1 Edit somnode.INSTALL($SSMV8).
2 In the command line area type:
caps on
3 Modify SYSDA if necessary.
4 Modify all somnode to the proper high level qualifier of the installed ChangeMan SSM data sets.
5 A small physical sequential data set is dynamically allocated for each user’s session as userid.SSM.LOG.
6 Copy the $SSMV8 CLIST member to a common CLIST data set (verify the BLKSIZE of your target CLIST library).
7 If you are not planning to install the Change Tracking component of ChangeMan SSM, you may select ISPF Option 6 at this point, and then type $SSMV8 on the command line. Otherwise, proceed with the remaining steps.
When invoked, the CLIST allocates the bridge file as tsoid.BRIDGE.FILE. The bridge file is used as intermediate storage to hold the commands generated by ISPF before the file is made available to the batch programs HPSTRANS and HPSTRACK (and for some ChangeMan SSM online functions).
A sample use of the bridge file follows:
VIEW USER17.BRIDGE.FILE Columns 00001 00072Command ===> Scroll ===> PAGE**************************** Top of Data *****************************000001 DATACOMP=(BASEDSN=USER17.JCL,BASEMEM=$GLOBAL, 000002 TARGDSN=USER17.PDSE.RENAME,TARGMEM=$JOBCARD, 000003 REPORT=(SBS=Y, 000004 ADD,UPD,DEL, 000005 COMPLETE=Y)) ************************** Bottom of Data ****************************
84 Serena® ChangeMan® SSM 8.4

Install ChangeMan SSM
Step 10: Connect to Primary Menu Optional. One of the site's selection menus can be modified to invoke the ChangeMan SSM $SSMV8 CLIST. The following source panel suggests one approach for this connection. This method assumes that the user makes a selection to invoke the VENDOR panel first. This panel is expandable to invoke other vendor's software.
If somnode.CMNSSM.LOAD is not in the LINKLIST, the user's LOGON procedure can be updated to include this library in the STEPLIB DD. Verify that all libraries in the concatenation list are authorized. Any non-APF-authorized library will break the chain of authorization. If this library is not authorized, an ABEND 047 will occur.
If you are not installing the Change Tracking component, proceed to Chapter 6, "Post-Installation Verification" on page 157; otherwise, continue with the next section "Install Change Tracking Component" on page 86.
)BODY expand(!!)%!-! Vendor Supplied Software !-!%Option ===>$ZCMD ! !+ +%% 1 +&DR - Environment Synchronization and Data Set Tracking% 2 +Other - Invoke Other Vendor Software% 3 +X - Return to Primary Option Menu%%+Press%Enter+to Continue or%END+Command to%Exit)INIT&DR = 'SSM')PROC &ZSEL = TRANS (TRUNC (&ZCMD,'.') 1,'CMD($SSMV8)' ' ',' ' X,'EXIT' *,'?') &ZTRAIL = .TRAIL)END
NOTE This completes the installation of the Detection and Synchronization component.
Installation Guide 85
Chapter 5 Installation Procedures
Install Change Tracking Component
This part of the installation contains steps for installing the Change Tracking component. Some of the steps are optional.
Step 11: Define Databases
Step 12: Set Up Starter Environment
Step 13: Edit and Save HPSPARMS for Change Tracking
Step 14: Define Objects to Change Tracking
Step 15: Add Post-Processing Installation Exits for SCRATCH and RENAME
Step 16: Add Installation Exits for HMIGRATE, HRECALL, and HDELETE
Step 17: COPY Intercept Modules into LPA/MLPA
Step 18: Allocate Data Set for RTCT in a Sysplex (Optional)
Step 19: Copy RTCT Startup Task Members
Step 20: Set Up RTCT Notifications (Optional)
Step 21: Make RTCT Task Non-Cancelable
Step 22: Refresh LPA/MLPA
Step 23: Member-Level Security (MLS) - Optional
Step 24: Member Reference Tracking (MRT) - Optional
Step 25: Start or Shut Down RTCT Task
Step 26: Verify RTCT
Step 27: Set Up the Global Capture Job for RTCT (Optional)
Step 28: Set Up the Global Capture Job (non-RTCT)
NOTE Before starting this section, you must first complete the steps in the previous section, "Install ChangeMan SSM" on page 71.
86 Serena® ChangeMan® SSM 8.4

Install Change Tracking Component
Implementing Real Time Change Tracking (RTCT) Perform the following steps to implement RTCT:
Step 11: Define Databases
thru
Step 27: Set Up the Global Capture Job for RTCT (Optional).
The HPSRTO started task must be installed (and running) to enable Member Level Security (MLS) and Member Reference Tracking (MRT).
After completing the above steps, perform the tasks in "Administrative Facilities for Maintaining Change Tracking Databases" on page 140 before using RTCT.
Implementing Batch Interval Change Tracking (BICT) If you are implementing BICT, only the following steps are required:
Step 11: Define Databases
thru
Step 14: Define Objects to Change Tracking
and
Step 28: Set Up the Global Capture Job (non-RTCT).
After completing the above steps, perform the tasks in "Administrative Facilities for Maintaining Change Tracking Databases" on page 140 before using BICT.
Installation Guide 87

Chapter 5 Installation Procedures
Step 11: Define DatabasesIn this step, the Site Master, Object Master, Delta Master, and Archive databases are defined.
Only one set of databases is needed for operation of the Change Tracking component if you are using one LPAR.
Multiple LPARS in Non-Sysplex Environment
In non-sysplex environments with multiple LPARS, one set of databases should be defined for each LPAR. During the initialization of RTCT, the presence of the HPSPLIB DD will point to the correct PARM member.
Refer to "Multiple HPSPARMS Members (Optional)" on page 45 for special conditions where having multiple HPSPARMS members can be a consideration for your environment.
If multiple Change Tracking environments (one for each LPAR) are required, use the procedure described in "Multiple Change Tracking Environments (Optional)" on page 46 (after you define the initial set of databases).
RLS Implementation
If you will be using multiple LPARs and sharing a common set of databases amongst all HPSRTO started tasks, Record Level Sharing (RLS) is the recommended method for managing multiple concurrent users. See "Multiple LPARs or Sysplex Environments" on page 44 for more information on the different methods.
See "Record Level Sharing (RLS)" on page 40 for required setup tasks for implementing RLS. You must complete these required steps before attempting to bring up ChangeMan SSM with RLS enabled.
To secure the databases using RLS, you must define them using an RLS-enabled storage class.
NOTE To rename the databases after they have been defined, refer to the procedure “Renaming the Databases” in the “Administrator Processes” chapter of the Serena ChangeMan SSM Change Tracking User’s Guide.
88 Serena® ChangeMan® SSM 8.4

Install Change Tracking Component
The LOG(NONE) setting is recommended when defining the databases. LOG(NONE) specifies that the databases are non-recoverable. The supplied database definition JCL uses this setting as the default. To change the LOG attribute after the databases are defined, use an IDCAMS ALTER command.
The above tasks must also be performed when reorganizing the databases (see "Set Up Reorganization Jobs" on page 143).
Allocate the Databases
Complete the following steps to allocate the databases.
1 Edit somnode.INSTALL($INIT).
2 In the command line area type:
caps on; x all; f 'somnode' all
3 Modify all somnode to the appropriate high level qualifier.
4 In the command line area type:
x all; f 'volser' all
5 Modify all volser to the volume where all VSAM data sets should reside. To secure the databases using RLS, you must define them using an RLS-enabled storage class.
6 For RLS support, the recommended default is LOG(NONE). Refer back to "RLS Implementation" on page 88 for additional information.
7 Review "Auxiliary Storage" on page 33 for information on space allocation.
8 Execute the job and check the return code for zero (RC=00).
9 After successful execution, it is suggested that you comment out the four IDCAMS DELETE statements in this member.
NOTE LOG(UNDO) or LOG(ALL) is specified to have recoverable databases, but this is not recommended.
IMPORTANT! Make sure to stop the started task before you run the job.
Installation Guide 89

Chapter 5 Installation Procedures
The following sample JCL ($INIT) illustrates how to define the databases:
//jobname JOB //* //*------------------------------------------------------------------- //* NOTE: The HPSRTO started task will be using the databases. //* To run the job, make sure the task has been stopped. //* Otherwise, the DELETE will fail. //* //* DEFINE: This job defines the three ChangeMan SSM databases //* required for the Change Tracking Component: //* o Site Master database //* o Object Master database //* o Delta Master database //* //* Optionally, a fourth database may be defined if event //* history and member backups are to be archived before //* being deleted. //* o Archive Master database //* //*------------------------------------------------------------------- //DEFINE EXEC PGM=IDCAMS,REGION=2048K //SYSPRINT DD SYSOUT=* //SYSIN DD * DELETE somnode.CMNSSM.SITE.MASTER DELETE somnode.CMNSSM.OBJECT.MASTER DELETE somnode.CMNSSM.DELTA.MASTER DELETE somnode.CMNSSM.ARCHIVE.MASTER <<<<< SET MAXCC = 0 /*-------------*/ /* SITE MASTER */ /*-------------*/ DEFINE CLUSTER (NAME(somnode.CMNSSM.SITE.MASTER) - SHAREOPTIONS(4 3) VOLUMES(volser) - LOG(NONE) - KEYS(55 0) FREESPACE(10 10) - RECORDSIZE(12288 20200)) - DATA (NAME(somnode.CMNSSM.SITE.MASTER.DATA) - CYL(5 5)) - INDEX (NAME(somnode.CMNSSM.SITE.MASTER.INDEX) - CYL(1 1) - CISZ(2048)) /*---------------*/ /* OBJECT MASTER */ /*---------------*/ DEFINE CLUSTER (NAME(somnode.CMNSSM.OBJECT.MASTER) - SHAREOPTIONS(4 3) VOLUMES(volser) - LOG(NONE) - KEYS(75 0) FREESPACE(10 10) - RECORDSIZE(200 4089)) - DATA (NAME(somnode.CMNSSM.OBJECT.MASTER.DATA) - CYL(5 5) - CISZ(4096)) - INDEX (NAME(somnode.CMNSSM.OBJECT.MASTER.INDEX) - CYL(1 1) - CISZ(2048)) /*---------------*/ /* DELTA MASTER */ /*---------------*/ DEFINE CLUSTER (NAME(somnode.CMNSSM.DELTA.MASTER) - SHAREOPTIONS(4 3) VOLUMES(volser) - LOG(NONE) - KEYS(12 0) FREESPACE(10 10) - RECORDSIZE(12288 22524)) - DATA (NAME(somnode.CMNSSM.DELTA.MASTER.DATA) -
90 Serena® ChangeMan® SSM 8.4
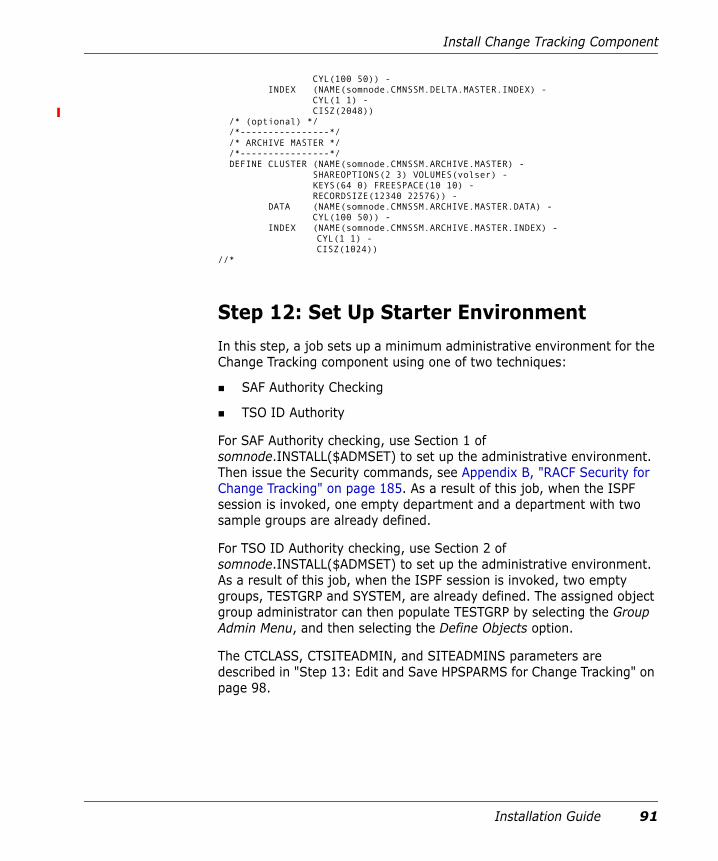
Install Change Tracking Component
CYL(100 50)) - INDEX (NAME(somnode.CMNSSM.DELTA.MASTER.INDEX) - CYL(1 1) - CISZ(2048)) /* (optional) */ /*----------------*/ /* ARCHIVE MASTER */ /*----------------*/ DEFINE CLUSTER (NAME(somnode.CMNSSM.ARCHIVE.MASTER) - SHAREOPTIONS(2 3) VOLUMES(volser) - KEYS(64 0) FREESPACE(10 10) - RECORDSIZE(12340 22576)) - DATA (NAME(somnode.CMNSSM.ARCHIVE.MASTER.DATA) - CYL(100 50)) - INDEX (NAME(somnode.CMNSSM.ARCHIVE.MASTER.INDEX) - CYL(1 1) - CISZ(1024)) //*
Step 12: Set Up Starter Environment In this step, a job sets up a minimum administrative environment for the Change Tracking component using one of two techniques:
SAF Authority Checking
TSO ID Authority
For SAF Authority checking, use Section 1 of somnode.INSTALL($ADMSET) to set up the administrative environment. Then issue the Security commands, see Appendix B, "RACF Security for Change Tracking" on page 185. As a result of this job, when the ISPF session is invoked, one empty department and a department with two sample groups are already defined.
For TSO ID Authority checking, use Section 2 of somnode.INSTALL($ADMSET) to set up the administrative environment. As a result of this job, when the ISPF session is invoked, two empty groups, TESTGRP and SYSTEM, are already defined. The assigned object group administrator can then populate TESTGRP by selecting the Group Admin Menu, and then selecting the Define Objects option.
The CTCLASS, CTSITEADMIN, and SITEADMINS parameters are described in "Step 13: Edit and Save HPSPARMS for Change Tracking" on page 98.
Installation Guide 91

Chapter 5 Installation Procedures
In either case, the JCL in somnode.INSTALL($ADMSET) is used to set up the administrative environment.
A sample of the JCL in $ADMSET follows:
//jobname JOB//*//********************************************************************//* This job sets up a minimum administrative environment for the//* Change Tracking component.//*//* If you will be using SAF authority checking, create a job//* consisting of Section 1 of this member only.//*//* If you will be using only TSO ID authority, create a job//* consisting of Section 2 of this member only.//*//********************************************************************//*//* Section 1 - Use SAF Authority Checking//*//*//* Two sample Departments are defined by this job://*//* "Department1" and "Department2".//*//* Two sample Groups are defined in "Department1" by this job://*//* "Group1" and "Group2".//*//*//* Before submitting this job, create the following SAF definitions://*//* 1. Define a Class whose name matches the value specified in//* the CTCLASS parameter in HPSPARMS. Activate the class.//*//* 2. Define a Profile in that class whose name matches the//* value specified in the CTSITEADMIN parameter in HPSPARMS.//*//* 3. Grant UPDATE authority to that profile to one or more//* TSO Id's that will act as Site Administrator.//*//*//* 4. Define two Profiles in that class named "Department1" and//* "Department2" (fill in department names of your choosing).//*
NOTE After the initial setup, if you need to add additional Site Master administrators, see member $ADMSET2 in the INSTALL distribution library for instructions.
92 Serena® ChangeMan® SSM 8.4
Install Change Tracking Component
//* 5. Grant ALTER authority to these profiles to one or more//* TSO Id's that will act as Department Administrators.//*//* 6. Grant UPDATE authority to the "Department1" profile to one or//* more TSO Id's that will act as Group Administrator for that//* department.//*//*//* Make the following changes in Section 1://*//* CAPS ON;//* X ALL; F somnode ALL;//* change as required.//*//* X ALL; F SiteAdmPrf;//* Change this to match the value specified in the//* CTSITEADMIN parameter in HPSPARMS.//*//* X ALL; F Department1 all;//* Specify the name of the first department to be//* defined. This name may be from 1 to 16 alpha-//* numeric characters.//*//* X ALL; F Department2 all;//* Specify the name of the second department to be//* defined.//*//* X ALL; F Group1 all;//* Specify the name of the first group to be defined//* in "Department1". This name may be from 1 to 8//* alpha-numeric characters.//*//* X ALL; F Group2 all;//* Specify the name of the second group to be defined//* in "Department1".//*//* ------------------------------------------------------------------//*//* X ALL; F tsoid2 all;//* Specify the TSO Id of someone who will have Change//* Tracking User authority only - for "Group1" in//* "Department1".//*//* NOTE: NAME can be a maximum 20 characters, mixed case,//* and may contain spaces between words.//*//*//* Alternatively, by setting the CTUSERSAFAUTH parameter in HPSPARMS//* to YES, Change Tracking User authority to a Group can be managed//* by associating a SAF profile with the Group, and granting Users//* READ authority to that profile: see "GroupProfileName" (below).//*
Installation Guide 93

Chapter 5 Installation Procedures
//* ------------------------------------------------------------------//*//*//* DESCRIPTIONS://* -------------//*//* STEP1: This step assigns the CTSITEADMIN parameter value from//* HPSPARMS which is used to identify Site Administrators.//*//* This step must be submitted by someone who has at least//* UPDATE authority to the SAF Profile of the same name//* (usually the product installer).//*//*//* STEP2: In this step, the Site Administrator creates one//* or more Departments.//*//* This step must be submitted by a Site Administrator.//*//*//* STEP3: In this step, the Department Administrator defines one or//* more groups and assigns users to work with those groups.//*//* Define 2 Groups (command GRPADD)//* Authorize a second user of the groups (command USERADD)//*//* This step must be submitted by a Department Administrator.//*//*//* NOTE: This job assumes that the submitter has SAF authority for//* ----- all the administrative roles://* o Site Admin//* o Department Admin//* o Group Admin//*//*-------------------------------------------------------------------//*//JOBLIB DD DSN=somnode.CMNSSM.LOAD,DISP=SHR <===// DD DSN=somnode.SERCOMC.LOAD,DISP=SHR <===// DD DSN=somnode.LICENSE.LOAD,DISP=SHR <===//*//STEP1 EXEC PGM=HPSTRACK,REGION=4M//HPSPLIB DD DISP=SHR,DSN=SYS1.PARMLIB(HPSPARMS) <===//SERLIC DD DISP=SHR,DSN=somnode.LICENSE.DATA <===//SYSPRINT DD SYSOUT=*//HPSIN DD *SITEADMADD=(ID=SiteAdmPrf,NAME='Site Administrators') <===//*//STEP2 EXEC PGM=HPSTRACK,REGION=4M//HPSPLIB DD DISP=SHR,DSN=SYS1.PARMLIB(HPSPARMS) <===//SERLIC DD DISP=SHR,DSN=somnode.LICENSE.DATA <===//SYSPRINT DD SYSOUT=*
94 Serena® ChangeMan® SSM 8.4
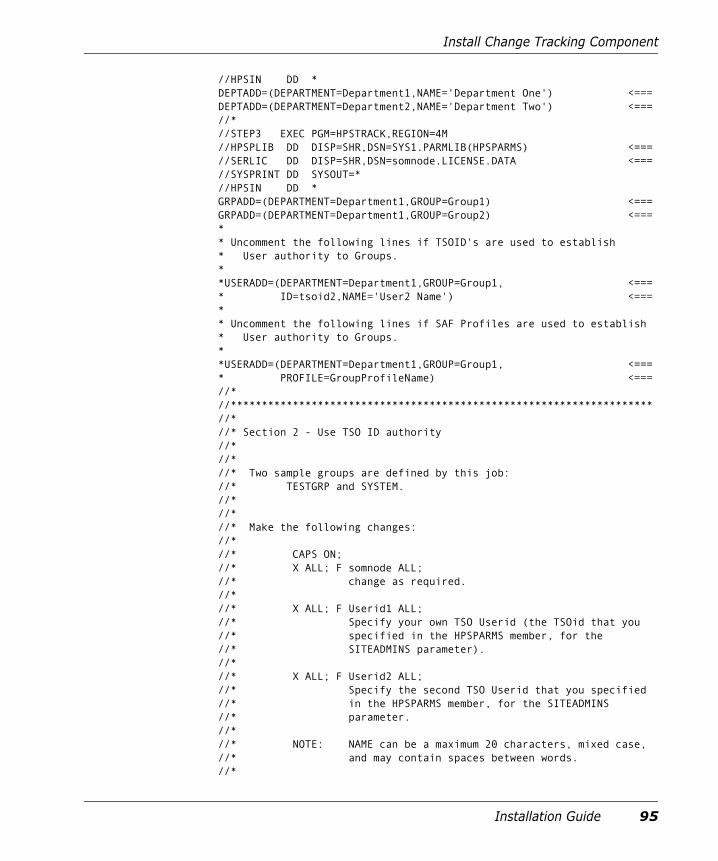
Install Change Tracking Component
//HPSIN DD *DEPTADD=(DEPARTMENT=Department1,NAME='Department One') <===DEPTADD=(DEPARTMENT=Department2,NAME='Department Two') <===//*//STEP3 EXEC PGM=HPSTRACK,REGION=4M//HPSPLIB DD DISP=SHR,DSN=SYS1.PARMLIB(HPSPARMS) <===//SERLIC DD DISP=SHR,DSN=somnode.LICENSE.DATA <===//SYSPRINT DD SYSOUT=*//HPSIN DD *GRPADD=(DEPARTMENT=Department1,GROUP=Group1) <===GRPADD=(DEPARTMENT=Department1,GROUP=Group2) <===** Uncomment the following lines if TSOID's are used to establish* User authority to Groups.**USERADD=(DEPARTMENT=Department1,GROUP=Group1, <===* ID=tsoid2,NAME='User2 Name') <===** Uncomment the following lines if SAF Profiles are used to establish* User authority to Groups.**USERADD=(DEPARTMENT=Department1,GROUP=Group1, <===* PROFILE=GroupProfileName) <===//*//********************************************************************//*//* Section 2 - Use TSO ID authority//*//*//* Two sample groups are defined by this job://* TESTGRP and SYSTEM.//*//*//* Make the following changes://*//* CAPS ON;//* X ALL; F somnode ALL;//* change as required.//*//* X ALL; F Userid1 ALL;//* Specify your own TSO Userid (the TSOid that you//* specified in the HPSPARMS member, for the//* SITEADMINS parameter).//*//* X ALL; F Userid2 ALL;//* Specify the second TSO Userid that you specified//* in the HPSPARMS member, for the SITEADMINS//* parameter.//*//* NOTE: NAME can be a maximum 20 characters, mixed case,//* and may contain spaces between words.//*
Installation Guide 95

Chapter 5 Installation Procedures
//* DESCRIPTIONS://* -------------//*//* STEP1: This step assigns two TSOids as initial Object Master//* / Site Administrators. These users will be able to//* define and delete Departments.//*//* This step must be submitted by a Site-Master Admin//* (usually the product installer), defined as such in//* the SITEADMINS parameter in HPSPARMS.//*//* NOTE: There can be a maximum of five Site Admins. If//* you have not defined them all during the install,//* you can define them in the future. Refer to the//* $ADMSET2 job.//*//*//* STEP2: In this step, a Site Administrator defines one or//* more Departments. The TSOid's named as Departments//* become the administrator of their department. These//* users will be able to define and delete Groups.//*//* Define two Departments (DEPTADD).//*//* This step must be submitted by a Site Administrator.//*//*//* STEP3: In this step, a Department Admin defines one or//* more Groups and assigns users to work with those groups.//*//* Define 2 Groups (GRPADD).//* Authorize 2 users to work with the groups (USERADD).//*//* This step must be submitted by a Department Administrator.//*//*//* NOTE: This job assumes that the submitter (userid1) is defined//* ----- as a Site Admin in the SITEADMINS parameter in HPSPARMS.//*//*-------------------------------------------------------------------//*//JOBLIB DD DSN=somnode.CMNSSM.LOAD,DISP=SHR <===// DD DSN=somnode.SERCOMC.LOAD,DISP=SHR <===// DD DSN=somnode.LICENSE.LOAD,DISP=SHR <===//*//STEP1 EXEC PGM=HPSTRACK,REGION=4M//HPSPLIB DD DISP=SHR,DSN=SYS1.PARMLIB(HPSPARMS) <===//SERLIC DD DISP=SHR,DSN=somnode.LICENSE.DATA <===//SYSPRINT DD SYSOUT=*//HPSIN DD *OMADMADD=(ID=Userid1,NAME='User-Name1') OM / Site Admin1 <===OMADMADD=(ID=Userid2,NAME='User-Name2') OM / Site Admin2 <===
96 Serena® ChangeMan® SSM 8.4

Install Change Tracking Component
//*//STEP2 EXEC PGM=HPSTRACK,REGION=4M//HPSPLIB DD DISP=SHR,DSN=SYS1.PARMLIB(HPSPARMS) <===//SERLIC DD DISP=SHR,DSN=somnode.LICENSE.DATA <===//SYSPRINT DD SYSOUT=*//HPSIN DD *DEPTADD=(ID=Userid1,NAME='User-Name1') Department (Admin) <===DEPTADD=(ID=Userid2,NAME='User-Name2') Department (Admin) <===//*//STEP3 EXEC PGM=HPSTRACK,REGION=4M//HPSPLIB DD DISP=SHR,DSN=SYS1.PARMLIB(HPSPARMS) <===//SERLIC DD DISP=SHR,DSN=somnode.LICENSE.DATA <===//SYSPRINT DD SYSOUT=*//HPSIN DD *GRPADD=(GROUP=TESTGRP) Group <===GRPADD=(GROUP=SYSTEM) Group*USERADD=(GROUP=TESTGRP,ID=Userid2,NAME='User-Name2') a 2nd User <===USERADD=(GROUP=SYSTEM,ID=Userid2,NAME='User-Name2') a 2nd User <===//*
1 Change the JCL as documented in the above member.
2 Verify that the HPSPLIB DD is pointing to the correct PARM member. This is important when you have established PARM members and databases (one for each LPAR), and the software has been installed on shared DASD. The software now supports multiple LPARs sharing a single group of databases. In this case, the started task on each LPAR will refer to the same PARM member (see "Multiple LPARs or Sysplex Environments" on page 44).
3 Execute the job and check the return codes for zeros (RC=00).
Installation Guide 97
Chapter 5 Installation Procedures
Step 13: Edit and Save HPSPARMS for Change Tracking This step describes HPSPARMS parameters used for the Change Tracking component.
Database Names
The Change Tracking component requires a set of three VSAM databases for its operation. The following table lists the databases and recommended names:
Do not specify a version in these database names because they will be referenced in future releases of ChangeMan SSM.
Change event information and fingerprint tokens are stored in the Site Master. Objects to be tracked, and the groups they belong to, are collectively defined and stored in the Object Master. Backups of changed PDS members are stored in the Delta Master. When objects are initially defined as delta-tracked, they are compressed and stored in the Delta Master.
Site Administrators
To maintain the tracking system, site administrators must be assigned. The site administrators are defined during the installation. Regardless of who is assigned, at least one alternate site administrator should be defined in case the primary site administrator is unavailable to perform this function.
Site administration is established using either SAF or TSO Userid security.
To establish SAF security, code the CTCLASS and CTSITEADMIN parameters and comment out the SITEADMINS parameter. Then set up the security commands, see Appendix B, "RACF Security for Change Tracking" on page 185.
Database Recommended Name
Site Master somnode.SITE.MASTER
Object Master somnode.OBJECT.MASTER
Delta Master somnode.DELTA.MASTER
98 Serena® ChangeMan® SSM 8.4

Install Change Tracking Component
To establish TSO Userid security, code the SITEADMINS parameter and comment out the CTCLASS and CTSITEADMIN parameters. The $ADMSET job coded and run in "Step 12: Set Up Starter Environment" on page 91 establishes the administration environment.
Change Log Records
RTCT produces a change log in addition to updating the databases. For each update activity, a one line record is written to SYSPRINT (default) or the CONSOLE.
This facility can be controlled by two parameters in HPSPARMS:
RTOSYSPRINT (YES or NO)
RTOCONSOLE (YES or NO)
When writing to the console is desired, the user can set up the route code. The module HPSRTWTO (Real-Time WTO) is supplied, in which ROUTCDE=10 has been specified. This setting can be changed by assembling and linking the source code using the LINKWTO job supplied in the INSTALL data set (refer to the internal documentation of this job).
The following HPSPARMS parameters determine the information that is displayed in the DETECT log:
RTOLOGEVENTS (YES or NO). Determines if the Change Tracking events that the started task detects are displayed in the DETECT log.
RTOLOGFULLCTL (YES or NO). Determines if the full list of tracked objects is displayed in the DETECT log each time it is refreshed.
RTOLOGUPDATES (YES or NO). Determines if updates (additions or deletions) to the Change Tracking list are displayed in the DETECT log.
You can specify both RTOLOGFULLCTL and RTOLOGUPDATES, if desired.
The RTOLOGEVENTS, RTOLOGFULLCTL, and RTOLOGUPDATES parameters initially determine the information that is displayed in the DETECT log. You can modify this information after the SSM started task is running by issuing the following Modify command from SDSF or from the operator console:
/F taskname,SYN,RTOLOG={EVENTS|FULL|UPDATES|DEFAULTS|NONE|SHOW}
Installation Guide 99

Chapter 5 Installation Procedures
where:
Parameter Description
taskname Name of the SSM started task.
SYN SERNET application name for SSM.
RTOLOG= One of the following RTOLOG parameters to control what is displayed on the DETECT log:
EVENTS Toggles the existing RTOLOGEVENTS setting from YES to NO or vice versa.
FULL Toggles the existing RTOLOGFULLCTL setting from YES to NO or vice versa.
UPDATES Toggles the existing RTOLOGUPDATES setting from YES to NO or vice versa.
DEFAULTS Resets RTOLOGEVENTS, RTOLOGFULLCTL, and RTOLOGUPDATES to their default settings:RTOLOGEVENTS=YESRTOLOGFULLCTL=YESRTOLOGUPDATES=NO
NONE Sets RTOLOGEVENTS, RTOLOGFULLCTL, and RTOLOGUPDATES to NO.
SHOW Echoes the current settings for RTOLOGEVENTS, RTOLOGFULLCTL, and RTOLOGUPDATES in the DETECT log.
NOTE The CLIST that allocates the HPSPLIB DD that points to the default HPSPARMS member also allocates the DETECT sysout.
See "Step 9: Set Up ISPF Interface" on page 80.
100 Serena® ChangeMan® SSM 8.4
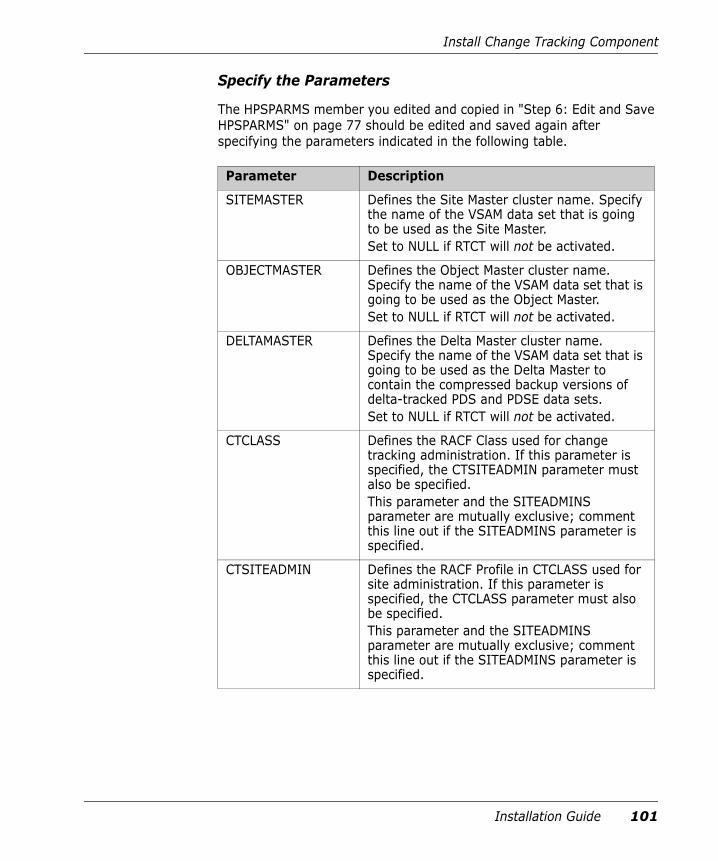
Install Change Tracking Component
Specify the Parameters
The HPSPARMS member you edited and copied in "Step 6: Edit and Save HPSPARMS" on page 77 should be edited and saved again after specifying the parameters indicated in the following table.
Parameter Description
SITEMASTER Defines the Site Master cluster name. Specify the name of the VSAM data set that is going to be used as the Site Master.Set to NULL if RTCT will not be activated.
OBJECTMASTER Defines the Object Master cluster name. Specify the name of the VSAM data set that is going to be used as the Object Master.Set to NULL if RTCT will not be activated.
DELTAMASTER Defines the Delta Master cluster name. Specify the name of the VSAM data set that is going to be used as the Delta Master to contain the compressed backup versions of delta-tracked PDS and PDSE data sets.Set to NULL if RTCT will not be activated.
CTCLASS Defines the RACF Class used for change tracking administration. If this parameter is specified, the CTSITEADMIN parameter must also be specified.This parameter and the SITEADMINS parameter are mutually exclusive; comment this line out if the SITEADMINS parameter is specified.
CTSITEADMIN Defines the RACF Profile in CTCLASS used for site administration. If this parameter is specified, the CTCLASS parameter must also be specified.This parameter and the SITEADMINS parameter are mutually exclusive; comment this line out if the SITEADMINS parameter is specified.
Installation Guide 101
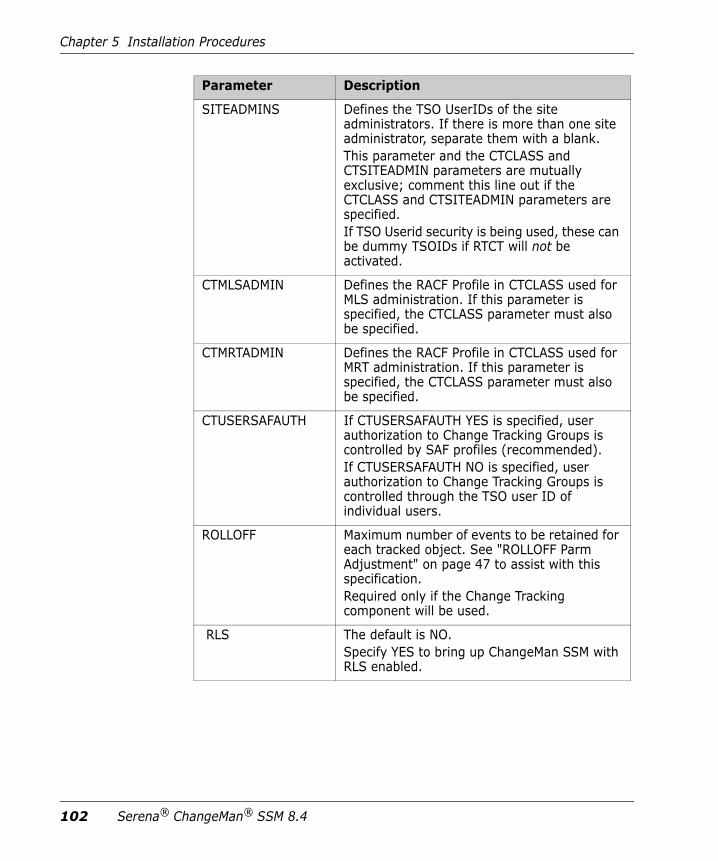
Chapter 5 Installation Procedures
SITEADMINS Defines the TSO UserIDs of the site administrators. If there is more than one site administrator, separate them with a blank. This parameter and the CTCLASS and CTSITEADMIN parameters are mutually exclusive; comment this line out if the CTCLASS and CTSITEADMIN parameters are specified.If TSO Userid security is being used, these can be dummy TSOIDs if RTCT will not be activated.
CTMLSADMIN Defines the RACF Profile in CTCLASS used for MLS administration. If this parameter is specified, the CTCLASS parameter must also be specified.
CTMRTADMIN Defines the RACF Profile in CTCLASS used for MRT administration. If this parameter is specified, the CTCLASS parameter must also be specified.
CTUSERSAFAUTH If CTUSERSAFAUTH YES is specified, user authorization to Change Tracking Groups is controlled by SAF profiles (recommended).If CTUSERSAFAUTH NO is specified, user authorization to Change Tracking Groups is controlled through the TSO user ID of individual users.
ROLLOFF Maximum number of events to be retained for each tracked object. See "ROLLOFF Parm Adjustment" on page 47 to assist with this specification.Required only if the Change Tracking component will be used.
RLS The default is NO. Specify YES to bring up ChangeMan SSM with RLS enabled.
Parameter Description
102 Serena® ChangeMan® SSM 8.4

Install Change Tracking Component
MEMODELETE If MEMODELETE YES (default) is specified, deleting an object from Change Tracking will remove the object from the Change Tracking List and from the various displays of tracked objects. The object definition and its event and backup records will be placed in memo-deleted status and retained in the SSM Master databases until the next run of the $MAINT job. When $MAINT is run, the memo-deleted objects and their event and backup records will be deleted from the SSM Master databases (unless the SIMULATE parm is specified for the $MAINT run. If SIMULATE is specified, the requested $MAINT functions are performed but the SSM Master databases are not updated.)If the ARCHIVE parm is specified for the next $MAINT run, the memo-deleted object definitions and their event history and backup records are written to the ARCHIVE Master database before they are deleted.You can reinstate a memo-deleted object and its events and backups by redefining the object to a Department-Group up until the next $MAINT job is run.If MEMODELETE NO is specified, deleting an object from Change Tracking immediately deletes the object and its event history and backup records from the SSM Master databases.
RTOSYSPRINT Specifying YES directs update activity records to be written to SYSPRINT (default).Specify NO if the HPSRTO started task will not be activated.
RTOCONSOLE Specifying YES directs update activity records to be written to the CONSOLE.The default is NO.
Parameter Description
Installation Guide 103

Chapter 5 Installation Procedures
RTOLOGEVENTS RTOLOGEVENTS YES (default) causes Change Tracking events to be displayed in the DETECT log.If RTOLOGEVENTS NO is specified, Change Tracking events are not displayed in the DETECT log.
RTOLOGFULLCTL RTOLOGFULLCTL YES (default) causes the full list of tracked objects to be displayed in the DETECT log each time the list is refreshed.If RTOLOGFULLCTL NO is specified, the full list of tracked objects is not displayed in the DETECT log each time the list is refreshed.
RTOLOGUPDATES RTOLOGUPDATES YES causes updates (additions or deletions) to the Change Tracking list to be displayed in the DETECT log.RTOLOGUPDATES NO (default) specifies that updates to the Change Tracking list not be displayed in the DETECT log.
Parameter Description
104 Serena® ChangeMan® SSM 8.4

Install Change Tracking Component
RTOGLOBE This parameter controls the Automatic Global Capture feature of RTCT. This feature fingerprints a tracked object if it has not been fingerprinted in the specified amount of time.The values are:0 - (Default) Eight hours between global captures.1 - Run global capture only once, when RTCT is first started.2 - No global capture.5 - Five minute interval (recommended for use during testing only).<30 - Value forced to 30, unless the value is 0, 1, 2, or 5.>=30 - Value is taken as the number of minutes between global captures.
NOTE In a sysplex environment, only the master task will perform the global capture and issue the “Global Processing Completed” message. If a slave task is promoted to master, the global capture will begin again. This will happen if the master task is brought down.
RTOMLS Specify YES to enable MLS. Specify NO to disable MLS, or if the HPSRTO started task will not be activated.
RTORENAME Specifying YES causes an unauthorized change to an MLS-protected member to be saved under a new name. Specifying NO causes all changes to be lost.
NOTE RTORENAME=YES overrides the MLSABEND parameter.
RTORACCHECK If you specify YES, MLS will use calls to RACF to check for protected entities. This method is no longer supported.It is recommended that you use the default of NO.
Parameter Description
Installation Guide 105

Chapter 5 Installation Procedures
RTORACFID Specify YES to enable the SAF-based MLS configuration, which is the recommended method. Specify NO to use the internal method. If you specify YES (for the SAF method), you must also specify the following: YES for RTOMLS
NO for RTORACCHECK
A valid RACF class for RTOCLASSIf you specify NO (for the internal method), you must also specify the following: YES for RTOMLS
NO for RTORACCHECK
RTOCLASS The RACF security class used when RTORACFID is set to YES. The default is SSMMLS.If you specified YES for the RTORACFID parameter, you must define the SSMMLS class to RACF, or change it to a valid RACF class in your environment.
MLSABEND Determines if a prohibited access attempt will result in termination of the batch job step.Specify YES to cause the job step to terminate with a User ABEND U913-38.Specify NO to receive a return code of 16, reason code 52 (the job step will not ABEND).
NOTE RTORENAME=YES overrides the MLSABEND parameter.
RTCTICLOSERTCTIDSRNRTCTISCRARTCTISTOWRTCTIMIGRRTCTIRCDL
These parameters enable/disable individual intercepts and DADSM/HSM Installation Exits used by Change Tracking.The default is YES, which enables the intercept.
IMPORTANT! These settings should not be changed unless directed to do so by Serena Software.
Parameter Description
106 Serena® ChangeMan® SSM 8.4

Install Change Tracking Component
AUTOTRACKAUTODEPTAUTOGROUP
These optional parameters are for the Operational Integrity feature of real-time change tracking. If this feature is enabled, the following data sets will be added to dynamically defined groups to provide automatic change tracking: APF entries Linklist LPA list Proclibs allocated in the Master address
space and JES2/3 address space SYS1.NUCLEUS SYSx.IPLPARM All parmlib datasets that are referenced
during the IPL.
To enable the Operational Integrity feature: Specify YES for AUTOTRACK. Specify a department name for
AUTODEPT. Specify a group name for AUTOGROUP.
To disable the Operational Integrity feature, specify NO for the AUTOTRACK parameter (default).
RTCTHFS Specify YES to enable HFS change tracking intercepts.Specify NO to disable HFS (default).
RTCTMRT Specify YES to enable MRT (default).Specify NO to disable MRT.
MRTFIND Specify YES/NO to enable/disable FIND Member Reference Tracking.The default is YES.
Parameter Description
Installation Guide 107

Chapter 5 Installation Procedures
MRTMULTI Specify YES/NO to enable/disable Member Reference Tracking for BLDL references with multiple members.The default is YES.
MRTLDREFSUP This parameter reduces the overhead associated with Member Reference Tracking of load modules and program objects by ignoring the load of a module whose use count is greater than zero. Normally this will limit the number of references to one within a job step. By default the product continues to count all references.Specify YES to enable suppression of references to a load module if the module is already loaded. Specify NO to disable this feature.
RTCTIATCH RTCTIBLDL RTCTILINK RTCTILOAD RTCTIXCTL
These parameters enable/disable individual SVC intercepts used by MRT.Specify YES to enable the intercept (default).
NOTE It is not recommended to change these settings unless directed by Serena Software.
Disabling RTCTIBLDL also disables RTCTIATCH, RTCTILINK, RTCTILOAD, and RTCTIXCTL, which all use RTCTIBLDL for MRT.
DESERVEXIT Specify YES to enable an exit which traps accesses to PDS/PDSEs that use Directory Services rather than STOW or BLDL (default).Specify NO to disable the exit.
COMPAREPROGRAM Specify BUILT-IN to use the ChangeMan SSM built-in compare facility (default).Specify COMPAREX to use Serena Comparex.Specify SUPERC to use the Super/C interface.
SMSALLOCATION Specifies the type of allocation for temporary data sets that are dynamically allocated by ChangeMan SSM. Specify the allocation type as TRK, CYL, or BLK.
Parameter Description
108 Serena® ChangeMan® SSM 8.4

Install Change Tracking Component
Step 14: Define Objects to Change Tracking In this step you define data sets (objects) for tracking.
Edit and submit the following JCL, somnode.INSTALL($DEFINE). In this example, four data sets are defined for tracking. The fourth DSN, hlq.JCL, is a data set of your choice that you can make changes to immediately.
//jobname JOB //JOBLIB DD DISP=SHR,DSN=somnode.CMNSSM.LOAD // DD DISP=SHR,DSN=somnode.SERCOMC.LOAD // DD DISP=SHR,DSN=somnode.LICENSE.LOAD //STEP1 EXEC PGM=HPSTRACK,REGION=4096K //HPSPLIB DD DISP=SHR,DSN=SYS1.PARMLIB(HPSPARMS)//SERLIC DD DISP=SHR,DSN=somnode.LICENSE.DATA //SYSPRINT DD SYSOUT=* //HPSIN DD * DEFINEDS=(DEPARTMENT=Department1,
SMSNODE Specifies the number of nodes allowed during the dynamic allocation of SMS compatible data sets by ChangeMan SSM. Specify the allowed number of nodes for temporary data sets as 3 or 4.
SMSPRIMARY Defines the primary size of dynamically-allocated data sets. Specify the primary allocation size as a value between 1 and 15 for CYL, between 15 and 150 for TRK, and between 1 and 500 for BLK allocations. These are suggested starting values, which you can adjust as needed.
SMSSECONDARY Defines the secondary size of dynamically-allocated data sets. Specify the secondary allocation size as a value between 0 and 15 for CYL, between 0 and 150 for TRK, and between 0 and 500 for BLK allocations. These are suggested starting values, which you can adjust as needed.
PRINTUTILITY Identifies the print utility to be used by ChangeMan SSM. Specify PRINTDS, VPSPRINT, or PRINTOFF.
Parameter Description
Installation Guide 109

Chapter 5 Installation Procedures
GROUP=Group1, DELTA=Y, DSN=(SYS1.PARMLIB, SYS1.PROCLIB, SYS1.LINKLIB, hlq.JCL)) //*
Step 15: Add Post-Processing Installation Exits for SCRATCH and RENAME
Add Exit for SCRATCH
If online tracking of dataset SCRATCH events is required, perform the following steps to update the IBM DADSM SCRATCH installation exit stub:
a Create an SMP/E input file by concatenating the HPSSCR0 member in the INSTALL library with the IGGDASU3 object deck in the new Object library.
b Run an SMP/E RECEIVE job using the input file just created.
c Run an SMP/E APPLY job to replace your IGGDASU3 stub within the IGGDADSM load module with the new exit.
The exit will be activated by the next IPL of the LPAR.
If the SSM Started Task is not active on the LPAR, or if HPSPARMS does not request tracking of dataset SCRATCH events, the Installation Exit will just return to its IGGDADSM caller.
The source code for the exit can be found in member IGGDASU3 in the ChangeMan SSM SAMPLES library.
NOTE When a tracked data set (PDS or PDSE) is deleted while the started task is up, the system will log a SCRATCH event, as expected, but it will also generate a member DELETE event for every member in the library.
110 Serena® ChangeMan® SSM 8.4

Install Change Tracking Component
Add Exit for RENAME
If online tracking of dataset RENAME events is required, perform the following steps to update the IBM DADSM RENAME installation exit stub:
a Create an SMP/E input file by concatenating the HPSDSR0 member in the INSTALL library with the IGGDARU3 object deck in the new Object library.
b Run an SMP/E RECEIVE job using the input file just created.
c Run an SMP/E APPLY job to replace your IGGDARU3 stub within the IGGDADSM load module with the new exit.
The exit will be activated by the next IPL of the LPAR.
If the SSM Started Task is not active on the LPAR, or if HPSPARMS does not request tracking of dataset RENAME events, the Installation Exit will just return to its IGGDADSM caller.
The source code for the exit can be found in member IGGDARU3 in the ChangeMan SSM SAMPLES library.
Step 16: Add Installation Exits for HMIGRATE, HRECALL, and HDELETE The HMIGRATE, HRECALL, and HDELETE exits provide for logging of those data set events when they happen, instead of relying on Global Capture or a CLOSE-driven capture.
Perform the following steps to install the exits.
1 Copy the exits from the ChangeMan SSM LOAD library to SYS1.LINKLIB. The member names in the LOAD library are:
• ARCMDEXT - the exit for HMIGRATE
• ARCRPEXT - the exit for HRECALL and HDELETE
2 Refresh LLA.
3 Issue the following command to activate the exits:
/F DFHSM01,SETSYS,EXITON(MD,RP)
The source code for the exits can be found in the ARCMDEXT and ARCRPEXT members in the ChangeMan SSM SAMPLES library.
Installation Guide 111

Chapter 5 Installation Procedures
Step 17: COPY Intercept Modules into LPA/MLPA Step 17: COPY Intercept Modules into LPA/MLPA through Step 27: Set Up the Global Capture Job for RTCT (Optional) are necessary only if you are installing RTCT.
If RTCT is not being installed, go to "Step 28: Set Up the Global Capture Job (non-RTCT)" on page 137.
1 Allocate an MLPA data set if you do not already have one. We recommend the name SYS1.MLP.
2 Verify that you already have an MLPA=01 parameter specified in the IEASYS01 member of SYS1.PARMLIB. If not, specify the following:
MLPA=01
3 Copy the intercept routines from somnode.CMNSSM.LPA to “SYS1.MLPA.
4 Add the following commands to the IEALPA01 member of SYS1.PARMLIB:
INCLUDE LIBRARY (SYS1.MLPA)MODULES(HPSFCLOS,HPSFSTOW,HPSFATCH,HPSFBLDL,HPSFLINK,HPSFLOAD, HPSFXCTL,HPSICLOS,HPSISTOW,HPSIDESX,HPSISCRA,HPSIDSRN, HPSIATCH,HPSIBLDL,HPSILINK,HPSILOAD,HPSIXCTL)
NOTE If Change Tracking of HFS files is required, the following load modules must be added to the MODULES command displayed above:
HPSIHCLO
HPSIHFD
HPSIHFP
HPSIHARR
HPSIHOP
HPSIHOPN
HPSIUNL
112 Serena® ChangeMan® SSM 8.4

Install Change Tracking Component
Step 18: Allocate Data Set for RTCT in a Sysplex (Optional)
Review and edit the ALOCPLEX member in the INSTALL library. This JCL allocates the data set that is required by RTCT in a multi-LPAR sysplex environment. This data set serves as a communication media between several LPARs sharing the same change tracking databases; it must reside on shared DASD.
Follow the instructions documented in the ALOCPLEX member and submit the job:
//JOB//* Note 1: You will need to adjust the primary size specification,//* one (1) primary track is required for each HPSRTO plus//* one additional track for internal control information.//* For example, for a 3 LPAR system, specify 4 tracks.//*//* Note 2: The secondary track allocation must be zero (0).//*//* This file is referenced by //SYSPLEX DD in the SSMSTAR proc. It is//* initialized with the proper BLKSIZE when the first HPSRTO (MASTER)//* task is started.//*//* 1. Modify the generic UNIT name in the PROC if needed//* 2. Make a global change to "somnode"//* -------------------------------------------------------------------//*//ALLOCPS PROC NAME=,SIZE=//S1 EXEC PGM=IEFBR14//SYSPRINT DD SYSOUT=*//DD1 DD DSN=&NAME,// UNIT=SYSALLDA,// DISP=(NEW,CATLG,DELETE),// DCB=(DSORG=PS,RECFM=F),// SPACE=&SIZE// PEND//*//STEP01 EXEC ALLOCPS,// NAME='somnode.SYSPLEX', <== adjust the name// SIZE='(TRK,(4,0))' <== 4 tracks for 3 HPSRTOs
NOTE If you will be using RLS support, do not perform this step; skip to the next step. RLS is the recommended method for managing multiple concurrent users. See "Multiple LPARs or Sysplex Environments" on page 44.
Installation Guide 113

Chapter 5 Installation Procedures
Step 19: Copy RTCT Startup Task Members The SSMPROC and SSMPARM members in the INSTALL library must be edited as needed and copied to the appropriate system libraries.
Additional PROCS are provided for Event Notification (see "Step 20: Set Up RTCT Notifications (Optional)" on page 115).
Edit and Copy the SSMPROC Member
1 Edit the SSMPROC member as needed.
To use RLS support, you must remove (or comment out) the //SYSPLEX DD statement.
If you are planning to use RTCT on multiple LPARs with shared DASD, or in a sysplex environment, see "Multiple LPARs or Sysplex Environments" on page 44.
2 Copy the SSMPROC member to the appropriate system library, renaming it to SSMSTAR:
From: somnode.INSTALL(SSMPROC)
To: somnode.PROCLIB(SSMSTAR)
See "Compliance with Security Products" on page 115 for access required by the SSMSTAR task.
Edit and Copy the SSMPARM Member
1 Edit the SSMPARM member as needed.
The SSMPARM member contains SERNET parameters for the started task. The only two parameters required are SUBSYS and XML. If you are using an older version of SSMPARM, it may contain several parameters, but only SUBSYS and XML are required.
• The XML parameter must be set to NO.
• The SUBSYS parameter must contain a unique sub-system ID if there are other Serena products running on the same LPAR. For example, if ChangeMan ZMF and ChangeMan SSM are running on the same LPAR, they must not use the same sub-system ID.
114 Serena® ChangeMan® SSM 8.4

Install Change Tracking Component
NOTE The SUBSYS parameter in the SSMPARM member takes precedence over what is coded on the EXEC statement in the started task JCL.
2 Copy the SSMPARM member to the appropriate system library:
From: somnode.INSTALL(SSMPARM)
To: somnode.PARMLIB(SSMPARM)
Compliance with Security Products
The SSMSTAR task requires read access to data sets that group administrators define to the Change Tracking component. When a file is initially defined to change tracking by a group administrator, the file is opened to verify access through your installed security software. If the SSMSTAR task does not have read access to a data set being defined, it will detect a security failure, generate a message indicating the failure, and halt change detection from that point on.
Step 20: Set Up RTCT Notifications (Optional)
This section provides instructions for installing and using automated TSO or e-mail notification with RTCT. The installation of TSO notification is highly recommended. E-mail notification is recommended for managers who need to know of critical events, but have no MVS TSO ID, or rarely log on to MVS.
The following steps must be carefully read and applied before automated TSO and e-mail notification will take effect.
Components for TSO notification.
Installation instructions for TSO notification.
Components for e-mail notification.
Installation instructions for e-mail notification.
Verification of e-mail notification.
NOTE The installation of RTCT notifications is optional; however, it is highly recommended.
Installation Guide 115
Chapter 5 Installation Procedures
Components for TSO Notification
Installation Instructions for TSO Notification
1 The NOTE0ALC job in the INSTALL data set allocates the somnode.MESSAGE data set required by TSO notification.
NOTE0ALC somnode.INSTALL(NOTE0ALC)This job allocates the MESSAGE file required by the transmit command for RTCT notification.
NOTE1JCL somnode.INSTALL(NOTE1JCL)This JCL runs the REXX exec. A copy of this job exists in the SYNPRO1 proc.
NOTE2EXE somnode.INSTALL(NOTE2EXE)This REXX exec reads an RTCT event from shared memory, creates a message from the parsed event, and performs a TSO SEND and TSO TRANSMIT to notify specified users of the event.Multiple events that occur to members of the same data set or HFS file are combined into a single TSO notification if the events occur within 5 seconds of each other.
NOTE3CAL somnode.INSTALL(NOTE3CAL)This member contains the REXX exec name (NOTE2EXE) so it can be invoked from a procedure.
NOTE4NFY somnode.INSTALL(NOTE4NFY)This member contains the data set name patterns, user lists, and member patterns that determine who is notified of events. This member must be modified to match the site’s requirements.
somnode.MESSAGE
somnode.MESSAGE This data set contains the message sent by the TRANSMIT command. The recipient will type TSO RECEIVE to view this message. A TSO SEND is issued to notify recipients that a message has been sent to them.
HPSNOTFY somnode.CMNSSM.LOAD(HPSNOTFY)This assembly routine is called to read the next event from shared memory and pass it to the REXX exec (NOTE2EXE).
116 Serena® ChangeMan® SSM 8.4

Install Change Tracking Component
This data set stores the actual generated message that is used by the TRANSMIT program.
2 Modify the SSMPRO1 proc and copy it to an appropriate PROCLIB under the name SSMNOTE.
This SSMNOTE job creates a TSO environment and executes the REXX program (NOTE2EXE) that reads events, then performs a TSO SEND and TRANSMIT for appropriate users.
SSMNOTE is a started task that can be initiated after the SSMSTAR task. When the SSMSTAR task is shut down, this SSMNOTE task will end gracefully. However, the SSMNOTE task can be started and stopped at any time, independent of SSMSTAR.
There are several DD statements in the SSMPRO1 procedure that must be modified to fit the installation environment.
• STEPLIB points to the installed load library somnode.CMNSSM.LOAD, and the TCPIP.SEZALINK loadlib if it is not link-listed.
• SYSEXEC points to the library containing the REXX program, somnode.INSTALL.
• NOTIFYDD points to the NOTE4NFY member in the somnode.INSTALL data set.
• MSGDD points to the somnode.MESSAGE data set.
• SYSTSIN points to the member somnode.INSTALL(NOTE3CAL).
3 Modify somnode.INSTALL(NOTE4NFY) to match the installation environment. Complete instructions are documented within the NOTE4NFY member.
For the SSM_SSID parameter, specify the name of your CMNSSM started task subsystem ID, which will be the same name you specify in somnode. CMNSSM.INSTALL(SSMPARM).
The main area of modification in the REXX program is the data set name patterns, and their corresponding notification lists. In the following example, users JSMITH and TJONES will be notified of any changes to the tracked SYS1.* data sets. The SSMNOTE task must be cycled for changes to NOTE4NFY to take effect.
Installation Guide 117

Chapter 5 Installation Procedures
DSN.1 = 'SYS1.*' NOTIFY.1 = '(NODE1.JSMITH,NODE1.TJONES)' MEM.1 = 'MEM*' /* Optional Member Pattern */
This pattern can continue with DSN.2, NOTIFY.2 to DSN.n, NOTIFY.n. All patterns are searched for potential matches.
A maximum of twenty users are permitted for each NOTIFY.n entry. For additional users, use duplicate DSN.n entries (for example, DSN.4 and DSN.5) with different NOTIFY.4 and NOTIFY.5 user lists.
The data set must be a tracked object for the REXX program to perform the notification. Optionally, a MEM.n = 'member name pattern' can be specified to restrict notification to specific member name patterns.
There is also a defaultlist parameter that lets a set of users be defined for notification if no DSN pattern is matched.
The ACTION list is the list of all events that will trigger an event notification. If ACTION = "ADD,UPD,DEL" then only add, update, and delete events will trigger a notification.
4 The formatting of the MESSAGE can also be modified in the NOTE2EXE program. This is an optional step. Currently there are two different formats, one for data set events, and one for member events. The following is an example of the data set event message creation:
QUEUE ' SUBJECT: SSM Mainframe RTCT Data Set Event notification' QUEUE ' TO: 'USERLIST QUEUE ' ' QUEUE ' SSM Mainframe RTCT Data Set Event notification' QUEUE ' ' QUEUE ' Type of event: ' EVENT QUEUE ' Data Set name: ' DSNAME QUEUE ' Volume: ' VOLSER QUEUE ' Date: ' DATE QUEUE ' Time: ' TIME QUEUE ' ' QUEUE ' Update by ' QUEUE ' User: ' USERID QUEUE ' Program: ' PROGRAM QUEUE ' Job: ' JOBNAME
The words EVENT, DSNAME, VOLSER,…, and JOBNAME are variables that get replaced by the actual values for an event. Additionally, the EVENT type is transformed from a three letter abbreviation to a plain-English equivalent. QUEUE is a REXX command that puts the
118 Serena® ChangeMan® SSM 8.4
Install Change Tracking Component
line into a buffer. These lines can be modified, added, and deleted to suit the site's requirements. The maximum line length is 80 characters.
Testing TSO Notification
TSO Notification uses a standard TSO TRANSMIT and TSO SEND in the following format:
"TRANSMIT " userlist " MSGDDNAME(MSGDD) NOLOG NONOTIFY" "SEND 'RTCT MESSAGE GENERATED, TYPE TSO RECEIVE TO VIEW MESSAGE USER(" users "),LOGON,NOWAIT"
You can issue these in TSO to see if the username is valid. There should be some output in the job or system log if there is a problem
Additionally, you can enable the debugging output by changing DEBUG = 0 to DEBUG = 1 in the NOTE2EXE REXX exec.
Components for Email Notification
MAIL1JCL somnode.INSTALL(MAIL1JCL)This JCL runs the REXX exec. These job steps can be copied into the RTCT started task to automatically start MAIL2EXE. This would replace the step copied from REXX1JCL that automatically starts REXX2EXE.
MAIL2EXE somnode.INSTALL(MAIL2EXE)This REXX exec reads an RTCT event from shared memory, creates a message from the parsed event, and e-mails the message to a list of e-mail addresses.Multiple events that occur to members of the same data set or HFS file are combined into a single e-mail if the events occur within 5 seconds of each other.
MAIL3CAL somnode.INSTALL(MAIL3CAL)This member contains the REXX exec name (MAIL2EXE) so that it can be invoked from a procedure.
Installation Guide 119

Chapter 5 Installation Procedures
Installation Instructions for E-mail Notification
1 The MAIL1JCL member should be copied to an appropriate JCL library, and the MAIL2EXE program and MAIL4NFY member should be copied to a REXX library before modification. Alternately, copies can be made in the INSTALL library.
The MAIL1JCL has the following DD statements that must be modified to match the installed environment.
• //STEPLIB points to the installed somnode.CMNSSM.LOAD where the HPSNOTFY assembly routine exists.
• //SYSEXEC points to the library with the REXX program, somnode.INSTALL.
• //NOTIFYDD points to the MAIL4NFY member in the somnode.INSTALL data set.
• //SYSTSIN points to the member somnode.INSTALL(MAIL3CAL).
The MAIL1JCL job must be modified to match the installed software environment. This proc should be started after the SSMSTAR procedure has been activated.
2 The somnode.INSTALL(MAIL4NFY) member must be customized to match the data center. Data set name patterns are matched with the USERIDs to be notified. A member pattern can also be specified. The SSMMAIL task must be cycled for changes to MAIL4NFY to take effect.
The DSN specification must be all uppercase for the data set name matching to work.
For the SSM_SSID parameter, specify the name of your CMNSSM started task subsystem ID, which will be the same name you specify in somnode.CMNSSM.INSTALL(SSMPARM).
MAIL4NFY somnode.INSTALL(MAIL4NFY)This member contains the data set name patterns, user lists, and member patterns that determine who is notified of the event. This member must be modified to match the site.
HPSNOTFY somnode.CMNSSM.LOAD(HPSNOTFY)This assembly routine is called to read the next event from shared memory, and pass it to the REXX exec.
120 Serena® ChangeMan® SSM 8.4
Install Change Tracking Component
Complete instructions are documented within the MAIL4NFY member.
3 The format of the message can optionally be modified in this REXX program. Instructions on modifying this message are in the REXX exec. Following is the current format of the mail message:
smtp.company.com // mail server addresshostname // hostname25 // smtp port numberHELO host.company.com // HELO from host MAIL FROM: [email protected] // FROM field of messageRCPT TO: <[email protected]> // TO field of messageRCPT TO: <[email protected]> // TO field of messageRCPT TO: <[email protected]> // TO field of messageDATA // Indicates start of message dataSUBJECT: SSM Mainframe RTCT Member Event notificationTO:[email protected],[email protected],[email protected]// Begin modifications here.SSM Mainframe RTCT Member Event notification
Type of event: UPD Member name: DMS510MADataset name: SYS1.PROCLIB Volume: SCPMV5 Date: 2004/02/21 Time: 19:50:10
Update by User: USER14 Program: IRXTSOJK Job: USER14A// End modifications here. // Indicates end of message data QUIT // Close smtp connection
Verification of E-mail Notification
With RTCT activated, and objects defined to its tracking list, the MAIL2EXE REXX exec should also be initiated.
Once the REXX exec is running, look at the bottom of the REXX exec output job. Here you will see the event types that trigger a notification, as well as the data sets that trigger notification.
Once a change is made to any data set triggering a notification, this same output job will also display the users that the REXX exec is mailing to. This is simply a check to ensure that the changes were picked up, and the appropriate users are being notified.
Installation Guide 121

Chapter 5 Installation Procedures
Additionally, once a change is made, the event will be picked up by RTCT and can be viewed at the bottom of the RTCT output job.
Finally, you must ensure that the e-mail messages were received by the people who were being notified and by SBM if post-approval of changes is implemented. Once all e-mail messages are successfully delivered, this is a good indication that e-mail notification is working properly.
If you are having problems receiving E-mail notifications after going through the Verification process, please supply support with the following documentation:
1 The entire output of the E-mail notification STC. Insure that the DEBUG parm was set to "1" in the MAIL4NFY member as shown below:
/* Set debug = 1 to enable debugging messages */ debug = 1
2 The latest version of your MAIL4NFY member as noted in your E-mail notification STC.
NOTE Some mail servers require angle brackets around the email address, for example "<[email protected]>". This is noted with a message similar to below:
501 badly formatted MAIL FROM user - no "<".
In this situation, make the changes noted below to your MAIL4NFY member.
All email addresses specified in the MAIL4NFY member should be in this format: "<[email protected]>".
DSN.1 = ’SYS1.PARMLIB’ NOTIFY.1 = ’<[email protected]>’ MEM.1 = ’XX*’
As well as the FROM statement in this member:
/* E-mail address for the FROM field of the mesg */ FROM = ’<[email protected]>’
Step 21: Make RTCT Task Non-Cancelable To make the SSMSTAR task non-cancelable, add an entry in your SCHEDxx member of the PARMLIB, as follows:
122 Serena® ChangeMan® SSM 8.4

Install Change Tracking Component
PPT PGNAME(SERVER) /* PROGRAM NAME */NOCANCEL /* CANNOT BE CANCELLED */
Step 22: Refresh LPA/MLPAIMPORTANT! If you are upgrading from a prior release of SSM, IPL your system before continuing, which will remove the old SVC hooks and control blocks.
You can issue the following SETPROG commands to add LPA modules without an IPL. RTCT must be stopped before these commands are issued, or the members will not be refreshed.
SETPROG LPA,ADD,MODNAME=(HPSFCLOS,HPSFSTOW,HPSFATCH,HPSFBLDL,HPSFLINK,HPSFLOAD,HPSFXCTL),DSNAME=your_mlpa_lib
SETPROG LPA,ADD,MODNAME=(HPSICLOS,HPSISTOW,HPSIDESX,HPSISCRA,HPSIDSRN,HPSIATCH,HPSIBLDL,HPSILINK,HPSILOAD,HPSIXCTL),DSNAME=your_mlpa_lib
NOTE If Change Tracking of HFS files is required, the following load modules must also be refreshed. They can be added to the second SETPROG command displayed above.
HPSIHCLO
HPSIHFD
HPSIHFP
HPSIHARR
HPSIHOP
HPSIHOPN
HPSIUNL
TIP If the dataset "your_mlpa_lib" points to the .LPA library supplied with ChangeMan SSM, then the SETPROG commands can be abbreviated as follows:
SETPROG LPA,ADD,MASK=HPSF*,DSNAME=your_mlpa_lib
SETPROG LPA,ADD,MASK=HPSI*,DSNAME=your_mlpa_lib
Installation Guide 123
Chapter 5 Installation Procedures
Step 23: Member-Level Security (MLS) - Optional
You can implement a Member-Level Security (MLS) strategy that secures individual library members (or groups of library members) from UPDATE access.
Entities defined to MLS are only protected from change through standard applications (such as TSO/ISPF) that issue the standard IBM STOW SVC. MLS does not protect entities from update if the entire PDS is overlaid (such as with IEBCOPY).
For example, MLS prevents an unauthorized user from updating a protected member, but does not prevent the user from overlaying the entire PDS (included the protected member). This is because overlaying the PDS (which operates at the data set level) does not issue a STOW SVC.
MLS requires proper data-set-level security. Prevent users from bypassing the MLS by granting data set ALTER access only to those who are authorized.
MLS Scenario
Suppose SYSAPPL.LARGE.LIBRARY contains many members crossing product boundaries, and that it is a prime candidate for Member Level Security. Assume that all users have a legitimate user ID and password. Assume also that users associated with a product code (such as ABC) can be grouped by the shop's security system into artificial and recognizable names (for example: $ABC, $JKL).
Individual user IDs of groups can have more or less authority than granted to the group. Moreover, any user ID can be suspended or revoked at any time, and the user will lose all access rights immediately.
NOTE RTCT must be running for Member Level Security (MLS) to be enabled.
NOTE IBM continues to phase out the use of the STOW SVC by many of its PDS and PDSE member update functions. Therefore, you should test the specific user scenarios that you intend to protect against with MLS in place before you rely on the MLS rules that you have established.
124 Serena® ChangeMan® SSM 8.4

Install Change Tracking Component
When implementing MLS for the LARGE library, our intent is to grant UPDATE authority to the library in general, but provide further granularity along product code patterns.
If the preceding steps have been performed successfully, members of security group $ABC can update members that start with ABC, but they are the only ones. Similarly, members of security group $JKL can update members that start with JKL to the exclusion of all other user IDs.
If an attempt to update a protected member is made by an unauthorized user, a standard RACF violation is issued.
If RTORENAME is enabled, a WTO message is sent to inform users that the protected member was saved under an internally-generated name. The name format is XXXXXX%U, where XXXXXX is the first six characters of real member name, and U is a special unprintable character.
If RTORENAME is disabled, the update is denied, and the user must manually save the member under an unprotected name to preserve the work.
Unauthorized delete and rename attempts will also result in a security violation message, and a "member NOT FOUND" message when in ISPF.
Implementation Methods
There are two methods for implementing MLS (prior to the release of ChangeMan SSM 8.3, there was another SAF method available, but it is no longer supported):
SAF Method (Recommended)
This method uses a single RACF profile to determine if a protected entity may be accessed. The RACF profile is defined to the security class specified in RTOCLASS, see "RACF Security for MLS" on page 189.
Internal Method
This method uses a list of user IDs to determine if a protected entity may be accessed.
Implementing the SAF Method (Recommended)
MLS entities can be defined, deleted, and reported using either batch commands or the Member Level Security options on the Change Tracking
Installation Guide 125

Chapter 5 Installation Procedures
Administration Menu. The following examples use batch commands. See the MLS* member in the somnode.SAMPLES library for sample JCL.
1 Set up MLS Parameters in HPSPARMS
Use the following settings in the HPSPARMS member:
• RTOMLS YES
• RTORACCHECK NO
• RTORACFID YES
• RTOCLASS SSMMLS
Optional settings are:
• RTORENAME NO (or YES)
• MLSABEND NO (or YES)
See "Step 13: Edit and Save HPSPARMS for Change Tracking" on page 98 for a more detailed description of the parameters.
2 Define Data Sets to MLS
The following examples illustrate how to define, delete, and report MLS entities using batch commands:
*-----------------------------* * DEFINE DATA SETS TO MLS * *-----------------------------* MLSDEF=(DSN=SYS1.PARMLIB, DATA SET NAME MEMBER=IEF*, MEMBER NAME OR PATTERN ACCESSLIST=(PROF1)) SECURITY ENTITY or RACF PROFILE
*-----------------------------* * DELETE DATA SETS FROM MLS * *-----------------------------* MLSDEL=(DSN=SYS1.PROCLIB, DATA SET NAME MEMBER=IEF*) MEMBER NAME OR PATTERN
*-----------------------------------------------* * REPORT ALL PROTECTED ENTITIES IN THE SYSTEM * *-----------------------------------------------* SHOW=MLS
NOTE SSMMLS is the default security class; you may specify a different class. The security class must be defined to RACF.
126 Serena® ChangeMan® SSM 8.4

Install Change Tracking Component
Verifying the SAF Method
Use the following procedure to verify the correct operation of MLS using the SAF method:
1 Allocate the data set somnode.MLS.PDS.
2 Create members HPS01, HPS02, HPS03, SER01, and SER02.
3 Create the following protected entity through batch or ISPF:
MLSDEF=(DSN=somnode.MLS.PDS, DATA SET NAME MEMBER=HPS*, MEMBER NAME OR PATTERN ACCESSLIST=(TEST)) RACF PROFILE NAME
4 Define the profile TEST to the RTOCLASS specified in the HPSPARMS member.
5 Authorize a user to profile TEST.
6 Verify that the authorized user can modify the HPS* members, and that unauthorized users cannot.
Implementing the Internal Method
MLS entities can be defined, deleted, and reported using either batch commands or the Member Level Security options on the Change Tracking Administration Menu. The following examples use batch commands. See the MLS* member in the somnode.SAMPLES library for sample JCL.
1 Set up MLS Parameters in HPSPARMS
Use the following settings in the HPSPARMS member:
• RTOMLS YES
• RTORACCHECK NO
• RTORACFID NO
You may set the MLSABEND parameter to either NO or YES.
See "Step 13: Edit and Save HPSPARMS for Change Tracking" on page 98 for a more detailed description of the parameters.
NOTE Before starting the verification procedure, RTCT must be running for MLS to be enabled.
Installation Guide 127

Chapter 5 Installation Procedures
2 Define Data Sets to MLS
The following examples illustrate how to define, delete, and report MLS entities using batch commands:
*-----------------------------* * DEFINE DATA SETS TO MLS * *-----------------------------* MLSDEF=(DSN=SYS1.PARMLIB, DATA SET NAME MEMBER=IEF*, MEMBER NAME OR PATTERN ACCESSLIST=(USER12,USER17,USER14), ACCESS LIST OF USERIDs ACCESSLIST=(USER15,USER16,USER13)) CONTINUED ACCESS LIST
MLSDEF=(DSN=SYS1.PARMLIB, DATA SET NAME MEMBER=PROG00, MEMBER NAME OR PATTERN ACCESSLIST=NONE) NO ACCESS ALLOWED
*-----------------------------* * DELETE DATA SETS FROM MLS * *-----------------------------* MLSDEL=(DSN=SYS1.PROCLIB, DATA SET NAME MEMBER=IEF*) MEMBER NAME OR PATTERN
*-----------------------------------------------* * REPORT ALL PROTECTED ENTITIES IN THE SYSTEM * *-----------------------------------------------* SHOW=MLS
Verifying the Internal Method
Use the following procedure to verify the correct operation of MLS using the Internal method:
1 Allocate the data set somnode.MLS.PDS.
2 Create members HPS01, HPS02, HPS03, SER01, and SER02.
3 Create the following protected entity through batch or ISPF:
MLSDEF=(DSN=somnode.MLS.PDS, DATA SET NAME MEMBER=HPS*, MEMBER NAME OR PATTERN ACCESSLIST=(userid1,userid2,...)) ACCESS LIST OF USERIDs
4 Verify that authorized users can modify the HPS* members, and that unauthorized users cannot.
NOTE Before starting the verification procedure, RTCT must be running for MLS to be enabled.
128 Serena® ChangeMan® SSM 8.4

Install Change Tracking Component
Step 24: Member Reference Tracking (MRT) - Optional
There are three files required for the MRT facility:
MRTAUX1 Swap file
MRTAUX2 Swap file
MRTAUX3 VSAM file (contains member reference data)
If the MRT facility is to be active on more than one LPAR, define one set of Swap files per LPAR. The MRTAUX3 file can be shared so that it contains data from each LPAR.
The MRTINIT member of the INSTALL library contains JCL to allocate these files.
Allocating AUX1 and AUX2
The recommended allocation for AUX1 and AUX2 is one track each (with no secondary extents), and half-track or smaller blocking. The reason for this is that if you are tracking members that are seldom used, and you do not bring down the started task regularly, then you will have to either wait until an AUX1 or AUX2 file fills up, or cause a swap manually (see note below), before you can report on the data from the AUX3 VSAM file. The larger the AUX1 and AUX2 files are, the longer this will take.
To initiate a manual swap, issue the following command:
/F taskname,SYN,MRTSWAP
where taskname is the started task name, SYN is the application name, and MRTSWAP is the command name.
NOTE RTCT must be installed to enable Member Reference Tracking (MRT).
TIP If you are about to run an MRT report job to see the latest references (while the started task is up), a manual swap will ensure that the MRTAUX3 VSAM file contains the most recent data collected by the intercepts.
Installation Guide 129

Chapter 5 Installation Procedures
Allocating and Initializing AUX3
The size of AUX3 depends on how many tracked members are being referenced, and whether or not you are using optional key fields. The more key fields you use, the more records you will have.
The file is initialized by writing one 9s record. The 9s record is also used to define the four optional key fields. Following is an example of the 9s record used in the INIT step of the provided JCL:
//INDD1 DD * 1234 99999999999999999999999999999999999999999999999999990000
Columns 53 - 56 of the INDD1 data (indicated by 1234 above the columns) are used to define the four optional key fields:
Code a "0" to exclude the field from the key.
Code a "1" to include the field in the key.
If no optional key fields are specified (0000), each record added to the file will contain:
The number of references found for each data set and member name matching a pattern defined to MRT.
The date and time of both the first reference and the last reference.
Other data collected from the LAST reference only.
The presence of optional key fields causes the system to accumulate references only when Dataset, Member Name, and the additional keys match an existing record. Otherwise, a new record will be added to the file.
Column Optional Key Field
53 SYSTEM NAME
54 VOLUME SERIAL
55 AUTH ID
56 JOB NAME
130 Serena® ChangeMan® SSM 8.4

Install Change Tracking Component
MRTINIT JCL Example
Following is an example of the JCL provided in the MRTINIT member of the INSTALL library.
//jobname JOB (account),'user name',MSGCLASS=X,// MSGLEVEL=(1,1),NOTIFY=&SYSUID//*//* Delete and Reallocate MRT Files//*//* This job deletes and reallocates the three files needed by the//* started task when RTCTMRT YES is specified in HPSPARMS. The swap//* files collect data from the SVC intercepts, and the MRTAUX3 file//* is used to save the data, over time, for reporting purposes.//*//* If MRT is to be active on more than one LPAR, you must define one//* set of Swap files per LPAR. The MRTAUX3 file can be shared by//* multiple LPAR's or it can be unique. If it is shared, it will//* contain data from each LPAR, and you may want to consider adding//* SYSTEM NAME (below) as a key field so that accesses to a given data//* set and member from different LPAR'S can be reported separately.//*//* Note: The MRTAUX3 file should be SAF-protected against unauthor-//* ized access. The started task and any MRT Administrators//* need at least UPDATE access in order to update and maintain//* the file contents. Users submitting the MRTRPT job (report//* only) will need READ access.//*//*//* Delete and Reallocate Swap Files//*//SCRTCH EXEC PGM=IEFBR14//AUX1 DD DSN=somnode.CMNSSM.MRTAUX1,DISP=(MOD,DELETE),// UNIT=SYSDA,SPACE=(TRK,1)//AUX2 DD DSN=somnode.CMNSSM.MRTAUX2,DISP=(MOD,DELETE),// UNIT=SYSDA,SPACE=(TRK,1)//*//* If MRT is active, it will perform a "swap" between the MRTAUX1 &//* MRTAUX2 files whenever the "current" file is full. The swap will//* also update the MRTAUX3 VSAM file with the contents of the AUX1/2//* file just closed. Thus the currency of the data in the AUX3 file//* is a function of how often tracked members are being referenced//* and how much space is provided in the AUX1 and AUX2 files.//*//* NOTE: A swap can also be forced at any time while MRT is active//* by issuing the F taskname,SYN,MRTSWAP console command.//*//* In the ALLOC step below, we recommend that "trk" = 1 and "nnnnn"//* = 27956 (for a 3390) or two blocks per track. In the DEFINE step,//* the primary allocation "pri" and secondary allocation "sec" needs//* to be set for the MRTAUX3 VSAM file. A value of CYL(100 15) is
Installation Guide 131

Chapter 5 Installation Procedures
//* recommended initially.//*//*//ALLOC EXEC PGM=IEFBR14//AUX1 DD DSN=somnode.CMNSSM.MRTAUX1,DISP=(,CATLG),// UNIT=SYSDA,SPACE=(TRK,trk),// DCB=(RECFM=FB,LRECL=116,BLKSIZE=nnnnn)//AUX2 DD DSN=somnode.CMNSSM.MRTAUX2,DISP=(,CATLG),// UNIT=SYSDA,SPACE=(TRK,trk),// DCB=(RECFM=FB,LRECL=116,BLKSIZE=nnnnn)//*//* Delete and Redefine VSAM File//*//DEFINE EXEC PGM=IDCAMS,REGION=1M//SYSPRINT DD SYSOUT=*//SYSIN DD * DELETE somnode.CMNSSM.MRTAUX3 DEFINE CLUSTER (NAME(somnode.CMNSSM.MRTAUX3) - SHAREOPTIONS(4,3) VOLUMES(SYSDA) - KEYS(77 0) FREESPACE(10 10) - RECORDSIZE(164 164)) - DATA (NAME(somnode.CMNSSM.MRTAUX3.DATA) - CYL(pri sec) - CISZ(4096)) - INDEX (NAME(somnode.CMNSSM.MRTAUX3.INDEX) - CYL(1 1) - CISZ(2048)) //*//* Initialize the File//*//* The file is initialized by writing one "9's" record - which is//* also used to define the four optional key fields as follows://*//* Columns 53-56 of the INDD1 data (below) represent//*//* 1 - SYSTEM NAME//* 2 - VOLUME SERIAL//* 3 - AUTH ID//* 4 - JOB NAME//*//* If a "0" is coded, the field is not included in the key.//* If a "1" is coded, the field is included in the key.//*//* If no optional key fields are specified (0000), each record added//* to the file will contain: the number of references found for each//* Dataset & Member Name matching an MRT pattern defined at the time,//* the Date and Time of the first reference and the last reference,//* and other data collected from the LAST reference only.//*//* If optional key fields are defined, the system will accumulate
132 Serena® ChangeMan® SSM 8.4

Install Change Tracking Component
//* references only when the Dataset, the Member Name, AND the addi-//* tional key(s) match an existing record; otherwise, a new record//* will be added to the file for that reference. Thus more granular//* data will be available to you for reporting, but the MRTAUX3 file//* will require more DASD space than it would otherwise.//*//INIT EXEC PGM=IDCAMS,REGION=2M,COND=(8,LT)//INDD1 DD * 123499999999999999999999999999999999999999999999999999990000//OUTDD1 DD DISP=OLD,DSN=somnode.CMNSSM.MRTAUX3//SYSPRINT DD SYSOUT=*//SYSIN DD * REPRO INFILE(INDD1) OUTFILE(OUTDD1)//*
Enabling MRT
To enable MRT:
The three AUX files must be present in the started task JCL.
The RTCTMRT and RTCTIBLDL parameters in the HPSPARMS member must be set to YES.
Maintaining the MRTAUX3 File
The following JCL is available for maintaining the MRTAUX3 file:
The MRTREORG member in the INSTALL library:
• creates a backup
• deletes and redefines
• restores MRTAUX3 from the backup
See "Back Up and Restore MRTAUX3" on page 153.
The MRTRP member in the INSTALL library performs the following functions based on your selection criteria:
• creates a report of selected records
• archives selected records
• deletes selected records
Installation Guide 133
Chapter 5 Installation Procedures
See "Archive and Delete MRTAUX3 Records" on page 154.
There are three batch jobs in the SAMPLES library to help you initialize your MRT environment: MRXDEF, MRTDEF, and MREDEF.
MRXDEF is used to add common member prefixes to the MRX list. These prefixes are recommended by Serena to filter out high-activity members from MRT processing. If any of these prefixes overlap with members whose references you are tracking, you will need to remove them or make them more specific.
It is highly recommended that you run the MRXDEF job to prevent performance problems.
MRTDEF is used to define DSN and member patterns to be tracked by MRT.
MREDEF is used to define DSN and member patterns to be excluded from tracking by MRT.
You can also enter these definitions using the online panels after you bring up the system.
For more information on MRXDEF, MRTDEF, MREDEF, and the other MRT functions, refer to the Change Tracking User’s Guide in the following sections:
Chapter 2 “Online Administration”, topic “Member Reference Tracking Options”.
Chapter 3 “Batch Administration”, where each command is documented.
Step 25: Start or Shut Down RTCT TaskAfter the MLPA is refreshed, edit and run the SSMSTAR job. This jobs starts the SERVER, which then starts the HPSSTART subtask, which in turn starts the HPSRTO program. You can also start the task by specifying the /S SSMSTAR operator command. This task must be started after every IPL.
Before starting the SSMSTAR task, verify that a minimal tracking environment has been set up. See "Step 12: Set Up Starter
IMPORTANT! Read the following before proceeding to the next step!
134 Serena® ChangeMan® SSM 8.4

Install Change Tracking Component
Environment" on page 91, and "Step 14: Define Objects to Change Tracking" on page 109.
To stop the task, issue the /F SSMSTAR,SH,n command. The parameters for the F (MODIFY) command are:
When the task is stopped, the intercepts will be disabled.
If there are any problems, start, then immediately stop the SSMSTAR task to disable the intercepts from the system. No IPL is required to disable the intercepts.
Step 26: Verify RTCTAs the task runs, change one of the tracked data sets, and browse the DETECT sysout of the started task to see the change log. Page down to the end to see how the changes are tracked. These change events are also stored in the ChangeMan SSM database. The changed members of delta-tracked objects are backed up in compressed form by ChangeMan SSM.
The following table describes the identifiers displayed in the change log for the RTCT tracked events:
SSMSTAR Name of the started task for RTCT.
SH Shutdown parameter of the F command.
n Maximum grace period, in minutes (optional). If supplied, this parameter specifies the maximum amount of time that the started task will wait for all work to complete before shutting down.
Identifier Description
ADD Add - a member was added to a PDS.
UPD Update - an existing PDS member was modified.
DEL Delete - a member was deleted from a PDS.
REN Rename - a member was renamed in a PDS.
STA Status - the ISPF user fields were changed for a member.
DSU Data Set Update - a PS or DA file was modified.
Installation Guide 135

Chapter 5 Installation Procedures
Step 27: Set Up the Global Capture Job for RTCT (Optional)
RTCT tracks updates to PDS, PDSE, PS, and DA files. To detect update activities in tracked VSAM data sets, the HPSGLOBE program can be scheduled to run periodically.
To run the HPSGLOBE program:
1 Edit somnode.INSTALL($GLOBAL).
2 For the parameter, use PARM='GLOBAL,VSAMONLY'.
3 Change the STEPLIB data set name.
Do not run the global job until at least one data set has been defined to tracking by a group administrator. This should have been performed in "Step 14: Define Objects to Change Tracking" on page 109.
The following sample JCL ($GLOBAL) performs a global event capture for VSAM files:
//JOB//*//GLOBAL EXEC PGM=HPSGLOBE,REGION=3072K,PARM='GLOBAL,VSAMONLY' <===//STEPLIB DD DSN=somnode.CMNSSM.LOAD,DISP=SHR <===// DD DSN=somnode.SERCOMC.LOAD,DISP=SHR <===//SYSPRINT DD SYSOUT=*//SYSUDUMP DD SYSOUT=*//
REL Relocate - a data set was relocated on DASD.
CMP Compress - a PDS was compressed.
MIG Migrate - a data set was migrated.
Identifier Description
NOTE If you are implementing RTCT, this step is necessary only if you will be tracking VSAM data sets.
136 Serena® ChangeMan® SSM 8.4

Install Change Tracking Component
Step 28: Set Up the Global Capture Job (non-RTCT)If RTCT is not implemented, the capture of change events for the objects defined to the Change Tracking component can be performed in the following ways:
Object-level capture online using option 1 of the Change Tracking menu.
Group-level capture online for all objects in a group using option 2 of the Change Tracking menu.
Group-level capture in batch mode for selected groups using the CAPTURE command. Refer to the Change Tracking User’s Guide for information about the CAPTURE command.
Global capture using the HPSGLOBE program.
This step describes how to use the HPSGLOBE program for capturing change events.
The HPSGLOBE program, with the appropriate PARM specification, performs the Global Event Capture for all tracked Objects in the system. To maintain the continuity of the event-detection process, this job needs to be defined in your existing scheduling package, and to be run at desired intervals. This is required only if RTCT has not been implemented.
1 Edit somnode.INSTALL($GLOBAL).
2 Change the STEPLIB data set name.
3 Change the PARM on the EXEC statement according to the documentation in the $GLOBAL member.
Do not run the global job until at least one data set has been defined to tracking by a group administrator. This should have been performed in "Step 14: Define Objects to Change Tracking" on page 109.
The following sample JCL performs a global event capture:
//jobname JOB //* //*------------------------------------------------------------------- //* This job performs a GLOBAL EVENT Capture for all Objects defined //* to the SSM Tracking Component. This job can run at any time //* the user desires to capture ALL Events for ALL tracked Objects
Installation Guide 137

Chapter 5 Installation Procedures
//* in the system. It is recommended that this job be run at least //* once every 24 hours if Real-Time Change Tracking (RTCT) has not //* been implemented. If RTCT has been implemented, this job can //* still be run periodically. //* //* PARM=GLOBAL Global Capture. //* PARM='GLOBAL,QUICK' Enhances performance. //* PARM='GLOBAL,HYPER' Enhances performance for loadlibs. //* PARM='GLOBAL,TRACE' Causes TRACE messages to generate. //* PARM='GLOBAL,AUTORECALL' Recalls migrated tracked data sets. //* PARM='GLOBAL,VSAMONLY' Detects the changes in VSAM objects //*------------------------------------------------------------------- //* //JOBLIB DD DSN=somnode.CMNSSM.LOAD,DISP=SHR // DD DSN=somnode.SERCOMC.LOAD,DISP=SHR //GLOBAL EXEC PGM=HPSGLOBE,REGION=3072K,PARM='GLOBAL' <=== //*HPSPLIB DD DISP=SHR,DSN=SYS1.PARMLIB(HPSPARMS) //SYSPRINT DD SYSOUT=* //SYSUDUMP DD SYSOUT=* //*
The following table describes parameters in the JCL:
Parameter Description
GLOBAL GLOBAL processing.
GLOBAL,QUICK TTR processing identifies candidates for hashing. Load module standard ZAPs are detected. This is an optimized Global Event Detection.
GLOBAL,HYPER A faster version of the QUICK mode. In-place ZAP events are not detected.
GLOBAL,TRACE Causes trace messages to be generated.
GLOBAL,AUTORECALL During the capture, if a data set has been archived by IBM’s HSM or Computer Associates’ SAMS:Disk (previously Sterling Software’s SAMS:Disk), it will be recalled.
GLOBAL,VSAMONLY Detects only VSAM update activities. RTCT does not perform capture for tracked VSAM data sets. To update tracking for VSAM data sets, it is required to schedule a batch capture job.
138 Serena® ChangeMan® SSM 8.4

Install Change Tracking Component
Global Capture Example 1
The following PARM performs a global capture of all objects. All members in all tracked data sets are fingerprinted to detect any changes. Run this at least once every 24 hours.
EXEC PARM='GLOBAL'
Global Capture Example 2
The following PARM performs a global capture of all objects in a QUICK mode.
For each tracked data set, an analysis is first made to identify the members with new TTRs.
For load modules, the internal IDR records are evaluated to determine if any standard ZAPs have been applied. If the IDR record has not changed, it is assumed there was no change in the content of the load module. Load modules with changed TTRs are fingerprinted to determine if a true change in content has occurred.
Non-standard ZAPs to load modules, and in-place updates for non-load members are not detected.
This combination of parameters has improved the performance of the HPSGLOBE program by 75% or more, and is recommended for periodic runs. All event types are still generated, including the load module standard ZAP event.
EXEC PARM='GLOBAL,QUICK'
Global Capture Example 3
The following PARM performs a global capture of all objects in a HYPER mode (HYPER is faster than QUICK).
The difference between the HYPER and QUICK modes is that PARM=HYPER assumes load module ZAP events are not important, while PARM=QUICK assumes they are important. Therefore, if the TTR of a load module or a source member has not changed, it assumes that no program update has taken place. LINK events are detected as usual.
This parameter improves performance of the HPSGLOBE program by 85% and is recommended for multiple scheduled runs during the day to
Installation Guide 139

Chapter 5 Installation Procedures
minimize CPU overhead. The nightly run, without the QUICK or HYPER parameters, will detect all change events.
EXEC PARM='GLOBAL,HYPER'
Administrative Facilities for Maintaining Change Tracking Databases
This section describes maintenance procedures required if you are using either Real Time Change Tracking (RTCT) or Batch Interval Change Tracking (BICT).
Define GDGs for Database Backups The following member ($DEFGDG) is supplied in the INSTALL library to define the Generation Data Groups (GDGs) required for the database backup process. The two Data Control Block (DCB) models are used in the $BACKUP job that is supplied in the INSTALL library.
//jobname JOB //* //*-------------------------------------------------------------- //* STEP0: Deletes the GDG if there is any //* STEP1: Defines 4 GDGs for database backups for: //* o Site Master Database //* o Object Master Database //* o Delta Master Database //* o MRTAUX3 Database //* STEP2: Defines 2 backup MODEL DCB's //* //* Note1: X all; f somnode all; x all; f <=== all //* Note2: See member $BACKUP after generating the GDG entries. //* //*-------------------------------------------------------------- //STP0DEL EXEC PGM=IDCAMS //**************************************** //* To allow the GDG to be deleted, all * //* the created generations must first * //* be deleted. * //**************************************** //SYSPRINT DD SYSOUT=* //SYSIN DD * DELETE somnode.CMNSSM.SM.BACKUP
140 Serena® ChangeMan® SSM 8.4

Administrative Facilities for Maintaining Change Tracking Databases
DELETE somnode.CMNSSM.OM.BACKUP DELETE somnode.CMNSSM.DM.BACKUP DELETE somnode.CMNSSM.MRT.BACKUP DELETE somnode.CMNSSM.BACKUP.MODEL.DCB DELETE somnode.CMNSSM.MRTBKUP.MODEL.DCB //* //STP1DEF EXEC PGM=IDCAMS //SYSPRINT DD SYSOUT=* //SYSIN DD * DEFINE GENERATIONDATAGROUP - (NAME(somnode.CMNSSM.SM.BACKUP) - LIMIT(3) - SCRATCH - NOEMPTY) DEFINE GENERATIONDATAGROUP - (NAME(somnode.CMNSSM.OM.BACKUP) - LIMIT(3) - SCRATCH - NOEMPTY) DEFINE GENERATIONDATAGROUP - (NAME(somnode.CMNSSM.DM.BACKUP) - LIMIT(3) - SCRATCH - NOEMPTY) DEFINE GENERATIONDATAGROUP - (NAME(somnode.CMNSSM.MRT.BACKUP) - LIMIT(3) - SCRATCH - NOEMPTY) //* //STP2MDL EXEC PGM=IEFBR14 //MODEL DD DSN=somnode.CMNSSM.BACKUP.MODEL.DCB, <=== // DISP=(,CATLG,DELETE), // UNIT=SYSDA,VOL=SER=vvvvvv, <=== // SPACE=(TRK,(1,1)), // DCB=(RECFM=VB,LRECL=22528,BLKSIZE=22532,DSORG=PS) //MODEL DD DSN=somnode.CMNSSM.MRTBKUP.MODEL.DCB, <=== // DISP=(,CATLG,DELETE), // UNIT=SYSDA,VOL=SER=vvvvvv, <=== // SPACE=(TRK,(1,1)), // DCB=(RECFM=FB,LRECL=164,BLKSIZE=27880,DSORG=PS) //*
Installation Guide 141
Chapter 5 Installation Procedures
Set Up Database Backup JobThe ChangeMan SSM databases should be backed up periodically (daily). To ensure the integrity of ChangeMan SSM operation, these databases must be backed up simultaneously. Modify and schedule the $BACKUP job, found in the INSTALL distribution library.
The following sample JCL ($BACKUP) shows how to set up the backup job:
//jobname JOB //* //*--------------------------------------------------------------- //* NOTE1: X ALL; F <=== for all required changes //* //* NOTE2: Make sure to periodically back up your Site Master, //* Object Master and Delta Master databases. A syn- //* chronized backup/restore of the three databases i //* is required to ensure the integrity of the Trackin //* Facility. //* //* NOTE3: If you installed the MRT option, STEP4 should also //* run periodically to back up the MRTAUX3 database //* //* NOTE4: See member $DEFGDG to define the required OUTDD GDG //* prior to running this job. //* //*--------------------------------------------------------------- //STEP1 EXEC PGM=IDCAMS,REGION=1M //INDD DD DSN=somnode.CMNSSM.SITE.MASTER,DISP=SHR <=== //OUTDD DD DSN=somnode.CMNSSM.SM.BACKUP(+1), <=== // DISP=(,CATLG,DELETE), // SPACE=(CYL,(5,1)),VOL=SER=Diskvol,UNIT=SYSDA, <=== // DCB=somnode.CMNSSM.BACKUP.MODEL.DCB <=== //SYSPRINT DD SYSOUT=* //SYSIN DD * REPRO INFILE(INDD) OUTFILE (OUTDD) //* //STEP2 EXEC PGM=IDCAMS,REGION=1M //INDD DD DSN=somnode.CMNSSM.OBJECT.MASTER,DISP=SHR <=== //OUTDD DD DSN=somnode.CMNSSM.OM.BACKUP(+1), <=== // DISP=(,CATLG,DELETE), // SPACE=(CYL,(2,1)),VOL=SER=Diskvol,UNIT=SYSDA, <=== // DCB=somnode.CMNSSM.BACKUP.MODEL.DCB <=== //SYSPRINT DD SYSOUT=* //SYSIN DD * REPRO INFILE(INDD) OUTFILE (OUTDD) //* //STEP3 EXEC PGM=IDCAMS,REGION=1M
142 Serena® ChangeMan® SSM 8.4

Administrative Facilities for Maintaining Change Tracking Databases
//INDD DD DSN=somnode.CMNSSM.DELTA.MASTER,DISP=SHR <=== //OUTDD DD DSN=somnode.CMNSSM.DM.BACKUP(+1), <=== // DISP=(,CATLG,DELETE), // SPACE=(CYL,(15,10)),VOL=SER=Diskvol,UNIT=SYSDA,<=== // DCB=somnode.CMNSSM.BACKUP.MODEL.DCB <=== //SYSPRINT DD SYSOUT=* //SYSIN DD * REPRO INFILE(INDD) OUTFILE (OUTDD) //* //STEP4 EXEC PGM=IDCAMS,REGION=1M //INDD DD DSN=somnode.CMNSSM.MRTAUX3,DISP=SHR <=== //OUTDD DD DSN=somnode.CMNSSM.MRT.BACKUP(+1), <=== // DISP=(,CATLG,DELETE), // SPACE=(CYL,(15,10)),VOL=SER=Diskvol,UNIT=SYSDA,<=== // DCB=somnode.CMNSSM.MRTBKUP.MODEL.DCB <=== //SYSPRINT DD SYSOUT=* //SYSIN DD * REPRO INFILE(INDD) OUTFILE (OUTDD) //*
Set Up Reorganization JobsChangeMan SSM’s VSAM databases should be reorganized periodically as required (see the $REORG member in the INSTALL distribution library for sample JCL).
RLS Implementation
To secure the databases using RLS, you must define them using an RLS-enabled storage class.
The LOG(NONE) setting is recommended when defining the databases. LOG(NONE) specifies that the databases are non-recoverable. The supplied database definition JCL uses this setting as the default. To change the LOG attribute after the databases are defined, use an IDCAMS ALTER command.
See "RLS Implementation" on page 88 for more information.
NOTE LOG(UNDO) or LOG(ALL) is specified to have recoverable databases, but this is not recommended.
Installation Guide 143

Chapter 5 Installation Procedures
REORG JCL
The following sample illustrates the reorganization JCL ($REORG):
//jobname JOB //* //*-----------------------------------------------------------------//* This job performs the following processes: //* 1. Backs up the three ChangeMan SSM databases. //* 2. Deletes & redefines the three SSM databases. //* 3. Restores the three SSM databases from the backups. //* //* Edit this member as follows: //* 1. Caps on; X ALL; f "<===" ALL Change as required. //* 2. F 'somnode' ALL Change as required. //* 3. F 'Diskvol' ALL Change as required. //* //*-----------------------------------------------------------------//* //* -------------------------------------------- //* Back up the Site Master Database. //* -------------------------------------------- //BACKUPSM EXEC PGM=IDCAMS,REGION=1M,COND=(0,LT) //INDD DD DSN=somnode.CMNSSM.SITE.MASTER,DISP=SHR <===//OUTDD DD DSN=somnode.CMNSSM.SITE.MASTER.BACKUP, <===// DISP=(,CATLG,DELETE), // SPACE=(CYL,(5,5)),VOL=SER=Diskvol,UNIT=SYSDA, <===// DCB=(RECFM=VB,DSORG=PS,LRECL=22528,BLKSIZE=22532) //SYSPRINT DD SYSOUT=* //SYSIN DD * REPRO INFILE(INDD) OUTFILE (OUTDD) //* -------------------------------------------- //* Back up the Object Master Database. //* -------------------------------------------- //BACKUPOM EXEC PGM=IDCAMS,REGION=1M,COND=(0,LT) //INDD DD DSN=somnode.CMNSSM.OBJECT.MASTER,DISP=SHR <===//OUTDD DD DSN=somnode.CMNSSM.OBJECT.MASTER.BACKUP, <===// DISP=(,CATLG,DELETE), // SPACE=(CYL,(5,5)),VOL=SER=Diskvol,UNIT=SYSDA, <===// DCB=(RECFM=VB,DSORG=PS,LRECL=22528,BLKSIZE=22532) //SYSPRINT DD SYSOUT=* //SYSIN DD * REPRO INFILE(INDD) OUTFILE (OUTDD) //* -------------------------------------------- //* Back up the Delta Master Database. //* -------------------------------------------- //BACKUPDM EXEC PGM=IDCAMS,REGION=1M,COND=(0,LT) //INDD DD DSN=somnode.CMNSSM.DELTA.MASTER,DISP=SHR <===//OUTDD DD DSN=somnode.CMNSSM.DELTA.MASTER.BACKUP, <===// DISP=(,CATLG,DELETE),
144 Serena® ChangeMan® SSM 8.4
Administrative Facilities for Maintaining Change Tracking Databases
// SPACE=(CYL,(50,50)),VOL=SER=Diskvol,UNIT=SYSDA, <===// DCB=(RECFM=VB,DSORG=PS,LRECL=22528,BLKSIZE=22532) //SYSPRINT DD SYSOUT=* //SYSIN DD * REPRO INFILE(INDD) OUTFILE (OUTDD) //* -------------------------------------------- //* Delete & Re-define the Site Master Database. //* -------------------------------------------- //DEFINESM EXEC PGM=IDCAMS,REGION=1M,COND=(0,LT) //SYSPRINT DD SYSOUT=* //SYSIN DD * DELETE somnode.CMNSSM.SITE.MASTER DEFINE CLUSTER (NAME(somnode.CMNSSM.SITE.MASTER) - SHAREOPTIONS(4 3) VOLUMES(Diskvol) - LOG(NONE) - KEYS(55 0) FREESPACE(10 10) - RECORDSIZE(12288 20200)) - DATA (NAME(somnode.CMNSSM.SITE.MASTER.DATA) - CYL(5 5)) - INDEX (NAME(somnode.CMNSSM.SITE.MASTER.INDEX) - CYL(1 1) - CISZ(2048)) //* ------------------------------------------------- //* Restore the Site Master Database from the backup. //* ------------------------------------------------- //RESTORES EXEC PGM=IDCAMS,REGION=1M,COND=(0,LT) //INDD DD DSN=somnode.CMNSSM.SITE.MASTER.BACKUP,DISP=SHR //OUTDD DD DSN=somnode.CMNSSM.SITE.MASTER,DISP=SHR //SYSPRINT DD SYSOUT=* //SYSIN DD * REPRO INFILE(INDD) OUTFILE (OUTDD) //* ----------------------------------------------- //* Delete & Re-define the Object Master Database. //* ----------------------------------------------- //DEFINEOM EXEC PGM=IDCAMS,REGION=2048K,COND=(0,LT) //SYSPRINT DD SYSOUT=* //SYSIN DD * DELETE somnode.CMNSSM.OBJECT.MASTER DEFINE CLUSTER (NAME(somnode.CMNSSM.OBJECT.MASTER) - SHAREOPTIONS(4 3) VOLUMES(Diskvol) - LOG(NONE) - KEYS(75 0) FREESPACE(10 10) - RECORDSIZE(200 4089)) - DATA (NAME(somnode.CMNSSM.OBJECT.MASTER.DATA) - CYL(5 5) - CISZ(4096)) - INDEX (NAME(somnode.CMNSSM.OBJECT.MASTER.INDEX) - CYL(1 1) - CISZ(2048)) //* ---------------------------------------------------
Installation Guide 145

Chapter 5 Installation Procedures
//* Restore the Object Master Database from the backup. //* --------------------------------------------------- //RESTOREO EXEC PGM=IDCAMS,REGION=1M,COND=(0,LT) //INDD DD DSN=somnode.CMNSSM.OBJECT.MASTER.BACKUP,DISP=SHR //OUTDD DD DSN=somnode.CMNSSM.OBJECT.MASTER,DISP=SHR //SYSPRINT DD SYSOUT=* //SYSIN DD * REPRO INFILE(INDD) OUTFILE (OUTDD) //* -------------------------------------------- //* Delete & Re-define the Delta Master Database. //* -------------------------------------------- //DEFINEDM EXEC PGM=IDCAMS,REGION=1M,COND=(0,LT) //SYSPRINT DD SYSOUT=* //SYSIN DD * DELETE somnode.CMNSSM.DELTA.MASTER DEFINE CLUSTER (NAME(somnode.CMNSSM.DELTA.MASTER) - SHAREOPTIONS(4 3) VOLUMES(Diskvol) - LOG(NONE) - KEYS(12 0) FREESPACE(10 10) - RECORDSIZE(12288 22524)) - DATA (NAME(somnode.CMNSSM.DELTA.MASTER.DATA) - CYL(100 50)) - INDEX (NAME(somnode.CMNSSM.DELTA.MASTER.INDEX) - CYL(1 1) - CISZ(2048)) //* -------------------------------------------------- //* Restore the Delta Master Database from the backup. //* -------------------------------------------------- //RESTORED EXEC PGM=IDCAMS,REGION=1M,COND=(0,LT) //INDD DD DSN=somnode.CMNSSM.DELTA.MASTER.BACKUP,DISP=SHR //OUTDD DD DSN=somnode.CMNSSM.DELTA.MASTER,DISP=SHR //SYSPRINT DD SYSOUT=* //SYSIN DD * REPRO INFILE(INDD) OUTFILE (OUTDD) //*
Set Up Database Integrity Verification JobDue to system interruptions, the internal relationship among the three Change Tracking databases can be affected. To verify and re-establish their integrity, the $INTEG job must be run when needed. Refer to the internal documentation supplied in this job and prepare it to be submitted if integrity exposures have been introduced.
You should run this job in simulation mode before backing up the databases. If problems are reported, back up the three databases and
146 Serena® ChangeMan® SSM 8.4
Administrative Facilities for Maintaining Change Tracking Databases
run the job without the SIMULATE parameter. Be sure to include the COND=(4,NE) parameter on the JOB statement.
Following is the sample JCL $INTEG:
//jobname JOB (acct),username,CLASS=A,MSGCLASS=X,COND=(4,NE), // NOTIFY=&SYSUID //*--------------------------------------------------------------------//* DATABASE INTEGRITY PROGRAM //* //* This job performs integrity checking between the 3 databases. //* If there are any discrepancies, all necessary corrections are //* made to re-establish synchronization. There are three EXEC //* PARMS that may be specified, as follows: //* //* PARM DESCRIPTIONS: //* ------------------ //* SIMULATE - Simulation mode only. No updates will be performed. //* KEYS - The key of the record (in error) is reported. //* TRACE - Details of the actions to be taken are reported. //* //* EXAMPLES: //* --------- //* PARM='KEYS,SIMULATE,TRACE' Simulation mode with detailed reports.//* PARM='TRACE' Errors are identified, AND CORRECTED. //* //* In simulate mode, the first step will end with rc NE 4. Steps 2 //* and 3 will not execute because of the COND=(4,NE) parameter on //* the JOB card (above). In non-simulate mode, each step will end //* with rc=4 as long as discrepancies were found and corrected. So //* when no further errors are found, the job will end. //* //* RECOMMENDATIONS: //* --------------- //* Since this job compares the three databases for consistency, //* the most reliable results will be obtained if it is run when //* they are not currently being updated. Batch jobs, users of //* the SSM ISPF interface, and the HPSRTO started task could all //* cause updates to the databases. //* //* Note: If the RLS parameter in HPSPARMS is set to YES, all SSM
CAUTION! Before running the $INTEG job, make sure that the databases are not being updated. The HPSRTO started task must be inactive, no users should be accessing the databases through ISPF, and no batch jobs should be running that update the databases.
CAUTION! When modifying the JOB statement, be sure to include the COND=(4,NE) parameter.
Installation Guide 147
Chapter 5 Installation Procedures
//* connections to the databases must have ended before //* running this job. //* //* If an interruption has occurred during an HPSGLOBE run, a //* CAPTURE job, or the HPSRTO started task, run this job first //* with the SIMULATE parm specified. Note the statistics at the //* end of the output. If there are any errors, perform the //* following steps: //* //* 1. Make sure that the HPSRTO started task is shut down //* and that all activity against the databases has ended. //* 2. Back up the three databases. //* 3. Run this job WITHOUT the SIMULATE parameter. //* //*------------------------------------------------------------------//* //JOBLIB DD DSN=somnode.CMNSSM.LOAD,DISP=SHR // DD DSN=somnode.SERCOMC.LOAD,DISP=SHR //* //PASS1 EXEC PGM=HPSINTEG,REGION=32M, // PARM='KEYS,TRACE,SIMULATE' <=== //*HPSPLIB DD DISP=SHR,DSN=SYS1.PARMLIB(HPSPARMS) <=== //SYSPRINT DD SYSOUT=* //SYSUDUMP DD SYSOUT=* //* //PASS2 EXEC PGM=HPSINTEG,REGION=32M, // PARM='TRACE' //*HPSPLIB DD DISP=SHR,DSN=SYS1.PARMLIB(HPSPARMS) <=== //SYSPRINT DD SYSOUT=* //SYSUDUMP DD SYSOUT=* //* //PASS3 EXEC PGM=HPSINTEG,REGION=32M, // PARM='TRACE' //*HPSPLIB DD DISP=SHR,DSN=SYS1.PARMLIB(HPSPARMS) <=== //SYSPRINT DD SYSOUT=* //SYSUDUMP DD SYSOUT=* //*
Delta Master Database Maintenance
The ChangeMan SSM Delta Master is a VSAM database that contains initial backup members of tracked objects and subsequent backups of only the changed members.
IMPORTANT! Before executing this process, first back up the three ChangeMan SSM databases (described in "Set Up Database Backup Job" on page 142). The JCL to back up the databases can be found in the $BACKUP member of the INSTALL distribution library.
148 Serena® ChangeMan® SSM 8.4

Administrative Facilities for Maintaining Change Tracking Databases
The HPSMAINT program purges events older than a certain date, and/or backup version prior to a specified level, from the Site Master. At the same time, it purges the compressed versions of members stored in the Delta Master. However, it never purges the latest backup (level 0).
This function can be performed only by a site administrator.
The HPSMAINT program is controlled by parameters supplied on the EXEC statement and/or the HPSIN DD statement. The HPSIN parameters specify criteria at the object level. If an object matches the criteria on the HPSIN DD parameters, those parameters are used, otherwise, the EXEC parameters are used. The parameters are described below in EXEC Parameters and HPSIN DD Control Statement Parameters.
To execute this procedure, edit the JCL in somnode.INSTALL($MAINT).
If more than one HPSPARMS member exists, the following DD statement must be specified to point to the correct one:
//HPSPLIB DD DSN=SYS1.PARMLIB(HPSPARMx),DISP=SHR
EXEC Parameters
The following table describes the HPSMAINT EXEC parameters:
Parameter Description
Execute HPSMAINT with no parameters to verify and correct the Delta Master database.
ARCHIVE Save the event or backup data to the Archive Master VSAM file before removing that data from the Site and Delta Master files. You must supply an HPSARCHV DD statement in the JCL.
BACKUPS | EVENTS
BACKUPS (the default) causes only Backup events to be considered for removal.EVENTS causes all events except Backups to be considered for removal.Level 0 (the most recent) is always kept.
SIMULATE If specified, the requested functions are performed but the VSAM files are not updated.
TRACE Specify TRACE=ON to print trace messages. TRACE=OFF is the default.
Installation Guide 149
Chapter 5 Installation Procedures
The LEVEL and PURGE parameters can be executed in a two-pass process, but they work independently.
If the LEVEL parameter is supplied, HPSMAINT controls the number of versions kept, regardless of the backup time stamp.
NOTE If the object is a PDS or PDSE, the following parameters, if specified, are applied at the member level.
AGING Backups older than the specified days will be deleted.Specify a number from 1- 99999. For example, AGING=365This parameter cannot be used with the PURGE parameter.To ensure that a minimum number of backups are retained, use the MINLEVEL parameter in conjunction with the AGING parameter.
LEVEL Indicates that backups at this level or higher will be removed from the Delta Master. Specify a number from 1- 99999. For example, LEVEL=500. LEVEL=0 is not permitted.This parameter cannot be used with the MINLEVEL parameter.
MINLEVEL Backups less than or equal to the specified version number will be saved. Specify a number from 0- 99999. For example, MINLEVEL=365This parameter can only be used with the AGING parameter.
PURGE The date/time stamp used to determine which events will be purged from the Site Master. Specification of this parameter causes all events that predate the date/time stamp to be purged except the latest backup event (from the Site Master) and its corresponding backup version (from the Delta Master). Specify a date/time in the format YYYY/MM/DD_HH:MM.ChangeMan SSM maintains a minimum of one version for each member of delta tracked data sets. This parameter cannot be used with the AGING or MINLEVEL parameters.
Parameter Description
150 Serena® ChangeMan® SSM 8.4
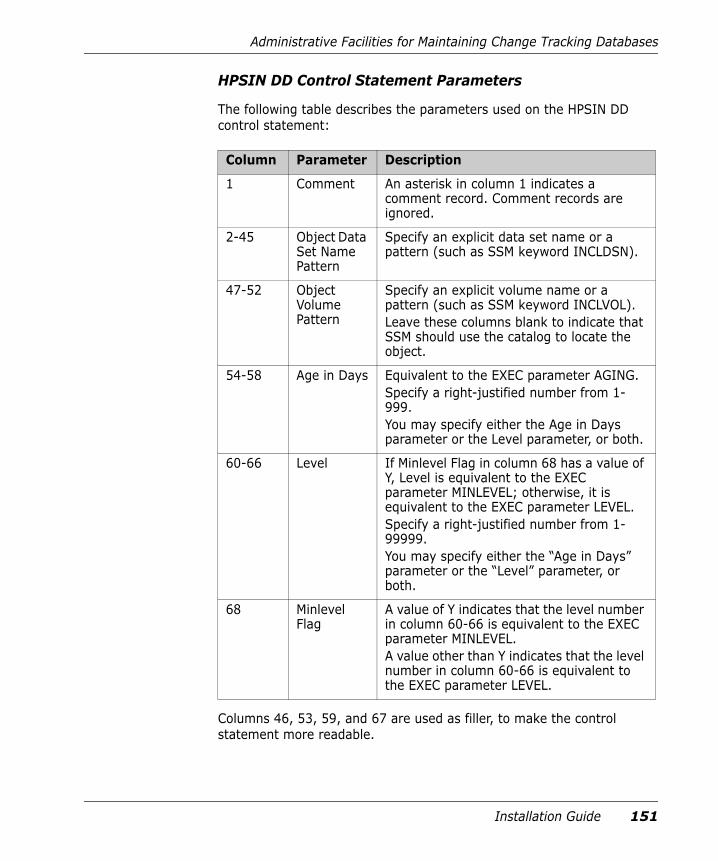
Administrative Facilities for Maintaining Change Tracking Databases
HPSIN DD Control Statement Parameters
The following table describes the parameters used on the HPSIN DD control statement:
Columns 46, 53, 59, and 67 are used as filler, to make the control statement more readable.
Column Parameter Description
1 Comment An asterisk in column 1 indicates a comment record. Comment records are ignored.
2-45 Object Data Set Name Pattern
Specify an explicit data set name or a pattern (such as SSM keyword INCLDSN).
47-52 Object Volume Pattern
Specify an explicit volume name or a pattern (such as SSM keyword INCLVOL).Leave these columns blank to indicate that SSM should use the catalog to locate the object.
54-58 Age in Days Equivalent to the EXEC parameter AGING.Specify a right-justified number from 1- 999.You may specify either the Age in Days parameter or the Level parameter, or both.
60-66 Level If Minlevel Flag in column 68 has a value of Y, Level is equivalent to the EXEC parameter MINLEVEL; otherwise, it is equivalent to the EXEC parameter LEVEL. Specify a right-justified number from 1- 99999.You may specify either the “Age in Days” parameter or the “Level” parameter, or both.
68 Minlevel Flag
A value of Y indicates that the level number in column 60-66 is equivalent to the EXEC parameter MINLEVEL. A value other than Y indicates that the level number in column 60-66 is equivalent to the EXEC parameter LEVEL.
Installation Guide 151

Chapter 5 Installation Procedures
Delta Master Maintenance Example 1
The following EXEC PARM purges all events from the Site Master that predate midnight (23:59 PM) of Mar 30, 2010. The level 0 backup event and its associated member backup are excluded. One copy of a member is always retained (by default).
PARM='PURGE=2010/03/30_23:59'
Delta Master Maintenance Example 2
The following EXEC PARM purges all backup events from the Site Master that exceed the number specified. A maximum of three backup events (in the Site Master) and their associated backup versions (in the Delta Master) are kept; the rest are deleted.
PARM='LEVEL=3'
Delta Master Maintenance Example 3
The following example uses an EXEC parameter and HPSIN DD parameters.
If an object matches the pattern TEST.PANELS.*, the associated events older that 99 days will be deleted.
For objects that do not match the pattern TEST.PANELS.*, the EXEC parameter will be used: a maximum of three backup events (in the Site Master) and their associated backup versions (in the Delta Master) are kept; the rest are deleted.
PARM='LEVEL=3'
//HPSIN DD * * * Delete objects starting with Test.Panels that are older than 99 days.* TEST.PANELS.* 099 *2345678901234567890123456789012345678901234567890123456789012345678
152 Serena® ChangeMan® SSM 8.4
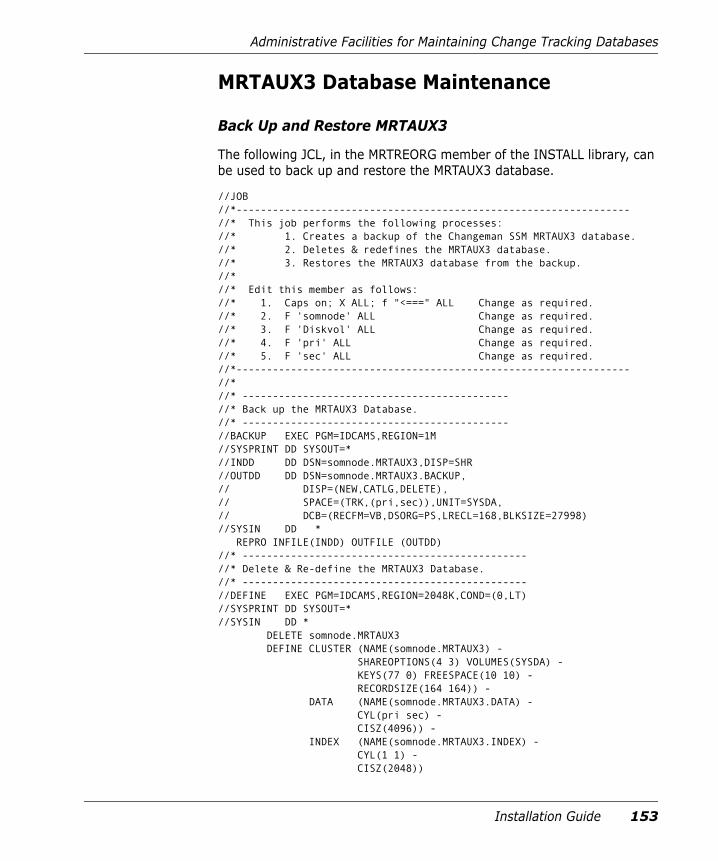
Administrative Facilities for Maintaining Change Tracking Databases
MRTAUX3 Database Maintenance
Back Up and Restore MRTAUX3
The following JCL, in the MRTREORG member of the INSTALL library, can be used to back up and restore the MRTAUX3 database.
//JOB //*-----------------------------------------------------------------//* This job performs the following processes://* 1. Creates a backup of the Changeman SSM MRTAUX3 database.//* 2. Deletes & redefines the MRTAUX3 database.//* 3. Restores the MRTAUX3 database from the backup.//*//* Edit this member as follows://* 1. Caps on; X ALL; f "<===" ALL Change as required.//* 2. F 'somnode' ALL Change as required.//* 3. F 'Diskvol' ALL Change as required.//* 4. F 'pri' ALL Change as required.//* 5. F 'sec' ALL Change as required.//*-----------------------------------------------------------------//*//* --------------------------------------------//* Back up the MRTAUX3 Database.//* --------------------------------------------//BACKUP EXEC PGM=IDCAMS,REGION=1M//SYSPRINT DD SYSOUT=*//INDD DD DSN=somnode.MRTAUX3,DISP=SHR//OUTDD DD DSN=somnode.MRTAUX3.BACKUP,// DISP=(NEW,CATLG,DELETE),// SPACE=(TRK,(pri,sec)),UNIT=SYSDA,// DCB=(RECFM=VB,DSORG=PS,LRECL=168,BLKSIZE=27998)//SYSIN DD * REPRO INFILE(INDD) OUTFILE (OUTDD)//* -----------------------------------------------//* Delete & Re-define the MRTAUX3 Database.//* -----------------------------------------------//DEFINE EXEC PGM=IDCAMS,REGION=2048K,COND=(0,LT)//SYSPRINT DD SYSOUT=*//SYSIN DD * DELETE somnode.MRTAUX3 DEFINE CLUSTER (NAME(somnode.MRTAUX3) - SHAREOPTIONS(4 3) VOLUMES(SYSDA) - KEYS(77 0) FREESPACE(10 10) - RECORDSIZE(164 164)) - DATA (NAME(somnode.MRTAUX3.DATA) - CYL(pri sec) - CISZ(4096)) - INDEX (NAME(somnode.MRTAUX3.INDEX) - CYL(1 1) - CISZ(2048))
Installation Guide 153

Chapter 5 Installation Procedures
//* ---------------------------------------------------//* Restore the MRTAUX3 Database from the backup.//* ---------------------------------------------------//RESTORE EXEC PGM=IDCAMS,REGION=1M,COND=(0,LT)//SYSPRINT DD SYSOUT=*//INDD DD DSN=somnode.MRTAUX3.BACKUP,DISP=SHR//OUTDD DD DSN=somnode.MRTAUX3,DISP=SHR//SYSIN DD * REPRO INFILE(INDD) OUTFILE (OUTDD) /*
Archive and Delete MRTAUX3 Records
The following JCL, in the MRTRP member of the INSTALL library, can be used to archive and delete selected records from the MRTAUX3 database.
//jobname JOB (accounting),'programmer',MSGCLASS=x, // MSGLEVEL=(1,1),NOTIFY=tsoid //* //* //* Member Reference Tracking - Report and File Maintenance //* //* //* This job will produce a report of records selected from the //* MRTAUX3 Vsam file. It also allows for the optional archiving //* and/or deletion of the selected records. The ARCHIVE function //* copies the selected records to a flat file which may be used, //* for backup purposes, as input to an IDCAMS REPRO job to restore//* the file. The REPORT parameter controls the printing (or not) //* of the report itself, and also allows the report data to be //* directed to a sequential file which might be used as input to //* a spreadsheet or other reporting tool. //* //* If ARCHIVE is requested, you must uncomment the SCRTCH1 step and//* the AUX3OUT DD statement below - before running this job. //* //* If REPORT = FILE (or BOTH), you must uncomment the SCRTCH2 step//* and the DATA DD statement below - before running this job. //* //* //*SCRTCH1 EXEC PGM=IEFBR14 //*DD1 DD DSN=somnode.CMNSSM.MRTAUX3.ARCHIVE.Dyymmdd, //* DISP=(MOD,DELETE), //* UNIT=SYSDA,SPACE=(TRK,1) //*
NOTE This job can also be used to create a report.
154 Serena® ChangeMan® SSM 8.4

Administrative Facilities for Maintaining Change Tracking Databases
//*SCRTCH2 EXEC PGM=IEFBR14 //*DD2 DD DSN=somnode.CMNSSM.MRTDATA.Dyymmdd, //* DISP=(MOD,DELETE), //* UNIT=SYSDA,SPACE=(TRK,1) //* //PRINT EXEC PGM=HPSMRTRP,REGION=40M //STEPLIB DD DISP=SHR,DSN=somnode.CMNSSM.LOAD //SITEMSTR DD DISP=SHR,DSN=somnode.CMNSSM.SITE.MASTER //MRTAUX3 DD DISP=SHR,DSN=somnode.CMNSSM.MRTAUX3 //*AUX3OUT DD DSN=somnode.CMNSSM.MRTAUX3.ARCHIVE.Dyymmdd, //* DISP=(,CATLG), //* UNIT=SYSDA,SPACE=(TRK,(prim,sec)), //* DCB=(RECFM=FB,LRECL=164,BLKSIZE=nnnnn) //*DATA DD DSN=somnode.CMNSSM.MRTDATA.Dyymmdd, //* DISP=(,CATLG), //* UNIT=SYSDA,SPACE=(TRK,(prim,sec)), //* DCB=(RECFM=FB,LRECL=140,BLKSIZE=nnnnn) //REPORT DD SYSOUT=* //SYSPRINT DD SYSOUT=* //SYSOUT DD SYSOUT=* //HPSIN DD * * Utilize from none to all of the parameters below. All filters * except FROM and TO may have a generic value (by specifying "*" as* the final character). If two (or more) filters are used, a record* must meet both (all) criteria in order to be selected. Put an "*"
* in column one (or remove the line) for a parm that is not needed. * If FROM and/or TO are specified, a "yyyy/mm/dd" value must be * given. * To further restrict the search to a specific time range, supply* an "_hh", "_hh:mm", or "_hh:mm:ss" value after the date, as * shown below. For FROM, the default time is _00:00:00. For TO,* the default is _23:59:59. * If INCLUSIVE is specified, both FROM and TO must be specified. * This parameter will cause a given record to be selected only if* its First and Last Reference date/time values <both> lie between* the FROM and TO values supplied. * If ZEROREF is specified, it should be the first parameter * supplied. This parameter will cause a "Zero Reference" report to * be created, which identifies all tracked members in all tracked * datasets (after filtering by DSNAME and/or MEMBER) which were NOT* referenced during the FROM/TO interval. All parameters except * DSNAME, MEMBER, FROM, TO, INCLUSIVE and REPORT will be ignored * with this option, and the Member Reference Tracking report will * not be produced.
Installation Guide 155

Chapter 5 Installation Procedures
*ZEROREF (Generates the Zero-Reference report) FROM = yyyy/mm/dd_hh:mm:ss TO = yyyy/mm/dd_hh:mm:ss *INCLUSIVE (see note above) DSNAME = MEMBER = SYSTEM = VOLSER = AUTHID = JOBNAME = PROCSTEP= JOBSTEP = *REPORT = {PRINT|YES (default)} | FILE | BOTH | NO (choose one) *ARCHIVE (Causes selected records to be written to AUX3OUT) *DELETE (Causes selected records to be deleted from the MRTAUX3 *file) //*
156 Serena® ChangeMan® SSM 8.4

Chapter 6Post-Installation Verification
This chapter provides instructions for verifying the ChangeMan SSM installation. The batch and online facilities are verified for each licensed component.
The verification process includes the following:
Batch facility installation verification
Online facility installation verification
• Verify Change Tracking component
• Verify Detection and Synchronization component
The verification of the batch facility checks all components at the same time; it does not need to be repeated for each component.
The verification of the online facility has instructions for the Change Tracking and Detection and Synchronization components. The Data Extraction component does not require online verification; verification of the online facility of either of the other components indicates that the Data Extraction component is properly installed and operational.
Batch Facility Installation Verification 158Online Facility Installation Verification 159Verify Change Tracking Online Facility 162Verify Detection and Synchronization Online Facility 169
Installation Guide 157

Chapter 6 Post-Installation Verification
Batch Facility Installation VerificationModify and submit the following JCL to determine if a Sync or OutSync condition exists between two partitioned data sets at your data center. A successful result indicates that the ChangeMan SSM load library is properly APF-authorized, and both the Detection and Synchronization and the Data Extraction components are installed successfully.
//JOBCARD//STEP1 EXEC PGM=HPSTRANS,REGION=4096K//STEPLIB DD DSN=somnode.CMNSSM.LOAD,DISP=SHR// DD DSN=somnode.SERCOMC.LOAD,DISP=SHR//SYSPRINT DD SYSOUT=*//SYSUDUMP DD SYSOUT=*//HPSIN DD ** --------------------------------------------------------* Modify the following two "explicit" DSNs to refer to your* own partitioned data sets to perform a Member-to-Member * verification* -------------------------------------------------------- EXTENDEDSYNC=YES BASE=DSN=SYS1.LINKLIB TARG=DSN=SYS2.LINKLIB* SETPRINT=EXCEPTIONSONLY=YES COMPARE=MEMTOMEM/*
An ABEND 047 indicates that the APF-authorization has not been established properly. Verify that the ChangeMan SSM load library is an APF-authorized library. A dynamic refresh of the authorization table or an IPL may be required.
158 Serena® ChangeMan® SSM 8.4

Online Facility Installation Verification
Online Facility Installation Verification
Invoke ChangeMan SSMChangeMan SSM can be invoked by executing the following command on the ISPF Option 6 (TSO) command line:
$SSMV8
The ChangeMan SSM Main Menu displays. If ChangeMan SSM is connected to the main ISPF menu, it may be invoked from the customized menu.
If the above panel is displayed, TSO/E authorization was installed properly.
If the above panel is not displayed, following are some possible causes:
ABEND 016D indicates that the ISPF session is not authorized.
• If you are using the dynamic ESR method, submit the job $AUTH to install the dynamic ESR code. NOTE The $AUTH job must be run as part of the IPL deck to automatically authorize ISPF sessions.
• If you are using the static ESR method, go back to "Static ESR Installation" on page 74 and follow the instructions to assign an
HPS@PRI1 ---- ChangeMan SSM Main Menu (Ver 8.4.0) Time: 13:49:14 ------------ Option ===> Select one of the highlighted functions: 0 Options - Review or Modify Parameters A Administration - Change Tracking Administrator Functions C Change Tracking - History, Problem Determination, Recovery Z HFS Change Tracking - HFS History, Problem Determination S Detection and Synchronization - Detect Changes and Synchronize MVS data H HFS - Detect and Synchronize - Detect Changes and Synchronize HFS data D Data Extraction - Extract Changed Data in KSDS, other VSAM, PS or DA files and Flattened Databases U Utilities - Utilities and Self-guided Product Demos X Exit ChangeMan SSM Copyright (c) 1999-2013 - Serena Software, Inc. All Rights Reserved. Press END to Exit
Installation Guide 159

Chapter 6 Post-Installation Verification
ESR route code. Do not submit the $AUTH job if you are using the static method.
If the load library is not in the LINKLIST, check the STEPLIB DD in your LOGON procedure to assure that all libraries in the concatenation list are APF-authorized.
ABEND 306-0C indicates there is a problem with the APF-authorization. Check the system log for further clarifications. One of the following messages could indicate a likely error:
CSV0191 - Requested module ISPLINK is invoked from a non-APF library.
CSV0281 - ABEND 306-0C jobname 'job', stepname 'step'.
Consult your ISPF system programmer to determine if ISP.SISPLOAD is an authorized library. The ISPLINK module must be invoked from an authorized library.
Verify Comparex InstallationIf the Comparex interface has been installed, its library must be APF-authorized. Otherwise, the Comparex load module must be copied to a ChangeMan SSM authorized library. An ABEND 306-C, when invoked during the “Sync Check” option at a later time, indicates that Comparex is not loaded from an authorized library. After correcting the problem, restart ChangeMan SSM.
Verify Setup of Initial EnvironmentVerify that you have completed the following installation steps to define the databases, set up an initial tracking environment, and define objects for tracking:
"Step 11: Define Databases" on page 88
"Step 12: Set Up Starter Environment" on page 91
"Step 14: Define Objects to Change Tracking" on page 109
160 Serena® ChangeMan® SSM 8.4

Online Facility Installation Verification
SVC InterceptionWhen intercepting an SVC routing (SVDUPDTE), review the following extract from "z/OS V1R12.0 MVS Authorized Assembler Services Guide", section "23.2.1.3 Intercepting an SVC Routine".
"When you execute an SVC instruction, the unique program to which control is passed is called the SVC routine. A common programming technique is to intercept an SVC routine by inserting another program in the path between the SVC instruction and the SVC routine. The inserted program is sometimes called a FRONT END to the original SVC routine. After the front end program is inserted, the resulting body of the code, including the front end program and the original SVC routine, is the new SVC routine. Intercepting SVC routines can be recursive. Thus, if an SVC routine already has a front end, you can still add another front end onto it, an so on, indefinitely".
Vendors are encouraged to use this technique to allow for recursive intercepts. ChangeMan SSM adheres to this dynamic SVC interception.
There are several products that may have used other techniques. To avoid a co-existence problem with other products, such as:
• BMC’s Recovery Manager
• BMC’s SMARTBATCH
• CA’s QuickFetch
• CA’s SHRINK
place the SSMSTAR started task first in the IPL deck.
By doing this, users can stop or start other tasks at will, and in any order, without any problem. Even if SSMSTAR is stopped and then restarted, it will remember its original entry point determined at IPL.
The co-existence problem may manifest itself as an 0C4 in those other started tasks when they are stopped. This can be avoided simply by placing the SSMSTAR started task first in the IPL deck.
Installation Guide 161

Chapter 6 Post-Installation Verification
Verify Change Tracking Online Facility The steps in this section verify the Change Tracking online facility installation. The steps are divided into two sections and must be performed in this order:
• Perform Group Administrator Tasks
• Perform User Tasks
Successful execution of these steps and the previous batch facility installation verification indicates that all aspects of the Change Tracking component are properly installed and operational.
For a more detailed description of the instructions in these steps, refer to the Serena ChangeMan SSM Change Tracking User’s Guide.
Perform Group Administrator TasksBefore starting this section, you must previously have been assigned as a Group administrator. Group administrators were initially assigned in "Step 12: Set Up Starter Environment" on page 91. A Group Administrator works within the Department that contains the Groups.
Define Objects
This task defines objects (datasets or files) to the Group.
1 From the ChangeMan SSM Main Menu, select Option A (Administration).
2 From the Change Tracking Administration Menu, select Option 3 (Group Administrator).
3 From the Available Departments for User panel, select the Department that contains the appropriate Group.
4 From the Group Admin Menu, select Option 1 (Define Objects).
162 Serena® ChangeMan® SSM 8.4

Verify Change Tracking Online Facility
5 Press Enter; the Define Objects - Department panel displays.
6 Select a group name (one you have previously defined).
7 Press Enter; the Define Objects panel displays.
8 Enter object (data set) names, or data set name patterns.
HPSCONG2 Define Objects - Department TECHDOCDEPT Row 1 of 4 Command ===> SCROLL ===> CSR Enter S to Select the Group where Objects will be defined. Lcmd: (S)elect Delta Tracking ===> Y (Y or N; applies to PDS(E) data sets only)Cataloged Data Sets ===> Y (Y or N) Object Define Mode ===> ONLINE (ONLINE or BATCH) Press ENTER to continue or END to exit Group Name User Count Object Count Creation Date _ CRTEST N/A 0005 2006/01/06 _ SSM83DOC N/A 0003 2006/05/18 _ TSTDEF01 N/A 0000 2006/09/18 _ XYZ67DOC N/A 0000 2006/06/12 ******************************* Bottom of data ********************************
HPSCONOR Define Objects Row 1 of 10Command ====> SCROLL ===> CSR Enter one or more explicit or generic DSN(s) on each line Lcmd: (I)nsert, (R)eplicate, (D)elete Press ENTER to continue or END to exit Department, Group Name ===> TECHDOCDEPT, TSTDEF01 Type of data set(s) ===> NONVSAM (VSAM, NONVSAM, All) Explicit or Pattern DSNs, similar to ISPF 3.4 _ XYZ123.UTL04.**_____________________________ _ ____________________________________________ _ ____________________________________________ _ ____________________________________________ _ ____________________________________________ _ ____________________________________________ _ ____________________________________________ _ ____________________________________________ _ ____________________________________________ _ ____________________________________________ ******************************* Bottom of data ********************************
Installation Guide 163

Chapter 6 Post-Installation Verification
9 Press Enter; the Resolved Objects panel displays, showing the data set names to be initialized for tracking.
10 Exclude any data sets that are not to be tracked by marking them with an X and then pressing Enter.
11 Press Enter again to update the group with these data sets.
Authorize Users
This task authorizes users for a group.
1 Select Option 5 (Authorize Users) from the Group Admin Menu.
2 Press Enter; the Authorize Users - Department panel displays.
HPSCONOI Resolved Objects - NONVSAM Row 1 of 7Command ====> SCROLL===> CSR Lcmd: To Exclude unwanted data sets, enter X on corresponding line(s) Press ENTER to continue or END to exit Catlg Volser Objects to be Initialized for Tracking Volser To Use _ XYZ123.UTL04.DELTA.PANELS SZRMF6 catlg _ XYZ123.UTL04.DELTA.SKELS SZR9YA catlg _ XYZ123.UTL04.INSTALL SZRMF6 catlg _ XYZ123.UTL04.LINKLIB SZRMF6 catlg _ XYZ123.UTL04.LST SZRMF6 catlg _ XYZ123.UTL04.MACLIB SZRMEC catlg _ XYZ123.UTL04.MESSAGES SZRMF6 catlg
HPSCONG3 Authorize Users - Department TECHDOCDEPT Row 1 of 3Command ===> SCROLL===> CSR To authorize Users to a Group, enter S to select the Group first. Lcmd: (S)elect Press ENTER to continue or END to exit Group Name User Count Object Count Creation Date _ XYZ83DOC 0002 0003 2010/05/18 _ TSTDEF01 0001 0000 2010/09/18 _ CMNSSM 0001 0000 2010/06/12 ******************************* Bottom of data ********************************
164 Serena® ChangeMan® SSM 8.4

Verify Change Tracking Online Facility
3 Select a group and press Enter; the Authorize Users - Group panel displays. The appearance of the panel varies, depending on whether the group is authorized by a SAF profile (if the CTUSERSAFAUTH parameter in HPSPARMS is set to YES, a group can be managed by associating a SAF profile with the group).
4 If the group is authorized by a SAF profile, the following panel displays:
Enter the SAF Profile Name for the group.
5 If the group is not authorized by a SAF profile, the following panel displays:
Enter the TSO user IDs and names of users to be authorized for this group.
Do not enter your own user ID - you were automatically authorized as a user when you defined the group.
HPSCONU2 Authorize Users - Group CMNSSM Row 1 of 1Command ====> SCROLL===> CSR To authorize Users, enter the SAF Profile Name for this Group. Press ENTER to continue or END to exit Userid Profile Name SAF____ GROUPPROF1__________
******************************* Bottom of data ********************************
HHPSCONU2 Authorize Users - Group TSTDEF01 Row 1 of 9Command ====> SCROLL===> CSR To authorize a User, enter the user’s TSOid and name on a new line. Lcmd: (I)nsert, (D)elete Press ENTER to continue or END to exit Userid Name _ USER001_ Doc Development_____ _ ________ ____________________ _ ________ ____________________ _ ________ ____________________ _ ________ ____________________ _ ________ ____________________ _ ________ ____________________ _ ________ ____________________ _ ________ ____________________ ******************************* Bottom of data ********************************
Installation Guide 165

Chapter 6 Post-Installation Verification
6 Press Enter.
Perform User Tasks To begin a task as a user, select Option C (Change Tracking) from the ChangeMan SSM Main Menu (see page 159).
Press Enter; the Change Tracking User Menu displays.
Capture Change Events
This step is applicable only if RTCT has not been activated. In this step, you are requested to make changes in the tracked datasets. This allows you to see how they are found and reported.
If RTCT is active when a change is made, it is logged in the DETECT sysout of the started task (SSMSTAR). If RTCT is active in your system, it will automatically capture your changes; therefore, go directly to "Browse Change Events" on page 168 to browse the events; or, select Option 3 (Query Events) for a more versatile way of seeing the events.
To begin the capture process:
1 Edit one of the two objects (data sets) that were defined previously in one of your groups. Changes can include, but are not limited to, the following:
HPSMENUU ------------ Change Tracking User Menu - USER001 ------------------- Option ===> 1 Capture Object or Browse Events - Make Object Tracking current 2 Capture Group and Browse Events - Make Group Tracking current 3 Query Events and Report - Show Events in an Object or Group 4 Recover Members - Recovery of changed members 5 Recover Entire PDS through Batch - Recovery of all members to a date/time 6 Tracking Summary on an Object - Object physical characteristics 7 Tracked Groups - List of Tracked Groups 8 Tracked Objects - Tracked Objects in all Groups 9 Compare Filtered Members - Side by Side (Source or Load) L Load Tracking Data to a DB2 table - Loads tracking data for DB2 query V View TSO notifications - Receives RTO TSO notification messages X Exit Press END to Exit
166 Serena® ChangeMan® SSM 8.4

Verify Change Tracking Online Facility
• Create a new temporary member in a source library.
• Update a member in the same data set (change the job card, for example).
• Rename one of the JCL members in the same data set.
• Reassemble and link edit a module.
2 To capture events just created in Step 1, select Option 1 (Capture Object or Browse Event) from the Change Tracking User Menu.
Press Enter; the Capture Object Events (Select Group) panel displays.
3 Select a group name containing a data set you changed.
4 After you press Enter, the Tracked Objects in Group panel displays.
HPSUGR1 Capture Object Events (Select Group) Row 1 of 3 Command ===> SCROLL===> CSR To Capture Object Events, enter S to select the Department-Group first Lcmd: (S)elect a Department-Group Last Global Capture ===> 2010/07/28_14:27 Press ENTER to continue or END to exit Total Delta-Tracked Department Group Creation-Date Object Count Object Count _ TECHDOCDEPT SSM83DOC 2010/05/18 3 1 _ TECHDOCDEPT TSTDEF01 2010/09/18 0 0 _ TECHDOCDEPT XYZ67DOC 2010/06/12 0 0 ******************************* Bottom of data ********************************
HPSUOB1 Tracked Objects in Group: U73A Row 1 of 6Command ===> SCROLL ===> CSR Lcmd: (C)apture, (N)ew, (B)rowse, (L)ast member events, (E)vents summary Press ENTER to continue or END to exit Event DS Latest Tracked Objects Vol Count ORG Event-date-time_ USER17.V830.INSTALL catlg 0 PDS 2010/07/09_18:15_ USER17.v830.LOAD catlg 133 PDS 2010/07/09_18:15_ USER17.v830.MESSAGES catlg 60 PDS 2010/07/09_18:15_ USER17.v830.PANELS catlg 6 PDS 2010/07/09_18:15_ USER17.v830.SAMPLES catlg 6 PDS 2010/07/09_18:15_ USER17.v830.SKELS catlg 6 PDS 2010/07/09_18:15******************************* Bottom of data ***************************
Installation Guide 167

Chapter 6 Post-Installation Verification
5 To capture new events, enter C on the command line of a changed object from the Tracked Objects in Group panel.
6 Press Enter; the follow message displays if there has been a change in the data set:
HPS234I CAPTURE function is successful. 1 New event(s) detected.
The absence of a new event indicates that there has been no change in the data set.
7 Proceed to the next section to browse the new captured events.
Browse Change Events
To see the new detected change events:
1 From the Tracked Objects in Group panel, type N on the command line of a captured object.
HPSUOB1 Tracked Objects in Group: U73A Row 1 of 6Command ===> SCROLL ===> CSR Lcmd: (C)apture, (N)ew, (B)rowse, (L)ast member events, (E)vents summary Press ENTER to continue or END to exit Event DS Latest Tracked Objects Vol Count ORG Event-date-time C USER17.v830.INSTALL catlg 0 PDS 2010/07/09_18:15_ USER17.v830.LOAD catlg 133 PDS 2010/07/09_18:15_ USER17.v830.MESSAGES catlg 60 PDS 2010/07/09_18:15_ USER17.v830.PANELS catlg 6 PDS 2010/07/09_18:15_ USER17.v830.SAMPLES catlg 6 PDS 2010/07/09_18:15_ USER17.v830.SKELS catlg 6 PDS 2010/07/09_18:15******************************* Bottom of data **************************
HPSUOB1 Tracked Objects in Group: U73A Row 1 of 6 Command ===> SCROLL ===> CSR Lcmd: (C)apture, (N)ew, (B)rowse, (L)ast member events, (E)vents summary Press ENTER to continue or END to exit Event DS Latest Tracked Objects Vol Count ORG Event-date-time N USER17.v830.INSTALL catlg 0 PDS 2010/07/09_18:15 _ USER17.v830.LOAD catlg 133 PDS 2010/07/09_18:15 _ USER17.v830.MESSAGES catlg 60 PDS 2010/07/09_18:15 _ USER17.v830.PANELS catlg 6 PDS 2010/07/09_18:15 _ USER17.v830.SAMPLES catlg 6 PDS 2010/07/09_18:15 _ USER17.v830.SKELS catlg 6 PDS 2010/07/09_18:15 ******************************* Bottom of data *****************************
168 Serena® ChangeMan® SSM 8.4

Verify Detection and Synchronization Online Facility
NOTE If RTCT is active, after you performed a capture, you will see 0 events for each object. The reason is that RTCT already determined the events. Therefore, you can only perform a BROWSE on this panel. Selecting option 3 (Query Events) provides a more versatile way of seeing the events.
2 The absence of a new event indicates that there has been no change in the data set.
3 Press End to exit.
Verify Detection and Synchronization Online Facility
The steps in this section verify the Detection and Synchronization online facility installation. Successful execution of these steps and the Batch Facility installation verification indicates that all aspects of the Detection and Synchronization component are properly installed and operational.
For a more detailed description of the instructions in these steps, refer to the Serena ChangeMan SSM Detection and Synchronization Guide.
Specify Defaults and User OptionsEach first time user must specify their defaults and user options.
Installation Guide 169

Chapter 6 Post-Installation Verification
1 Select Option 0 (Options) from the ChangeMan SSM Main Menu.
2 Press Enter; the ChangeMan SSM Defaults and User Options panel displays.
3 Specify in the Your JCL Library field where JCL created by ChangeMan SSM will be saved. This data set must be specified, and must be pre-allocated.
4 Specify Y in the Report Disposition Panel field to allow the display of the intermediate panel for printing the differences report.
HPS@PRI1 ---- ChangeMan SSM Main Menu (Ver 8.4.0) Time: 13:49:14 ------------ Option ===> Select one of the highlighted functions: 0 Options - Review or Modify Parameters A Administration - Change Tracking Administrator Functions C Change Tracking - History, Problem Determination, Recovery Z HFS Change Tracking - HFS History, Problem Determination S Detection and Synchronization - Detect Changes and Synchronize MVS data H HFS - Detect and Synchronize - Detect Changes and Synchronize HFS data D Data Extraction - Extract Changed Data in KSDS, other VSAM, PS or DA files and Flattened Databases U Utilities - Utilities and Self-guided Product Demos X Exit ChangeMan SSM Copyright (c) 1999-2013 - Serena Software, Inc. All Rights Reserved. Press END to Exit
HPSUOPTN ------ ChangeMan SSM Defaults and User Options (8.4.0.00) ------------Command ===> The Administrator can modify the defaults by editing the member HPSPARMS in the HPSPLIB library: XYZPRD.SSM84U.PARMLIB Defaults in effect: SSM Site Master ==> XYZPRD.SSM83U.SITE.MASTER SSM Object Master ==> XYZPRD.SSM83U.OBJECT.MASTER SSM Delta Master ==> XYZPRD.SSM83U.DELTA.MASTER Print Utility ==> VPSPRINT Allowed Number of Nodes for temporary SMS data sets: ==> 4 Allocation Parameters for temporary SMS data sets: ==> TRK,(120,060) User Defaults to be set: Report Disposition Panel ==> Y Y-Display panel, N-Delete report Comparison Utility ==> BUILT-IN BUILT-IN/COMPAREX/SUPERC Your JCL Library ==> JOB Card Statements: ==> //USER001 JOB (Account),'ChangeMan SSM', ==> // CLASS=A,NOTIFY=USER001,MSGCLASS=X ==> //* ==> //*
170 Serena® ChangeMan® SSM 8.4

Verify Detection and Synchronization Online Facility
5 Modify the Job Card Statements field. This Job statement is automatically prefixed to JCL generated by ChangeMan SSM through the Batch panel functions. Press Enter to record your selections.
6 Press End to return to the main menu.
Check Synchrony Between Data Sets The purpose of this task is to check the synchronization between two data sets. The differences between a base data set and a target data set are identified, and a report is generated.
Set Up Base and Target Data Sets
For this test, two data sets are required: Base and Target.
• somnode.INSTALL.NEW is used for the Base data set
• somnode.INSTALL, the ChangeMan SSM INSTALL library, is used for the Target data set
1 Allocate a new Base data set called somnode.INSTALL.NEW.
2 Copy the members from the Target data set, somnode.INSTALL, to the new one.
3 Modify some of the members in the new data set. Now you are ready to check the synchrony of the new data set (Base) with the old one (Target).
Installation Guide 171

Chapter 6 Post-Installation Verification
Check Synchrony of the Base and Target Data Sets
1 Select option S (Detection and Synchronization) from the ChangeMan SSM Main Menu (see page 170); the Detection and Synchronization Menu displays.
HPSMENUT ------------- Detection and Synchronization Menu -------------------Option ===>
0 Masking and Filtering - Detection masking and Synchronization filtering
1 Fingerprint - Fingerprint an Environment 2 Review Changes - Detect changes to a Fingerprinted Environment 3 Package Changes * - Changes to an Environment; Current vs. FGP 4 Package Data Sets * - Export full data sets into a Basket 5 View Basket - Display the list of data sets and their actions 6 Apply Basket * - Apply changes to the Target Environment
7 View Fingerprint - Display data set names, attributes, and members 8 Detect Changes - Compare the Fingerprints of two Environments 9 Package Changes * - Changes to an Environment; FGP vs. FGP
G Generate Token - Fingerprint Token for a single file or PDS memberC Check Synchrony - Compare selected members in Environment(s) P PDS Compare - Produce a MEMTOMEM compare report for two PDS's S Synchronize * - Two local Environments, or just save a Basket
A Advanced Operations - Batch jobs suitable for large Environments
X Exit - Press END to Exit
172 Serena® ChangeMan® SSM 8.4

Verify Detection and Synchronization Online Facility
2 Select option C (Check Synchrony) from the Detection and Synchronization Menu; the BASE PDS panel displays.
3 On the BASE PDS panel:
• Specify N for sync, and Y for outsync to request a report of the out-of-sync members only.
• On the line under Explicit PDS, specify the full data set name (or pattern) for somnode.INSTALL.NEW (the Base data set you created in "Set Up Base and Target Data Sets" on page 171).
HPSDSYN1 BASE PDS (1 of 2) Row 1 of 13Command ===> SCROLL ===> CSR Members reside within ONE environment ==> N Y: BASE only N:BASE and TARGExplicit Member/Pattern ending with * ==> * Compare like-named cataloged vs. non-cataloged DSNs/patterns ==> N Y/N Specify VOLSER ==> Reporting Options TYPE(S) ==> ALL Specify a list: ADD,UPD,DEL or ALLReporting Options RECORD ==> Y N: Report the first segment only Y: Report the entire record Cataloged PDS (or Pattern) ==> Y -(Y or N) Y: Resolve data sets from catalog Sync ==> N -(Y or N) N: Do not report equal members OutSync ==> Y -(Y or N) Y: Filter only the differences Sort by Token ==> N -(Y or N) N: List sorted by Member Name Press ENTER to continue or END to exit Explicit PDS (or patterns similar to ISPF 3.4) _ ____________________________________________ _ ____________________________________________ _ ____________________________________________ _ ____________________________________________ _ ____________________________________________ _ ____________________________________________
Installation Guide 173

Chapter 6 Post-Installation Verification
4 Press Enter; the TARG PDS panel displays.
5 Specify the full data set name (or pattern) for somnode.INSTALL (the Target data set from "Set Up Base and Target Data Sets" on page 171).
6 Press Enter; the Member List To Compare (HPSDSYN3) panel displays, showing the results of the Sync Check.
Because you requested OutSync members on the BASE PDS panel, the members you changed in the new data set are reported as different from those in the source data set. The message area at the bottom of the panel indicates that there are only eight members out-
HPSDSYN2 TARG PDS or a NULL Entry (2 of 2) Row 1 of 13Command ===> SCROLL===> CSR Enter a second PDS, or press ENTER without a specification to denote NULL Cataloged PDS (or pattrn) ===> Y -(Y or N) N: For uncataloged PDS Explicit PDS (or a pattern); No entry means NULL _ ___________________________<==== enter the Target data set name or pattern_ ________________________________________________ _ ________________________________________________ _ ________________________________________________ _ ________________________________________________ _ ________________________________________________ _ ________________________________________________ _ ________________________________________________
HPSDSYN3 Member List To Compare Row 1 of 4 Command ===> SCROLL ===> CSR (S)elect one pair of members to be compared Press ENTER to continue or END to exit Group Type Member Fingerprint Volser Data Set Name _ B $INIT E272ACAD-00000997 SRSM7F CMNDEV.SSM84U.INSTALL.NEW _ T $INIT EC58A4E2-00000CC0 SRSM7A CMNDEV.SSM84U.INSTALL _ B $MAINT A60D619E-000024B1 SRSM7F CMNDEV.SSM84U.INSTALL.NEW _ T $MAINT C892470C-000024A2 SRSM7A CMNDEV.SSM84U.INSTALL ******************************* Bottom of data ******************************** +----------------------------------------------------------------------------+ | HPS268I Completed. Sync= 16, OutSync= 4, (S)elect pairs to COMPARE. | +----------------------------------------------------------------------------+
174 Serena® ChangeMan® SSM 8.4
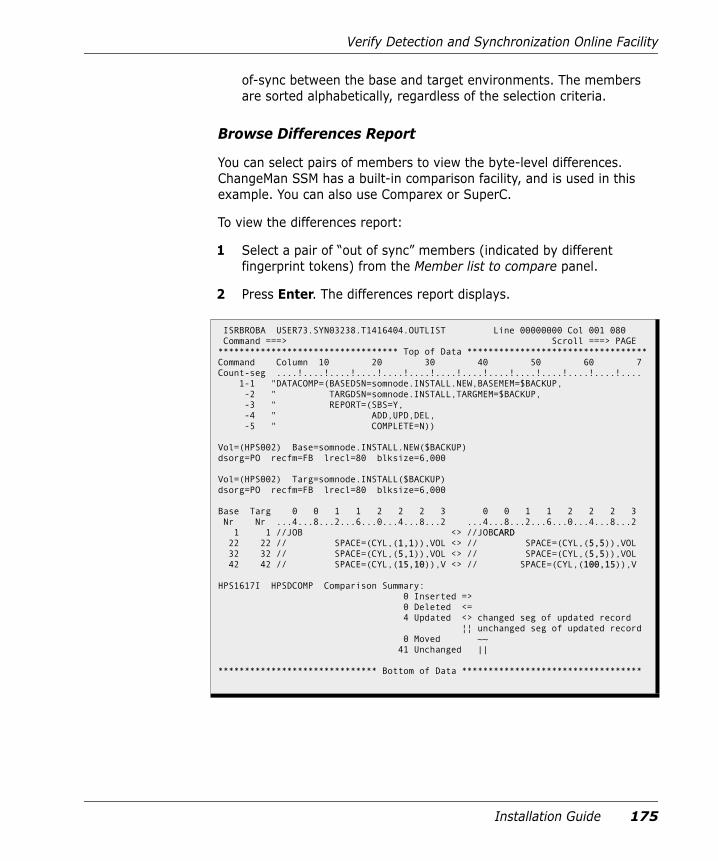
Verify Detection and Synchronization Online Facility
of-sync between the base and target environments. The members are sorted alphabetically, regardless of the selection criteria.
Browse Differences Report
You can select pairs of members to view the byte-level differences. ChangeMan SSM has a built-in comparison facility, and is used in this example. You can also use Comparex or SuperC.
To view the differences report:
1 Select a pair of “out of sync” members (indicated by different fingerprint tokens) from the Member list to compare panel.
2 Press Enter. The differences report displays.
ISRBROBA USER73.SYN03238.T1416404.OUTLIST Line 00000000 Col 001 080 Command ===> Scroll ===> PAGE ********************************** Top of Data **********************************Command Column 10 20 30 40 50 60 7Count-seg ....!....!....!....!....!....!....!....!....!....!....!....!....!.... 1-1 "DATACOMP=(BASEDSN=somnode.INSTALL.NEW,BASEMEM=$BACKUP, -2 " TARGDSN=somnode.INSTALL,TARGMEM=$BACKUP, -3 " REPORT=(SBS=Y, -4 " ADD,UPD,DEL, -5 " COMPLETE=N)) Vol=(HPS002) Base=somnode.INSTALL.NEW($BACKUP) dsorg=PO recfm=FB lrecl=80 blksize=6,000 Vol=(HPS002) Targ=somnode.INSTALL($BACKUP) dsorg=PO recfm=FB lrecl=80 blksize=6,000 Base Targ 0 0 1 1 2 2 2 3 0 0 1 1 2 2 2 3 Nr Nr ...4...8...2...6...0...4...8...2 ...4...8...2...6...0...4...8...2 1 1 //JOB <> //JOBCARD 22 22 // SPACE=(CYL,(1,1)),VOL <> // SPACE=(CYL,(5,5)),VOL 32 32 // SPACE=(CYL,(5,1)),VOL <> // SPACE=(CYL,(5,5)),VOL 42 42 // SPACE=(CYL,(15,10)),V <> // SPACE=(CYL,(100,15)),V HPS1617I HPSDCOMP Comparison Summary: 0 Inserted => 0 Deleted <= 4 Updated <> changed seg of updated record ¦¦ unchanged seg of updated record 0 Moved ~~ 41 Unchanged || ****************************** Bottom of Data **********************************
Installation Guide 175

Chapter 6 Post-Installation Verification
Print Differences Report
Optional. The temporary data set containing the differences report can be printed, saved, or deleted.
1 Press End from the panel displaying the differences report. The Print of Differences Report panel displays.
2 Specify JD or JK to submit a job to print the report. Otherwise, your specified print utility (PRINTDS, VPSPRINT, or PRINTOFF) will be invoked to print and route your output.
Synchronize Data Sets The purpose of this task is to synchronize two data sets. A base data set and target data set are created. Then, the two data sets are synchronized by identifying the differences, exporting the differences to a change basket, and importing the change basket to the target data set.
Set Up Base and Target Data Sets
1 Allocate the following partitioned data sets:
• somnode.INSTALL.NEW (the base data set)
• somnode.INSTALL.OLD (the target data set)
HPSUREP ------------------ Print of Differences Report------------------------- Command ===> Differences Report Dsn: USER73.SYN03238.T1416404.OUTLIST Printing Mechanism: PRINTDS Report Disposition ===> K (P=Print) (K=Keep) (D=Delete) (PD=Print and delete) (JD=Submit a job to print and delete) (JK=Submit a job to print and keep) Local Printer Id (Or Print Class) ===> (For Print option) VPSPRINT WRITER ===> (Applicable to VPSPRINT Only) Job cards for submission if report disposition option above is JD or JK ===> //USER73 JOB (ACCOUNT),'SSM', ===> // CLASS=A,NOTIFY=USER73,MSGCLASS=* ===> //* ===> //* Press ENTER to continue; Enter END Command to exit.
176 Serena® ChangeMan® SSM 8.4

Verify Detection and Synchronization Online Facility
2 Populate these two data sets by copying all of the members in somnode.INSTALL (one of the ChangeMan SSM distribution libraries).
The two data sets are now synchronized.
3 Edit somnode.INSTALL.NEW, making changes to several members.
Specify Base and Target Environments
To begin the synchronization process:
1 Select option S (Synchronize) from the Detection and Synchronization Menu; the Synchronize: BASE Environment panel displays.
2 Specify Y for Catalog Search to produce a list.
Specify N for Catalog Processing Commands.
Specify the base environment by typing somnode.INSTALL.NEW on the first line.
3 Press Enter; the Resolved Data Sets (BASE) panel displays.
HPSUSNC1 Synchronize: BASE Environment (1 of 2) Row 1 of 3 Command ====> SCROLL===> CSR Enter one or more explicit or pattern DSN(s) on each Line Catalog Search to produce a list ==> Y (Y/N): Y - Resolves data sets onlineCatalog Processing Commands ==> N (Y/N): N - Generates volume commandsSaved Member Name ==> SYNCUP Pre-Existing Reverse DSN (Optional) ==> Explicit or Pattern DSNs similar to ISPF 3.4 _ somnode.INSTALL.NEW_________________________ _ ____________________________________________ _ ____________________________________________
HHPSUSYNR---------------Resolved Data Sets (BASE)----------------- Row 1 of 1 Command ====> SCROLL===> CSR Enter X to Exclude any data set. Overtype Volser(s) for Uncataloged DSN(s). Lcmd: X Press ENTER To Continue or END to Exit Data Sets Involved in the Verification Process Volser _ somnode.INSTALL.NEW HPS002
Installation Guide 177

Chapter 6 Post-Installation Verification
There are no data sets to exclude because this example uses only one data set.
4 Press Enter; the Synchronize: TARGET Environment panel displays.
5 Specify Y for Catalog Search to produce a list.
Specify N for Catalog Processing Commands.
Specify the target environment by typing somnode.INSTALL.OLD on the first line.
6 Press Enter; the Resolved Data Sets (TARGET) panel displays.
There are no data sets to exclude because this example uses only one data set. Press Enter and proceed to the next step.
HPSUSNC2 Synchronize: TARGET Environment (2 of 2) Row 1 of 8 Command ====> SCROLL===> CSR Enter one or more explicit or pattern DSN(s) on each line Catalog Search to produce a list ==> Y (Y/N): Y - Resolves data sets online Catalog Processing Commands ==> N (Y/N): N - Generates volume commands Explicit or Pattern DSNs similar to ISPF 3.4 _ somnode.INSTALL.OLD_________________________ _ ____________________________________________ _ ____________________________________________ _ ____________________________________________ _ ____________________________________________ _ ____________________________________________ _ ____________________________________________ _ ____________________________________________
HPSUSYNR---------------Resolved Data Sets (TARGET)--------------- Row 1 of 1 Command ====> SCROLL===> CSR Enter X to Exclude any data set. Overtype Volser(s) for Uncataloged DSN(s). Lcmd: X Press ENTER To Continue or END to Exit Data Sets Involved in the Verification Process Volser _ somnode.INSTALL.OLD HPS002
178 Serena® ChangeMan® SSM 8.4
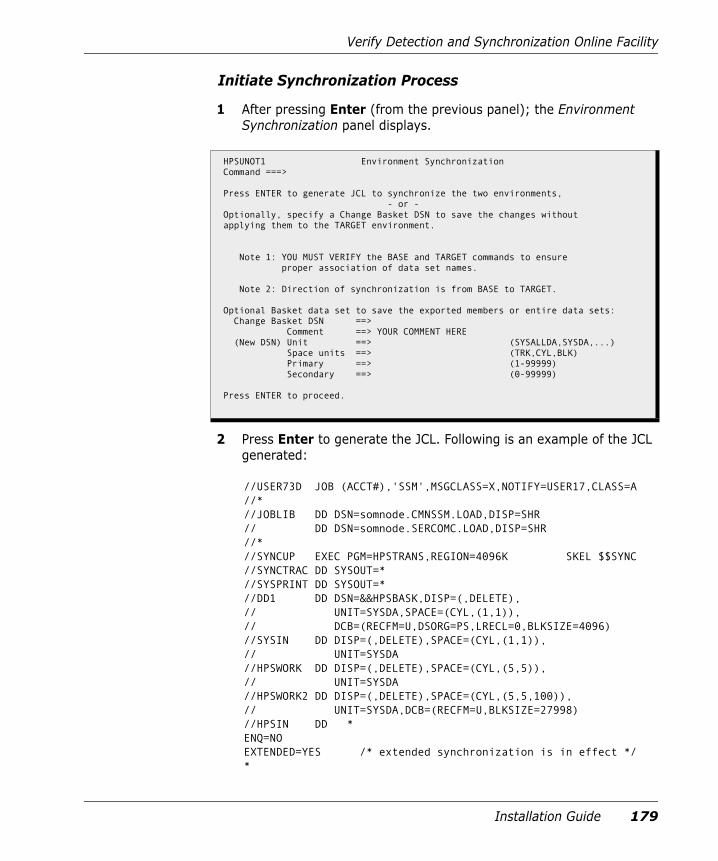
Verify Detection and Synchronization Online Facility
Initiate Synchronization Process
1 After pressing Enter (from the previous panel); the Environment Synchronization panel displays.
2 Press Enter to generate the JCL. Following is an example of the JCL generated:
//USER73D JOB (ACCT#),'SSM',MSGCLASS=X,NOTIFY=USER17,CLASS=A //* //JOBLIB DD DSN=somnode.CMNSSM.LOAD,DISP=SHR // DD DSN=somnode.SERCOMC.LOAD,DISP=SHR //* //SYNCUP EXEC PGM=HPSTRANS,REGION=4096K SKEL $$SYNC //SYNCTRAC DD SYSOUT=* //SYSPRINT DD SYSOUT=* //DD1 DD DSN=&&HPSBASK,DISP=(,DELETE), // UNIT=SYSDA,SPACE=(CYL,(1,1)), // DCB=(RECFM=U,DSORG=PS,LRECL=0,BLKSIZE=4096) //SYSIN DD DISP=(,DELETE),SPACE=(CYL,(1,1)), // UNIT=SYSDA //HPSWORK DD DISP=(,DELETE),SPACE=(CYL,(5,5)), // UNIT=SYSDA //HPSWORK2 DD DISP=(,DELETE),SPACE=(CYL,(5,5,100)), // UNIT=SYSDA,DCB=(RECFM=U,BLKSIZE=27998) //HPSIN DD * ENQ=NO EXTENDED=YES /* extended synchronization is in effect */ *
HPSUNOT1 Environment Synchronization Command ===> Press ENTER to generate JCL to synchronize the two environments, - or - Optionally, specify a Change Basket DSN to save the changes without applying them to the TARGET environment. Note 1: YOU MUST VERIFY the BASE and TARGET commands to ensure proper association of data set names. Note 2: Direction of synchronization is from BASE to TARGET. Optional Basket data set to save the exported members or entire data sets: Change Basket DSN ==> Comment ==> YOUR COMMENT HERE (New DSN) Unit ==> (SYSALLDA,SYSDA,...) Space units ==> (TRK,CYL,BLK) Primary ==> (1-99999) Secondary ==> (0-99999) Press ENTER to proceed.
Installation Guide 179
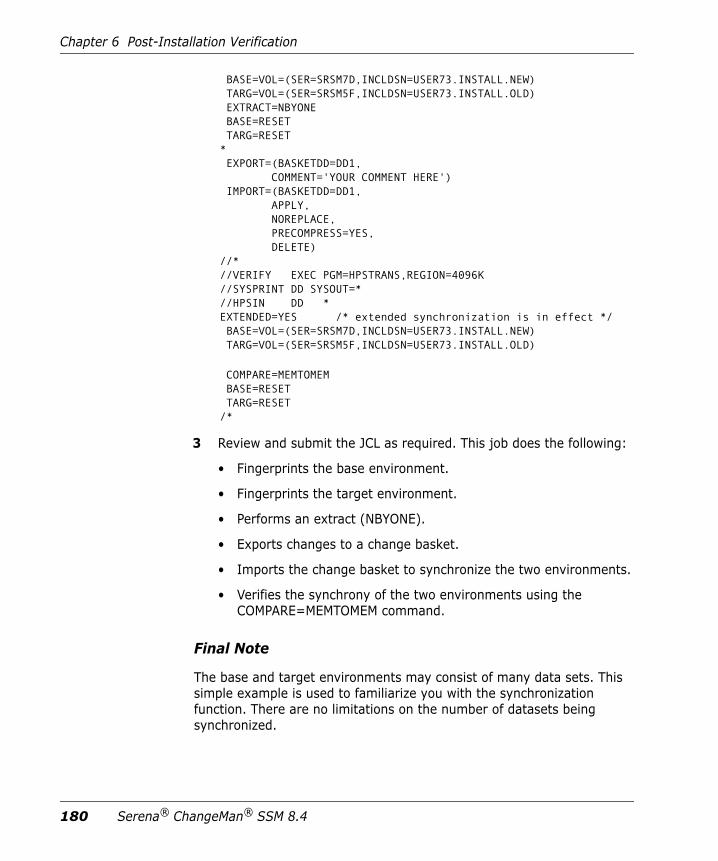
Chapter 6 Post-Installation Verification
BASE=VOL=(SER=SRSM7D,INCLDSN=USER73.INSTALL.NEW) TARG=VOL=(SER=SRSM5F,INCLDSN=USER73.INSTALL.OLD) EXTRACT=NBYONE BASE=RESET TARG=RESET * EXPORT=(BASKETDD=DD1, COMMENT='YOUR COMMENT HERE') IMPORT=(BASKETDD=DD1, APPLY, NOREPLACE, PRECOMPRESS=YES, DELETE) //* //VERIFY EXEC PGM=HPSTRANS,REGION=4096K //SYSPRINT DD SYSOUT=* //HPSIN DD * EXTENDED=YES /* extended synchronization is in effect */ BASE=VOL=(SER=SRSM7D,INCLDSN=USER73.INSTALL.NEW) TARG=VOL=(SER=SRSM5F,INCLDSN=USER73.INSTALL.OLD) COMPARE=MEMTOMEM BASE=RESET TARG=RESET /*
3 Review and submit the JCL as required. This job does the following:
• Fingerprints the base environment.
• Fingerprints the target environment.
• Performs an extract (NBYONE).
• Exports changes to a change basket.
• Imports the change basket to synchronize the two environments.
• Verifies the synchrony of the two environments using the COMPARE=MEMTOMEM command.
Final Note
The base and target environments may consist of many data sets. This simple example is used to familiarize you with the synchronization function. There are no limitations on the number of datasets being synchronized.
180 Serena® ChangeMan® SSM 8.4

Appendix AApplying a Patch
This appendix describes the steps to apply a patch. Patch files are provided in this format:
PMRvrnnn.DOC - Patch description and instructions in a Word format.
PMRvrnnn.BIN - Patch containing the module replacements (source or load).
where:
v = product version
r = product release
nnn = product modification number
Step 1: Copy PatchCopy the patch file (PMRvrnnn.BIN) to an appropriate folder on your desktop.
Step 2: Allocate Target Data SetAllocate an XMIT data set on MVS as follows:
DSN 'your-userid.XMIT'
DCB DSORG=PS,RECFM=FB,LRECL=80,BLKSIZE=6000
SPACE SPACE=(TRK,(15,15))
Installation Guide 181

Appendix A
Step 3: Define New Transfer Type1 Define a new transfer type called BIN80. On the menu bar of your
emulator software, make the following selections:
a Transfer
b Setup
c Define Transfer Types
2 When the window displays, specify a new transfer type called BIN80 (under Transfer Type Names).
3 Verify that the three fields (ascii, clrf, and append) are not checked. The only fields that are required are:
RECFM: FIXEDLRECL: 80
4 Click ADD.
This new transfer type will be used to upload the PMRvrnnn.BIN file from your PC to MVS (Send File to Host).
Step 4: Transfer PC File to MVSWhile in ISPF Option 6 (TSO), or the TSO ready mode, perform a Send File To Host operation from the menu bar of your emulator software, using the newly created BIN80 transfer type.
Make the following selections:
PC file: PMRvrnnn.BIN (patch file)
Host file: XMIT (will prefix your TSO UserID)
Transfer type: BIN80 (your new transfer type)
182 Serena® ChangeMan® SSM 8.4
Step 5: Rebuild Transferred File to LINKLIB Format
Step 5: Rebuild Transferred File to LINKLIB Format
1 On MVS, while in ISPF Option 6 (TSO), issue the TSO RECEIVE command to automatically rebuild the partial LINKLIB PDS from the somnode.XMIT data set, with the proper attributes:
RECEIVE INDS(XMIT)
2 If a message is displayed, press Enter when prompted. This is a null reply and will generate the following data set:
yourid.TRANS.LINKLIB
Step 6: Replace Previous Modules or Members1 Prior to performing the copy operation, verify that you have
generated an appropriate backup.
2 Refer to the installation instructions included with the patch for further instructions.
Installation Guide 183

Appendix A
184 Serena® ChangeMan® SSM 8.4

Appendix BRACF Security for Change Tracking
This appendix provides sample commands for setting up SAF Security checking for the Change Tracking environment.
SAF definitions must be in place before submitting the $ADMSET job.
Sample RACF CommandsThe following sample commands are for RACF. ACF2 or Top Secret commands must produce the same result.
NOTE Replace RACF command parameters specified in lower case and italics with the appropriate site-specific information.
Perform the following steps:
1 Define a Class whose name matches the value specified in the CTCLASS parameter in HPSPARMS; use an existing Class that you have ALTER authority to or define a new class.
2 Activate the class.
3 Define a Site Administrator Profile in that Class whose name matches the value specified in the CTSITEADMIN parameter in HPSPARMS.
TSO RDEF classname (profile) UACC(NONE)
4 Grant UPDATE authority to that profile to one or more TSO UserIDs that will act as Site Administrators.
TSO PE profile CLASS(classname) ID(tsoid) ACC(UPDATE)
Installation Guide 185
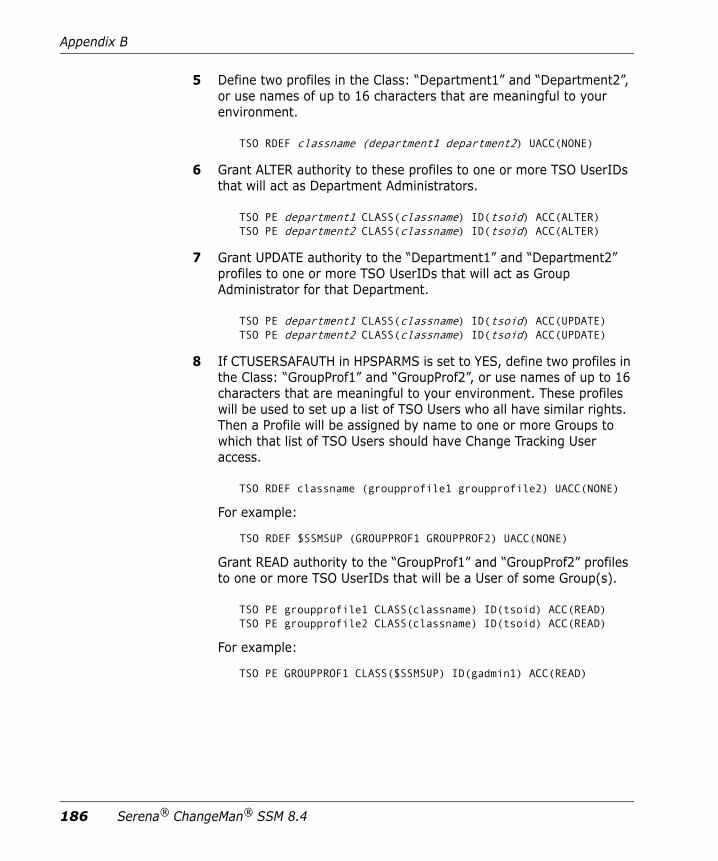
Appendix B
5 Define two profiles in the Class: “Department1” and “Department2”, or use names of up to 16 characters that are meaningful to your environment.
TSO RDEF classname (department1 department2) UACC(NONE)
6 Grant ALTER authority to these profiles to one or more TSO UserIDs that will act as Department Administrators.
TSO PE department1 CLASS(classname) ID(tsoid) ACC(ALTER) TSO PE department2 CLASS(classname) ID(tsoid) ACC(ALTER)
7 Grant UPDATE authority to the “Department1” and “Department2” profiles to one or more TSO UserIDs that will act as Group Administrator for that Department.
TSO PE department1 CLASS(classname) ID(tsoid) ACC(UPDATE) TSO PE department2 CLASS(classname) ID(tsoid) ACC(UPDATE)
8 If CTUSERSAFAUTH in HPSPARMS is set to YES, define two profiles in the Class: “GroupProf1” and “GroupProf2”, or use names of up to 16 characters that are meaningful to your environment. These profiles will be used to set up a list of TSO Users who all have similar rights. Then a Profile will be assigned by name to one or more Groups to which that list of TSO Users should have Change Tracking User access.
TSO RDEF classname (groupprofile1 groupprofile2) UACC(NONE)
For example:
TSO RDEF $SSMSUP (GROUPPROF1 GROUPPROF2) UACC(NONE)
Grant READ authority to the “GroupProf1” and “GroupProf2” profiles to one or more TSO UserIDs that will be a User of some Group(s).
TSO PE groupprofile1 CLASS(classname) ID(tsoid) ACC(READ) TSO PE groupprofile2 CLASS(classname) ID(tsoid) ACC(READ)
For example:
TSO PE GROUPPROF1 CLASS($SSMSUP) ID(gadmin1) ACC(READ)
186 Serena® ChangeMan® SSM 8.4

Sample RACF Commands
If Member Reference Tracking (MRT) or Member Level Security (MLS) will be used, Administrators need to be defined and granted authority.
For MRT:
1 Define an MRT Administrator Profile in your Class whose name matches the value specified in the CTMRTADMIN parameter in HPSPARMS.
TSO RDEF classname (profile) UACC(NONE)
2 Grant UPDATE authority to that profile to one or more TSO UserIDs that will act as MRT Administrators.
TSO PE profile CLASS(classname) ID(tsoid) ACC(UPDATE)
For MLS:
1 Define an MLS Administrator Profile in your Class whose name matches the value specified in the CTMLSADMIN parameter in HPSPARMS.
TSO RDEF classname (profile) UACC(NONE)
2 Grant UPDATE authority to that profile to one or more TSO UserIDs that will act as MLS Administrators.
TSO PE profile CLASS(classname) ID(tsoid) ACC(UPDATE)
The following RACF commands will enable the SSM product installer, or RACF Administrator, to verify that the definitions are correct:
TSO RL classname * AUTH
or
TSO RL classname (profile1 profile2 ...) AUTH
The second command is for specific profiles/resources.
These commands will list the TSO UserIDs defined to each profile and their level of authority (ALTER, UPDATE, READ, NONE). In RACF, as a rule, the default is NONE. So, if a UserID is not listed for a given profile, it is the same as being listed with an access level of NONE.
Installation Guide 187

Appendix B
188 Serena® ChangeMan® SSM 8.4

Appendix CRACF Security for MLS
This appendix provides sample commands for setting up SAF Security checking for Member Level Security (MLS) protected Entities.
Sample RACF CommandsThe following sample commands are for RACF. ACF2 or Top Secret commands must produce the same result.
NOTE Replace RACF command parameters specified in lower case and italics with the appropriate site-specific information.
Perform the following steps:
1 Define a Class whose name matches the value specified in the RTOCLASS parameter in HPSPARMS; use an existing Class that you have ALTER authority to or define a new class.
2 Activate the class.
3 Define Group Profiles in that class named “dsngrp1, dsngrp2, ...”, using data set Group names of up to 16 characters that are meaningful to your environment.
TSO RDEF classname (dsngrp1 dsngrp2 ...) UACC(NONE)
4 Grant UPDATE authority to those profiles to one or more TSO UserIDs that will have UPDATE access to these data set Groups.
TSO PE dsngrp1 CLASS(classname) ID(tsoid) ACC(UPDATE) TSO PE dsngrp2 CLASS(classname) ID(tsoid) ACC(UPDATE)
NOTE When defining MLS protected Entities, the MLS Administrator specifies in the Access List the appropriate RACF Group Profile name used to control access to each protected Entity (data set name/member pattern).
Installation Guide 189

Appendix C
190 Serena® ChangeMan® SSM 8.4
Glossary
Alternate Group Administrator
A person assigned by an existing Group Administrator to perform the primary tasks of that Group Administrator in his/her absence.
BICT (Batch Interval Change Tracking)
A batch program (HPSGLOBE) that performs the change-capture process for all tracked Objects at specified intervals. It should be scheduled to run minimally, once every 24 hours. This is an alternative to RTCT (Real Time Change Tracking).
Change Basket (keyed, positional, or text)
A single physical sequential data set that contains the changes between two keyed, positional, or text flat files. This file contains the changed data records. Add, update, and delete information is present, but is not currently used for synchronization by ChangeMan SSM.
Definitions for file types:
Keyed file: A physical sequential or direct access file that has a field in each record that can be used as a key. This key must be unique for each record in the file.
Positional file: A physical sequential or direct access file containing records that are indexed by their physical position. For example, the first record is considered record 1, and the second is record 2.
Text file: A physical sequential or direct access file with records that are in no particular order, and do not have a specific key.
Change Basket (non-VSAM)
A single physical sequential data set that contains the changes to an environment over time, or differences between two environments. For example: Test/Prod, SYSRES/ALTRES, and LPAR/LPAR. This file holds the data and information required to synchronize two environments, or propagate change form one system to another, locally or remotely.
Installation Guide 191
Glossary
Change Basket (VSAM)
A single physical sequential data set that contains the changes/differences between two VSAM clusters. This file contains the data records and required information to synchronize two VSAM KSDS data sets, locally or remotely.
Delta Master A ChangeMan SSM database that contains the initial base version, plus subsequent changed versions, of a PDS/PDSE member (for data sets defined to ChangeMan SSM with Delta Tracking). Backup members are stored in compressed format.
Department Administrator
A person assigned by a Site Master Administrator to manage the Object Master database.
DSORG (Supported Types)
DA indicates a direct access data set.
PO indicates a partitioned data set (PDS and PDS/E).
PO type Format-3 data sets provide support for DFSMS Binder, NPO Format-3 load modules, and stored IBM JAVA files.
PS indicates a physical sequential data set.
VS indicates a VSAM data set.
NOTE Data sets with no DSORG specified are not supported.
Extract/Export Extract is the process that ChangeMan SSM uses to identify changes/differences, utilizing fingerprints and/or active data sets.
Export is the process that packages the changes/differences into a Change Basket data set.
Event A change event when ChangeMan SSM detects a variance in content or status of a tracked data set or data set member. There are 23 types of events distinguished by the software.
Fingerprint Dataset
A physical sequential data set containing all the data set and member tokens to identify the contents of that environment at the time the Fingerprint data set was generated. A Fingerprint data set can represent a single PDS member, or the contents of several DASD volumes.
192 Serena® ChangeMan® SSM 8.4

Fingerprint Dataset (keyed, positional, or text
A physical sequential file that contains all the fingerprint tokens of all the records in a physical sequential file. This file represents a PS or DA file.
Definitions for file types:
Keyed file: A physical sequential or direct access file that has a field in each record that can be used as a key. This key must be unique for each record in the file.
Positional file: A physical sequential or direct access file containing records that are indexed by their physical position. For example, the first record is considered record 1, and the second is record 2.
Text file: A physical sequential or direct access file with records that are in no particular order, and do not have a specific key.
Fingerprint Dataset (VSAM)
A physical sequential data set containing tokens for every record in a VSAM KSDS cluster. This file represents the contents of a VSAM cluster at the time the Fingerprint data set was generated.
Fingerprint Token
A unique identity attribute for the content of a data set or data set member. The attribute is an eight-byte, hexadecimal value.
Fingerprint Token (keyed, positional, or text
A unique identity attribute for records of a keyed, positional, or text file. The attribute is a six-byte, hexadecimal value.
Definitions for file types:
Keyed file: A physical sequential or direct access file that has a field in each record that can be used as a key. This key must be unique for each record in the file.
Positional file: A physical sequential or direct access file containing records that are indexed by their physical position. For example, the first record is considered record 1, and the second is record 2.
Text file: A physical sequential or direct access file with records that are in no particular order, and do not have a specific key.
Fingerprint Token (VSAM)
A unique identity attribute for records of VSAM clusters. The attribute is a six-byte, hexadecimal value.
Group Administrator
A person assigned by a Department Administrator to manage one or more Object Groups.
Installation Guide 193

Glossary
HFS Change Basket
A single physical sequential data set that contains the changes/differences between two HFS files. This file contains the data records and required information to synchronize two HFS files, locally or remotely.
HFS Fingerprint Dataset
A physical sequential data set containing tokens for every record in an HFS file. This file represents the contents of an HFS file at the time the Fingerprint data set was generated.
HFS Fingerprint Token
A unique identity attribute for records of HFS files. The attribute is a six-byte, hexadecimal value.
HFS Reverse Change Basket
A single physical sequential data set created during an HFS Import operation. It contains the information and data to undo the effects of updates, as a result of an HFS Import operation. This file has an identical structure to an HFS Change Basket.
Import Import is the process that ChangeMan SSM utilizes to apply the changes contained in a Change Basket data set, to target environments. During Import processing there are several parameters that can be specified to customize the apply process, as well as a SIMULATE feature, and the creation of a Reverse Change Basket.
MLS (Member Level Security)
This facility allows for the protection of PDS/PDSE members being updated. The software provides the capability for MLS Administrators to identify who is allowed to update specific members/member patterns for specified data sets, by specifying either TSO User IDs or a RACF profile name.
If an attempt is made to update a protected member, ChangeMan SSM will either save the changes to an internally-generated member name or cancel the updates, depending on what option you selected for the RTORENAME parameter.
MRT (Member Reference Tracking)
This facility allows you to detect and report references to members of PDSs. Read and update access is tracked on existing members that you define to the MRT system, and where standard I/O routines are used.
You can also define members to be excluded from MRT. This allows you to filter out references to high-activity members at the beginning of MRT processing, which greatly enhances performance.
194 Serena® ChangeMan® SSM 8.4

Non-user A person unknown, or not defined by a Group Administrator to any Object Group, but allowed access to the Synchronization and Detection functions of ChangeMan SSM.
Notifications A ChangeMan SSM facility that provides change notifications to specified users about changes to tracked data sets and PDS members. There are both TSO User ID and E-mail notification facilities that can be used separately or together.
Object A data set defined to the Change Tracking component of the tracking software. An object of the tracking function.
Object (Delta Tracked)
A PDS or PDS/E data set defined to the Change Tracking component, where Delta Tracking was specified during the initial define of the object. This specification creates an initial backup of all members into the Delta Master database. Subsequently, only changed members, and additions are backed up in compressed format.
NOTE Seqential data sets cannot be delta-tracked; if they are defined as DELTA=Y, the object is defaulted to DELTA=N.
Object Group A group of conceptually related data sets (Objects) that are associated for tracking, change detection, and reporting. There are no restrictions on mixing data set types in a group.
Object Master A ChangeMan SSM database connected to the Site Master database, which contains definitions of all the Object Groups, their associated Group Administrators, and users defined to the Change Tracking environment.
RTO (Real Time Option)
RTO was the name used for Real Time Change Tracking (RTCT) for ChangeMan SSM Version 8.1 and earlier.
See RTCT.
RTCT (Real Time Change Tracking)
The task of capturing data set or data set member information that allows the software to detect and identify change in real time.
Recall A ChangeMan SSM facility to allow the recall of a backup version of selected (Delta Tracked) PDS or PDS/E members to a compatible data set. Expansion is performed automatically.
Installation Guide 195

Glossary
Recover A ChangeMan SSM facility to allow the recovery of a Delta Tracked PDS or PDS/E data set, as it existed in some previous point in time, to a compatible data set. Expansion is performed automatically.
Redundancy Detection
A ChangeMan SSM facility that identifies duplicate data sets and PDS/PDSE members by content. A comprehensive reporting facility allows for the identification of duplicates to facilitate the deletion of those having duplicate content. This allows for recovery of DASD space and enhanced integrity (only one copy). This facility also assists in library cleanup and consolidation.
Restore A ChangeMan SSM facility to allow the restore of a backup version of selected (Delta Tracked) PDS or PDS/E members to the original data set. Expansion is performed automatically.
Reverse Change basket
A single physical sequential data set, created during an Import operation, which contains the information and data to undo (entirely or partially) the effects of updates as a result of an Import operation. This file has an identical structure to a Change Basket.
Reverse Change Basket (VSAM)
A single physical sequential data set created during a VSAM Import operation. It contains the information and data to undo the effects of updates, as a result of a VSAM Import operation. This file has an identical structure to a VSAM Change Basket.
Site Master The main ChangeMan SSM VSAM database, which contains information for all tracked data sets and their detected events.
Site Master Administrator
A person assigned (during installation) to manage the Site Master and define departments.
SMS System Managed Storage. Enhanced data management software for MVS mainframes from IBM. Provides functions such as automatically allocating data, which prevents most out-of-space errors when disk volumes become full.
196 Serena® ChangeMan® SSM 8.4
Snapshot A ChangeMan SSM facility that interrogates the VTOC and VVDS to identify data sets existing on one or several volumes, and capture information about these data sets and their attributes. This information is stored in a SNAPSHOT data set, which can be used to compare to another SNAPSHOT data set generated at a different location. This comparison can verify that all data sets are available, and check for differences in any data set attributes or space allocations.
The SNAPSHOT function is especially useful as a pre-step to performing DR testing, to verify that all the production data sets are available. In addition, it allows pre-screening to eliminate potential x37 type abends, where a data set was expanded at the source site, but not at the target, when applying maintenance.
Tracking The function of monitoring a data set or data set member for events in real time (RTCT), or over a period of time (BICT).
User A person defined to the Change Tracking component as a User in one or more groups by a Group Administrator, and allowed controlled access to its functions.
Installation Guide 197
Glossary
198 Serena® ChangeMan® SSM 8.4

Index
Symbols$ADMSET job 46, 92$AUTH job 74$BACKUP job 142$DEFGDG job 140$DEFINE job 109$GLOBAL job 137$GLOBAL job (VSAM) 136$INIT job 46, 90$INTEG job 146$MAINT job 149$REORG job 143
AABENDS
16D 74S878-10 42
ALOCPLEX job 113APF authorization 40, 72assigning
group administrators 91users to group 91
authorizingload libraries 72TSO/E 73
auxilary storagerequirements 33
Bbacking up
databases 142base fingerprints 25batch interval change tracking
installation steps 87
overview 18BICT, see batch interval change tracking
Cchange basket
overview 25reverse 25
change trackingauxiliary storage 33batch interval change tracking 18DB2 setup 48defining objects 109installation considerations 42installation procedures 63installation steps 86maintaining databases 140multiple environments 46multiple HPSPARMS members 45overview 17post-installation verification 159real time change tracking 19
change tracking componentuses 28
ChangeMan SSMuses of 27
changespost-approval of 48
compatibilitySERCOMC 35SERNET 35
concepts, ChangeMan SSM 15connecting to primary menu 85copying intercept modules into MLPA 112CTUSERSAFAUTH 102, 165, 186
Installation Guide 199

Index
Ddata extraction component
defined 26installation procedures 63uses 29
data set organizationsupported types 192
databasesbacking up 142defining 88defining GDGs for backups 140Delta Master maintenance 148maintaining 140MRTAUX3 maintenance 153reorganizing 143verifying integrity 146
Datasethigh level qualifiers 55
DB2 setupchange tracking 48
definingdatabases 88groups 91objects to change tracking 109site administrators 91
Delta Master database 33, 98maintaining 148
detection and synchronizationinstallation procedures 63overview 25post-installation verification 169
detection and synchronization component
uses 28distribution media 52documents related to ChangeMan SSM 12DSORG
supported types 192
Eemail
post-approval of changes 25, 48, 122email notification 119exits 110, 111
Ffingerprinting
large load modules 42local clusters 27overview 16remote clusters 27
fingerprintsbase 25target 25
flat fileskeyed 26non-keyed 26
Gglobal capture job
setting up for non-RTCT 137setting up for RTCT 136
Glossary 191group administrator
assigning 91
Hhelp
online 14HFS 17
functions 26installation 75
Hierarchical File System 17high level qualifiers
Dataset 55Receive Indataset 55
hosttransferring files to 57
HPSGLOBE 46
200 Serena® ChangeMan® SSM 8.4

Index
HPSMAINT 148HPSPARMS 76
AUTODEPT 107AUTOGROUP 107AUTOTRACK 107change tracking 98COMPAREPROGRAM 77DELTAMASTER 78, 101DESERVEXIT 108editing 77, 98MLSABEND 106MRTFIND 107MRTLDREFSUP 108MRTMULTI 108OBJECTMASTER 78, 101PRINTUTILITY 77, 109RLS 78, 102ROLLOFF 102RTCTHFS 107RTCTIATCH 108RTCTIBLDL 108RTCTICLOSE 106RTCTIDSRN 106RTCTILINK 108RTCTILOAD 108RTCTIMIGR 106RTCTIRCDL 106RTCTISCRA 106RTCTISTOW 106RTCTIXCTL 108RTCTMRT 107RTOCLASS 106RTOCONSOLE 103RTOGLOBE 105RTOLOGEVENTS 99RTOLOGFULLCTL 99RTOLOGUPDATES 99RTOMLS 105RTORACCHECK 105RTORACFID 106RTORENAME 105RTOSYSPRINT 103SITEADMINS 102SITEMASTER 78, 101
SMSALLOCATION 77SMSNODE 77SMSPRIMARY 78SMSSECONDARY 78
HPSPARMS parametersCTUSERSAFAUTH 102, 165, 186
HPSPLIB DD 46HPSRTO
described 20starting and shutting down 134
HPSSTARTdescribed 20
HPSTRACK 46HPSZROUT 73, 74HPSZSVC 73
installation method 1 73installation method 2 74
HSM Delete installation exit 111HSM Recall installation exit 111
IINSTALL library
contents 64PARMLIB members 76
installationHPSZSVC 73, 74overview 11, 70procedures 63
installation exits 110, 111installing
from download 54integrity verification
databases 146intercepts
copying into MLPA 112member reference tracking 20real time change tracking 20
ISPF interface 80
Installation Guide 201

Index
JJOBLIB member
SKELS library 79jobs
$ADMSET 92$AUTH 74$BACKUP 142$DEFGDG 140$DEFINE 109$GLOBAL 137$GLOBAL (VSAM) 136$INIT 90$INTEG 146$MAINT 149$REORG 143ALOCPLEX 113MRTDEF 134MRTINIT 131MRTREORG 153MRXDEF 134
Kkey certificates
defined 39keyed files 26
Llarge load modules
fingerprinting and tracking 42licensing
overview 39process 72
LINKLISTadd load libraries to 78and Serena load libraries 39
load librariesadd to LINKLIST 78authorizing 72
local clusters
fingerprinting 27LOG data set 80
Mmainframe
requirements 32maintaining
databases 140Delta Master database 148MRTAUX3 database 153, 154
member level securitydefining data sets and member
patterns 21installing 124–128overview 21
member reference trackingallocating AUX files 129–134archive MRTAUX3 records 154auxiliary storage 33back up MRTAUX3 153delete MRTAUX3 records 154enabling 133initializing AUX3 VSAM file 130installing 129–134intercepts 21maintaining 133overview 22–25report MRTAUX3 records 154restore MRTAUX3 153
MEMODELETE 103memory
requirements 32MLPA
copying intercepts into 112refreshing 123
MLS, see member level securityMRT, see member reference trackingMRTAUX3 database
maintaining 153, 154MRTDEF job 134MRTINIT job 131MRTREORG job 153
202 Serena® ChangeMan® SSM 8.4

Index
MRTRPJCL 154
MRXDEF job 134multiple change tracking environments
46multiple HPSPARMS members
change tracking 45multiple LPARs
in non-sysplex environmentdefining databases 88
real time change tracking 45
Nnon-keyed files 26notification
email 119TSO 116
OObject Master database 33, 98
attaching to Site Master 91online help 14
Pparameters
HPSPARMS 77SSMPARM, started task 114
PARMLIB data set 80PARMLIB members 76
SCHEDxx 122password
deleting 58patch
applying 181post-approval of changes 25, 48, 122post-installation verification
batch facility 158online facility 159, 169
overview 11primary menu
connecting to 85
RRACF_MLS 189README file 9real time change tracking
allocating data set for sysplex environment 113
copying startup task members 114dynamic SVC intercepts 20EXCP updates 21IEBCOPY 21installation steps 87multiple LPARs 45overview 19SERNET started task 19setting up global capture job 136setting up notifications 115shutting down HPSRTO subtask 134starting HPSRTO subtask 134subtasks 19, 20sysplex environment 45, 113verifying 135
Receive Indatasethigh level qualifiers 55
Record Level Sharingconsiderations 40defining databases to be secured 88,
143enabling for ChangeMan SSM 78, 102SYSPLEX DD 114
Refresh MLPA 43refreshing
MLPA 123related documents, ChangeMan SSM 12remote clusters
fingerprinting 27RENAME installation exit 110reorganizing
databases 143
Installation Guide 203
Index
reportzero reference 24
requirementsauxiliary storage 33mainframe 32memory 32
reverse change basket 25RLS, see Record Level SharingROLLOFF parm 47RTCT, see real time change trackingRTOLOG parameter 100RTOLOGEVENTS 99, 100, 104RTOLOGF 99RTOLOGFULLCTL 100, 104RTOLOGUPDATES 99, 100, 104
SS878-10 ABEND 42SCHEDxx
PARMLIB member 122SCRATCH installation exit 110security 40
and SSMSTAR started task 115SER10TY license manager 39, 72SERNET
compatibility 35described 43SSMPARM parameters 114SUBSYS parameter 114XML parameter 114
SERtificatesdefined 39
SERVERAO 39setting up starter environment 91site administrator
assigning 98defining 91
Site Master database 33, 98ROLLOFF parm 47
SKELsJOBLIB member 79setting up 79
STEPDD member 80space
requirements 33SSMPARM
SUBSYS parameter 114XML parameter 114
SSMPARM, started task parameters 114SSMPROC
updating 114SSMSTAR started task
making non-cancelable 122security 115
started task, see SERNETstarter environment
setting up 91STEPDD member
SKELS library 80storage
requirements 33SUBSYS parameter, SSMPARM 114subtasks
HPSRTO 20HPSSTART 20
SVCdynamic interceptions with HPSRTO
subtask 20sysplex
real time change tracking 45allocating data set for 113
support 21system requirements
auxilary storage 33mainframe 32memory 32
Ttarget fingerprints 25TESTGRP 91tokens
record-level 26tracking
large load modules 42
204 Serena® ChangeMan® SSM 8.4

Index
tracking facilitiesbatch interval change tracking 17real time change tracking 17
TSO notification 116TSO/E authorization 73
Uunloading ChangeMan SSM
from download 54upgrading
from a prior release 67
Vverification, post-installation
batch facility 158online facility 159, 169overview 11
verifying integritydatabases 146
XXML parameter, SSMPARM 114
Zzero reference report 24
Installation Guide 205

Index
206 Serena® ChangeMan® SSM 8.4