chapter 3: cinematography film 125: the textbook © lynne ...€¦ · cinematography editing sound...
TRANSCRIPT

Chapter 3: Cinematography Film 125: The Textbook © Lynne Lerych
Page 1 of 26
In Chapter 2, you began the process of learning about the stylistic formal system in film by
becoming familiar with the first consideration involved in the shot: Mise-en-Scène. But the shot is
about more than that which is placed inside the frame. It is also about how that frame – indeed, how
all frames in the film – are captured so that they can be shared with an audience. On one level, the
answer to the question of how frames are captured is quite simple: they’re captured by the camera.
Cinematography is, simply, everything related to the use of the camera. On another level, of
course, the answer is complex and sophisticated – which brings us to our second major element of
a film’s stylistic form:
Mise-en-Scène
Cinematography
Editing
Sound
The word “cinematography” comes from the Greek roots kinema, meaning “motion,” and graphia,
meaning “to describe” or “to write.” So cinematography translates literally as writing or
describing in motion. This makes perfect sense when you think about what film is: a series of
pictures projected in such a way that what they describe (or “write”) is the illusion of motion. This
understanding of what films actually are explains the name early filmmakers adopted for their
creation: moving pictures – which of course was later shortened to the term most often used to
refer to film today, movies.
As you learned in Chapter 1, the cinematographer is responsible for all aspects of the filmmaking
process related to the use of the camera. These aspects include choice of materials, composition,
light & color, framing, movement, and duration.
At its simplest, the cinematographer’s raw material comprises a series of still photographs that are
recorded (“shot”) and then projected at a rate sufficient to fool the human eye into thinking that it is
perceiving actual motion. This rate – in film, it’s generally 24 frames per second – is referred to as
critical flicker fusion1, and the trick that it plays on our eyes is called persistence of vision.
The process is actually quite simple: the camera shoots the action at a rate of 24 frames every
second; later, when the final product has been assembled, the frames are projected at the same rate
1 Also known as the phi phenomenon.

Chapter 3: Cinematography Film 125: The Textbook © Lynne Lerych
Page 2 of 26
at which they were shot, with very brief projections of black between each frame.2 If you’ve ever
watched a film from the 1920s or 1930s that appears jumpy and “speeded up,” that’s likely a result
of the fact that those early films were often shot at a rate of 16 frames per second rather than 24, but
they’re projected at the modern rate of 24. When this happens, the action appears to be happening
at a rate roughly 1.5 times its actual speed.3
Aside from the most basic
of materials – lots and lots
of photographs4 – the
cinematographer has
several other basic
materials to work with as
well, most of them having
to do with the camera itself
as well as the film the
camera uses.5 Film
cameras can make use of a
variety of lenses, which
affect the framing of the
shot – and for this reason,
lenses will be discussed in the framing section later in this chapter. Regardless of the specific lens
used, though, cinematographers can also add to those lenses in order to affect the overall visual
feel of the shot. Specifically,
cinematographers employ filters
to manipulate exposure (the
amount of light allowed in
through the camera’s aperture)
and gels to manipulate the
color-feel of the shot. See if you
can spot the differences in
exposure and color achieved
through filters and gels in these
shots from George Roy Hill’s
Butch Cassidy and the Sundance
Kid.
2 In the early days of film, cinematographers and projectionists didn’t realize that they could create a smoother
persistence of vision by inserting the black frames, so those early films had a rather jumpy, flickering feel – which is
why early movie fans referred to films as “flicks.” True story. 3 And in case you’re curious about why filmmakers switched from shooting 16 fps to shooting 24 fps – it’s because the
human eye can still detect individual images at a rate of 12, 13, even 14 frames per second . . . which means that film
shot at 16 fps will only barely achieve critical flicker fusion for some viewers. 4 The word “photography,” also from the Greek, means “writing in light” – which makes sense, right?
5 In general in this chapter, we’re talking about actual film-camera cinematography – you know, celluloid. Today
more and more films are shot using digital video, which means that some of what we’re discussing in this section
(exposure, filters, etc.) doesn’t really apply, at least not in the shooting stage. The effects achieved by various lenses
and film stocks are achieved, in digitally-shot films, in the computer.

Chapter 3: Cinematography Film 125: The Textbook © Lynne Lerych
Page 3 of 26
Beyond the above elements that are applied to the lens, the choice of film is another important
consideration for the cinematographer. Film stocks (types of actual, physical film) are classified in
the most basic of ways (color vs. black and white, for example) as well as in more sophisticated
ways, such as their responsivity – or speed – which is determined by its sensitivity to light. Film
speed determines the range of light conditions (night, natural sunlight, various artificial sources)
under which the film can be used effectively. The photos below demonstrate the use of different
film stocks within a single film – Christopher Nolan’s Memento.

Chapter 3: Cinematography Film 125: The Textbook © Lynne Lerych
Page 4 of 26
A final consideration in the selection of film stocks is the gauge of the film – in layman’s terms,
this is the width of the actual film. In general, the wider the gauge, the richer the image. Early films
were shot with 8 or 16 millimeter gauge, while most Hollywood feature films of the last several
decades have been shot in 35 mm. Some films – particularly the big, visually-striking epics of the
1960s such as David Lean’s Lawrence of Arabia and Stanley Kubrick’s 2001: A Space Odyssey,
are shot in 70 mm. Since 2002, an additional option for filmmakers who want to make big films
with the greatest possible image resolution is the film format known as IMAX.
Composition is one element of cinematography that might feel at first as if it were an aspect of
mise-en-scène – after all, it’s essentially about what’s seen in the shot. But whereas mise-en-scène
is about the what of the shot (what are we seeing?), cinematographic composition is about the
where and the how of the shot – where do elements appear within the frame, and how, aside from
the original recorded shot, is the content composed? One general rule when a cinematographer is
composing the shot is the rule of thirds, which values asymmetry over symmetry. Imagine that the
shot is divided into sectors by delineating both the height and the width of the frame into thirds like
the diagram below. The cinematographer will make the effort to compose each shot in such a way
that the focal point (in a shot with a single focal point) appears somewhere other than the center
rectangle – in other words, that the focal point appears in the right-hand third of the frame or the
left-hand third of the frame – or, if it’s in the center rather than left or right, it will appear in the
upper third or the lower third of the frame. In a shot with more than one focal point, the
cinematographer will make the effort to place both elements in such a way that their weight tends
toward left or right, top or bottom, rather than anchoring the center of the shot.
When
Chapter 3: Cinematography Film 125: The Textbook © Lynne Lerych
Page 5 of 26
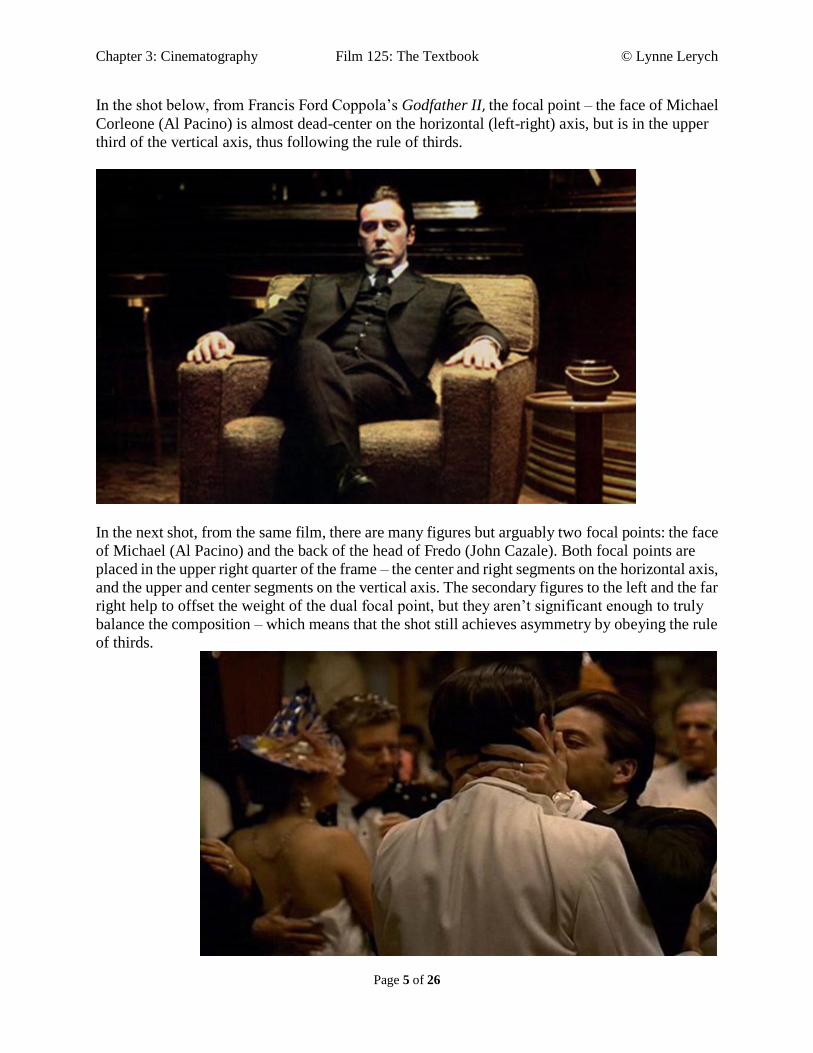
In the shot below, from Francis Ford Coppola’s Godfather II, the focal point – the face of Michael
Corleone (Al Pacino) is almost dead-center on the horizontal (left-right) axis, but is in the upper
third of the vertical axis, thus following the rule of thirds.
In the next shot, from the same film, there are many figures but arguably two focal points: the face
of Michael (Al Pacino) and the back of the head of Fredo (John Cazale). Both focal points are
placed in the upper right quarter of the frame – the center and right segments on the horizontal axis,
and the upper and center segments on the vertical axis. The secondary figures to the left and the far
right help to offset the weight of the dual focal point, but they aren’t significant enough to truly
balance the composition – which means that the shot still achieves asymmetry by obeying the rule
of thirds.

Chapter 3: Cinematography Film 125: The Textbook © Lynne Lerych
Page 6 of 26
The rule of thirds is the where aspect of cinematographic composition. The how aspect – how the
content is composed, beyond the original recorded material – involves several techniques. The first
of these is the glass shot, in which the action is shot through a pane of glass that has been painted
black in areas where a created background will be spliced in later. The shot below, from The
Wizard of Oz, involves glass shot technology for the Munchkinland backgrounds.
Another early method of composing the multi-sourced shot is superimposition: recording two
separate shots live and then combining the two shots by laying them atop one another
(superimposing them) and fading both just enough so that both images can clearly be seen, as in
this shot from Citizen Kane.
Chapter 3: Cinematography Film 125: The Textbook © Lynne Lerych
Page 7 of 26
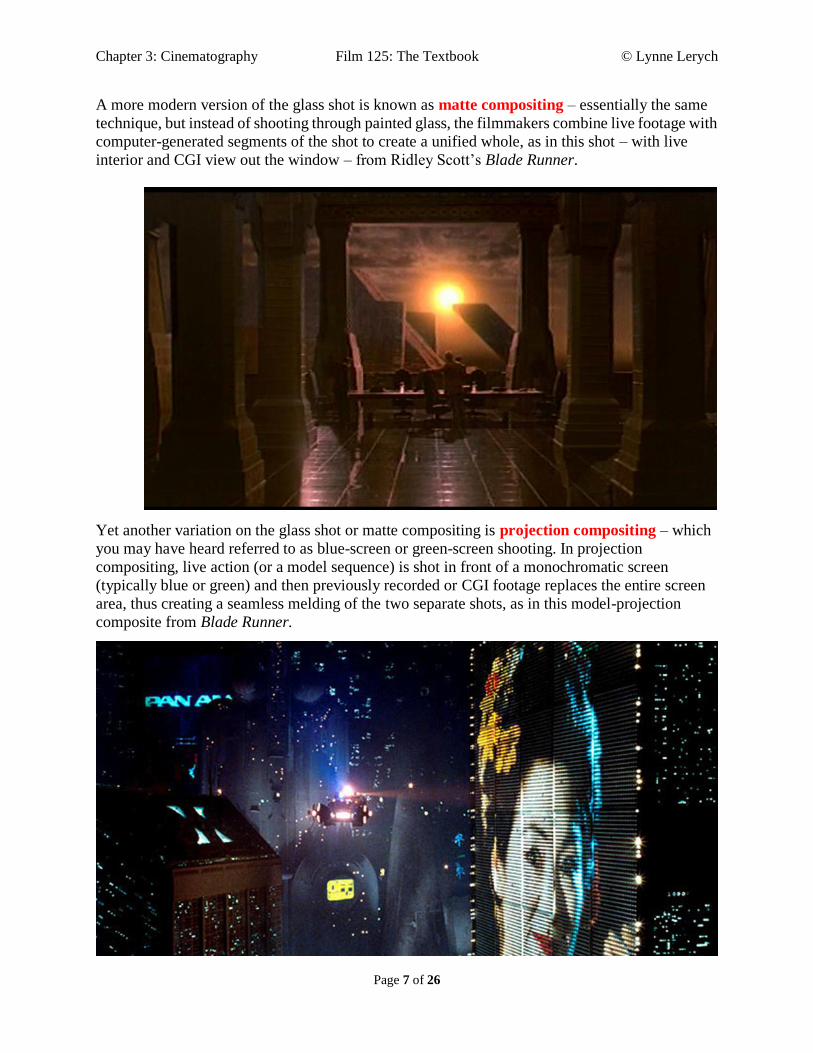
A more modern version of the glass shot is known as matte compositing – essentially the same
technique, but instead of shooting through painted glass, the filmmakers combine live footage with
computer-generated segments of the shot to create a unified whole, as in this shot – with live
interior and CGI view out the window – from Ridley Scott’s Blade Runner.
Yet another variation on the glass shot or matte compositing is projection compositing – which
you may have heard referred to as blue-screen or green-screen shooting. In projection
compositing, live action (or a model sequence) is shot in front of a monochromatic screen
(typically blue or green) and then previously recorded or CGI footage replaces the entire screen
area, thus creating a seamless melding of the two separate shots, as in this model-projection
composite from Blade Runner.

Chapter 3: Cinematography Film 125: The Textbook © Lynne Lerych
Page 8 of 26
A final area of consideration in composing the shot is focal emphasis. What is in the shot and how
it’s comprised is one thing – another thing is which element(s) within the shot are brought to our
attention through decisions the cinematographer makes about focus: what is seen sharply
compared to what is blurred. The eye is drawn toward the sharply-focused elements rather than
those that are out of focus. In creating focal emphasis, the first thing the cinematographer considers
is the camera’s depth of field, the degree of focus available within a specific camera. A camera
with a high depth of field can
focus sharply on several
planes at once, while a
camera with a low depth of
field can focus only on a few
foreground planes with sharp
definition. One of the
reasons that Citizen Kane is
considered a masterpiece of
filmmaking is the very high
depth of field in the cameras
used by cinematographer
Gregg Toland, as
exemplified in this
deep-focus shot (also
presented under deep-space
composition in Chapter 2).
A shallow-focus shot, on the other hand, is one in which only the foreground is in sharp focus
while the background is blurred, as seen in this shot from The Wizard of Oz:

Chapter 3: Cinematography Film 125: The Textbook © Lynne Lerych
Page 9 of 26
Cinematographers also have the option of racking focus within a shot – pulling focus from
foreground to background, shifting from a shallow-focus to a deep-focus shot (or vice-versa) while
the camera is running. This shot from Sam Raimi’s Spiderman, for example, racks between
shallow-focus and deep-focus, alternately emphasizing the spider web and the figures below.
We discussed light and color in Chapter 2 because some aspects of light and color are elements of
mise-en-scène – they are a function of what is placed in the scene. But other aspects of light and
color are functions of cinematography because they are about the camera and the film. In Chapter
1, you learned about color timers and color graders, the technicians who adjust the film’s
consistency of color, brightness and contrast (the relationship between light and dark areas of the
shot).
Sometimes, though, a
cinematographer will want to achieve
an effect involving color that has not
been captured through the images
actually shot live. The three general
types of color effect are tinting,
toning, and hand-coloring. Tinting
involves dipping developed film into
dye so that light areas of the
developed image take on the color of
the dye, as seen in this shot from
F.W. Murnau’s Nosferatu:

Chapter 3: Cinematography Film 125: The Textbook © Lynne Lerych
Page 10 of 26
Toning, on the other hand, involves developing the film in dye, which colors the dark areas instead
of the light areas, as seen in this shot from a very early film whose title and director have escaped
your humble author:
Finally, hand-coloring – which is used rarely because of how painstaking and time-consuming it
is – involves hand-painting individual elements within the frame, as seen in the shot below from
Francis Ford Coppola’s Rumble Fish.6
6 The contemporary version of hand-coloring involves computerized selection and modification of elements within
the shot, used to beautiful effect in Gary Ross’ Pleasantville.

Chapter 3: Cinematography Film 125: The Textbook © Lynne Lerych
Page 11 of 26
The cinematographer has many decisions to make regarding the size and shape of the frame. One
of the first decisions made involves the focal length of the camera lens used in capturing the shot.
There are three standard focal lengths: normal, wide-angle, and telephoto. A fourth lens, the zoom,
allows the camera operator to shift among these lengths while shooting. The normal lens captures
an image that appears very similar to what the human eye sees, and the resulting shot has straight
edges, as seen in this image from Casablanca:
A wide-angle lens is
capable of capturing a
somewhat greater
width than a normal
lens, which results in a
shot with distorted
edges – note how this
shot from Citizen
Kane, shot with a
wide-angle lens,
seems to curve
outward at the right
and left edges:

Chapter 3: Cinematography Film 125: The Textbook © Lynne Lerych
Page 12 of 26
The telephoto lens, which is used
rather rarely and typically for landscape
shots, is capable of capturing great
distances. This results in a flattening of
planes, which makes the objects within
this shot appear to be much closer
together than they really are, as seen in
this still photo, which collapses a great
deal of distance in the San Francisco
Bay:
Aside from the lens, the other major decision to be made in selecting the camera and film that will
best capture the desired size and shape of the shot is the film’s aspect ratio – the proportional
relationship between the shot’s width and height. A huge variety of aspect ratios are possible, but
the most common are 4:3 (a.k.a. 1.33:1), the standard 20th
century television format and the
preferred format of early films; and 16:9 (a.k.a. 1.78:1), the standard HDTV format and the
preferred format of films since the 1960s. Other aspect ratios exist as well, typically wider than
those mentioned already. A representative sample of aspect ratios is presented below.
4:3 (1.33:1)
John Huston’s The Maltese Falcon
16:9 (1.78:1)
Kenneth Branagh’s Much Ado About Nothing
11:5 (2.20:1)
David Lean’s Lawrence of Arabia
12:5 (2.39:1)
Michael Cimino’s The Deer Hunter
Chapter 3: Cinematography Film 125: The Textbook © Lynne Lerych
Page 13 of 26
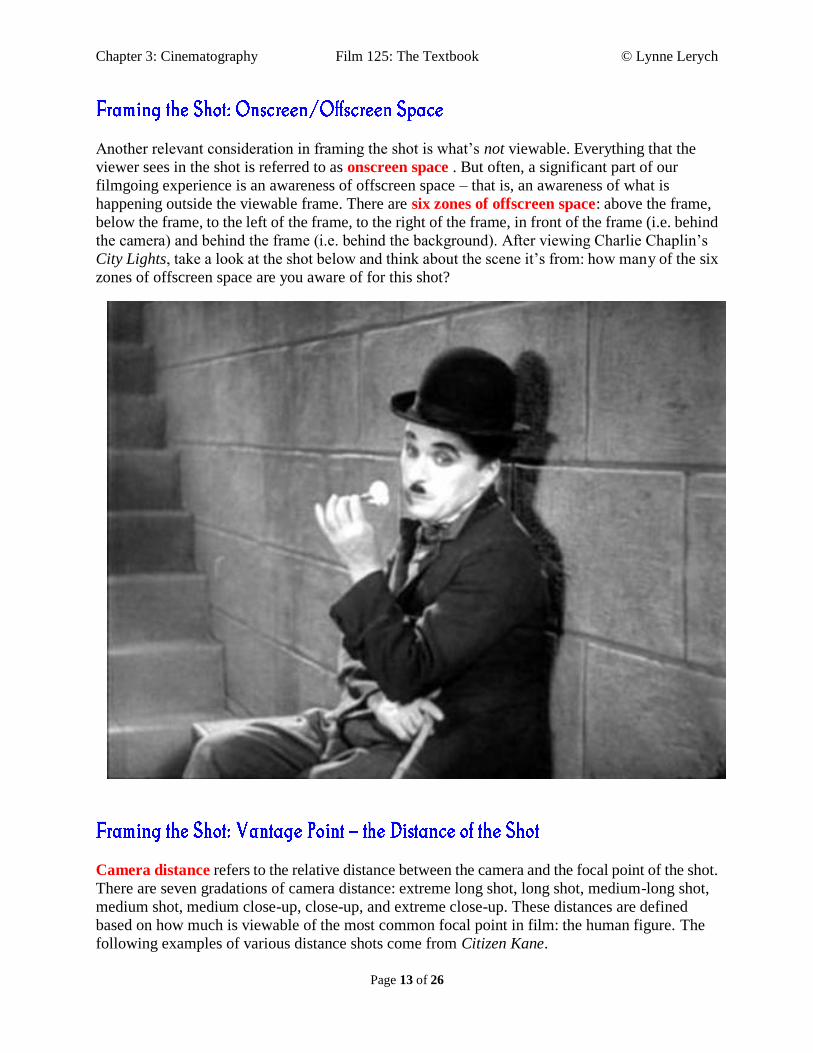
Another relevant consideration in framing the shot is what’s not viewable. Everything that the
viewer sees in the shot is referred to as onscreen space . But often, a significant part of our
filmgoing experience is an awareness of offscreen space – that is, an awareness of what is
happening outside the viewable frame. There are six zones of offscreen space: above the frame,
below the frame, to the left of the frame, to the right of the frame, in front of the frame (i.e. behind
the camera) and behind the frame (i.e. behind the background). After viewing Charlie Chaplin’s
City Lights, take a look at the shot below and think about the scene it’s from: how many of the six
zones of offscreen space are you aware of for this shot?
Camera distance refers to the relative distance between the camera and the focal point of the shot.
There are seven gradations of camera distance: extreme long shot, long shot, medium-long shot,
medium shot, medium close-up, close-up, and extreme close-up. These distances are defined
based on how much is viewable of the most common focal point in film: the human figure. The
following examples of various distance shots come from Citizen Kane.

Chapter 3: Cinematography Film 125: The Textbook © Lynne Lerych
Page 14 of 26
In the extreme long shot, we are viewing a landscape (real or imagined), and any human figures in
the shot will be seen at a great distance:
The long shot captures the human figure from head to toe:

Chapter 3: Cinematography Film 125: The Textbook © Lynne Lerych
Page 15 of 26
The medium-long shot (a.k.a. the full shot or the Plan Americain) captures the human figure from
the knees up. Note that this shot is masquerading as a long shot, but only because we focus on the
figure at center, which is actually a reflection in a mirror. The image of the man himself, not in
reflection, is the knees-up version at the far left:
The medium shot captures the human figure from the waist up. Note that the human figure in
question in this shot is Kane, in the foreground, although Leland, in the background, is also framed
similarly because his lower body is covered by the railing:
Chapter 3: Cinematography Film 125: The Textbook © Lynne Lerych
Page 16 of 26
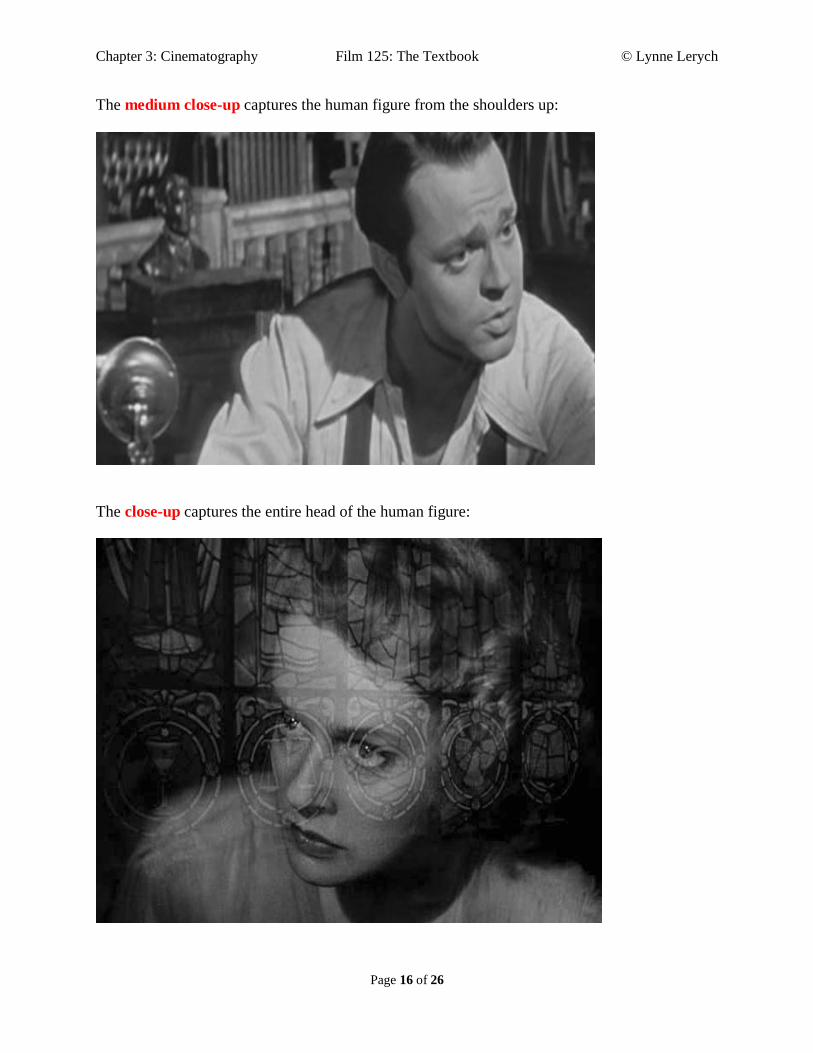
The medium close-up captures the human figure from the shoulders up:
The close-up captures the entire head of the human figure:

Chapter 3: Cinematography Film 125: The Textbook © Lynne Lerych
Page 17 of 26
And the extreme close-up captures an individual feature smaller than the head (an eye, a mouth –
or, in the case of this crucial shot, a hand):
Aside from the distance that
the camera is placed from its
focal point, the
cinematographer also
considers the angle from
which the camera records the
action. The angle of the
camera helps to place the
viewer in the
cinematographer’s desired
position in order to create a
sense of perspective. Many
shots in film are point-of-view
shots, meaning that what the
viewer sees is essentially what
a character in the film is
seeing, as in this shot from
Casablanca, which shows us
what Rick is seeing:

Chapter 3: Cinematography Film 125: The Textbook © Lynne Lerych
Page 18 of 26
The most common angle from which the camera records is the head-on angle, in which the
camera “looks” neither up nor down at its subject but rather is placed at the same height as the
subject(s) and aimed straight at the focal point, as in this shot from Citizen Kane.
In an upward-angle shot, the camera is pivoted vertically on a horizontal axis to “look” up at its
subject (again from Citizen Kane). Note that this angle makes the subject appear powerful and
domineering in relation to whatever he’s looking at (and indeed in relation to the viewer).

Chapter 3: Cinematography Film 125: The Textbook © Lynne Lerych
Page 19 of 26
In a downward-angle shot, the camera is pivoted vertically on a horizontal axis to “look” down at
its subject. This angle achieves the opposite effect from the upward-angle shot, in that the subject
(Suzan Alexander Kane from Citizen Kane) appears vulnerable and powerless in relation to
whatever she’s looking at – and perhaps in relation to the viewer as well.
Finally, in a canted-angle shot, the camera “leans” right or left to upset the horizon line,
disorienting the viewer and creating a sense of the scene being off-balance or out of control
(Citizen Kane once again):

Chapter 3: Cinematography Film 125: The Textbook © Lynne Lerych
Page 20 of 26
So far, everything we’ve talked about in this chapter involves the cinematographer using a camera
that stays put – a camera that is fixed in a single location without moving while it shoots. But
camera movement (a.k.a. mobile framing) is another important aspect of the cinematographer’s
art. There are five essential types of camera movement: panning, tilting, tracking, crane, and
steadicam.
In a pan shot, the camera stays in a fixed position on its tripod or dolly, but rotates horizontally on
a vertical axis, as in this shot from Steven Soderbergh’s Ocean’s Eleven (click the image to see
the video).
In a tilt shot, the camera stays in a fixed position on its tripod or dolly, but rotates vertically on a
horizontal axis, as in this shot from Bryan Singer’s The Usual Suspects, in which the brief but
crucial tilt occurs near the middle of the clip (click the image to see the video).

Chapter 3: Cinematography Film 125: The Textbook © Lynne Lerych
Page 21 of 26
In a tracking shot, the camera is mounted on a moving vehicle that follows the subject (or is
followed by the subject), as in this shot from Stanley Kubrick’s The Shining (click the image to
see the video).
In a crane shot, the camera is mounted on a crane to shoot from high above the subject, as seen in
this sequence from Sam Mendes’ American Beauty (click the image to see the video).
Chapter 3: Cinematography Film 125: The Textbook © Lynne Lerych
Page 22 of 26
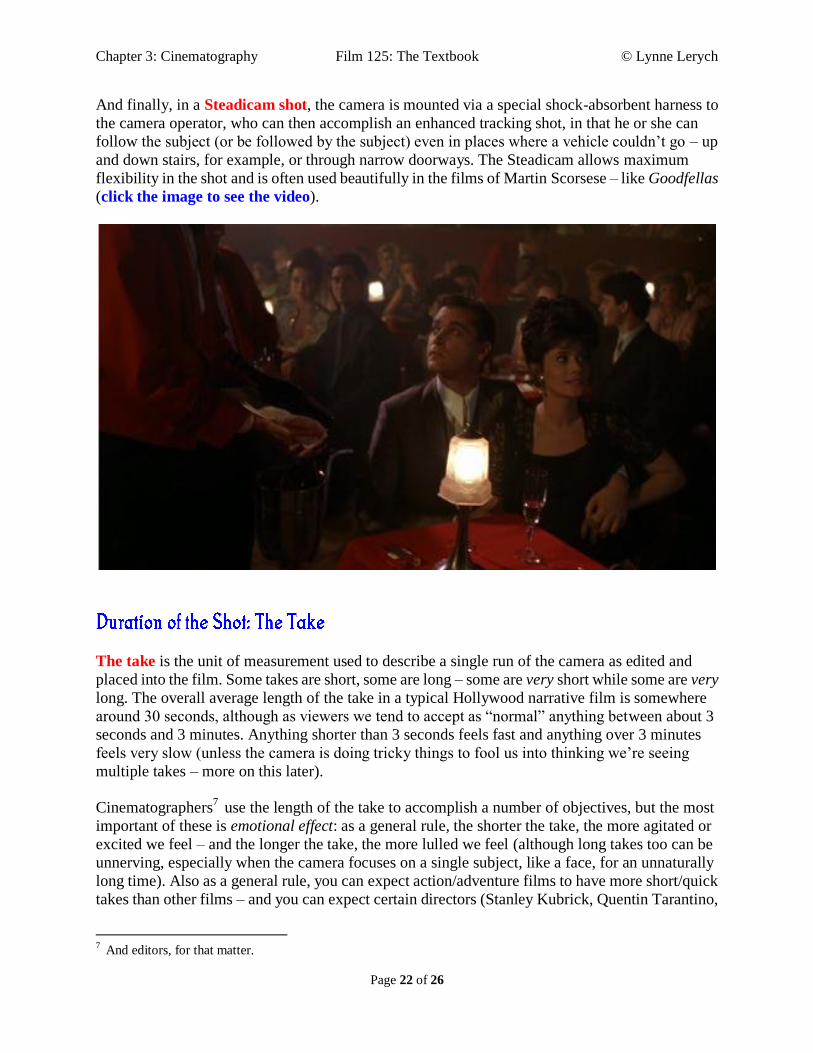
And finally, in a Steadicam shot, the camera is mounted via a special shock-absorbent harness to
the camera operator, who can then accomplish an enhanced tracking shot, in that he or she can
follow the subject (or be followed by the subject) even in places where a vehicle couldn’t go – up
and down stairs, for example, or through narrow doorways. The Steadicam allows maximum
flexibility in the shot and is often used beautifully in the films of Martin Scorsese – like Goodfellas
(click the image to see the video).
The take is the unit of measurement used to describe a single run of the camera as edited and
placed into the film. Some takes are short, some are long – some are very short while some are very
long. The overall average length of the take in a typical Hollywood narrative film is somewhere
around 30 seconds, although as viewers we tend to accept as “normal” anything between about 3
seconds and 3 minutes. Anything shorter than 3 seconds feels fast and anything over 3 minutes
feels very slow (unless the camera is doing tricky things to fool us into thinking we’re seeing
multiple takes – more on this later).
Cinematographers7 use the length of the take to accomplish a number of objectives, but the most
important of these is emotional effect: as a general rule, the shorter the take, the more agitated or
excited we feel – and the longer the take, the more lulled we feel (although long takes too can be
unnerving, especially when the camera focuses on a single subject, like a face, for an unnaturally
long time). Also as a general rule, you can expect action/adventure films to have more short/quick
takes than other films – and you can expect certain directors (Stanley Kubrick, Quentin Tarantino,
7 And editors, for that matter.

Chapter 3: Cinematography Film 125: The Textbook © Lynne Lerych
Page 23 of 26
Paul Thomas Anderson, Orson Welles) to make use of very long takes. The most extreme example
of a director obsessed with long takes may be Alfred Hitchcock, whose film Rope looks like a
single 80-minute take. In reality, he shot the film in eleven takes (each take consuming an entire
reel of film) but created the illusion of a single very long take by ending each take by zooming in
on something black and beginning each take by zooming out of something black. But Hitchcock
was weird in a number of ways. Most filmmakers settle for the challenge of the 4- or 8- or
12-minute take when they want to show off their long-take abilities.
One of the American cinema’s first widely-praised long takes is the nearly-five-minute opening
shot of Orson Welles’ Touch of Evil (click the image to see the video).
For comparison, take a look at the prevalence of short takes in an action film like Paul
Greengrass’ The Bourne Supremacy – the linked clip is 3 minutes long and comprises 79 takes, for
an average take length of 2.3 seconds. Note that some takes within the clip are longer than 2.3
seconds and many are shorter. Can you determine which are short, which are long, and why that
might be? (click the image to see the video).

Chapter 3: Cinematography Film 125: The Textbook © Lynne Lerych
Page 24 of 26
When an extremely long take is shot in such a way that the camera moves through locations,
distances, and angles – essentially shooting several scenes in a single run of the camera – that take
is called a sequence shot. Several films are well known for their sequence shots, including
Goodfellas and Touch of Evil (both linked earlier). Two impressive sequence shots are presented
below: the first from Paul Thomas Anderson’s Magnolia and the second from Robert Altman’s
The Player8 (click the images to see the videos).
Magnolia
The Player
8 To qualify as a true movie geek, listen carefully in the clip from Altman’s film for the clever reference to the
sequence shot in Touch of Evil.
Chapter 3: Cinematography Film 125: The Textbook © Lynne Lerych
Page 25 of 26
Our final topic in the category of cinematography is speed of motion – the apparent rate at which
the action on screen occurs. The vast majority of shots in the vast majority of narrative films are
both recorded and projected at 24 fps, as discussed earlier. But sometimes filmmakers have a
reason to want to present the action as if it were occurring slower than in real time or faster than in
real time. When they want to do this, they manipulate the rate at which the shot is recorded in
relation to the rate at which it’s projected.
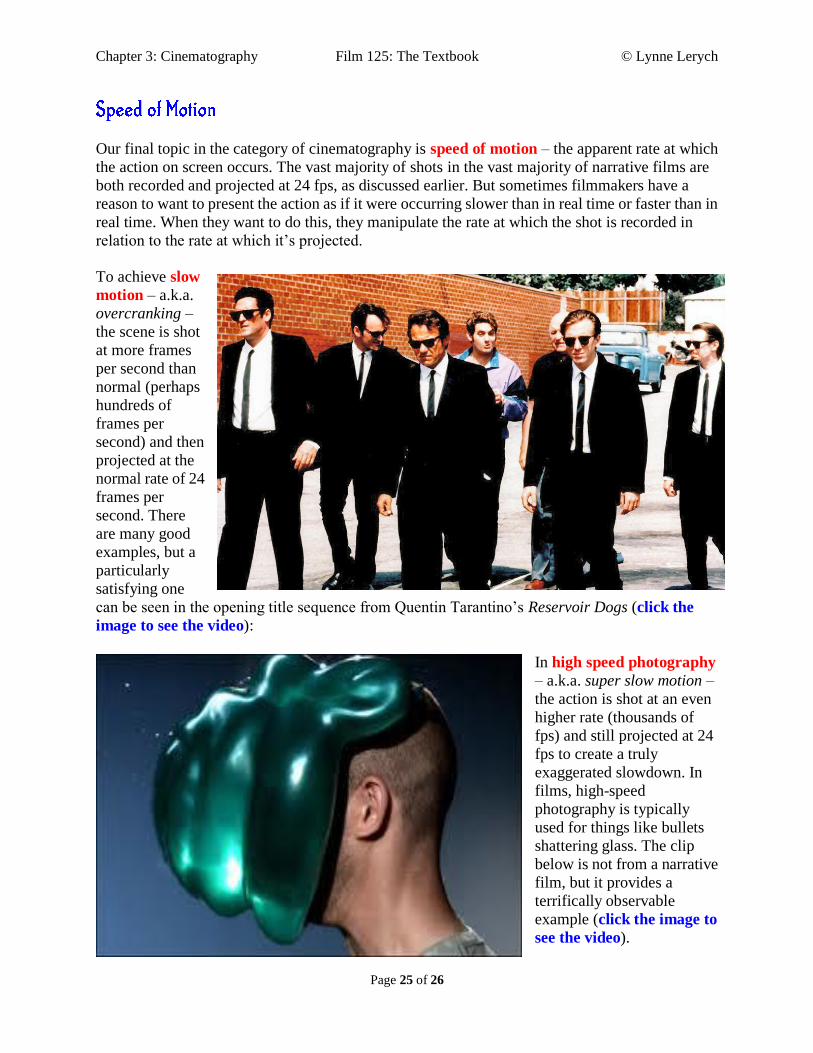
To achieve slow
motion – a.k.a.
overcranking –
the scene is shot
at more frames
per second than
normal (perhaps
hundreds of
frames per
second) and then
projected at the
normal rate of 24
frames per
second. There
are many good
examples, but a
particularly
satisfying one
can be seen in the opening title sequence from Quentin Tarantino’s Reservoir Dogs (click the
image to see the video):
In high speed photography
– a.k.a. super slow motion –
the action is shot at an even
higher rate (thousands of
fps) and still projected at 24
fps to create a truly
exaggerated slowdown. In
films, high-speed
photography is typically
used for things like bullets
shattering glass. The clip
below is not from a narrative
film, but it provides a
terrifically observable
example (click the image to
see the video).

Chapter 3: Cinematography Film 125: The Textbook © Lynne Lerych
Page 26 of 26
Time lapse photography achieves the opposite effect of slow-motion: it speeds up the action.
Time-lapse involves shooting at much fewer fps than normal – perhaps one per minute or one per
hour or even one per day – and then projecting at the normal 24 fps to achieve the illusion of
something that takes a lot of time (a flower blooming, clouds moving across the sky, the sun rising
and setting) happening very quickly, as in this scene from Godfrey Reggio’s Koyaanisqatsi (Life
Out of Balance) (click the image to see the video).
And finally, there are those filmmakers who want to alternate various speeds of motion within a
single scene for effect. This technique of combining slow, high, and normal speeds in a single
series of shots is called ramping – and its most famous use is still probably one of its earliest: the
“bullet time” in the Wachowski brothers’ The Matrix (click the image to see the video).
. . . and that’s it for Cinematography. Next up will be Chapter 4: Editing.