chapter 5 - installation & commissioning service course.pdfinstallation – field piping •...
TRANSCRIPT

S-PZE01 ZEAS Service Course 9/23/2009
Pieter Goes - DENV Service Department 1
S-PZE01 ZEAS CCU Service Course
Chapter 5: Installation & Commissioning
223-Sep-09
Internal Use Only
Chapter 5: Installation & Commissioning• Part 1: Installation• Part 2: Commissioning
Nitrogen cylinder

S-PZE01 ZEAS Service Course 9/23/2009
Pieter Goes - DENV Service Department 2
Part 1: InstallationOutdoor Unit Oil TrapField Piping Field Piping ComponentsRefnet / Branches ST-ControllerField Wiring
5.1.1: Outdoor Unit

S-PZE01 ZEAS Service Course 9/23/2009
Pieter Goes - DENV Service Department 3
523-Sep-09
Internal Use Only
Installation – Outdoor Unit• Unpacking the unit:
When unpacking the unit, be sure all of following items are present.– Installation Manual– Operation Manual– Clamps– Accessory bag
Do not loose any of these items!
Position 1
Position 2
111
22 2
623-Sep-09
Internal Use Only
Installation – Outdoor Unit• Accessory bag:
The accessory bag contains a number of pipes that can be used to connect the unit to the field piping (easy installation). The content is as follows:
Note: some units have pipe connection of 25.4mm or 31.8mm. Adapters for 28.6mm and 34.9mm have to be purchased on site. The future Mass Production will contain the correct adapters.

S-PZE01 ZEAS Service Course 9/23/2009
Pieter Goes - DENV Service Department 4
723-Sep-09
Internal Use Only
Installation – Outdoor Unit• Installation space:
Leave enough operation and service space, as shown in following 3 patters
Single Unit Multiple Units
Pattern 1(wall heightlimited)
Pattern 2(wall heightlimited)
Pattern 3(wall heightNOT limited)
823-Sep-09
Internal Use Only
Installation – Outdoor Unit• Remark for patterns 1 and 2:
In case of pattern 1 and 2, the wall height on the front side is limited to 1500mmand the wall height on the suction side is limited to 500mm. The wall height on the side is not limited.Should the height exceed these values, you should add h1 and h2 as below:
22100
22300
21500
hY
hY
hX
+=
+=
+=
(in case of pattern 1)
(in case of pattern 2)
S-PZE01 ZEAS Service Course 9/23/2009
Pieter Goes - DENV Service Department 5
923-Sep-09
Internal Use Only
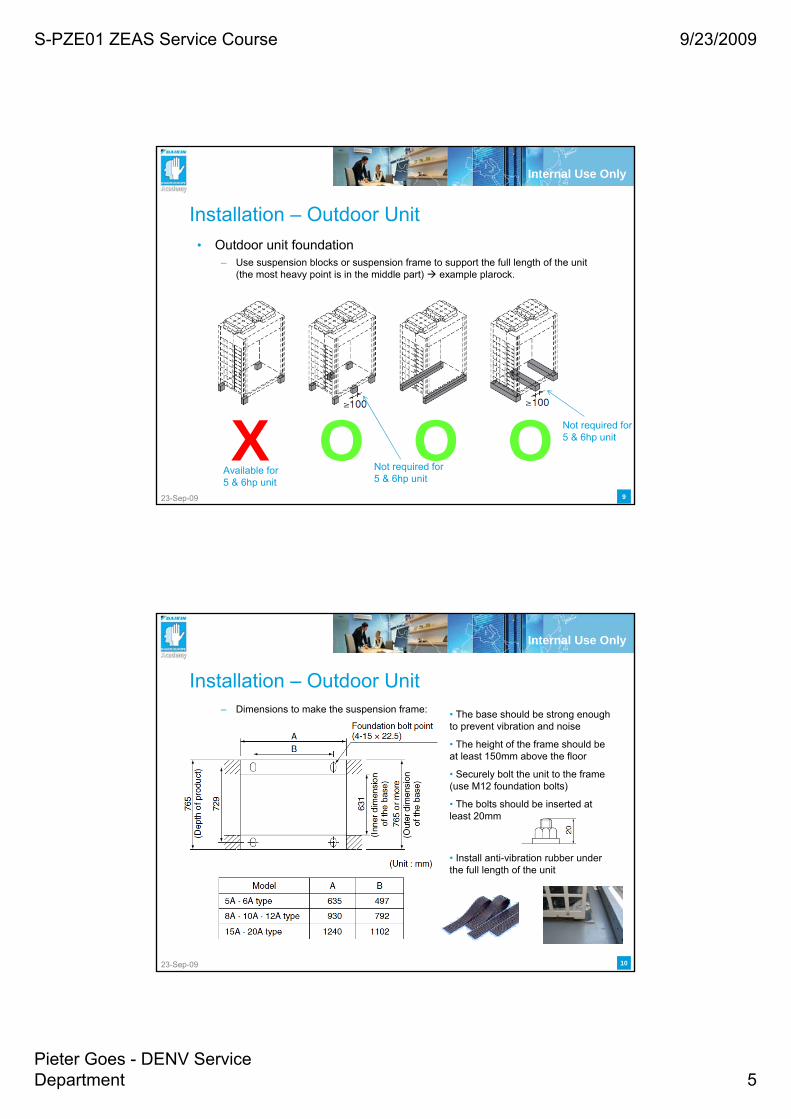
Installation – Outdoor Unit• Outdoor unit foundation
– Use suspension blocks or suspension frame to support the full length of the unit (the most heavy point is in the middle part) example plarock.
X O O O Not required for5 & 6hp unit
Not required for5 & 6hp unit
Available for5 & 6hp unit
1023-Sep-09
Internal Use Only
Installation – Outdoor Unit– Dimensions to make the suspension frame: • The base should be strong enough
to prevent vibration and noise
• The height of the frame should beat least 150mm above the floor
• Securely bolt the unit to the frame (use M12 foundation bolts)
• The bolts should be inserted at least 20mm
• Install anti-vibration rubber underthe full length of the unit

S-PZE01 ZEAS Service Course 9/23/2009
Pieter Goes - DENV Service Department 6
1123-Sep-09
Internal Use Only
Installation – Outdoor Unit– When using plarock
• Relatively cheap• Lightweight material• Strong structure
1223-Sep-09
Internal Use Only
Installation – Outdoor Unit• Outdoor unit installed inside
– Use drainpan (optional)– Make fan ducting (each fan separately)
• Standard the ESP of the outdoor fans is 30Pa, which can be seen as 3m of ducting
• The ESP value can be set to 78.6Pa by field setting (2-40-2)
S-PZE01 ZEAS Service Course 9/23/2009
Pieter Goes - DENV Service Department 7
1323-Sep-09
Internal Use Only
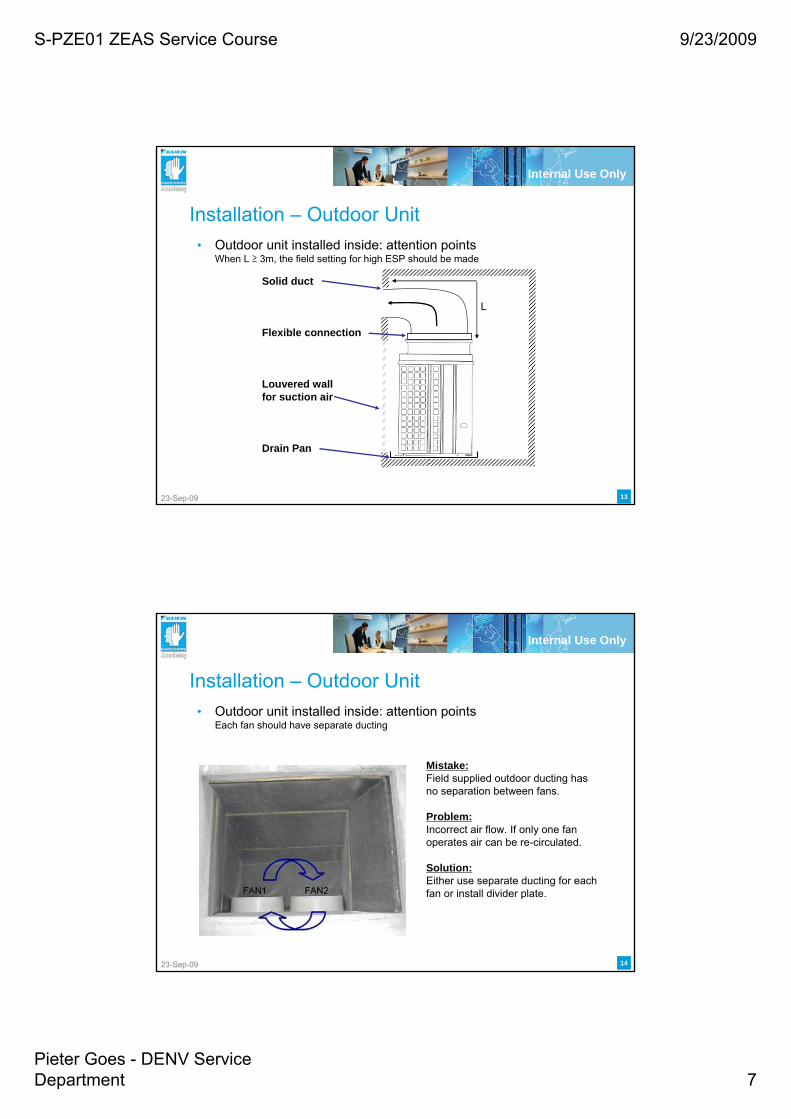
Installation – Outdoor Unit• Outdoor unit installed inside: attention points
When L ≥ 3m, the field setting for high ESP should be made
Louvered wall for suction air
Solid duct
Flexible connection
L
Drain Pan
1423-Sep-09
Internal Use Only
Installation – Outdoor Unit• Outdoor unit installed inside: attention points
Each fan should have separate ducting
Mistake:Field supplied outdoor ducting has no separation between fans.
Problem:Incorrect air flow. If only one fan operates air can be re-circulated.
Solution:Either use separate ducting for each fan or install divider plate.

S-PZE01 ZEAS Service Course 9/23/2009
Pieter Goes - DENV Service Department 8
1523-Sep-09
Internal Use Only
Installation – Outdoor Unit• Installation under eaves
Make sure that there is no air short circuit
Eaves are higher than 1 metre, good airflow
Eaves are lower than1 metre, good airflow
< 1m
> 1m
Eaves are 1 metre or less, short cycling can
occur
5.1.2 Field Piping

S-PZE01 ZEAS Service Course 9/23/2009
Pieter Goes - DENV Service Department 9
1723-Sep-09
Internal Use Only
Installation – Field Piping• 3 basic principles for field piping
Water/moisture
Dust/contaminants Leak
No leakage of refrigerantNo dust/contaminants inside
Do not let dust/contaminants inNo water/moisture inside
Do not let water/moisture in
TightCleanDry
Dust/contaminants
1823-Sep-09
Internal Use Only
Installation – Field Piping• Field piping installation precautions
– Keep pipes protected at all possible times during installation, or pinch/tape the pipe– Finish pipework ASAP
<Unprotected (uncovered) pipe ends> <Protected (covered) pipe ends>
<Unprotected pipe ends> <Protected pipe ends><Taping>A method by which the ends of the copper tubes are covered with vinyl tape
Pipe end
Wrap the copper tube with tape.
Cut flat
Fold down Wrap with tape again
<Pinching>A method by which the ends of the copper tubes are closed off and the gaps are brazed.
Copper tube
Braze
Brazing filler metal

S-PZE01 ZEAS Service Course 9/23/2009
Pieter Goes - DENV Service Department 10
1923-Sep-09
Internal Use Only
Installation – Field Piping• Brazing:
Oxygen Free Nitrogen MUST be used during all brazing processes (pressure regulated to 0.2bar = 0.02MPa)
N2 N2N2N2 N2
Taping
Tapered nozzle
Valve
Nitrogen gas regulator
Nitrogen cylinder
Taping Pressure hose
2023-Sep-09
Internal Use Only
Installation – Field Piping
Nitrogen replacementThe inner surface of the piping is clean.
The effects of nitrogen replacement
No nitrogen replacementThe inner surface of the pipe has blackened due to the oxide film.

S-PZE01 ZEAS Service Course 9/23/2009
Pieter Goes - DENV Service Department 11
2123-Sep-09
Internal Use Only
Installation – Field Piping• Consequenses of this carbon layer (brazing without N2)
– Clogging of expansion valve or capillary tube– Degradation of oil– Oxidation of compressor
Brazing is an exothermal reaction (energy comes free under the form of light and heat).
On the outer side of the pipe, the combustion is complete giving CO2 and H2O as products (enough oxygen present)
On the inner side of the pipe, the combustion is incomplete (not enough oxygen present to make complete combustion). This gives CO and C as side products (C is soot which can clog capillary tubes etc.)
When all the oxygen is replaced by nitrogen, there can be no reaction (nitrogen is an inert gas) no soot can be formed.
ECOOHOHC ++→+ 22283 345
EOHCOCOCOHC ++++↓→+ 22283 822272
2223-Sep-09
Internal Use Only
Installation – Field Piping• Piping insulation
Both liquid and gas line must be insulated! The liquid line can become very coldsee reference temperatures below.
– Liquid pipe minimum temperature: 0 ~ -10°C– Gas pipe minimum temperature: -26°C (MT Series)
-46°C (LT Series)
The thickness depends on the heat-through ratio.As a reference:- Gas pipe: 30mm- Liquid pipe: 10mm
Use sealant so no moisture can enter the insulation

S-PZE01 ZEAS Service Course 9/23/2009
Pieter Goes - DENV Service Department 12
2323-Sep-09
Internal Use Only
Installation – Field Piping• Outdoor unit field piping connections:
Model 5, 6hp 8, 10, 12hp 15, 20hpLiquid (mm) 9.5 9.5 12.7Gas (mm) 19.1 25.4 31.8
Locally purchased adapters willhave to be used (currently not in accessory bag)
2423-Sep-09
Internal Use Only
Installation – Field Piping• Connect the field piping to the unit (4 procedures)
– Procedure 1: Confirm if the shut-off valves are fully closed– Procedure 2: Connect a charge hose to the liquid and gas shut-off valves and
remove the gas from the pinched piping– Procedure 3: Cut off the small pinched pipe to check that teher is no oil inside
(danger for brazing!). If oil comes out, remove the large pinched pipe– Procedure 4: Sweat the brazing connection and remove the pinched pipe.

S-PZE01 ZEAS Service Course 9/23/2009
Pieter Goes - DENV Service Department 13
2523-Sep-09
Internal Use Only
Installation – Field Piping• Use the accessory pipes
– Connection to the front side
– Connection on the lateral side (through bottom plate)
5.1.3 Refnet / Branches

S-PZE01 ZEAS Service Course 9/23/2009
Pieter Goes - DENV Service Department 14
2723-Sep-09
Internal Use Only
Installation – Refnet / Branches• Liquid piping:
Install a Y-Joint (Refnet) or T-Joint and branch it horizontally, to create an even flowof liquid. A T-Joint is also allowed, because the flow of liquid is slow and under high pressure!
<Installation standards when installing Refnets in liquid line>Install the REFNET joint horizontally (±30°angle) or vertically (all positions allowed).
AAHorizontal
A. Arrow view
<Horizontal pipe> <Vertical pipe>
2823-Sep-09
Internal Use Only
Installation – Refnet / Branches• Gas piping:
Install a Y-Joint (Refnet) or T-Joint and branch it vertically, so that the branchedpiping will be located above the main piping. This is to prevent oil from entering a cabinet which is thermostat OFF.
<Installation standards when installing Refnets in the gas line>
<Installation standards when installing T-Joints in the gas line>
Create a downwardslope

S-PZE01 ZEAS Service Course 9/23/2009
Pieter Goes - DENV Service Department 15
2923-Sep-09
Internal Use Only
Installation – Refnet / Branches• Distance between 2 branches in the liquid line
This is to have a laminar flow of liquid
At least 500
At least 500 At least 1,000
<Top view>
5.1.4 Field Wiring

S-PZE01 ZEAS Service Course 9/23/2009
Pieter Goes - DENV Service Department 16
3123-Sep-09
Internal Use Only
Wiring a ZEAS SystemPower Supply• Outdoor• ST Controller• Showcase IF
Communication• F1/F2 out• P1/P2 (relay signal)
(High voltage contact 230V to V free)
• C/C1 (Caution output)
• C/W1 (Warning output)
3223-Sep-09
Internal Use Only
Installation – Field Wiring• Power Supply and Maximum Fuse Ampère (MFA)
• The power supply cable characteristics (diameter, type) dependon the local legislation (different for country by country).
Model Power supply Fuse (A)LRMEQ5,6AY1 15LRLEQ5,6AY1 3 phase, N + E 15LRMEQ8,10,12AY1 380-415V 25LRLEQ8,10,12AY1 50Hz 25LRMEQ15,20AY1 40LRLEQ15,20AY1 40Showcase I/F single phase 10ST-Controller 230V 50Hz 10

S-PZE01 ZEAS Service Course 9/23/2009
Pieter Goes - DENV Service Department 17
3323-Sep-09
Internal Use Only
Installation – Field Wiring• Procedure how to connect power supply wiring on outdoor unit
3423-Sep-09
Internal Use Only
Installation – Field Wiring• Keep the power wiring (high voltage) and communication wiring
(low voltage) separated at least 5mm– Crimp style terminals are recommended.
– DO NOT put high voltage and low voltage (signal) wires in the same cable tray. This could cause interference on the communication line.
Low voltage (signal) High voltage
Crimp-style terminal

S-PZE01 ZEAS Service Course 9/23/2009
Pieter Goes - DENV Service Department 18
3523-Sep-09
Internal Use Only
Installation – Field Wiring• Keep the equipment enough away from equipment that creates
electrical noise (e.g. AM broadcasting equipment)
At least 1,500 mmMore than 100A
At least 1,000 mm100A
At least 500 mm50A
At least 300 mm
At least 50 mm
Less than 10A220V or more
Separation distance between power wiring for other equipment and control
wiring for Daikin air conditioners
Separation distance between power wiring and control wiring
for Daikin air conditioners
Power supply capacity for power wiring
3623-Sep-09
Internal Use Only
Installation – Field Wiring
P2C C1 W1 P1
OutdoorF1 F2
1 2
Refrigerator RefrigeratorBlower coil
Relay Box Relay BoxRelay Box
ST Controller
F1F2
F1F2 Showcase IF
F1F2 Showcase IF
F1F2 Showcase IF
Control panel
Warning
Alarm
Operation switch

S-PZE01 ZEAS Service Course 9/23/2009
Pieter Goes - DENV Service Department 19
3723-Sep-09
Internal Use Only
Installation – Field Wiring• F1F2 Communication:
– Communication bus 16 V DC
– Type:• 2 core flexible (vinyl): NON-SHIELDED – IMPORTANT!• Sizes from 0,75 mm² - 1,25 mm²
– Maximum length of communication wiring = 1000 m
• F1/F2 Outdoor is used to connect Showcase I/F, ST-Controller & other Daikin equipment (ZEAS, CVP, VRV)
• F1F2 Indoor is not used for ZEAS
Conductor
Insulation
Sheath
<Cross-section of a communication cable>
3823-Sep-09
Internal Use Only
Installation – Field Wiring
P2C C1 W1 P1
OutdoorF1 F2
1 2
Refrigerator RefrigeratorBlower Coil
Relay Box Relay BoxRelay Box
ST Controller
F1F2
F1F2 Showcase IF
F1F2 Showcase IF
F1F2 Showcase IF
F1/F2 (outdoor)
Control panel
Warning
Alarm
Operation switch

S-PZE01 ZEAS Service Course 9/23/2009
Pieter Goes - DENV Service Department 20
3923-Sep-09
Internal Use Only
Installation – Field Wiring• Warning, Alarm and Operation Output (high voltage)
Connect Warning, Alarm and Operation Output wiring to terminal X2M and clamp it as follows
• Wiring specifications:– Wiring diameter: 0.75 ~ 1.25mm²– Maximum wiring length: 130m
• Capacity of contacts:– Total capacity Warning and Alarm Output: 0,5A or less at 220~240V– Capacity Operation Output: 0,5A or less at 220~240V
4023-Sep-09
Internal Use Only
Installation – Field Wiring
P2C C1 W1 P1
OutdoorF1 F2
1 2
Refrigerator RefrigeratorBlower coil
Relay Box Relay BoxRelay Box
ST Controller
F1F2
F1F2 Showcase IF
F1F2 Showcase IF
F1F2 Showcase IF
F1/F (outdoor)
Control panel
Warning
Alarm
Operation switch
P1/P2 (operation)
C/C1 (warning)
C/W1 (alarm)

S-PZE01 ZEAS Service Course 9/23/2009
Pieter Goes - DENV Service Department 21
4123-Sep-09
Internal Use Only
Installation – Field Wiring• Principle of Operation Output (P1/P2)
The Relay Control Box contains a relay, which must be wired onsite in order to operate the Liquid Line Solenoid Valve in the desired conditions
P1P2 Relay Control Boxes
230VAC Refrigerator permission signal from outdoor unit
4223-Sep-09
Internal Use Only
Installation – Field Wiring
Refrigerator Cabinet 1 Refrigerator Cabinet 2 Refrigerator Cabinet 3
SV
L
N
SV SV
P1
P2
Outdoor Unit PCB
L
N
L
N
Thermo onCabinet 1
Thermo onCabinet 3
Thermo onCabinet 2
230V AC Output
Relay control box 1 Relay control box 2 Relay control box 3
• P1P2 HIGH voltage (similar CVP principle)
S-PZE01 ZEAS Service Course 9/23/2009
Pieter Goes - DENV Service Department 22
4323-Sep-09
Internal Use Only
Installation – Field Wiring
Refrigerator Cabinet 1 Refrigerator Cabinet 2 Refrigerator Cabinet 3
SV
L
N
SV SV
Outdoor Unit PCB
L
N
L
N
230V AC – 24V ACStep down Transformer
Relay control box 1 Relay control box 2 Relay control box 3
P1
P2
Thermo onCabinet 1
Thermo onCabinet 3
Thermo onCabinet 2
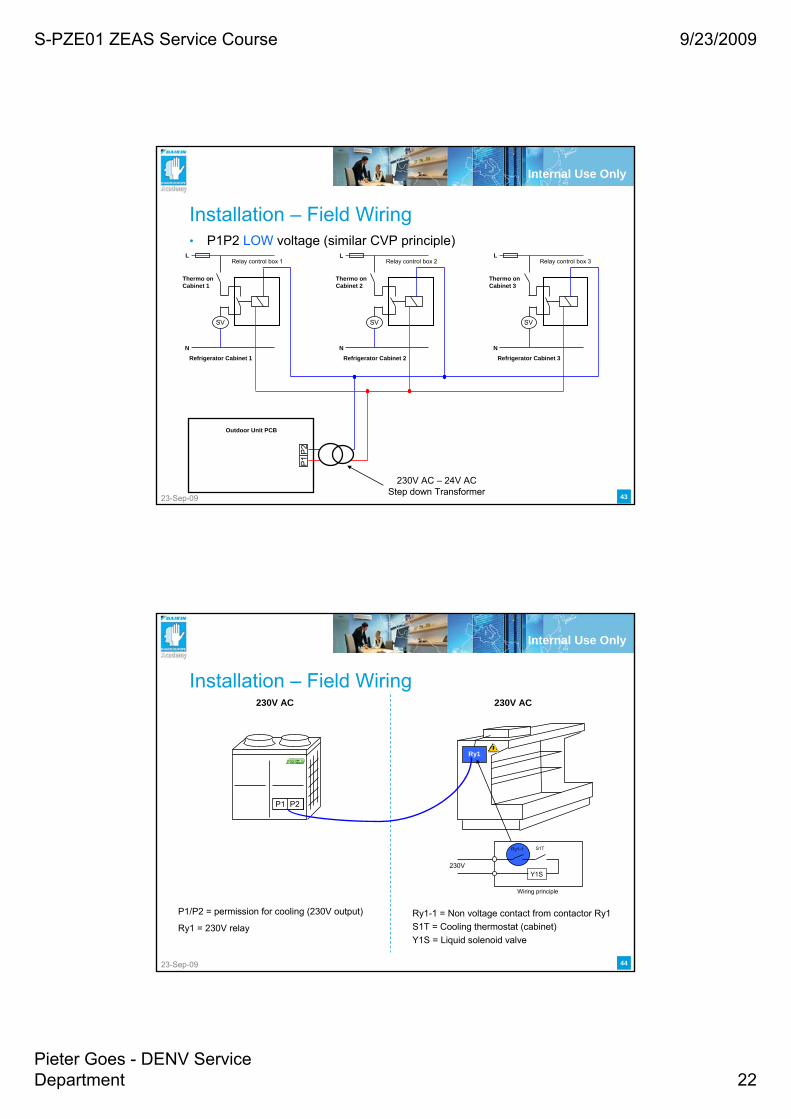
• P1P2 LOW voltage (similar CVP principle)
4423-Sep-09
Internal Use Only
Installation – Field Wiring
Ry1
P1/P2 = permission for cooling (230V output)
Ry1 = 230V relayRy1-1 = Non voltage contact from contactor Ry1S1T = Cooling thermostat (cabinet)Y1S = Liquid solenoid valve
230V AC 230V AC
1 2P1 P2
Y1S
S1TRy1-1
230V
Wiring principle

S-PZE01 ZEAS Service Course 9/23/2009
Pieter Goes - DENV Service Department 23
4523-Sep-09
Internal Use Only
Installation – Field Wiring• Remote operation switch wiring
– For remote switch, use a non-voltage contact for microcurrent (not more than1mA, 12VDC)
– If the remote switch is used to start/stop the system, set the operating switch to “REMOTE”
• Wiring installationWire using the 1-2 contact on terminal X3M
Wiring specifications:
• Wiring diameter: 0.75 ~ 1.25mm²
• Maximum wiring length: 130m
4623-Sep-09
Internal Use Only
Installation – Field Wiring
P2C C1 W1 P1
OutdoorF1 F2
1 2
Refrigerator RefrigeratorBlower coil
Relay Box Relay BoxRelay Box
ST Controller
F1F2
F1F2 Showcase IF
F1F2 Showcase IF
F1F2 Showcase IF
F1/F2 (outdoor)
Control panel
Warning
Alarm
Operation switch
P1/P2 (operation)
C/C1 (warning)
C/W1 (alarm)
1-2 (remote switch)

S-PZE01 ZEAS Service Course 9/23/2009
Pieter Goes - DENV Service Department 24
4723-Sep-09
Internal Use Only
Installation – Field Wiring• General remark for all wiring
– Use the washers for power wiring which are foreseen at the terminals
– Use tightening torque as in below table
5.1.5 Oil Trap

S-PZE01 ZEAS Service Course 9/23/2009
Pieter Goes - DENV Service Department 25
4923-Sep-09
Internal Use Only
Installation – Oil Trap• The outdoor unit has several ways of getting the oil back to the
compressors– By oil return cycle (2 ways) outdoor unit software– By oil separator outdoor unit hardware– By oil traps in gas line field piping (each 5 meter height difference)
<5m
5m
5m
5023-Sep-09
Internal Use Only
Installation – Oil Trap• Only when outdoor unit is situated HIGHER than the cabinets,
you will need to make an ‘OIL RECOVERY BEND’ for every 5 meters level difference in the GAS LINE.
• Remark 1: If the evaporator coil is in the top of the cabinet, the 5 metres should be measured from the top of the unit.
• Remark 2: The “oil recovery bend” should be constructed in such a way that there is a minimum of pressure drop.
The refrigerant velocity increases and takes the oil.OIL
To the outdoor unit
S-PZE01 ZEAS Service Course 9/23/2009
Pieter Goes - DENV Service Department 26
5.1.6 Field Piping Components
5223-Sep-09
Internal Use Only
Installation – Field Piping Components• Solenoid valves • Liquid line drier• Ball valves • Suction drier core• Sight glasses• Indoor filter• Expansion valve
Details: See Chapter 2 “System Build-Up”

S-PZE01 ZEAS Service Course 9/23/2009
Pieter Goes - DENV Service Department 27
5.1.7 ST-Controller
5423-Sep-09
Internal Use Only
Installation – ST-Controller• ST-Controller dimensions
Make some ventilation possible (heat generation 10W max)

S-PZE01 ZEAS Service Course 9/23/2009
Pieter Goes - DENV Service Department 28
Part 2: CommissioningFlushing Additional Refrigerant ChargePressure Test Test RunVacuum Drying ST-ControllerInstallation Check
5.2.1 Flushing
S-PZE01 ZEAS Service Course 9/23/2009
Pieter Goes - DENV Service Department 29
5723-Sep-09
Internal Use Only
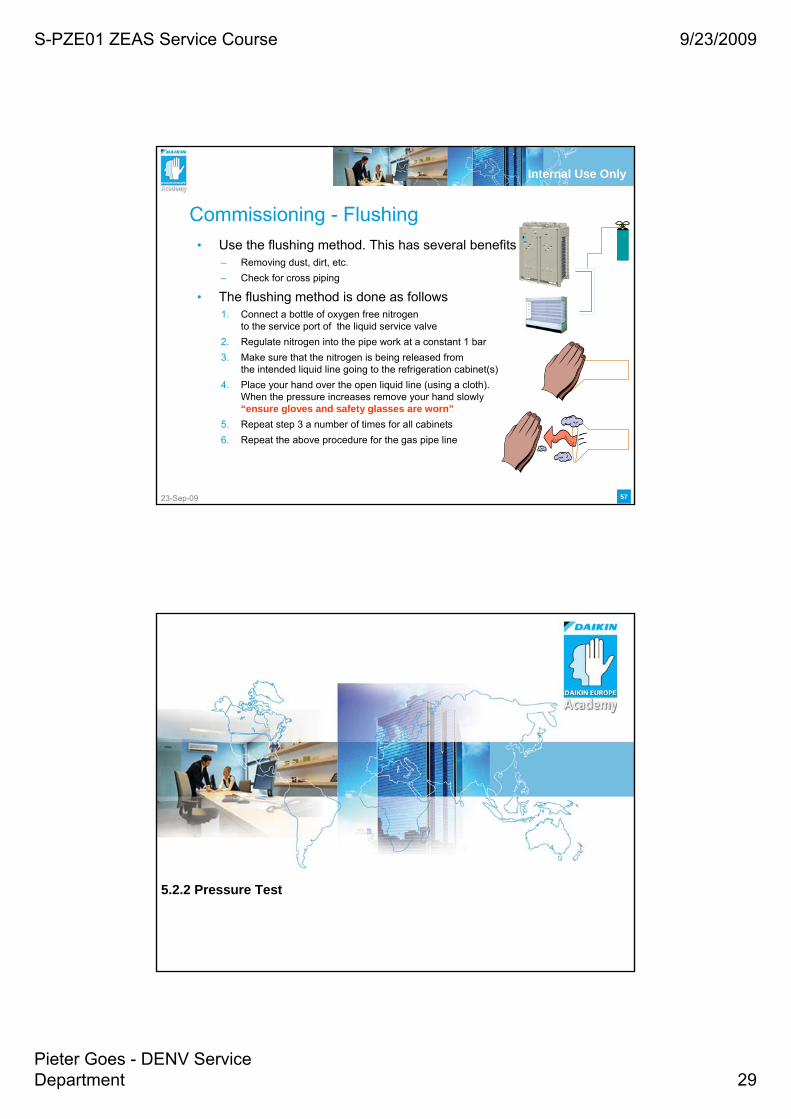
Commissioning - Flushing• Use the flushing method. This has several benefits
– Removing dust, dirt, etc.– Check for cross piping
• The flushing method is done as follows1. Connect a bottle of oxygen free nitrogen
to the service port of the liquid service valve2. Regulate nitrogen into the pipe work at a constant 1 bar3. Make sure that the nitrogen is being released from
the intended liquid line going to the refrigeration cabinet(s)4. Place your hand over the open liquid line (using a cloth).
When the pressure increases remove your hand slowly“ensure gloves and safety glasses are worn”
5. Repeat step 3 a number of times for all cabinets6. Repeat the above procedure for the gas pipe line
5.2.2 Pressure Test
S-PZE01 ZEAS Service Course 9/23/2009
Pieter Goes - DENV Service Department 30
5923-Sep-09
Internal Use Only
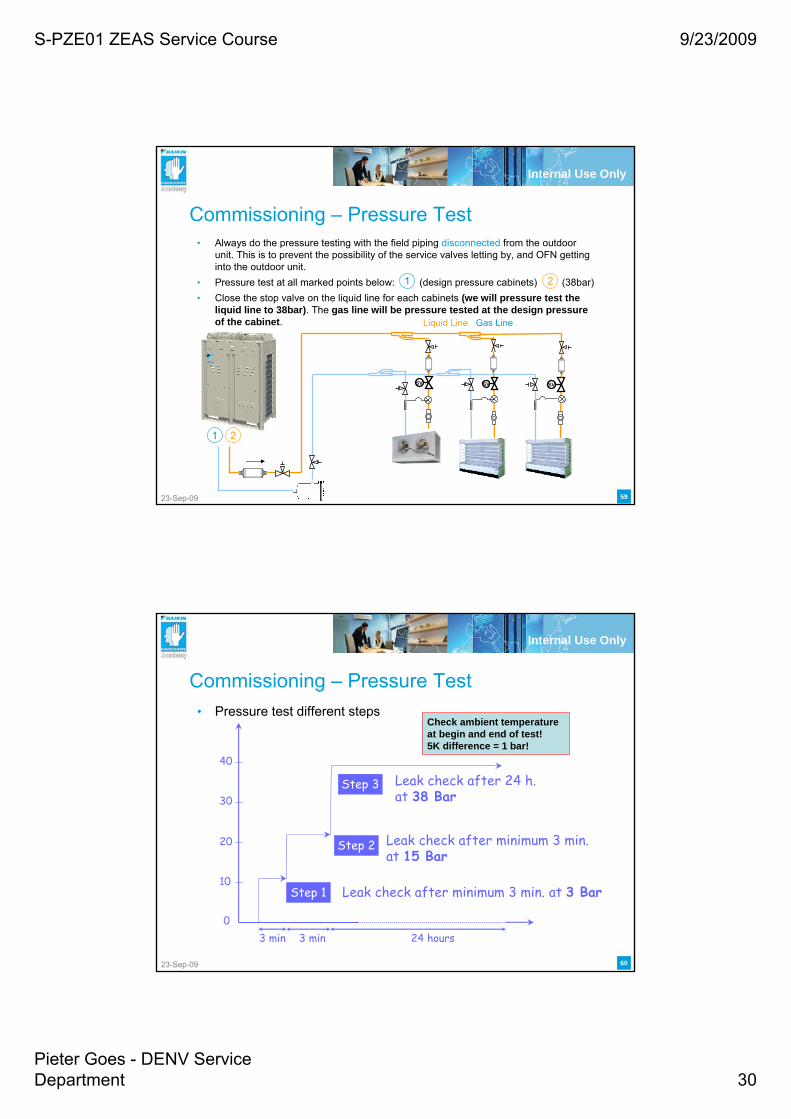
Commissioning – Pressure Test• Always do the pressure testing with the field piping disconnected from the outdoor
unit. This is to prevent the possibility of the service valves letting by, and OFN getting into the outdoor unit.
• Pressure test at all marked points below: (design pressure cabinets) (38bar)• Close the stop valve on the liquid line for each cabinets (we will pressure test the
liquid line to 38bar). The gas line will be pressure tested at the design pressure of the cabinet.
1 2
SV SV SV
Liquid Line Gas Line
1 2
6023-Sep-09
Internal Use Only
Commissioning – Pressure Test• Pressure test different steps
10
0
20
30
40
3 min 3 min 24 hours
Step 1 Leak check after minimum 3 min. at 3 Bar
Step 2 Leak check after minimum 3 min. at 15 Bar
Step 3 Leak check after 24 h. at 38 Bar
Check ambient temperatureat begin and end of test!5K difference = 1 bar!

S-PZE01 ZEAS Service Course 9/23/2009
Pieter Goes - DENV Service Department 31
6123-Sep-09
Internal Use Only
Commissioning – Pressure Test• Leak test
When you are checking for leaks using bubble solution, be certain to use a recommended product from your Wholesaler, as using a watered down Fairy liquid solution can have the following effects or damage:
– Fairy liquid contains salt and this will have a capillary action and pull in moisture to your flare nut. This moisture will then get into the thread of the flare nut and when the pipe gets cold the moisture will freeze and expand causing the flare nut to crack.
– It also contains Ammonia, which if comes in contact your flared joint causes a corrosive action between the brass nut and the copper flare.
5.2.3 Vacuum Drying

S-PZE01 ZEAS Service Course 9/23/2009
Pieter Goes - DENV Service Department 32
6323-Sep-09
Internal Use Only
Commissioning – Vacuum Drying• Connect the vacuum pump to both liquid and gas service port
– Vacuum drying is an essential procedure, to ensure that the refrigerant pipe work isfree from moisture and foreign material, causing blockages which will cause problems with efficiency and the possibility of component failure.
– Evacuation must be carried out to using a high quality two stage vacuum pump (with non-return valve), good quality gauge manifold and hose set, and it is essential that a torr gauge is used to check the level of evacuation achieved.
6423-Sep-09
Internal Use Only
Commissioning – Vacuum Drying• Length of vacuuming
– Vacuum should take at least 2 hours down to -100.7kPa or below
– Then, leave the unit for at least 1 hour at the pressure of -100.7kPa or below and check that the vacuum gauge reading is not increasing. If the pressure rizes, there is residual water in the system or the system has a leakage.
– In case of rizing pressure, break the vacuum with Nitrogen and re-vacuumcompletely (Multiple evacuation).
Water boiling point Absolute pressure Gauge pressurekPa mmHgmmHg kPa℃

S-PZE01 ZEAS Service Course 9/23/2009
Pieter Goes - DENV Service Department 33
6523-Sep-09
Internal Use Only
Commissioning – Vacuum Drying• Using a Torr gauge
We advise to use a Torr gauge to check the state of vacuuming carefully. Be sure to vacuum deep enough to make sure that all moisture in the system can evaporate(depending on the outdoor temperature!).Below is a table that shows at which temperature moisture will boil off, against the level of vacuum in the system pipe work. So the colder the outdoor temperature, the lower level of Torr is required to be sure no moisture is present in the pipe work.
5.2.4 Installation Check

S-PZE01 ZEAS Service Course 9/23/2009
Pieter Goes - DENV Service Department 34
6723-Sep-09
Internal Use Only
Commissioning – Installation Check• Electrical work:
– Check if all the wiring is firmly connected– Check if te main power supply is good quality (stable condition etc.)
• Pipe work:– Make sure pipe size is correct– Make sure insulation work is done
5.2.5 Additional Refrigerant ChargeCalculationCharging

S-PZE01 ZEAS Service Course 9/23/2009
Pieter Goes - DENV Service Department 35
6923-Sep-09
Internal Use Only
Commissioning – Additional Refrigerant Charge
• Additional Refrigerant CalculationAll ZEAS units are pre-charged from factory following the table below
However, this is not enough. There must be an additional charge (sum of 4 items)
– Item 1: additional charge by piping length. This is called the “trim charge”. The trim charge is calculated as follows
total length of 15.9mm liquid pipe x 0.19 = “ ” kgtotal length of 12.7mm liquid pipe x 0.12 = “ ” kgtotal length of 9.5mm liquid pipe x 0.06 = “ ” kgtotal length of 6.4mm liquid pipe x 0.023 = “ ” kg +
= “ ” kg
Model 5, 6hp 8, 10, 12hp 15, 20hpFactory charge (kg R410A) 5.2 7.9 11.5
7023-Sep-09
Internal Use Only
Commissioning – Additional Refrigerant Charge
• Additional Refrigerant Calculation– Item 2: Additional charge by showcase size. Because the heat exchanger from
one refrigerator has another volume than the heat exchanger volume of another, it is impossible to calculate it based on the liquid line length (difference case bycase). That is why we add a small charge for each refrigerator in the system.
*Note: 1. Case of showcase, the condition of capacity:
• Medium temperature application (MT): Te = -10°C
• Low temperature application (LT) Te = -35°C
2. In case of blower coil, the condition of capacity is given with Td = 10 K
Showcase capacity* Additional charge (kg)Q Showcase Blower
MT LT coil Q < 5kW 1.2 1.4 0.6
5kW ≤ Q < 10kW 2.3 3.2 1.210kW ≤ Q < 15kW 3.4 5.2 1.715kW ≤ Q < 20kW 4.6 2.320kW ≤ Q < 25kW 5.9 3.025kW ≤ Q < 30kW 7.0 3.530kW ≤ Q < 35kW 8.2 4.135kW ≤ Q < 40kW 9.7 4.9
40 ≤ Q 11.0 5.5

S-PZE01 ZEAS Service Course 9/23/2009
Pieter Goes - DENV Service Department 36
7123-Sep-09
Internal Use Only
Commissioning – Additional Refrigerant Charge
• Additional Refrigerant Calculation– Item 3: Additional refrigerant charge depending on the outdoor unit model
(constant)
– Item 4: Additional charge by adjustment = finetuning charge. This is decided bythe reading of the sight glass. If the sight glass is full liquid or few bubbles are present, no finetune charge must be added. However, if the sightglass shows many bubbles, a maximum of 10% of item 2 can be added.
Item 4 ≤ 0.1 * Item 2
Model 5, 6hp 8, 10, 12hp 15, 20hpConstant charge (kg R410A) 1.0 3.0 3.5
7223-Sep-09
Internal Use Only
Commissioning – Additional Refrigerant Charge
• Additional Refrigerant Calculation– Total additional charge = item 1 + item 2 + item 3 + item 4.– Round this value in units of 0.1kg.– Write it on the specified label (as below) and attach it to the unit.

S-PZE01 ZEAS Service Course 9/23/2009
Pieter Goes - DENV Service Department 37
7323-Sep-09
Internal Use Only
Commissioning – Additional Refrigerant Charge
• Additional refrigerant charging procedure1. Check that the RUN SWITCH is OFF. The RUN SWITCH is located behind
the left-hand side inspection hole.2. Turn ON the main power supply the “Alive LED” on the Main PCB should
blink. When the power supply is turned on, H2P will blink for the first 5 seconds. After that, H2P will go OFF. H2P comes ON in case of an abnormality. The LED’s are located behind the right-hand side inspection hole
7423-Sep-09
Internal Use Only
Commissioning – Additional Refrigerant Charge
• Additional refrigerant charging procedure3. Open the valve to charge refrigerant through the liquid line service port. Make
sure that only liquid R410A is charged. When the cylinder has no siphon, put the cylinder upside down during the charging process. Now we are chargingbased on the pressure difference between cylinder and vacuumed field piping. Use a scale to measure the amount of R410A that is charged.
4. When the calculated amount is charged, close the charging valve and disconnect the bottle. You can now proceed to step 6.
5. When the charging procedure slows down (pressures have equalized) and the full additional charge has not been added yet, the bottle must be disconnectedfrom the liquid line service port and connected to gas line service port.
6. Now open the liquid and gas stop valves, so the refrigerant comes free fromthe outdoor unit. Put the RUN SWITCH in the ON position. When you stillneed to fill refrigerant, it must be done through the gas line. Be very carefullthat no liquid enters the compressor, as we are charging liquid directlyinto the compressor suction line.

S-PZE01 ZEAS Service Course 9/23/2009
Pieter Goes - DENV Service Department 38
7523-Sep-09
Internal Use Only
• Apply screw lock agent (especially on the gas stop valve)!To prevent the brass nuts from cracking (freezing water inside the nut), the nuts must be sealed (example: green Locktite = soft type). Do not apply screw lock agent to the sealing part (rubber).
– Stop valve cover:
– Service port nut:
Commissioning – Additional Refrigerant Charge
7623-Sep-09
Internal Use Only
Commissioning – Additional Refrigerant Charge
• Tighten the stop valve shaft, stop valve cover and service port nuts firmly using a torquewrenchThis is to prevent any leaks that might happen during the years of operation (no onevalve is 100% closed)

S-PZE01 ZEAS Service Course 9/23/2009
Pieter Goes - DENV Service Department 39
5.2.6 Test Run
7823-Sep-09
Internal Use Only
Commissioning – Test Run• Check the sight glass condition
• Check that there is cold air coming from the indoor units.• Check that the indoor units perform defrosting.• When turning the power supply OFF, ALWAYS set first the
OPERATION SWITCH OFF before turning OFF the main power supply. Not doing so, you might damage crucial parts likecompressor etc.

S-PZE01 ZEAS Service Course 9/23/2009
Pieter Goes - DENV Service Department 40
7923-Sep-09
Internal Use Only
Commissioning – Test Run• Use the RAM Monitor to verify the system parameters. Most
important are:– Suction superheat: 10 ~ 20K– Discharge superheat: 20 ~ 40K
When these values are too high/low, it could be that the indoorunit expansion valves are not correctly regulated (open/closethem a little bit).
RAMMonitor
MAINPCB
More info on how to use RAM Monitor in Chapter 6 “Troubleshooting & Maintenance”
8023-Sep-09
Internal Use Only
Commissioning – Test Run• Should there be an error at the time of the test run (H2P lit), the
malfunction should be checked in the Monitoring Mode. See Chapter 6 “Troubleshooting & Maintenance” on how to use this function.
*1 Set the OPERATION SWITCH to OFF and the ON again. If the problem persists, refer to the Service Manual

S-PZE01 ZEAS Service Course 9/23/2009
Pieter Goes - DENV Service Department 41
5.2.7 ST-Controller
8223-Sep-09
Internal Use Only
Commissioning – ST-Controller• Get the Activation Key (same procedure as for iTouch
controller/iManager)
• MAC address
• Software ID
• User informationActivation key
ST-Controller
S-PZE01 ZEAS Service Course 9/23/2009
Pieter Goes - DENV Service Department 42
8323-Sep-09
Internal Use Only
Commissioning – ST-Controller
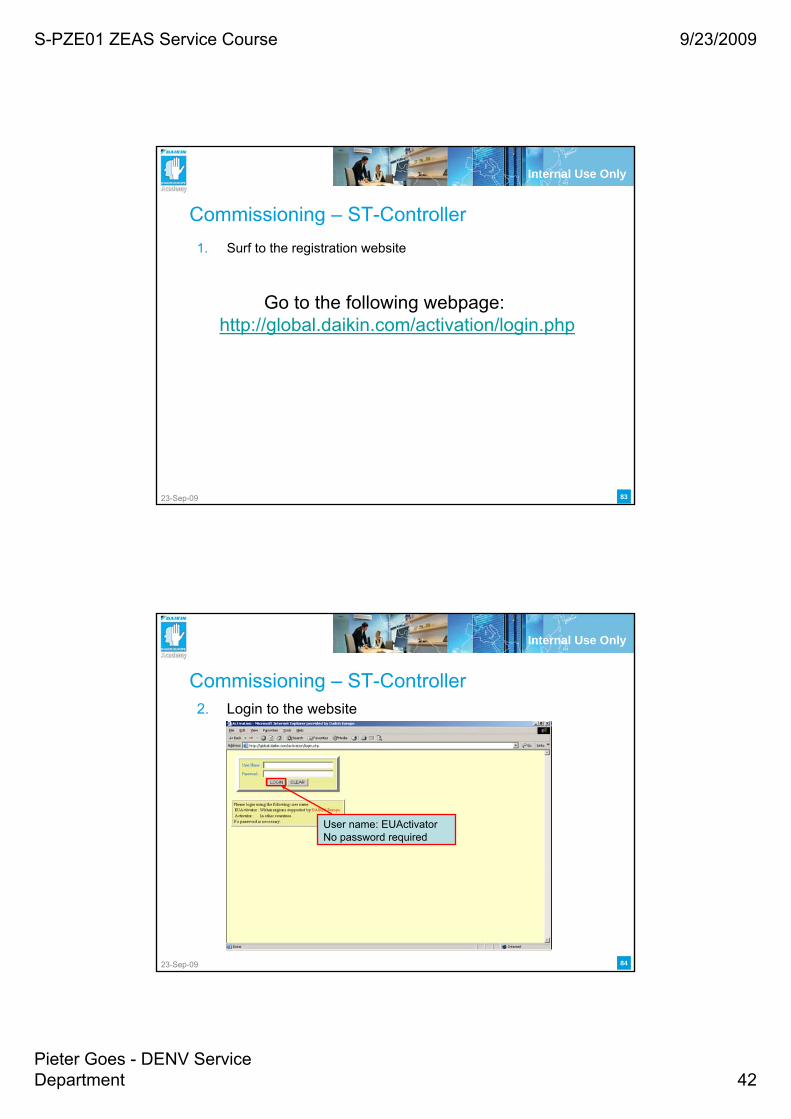
Go to the following webpage:http://global.daikin.com/activation/login.php
1. Surf to the registration website
8423-Sep-09
Internal Use Only
User name: EUActivatorNo password required
Commissioning – ST-Controller2. Login to the website

S-PZE01 ZEAS Service Course 9/23/2009
Pieter Goes - DENV Service Department 43
8523-Sep-09
Internal Use Only
There are three submenu’s:
Basic software: Choose this item when you want to get the activation key for the basic software (at startup of the controller)
Option software: Not used for ST-Controller
Reconfirm: Choose this item when you do not remember your activation key and you want tore-confirm it.
Commissioning – ST-Controller3. Choose “Basic Software”
8623-Sep-09
Internal Use Only
When choosing “basic software”you will be asked to fill in more information about the site.
This provides useful information to DIL for future improvements of the product.
Be sure to fill in your country correctly, because we might need this particular info in the database, for instance when an ESV has to be issued.
Commissioning – ST-Controller4. Fill in site information

S-PZE01 ZEAS Service Course 9/23/2009
Pieter Goes - DENV Service Department 44
8723-Sep-09
Internal Use Only
Confirm the information
Commissioning – ST-Controller5. Confirm the data
8823-Sep-09
Internal Use Only
Fill in all fields and press the “OK” button.
Fill in the following fields:
The MAC address: give in the MAC address (you can find it on a sticker on the back of the ST-Controller). Make sure you use capital letters and numbers and also fill in the dash “-” between every two letters or numbers. (e.g. 00-80-4F-81-00-9E)
The Software ID: give in the Software ID (you can find it on a sticker on the back of the ST-Controller and also on a piece of paper delivered with the controller). Be careful not to make input mistakes, e.g. difference between number 0 and capital letter O.
The Software Version: give in the software version.
No need to fill in
Commissioning – ST-Controller6. Fill in Mac Address, Software ID and Software Version

S-PZE01 ZEAS Service Course 9/23/2009
Pieter Goes - DENV Service Department 45
8923-Sep-09
Internal Use Only
Press the “OK”button
Commissioning – ST-Controller7. Re-confirm the key information
9023-Sep-09
Internal Use Only
1) Write down the Activation key and keep it in a safe place
2) Fill in the activation key in the License key input screen of your ST-Controller (go to settings system settings license key input)
3) Your ST-Controller is now activated
Commissioning – ST-Controller8. Fill in the Activation Key and make a copy of it on the License
Paper (that you get with the ST-Controller). Save this info!