logging safety: a field guide · by a chainsaw (110 dbas). ... • throttle trigger lockout ... do...
TRANSCRIPT
LOGGING SAFETY: A F IELD GUIDE
New York Fatality Assessmentand Control Evaluation ProgramNew York State Department of Health

Introduction
Logging has consistently been one of the most hazardous industries in the United States.
• 95 workers were fatally injured in the U.S. logging industry in 2006, resulting in a fatality rate of 85.6 deaths per 100,000 workers. The fatality rate for all occupations in the U.S. in 2006 was 4.0 deaths per 100,000 workers.
• 40 workers were killed in New York State while performing tree work, including logging, between 20022007.
• 17% of logging employee fatalities are machine related accidents.
• 40,000 logging injuries occurred in the U.S. in 2007. Total medical costs approached $300 million.
The information in this booklet reviews the key elements of logging hazards and the OSHA Logging Standard requirements and suggests some preventive measures that can help loggers and other tree workers to reduce injuries and work safely.
1
Table of Contents
SECTION ONE: Logging Personal Protective Equipment (PPE) . . . . . . . . . . . . 3SECTION TWO: Chain Saw Safety . . . . . . . . . . . . . . . . . . . . . . . . . . . . . . . . . . . . . 12SECTION THREE: Manual Felling . . . . . . . . . . . . . . . . . . . . . . . . . . . . . . . . . . . . . 19SECTION FOUR: Limbing and Bucking. . . . . . . . . . . . . . . . . . . . . . . . . . . . . . . . . 35SECTION FIVE: Skidding/Yarding . . . . . . . . . . . . . . . . . . . . . . . . . . . . . . . . . . . . . 45SECTION SIX: Loading and Transporting. . . . . . . . . . . . . . . . . . . . . . . . . . . . . . . 48SECTION SEVEN: Machines and Vehicles . . . . . . . . . . . . . . . . . . . . . . . . . . . . . . 52SECTION EIGHT: Chemicals. . . . . . . . . . . . . . . . . . . . . . . . . . . . . . . . . . . . . . . . . . . 64SECTION NINE: Signaling and Signal Equipment. . . . . . . . . . . . . . . . . . . . . . . 66SECTION TEN: First Aid and Emergencies . . . . . . . . . . . . . . . . . . . . . . . . . . . . . 67SECTION ELEVEN: Logging Safety Program. . . . . . . . . . . . . . . . . . . . . . . . . . . . 80APPENDIX: Glossary of Logging Terms. . . . . . . . . . . . . . . . . . . . . . . . . . . . . . . . 96Acknowledgments . . . . . . . . . . . . . . . . . . . . . . . . . . . . . . . . . . . . . . . . . . . . . . . . . 107
2
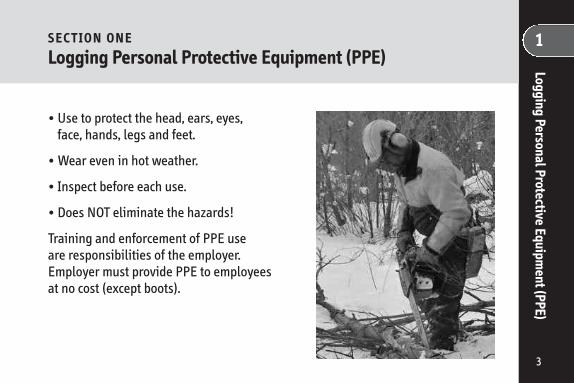
SECT ION ONE
Logging Personal Protective Equipment (PPE)
• Use to protect the head, ears, eyes, face, hands, legs and feet.
• Wear even in hot weather.
• Inspect before each use.
• Does NOT eliminate the hazards!
Training and enforcement of PPE use are responsibilities of the employer. Employer must provide PPE to employees at no cost (except boots).
Logging Personal Protective Equipment (PPE)
1
3

Logg
ing Pe
rson
al Protective Eq
uipm
ent (PP
E)
1
4
Head Protection
Many loggers are killed by being struck in the head by falling/flying objects (limbs, branches, etc.). Even the smallest piece of wood can be deadly.
• Hard hats must be worn!
• Hard hats are designed to absorb energy.
• Hard hats should be of a high visibility color.
• Head protection must be ANSI approved; look for the ANSI Z89.1 stamp.
Hearing Protection Noise Facts 1 • Time Weighted Average (TWA) represents the average noise level you are exposed to in an 8hour workday including all levels of noise experienced.
• Workplace exposure limits are expressed in units of dBA. Decibels are measured using an Aweighted scale for noise level, which adjusts noise measurements using a builtin Aweighted filter that largely ignores low frequency sound energy just as the human ears do.
• OSHA requires that all employers administer a hearing conservation program whenever worker noise exposures equal or exceed 8hour TWA of 85 dBA.
• Long or repeated exposure to sounds at or above 85 dBA can cause hearing loss. • Some hearing loss occurs naturally as you age. • Workrelated hearing loss and noiseinduced hearing loss from recreational activities may be irreversible.
• Hearing loss may impact your enjoyment of life. • Ears are not designed to deal with harmful loud noises, such as that produced by a chainsaw (110 dBAs).
• Hearing loss may be gradual, so it is not always obvious. • Noise may increase your blood pressure. 5
Logging Personal Protective Equipment (PPE)
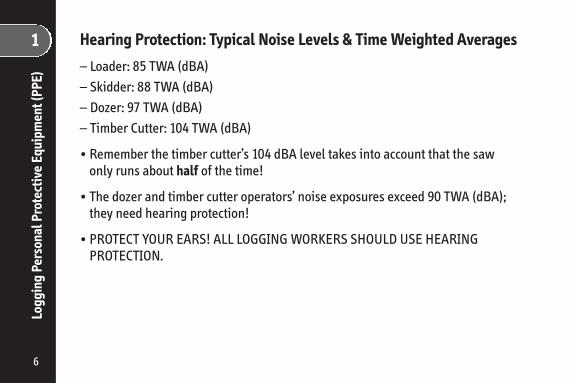
1 Hearing Protection: Typical Noise Levels & Time Weighted Averages
– Loader: 85 TWA (dBA) – Skidder: 88 TWA (dBA) – Dozer: 97 TWA (dBA) – Timber Cutter: 104 TWA (dBA)
• Remember the timber cutter’s 104 dBA level takes into account that the saw only runs about half of the time!
• The dozer and timber cutter operators’ noise exposures exceed 90 TWA (dBA); they need hearing protection!
• PROTECT YOUR EARS! ALL LOGGING WORKERS SHOULD USE HEARING PROTECTION.
Logg
ing Pe
rson
al Protective Eq
uipm
ent (PP
E)
6
1 Hearing Protection
• Whenever workers’ noise exposures equal or exceed an 8 hour TWA of 85dBA, hearing protection is required.
• Employers must make hearing protection available for all workers at no cost to the workers.
• Employees must wear hearing protection, such as ear muffs or ear plugs. Cotton balls are not acceptable protection.
• The hearing protection: – Must be capable of limiting exposure to less than 90 Decibels (dBA)for 8 hours (use NRR rating*).
– Must be used and cared for according to the manufacturer. – Must be kept clean so as to avoid infecting the ear.
*NRR is the Noise Reduction Rating listed on each hearing protection container.
Logging Personal Protective Equipment (PPE)
7
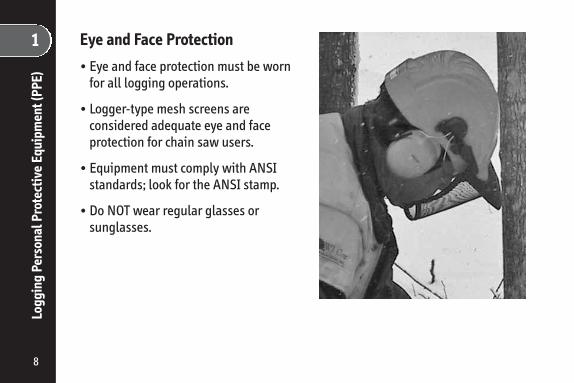
1 Eye and Face Protection
• Eye and face protection must be worn for all logging operations.
• Loggertype mesh screens are considered adequate eye and face protection for chain saw users.
• Equipment must comply with ANSI standards; look for the ANSI stamp.
• Do NOT wear regular glasses or sunglasses.
Logg
ing Pe
rson
al Protective Eq
uipm
ent (PP
E)
8
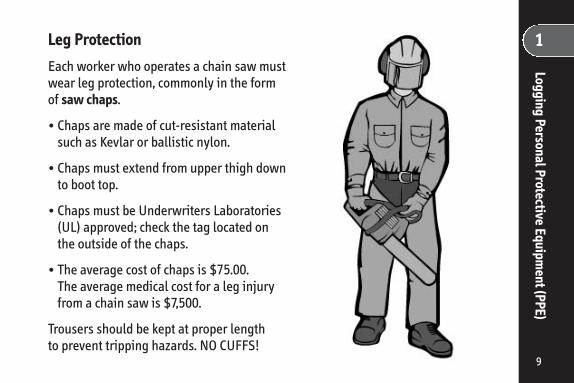
Leg Protection 1 Each worker who operates a chain saw must wear leg protection, commonly in the form of saw chaps.
• Chaps are made of cutresistant material such as Kevlar or ballistic nylon.
• Chaps must extend from upper thigh down to boot top.
• Chaps must be Underwriters Laboratories (UL) approved; check the tag located on the outside of the chaps.
• The average cost of chaps is $75.00. The average medical cost for a leg injury from a chain saw is $7,500.
Trousers should be kept at proper length to prevent tripping hazards. NO CUFFS!
9
Logging Personal Protective Equipment (PPE)
1 Foot and Hand Protection
• Employers must ensure that workers wear foot protection. – Boots should be heavy duty and waterrepellent. – Boots should cover and support the ankle. – Cutresistant boots are required by OSHA for chain saw operators. They must be UL approved.
• Employers must require and provide hand protection for all workers who are exposed to hand hazards.
– Gloves are required for all workers who handle wire rope. – Gloves for wire rope handling should be cotton or equivalent.
Logg
ing Pe
rson
al Protective Eq
uipm
ent (PP
E)
10
1 Torso/Upper Body Protection
• Clothing should be properly fitted. – No dangling shirt tails. – No cuffs. – No loose or fraying materials. – No bare skin; cover up even in hot weather.
Logging Personal Protective Equipment (PPE)
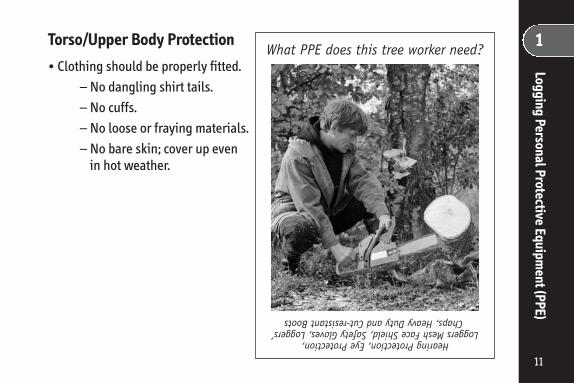
Hearing Protection, Eye Protection, Loggers Mesh Face Shield, Safety Gloves, Loggers’
Chaps, Heavy Duty and Cutresistant Boots What PPE does this tree worker need?
11
SECT ION TWO
Chain Saw Safety Ch
ain Sa
w Safety
2
12
• The chain saw is one of the most efficient, productive and dangerous portable power tools in any industry!
• Proper operation and maintenance will increase both safety and productivity!
• Chain saws must be in good condition and inspected before each shift.
• Chain saws must be secured when transporting in vehicle or equipment cab. Unsecured tools can be a hazard to the operator, especially if a rollover occurs.
Review the operator’s manual and follow the manufacturer’s instructions!
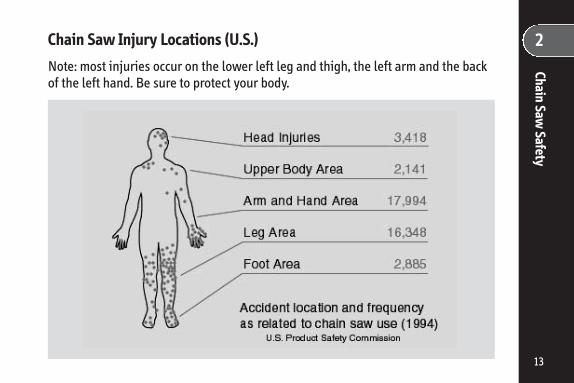
2 Chain Saw Injury Locations (U.S.) Chain Saw
Safety
13
Note: most injuries occur on the lower left leg and thigh, the left arm and the back of the left hand. Be sure to protect your body.
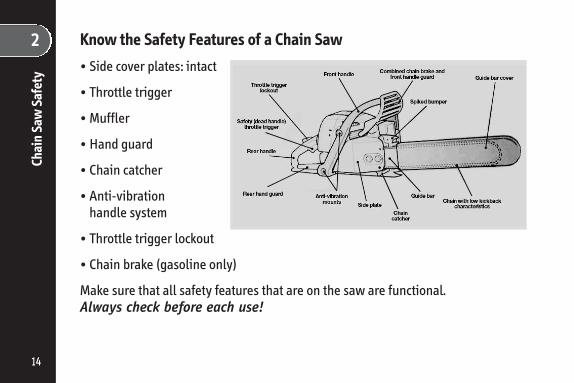
2 Know the Safety Features of a Chain Saw
• Side cover plates: intact
• Throttle trigger
• Muffler
• Hand guard
• Chain catcher
• Antivibrationhandle system
• Throttle trigger lockout
• Chain brake (gasoline only)
Make sure that all safety features that are on the saw are functional.Always check before each use!
Chain Sa
w Safety
14
2 Before Starting Your Chain Saw Always
• Check for properly sharpened chain.
• Check controls, chain tension, bolts, and handles.
• Adjust according to manufacturer’s instructions.
• Fuel at least 10 ft. from ignition sources.
• Start at least 10 ft. away from fuel.
• Start with chain brake on, while standing on level ground or firmly supported.
• Use approved metal or plastic fuel containers. Metal safety cans are the best choice.
Chain Saw Safety
15
2 While Running Your Chain Saw Always
• Keep hands on handles.
• Maintain secure footing.
• Eliminate cutting overhead.
• Keep your cutting area and your retreat path free of obstacles.
• Shut saw off or release throttle prior to retreating.
• Shut saw off or engage the chain brake if the terrain is hazardous or if you are traveling more than 50 ft.
Chain Sa
w Safety
16

2 Chain Saw Maintenance
• Read and study the operator’s manual.
• Follow manufacturer’s instructions.
• Inspect, operate, adjust, sharpen, maintain and repair regularly.
Chain Saw Safety
A sharp and well maintained saw increases production, decreases fatigue and helps prevent injury and accident.
17

■
■
■
■
■
■
■
■
■
■
■
2 Chain Saw Operation Checklist
■ Do you inspect your saw at the beginning of each shift?
■ Are the safety features of your chain saw working properly?
■ Is your saw adjusted and used according to the manufacturer?
■ Do you fuel your saw at least 10 feet from ignition sources?
■ Do you start your saw at least 10 feet from the fuel sources?
■ Do you start your saw with the chain brake on and firmly supported or on the ground?
■ Do you keep both hands on the saw and your footing secure?
■ Do you keep your cutting area and retreating path free of obstacles?
■ Do you avoid cutting overhead?
■ Do you shut off the saw release or throttle before you retreat?
■ Do you shut off the chain saw or engage the chain brake if the terrain is hazardous or if you are moving more than 50 feet?
Chain Sa
w Safety Ch
ecklist
18
SECT ION THREE
Manual Felling
The Cold Hard Facts
• More loggers are hurt and killed during felling than any other activity!
• Most who die at work are killed within 10 feet of the stump.
• These accidents can be avoided!
To Safely Fell Any Tree You Should…
• Use proper personal protective equipment (PPE).
• Identify potential hazards and ways to avoid or eliminate hazards.
• Determine the best felling direction.
Manual Felling
3
19
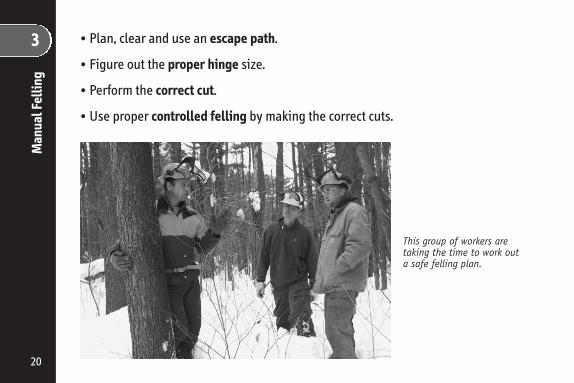
3 • Plan, clear and use an escape path.
• Figure out the proper hinge size.
• Perform the correct cut.
• Use proper controlled felling by making the correct cuts.
Man
ual F
ellin
g
This group of workers are taking the time to work out a safe felling plan.
20
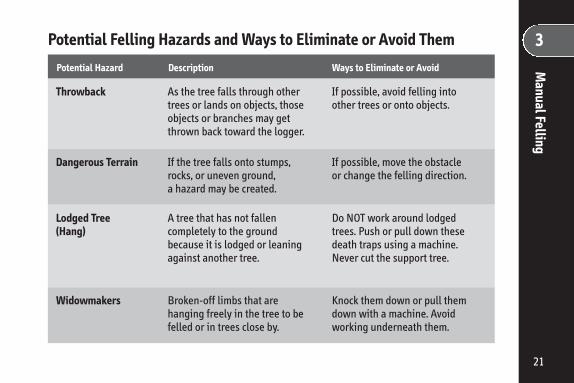
Potential Felling Hazards and Ways to Eliminate or Avoid Them
Potential Hazard Description Ways to Eliminate or Avoid
As the tree falls through other trees or lands on objects, those objects or branches may get thrown back toward the logger.
If possible, avoid felling into other trees or onto objects.
Throwback
If the tree falls onto stumps, rocks, or uneven ground, a hazard may be created.
If possible, move the obstacle or change the felling direction.
Dangerous Terrain
A tree that has not fallen completely to the ground because it is lodged or leaning against another tree.
Do NOT work around lodged trees. Push or pull down these death traps using a machine. Never cut the support tree.
Lodged Tree (Hang)
Brokenoff limbs that are hanging freely in the tree to be felled or in trees close by.
Knock them down or pull them down with a machine. Avoid working underneath them.
Widowmakers
Manual Felling
3
21
Man
ual F
ellin
g 3
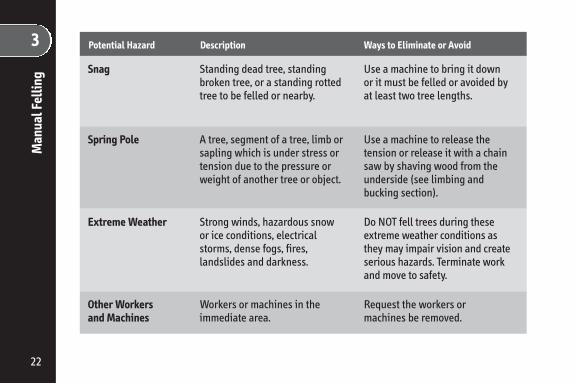
22
Standing dead tree, standing broken tree, or a standing rotted tree to be felled or nearby.
Use a machine to bring it down or it must be felled or avoided by at least two tree lengths.
Snag
A tree, segment of a tree, limb or sapling which is under stress or tension due to the pressure or weight of another tree or object.
Use a machine to release the tension or release it with a chain saw by shaving wood from the underside (see limbing and bucking section).
Spring Pole
Strong winds, hazardous snow or ice conditions, electrical storms, dense fogs, fires, landslides and darkness.
Do NOT fell trees during these extreme weather conditions as they may impair vision and create serious hazards. Terminate work and move to safety.
Extreme Weather
Workers or machines in the immediate area.
Request the workers or machines be removed.
Other Workers and Machines
Potential Hazard Description Ways to Eliminate or Avoid
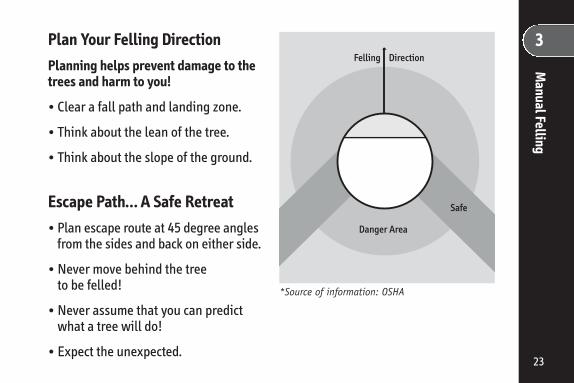
Plan Your Felling Direction
Planning helps prevent damage to the trees and harm to you!
• Clear a fall path and landing zone.
• Think about the lean of the tree.
• Think about the slope of the ground.
Escape Path… A Safe Retreat Safe
• Plan escape route at 45 degree angles Danger Area
from the sides and back on either side.
• Never move behind the tree to be felled! *Source of information: OSHA
• Never assume that you can predict what a tree will do!
• Expect the unexpected.
Felling Direction
Safe
Manual Felling
3
23

3 Use an Escape Path: How to Retreat
• Use the chain brake!
• Use a bore cut and a release cut to give you enough time to retreat.
• Don’t turn your back on a falling tree.
• Quickly walk at least 20 feet away.
• Try to position yourself behind a standing tree, if possible.
Man
ual F
ellin
g
24
3 Why a Felling Hinge?
• It provides controlled directional felling.
• It holds the tree to the stump during most of the tree’s fall.
• It guides the tree in the intended direction.
• It makes things more predictable!
Manual Felling
25
Man
ual F
ellin
g 3
26
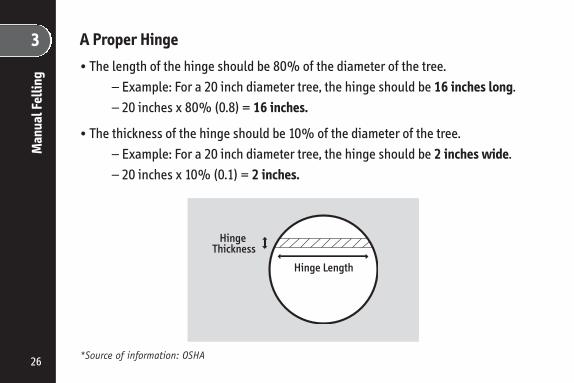
A Proper Hinge
• The length of the hinge should be 80% of the diameter of the tree. – Example: For a 20 inch diameter tree, the hinge should be 16 inches long. – 20 inches x 80% (0.8) = 16 inches.
• The thickness of the hinge should be 10% of the diameter of the tree. – Example: For a 20 inch diameter tree, the hinge should be 2 inches wide. – 20 inches x 10% (0.1) = 2 inches.
Hinge Length
Hinge Thickness
*Source of information: OSHA
Manual Felling
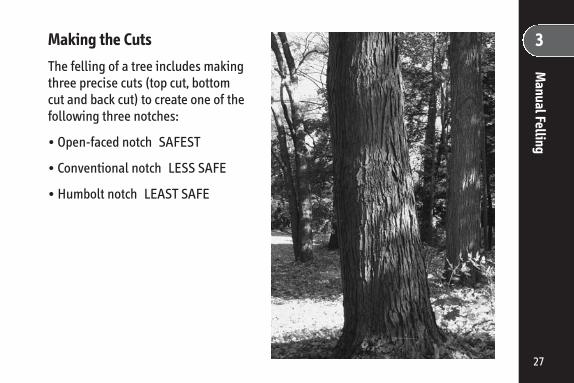
3Making the Cuts
The felling of a tree includes making three precise cuts (top cut, bottom cut and back cut) to create one of the following three notches:
• Openfaced notch SAFEST
• Conventional notch LESS SAFE
• Humbolt notch LEAST SAFE
27
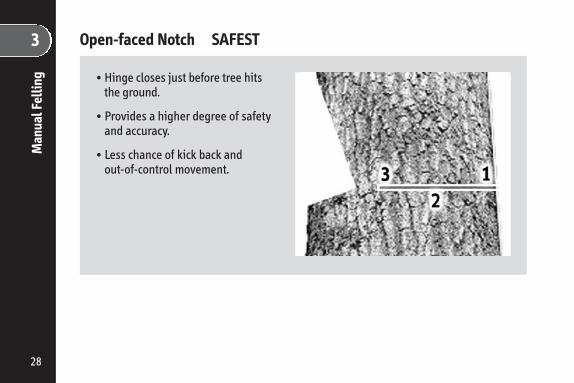
3 Openfaced Notch SAFEST Man
ual F
ellin
g • Hinge closes just before tree hits the ground.
• Provides a higher degree of safety and accuracy.
• Less chance of kick back and outofcontrol movement.
28
3
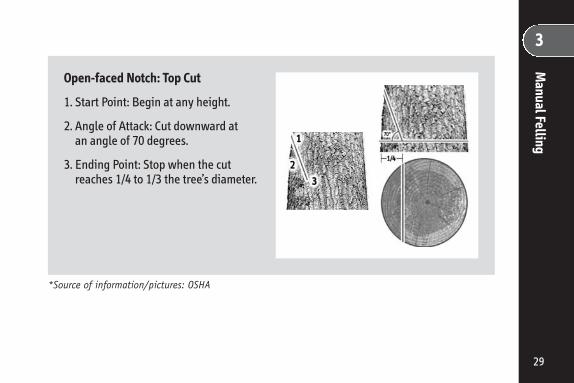
Openfaced Notch: Top Cut
1. Start Point: Begin at any height.
2. Angle of Attack: Cut downward at an angle of 70 degrees.
3. Ending Point: Stop when the cut reaches 1/4 to 1/3 the tree’s diameter.
Manual Felling
*Source of information/pictures: OSHA
29
3 Man
ual F
ellin
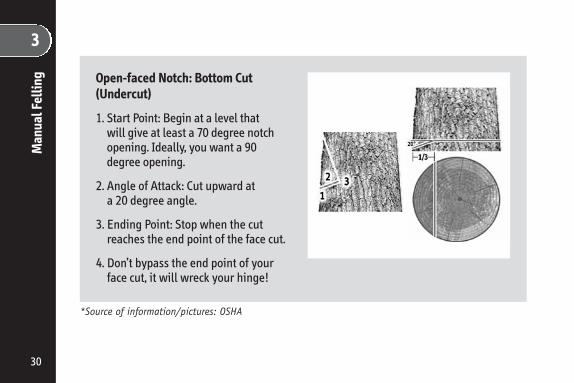
g Openfaced Notch: Bottom Cut(Undercut)
1. Start Point: Begin at a level that will give at least a 70 degree notch opening. Ideally, you want a 90 degree opening.
2. Angle of Attack: Cut upward at a 20 degree angle.
3. Ending Point: Stop when the cut reaches the end point of the face cut.
4. Don’t bypass the end point of your face cut, it will wreck your hinge!
*Source of information/pictures: OSHA
30

3
Openfaced Notch: Back Cut
1. Start Point: IMPORTANT Begin on the opposite side of the notch at the same level as the notched corner.
2. Angle of Attack: Cut flat along a horizontal plane.
3. Ending Point: VERY IMPORTANT Stop at a point that will leave a hinge width 1/10 of the tree’s diameter.
Manual Felling
*Source of information/pictures: OSHA
31
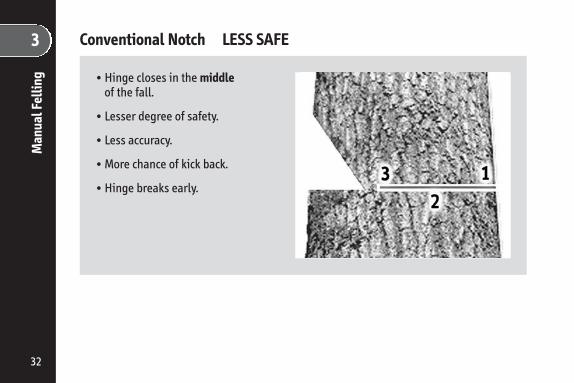
3 Conventional Notch LESS SAFE Man
ual F
ellin
g • Hinge closes in the middle of the fall.
• Lesser degree of safety.
• Less accuracy.
• More chance of kick back.
• Hinge breaks early.
32
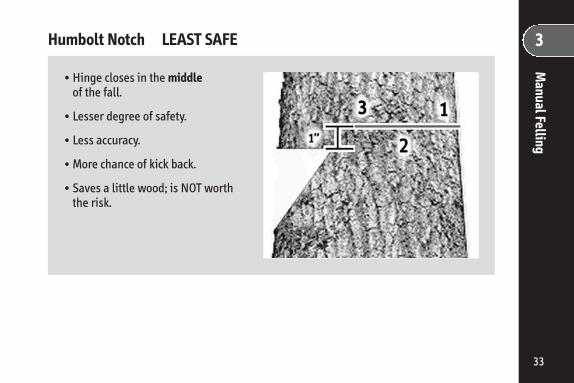
3 Humbolt Notch LEAST SAFE
• Hinge closes in the middle of the fall.
• Lesser degree of safety.
• Less accuracy.
• More chance of kick back.
• Saves a little wood; is NOT worth the risk.
Manual Felling
33
■
■
■
■
■
■
■
■
■
■
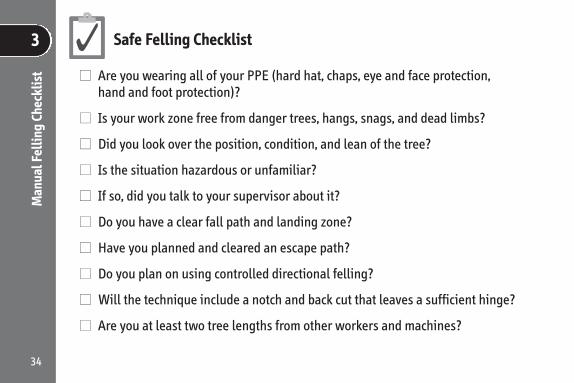
3 Safe Felling Checklist
■ Are you wearing all of your PPE (hard hat, chaps, eye and face protection, hand and foot protection)?
■ Is your work zone free from danger trees, hangs, snags, and dead limbs?
■ Did you look over the position, condition, and lean of the tree?
■ Is the situation hazardous or unfamiliar?
■ If so, did you talk to your supervisor about it?
■ Do you have a clear fall path and landing zone?
■ Have you planned and cleared an escape path?
■ Do you plan on using controlled directional felling?
■ Will the technique include a notch and back cut that leaves a sufficient hinge?
■ Are you at least two tree lengths from other workers and machines?
Man
ual F
ellin
g Ch
ecklist
34
SECT ION FOUR
Limbing and Bucking
Limbing is cutting branches off felled or standing trees. Bucking is sawing felled trees into sections called logs.
• Many loggers are hurt and sometimes killed during limbing and bucking operations.
• Never limb a tree just after felling; allow more time for overhead hazards to come down before limbing.
• Felled trees often have a great amount of stored energy in their limbs and stems.
• Loggers must release this energy in a controlled manner.
Limbing and Bucking
4
35
4 Limbing and Bucking
• Limb and buck on the uphill side of each tree or log, where rolling or sliding of logs may be expected.
• Chock or move logs to stable positions to prevent the logs or the butt from striking loggers.
• Do NOT cut above the level of your shoulder when limbing.
Limbing
and
Bucking
36
4 Before Limbing
Check for potential hazards:
• Look for overhead hazards such as hanging limbs and rolling trees.
• Check for spring poles.
• Look for butt movement forward (creates back pressure on limbs).
• Look for butt twist (creates sideways pressure on limbs).
• Check if the butt is off the ground (creates tension and compression on the tree stem).
Before Bucking
Check for potential hazards:
• Look for steep terrain and rolling trees (see below).
• Relieve tension for top bind and bottom bind.
Limbing and Bucking
37
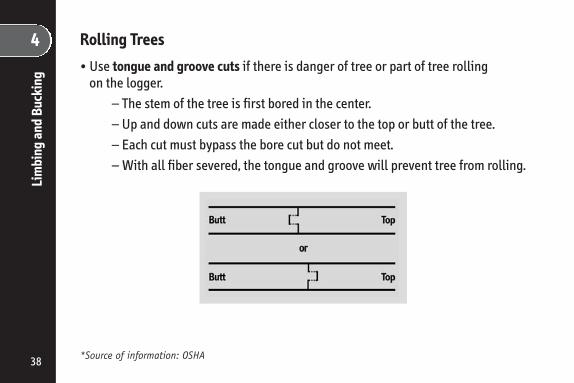
4 Rolling Trees
• Use tongue and groove cuts if there is danger of tree or part of tree rolling on the logger.
– The stem of the tree is first bored in the center. – Up and down cuts are made either closer to the top or butt of the tree. – Each cut must bypass the bore cut but do not meet. – With all fiber severed, the tongue and groove will prevent tree from rolling.
Limbing
and
Bucking
*Source of information: OSHA 38
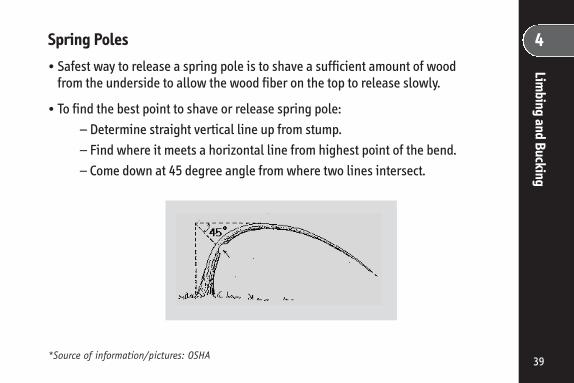
4 Spring Poles
• Safest way to release a spring pole is to shave a sufficient amount of wood from the underside to allow the wood fiber on the top to release slowly.
• To find the best point to shave or release spring pole: – Determine straight vertical line up from stump. – Find where it meets a horizontal line from highest point of the bend. – Come down at 45 degree angle from where two lines intersect.
Limbing and Bucking
*Source of information/pictures: OSHA 39
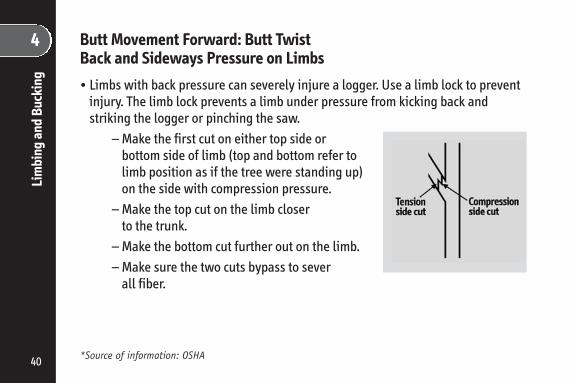
4 Butt Movement Forward: Butt Twist Back and Sideways Pressure on Limbs
• Limbs with back pressure can severely injure a logger. Use a limb lock to prevent injury. The limb lock prevents a limb under pressure from kicking back and striking the logger or pinching the saw.
– Make the first cut on either top side or bottom side of limb (top and bottom refer to limb position as if the tree were standing up) on the side with compression pressure.
– Make the top cut on the limb closerto the trunk.
– Make the bottom cut further out on the limb. – Make sure the two cuts bypass to severall fiber.
Limbing
and
Bucking
*Source of information: OSHA 40
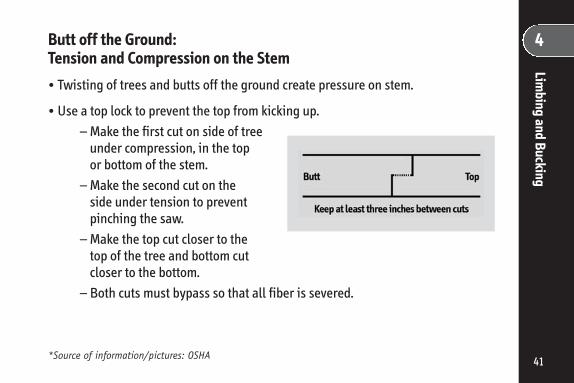
4 Butt off the Ground:Tension and Compression on the Stem
• Twisting of trees and butts off the ground create pressure on stem.
• Use a top lock to prevent the top from kicking up. – Make the first cut on side of tree under compression, in the topor bottom of the stem.
– Make the second cut on the side under tension to prevent pinching the saw.
Limbing and Bucking
– Make the top cut closer to the top of the tree and bottom cut closer to the bottom.
– Both cuts must bypass so that all fiber is severed.
*Source of information/pictures: OSHA 41
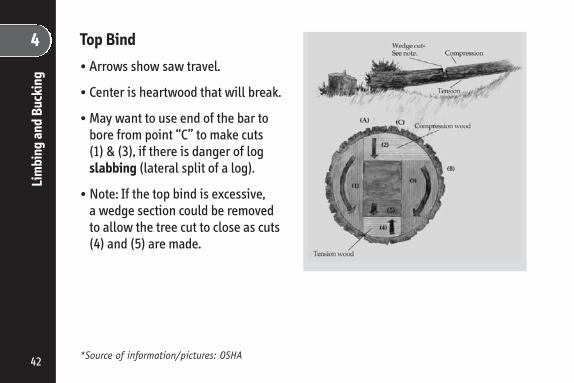
4 Top Bind
• Arrows show saw travel.
• Center is heartwood that will break.
• May want to use end of the bar to bore from point “C” to make cuts (1) & (3), if there is danger of log slabbing (lateral split of a log).
• Note: If the top bind is excessive, a wedge section could be removed to allow the tree cut to close as cuts (4) and (5) are made.
Limbing
and
Bucking
*Source of information/pictures: OSHA 42

Bottom Bind
• Cuts similar to top bind, except top and bottom cuts are reversed.
Limbing and Bucking
4
*Source of information/pictures: OSHA 43
■
■
■
■
■
■
■
4 Limbing and Bucking Checklist
■ Are there any overhead hazards?
■ Have any spring poles been created?
■ If so, will they be mechanically released or released by properly shaving wood from the underside?
■ Are you planning on limbing and bucking on the uphill side of the log?
■ Will the log move or roll?
■ If so, have you chocked the log or planned to use cuts such as the top lock or tongue and groove to control log movement?
■ If you are bucking a windthrown tree, have you chocked the root wad to prevent it from hitting you?
Limbing
and
Bucking
Che
cklis
t
44
SECT ION FIVE
Skidding/Yarding
• Next to felling, skidding is the most dangerous part of a logging operation.
• Getting the timber to the loading area safely requires good communication and safe work practices.
• Skidding hazards include: – Moving equipment – Moving and rolling logs – Cable releases – Cablerelated cuts and punctures – Rollovers
Skidding/Yarding5
45
5 Skidding Safety
• Hook and unhook chokers from the end of the log on the uphill side (unless log is securely chocked).
• Position yourself in clear view of equipment operators.
• Communicate clearly with the yarding machine operator to signal the movement of the line.
• Move the line only after receiving a clear signal (yarding machine operator)!
• Ensure winching is done within the stability limits of the machine.
• Place each yarded tree in a location that does not cause a hazard.
Skidding
/Yarding
46
■
■
■
■
■
■
■
5 Skidding/Yarding Checklist
■ Are chokers hooked and unhooked from end of the log on the uphill side?
■ Are workers on foot within clear view of the skidder operators?
■ Are operators waiting for the signal before moving the line?
■ Is winching being done within the stability limits of the machine?
■ Are cable handlers wearing gloves?
■ Are operators wearing seat belts?
■ Are yarded trees being placed in a location that does not cause a hazard?
Skidding/YardingChecklist
47
Load
ing an
d Tran
sportin
g 6
48
SECT ION SIX
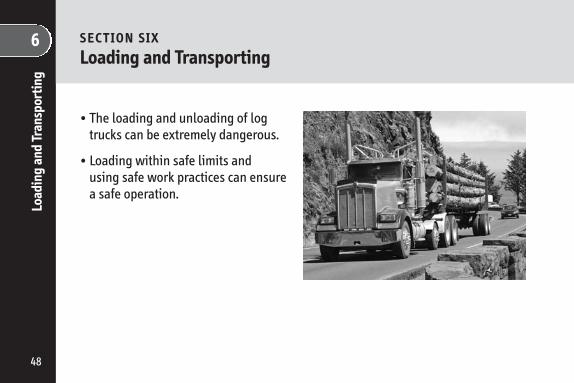
Loading and Transporting
• The loading and unloading of log trucks can be extremely dangerous.
• Loading within safe limits and using safe work practices can ensure a safe operation.
6 Loading and Transporting
• Only the machine operator and necessary workers are allowed in the loading area.
• Log truck drivers must be out of the cab if logs are moved over the cab (unless protected by reinforcement of the cab or other effective means).
• Each tie down must be left in place over the peak log until the unloading lines or stakes are put in place. Tie downs must be released only from the side on which the unloading machine operates.
• The logging truck must be positioned to provide working clearance between the truck and the deck.
• The load must be positioned to prevent slippage during handling and transport.
• The safest load is one in which the logs never go above the stanchions!
Loading and Transporting
49
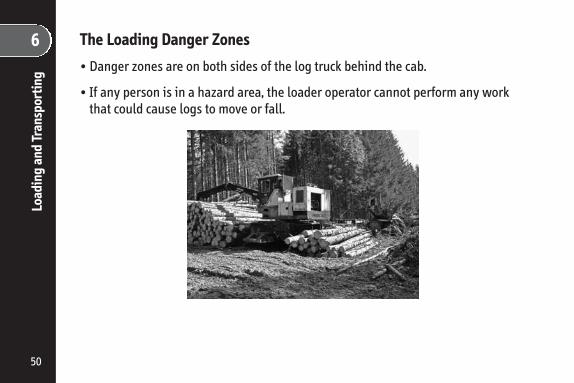
6 The Loading Danger Zones
• Danger zones are on both sides of the log truck behind the cab.
• If any person is in a hazard area, the loader operator cannot perform any work that could cause logs to move or fall.
Load
ing an
d Tran
sportin
g
50
■
■
■
■
■
■
■
■
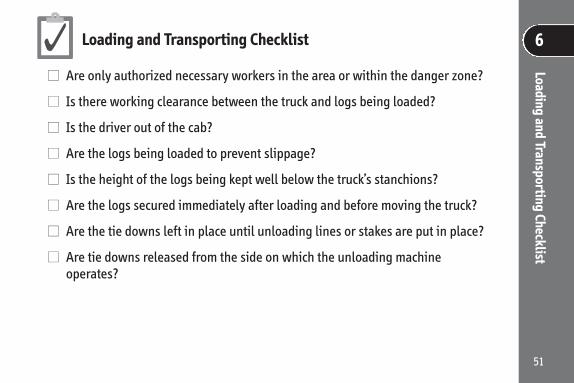
6 Loading and Transporting Checklist
■ Are only authorized necessary workers in the area or within the danger zone?
■ Is there working clearance between the truck and logs being loaded?
■ Is the driver out of the cab?
■ Are the logs being loaded to prevent slippage?
■ Is the height of the logs being kept well below the truck’s stanchions?
■ Are the logs secured immediately after loading and before moving the truck?
■ Are the tie downs left in place until unloading lines or stakes are put in place?
■ Are tie downs released from the side on which the unloading machine operates?
Loading and Transporting Checklist
51
SECT ION SEVEN
Machines and Vehicles Machine
s and
Veh
icles
7
52
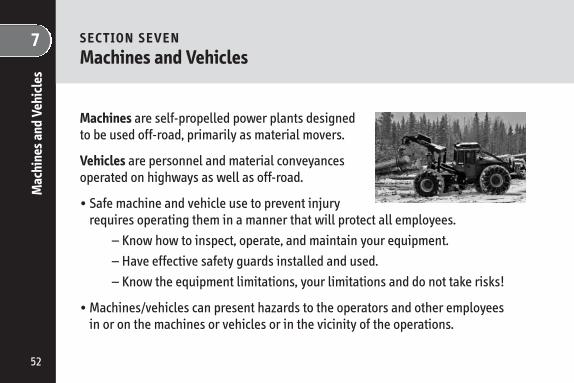
Machines are selfpropelled power plants designed to be used offroad, primarily as material movers.
Vehicles are personnel and material conveyances operated on highways as well as offroad.
• Safe machine and vehicle use to prevent injury requires operating them in a manner that will protect all employees.
– Know how to inspect, operate, and maintain your equipment. – Have effective safety guards installed and used. – Know the equipment limitations, your limitations and do not take risks!
• Machines/vehicles can present hazards to the operators and other employees in or on the machines or vehicles or in the vicinity of the operations.
7 General Safety for Machines/Vehicles
• Machines/vehicles must be maintained in serviceable condition and inspected at the beginning of each shift.
• If any defect or damage is found that would affect safe operation, the machines/vehicles MUST NOT BE USED.
• Operating and maintenance instructions should be in each machine/vehicle; operators and maintenance employees must comply with these.
• Machines must be started and operated by designated employees. The employer must assure that each vehicle operator has a valid operator's license for the class of vehicle being operated.
• Seats must be securely fastened and seat belts used by persons operating or riding in or on mobile machines or vehicles.
• Tools being transported must be secured by racks, boxes, holsters or other means so that a hazard is not created for any machine/vehicle operator or passenger.
Machines and Vehicles
53
7 • Machines and vehicles used to transport employees off public roads or on logging operations must meet applicable requirements.
• Operators of stationary machines with Rollover Protective Structure (ROPS), Falling Object Protective Structure (FOPS) or overhead guards must wear seat belts.
• Machines must have a portable fire extinguisher that is properly maintained and fully charged.
Machine
s and
Veh
icles
54
7 Inspections are Important • Perform inspections at the beginning of each shift.
• Report problems to your supervisor.
• Correct defects that affect safe operation immediately. Do NOT use the machine/vehicle if defects are not corrected.
Defective machines can kill!
What Should You Inspect? • Obtain the manufacturers’ prestart inspection lists.
• Keep a laminated copy on each machine/vehicle.
• Start at the same point each time and work your way around the machine/vehicle.
• Look for any defect which could affect the operation or safety.
• Report any problems to your supervisor.
• Correct the problem immediately or take the machine/vehicle out of service until the defect or damage is repaired.
Machines and Vehicles
55
7 Protective Controls for Operators
• Protective controls include cabs, rollover protective structures (ROPS), falling object protective structures (FOPS), overhead guards and operator restraint devices.
– The controls must meet applicable OSHA standards. – The controls must be used to protect workers from injuries and fatalities from rollovers and falling objects.
– The controls must provide maximum visibility. – The seat belts confine operators to the protective zone.
Seat Belts: Make It a Habit!
• Each year many operators are crushed and killed due to rollovers. Many of them were not wearing seat belts.
– Seat belts must be used by all persons operating or riding in or on machines and vehicles.
– Seat belts must be worn by operators of stationary machines with ROPS, FOPS or overhead guards.
– Seat belts must never be removed.
Machine
s and
Veh
icles
56
7 Visibility and Safety
Visibility and safety go handinhand!
• Keep all vehicle and machine glass clean and free from scratches.
• Replace any broken, missing or cracked glass.
• Install deflectors in the front of cabs to deflect whipping saplings and branches. Ensure that deflectors do not block visibility or access.
Fire Prevention
• Portable fire extinguishers must be installed in each machine or vehicle.
• Fire extinguishers must be the correct type for the hazards to be encountered.
• Fire extinguishers should be inspected at the beginning of each shift as part of the vehicle or machine inspection.
• Fire extinguishers must be properly maintained and fully charged.
Machines and Vehicles
57
7 Machine Operation
• Machines must be operated at a distance from other workers and equipment so that the operation will not create a hazard.
• Before leaving a machine, the operator must secure it by: – Placing transmission in park position. – Applying the parking brake or brake locks. – Placing each moving part (such as blades, buckets, saws and shears) to the ground and securing properly.
– Discharging any stored energy or pressure in moving pneumatic or hydraulic elements.
• The operator must follow the proper shut down procedure specified by the manufacturer.
Machine
s and
Veh
icles
58
7 Brake and Exhaust Systems
• Each machine must have: – Primary and secondary brakes that work properly. – Brakes that hold machine and its load under all conditions of use. – Parking brakes that continuously hold the stopped machine stationary.
• Exhaust pipes must be: – Effectively muffled with muffler in place at all times when machine is in operation.
– Located to direct exhaust away from the operator. – Guarded or mounted to protect operator from burns. – Equipped with spark arresters unless engine has turbochargers.
Machines and Vehicles
59
7 Getting In and Out
• Each machine or vehicle cab must have a second means of exit.
• Walking and working surfaces of each machine and machine work area must be slipresistant.
• Surfaces must be kept free of waste, debris or other material that could cause fire, slipping or falling.
Moving Parts and Flying Debris
• Factory guards must be kept in place at all times.
• Guards must protect worker from exposed moving elements such as gears, shafts, pulleys and belts.
• Machines for debarking, limbing and chipping must have guards in place to protect workers from flying wood chunks, logs, chips, bark, limbs and other debris.
Machine
s and
Veh
icles
60
7 Know Your Equipment Limitations
This may prevent mishaps.
• Follow manufacturer’s instructions for all machines and vehicles.
• Don’t take unnecessary risks by pushing your equipment to the limit.
• Learn the limitations of all machines and vehicles used. – Do NOT exceed the rated capacity of any vehicle transporting a machine. – Do NOT exceed the rated capacity of any machine to prevent rollovers and tipovers.
– Do not place undue shock loads on wire rope. – Do observe speed limits and adjust speeds with changes in weatherand road conditions.
– Do NOT exceed the stated capacity of pallets and trailers.
Machines and Vehicles
61
7 Stabilize Equipment
Poorly or partially stabilized equipment is dangerous. Workers have been killed when loading or unloading logging equipment that has been inadequately supported.
• Follow manufacturer’s instructions. – Anchor or otherwise stabilize stationary logging machines and their components to prevent movement during operation.
– Attach trailer equipment to the vehicle in such a way as to allow for full 90 degree turn and to prevent overturning of the towing vehicle.
– Follow load size and proper load handling guidelines.
• Weather and physical environment may also change equipment stability. – Use mud sills in bad/rainy weather as needed. – Do not operate on any slope greater than maximum slope allowed.
Machine
s and
Veh
icles
62
■
■
■
■
■
■
■
■
■
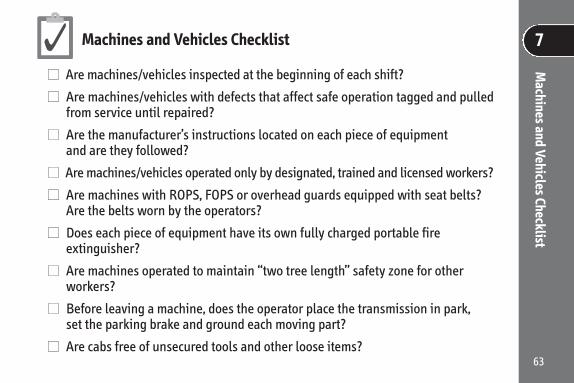
7 Machines and Vehicles Checklist
■ Are machines/vehicles inspected at the beginning of each shift?
■ Are machines/vehicles with defects that affect safe operation tagged and pulled from service until repaired?
■ Are the manufacturer’s instructions located on each piece of equipment and are they followed?
■ Aremachines/vehicles operated only by designated, trained and licensed workers?
■ Are machines with ROPS, FOPS or overhead guards equipped with seat belts? Are the belts worn by the operators?
■ Does each piece of equipment have its own fully charged portable fire extinguisher?
■ Are machines operated to maintain “two tree length” safety zone for other workers?
■ Before leaving a machine, does the operator place the transmission in park, set the parking brake and ground each moving part?
■ Are cabs free of unsecured tools and other loose items?
Machines and Vehicles Checklist
63
Chem
icals
8
64
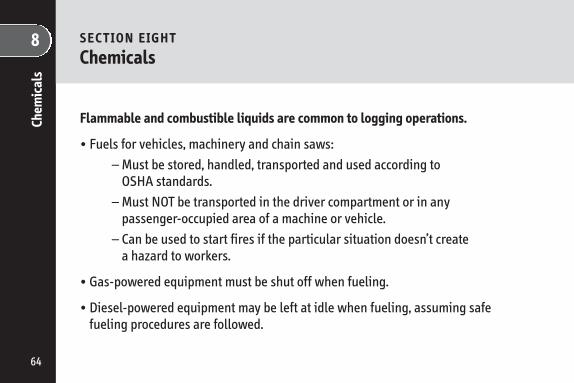
SECT ION EIGHT
Chemicals
Flammable and combustible liquids are common to logging operations.
• Fuels for vehicles, machinery and chain saws: – Must be stored, handled, transported and used according to OSHA standards.
– Must NOT be transported in the driver compartment or in any passengeroccupied area of a machine or vehicle.
– Can be used to start fires if the particular situation doesn’t create a hazard to workers.
• Gaspowered equipment must be shut off when fueling.
• Dieselpowered equipment may be left at idle when fueling, assuming safe fueling procedures are followed.
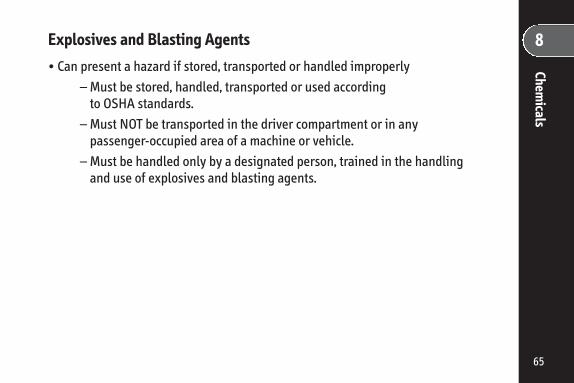
8 Explosives and Blasting Agents
• Can present a hazard if stored, transported or handled improperly – Must be stored, handled, transported or used accordingto OSHA standards.
– Must NOT be transported in the driver compartment or in anypassengeroccupied area of a machine or vehicle.
– Must be handled only by a designated person, trained in the handlingand use of explosives and blasting agents.
Chemicals
65

Sign
aling an
d Sign
al Equ
ipmen
t 9
66
SECT ION NINE
Signaling and Signal Equipment
• Hand or audible signals (such as whistles, horns, or radios) must be utilized whenever noise, distance or other factors prevent clear understanding of normal voice communication.
• The use of engine noise, such as from chain saws, CANNOT be used to maintain contact.
SECT ION TEN
First Aid and Emergencies
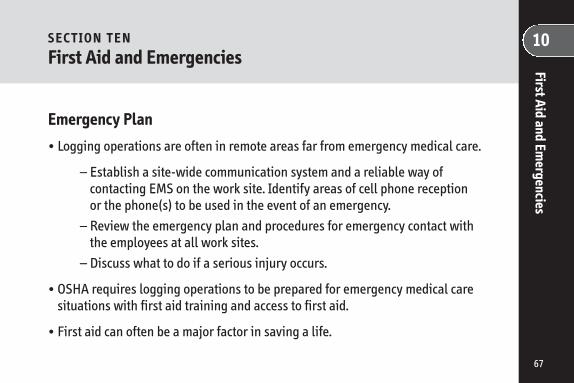
Emergency Plan
• Logging operations are often in remote areas far from emergency medical care.
– Establish a sitewide communication system and a reliable way of contacting EMS on the work site. Identify areas of cell phone reception or the phone(s) to be used in the event of an emergency.
– Review the emergency plan and procedures for emergency contact with the employees at all work sites.
– Discuss what to do if a serious injury occurs.
• OSHA requires logging operations to be prepared for emergency medical care situations with first aid training and access to first aid.
• First aid can often be a major factor in saving a life.
First Aid and Emergencies
10
67
10 First Aid First A
id and
Emerge
ncies • All employees, including supervisors, must be certified in First Aid and CPR.
• First aid kits are required at each work site where trees are being cut, at each active landing, and on each employee transport vehicle.
• The number of kits and content must reflect the degree of isolation, the number of employees, and the hazards anticipated.
• Persons responding to accidents may be exposed to bloodborne diseases. – Avoid potential exposure by not contacting the blood or other infectious material.
– Control the exposure if the blood or infectious material cannot be avoided entirely.
– Use PPE to prevent direct contact with blood, bodily fluids or other potentially infectious material.
• Workers should also be aware of first aid for insect bites, stings, tickborne diseases, and snake bites.
68
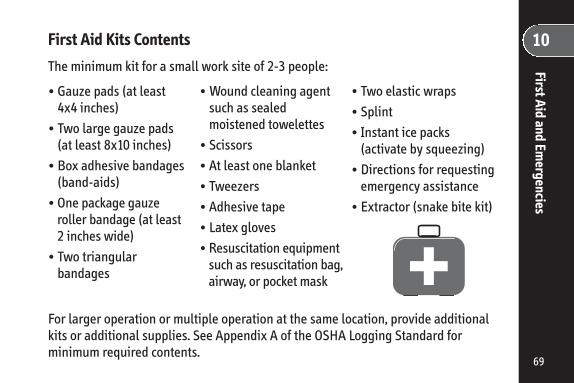
10 First Aid Kits Contents
The minimum kit for a small work site of 23 people:
• Gauze pads (at least 4x4 inches)
• Two large gauze pads (at least 8x10 inches)
• Box adhesive bandages (bandaids)
• One package gauze roller bandage (at least 2 inches wide)
• Two triangular bandages
• Wound cleaning agent such as sealed moistened towelettes
• Scissors • At least one blanket • Tweezers • Adhesive tape
• Latex gloves • Resuscitation equipment such as resuscitation bag, airway, or pocket mask
• Two elastic wraps • Splint • Instant ice packs (activate by squeezing)
• Directions for requesting emergency assistance
• Extractor (snake bite kit)
First Aid and Emergencies
For larger operation or multiple operation at the same location, provide additional kits or additional supplies. See Appendix A of the OSHA Logging Standard for minimum required contents.
69
10 First Aid Kits Should Be...
• Kept clean.
• Well stocked.
• Inspected often.
• Available when needed.
• Kept in a visible location.
• Located at each cutting site, landing, and in each worker transport vehicle.
First A
id and
Emerge
ncies
70
10 First Aid and CPR Training
First Aid and CPR training and certificates must remain current. The basic elements of First Aid and CPR training should include:
• The definition of first aid.
• Legal issues of applying first aid (Good Samaritan Laws).
• Basic anatomy.
• CPR.
• Application of dressings and slings.
• Treatment of strains, sprains and slings.
• Immobilization of injured persons.
• Handling and transporting injured persons.
• Treatment of bites, stings, or contact with poisonous plants or animals.
First Aid and Emergencies
71
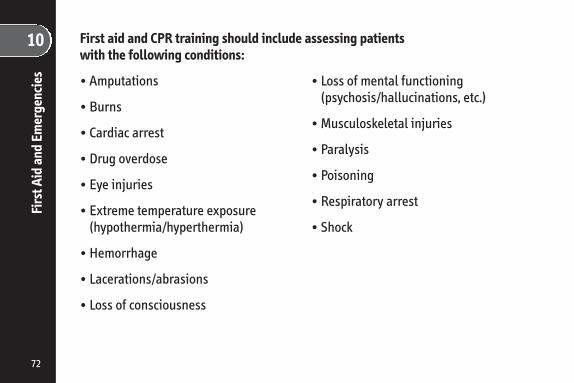
10 First aid and CPR training should include assessing patients First A
id and
Emerge
ncies
with the following conditions:
• Amputations
• Burns
• Cardiac arrest
• Drug overdose
• Eye injuries
• Extreme temperature exposure (hypothermia/hyperthermia)
• Hemorrhage
• Lacerations/abrasions
• Loss of consciousness
• Loss of mental functioning (psychosis/hallucinations, etc.)
• Musculoskeletal injuries
• Paralysis
• Poisoning
• Respiratory arrest
• Shock
72
10 Cardiopulmonary Resuscitation (CPR)
1. Time is of the essence. Follow the company emergency notification procedure to call 911.
2. Open airway with head tilt and chin lift.
3. Check for breathing (look, listen, feel). – If the victim is not breathing normally, provide 2 rescue breaths. (1 second each. Breaths should be normal, not deep breaths.)
– Be sure the chest rises with each breath. – If chest does NOT rise, reopen airway; try again.
4. Following TWO (2) rescue breaths, begin compressions.*
– Place heel of one hand on the breastbone in the center of the chestbetween the nipples.
– Place heel of second hand on top of the first so hands are overlappedand parallel (fingers are pointing in the same direction).
First Aid and Emergencies
*If you are unwilling or unable to give rescue breaths, begin chest compressions. 73
10 First A
id and
Emerge
ncies
– Compress lower half of breastbone (at nipple line) 1.5 to 2 inches. – Allow chest to recoil completely after compression. – Rate of about 100 times per minute. “Push hard and push fast.” – 30 compressions, then 2 rescue breaths (use normal 1 second breaths, not deep breaths).
– Check for response every 2 minutes OR after 5 cycles of compression and ventilation at a ratio of 30 compressions to 2 breaths.
– Continue until rescue personnel arrive.
74
10 Head Injuries
Lay victim down while keeping victim’s head and shoulders slightly raised.
For bleeding scalp:
1. Control bleeding with direct pressure. For suspected skull fracture, apply pressure to the outside edges of wound.
2. For shallow scalp wound, wash with soap and water. Flush with water under pressure.
For swelling and pain:
1. Apply an ice pack for 1520 minutes.
For motionless victim:
1. Check for breathing. Begin CPR if needed.
2. Place on left side to keep airway open, drain fluids, and prevent vomiting.
First Aid and Emergencies
75
10 Spine Injuries
If victim cannot: • feel pinching of fingers or toes. • wiggle fingers or toes. • squeeze your hand or push foot against your hand.
Follow these steps:1. Keep checking breathing. Begin CPR if needed.
2. Stabilize victim against any movement. Instruct victim not to move.
3. Call 911.
ALERT: DO NOT move victim unless endangered. Wait for trained EMS personnel with proper equipment.
First A
id and
Emerge
ncies
76

Bleeding 10 1. Cover entire wound with clean, dry cloth or sterile dressing.
2. Press against entire wound for 510 minutes. If bleeding does not slow or stop, press harder over a wider area. If bleeding is from an arm or leg, raise the limb above heart level unless the arm or leg is broken.
Eye Injuries
If an object is embedded in victim’s eye:
1. Do NOT remove object.
2. Protect eye to prevent object being driven deeper into the eye.
3. Seek medical attention immediately.
First Aid and Emergencies
77
10 Snake Bites
1. Get away from the snake.
2. Keep the victim quiet so venom will not spread as quickly.
3. Gently wash the bitten area with soap and water.
4. If you are more than a few hours from a medical facility with antivenin or if the the skin is swelling rapidly, immediately suction over the fang mark(s) with the Extractor for 30 minutes. Cutting the skin is not needed.
5. Seek medical attention immediately.
ALERT: DO NOT use the following methods for snake bites: cold or ice, cut and suck method, mouth suction, electric shock, or tourniquet.
First A
id and
Emerge
ncies
78
■
■
■
■
■
■
10 Emergency Response Checklist
■ Is there a sitewide communication system and a reliable way of contacting EMS on the work site?
■ If using a cell phone, have you identified areas of reception?
■ Has the workforce discussed what to do if a serious injury occurs?
■ Do all cutting sites, landings and worker transport vehicles have first aid kits?
■ Do all workers have current First Aid and CPR training completion certificates?
■ Have you considered purchasing smokeproducing locator flares to assist a LifeFlight in locating your site?
First Aid and Emergencies Checklist
79
Logg
ing Sa
fety Program
11
80
SECT ION ELEVEN
Logging Safety Program
The success of any safety program hinges on:
• Clearly stated company policies and work rules (written program is best).
• Regularly scheduled and informative safety training and meetings.
• Thorough selfauditing program.
• Strictly enforced discipline policy for those who break the rules.
• Involvement, assistance and cooperation of all employees, both management and workers.
11 Who is Responsible for Safety?
• You are! Everyone must take the obligation seriously.
• Unsafe work practices should not be tolerated.
• Unsafe conditions should not be tolerated.
• Production should never be more important than safety!
Logging Safety Program
81
11 As an Owner You Should:
• Implement the company safety program.
• Monitor and require compliance with the company safety program, work rules and OSHA.
• Foster a work environment where safety is the priority.
• Provide employees with adequate training necessary to maintain a safe work site.
• Provide the required PPE.
• Make sure that purchased supplies and equipment comply with safety standards.
• Make sure that employeeowned equipment complies with OSHA and company policies.
• Maintain employee records.
Logg
ing Sa
fety Program
82
11 As a Supervisor You Should:
• Monitor and require compliance with company safety program, work rules, and OSHA.
• Make sure safety equipment is available and used!
• Conduct jobsite inspections, safety meetings, and training.
• Supervise the workers!
• Correct hazards and unsafe practices.
• Obtain immediate medical attention for workers who are injured.
Logging Safety Program
83

11 As a Worker You Should:
• Comply with the company safety program and work rules.
• Actively participate in safety training.
• Ask for assistance and supervision as needed.
• Use and maintain all equipment in accordance with the safety program, work rules and OSHA standards.
• Use and maintain your PPE.
• Report all unsafe acts, practices, conditions, near misses and injuries.
• Correct unsafe acts, practices or conditions within your immediate work area.
Logg
ing Sa
fety Program
84
11 Management Should Provide Each Employee With:
• Access to the company Health and Safety Program.
• A copy of company work rules.
• Access to the OSHA Logging Standard.
• A specific job description of the tasks expected to be performed.
• Standard operating procedures (SOPs), detailing proper techniques for safely performing the tasks.
• Detailed instructions on proper use and maintenance of PPE.
• Training for hazard identification and corresponding safety standards and work rules.
• On the job training that includes mastery demonstration of safety skills and technical competence.
Logging Safety Program
85
11 Logging Safety Training
• Training should be provided: – To each new hire prior to starting work. – Whenever a worker is assigned a new work task, tools or equipment. – Whenever there is a change in work procedure. – Whenever a worker demonstrates unsafe work practices or job performance.
– Whenever there is a nearmiss or accident.
• Workers who need training must work under close supervision of a designated person until they demonstrate that they can safely perform their duties.
Logg
ing Sa
fety Program
86
11 Logging Safety Training Should Include: • Hazard identification, prevention and control.
• Personal protective equipment.
• Safe felling techniques and chain saw operation.
• Safe procedures for handling dead trees/widowmakers/snags/lodged trees.
• Safe machine/skidder operation.
• Safe use and maintenance of tools, machines and vehicles.
• Emergency communication and evacuation.
• Chemical handling
• Signaling and signal equipment
• First aid and CPR.
• Company and site safety requirements and programs.
• OSHA standards including logging, bloodborne pathogens, personal protective equipment, hearing conservation, lockout/tagout, and hazard communication.
Logging Safety Program
87
11 Training Records
• Written training certification must be maintained for each employee.
• Records must indicate course, date, signature of employer/trainer, and the names of employees trained.
• If accepting an employee’s training from a previous employer or provider (for example, First Aid or CPR training), the employer must verify the content, the documentation with signature of the trainer or the employer, and date(s) of prior training. Per OSHA, the certification record must indicate the date that the new employer determined the prior training was adequate. Lo
gging Sa
fety Program
88
11 Safety Meetings
The owner or supervisor should hold regular safety meetings.
• Schedule daily, as a best practice.
• Require all employees to attend.
• Document with signin sheet.
• Conduct individually, in crews, or in larger groups.
• Review and discuss the most recent site safety inspection results. (See next page).
• Review and discuss the most recent accidents and near misses.
• Present other selected topics for discussion.
• Seek worker input, ideas, concerns, and suggestions.
• Maintain meeting minutes for records.
• Distribute at the next meeting.
Logging Safety Program
89
11 Site Safety Inspections
• Conduct inspections of logging operations frequently and regularly: – Perform at least weekly (daily is better). – Audit by owner/supervisor with employee involvement. – Develop written inspection check list to identify hazards/problems. Include:
■ Work site review ■ PPE review ■ Review of skill/technique of each worker (observation and feedback) ■ Equipment (machine and vehicle) review ■ Discuss results with workers at next safety meeting
• Ensure compliance with OSHA safety standards, company safety policies, and company work rules.
• Maintain records of each onsite inspection.
Logg
ing Sa
fety Program
90
11 Investigating Accidents and Near Misses
• All accidents and near misses must be reported immediately to the owner or supervisor.
– This includes all events that result in personal injury or property damage.
• The owner/supervisor/worker should conduct an onsite investigation of each accident and near miss to determine the root cause(s).
– There is something to be learned from each incident.
• A written accident investigation form should be prepared and used, with pictures where possible.
• Investigation results should be posted where employees may observe and comment.
• Reports should be discussed at the next safety meeting.
Logging Safety Program
91
■
■
■
■
■
■
■
■
11 Logger Safety Checklist
■ Do you have and use your hard hat, chaps, eye and face protection, hearing protection, foot protection and gloves?
■ Have you been trained on how to identify and control the hazards associated with your job?
■ Have you been trained on work procedures, company and site requirements as well as safe procedures for performing assigned tasks?
■ Are you familiar with the OSHA logging standard?
■ Do you have current First Aid and CPR training certificates?
■ Do you attend and participate in company safety meetings, site safety inspections, and accident investigations?
■ Do you comply with all company rules?
■ Are you receptive to onthejob safety counseling from a supervisor and coworkers?
Logg
ing
Safe
ty P
rogr
am C
heck
list
92
■
■
■
■
11 ■ Do you talk to your supervisor about unusual, unfamiliar and particularly unsafe situations before attempting to deal with them?
■ Do you report all unsafe acts, practices or conditions to your supervisor?
■ Do you correct unsafe acts, practices or conditions within your immediate area?
■ Do you realize that risktaking will eventually catch up to you?
Logging Safety Program Checklist
93
■
■
■
■
■
■
■
■
■
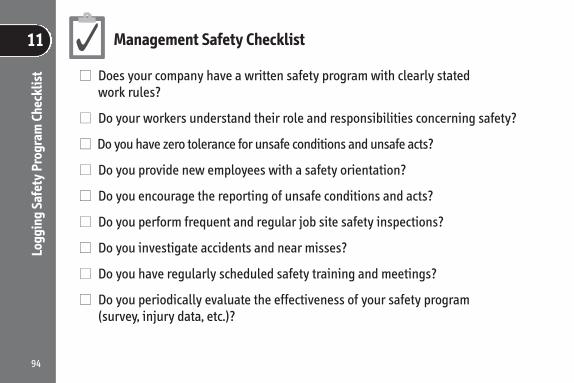
11 Management Safety Checklist
■ Does your company have a written safety program with clearly stated work rules?
■ Do your workers understand their role and responsibilities concerning safety?
■ Do you have zero tolerance for unsafe conditions and unsafe acts?
■ Do you provide new employees with a safety orientation?
■ Do you encourage the reporting of unsafe conditions and acts?
■ Do you perform frequent and regular job site safety inspections?
■ Do you investigate accidents and near misses?
■ Do you have regularly scheduled safety training and meetings?
■ Do you periodically evaluate the effectiveness of your safety program (survey, injury data, etc.)?
Logg
ing Sa
fety Program
Che
cklis
t
94
■
■
■
■
■
■
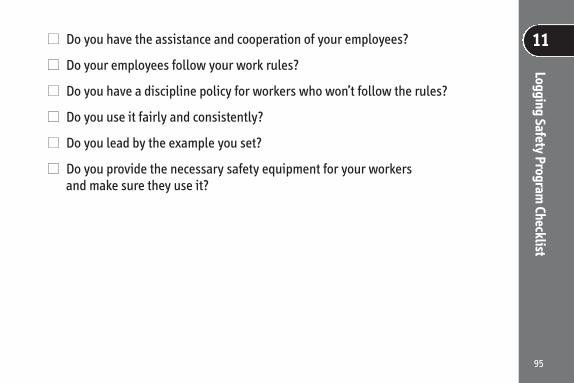
11 ■ Do you have the assistance and cooperation of your employees?
■ Do your employees follow your work rules?
■ Do you have a discipline policy for workers who won’t follow the rules?
■ Do you use it fairly and consistently?
■ Do you lead by the example you set?
■ Do you provide the necessary safety equipment for your workers and make sure they use it?
Logging Safety Program Checklist
95

Appe
ndix
A
96
APPEND IX
Glossary of Logging Terms
Approved: Approved by the appropriate authority or testing laboratory.
Backcut (Felling Cut): The last of the three cuts required to fell a tree. Located on the opposite side of the tree from the face. The backcut must NEVER be continued to a point at which no holding wood remains.
Ballistic Nylon: A nylon fabric of high tensile properties designed to provide protection from lacerations.
Blade: The long, thin projection of the chain saw upon which the cutting chain travels; a moving part. Improper use of the blade results in kickbacks and saw cuts.
Base of Tree: That portion of a natural tree not more than 3 ft. above ground level.
Bind: Series of pressures in a felled tree resulting from objects (terrain, stumps, windfalls, etc.) which prevent the tree from lying flat on the ground. The two major
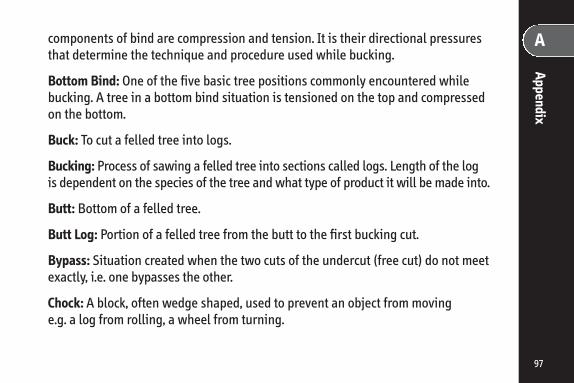
components of bind are compression and tension. It is their directional pressures A that determine the technique and procedure used while bucking.
Bottom Bind: One of the five basic tree positions commonly encountered whilebucking. A tree in a bottom bind situation is tensioned on the top and compressedon the bottom.
Buck: To cut a felled tree into logs.
Bucking: Process of sawing a felled tree into sections called logs. Length of the logis dependent on the species of the tree and what type of product it will be made into.
Butt: Bottom of a felled tree.
Butt Log: Portion of a felled tree from the butt to the first bucking cut.
Bypass: Situation created when the two cuts of the undercut (free cut) do not meetexactly, i.e. one bypasses the other.
Chock: A block, often wedge shaped, used to prevent an object from movinge.g. a log from rolling, a wheel from turning.
Appendix
97
Appe
ndix
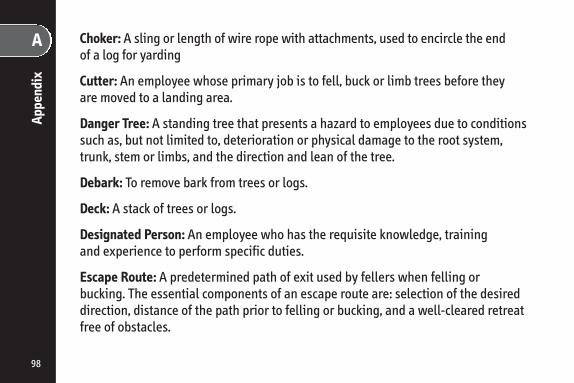
A Choker: A sling or length of wire rope with attachments, used to encircle the end
of a log for yarding
Cutter: An employee whose primary job is to fell, buck or limb trees before they are moved to a landing area.
Danger Tree: A standing tree that presents a hazard to employees due to conditions such as, but not limited to, deterioration or physical damage to the root system, trunk, stem or limbs, and the direction and lean of the tree.
Debark: To remove bark from trees or logs.
Deck: A stack of trees or logs.
Designated Person: An employee who has the requisite knowledge, training and experience to perform specific duties.
Escape Route: A predetermined path of exit used by fellers when felling or bucking. The essential components of an escape route are: selection of the desired direction, distance of the path prior to felling or bucking, and a wellcleared retreat free of obstacles.
98
Extreme Weather Conditions include: • strong winds in the timber area, where wind velocity reaches sufficient force to blow limbs from standing trees or prevent cutters from felling trees in the desired direction.
• impaired vision, where conditions such as falling snow, sleet, mist, dense fog, rain, dust or darkness impair visibility to the extent that employees cannot clearly see signals, moving vehicles, equipment and lines, falling trees or other hazards.
• hazardous snow or ice conditions which prevent escape from hazards such as falling trees, moving logs, vehicles or lighting.
• electrical storms, extreme cold, fires and mudslides.
Fell: To cut down trees.
F.O.P.S.: Falling object protective structure.
AAppendix
99
Appe
ndix
A Guarded: Covered, shielded, fenced, enclosed or otherwise protected by means
of location, suitable enclosures, covers, casings, shields, troughs, railings, screens, mats, platforms, to prevent injury.
Hangs: Situation in which a tree is lodged in another and prevented from falling to the ground. This results from a number of causes such as improper faceboring and/or back cutting and the wind. Can be very dangerous.
Hazardous Falling Area: The area within a circle centered on the tree being felled and having a radius not less than twice the height of that tree.
Humboldt Notch: One of the three types of notches commonly used to fell a tree (least safe).
Hung/Lodged Tree: See Hangs
In the Clear: A position within the work area where the probability of hazardous contact with falling trees, moving logs, root wads, chunks, material, rigging and equipment is minimized by distance from the hazards and/or use of physical barriers, such as stumps, trees, terrain, or other objects providing protection.
100

Kickback: A strong thrust of the saw back toward the feller generally resulting A from improper use of the nose of the blade or from pinching of the blade in a cut. Kickback causes loss of control of the saw and this in turn results in numerous saw cut injuries each year. Kickback also refers to a tree jumping back over the stump toward the feller. This kind of kickback generally results from a tree being felled into standing timber.
Landing: Any place where logs are laid after being yarded and before transport to the work site.
Lean: Directional tilt of a tree away from its vertical position. Many times two lean forces may be in play in the same tree. The lean of a tree can be easily established with the use of a plumb bob or axe handle.
Leg Protector: Ballistic nylon pad attached to one or both pant legs to protect the leg from contact with the saw chain. It can be attached to either the inside or outside of the pant leg.
Limb Lock: A series of cuts made on limbs to release back or side pressure and create a step in the limb that will prevent the limb from either kicking back and striking the logger or from pinching the saw.
Appendix
101
Appe
ndix
A Limbing: To cut branches off felled trees.
Lodged Tree (Hang): A tree leaning against another tree or object which prevents it from falling to the ground.
Log: A segment sawed or split from a felled tree.
Logging Machine: Amachine used or intended for use to yard, move or handle logs, trees, chunks, trailers, and related materials or equipment. This includes selfloading log trucks only during the loading and unloading process.
Logging Operations: Operations associated with felling and moving trees and logs from the stump to the point of delivery, such as the marking of danger trees and trees/logs to be cut to length, felling, limbing, bucking, debarking, chipping, yarding, loading, unloading, storing and transporting of machines, equipment and personnel to, from and between logging sites.
Machine: A piece of stationary or mobile equipment having a selfcontained power plant that is operated offroad and used for the movement of material. Machines include tractors, skidders, frontend loaders, scrapers, graders, bulldozers, log stackers, log loaders, and mechanical felling devices.
102
Must: Following the language in OSHA Logging Standard 29CFR 1910.266, A “must” is the same as “shall” and is mandatory.
Rated Capacity: The maximum load a system, vehicle, machine or piece of equipment was designed by the manufacturer to handle.
Rootwad: The ball of a tree root and dirt that is pulled from the ground when a tree is uprooted.
R.O.P.S.: Roll over protection structure.
Serviceable Condition: A state or ability of a machine, vehicle, tool or other device to operate as it was intended by the the manufacturer to operate.
Skidder: A machine used to move logs or trees to landing.
Skidding: The movement of trees or logs by pulling or towing them across theground from the place they are felled to a landing.
Slabbing: A lateral split of a log, generally a result of improper technique and/or sequence of bucking cuts.
Appendix
103
Appe
ndix
A Slope (Grade): The increase or decrease in altitude over a horizontal distance
expressed as a percentage; for example, a change of altitude of 20 feet over a horizontal distance of 100 feet is expressed as a 20% slope or grade.
Snag: A dead or dying tree that is still standing or any portion thereof. Snags must be felled prior to beginning work on an area. Special procedures must be observed when felling snags.
Spring Pole: A tree, segment of a tree, limb, or sapling that is under stress or tension due to the pressure or weight of another object.
Throw Back: Portions of trees or limbs propelled back toward the timber feller by the action of a tree falling through other standing trees.
Tie Down: Chain, cable, steel strips or fiber webbing and binders attached to a truck, trailer, or other conveyance as a means to secure loads and to prevent them from shifting or moving when they are being transported.
Tongue and Groove: Bucking technique used to hold logs in place after bucking cuts are made. Used where trees can slide or roll after bucking.
104
Top Bind: One of the five basic tree positions commonly encountered while A bucking. A tree in a top bind situation is compressed on top and tensioned on the bottom.
Top Lock: Limbing technique used to cut off the tops of felled trees whose stem is under stress. Two offset and bypassing cuts are made in the stem near the top of the tree. The first cut is made on the side of the tree that is under compression. The second cut is offset from the first and made on the side of the tree that is under tension.
Vehicle: A car, bus, truck, trailer or semitrailer owned, leased or rented by the employer that is used for transportation of employees or movement of material.
Wedge: A section sawn from a tree during the bucking sequence to allow for the directional pressures of various bind situations. Splits, slabs, and excessive woodpulling are minimized when a wedge is sawn.
Widow Maker: Any loose overhead debris such as limbs or tree tops that may fall or be thrown from a tree toward the feller at any time. Widow makers are extremely dangerous and present the feller with a continued source of danger.
Appendix
105
A Winching: The winding of cable or rope onto a spool or drum.
Yarding: The movement of logs from the place they are felled to a landing.
Appe
ndix
106
Acknowledgements
• New York State Fatality Assessment and Control Evaluation (NYFACE) administered by the New York State Department of Health is a research program designed to identify and study fatal occupational injuries. The program is partially funded by NIOSH under: U60 OH008474. www.health.state.ny.us/environmental/investigations/face/ (800) 4581158 ext. 27900 or (518) 4027900
• “Logging Safety: A Field Guide” was based on “Logger’s Safety Field Guide” that was originally developed by Wayne Lundstrom and Jim Helmkamp, Safety and Health Extension of West Virginia University, West Virginia Fatality Assessment and Control Evaluation Program (WVFACE).
• Certified Game of Logging trainer Bill Lindloff.
• U.S. Dept. of Labor, OSHA Logging Tool http://www.osha.gov/SLTC/etools/logging/mainpage.html
Acknowledgem
ents
107

Notes
108
Notes

State of New YorkDepartment of Health
3132 9/09