chapter 5: ligation
TRANSCRIPT
Ligation1
Cloning and Sequencing Explorer Series
CHAPTER 5: LIGATION
Background
Cloning Vectors
Once a gene or part of a gene has been amplified using PCR, the next step in cloning is to insert the DNA into a plasmid or cloning vector so that the fragment can be propagated. In infectious disease, a vector is defined as an organism that transmits an infectious agent from one host to another. In molecular biology, the definition is similar. A vector is an agent (such as a bacteriophage or plasmid) that is used to transfer genetic material into a cell.
Many cloning vectors are derived from bacterial plasmids. Plasmids are extrachromosomal DNA, usually circular DNA molecules 2,000–100,000 base pairs (bp) long, although most plasmids used in cloning are 2,000–10,000 bp. Bacteria may naturally contain many copies of a single plasmid, or single copies of others. Plasmids are able to replicate independently of the host DNA and most plasmids carry at least one gene. Frequently these genes code for a factor or function that helps the bacteria survive. For example, resistance to the antibiotic ampicillin is conveyed by a plasmid carrying an ampicillin-resistance gene. Plasmids are capable of being transferred from one bacterium to another. These characteristics have resulted both in wonderful new uses for plasmids (such as their use in cloning, making many of the techniques of molecular biology possible) and in the emergence of dangerous pathogenic organisms (namely, bacteria resistant to multiple antibiotics).
Plasmids, thus, already have many of the characteristics needed for use as cloning vectors, and other useful features have been added through genetic engineering. A wide variety of vectors are commercially available for various applications. A plasmid designed to clone a gene is different from a plasmid designed to express a cDNA in a mammalian cell line, which is different again from one designed to add a tag to a protein for easy purification. The primary characteristics of any good vector include:
• Self-replication — plasmids have an origin of replication so they can reproduce independently within the host cell; since the origin of replication engineered into most cloning vectors is bacterial, the plasmid can be replicated by enzymes already present in the host bacteria
• Size — most bacterial vectors are small, between 2,000 and 10,000 bp long(2–10 kilobases or kb), making them easy to manipulate
• Copy number — each plasmid is found at specific levels in its host bacterial strain. A high copy number plasmid might have hundreds of copies in each bacterium, while a low copy number plasmid might have only one or two copies per cell. Cloning vectors derived from specific plasmids have the same copy number range as the original plasmid. Most commonly used vectors are high copy number
• Multiple cloning site (MCS) — vectors have been engineered to contain an MCS, a series of restriction sites, to simplify insertion of foreign DNA into the plasmid. An MCS may have 20 or more different enzyme sites, each site usually unique both in the MCS and in the plasmid. This means that for each restriction site included in the MCS, the corresponding restriction enzyme will cut the plasmid only at its single site in the MCS
• Selectable markers — plasmids can carry one or more resistance genes for antibiotics, so if the transformation is successful (that is, if the plasmid enters and replicates in the host cell), the host cell will grow in the presence of the antibiotic. Therefore, antibiotics can be used as markers to select for postivite transformants. Commonly used selectable markers are genes for resistance to ampicillin (ampr), tetracycline (tetr), kanamycin (kanr), streptomycin (smr), and chloramphenicol (cmr)
CH
AP
TE
R 5
BA
CK
GR
OU
ND
Ligation 2
Cloning and Sequencing Explorer Series
• Screening — when bacteria are being transformed with a ligation reaction, not all of thereligated vectors will necessarily contain the DNA fragment of interest. To produce visibleindicators that cells contain an insert, vectors frequently contain reporter genes, whichdistinguish them from cells that do not have inserts. Two common reporter genes are β-galactosidase (β-gal) and green fluorescent protein (GFP)Some newer plasmid vectors use positive selection, in which the inserted DNA interrupts agene that would otherwise be lethal to the bacteria. If foreign DNA is not successfully insertedinto the MCS, the lethal gene is expressed and transformed cells die. If the foreign DNA issuccessfully inserted, the lethal gene is not expressed and the transformed bacteria surviveand divide. Positive selection eliminates the need for reporter genes, as only cells transformedwith vector containing an insert will survive
• Control mechanism — most vectors have some control mechanism for transcription of theantibiotic resistance or other engineered gene. One of the best-known control mechanisms isthe lac operon (an operon is a group of genes). When lactose (a sugar) is absent in the cell,the lac repressor protein binds to the lac operon, preventing transcription of the gene. Whenlactose is present in the cell, it binds to the lac repressor protein, causing the repressor proteinto detach from the operon. With the repressor protein no longer bound to the operon, RNApolymerase can bind and the genes can be transcribed. Lactose acts as an inducer of the lacoperon. (A compound closely related to lactose, isopropyl β-D-1-thiogalactopyranoside (IPTG),is often used in the lab as an artificial inducer.) Genes from the lac operon have beenengineered into many cloning vectors
• Size of insert — plasmid vectors have limitations on the size of inserts that they can accept,usually less than the size of the vector. Other vectors have been developed for use if the targetDNA is larger, for example, lambda phage (inserts up to 25 kb), cosmids (insert up to 45 kb),bacterial artificial chromosomes (BACs; inserts from 100 to 300 kb), yeast artificialchromosomes (YACs; insert from 100 to 3,000 kb), and bacteriophage P1 (inserts up to 125kb)
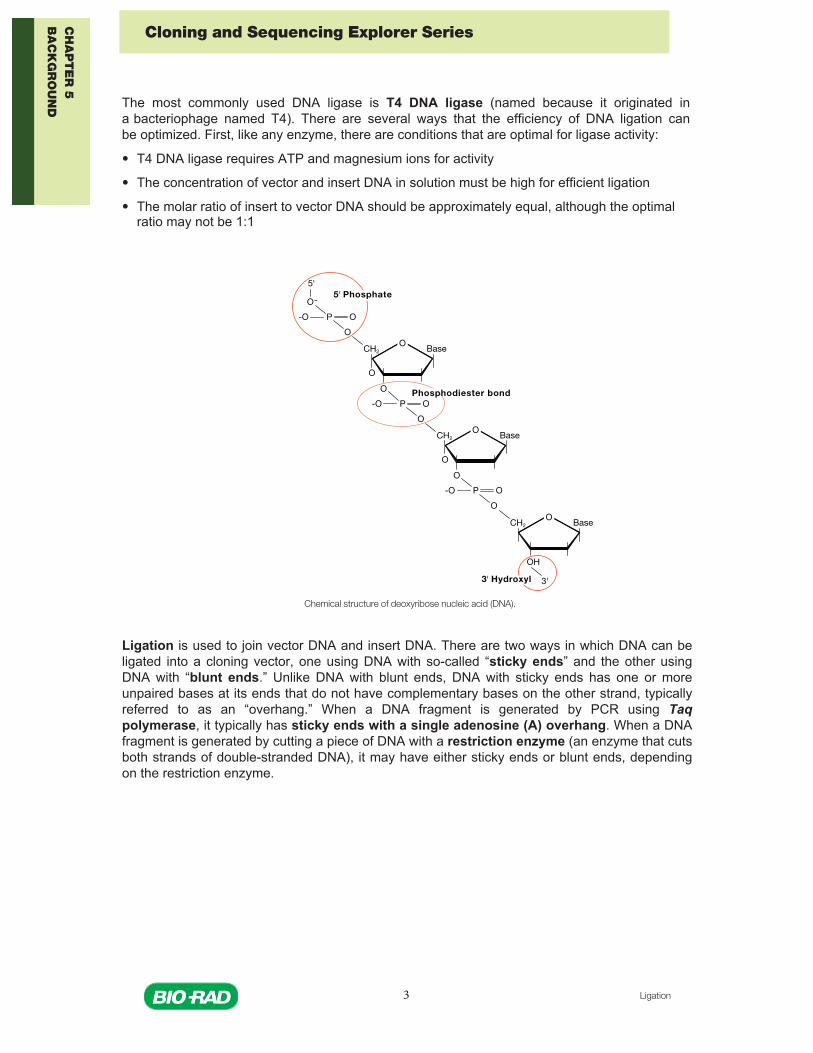
DNA LigationLigation is the process of joining two pieces of linear DNA into a single piece through the use of an enzyme called DNA ligase. DNA ligase catalyzes the formation of a phosphodiester bond between the 3'-hydroxyl on one piece of DNA and the 5'-phosphate on a second piece of DNA.
CH
AP
TE
R 5
BA
CK
GR
OU
ND
Ligation3
Cloning and Sequencing Explorer SeriesCloning and Sequencing Explorer Series
The most commonly used DNA ligase is T4 DNA ligase (named because it originated in a bacteriophage named T4). There are several ways that the efficiency of DNA ligation can be optimized. First, like any enzyme, there are conditions that are optimal for ligase activity:
• T4 DNA ligase requires ATP and magnesium ions for activity
• The concentration of vector and insert DNA in solution must be high for efficient ligation
• The molar ratio of insert to vector DNA should be approximately equal, although the optimal ratio may not be 1:1
Ligation is used to join vector DNA and insert DNA. There are two ways in which DNA can be ligated into a cloning vector, one using DNA with so-called “sticky ends” and the other using DNA with “blunt ends.” Unlike DNA with blunt ends, DNA with sticky ends has one or more unpaired bases at its ends that do not have complementary bases on the other strand, typically referred to as an “overhang.” When a DNA fragment is generated by PCR using Taq polymerase, it typically has sticky ends with a single adenosine (A) overhang. When a DNA fragment is generated by cutting a piece of DNA with a restriction enzyme (an enzyme that cuts both strands of double-stranded DNA), it may have either sticky ends or blunt ends, depending on the restriction enzyme.
Cloning and Sequencing Explorer Series
Chemical structure of deoxyribose nucleic acid (DNA).
CH
AP
TE
R 5
BA
CK
GR
OU
ND
Ligation 4
Cloning and Sequencing Explorer Series
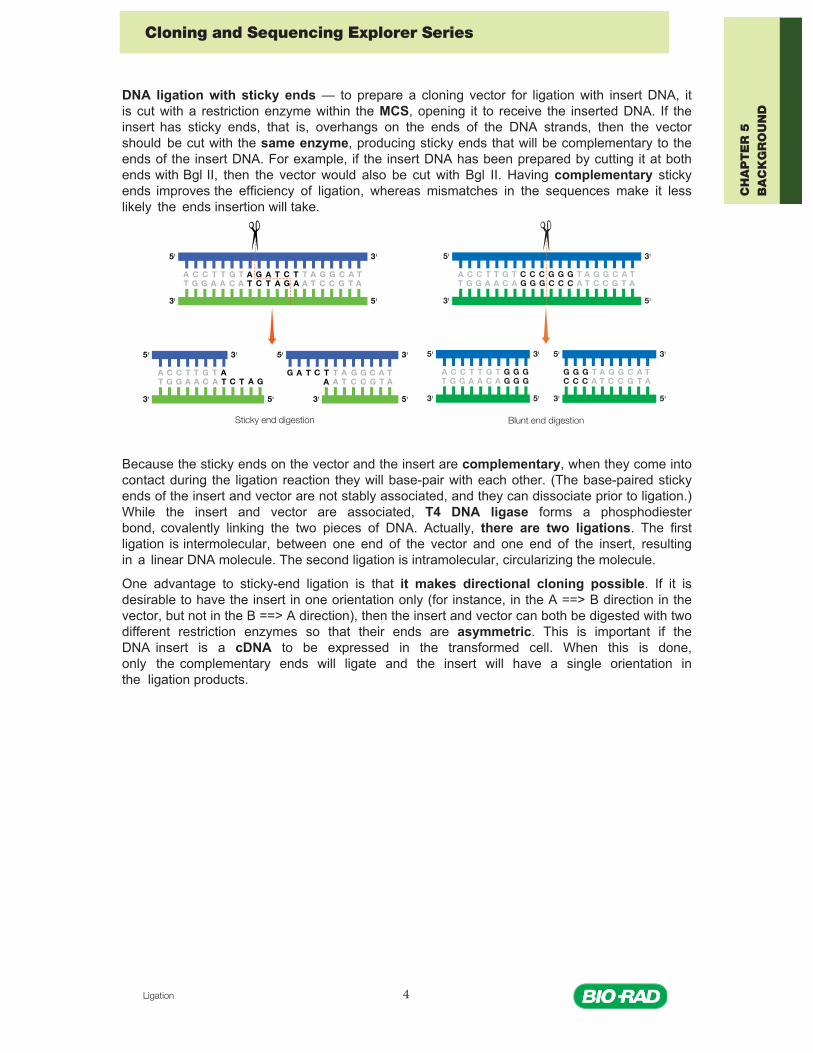
DNA ligation with sticky ends — to prepare a cloning vector for ligation with insert DNA, it is cut with a restriction enzyme within the MCS, opening it to receive the inserted DNA. If the insert has sticky ends, that is, overhangs on the ends of the DNA strands, then the vector should be cut with the same enzyme, producing sticky ends that will be complementary to the ends of the insert DNA. For example, if the insert DNA has been prepared by cutting it at both ends with Bgl II, then the vector would also be cut with Bgl II. Having complementary sticky ends improves the efficiency of ligation, whereas mismatches in the sequences make it less likely the ends insertion will take.
Because the sticky ends on the vector and the insert are complementary, when they come into contact during the ligation reaction they will base-pair with each other. (The base-paired sticky ends of the insert and vector are not stably associated, and they can dissociate prior to ligation.) While the insert and vector are associated, T4 DNA ligase forms a phosphodiester bond, covalently linking the two pieces of DNA. Actually, there are two ligations. The first ligation is intermolecular, between one end of the vector and one end of the insert, resulting in a linear DNA molecule. The second ligation is intramolecular, circularizing the molecule.
One advantage to sticky-end ligation is that it makes directional cloning possible. If it is desirable to have the insert in one orientation only (for instance, in the A ==> B direction in the vector, but not in the B ==> A direction), then the insert and vector can both be digested with two different restriction enzymes so that their ends are asymmetric. This is important if the DNA insert is a cDNA to be expressed in the transformed cell. When this is done, only the complementary ends will ligate and the insert will have a single orientation in the ligation products.
Sticky end digestion Blunt end digestion
CH
AP
TE
R 5
BA
CK
GR
OU
ND
Ligation
Cloning and Sequencing Explorer Series
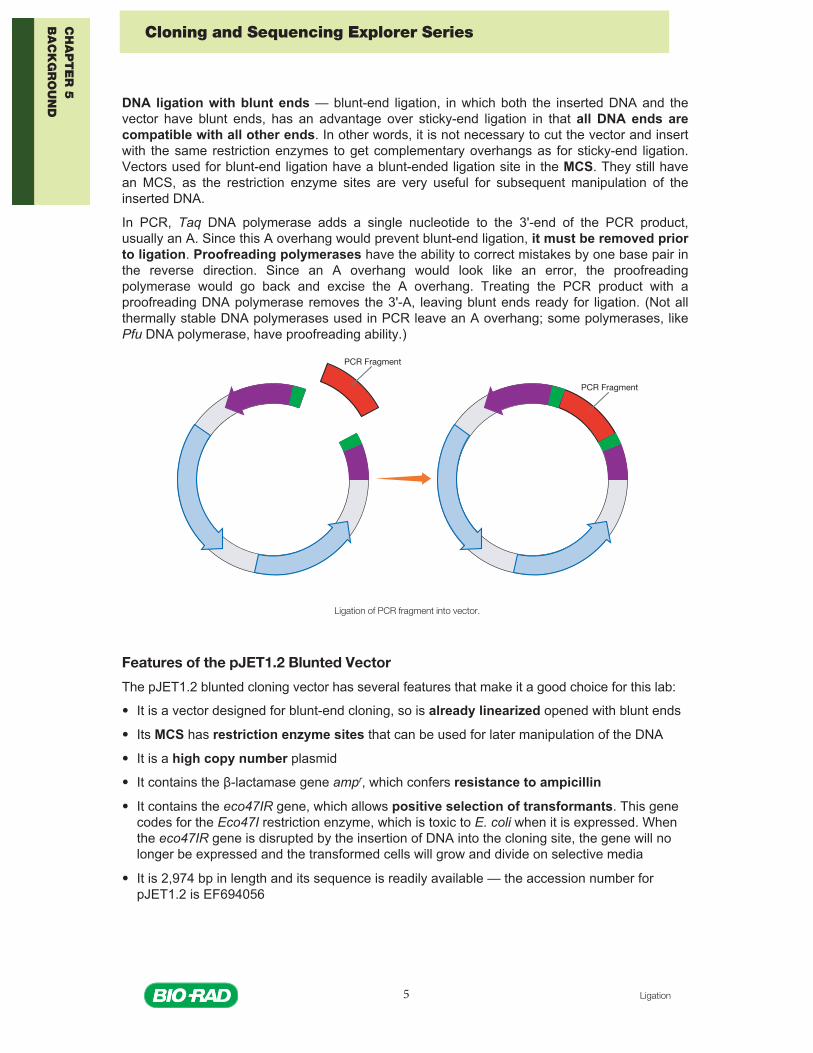
DNA ligation with blunt ends — blunt-end ligation, in which both the inserted DNA and the vector have blunt ends, has an advantage over sticky-end ligation in that all DNA ends are compatible with all other ends. In other words, it is not necessary to cut the vector and insert with the same restriction enzymes to get complementary overhangs as for sticky-end ligation. Vectors used for blunt-end ligation have a blunt-ended ligation site in the MCS. They still have an MCS, as the restriction enzyme sites are very useful for subsequent manipulation of the inserted DNA.
In PCR, Taq DNA polymerase adds a single nucleotide to the 3'-end of the PCR product, usually an A. Since this A overhang would prevent blunt-end ligation, it must be removed prior to ligation. Proofreading polymerases have the ability to correct mistakes by one base pair in the reverse direction. Since an A overhang would look like an error, the proofreading polymerase would go back and excise the A overhang. Treating the PCR product with a proofreading DNA polymerase removes the 3'-A, leaving blunt ends ready for ligation. (Not all thermally stable DNA polymerases used in PCR leave an A overhang; some polymerases, like Pfu DNA polymerase, have proofreading ability.)
Features of the pJET1.2 Blunted Vector
The pJET1.2 blunted cloning vector has several features that make it a good choice for this lab:
• It is a vector designed for blunt-end cloning, so is already linearized opened with blunt ends
• Its MCS has restriction enzyme sites that can be used for later manipulation of the DNA
• It is a high copy number plasmid
• It contains the β-lactamase gene ampr, which confers resistance to ampicillin
• It contains the eco47IR gene, which allows positive selection of transformants. This gene codes for the Eco47I restriction enzyme, which is toxic to E. coli when it is expressed. When the eco47IR gene is disrupted by the insertion of DNA into the cloning site, the gene will no longer be expressed and the transformed cells will grow and divide on selective media
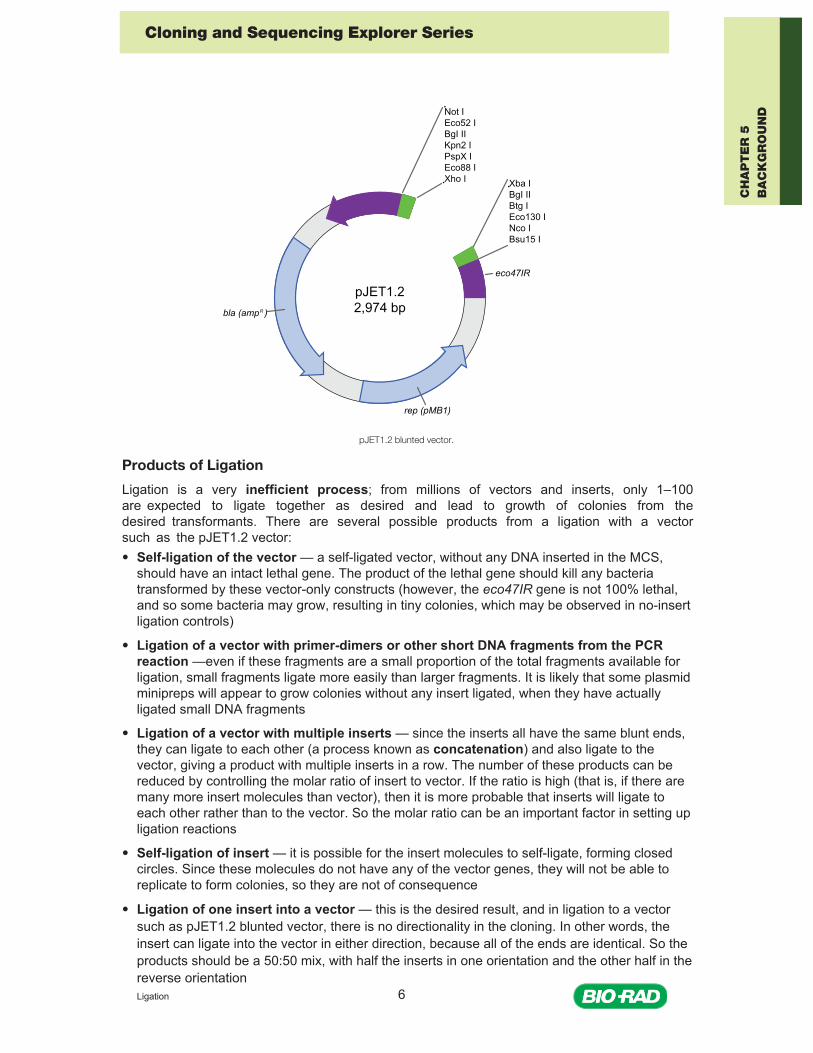
• It is 2,974 bp in length and its sequence is readily available — the accession number for pJET1.2 is EF694056
5
Ligation of PCR fragment into vector.
CH
AP
TE
R 5
BA
CK
GR
OU
ND
Cloning and Sequencing Explorer Series
Products of Ligation
Ligation is a very inefficient process; from millions of vectors and inserts, only 1–100 are expected to ligate together as desired and lead to growth of colonies from the desired transformants. There are several possible products from a ligation with a vector such as the pJET1.2 vector: • Self-ligation of the vector — a self-ligated vector, without any DNA inserted in the MCS,
should have an intact lethal gene. The product of the lethal gene should kill any bacteria transformed by these vector-only constructs (however, the eco47IR gene is not 100% lethal, and so some bacteria may grow, resulting in tiny colonies, which may be observed in no-insert ligation controls)
• Ligation of a vector with primer-dimers or other short DNA fragments from the PCR reaction —even if these fragments are a small proportion of the total fragments available for ligation, small fragments ligate more easily than larger fragments. It is likely that some plasmid minipreps will appear to grow colonies without any insert ligated, when they have actually ligated small DNA fragments
• Ligation of a vector with multiple inserts — since the inserts all have the same blunt ends, they can ligate to each other (a process known as concatenation) and also ligate to the vector, giving a product with multiple inserts in a row. The number of these products can be reduced by controlling the molar ratio of insert to vector. If the ratio is high (that is, if there are many more insert molecules than vector), then it is more probable that inserts will ligate to each other rather than to the vector. So the molar ratio can be an important factor in setting up ligation reactions
• Self-ligation of insert — it is possible for the insert molecules to self-ligate, forming closed circles. Since these molecules do not have any of the vector genes, they will not be able to replicate to form colonies, so they are not of consequence
• Ligation of one insert into a vector — this is the desired result, and in ligation to a vector such as pJET1.2 blunted vector, there is no directionality in the cloning. In other words, the insert can ligate into the vector in either direction, because all of the ends are identical. So the products should be a 50:50 mix, with half the inserts in one orientation and the other half in the reverse orientationLigation 6
pJET1.22,974 bp
Not IEco52 IBgI IIKpn2 IPspX IEco88 IXho I Xba I
BgI IIBtg IEco130 INco IBsu15 I
eco47IR
bla (amp )
rep (pMB1)
R
CH
AP
TE
R 5
BA
CK
GR
OU
ND
pJET1.2 blunted vector.
Ligation7
Cloning and Sequencing Explorer Series
Protocol
Overview
In this stage, you will insert (ligate) the PCR product into a plasmid vector. The plasmid is supplied ready to use, already opened up to receive the DNA fragment. Because this will be a blunt-end ligation, a single adenosine (A) nucleotide left on the 3'-ends of the PCR fragment by Taq DNA polymerase must be removed before the ligation so that the fragment will also have blunt ends. The nucleotideis removed and the PCR product blunted by treating the PCR product with a proofreading polymerase. ThisDNA polymerase is active at 70°C butnot at lower temperatures, so it is notnecessary to inactivate this enzyme after use.
Once blunted, the PCR product is combined with the plasmid and T4 DNA ligase under conditions optimal for ligation. The ligation reaction will be complete in 5–10 minutes.
Student Workstations
Each student team will require the following items to ligate one PCR product.*
Material Needed for Each Workstation Quantity
Purified PCR product 1–2 µl
2x ligation reaction buffer* 5 µl
Proofreading polymerase* 0.5 µl
T4 DNA ligase* 0.5 µl
pJET1.2 blunted vector* 0.5 µl
Sterile water* 5 µl
Microcentrifuge tube 1
10 µl adjustable-volume micropipet and tips 1
Marking pen 1
* The volumes of reagents required for each student group are provided for your information.However, aliquoting of reagents for students in this exercise is not recommended due to the smallvolumes required. Please also see Common Workstation.
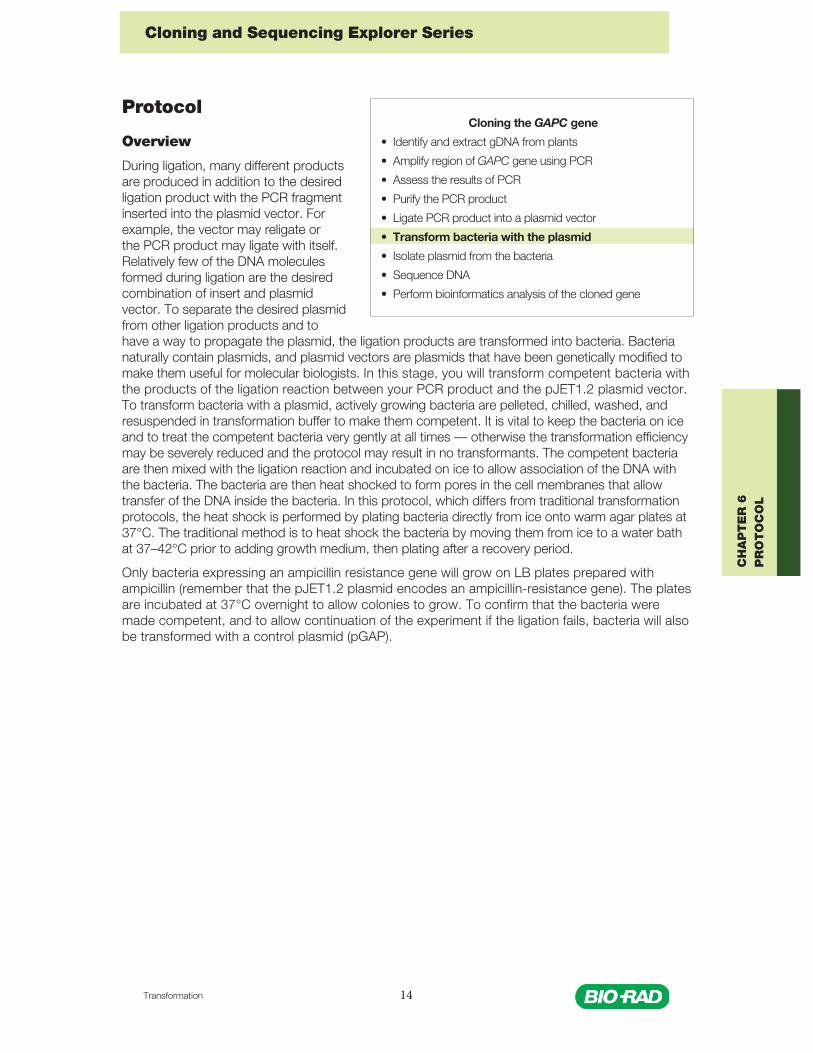
Cloning the GAPC gene
• Identify and extract gDNA from plants
• Amplify region of GAPC gene using PCR
• Assess the results of PCR
• Purify the PCR product
• Ligate PCR product into a plasmid vector
• Transform bacteria with the plasmid
• Isolate plasmid from the bacteria
• Sequence DNA
• Perform bioinformatics analysis of the cloned gene
CH
AP
TE
R 5
PR
OT
OC
OL
Ligation 8
Cloning and Sequencing Explorer Series
Common Workstation
Material Required
Ice bucket containing stock tubes of:
• 2x ligation reaction buffer
• Proofreading polymerase
• T4 DNA ligase
• pJET1.2 blunted vector
• Sterile water
Water bath, heating block, or incubator at 70°C
Microcentrifuge
Experimental Procedure for Ligation
1. Label a microcentrifuge tube with your initials, your plant name, and “ligation.”
2. Briefly centrifuge the stock tubes containing the 2x ligation reaction buffer and proofreadingpolymerase in a microcentrifuge to force contents to bottom of tubes.
Note: Take special care when pipetting very small volumes. Make sure only the soft stop of thepipet is used, when pulling up reagents even though it may feel like a very small movement.Also, look at the end of the pipet tip to be sure that the correct volume of reagent is in the tip.After adding the reagent to the tube, be sure that the pipet tip is empty. Never reuse a pipet tip.
3. Set up a blunting reaction with the following reagents:
Reagent Amount
2x ligation reaction buffer 5.0 µl
Purified PCR product 1.0 µl*
Sterile water 2.5 µl*
Proofreading polymerase 0.5 µl
Total 9.0 µl
* If the PCR product was not as intense as the 1 kb band in the molecular weight marker in theagarose gel analysis (see results from the Electrophoresis chapter), increase the amount of PCRproduct added to the blunting reaction to 2 µl. You will need to decrease the volume of sterilewater to 1.5 µl to compensate.
CH
AP
TE
R 5
PR
OT
OC
OL
Ligation9
Cloning and Sequencing Explorer Series
4. Close the cap and mix well. Centrifuge briefly in a microcentrifugeto collect the contents at the bottom of the tube.
This step is essential due to the very small volume used in thisreaction.
5. Incubate the tube at 70°C for 5 min.
70°C is the optimal temperature for the proofreading polymeraseto blunt the PCR fragment.
6. Cool the tube on ice for 2 min.
This recondenses water vapor to maintain the reaction volume.
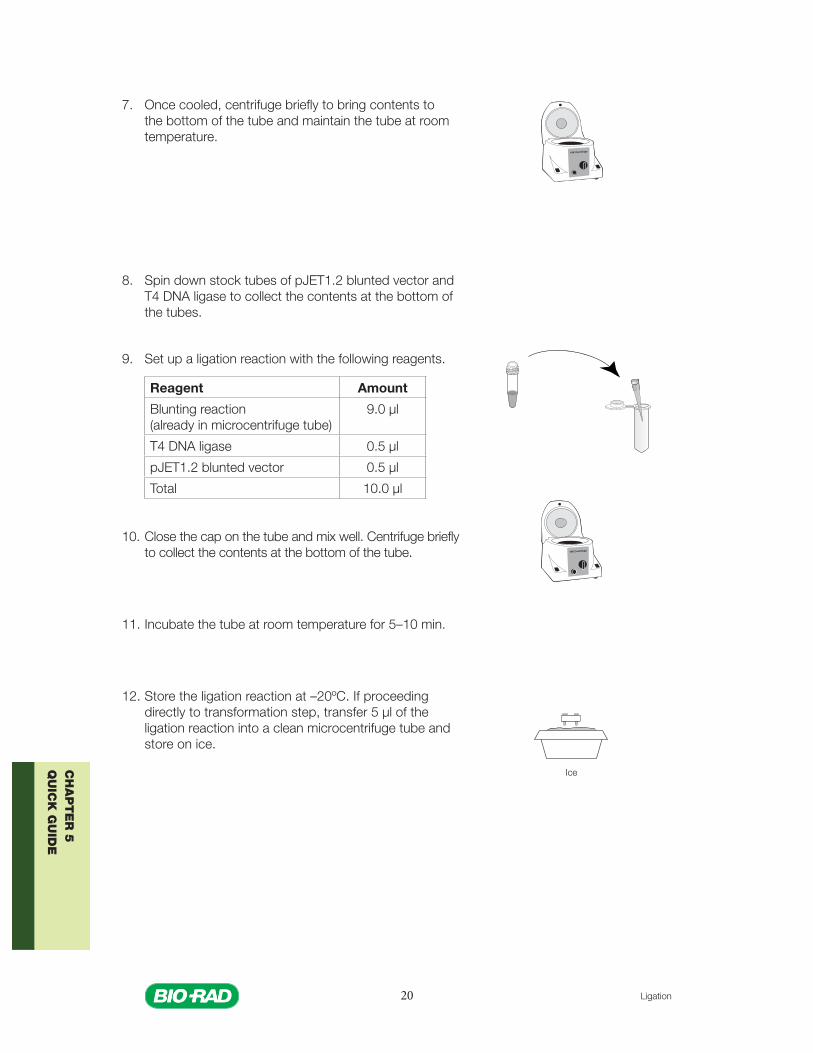
7. Once cooled, centrifuge the tube briefly to collect the contents atthe bottom of the tube. Maintain the tube at room temperature.
8. Briefly centrifuge the stock tubes containing the pJET1.2 bluntedvector and the T4 DNA ligase in a microcentrifuge to force thecontents to bottom of tubes.
9. Set up a ligation reaction with the following reagents:
Reagent Amount
Blunt reaction(already in microcentrifuge tube)
9.0 µl
T4 DNA ligase 0.5 µl
pJet1.2 blunted vector 0.5 µl
Total 10.0 µl
70°C water bath
CH
AP
TE
R 5
PR
OT
OC
OL
Ligation 10
Cloning and Sequencing Explorer Series
10. Close the cap and mix well. Centrifuge briefly in amicrocentrifuge to collect the contents at the bottom ofthe tube.
11. Incubate the tube at room temperature for 5–10 min.
12. Store the ligation reaction at –20°C. However, if you areproceeding directly to the transformation, pipet 5 µl of theligation reaction into a microcentrifuge tube labeled withyour initials, plant name, and “transformation” and store iton ice until needed for the transformation.
CH
AP
TE
R 5
PR
OT
OC
OL
Transformation 11
Cloning and Sequencing Explorer Series
CHAPTER 6: TRANSFORMATION
Background
Transformation
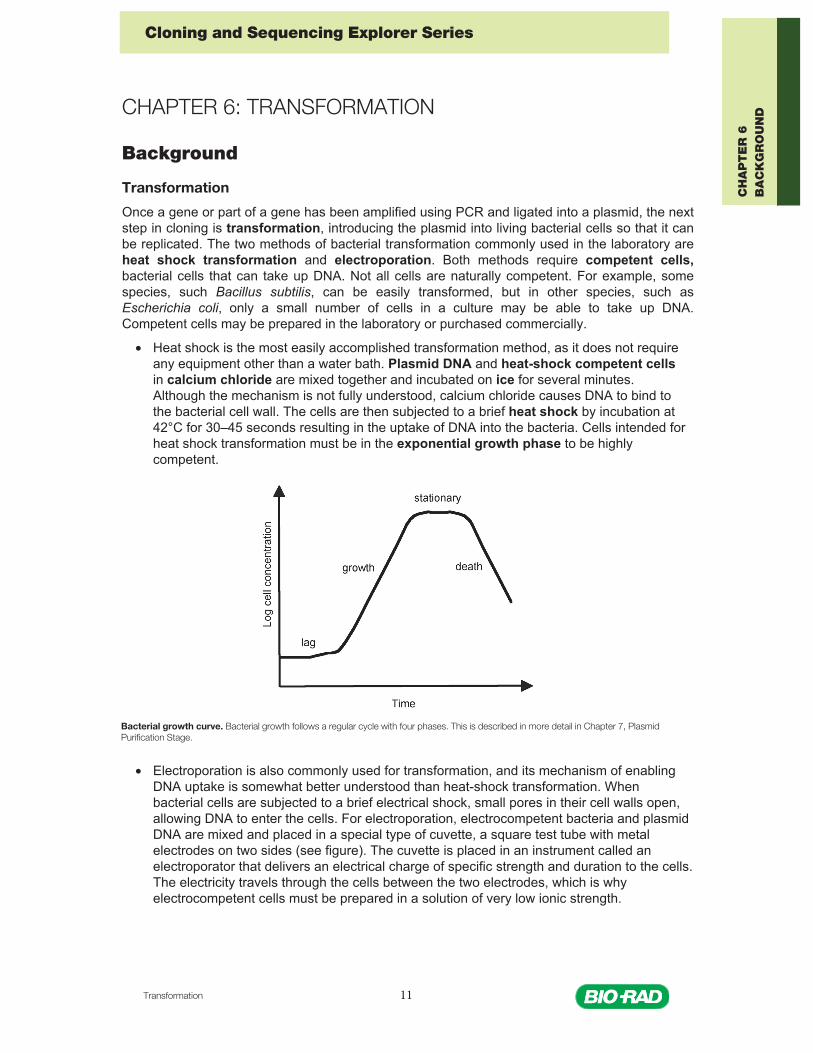
Once a gene or part of a gene has been amplified using PCR and ligated into a plasmid, the next step in cloning is transformation, introducing the plasmid into living bacterial cells so that it can be replicated. The two methods of bacterial transformation commonly used in the laboratory are heat shock transformation and electroporation. Both methods require competent cells, bacterial cells that can take up DNA. Not all cells are naturally competent. For example, some species, such Bacillus subtilis, can be easily transformed, but in other species, such as Escherichia coli, only a small number of cells in a culture may be able to take up DNA. Competent cells may be prepared in the laboratory or purchased commercially.
• Heat shock is the most easily accomplished transformation method, as it does not requireany equipment other than a water bath. Plasmid DNA and heat-shock competent cellsin calcium chloride are mixed together and incubated on ice for several minutes.Although the mechanism is not fully understood, calcium chloride causes DNA to bind tothe bacterial cell wall. The cells are then subjected to a brief heat shock by incubation at42°C for 30–45 seconds resulting in the uptake of DNA into the bacteria. Cells intended forheat shock transformation must be in the exponential growth phase to be highlycompetent.
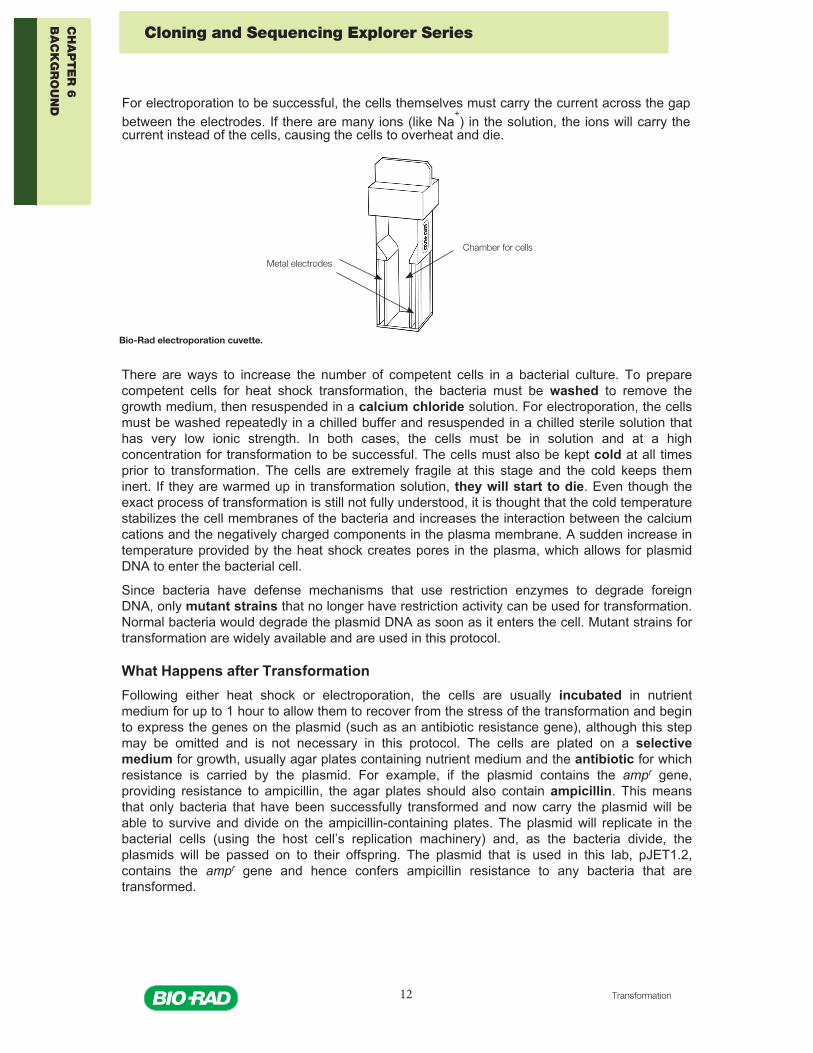
• Electroporation is also commonly used for transformation, and its mechanism of enablingDNA uptake is somewhat better understood than heat-shock transformation. Whenbacterial cells are subjected to a brief electrical shock, small pores in their cell walls open,allowing DNA to enter the cells. For electroporation, electrocompetent bacteria and plasmidDNA are mixed and placed in a special type of cuvette, a square test tube with metalelectrodes on two sides (see figure). The cuvette is placed in an instrument called anelectroporator that delivers an electrical charge of specific strength and duration to the cells.The electricity travels through the cells between the two electrodes, which is whyelectrocompetent cells must be prepared in a solution of very low ionic strength.
Bacterial growth curve. Bacterial growth follows a regular cycle with four phases. This is described in more detail in Chapter 7, Plasmid Purification Stage.
CH
AP
TE
R 6
BA
CK
GR
OU
ND
Transformation12
Cloning and Sequencing Explorer Series
For electroporation to be successful, the cells themselves must carry the current across the gap between the electrodes. If there are many ions (like Na
+) in the solution, the ions will carry the
current instead of the cells, causing the cells to overheat and die.
There are ways to increase the number of competent cells in a bacterial culture. To prepare competent cells for heat shock transformation, the bacteria must be washed to remove the growth medium, then resuspended in a calcium chloride solution. For electroporation, the cells must be washed repeatedly in a chilled buffer and resuspended in a chilled sterile solution that has very low ionic strength. In both cases, the cells must be in solution and at a high concentration for transformation to be successful. The cells must also be kept cold at all times prior to transformation. The cells are extremely fragile at this stage and the cold keeps them inert. If they are warmed up in transformation solution, they will start to die. Even though the exact process of transformation is still not fully understood, it is thought that the cold temperature stabilizes the cell membranes of the bacteria and increases the interaction between the calcium cations and the negatively charged components in the plasma membrane. A sudden increase in temperature provided by the heat shock creates pores in the plasma, which allows for plasmid DNA to enter the bacterial cell.
Since bacteria have defense mechanisms that use restriction enzymes to degrade foreign DNA, only mutant strains that no longer have restriction activity can be used for transformation. Normal bacteria would degrade the plasmid DNA as soon as it enters the cell. Mutant strains for transformation are widely available and are used in this protocol.
What Happens after TransformationFollowing either heat shock or electroporation, the cells are usually incubated in nutrient medium for up to 1 hour to allow them to recover from the stress of the transformation and begin to express the genes on the plasmid (such as an antibiotic resistance gene), although this step may be omitted and is not necessary in this protocol. The cells are plated on a selective medium for growth, usually agar plates containing nutrient medium and the antibiotic for which resistance is carried by the plasmid. For example, if the plasmid contains the ampr gene, providing resistance to ampicillin, the agar plates should also contain ampicillin. This means that only bacteria that have been successfully transformed and now carry the plasmid will be able to survive and divide on the ampicillin-containing plates. The plasmid will replicate in the bacterial cells (using the host cell’s replication machinery) and, as the bacteria divide, the plasmids will be passed on to their offspring. The plasmid that is used in this lab, pJET1.2, contains the ampr gene and hence confers ampicillin resistance to any bacteria that are transformed.
Chamber for cells
Metal electrodes
Bio-Rad electroporation cuvette.
CH
AP
TE
R 6
BA
CK
GR
OU
ND
Transformation 13
Cloning and Sequencing Explorer Series
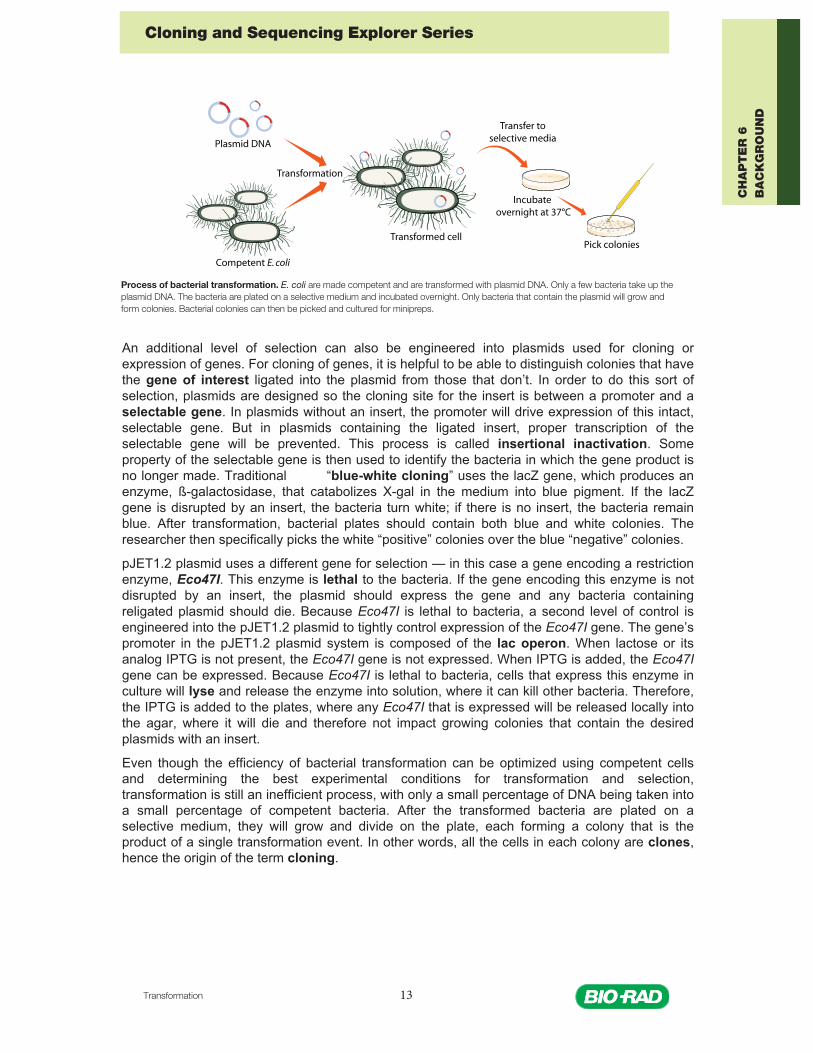
An additional level of selection can also be engineered into plasmids used for cloning or expression of genes. For cloning of genes, it is helpful to be able to distinguish colonies that have the gene of interest ligated into the plasmid from those that don’t. In order to do this sort of selection, plasmids are designed so the cloning site for the insert is between a promoter and a selectable gene. In plasmids without an insert, the promoter will drive expression of this intact, selectable gene. But in plasmids containing the ligated insert, proper transcription of the selectable gene will be prevented. This process is called insertional inactivation. Some property of the selectable gene is then used to identify the bacteria in which the gene product is no longer made. Traditional “blue-white cloning” uses the lacZ gene, which produces an enzyme, ß-galactosidase, that catabolizes X-gal in the medium into blue pigment. If the lacZ gene is disrupted by an insert, the bacteria turn white; if there is no insert, the bacteria remain blue. After transformation, bacterial plates should contain both blue and white colonies. The researcher then specifically picks the white “positive” colonies over the blue “negative” colonies.
pJET1.2 plasmid uses a different gene for selection — in this case a gene encoding a restriction enzyme, Eco47I. This enzyme is lethal to the bacteria. If the gene encoding this enzyme is not disrupted by an insert, the plasmid should express the gene and any bacteria containing religated plasmid should die. Because Eco47I is lethal to bacteria, a second level of control is engineered into the pJET1.2 plasmid to tightly control expression of the Eco47I gene. The gene’s promoter in the pJET1.2 plasmid system is composed of the lac operon. When lactose or its analog IPTG is not present, the Eco47I gene is not expressed. When IPTG is added, the Eco47I gene can be expressed. Because Eco47I is lethal to bacteria, cells that express this enzyme in culture will lyse and release the enzyme into solution, where it can kill other bacteria. Therefore, the IPTG is added to the plates, where any Eco47I that is expressed will be released locally into the agar, where it will die and therefore not impact growing colonies that contain the desired plasmids with an insert.
Even though the efficiency of bacterial transformation can be optimized using competent cells and determining the best experimental conditions for transformation and selection, transformation is still an inefficient process, with only a small percentage of DNA being taken into a small percentage of competent bacteria. After the transformed bacteria are plated on a selective medium, they will grow and divide on the plate, each forming a colony that is the product of a single transformation event. In other words, all the cells in each colony are clones, hence the origin of the term cloning.
Plasmid DNA
Transformation
Competent E. coli
Transformed cell
Transfer toselective media
Incubate overnight at 37°C
Pick colonies
Process of bacterial transformation. E. coli are made competent and are transformed with plasmid DNA. Only a few bacteria take up the plasmid DNA. The bacteria are plated on a selective medium and incubated overnight. Only bacteria that contain the plasmid will grow and form colonies. Bacterial colonies can then be picked and cultured for minipreps.
CH
AP
TE
R 6
BA
CK
GR
OU
ND
Transformation 14
Cloning and Sequencing Explorer Series
Protocol
Overview
During ligation, many different products are produced in addition to the desired ligation product with the PCR fragment inserted into the plasmid vector. For example, the vector may religate or the PCR product may ligate with itself.Relatively few of the DNA molecules formed during ligation are the desired combination of insert and plasmid vector. To separate the desired plasmidfrom other ligation products and tohave a way to propagate the plasmid, the ligation products are transformed into bacteria. Bacterianaturally contain plasmids, and plasmid vectors are plasmids that have been genetically modified tomake them useful for molecular biologists. In this stage, you will transform competent bacteria withthe products of the ligation reaction between your PCR product and the pJET1.2 plasmid vector.To transform bacteria with a plasmid, actively growing bacteria are pelleted, chilled, washed, andresuspended in transformation buffer to make them competent. It is vital to keep the bacteria on iceand to treat the competent bacteria very gently at all times — otherwise the transformation efficiencymay be severely reduced and the protocol may result in no transformants. The competent bacteriaare then mixed with the ligation reaction and incubated on ice to allow association of the DNA withthe bacteria. The bacteria are then heat shocked to form pores in the cell membranes that allowtransfer of the DNA inside the bacteria. In this protocol, which differs from traditional transformationprotocols, the heat shock is performed by plating bacteria directly from ice onto warm agar plates at37°C. The traditional method is to heat shock the bacteria by moving them from ice to a water bathat 37–42°C prior to adding growth medium, then plating after a recovery period.
Only bacteria expressing an ampicillin resistance gene will grow on LB plates prepared with ampicillin (remember that the pJET1.2 plasmid encodes an ampicillin-resistance gene). The plates are incubated at 37°C overnight to allow colonies to grow. To confirm that the bacteria were made competent, and to allow continuation of the experiment if the ligation fails, bacteria will also be transformed with a control plasmid (pGAP).
Cloning the GAPC gene
• Identify and extract gDNA from plants
• Amplify region of GAPC gene using PCR
• Assess the results of PCR
• Purify the PCR product
• Ligate PCR product into a plasmid vector
• Transform bacteria with the plasmid
• Isolate plasmid from the bacteria
• Sequence DNA
• Perform bioinformatics analysis of the cloned gene
CH
AP
TE
R 6
PR
OT
OC
OL
Transformation15
Cloning and Sequencing Explorer Series
Student Workstations
Each student team will require the following items to transform bacteria with one PCR product:
Material Needed for Each Workstation Quantity
Ligation reaction from Chapter 5 (on ice) 5 µl
pGAP control plasmid (on ice) 1 µl
Previously prepared fresh starter cultures of E. coli at 37°C 1
15 ml culture tube (containing C-growth medium) 1
C-growth medium (in culture tube) prewarmed to 37°C 1.5 ml
LB amp IPTG plates prewarmed in 37°C incubator 2
Transformation reagent A (on ice) 250 µl
Transformation reagent B (on ice) 250 µl
1.5 ml microcentrifuge tubes 4
Sterile inoculating loops 2
20 µl adjustable-volume micropipet and tips 1
200 µl adjustable-volume micropipets and tips 1
1,000 µl adjustable-volume micropipets and tips 1
Marking pen 1
Ice bath 1
(Optional) Vacuum source 1
Common Workstation
Material Required Quantity
Shaking 37°C water bath or incubator 1
37°C incubator 1
Microcentrifuge (refrigerated, if available) 1
(Optional) Vortex mixer 1
Experimental Procedure
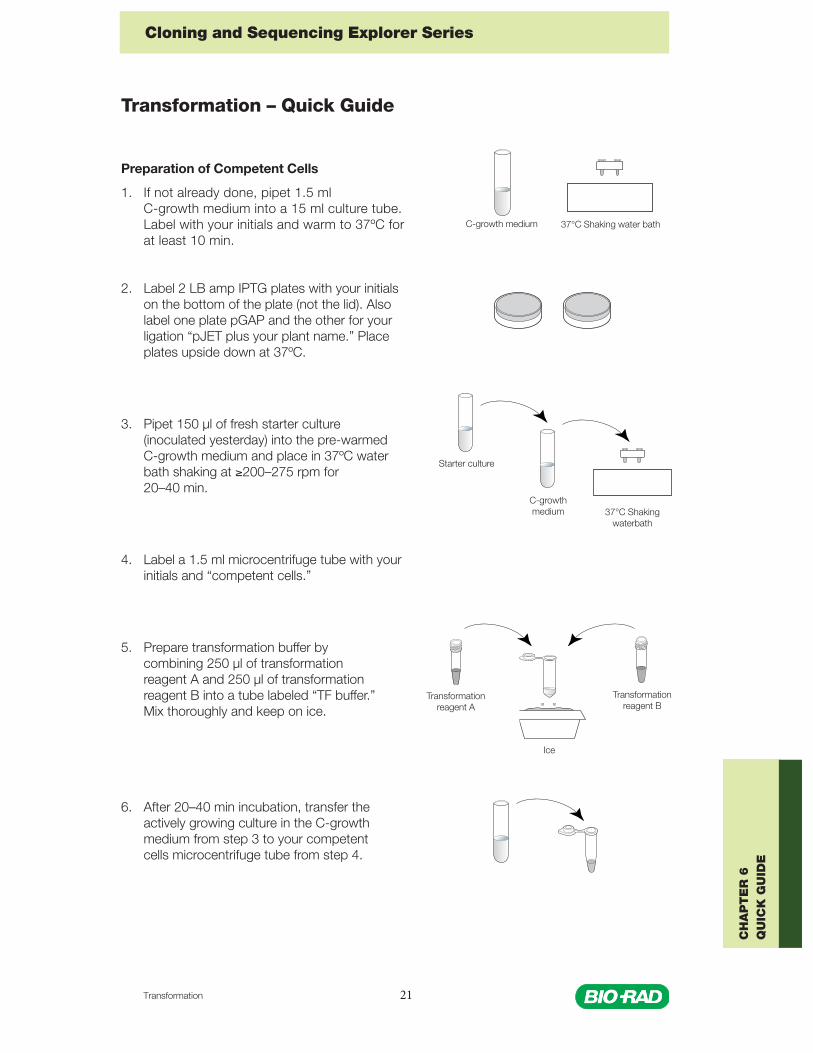
1. If not already done, pipet 1.5 ml C-growth medium into a 15 ml culture tube. Label tube withyour initials and warm it at 37°C for at least 10 min.
2. Label 2 LB amp IPTG agar plates with your initials (on the bottom of the plate, not the lid). Alsolabel one of the plates “pGAP” for the control plasmid and the other for your ligation (pJET +your plant name).
Place plates upside down at 37°C.
CH
AP
TE
R 6
PR
OT
OC
OL
Transformation 16
Cloning and Sequencing Explorer Series
3. Approximately 20–40 min prior to starting the transformation, pipet 150 µlof fresh E. coli starter culture (inoculated one day prior) into the prewarmedC-growth medium and place in a 37°C incubator or water bath for 20–40 minshaking at 275 rpm.
C-growth medium is a nutrient broth that helps bacteria enter the growthphase efficiently.
Note: It is important to use an E. coli starter culture that is fresh (inoculated <24 hours before) to ensure sufficiently high transformation efficiency.
4. Label a 1.5 microcentrifuge tube with your initials and “competent cells.”
5. Prepare transformation buffer by combining 250 µl of transformation reagent A and250 µl of transformation reagent B into a tube labeled “TF buffer” and mix thoroughly with avortex mixer (if available). Keep on ice until use. (Note: This mixture must be prepared and usedon the day of transformation.)
The transformation buffer contains calcium chloride and DMSO that assist the plasmid DNA topass through the lipid cell membrane.
6. After bacteria have grown in C-growth medium for 20–40 min at 37°C withshaking, transfer the entire culture to the tube labeled “competent cells” bydecanting or pipetting. Do not put the actively growing cell culture on ice atthis step.
7. Centrifuge the bacterial culture in a microcentrifuge at top speed for1 min. Accomodate tubes of classmates to ensure economic use ofthe microcentrifuge. Make sure that the microcentrifuge is balanced.Immediately put the pelleted bacterial culture on ice.
Note: After this step, it is very important to keep the bacteria on ice as much as possible duringthis procedure. Transformation efficiency will be severely compromised if the cells warm up.
It is very important to treat the bacteria extremely gently during this procedure — the bacteria arevery fragile and your transformation efficiency will be compromised unless you are very gentle.
8. Locate the pellet of bacteria at the bottom of the tube. Remove the culturesupernatant, avoiding the pellet, using a 1,000 µl pipet or a vacuum source.Keep the cells on ice.
9. Pipet 300 µl of ice-cold transformation buffer into the microcentrifuge tubecontaining the bacterial pellet. Resuspend the pellet by gently pipetting up anddown in the solution above the pellet with a 1,000 µl pipet, and gradually wear away the pelletfrom the bottom of the tube. Make sure that the bacteria are fully resuspended, with no clumps.Avoid removing the cells from the ice bucket for more than a few seconds.
10. Incubate the resuspended bacteria on ice for 5 min.
11. Centrifuge the bacteria in a microcentrifuge for 1 min, then place back inice bucket immediately.
Note: Ensure that the bacteria are on ice immediately prior to andimmediately following centrifugation. If the centrifuge is not close to thelab bench, take the entire ice bucket to the microcentrifuge so that thebacteria are only out of the ice bucket for 1 minute. Use a refrigeratedmicrocentrifuge, if available.
12. Remove the supernatant from the pellet using a 1,000 µl pipet or vacuum source.
Starter culture
CH
AP
TE
R 6
PR
OT
OC
OL
Transformation17
Cloning and Sequencing Explorer Series
13. Pipet 120 µl of ice-cold transformation buffer onto the pellet and resuspend by gently pipetting upand down with a 200 µl pipet. Be sure that bacteria are fully resuspended with no clumps. Avoidremoving the cells from the ice bucket for more than a few seconds.
14. Incubate the resuspended bacteria on ice for 5 min.
The cells are now competent for transformation.
Note: Competent cells made using this protocol must be used on the day of preparation andcannot be stored at –70°C.
Experimental Procedure for Transformation
15. Label one microcentrifuge tube with your initials and “pGAP TF” (for pGAP transformation) andanother microcentrifuge tube with your initials, plant name, and “TF” (referred to below as the“plant TF” tube).
Note: If you are performing the ligation and transformation steps on the same day, use themicrocentrifuge tube containing 5 µl of the ligation prepared and labeled at the end of theligation step.
16. Pipet 1 µl of control pGAP plasmid into the microcentrifuge tube labeled “pGAP TF.”
17. If not already done, pipet 5 µl of the ligation reaction from your ligation reaction tube into the“plant TF” microcentrifuge tube. Store any remaining ligation reaction at –20°C.
18. Using a fresh tip, pipet 50 µl of competent bacteria directly into the ice-cold “pGAP TF” tubeand gently pipet up and down 2 times to mix.
19. Using a fresh tip, pipet 50 µl of competent bacteria directly into the ice-cold“plant TF” tube containing 5 µl of your ligation, and gently pipet up anddown 2 times to mix.
20. Incubate the transformations for 10 min on ice.
21. Retrieve the warm LB amp IPTG agar plates from the 37°C incubator.
Pipet the entire volume of each transformation onto the corresponding labeled LB amp IPTGplate and, using an inoculation loop or a sterile spreader, very gently spread the bacteria aroundthe plate — remember that the bacteria are still very fragile! Once the plate is covered, stopspreading. Do not spread for more than 10 sec.
It is vital that the LB amp IPTG plates are warm at this step to ensuresufficiently high transformation efficiency. This is the heat shock forthe transformation. Spreading the plate until it is dry will also reducetransformation efficiency.
22. Once the volume is absorbed in the agar, cover and place the LB amp IPTG plates upsidedown and incubate them overnight at 37°C.
23. The next day, analyze the results or wrap the plates in Parafilm and place them upside down at4°C until required for inoculation of miniprep cultures (see Next Steps).
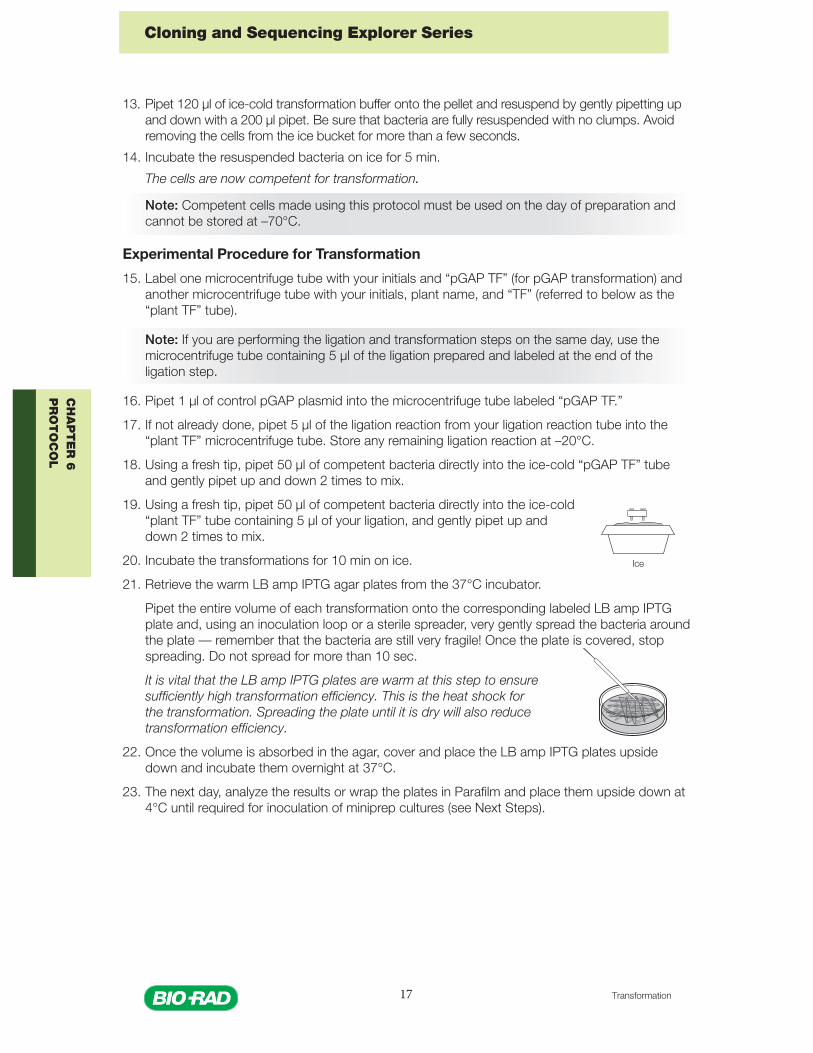
Ice
CH
AP
TE
R 6
PR
OT
OC
OL
Transformation 18
Cloning and Sequencing Explorer Series
CH
AP
TE
R 6
PR
OT
OC
OL
Next Steps
1. Before the next lab, transformed bacterial colonies need to be grown in liquid culture minipreps.
a. Pr epare 25 ml of LB amp broth.
b. Label four 15 ml culture tubes with your initials and “pJET,” the name of your plant, and #1 through #4.
c. Using sterile technique, pipet 3 ml of LB amp broth into each of the four 15 ml culture tubes.
d. One day prior to the next lab session, use a sterile loop or a sterile pipet tip to pick a single colony from the LB amp IPTG plate containing the plated bacteria transformed with your plant gene ligation reaction. Inoculate an LB amp culture tube with the colony. Repeat for a total of 4 miniprep cultures (one colony in each culture tube).
Note: It is not necessary to add IPTG to the liquid culture medium. Note: Occasionally, satellite colonies may grow using this ligation method. Pick the large individual colonies, not the tiny satellite colonies surrounding larger colonies. Be sure that a
single colony is picked, or you may isolate multiple plasmids from your miniprep. Multiple plasmids will result in mixed sequencing data that is not able to be deciphered.
e. Place the miniprep cultures to grow overnight (18–28 hr) at 37°C in a shaking water bath or incubator set to a speed of 275 rpm. Note: If no colonies grew on your team’s plate from the pJET1.2 + plant gene ligation reaction, either use colonies from another team’s successful transformation, if available, or inoculate your cultures with colonies from the pGAP control plate. Relabel your 15 ml culture tubes accordingly.
2. Prepare a 1% agarose gel and electrophoresis running buffer to analyze the plasmid miniprep restriction enzyme digestion.
Results Analysis of Ligation and Transformation
Count the number of bacterial colonies that grew on the LB amp IPTG agar plates. Occasionally, satellite colonies may grow using this ligation method. Count only the large individual colonies, not the tiny satellite colonies surrounding larger colonies.
Transformation Number of Colonies
Control pGAP plasmid
Plant gene ligation
If the number of colonies is very high and uncountable, enter “TNC” for too numerous to count in the results table.

Ligation 19
Cloning and Sequencing Explorer Series
Ligation – Quick Guide
1. Label a microcentrifuge tube with your initials, plant name,and “ligation.”
2. Briefly spin down the stock tubes of 2x ligation reaction bufferand proofreading polymerase to collect the contents at thebottom of the tube.
3. Set up a blunting reaction with the following reagents.
Reagent Amount
2x ligation reaction buffer 5.0 µl
Purified PCR product 1.0 µl
Sterile water 2.5 µl
Proofreading polymerase 0.5 µl
Total 9.0 µl
4. Close the cap and mix well. Centrifuge briefly to collect thecontents at the bottom of the tube.
5. Place the tube into a water bath at 70ºC for 5 min.
6. Place tube on ice to cool for 2 min.
70°C Water bath
Ice
CH
AP
TE
R 5
QU
ICK
GU
IDE
7. Once cooled, centrifuge briefly to bring contents tothe bottom of the tube and maintain the tube at roomtemperature.
8. Spin down stock tubes of pJET1.2 blunted vector andT4 DNA ligase to collect the contents at the bottom ofthe tubes.
9. Set up a ligation reaction with the following reagents.
Reagent Amount
Blunting reaction(already in microcentrifuge tube)
9.0 µl
T4 DNA ligase 0.5 µl
pJET1.2 blunted vector 0.5 µl
Total 10.0 µl
10. Close the cap on the tube and mix well. Centrifuge brieflyto collect the contents at the bottom of the tube.
11. Incubate the tube at room temperature for 5–10 min.
12. Store the ligation reaction at –20ºC. If proceedingdirectly to transformation step, transfer 5 µl of theligation reaction into a clean microcentrifuge tube andstore on ice.
Ice
CH
AP
TE
R 5
QU
ICK
GU
IDE
Ligation20
Transformation 21
Cloning and Sequencing Explorer Series
Transformation – Quick Guide
Preparation of Competent Cells
1. If not already done, pipet 1.5 mlC-growth medium into a 15 ml culture tube.Label with your initials and warm to 37ºC forat least 10 min.
2. Label 2 LB amp IPTG plates with your initialson the bottom of the plate (not the lid). Alsolabel one plate pGAP and the other for yourligation “pJET plus your plant name.” Placeplates upside down at 37ºC.
3. Pipet 150 µl of fresh starter culture(inoculated yesterday) into the pre-warmedC-growth medium and place in 37ºC waterbath shaking at ≥200–275 rpm for20–40 min.
4. Label a 1.5 ml microcentrifuge tube with yourinitials and “competent cells.”
5. Prepare transformation buffer bycombining 250 µl of transformationreagent A and 250 µl of transformationreagent B into a tube labeled “TF buffer.”Mix thoroughly and keep on ice.
6. After 20–40 min incubation, transfer theactively growing culture in the C-growthmedium from step 3 to your competentcells microcentrifuge tube from step 4.
37°C Shaking water bathC-growth medium
CH
AP
TE
R 6
QU
ICK
GU
IDE
37°C Shaking waterbath
Starter culture
C-growthmedium
Ice
Transformation reagent A
Transformation reagent B
Transformation22
Cloning and Sequencing Explorer Series
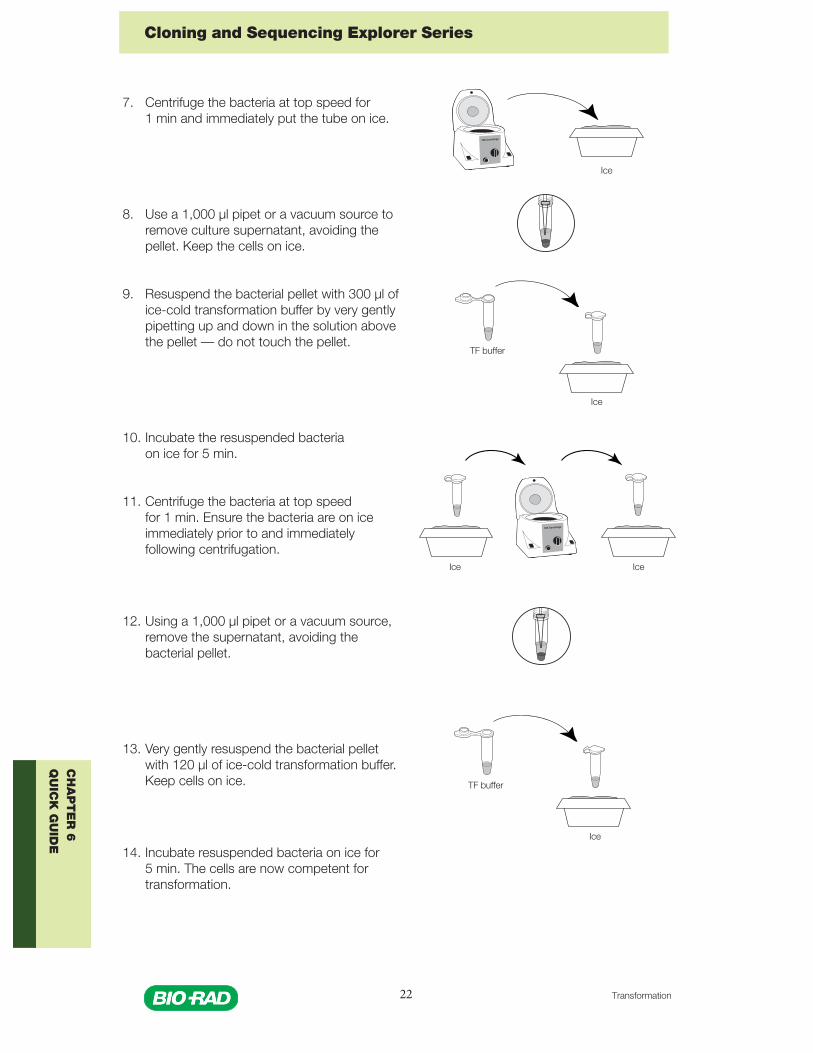
7. Centrifuge the bacteria at top speed for1 min and immediately put the tube on ice.
8. Use a 1,000 µl pipet or a vacuum source toremove culture supernatant, avoiding thepellet. Keep the cells on ice.
9. Resuspend the bacterial pellet with 300 µl ofice-cold transformation buffer by very gentlypipetting up and down in the solution abovethe pellet — do not touch the pellet.
10. Incubate the resuspended bacteriaon ice for 5 min.
11. Centrifuge the bacteria at top speedfor 1 min. Ensure the bacteria are on iceimmediately prior to and immediatelyfollowing centrifugation.
12. Using a 1,000 µl pipet or a vacuum source,remove the supernatant, avoiding thebacterial pellet.
13. Very gently resuspend the bacterial pelletwith 120 µl of ice-cold transformation buffer.Keep cells on ice.
14. Incubate resuspended bacteria on ice for5 min. The cells are now competent fortransformation.
Ice
CH
AP
TE
R 6
QU
ICK
GU
IDE
Ice
TF buffer
Ice Ice
Ice
TF buffer
Transformation 23
Cloning and Sequencing Explorer Series
“Plant name TF”
Ligation
Competentcells
Competentcells
pGAP
Ice
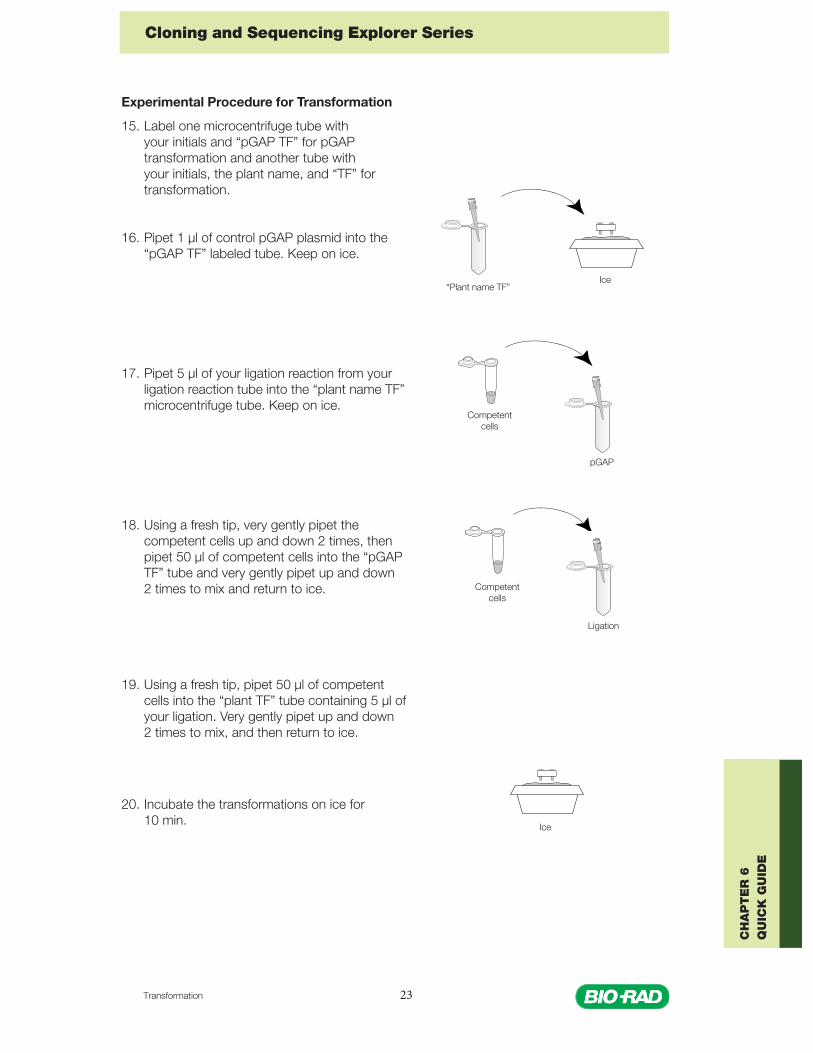
Experimental Procedure for Transformation
15. Label one microcentrifuge tube withyour initials and “pGAP TF” for pGAPtransformation and another tube withyour initials, the plant name, and “TF” fortransformation.
16. Pipet 1 µl of control pGAP plasmid into the“pGAP TF” labeled tube. Keep on ice.
17. Pipet 5 µl of your ligation reaction from yourligation reaction tube into the “plant name TF”microcentrifuge tube. Keep on ice.
18. Using a fresh tip, very gently pipet thecompetent cells up and down 2 times, thenpipet 50 µl of competent cells into the “pGAPTF” tube and very gently pipet up and down2 times to mix and return to ice.
19. Using a fresh tip, pipet 50 µl of competentcells into the “plant TF” tube containing 5 µl ofyour ligation. Very gently pipet up and down2 times to mix, and then return to ice.
20. Incubate the transformations on ice for10 min.
Ice
CH
AP
TE
R 6
QU
ICK
GU
IDE
Transformation24
Cloning and Sequencing Explorer Series
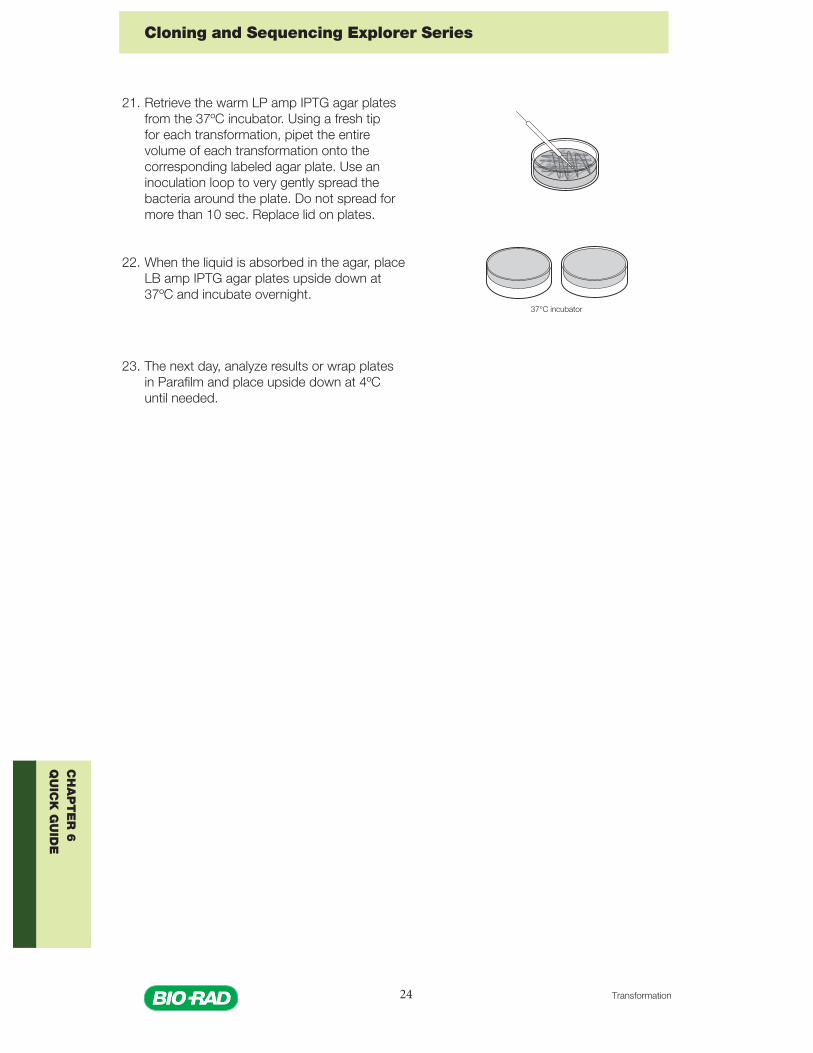
21. Retrieve the warm LP amp IPTG agar platesfrom the 37ºC incubator. Using a fresh tipfor each transformation, pipet the entirevolume of each transformation onto thecorresponding labeled agar plate. Use aninoculation loop to very gently spread thebacteria around the plate. Do not spread formore than 10 sec. Replace lid on plates.
22. When the liquid is absorbed in the agar, placeLB amp IPTG agar plates upside down at37ºC and incubate overnight.
23. The next day, analyze results or wrap platesin Parafilm and place upside down at 4ºCuntil needed.
37°C incubator
CH
AP
TE
R 6
QU
ICK
GU
IDE