chapter 5 proposal creation - alaska
TRANSCRIPT

Chapter 5 - Page 1 of 24 Alaska DOT&PF AWP Preconstruction User Guide revised 2/20
Chapter 5 – Proposal Creation
Contents
5.1 Creating a Proposal ........................................................................................................................ 2
5.2 Adding or Editing General Proposal Information ........................................................................... 5
5.3 Managing Projects on a Proposal ................................................................................................... 7
5.4 Adding or Editing Proposal Time ................................................................................................. 10
5.5 Managing Proposal Workflow ...................................................................................................... 12
5.6 Generating Proposal Sections ..................................................................................................... 13
5.7 Proposal Items & Proposal and Project Items ............................................................................... 16
5.8 Proposal Location Summary ........................................................................................................17
5.9 Proposal Validation ..................................................................................................................... 18
5.10 Proposal Engineer’s Estimate Report ......................................................................................... 21
5.11 DBE Goal Item Selection ............................................................................................................ 22
5.12 Proposal Summary Data Fields .................................................................................................. 23

Chapter 5 - Page 2 of 24 Alaska DOT&PF AWP Preconstruction User Guide revised 2/20
5.1 Creating a Proposal
The Proposal User role has the ability to create or edit proposal information as necessary. A Proposal is
one or more projects grouped together (into a PS&E package) for advertising. Any project items that
were created to Roll Up into one item for bidding will do so at the Proposal level.
This chapter assumes you are already logged into AASHTOWare Project (AWP) Preconstruction as a
Proposal User and the project(s) to be included in the proposal is complete and valid.
There are two ways to create a Proposal. The first is from a project or the primary (controlling) project
(if there will be more than one project). This method automatically pulls the information from the
project from which the proposal was created into the corresponding proposal fields. If there will be
more than one project, the proposal data must then be modified to include the additional project
information and the additional project(s) added to the proposal. The second method of creating a
proposal is from scratch. When creating a proposal from scratch, the Proposal User then imports
project data when adding the project(s) to the proposal.
To create a Proposal from a project (two options):
1. Option 1: From the Project Overview screen (Figure 5.1 and Figure 5.2).
a. (A) Search for the project or the controlling project to be included in the proposal.
b. (B) Expand the project row action menu.
c. (C) Select Create Proposal from Project.
A
B
C
Figure 5.1

Chapter 5 - Page 3 of 24 Alaska DOT&PF AWP Preconstruction User Guide revised 2/20
d. The Proposal Summary component opens up in the General tab.
e. (C) Click <Save>.
2. Option 2: From the Project Summary component (Figure 5.3 and Figure 5.4).
a. From the Project Overview component on the dashboard, search for and select
your project (or the controlling project if more than one project). You will be taken
to the Project Summary component.
b. (A) Expand the Project Summary component action menu on the right side of the
header.
c. (B) Select Create Proposal.
d. The Proposal Summary component opens up in the General tab with some Project
Summary information already populated
e. (C) Click <Save>.
Figure 5.3
A
B
C
Figure 5.2
Figure 5.4
C

Chapter 5 - Page 4 of 24 Alaska DOT&PF AWP Preconstruction User Guide revised 2/20
To create a Proposal from scratch (Figure 5.5 and Figure 5.6):
1. In the Proposal Overview on the dashboard, (A) expand the Proposal component action menu.
2. (B) Select <Add>.
3. Enter in the two required fields:
a. (A) Proposal ID – the State/IRIS number of the project or controlling project (if more
than one project) to be included in the proposal.
b. (B) Proposal Description – The project description(s) of the project(s) to be included in
the proposal.
4. (C) Click <Save>.
NOTE: Project Summary information can be imported from a project added to a proposal created from
scratch. See segment entitled “To add a project to a proposal created from scratch” in the following
section before entering data into Proposal Summary data fields.
A B
Figure 5.5
B
A C
Figure 5.6

Chapter 5 - Page 5 of 24 Alaska DOT&PF AWP Preconstruction User Guide revised 2/20
5.2 Adding or Editing General Proposal Information
Figure 5.7

Chapter 5 - Page 6 of 24 Alaska DOT&PF AWP Preconstruction User Guide revised 2/20
Once you’ve created your proposal, the proposal opens up in the General tab (Figure 5.7). If you created
a Proposal from a Project, you’ll notice that some of the Project Summary information transferred to
the Proposal Summary. Complete the fields using the field tool tips of the Proposal Summary Data
Fields table at the end of this chapter for guidance. Once you are finished, click <Save>. Keep in mind
that fields may be filled out at different times as the proposal progresses through the PS&E phase.
Modifying Proposal Summary General information after a proposal has been created:
1. From the Proposal Overview component on the dashboard, (A) search for and (B) select the
proposal you want to edit or modify (Figure 5.8).
2. Modify as needed using the field tool tips of the Proposal Summary Data Fields table at the
end of this chapter for guidance.
3. Click <Save>.
A
B
Figure 5.8

Chapter 5 - Page 7 of 24 Alaska DOT&PF AWP Preconstruction User Guide revised 2/20
5.3 Managing Projects on a Proposal
The Projects tab contains a list of all the projects currently associated to the proposal. Once a project is
associated to a proposal, it cannot be associated to another proposal unless it is removed from the first
proposal. If a proposal is created from scratch, the project(s) must be associated. If the proposal is
created from a project, the project is already associated. A proposal can contain a single project or
many projects. If you are creating a multiple project proposal, be sure to edit the proposal summary
information to include information for all associated projects.
NOTE: If creating a Proposal with more than one Project, use only the controlling Project ID as the
Proposal ID.
To add a project (or another project) to a proposal (Figure 5.9 – Figure 5.11):
1. (A) In the Proposal Summary, click the Projects tab.
2. (B) Click the <Select Projects> button.
3. (C) Search for the project. NOTE: A minimum of a three (3) character string is required for the
system to search. You can search by Project ID (State/IRIS number) or the Project Name
4. (D) Select the project(s) to be added. Projects selected will be noted with a green checkmark.
5. (E) Click the <Add to Proposal> button on the lower right of the selection window.
B A
Figure 5.9
C
D E
Figure 5.10

Chapter 5 - Page 8 of 24 Alaska DOT&PF AWP Preconstruction User Guide revised 2/20
6. The project(s) added will be displayed on the Projects tab under the Proposal Summary
component.
7. (F) Designate the Controlling Project by checking the Control Proj box in the project row.
To add a project to a proposal started from scratch (Figure 5.12 – Figure 5.15):
1. (A) In the Proposal Summary, click the Projects tab.
2. (B) Click the <Select Projects> button.
3. (C) Search for the project. NOTE: A minimum of a three (3) character string is required for the
system to search. You can search by Project ID (State/IRIS number) or the Project Name
4. (D) Select the project(s) to be added. Projects selected will be noted with a green checkmark.
5. (E) Click the <Add to Proposal> Button on the lower right of the selection window.
Figure 5.11
B A
Figure 5.12
C
D
E
Figure 5.13
F

Chapter 5 - Page 9 of 24 Alaska DOT&PF AWP Preconstruction User Guide revised 2/20
6. (F) Designate the Controlling Project by checking the Control Proj box in the project row.
7. (G) Click <Save>.
8. (H) Expand the row action menu for the controlling project row.
9. (I) Select <Import Project Data> to pull Project Summary information into the Proposal
Summary component.
To remove a project from a Proposal (Figure 5.16):
1. (A) In the Proposal Summary, click the Projects tab.
2. (B) Expand the action menu on the project row for the project you want to remove.
3. (C) Select Remove. The system saves the changes automatically.
NOTES:
If you are removing the controlling project, make sure to designate another project on
the proposal as the controlling project.
If you remove a project from a proposal, remember to modify the Proposal Summary
general tab information to reflect the change.
This process disassociates the project from the proposal. The project is not deleted
from the system, but becomes available to be added to a different proposal.
F
G
Figure 5.14
I
H
Figure 5.15
B
C
A
Figure 5.16

Chapter 5 - Page 10 of 24 Alaska DOT&PF AWP Preconstruction User Guide revised 2/20
NOTE: Proposal Users can navigate to the Project to view project information or update Tentative
Advertising info by clicking the Project link (Figure 5.17).
5.4 Adding or Editing Proposal Time
(Figure 5.18)
1. (A) In the Proposal Summary, click the Time tab.
2. (B) Click <New>.
3. (C) From the Time Type dropdown, select the appropriate time type (Completion Date,
Calendar Days, or Working Days). The time type selection will make either the Completion
Date Calendar field required or the Number of Days field required.
4. (D) In the Liquidated Damages Rate field, enter the correct liquidated damages rate per day
for your proposal
NOTE: The possible LD rates for all the types and sizes of projects was too varied to be
able to populate a set list for users to select from.
5. (E) Click the Completion Date calendar icon and select the appropriate date or in the Number
of Days field, enter the number of calendar days in which the contractor has to complete the
project.
NOTE: If your proposal time is calendar days which must be completed before a completion
date, select Completion Date as your time type, but input the calendar days in the Number of
Days field.
6. (F) Click <Save>.
NOTE: The Proposal Time fields (including the LD rate) are specifically for populating contract
documents. Construction will have the ability to assess LDs (or not) as appropriate.
Figure 5.17

Chapter 5 - Page 11 of 24 Alaska DOT&PF AWP Preconstruction User Guide revised 2/20
To modify a proposal Time record imported is not necessary to delete the existing Time record and
create a new one. Simply modify the existing record:
a. From the Proposal Summary you want to change, click the Time tab.
b. Modify the time record data as necessary.
c. Click <Save>.
To delete a proposal Time record:
d. Locate the Time record you want to delete.
e. Expand the row actions menu on the right side and select Delete (see Figure 5.18). The
Time record is marked for deletion and users may “undo” the action until the user
clicks <Save>.
B
C
D
F
Row Action Menu To Delete
A
E
Figure 5.18

Chapter 5 - Page 12 of 24 Alaska DOT&PF AWP Preconstruction User Guide revised 2/20
5.5 Managing Proposal Workflow
Chapter two (2) contains information on workflow and the eight (8) Alaska DOT&PF workflow phases.
Workflow is only discussed here due to its location within the Proposal Summary component. Proposal
Users and Letting Users only have access to change the workflow phase. All other roles have no access
to workflow. Individuals with Proposal User role will only change the workflow one time, to Proj
Design & Review, when the project is ready to be actively designed. Directions on that specific
workflow phase change are detailed in chapter three (3).
To update the proposal workflow (Figure 5.19):
1. (A) From the Proposal Summary component click the Workflow tab.
2. (B) From the Workflow dropdown, select Alaska DOT&PF.
3. (C) From the Workflow Phase dropdown, select the appropriate workflow phase.
4. (D) Click <Save>.
Figure 5.19
Make a selection
when appropriate C
D B
A
Chapter 5 - Page 13 of 24 Alaska DOT&PF AWP Preconstruction User Guide revised 2/20
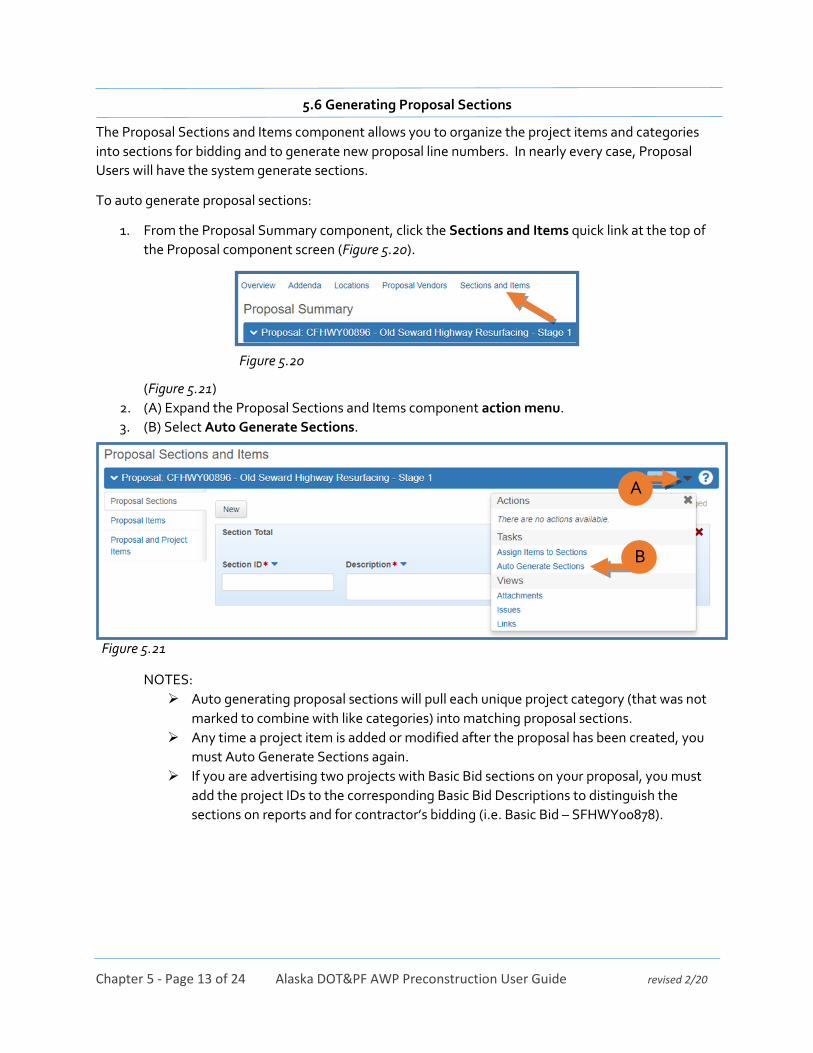
5.6 Generating Proposal Sections
The Proposal Sections and Items component allows you to organize the project items and categories
into sections for bidding and to generate new proposal line numbers. In nearly every case, Proposal
Users will have the system generate sections.
To auto generate proposal sections:
1. From the Proposal Summary component, click the Sections and Items quick link at the top of
the Proposal component screen (Figure 5.20).
(Figure 5.21)
2. (A) Expand the Proposal Sections and Items component action menu.
3. (B) Select Auto Generate Sections.
NOTES:
Auto generating proposal sections will pull each unique project category (that was not
marked to combine with like categories) into matching proposal sections.
Any time a project item is added or modified after the proposal has been created, you
must Auto Generate Sections again.
If you are advertising two projects with Basic Bid sections on your proposal, you must
add the project IDs to the corresponding Basic Bid Descriptions to distinguish the
sections on reports and for contractor’s bidding (i.e. Basic Bid – SFHWY00878).
Figure 5.20
A
B
Figure 5.21

Chapter 5 - Page 14 of 24 Alaska DOT&PF AWP Preconstruction User Guide revised 2/20
For proposals with additive alternates or multiple NTPs, uncheck the Basic Bid box for all but
the actual Basic Bid section (or NTP 1 section for aviation projects) (Figure 5.22 and Figure 5.23).
4. Click <Save>.
To manually generate proposal sections (Figure 5.24 - Figure 5.26):
NOTE: This function will be used only in very rare cases.
1. From the Proposal Summary component, click the Sections and Items quick link at the top of
the Proposal component screen (see Figure 5.20).
2. (A) Enter the section ID/name in the Section ID field.
3. (B) Enter the section description in the Description field.
4. (C) Click <Save>.
Figure 5.22
Figure 5.23

Chapter 5 - Page 15 of 24 Alaska DOT&PF AWP Preconstruction User Guide revised 2/20
5. (D) Expand the Proposal Sections and Items component actions menu.
6. (E) Select Assign Items to Sections.
7. (F) Mark the appropriate radio button to assign individual items to a section.
8. (G) Click <Save>.
C
B A
Figure 5.24
Figure 5.25
D
E
F G
Figure 5.26

Chapter 5 - Page 16 of 24 Alaska DOT&PF AWP Preconstruction User Guide revised 2/20
5.7 Proposal Items & Proposal and Project Items
The Proposal Items tab provides a read-only summary view of the bid schedule items in the proposal,
except the Bid Schedule Supplemental Description and the DBE designation. Adding/deleting items or
changes to items (quantity or unit price changes) must be made at the project item level (in the Project
User role).
1. From the Proposal Summary component, click the Sections and Items quick link at the top of
the Proposal component screen (see Figure 5.20).
2. Select the Proposal Items tab (Figure 5.27).
3. Review the Proposal Items for accuracy.
NOTES:
This is the bid schedule that contractors will see in Bids/Bid Express.
This screen is where items are marked as DBE (and the DBE Work Category chosen) to be
included in the DBE goal. The person assigned this task varies from region to region. See
DBE/OJT Goal Creation chapter six (6).
If you add new items to one or more of the projects on the proposal after you have generated
sections, you must Auto Generate Sections again to make sure the new project items are
transitioned to proposal items.
To view Proposal and Project Items:
1. Select the Proposal and Project Items tab (Figure 5.28).
Figure 5.27
Figure 5.28

Chapter 5 - Page 17 of 24 Alaska DOT&PF AWP Preconstruction User Guide revised 2/20
2. Click the Expand/Collapse arrow for a proposal item to view the associated project items
(Figure 5.29).
Each proposal item contains its project item or items (Figure 5.30). Roll Up items will appear under their
proposal item. The number of project items contained within a proposal item is listed.
5.8 Proposal Location Summary
The Proposal Location summary contains a read-only view of the information related to where the work
will take place for all projects in the proposal. Proposal Users can view but not change the information.
Changing location information must be done on the Project Summary (in the Project User role).
Proposal Location information is reached by clicking the Locations quick link on the top of the Proposal
Summary component screen (Figure 5.31).
Project Line Numbers
Roll Up Supp Descr
Proposal Item
Project Items
Figure 5.29
Figure 5.30
Figure 5.31
Chapter 5 - Page 18 of 24 Alaska DOT&PF AWP Preconstruction User Guide revised 2/20
Information is grouped on five tabs that correspond to the project tabs (Figure 5.32):
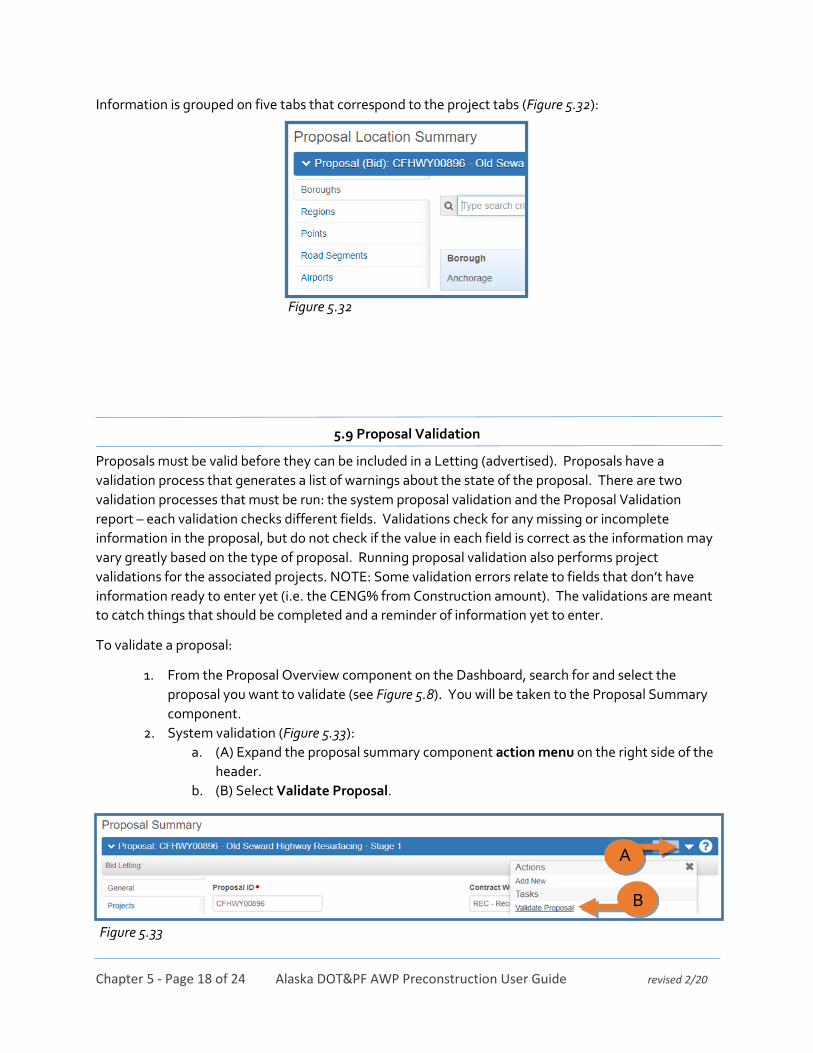
5.9 Proposal Validation
Proposals must be valid before they can be included in a Letting (advertised). Proposals have a
validation process that generates a list of warnings about the state of the proposal. There are two
validation processes that must be run: the system proposal validation and the Proposal Validation
report – each validation checks different fields. Validations check for any missing or incomplete
information in the proposal, but do not check if the value in each field is correct as the information may
vary greatly based on the type of proposal. Running proposal validation also performs project
validations for the associated projects. NOTE: Some validation errors relate to fields that don’t have
information ready to enter yet (i.e. the CENG% from Construction amount). The validations are meant
to catch things that should be completed and a reminder of information yet to enter.
To validate a proposal:
1. From the Proposal Overview component on the Dashboard, search for and select the
proposal you want to validate (see Figure 5.8). You will be taken to the Proposal Summary
component.
2. System validation (Figure 5.33):
a. (A) Expand the proposal summary component action menu on the right side of the
header.
b. (B) Select Validate Proposal.
Figure 5.32
A
B
Figure 5.33

Chapter 5 - Page 19 of 24 Alaska DOT&PF AWP Preconstruction User Guide revised 2/20
c. A Proposal Validation Results window will open in a new tab and will notify you
whether this is a valid proposal (Figure 5.34) or will list warnings for missing or
invalid data (Figure 5.35).
NOTE: Zero quantity Contingent Sum items will show up as warnings. These are okay,
just make sure they are actually your zero quantity CS items. Each item will show up in
two errors, the project item error and the proposal item error. Fix any other validation
errors.
3. Report validation (Figure 5.36):
a. (A) Expand the Proposal Summary component action menu on the right side of the
header.
b. (B) Select Proposal Validation Report.
Figure 5.34
Figure 5.35
Figure 5.36
B
A

Chapter 5 - Page 20 of 24 Alaska DOT&PF AWP Preconstruction User Guide revised 2/20
c. Click <Execute>.
d. A new tab will open with the Proposal Validation Report and will notify you whether
this proposal is valid or will list warnings for missing or invalid data (see Figure 5.34
and Figure 5.35).
4. Correct any errors identified and validate the proposal again.
C
Figure 5.37

Chapter 5 - Page 21 of 24 Alaska DOT&PF AWP Preconstruction User Guide revised 2/20
5.10 Proposal Engineer’s Estimate Report
Generating the Proposal level Engineer’s Estimate PDF report or XLS spreadsheet:
1. From the Proposal Overview component on the Dashboard, search for and select the
proposal (see Figure 5.8). You will be taken to the Proposal Summary component.
(Figure 5.38)
2. (A) Expand the Proposal Summary component action menu on the right side of the header.
3. (B) Select Proposal Engineer’s Estimate or Proposal Engineer’s Estimate-XLS.
4. (C) Click <Execute> (Figure 5.39).
For a full list of reports, see chapter 10.
Figure 5.38
B
A
C
Figure 5.39
Chapter 5 - Page 22 of 24 Alaska DOT&PF AWP Preconstruction User Guide revised 2/20
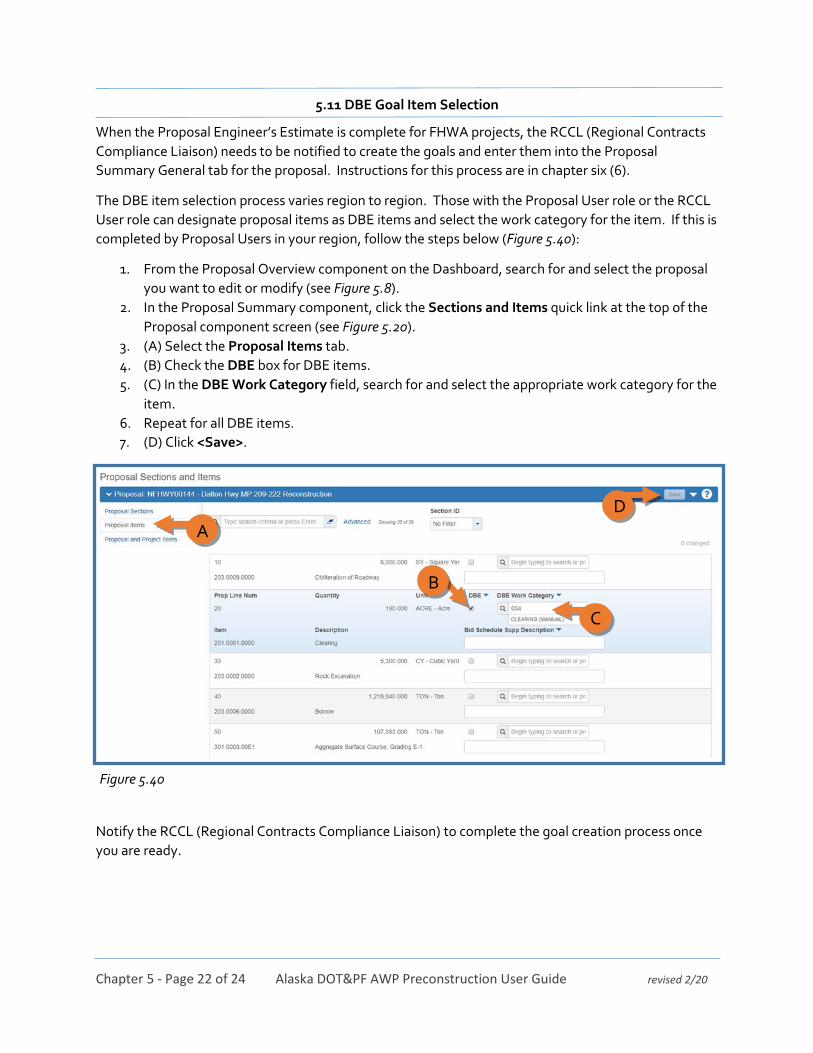
5.11 DBE Goal Item Selection
When the Proposal Engineer’s Estimate is complete for FHWA projects, the RCCL (Regional Contracts
Compliance Liaison) needs to be notified to create the goals and enter them into the Proposal
Summary General tab for the proposal. Instructions for this process are in chapter six (6).
The DBE item selection process varies region to region. Those with the Proposal User role or the RCCL
User role can designate proposal items as DBE items and select the work category for the item. If this is
completed by Proposal Users in your region, follow the steps below (Figure 5.40):
1. From the Proposal Overview component on the Dashboard, search for and select the proposal
you want to edit or modify (see Figure 5.8).
2. In the Proposal Summary component, click the Sections and Items quick link at the top of the
Proposal component screen (see Figure 5.20).
3. (A) Select the Proposal Items tab.
4. (B) Check the DBE box for DBE items.
5. (C) In the DBE Work Category field, search for and select the appropriate work category for the
item.
6. Repeat for all DBE items.
7. (D) Click <Save>.
Notify the RCCL (Regional Contracts Compliance Liaison) to complete the goal creation process once
you are ready.
D
C
A
B
Figure 5.40

Chapter 5 - Page 23 of 24 Alaska DOT&PF AWP Preconstruction User Guide revised 2/20
5.12 Proposal Summary Data Fields

Chapter 5 - Page 24 of 24 Alaska DOT&PF AWP Preconstruction User Guide revised 2/20