chapter 6 information management with outlook - … · chapter 6 information management with ......
TRANSCRIPT

CHAPTERSIX: INFORMATIONMANAGEMENTWITHOUTLOOK 1
OMA241–INTEGRATEDOFFICEAPPLICATIONS|
TOPIC
GettingStartedWithOutlookandE-mail
CreateandManageContacts
UseCalendartoScheduleAppointments
CreateandUseTasks
UseNotesandJournal
ManageMessages
Chapter 6
INFORMATIONMANAGEMENTWITH
OUTLOOK

CHAPTERSIX: INFORMATIONMANAGEMENTWITHOUTLOOK 2
OMA241–INTEGRATEDOFFICEAPPLICATIONS|
Outlook isa full-featuredpersonal informationmanagementprogramthatprovides the tools youneed to be organized in today’s electronicworld. Themajor components of Outlook thatwill becoveredinthemoduleare:•Mail—providesatoolforsending,receiving,andmanagingyoure-mail• Contacts—an electronic address book that holds names, addresses, phone numbers, and otherpertinentinformation•Calendar—keepstrackofyourappointmentsandschedule•Tasks—anelectronic“to-do”list•Notes—stickynotes,oranotepadforyourcomputer• Journal—record activities based on contact Outlook has the ability to integrate all of itscomponents and link them. It can keep you organizedwith its ability to help you track and findactivitiespertainingtoaparticularperson,topic,location,date,orevent
OutlookScreen
LESSON 1 GETTINGSTARTEDWITH
OUTLOOKANDE-MAIL
Navigation Pane
YoucancustomizetheReadingPanetoappearbelowtheInbox,orturnitoff.
People Pane
Reading Pane
Inbox

CHAPTERSIX: INFORMATIONMANAGEMENTWITHOUTLOOK 3
OMA241–INTEGRATEDOFFICEAPPLICATIONS|
ComposeandSendE-mail
1) ClickNewE-mailtoopenaMessageform
• Keyrecipientaddress
• Keyaddressofanyonereceivingacopy
• Keysubjectlineandbodyofmessage
2) ClickSendbutton
v YoucanindicatewhetheramessageisofhighorlowimportancebyclickingtheappropriatebuttonintheTagsgroupoftheMessagetab.
v Tocreateadraftofamessageyoucaneditatalatertime,clicktheSavebutton
andclosethemessage.
WorkwithE-mailMessages
1) UseMailwindowto:
• ReceivemessagesandreadthemintheReadingPane
• Replytoamessage
• Forwardamessage
• Deleteamessage
v Toretrievethemessage,selecttheDraftsfolderintheNavigationPaneanddouble-clickthesavedmessage.(Outlookusedyoursubjectlinetonamethemessage.)

CHAPTERSIX: INFORMATIONMANAGEMENTWITHOUTLOOK 4
OMA241–INTEGRATEDOFFICEAPPLICATIONS|
SendaMessagewithanAttachment
1) ClickAttachFileontheMessagetabortheInserttab
2) UsetheInsertFiledialogboxtonavigatetothelocationofthefiletoattach
3) AttachedfilenamedisplaysintheAttachedboxonthemessage
CHAPTERSIX: INFORMATIONMANAGEMENTWITHOUTLOOK 5
OMA241–INTEGRATEDOFFICEAPPLICATIONS|
ActivityOL1-2:SendMessage
a) ClickNewE-mailtodisplaytheUntitled-Messagewindow;addressamessagetoyourself.
b) KeyMeetingwithSuniEngineeringintheSubjectbox.
c) Keythefollowingmessage:
I would like to arrange a meeting with Suni Engineering at 2:00 on [insert a date that is one week from today]. The meeting will be held in one of our conference rooms. Will you be able to attend? Let me know by[insert the day after tomorrow] so that I can make the necessary arrangements.
d) IndicatethatthemessageisurgentbyclickingtheHighImportancebutton.e) ClicktheSendbutton.
ActivityOL1-2:CreateWordAttachment
a) KeythefollowingdocumentinWord2010.FormattheheadingasHeading1andapplytheFlowthemetothedocument.
b) SaveitasTrackingandFlaggingMessagestoyourfolderChapter5 Tracking and Flagging Messages
Many of the e-mail messages that you receive are read and then discarded. Some messages can be responded to immediately. Other messages may require that you deal with them at a later time. Outlook 2010 has a feature that allows you to flag messages to draw your attention to them. It even takes this concept one step further by creating the message as a task with a due date. It then automatically places the item in your To-Do List with the follow-up date you assigned.
CLASSACTIVITY

CHAPTERSIX: INFORMATIONMANAGEMENTWITHOUTLOOK 6
OMA241–INTEGRATEDOFFICEAPPLICATIONS|
ActivityOL1-3:CreateE-mailandSaveasDraft
a) Createthefollowinge-mailmessagetoyourself.Markthemessageasbeingoflowimportance.Thesubjectofthee-mailisTrackingandFlaggingMessages.Includethefollowingmessage:Downloadthisattachmentandreadaboutthefollow-upflaggingfeature.Itrieditandreallyfindittobeuseful.
b) Savethee-mailbyclickingtheSavebuttonontheQuickAccessToolbar.Themessagehasbeensavedasadraft.
c) Closethemessage.
ActivityOL1-4:AttachFile,Forward,Delete,andMoveMessages
a) Findthee-mailTrackingandFlaggingMessagesinyourDraftsfolder.Double-clickthemessagetoopenit.
b) Attach theWord file thatyoucreated inOL1-Activity2 to themessage. Printandsendthemessage.
c) Openthee-mailandforwardacopytoaclassmateoryourteacher.d) Delete the messages Meeting with Suni Engineering and Tracking and Flagging
Messages.e) Display theDeleted Items folder. Movebothmessagesback to the Inbox folder.
PrintthemessagesinyourInboxfolderinTableStyleandlabeltheprintout.f) ClicktheSentItemsfolder;printthemessagesinSentItemsinTableStyle.

CHAPTERSIX: INFORMATIONMANAGEMENTWITHOUTLOOK 7
OMA241–INTEGRATEDOFFICEAPPLICATIONS|
TheContacts feature serves as an electronic address book. All the information that youneedtocommunicateandconductbusiness—suchasname,address,telephonenumber,e-mailaddress,andWebpageaddress—isstoredindatabasefieldsinContactsWindow
ContactsWindow
LESSON 2 CREATEANDMANAGECONTACTS
Contacts display by default as business cards

CHAPTERSIX: INFORMATIONMANAGEMENTWITHOUTLOOK 8
OMA241–INTEGRATEDOFFICEAPPLICATIONS|
AddaContact
1) UseaContactformtoaddanewcontact
2) ClickHomeà Newà NewContact
§ Click Full Name button to addmoredetailednameinfo
§ Clickarrowstotherightofbuttonsto select additional info such ashomeaddress
AddContactfromSameCompany
Twooptions:
1) CreatenewcontactfromContactswindowHomeàNewàNewItemsàContactfromtheSameCompany
2) CreatenewcontactwhileinContactformContactàActionsàSave&Newà ContactfromtheSameCompany
§ Contactformopenswithcompanynamealreadyfilledin

CHAPTERSIX: INFORMATIONMANAGEMENTWITHOUTLOOK 9
OMA241–INTEGRATEDOFFICEAPPLICATIONS|
WorkwithCategories
§ Use category colors to organizeOutlookitems
o Renameacategoryoraddnewcolortocustomize
§ ApplyacategorytoanitemusingCategorizelist
§ Categories can be applied to allother Outlook items, such asmessages,tasks,appointments,andnotes
ChangeViews
§ UseCurrent Viewoptions ontheHome tabtodisplaycontacts in adifferent view
§ List viewshowscontactsgrouped bycategory
ClickAllCategoriestoapplymorethanonecategorytoanitem.

CHAPTERSIX: INFORMATIONMANAGEMENTWITHOUTLOOK 10
OMA241–INTEGRATEDOFFICEAPPLICATIONS|
PeoplePane
§ UsethePeoplePanetoseeinformationaboutacontacto Recente-mailmessageso Attachmentso Upcomingmeetingso Activityfeedsfrombusinessandsocialnetworks
§ CollapsethePeoplePaneusingthedownarrowwhenyouhavefinishedviewing
items
CHAPTERSIX: INFORMATIONMANAGEMENTWITHOUTLOOK 11
OMA241–INTEGRATEDOFFICEAPPLICATIONS|
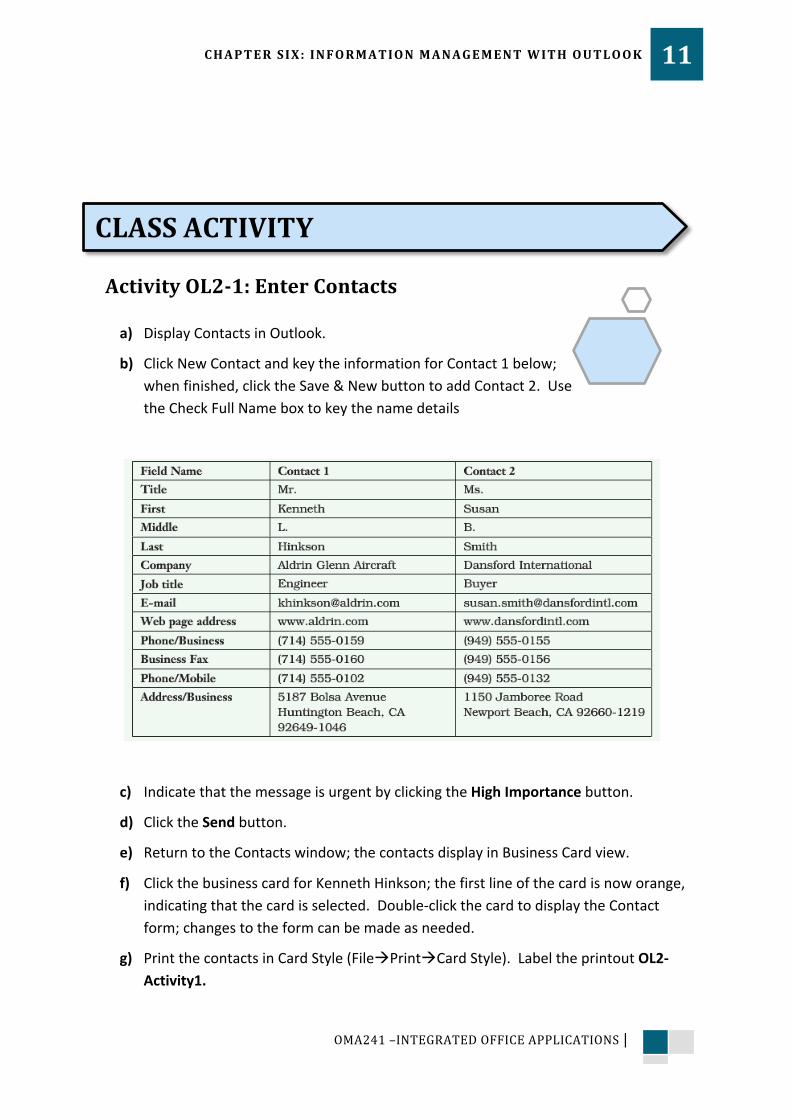
ActivityOL2-1:EnterContacts
a) DisplayContactsinOutlook.
b) ClickNewContactandkeytheinformationforContact1below;whenfinished,clicktheSave&NewbuttontoaddContact2.UsetheCheckFullNameboxtokeythenamedetails
c) IndicatethatthemessageisurgentbyclickingtheHighImportancebutton.
d) ClicktheSendbutton.
e) ReturntotheContactswindow;thecontactsdisplayinBusinessCardview.
f) ClickthebusinesscardforKennethHinkson;thefirstlineofthecardisnoworange,indicatingthatthecardisselected.Double-clickthecardtodisplaytheContactform;changestotheformcanbemadeasneeded.
g) PrintthecontactsinCardStyle(FileàPrintàCardStyle).LabeltheprintoutOL2-Activity1.
CLASSACTIVITY

CHAPTERSIX: INFORMATIONMANAGEMENTWITHOUTLOOK 12
OMA241–INTEGRATEDOFFICEAPPLICATIONS|
ActivityOL2-2:Edit,AddandPrintContacts
a) ChangeSusanSmith’smobilephonenumber:Double-clickSusan’sbusinesscardtoopenherContactform.Changethemobilephonenumberto(949)555-0130.
b) Addthefollowingcontacts.Thesepeoplearefromthesamecompaniesasprevious
contacts,soyoucanusetheContactfromtheSameCompanyfeature.
c) Afteryoufinishaddingallthecontacts,viewthemintheContactswindow.PrintallthecontactsinMediumBookletStyle.LabeltheprintoutasOL2-Activity2.
ActivityOL2-3:RenameandAddCategoriesa) Renamethecategoriesasfollows:
Color CategoryName Blue Business GreenSupplier Orange KeyCustomer Red ImportantContact
b) Assignthefollowingcategoriestoyourcontacts.
NameofContact CategoryHinkson Business
Smith Business,KeyCustomerRamirez Business,ImportantContactTruong Business,Supplier
CHAPTERSIX: INFORMATIONMANAGEMENTWITHOUTLOOK 13
OMA241–INTEGRATEDOFFICEAPPLICATIONS|
c) Viewthecontactsbycategory(ViewàCurrentViewàChangeViewàListàArrangementàCategories).PrintthelistinTableStyle;labeltheprintout.
Outlook1–CreateContacts
1) ChangetheviewtoBusinessCardview.2) AddthecontactsinthecontactsdatafiletoyourContactsfolder.3) RenamethepurplecategoryasVendor.4) PrintthecontactsbycategoryinTableStyle(ListViewàCategoriesarrangement,
Print).LabeltheprintoutOL1-Contacts-Name.
Outlook2–SearchandEditContacts,UseMapIt,andDisplayPeoplePane
1) UseSearchContactstofindJudithEnglewood.Addherhomephone(310)555-0110
tohercontactrecord.
2) Use Find a Contact to find the contact information for Hillary Richardson. Add ahomeaddressforher:43NiguelVillageDrive,LagunaNiguel,CA92677-4027.
3) Add your name, home address, and e-mail address to Contacts. Remember tochangetheaddressbuttontoHome.Clicktheuparrowinthelower-rightcornertoexpandthePeoplePane.Alistofrecentmessagessenttoyoudisplays.Clickononeofthemessagestodisplaythemessageinthee-mailwindow.ViewyouraddressonthemapbyclickingtheMapItbutton,locatedattherightoftheaddressboxintheContactform.Closeyourbrowser.
4) AddoneofyourclassmatestoContacts, includinghisorhername,address,phonenumber, and e-mail address. Rename the yellow category Classmate. Assign theClassmatecategorytoyourclassmate.Savethecontact.UseSearchContactstofindandopen the contact. Send an e-mail from theContact form to your classmate,givinghimorherthedirectionsonhowtosendane-maildirectlyfromtheContactform.
Let’sApplyIt.

CHAPTERSIX: INFORMATIONMANAGEMENTWITHOUTLOOK 14
OMA241–INTEGRATEDOFFICEAPPLICATIONS|
5) AddasecondclassmatetoContacts.AssigntheClassmatecategory.UseMapIttolocatetheclassmate’saddressonthemap.
6) ClicktheSearchContactsboxintheContactswindow;theSearchtabdisplays.Clickthe Categorized button, and then click Classmate. The two classmates that youenteredinsteps4and5display.Closethesearch.
7) InOutlookMail,clickSentItems.ClickintheSearchSentItemsbox.IntheSearchtab,clicktheSentTodrop-listarrowandchooseSentTo: MeorCC: Me. Thee-mailsthatyousenttoyourselfdisplay.Closethesearch.
8) Display yourMail Inbox screen. On theHome tab, in the Find group, click Find aContact. Key your name and tap ENTER. Your Contact form displays. Close thesearch.
9) ClicktheSearchboxintheInboxscreenandsearchforalle-mailsfromoneofyourclassmates.Closethesearch.
10) DisplayallthecontactsthathavebeencategorizedasVendors.Closethesearch.
11) DisplayallcontactsthathaveajobtitleofBuyer.(ClickSearchbox,More,JobTitle,keyBuyerintheJobTitlebox;tapENTER.)Closethesearch.
12) PrintallthecontactsbycategoryinTableStyleandlabeltheprintout.

CHAPTERSIX: INFORMATIONMANAGEMENTWITHOUTLOOK 15
OMA241–INTEGRATEDOFFICEAPPLICATIONS|
TheCalendarfeatureisanessentialtoolfororganizingbothbusinessandpersonalactivities.Youcanscheduleappointments,events,andmeetingswithOutlook.Outlookprovidesmanywaystoviewthecalendar,aswellasallowingyoutosharethecalendarwithothers
CalendarWindow
LESSON 3 USECALENDARTOSCHEDULE
APPOINTMENTS
Date Navigator
Daily Task List
Today button Day, Week, Month buttons

CHAPTERSIX: INFORMATIONMANAGEMENTWITHOUTLOOK 16
OMA241–INTEGRATEDOFFICEAPPLICATIONS|
ScheduleanAppointment
a) ClickHomeàNewàNewItem-->AllDayEvent
b) ClickinCalendarandkeyappointment;adjustlengthofappointmentbydragging-or-
c) OpenAppointmentformtoaddmoredetails
d) UseAppointmentformtoscheduleevents(allday)
SetaRecurringAppointment
§ Forappointmentsthatare
scheduled on a regularbasis:
SetaremindertohaveOutlookalertyoufortheappointment.

CHAPTERSIX: INFORMATIONMANAGEMENTWITHOUTLOOK 17
OMA241–INTEGRATEDOFFICEAPPLICATIONS|
a) CreatetheappointmentandclickRecurrenceb) Specifythepatternofrecurrencec) Specifyanenddateifdesired
MaintainMultiple
Calendars
§ Usemultiplecalendarstokeeptrackofappointmentsformorethanonepersonortoshowpersonalappointments
§ DisplaycalendarssidebysideorinOverlayviewtomakeiteasytoscheduleonbothcalendarsatthesametime
a) FollowthepathtodisplaytheCreateNewFolderdialogbox.
b) Keythenameofthefolder.
c) SelectCalendarItemsintheFoldercontainsdroplist,ifnecessary.
d) IntheSelectwheretoplacethefolderlist,selectCalendar.ClickOK.
e) ThenewPersonalfolderisnowlistedintheNavigationPane.ClickthecheckboxtotheleftofPersonalfoldertodisplaythepersonalcalendarsidebysidewithyouroriginalcalendar.

CHAPTERSIX: INFORMATIONMANAGEMENTWITHOUTLOOK 18
OMA241–INTEGRATEDOFFICEAPPLICATIONS|
f) Tooverlaythecalendars,clicktheViewtab.IntheArrangementgroup,clickOverlay.Thecalendarsbecometransparentandarenowstackedtodisplaycommonfreetimeslots.
ScheduleaMeeting
Outlookautomaticallyaddsthemeetingtoyourcalendarandtothecalendarofallwhoacceptyourmeetinginvitation.
a) ClickHomeà Newà NewMeeting
b) Keythee-mailaddressesofpeoplewhowillbeinvitedtothemeeting.
c) Keythesubject,location,date,time,andanymessagethatneedstobeincluded;thenclicktheSendbutton.
d) Thebuttonstoaccept,decline,orproposeanewtimeforthemeetingdisplayatthetopoftherecipients’meetinginvitation
§ Oncetherecipientclicksontheresponsebutton,ane-mailisautomaticallysent
tothepersonsettingupthemeeting
SendCalendarinE-mail
a) ClickHomeà Shareà EmailCalendar
b) Ifyouworkwithmultiplecalendars,clicktheCalendardownarrowandselectthecalendaryouwanttoe-mail.
c) ClicktheDateRangedownarrowandspecifythetimeperiodofthecalendar.
CHAPTERSIX: INFORMATIONMANAGEMENTWITHOUTLOOK 19
OMA241–INTEGRATEDOFFICEAPPLICATIONS|
d) ClicktheDetaildownarrowandspecifytheamountofinformationyouwantincludedinthecalendar.ClickOK.
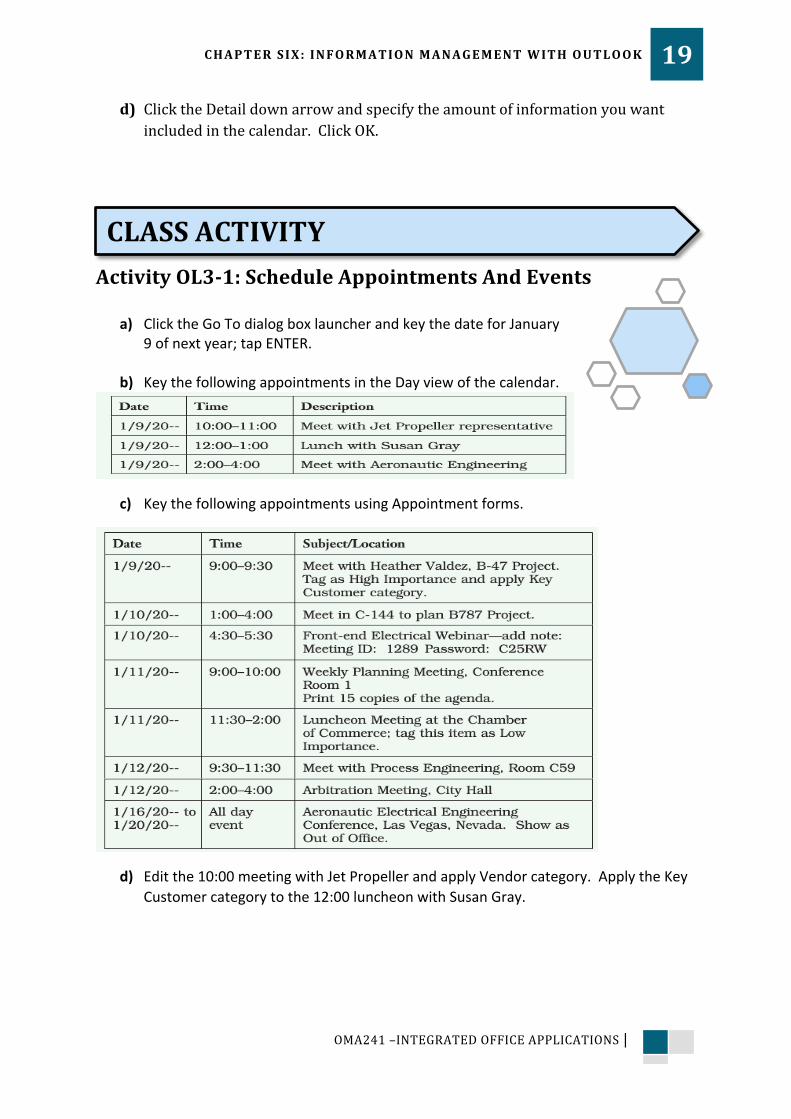
ActivityOL3-1:ScheduleAppointmentsAndEvents
a) ClicktheGoTodialogboxlauncherandkeythedateforJanuary9ofnextyear;tapENTER.
b) KeythefollowingappointmentsintheDayviewofthecalendar.
c) KeythefollowingappointmentsusingAppointmentforms.
d) Editthe10:00meetingwithJetPropellerandapplyVendorcategory.ApplytheKeyCustomercategorytothe12:00luncheonwithSusanGray.
CLASSACTIVITY

CHAPTERSIX: INFORMATIONMANAGEMENTWITHOUTLOOK 20
OMA241–INTEGRATEDOFFICEAPPLICATIONS|
ActivityOL3-2:SetRecurringAppointmentandReminder
a) Double-click theWeekly Planning Meeting set for 1/11. Make this a recurringappointment that will meet on the same day of the week for the next 12occurrences.Setaremindertodisplay15minutesbeforethemeeting.
b) Double-click the Luncheon Meeting at the Chamber of Commerce scheduled for1/11.
c) Makethisarecurringappointmentthatwillmeetthesameday,inthesecondweekofeverymonth.TheendoftherangeofrecurrencewillbeinDecember.
d) ClickOKtoclosetheAppointmentRecurrencedialogbox.Setaremindertodisplay30 minutes before the appointment. Click Save & Close to close the LuncheonMeetingAppointmentform.
ActivityOL3-3:CreatePersonalCalendara) CreateapersonalfoldernamedPersonal—xx(useyourinitialsinplaceofthexx).
b) PlacethenewfolderintheCalendarfolder.
c) Clickthecheckboxtotheleftofyourpersonalfoldertodisplaythecalendarssidebyside.
d) Add a dentist appointment from 4:30 to 5:30 on January 9 of next year to yourpersonalcalendar.
e) Overlaythecalendars(ViewàArrangementàOverlay).
ActivityOL3-4:ScheduleaMeetinga) Sendameetinginvitationtoaclassmateinvitinghimorhertoastudygroupsession
nextweekinthestudentlounge.
b) Ask the classmate to accept the invitation; the meeting will be placed on yourcalendar.
CHAPTERSIX: INFORMATIONMANAGEMENTWITHOUTLOOK 21
OMA241–INTEGRATEDOFFICEAPPLICATIONS|
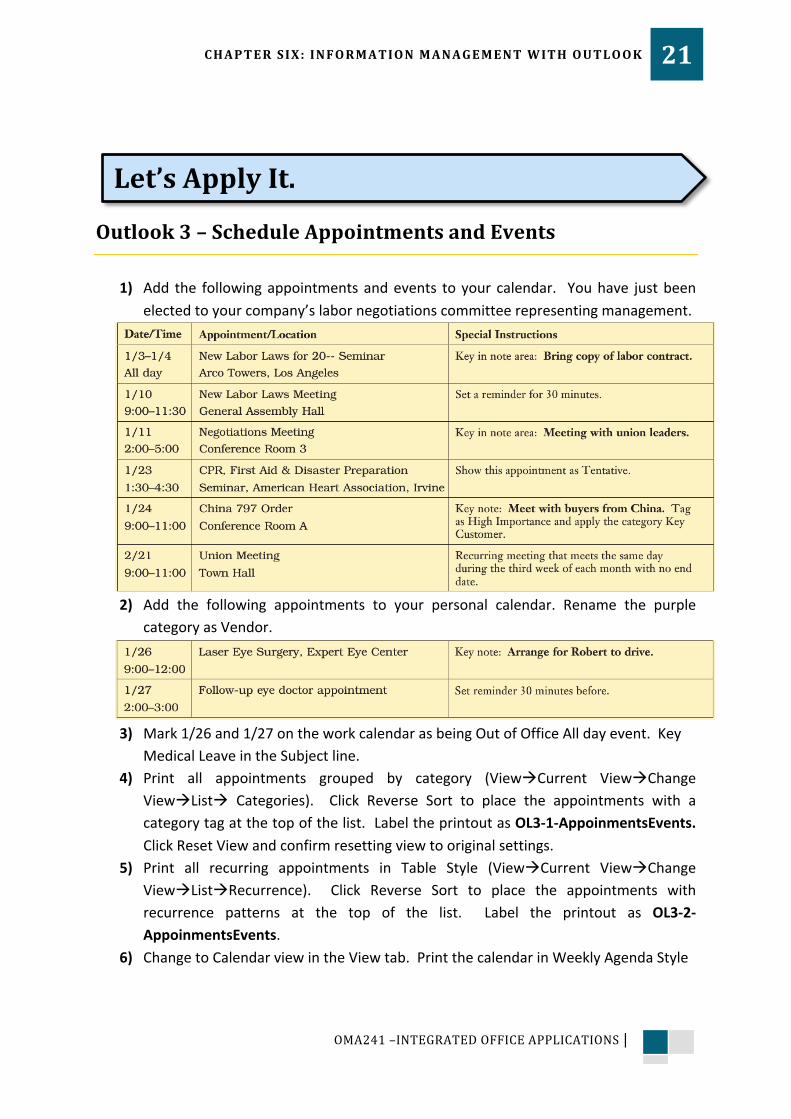
Outlook3–ScheduleAppointmentsandEvents
1) Add the followingappointmentsandevents to your calendar. Youhave justbeenelectedtoyourcompany’slabornegotiationscommitteerepresentingmanagement.
2) Add the following appointments to your personal calendar. Rename the purple
categoryasVendor.
3) Mark1/26and1/27ontheworkcalendarasbeingOutofOfficeAlldayevent.Key
MedicalLeaveintheSubjectline.4) Print all appointments grouped by category (ViewàCurrent ViewàChange
ViewàListà Categories). Click Reverse Sort to place the appointments with acategorytagatthetopofthelist.LabeltheprintoutasOL3-1-AppoinmentsEvents.ClickResetViewandconfirmresettingviewtooriginalsettings.
5) Print all recurring appointments in Table Style (ViewàCurrent ViewàChangeViewàListàRecurrence). Click Reverse Sort to place the appointments withrecurrence patterns at the top of the list. Label the printout as OL3-2-AppoinmentsEvents.
6) ChangetoCalendarviewintheViewtab.PrintthecalendarinWeeklyAgendaStyle
Let’sApplyIt.

CHAPTERSIX: INFORMATIONMANAGEMENTWITHOUTLOOK 22
OMA241–INTEGRATEDOFFICEAPPLICATIONS|
7) between the dates of 1/3 and 2/24 (FileàPrintàWeekly Agenda StyleàPrintOptionsàPrint range Start 1/3/20-- End 2/24/20--). Label the printout. OL3-3-
AppoinmentsEvents.
TheTasksfeatureinOutlookhelpsyoukeeptrackofthingsthatyouneedtodo.Ataskisanitem that you can track. For example, you can track the status of the task, change thepercentage completed, assign the task to someone else, or have it recur over time.Incompletetasksorotheritemsyoumarkedforfollow-upwilldisplayintheTo-DoBar.Youcancreateto-doitemsfromotherOutlookitemssuchasmessagesorcontacts. Wheneveryoucreateatask,Outlookalsocreatesato-doitemwiththesamename
TasksWindow
LESSON 4 CREATEANDUSETASKS
Tasks shown in Simple List view
Overdue task
Completed task
To-Do Bar

CHAPTERSIX: INFORMATIONMANAGEMENTWITHOUTLOOK 23
OMA241–INTEGRATEDOFFICEAPPLICATIONS|
AddaNewTask
a) ClickHomeà Newà NewTask
b) Click“ClickheretoaddanewTask”boxinTaskswindow-or-OpenaTaskformtoaddmoredetails
c) Specifystartandduedate,status,priority
d) Setareminderifdesired
ToCreateaTaskRequest
a) ClickHomeàNewàNewItemsàTaskRequest
b) Completetheformwiththetaskinformationandtheassignee’se-mailaddress

CHAPTERSIX: INFORMATIONMANAGEMENTWITHOUTLOOK 24
OMA241–INTEGRATEDOFFICEAPPLICATIONS|
c) Theoptionstokeepanupdatedcopyofthetaskon
yourtasklistandsendingastatusreportwhenthetaskiscompletedareselectedbydefaulttokeepyouinformedoftheprogressonthetask.
d) ClickSend.Theassigneecaneitheracceptordeclinethetask.
MarkaTaskasComplete
§ Clickinboxtoleftoftaskintasklist
§ Strikethroughindicatestaskiscomplete
§ Taskstaysinlistuntildeleted
ChangeTaskView
§ UsetheChangeViewoptionontheViewtabtoselectadifferenttaskview
Youcanalsomarkataskascompletebyopeningthetask’sformandclickingMarkCompleteontheTasktabor
changingthe%Completeentryto100%.

CHAPTERSIX: INFORMATIONMANAGEMENTWITHOUTLOOK 25
OMA241–INTEGRATEDOFFICEAPPLICATIONS|
To-DoBarandDailyTasksList
§ UseTo-DoBartoviewDateNavigator,appointments,andtasks
§ UseDailyTaskListinCalendartoseetasksdueonthatdate
ActivityOL4-1:EnterTasks
a) Keyth
efollowingtasksinthetasklist
b) KeythefollowingtasksusingTaskforms(Insertduedatesfornextyear
Tasks shown in Active view
CLASSACTIVITY

CHAPTERSIX: INFORMATIONMANAGEMENTWITHOUTLOOK 26
OMA241–INTEGRATEDOFFICEAPPLICATIONS|
ActivityOL4-2:UpdateTasksandUseTaskViews
a) Updatethetaskofsigningemploymentcontracts. Inserttoday’sdateforthestartdate.ChangethestatustoInProgressandthe%Completeto25%.
b) Indicatethatthetasktoreturnthebookstotheresourcecenteriscomplete.
c) AssigntheBusinesscategorytothetasktocallforprinterrepair.
d) Display the task list inDetailed view. Print the list in Table Style. Label theprintoutOL4-Activity2.
Outlook4–Tasks
1) CreateanewcategorycalledPersonal;selecttheDarkBluecolor.Addthefollowingtaskstoyourtasklist.Donotkeythelettersinparentheses;theywillbeusedforreferenceonly.
2) DisplayTasksinDetailedview.PrintinTableStyle.Labelprintout.
3) Marktask(C)asbeingcomplete.
Let’sApplyIt.

CHAPTERSIX: INFORMATIONMANAGEMENTWITHOUTLOOK 27
OMA241–INTEGRATEDOFFICEAPPLICATIONS|
4) Markthetasktorepairtheprinterasbeingcomplete.
5) Updatetask(A)withthefollowinginformation:Indicatethecurrentdateforthe
Startdate.Changethestatusto“InProgress.”Show25%completion.
6) UpdatethetasktosendthesalesreporttoKenHinkson.Usetoday’sdateforthestartdate.ChangethestatustoInProgressandindicatethatitis75%complete.
7) Deletetask(C)fromthelist.
8) AssignthePersonalcategorytothetasktoshopforcoatandboots.
9) DisplaytheTo-DoListinDetailedview,printinTableStyle,andlabel.
10)DisplayTasksinSimpleListviewbycategories(ViewàArrangementàCategories);printinTableStyle,andlabel.
11)Displaythetasksthatarecompleted(HomeàCurrentViewàCompleted).PrintinTableStyle,andlabel.
12)DisplayTasksinActiveview,printinTableStyle,andlabel.
13)ExpandtheTo-DoBartoviewtheappointmentsandtasks.
14)SendaTaskRequesttooneofyourclassmatesaskinghimorhertocreateandpostflyersregardingthenextBusinessClubmeeting.
15)SendaTaskRequesttoasecondclassmateaskinghimorhertopurchaseandsetup
refreshmentsforthenextBusinessClubmeeting.
5

CHAPTERSIX: INFORMATIONMANAGEMENTWITHOUTLOOK 28
OMA241–INTEGRATEDOFFICEAPPLICATIONS|
TheOutlookNotesfeatureisoftenreferredtoaselectronicstickynotesbecauseofitsappearance.Notesprovidealltheconvenienceofstickynoteswithouttheclutter.InformationstoredonnotescaneasilybetransferredtoamorepermanentareasuchasContacts,Tasks,orCalendar.
AboutNotes
CreateandModifyaNote
§ TOCREATEANOTE
a) ClickHomeàNewàNewNote
b) BeginbykeyingatitleforthenotethentapENTER.Keepthetitleshortanddescriptiveofthecontentsofthenote.ThetitlewilldisplaybelowthenoteiteminNotes.
c) Keythetextforthebodyofthenote;thenoteaddsnewlinesasyouneedthem.
d) Whenyouarefinishedwiththenote,clicktheCloseboxintheupper-rightcornertoclosethenote.Closingthenoteautomaticallysavesit.ThenotenowdisplaysintheNoteswindow;thetitleofthenotedisplaystoidentifyit.
§ TOEDITANOTE:
Drag the note to the Tasks folder to create a new task
from the note
CHAPTERSIX: INFORMATIONMANAGEMENTWITHOUTLOOK 29
OMA241–INTEGRATEDOFFICEAPPLICATIONS|
a) Double-clickthenotetobeedited.
b) Makethenecessarychanges.ClicktheCloseboxintheupper-rightcornertosaveandclosethenote.
§ TORESIZEANOTE:
a) Resizethenotebydraggingonthebottombordertolengthenitoronthesideborderstowidenit.
b) Dragtheresizeareainthelower-rightcorneroutwardtomakethenotelargerdiagonally.Draggingawayfromthenoteenlargesit;draggingtowardthenotereducesit.
§ TODELETEANOTE:
a) Selectthenotethatistobedeleted.
b) TapDELETE.Youcanalsoright-clickthenoteandselectDeletefromtheshortcutmenu.
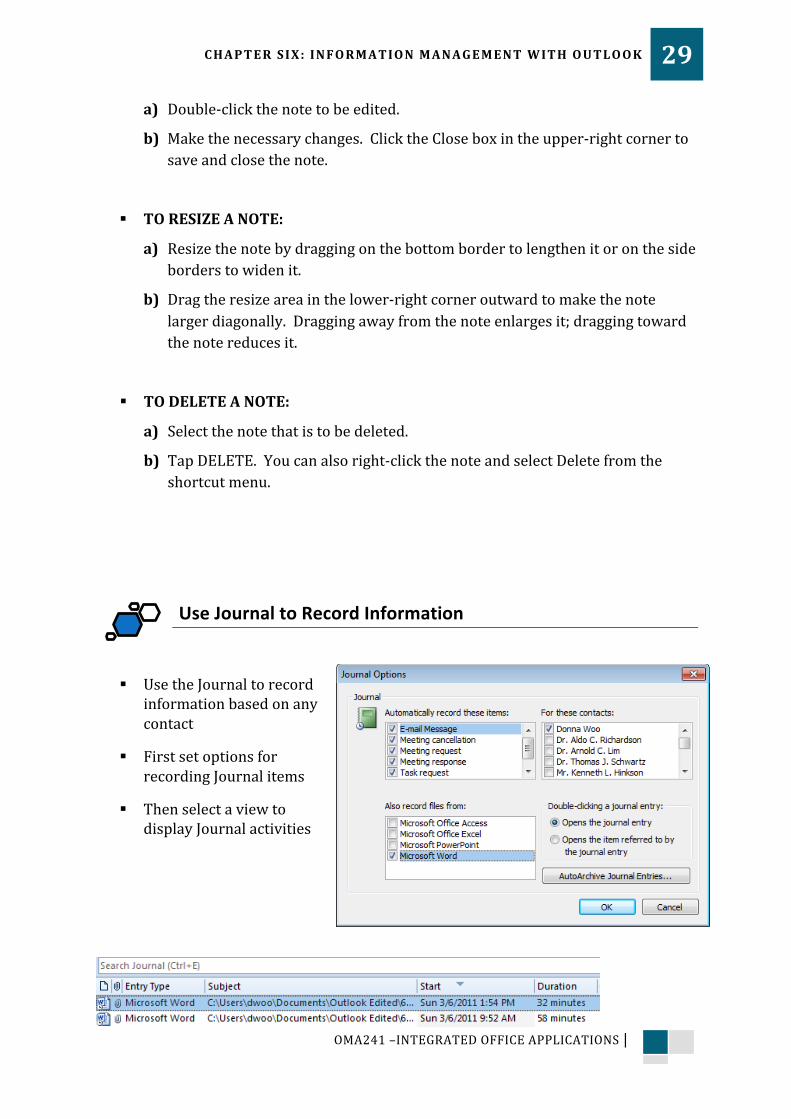
UseJournaltoRecordInformation
§ UsetheJournaltorecordinformationbasedonanycontact
§ FirstsetoptionsforrecordingJournalitems
§ ThenselectaviewtodisplayJournalactivities

CHAPTERSIX: INFORMATIONMANAGEMENTWITHOUTLOOK 30
OMA241–INTEGRATEDOFFICEAPPLICATIONS|
ActivityOL5-1:Create,EditandDeleteNotesa) DisplayNotes.Createthefollowingnotes.UsetheNotesmenu
toapplycategories
CLASSACTIVITY

CHAPTERSIX: INFORMATIONMANAGEMENTWITHOUTLOOK 31
OMA241–INTEGRATEDOFFICEAPPLICATIONS|
b) EdittheCallJohnDoenotebyaddingthetelephonenumbertothemessage:555-555-0192.
c) Enlargeeachofthenotes.Restorethemtonormalsize.
d) ClicktheNotesListbuttonontheHometab,intheCurrentViewgroup.Thenotesdisplaywiththecontents,categories,andcreationdateandtimedisplayed.PrintacopyofyournotesinTableStyle.LabeltheprintoutasOL5-1Activity1-1.
e) Print the notes displayed by category in Table Style. The notes should still bedisplayed in Notes List view; click the View tab and then Categories. Label theprintoutasOL5-1Activity1-2.
Outlook5–WorkingwithNotes
1) OpentheReserveMicrophonenote. Createanewcolorcategory fornotesusingtheDarkRedcolor.NamethecategoryUrgent.
2) ApplytheUrgentcategorytotheFixPhotocopiernote.
Let’sApplyIt.

CHAPTERSIX: INFORMATIONMANAGEMENTWITHOUTLOOK 32
OMA241–INTEGRATEDOFFICEAPPLICATIONS|
3) Createthenotesshownbelow
4) AddthefollowingtexttotheHinksonSpeechnote:WishKenabelatedhappy
birthday.
8) Print the Notes by category in Table Style (ViewàChange ViewàNotesListàCategories)andlabeltheprintoutOL5-Notes.
Outlook6–UseJournal
1) Activate Journal to track E-mail message, Meeting cancellation, Meeting request,Meetingresponse,Taskrequest,andTaskresponseontwoofyourclassmatesandyourInstructor.YourclassmatesandyourinstructormustbeinyourmainContactsfolder.
2) E-mailyourclassmatesandyourinstructoraninvitationtoaBusinessClubmeeting
thatyouwillbehostingnextweek;specifylocationandtime.
3) Afteryoureceivetheresponses,usetheEntryListviewtoseethejournalrecordings.PrintacopyinTableStyleandlabelOL6-Journal
CHAPTERSIX: INFORMATIONMANAGEMENTWITHOUTLOOK 33
OMA241–INTEGRATEDOFFICEAPPLICATIONS|
.
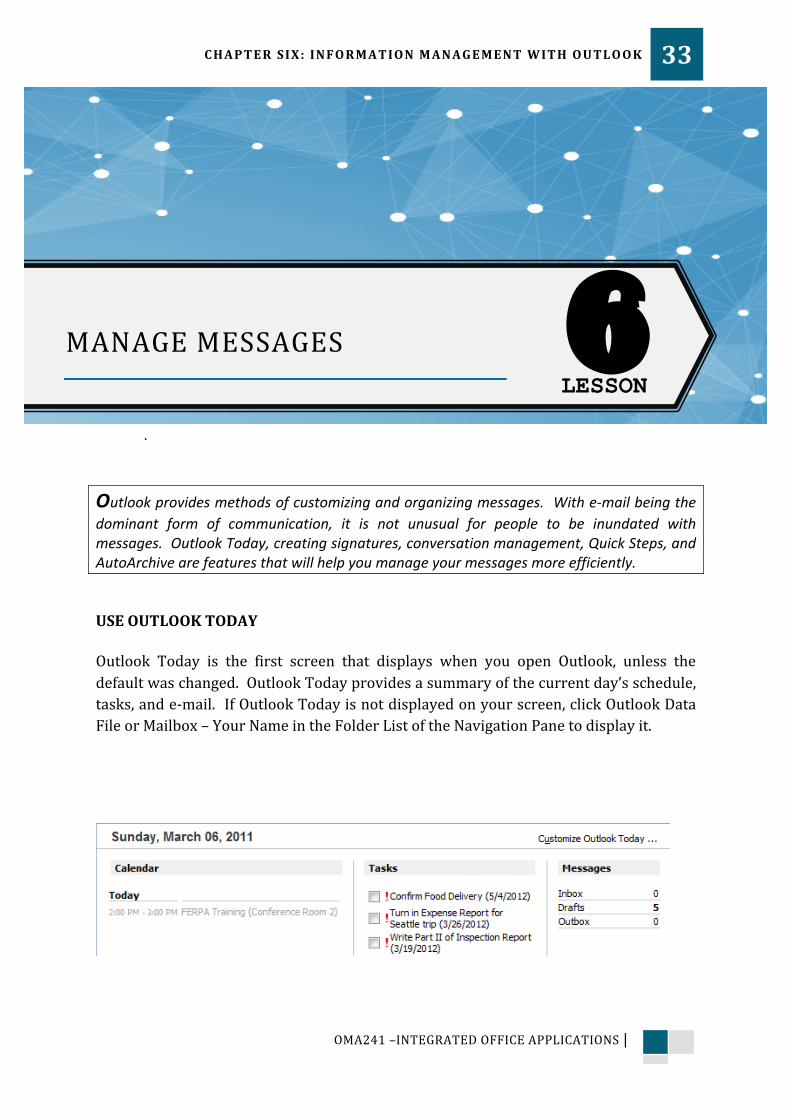
Outlookprovidesmethodsofcustomizingandorganizingmessages.Withe-mailbeingthedominant form of communication, it is not unusual for people to be inundated withmessages.OutlookToday,creatingsignatures,conversationmanagement,QuickSteps,andAutoArchivearefeaturesthatwillhelpyoumanageyourmessagesmoreefficiently.USEOUTLOOKTODAYOutlook Today is the first screen that displays when you open Outlook, unless thedefaultwaschanged.OutlookTodayprovidesasummaryofthecurrentday’sschedule,tasks,ande-mail.IfOutlookTodayisnotdisplayedonyourscreen,clickOutlookDataFileorMailbox–YourNameintheFolderListoftheNavigationPanetodisplayit.
LESSON 6 MANAGEMESSAGES

CHAPTERSIX: INFORMATIONMANAGEMENTWITHOUTLOOK 34
OMA241–INTEGRATEDOFFICEAPPLICATIONS|
CreateaSignature
§ Tocreateasignature:
a) ClickFileàOptionsàMailàSignatures
b) Keythesignature
c) Formatthesignature
§ Specifythesignaturefornewmessagesandreplies
UseStationeryandThemes
§ SelectanOutlookstationerytoapplybydefault
§ ApplyanOffice2010themetoanewmessageusingOptionsàThemesàThemesinmessage
ConversationManagement
§ UseConversationviewtoorganizemessagethreadsintoconversations
§ Conversationviewdisplaystheoriginalmessageandallrepliestothemessagegroupedtogether
§ SelectsettingstocontrolConversationview

CHAPTERSIX: INFORMATIONMANAGEMENTWITHOUTLOOK 35
OMA241–INTEGRATEDOFFICEAPPLICATIONS|
UseQuickSteps
§ QuickStepshelpyouprocessmessageseasierandfaster
§ UseadefaultQuickStepfromtheQuickSteps
gallery-or-CreateacustomQuickStepthatwillperformthedesiredaction
§ UsetheEditQuickStepdialogboxtospecifyanameandtheactionfortheQuickStep
UseAutoArchive
§ AutoArchivehandlesroutinearchivingofmessagesolderthanaspecifiednumberofdays
§ SetoptionsforAutoArchivingintheOutlookOptionsdialogbox
§ Specifyhowoftentoarchiveandwheretostorethearchivedmessages

CHAPTERSIX: INFORMATIONMANAGEMENTWITHOUTLOOK 36
OMA241–INTEGRATEDOFFICEAPPLICATIONS|
ActivityOL6-1:DisplayOutlookTodaya) LaunchOutlookanddisplayOutlookToday.
b) Viewyourappointmentsfortheday,ifanyhavebeenscheduled.
c) Scheduleanappointmentfortodaytobegininonehour.Thesubject is Marketing Strategy Meeting; it will be held inConferenceRoom2. Addanotetobringacopyofthedraftplan.
d) Saveandclosetheappointmentwindow.
e) DisplaytheOutlookTodayscreen;theappointmentislistedunderCalendar.
f) ClicktheappointmenttoseetheAppointmentform.Thenotetobringthedraftplandisplays.ClosetheAppointmentform.
ActivityOL6-2:CreateQuickStepsa) Create a new Quick Step that will move messages to the Deleted Items folder.
NametheQuickStepCompletexx(replacexxwithyourinitials).
b) SelectDeletemessagefromtheChooseanActiondroplist.
c) ClickFinish.
CLASSACTIVITY

CHAPTERSIX: INFORMATIONMANAGEMENTWITHOUTLOOK 37
OMA241–INTEGRATEDOFFICEAPPLICATIONS|
Outlook6–CreateSignatureandUseStationery
1) Create a new signature; name the file using your first and last name. Key thefollowingtextintheEditsignaturebox.Selectafontandacolorforyoursignature.
2) UnderChoosedefaultsignature,insertyoure-mailaddressforE-mailaccount.Click
theNewmessagesdrop-listarrowandchooseYourName.ClickOKuntilyoureturn
toyourInbox.
3) Selectastationeryforyoure-mail.
4) Send an e-mail message to yourself using the stationery and signature you justcreated.Insertanappropriatesubjectline.Keythemessage:
5) Print thee-mailmessage. Theprinted copywill showyour signaturebutmaynotincludethestationerydesign.
Outlook7–CreateandUseQuickSteps
1) Compose and send an e-mail to yourself explaining the advantagesof usingQuickSteps.
2) UsetheCompletexxQuickSteptodeletethemessage.MovethemessagefromthedeletedItemsfolderbacktoyourInbox.
3) IntheNavigationPane,right-clicktheInboxfolderandchooseNewFolder.TheCreateNewFolderdialogboxdisplays.
4) KeyOutlookClass(xx)intheNamebox;replacexxwithyourinitials.ClickOK.
TheOutlookClassfolderdisplaysintheNavigationPanebelowtheInbox.
5) CreateaNewQuickStepthatmovesclassassignmentstotheOutlookClassfolder:
NametheQuickStepClassAssignmentsxx.
6) SelectMove to folder as the action. Themessageswill bemoved to theOutlookClassfolder.
Let’sApplyIt.

CHAPTERSIX: INFORMATIONMANAGEMENTWITHOUTLOOK 38
OMA241–INTEGRATEDOFFICEAPPLICATIONS|
Outlook8–UseConversationView7)
1) SetOutlooktodisplayyourmessagesinConversationview.
2) SelectalltheoptionsintheConversationSettingsdroplist.
3) ClickonmessagethreadstoseehowOutlookgroupedthemessagesinConversation
Outlook9–SetAutoArchiveOptions
1) Display the AutoArchive dialog box. Click the checkbox to select RunAutoArchiveevery;changethenumberofdaysto1.
2) ClickthecheckboxtopromptbeforeAutoArchiverunsifnecessary.
3) Remove the check mark in the checkbox for Delete expired items (e-mail foldersonly).
4) Click the checkboxes for Archive or delete old items and Show archive folder infolderlistifnecessary.
5) ChangeCleanoutitemsolderthanto2days(setthisoptionsothate-mailmessagesfromthefirstdayofclasswillbemoved).
6) Bydefault,Moveold items to: is selected and thedefault location formovingolditemsistotheArchivefolder.Nochangesneedtobemade.
7) Thenexttimeyousignontoyourcomputer,youwillbeaskedwhetheryouwantto
archiveolditems.Ifyouwishtodoso,messagesolderthanthespecifiedtimewillbemovedtotheArchive folder. Ifyoudonotwanttoarchivethemessages,clickCancel.