chapter 8 back care - ihsa.ca · posture. correct posture is not an erect, ... position for a...
TRANSCRIPT

8-1Health
CHAPTER 8 BACK CARE
8 BACK CARE
Nearly 25% of the lost-time injuries in construction are related to the back. More than half of these injuries result from lifting excessive weight or lifting incorrectly.
To prevent injuries, you need
1. Proper posture2. Correct lifting techniques3. Regular exercise.
PostureCorrect posture is not an erect, military pose. It means maintaining the naturally occurring curves in your spine. Those are the two inward curves (lordosis), one each at the neck and lower back, and one outward curve (kyphosis) at the upper back (Figure 8-1).
Keeping your spine aligned in this manner reduces everyday stresses on your back. It also minimizes the effects of gravity and of the normal aging process on the spine.
When working in a crouched, bent, or stooped position for a prolonged period, take regular breaks by standing up and bending backwards three times.
Figure 8-1: Correct Posture for Standing
Cervical Lordosis
Thoracic Kyphosis
Lumbar Lordosis
Even with the correct posture, standing for a long period of time can put stress on your back, joints, and muscles. As your muscles fatigue, it can become harder to maintain the correct posture. Prolonged standing often causes an increased curve in your back. Putting one foot on a stool or other object (phone book, bricks, etc.) can take stress off the lower spine (Figure 8-2).
Figure 8-2: Posture for Prolonged Standing
The correct posture is about keeping your body well-balanced and in proper alignment. An incorrect posture will cause you to lean too far backward or too far forward. This will affect your weight distribution and cause back problems. The most common incorrect postures are sway back and flat back (Figure 8-3).
Sway back occurs when the spine curves inward too much. An increased curve in your lower back will jam the vertabrae together. If held too long, this position will cause lower back muscles and ligaments to tighten and lead to lower back pain.
Flat back is just the opposite. Too little curve in the spine will put extra pressure on the front of your discs. This may contribute to disc problems and pain in the upper back.
Flat BackSway Back
Figure 8-3: Incorrect Posture

8-2 Construction Health and Safety Manual
BACK CARE
Work Height
Maintaining proper posture is also important when working. Always work in a comfortable position (i.e., between knee level and shoulder level). For example, when working near the floor, raise the work height by using a workbench (or making one with existing equipment such as pallets). A stable workbench will allow you to work at optimal height, which is while standing upright with your arms close to your sides. Make sure you have easy access to the work materials to avoid overreaching. The height of your workbench will depend on the type of work being done (Figure 8-4).
Working overhead or above shoulder height puts a lot of stress on your back and muscles. Take regular breaks by returning to stable footing and bending forward three times. Use a stable work platform such as a scaffold instead of a ladder, especially for long-term tasks or for jobs where you must handle heavy materials.
Figure 8-4: Proper Heights of a Workbench
Precision work
Light work
Heavy work
Wrong
Lifting and Material HandlingWhen lifting, carrying, or performing other material handling tasks, proper technique is essential. Your back can manage most lifts—but only if you lift correctly. Folow the lifting technique outlined below (Figure 8-5):
1. Plan your move.• Size up the load and make sure pathway is
clear.• Get help as needed.• Use a dolly or other device if necessary.
2. Use a wide-balanced stance with one foot slightly ahead of the other.
3. Get as close to the load as possible.
4. Tighten your stomach muscles as the lift begins.
5. When lifting, keep your lower back in its normal arched position and use your legs to lift.
6. Pick up your feet and pivot to turn – don’t twist your back.
7. Lower the load slowly, maintaining the curve in your lower back.
Figure 8-5: Proper Lifting Technique
Here are some other tips to avoid back injuries when lifting and handling material:
• Plan ahead to minimize material handling tasks. For example, storing heavy materials close to the work location will reduce the distance you will need to carry it.
• Get help from a co-worker if a load is too much for you to handle on your own.
• Split large, heavy loads into smaller loads. Making more trips with small loads puts less stress on your back than making fewer trips with large loads.
• Store materials above standing knuckle level and below standing shoulder level. Lifting from the floor or from below standing knuckle height can put severe stress on your back and reduce your lifting ability.
• Remove clutter around the work area to make it easier to move materials.
• Avoid lifting above shoulder height. This causes the back to arch, placing heavy stress on the small joints of the spine.
• Do not catch falling objects. Your muscles may not have time to coordinate properly to protect the spine.
• Push rather than pull. Pushing allows you to maintain the normal curves in your back.
8-3Health
BACK CARE
When lifting objects that are awkwardly shaped, such as long lengths of lumber or pipe, proper technique is essential. Squat and lift one end of the object, walk up the object to the midpoint, then lift the entire object off the ground (Figure 8-6).
Figure 8-6: Lifting Lumber or Pipe
Wrong
Lift at one end
Walk to midpoint
Balance on shoulder
Sheet materials, such as plywood, are also awkward to handle alone. You need to use proper techniques to protect your back (Figure 8-7).
Where possible, store sheets at a convenient height and above ground on timbers or trestles. If sheets are on the ground or floor, use the same technique as for lifting long lumber (i.e., lift one end first).
Transfer your weight to the lift side while pulling the object toward you. Lift only to the level required. Shift your weight to your other leg while pushing the object into position.
Grasp sheet on long side at mid-point.
Tip sheet up, then slide sheet partway off pile.
Bend at the knees, maintaining the normal curve in your lower back. Grasp sheet above and below at mid-point.
Carry sheet, keeping back erect. Avoid leaning to one side.
Figure 8-7: Lifting Sheet Materials
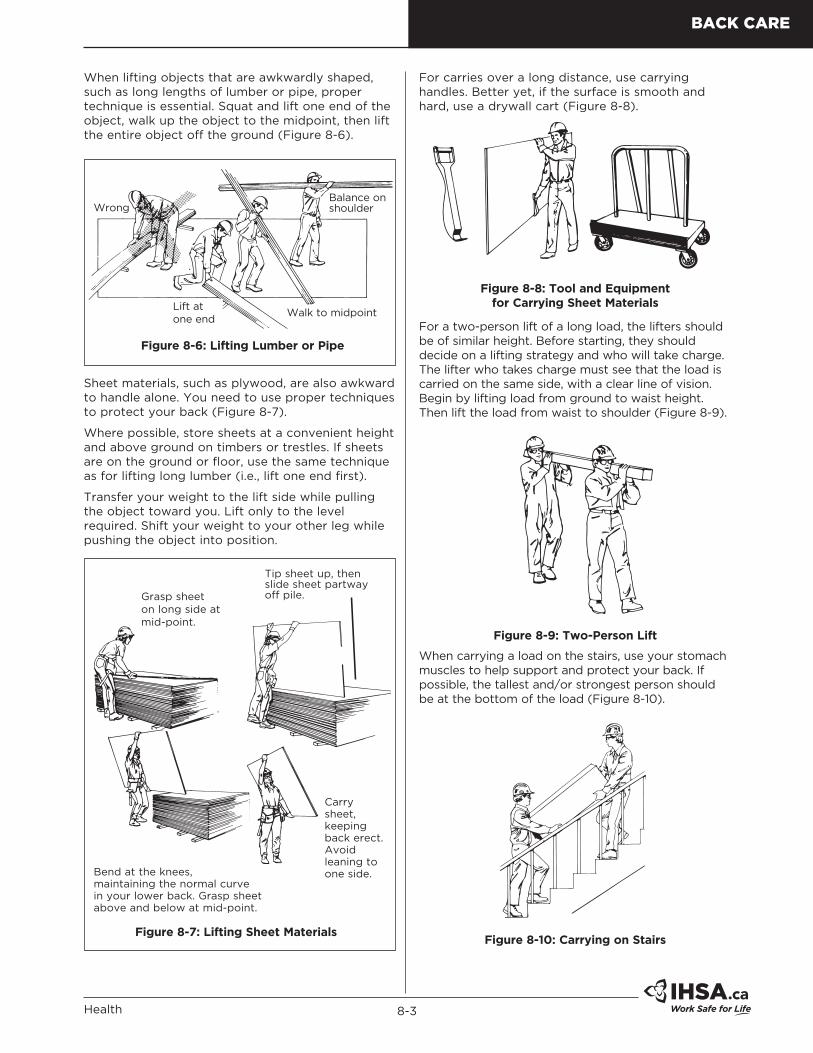
For carries over a long distance, use carrying handles. Better yet, if the surface is smooth and hard, use a drywall cart (Figure 8-8).
Figure 8-8: Tool and Equipment for Carrying Sheet Materials
For a two-person lift of a long load, the lifters should be of similar height. Before starting, they should decide on a lifting strategy and who will take charge. The lifter who takes charge must see that the load is carried on the same side, with a clear line of vision. Begin by lifting load from ground to waist height. Then lift the load from waist to shoulder (Figure 8-9).
Figure 8-9: Two-Person Lift
When carrying a load on the stairs, use your stomach muscles to help support and protect your back. If possible, the tallest and/or strongest person should be at the bottom of the load (Figure 8-10).
Figure 8-10: Carrying on Stairs

8-4 Construction Health and Safety Manual
BACK CARE
Avoid one-handed carrying if possible. Try to distribute the weight evenly on each side. If you can’t avoid one-handed carrying, such as with a single pail, hold the free arm either straight out or on your hip as a counterbalance (Figure 8-11).
Figure 8-11: One-handed Carrying
Use material-handling equipment such as carts, wheelbarrows, dollies, lift trucks, or pallet jacks whenever you can (Figure 8-12).
Pallet jacks can only be used where surface conditions allow. Note that wheelbarrows with dual wheels are a great improvement over single wheels. Better balance and increased flotation over soft ground make wheeling easier on the back.
Figure 8-12: Pallet Jack
Lift tables with casters for heavy components can be helpful. These tables are light, carry loads of several hundred pounds, and have adjustable heights from one to several feet (Figure 8-13).
Rolling frame scaffolds with a few tube-and-clamp components may be useful for moving heavy objects such as motors or drives where other devices such as forklifts are not available (Figure 8-13).
8-13: Material-handling Equipment
Warm-Up and Stretching Exercises Getting ready for the job means getting your muscles ready too. Exercising before work can help prevent back, neck, and shoulder injuries.
Construction work strengthens some muscles while others become shorter and weaker, creating a muscle imbalance. A regular exercise program can help to prevent this from happening.
A good exercise program should consist of four basic parts:
1. Warm-up2. Main workout3. Strength and stretch4. Cool-down.
CAUTION: Participation must be voluntary. If workers have any doubts about their ability to do the exercises safely, they should not do them. If they feel any pain, they should stop immediately.
Warm-Up
This helps get your muscles warm and loose. A warm muscle is a lot less likely to tear than a cold one.
1. March in Place
Stand in position. Pump arms and legs in opposite directions. Make sure that your heels touch the ground. Continue 3 to 5 minutes.
2. Arm Circles
Stand with arms raised horizontally and slightly in front of shoulders, palms down, and feet shoulder-width apart. Rotate arms in a forward circular motion for 15 seconds. Relax. Repeat 3 to 5 times.

8-5Health
BACK CARE
Stretching Program
The following stretching exercises are of greatest value before work starts. They may, however, be done at any convenient time. Whenever they are done, a brief warm-up (walking briskly or jogging on the spot) is most beneficial.
The exercises should be performed in a slow, controlled manner and held in a sustained stretch. Avoid bouncy, jerky movements which may tear muscle fibres.
3. Knees to Chest
Support yourself securely with one hand.With your free hand, pull your knee toward your chest. Hold the stretch for 30 seconds. Lower your leg to the ground and repeat with the other leg. Repeat 3 times for each leg.
4. Hip Stretch
Stand with one foot in front of the other. Place hands above the knee of the front leg. Gently bend front knee, keeping back foot flat on the floor. Hold 20 to 30 seconds. Repeat with other leg. Repeat 3 times for each leg.
5. Thigh Stretch
Support yourself with one hand. With your free hand, bend your leg back and grasp your ankle with your free hand. Gently pull your ankle toward your body, keeping your trunk straight. Hold 20 to 30 seconds. Repeat with other leg. Repeat 3 times for each leg.
6. Calf Stretch
Lean on a solid support with your hands outstretched. Bend the forward leg and place the other leg straight behind you. Slowly move your hips forward, keeping the heel of the back leg on the ground. Hold 30 seconds, relax, and repeat with other leg. Repeat 3 times for each leg.
7. Backward Stretch
Stand up and bend backwards, holding for 2 to 4 seconds. Repeat 3 times. This will help relieve lower-back muscle tension. Do this stretch after working in a crouched, bent, or stooped position.