christmas countdown chalkmade kit
TRANSCRIPT
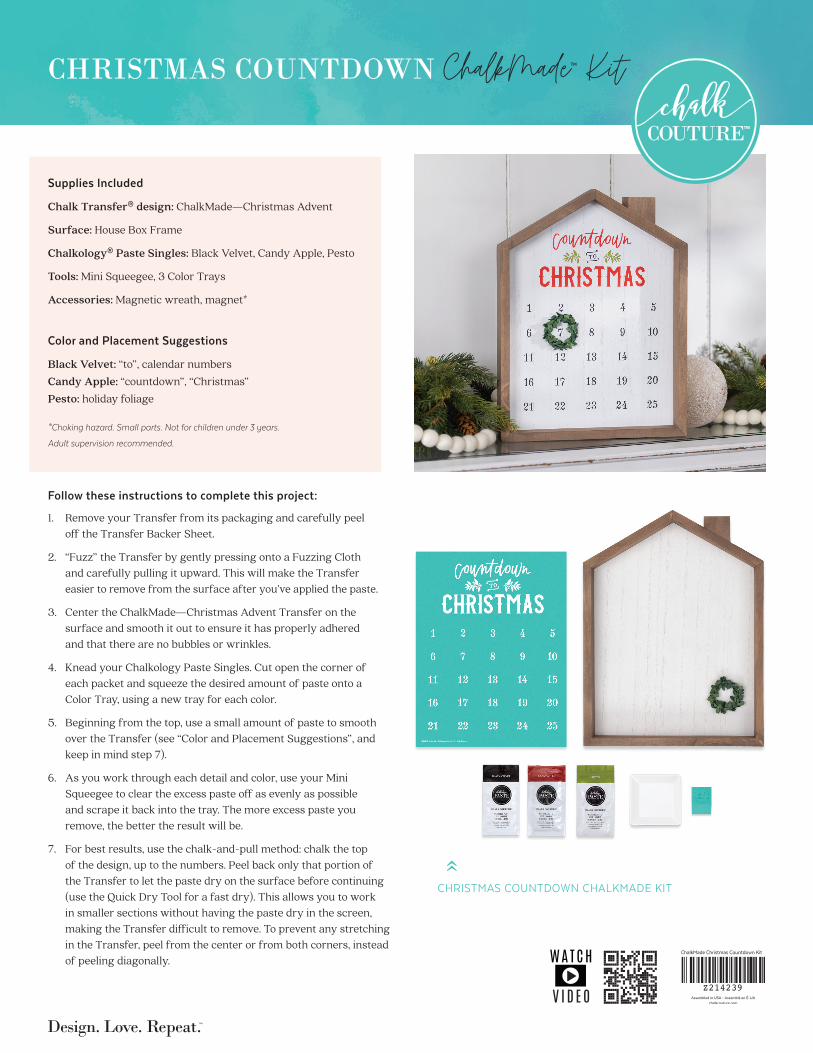
Supplies Included
Chalk Transfer® design: ChalkMade—Christmas Advent
Surface: House Box Frame
Chalkology® Paste Singles: Black Velvet, Candy Apple, Pesto
Tools: Mini Squeegee, 3 Color Trays
Accessories: Magnetic wreath, magnet*
Color and Placement Suggestions
Black Velvet: “to”, calendar numbersCandy Apple: “countdown”, “Christmas”Pesto: holiday foliage
*Choking hazard. Small parts. Not for children under 3 years.
Adult supervision recommended.
Follow these instructions to complete this project:
1. Remove your Transfer from its packaging and carefully peel off the Transfer Backer Sheet.
2. “Fuzz” the Transfer by gently pressing onto a Fuzzing Cloth and carefully pulling it upward. This will make the Transfer easier to remove from the surface after you’ve applied the paste.
3. Center the ChalkMade—Christmas Advent Transfer on the surface and smooth it out to ensure it has properly adhered and that there are no bubbles or wrinkles.
4. Knead your Chalkology Paste Singles. Cut open the corner of each packet and squeeze the desired amount of paste onto a Color Tray, using a new tray for each color.
5. Beginning from the top, use a small amount of paste to smooth over the Transfer (see “Color and Placement Suggestions”, and keep in mind step 7).
6. As you work through each detail and color, use your Mini Squeegee to clear the excess paste off as evenly as possible and scrape it back into the tray. The more excess paste you remove, the better the result will be.
7. For best results, use the chalk-and-pull method: chalk the top of the design, up to the numbers. Peel back only that portion ofthe Transfer to let the paste dry on the surface before continuing(use the Quick Dry Tool for a fast dry). This allows you to work in smaller sections without having the paste dry in the screen, making the Transfer diff icult to remove. To prevent any stretchingin the Transfer, peel from the center or from both corners, insteadof peeling diagonally.
CHRISTMAS COUNTDOWN CHALKMADE KIT
Scan meScan me
Scan me
WAT C H
V I D E O
CHRISTMAS COUNTDOWNCHRISTMAS COUNTDOWN ChalkMade™ Kit

PAGE 2
8. Once the top of the design is dry, ensure the bottom of the Transfer is still secure on the surface and repeat steps 5 and 6 for the rest of the design.
9. Before the paste dries, remove your Transfer from the surface and immediately clean the Transfer with cool water (do not let it soak).
10. Dry the Transfer flat with the sticky side up.
11. Reapply the Transfer Backer Sheet and store flat.
12. To fasten the wreath over the desired date, place the magnetic wreath on the front of the box frame, and the small magnet on the back of the frame. You can remove to adjust for a different day or slide the wreath slowly to adjust.
13. Admire your new creation and start counting down to Christmas!