cisco uc integration for microsoft office communicatorrabdoul.free.fr/public/cisco...
TRANSCRIPT

© 2009 Cisco Systems, Inc. Lab Guide 1
CUCIMOC
Cisco UC Integration for Microsoft Office Communicator
Version 1.0 SEP2009
Lab Guide

2 Cisco Unified Communications Integration for Microsoft Office Communicator (CUCIMOC) v1.0 © 2009 Cisco Systems, Inc.
DISCLAIMER WARRANTY: THIS CONTENT IS BEING PROVIDED “AS IS.” CISCO MAKES AND YOU RECEIVE NO WARRANTIES IN
CONNECTION WITH THE CONTENT PROVIDED HEREUNDER, EXPRESS, IMPLIED, STATUTORY OR IN ANY OTHER PROVISION OF
THIS CONTENT OR COMMUNICATION BETWEEN CISCO AND YOU. CISCO SPECIFICALLY DISCLAIMS ALL IMPLIED
WARRANTIES, INCLUDING WARRANTIES OF MERCHANTABILITY, NON-INFRINGEMENT AND FITNESS FOR A PARTICULAR
PURPOSE, OR ARISING FROM A COURSE OF DEALING, USAGE OR TRADE PRACTICE. This learning product may contain early release
content, and while Cisco believes it to be accurate, it falls subject to the disclaimer above.
© 2009 Cisco Systems, Inc. Lab Guide 3
TABLE OF CONTENTS
Cisco UC Integration for Microsoft Office Communicator
Lab Overview.............................................................................................................................. 4
Lab 1-1: Configuring Cisco Unified Communications Manager and OCS/AD Server for IP Phone
and MOC Registration ……………………………………………………………… 6
Lab 2-1: Deploying CUCiMOC with Batch Files...................................................................... 21
Lab 2-2: Deploying CUCiMOC with Group Policies………………………………………… 28
Lab 3-1: Configuring CUCiMOC Dial Plan ………………………………………………….. 33
Lab 4-1: Exploring CUCiMOC Features……………………………………………………… 39
4 Cisco Unified Communications Integration for Microsoft Office Communicator (CUCIMOC) v1.0 © 2009 Cisco Systems, Inc.
CUCIMOC
Lab Guide
Overview This guide presents the instructions and other information concerning the lab activities for this
course.
Outline
This guide includes these activities:
� Lab 1-1: Configuring Cisco Unified Communications Manager and OCS/AD Server for IP
Phone and MOC Registration
� Lab 2-1: Deploying CUCiMOC with Batch Files
� Lab 2-2: Deploying CUCiMOC with Group Policies
� Lab 3-1: Configuring CUCiMOC Dial Plan
� Lab 4-1: Exploring CUCiMOC Features
© 2009 Cisco Systems, Inc. Lab Guide 5
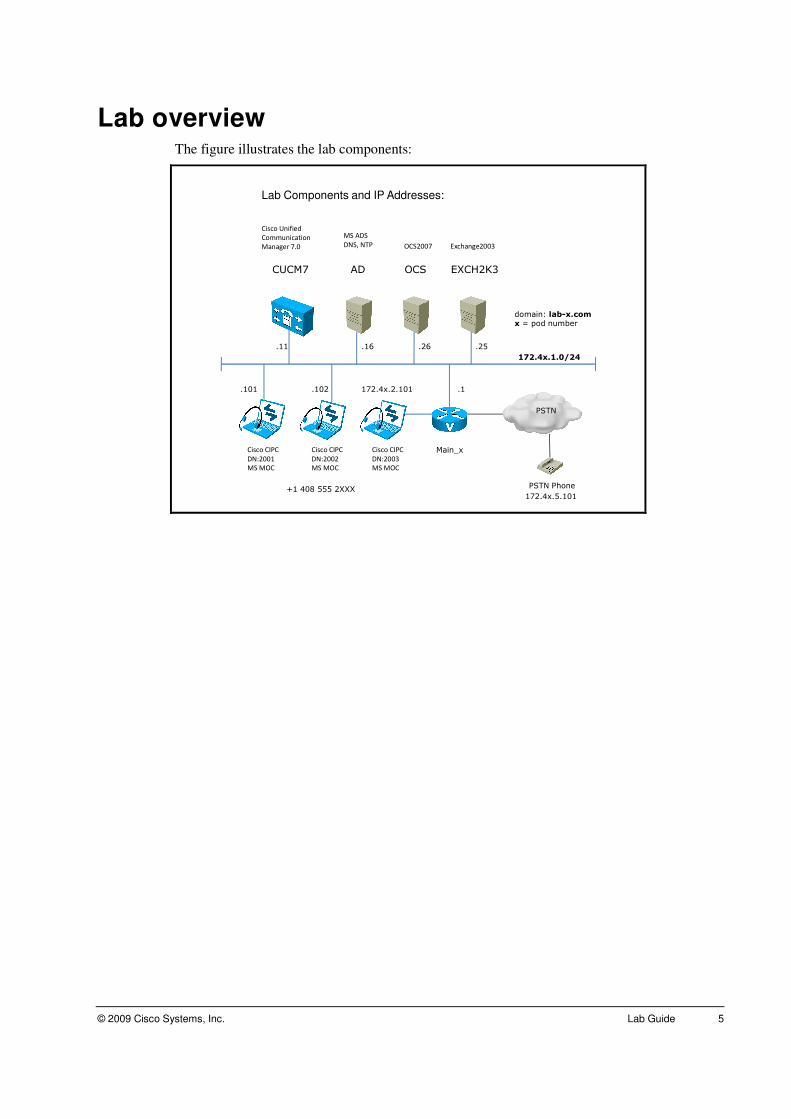
Lab overview The figure illustrates the lab components:
ADCUCM7
.11 .16
.101 .102
Cisco CIPC
DN:2001
MS MOC
MS ADS
DNS, NTP
Cisco CIPC
DN:2002
MS MOC
Cisco Unified
Communication
Manager 7.0
Lab Components and IP Addresses:
.26 .25
OCS EXCH2K3
OCS2007 Exchange2003
PSTN
Main_x
PSTN Phone
172.4x.2.101
Cisco CIPC
DN:2003
MS MOC
+1 408 555 2XXX
domain: lab-x.comx = pod number
172.4x.1.0/24
.1
172.4x.5.101
6 Cisco Unified Communications Integration for Microsoft Office Communicator (CUCIMOC) v1.0 © 2009 Cisco Systems, Inc.
Lab 1-1: Configuring Cisco Unified Communications Manager and OCS/AD Server for IP Phone and MOC Registration
Complete this lab activity to practice what you learned in the related module.
Activity Objective
In this activity, you will configure Cisco Unified Communications Manager 7.0 and OCS/AD
Server for IP Phone and MOC registration. After completing this activity, you will be able to
meet these objectives:
� Configure Cisco Unified Communications Manager for IP Phone registration, LDAP
synchronization and authentication, and PSTN connectivity
� Configure Active Directory and OCS for MOC registration
� Test internal and external IP Phone calls
� Install and test Microsoft Office Communicator
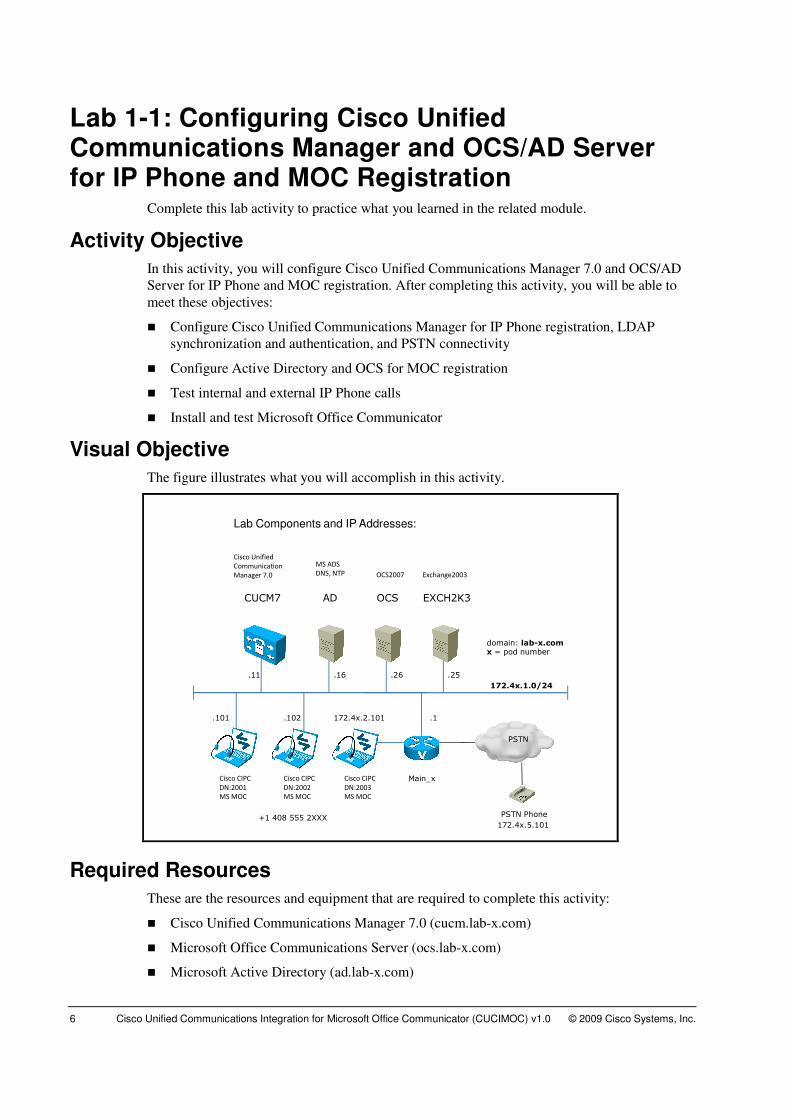
Visual Objective
The figure illustrates what you will accomplish in this activity.
ADCUCM7
.11 .16
.101 .102
Cisco CIPC
DN:2001
MS MOC
MS ADS
DNS, NTP
Cisco CIPC
DN:2002
MS MOC
Cisco Unified
Communication
Manager 7.0
Lab Components and IP Addresses:
.26 .25
OCS EXCH2K3
OCS2007 Exchange2003
PSTN
Main_x
PSTN Phone
172.4x.2.101
Cisco CIPC
DN:2003
MS MOC
+1 408 555 2XXX
domain: lab-x.comx = pod number
172.4x.1.0/24
.1
172.4x.5.101
Required Resources
These are the resources and equipment that are required to complete this activity:
� Cisco Unified Communications Manager 7.0 (cucm.lab-x.com)
� Microsoft Office Communications Server (ocs.lab-x.com)
� Microsoft Active Directory (ad.lab-x.com)
© 2009 Cisco Systems, Inc. Lab Guide 7
� Microsoft Exchange Server (exch2k3.lab-x.com)
� Cisco IP phones (Cisco IP Communicator) on Phone1, Phone2, and Phone3 PCs
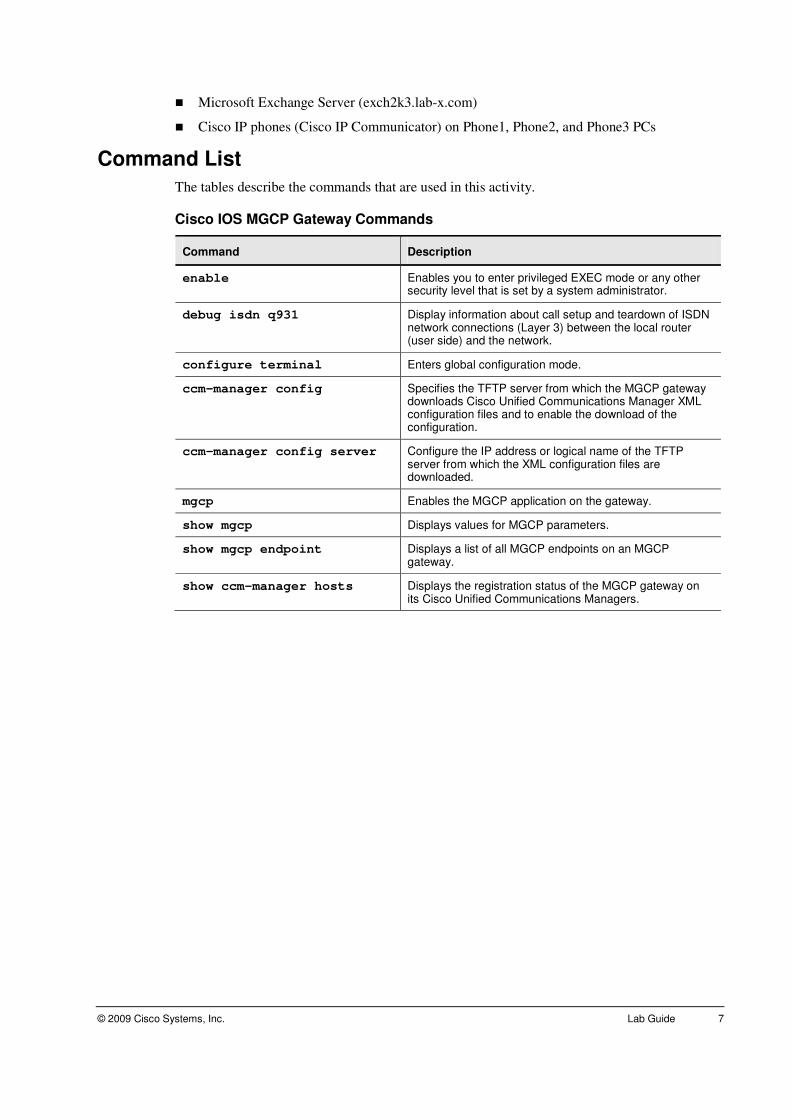
Command List
The tables describe the commands that are used in this activity.
Cisco IOS MGCP Gateway Commands
Command Description
enable Enables you to enter privileged EXEC mode or any other security level that is set by a system administrator.
debug isdn q931 Display information about call setup and teardown of ISDN network connections (Layer 3) between the local router (user side) and the network.
configure terminal Enters global configuration mode.
ccm-manager config Specifies the TFTP server from which the MGCP gateway downloads Cisco Unified Communications Manager XML configuration files and to enable the download of the configuration.
ccm-manager config server Configure the IP address or logical name of the TFTP server from which the XML configuration files are downloaded.
mgcp Enables the MGCP application on the gateway.
show mgcp Displays values for MGCP parameters.
show mgcp endpoint Displays a list of all MGCP endpoints on an MGCP gateway.
show ccm-manager hosts Displays the registration status of the MGCP gateway on its Cisco Unified Communications Managers.
8 Cisco Unified Communications Integration for Microsoft Office Communicator (CUCIMOC) v1.0 © 2009 Cisco Systems, Inc.
Job Aids
These job aids are available to help you complete the lab activity.
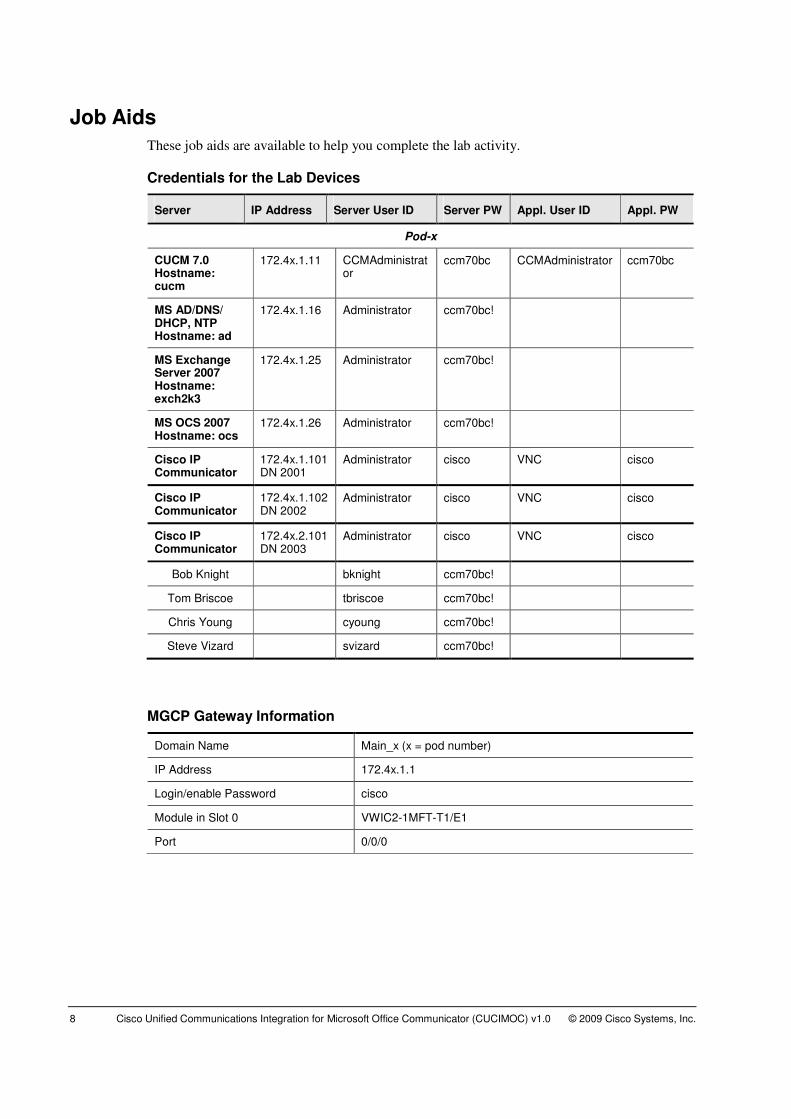
Credentials for the Lab Devices
Server IP Address Server User ID Server PW Appl. User ID Appl. PW
Pod-x
CUCM 7.0 Hostname: cucm
172.4x.1.11 CCMAdministrator
ccm70bc CCMAdministrator ccm70bc
MS AD/DNS/ DHCP, NTP Hostname: ad
172.4x.1.16 Administrator ccm70bc!
MS Exchange Server 2007 Hostname: exch2k3
172.4x.1.25 Administrator ccm70bc!
MS OCS 2007 Hostname: ocs
172.4x.1.26 Administrator ccm70bc!
Cisco IP Communicator
172.4x.1.101 DN 2001
Administrator cisco VNC cisco
Cisco IP Communicator
172.4x.1.102 DN 2002
Administrator cisco VNC cisco
Cisco IP Communicator
172.4x.2.101 DN 2003
Administrator cisco VNC cisco
Bob Knight bknight ccm70bc!
Tom Briscoe tbriscoe ccm70bc!
Chris Young cyoung ccm70bc!
Steve Vizard svizard ccm70bc!
MGCP Gateway Information
Domain Name Main_x (x = pod number)
IP Address 172.4x.1.1
Login/enable Password cisco
Module in Slot 0 VWIC2-1MFT-T1/E1
Port 0/0/0
© 2009 Cisco Systems, Inc. Lab Guide 9
Task 1: Configure Microsoft Active Directory Integration for Cisco Unified Communications Manager
In this task, you will create the web virtual directory for the staff pictures, create an AD
organizational unit for the CUCiMOC users, and configure the Cisco Unified Communications
Manager 7.0 to use LDAP database synchronization and authentication.
Activity Procedure
Complete these steps:
Step 1 Open an RDP session to the Active Directory server (mstsc.exe to 172.4x.1.16).
Step 2 Login with domain admin credentials (Administrator/ccm70bc!) into the AD server.
Step 3 Create a directory C:\cucipics and copy all the contents of pictures folder from
D:\CUCIMOC folder to this directory
Step 4 Go to Start > Administrative Tools and choose IIS Manager.
Step 5 Expand AD (local computer) > Web Sites. Right-click Default Web Site, choose
New > Virtual Directory. Click Next
Step 6 Under Alias, enter cucipics, click Next.
Step 7 Browse to the C:\cucipics folder and click Next.
Step 8 Check the Read option, click Next, and click Finish.
Step 9 Go to Start > Run and start dsa.msc. This starts the Active Directory Users and
Computers administration tool.
Step 10 In the left column, in the tree shown, expand the lab-x.com, where x represents your
Lab Pod Number.
Step 11 Right-click lab-x.com, choose New > Organizational Unit. Create a new OU called
cuciusers and click OK.
Step 12 Move user Bob Knight, Tom Briscoe, Chris Young, and Steve Vizard from Users
container to the new cuciusers OU.
Step 13 Configure the following user’s phone numbers and web page :
Bob Knight:
Telephone number: +14085552001 (General tab)
Web page: http://172.4x.1.16/cucipics/bob-knight.jpg
Mobile number: +1404xxx4001 (Telephone Numbers tab, x = pod number)
Remove 2001 from the IP Phone field (OCS doesn’t support non E.164 numbers).
Tom Briscoe:
Telephone number: +14085552002
Web page: http://172.4x.1.16/cucipics/tom-briscoe.jpg
Mobile number: +1408xxx6666
Remove 2002 from the IP Phone field
Chris Young:
Telephone number: +14085552003
Web page: http://172.4x.1.16/cucipics/chris-young.jpg
Mobile number: +1312xxx6666
Remove 2003 from the IP Phone field
Steve Vizard:
Telephone number: +14085552004
10 Cisco Unified Communications Integration for Microsoft Office Communicator (CUCIMOC) v1.0 © 2009 Cisco Systems, Inc.
Web page: http://172.4x.1.16/cucipics/steve-vizard.jpg
Remove 2004 from the IP Phone field
Step 14 Exit the Active Directory Users and Computers tool.
Step 15 On your lab PC (or directly from your PC if you have a VPN connection to the lab),
open Internet Explorer and navigate to your Cisco Unified Communications
Manager Administration page: https://172.4x.1.11/ccmadmin, where x represents
the Lab Pod number.
Step 16 Log in with the username CCMAdministrator and the password ccm70bc.
Step 17 Go to System > Server and click Find to list all servers of your cluster.
Step 18 Click cucm and change the Host Name/IP Address field from cucm to 172.4x.1.11
then click Save.
Step 19 From the Navigation panel, go to Cisco Unified Serviceability page
(https://172.4x.1.11/ccmservice).
Step 20 In Cisco Unified Communications Manager Serviceability, navigate to Tools >
Service Activation and select Set to Default.
Step 21 Activate the Cisco IP Voice Media Streaming and the Cisco DirSync services and
click Save.
Step 22 Go back to Cisco Unified Communications Manager Administration, navigate to
System > Cisco Unified CM. Configure Auto registration with Starting DN of 2001
and Ending DN of 2010 and click Save.
Step 23 Navigate to System > LDAP > LDAP System. Check the box Enable
Synchronizing from LDAP Server. The server LDAP type is Microsoft Active
Directory and the LDAP attribute for the user ID is sAMAccountName, click Save.
Step 24 Navigate to System > LDAP > LDAP Directory. Configure the LDAP directory
name, by clicking Add New. A warning message will be displayed, click OK.
Step 25 Another warning message about userID will be displayed, click OK.
Step 26 For the LDAP Directory, enter the following parameters:
� LDAP Configuration Name: TheLabAD
� LDAP Manager Distinguished Name:
cn=Administrator,cn=Users,dc=lab-x,dc=com
� LDAP Password: ccm70bc!
� LDAP User Search Base: ou=cuciusers,dc=lab-x,dc=com
Step 27 Perform a re-synchronization every 6 hours
Step 28 Map the user attributes Middle Name as middleName, Phone Number as
telephoneNumber, Mail ID as mail.
Step 29 Enter the Host Name of the LDAP server: ad.lab-x.com and the port 389. Click
Save.
Step 30 After the new LDAP Directory information is saved, click Perform Full Sync Now
and click OK when popup window is displayed.
Step 31 To configure LDAP Authentication, navigate in Cisco Unified Communications
Manager Administration to System > LDAP > LDAP Authentication.
Step 32 Enable the LDAP authentication by checking the Use LDAP Authentication for
End Users check box, and make sure that the following parameters are entered:
© 2009 Cisco Systems, Inc. Lab Guide 11
� LDAP Manager Distinguished Name:
cn=Administrator,cn=Users,dc=lab-x,dc=com
� LDAP Password: ccm70bc!
� LDAP User Search Base: ou=cuciusers,dc=lab-x,dc=com
� Host Name of the LDAP server: ad.lab-x.com and the port 389
Step 33 Click Save.
Activity Verification
You have completed this task when you attain these results:
� When the LDAP synchronization has completed, navigate to User Management > End
User and click Find. You should see four users obtained from the directory server:
— Bob Knight (bknight) DN +14085552001
— Tom Briscoe (tbriscoe) DN +14085552002
— Chris Young (cyoung) DN +14085552003
— Steve Vizard (svizard) DN +14085552004
12 Cisco Unified Communications Integration for Microsoft Office Communicator (CUCIMOC) v1.0 © 2009 Cisco Systems, Inc.
Task 2: Configure Cisco Unified Communications Manager Endpoints
In this task, you will configure a default voice mail pilot number and profile, register CIPC
phones to Cisco Unified Communications Manager, and associate the Cisco IP Communicator
with the imported LDAP users.
Activity Procedure
Complete these steps:
Configure Voice Mail Profile
Step 1 Go to Cisco Unified Communications Manager Administration, navigate to Voice
Mail > Voice Mail Pilot. Click Add New.
Step 2 Configure Voice Mail Pilot Number: 2100, and check Make this the default Voice
Mail Pilot for the System. Click Save.
Step 3 Go to Voice Mail > Voice Mail Profile. Click Default.
Step 4 Configure Voice Mail Pilot: 2100/<None>, and check Make this the default Voice
Mail Profile for the System. Click Save.
Register Cisco IP Communicator with Cisco Unified Communications Manager
Step 5 Using the Cisco Unified Communications Manager Serviceability, make sure that all
necessary services (Cisco CallManager and Cisco TFTP service) are activated and
running.
Step 6 Open an RDP session to Phone1, Phone2, and Phone3 (run mstsc.exe to IP address
172.4x.1.101, 1.102, and 2.101)
Step 7 Launch Cisco IP Communicator on Phone1, Phone2, and Phone3 PCs and once they
registered, make sure they have the following directory numbers assigned:
� Phone1: 2001
� Phone2: 2002
� Phone3: 2003
You might have to configure TFTP Server to point to the Cisco Unified
Communications Manager IP address.
Note If Audio Tuning Wizard popup window is displayed, click Skip.
Configure Device Association
Step 8 In the Device Associations section, click Device Association.
Step 9 Click Find and from the list select the Cisco IP Communicator:
� Device with Line 2001 if configuring bknight
� Device with Line 2002 if configuring tbriscoe
� Device with Line 2003 if configuring cyoung
Step 10 Click Save Selected/Changes.
Step 11 From the Related Links menu, choose Back to User and click Go.
Step 12 In the Directory Number Associations section, set the Primary Extension to 2001
for bknight, 2002 for tbriscoe, or 2003 for cyoung.

© 2009 Cisco Systems, Inc. Lab Guide 13
Step 13 Click Save.
Activity Verification
You have completed this task when you attain these results:
� Your end users have been associated with the Cisco IP Communicator lines.
� You can make internal calls between the IP Phones
14 Cisco Unified Communications Integration for Microsoft Office Communicator (CUCIMOC) v1.0 © 2009 Cisco Systems, Inc.
Task 3: Configure Cisco Unified Communications Manager for PSTN Connectivity
In this task, you will configure MGCP Gateway and Route Pattern for PSTN connectivity.
Activity Procedure
Complete these steps:
Add an MGCP gateway in Cisco Unified Communications Manager
Note These steps are platform dependent. This lab guide is based on Cisco 2811 router platform
with T1/E1 interfaces. You can use the show version, show diag or show inventory
commands to see details about the actually used hardware in your lab environment.
Step 1 Telnet to the MGCP gateway Main_x (IP address 172.4x.1.1). The login password
and enable secret is cisco. Type show diag or show inventory to see the gateway
platform model and the voice interfaces part number and slot number.
Step 2 In Cisco Unified Communications Manager Administration, choose Device >
Gateway and, on the new page shown, click the Add New button.
Step 3 Choose the gateway platform (e.g. Cisco 2811) that is used for Cisco IOS MGCP
gateway Main_x (x is your pod number) from the Gateway Type drop-down list and
click Next.
Step 4 Select from the Protocol drop-down list the protocol type MGCP and click Next.
Step 5 Enter the following parameters in the Gateway Configuration window, then click
Save:
� Domain Name: Main_x
Note The name has to match the hostname of the router and is case sensitive.
� Cisco Unified Communications Manager Group: Default
� Module in Slot 0: NM-4VWIC-MBRD
� Global ISDN Switchtype: 4ESS
� Click Save
Add MGCP Endpoints by Selecting Modules and Voice Interface Cards
Step 6 Select in the Configured Slots, VICs and Endpoints pane from the Subunit 0 in Slot
0, the module VWIC2-1MFT-T1E1-T1. Click Save.
Step 7 Click the port icon 0/0/0 (far left endpoint with the question mark).
Step 8 Select in the next window from the Device Protocol drop-down list the Digital
Access PRI value and click Next.
Step 9 Select in the Gateway Configuration page the following parameters:
� Device Pool: Default
� PRI Protocol Type: PRI 4ESS
� Channel Selection Order: Top Down
� Significant Digits: 4
© 2009 Cisco Systems, Inc. Lab Guide 15
Step 10 Save your changes and reset the gateway.
Configure the MGCP IOS Gateway to use the configuration server method
Step 11 Telnet to the MGCP gateway Main_x (IP address 172.4x.1.1). The login password
and enable secret is cisco.
Step 12 Enter the global configuration mode with configure terminal and configure the
following commands:
ccm-manager config server 172.4x.1.11
ccm-manager config
exit
copy running-config startup-config
Note The gateway will now pull its MGCP configuration from the Cisco Unified Communications
Manager TFTP server.
Step 13 Enter the show running-config command. You should see more than the two
configured mgcp commands.
Verify that the MGCP gateway is registered in Cisco UC Manager:
Step 14 Login to Cisco Unified Communications Manager administration GUI.
Step 15 Navigate to Device > Gateway. Click Find.
Step 16 In the Gateways section, click See Endpoints and click Find.
Step 17 The status of the MGCP gateway’s endpoint should be Registered; the gateway’s IP
address should be 172.4x.1.1.
Create a Route Pattern in Cisco Unified Communications Manager
Step 18 Go to Call Routing > Route/Hunt > Route Pattern, and then click the Add New
button.
Step 19 In the Route Pattern Configuration window enter the following parameters:
� Route Pattern: 9.@
� Description: Route Pattern to PSTN
� Numbering Plan: NANP
� Gateway/Route List: S0/SU0/DS1-0@Main_x
� Called Party Transformation, Discard Digits: PreDot
Step 20 Click Save. You are notified by a pop-up window that the authorization code will
not be activated. Click OK.
Step 21 Then you are notified by another pop-up window that changes will reset the
gateway. Click OK.
Activity Verification
You have completed this task when you attain this result:
� Open an RDP session to PSTN-Phone PC (mstsc.exe to 172.4x.5.101) and start Cisco IP
Communicator.
� Cisco IP Communicator should display PSTN PREFIX 9 or 0 (depending on the pod
number) in the top right corner of its display.

16 Cisco Unified Communications Integration for Microsoft Office Communicator (CUCIMOC) v1.0 © 2009 Cisco Systems, Inc.
� Place an outbound call from one of your internal IP phones to a valid telephone number on
the PSTN-Phone. Prepend an access code 9 to indicate that the call should be sent to the
PSTN using the MGCP gateway Main_x. Use one of the numbers displayed on the PSTN-
Phone
� At the PSTN-Phone accept the call. This call is sent through the Main_x PSTN gateway.
� Place an inbound call from PSTN-Phone to the internal phone DID number 14085552001,
14085552002, or 14085552003. In this remote lab, you will need to prefix the call with 9 or
0 as displayed on the PSTN Phone display.
� At the internal IP Phone accept the call. This call is received through the Main_x PSTN
gateway.
© 2009 Cisco Systems, Inc. Lab Guide 17
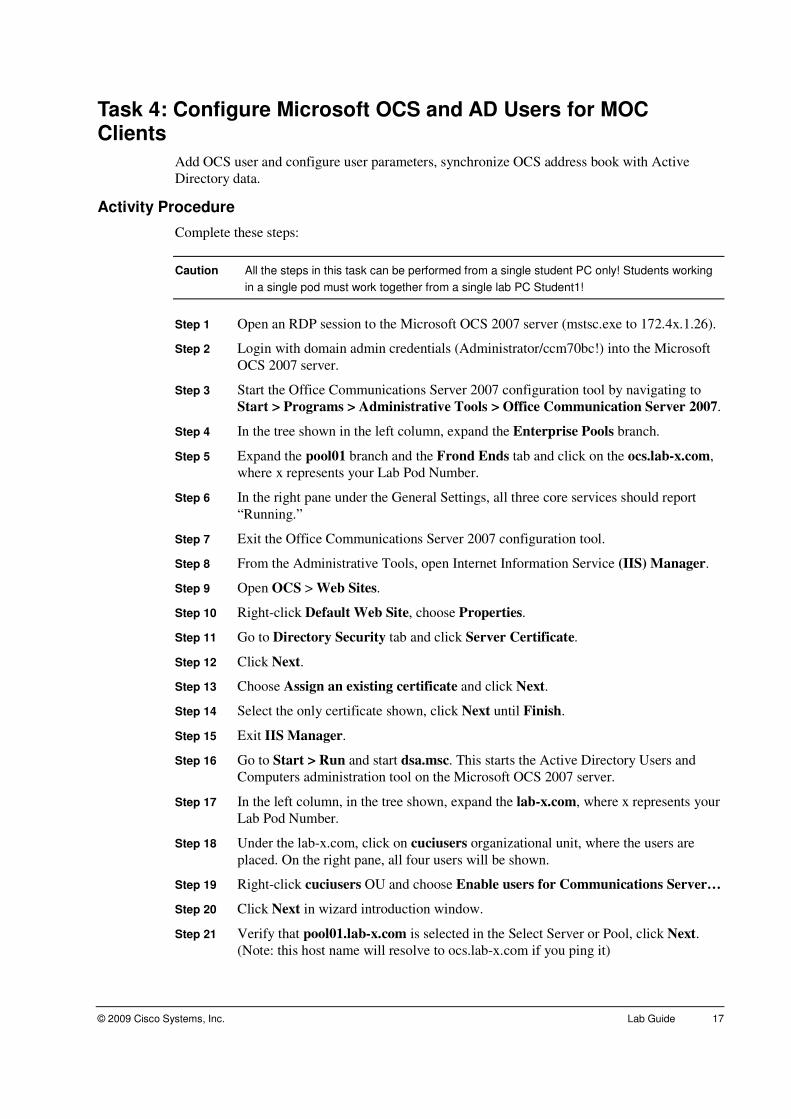
Task 4: Configure Microsoft OCS and AD Users for MOC Clients
Add OCS user and configure user parameters, synchronize OCS address book with Active
Directory data.
Activity Procedure
Complete these steps:
Caution All the steps in this task can be performed from a single student PC only! Students working
in a single pod must work together from a single lab PC Student1!
Step 1 Open an RDP session to the Microsoft OCS 2007 server (mstsc.exe to 172.4x.1.26).
Step 2 Login with domain admin credentials (Administrator/ccm70bc!) into the Microsoft
OCS 2007 server.
Step 3 Start the Office Communications Server 2007 configuration tool by navigating to
Start > Programs > Administrative Tools > Office Communication Server 2007.
Step 4 In the tree shown in the left column, expand the Enterprise Pools branch.
Step 5 Expand the pool01 branch and the Frond Ends tab and click on the ocs.lab-x.com,
where x represents your Lab Pod Number.
Step 6 In the right pane under the General Settings, all three core services should report
“Running.”
Step 7 Exit the Office Communications Server 2007 configuration tool.
Step 8 From the Administrative Tools, open Internet Information Service (IIS) Manager.
Step 9 Open OCS > Web Sites.
Step 10 Right-click Default Web Site, choose Properties.
Step 11 Go to Directory Security tab and click Server Certificate.
Step 12 Click Next.
Step 13 Choose Assign an existing certificate and click Next.
Step 14 Select the only certificate shown, click Next until Finish.
Step 15 Exit IIS Manager.
Step 16 Go to Start > Run and start dsa.msc. This starts the Active Directory Users and
Computers administration tool on the Microsoft OCS 2007 server.
Step 17 In the left column, in the tree shown, expand the lab-x.com, where x represents your
Lab Pod Number.
Step 18 Under the lab-x.com, click on cuciusers organizational unit, where the users are
placed. On the right pane, all four users will be shown.
Step 19 Right-click cuciusers OU and choose Enable users for Communications Server…
Step 20 Click Next in wizard introduction window.
Step 21 Verify that pool01.lab-x.com is selected in the Select Server or Pool, click Next.
(Note: this host name will resolve to ocs.lab-x.com if you ping it)
18 Cisco Unified Communications Integration for Microsoft Office Communicator (CUCIMOC) v1.0 © 2009 Cisco Systems, Inc.
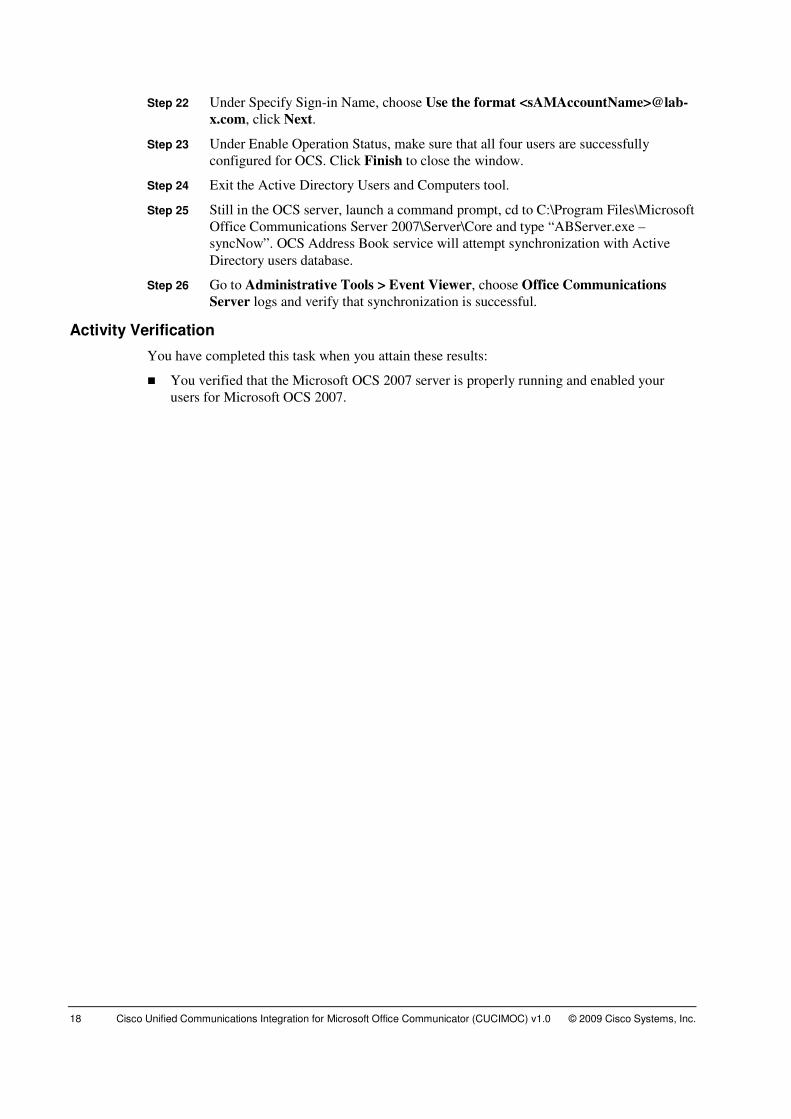
Step 22 Under Specify Sign-in Name, choose Use the format <sAMAccountName>@lab-
x.com, click Next.
Step 23 Under Enable Operation Status, make sure that all four users are successfully
configured for OCS. Click Finish to close the window.
Step 24 Exit the Active Directory Users and Computers tool.
Step 25 Still in the OCS server, launch a command prompt, cd to C:\Program Files\Microsoft
Office Communications Server 2007\Server\Core and type “ABServer.exe –
syncNow”. OCS Address Book service will attempt synchronization with Active
Directory users database.
Step 26 Go to Administrative Tools > Event Viewer, choose Office Communications
Server logs and verify that synchronization is successful.
Activity Verification
You have completed this task when you attain these results:
� You verified that the Microsoft OCS 2007 server is properly running and enabled your
users for Microsoft OCS 2007.
© 2009 Cisco Systems, Inc. Lab Guide 19
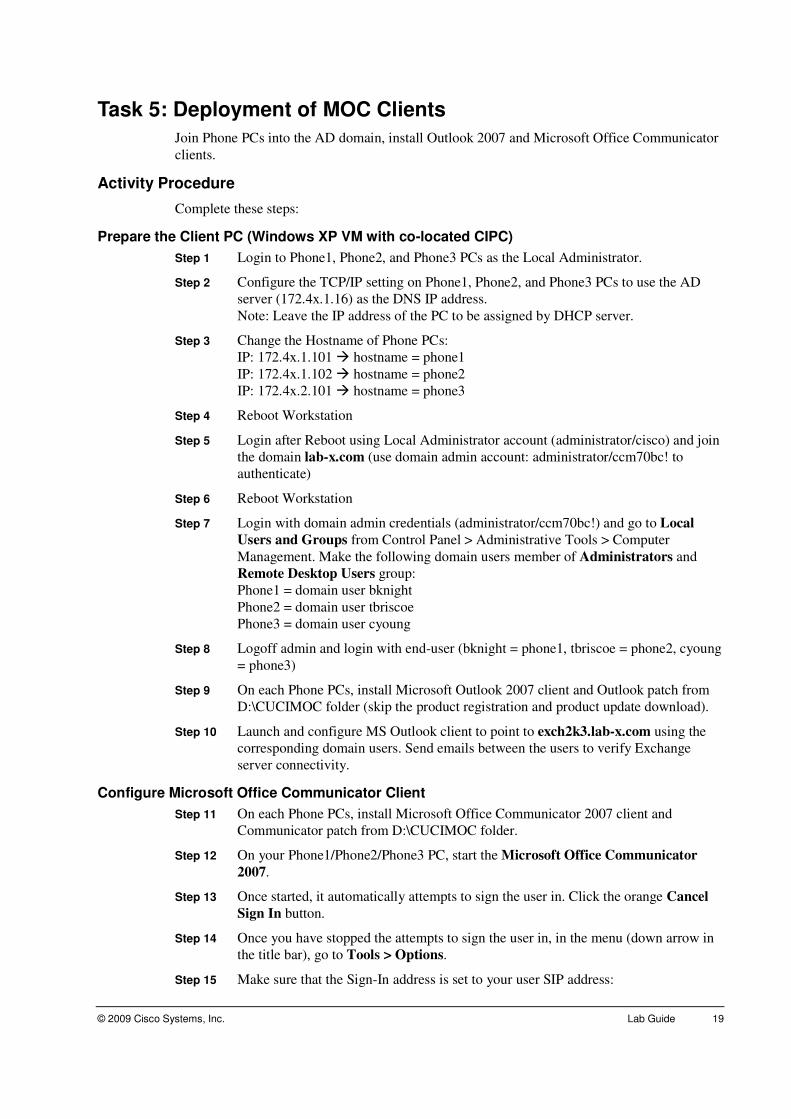
Task 5: Deployment of MOC Clients
Join Phone PCs into the AD domain, install Outlook 2007 and Microsoft Office Communicator
clients.
Activity Procedure
Complete these steps:
Prepare the Client PC (Windows XP VM with co-located CIPC)
Step 1 Login to Phone1, Phone2, and Phone3 PCs as the Local Administrator.
Step 2 Configure the TCP/IP setting on Phone1, Phone2, and Phone3 PCs to use the AD
server (172.4x.1.16) as the DNS IP address.
Note: Leave the IP address of the PC to be assigned by DHCP server.
Step 3 Change the Hostname of Phone PCs:
IP: 172.4x.1.101 � hostname = phone1
IP: 172.4x.1.102 � hostname = phone2
IP: 172.4x.2.101 � hostname = phone3
Step 4 Reboot Workstation
Step 5 Login after Reboot using Local Administrator account (administrator/cisco) and join
the domain lab-x.com (use domain admin account: administrator/ccm70bc! to
authenticate)
Step 6 Reboot Workstation
Step 7 Login with domain admin credentials (administrator/ccm70bc!) and go to Local
Users and Groups from Control Panel > Administrative Tools > Computer
Management. Make the following domain users member of Administrators and
Remote Desktop Users group:
Phone1 = domain user bknight
Phone2 = domain user tbriscoe
Phone3 = domain user cyoung
Step 8 Logoff admin and login with end-user (bknight = phone1, tbriscoe = phone2, cyoung
= phone3)
Step 9 On each Phone PCs, install Microsoft Outlook 2007 client and Outlook patch from
D:\CUCIMOC folder (skip the product registration and product update download).
Step 10 Launch and configure MS Outlook client to point to exch2k3.lab-x.com using the
corresponding domain users. Send emails between the users to verify Exchange
server connectivity.
Configure Microsoft Office Communicator Client
Step 11 On each Phone PCs, install Microsoft Office Communicator 2007 client and
Communicator patch from D:\CUCIMOC folder.
Step 12 On your Phone1/Phone2/Phone3 PC, start the Microsoft Office Communicator
2007.
Step 13 Once started, it automatically attempts to sign the user in. Click the orange Cancel
Sign In button.
Step 14 Once you have stopped the attempts to sign the user in, in the menu (down arrow in
the title bar), go to Tools > Options.
Step 15 Make sure that the Sign-In address is set to your user SIP address:
20 Cisco Unified Communications Integration for Microsoft Office Communicator (CUCIMOC) v1.0 © 2009 Cisco Systems, Inc.
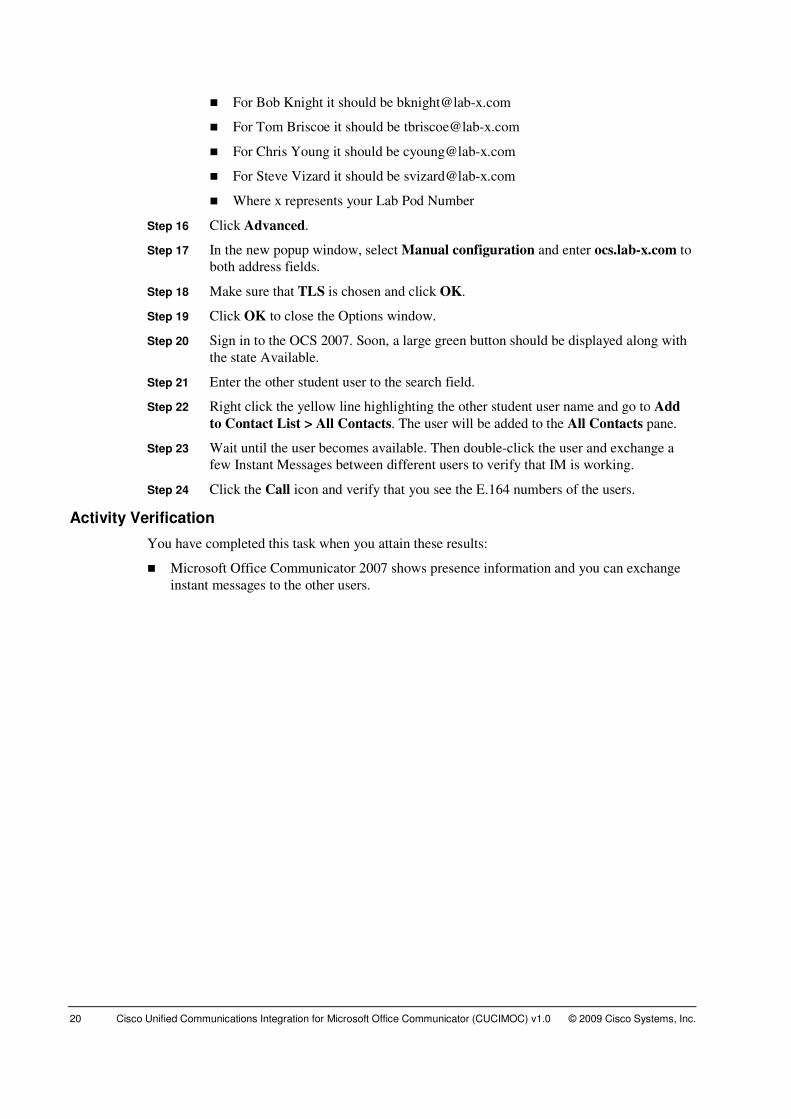
� For Bob Knight it should be [email protected]
� For Tom Briscoe it should be [email protected]
� For Chris Young it should be [email protected]
� For Steve Vizard it should be [email protected]
� Where x represents your Lab Pod Number
Step 16 Click Advanced.
Step 17 In the new popup window, select Manual configuration and enter ocs.lab-x.com to
both address fields.
Step 18 Make sure that TLS is chosen and click OK.
Step 19 Click OK to close the Options window.
Step 20 Sign in to the OCS 2007. Soon, a large green button should be displayed along with
the state Available.
Step 21 Enter the other student user to the search field.
Step 22 Right click the yellow line highlighting the other student user name and go to Add
to Contact List > All Contacts. The user will be added to the All Contacts pane.
Step 23 Wait until the user becomes available. Then double-click the user and exchange a
few Instant Messages between different users to verify that IM is working.
Step 24 Click the Call icon and verify that you see the E.164 numbers of the users.
Activity Verification
You have completed this task when you attain these results:
� Microsoft Office Communicator 2007 shows presence information and you can exchange
instant messages to the other users.
© 2009 Cisco Systems, Inc. Lab Guide 21
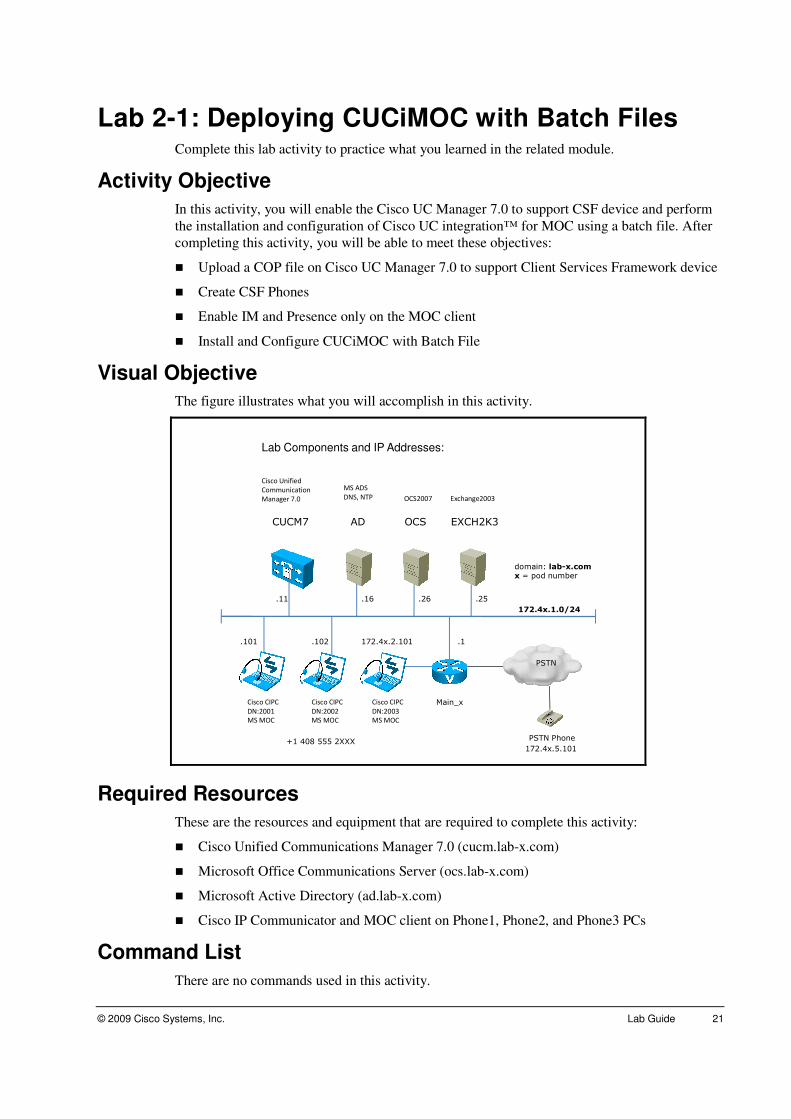
Lab 2-1: Deploying CUCiMOC with Batch Files Complete this lab activity to practice what you learned in the related module.
Activity Objective
In this activity, you will enable the Cisco UC Manager 7.0 to support CSF device and perform
the installation and configuration of Cisco UC integration™ for MOC using a batch file. After
completing this activity, you will be able to meet these objectives:
� Upload a COP file on Cisco UC Manager 7.0 to support Client Services Framework device
� Create CSF Phones
� Enable IM and Presence only on the MOC client
� Install and Configure CUCiMOC with Batch File
Visual Objective
The figure illustrates what you will accomplish in this activity.
ADCUCM7
.11 .16
.101 .102
Cisco CIPC
DN:2001
MS MOC
MS ADS
DNS, NTP
Cisco CIPC
DN:2002
MS MOC
Cisco Unified
Communication
Manager 7.0
Lab Components and IP Addresses:
.26 .25
OCS EXCH2K3
OCS2007 Exchange2003
PSTN
Main_x
PSTN Phone
172.4x.2.101
Cisco CIPC
DN:2003
MS MOC
+1 408 555 2XXX
domain: lab-x.comx = pod number
172.4x.1.0/24
.1
172.4x.5.101
Required Resources
These are the resources and equipment that are required to complete this activity:
� Cisco Unified Communications Manager 7.0 (cucm.lab-x.com)
� Microsoft Office Communications Server (ocs.lab-x.com)
� Microsoft Active Directory (ad.lab-x.com)
� Cisco IP Communicator and MOC client on Phone1, Phone2, and Phone3 PCs
Command List
There are no commands used in this activity.

22 Cisco Unified Communications Integration for Microsoft Office Communicator (CUCIMOC) v1.0 © 2009 Cisco Systems, Inc.
Job Aids
These job aids are available to help you complete the lab activity.
Credentials for the Lab Devices
Server IP Address Server User ID Server PW Appl. User ID Appl. PW
Pod-x
CUCM 7.0 Hostname: cucm
172.4x.1.11 CCMAdministrator
ccm70bc CCMAdministrator ccm70bc
MS AD/DNS/ DHCP, NTP Hostname: ad
172.4x.1.16 Administrator ccm70bc!
MS Exchange Server 2007 Hostname: exch2k3
172.4x.1.25 Administrator ccm70bc!
MS OCS 2007 Hostname: ocs
172.4x.1.26 Administrator ccm70bc!
Cisco IP Communicator
172.4x.1.101 DN 2001
Administrator cisco VNC cisco
Cisco IP Communicator
172.4x.1.102 DN 2002
Administrator cisco VNC cisco
Cisco IP Communicator
172.4x.2.101 DN 2003
Administrator cisco VNC cisco
Bob Knight bknight ccm70bc!
Tom Briscoe tbriscoe ccm70bc!
Chris Young cyoung ccm70bc!
Steve Vizard svizard ccm70bc!
© 2009 Cisco Systems, Inc. Lab Guide 23
Task 1: Configure User Group Settings and Uploading COP file to Cisco Unified Communications Manager 7.0
In this task, you will put the CUCiMOC users into CCM End Users and CTI Enabled groups.
You will also upload the CSF COP file to Cisco Unified Communications Manager 7.0 to
enable Client Services Framework devices on Cisco Unified Communications Manager 7.0.
Activity Procedure
Complete these steps:
Configure User Group Settings
Step 1 On your lab PC (or directly from your PC if you have a VPN connection to the lab),
open Internet Explorer and navigate to your Cisco Unified Communications
Manager Administration page: https://172.4x.1.11/ccmadmin
Step 2 Choose User Management > User Group and click Find.
Step 3 Select Standard CCM End Users from the list.
Step 4 On the User Group Configuration page, click Add End Users to Group.
Step 5 Click Find, select all the users and click Add Selected.
Step 6 Select the Back to Find/List from the Related Links drop-down menu and click Go.
Step 7 Now select the Standard CTI Enabled group.
Step 8 Click Add End Users to Group.
Step 9 Check all the users and click Add Selected.
Step 10 To verify that the changes were accepted, choose User Management > End User
and click Find.
Step 11 Click on one of your users and when the End User Configuration page displays,
check the Permissions Information section at the bottom of the page. You should see
both configured user groups.
Upload a CSF COP File to Support Client Services Framework on Cisco Unified Communications Manager 7.0
Step 12 Open an RDP session to Phone1 PC (mstsc.exe to 172.4x.1.101). Turn off Windows
Firewall on this VM machine.
Step 13 Use 3CDaemon as the FTP server and create a profile called cucimoc with password
ccm70bc and point to D:\CUCIMOC as the FTP directory. Stop and Start the FTP
Server.
Step 14 Go to the Cisco Unified Communications Manager OS Administration page
(https://172.4x.1.11/cmplatform) and log in using CCMAdministrator account,
password ccm70bc (both user id and passwords are case sensitive).
Step 15 Go to Software Upgrades > Install/Upgrade, and point to the FTP server above:
Source: Remote Filesystem
Directory: \
Server: 172.4x.1.101
User Name: cucimoc
User Password: ccm70bc
Transfer Protocol: FTP
Click Next

24 Cisco Unified Communications Integration for Microsoft Office Communicator (CUCIMOC) v1.0 © 2009 Cisco Systems, Inc.
Step 16 Under Options/Upgrades, select ciscocm.galway.alpha.csf.cop.sgn file. Click
Next.
Step 17 The file will be downloaded to Cisco Unified Communications Manager. Click Next
on File Checksum Details.
Step 18 The COP file will be installed on Cisco Unified Communications Manager and the
progress can be viewed in the installation log. Wait until the Installation Status
shows Complete.
Step 19 Go to Settings > Version and click the Restart button (DO NOT press Shutdown!).
Wait for a few minutes before the Cisco Unified Communications Manager comes
back online.
© 2009 Cisco Systems, Inc. Lab Guide 25
Task 2: Create Client Services Framework (CSF) Softphones
In this task, you will create three CSF IP Softphones in Cisco Unified Communications
Manager and assign them with the same DN as the user’s IP phones.
Activity Procedure
Complete these steps:
Create CSF Phones
Step 1 Go to the Cisco Unified Communications Manager Administration page:
https://172.4x.1.11/ccmadmin and click Device > Phone. Click the Add New
button.
Step 2 Under Phone Type, select Client Services Framework and then click Next.
Step 3 Under the Phone Configuration, enter the following:
Device Name: MOCBKNIGHT
Device Pool: Default
Phone Button Template: Standard Client Services Framework
Common Phone Profile: Standard Common Phone Profile
Device Security Profile: Client Services Framework – Standard SIP Non-Secure
SIP Profile: Standard SIP Profile
Click Save and OK.
Step 4 Add a new DN in Line 1 of the CSF phone:
Directory Number: 2001
Partition: None
Voice Mail Profile: Default
Max Number of Calls: 4
Busy Trigger: 2
Click Save
Step 5 From the Related Links menu, choose Configure Device (MOC…) and click Go.
Step 6 Click Save and Reset the CSF Phone.
Step 7 Repeat step 1 to 6 for device name MOCTBRISCOE (DN: 2002), and device name
MOCCYOUNG (DN: 2003)
Associate CSF Phones to End Users
Step 8 Go to User Management > End User. Click the Find button.
Step 9 Click user bknight, click Device Association button.
Step 10 Click Find and select MOCBKNIGHT device. Click Save Selected/Changes.
Step 11 From Related Links menu, choose Back to User and click Go.
Step 12 Verify that user bknight has both the CIPC phone and CSF phone associated to him.
Step 13 From Related Links menu, choose Back to Find List Users and click Go.
Step 14 Repeat step 9 to 13 for user tbriscoe and cyoung with their corresponding CSF
device name (MOCTBRISCOE and MOCCYOUNG, respectively).

26 Cisco Unified Communications Integration for Microsoft Office Communicator (CUCIMOC) v1.0 © 2009 Cisco Systems, Inc.
Task 3: Install CUCiMOC software
In this task you will install the CUCiMOC software, change the registry setting to allow IM and
Presence only on MOC, and finally edit and apply a batch file to configure the CUCiMOC
settings to the client’s registry.
Activity Procedure
Complete these steps:
Install CUCiMOC Software and Configure Settings on the Registry
Step 1 Open an RDP session to Phone1 PC (mstsc.exe to 172.4x.1.101). Log in to the
domain using AD user bknight and password ccm70bc!.
Step 2 Close Microsoft Outlook and Microsoft Office Communicator completely (from the
bottom right corner of the screen, right-click the MOC icon and choose Exit.
Step 3 Install Microsoft .Net Framework 3.5 SP1 from the D:\CUCIMOC folder.
Follow the wizard and choose default installation. Wait until the installation is
completed before proceeding with the next step.
Note: this installation is necessary because we don’t have direct internet access in
the remote lab to download the software automatically.
Step 4 Install the CUCiMOC software from the D:\CUCIMOC folder. Follow the wizard
and choose default installation. Wait until the installation is completed before
proceeding.
Step 5 From the D:\CUCIMOC folder, right-click on the Telephony_mode_5.reg file and
choose Edit
Step 6 View and verify the registry settings (Mode 5 = IM and Presence only with MOC).
Close the file.
Step 7 Double-click the Telephony_mode_5.reg file to apply the settings to the registry.
Step 8 From the D:\CUCIMOC folder, copy the DeviceSettings.bat file to the Phone1 PC
desktop.
Step 9 Launch Microsoft Wordpad and open the DeviceSettings.bat file to edit.
Step 10 Set the following variables (x = your pod number):
SET TFTP1="172.4x.1.11"
SET CTI1="172.4x.1.11"
SET LDAP_Server_1="ldap://172.4x.1.16:389"
SET LDAP_SearchBaseDN_1="OU=cuciusers,DC=lab-x,DC=com"
SET LDAP_UserLogonDomain="lab-x.com"
SET LDAP_AttributeName_photoUri="wWWHomePage"
SET LDAP_AttributeName_businessPhone="telephoneNumber"
SET LDAP_AttributeName_mobilePhone="mobile"
SET LDAP_AttributeName_userAccountName="sAMAccountName"
SET VMPilot="2100"
SET CCMCIP1="172.4x.1.11"
Save and Close the batch file.
Step 11 Launch a command prompt and cd to the desktop. Type Devicesettings.bat to apply
the CUCiMOC settings to the registry. Verify that all settings are successfully set.
Step 12 Restart the PC by issuing “shutdown –r -f” command.
© 2009 Cisco Systems, Inc. Lab Guide 27
Activity Verification
Step 1 Open an RDP session to Phone1 PC. Log in to the domain using user id bknight.
Also open another RDP session to PSTN-Phone PC (172.4x.5.101), log in as
administrator password cisco.
Step 2 Launch Microsoft Office Communicator only (DO NOT launch CIPC phone) and
login using the corresponding user id. Make sure “Cannot Synchronize Address
Book” message is not displayed after the user sign in to OCS server.
Step 3 CUCiMOC communication pane will be uploaded automatically. You need to key in
the user id and password again (select the “remember my details” checkbox so the
login info will be cached the next time you launch the communication pane).
Step 4 After a successful login to the CUCiMOC, set the Phone Mode to Softphone from
the communication pane.
Step 5 Try to make an outbound PSTN call using the CUCIMOC keypad (use “9” PSTN
code).
Step 6 Pick up the call from the PSTN-Phone PC.
Step 7 Go to the Cisco Unified Communications Manager Administration page and verify
that the MOCBKNIGHT CSF Phone is registered.
28 Cisco Unified Communications Integration for Microsoft Office Communicator (CUCIMOC) v1.0 © 2009 Cisco Systems, Inc.
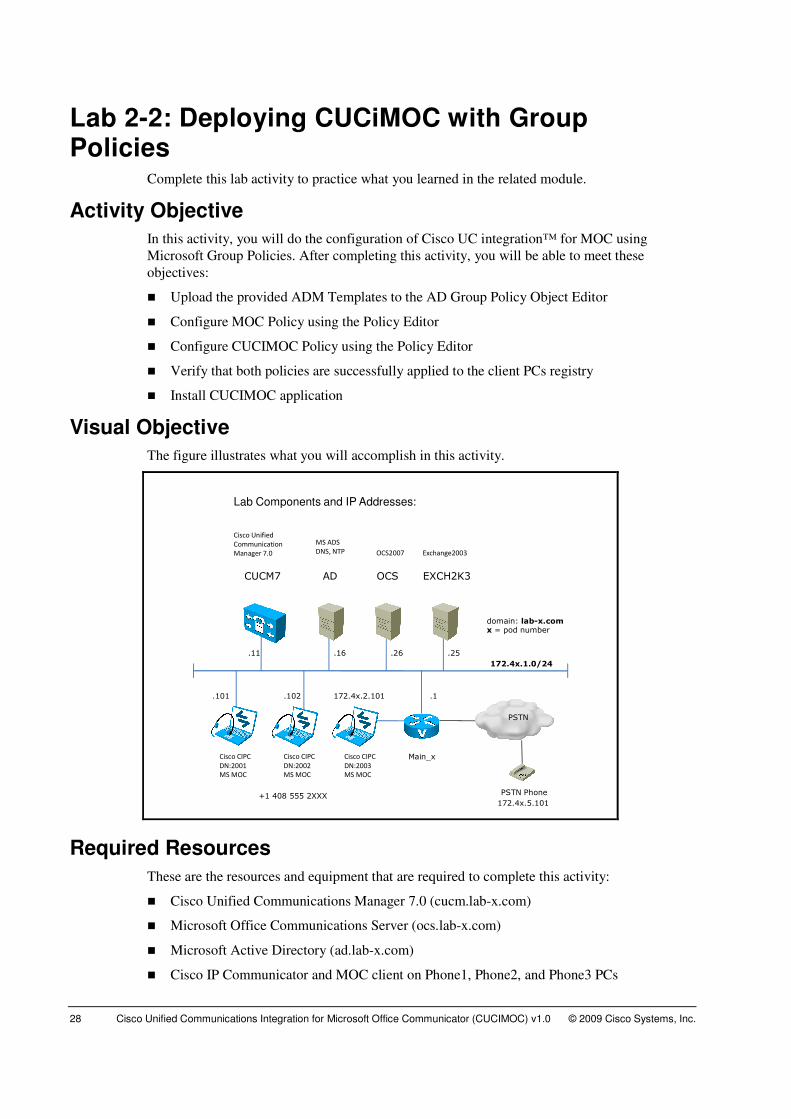
Lab 2-2: Deploying CUCiMOC with Group Policies
Complete this lab activity to practice what you learned in the related module.
Activity Objective
In this activity, you will do the configuration of Cisco UC integration™ for MOC using
Microsoft Group Policies. After completing this activity, you will be able to meet these
objectives:
� Upload the provided ADM Templates to the AD Group Policy Object Editor
� Configure MOC Policy using the Policy Editor
� Configure CUCIMOC Policy using the Policy Editor
� Verify that both policies are successfully applied to the client PCs registry
� Install CUCIMOC application
Visual Objective
The figure illustrates what you will accomplish in this activity.
ADCUCM7
.11 .16
.101 .102
Cisco CIPC
DN:2001
MS MOC
MS ADS
DNS, NTP
Cisco CIPC
DN:2002
MS MOC
Cisco Unified
Communication
Manager 7.0
Lab Components and IP Addresses:
.26 .25
OCS EXCH2K3
OCS2007 Exchange2003
PSTN
Main_x
PSTN Phone
172.4x.2.101
Cisco CIPC
DN:2003
MS MOC
+1 408 555 2XXX
domain: lab-x.comx = pod number
172.4x.1.0/24
.1
172.4x.5.101
Required Resources
These are the resources and equipment that are required to complete this activity:
� Cisco Unified Communications Manager 7.0 (cucm.lab-x.com)
� Microsoft Office Communications Server (ocs.lab-x.com)
� Microsoft Active Directory (ad.lab-x.com)
� Cisco IP Communicator and MOC client on Phone1, Phone2, and Phone3 PCs
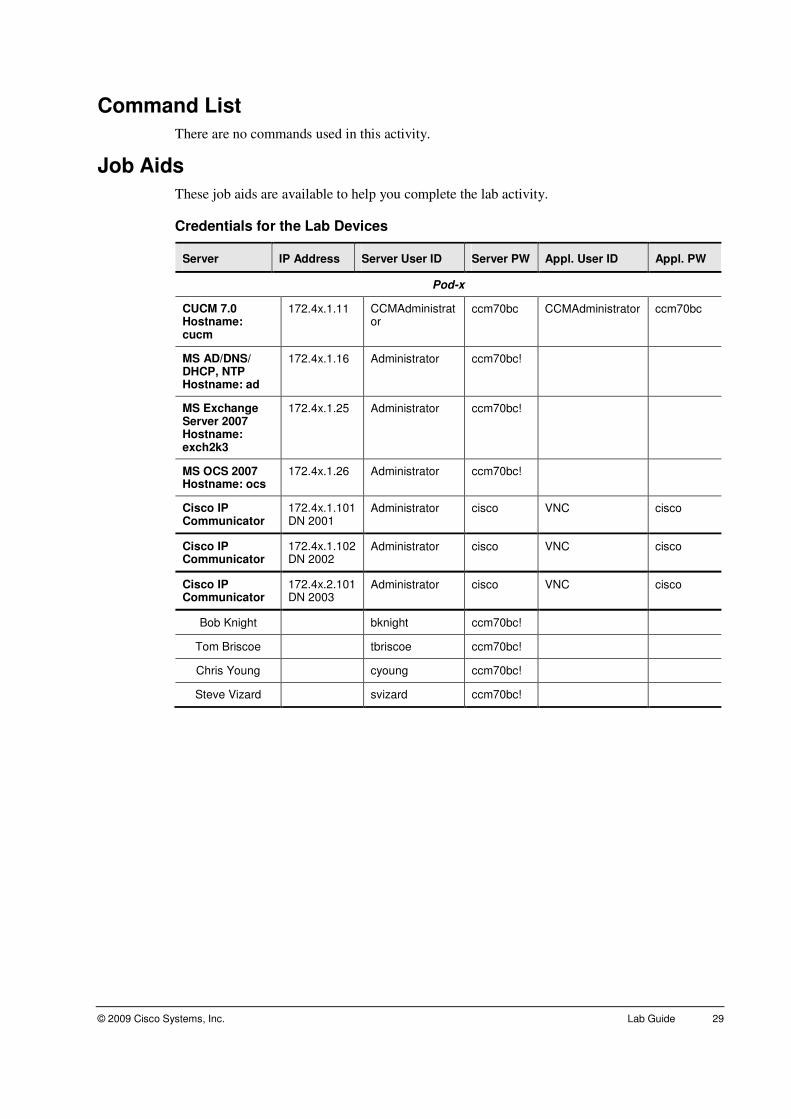
© 2009 Cisco Systems, Inc. Lab Guide 29
Command List
There are no commands used in this activity.
Job Aids
These job aids are available to help you complete the lab activity.
Credentials for the Lab Devices
Server IP Address Server User ID Server PW Appl. User ID Appl. PW
Pod-x
CUCM 7.0 Hostname: cucm
172.4x.1.11 CCMAdministrator
ccm70bc CCMAdministrator ccm70bc
MS AD/DNS/ DHCP, NTP Hostname: ad
172.4x.1.16 Administrator ccm70bc!
MS Exchange Server 2007 Hostname: exch2k3
172.4x.1.25 Administrator ccm70bc!
MS OCS 2007 Hostname: ocs
172.4x.1.26 Administrator ccm70bc!
Cisco IP Communicator
172.4x.1.101 DN 2001
Administrator cisco VNC cisco
Cisco IP Communicator
172.4x.1.102 DN 2002
Administrator cisco VNC cisco
Cisco IP Communicator
172.4x.2.101 DN 2003
Administrator cisco VNC cisco
Bob Knight bknight ccm70bc!
Tom Briscoe tbriscoe ccm70bc!
Chris Young cyoung ccm70bc!
Steve Vizard svizard ccm70bc!
30 Cisco Unified Communications Integration for Microsoft Office Communicator (CUCIMOC) v1.0 © 2009 Cisco Systems, Inc.
Task 1: Configure Group Policy Setting
In this task, you will upload two ADM templates to the Active Directory Group Policy Object
Editor and configure both the MOC and CUCIMOC Policy Settings.
Activity Procedure
Complete these steps:
Upload ADM Files to Group Policy Object Editor
Step 1 Open an RDP session to Active Directory PC (mstsc.exe to 172.4x.1.16). Log in
using AD user administrator and password ccm70bc!.
Step 2 From Start > Run, type dsa.msc to run Active Directory User and Computers
(ADUC).
Step 3 Right-click the cuciusers OU and choose Properties.
Step 4 Select the Group Policy tab, click New and create a policy called Cucimoc
Configuration.
Step 5 Highlight the new Cucimoc Configuration policy and click Edit.
Step 6 Under the User Configuration branch, right-click Administrative Templates and
select Add/Remove Templates…
Step 7 Click Add and load both Communicator.adm and
CUCIMOC_CUCSF_AdminData.adm from the D:\CUCIMOC folder
Step 8 Close Add/Remove Templates and confirm the tree now shows the extra policy
settings.
Configure Microsoft Office Communicator Policy Settings
Step 9 Expand the Microsoft Office Communicator Policy Setting branch and double-
click the Microsoft Office Communicator Feature Policies folder.
Step 10 Double-click Specify Transport and Server to configure Property Settings
Step 11 Enable the Transport and Server settings:
Internal Server: ocs.lab-x.com
External Server: ocs.lab-x.com
Transport: TLS
Click Apply and OK.
Step 12 Double-click Telephony Mode and enable IM and Presence Only. Click Apply
and OK.
Step 13 Double-click Disable Audio/Video Conferencing and select Enable. Click Apply
and OK. This will disable the audio/video conferencing of OCS.
Configure CUCIMOC Policy Settings
Step 14 Right-click the Cisco Unified Communications Integration for Microsoft Office
Communicator folder and select View > Filtering
Step 15 Uncheck Only show policy settings that can be fully managed. Click OK.
Step 16 You should see now five folders under the CUCIMOC folder: TFTP Servers, CTI
Servers, CCMIP Servers, Voicemail, and LDAP Settings.
Step 17 Enable and configure the following under the corresponding folder:
TFTPServer1: 172.4x.1.11 (x=pod number)
CTIServer1: 172.4x.1.11
© 2009 Cisco Systems, Inc. Lab Guide 31
CCMCIPServer1: 172.4x.11
VoicemailPilotNumber: 2100
Step 18 Under the LDAP setting, configure/enable ALL of the below parameters (click Next
Setting to move forward):
LDAP_Server_1: ldap://172.4x.1.16:389
LDAP_SearchBaseDN_1: ou=cuciusers,dc=lab-x,dc=com
LDAP_UserLogonDomain: lab-x.com
LDAP_MaxCacheSize: 1000
LDAP_ResultSetMaxSize: 250
LDAP_AttributeName_objectclassKey: objectclass
LDAP_AttributeName_objectclassValue: person
LDAP_AttributeName_userLogonName: userPrincipalName
LDAP_AttributeName_displayName: displayName
LDAP_AttributeName_commonName: cn
LDAP_AttributeName_firstName: givenName
LDAP_AttributeName_lastName: sn
LDAP_AttributeName_email: mail
LDAP_AttributeName_uri: msRTCSIP-PrimaryUserAddress
LDAP_AttributeName_photoUri: wWWHomePage
LDAP_AttributeName_businessPhone: telephoneNumber
LDAP_AttributeName_homePhone: homePhone
LDAP_AttributeName_mobilePhone: mobile
LDAP_AttributeName_otherPhone: otherTelephone
LDAP_AttributeName_title: title
LDAP_AttributeName_companyName: company
LDAP_AttributeName_userAccountName: sAMAccountName
Click OK, close the AD Users and Computers, and log out from the AD server.
32 Cisco Unified Communications Integration for Microsoft Office Communicator (CUCIMOC) v1.0 © 2009 Cisco Systems, Inc.
Task 2: Testing the Group Policy
In this task, you will verify that the group policy settings have been applied to the Phone2 and
Phone3 PCs.
Activity Procedure
Complete these steps:
Step 1 Log out from Phone2 and log in back again as user tbriscoe.
Step 2 Launch a command prompt and type gpresult.
Step 3 Search for the information the Cucimoc Configuration under the Applied Group
Policy Objects.
Step 4 Alternatively, you can go to Start > Run > Regedit and go to
HKEY_CURRENT_USER > Software > Cisco Systems, Inc > Client Services
Framework > AdminData to confirm the LDAP attributes are correct.
Step 5 Close Microsoft Outlook and Microsoft Office Communicator completely (from the
bottom right corner of the screen, right-click the MOC icon and choose Exit.
Step 6 Install Microsoft .Net Framework 3.5 SP1 from the D:\CUCIMOC folder.
Follow the wizard and choose default installation. Wait until the installation is
completed before proceeding with the next step.
Step 7 Install the CUCiMOC software from the D:\CUCIMOC folder. Follow the wizard
and choose default installation. Wait until the installation is completed.
Step 8 Restart the PC by issuing “shutdown –fr” command.
Step 9 Repeat step 1 to 8 on Phone3 PC, log in as user cyoung.
Activity Verification
Step 1 Launch Microsoft Office Communicator only (DO NOT launch CIPC phone) on
Phone2 and Phone3 and login using tbriscoe and cyoung user id, respectively.
Make sure “Cannot Synchronize Address Book” message is not displayed after the
user sign in to OCS server.
Step 2 CUCiMOC communication pane will be uploaded automatically. You need to key in
the user id and password again (select the “remember my details” checkbox so the
login info will be cached the next time you launch the communication pane).
Step 3 After a successful login to the CUCiMOC, set the Phone Mode to Softphone from
the communication pane.
Step 4 Go to the Cisco Unified Communications Manager Administration page and verify
that the MOCTBRISCOE and MOCCYOUNG CSF Phones are registered.
© 2009 Cisco Systems, Inc. Lab Guide 33
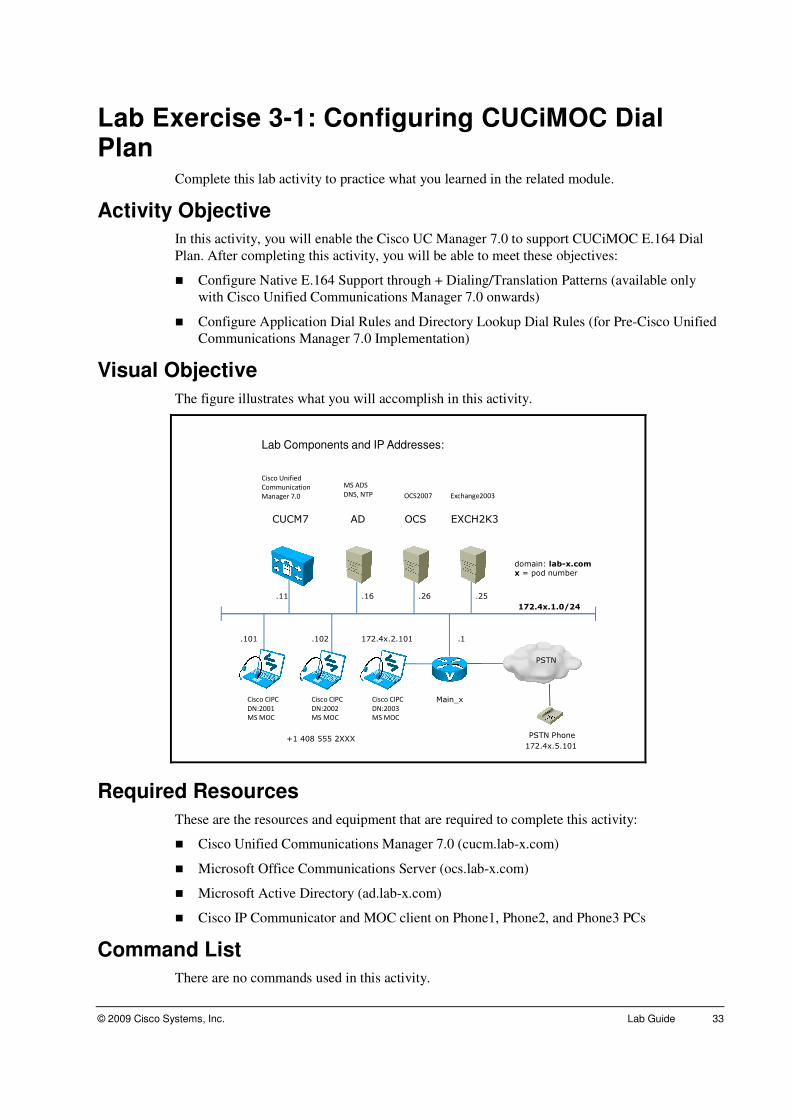
Lab Exercise 3-1: Configuring CUCiMOC Dial Plan
Complete this lab activity to practice what you learned in the related module.
Activity Objective
In this activity, you will enable the Cisco UC Manager 7.0 to support CUCiMOC E.164 Dial
Plan. After completing this activity, you will be able to meet these objectives:
� Configure Native E.164 Support through + Dialing/Translation Patterns (available only
with Cisco Unified Communications Manager 7.0 onwards)
� Configure Application Dial Rules and Directory Lookup Dial Rules (for Pre-Cisco Unified
Communications Manager 7.0 Implementation)
Visual Objective
The figure illustrates what you will accomplish in this activity.
ADCUCM7
.11 .16
.101 .102
Cisco CIPC
DN:2001
MS MOC
MS ADS
DNS, NTP
Cisco CIPC
DN:2002
MS MOC
Cisco Unified
Communication
Manager 7.0
Lab Components and IP Addresses:
.26 .25
OCS EXCH2K3
OCS2007 Exchange2003
PSTN
Main_x
PSTN Phone
172.4x.2.101
Cisco CIPC
DN:2003
MS MOC
+1 408 555 2XXX
domain: lab-x.comx = pod number
172.4x.1.0/24
.1
172.4x.5.101
Required Resources
These are the resources and equipment that are required to complete this activity:
� Cisco Unified Communications Manager 7.0 (cucm.lab-x.com)
� Microsoft Office Communications Server (ocs.lab-x.com)
� Microsoft Active Directory (ad.lab-x.com)
� Cisco IP Communicator and MOC client on Phone1, Phone2, and Phone3 PCs
Command List
There are no commands used in this activity.
34 Cisco Unified Communications Integration for Microsoft Office Communicator (CUCIMOC) v1.0 © 2009 Cisco Systems, Inc.
Job Aids
These job aids are available to help you complete the lab activity.
Credentials for the Lab Devices
Server IP Address Server User ID Server PW Appl. User ID Appl. PW
Pod-x
CUCM 7.0 Hostname: cucm
172.4x.1.11 CCMAdministrator
ccm70bc CCMAdministrator ccm70bc
MS AD/DNS/ DHCP, NTP Hostname: ad
172.4x.1.16 Administrator ccm70bc!
MS Exchange Server 2007 Hostname: exch2k3
172.4x.1.25 Administrator ccm70bc!
MS OCS 2007 Hostname: ocs
172.4x.1.26 Administrator ccm70bc!
Cisco IP Communicator
172.4x.1.101 DN 2001
Administrator cisco VNC cisco
Cisco IP Communicator
172.4x.1.102 DN 2002
Administrator cisco VNC cisco
Cisco IP Communicator
172.4x.2.101 DN 2003
Administrator cisco VNC cisco
Bob Knight bknight ccm70bc!
Tom Briscoe tbriscoe ccm70bc!
Chris Young cyoung ccm70bc!
Steve Vizard svizard ccm70bc!
© 2009 Cisco Systems, Inc. Lab Guide 35
Task 1: Configure E.164 Support
In this exercise, you will configure the Cisco Unified Communications Manager 7.0 to support
OCS E.164 numbers via + Digit Translation Patterns.
Activity Procedure
Complete these steps:
Configure Translation Pattern
Step 1 Go to the Cisco Unified Communications Manager Administration page:
https://172.4x.1.11/ccmadmin and click Call Routing > Translation Patterns.
Click the Add New button.
Step 2 Configure the following translation pattern that will translate the E.164 numbers of
internal phones to their 4-digit numbers:
Translation Pattern: \+1408555.2XXX
Route Option: Route this pattern
Urgent Priority: Checked
Discard Digits: PreDot
Step 3 Configure a translation pattern that will translate the E.164 numbers for PSTN calls:
Translation Pattern: \+.@
Numbering Plan: NANP
Route Option: Route this pattern
Urgent Priority: Unchecked
Discard Digits: PreDot
Prefix Digits (Outgoing Calls): 9
Activity Verification
Step 1 Launch Microsoft Office Communicator only (DO NOT launch CIPC phone) on
Phone1, Phone2, and Phone3 and login using bknight, tbriscoe and cyoung user
id, respectively. Also open an RDP session to PSTN-Phone PC (172.4x.5.101).
Step 2 CUCiMOC communication pane will be uploaded automatically on the MOC PCs.
Step 3 After a successful login to the CUCiMOC, make sure the Phone Mode is set to
Softphone from the communication pane.
Step 4 From each MOC clients, verify or add the other two contacts by typing their name in
MOC and then drag them to the All Contacts group.
Step 5 From one of the MOC client, drag one of the contacts to the Call icon on the
CUCiMOC communication pane. Select the contact’s internal E.164 number to dial.
Step 6 Pick up the call from the other Phone PC. Hang-up the call.
Step 7 Drag again one of the contacts to the Call icon on the CUCiMOC pane. Select the
contact’s mobile phone number to dial.
Step 8 Pick up the call from the PSTN-Phone PC.
Step 9 Try to call from another MOC client to check all internal and PSTN E.164 numbers
are working.
36 Cisco Unified Communications Integration for Microsoft Office Communicator (CUCIMOC) v1.0 © 2009 Cisco Systems, Inc.
Task 2: Configure Application Rules and Directory Lookup Rules
In this exercise, you will configure the Cisco Unified Communications Manager 7.0 to support
OCS E.164 numbers via Application Rules and Dial Rules. This is a more generic approach as
most current Cisco Unified Communications Manager implementations are not based on Cisco
Unified Communications Manager 7.x yet.
Activity Procedure
Complete these steps:
Configure Application Dial Rules
Step 1 Go to the Cisco Unified Communications Manager Administration page:
https://172.4x.1.11/ccmadmin and click Call Routing > Translation Patterns.
Click Find button.
Step 2 Remove ALL the translation patterns that were created in Task 1.
Step 3 Click Call Routing > Dial Rules > Application Dial Rules. Click the Add New
button.
Step 4 Add the following application dial rules that will translate the E.164 numbers of
internal phones to their 4-digit numbers:
Name: Internal Number Translation
Number Begins With: +14085552
Number of Digits: 12
Total Digits to be Removed: 8
Step 5 Add the following application dial rules that will translate the E.164 numbers for
external local and long-distance/mobile PSTN calls:
Name: PSTN Number Translation (Local)
Number Begins With: +1408
Number of Digits: 12
Total Digits to be Removed: 5
Prefix With Pattern: 9
Name: PSTN Number Translation (LD)
Number Begins With: +1
Number of Digits: 12
Total Digits to be Removed: 2
Prefix With Pattern: 91
Configure Directory Lookup Dial Rule
Step 6 On the Cisco Unified Communications Manager Administration page, click Call
Routing > Dial Rules > Directory Lookup Dial Rules. Click the Add New button.
Step 7 Add the following directory lookup rules that will translate numbers received in
Cisco Unified Communications Manager inbound calls to the numbers that can be
resolved by AD:
Name: Directory Lookup Translation
Number Begins With: 2
Number of Digits: 4
Total Digits to be Removed: 0
Prefix With Pattern: +1408555
© 2009 Cisco Systems, Inc. Lab Guide 37
Task 3: Apply Application and Directory Lookup Dial Rules COP File
In this exercise, you will activate the application dial rules and directory lookup dial rules
configured above by uploading the dial rule COP wizard file. The wizard in the COP file will
extract the dial rules from Cisco Unified Communications Manager and create an XML file in
Cisco Unified Communications Manager TFTP directory.
Activity Procedure
Complete these steps:
Apply Dial Rules COP File
Step 1 Open an RDP session to Phone1 PC (mstsc.exe to 172.4x.1.101). Turn off Windows
Firewall on this VM machine.
Step 2 Start 3CDaemon as the FTP server and verify a profile called cucimoc with
password ccm70bc and point to D:\CUCIMOC as the FTP directory still exist.
Step 3 Go to the Cisco Unified Communications Manager OS Administration page
(https://172.4x.1.11/cmplatform) and log in using CCMAdministrator account,
password ccm70bc (both user id and passwords are case sensitive).
Step 4 Go to Software Upgrades > Install/Upgrade, and point to the FTP server above:
Source: Remote Filesystem
Directory: \
Server: 172.4x.1.101
User Name: cucimoc
User Password: ccm70bc
Transfer Protocol: FTP
Click Next
Step 5 Under Options/Upgrades, select cmterm-cupc-dialrule-wizard-0.1.cop.sgn file.
Click Next.
Step 6 The file will be downloaded to Cisco Unified Communications Manager. Click Next
on File Checksum Details.
Step 7 The COP file will be installed on Cisco Unified Communications Manager and the
progress can be viewed in the installation log. Wait until the Installation Status
shows Complete.
Step 8 Go to Settings > Version and click the Restart button (DO NOT press Shutdown!).
Wait for a few minutes before the Cisco Unified Communications Manager comes
back online.
Activity Verification
Step 1 Exit and relaunch Microsoft Office Communicator only (DO NOT launch CIPC
phone) on Phone1, Phone2, and Phone3 and login using bknight, tbriscoe and
cyoung user id, respectively. Also open an RDP session to PSTN-Phone PC.
Step 2 After a successful login to the CUCiMOC, make sure the Phone Mode is set to
Softphone from the communication pane.
Step 3 From one of the MOC client, drag one of the contacts to the Call icon on the
CUCiMOC communication pane. Select the contact’s internal E.164 number to dial.
Step 4 Pick up the call from the other Phone PC. Hang-up the call.

38 Cisco Unified Communications Integration for Microsoft Office Communicator (CUCIMOC) v1.0 © 2009 Cisco Systems, Inc.
Step 5 Drag again one of the contacts to the Call icon on the CUCiMOC pane. Select the
contact’s mobile phone number to dial.
Step 6 Pick up the call from the PSTN-Phone PC.
Step 7 Try to call from another MOC client to check all internal and PSTN E.164 numbers
are working.
© 2009 Cisco Systems, Inc. Lab Guide 39
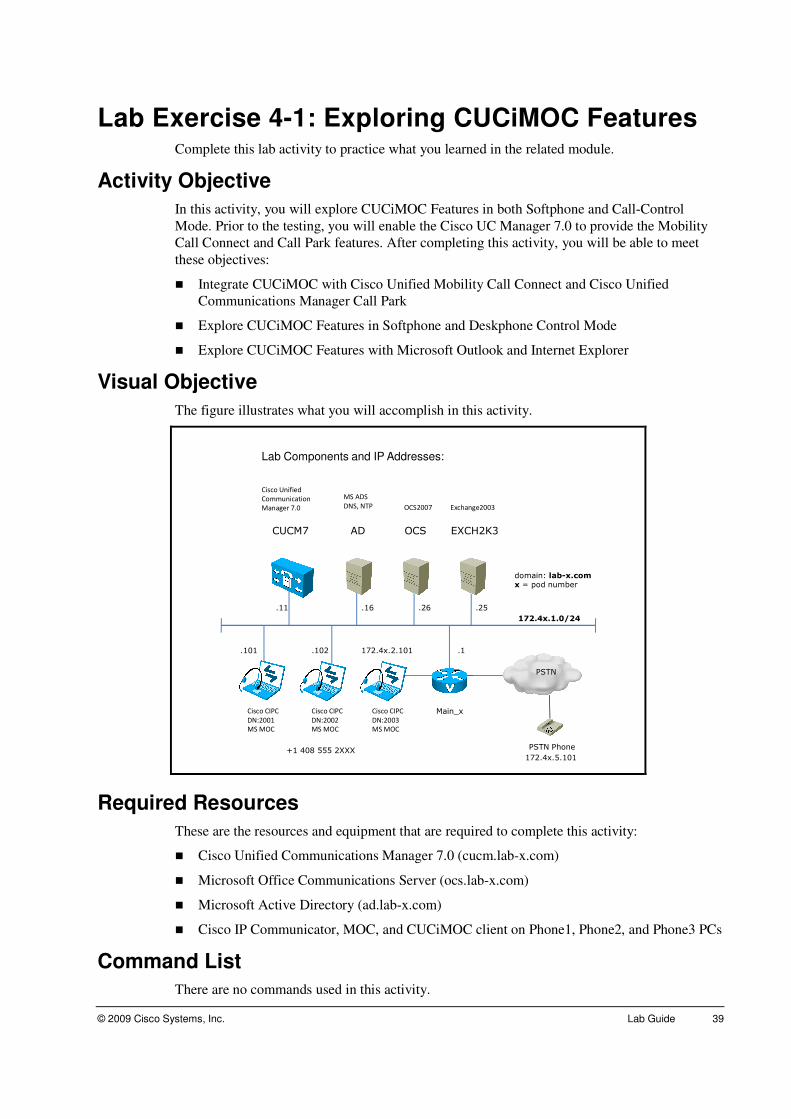
Lab Exercise 4-1: Exploring CUCiMOC Features Complete this lab activity to practice what you learned in the related module.
Activity Objective
In this activity, you will explore CUCiMOC Features in both Softphone and Call-Control
Mode. Prior to the testing, you will enable the Cisco UC Manager 7.0 to provide the Mobility
Call Connect and Call Park features. After completing this activity, you will be able to meet
these objectives:
� Integrate CUCiMOC with Cisco Unified Mobility Call Connect and Cisco Unified
Communications Manager Call Park
� Explore CUCiMOC Features in Softphone and Deskphone Control Mode
� Explore CUCiMOC Features with Microsoft Outlook and Internet Explorer
Visual Objective
The figure illustrates what you will accomplish in this activity.
ADCUCM7
.11 .16
.101 .102
Cisco CIPC
DN:2001
MS MOC
MS ADS
DNS, NTP
Cisco CIPC
DN:2002
MS MOC
Cisco Unified
Communication
Manager 7.0
Lab Components and IP Addresses:
.26 .25
OCS EXCH2K3
OCS2007 Exchange2003
PSTN
Main_x
PSTN Phone
172.4x.2.101
Cisco CIPC
DN:2003
MS MOC
+1 408 555 2XXX
domain: lab-x.comx = pod number
172.4x.1.0/24
.1
172.4x.5.101
Required Resources
These are the resources and equipment that are required to complete this activity:
� Cisco Unified Communications Manager 7.0 (cucm.lab-x.com)
� Microsoft Office Communications Server (ocs.lab-x.com)
� Microsoft Active Directory (ad.lab-x.com)
� Cisco IP Communicator, MOC, and CUCiMOC client on Phone1, Phone2, and Phone3 PCs
Command List
There are no commands used in this activity.

40 Cisco Unified Communications Integration for Microsoft Office Communicator (CUCIMOC) v1.0 © 2009 Cisco Systems, Inc.
Job Aids
These job aids are available to help you complete the lab activity.
Credentials for the Lab Devices
Server IP Address Server User ID Server PW Appl. User ID Appl. PW
Pod-x
CUCM 7.0 Hostname: cucm
172.4x.1.11 CCMAdministrator
ccm70bc CCMAdministrator ccm70bc
MS AD/DNS/ DHCP, NTP Hostname: ad
172.4x.1.16 Administrator ccm70bc!
MS Exchange Server 2007 Hostname: exch2k3
172.4x.1.25 Administrator ccm70bc!
MS OCS 2007 Hostname: ocs
172.4x.1.26 Administrator ccm70bc!
Cisco IP Communicator
172.4x.1.101 DN 2001
Administrator cisco VNC cisco
Cisco IP Communicator
172.4x.1.102 DN 2002
Administrator cisco VNC cisco
Cisco IP Communicator
172.4x.2.101 DN 2003
Administrator cisco VNC cisco
Bob Knight bknight ccm70bc!
Tom Briscoe tbriscoe ccm70bc!
Chris Young cyoung ccm70bc!
Steve Vizard svizard ccm70bc!

© 2009 Cisco Systems, Inc. Lab Guide 41
Task 1: Configure Unified Mobility Call Connect
In this task, you will configure Unified Mobility Call Connect in Cisco Unified
Communications Manager.
Activity Procedure
Complete these steps:
Configure Service Parameter
Step 1 In Cisco Unified CM Administration, navigate to the System > Service Parameters
and choose Server 172.4x.1.11 and Service Cisco CallManager.
Step 2 Under Clusterwide Parameters (System – Mobility), configure Matching Caller
ID with Remote Destination to Partial Match, and Number of Digits for Caller
ID Partial Match to 11. Click Save.
Enable an End User Account with Mobility
Step 3 In Cisco Unified CM Administration, navigate to the User Management > End
User and click Find.
Step 4 Select user bknight.
Step 5 Verify that the device name of the CSF Phone, as well as the device name (MAC
address) of Phone1, is displayed in the Controlled Devices section of the Device
Association window.
Step 6 In the Mobility Information area activates the Enable Mobility check box.
Step 7 Click Save.
Step 8 Go to Device > Phone and click Find.
Step 9 Select MOCBKNIGHT CSF phone.
Step 10 In the Device Information pane, select bknight at the Owner User ID and Mobility
User ID drop-down list.
Step 11 Click Save and click OK on the pop-up window.
Step 12 Reset the phone.
Configure Remote Destination Profiles and Remote Destinations
In this task, you will configure Remote Destination Profiles and Remote Destinations. The
remote destination profile is a virtual phone that shares its line with the office phone of the user.
The remote destination profile represents the associated remote destinations (i.e. PSTN
numbers such as mobile phone or home phone).
Step 13 Navigate to Device > Device Settings > Remote Destination Profile and click Add
New.
Step 14 Enter the following parameters:
� Name: bknight-rdp
� User ID: bknight
� Device Pool: Default
Step 15 Activate the Ignore Presentation Indicators (internal calls only) check box.
Step 16 Click Save.

42 Cisco Unified Communications Integration for Microsoft Office Communicator (CUCIMOC) v1.0 © 2009 Cisco Systems, Inc.
Step 17 Click Line [1] - Add a new DN.
Step 18 At the Directory Number Configuration page enter 2001 for the Directory Number
and select None as Route Partition. Then click into any other input field so that the
configuration of this directory number is loaded.
Step 19 Verify that after the screen refreshed, both the CSF Phone and CIPC Phone1 (MAC-
Address) is found under Associated Devices.
Step 20 Click Save.
Step 21 At the Related Links select Configure Device (bknight _rdp) and click Go, to go
back to the Remote Destination Profile Configuration window.
Configure a Remote Destination
Step 22 Click Add a New Remote Destination.
Step 23 Enter as name bknight _mobile.
Step 24 Enter the Destination Number 91404xxx4001 (x = pod number)
Step 25 Activate the Mobile Phone check box.
Note This parameter allows or disallows calls that are active at the office phone to be handed over
to the remote destination.
Step 26 Verify that the Enable Mobile Connect check box is activated.
Note This parameter allows or disallows the remote destination to ring when a call is received at
the office phone.
Step 27 Click Save and click OK on the pop-up window.
Step 28 In the Association Information pane activate the checkbox right to Line [1] - 2001.
Step 29 Click Save and click OK on the pop-up window.
Add the Mobility Softkey to IP Phones (Optional)
In this task, you will configure a softkey template to include the Mobility softkey and apply the
softkey template to a CIPC phone. This step is performed because the CUCiMOC only supports
sending a call to a remote destination number only if it’s in the Softphone mode. Therefore, for
CUCiMOC in the call-control mode, the mobility Softkey on the IP Phone will be used instead.
Step 30 Go to the Device > Device Settings > Softkey Template menu and click Find.
Step 31 Select the Standard User.
Step 32 Click Copy and change the name to Standard Mobility User and click Save.
Step 33 At the Related Links select Configure Softkey Layout and click Go.
Step 34 Verify that On Hook is selected in the “Select a call state to configure” drop-down
list. Click the Mobility entry in the Unselected Softkeys pane and move it to the
Selected Softkeys pane using the arrow link.
Step 35 Save the configuration.
Step 36 Repeat the previous steps to add the Mobility softkey to the Connected call state.
Step 37 Go to Device > Phone menu and click Find. Change the Softkey Template of Cisco
IP Communicator Phone1 (DN=2001) to Standard Mobility User.
© 2009 Cisco Systems, Inc. Lab Guide 43
Step 38 Select bknight at the Owner User ID drop-down list.
Step 39 Click Save and click OK on the pop-up window.
Step 40 Reset the phone.
Activity Verification
You have completed this task when you attain these results:
Verify that the office phone can hand an answered call over to the PSTN phone:
Step 1 From Phone2 (Tom Briscoe) MOC, drag Bob Knight contact onto the Call icon and
select +14085552001 to dial.
Step 2 The call should be presented to CSF Phone1 first and then to PSTN phone line 1 a
few seconds later.
Step 3 Answer the call on the CSF phone.
Step 4 Hand the call over to the PSTN phone by pressing the More… (drop down arrow)
menu in the Active Conversation pane, select Transfer To > Alternate Device
Step 5 End the call.
Verify that both the internal (CSF) phone and the PSTN phone ring when internal calls are
made to the internal phone:
Step 6 From Phone2 (Tom Briscoe) MOC, drag Bob Knight contact onto the Call icon and
select +14085552001 to dial.
Step 7 The call should be presented to CSF Phone1 first and then to PSTN phone line 1 a
few seconds later.
Step 8 Answer the call on the PSTN phone.
Step 9 Look at the status of Bob Knight MOC. The status should be “On the Phone” (red
button)
Step 10 Hand the call over to the CSF Phone1 by ending the call at the PSTN phone and then
pressing the Resume ( ) button in the Bob’s Active Conversation pane.
Step 11 Hand the call over to the PSTN phone again by pressing the More… menu in the
Active Conversation pane, select Transfer To > Alternate Device
Step 12 End the call.
Verify that calls from the PSTN phone are presented as calls from the office phone when
calling internal directory numbers:
Step 13 At the PSTN phone, press the first line button to place a call and dial the number
14085552002 (prefix with either 9 or 0 as shown on your PSTN Phone screen)
Step 14 Verify that the call is presented with the internal number of CSF Phone1 2001 (Bob
Knight - Work) at the receiving CSF phone (MOC Phone2).
Step 15 Answer the call on Phone2.
Step 16 Look at the MOC status of Bob Knight. Note that the button color is red, indicating
that the remote destination (Bob’s mobile number) has a call.
Step 17 End the call.
44 Cisco Unified Communications Integration for Microsoft Office Communicator (CUCIMOC) v1.0 © 2009 Cisco Systems, Inc.
Task 2: Configure Call Park
In this task, you will configure Call Park numbers in Cisco Unified Communications Manager.
Activity Procedure
Complete these steps:
Step 1 Go to the Cisco Unified Communications Manager Administration page:
https://172.4x.1.11/ccmadmin and choose Call Routing > Call Park.
Step 2 Click Add New to open the Call Park Configuration page.
Step 3 Enter 266X for the Call Park Number/Range field. In the Description field, enter
Call Park Range.
Step 4 Select None for the Partition.
Step 5 Choose CM_cucm as the Cisco Unified Communications Manager to which the
Call Park range should be assigned. Click Save.
Activity Verification
You have completed this task when you attain these results:
Step 1 From Phone2 (Tom Briscoe) MOC, drag Bob Knight contact onto the Call icon and
select +14085552001 to dial.
Step 2 Answer the call on the CSF Phone1.
Step 3 In the Active Conversation pane of Phone1, select More… menu, and choose Park
Call.
Step 4 You should get a message Parked at 2660 on Phone1, and Park Number:2660 and
music on hold on Phone2.
Step 5 Go to Phone3, open the CUCiMOC keypad and dial 2660. The call will be resumed
between Phone2 and Phone3.
© 2009 Cisco Systems, Inc. Lab Guide 45
Task 3: Exploring Call Features
In this task, you will test various call features using the CUCiMOC communication pane and
Active Conversation pane.
Activity Procedure
Complete these steps:
Call Waiting, Call Hold and Resume, Conference Call
Step 1 From Phone2 (Tom Briscoe) MOC, drag Bob Knight contact onto the Call icon and
select +14085552001 to dial.
Step 2 Answer the call on the Bob’s CSF Phone1.
Step 3 Press the Hold button to put the call on-hold, the other party will hear the music on
hold playing. Press the Hold button again to resume the call.
Step 4 During the call, drag Chris Young onto the Call icon in the communication pane and
select +14085552003 to dial.
Step 5 You now have two calls in progress and can switch between the two calls by
clicking on them and press the Resume button.
Step 6 Press the More… menu in the Active Conversation pane and select Conference
With contact name to merge the calls into a conference call.
Step 7 End the conference call.
Step 8 Another way to make a conference call is: from one of the MOC client select
multiple contacts by using the Shift key and drag them onto the Call icon in the
communications pane.
Step 9 Press Call and Join button to put the participants into a conference call.
Step 10 End the conference call.
Communication History
Step 11 From Tom Briscoe Phone, select the Options button from the CUCiMOC tab
Step 12 Click the Save communications history to Outlook option. Click OK.
Step 13 Make a few calls and then launch Microsoft Outlook client to read the
communication history.
Step 14 Another way to read the communication history is by clicking the Communication
History button in the Communication pane to open the History pane for the user.
Voicemail
Step 15 In Softphone mode, the voice mail icon will call the voicemail pilot number
configured in the voice mail profile of the CSF device. The icon will also show
message waiting indication (MWI)
Step 16 In Desk phone control mode, the voice mail icon will call the voicemail number
specified in the registry setting that was configured through the batch file or group
policy editor. The MWI will be shown on the physical phone, and not on the
CUCiMOC pane.
Sending Instant Messages during a Call
Step 17 During a call, you can click the Chat button to send instant messages to the other
party.
46 Cisco Unified Communications Integration for Microsoft Office Communicator (CUCIMOC) v1.0 © 2009 Cisco Systems, Inc.
Step 18 Reply to the messages on the other Phone.
Desk Phone Control Mode
Step 19 On Phone1 PC, launch Cisco IP Communicator. The CIPC should get the same DN
2001 as the softphone.
Step 20 From CUCiMOC communication pane, change the Phone Mode to Deskphone
mode.
Step 21 From MOC drop down menu, choose Tools > Select Device for Communications
Pane
Step 22 From the list of active devices, select or verify the device to control. Click OK.
Step 23 Drag Tom Briscoe to the Call icon and select a number to call. Notice that the CIPC
(not CUCiMOC) will dial the number.
Step 24 Pickup the call from Tom Briscoe’s phone.
Step 25 Notice that Transfer To > Alternate Device option is not available in Desk Phone
Control Mode. Use the Mobility Softkey (???) in CIPC to transfer the call to mobile
PSTN number.
Server Status
Step 26 From the MOC drop down menu, select Tools > Server Status.
Step 27 The status of a subsystem (LDAP, Softphone (SIP), or Desk phone (CTI)) will be
shown.
Step 28 Click on an item to display the details for that subsystem.
Connection Statistics
Step 29 Set the Phone Mode to Softphone. Make a call by dragging a contact to the Call
icon and selecting the number to call.
Step 30 During an active call, click the MOC drop down menu, select Tools > Connection
Statistics.
Step 31 The Transmit and Receive statistics (codec, jitter, packets lost, etc) of the RTP
stream will be shown (all are shown as 0 in the remote lab because we can’t send
voice traffics through the RDP session)

© 2009 Cisco Systems, Inc. Lab Guide 47
Task 4: Microsoft Outlook and Internet Explorer Integration
In this task, you will work with Call History in Microsoft Outlook and Click to Call.
Activity Procedure
Complete these steps:
Call History
Step 1 From Tom Briscoe Phone, launch Microsoft Outlook client.
Step 2 Read the Conversation History, notice the history contains hyperlinks which allow
you start a call or instant message conversation with the contact.
Step 3 Click on Work telephone number under Conversation Duration in the email.
Step 4 A Call with Edit window will come up. Click OK and CUCiMOC will dial the
number.
Step 5 Click on Mobile telephone number to call the PSTN phone.
Step 6 Click on the email address next to Instant Message and a MOC pane will come up
to allow you to chat with the contact.
Step 7 Click on the email address next to Email and a new mail window will come up to
allow you to send an email to the contact.
Click to Call
Step 8 Still in Tom Briscoe’s Outlook client, open an email from Bob Knight (send an
email from Phone1 if you can’t find it)
Step 9 At the top of the email, right-click on the Bob’s contact information with a smart tag
(green or yellow ball). Select Additional Actions > Call Business to call Bob’s
number.
Step 10 Do not select “Call Bob Knight” as this is the MOC calling options (we already
disabled this in the registry). It is possible to remove this “Call” option using a
Microsoft Office ADM template.
Step 11 From inside one of the Phone PCs, launch Internet explorer and go to
http://172.4x.1.16/cucipics/index.html
Step 12 Click the contact telephone number on the web page to call the person.
Step 13 View the HTML source of the web page. Notice that we are using the TEL URI to
create the hyperlinks.