cise 412 mechatronics lab manual
TRANSCRIPT

King Fahd University of Petroleum & Minerals Systems Engineering Department
CISE 412: Mechatronics
Lab Manual
(Term 092)
Dr. Samir Al-Amer
2010

Table of Contents Lab # 1: Component Information Gathering ................................................................. 3 Lab # 2: Modeling and Controller Design of Magnetic Levitation System .................. 6 Lab # 3-4: Modeling and Controller Design of Magnetic Levitation System ............ 18 Lab # 5: Design and Implementation of Operational Amplifier Circuits .................... 29 Lab # 6: Introduction to Boe-Bot ................................................................................. 41 Lab # 7: Servomotors for the Boe-Bot ........................................................................ 42 Lab # 8: Assembling and Testing the Boe-Bot ........................................................... 43 Lab # 9: Basic Boe-Bot Navigation ............................................................................ 44 Lab # 10: Boe-Bot Navigation with Whiskers ............................................................. 45 Lab # 11: Boe-Bot Navigation with Photoresistors ..................................................... 46

CISE 412: Mechatronics Term 092
LAB # 1: Component Information Gathering Objective: The objective of this lab is to practice gathering technical information about different types of components used in Mechatronic Systems.
Introduction: An important step in the design of mechatronic systems is to gather technical information about components that can be used in design of a system. In this lab session you will practice collecting information and selecting components to satisfy some constraints. This involves reading data sheets and extracting information from them.
Part 1: Using Internet search, obtain the data sheets for the following components. Use the data sheet to provide the required data. 1. Provide the following information about TTL 7400 (or 74ACT00)
The purpose of this IC Sketch the IC pin-out (DIP if available) Temperature operating range Supply voltage (min –max) Input Voltage level for OFF (low) Input Voltage Level for ON (high) Output Voltage level for OFF (low) Output Voltage Level for ON (high) High level input current Low level input current Typical propagation delay A company that produce such IC.(Name-address)
2. Provide a CMOS IC to do the function similar to the TTL 7400 and provide the same information asked for in (1).

Part 2 In the following, you need to search for and provide information about several components. In some cases a specific name (component number) is provided. In other cases a general name indicating the function of the component is provided. You are asked to do a search on the internet to get more details about those components. There could be many components to do the required job. Provide information about one such component. Required information include the company providing the component, URL location for specification sheet if available , Pin-out diagram, component number How does it work? How much does it cost? 1. 4-digit LED display unit that can be used to display 0,1,2,..9. 2. SN7490 Decay Counter 3. LM7414 Schmitt Trigger ( How does it work?) 4. NE555 timer. ( How does it work?) 5. Optical Isolator TTL, DIP format 6. 0.25 W resistors DIP resistor (8 resistors, 10 M ohm if
available) 7. Potentiometer (rotary type , power rating <5 W, Rotation
Angle>200 degrees) 8. 12-bit DAC 9. Toggle Switches ( lower power, voltage < 20V, small size,
ON-OFF) 10. Keypads (4X4 , small size) 11. Speed and position transducer (Shaft Encoder) (<100
pulse/rev)

Groups of 2 can work on this lab project Soft copy of the report can be submitted through webCT. Due date for submission is the beginning of the next lab.

CISE 412: MECHATRONICS
(Term 092)
Lab # 2: Modeling and Controller Design of Magnetic Levitation System
Equipment Needed
PC with MATLAB and SIMULINK
Introduction: Magnetic levitation system finds applications in engineering
including aerospace, high speed transportation system, levitated
micro-robotics, magnetic levitated automotive engine valves,
magnetic bearings. Control and identification of magnetic levitation
system physical system is challenging research problem as the
system is nonlinear and unstable [1-4]. From educational point of
view the magnetic levitation provides a test bed for learning
controller design as it is unstable and nonlinear and must be
operated in a closed loop [1]. There are a number of other physical
systems which are unstable and must be operated in closed loop
such as an aircraft, helicopter, inverted pendulum (e.g. Segway),
position control system, liquid level process control. However the
maglev system has poles strictly in the right half plane system
whereas the above stated systems have poles at the origin (each
behaves as an integrator) and hence poses difficulties in the design
of a robust controller and its implementation.
Objective: The objective of this lab is as follows:

Model the maglev system using the physical laws governing
the electro-magnetic circuits, and Newton law’s laws of
motion.
Design an analog/ digital controller.
Evaluate the performance of the closed loop control system in
time domain ( settling time, overshoot and control input
magnitude, and in frequency domain including the
bandwidth, resonance frequency and resonance peak.
Iterate the design till the controller performance is acceptable
for implementation
Modeling of a Magnetic Levitation System We will use physical laws governing the attractive force generated
by the interaction of the electromagnetic field and an iron ball, and
the resulting motion by the Newton’s Law. Consider a magnetic
levitation shown in Fig. 1. It consists of an electromagnet which
produces a magnetic field that attracts an iron ball. The vertical
motion of the ball is measured by an optical system.
Fig. 1. MAGLEV system
Electromagnetic force A magnetic material such as an iron ball placed in the magnetic field will experience a force, f, due to attraction between the magnetic

poles, one in the electromagnetic and the other induced in the magnetic material as shown in the Fig. 2.
Fig. 2. Force in the magnetic material placed in a magnetic field
The attractive force on the iron ball, F, is
2 2
2
02
N AiF
X
where N is the number of turn of the coil, A is the area of the
electromagnetic, i is current in the coil which creates the magnetic
field, 0 X is the length of the magnetic path, X is the distance
between the iron ball and the electromagnet and 0 is the length of
the magnetic path in the magnetic materials of the electro-magnetic
and the iron ball.
The direction of this force is vertically upwards.
Comments: Applications of the force between the flux and a magnetic material include the following:
Magnetic levitation train ( the train levitates thanks to the force experience by the electromagnet attached to the train and the ferrous rail).
magnetic bearing (rotating shaft is suspended in a circular magnetic field so that the rotating shaft does not touch any component thereby eliminating friction)
Electromagnetic switches, e.g. solenoids , relays. Solenoids are inexpensive and are used in latching, locking. Examples include automobile door latches and starter solenoids, opening and closing of valves in washing machines, relays in power systems. It has advantage over semiconductor switches as it can handle very large currents, and the circuit controlling the electromagnetic switches is isolated
Stepper motor and reluctance motors
x
magnetic
magnetic flux
coil
current,

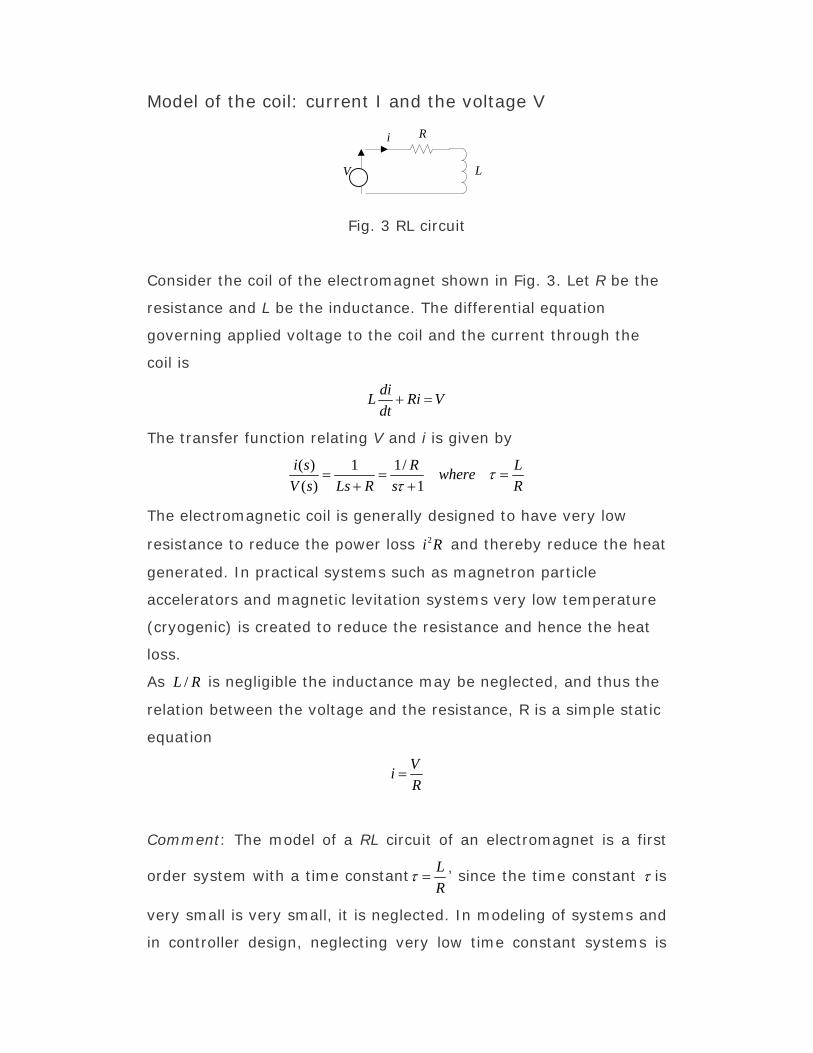
Model of the coil: current I and the voltage V =
Fig. 3 RL circuit
Consider the coil of the electromagnet shown in Fig. 3. Let R be the
resistance and L be the inductance.
Verify that the differential equation governing applied voltage to
the coil and the current through the coil is
diL Ri V
dt
Verify that the transfer function relating V and i is given by
( ) 1 1/
( ) 1
i s R Lwhere
V s Ls R s R
The electromagnetic coil is generally designed to have very low
resistance to reduce the power loss 2i R and thereby reduce the heat
generated. In practical systems such as magnetron particle
accelerators and magnetic levitation systems very low temperature
(cryogenic) is created to reduce the resistance and hence the heat
loss.
As /L R is negligible the inductance may be neglected, and thus the
relation between the voltage and the resistance, R is a simple static
equation
Vi
R
R
L i
+ V _
+ V _

Comment: The model of a RL circuit of an electromagnet is a first
order system with a time constant L
R ’ since the time constant is
very small, it is neglected. In modeling of systems and in controller
design, neglecting very low time constant systems is termed as
unmodelled dynamics or model reduction. In other words the
transfer function of the coil is approximated:
( ) 1/ 1
( ) 1
i s R
V s s R
In practice it is common to neglect fast dynamics and an
approximate reduced order model so as to simplify the design of
controller without affecting the performance.
With this approximation, the vertical force on the iron ball becomes
2 2
22
02
N A VF
R X
Model of the maglev system using Newton’s law of motion Consider the iron ball. Let m be the mass of the ball. Using
Newton’s law of motion (mass times the acceleration equals the net
force), the force and the distance are related by the following
differential equation
mX F mg
Substituting for the force F and simplifying we get
2
2
0
VX k g
X
where 2
22
N Ak
mR

Equilibrium point
There is a upward force, F, on the iron ball and there is a downward
force due to gravity, mg. The question arises as to where will the
iron ball go. Will it fall down, will it be attracted upwards and crash
on the electromagnet or it will remain at some location where the
upward force will balance the downward force. The answer to this
question will depend upon the equilibrium point also termed the
singular point of the differential equation. The equilibrium point is
obtained by setting all the derivatives, first order, second and
higher order derivatives to zero. In this case we only have second
order derivative. Setting it to zero yields the equilibrium point, 0X ,
is obtained from
20
2
0 0
0V
k gX
where 0V is the voltage applied.
20
2
0
0V
k gX
The equilibrium point, 0X , is given by
0 0
kX L V
g
Substituting for k we get
0 2
VR AX L
N mg
Linearization of the Differential Equation Consider the differential equation model
( , )X f X V g
where 2
2( , )
Vf X V k
X

It is second order nonlinear system. For designing a controller, a
linear approximate model is employed as it is very difficult to design
a controller for a nonlinear system. A linear approximation is
obtained by linearizing the nonlinear function, ( , )f X V about the
equilibrium point, 0x and the nominal voltage input, 0V , using
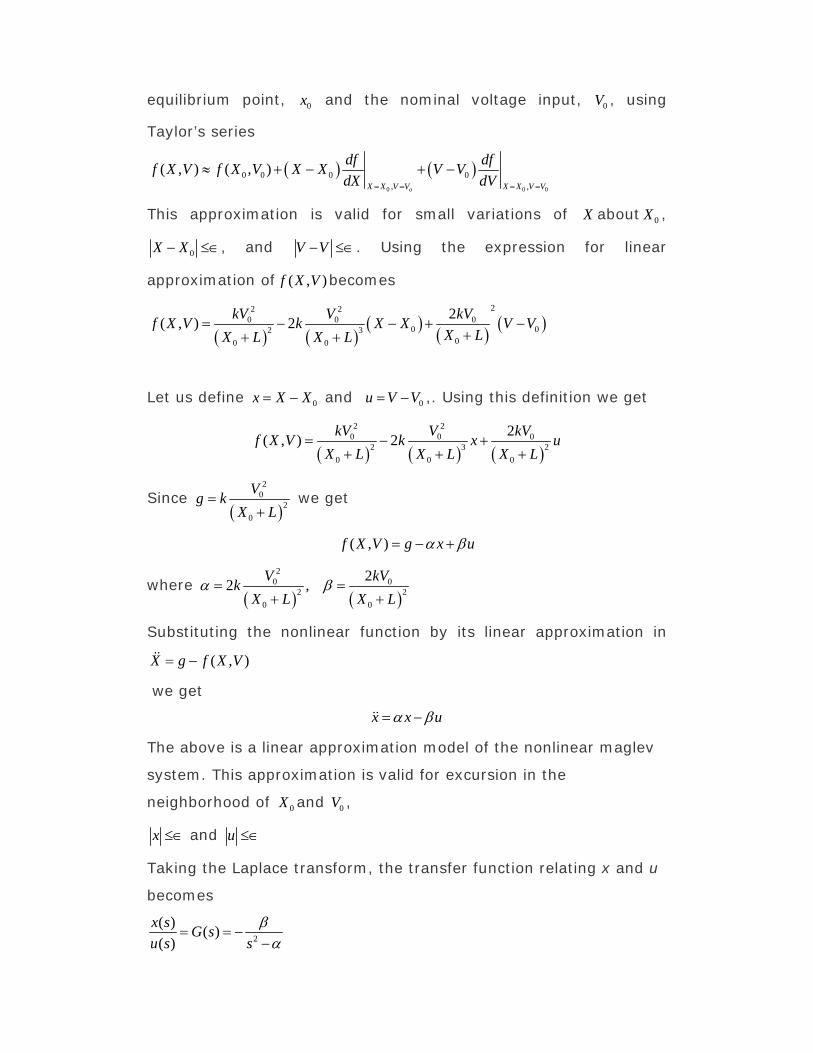
Taylor’s series
0 0 0
0 0 0 0, ,
( , ) ( , )oX X V V X X V V
df dff X V f X V X X V V
dX dV
This approximation is valid for small variations of X about 0X ,
0X X , and V V .
Verify that the expression for linear approximation
of ( , )f X V becomes
22 20 0 0
0 02 300 0
2( , ) 2
kV V kVf X V k X X V V
X LX L X L
Let us define 0x X X and 0u V V ,. Using this definition we get
2 20 0 0
2 3 2
0 0 0
2( , ) 2
kV V kVf X V k x u
X L X L X L
Since
20
2
0
Vg k
X L
we get
( , )f X V g x u
where
20 0
2 2
0 0
22 ,
V kVk
X L X L
Substituting the nonlinear function by its linear approximation in
( , )X g f X V
we get
x x u
The above is a linear approximation model of the nonlinear maglev
system. This approximation is valid for excursion in the
neighborhood of 0X and 0V ,

x and u
Taking the Laplace transform, the transfer function relating x and u
becomes
2
( )( )
( )
x sG s
u s s
The system is unstable as there is pole in the right half of the s-
plane. The poles, p, of the plant are real and are symmetrically
located about the imaginary axis
p
Analysis of the open loop system
Stability analysis The system is unstable as there is pole in the right half of the s-
plane. The poles, p, of the plant are real and are symmetrically
located about the imaginary axis
p
The poles are symmetrically located about the imaginary axis in the
s-plane.
Step response Verify that the step response will be unbounded and is given by
1 1( ) 1
2t tx t e e
The step response is unbounded.
)(lim txt
Frequency response Consider the transfer function, ( )G s . Setting s j the frequency
response becomes
2
( ) 1( )
( )
x jG j
u j

The frequency response is real and positive for all frequencies
thanks to the symmetric location of the poles.
This shows that one can analyze the maglev system using
frequency response and not step response.
Design of controller
Controller structure and controller design approach There are a number of choices of controller structures including,
proportional integral derivative (PID) controller, lead-lag
compensator, and state feedback controller and number of
approaches for designing a controller.
The maglev system in the laboratory has lead-lag compensator.
Hence we will choose a lead-lag compensator. As for the design
approach we will choose a simple approach based on pole-
placement.
The lead-lag compensator, C(s), takes the general form
( )s b
C s ks a
Closed loop system Since the plant, G(s) is unstable it must be operated in a closed
loop configuration formed of the plant G(s) and the controller, C(s)
as shown in Fig. 4 below.
e u x r C(s G(s
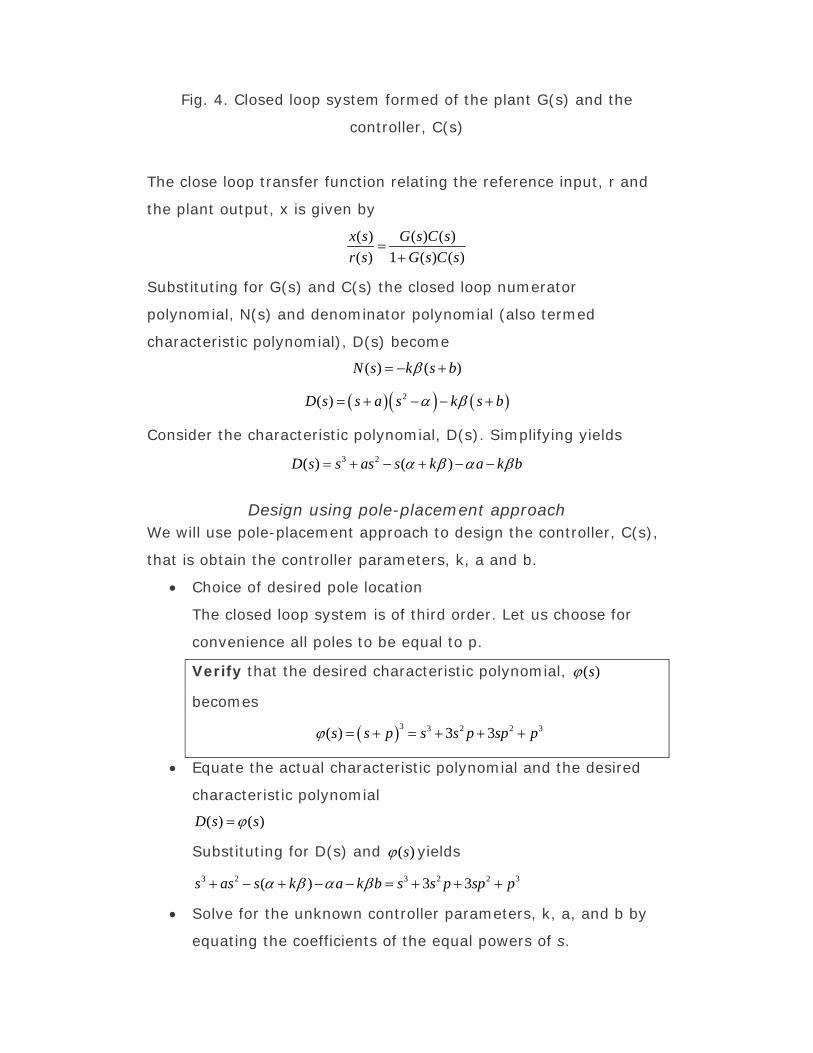
Fig. 4. Closed loop system formed of the plant G(s) and the
controller, C(s)
The close loop transfer function relating the reference input, r and
the plant output, x is given by
( ) ( ) ( )
( ) 1 ( ) ( )
x s G s C s
r s G s C s
Substituting for G(s) and C(s) the closed loop numerator
polynomial, N(s) and denominator polynomial (also termed
characteristic polynomial), D(s) become
( ) ( )N s k s b
2( )D s s a s k s b
Consider the characteristic polynomial, D(s). Simplifying yields 3 2( ) ( )D s s as s k a k b
Design using pole-placement approach We will use pole-placement approach to design the controller, C(s),
that is obtain the controller parameters, k, a and b.
Choice of desired pole location
The closed loop system is of third order. Let us choose for
convenience all poles to be equal to p.
Verify that the desired characteristic polynomial, ( )s
becomes
3 3 2 2 3( ) 3 3s s p s s p sp p
Equate the actual characteristic polynomial and the desired
characteristic polynomial
( ) ( )D s s
Substituting for D(s) and ( )s yields 3 2 3 2 2 3( ) 3 3s as s k a k b s s p sp p
Solve for the unknown controller parameters, k, a, and b by
equating the coefficients of the equal powers of s.

Verify that the solution of the equations yields
3
2
2
3
3
3
a p
p pb
p
pk

Deliverables Each student should submit a word file containing the following:
Verification of marked expressions.
The mathematical model of maglev system
Analysis of the linear approximation model of the Maglev
system in time and frequency domain using SIMULINK.
Evaluation of the performance
REFERENCES
[1] Galvão, R. K. H., Yoneyama, T., Araújo, F. M. U., Machado, R.
G. “A Simple Technique for Identifying a Linearized Model for a
Didactic Magnetic Levitation System”. IEEE Transactions on
Education, v. 46, n. 1, p. 22-25, 2003.
[2] K.Peterson, J.W.Grizzle, and A.G.Stefanpolou, Nonlinear
magnetic levitation of automotive engine valves
[3] David Craig and Mir Behrad Khamesee, “ Black box model
identification of a magnetically levitated microrobotic system” Smart
Materials and Structures, 16, 2007, pp.739-747

CISE 412: MECHATRONICS (Term 082)
Lab # 3: Modeling and Controller Design of Magnetic Levitation System
Introduction: Magnetic levitation system finds applications in engineering
including aerospace, high speed transportation system, levitated
micro-robotics, magnetic levitated automotive engine valves,
magnetic bearings. Control and identification of magnetic levitation
system physical system is challenging research problem as the
system is nonlinear and unstable [1-4]. From educational point of
view the magnetic levitation provides a test bed for learning
controller design as it is unstable and nonlinear and must be
operated in a closed loop [1]. There are a number of other physical
systems which are unstable and must be operated in closed loop
such as an aircraft, helicopter, inverted pendulum (e.g. Segway),
position control system, liquid level process control. However the
maglev system has poles strictly in the right half plane system
whereas the above stated systems have poles at the origin (each
behaves as an integrator) and hence poses difficulties in the design
of a robust controller and its implementation.
Objective: The objective of this lab is as follows:
Model the maglev system using the physical laws governing
the electro-magnetic circuits, and Newton law’s laws of
motion.
Design an analog/ digital controller.

Evaluate the performance of the closed loop control system in
time domain ( settling time and overshoot, control input
magnitude, and in frequency domain including the
bandwidth, resonance frequency and resonance peak.
Iterate the design till the controller performance is acceptable
for implementation
Modeling of a Magnetic Levitation System We will use physical laws governing the attractive force generated
by the interaction of the electromagnetic field and an iron ball, and
the resulting motion by the Newton’s Law. Consider a magnetic
levitation shown in Fig. 1. It consists of an electromagnet which
produces a magnetic field that attracts an iron ball. The vertical
motion of the ball is measured by an optical system.
Fig. 1. MAGLEV system
Electromagnetic force A magnetic material such as an iron ball placed in the magnetic field will experience a force, f, due to attraction between the magnetic poles, one in the electromagnetic and the other induced in the magnetic material as shown in the Fig. 2.

Fig. 2. Force in the magnetic material placed in a magnetic field
The attractive force on the iron ball, F, is
2 2
2
02
N AiF
X
where N is the number of turn of the coil, A is the area of the
electromagnetic, i is current in the coil which creates the magnetic
field, 0 X is the length of the magnetic path, X is the distance
between the iron ball and the electromagnet and 0 is the length of
the magnetic path in the magnetic materials of the electro-magnetic
and the iron ball.
The direction of this force is vertically upwards.
Comments: Applications of the force between the flux and a magnetic material include the following:
Magnetic levitation train ( the train levitates thanks to the force experience by the electromagnet attached to the train and the ferrous rail).
magnetic bearing (rotating shaft is suspended in a circular magnetic field so that the rotating shaft does not touch any component thereby eliminating friction)
Electromagnetic switches, e.g. solenoids , relays. Solenoids are inexpensive and are used in latching, locking. Examples include automobile door latches and starter solenoids, opening and closing of valves in washing machines, relays in power systems. It has advantage over semiconductor switches as it can handle very large currents, and the circuit controlling the electromagnetic switches is isolated
Stepper motor and reluctance motors
x
magnetic
magnetic flux
coil
current,
Model of the coil: current I and the voltage V
V
i R
L
Fig. 3 RL circuit
Consider the coil of the electromagnet shown in Fig. 3. Let R be the
resistance and L be the inductance. The differential equation
governing applied voltage to the coil and the current through the
coil is
diL Ri V
dt
The transfer function relating V and i is given by
( ) 1 1/
( ) 1
i s R Lwhere
V s Ls R s R
The electromagnetic coil is generally designed to have very low
resistance to reduce the power loss 2i R and thereby reduce the heat
generated. In practical systems such as magnetron particle
accelerators and magnetic levitation systems very low temperature
(cryogenic) is created to reduce the resistance and hence the heat
loss.
As /L R is negligible the inductance may be neglected, and thus the
relation between the voltage and the resistance, R is a simple static
equation
Vi
R
Comment: The model of a RL circuit of an electromagnet is a first
order system with a time constant L
R ’ since the time constant is
very small is very small, it is neglected. In modeling of systems and
in controller design, neglecting very low time constant systems is

termed as unmodelled dynamics or model reduction. In other
words the transfer function of the coil is approximated:
( ) 1/ 1
( ) 1
i s R
V s s R
In practice it is common to neglect fast dynamics and an
approximate reduced order model so as to simplify the design of
controller without affecting the performance.
With this approximation, the vertical force on the iron ball becomes
2 2
22
02
N A VF
R X
Model of the maglev system using Newton’s law of motion Consider the iron ball. Let m be the mass of the ball. Using
Newton’s law of motion (mass times the acceleration equals the net
force), the force and the distance are related by the following
differential equation
mX F mg
Substituting for the force F and simplifying we get
2
2
0
VX k g
X
where 2
22
N Ak
mR
Equilibrium point
There is a upward force, F, on the iron ball and there is a downward
force due to gravity, mg. The question arises as to where will the
iron ball go. Will it fall down, will it be attracted upwards and crash
on the electromagnet or it will remain at some location where the
upward force will balance the downward force. The answer to this
question will depend upon the equilibrium point also termed the
singular point of the differential equation. The equilibrium point is
obtained by setting all the derivatives, first order, and second and
higher order derivatives to zero. In this case we only have second
order derivative. Setting it to zero yields the equilibrium point, 0X ,
is obtained from
20
2
0 0
0V
k gX
where 0V is the voltage applied.
20
2
0
0V
k gX
The equilibrium point, 0X , is given by
0 0
kX L V
g
Substituting for k we get
0 2
VR AX L
N mg
Linearization of the Differential Equation Consider the differential equation model
( , )X f X V g
where 2
2( , )
Vf X V k
X
It is second order nonlinear system. For designing a controller, a
linear approximate model is employed as it is very difficult to design
a controller for a nonlinear system. A linear approximation is
obtained by linearizing the nonlinear function, ( , )f X V about the
equilibrium point, 0x and the nominal voltage input, 0V , using
Taylor’s series
0 0 0
0 0 0 0, ,
( , ) ( , )oX X V V X X V V
df dff X V f X V X X V V
dX dV
This approximation is valid for small variations of X about 0X ,
0X X , and V V . Using the expression for linear
approximation of ( , )f X V becomes
22 20 0 0
0 02 300 0
2( , ) 2
kV V kVf X V k X X V V
X LX L X L
Let us define 0x X X and 0u V V ,. Using this definition we get
2 20 0 0
2 3 2
0 0 0
2( , ) 2
kV V kVf X V k x u
X L X L X L
Since
20
2
0
Vg k
X L
we get
( , )f X V g x u
where
20 0
2 2
0 0
22 ,
V kVk
X L X L
Substituting the nonlinear function by its linear approximation in
( , )X g f X V
we get
x x u
The above is a linear approximation model of the nonlinear maglev
system. This approximation is valid for excursion in the
neighborhood of 0X and 0V ,
x and u
Taking the Laplace transform, the transfer function relating x and u
becomes
2
( )( )
( )
x sG s
u s s

The system is unstable as there is pole in the right half of the s-
plane. The poles, p, of the plant are real and are symmetrically
located about the imaginary axis
p
Analysis of the open loop system
Stability analysis The system is unstable as there is pole in the right half of the s-
plane. The poles, p, of the plant are real and are symmetrically
located about the imaginary axis
p
The poles are symmetrically located about the imaginary axis in the
s-plane.
Step response The step response will be unbounded and is given by
1 1( ) 1
2t tx t e e
The step response is unbounded.
)(lim txt
Frequency response Consider the transfer function, ( )G s . Setting s j the frequency
response becomes
2
( ) 1( )
( )
x jG j
u j
The frequency response is real and positive for all frequencies
thanks to the symmetric location of the poles.
This shows that one can analyze the maglev system using
frequency response and not step response.

Design of controller
Controller structure and controller design approach There are a number of choices of controller structures including,
proportional integral derivative (PID) controller, lead-lag
compensator, and state feedback controller and number of
approaches for designing a controller.
The maglev system in the laboratory has lead-lag compensator.
Hence we will choose a lead-lag compensator. As for the design
approach we will choose a simple approach based on pole-
placement.
The lead-lag compensator, C(s), takes the general form
( )s b
C s ks a
Closed loop system Since the plant, G(s) is unstable it must be operated in a closed
loop configuration formed of the plant G(s) and the controller, C(s)
as shown in Fig. 4 below.
Fig. 4. Closed loop system formed of the plant G(s) and the
controller, C(s)
The close loop transfer function relating the reference input, r and
the plant output, x is given by
e u x r C(s G(s

( ) ( ) ( )
( ) 1 ( ) ( )
x s G s C s
r s G s C s
Substituting for G(s) and C(s) the closed loop numerator
polynomial, N(s) and denominator polynomial (also termed
characteristic polynomial), D(s) become
( ) ( )N s k s b
2( )D s s a s k s b
Consider the characteristic polynomial, D(s). Simplifying yields 3 2( ) ( )D s s as s k a k b
Design using pole-placement approach We will use pole-placement approach to design the controller, C(s),
that is obtain the controller parameters, k, a and b.
Choice of desired pole location
The closed loop system is of third order. Let us choose for
convenience all poles to be equal to p. The desired
characteristic polynomial, ( )s becomes
3 3 2 2 3( ) 3 3s s p s s p sp p
Equate the actual characteristic polynomial and the desired
characteristic polynomial
( ) ( )D s s
Substituting for D(s) and ( )s yields 3 2 3 2 2 3( ) 3 3s as s k a k b s s p sp p
Solve for the unknown controller parameters, k, a, and b by
equating the coefficients of the equal powers of s
2
3
3
3
a p
k p
a k b p
Solving the above equations yields

3
2
2
3
3
3
a p
p pb
p
pk
Deliverables Each student should submit a word file containing the following:
The mathematical model of maglev system
Analysis of the linear approximation model of the Maglev
system in time and frequency domain using SIMULINK.
Design of a lead-lag compensator
Evaluation of the performance

CISE 412: MECHATRONICS
(Term 092)
Lab # 5:
Design and Implementation of Operational Amplifier Circuits
Equipment Needed
Operational Amplifiers (LM 741, LM 311, or equivalent)
Resistors (500 , 1k ,1M , )
Variable Resistor
Capacitors (22 pF, 33 pF,… )
Multi-meter
Oscilloscope
Signal Generator
Power Supply
Introduction:
Operational Amplifiers are important devices that can be used for
signal conditioning and interfacing sensors and actuators. In this lab,
you will practice using the op- amp in different ways. LM 741 in a
classical operational amplifier that is widely used. It comes in DIP or
metallic package. The one used in this lab is an 8-Pin DIP package.
Prelab Activity 0:
Down load the Op-Amp data sheets from the
manufacture's web site.
Identify the main characteristics of the LM 741.


Step 1:
Part 1: How to connect the LM 741 If you have not already done so, wire the bus strips on your breadboard to provide positive power, negative power and ground buses. Whatever color scheme you have chosen for your wires, you should use the green binding post for ground, the black for -15 V, and the red for +15 V.
Step 2:
Connect a 0.1F capacitor between the +15 V power bus and ground. Connect another 0.1F capacitor between the -15 V power bus and ground. The power buses for your board should look like this:
These capacitors are the first of several bits of "magic" we will employ to try to avoid amomolous behavior. As we will see when we study control systems, feedback also has a dark side. In particular, feedback which becomes positive at some frequency can cause instabilities. Although we have not deliberately introduced any positive feedback, feedback can occur where we don't intend it. The purpose of these capacitors is to prevent it from occurring via the power supply, which at high frequencies is not a very ideal voltage source.
Step 3:
Plug an op-amp into the breadboard so that it straddles the gap between the top and bottom sections of the socket strip. If you have wired the power buses as suggested above, Pin 1 should be to the left.
Warning Do not try to unplug the op-amp with your thumb and forefinger. Use IC puller.
Step 4: Connect Pin 4 (Vcc-) to the negative power supply bus (-15 V). Connect Pin 7 (Vcc+) to the positive power supply bus (+15 V).

Step 5:
Set the METER SELECTOR on the power supply to +20V. With the power supply disconnected from the breadboard, turn on the supply and adjust the left-hand voltage control until the meter reads 15 volts.
Step 6:
Turn off the supply and connect the supply to the breadboard with banana plug patch cables. Connect the 0 to -20V terminal (black) to the black binding post on your breadboard, the 0 to +20V terminal (red) to the red breadboard binding post, and the COMMON terminal (light blue) to the green breadboard binding post. Note that none of the power supply output terminals are connected to ground. If we want the power supply zero volt reference connected to ground, we must make the connection ourselves.

Part 2: Non-inverting Amplifier Pre-lab Activity 2 : Design a non-inverting Amplifier circuit. The closed loop gain of the amplifier is required to be 2. Lab Activity 2:
1. Select the resistors needed to implement the designed non-inverting amplifier.
2. Connect the circuit 3. Use the signal generator to provide the input to the amplifier.
Use sine wave with Peak to peak value of 2Volts. Use Frequencies of 1 Hz, 100 Hz and 1000Hz.
4. Use the oscillator to display the output of the amplifier Observations and Comments:
Part 3: Inverting Amplifier Pre-lab Activity 3 : Design an Inverting Amplifier circuit. The closed loop gain of the amplifier is required to be 2. Lab Activity 3:
5. Select the resistors needed to implement the designed inverting amplifier.
6. Connect the circuit 7. Use the signal generator to provide the input to the amplifier.
Use sine wave with Peak to peak value of 2Volts. Use Frequencies of 1 Hz, 100 Hz and 1000Hz
8. Use the oscillator to display the output of the amplifier Observations and Comments:


Step 1:
Part 3: The Op Amp as a Comparator With the power turned off, wire the following circuit. This will compare the function generator output with an adjustable threshold proficed by the 0-6V supply.
Step 2: Set the function generator to produce a 4 V p-p, 100 Hz triangle wave.
Step 3:
Pull out the DC OFFSET control and adjust it so that the waveform has an average value of 2.5 V (i.e. the negative peaks have a value of +0.5 V).
Step 4:
Connect the function generator output to Vin of the circuit above. Connect CH1 of the scope to Vin and CH2 to Vout. Set the CH2 VOLTS/DIV to 5. Make sure both channels of the scope are on DC.
Step 5: Turn on the power supply and set the 0-6V output to zero.
Step 6: Slowly increase the 0-6V control until Vout begins to change. Sketch the waveform.
Step 7:
Increase V2 in steps of 0.4 V until Vout stops changing. At each step sketch Vout, noting the positive and negative peak values and the duration of the high and low states.
Step 8: Set V2 to zero and push the DC OFFSET control back in. Vout should be approximately a square wave. Is this what you expect?
Question Explain the waveforms observed in this Part. Develop an expression for the duty cycle (the percentage of the time that the waveform is in the "high" state) as a function of

1: V2.

Balancing the Input Offset
Introduction
In the previous experiment (The Basic Op Amp Inverter), we learned that there are at least three basic limitations on the accuracy of an op amp circuit: the tolerance of the resistors, input offset voltage and current, and output saturation. We can't do anything about output saturation, and we can only deal with resistor tolerances by selecting resistors of the degree of precision required for a specific application. However, in those cases where it is necessary, we can make use of a feature of the basic 741 op amp to balance out the input offsets and thus remove their influence on the output voltage.
Fortunately, in most applications this is not necessary. This permits the construction of dual- and quad-op amp packages, where the offset adjustment connections are not available outside the package. However, there are some cases where the input offset must be balanced as closely as possible. Therefore, we will examine the required method in this experiment.
Schematic Diagram
The recommended circuit for balancing out the input offset is quite simple, as shown here. The offset null pins (1 and 5) give direct access to the 1K emitter resistors in the input stage, and the offset null circuit is simply a 10K potentiometer connected between them, with its slider connected to the negative power supply. This is equivalent to putting a 5K resistance in parallel with each of the 1K resistors inside the IC. The difference is that we can vary the external resistances by adjusting the potentiometer, until the voltage offset becomes zero.

Since we're dealing with the input stage of a high-gain amplifier, the output voltage will be very sensitive to potentiometer changes. Therefore, we'll use a 15-turn trimpot here.
So how do we tell when we have exactly balanced out the offset? After all, the input offset is internal to the IC, and is rated to be no more than 6.0 millivolts (0.006 V) and 0.2 milliamps (0.0002 A). These require very accurate and sensitive measuring equipment, and are inaccessible in any case.
What we can do is select Rin and Rf to amplify an input voltage of zero. We'll make Rin = 1K and Rf = 100K, and connect the input end of Rin to ground. This will give the overall circuit a gain of 100, and assure us that the correct output voltage should nevertheless be 0.000 volt. Any output voltage will be due to offsets in the op amp itself, and we will use the 10K trimpot to balance them out as closely as possible.
Parts List
To construct and test the offset balancing circuit on your breadboard, you will need the following experimental parts:
(2) 1K, 1% resistors (brown-black-black-brown). (1) 100K, 1% resistor (brown-black-black-orange). (1) 10K trimmer potentiometer.
Performing the Experiment
Turn on your voltmeter and set it to measure voltages in the range of ±20 volts, and connect it to monitor the output voltage of the 741 op amp at pin 6 (the top end of the 100K resistor). Turn on power to your experimental circuit, and note the output voltage of this circuit. If the trimpot is still at one end of its range from the last experiment, the output voltage may well be quite high. This is not a problem; simply note it for now.
Adjust the trimpot over its range and note the effect on the output voltage. Then, readjust the trimpot to reduce the output voltage to below ±1.00 volt.
Reduce the range on your voltmeter to measure voltages up to ±2 volts, and then continue to adjust the trimpot to reduce the output voltage to zero.
If your voltmeter has a 200 mV range, switch down to that and use the trimpot to adjust the output voltage to as close to zero as you can. By now the adjustment will be very sensitive to slight changes, so you may have difficulty balancing out the last millivolt. If so, don't worry about it; just do the best you can.

When you have reduced the output voltage as closely as possible to zero, leave the trimpot alone and simply observe the output voltage for a few minutes. What does this observation show you?
Finally, remove the trimpot from the breadboard socket and set it aside. What is the output voltage now? Keeping in mind the op amp gain of 100, what was the effective initial input offset voltage?
When you have made your determinations, turn off the power to your experimental circuit and voltmeter and compare your results with the discussion below.
Discussion 1. Why balancing is needed? 2. How can we balance the LM 741 op-amp?
Part 5: Design and implement a summing amplifier.
The required equation is
)2( 21 VVVout
The inputs are two constant voltages
Draw the circuit diagram Connect the circuit Turn on the power supply Check the result and comment on it.

Part 6: Design and implement a low pass first order active filter. The required equation is
The input is a sign wave with frequencies 10Hz, 100Hz and 10000Hz.
Draw the circuit diagram Connect the circuit Turn on the power supply Check the result and comment on it.
When you have completed this experiment, make sure power to your experimental circuit and voltmeter is turned off. Remove all of your experimental components from the breadboard socket and put them aside for use in later experiments.
Turn the power supply off during the connection of the circuit

Lab # 6: Introduction to Boe-Bot Objectives: Getting and installing the BASIC STAMP Editor Setting up hardware and testing the system Writing the first program for the Boe-Bot Lab activities: In this lab session, students are expected to do the following six activities. Details of the activities are available in Chapter 1 of the Boe-Bot manual
1. Getting the software: The instructor will provide the CD to be used in installing the BASIC STAMP Editor. You can follow the steps in pages 4-8 to download most recent version of the software.
2. Software Installation: to install the BASIC STAMP Editor, you need to follow the procedure in pages 10-12.
3. Setting up Hardware and Testing the System: Follow the details given in page 13-20.
4. Writing the First Program: Follow the details given in page 22-36.
5. Projects: Each student group must do Projects 1 and 2. The instructor need to check that all activities are done correctly. Deliverables: Lab report summarizing what was done in the lab. Short description and program listings for Projects 1 and 2.

Lab # 7: Servomotors for the Boe-Bot Objectives: Connect, adjust and testing the servomotors Lab activities: In this lab session, students are expected to do the following six activities. Details of the activities are available in Chapter 2 of the Boe-Bot manual
1. Time Tracking and Repeat Actions: To practice software instructions for time tracking and timed loops.
2. Testing LEDs: Practice instructions of the microcontroller to send outputs. Do the steps in page 48 to connect the LEDs and write a program to turn the LEDs ON and OFF.
3. Using Pulseout and Pause Follow the details given in page 52-58 to generate specific timing diagrams.
4. Connecting Servomotors: Follow the details given in page 58-66.
5. Centering the Servos: Follow the details given in page 66-70.
6. Testing the Servos: 7. Projects: Each student group must do Projects 1 and 2
given in page 87 The instructor need to check that all activities are done correctly. Deliverables: Lab report summarizing what was done in the lab. Short description and program listings for Projects 1 and 2.

Lab # 8: Assembling and Testing the Boe-Bot Objectives: Build the Boe-Bot Test the servomotors Connect the speaker and test it Use Debug to control and test the servo speed Lab activities: In this lab session, students are expected to do the following six activities. Details of the activities are available in Chapter 2 of the Boe-Bot manual
1. Assembling the Boe-Bot: Follow the steps in 91-100 to assemble the Boe-Bot .
2. Re-Testing the Servos: to test the servos, Follow the steps in 101-105.
3. Start/Rest Indicator and program 4. Testing Speed Control 5. Projects: Each student group must do Projects 1 and 2
given in page 119. The instructor need to check that all activities are done correctly. Deliverables: Lab report summarizing what was done in the lab. Short description and program listings for Projects 1 and 2.

Lab # 9: Basic Boe-Bot Navigation Objectives: Program the Boe-Bot to do the basic maneuvers: Move forward,
backward, rotate left, rotate right, pivot turn Calculate required time to move Boe-bot precise distances. Program Boe-Bot to accelerate and decelerate Lab activities: In this lab session, students are expected to do the following seven activities. Details of the activities are available in Chapter 4 of the Boe-Bot manual
1. Basic Boe-Bot Maneuvers 2. Tuning the basic maneuvers 3. Calculating distances 4. Ramping maneuvers 5. Subroutines for maneuvers 6. Building complex maneuvers in the EEPROMS 7. Projects: Each student group must do Projects 1 and 2
given in page 159. The instructor need to check that all activities are done correctly. Deliverables: Lab report summarizing what was done in the lab. Short description and program listings for Projects 1 and 2.

Lab # 10: Boe-Bot Navigation with Whiskers Objectives: Build Tactile switches using whiskers Program Boe-Bot to use the tactile switches in navigation Lab activities: In this lab session, students are expected to do the following seven activities. Details of the activities are available in Chapter 5 of the Boe-Bot manual
1. Building and Testing the Whiskers 2. Testing the Whiskers 3. Navigation with Whiskers 4. Projects: Each student group must do Projects 1 and 2
given in page 189. The instructor need to check that all activities are done correctly. Deliverables: Lab report summarizing what was done in the lab. Short description and program listings for Projects 1 and 2.

Lab # 11: Boe-Bot Navigation with Photoresistors
Objectives: Build and test photoresistor circuit Program Boe-Bot to use the photoresistor in navigation Lab activities: In this lab session, students are expected to do the following seven activities. Details of the activities are available in Chapter 6 of the Boe-Bot manual
5. Building and Testing photoresistor circuit 6. Avoiding Shadows 7. Navigation with photoresistor 8. Roaming toward the light 9. Projects: Each student group must do Project 1 given in
page 228. The instructor need to check that all activities are done correctly. Deliverables: Lab report summarizing what was done in the lab. Short description and program listings for Project 1.