cj - buchty.net · or supplement what is written in the esq·1 musician's manual. 1) ... there...
TRANSCRIPT

I ESQ-1 Software Version 3 Update
The following revisions have been made to the ESQ·1's software between Version 2.0 and Version 3.x, which change or supplement what is written in the ESQ·1 Musician's Manual.
1) C ANGES TO THE MASTER PAGE Two parameters have been added and one renamed on the MASTER Page (see p. 18 in your ESQ-1 Musician's Manual). The new parameters 1) allow the use of an optional CVP·1 Control Voltage Foot Pedal as a Modulator QL as a Volume Pedal, and 2) add a Status selector (Local/MIDI/Both) for the "Straight Synth" section. In addition, the VELOCITY parameter hasbeen renamed "TOUCH." The Master Page now looks like this:
MASTER I!::!tlE=!~Q
"Straight Synth" Touch: Velocity Keyboard Status Sensitivity Adj ust
KBD = BOTH TOUCH = MED
PEDAL=MOD BEND- RANGE= 82 MODE= ALL
CJ
Foot Pedal Function Sel ect
Pitch Bend Wheel Range
The new parameters on this Page are as follows:
KBD - "Straight Synth" Keyboard Status. This determines whether the "Straight Synth," (which is what we call normal keyboard operation, with no SequenC?erTracks selected) will play locally (only on the ESQ·1), only over MIDI, or both. The "Straight Synth" is independent of the Sequencer, so depending on the setting of this parameter you can play along with a Sequence using only local voices, only a remote Instrument, or both. See the section MIDI Page (p. 20 in the manual) for more on "Straight Synth" operation. The three available settings are:
--) BOTH - When BOTH is selected here, notes, controllers and Program Changes played from the keyboard when no Sequencer Track is selected will both play locally andbe sent out MIDI. This is the default, and the most common setting. When you select a Program from the ESQ·1 front panel, the corresponding Program Change will be sent out MIDI and you will hear the change locally.
--) MIDI- Notes and controllers played from the keyboard when no Sequencer Track is selected will only be sent out MIDI and will not play any local ESQ·1 voices. It is comparable to "Local Off" on some Instruments. When you select a Program from the ESQ·1 front panel, the corresponding Program Change will be sent out MIDI.
--) LOCAL - Notes and controllers played from the keyboard when no Sequencer Track is selected will only play on the ESQ·1 and will not be sent out MIDI at all. When you select a Program from the ESQ-1 front panel, no Program Change will be sent out via MIDI.
PIN 9311 0011 01 rev. A

1) CHANGES TO THE MASTER PAGE (continued)
PEDAL - Foot Pedal Function Select The setting of this parameter determines whether a CVP·1 Foot Pedal plugged into the PEDALlCV jack in the ESQ·1's rear panel will act as a Modulator (varying the "Manual" level wherever PEDAL is selected as a Modulation source) or as a Volume Pedal (changing the volume of the "straight synth" or any selected Track). Note that this only affects a Pedal plugged into the ESQ-1 itself. The setting of this control has no effect whatever on incoming MIDI Foot Pedal (controller #4) or Volume (controller #7) information. There are two possible states:
--) PEDAL:MOD - This is the default value. When PEDAL=MOD, the Foot Pedal will act as a Modulator in the Voice section of the ESQ-1 and will have an effect on the sound when PEDAL is selected as a Modulator and assigned a modulation depth other than zero. When PEDAL=MOD, moving the Pedal will send MIDI Foot Pedal (controller #4) messages out MIDI.
--) PEDAL=VOL - When PEDAL=VOL the Foot Pedal will adjust the volume of the ESQ-1. When no sequencer Track is selected, moving the Pedai will raise or lower the volume of the "Straight Synth." When a Track is selected, moving the Pedal will have the same effect as adjusting the MIX Level on the Mix/MIDI Page. Only the "Straight synth" Q.( one sequencer Track will be affected - only one Track's volume can be adjusted at a time (though the Pedal will be recorded if it is moved while recording a Track). When PEDAL=VOL, moving the Pedal will send MIDI Volume (controller #7) messages out MIDI.
The ESQ·1 sequencer will record and play back Foot Pedal information. However, when the sequence is played back any Foot Pedal information in the Tracks will be interpreted.e.i1.b.e.r as modulator or as volume information depending on the setting of this control at the time of playback. If a Track is recorded with this parameter set one way, and then played back with it set the other way, you will not get the desired result.
Important Note: If you don't have a CV Pedal plugged into the ESQ-1, you should NOT leave this parameter set to PEDAL=VOL when you turn the unit off. If you do, the next time you power it up, the ESQ-1 will set the "straight synth" volume to zero - it won't make any sound. To get the volume back to normal, just go to the MASTER Page, select this parameter and set it to PEDAL=MOD.
TOUCH - Velocity Sensitivity Adjust. This parameter, previously called "VELOCITY," has been renamed "TOUCH:' It controls the overall velocity response of the ESQ-1. Its function, and the three available settings, remain exactly as described in the Musician's Manual on p. 19.
All other parameters on the Master Page remain as described in the Musician's Manual.
2) A SLIGHT CHANGE TO THE START-UP PROCEDURE When you turn the ESQ-1 's poweron, itwill nowshowthe "ENSONIQ ESQ-1 DIGITAL WAVE SYNTHESIZER"screen for several seconds and then automatically switch to one of the four Internal Program Select Pages.
3) SHORTCUT FOR CHANGING THE SPLIT KEY (SPLIT/LAYER PAGE) There is an easy way to adjust the value of the split key parameter ("SPLIT-KEY=" on the Split/Layer Page; see p. 70 in the ESQ-1 Musician's Manual) using the following short cut: • With the SPLIT KEY parameter selected (underlined) press and hold down the Record button (in the Sequencer
section) . • While holding down the Record button, play any key on the keyboard. That key will be set as the Split Key. The
Split Key number showing on the Display will be updated accordingly.
4) OCTAVE RANGE OF OSCILLATORS The available range of values for the Octave of each Oscillator (the parameter "OCT=_" on the OSC 1, OSC 2 and OSC 3 Pages) now goes from -3 to +5 instead of -3 to +3 as shown on p. 42-43 in the manual.
ESQ-1 Software Version 3 Update - Page 2

5) SE DING SEQUENCER DATA TO REMOTE DEVICES FOR STORAGE When you send Sequencer data via MIDI in the ESQ format (SEQ TO ESQ-1 on the STORAGE Page; see pp. 182184 in the ESQ·1 Musician's Manual), the data :ti.ill be sent, followed by the message "DATA TRANSMITTED CHECK RECEIVER," even if there is no response from the receiving unit. This allows sending Sequencer data to nonESQ systems such as MIDI disk drives, etc.
See the Application Note on Page 8 of this update for more on storing ESQ-1 Data to remote devices via MIDI.
6) CHANGES TO MIDI OVERFLOW MODE When MIDI Overflow Mode is Q.O. the ESQ·1 will echo all inbound MIDI Program Changes and controllers at its MIDI Out jack. Also, when Overflow is on, Tracks with LOCAL status will send Program and Volume changes out via MIDI when a sequence is selected or comes around as a step in a Song.
7) FA TORY INTER AL PRO RAMS RELOADE AFTER REINITIALIZING When the memory of the ESQ·1 is re-initialized (by holding down Record and pressing the upper-left-hand "Soft Button", then answering "YES") the 40 original factory sounds will automatically be reloaded into the ESQ-1 's Internal Program Memory, as part of the re-initialization process. Note that re-initializing erases the sequencer memory and replaces any Programs that were in the Internal memory at the time.
8) A QUICK WAY TO CREATE A EW SONG OR SEQUENCE There is now a shortcut which lets you bypass the CREATE/ERASE Page when you want to create a new Sequence or Song. • Press the yellow SEQ button and then one of the four Bank buttons to go to any Sequence or Song Select Page. • Press the "Soft" button which corresponds to any unused Sequence or Song location (one that reads XXX- instead
of SEQ or a Song name). • You will automatically be placed on the CREATE SEQUENCE or CREATE SONG screen (shown on pp. 125.. 126
of the ESQ-1 Musician's Manual), bypassing the CREATE/ERASE Page. The Sequence or Song location you pressed is the one that will be created if you press *YES*.
If you pressed an empty Song or Sequence by mistake, or you change your mind, just press *NO".
9) RENAMING AN EXISTING SONG While on the SONG EDIT Page (see p. 160 in the ESQ·1 Musician's Manual) , you can change the name of an existing Song if you like. Pressing the "Soft" button above the Song name puts you on a RENAME SONG sub-page. The procedure for renaming a Song is the same as for naming it when first created. Use the Data Entry Slider and the Up and Down Arrow buttons to choose the character you want; then use the MOVE CURSOR buttons to select a different character. Repeat the process until the name you want shows on the Display. Press "EXIT" to return to the SONG EDIT Page with the new name in place.
10) PROGRAM UMBERS FROM 1-128 N THE MIX/MIDI PAGE On the TRACK PROG NUM sub-Page of the Mix/MIDI Page (p.113 in the Musician's Manual) the range for each Track is now 001 To 128 (the full range of MIDI Program Numbers) whether a cartridge is installed or not. This allows you to select Program Numbers which are out of range forthe ESQ-1 (above 40 when no Cartridge is inserted, and above 120 when a Cartridge is inserted). It means that Tracks can now send the full 128 Program Changes to those external instruments which can receivG them.
Also, when on the Mix/MIDI Page, pressing the Mix/MIDI button again has the same effect as pressing *MORE" the Display will advance to the next sub-Page. You can easily review the settings on four sub-pages, or just find the one you want, by repeatedly pressing the Mix/MIDI button.
ESQ-1 Software Version 3 Update - Page 3

11) ACCESS TO THE CONTROL AND MIX/MIDI PAGES FROM THE PLAY/KEEP PAGE With the ESQ-1 in the Audition Play or Audition Stop states, you can now select the Control Page (for turning the Click on or off while auditioning Tracks) or the Mix/MIDI Page (for balancing the levels of Tracks while auditioning). Any time you press Stop, you will be returned to the PLAY/KEEP Page. Remember that you must keep either the original or the new Track before you can get out of Audition Play and return to normal operation.
12) LOOP SWITCH SETIING SAVED WITH EACH SONG The setting (On or Off) of the LOOP Switch on the Control Page will now be remembered for Songs as well as Sequences. For your existing ESQ-1 Songs you might want to check the status of this parameter to make sure it is how you want it for each Song. Once set, it will be remembered.
13) CHANGES TO THE LOOK OF THE STORAGE PAGE The look of the Storage page has changed slightly from what is represented on pp. 78 and 174 of the ESQ-1 Musician's Manual, but the functions performed from there are the same. When you press the STORAGE button, the Page now appears like this:
STORAGE -- SELECT TYPE -
CARTRIDGE MIDI TAPE
From here you choose which type of Data Transfer you want:
CARTRIDGE - To transfer Program Banks between Internal Memory and a Cartridge, press CARTRIDGE. The ESQ-1 goes to the Bank Copy Page which looks and functions exactly as shown on pp. 78-80 of the manual.
MIDI - To transfer ESQ·1 data via MIDI, press MIDI. The following page appears:
Select LOAD or SEND from this page (LOAD to CJ CJ CJ CJ CJ retrieve ESQ-1 Sequencer data from a Mirage; SEND to transmit Sequences or Programs) MIDI - SELECT FUNCTION - depending on the task at hand. Then proceed exactly as shown on pp. 84-85 (for Programs) or pp. 180-184 (for Sequences).
LOAD SEND
_11CJ l%%WfI CJ CJ
TAPE·- To perform any of the Tape Storage functions, press TAPE, and you will see the following:
CJ CJ CJ CJ CJ Choose the tape function you want by pressing LOAD, SAVE or VERIFY, and then proceed TAPE SELECT FUNCTION - exactly as shown on pp. 81-83 (for Programs) or pp. 174-179 (for Sequences).
LOAD SAVE VERIFV
CJ @gAdl wAd e&--D CJ
In short, all of the functions of the Storage Page remain as described in the manual. The only difference is that the "top level" page has been replaced with a set of "menus" which provide a somewhat clearer path to any given function.
ESQ-1 Software Version 3 Update - Page 4

14) ADD OR DELETE BARS FROM ANY POINT WITHIN A EQUENCE The ability to ADD or DELETE bars starting from anybarwithin a Sequence has been added to the EDIT SEQUENCE Page (see p. 155 in the ESQ-1 Musician's Manual). The CHANGE LENGTH function, which added or deleted bars only from the end of the Sequence has been replaced with two separate commands - ADD and DELETE.
Changing the length of a Sequence is now a two-step process. First you tell the ESQ-1 at which bar you want to begin altering the Sequence. Second you tell it how many bars you want to add or delete starting from that point.
In combination with the COPY and APPEND Edit functions, you can use these new commands to effectively "cut and paste" parts of different Sequences together.
When you press SEQ from the EDIT Page, the Display now looks like this:
ED IT SEQUENCE rr 1 rrrr4 BARS 4/4
APPEND ADD DELETE COpy * EX IT *
The two new Edit functions are as follows:
ADD Bars
The ADD Bars function lets you Add up to 99 Bars to the Sequence at a time. There are two steps: 1) decide at which bar you want to start adding, and 2) decide how many Bars you want to add.
To ADD Bars to the Selected Sequence:
--, Make sure the Sequence to which you want to ADD Bars is selected. --) Select EDIT Page. and press SEQ. --) Press ADD - the Display shows the following:
--) Use the Data Entry Slider and the Up and c::::l c::::l c::::l c::::l c::::l Down Arrow Buttons to determine at which Bar the new Measures will be ADD BARS TO SEQ-ffl AT BAR ffff5 added. This can be any Bar within the
FIRST =ffffl LAST =ffff4 *NEXT*Sequence. Bars will be added from the beginning of the Bar you select here. • Selecting Bar 01 will cause Bars to be c::::l c::::l c::::l c::::l @'t.kiJ
added at the beginning of the Sequence.
• Selecting the Bar after the last Bar will cause Bars to be added at the end of the Sequence. • Selecting any other Bar will cause empty Bars to be inserted starting from that point in the Sequence.
--> Press *NEXT*. The Display shows the following:
--) Use the Data Entry Slider and the Up and Down Arrow Buttons to select how SEQ-ffl IS ffff4 BARS LONG *YES * many Bars you want to add. You can ad- ADD ff1 BARS AT BAR ffff5 * NO * just this from 01 to 99 Bars. Empty Bars '- _ (no Track Data) will be added beginning from the Bar selected in the previous step.
ESQ-1 Software Version 3 Update - Page 5
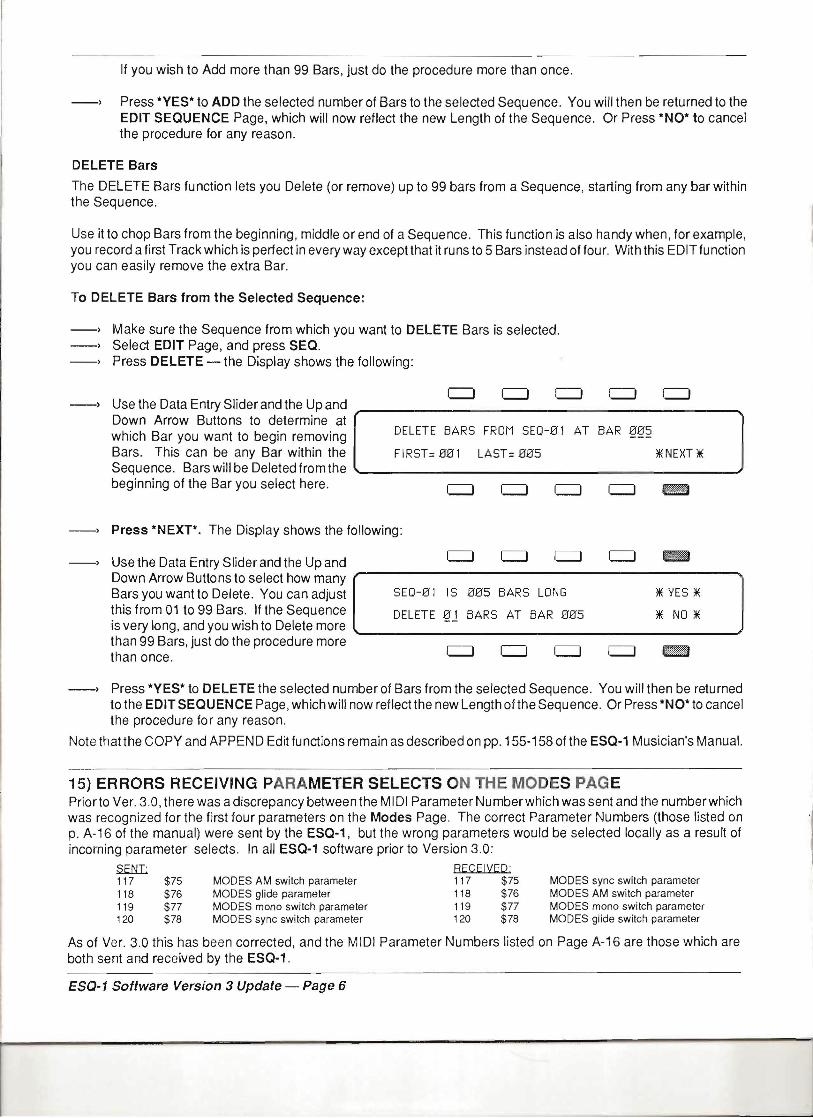
If you wish to Add more than 99 Bars, just do the procedure more than once.
--) Press *YES* to ADD the selected number of Bars to the selected Sequence. You will then be returned to the EDIT SEQUENCE Page, which will now reflect the new Length of the Sequence. Or Press *NO* to cancel the procedure for any reason.
DELETE Bars
The DELETE Bars function lets you Delete (or remove) up to 99 bars from a Sequence, starting from any bar within the Sequence.
Use it to chop Bars from the beginning, middle or end of a Sequence. This function is also handy when, for example, you record a first Track which is perfect in every way except that it runs to 5 Bars instead of four. With this EDIT function you can easily remove the extra Bar.
To DELETE Bars from the Selected Sequence:
--) Make sure the Sequence from which you want to DELETE Bars is selected. --) Select EDIT Page, and press SEQ. --) Press DELETE - the Display shows the following:
C::l C::l C::l C::l C::l --) Use the Data Entry Slider and the Up and
Down Arrow Buttons to determine at which Bar you want to begin removing Bars. This can be any Bar within the
DELETE BARS FROM SEO-01
FIRST= B01 LAST= 0B5
AT BAR 005
lIfNEXT * Sequence. Bars will be Deleted from the beginning of the Bar you select here. c:::J c:::J c:::J c:::J ~
--) Press *NEXT*. The Display shows the following:
--) Use the Data Entry Slider and the Up and Down Arrow Buttons to select how many Bars you want to Delete. You can adjust this from 01 to 99 Bars. If the Sequence is very long, and you wish to Delete more
SEO-01
DELETE
c:::J c:::J c:::J
IS 005 BARS LONG
~.l BARS AT BAR 005
c:::J Em
*YES * * NO *
than 99 Bars, just do the procedure more c:::J c:::J c:::J c:::J ¢WrtmJ
than once.
--) Press *YES* to DELETE the selected number of Bars from the selected Sequence. You will then be returned to the EDIT SEQUENCE Page, which will now reflect the new Lengthofthe Sequence. Or Press *NO*to cancel the procedure for any reason.
Note that the COPY and APPEND Edit functions remain as described on pp. 155-158 of the ESQ-1 Musician's Manual.
15) ERRORS RECEIVING PARAMETER SELECTS ON THE MODES PAGE Priorto Ver. 3.0, there was a discrepancy between the MIDI Parameter Numberwhich was sent and the numberwhich was recognized for the first four parameters on the Modes Page. The correct Parameter Numbers (those listed on p. A-16 of the manual) were sent by the ESQ-1, but the wrong parameters would be selected locally as a result of incoming parameter selects. In all ESQ-1 software prior to Version 3.0:
~ RECEIVED 117 $75 MODES AM switch parameter 117 $75 MODES sync switch parameter 118 $76 MODES glide parameter 118 $76 MODES AM switch parameter 119 $77 MODES mono switch parameter 119 $77 MODES mono switch parameter 120 $78 MODES sync switch parameter 120 $78 MODES glide switch parameter
As of Ver. 3.0 this has been corrected, and the MIDI Parameter Numbers listed on Page A-16 are those which are both sent and received by the ESQ-1.
ESQ-1 Software Version 3 Update - Page 6

16) ADDENDUM TO THE ESQ-1 MIDI SPECIFICATION (See Appendix 2 in the ESQ-1 Musician's Manual.) Please note that these additions pertain to software release 2.1 and higher only.
2.5.1 Compare Button Status Message This message is now both sent and received by the ESQ-1. It is sent whenever the Compare status of the ESQ-1 is changed by pressing the Compare button. The same message format is recognized when it is received from another ESQ product if recognition of system exclusive messages is enabled (MIDI ENABLE=KEYS+CT+PC+SS+SX).
xxxxxxxx ESQ System Exclusive header 00010000 Compare Status Command code OOOOOOOn Status of the Compare button
n= 1, Compare On n=O, Compare Off
11110111 End of exclusive
2.7.1 Deyice Inquiry Message The ESQ-1 now supports the MIDI Device Inquiry message which allows instruments and computers to ascertain the identity of the unit(s) to which they are connected. The ESQ-1 will respond to the following Device Inquiry Message with the Device ID Message detailed below. The ESQ-1 will respond to the inquiry if the channel information in the message contains either the base MIDI channel number of the ESQ-1 or the all channel broadcast code ($7F).
11110000 System Exclusive status byte 01111110 Non real time message OOOOnnnn nnnn=MIDI Channel number
or 01111111 All channel broadcast code 00000110 General Information message code 00000001 Device Inquiry Message message code 11111110 End of Exclusive
2.7.2 Device 10 Message When the ESQ-1 receives a correctly formatted MIDI Device Inquiry message it will respond with the following Device ID Message. This message follows the MMA recommendations for device ID messages, and contains information about the responding device including manufacturer, product family and software revision.
11110000 System Exclusive Status byte 01111110 Non real time message OOOOnnnn nnnn=Base MIDl Channel 00000110 General Information message code 00000010 Device ID Message code 00001111 ENSONIQ System Exclusive manufacturer's code 00000010 ESQ Product Family code (Isb) 00000000 ESQ Product Family code (msb) 00000001 ESQ-1 Family Member code (Isb) 00000000 ESQ-1 Family Member code (msb) 00000000 Software revision information 00000000 Onnnnnnn Major Version number (integer portion) Onnnnnnn Minor Version number (decimal fraction) 11111110 End of Exclusive
17) ERRORS IN THE ESQ-1 MIDI SPECIFICATION The following documentation errors exist in the MIDI Parameter Number List (Appendix 3 in the Musician's Manual):
ENV1 T1 should be OS, not 03 S/L layer switch should be 127, not 125 ENV1 LV should be 03, not 04 S/L layer program should be 128, not 126 ENV1 T1V should be 04, not 05 S/L split-layer switch should be 125, not 127
S/L split-layer program should be 126, not 128
Also, on the Master Page, MIDI Parameter Number 134 ($86) should be Pedal Function Select parameter.
ESQ-1 Software Version 3 Update - Page 7
18) SPECIAL APPLICATION NOTE - Storing ESQ-1 data to an external MIDI Disk Drive Instructions for using an external device with Sys-Ex Recording capabilities (such as the ENSONIQ SQ-80 CrossWave Synthesizer and the ENSONIQ EPS Performance Sampler, or a "M IDI disk drive" (such as the Yamaha™ MDF-1) to save and load ESQ-1 Sequencer and Program data.
Important: When sending ESQ·1 data to an external disk drive or Sys-ex recorder, send the data exactly as you would to another ESQ-1. When you later want to reload the data from the drive, DO NOT use the MIDI LOAD command on the ESQ-1 's Storage Page. This command only relates to storage in Mirage format. Your MIDI disk drive will ignore it completely, and nothing will happen. To reload the data, you must send it to the the ESQ-1 from the drive, using the Send (or Load) command on the drive unit itself. Consult the owner's manual of your particular storage device for specific instructions.
Sequences: To save Sequencer data to the disk drive: 1) Connect the MIDI Out of the ESQ-1 to the MIDI In of
the drive. 2) Prepare the drive unit to receive data. 3) Select the Storage Page on the ESQ-1. 4) Press MIDI SEND. 5) Press SEQ TO ESQ-1 6) To save only the currently selected Sequence, press
CURRENT SEQUENCE; OR, To save the entire Sequencer memory, press ALL SEQUENCER DATA.
7) The Display will read MIDI DATA BEING TRANSMITIED - PLEASE WAIT. When the transfer is complete, the Display will read DATA TRANSMITIED - CHECK RECEIVER. This indicates that the ESQ-1 did not receive a reply from another ESQ-1 confirming the transfer, but it sent the data anyway. The Sequencer data should now be in the buffer memory of the disk drive unit.
8) Save the data in the drive unit's buffer memory to disk.
To Load Sequencer data back into the ESQ-1 from the disk drive:
1) Connect the MIDI Out of the drive unit to the MIDI In of the ESQ·1.
2) Enable the ESQ-1 to receive System Exclusive messages (ENABLE=KEYS+CT+PC+SS+SX on the MIDI Page).
3) Make sure the ESQ-1 is set to the same Base MIDI Channel (CHAN,=,_ on the MIDI Page) as when you transmitted the data to the drive.
4) Locate the file you want on the disk, and prepare to send it to the ESQ-1.
5) Send the data from the disk drive. 6) When the transfer is complete, the ESQ·1 Displaywill
show a Sequence Select Page. If you loaded just one sequence (as opposed to the entire sequencer memory), it will be placed in the highest numbered empty sequence location.
Programs: To save Programs to the disk drive: 1) Connect the MIDI Out of the ESQ-1 to the MID/In of
the drive. 2) Prepare the drive unit to receive data. 3) Select the Storage Page on the ESQ-1. 4) Press MIDI SEND. 5) To save only the currently selected Program, press
CURRENT PROGRAM; OR, To save all40 Programs inthe Internal memory, press INT PROG BANKS.
6) The Display will read MIDI DATA BEING TRANSMITTED - PLEASE WAIT. When the transfer is complete, the Display will return to the Storage Page. The Program data should now be in the buffer memory of the disk drive unit.
7) Save the data in the drive unit's buffer memory to disk.
To Load Programs back into the ESQ-1 from the disk drive:
1) Connect the MIDI Out of the drive unit to the MIDI In of the ESQ-1.
2) Enable the ESQ·1 to receive System Exclusive messages (ENABLE=KEYS+CT+PC+SS+SX on the MIDI Page).
3) Make sure the ESQ-1 is set to the same Base MIDI Channel (CHAN==_ on the MIDI Page) as when you transmitted the data to the drive.
4) The ESQ-1 must be on a Program Select Page to receive Programs via MIDI. Press Internal, CART A or CART B, so that a Program Select Page is showing on the Display.
5) Locate the file you want on the disk, and prepare to send it to the ESQ-1.
6) Send the data from the disk drive. 7) When the transfer is complete, the ESQ·1 Display will
show a Program Select Page, with the new Programs in place. Or, if you loaded just one Program (as opposed to an entire Bankof40), the WRITE Page will appear with the new Program on it, ready to write to any Internal or Cartridge location.
Yamaha is a registered trademark of Yamaha Music Corporation
ESQ-1 Software Version 3 Update - Page 8