climbing basics
DESCRIPTION
Climbing basicsTRANSCRIPT

TECH-INFO
2014 /EN
SINGING_Techinfo_2014_EN 21. 1. 2014 16:04 Stránka 1
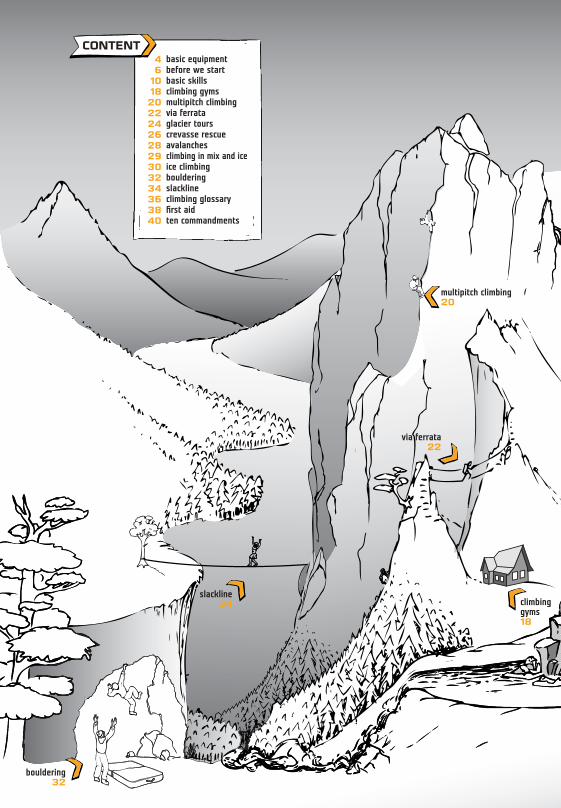
climbing gyms18
via ferrata22
slackline34
multipitch climbing20
bouldering32
CONTENT46
1018202224262829303234363840
basic equipmentbefore we startbasic skillsclimbing gymsmultipitch climbingvia ferrataglacier tourscrevasse rescueavalanchesclimbing in mix and iceice climbingboulderingslacklineclimbing glossaryfirst aidten commandments
SINGING_Techinfo_2014_EN 21. 1. 2014 16:04 Stránka 2
3
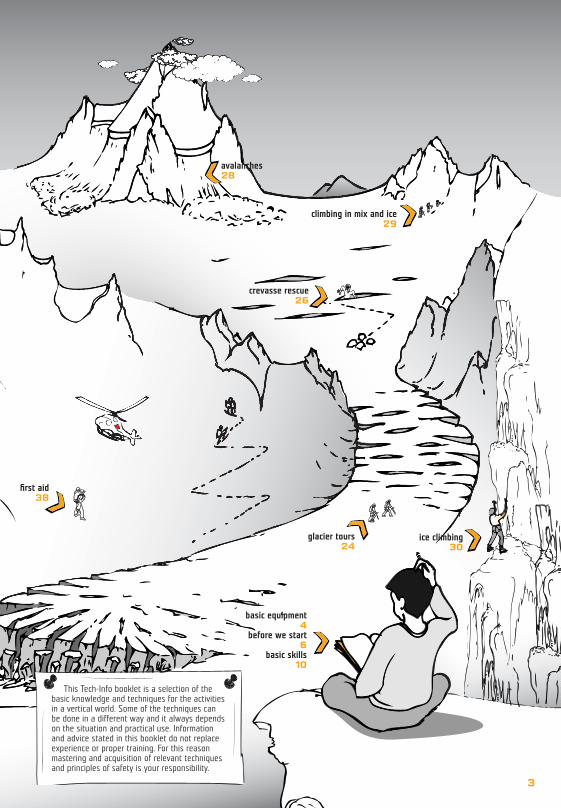
climbing in mix and ice29
avalanches28
crevasse rescue26
glacier tours24
ice climbing30
basic equipment4
before we start6
basic skills10
first aid38
This Tech-Info booklet is a selection of thebasic knowledge and techniques for the activitiesin a vertical world. Some of the techniques can be done in a different way and it always dependson the situation and practical use. Information and advice stated in this booklet do not replaceexperience or proper training. For this reasonmastering and acquisition of relevant techniquesand principles of safety is your responsibility.
SINGING_Techinfo_2014_EN 21. 1. 2014 16:04 Stránka 3
4
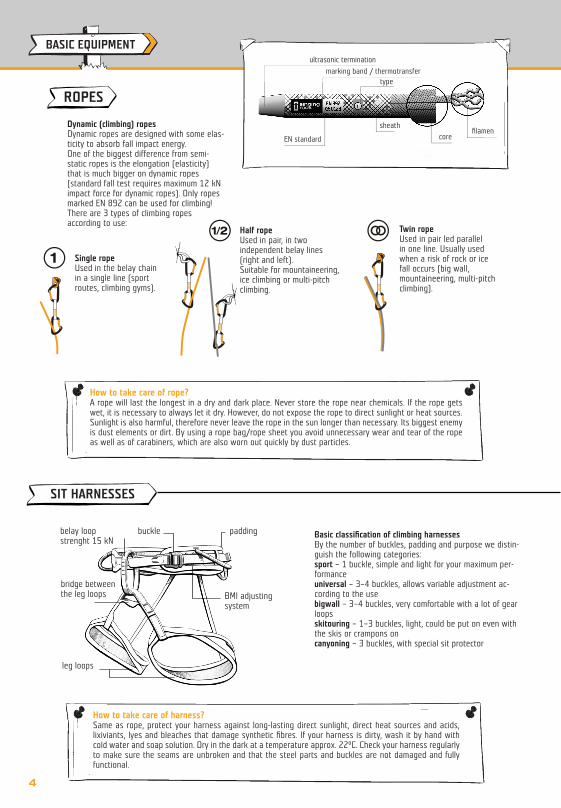
Dynamic (climbing) ropes Dynamic ropes are designed with some elas-ticity to absorb fall impact energy.One of the biggest difference from semi-static ropes is the elongation (elasticity)that is much bigger on dynamic ropes (standard fall test requires maximum 12 kNimpact force for dynamic ropes). Only ropesmarked EN 892 can be used for climbing!There are 3 types of climbing ropes according to use:
Single ropeUsed in the belay chain in a single line (sport routes, climbing gyms).
Half ropeUsed in pair, in two independent belay lines (right and left).Suitable for mountaineering,ice climbing or multi-pitchclimbing.
Twin ropeUsed in pair led parallel in one line. Usually used when a risk of rock or ice fall occurs (big wall, mountaineering, multi-pitchclimbing).
How to take care of rope?A rope will last the longest in a dry and dark place. Never store the rope near chemicals. If the rope getswet, it is necessary to always let it dry. However, do not expose the rope to direct sunlight or heat sources.Sunlight is also harmful, therefore never leave the rope in the sun longer than necessary. Its biggest enemyis dust elements or dirt. By using a rope bag/rope sheet you avoid unnecessary wear and tear of the ropeas well as of carabiners, which are also worn out quickly by dust particles.
belay loop strenght 15 kN
buckle padding
BMI adjustingsystem
bridge betweenthe leg loops
leg loops
How to take care of harness?Same as rope, protect your harness against long-lasting direct sunlight, direct heat sources and acids,lixiviants, lyes and bleaches that damage synthetic fibres. If your harness is dirty, wash it by hand withcold water and soap solution. Dry in the dark at a temperature approx. 22°C. Check your harness regularlyto make sure the seams are unbroken and that the steel parts and buckles are not damaged and fullyfunctional.
Basic classification of climbing harnessesBy the number of buckles, padding and purpose we distin-guish the following categories:sport – 1 buckle, simple and light for your maximum per-formanceuniversal – 3–4 buckles, allows variable adjustment ac-cording to the usebigwall – 3–4 buckles, very comfortable with a lot of gearloopsskitouring – 1–3 buckles, light, could be put on even withthe skis or crampons oncanyoning – 3 buckles, with special sit protector
ROPES
SIT HARNESSES
ultrasonic termination
marking band / thermotransfertype
EN standard
sheath
corefilamen
BASIC EQUIPMENT
SINGING_Techinfo_2014_EN 21. 1. 2014 16:04 Stránka 4
twist lock
screw lock
triple lock
screw lock
5
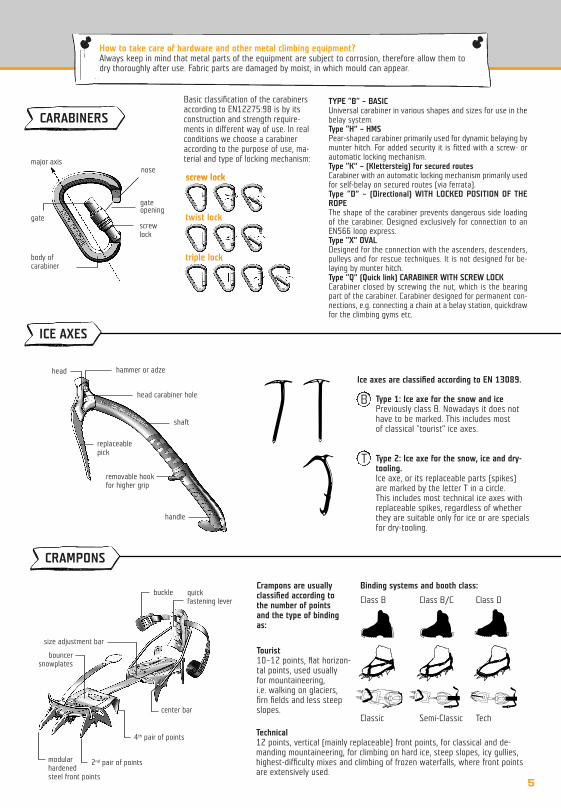
Basic classification of the carabinersaccording to EN12275:98 is by itsconstruction and strength require-ments in different way of use. In realconditions we choose a carabiner according to the purpose of use, ma-terial and type of locking mechanism:
How to take care of hardware and other metal climbing equipment?Always keep in mind that metal parts of the equipment are subject to corrosion, therefore allow them todry thoroughly after use. Fabric parts are damaged by moist, in which mould can appear.
TYPE “B“ – BASICUniversal carabiner in various shapes and sizes for use in thebelay system.Type “H” – HMSPear-shaped carabiner primarily used for dynamic belaying bymunter hitch. For added security it is fitted with a screw- orautomatic locking mechanism.Type “K” – (Klettersteig) for secured routesCarabiner with an automatic locking mechanism primarily usedfor self-belay on secured routes (via ferrata).Type “D” – (Directional) WITH LOCKED POSITION OF THEROPE The shape of the carabiner prevents dangerous side loadingof the carabiner. Designed exclusively for connection to anEN566 loop express.Type “X” OVALDesigned for the connection with the ascenders, descenders,pulleys and for rescue techniques. It is not designed for be-laying by munter hitch.Type “Q” (Quick link) CARABINER WITH SCREW LOCKCarabiner closed by screwing the nut, which is the bearingpart of the carabiner. Carabiner designed for permanent con-nections, e.g. connecting a chain at a belay station, quickdrawfor the climbing gyms etc.
Type 1: Ice axe for the snow and ice Previously class B. Nowadays it does nothave to be marked. This includes most of classical "tourist” ice axes.
Type 2: Ice axe for the snow, ice and dry-tooling. Ice axe, or its replaceable parts (spikes) are marked by the letter T in a circle. This includes most technical ice axes with replaceable spikes, regardless of whetherthey are suitable only for ice or are specialsfor dry-tooling.
Crampons are usuallyclassified according tothe number of pointsand the type of bindingas:
Binding systems and booth class:
Class B Class B/C Class D
Classic Semi-Classic Tech
Tourist10–12 points, flat horizon-tal points, used usually for mountaineering, i.e. walking on glaciers, firn fields and less steepslopes.
Technical12 points, vertical (mainly replaceable) front points, for classical and de-manding mountaineering, for climbing on hard ice, steep slopes, icy gullies,highest-difficulty mixes and climbing of frozen waterfalls, where front pointsare extensively used.
CARABINERS
ICE AXES
CRAMPONS
Ice axes are classified according to EN 13089.
B
T
major axisnose
gateopening
screw lock
body of carabiner
head
gate
hammer or adze
head carabiner hole
shaft
replaceablepick
removable hookfor higher grip
handle
buckle quick fastening lever
size adjustment bar
bouncersnowplates
center bar
4th pair of points
2nd pair of pointsmodularhardenedsteel front points
SINGING_Techinfo_2014_EN 21. 1. 2014 16:04 Stránka 5
min.20 cmmin.20 cm
6
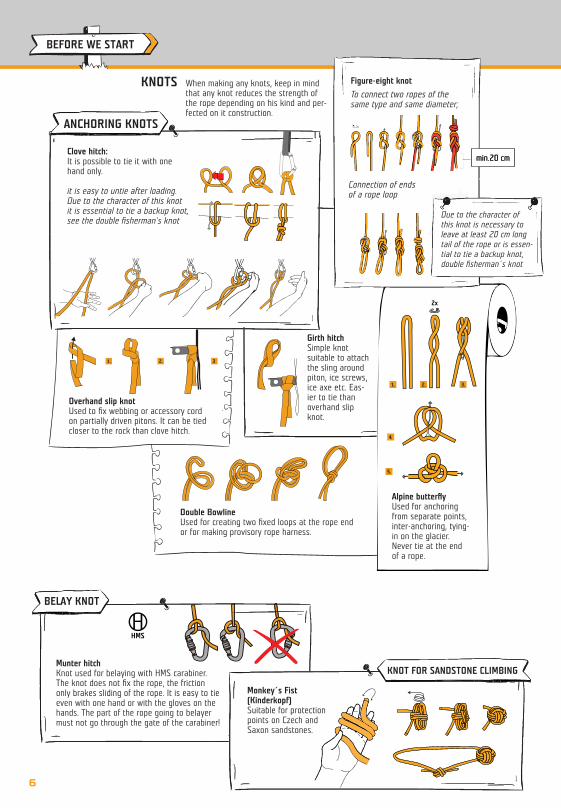
Clove hitch:It is possible to tie it with one hand only.
it is easy to untie after loading. Due to the character of this knot it is essential to tie a backup knot,see the double fisherman's knot
When making any knots, keep in mindthat any knot reduces the strength ofthe rope depending on his kind and per-fected on it construction.
Figure-eight knot
To connect two ropes of thesame type and same diameter;
Due to the character ofthis knot is necessary toleave at least 20 cm longtail of the rope or is essen-tial to tie a backup knot,double fisherman´s knot
Connection of ends of a rope loop
Girth hitch Simple knot suitable to attachthe sling aroundpiton, ice screws,ice axe etc. Eas-ier to tie thanoverhand slipknot.
Overhand slip knot Used to fix webbing or accessory cordon partially driven pitons. It can be tiedcloser to the rock than clove hitch.
Double Bowline Used for creating two fixed loops at the rope end or for making provisory rope harness.
Alpine butterflyUsed for anchoringfrom separate points,inter-anchoring, tying-in on the glacier. Never tie at the end of a rope.
Munter hitch Knot used for belaying with HMS carabiner.The knot does not fix the rope, the frictiononly brakes sliding of the rope. It is easy to tieeven with one hand or with the gloves on thehands. The part of the rope going to belayermust not go through the gate of the carabiner!
Monkey´s Fist(Kinderkopf)Suitable for protectionpoints on Czech andSaxon sandstones.
ANCHORING KNOTS
KNOTS
BELAY KNOT
KNOT FOR SANDSTONE CLIMBING
BEFORE WE START
SINGING_Techinfo_2014_EN 21. 1. 2014 16:04 Stránka 6
7
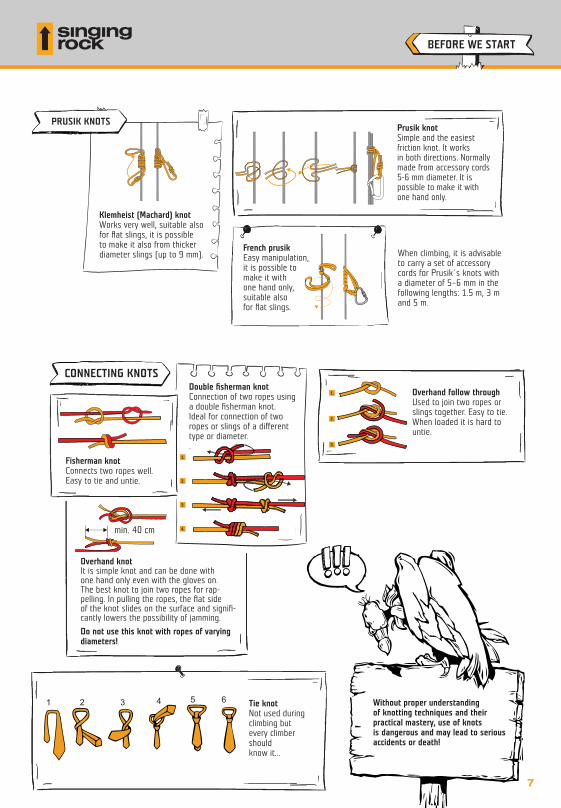
Klemheist (Machard) knot Works very well, suitable also for flat slings, it is possible to make it also from thicker diameter slings (up to 9 mm). When climbing, it is advisable
to carry a set of accessorycords for Prusik´s knots with a diameter of 5–6 mm in thefollowing lengths: 1.5 m, 3 mand 5 m.
Prusik knot Simple and the easiest friction knot. It worksin both directions. Normallymade from accessory cords5-6 mm diameter. It is possible to make it with one hand only.
Double fisherman knot Connection of two ropes usinga double fisherman knot. Ideal for connection of tworopes or slings of a differenttype or diameter..
Overhand follow through Used to join two ropes orslings together. Easy to tie.When loaded it is hard tountie.
Overhand knot It is simple knot and can be done with one hand only even with the gloves on. The best knot to join two ropes for rap-pelling. In pulling the ropes, the flat side of the knot slides on the surface and signifi-cantly lowers the possibility of jamming.
Do not use this knot with ropes of varyingdiameters!
Without proper understanding of knotting techniques and their practical mastery, use of knots is dangerous and may lead to seriousaccidents or death!
Tie knotNot used duringclimbing butevery climbershouldknow it...
French prusik Easy manipulation,it is possible tomake it with one hand only, suitable also for flat slings.
Fisherman knotConnects two ropes well.Easy to tie and untie.
PRUSIK KNOTS
CONNECTING KNOTS
BEFORE WE START
SINGING_Techinfo_2014_EN 21. 1. 2014 16:04 Stránka 7
8
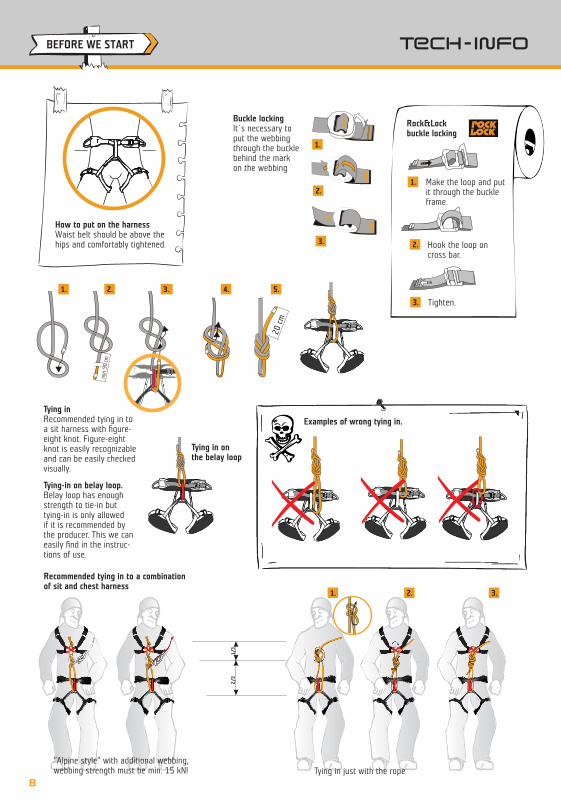
How to put on the harnessWaist belt should be above thehips and comfortably tightened.
Buckle lockingIt´s necessary to put the webbingthrough the bucklebehind the mark on the webbing
Rock&Lockbuckle locking
Tying inRecommended tying in to a sit harness with figure-eight knot. Figure-eightknot is easily recognizableand can be easily checkedvisually.
Tying-in on belay loop. Belay loop has enoughstrength to tie-in but tying-in is only allowed if it is recommended by the producer. This we can easily find in the instruc-tions of use.
Tying in on the belay loop
Examples of wrong tying in.
Recommended tying in to a combination of sit and chest harness
“Alpine style” with additional webbing,webbing strength must be min. 15 kN! Tying in just with the rope
Make the loop and putit through the buckleframe.
Hook the loop oncross bar.
Tighten.
BEFORE WE START
SINGING_Techinfo_2014_EN 21. 1. 2014 16:04 Stránka 8
9
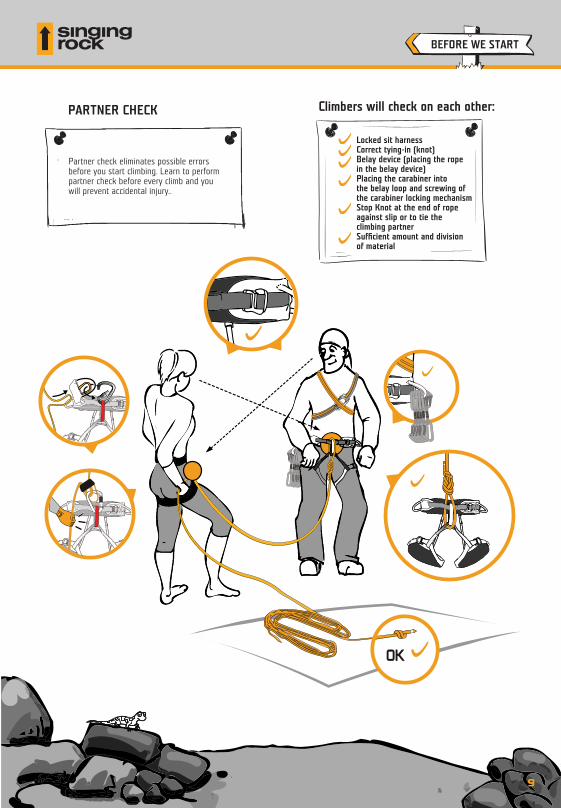
Partner check eliminates possible errors before you start climbing. Learn to performpartner check before every climb and youwill prevent accidental injury..
PARTNER CHECK Climbers will check on each other:
Locked sit harnessCorrect tying-in (knot)Belay device (placing the rope in the belay device)Placing the carabiner into the belay loop and screwing ofthe carabiner locking mechanismStop Knot at the end of ropeagainst slip or to tie the climbing partnerSufficient amount and division of material
BEFORE WE START
SINGING_Techinfo_2014_EN 21. 1. 2014 16:04 Stránka 9

10
IMPACT FORCE In fall arrest, the falling climber is subjected to a break-ing action thanks to his belay system (belayer, rope,protection points), which peaks at the moment of fallarrest = impact force.The human body can survive the load 15x higher thanits weight. Practically it means a value of approximately12 kN. The value of impact force of all dynamic ropestherefore has to be lower than 12 kN.
FALL FACTOR Fall factor is a number describing the relation betweenthe length of fall and the working (“active”) length of rope. Active length of rope means the length of ropebetween the belayer and the climber. Using standardbelaying methods and standard climbing belay system(belayer, rope, protection…) the fall factor can get thevalues from 0 to 2.
F (fall factor) = fall length/active length of rope
The higher the fall factor the higher impact force gener-ated while arresting a fall. Every climber needs to have fall factor on his mindwhen climbing and do everything to lower the fall factor and the potential impact force to minimum: • use proper rope and equipment (a quality dynamic
rope and a safe harness)• place the first protection as soon as possible• place protection in short distances (even in easy terrain)• keep your rope running fluently through runners (use
quickdraws and slings) • use fall absorbers for weak protection points (espe-
cially when the strength of protection is not secureenough – ice climbing, poor rock)
• use dynamic belaying technique (demanding skilledbelayer with gloves)
F (fall factor) = fall length/active length of rope
Sheave effect The last protection point is loaded withforce resulting from the fall of climberand breaking force evolved by the belayer (friction on carabiner of last protection reduces the breaking force,which is about 40% lower than force induced by climber). The described twoforces are acting on the last protectionpoint at the moment of breaking the fall,which means the last protection pointtakes effect of 1,6x higher force compar-ing to force acting to fallen climber
active length of ropeL 2,5 mPF = 5/2,5 = 2
fall
leng
th =
5 m
belayer climber
BASIC SKILLS
SINGING_Techinfo_2014_EN 21. 1. 2014 16:04 Stránka 10

11
• only with certified equipment• one hand grips the rope under the belay device• catch the leader's back until the first protection point• keep proper distance from the rock• take in the rope in time• do not leave slack• at all times watch the climber• maintain absolute attention, fall may occur any
time, holds/footholds can break• communicate with the belayer after finishing the route• lower the climbing partner slowly and smoothly• check where you are lowering your partner• use the gloves for belaying
Beware of a swing.Do not stay in the fall area, neither on the ground nor on the rock.
Always one hand holds the rope belowthe belay device.
Before you start to climb, coil the rope toavoid the knots and twisting of the rope.The upper end of the rope is for leader.
Before clipping the first protection spot your partner.First protection
as low as possible
Watch theclimber all the time.
Keep your attention all the time,the fall may happened any time,the hold/foothold can brake
Keep the safe distance from the wall.
Take into account the weight difference; if the belayer is 20% lighter or if the terrain so requires, the belayer must be secured as well.
BELAYING
BASIC SKILLS
SINGING_Techinfo_2014_EN 21. 1. 2014 16:04 Stránka 11
12
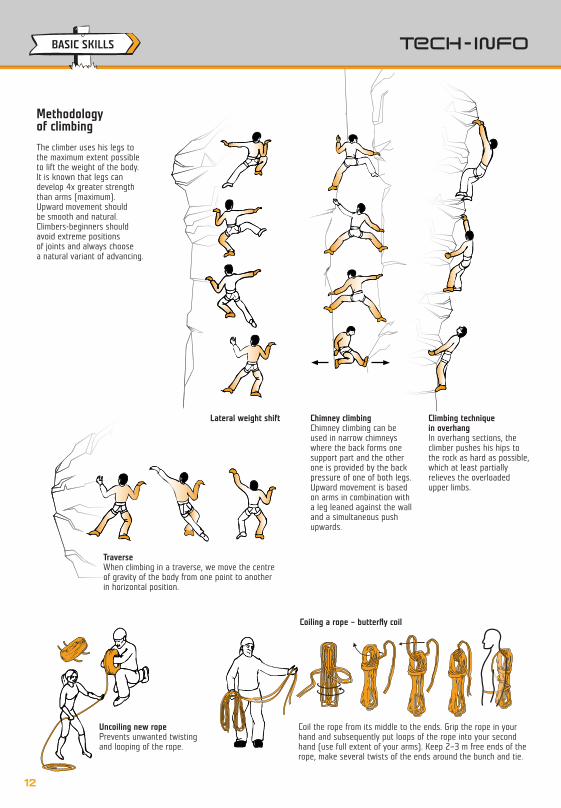
Methodology of climbing
The climber uses his legs tothe maximum extent possibleto lift the weight of the body.It is known that legs can develop 4x greater strengththan arms (maximum). Upward movement should be smooth and natural.Climbers-beginners shouldavoid extreme positions of joints and always choose a natural variant of advancing.
Lateral weight shift Chimney climbingChimney climbing can beused in narrow chimneyswhere the back forms onesupport part and the otherone is provided by the backpressure of one of both legs.Upward movement is basedon arms in combination witha leg leaned against the walland a simultaneous push upwards.
Climbing technique in overhang In overhang sections, theclimber pushes his hips tothe rock as hard as possible,which at least partiallyrelieves the overloadedupper limbs.
TraverseWhen climbing in a traverse, we move the centreof gravity of the body from one point to anotherin horizontal position.
Coiling a rope – butterfly coil
Uncoiling new ropePrevents unwanted twistingand looping of the rope.
Coil the rope from its middle to the ends. Grip the rope in your hand and subsequently put loops of the rope into your second hand (use full extent of your arms). Keep 2–3 m free ends of therope, make several twists of the ends around the bunch and tie.
BASIC SKILLS
SINGING_Techinfo_2014_EN 21. 1. 2014 16:04 Stránka 12

13
Quickdraw clippingThe basic skill for climbers who climb“on the sharp end of the rope”, i.e.leader. Clip the rope from the moststable position and if possible at theheight of the sit harness.
Correct leading of the rope
Fingerclip
Pinchclip
Wrong leading of the rope in the quickdraw
Incorrect leading of the rope
Leading of the rope
Fixing the carabiner in the quickdraw setPrevents the carabiner from rotation across.
Correct leading of the rope
Incorrect leading of the rope
BASIC SKILLS
SINGING_Techinfo_2014_EN 21. 1. 2014 16:04 Stránka 13

14
Belay stationIt must be established with 100% certainty and mustmean security for belaying and rappelling. Usually madeof several protection points (at least two). Protectionpoint can be a rock piton, ice screw, friend, nut, sling in a thread, bolt expansion or glue-in anchor.
DangerousThe anchor point has too much load
Station formed by a figure-eight knot and an Alpine butterfly
Station with a central loop using an overhand knot
In the event of tearing out an anchor point, theimpact force is decreasedby the overhand knot and twist of the sling.
How to carry a 120-cm sling over the shoulderThis method enables to incorporate the sling immediately into the belay system because it contains a carabiner. It allows to have thissling under other slings. You simply unclip it from one end and take it out.
A quick way of shortening/extending a slingEnables to quickly shorten/extend a sling with a carabiner in climbingwith protection points.
BASIC SKILLS
SINGING_Techinfo_2014_EN 21. 1. 2014 16:04 Stránka 14
15
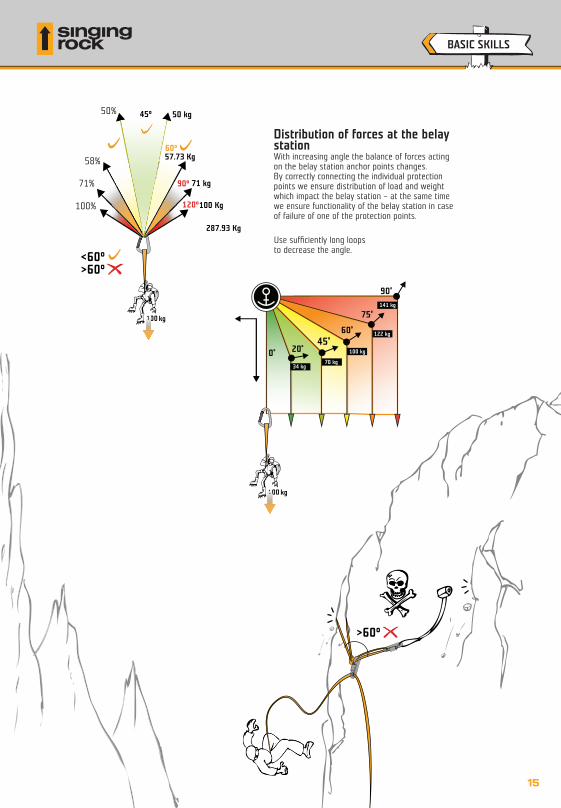
Distribution of forces at the belaystationWith increasing angle the balance of forces actingon the belay station anchor points changes. By correctly connecting the individual protectionpoints we ensure distribution of load and weightwhich impact the belay station – at the same timewe ensure functionality of the belay station in caseof failure of one of the protection points.
Use sufficiently long loops to decrease the angle.
BASIC SKILLS
SINGING_Techinfo_2014_EN 21. 1. 2014 16:04 Stránka 15

16
Never lower if the rope only runs througha bolt
Never lower if the ropeonly runs through a fabricsling. Due to friction, slings canburn within seconds!
Using thesling/daisy chain, sit to a fixed point.
Make a loop in the belay rope and pass it through the fixed point..
Tie a figure-eightknot at the end of the loop and fit it to the belay loopof the harness
Untie the originalfigure-eight knotand pass the end of the rope throughthe fixed point. Off belay throughthe sling/daisychain
SAFE LOWERING
The belayer always holds the brakingline of the rope with both hands.Lower the climbing partner slowly and smoothly.Check where you are lowering your partner.
Always have a knot (double fisherman´sknot recommended) at the end of therope which prevents the rope from slipping out of the belay device
When lowering from the quickdraws from the anchor point (belay station) always have the ropeclipped through two quickdraws with the gates facing each other.
BASIC SKILLS
SINGING_Techinfo_2014_EN 21. 1. 2014 16:04 Stránka 16
17
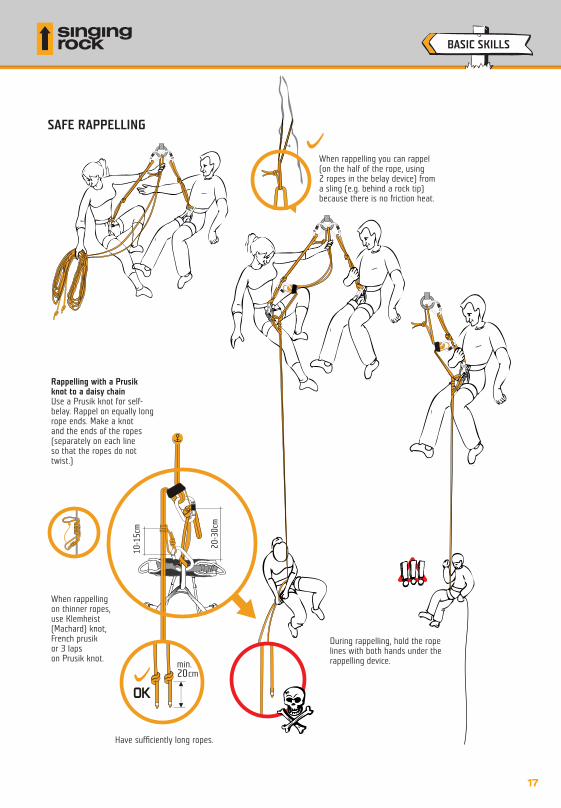
When rappelling you can rappel (on the half of the rope, using 2 ropes in the belay device) from a sling (e.g. behind a rock tip) because there is no friction heat.
Rappelling with a Prusik knot to a daisy chainUse a Prusik knot for self-belay. Rappel on equally longrope ends. Make a knot and the ends of the ropes(separately on each line so that the ropes do nottwist.)
When rappellingon thinner ropes,use Klemheist(Machard) knot,French prusikor 3 lapson Prusik knot.
During rappelling, hold the ropelines with both hands under therappelling device.
Have sufficiently long ropes.
SAFE RAPPELLING
BASIC SKILLS
SINGING_Techinfo_2014_EN 21. 1. 2014 16:04 Stránka 17
18
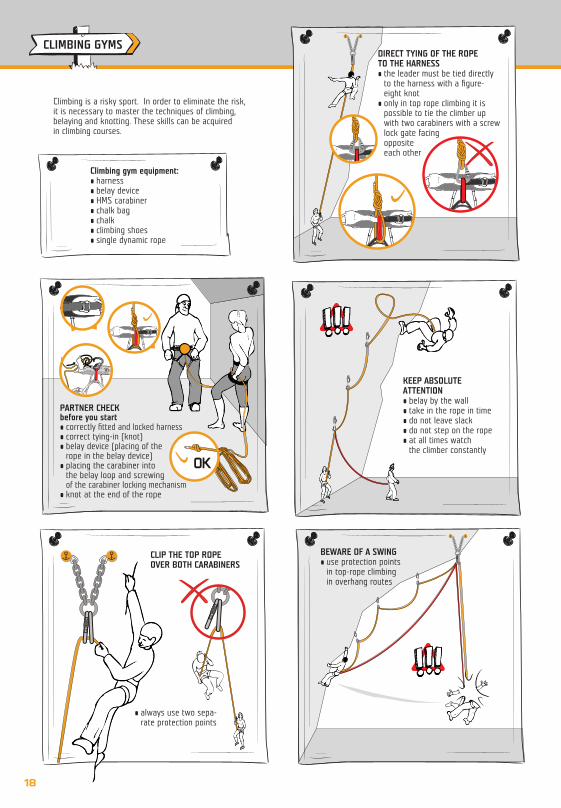
Climbing is a risky sport. In order to eliminate the risk, it is necessary to master the techniques of climbing, belaying and knotting. These skills can be acquired in climbing courses.
Climbing gym equipment:• harness• belay device• HMS carabiner• chalk bag• chalk• climbing shoes• single dynamic rope
DIRECT TYING OF THE ROPE TO THE HARNESS• the leader must be tied directly
to the harness with a figure-eight knot
• only in top rope climbing it ispossible to tie the climber upwith two carabiners with a screwlock gate facing opposite each other
KEEP ABSOLUTE ATTENTION• belay by the wall• take in the rope in time• do not leave slack• do not step on the rope• at all times watch
the climber constantly
PARTNER CHECKbefore you start• correctly fitted and locked harness• correct tying-in (knot)• belay device (placing of the
rope in the belay device)• placing the carabiner into
the belay loop and screwing of the carabiner locking mechanism
• knot at the end of the rope
CLIP THE TOP ROPEOVER BOTH CARABINERS
• always use two sepa-rate protection points
BEWARE OF A SWING• use protection points
in top-rope climbing in overhang routes
CLIMBING GYMS
SINGING_Techinfo_2014_EN 21. 1. 2014 16:04 Stránka 18
19
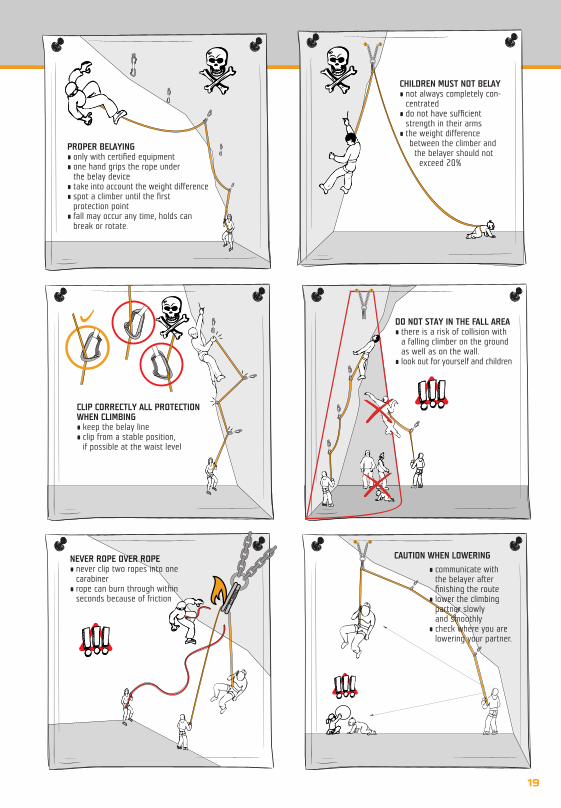
PROPER BELAYING• only with certified equipment• one hand grips the rope under
the belay device• take into account the weight difference• spot a climber until the first
protection point• fall may occur any time, holds can
break or rotate.
CHILDREN MUST NOT BELAY• not always completely con-
centrated• do not have sufficient
strength in their arms• the weight difference
between the climber andthe belayer should notexceed 20%
CLIP CORRECTLY ALL PROTECTIONWHEN CLIMBING• keep the belay line• clip from a stable position,
if possible at the waist level
DO NOT STAY IN THE FALL AREA• there is a risk of collision with
a falling climber on the groundas well as on the wall.
• look out for yourself and children
NEVER ROPE OVER ROPE• never clip two ropes into one
carabiner• rope can burn through within
seconds because of friction
CAUTION WHEN LOWERING
• communicate withthe belayer afterfinishing the route
• lower the climbingpartner slowlyand smoothly
• check where you arelowering your partner.
SINGING_Techinfo_2014_EN 21. 1. 2014 16:04 Stránka 19
20
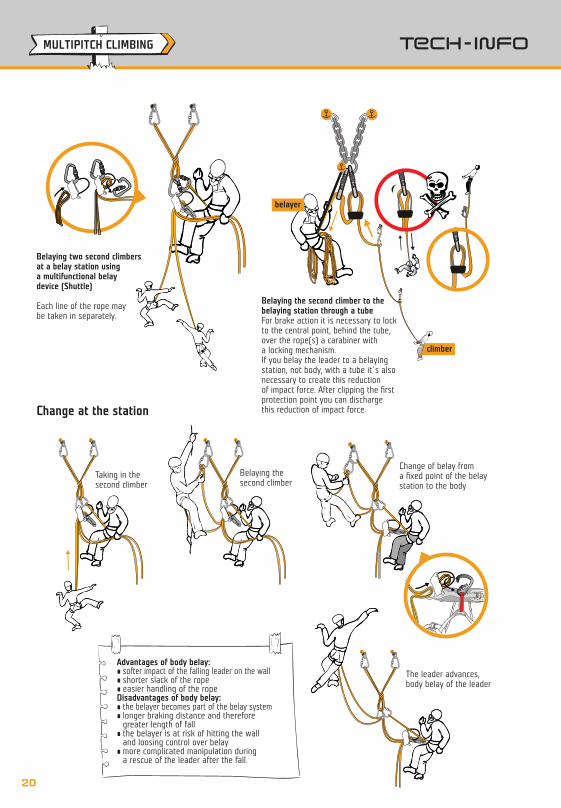
Belaying two second climbersat a belay station using a multifunctional belay device (Shuttle)
Each line of the rope may be taken in separately.
Belaying the second climber to thebelaying station through a tube For brake action it is necessary to lockto the central point, behind the tube,over the rope(s) a carabiner witha locking mechanism. If you belay the leader to a belayingstation, not body, with a tube it´s alsonecessary to create this reduction of impact force. After clipping the firstprotection point you can dischargethis reduction of impact force.Change at the station
Advantages of body belay:• softer impact of the falling leader on the wall• shorter slack of the rope• easier handling of the ropeDisadvantages of body belay:• the belayer becomes part of the belay system• longer braking distance and therefore
greater length of fall• the belayer is at risk of hitting the wall
and loosing control over belay• more complicated manipulation during
a rescue of the leader after the fall.
Taking in the second climber
Belaying the second climber
Change of belay from a fixed point of the belaystation to the body
The leader advances, body belay of the leader
MULTIPITCH CLIMBING
belayer
climber
SINGING_Techinfo_2014_EN 21. 1. 2014 16:04 Stránka 20

40 cmmin. cmmin. c40 cm
21
MULTIPITCH CLIMBING
Protection points
Possibilities of use of rock tips and threads as protection points
If the wind is strong and youare going to rappel, roll therope up to the bag (start withthose ends of the rope thatwill be the last to go out fromthe bag).
Tying ropes with overhand knot min. 40 cm Use the overhand knot to connect two ropes for rap-pelling (loose ends at least 40 cm). When pulling the ropeover the edge the knot goes to the outer edge, which reduces the risk of jamming..
Advantages of half/twin ropes use during multipitch climbing
When rappelling from thesandstone ring, always pullthe rope closer to the rock.
RAPPELLING
SINGING_Techinfo_2014_EN 21. 1. 2014 16:04 Stránka 21

22
Recommended way of tying“Alpine style” with additionalsling.
The sling strength must bemin. 15 kN!
Emergency rest on a via ferrataThe rest using a carabiner addedto the eye of the braking sling.In all variants of emergency sit outit is necessary to have clippedat least one loop of the ferrata setto the anchor rope as belay!
Equipment for via ferrata• via ferrata set with tearing
webbing fall absorber • sit (or fullbody) harness • chest harness• helmet• sling for the connection
of sit and chest harness • gloves• first aid kit• short rope for additional
belay• HMS carabiner, slings,
accessory cords
Maximum 1 climber in the section
VIA FERRATA
SINGING_Techinfo_2014_EN 21. 1. 2014 16:04 Stránka 22
0 m
2 m PF 3= 3/1
4 m PF 5 = 5/1PF 5 = 5/14 m
PF 3= 3/12 m
0 m
23
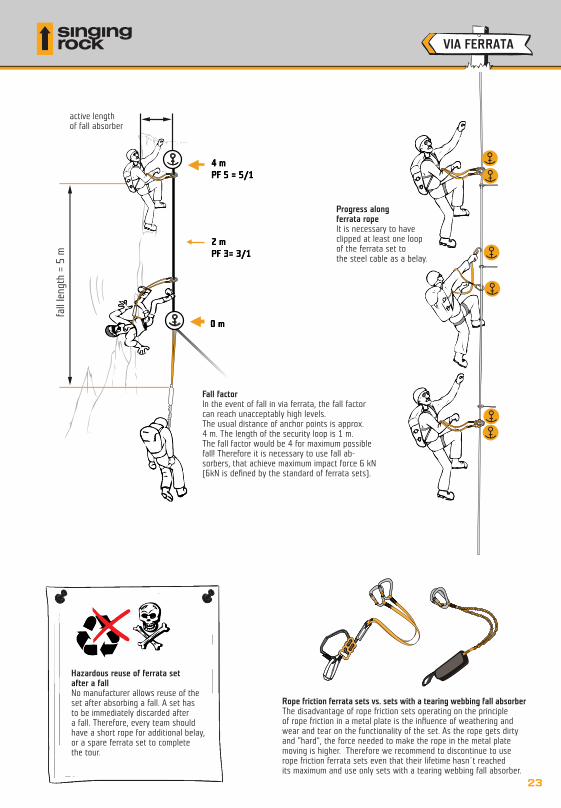
active length of fall absorber
Progress along ferrata ropeIt is necessary to haveclipped at least one loopof the ferrata set to the steel cable as a belay.
Fall factorIn the event of fall in via ferrata, the fall factorcan reach unacceptably high levels. The usual distance of anchor points is approx. 4 m. The length of the security loop is 1 m. The fall factor would be 4 for maximum possiblefall! Therefore it is necessary to use fall ab-sorbers, that achieve maximum impact force 6 kN(6kN is defined by the standard of ferrata sets).
Hazardous reuse of ferrata set after a fallNo manufacturer allows reuse of theset after absorbing a fall. A set has to be immediately discarded after a fall. Therefore, every team shouldhave a short rope for additional belay,or a spare ferrata set to complete the tour.
Rope friction ferrata sets vs. sets with a tearing webbing fall absorberThe disadvantage of rope friction sets operating on the principle of rope friction in a metal plate is the influence of weathering andwear and tear on the functionality of the set. As the rope gets dirtyand “hard”, the force needed to make the rope in the metal platemoving is higher. Therefore we recommend to discontinue to userope friction ferrata sets even that their lifetime hasn´t reached its maximum and use only sets with a tearing webbing fall absorber.
fall
leng
th =
5 m
VIA FERRATA
SINGING_Techinfo_2014_EN 21. 1. 2014 16:04 Stránka 23
8-15 m8-15 m
20-30 m
8-15 m 8-15 m
20-30 m20-30 m
24
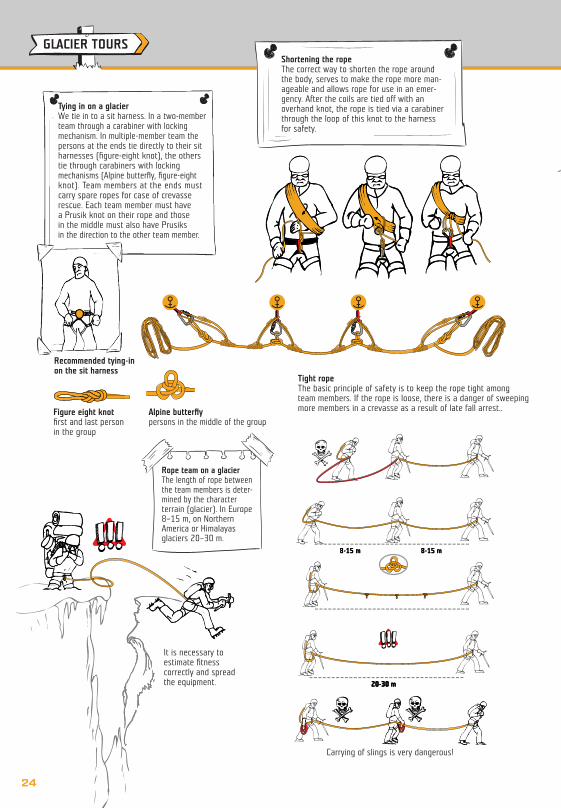
Tying in on a glacierWe tie in to a sit harness. In a two-memberteam through a carabiner with lockingmechanism. In multiple-member team thepersons at the ends tie directly to their sitharnesses (figure-eight knot), the otherstie through carabiners with locking mechanisms (Alpine butterfly, figure-eightknot). Team members at the ends mustcarry spare ropes for case of crevasserescue. Each team member must havea Prusik knot on their rope and those in the middle must also have Prusiks in the direction to the other team member.
Shortening the ropeThe correct way to shorten the rope aroundthe body, serves to make the rope more man-ageable and allows rope for use in an emer-gency. After the coils are tied off with anoverhand knot, the rope is tied via a carabinerthrough the loop of this knot to the harnessfor safety.
Recommended tying-inon the sit harness
Figure eight knotfirst and last personin the group
Alpine butterflypersons in the middle of the group
Tight ropeThe basic principle of safety is to keep the rope tight amongteam members. If the rope is loose, there is a danger of sweepingmore members in a crevasse as a result of late fall arrest..
Rope team on a glacierThe length of rope betweenthe team members is deter-mined by the character terrain (glacier). In Europe8–15 m, on Northern America or Himalayas glaciers 20–30 m.
It is necessary toestimate fitness correctly and spreadthe equipment.
Carrying of slings is very dangerous!
GLACIER TOURS
SINGING_Techinfo_2014_EN 21. 1. 2014 16:04 Stránka 24

25
Equipment fora glacier tour• ice axe• crampons• sit harness• rope• carabiners • slings 60 and 120 cm• accessory cords 6 mm
(1.5, 3 a 5 m)• ice screws
avalanche slope
nunatak– rocky peaksticking out of glacier
zone of tension
zone of compressionlateral crevasses
icefallsérac
tarn
terminal moraine
danger of fall or rocks
checking the terrain
Late summer Autumn Arrival of winter Winter Spring Summer
bare ice first snow cracks begin to be covered
huge snow pack melting season begins
bridges barely holding
danger of fall or rocks
accu
mul
atio
n zo
ne
firn
zone
ab
latio
n zo
ne
GLACIER TOURS
SINGING_Techinfo_2014_EN 21. 1. 2014 16:04 Stránka 25

„HALÓÓÓ“„HALÓÓÓ“„HALÓÓÓ“
26
CREVASSE RESCUERescue has to be properly trained in advance (preferably under the guidance of an experienced person).When moving on the glacier, always have the sit harness on.
Creating a belay stationIn order to arrest a fallwe have to create a safeanchor in the snow as fast as possible.
Anchor made by skis
Anchor made by buried iceaxe / backpack
Transferring the loadConnect the accessory cord, tied by a double Prusik on therope before each team member, by a carabiner with a lockingmechanism to a flat sling coming out of the belay device.Transfer the weight to the belay device and secure with onecarabiner with a locking mechanism and a clove hitch so thatthe entire weight is not in a 6-mm sling.
Creating a pulley systemFirst secure yourself using a 3-m accessory cord on which we tiea Prusik knot at the loose end of the rope where no one is hang-ing. At one end of the accessory cord tie a figure-eight knot and using a carabiner clip it to the belay loop of the harness.Find whether the person hanging in the crevasse communicatesand is able to move and if so, hang a carabiner on the loose endof the rope and lower it to the person.
Lifting backpack/skisRescue is easier without backpack or skis.
Fall arrestThe main rule is a tight rope and fast reaction of all teammembers.
Tying-in on sit harness
GLACIER TOURS
SINGING_Techinfo_2014_EN 21. 1. 2014 16:04 Stránka 26
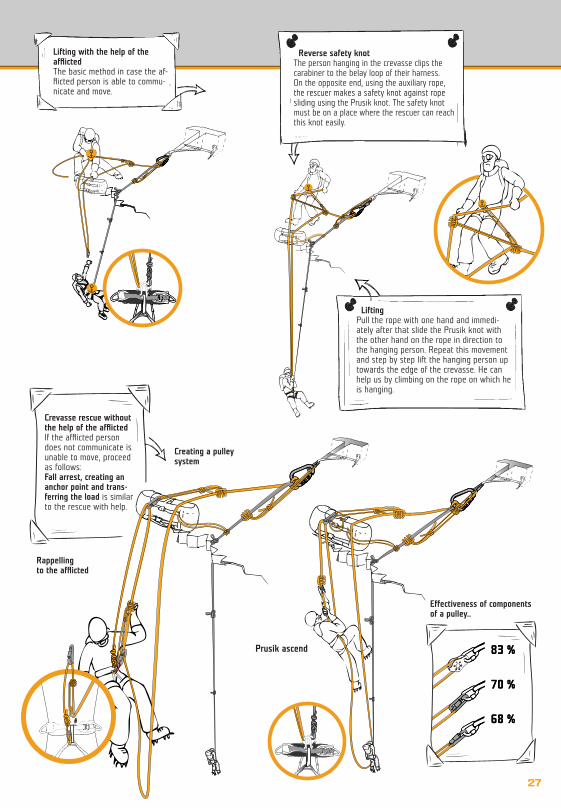
83 %
70 %
68 %
70 %
83 %
68 %
27
Lifting with the help of the afflictedThe basic method in case the af-flicted person is able to commu-nicate and move.
Reverse safety knotThe person hanging in the crevasse clips thecarabiner to the belay loop of their harness. On the opposite end, using the auxiliary rope,the rescuer makes a safety knot against ropesliding using the Prusik knot. The safety knotmust be on a place where the rescuer can reachthis knot easily.
LiftingPull the rope with one hand and immedi-ately after that slide the Prusik knot withthe other hand on the rope in direction tothe hanging person. Repeat this movementand step by step lift the hanging person uptowards the edge of the crevasse. He canhelp us by climbing on the rope on which heis hanging.
Crevasse rescue withoutthe help of the afflictedIf the afflicted persondoes not communicate isunable to move, proceedas follows:Fall arrest, creating ananchor point and trans-ferring the load is similarto the rescue with help.
Creating a pulleysystem
Rappelling to the afflicted
Prusik ascend
Effectiveness of componentsof a pulley..
SINGING_Techinfo_2014_EN 21. 1. 2014 16:04 Stránka 27
30 ° < 30 ° > 30 °
10 cm = 3 °
90°
1
2
3
4
5
6
°90
°30 °30 > ° 30 <
°10 cm = 3
4
3
2
1
6
5
28
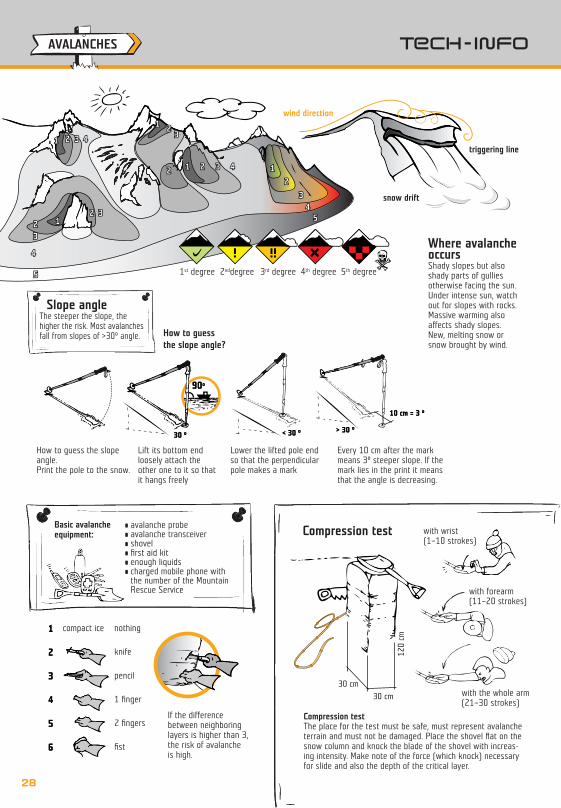
Slope angleThe steeper the slope, the higher the risk. Most avalanchesfall from slopes of >30° angle. How to guess
the slope angle?
How to guess the slopeangle.Print the pole to the snow.
Lift its bottom endloosely attach the other one to it so that it hangs freely
Lower the lifted pole endso that the perpendicularpole makes a mark
Every 10 cm after the markmeans 3° steeper slope. If themark lies in the print it meansthat the angle is decreasing.
compact ice
1st degree 2nddegree 3rd degree 4th degree 5th degree
Where avalancheoccursShady slopes but alsoshady parts of gullies otherwise facing the sun.Under intense sun, watchout for slopes with rocks.Massive warming also affects shady slopes.New, melting snow orsnow brought by wind.
wind direction
nothing
knife
pencil
1 finger
2 fingers
fist
If the difference between neighboringlayers is higher than 3, the risk of avalanche is high.
Compression testThe place for the test must be safe, must represent avalancheterrain and must not be damaged. Place the shovel flat on thesnow column and knock the blade of the shovel with increas-ing intensity. Make note of the force (which knock) necessaryfor slide and also the depth of the critical layer.
Compression test with wrist (1–10 strokes)
with forearm(11–20 strokes)
with the whole arm(21–30 strokes)
snow drift
triggering line
Basic avalancheequipment:
• avalanche probe• avalanche transceiver• shovel• first aid kit• enough liquids• charged mobile phone with
the number of the MountainRescue Service
AVALANCHES
SINGING_Techinfo_2014_EN 21. 1. 2014 16:05 Stránka 28

29
Self arrest
Watch out for crampons, they aresharp and can easily injure you.
Snow balling on crampons is a frequent cause of fall.
Techniques of ascentwith crampons
Techniques of descentwith crampons
Advanced descend techniquewith the crampons.
CLIMBING MIX AND ICE
SINGING_Techinfo_2014_EN 21. 1. 2014 16:05 Stránka 29
1 2 3 4 5 6
1 2 3 4 5 6 7
30 cm
1
3 4 2
7 6 5
1
3 4 2
3 4 2 1
7 6 5
65 4
30 cm
30
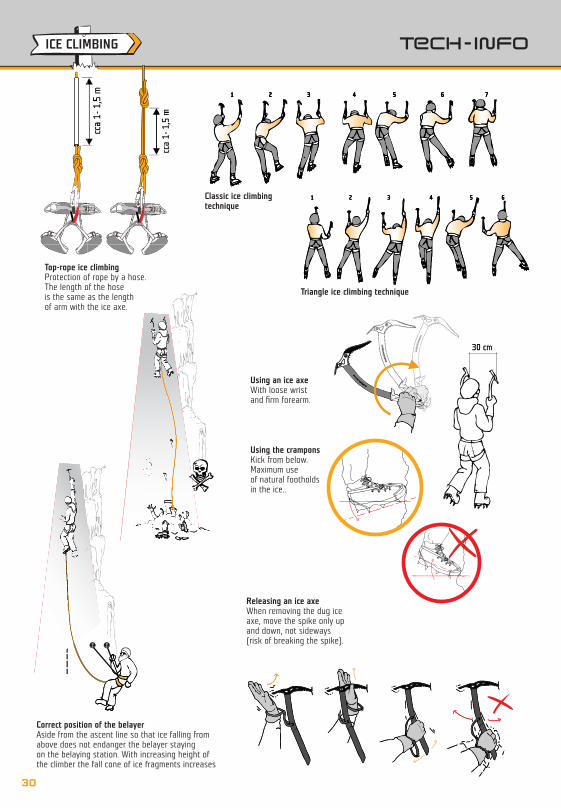
Using an ice axeWith loose wrist and firm forearm.
Using the cramponsKick from below. Maximum use of natural footholdsin the ice..
Releasing an ice axeWhen removing the dug ice axe, move the spike only up and down, not sideways (risk of breaking the spike).
Correct position of the belayerAside from the ascent line so that ice falling fromabove does not endanger the belayer staying on the belaying station. With increasing height of the climber the fall cone of ice fragments increases
Triangle ice climbing technique
Top-rope ice climbingProtection of rope by a hose. The length of the hose is the same as the length of arm with the ice axe.
Classic ice climbing technique
ICE CLIMBING
SINGING_Techinfo_2014_EN 21. 1. 2014 16:05 Stránka 30

10 cm = 6 kN15 cm = 10 kN20 cm = 12 kN
8 mm
10-15 cm
50 cm
8 m 8 mm
50 cm
10-15 cm
20 cm = 12 kN 15 cm = 10 kN10 cm = 6 kN
31
Rappelling from the icescrewAdvanced technique! Suitable only for short rappels and fixed eyescrews. Tilt handle maycause tangling to the sling!Only works in short ropelengths!
Taking out snow from the ice screwAfter screwing the ice screw out of ice, knock outor blow out snow remaining in the ice screw.
Screwing in the ice screwPreferably at waist level orslightly above. Screw in a quality ice from a stable position. Screw in the entire ice screw, to the head of theice screw.
Belay station on ice for top-rope ice climbingAlways use the longest possible ice screws (22 cm)and secure a screw belayingstation with an Abalakov iceanchor belaying station.
Abalakov ice anchorUse the longest possible ice screws (22 cm).
Belay station on ice for belaying the second climber
BELAY STATION IN ICE
ICE CLIMBING
SINGING_Techinfo_2014_EN 21. 1. 2014 16:05 Stránka 31

32
Catching falls in bouldering (andsport climbing before clippingthe first protection) is one of thebasic skills of climbers.
For safe bouldering observe the following rules and procedures:Watch the climber constantly.Two hands are always better than one hand.Two spoters are always better than one spotter.Try to rotate the climber before hitting the ground so that he hits the ground legs first. Bouldering is a social event but when you go bouldering on your own, always let someone knowwhen and where you go.
• Do not waste magnesium unnecessarilyand clean the holds and marks afterclimbing.
• Make sure no rubbish is left after you. • Do not shout, do not break branches• Use a crashpad, protecting the surround-
ings of rocks and your ankles• Make it a habit to bring a first aid kit
to the rocks• Before visiting a new area, find out
sufficient information about habits,classification, parking and camping there.
BOULDERING
SINGING_Techinfo_2014_EN 21. 1. 2014 16:05 Stránka 32
33
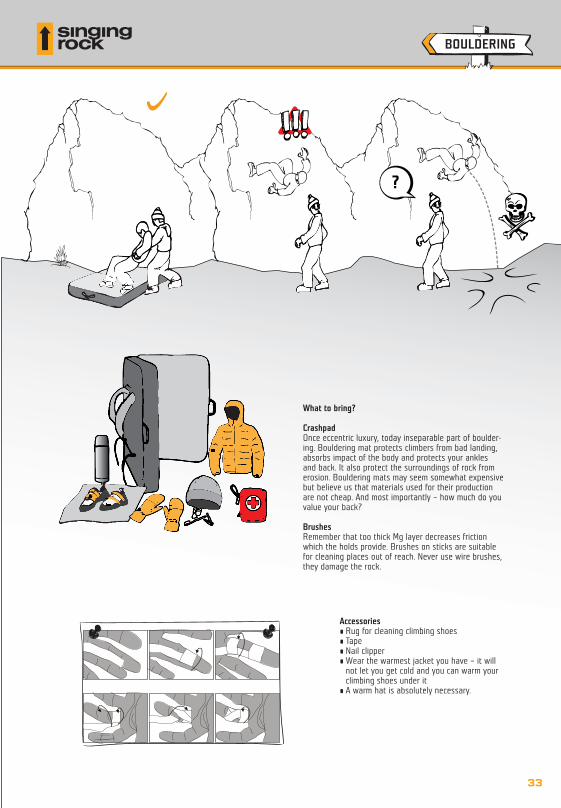
What to bring?
Crashpad Once eccentric luxury, today inseparable part of boulder-ing. Bouldering mat protects climbers from bad landing,absorbs impact of the body and protects your anklesand back. It also protect the surroundings of rock fromerosion. Bouldering mats may seem somewhat expensivebut believe us that materials used for their productionare not cheap. And most importantly – how much do youvalue your back?
BrushesRemember that too thick Mg layer decreases frictionwhich the holds provide. Brushes on sticks are suitablefor cleaning places out of reach. Never use wire brushes,they damage the rock.
Accessories• Rug for cleaning climbing shoes• Tape• Nail clipper• Wear the warmest jacket you have – it will
not let you get cold and you can warm yourclimbing shoes under it
• A warm hat is absolutely necessary.
BOULDERING
SINGING_Techinfo_2014_EN 21. 1. 2014 16:05 Stránka 33
34
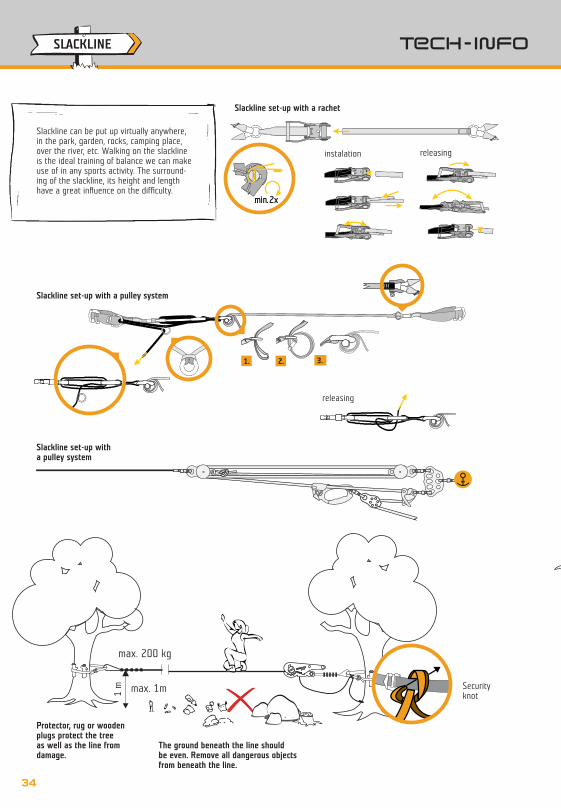
Slackline can be put up virtually anywhere,in the park, garden, rocks, camping place,over the river, etc. Walking on the slacklineis the ideal training of balance we can makeuse of in any sports activity. The surround-ing of the slackline, its height and lengthhave a great influence on the difficulty.
SLACKLINE
releasing
The ground beneath the line should be even. Remove all dangerous objectsfrom beneath the line.
Protector, rug or woodenplugs protect the tree as well as the line fromdamage.
Security knot
Slackline set-up with a pulley system
Slackline set-up with a pulley system
Slackline set-up with a rachet
instalation releasing
SINGING_Techinfo_2014_EN 21. 1. 2014 16:05 Stránka 34

35
Not excited by slacklining in parksany more?
Then try:
Longlineline longer than 30 m, it requires a lot of skill and effort. The length of the line plays an important role in the difficulty of lining.
Tying a block and tackle to a longline
Wasserlinewater underneath is not only an inter-esting variegation but it is also a muchmore difficult variant of lining.
Trickline – unseen trickscan be done on a specialwide line.
SLACKLINE
As in the case of belay station, also for slackline a sharp angle of the anchor point is better in terms of loaddistribution.
SINGING_Techinfo_2014_EN 21. 1. 2014 16:05 Stránka 35

36
Caution! It you are not 100% sure that yourpartner has given the command Off belay/Safe,do not off-belay! Double check whether the Off belay command was indeed said. Take theclimber off belay only when it is absolutely clearthat your partner is secured at the belay station!
CLIMBING GLOSSARY
SINGING_Techinfo_2014_EN 21. 1. 2014 16:05 Stránka 36

37
Accessory cord – a cord of diameter 4–8 mm which does nothave the properties of a rope.
Aid climbing – advancing on the wall using pitons, friends,nuts and other artificial aids used for ascent as well as belay.
Belay – belay station, anchor point.
Belay system – all mechanical parts of belay, i.e. harness,rope, belay station, protection points (bolts, glue-in anchors,etc.).
Big wall – a very high wall whose climbing lasts up to severaldays.
Bolt – a protection point anchored in the rock; hanger plateis screwed on a bolt. Quickdraws are clipped in it. Bolts arenot for rappelling!
Bouldering – climbing without a rope at the height of jump.
Campus board – an overhang board with horizontal slats de-signed for strength training.
Chalk – slang. Magnesium for better grip and friction.
Chest harness – for optimised body position when hangingor falling; only to be used together with a sit harness.
Chimney – a rock cleft large enough to fit the climber's bodyinto. To climb such a structure, the climber usually uses op-posite pressure on the vertical walls.
Crampons – metal framework with spikes attached to bootsto increase safety on snow and ice.
Crash pad / bouldering mat – a portable mattress used inbouldering as protection against injuries from a fall.
Dry-tooling – climbing with crampons and ice axes on a rockwithout snow and ice.
Fall factor – fall factor determines the hardness of fall. It iscalculated by dividing the length of the fall by the activelength of the rope.
Friend – mobile spring-loaded camming device used in routesmainly in tradiotional climbing.
Glue-in anchor – a steel securing eye in rock. Quickdraws areclipped in glue-in anchors. It is usually possible to rappel froma glue-in anchor.
Half rope – a thin rope used as two lines. Only one line maybe used in each protection point. Used in traditional climbing,on ice and mixes.
Ice axe, Ice tool – a handy tool for safety and balance, havinga pick/adze head and a spike at the opposite end of theshaft.
Jumaring – ascending on a rope using hand/chest ascendersheld in hand, tied by a sling or carabiner to the harness tothe leg.
Multi-pitch route – in climbing walls higher than the lengthrope; climbers proceed in a rope team from one belaying sta-tion to another
Nuts – metal pyramidal objects of different sizes used as mo-bile protection points. Suitable for narrow chinks.
Pitch – the distance between two belay stations.
Piton – a mobile anchor and belay device hammered intocracks and joints in traditional climbing.
Protection point – any point that catches a fall of the leader(glue-in anchor, bolt, friend, nut, piton, thread, etc.).
Quickdraw – connecting element (2 carabiners connected bya sling) between the rope and stable protection points.
Ring – a protection point anchored to the rock (mainly onsandstone) used mostly for rappelling or lowering.
Route – a climbing line of any distance.
Single rope – the only type of rope used to belay the leaderwith a single line of rope. Used mainly in sport climbing.
Thread (Wormhole) – two holes in rock or ice connected bya channel. Passing through a sling creates a protection pointor a belay station.
Topo – a schematic plan of a route
Tube – belay device used mainly in belaying in sport climbing.
Twin rope – a thin double rope, 7.5–8 mm Both lines are in-serted into protection points.
CLIMBING GLOSSARY
SINGING_Techinfo_2014_EN 21. 1. 2014 16:05 Stránka 37

38
Find out the state of consciousness of the injured. It is very important to thoroughly inspectthe injured and exclude the presence of massivebleeding.
If irresponsive to verbal or painful stimulus, focuson the presence of basic life functions:
Pulse: If impalpable, initiate cardiac massage.Put backs of hands of your crossed arms withelbows stretched on the breast-bone in the intersection of the line between the nipples and the centre of chest.For 30 compressions of chest breathe in twice.Compress the heart approximately 100x/min.
Breath: If not breathing, tilt the injured person’s head back and check and releaseoral cavity.
Artificial respiration: Press the nose withthumb and forefinger, open the injured person’s mouth with your lips and breathe in.
Systematically warm up frostbitten parts of body, remove rings, watches, etc. Frostbitten parts of bodymust not be rubbed as this could damage the tissue.
1st degree 2nd degree 3rd degree
Emergency
112EU countries
911 most of North America
999 (e.g. UK, China or someAfrican countries)
Most GSM phones have pre-programmedcalling to these numbers even in case of insufficient credit and some even without a SIM card.
The key is prevention
It is necessary to be at least in a 2-headteam when going climbing or doing other sports. Always be physically wellprepared. Have a charged mobile phoneand a first aid kit handy.
FROSTBITES
FIRST AID
FIRST AID
SINGING_Techinfo_2014_EN 21. 1. 2014 16:05 Stránka 38
39
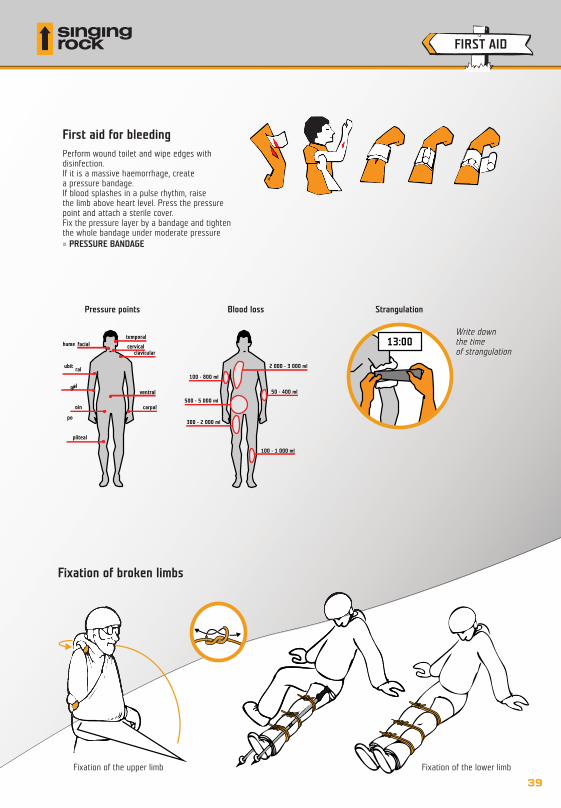
Perform wound toilet and wipe edges with disinfection.If it is a massive haemorrhage, create a pressure bandage.If blood splashes in a pulse rhythm, raise the limb above heart level. Press the pressurepoint and attach a sterile cover.Fix the pressure layer by a bandage and tightenthe whole bandage under moderate pressure = PRESSURE BANDAGE
First aid for bleeding
Pressure points Blood loss Strangulation
Write down the time of strangulation
Fixation of broken limbs
Fixation of the upper limb Fixation of the lower limb
FIRST AID
SINGING_Techinfo_2014_EN 21. 1. 2014 16:05 Stránka 39

40
ALTITUDE SICKNESS: BASIC RULESNever keep ascending with symptoms of altitudesickness! (shortness of breath, rapid heartbeat, weakness) Stop until the symptoms disappear completely.If you are feeling worse, descend immediately! Do not wait until the morning! Descend to the altitude where you last felt well after waking up.Never leave a person with altitude sickness alone!
ACCLIMATIZATION AND ALTITUDE SICKNESSA few rules
“NOT SO HIGH”no more than 300–400 meters of altitude /day stay for 2 nights every 1000 meters ofaltitude
“NOT SO HIGH”proceed slowly and smoothly in acclimatization
“CLIMB HIGHER, SLEEP LOWER”ascend additional 100–200 meters of altitude above the camp return and stay for the night
“LISTEN TO YOUR BODY”EMERGENCY PROCEDURES,transport
Improvised stretcher for 2 to 4 rescuers made of a rope
Improvised stretcher for 2 to 4 rescuers made of skis
Rope sitting stretcher for 1 rescuer
Improvised harness from a 150-cm slingIf the person is unconscious, add a chest harness
FIRST AID
SINGING_Techinfo_2014_EN 21. 1. 2014 16:05 Stránka 40
NE
25 x 25 m
NENE
25 x 25 m
41
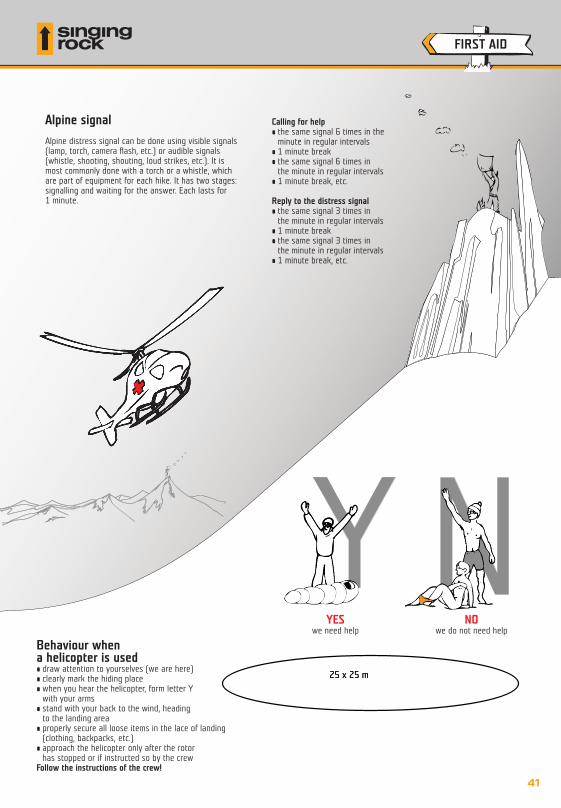
Alpine signal
Alpine distress signal can be done using visible signals(lamp, torch, camera flash, etc.) or audible signals(whistle, shooting, shouting, loud strikes, etc.). It ismost commonly done with a torch or a whistle, whichare part of equipment for each hike. It has two stages:signalling and waiting for the answer. Each lasts for 1 minute.
Calling for help• the same signal 6 times in the
minute in regular intervals• 1 minute break• the same signal 6 times in
the minute in regular intervals• 1 minute break, etc.
Reply to the distress signal• the same signal 3 times in
the minute in regular intervals• 1 minute break• the same signal 3 times in
the minute in regular intervals• 1 minute break, etc.
YESwe need help
NOwe do not need help
Behaviour when a helicopter is used• draw attention to yourselves (we are here)• clearly mark the hiding place• when you hear the helicopter, form letter Y
with your arms• stand with your back to the wind, heading
to the landing area• properly secure all loose items in the lace of landing
(clothing, backpacks, etc.)• approach the helicopter only after the rotor
has stopped or if instructed so by the crewFollow the instructions of the crew!
FIRST AID
SINGING_Techinfo_2014_EN 21. 1. 2014 16:05 Stránka 41
1. Quality equipmentUse only certified and for the certain activity recom-mended equipment whose history you know andread carefully the instructions for use.
2. Warm up before climbingStretching and warming-up protects your joints,ligaments and muscles from injury.
3. Partner checkBefore every route check with your climbing partner:tying knot, locking of harness, placing of the rope inthe belay device, placing the carabiner in the belayloop, screwing of the locking mechanism of the cara-biner, and finally securing the rope with a knot atthe end.
4. Pay full attention to belayingYou have your climbing partner's life in your hands.Therefore grip the braking line of the rope in handat all times and watch out constantly.
5. Correct position of the belayerChoose the right place for belaying and watchwhether your climbing partner does not deviate fromthe route.
6. CommunicateAlways let your partner know what is going on. Al-ways inform your partner before sitting out to therope or before expected fall. The belayer also hasto inform the climber if some complications in be-laying occur.
7. Be careful when passing the rope throughYou can only lower your partner from anchor points,from a carabiner with a locking mechanism or fromtwo quickdraws facing opposite each other. Onequickdraw in the anchor point is not sufficient. It isforbidden to hang the rope to a carabiner or ringwhich is already occupied by another rope. Frictionof ropes may cause their damage or breakage.
8. Protect your headA helmet protects against head injuries caused byuncontrolled fall or falling rocks. Keep a safe dis-tance from climbers in neighbouring routes. Helmetin the bag is useless!
9. Be considerateWait until your route is free. Respect other climbers,inform them of danger and mistakes you have seen.Observe prohibitions and restrictions in the areawhere you are.
10. Think of the environmentBehave to the rock, mountain and nature not to dev-astate them. It is only up to us in what environmentwe and those who come after us will be.The weather is also very important factor. Checkcarefully the weather forecast - especially in themountains before you go climbing or just for a hike.
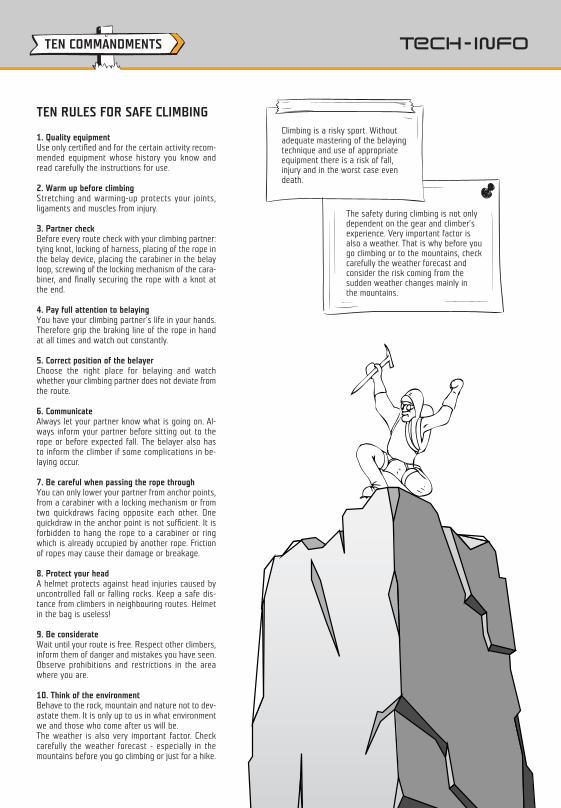
Climbing is a risky sport. Withoutadequate mastering of the belayingtechnique and use of appropriateequipment there is a risk of fall, injury and in the worst case evendeath.
The safety during climbing is not onlydependent on the gear and climber’sexperience. Very important factor isalso a weather. That is why before yougo climbing or to the mountains, checkcarefully the weather forecast and consider the risk coming from the sudden weather changes mainly in the mountains.
TEN RULES FOR SAFE CLIMBING
TEN COMMANDMENTS
SINGING_Techinfo_2014_EN 21. 1. 2014 16:05 Stránka 42

UIAA France sandstone USA
5- 4c V 5.55 5a VI 5.65+ 5a VI 5.76- 5b VIIa 5.86 5c VIIb 5.96 5c VII 5.96+ 5c+ VIIc 5.10a6+/7- 6a VIIc/VIIIa 5.10a7- 6a+ VIIIa 5.10b7-/7 6a+/6b VIIIa/VIIIb 5.10b7 6b VIIIb 5.10c7/7+ 6b/6b+ VIIIb/VIIIc 5.10c7+ 6b+ VIIIc 5.10d7+ 6b+/6c VIIIc 5.10d7+/8- 6c VIIIc/IXa 5.11a8- 6c/6c+ VIIIc/IXa 5.11a8- 6c+ IXa 5.11b8-/8 6c+/7a IXa/IXb 5.11b8 7a IXb 5.11c8/8+ 7a/7a+ IXb/IXc 5.11c8+ 7a+ IXc 5.11d8+ 7a+/7b IXc 5.11d8+/9- 7b IXc/Xa 5.12a9- 7b/7b+ IXc/Xa 5.12a
UIAA France sandstone USA
9- 7b+ Xa 5.12b9-/9 7b+/7c Xa/Xb 5.12b9 7c Xb 5.12c9/9+ 7c/7c+ Xb/Xc 5.12d9+ 7c+ Xc 5.12d9+ 7c+/8a Xc 5.13a9+/10- 8a Xc/XIa 5.13a10- 8a/8a+ Xc/XIa 5.13b10- 8a+ XIa 5.13b10-/10 8a+/8b XIa/XIb 5.13c10 8b XIb 5.13d10/10+ 8b/8b+ XIb/XIc 5.13d10+ 8b+ XIc 5.14a10+/11- 8b+/8c XIc/XIIa 5.14a11- 8c XIIa 5.14b11- 8c/8c+ XIIa 5.14b11-/11 8c+ XIIa/XIIb 5.14c11-/11 8c+/9a XIIa/XIIb 5.14c11 9a XIIb 5.14d11/11+ 9a/9a+ XIIb/XIIc 5.14d11+ 9a+ XIIc 5.15a12- 9b XIIIa 5.15b12 9b+ XIIIb 5.15c
NOTES
NOTES
GRADE TABLE
SINGING_Techinfo_2014_EN 21. 1. 2014 16:05 Stránka 43
Warning:Activities at height such as climbing, via ferrata,caving, rappelling, ski-touring, ice climbing, dry-tooling, rescue, work at height and explorationare dangerous activities which may lead to se-vere injury or even death. Each user is responsi-ble for proper and safe use of all products forthese activities. Information and advice statedhere do not replace experience or propertraining. Mastering and acquisition of relevanttechniques and principles of safety is your re-sponsibility.Information contained in this booklet representsstate of knowledge and facts at the time of pub-lishing the booklet. For this reason we can notguarantee that this information is exhaustiveand accurate, and Singing Rock reserves theright to change the content of this informationat any time.Please take time to read the information in thisbooklet as well as instructions for use which arepart of each Singing Rock product.In case of doubt contact Singing Rock or its rep-resentative.
SINGING ROCK 2014 – Technical informationSINGING ROCK – All rights reserved.Technical specifications may change without notice.Graphic: Borek Nechanický, Jan KroshExpert consultation: Antonín Volk (UIAGM), Vít Novák (UIAGM), Jan ZámečníkPrinted in the Czech Republic 2014. Print: www.hrg.czThis information is not complete. Take time to read alsoinstructions for use which are part of each Singing Rock product and to practical training.
SINGING_Techinfo_2014_EN 21. 1. 2014 16:05 Stránka 44