clinical impressions preparing for success with digital …€¦ · 12 i i clinical_ impressions...
TRANSCRIPT
10 I
I clinical_ impressions
_During the last decade, dentistry has seen a dra-matic shift from full-cast gold (FCG) and porcelain-fused-to-metal (PFM) restorations to metal-free, all-ceramic restorations. This shift has been caused by an explosion of dental ceramic technologies, which now allows dentists to provide both strength and esthetics.
As with all new technologies, there is a slight learning curve that, if approached correctly, can actually permit dentists to conserve more tooth structure while creating better preparations.
I have been working with digital dentistry and doing same day all ceramic crowns since 1997. I have been teaching the use of CAD/CAM systems and pre-paring teeth for all ceramic restorations since 2000. I have personally taught more than 800 dentists these techniques.
I have been in practice since 1981 as a general dentist and my practice is located in Northfield, Ohio. I currently own three different digital scanners and three different milling units. The Planmeca FIT™ Open CAD/CAM System is my daily choice for digital den-tistry whether restoring teeth chairside or sending files and impressions to a lab.
Although I have placed countless FCG and PFM restorations over the years, my practice now focuses primarily on providing metal-free all-ceramic res-torations. I utilize my Planscan to capture optical impressions and then fabricate my restorations in-house using my PlanMill 40. The one thing I’ve learned throughout my career regardless of which restorative material I use, is that success always starts with the preparation.
During my transition to fabricating mainly all- ceramic restorations, I have encountered three main bumps along the road, which causes many of us to stumble: underprepping, leaving sharp internal angles and not obtaining proper tissue management before my impressions or digital scans. If you are considering placing your first all ceramic restoration or you have already made the transition, it is my hope that this article can provide you with the tips and tricks that I have learned the hard way to help reduce your learning curve.
_Case information
I want to present this case to show that, with the correct diamonds, retraction materials and adjusting tools used in a step-by-step manner, predictable, ex-cellent results are easily achievable. Long-term suc-cess and immediate ease of design are both enhanced through teeth prepared to meet the requirements of the systems producing the crowns and the material used. I wanted to show how a simple bur kit could pave the way to success. Using quality diamonds, not just their shape, make achieving these results much easier.
The patient presented with a leaking, large MO composite, palatal and buccal, vertical craze lines, and a buccal abfraction lesion on tooth #14 as can be seen in Figs. 1 and 2. IPS e.max® CAD is the material of choice for restoring this tooth for its unmatched combination of proven strength and and esthetics. The material preparation guidelines call for 1.5 mm of occlusal reduction and 1 mm of axial reduction.
CAD/CAM2_2016
Preparing for success with digital impressionsAuthor_WilliamÊ Davidson,Ê DMD

I 11CAD/CAM 2_2016
clinical_ impressions I
_The preparation
How much should a traditional PFM preparation be reduced? The metal needs to be .5-.7 mm thick. The porcelain should be 1 mm thick. There also needs to be a cement gap. So a PFM needs at least 1.55 to 1.8 mm of reduction to be successful! When we give a lab less reduction, they have to correct our errors by adjusting the thickness of porcelain, not the metal thickness. Sometimes there is even a metal island or we are forced to reduce an opposing cusp to allow for fabrication of the restoration. Under prepping for PFM crowns can lead to metal show through and to porcelain fractures.
With all-ceramic dentistry, under preparation leads to thin construction of the monolithic ceramic, which can lead to failure by fracture. The good news is, however, that all ceramic restorations require any-where from 0.5 mm (BruxZir®) to 1.5 mm (IPS e.max® CAD) of reduction depending on the type of ceramic, which allows the dentist to conserve more tooth structure while also helping to reduce fractures.
_Lab vs. in-office milling
There are advantages and disadvantages to send-ing impressions to the lab and milling restorations in-house. If you send impressions to a lab, the lab technician can review your impression and prep and make accommodations for any discrepancies (which is a nice way of saying deficiencies) in our prepara-tions. They can correct undercuts, sharp angles, ditches, etc. The problem is, we may not be informed of our deficiencies so we continue to make them over and over. While the corrections the laboratory technicians need to make may provide a nicely fitting restoration for delivery, they may also have compro-mised the strength and integrity of the restoration.
If you are milling in-house, you do not have the lab technician as a middleman correcting any of your “discrepancies.” Therefore, the first few restorations may not fit due to insufficient occlusal reduction, sharp internal line angles, ill-defined margins, or inadequate degree of taper which may cause sub-stantial frustration. The key is to prepare the tooth in a way which is both predictable and reproducible.
In an effort to help me help you, Premier Dental Products Company has just introduced a digital dentistry optmization kit (see below) for metal free restorations which makes it easy to produce ideal preparations and obtain proper hemostasis and retraction. The following steps will demonstrate how, with the correct burs used in the proper sequence, ideal preps can be easily achieved.
_Preparation
1. Occlusal/incisal depth cutsI have been a CAD/CAM trainer for more than
16 years. In that time, I have trained more than 800 dentists on how to properly prepare teeth for all-ceramic and digitally fabricated restoration. The main problem I see is under-prepping.
I realize many of us have been practicing dentistry for quite some time and the last thing any of us want to hear is to be told how to do a crown prep. The things we were trained to do in dental school are distant memories in our rearview mirrors. If I may, I implore you to go back to the basics when prepping for all-ceramic restorations and start with depth cuts.
Premier Dental Products not only distributes the famous Two Striper® diamond bur, it also supplies the milling diamonds for the PlanMill40®. Premier Dental’s Director of Clinical Affairs, Dr. Jim DiMarino, also a long-time CAD/CAM dentist, in collaboration with other KOLs, has carefully chosen the diamonds required to achieve the desired optimal tooth prepa-
(Photos/Provided
by William Davidson, DMD)
Below, the Digital Dentistry
Optimization Kit.
Fig. 1 Fig. 2
12 I
I clinical_ impressions
ration and included them in the new Digital Dentistry Optimization Kit.
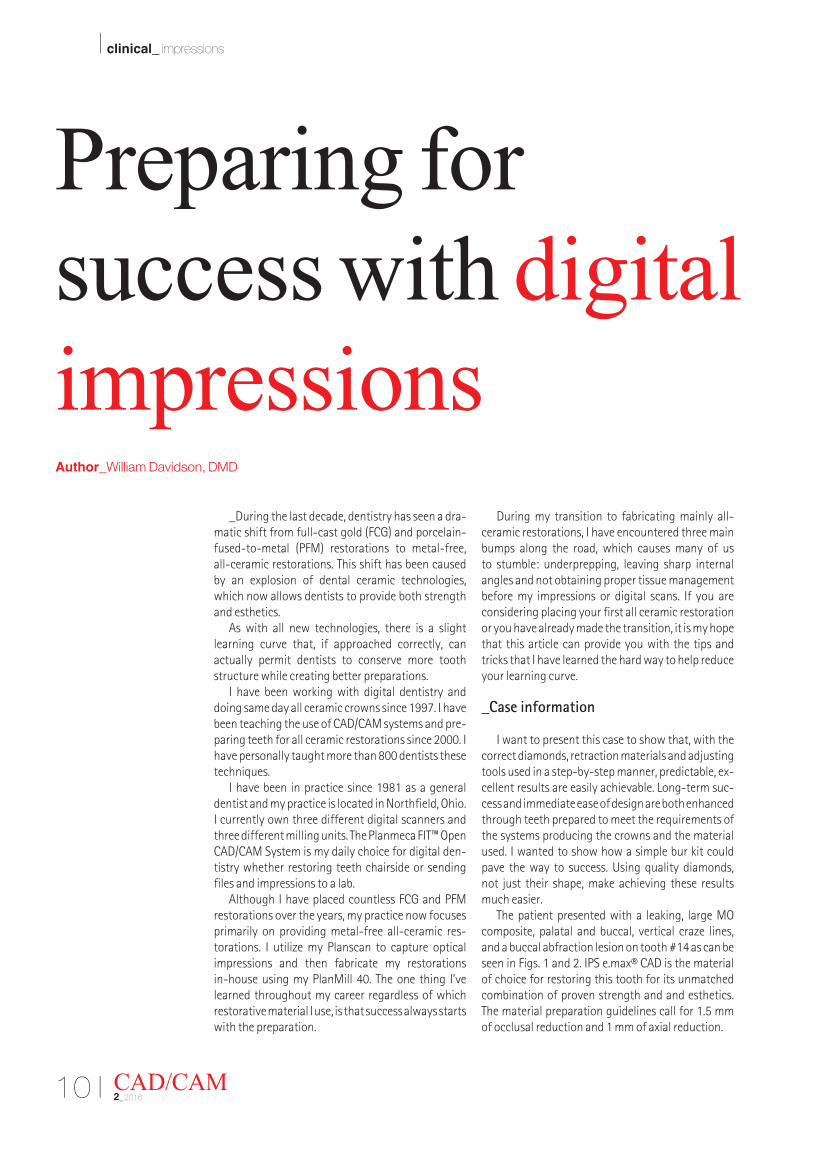
They have taken all the guesswork out of research-ing which diamonds to use and presented them in an autoclavable bur block with all the diamonds laid out according to the order of use as can be seen in Fig. 3.
The kit includes a Two Striper round diamond (L120c), which has a cutting depth length of 1.5 mm. It is absolutely critical that your first step includes proper reduction of the occlusal central fossa. By sinking the L120c to the edge of the cutting surface as shown in Fig. 4, you will guarantee that you are achieving the 1.5 mm of occlusal reduction. Fig. 5 shows the three occlusal depth cuts. I highly suggest you follow this step for your next five crown preps so that you may recalibrate your technique. You can also find alternative depth-guide burs, but I like the simplicity of the round diamond. I can also use it for many other procedures for which the specialized depth-guides are unsuitable.
Fig. 6 shows the Two Striper 770.8C diamond being used to complete the occlusal depth cuts. This diamond has a tip diameter of 1.2 mm and the major diameter of 1.8 mm. . Therefore, the center of the dia-mond length is 1.5 mm. Fig. 7 shows how, by holding
the 770.8C at the proper angle, we will easily achieve the desired 1.5 mm occlusal reduction.
2. Occlusal/incisal reductionI then take the same diamond (770.8C) and com-
plete the occlusal reduction by connecting the depth cuts as shown in Fig. 8. Fig. 9 shows the completion of the palatal occlusal reduction as compared to the buccal which still shows the occlusal depth cuts.
Note: Team Premier has tried to think of everything to allow us to recalibrate our prep technique while staying in our comfort zone. The kit provides identi-cal diamond shapes in multi-use (Two Striper) and single-patient use SOLO diamond burs. You choose your go-to bur for margin design. The kit contains a round-end taper for a chamfer margin and a KR modi-fied shoulder bur (KR indicates a “rounded” tip radius) for a shoulder margin with round internal line angles. Whether it’s the Two Striper multi-use or Solo pre-sterile single use, your transition to digital/all-ceramic restorations is a win-win using the Digital Dentistry Optimization Kit. An illustrated brochure delineates the bur dimensions and item numbers These multiple offerings allow dentists to focus on prep design using the cutting tools with which they are most familiar.
CAD/CAM2_2016
Fig. 3 Fig. 4 Fig. 5
Fig. 6 Fig. 7
Fig. 8 Fig. 9
I 13CAD/CAM 2_2016
clinical_ impressions I
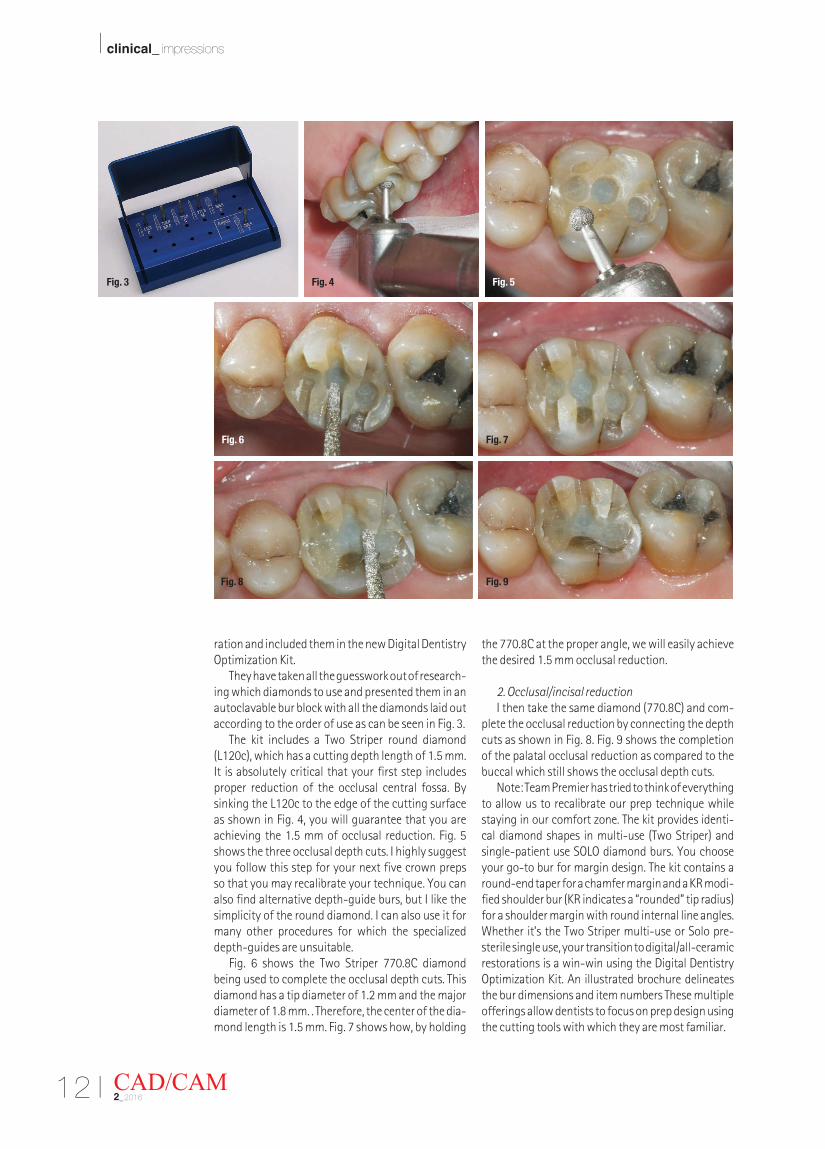
3. Axial depth cutsSimilarly, I use the dimensions of the 770.8C to
achieve three objectives:a. the axial depth cuts of 1 to 1.2 mm of reductionb. obtain the proper degree of taperc. establish the proper elevation of my marginsAs mentioned, both the 770.8C chamfer diamond
and the 703.8C KR modified shoulder diamond pro-vide a minimum diameter 1.2 mm at the tip and a maximum dimension of 1.8 mm at the base. Transla-tion: If you simply focus on holding this diamond par-allel to the long axis of the tooth at the desired margin height and sink the diamond into the tooth to create your depth cuts (Fig. 10), you will have achieved the three objectives.
Furthermore, by using either of these diamonds, you will also be eliminating any sharp internal line angles which are the second most common cause of all ceramic failures. Simply let the diamond do the work for you. Figure 11 shows the results. You can easily see the six axial depth cuts.
4. Axial reductionI then take the 770.8C chamfer diamond (you can
also use the 703.8C KR or either of the two corre-sponding SOLO diamonds if you prefer) and connect the axial depth cuts (Fig. 12). The key to completing the axial reduction is to make sure you’re holding the diamond parallel to the long axis of the tooth and the tip is at the desired height of the margin as you connect the depth cuts. By following this technique, you are guaranteeing then you will have the proper degree of taper, create rounded internal line angles, and eliminate any undercuts. Again, let the proper diamond dimensions do the work for you. Fig. 13 shows the final result of your axial reduction.
5. Break contactNext, either the Two Striper 777.8 M or the SOLO
862012C can be used to break your mesial and distal contacts. Both of these diamonds provide a flame shape to help you break contact without compromis-ing the adjacent teeth as can be seen in Fig. 14.
6. Define marginFig. 15 shows the preparation after breaking
contact and utilizing the 770.8C chamfer diamond to define the margins. When possible supra gingival
Fig. 10 Fig. 11
Fig. 12 Fig. 13
Fig. 14 Fig. 15
14 I
I clinical_ impressions
margins are preferred. It is very important to utilize the 770.8C, the 703.8C KR or the SOLO diamond equivalent to define your margins. Again, by holding these diamonds parallel to the long axis of the tooth your proper degree of taper and internal line angles are maintained.
One way to confirm this is to look at the prep from a true occlusal plane. If you are able to see the mar-gins 360 degrees around your prep as you can see in Fig. 15, you will confirm that you do not have un-dercuts.
7. Refine the preparationThe last thing you want to do before preparing the
tooth for an impression or optical scan is to make sure you round all line angles. This step is critically impor-tant for all ceramic restorations, especially for those milled in house because there is no lab technician to make any accommodations. The in-house milling units cannot mill sharp angles, therefore the restora-tions will not seat completely leading to longer visits and frustration.
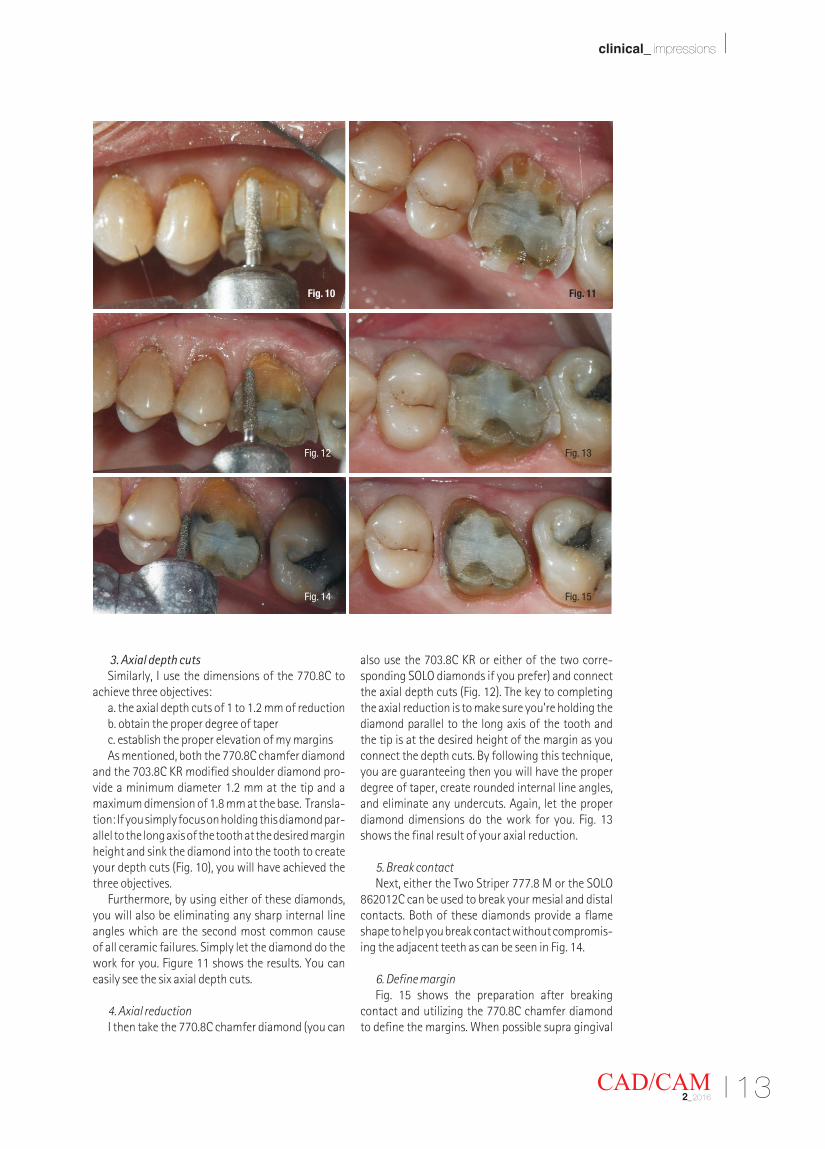
Truthfully, this is an easy step. Simply use your preferred diamond to round any sharp line angles and establish the proper secondary planes as can be seen in Fig. 16. Re-evaluate the prep to make sure you can see your margins and you do not have any sharp edges (Fig. 17).
Using the diamond shapes that Premier has already identified as optimal for all-ceramic prepara-tions in the aforementioned steps will all but ensure that your restorations will be successful if you pro-vide an impression or optical scan with proper tissue management.
_Retract
As with any crown and bridge impression, proper hemostasis and retraction is imperative. With digital impressioning there is no physical impression mate-rial to push tissue out of the way. We have to move tissue out of the way prior to scanning.
That’s where Traxodent™, used by itself or in conjunction with cord placement, becomes es-sential. Traxodent is 15 percent aluminum chloride in a proprietary clay matrix that absorbs crevicular fluid, saliva, and blood while also providing sulcular retraction.
Premier provides Traxodent, the market-leading retraction paste, in the kit along with a knitted retrac-tion cord called Knit-Pak. Traxodent can be used by itself, with a cord, or with a retraction cap.
Personally, I am a fan of the double cord technique but admit that packing the second cord is often difficult and time consuming. Who likes packing retraction cord? Not me. Anything that makes the task easier and more efficient helps. Knitted cord that packs easily and holds hemostatic agents efficiently do that. Knit-Pak does this better than any other cords I have used.
When gingival retraction pastes first came out, I tried several. I just didn’t like the material handling or delivery systems. Traxodent works! I like the small 0.7 g syringes of material with the bendable tips which allow for easy access to all areas of the mouth. The optional retraction caps really help me to insure the Traxodent is pressed into the sulcus and helps to keep my patient from displacing the material. Better retraction, done easier equals better impressions.
CAD/CAM2_2016
Fig. 16 Fig. 17
Fig. 18 Fig. 19

I 15CAD/CAM 2_2016
clinical_ impressions I
1. Apply TraxodentOne tip I can offer is that I easily pack the first cord
as shown in Fig. 17 before I eliminate sharp angles. You’ll notice however in Figs. 16 and 17 that hemos-tasis has now become a concern. In order to control the bleeding and obtain retraction, I then syringe Traxodent over the cord as shown in Fig. 18, place a retraction cap on the Traxodent, and ask the patient to close gently as shown in Fig. 19.
2. Wait two minutes and rinseAfter two minutes, I removed the retraction cap
and rinsed away the Traxodent with the light air water spray to reveal a dry, retracted, well-defined margin as seen in Fig. 20. Fig. 21 shows the margin and prep design in my PlanScan software.
3. Review margin Digital scanning allows you to see how precise
these technologies are. As you take a molar prep and review it on your 30-inch monitor, you will be able to analyze your prep design unlike anytime before. Any “discrepancies” are hard to hide at this magnitude, but you learn to be grateful for this opportunity to evaluate your preps because it encourages you to become the best dentist you can be.
At this point, you want to make sure you can see your margin clearly so either your lab or milling unit can fabricate a matching restoration. If you are un-able to see your margins, you have the ability to re-prep or retract again and take another scan in order to ensure you will have a perfectly fitting restoration.
_Adjust/polish ceramics
So far we have seen how easy the all ceramic preparation is if the proper products are utilized to
their fullest potential. Similarly, special care must be taken to use the right tools when adjusting and polishing these ceramics. I recommend that the only diamonds we should use to adjust the ceramics are the same diamonds which were used to mill the ce-ramic restorations.
Premier Dental Products not only supplies the milling diamonds used in the PlanMill40 but it also provides similarly made diamonds for dentists to use in adjusting ceramics. Premier calls these diamonds the Two Striper TSZtech.™ Given the popularity of e.max, in hindsight the company should have called them TSEtech! Suffice to say they work on both lithium disillicate and zirconia. The TSZtech foot-ball is included in the Premier kit to provide a safe, smooth cutting tool that does not gouge or crack the ceramic unlike other diamonds on the market. They are marked with two orange stripes as the proprietary diamond grit is in a range between fine and very fine, and the processes used to make them are identical to those used in manufacturing the Two Striper PlanMill 40 milling burs.
1. Adjust high spots — Tsztech diamondsWhen using TSZtech diamonds it is important to
use copious amounts of water and a light touch so that the diamond is always spinning at its highest speed. Fig. 22 shows the TSZtech 285.5 Z diamond lightly removing high spots from the occlusal sur-face of the finished ceramic restoration with high volumes of water spray.
2. Polish – Diamond Twist SCOWhen finishing ceramic restorations the more
highly polished the surface, the longer lasting more beautiful the restoration will be. Additionally if a ceramic is adjusted intra-orally and not polished
Fig. 20 Fig. 21
Fig. 22 Fig. 23
16 I
I clinical_ impressions
well it can wear the opposing dentition. Polishing traditionally takes time and many steps to achieve. Superior results in less time, what a concept! Pre-mier’s Diamond Twist SCL (L as in LAB) and SCO (O as in intra-ORAL) kits do just that. If you would like to polish the restoration before firing, I would suggest using the Diamond Twist SCL.
The SCL kit starts with the unique Fibra Points to achieve a rapid initial polish without generat-ing excess heat. They do this better than any other product I have used. The polishing is finished with the excellent diamond paste and a felt disk/point. If the ceramic is adjusted in the mouth with a Premier TSZtech diamond (special ziconia adjusting grit) and needs a final polish, the Diamond Twist SCO kit does that in one step. Just use the paste with a brush or micro-cloth disk. I use the SCL/SCO kits for better, faster results.
I have had long experience with the SCL/SCO kits and have always found them easy to use. What I especially like is the lack of heat build-up with the Fibra Points. When polishing ceramics in the lab and we are in a rush, they ensure my staff doesn’t stress the ceramic with a localized build up of excess heat. Additionally, the SCO kit can be used with composite and helps to cut down on stocking multiple finishing products for different materials.
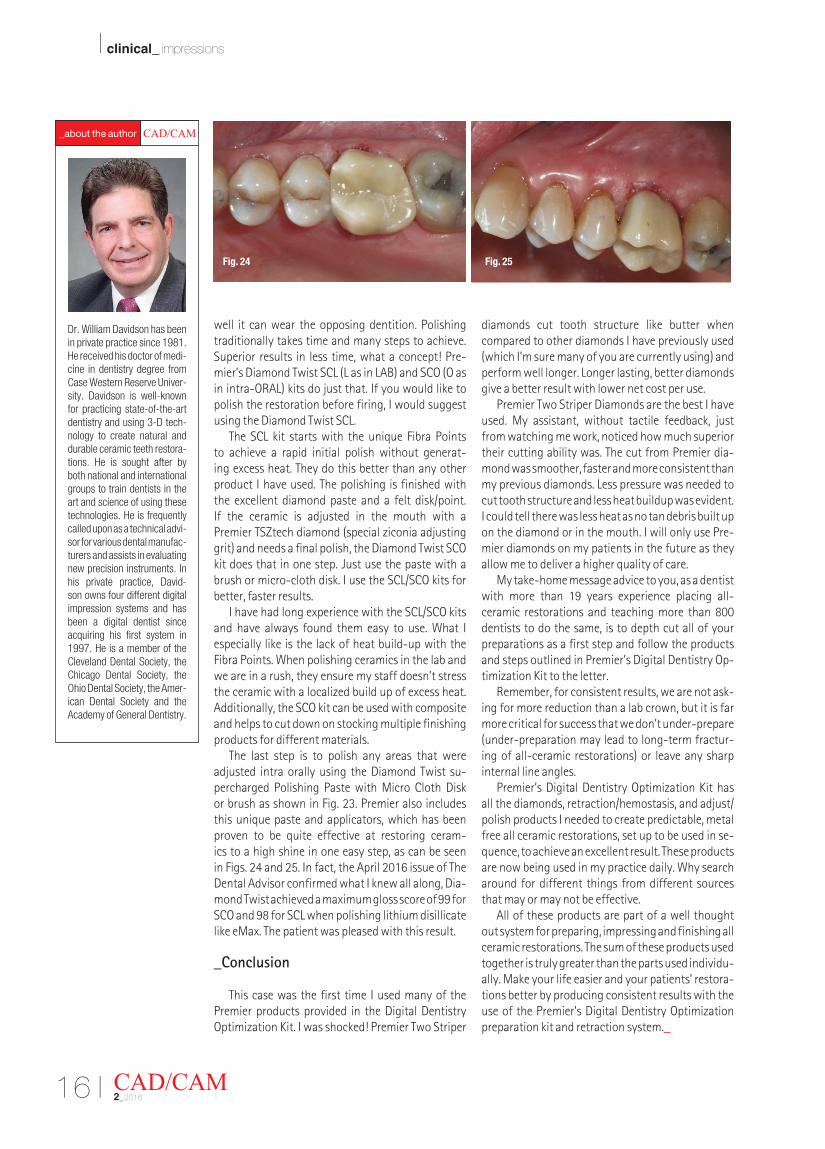
The last step is to polish any areas that were adjusted intra orally using the Diamond Twist su-percharged Polishing Paste with Micro Cloth Disk or brush as shown in Fig. 23. Premier also includes this unique paste and applicators, which has been proven to be quite effective at restoring ceram-ics to a high shine in one easy step, as can be seen in Figs. 24 and 25. In fact, the April 2016 issue of The Dental Advisor confirmed what I knew all along, Dia-mond Twist achieved a maximum gloss score of 99 for SCO and 98 for SCL when polishing lithium disillicate like eMax. The patient was pleased with this result.
_Conclusion
This case was the first time I used many of the Premier products provided in the Digital Dentistry Optimization Kit. I was shocked! Premier Two Striper
diamonds cut tooth structure like butter when compared to other diamonds I have previously used (which I’m sure many of you are currently using) and perform well longer. Longer lasting, better diamonds give a better result with lower net cost per use.
Premier Two Striper Diamonds are the best I have used. My assistant, without tactile feedback, just from watching me work, noticed how much superior their cutting ability was. The cut from Premier dia-mond was smoother, faster and more consistent than my previous diamonds. Less pressure was needed to cut tooth structure and less heat buildup was evident. I could tell there was less heat as no tan debris built up on the diamond or in the mouth. I will only use Pre-mier diamonds on my patients in the future as they allow me to deliver a higher quality of care.
My take-home message advice to you, as a dentist with more than 19 years experience placing all-ceramic restorations and teaching more than 800 dentists to do the same, is to depth cut all of your preparations as a first step and follow the products and steps outlined in Premier’s Digital Dentistry Op-timization Kit to the letter.
Remember, for consistent results, we are not ask-ing for more reduction than a lab crown, but it is far more critical for success that we don’t under-prepare (under-preparation may lead to long-term fractur-ing of all-ceramic restorations) or leave any sharp internal line angles.
Premier’s Digital Dentistry Optimization Kit has all the diamonds, retraction/hemostasis, and adjust/polish products I needed to create predictable, metal free all ceramic restorations, set up to be used in se-quence, to achieve an excellent result. These products are now being used in my practice daily. Why search around for different things from different sources that may or may not be effective.
All of these products are part of a well thought out system for preparing, impressing and finishing all ceramic restorations. The sum of these products used together is truly greater than the parts used individu-ally. Make your life easier and your patients’ restora-tions better by producing consistent results with the use of the Premier’s Digital Dentistry Optimization preparation kit and retraction system._
CAD/CAM2_2016
Fig. 24 Fig. 25
Dr. William Davidson has been in private practice since 1981. He received his doctor of medi-cine in dentistry degree from Case Western Reserve Univer-sity. Davidson is well-known for practicing state-of-the-art dentistry and using 3-D tech-nology to create natural and durable ceramic teeth restora-tions. He is sought after by both national and international groups to train dentists in the art and science of using these technologies. He is frequently called upon as a technical advi-sor for various dental manufac-turers and assists in evaluating new precision instruments. In his private practice, David-son owns four different digital impression systems and has been a digital dentist since acquiring his first system in 1997. He is a member of the Cleveland Dental Society, the Chicago Dental Society, the Ohio Dental Society, the Amer-ican Dental Society and the Academy of General Dentistry.
CAD/CAM _aboutÊ theÊ author