clinical - lindagreenwall.com · of treating incipient caries (meyer – lueckel et al 2008) either...
TRANSCRIPT

Linda Greenwall analyses a new technique for the treatment of white marks on anterior teeth
14 June 2013 adt
IntroductionWhite marks and white lesions on anterior teeth can be unsightly. Patients often seek treatment to have these marks eradicated. Whilst there is a wide array of treatments available, which includes whitening as a first choice (Greenwall 2009) and bonding over the mark as a last option, a new technique using resin infiltration has been introduced (Munoz et al 2013). Initially resin infiltration was used as a method of treating incipient caries (Meyer – Lueckel et al 2008) either interproximally or on the smooth surfaces of teeth. The low viscosity resin infiltrant (Paris et al 2012) was used to occlude the pores within the hypomineralised lesion which act as diffusion pathways for acids and dissolved minerals, thus sealing these pathways (Paris et al 2010). Thus the caries infiltration can also be used to camouflage aesthetically disfiguring white spot lesions on buccal surfaces. Whilst extensive research has been undertaken on the resin infiltration treatment for caries, a further use of the technique has been explored for the aesthetic treatment of white spots.
The purpose of this article is to assess the new use of this resin infiltration technique (Tirlet and Attal 2011) for the minimal invasive aesthetic treatment of white spots and how this may be used for the eradication of white lesion, flecks and patches that are not due to caries. A step-by-step approach will be described.
Treatment optionsThere are several treatment options for treating white spots on the labial surfaces of teeth:1. Tooth whitening2. Application of amorphous calcium phosphate directly to the lesion or in a bleaching tray (Abreu et al 2011).3. Microabrasion using 6.6% (Greenwall 2006, product used Opalustre, Optident UK) and 10% (Premier Products, USA) See Table 2 for the uses of hydrochloric acid4. Resin infiltration using 15% hydrochloric
Linda Greenwall BDS MGDS MSc MRD RCS FFGDP runs a multi-disciplinary practice in Hampstead, London. She is the founder of the
British Dental Bleaching Society (BDBS) and lectures extensively around the world on the subject of tooth bleaching. She is also the editor-in-chief of Aesthetic Dentistry Today magazine.
acid (Icon, DMG, Germany)5. Combination therapy using whitening and increasing concentrations of hydrochloric acid6. Composite bonding directly over the lesion7. Removing the white mark with a fast handpiece and restoring with composite resin, dentine, enamel and opaque shades8. Direct resin veneer9. Indirect resin veneer (Edelweiss, Optident UK)10. Porcelain laminate over the whole labial surface.
clinical
White lesion eradication using resin infiltration
Education aims and objectives To gain a greater understanding of the treatment options available for eradicating white marks and lesions on anterior teeth, as well as the various research undertaken on this subject.
Expected outcomes To grasp the benefits and the procedure of the resin infiltration technique, with the help of the step-by-step approach provided. Subscribers can answer the CPD questions on page 90.
Type of white lesion
1. Isolated single white spots with diameter less than 0.5mm adult maxillary incisors
Aetiology Possible treatment
Natural occurrence Whitening only
2. White speckled lesions: mottled enamel Fever during development Whitening then microabrasion at 6.6%
3. Multiple lesions: brown and white discolourations
Fluorosis Whitening then microabasion
4. White line/ stripes More severe developmental disturbance Whitening then microabasion
5. White patches Trauma to the primary dentition Whitening, followed by resin infiltration
6. White spots covered with yellow layer Bleeding had occurred during the traumatic injury and seeped into the areas of mineralisation
Whitening, microabrasion then resin infiltration
7. Faint white lesions, some black edges Demineralisation lesions after removal of orthodontic brackets
Resin infiltration or whitening or microabrasion depending on the size of the mark
8. Enamel defects and white lesions in deciduous incisors and molars
Ceoliac disease, Molar Incisor hypoplasia
Whitening, glass ionomers placed onto the defective molar teeth, resin infiltration of the anterior lesions
9. White spot or enamel hypoplasia Preterm birth (prevalence 45% normal birth weight to 92% preterm babies - lai et al)
Whitening. Microabrasion then resin infiltration
Table 1: Aetiology of white marks
adt June 2013 15
Classification of lesion size can also be according to aetiology, location and size (see Table 3). The sizes of white marks vary and for the purposes of this article they will be classified as small, medium and large. When starting to use the resin infiltration treatment, it is easier to begin treating a smaller white lesion as smaller white marks are easier to remove than the larger patches. The medium-to-large size patches may require two treatments if the lesion is very deep then it is advisable to sandblast the white area prior to applying the hydrochloric acid as an etch to the tooth. The sandblasting helps to open up the enamel tubules so that better penetration of the hydrochloric acid can be achieved.
Indications1. Small white lesions inherent on the tooth2. Smooth surface white decalcification on the tooth such as after stasis of plaque after orthodontic treatment3. Larger white marks and bands on the tooth4. Lesions due to molar incisor hypoplasia (MIH)5. Hypoplasia stains due to traumatic injuries6. Mild to moderate fluorosis7. Large single bands due to fluorosis.
The resin infiltration techniqueThe resin infiltration technique was introduced as a method of reducing the size of carious lesions in the enamel (Paris et al 2010). The resin was meant to infiltrate into the hypomineralised enamel and arrest the developing caries (Pharck et al 2009). Whilst this technique can be used for interproximal and smooth surface caries (Kugel et al 2009) a new use has been suggested, that of eradicating surface white spots and marks on the buccal and labial surface of anterior teeth. The use of resin infiltration interproximally was the only way of sealing the interproximal surface, thus improving the inhibition of caries progression (Pharck 2009). This resin infiltration can delay the time for restoration placement and
thus closes the gap between non-invasive and invasive treatment options (Pharck 2009).
The area is etched using 15% hydrochloric acid first. Alcohol is then placed over the lesion.
Resin is then infiltrated into the lesion and this is light cured. The lesion fades as the micro porosities are infiltrated with resin (see Figures 1-3).
Table 2 (above): The therapeutic use of hydrochloric acid at different concentrations to eradicate white marksTable 3 (right): The classification and treatment of white spots
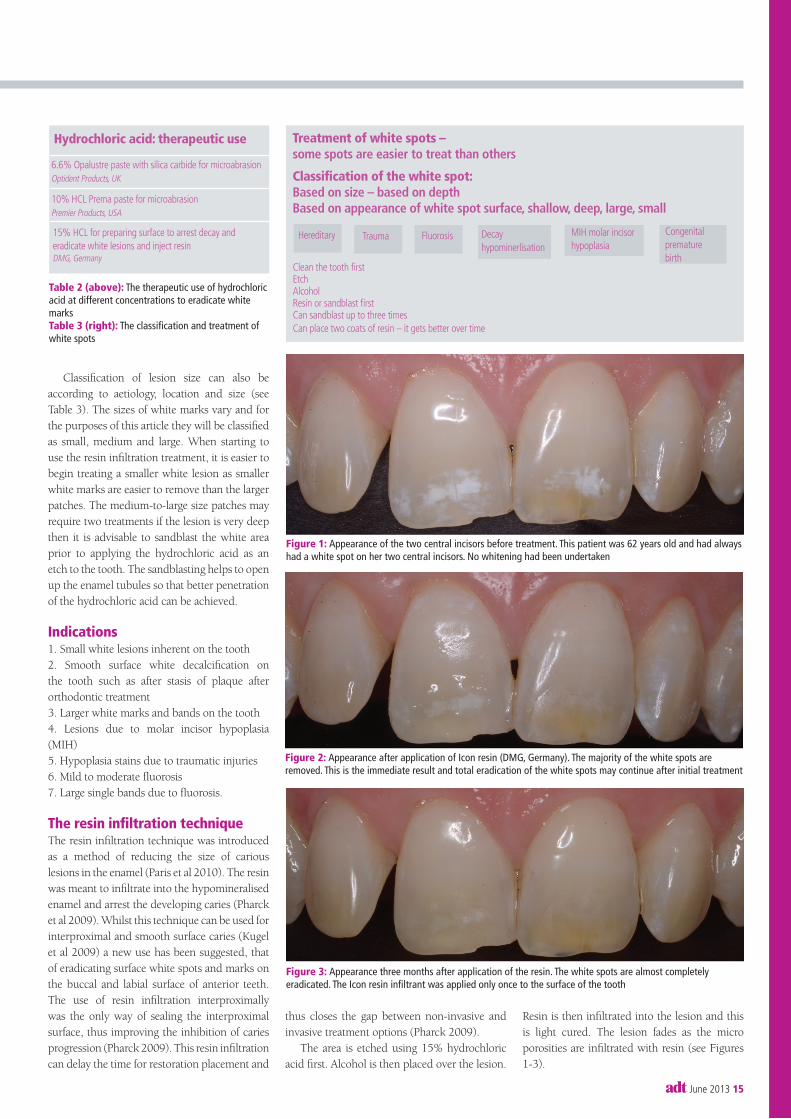
Figure 1: Appearance of the two central incisors before treatment. This patient was 62 years old and had always had a white spot on her two central incisors. No whitening had been undertaken
Hydrochloric acid: therapeutic use
6.6% Opalustre paste with silica carbide for microabrasionOptident Products, UK
10% HCL Prema paste for microabrasionPremier Products, USA
15% HCL for preparing surface to arrest decay and eradicate white lesions and inject resinDMG, Germany
Treatment of white spots – some spots are easier to treat than others
Clean the tooth firstEtchAlcoholResin or sandblast firstCan sandblast up to three timesCan place two coats of resin – it gets better over time
Classification of the white spot: Based on size – based on depthBased on appearance of white spot surface, shallow, deep, large, small
Hereditary Trauma Fluorosis Decay hypominerlisation
MIH molar incisor hypoplasia
Congenital premature birth
Figure 2: Appearance after application of Icon resin (DMG, Germany). The majority of the white spots are removed. This is the immediate result and total eradication of the white spots may continue after initial treatment
Figure 3: Appearance three months after application of the resin. The white spots are almost completely eradicated. The Icon resin infiltrant was applied only once to the surface of the tooth

16 June 2013 adt
clinical
The technique consists of these components:1. The preparation phase – the surface of the teeth is cleaned and prepared with 15% hydrochloric acid for 2-5 minutes (see Figure 4)2. Alcohol is placed onto the surface as a drying agents and left for 2 minutes (see Figures 5 & 6a-b)
3. The TEGMA resin is applied onto the tooth for 2-5 minutes (Figures 7-8)4. The tooth is light cured.Step by step approach:1. Isolation – good isolation is essential as the initial phase uses a strong acid for etching the tooth. This can be via a rubber dam or an
Optragate isolation retractor (Optragate lip and cheek retractor, Ivoclar Vivadent UK)2. The surface of the tooth is cleaned with a mixture of pumice and Hibiscrub 3. If there is a very large white lesion, this can be sand blasted first using a hand sandblaster directly onto the white mark (Figures 9-10)
Figure 4: Demonstrating the step-by-step technique: etching. The direct application of the 15% hydrochloric acid gel onto the surface of the white spots for two minutes.
Figure 5: The result after rinsing. The etched appearance on the teeth shows where the gel was placed. This process opens up the pores to receive the TEGMA resin
Figures 6a-b: After application of alcohol. The direct application of the resin onto the tooth using a special applicator. This is applied slowly to let the resin infiltrate gently
Figure 7 (left): The syringes with applicators of Icon etch. This is followed by an Icon dry (alcohol) from DMG
Figure 8 (above): The Icon resin infiltrant
Figure 9: If the white mark is more extensive, the lesion can be sandblasted first to allow for deeper penetration of the resin
Figure 10: After sandblasting, hydrochloric acid can be applied onto the white lesion. The sandblasting can be taken at least three times for deeper penetration of the resin. A sponge cup applicator is used to apply the hydrochloric acid

18 June 2013 adt
clinical
4. The preparatory phase – 15% hydrochloric acid is applied directly onto the lesion with a special applicator for anterior tooth which resembles a small circular sponge (Figure 10)5. This is left in place for a period of 2-5 minutes6. The tooth is rinsed with water7. Alcohol liquid in a syringe is applied directly onto the white lesion. This is dried. The alcohol is applied onto the surface of the lesion to act as a drying agent and to change the refractive index of the surface of the enamel. This will assist in assessing whether the resin will make a difference in erasing the white lesion completely of whether further sand blasting and hydrochloric acid etching will be necessary8. TEGMA resin is applied directly onto the dried white mark9. This is left in place for 2-5 minutes10. The tooth is light cured for 30 seconds11. Observation of the result can be undertaken and reviewed12. Photos taken.Should bleaching of the tooth be done first?Depending on the size of the lesion, it is always best to undertake bleaching first (Greenwall 2009) and this may reduce the size of the white mark and the entire appearance of the lesion. This will mean that less resin will need to be placed on the tooth if the bleaching completely eradicates the white mark.
ResearchIn a study undertaken by Munoz et al (2013) where suitable cases were infiltrated with resin, they found that the most successful cases were the ones with fluorosis stains. These cases showed visibly perceptible differences. The hypoplasia areas were not completely eradicated. The researchers reported that the patients recovered their self-esteem as a result of the treatment and thus this was considered as a success. The effect of the hydrochloric acid on the enamel was evaluated in a study by Paris et al (2010). These researchers evaluated the etching effect of the hydrochloric acid vs phosphoric acid on deciduous teeth. They evaluated 36 pairs of primary molars enamel lesions and etched for two minutes both the phosphoric acid and hydrochloric acid they examined the results under confocal microscopy. The reported that there was a difference between the two acids on the surface of the teeth and that the
References
1. Tirlet G, Attal JP L’erosion/infiltration: une nouvelle
therapeutique pour masque les taches blanches. Inf Dent
2011 4:12-16
2. Kugel G, Arsenault P, Papas A. treatment modalities
for caries management, including a new resin infiltration
system. Compend Contin Educat Dent 2009.3:1-10
3. Meyer – Lueckel H, Paris S. Improved resin infiltration
of natural caries lesions. J Dent Res 2008 87:1112-1126
4. Munoz MA,Arana-Gordillo LA, Gomes GM, Gomes OM,
Bombarda NH, Reis A, Loquercio AD ( 2013). Alternative
Esthetic Management of Fluorosis and Hypoplasia
Stains: Blending Effect Obtained with Resin Infiltration
Techniques. J Esthet Restor Dent. Feb;25 (1)32-39
5. Pharck JH, Duarte S, Meyer Leuckel H, Paris S. (2009)
Caries infiltration with resins. A novel treatment option for
interproximal caries.
6. Paris S, Dorfer CE, Meyer- Lueckel H (2010) Surface
conditioning of natural enamel caries lesions in decidu-
ous teeth in preparation for resin infiltration. Journal of
Dentistry 38(2010) 65-71
7. Paris S, Meyer- Lueckel H (2012) the potential for resin
infiltration technique in dental Practice Dent Update.
Nov;39(9):623-6, 628.
8. Kielbassa AM, Muller J, Gernhardt CR (2009) Closing
the gap between oral hygiene and minimal invasive
dentistry: a review on the resin infiltration technique of
incipient (proximal) enamel lesions. Quintessence Int . Sep;
40 (8): 663-81
9. Kim S, Kim EY, Jeong TS, Kim JW (2011) the evaluation
of resin infiltration for masking labial enamel white spot
lesions. Int J paediatric Dent Jul;21(4):241-8
10. Greenwall L.H. ( 2009) White lesions and bleaching
treatments. Aesthetic Dentistry Today Volume 3:2 page
15-18
11. Greenwall L.H (2006) Combining home bleaching and
microabrasion. Aesthetic and Implant Dentistry8:3, 34-41.
12. Abreu DR, Sasaki RS, Amaral FLB , Florio FM
and Basting R (2011) Effect of Home-Use an In-Office
Bleaching agents containing Hydrogen Peroxide Associated
with Amorphous Calcium Phosphate on Enamel
Microhardness and Surface Roughness. Journal of Esthetic
and Restorative Dentistry 23:3 158-168
13. Lai PY, Seow WK, Tudehope DI, Rogers Y (1997)
Enamel hypoplasia and dental caries in very-low birth-
weight children: a case-controlled, longitudinal study.
Pediatr Dent. Jan-Feb;19(1):42-49
hydrochloric acid caused higher erosion on the enamel thus allowing deeper penetration of the resin infiltrant. The erosion depth of the hydrochloric acid was twice the depth of the phosphoric acid. The phosphoric acid at etching time of two minutes cannot erode the surface of the enamel. It seems that the resin infiltration technique can reduce the long term restorative needs and costs thus complementing the concept of minimal intervention dentistry (Kielbassa et al 2009).
Side effectsThe resin infiltration technique may not always fade the white spot lesion entirely. This may improve over time. In a study by Kim et al (2011) 20 teeth with a developmental defect of enamel and 18 teeth with post orthodontic decalcification were selected to have resin infiltration. Standardised photographs were taken before, immediately after and one week after treatment. The results were classified into three different groups: completely masked, partially masked and unchanged. The image analysis of the delta E results showed that five (25%) of teeth were classified as completely masked whereas seven (35%) were partially masked and eight (40%) unchanged.
Of the post orthodontic decalcification group 11 (61%) of teeth were completely masked, six teeth (33%) were partially masked and one tooth (6%) was unchanged. In some teeth the result improved after one week after infiltration rather than immediately after the infiltration. They concluded that the masking effect was dramatic in some cases but not others. Further research on the long-term effects should be continued.
Further researchThere is still further research to be undertaken as there are many unanswered questions such as: how can it be determined which lesions will respond with complete eradication of the white spot and others with partial eradication? Should bleaching be undertaken before resin infiltration and will this improve the overall result? What is the effect of the TEGMA resin on further bonding techniques – will the bond be as strong or weaker?
SummaryThe resin infiltration techniques have opened up a new range of options for minimal invasive treatment of white spots.
As further research unfolds, more options for treatment will be available to explore with the resin infiltration technique. This will help to improve aesthetic outcomes for patients in a minimally invasive way. This will improve the appearance for patients suffering from these conditions in a minimal invasive aesthetics.Care to comment? @AesDenToday